
Stranded
-
Posts
40 -
Joined
-
Last visited
-
Days Won
2
Everything posted by Stranded
-
The odds were crazy that anybody would go digging between the hulls, and I'm sure whoever was on the assembly line just said, "Screw it! No one's gonna know the plates are in the wrong place. We got to keep the production rolling, just use whatever backing plates you can find." And to be fair, technically what they used worked; I've seen worse on fiberglass boats. So props to them for keeping things moving. But as the old saying goes, integrity is doing the right thing when nobody is looking. And since the fiberglassed backing plates for solar is something the company advertises about, I felt it was a bit shady the approach they took. Oh well. Someone might need your plates. I believe the factory drills straight through the aluminum plates and then uses a nylon nut to secure everything. If I had that set-up, and I needed to replace a mount, I'd cut the plates smaller and still use them to attach the bolts. I truly am glad everything worked out for you. It's always good to hear a success story of someone fixing or making something themselves. And since we live 2,000 miles away from the factory, it's doing it ourselves and helping each other that'll keep our trailers in good order.
-
Glad it worked out! Please post some pictures if you have them. Funny enough, I re-looked at my pictures and videos, ends up the factory fiberglassed plates into my roof too, except they were in the wrong place when they attached my solar panels, so they used the Fiamma spacers instead. That's why I had to cut some of my plates shorter, they were butting up to the fiberglassed aluminum plates, which were too far forward to be used correctly. I'm kind of pissed at the factory for taking a quick and dirty fix instead of grinding off the misplaced aluminum plates and fiberglassing them in the right location. Oh well, c'est la vie.
-
I agree 100% on having a checklist. It only takes 5 minutes to go through it, but it verifies everything is ready for travel.
-
I do worry about the future owner since my family will be outgrowing my trailer in just a few years, and I'll need to sell the trailer. The modifications would be simple for me to undo: just cut out the valves and use PEX 1/2 inch couplings to splice the pipes together where the tees for the valves went. As to over complicating things, I also agree on the KISS formula and believe it's best. Unfortunately, for most automation, it's going to require some complexity and expense. And to be honest, I may never incorporate any of the ideas I'm posting on this thread, but I wanted to share them as another possibility of how to eliminate freezing pipes; you never know who you might inspire as they look for ideas while going down their own rabbit hole. As an aside, I do appreciate your posts and willingness to make modifications and document such: its information sharing like yours that help the rest of us consider possibilities of improvements to our trailers.
-
The modifications would be minor, and if I use normally closed valves, it'll have no effect on the usual set up if I do it right. As to the flowing, the RV pump (I think it’s a Shurflo) maintains a pressurized system. When a faucet or other fixture is opened, there’s a loss in pressurization which activates the pump. In order to cause the loss in pressurization, and thus activate the pump to circulate water through the hot water heater, I plan to have a valve that connects the cold water system to the pipe that feeds the fresh water tank. Once that valve is opened, the pump will sense the loss in pressurization, and as the water circulates, it will end up in the fresh water tank. Thus, the water pump will be circulating water from the fresh water tank, through the pump, through the hot water heater, through both hot and then the cold lines, and then back into the fresh water tank. When the valves shut, everything returns to factory style water flow through each of the ports. Obviously, I’ll also need a valve near the pump that closes all direct flow from the pump through the cold water pipes, with exception to the one that feeds the hot water heater. I now it’s difficult to envision without a visual aid, and if I get some free time, I’ll draw a diagram. As to controlling them, I realize a PID controller and multiple temperature sensors in the pipes will severely affect cost and will be difficult to prototype. The PID controller and temp sensors would be a sort of phase 2 of development, if I even do the alteration at all. But if I install the diverter valves (and I'm thinking there'll be a minimum of 4 of them), as a phase 1 approach, I’ll probably set up the activation of the diverter valves with a cheap sprinkler system controller that works off of time. Depending on conditions, I’ll program it to circulate water for 3 to 5 minutes through the pipes once an hour while I’m away from the trailer. Again, this is all an idea in my head of something I might do, and since the point of a forum is to share information and ideas, I wanted to throw this out there as an alternative to running the furnace just to heat the basement. I still haven’t solved the problem with black and gray tanks not being heated. Theoretically, so long as they’re not too full, any freezing occurring in them shouldn’t crack them……right?
-
What about just heating the water in the pipes, and not the air? I don’t do that much winter camping, too hard with little kids. But I am planning a trip to Alaska and keeping the pipes warm has been on my mind, as well as eliminating water waste when boondocking. Another lifetime ago, I was an apprentice plumber in Los Angeles. Granted, it never freezes in L.A., but for some wealthier clients, recirculating hot water pipes were popular because it allowed hot water immediately. For clients that didn’t want their drywalls cut up, there was an option to install a pump in the bathroom farthest from the hot water heater. This pump simply ran a line from the hot water pipe, into the pump, and then into the cold water pipe. The pump was either activated by a switch or a temperature setting, pushing the hot water into the cold water line, which then went into the hot water heater, and then return to the pump, creating a loop, and it would remain on until the temperature at the pump reached the set temperature. This eliminated water waste and provided fairly instant hot water. My plan was to do something similar with my Oliver. I don’t need a recirculating pump since the onboard pump will do the work of circulating water whenever there is a loss of pressure. I intend to install around 3 or 4 electronically controlled 12 volt valves. I plan to install ½ inch tees at certain locations (i.e.: the faucet in the bathroom, the outside shower, and the fresh water fill pipe). The tees will be to connect the hot water line to the cold water line, with an electric valve that is normally closed between these connections. An activation of these 12 volt valves will cause the water pump to activate and will push water through the hot water heater, along the hot water line almost to the faucet where it will tee into the cold water line and then go through that line, and then get pushed into the fresh water tank. Obviously, I’ll need a valve to divert water into the fresh water tank. To activate the 12 volt lines at the proper intervals, I was going to get one of the cheap PID controllers from Amazon and some cheap water temperature sensors to put in key locations (i.e. outside shower cold line, the freshwater tank fill line, the freshwater tank, and the bathroom faucet). Once the temperature gets to 40 degrees at a certain location, the correct valves open, the pump activates, both the cold and hot water lines get hot water racing through them until a desired temperature is reached (say 85 degrees). If I also insulate what I can of the pipes, they should maintain their temperature a while. I’m probably not describing this too well, but the end result will be no frozen pipes, and instead of heating the entire basement, I’ll only be heating the water lines and the fresh water tank using just the hot water heater. I anticipate this will use less propane than heating everything with the furnace. I can leave it active while away hiking or exploring without running the propane hogging furnace. The only down side is it won’t keep the gray or black water tanks heated. Did this make sense? If so, thoughts?
-
Thanks! I'll probably take you up on that offer someday!
-
Everything should have been 1/4 20 threads, that's what the factory used on my trailer, and that's what I replaced it with. I misremembered when I wrote my first reply to this thread (I was going off my memory prior to reviewing my videos), and I think I neglected to edit all of the references to 10/24 (I missed one). I seem to no longer have the option to edit that original post.
-
I would only make the plates smaller if I had larger plates already fiberglassed in (like the factory does now). The roof bracket on top doesn't need to be large because there is no real force pushing the panels down, the real force is from the wind trying to blow the panels off. For that, you want a larger plate underneath to spread the load over as much fiberglass as possible. I don't remember the length of the final set of bolts, but I seem to remember it was possibly 1 1/4 (1.25) inches....? I know the factory bolts I pulled out were different sizes, even on the same mount. The factory really hodge-podged mine together, so I couldn't trust the size of the bolts they used. Before installing any plates, buy a couple of lengths of bolts of 1 inch, 1.25 inches, and 1.5 inches. Then drop them into your hole and view it from a borescope to see which size looks best. I remember I didn't want the threads to stick out too far under the plate, and you really don't want them touching the top of the inner hull. I would have rather had the plates where the fiberglass is a bit thick to give more meat to prevent bending, cracking or breaking the fiberglass, but seeing as how I've had no problems where the factory put the holes, I guess it's working out. As to flexible panels.......the current way the factory does it makes the roof line look dorky; it ruins the aesthetics. But like you mentioned, to get the most output from traditional panels, the panels need to "fly" over the curvatures of the roof. As to the aerodynamics of how the factory does it, the panels are pretty level, and appear to have a zero angle of attack. I used my trailer without the panels after they got damaged and I must have drove a combined 1,000 miles on different camping trips while I worked out how I was going to remove and replace the solar mounts; I didn't see a real difference in fuel mileage, so I don't think the parasitic drag of the panels is costing that much. But then again, I was driving a heavy diesel truck that doesn't know the trailer is even there. Flexible panels look cooler and can conform to a roof line giving better aerodynamics. They wouldn't need to fly over the roof because they should conform to the contours. Granted, with the complex roof contours of an Oliver, I'm not sure how well a flexible panel would contort to match the roof line, and a portion of the panel would be vertical, and thus not getting as much sun as the rest of the panel. Therefore, I have no idea how good they are. In all honesty, I haven't really researched flexible panels in a few years (maybe a decade), and back then the technology wasn't as good as traditional panels. How good it is now, I couldn't tell you. Furthermore, I still had the wire port roof cap on top of my trailer, and I wasn't in a position to re-engineer moving it. So I just stuck with using Zamp traditional panels. I'm in Tehachapi myself. I really like Northern California, I love seeing green landscapes; it's pretty drab out here in the desert. We try to camp either near the coast or in the mountains. It's gotten tougher though since the boys are in school now and want to get into activities like soccer. I bought my trailer because I was hell bent on driving through Alaska. Thanks to Covid restrictions and fuel prices, our big vacation plan has gotten scrapped for 2 years running, and this summer is my wife's big family reunion, so 2023 is a bust. I'm hoping for Alaska in 2024. After that, I'll probably have to sell my trailer because the boys will be too big for it. But we're sure enjoying it while we can all fit in it!
-
All I did to the brass screw was drill it hollow, I didn't grind or taper the end of it. I tried to video myself doing it, but I ended up needing both hands, so only got 20 seconds of footage. As you can see, I just put it in a coupling nut and slowly drilled it out. I ruined the first bolt when I attempted it, but got it right on the second bolt. The only reason I used brass is because it's a soft metal and was very easy for a drill bit to cut through. If I remember correctly, my drill bit wasn't long enough to go through from one side, so after bottoming out the drill bit, I flipped the screw and drilled from the bottom, and I got lucky and the two holes met decently well. I bought 4 brass bolts because I anticipated screwing a few up.

-
Some final thoughts/tips if someone attempts this: 1. Don't attempt without a borescope. They are pretty cheap on Amazon. 2. Before inserting the plates and tightening down any bolts, casually insert the bolts and confirm with the borescope they aren't too long and hitting the inner hull. 3. You might need remove the mounts a few times if the area you're installing them butts up against a thicker piece of fiberglass like mine did in the rear mounts. I had to trim the rear mounts a few times, cutting off a little piece at a time to ensure it was as long as possible and just barely touched the thicker fiberglass near the original mounting holes. 4. I originally used a non-magnetic stainless steel in my first iteration of the plates, which I'm glad I didn't go through with. Use something magnetic. 5. I used 410 stainless steel, which was expensive and overkill; I was just really afraid of rust but still wanted something magnetic. In retrospect, I could have just used a regular steel plate, which I could have drilled and tapped myself, and then covered it in paint to avoid rust. Also, a full 1/4 inch thick was probably overkill too. 6. Even if your trailer already has plates fiberglassed in, and if you need to add or replace the solar panel mounts (and don't want to go with flexible panels), the method I've described will still allow you to bolt the panels down without cutting into the fiberglass hull. But if I already had the plates fiberglassed in, I would probably have reduced the size of my receiver plate with two threaded holes to around 2 inches wide by 1 inch long. 7. If I need to remove the top mounts, I would remove one bolt and then finger install a long stud or all-thread, and then do the same to the second bolt. If I had all the knowledge I have now, I could have completed this whole project in less than 4 hours. It really only takes a few minutes to get the panel attached using the method I described as you'll see in the video. The hardest part was manuevering a wrench to get the old nuts off. Looking back, I could have just cut them off on top and still used a magnet on the long bar stock to get the remnants out between the hulls. If ever I need to install something else on the rooftop (like an antennae), or convert to a more powerful and aerodynamic panel type, this is how I'll probably do it. Anyway, all in all, for a proof of concept, this was a rewarding project for me. It felt pretty dang good knowing I didn't have to cut up my inner hull, and I couldn't help feeling prideful that I outsmarted the factory in attaching the mounts to the roof.
-
As promised, here's the little video clips I made when I removed and replaced the solar panel mounts. Please excuse how cluttered my trailer was, it's usually very tidy.
-
Interesting, mine was built just after yours, but they didn't attach the plates. Maybe because mine is an Elite 1 and yours is an Elite 2.....? I was really hoping the plates were attached on mine, I was disappointed they weren't.
-
1. I used an Eye bolt so the string wouldn't get smashed against the underside of the outer hull. In my first iteration of the plates, I actually epoxied the Eye bolt to the underside of one of the plates, which came out looking terrible, and I didn't use the plate anyway since I wanted thicker steel, and I wanted magnetic in case I needed to use a magnet to maneuver the plate over any wires. 2. I didn't think to use a slow curing adhesive, and in retrospect I'm glad I didn't. If I keep the trailer a few more years (but at the rate my kids are growing, it'll probably be too small for our family), I assume solar panel technology will get better, and I'll want to get more aerodynamic panels, like the Zamp Obsidian series. With the way the mounts are now, I can easily remove them and relocate them if necessary. When I put these on, I was trying to solve so many issues, I couldn't be bothered to also redesign the panels I'd even use since I wanted to get back to camping. 3. I think the brass bolt was 1.5 inches. 4. I drilled the brass bolt out myself at a buddy's house who has a drill press. The brass drilled out easily. I only used a machine shop to drill and tab the 410 stainless steel plates because 410 is tough to work with. The local machine shop only charged me $5 per drilled and tapped hole, and at $40, that was one less aggravation I didn't have to deal with. 5. The countersink is important because it makes it easier for the bolt to locate the threads. On my first iteration of plates, I didn't have the countersink, and I couldn't find the threads. 6. I just used string from Home Depot. I had to pull one of the plates out with it, and it worked just fine. 7. It wasn't a rod, it was a long metal strip of metal from Home Depot. It's sold in 48 inch length, and about 1/2 wide. I needed thin and flexible to duct tape a wrench to it. I just kept using the same piece of metal for the whole of my experience. I had to wash off the oils from the metal before taking it in the trailer, and I did paint it since the metal rusted easily without the oil. It'll show up in my part 1 video. Again, I was making everything up on the fly as I went along.
-
Here's a quick video of how I attached the solar panel mounts to my trailer. It'll say part 2, and I'll upload Part 1 and Part 3 on Sunday. Part 1 shows how I removed the old mounting brackets, and Part 3 shows me actually installing the mounting bracket on my trailer. But Part 2 shows the theory and why I did what I did. It's 12 minutes, but everything will make sense once you watch it.
-
I didn't have a choice, I live too far away from the factory, and my fiberglass skills aren't good enough to make a seamless repair. Thankfully, when my solar panels got hit, the weak point was the mounts, which is what bent, thus preserving the fiberglass, but all 4 mounts were too far gone to be easily straightened. Once I figured how to fix everything, it wasn't that hard, and didn't require that much patience. The tough part was coming up with the idea for the hollow bolt, and the decision to just tap and thread the plates themselves. If I had to do it over again, I could probably knock it out in about 4 hours maximum. Once you see the video, it'll all make sense.
-
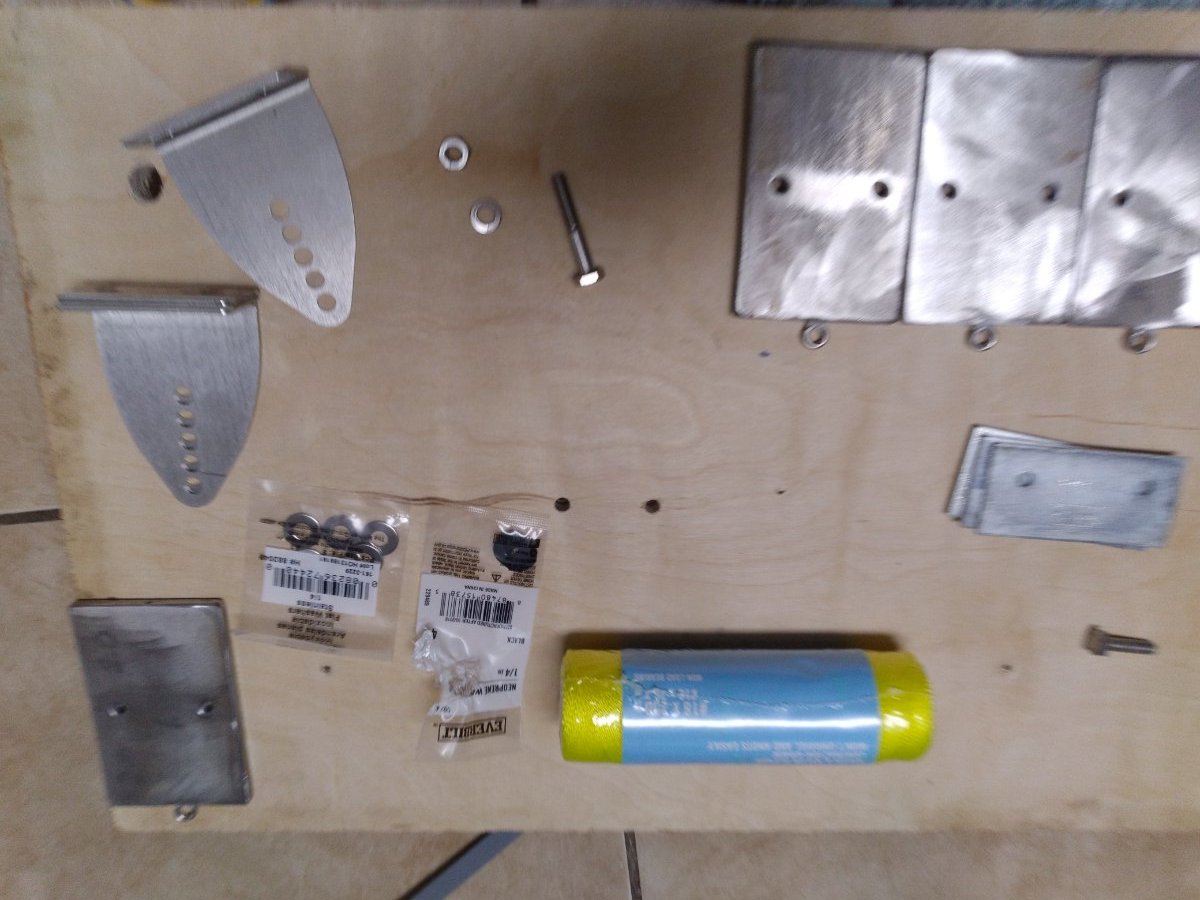
Yes, it is possible to add solid metal mounts between the hulls without cutting up the fiberglass, I know because I did it. My trailer came stock with the solar panels already attached. However, back in 2021, my solar panels got damaged and the mounts got bent. Thankfully, it was only the solar panels and their associated mounts that got damaged; the fiberglass was perfect. I attempted to take off the mount by unscrewing the bolts, but they just turned in place. I would have hoped the factory would have permanently attached the nuts to the underside plate, but they did not. I called the factory and spoke with someone (don't remember who, it was almost two years ago though) who advised the only way to get old mounts off was to either cut into the inner fiberglass hull to get a wrench on the nut, or to try and cut off the bolt from the top. Furthermore, I was advised to attach new mounts with hardware, I would still need to cut into the inner hull. I detested the idea of cutting into the inner hull, and so I found a way around it. I took off the MaxxFan which is only held on by four screws to its mount. This allows access to view the area between the hulls. You'll notice when you do this, the factory epoxied a plastic PVC spacer around the perimeter of the MaxxFan. You'll need to drill a hole in this and it will allow access to the space between the two hulls. I bought a cheap borescope off Amazon with a long extension wire. This allowed me to view the nuts and plates used by the factory. I used a piece of metal bar and duct taped a wrench to it. I was then able to insert the metal bar and carefully manuever the wrench around the nut. Then with a friend's help, he unscrewed the bolt from the top side. I had put some duct tape around the bottom of the wrench which thankfully stuck to all 8 nuts, allowing me to remove them (I put new duct tape on each time. Now, on my hull #220, which is a 2017 model, the factory had not permanently attached underside plate. In fact, they didn't even use a high quality set up, they only used some Fiamma awning metal plate spacer for each solar mount; it looked terribly pathetic, and they weren't even epoxied to the underside of the outer hull. They just fell down when the nuts were removed. To remove them, I duct taped a magnet to my metal bar and dragged them out one by one. Now, the dilemna was how to attach the new solar mounts without cutting up the inner fiberglass hull. Here's what I did: I sourced some 410 stainless steel that was a 1/4 inch thick. The factory had used screw and nuts for 1/4 x 20 threads, which results in a nut thickness of around a 1/4 inch. I used 410 stainless steel because it magnetic which would allow me to use a magnet to grab it if it wasn't in the right place. I cut the stainless steel to around 2 or 2 1/2 inches wide and around 3 to 4 inches long. This mimicked the Fiamma metal plates the factory used, except my steel was thicker and stronger. I then paid a machinist to drill and tap the metal plates for 1/4 x 20 threads. I also added an eye bolt and put a string through it so I could easily drag the plate back if necessary. You can see the plates in the above picture. You can also the Fiamma plates the factory used on the middle right of the picture. To get the plate in position between the hulls was tricky to figure out, but ended up being easy to attach once I figured it out. I put two pieces of string down each hole for each mount. Prior to putting the string down, I attached a piece of metal. I then inserted my magnet on the metal rod, which connected to the metal on the string, and I was able to drag the string to the opening I made at the MaxxFan. I then threaded the string through the holes in the metal plate. I then dragged the strings from the top of the outer hull, which put the plate right underneath the old holes for the old mount. To attach the mount, I took a 1/4 x 20 threaded brass screw and drilled it out so it was hollow inside. I then put the string through the hollow bolt. While pulling tight on the strings, I threaded the hollow brass bolt into the stainless steel plate. Once that was attached, I used screws and attached the other side of the plate. I then removed the hollow bolt and attached another regular bolt. I know I'm not describing this very well, but I thankfully made a few cellphone videos when I did it back. I never bothered to make it into a youtube video, but I have Saturday and Sunday off, and I'll turn my old footage into a quick clip and upload it Sunday. Once you see the video it'll all make sense. The end result I was able to attach new solar panels and mounts, with underlying metal plates, all without drilling into the inner fiberglass hull like the factory told me to do. The only cutting I did was to the spacer around the MaxxFan, which is easy to repair and is completely hidden by the MaxxFan trim. Anyway, I'll post the link to my Youtube video on Sunday.
- 39 replies
-
- 13
-

-

-

-
No, it's generally not humid where I live, I'm next to the Antelope Valley. Also, I don't plug my trailer into shore power. However, when I start camping again in late February and March, I'll probably get a small dehumidifier for when there is electrical at a campsite. That being said, I usually camp where there is no services.
-
Much better, thanks! Any way you can fix the pictures in the first post as well?
-
And for some reason, my pictures are still getting turned 90 degrees to the right.... oh well.
-
I meant to give an update sooner, but life got crazy like usual. Leaving the cabinets open seemed to stop condensation inside the light fixture; however, it should be noted that was without anyone sleeping inside the trailer. We also had some rain recently, and I did not observe any leaks either. To confirm there were no leaks, I left out paper towels and I also removed the rear driver's side speaker. This allowed me to access the area between the attic and my troublesome storage area; no moisture detected. I'm therefore pretty confident there are no leaks, at least from the rear Oliver light. I won't get a chance to camp in the trailer until the end of February, so till then I won't know of my condensation problem is completely resolved, but till then, it's looking promising! Thanks everyone for your help! I'll update again after we go camping next month.
-
Will do on the blue shop towel below the third tail light in the attic, its definitely worth checking.
-
That sounds like a good theory! I'll be at the trailer this Thursday and again on Saturday. I'll leave that cabinet open and see if there's any difference. I'll give a report back on Saturday.
-
Also, for some reason my pictures were rotated 90 degrees. I'm not tech savvy enough to know why. They look OK in my phone's photo gallery.
-
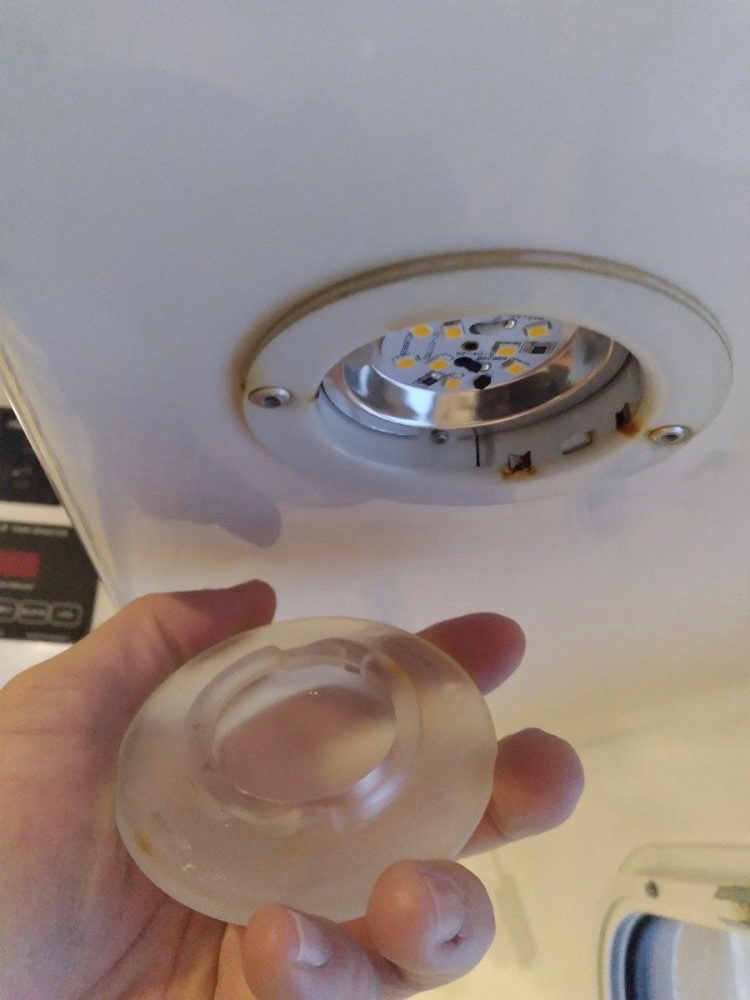
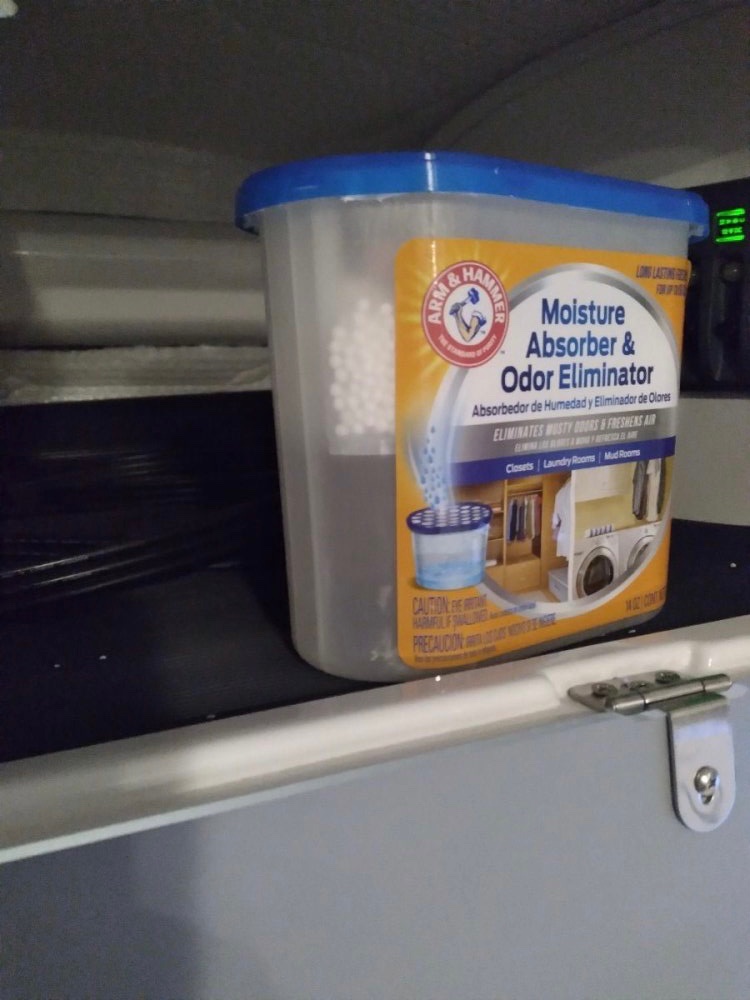
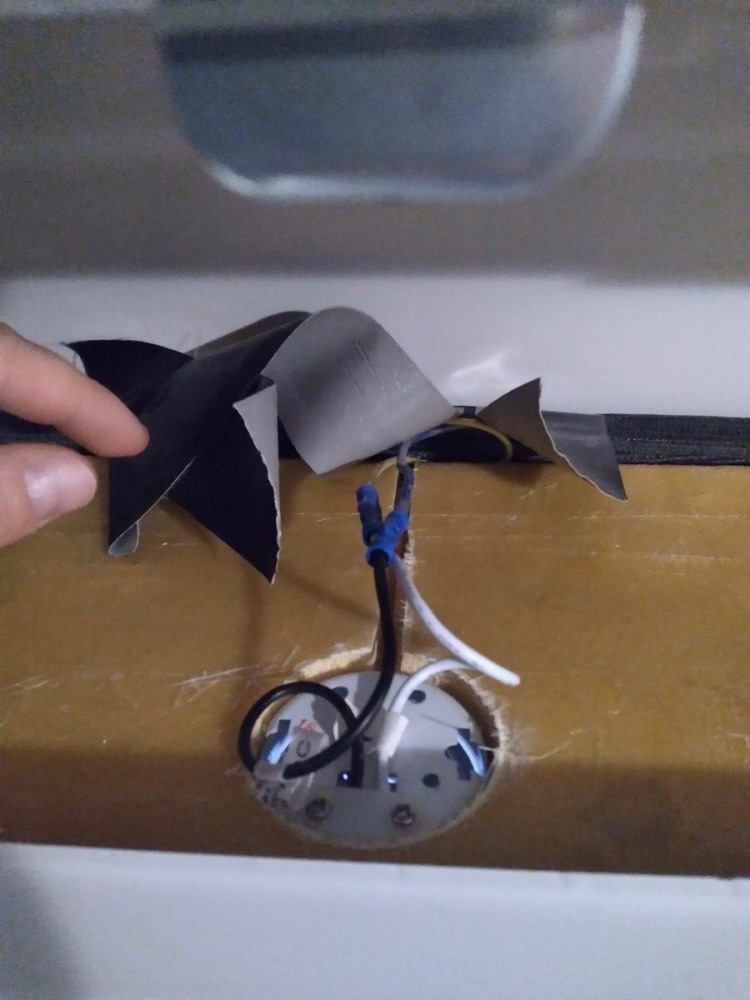
This problem only started near the beginning of 2022, and a year later, I still can't figure it out. I get condensation build up inside of the driver's rear light fixture; right above my head when I sleep. You can see the rust spots inside of the light. The glass dish/cover will fill with water/condensation and then drip out. At first I thought it was because that's right where my head was breathing towards; however, I haven't slept in my trailer in a few months, but everytime I hang out in it, I get the same condensation in the same light fixture. I put a plastic container of Arm & Hammer Moisture Absorber, but after a couple of weeks, it's dry. I altered the placement of the moisture absorber to different locations, but all condensation still goes to the same light fixture. I know it's not a leak because it occurs in dry weather and rainy, and because I inspected the cabinet with the wires that feeds the electricity to that light fixture. The channel the wires run through in the fiberglass is bone dry. I put multiple q-tips in there but don't show any moisture indicative of a leak coming from anywhere else, or condensation following a path to that location. In short, I'm stumped why condensation is only attracted to that particular light fixture.


.jpg.a21c3a5a0e322d2c440b9b88cff55116.jpg)