

MAX Burner
-
Posts
1,524 -
Joined
-
Last visited
-
Days Won
62
Posts posted by MAX Burner
-
-
18 hours ago, Patriot said:
The white coiled up plastic strip is a flea collar.
Absolutely brilliant, Patriot! Already added it to our checklist, brother!
-
 1
1
-
-
20 hours ago, Sak said:
Not sure for other model years, but for my 2021 Elite 2, I can access the the drawer by taking the top cover off. It's only held down by Velcro straps.
Our model (Hull #226) has a "wooden tray" underneath the velcroed nightstand top - it doesn't access the contents of the drawer.... But is a nifty storage area nonetheless...
-
14 hours ago, Brian and Brandelyne said:
2021 was the last year the cutout was under the nightstand top. It has now been eliminated and a taller drawer installed.
Brian
Correct! Our 2017 has the cutout/storage tray underneath the nightstand top.
Funny story: Just yesterday, we discovered a cutout/storage area underneath the countertop just below the pantry locker. So guess what was stored inside of it? A (what appears to be) brand new Foy kitchen sink mahogany cutting board! SCORE!!! The sad part of the funny story is that I made a bamboo cutting board custom fit to the sink - now we have two! HA!
-
 1
1
-
-
14 hours ago, Coddiwomple said:
Thanks Brian. I saw that but wondering if that is strong enough. I don't know anything about the strength of fiberglass so I guess I need to do some research on this. Don't want to damage ours when I install the lagun table mount.
The Lagun hardware packet came with a 3/8" thick piece of plywood for the backing bracket. I chose to use a piece of 3/16" aluminum plate (same width/length dimensions as the plywood piece) as the backing bracket. It's a bit bigger than the backing plate used for the TV mounting hardware, FYI.
-
1
-
1
-
-
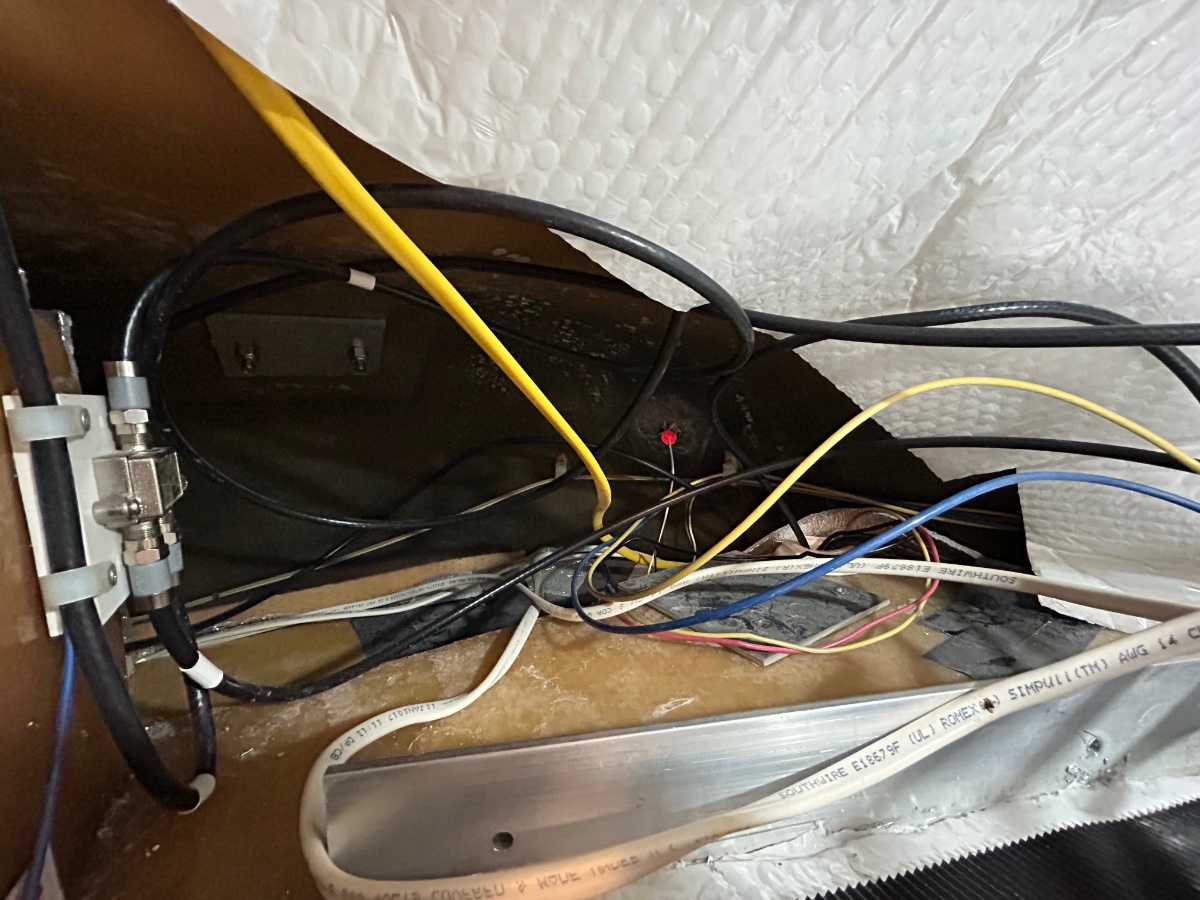
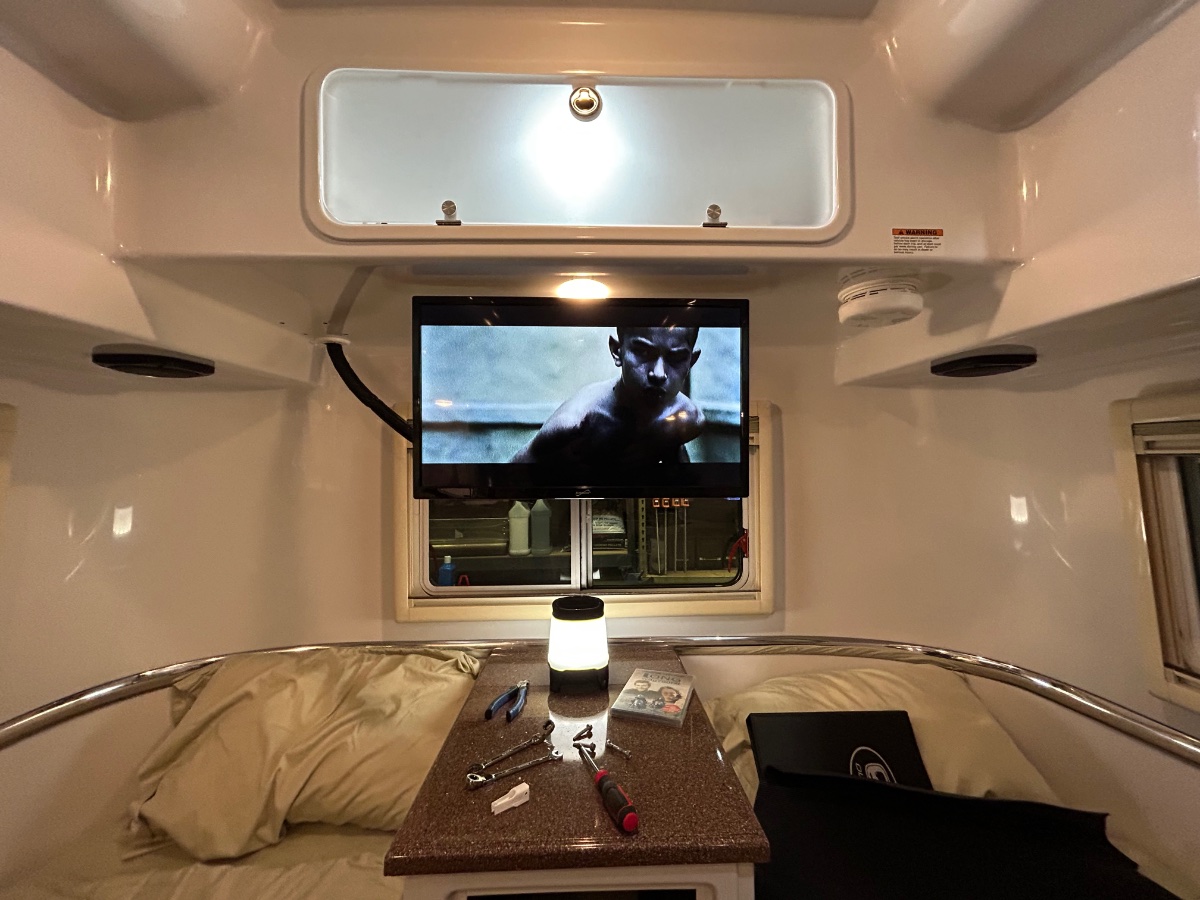
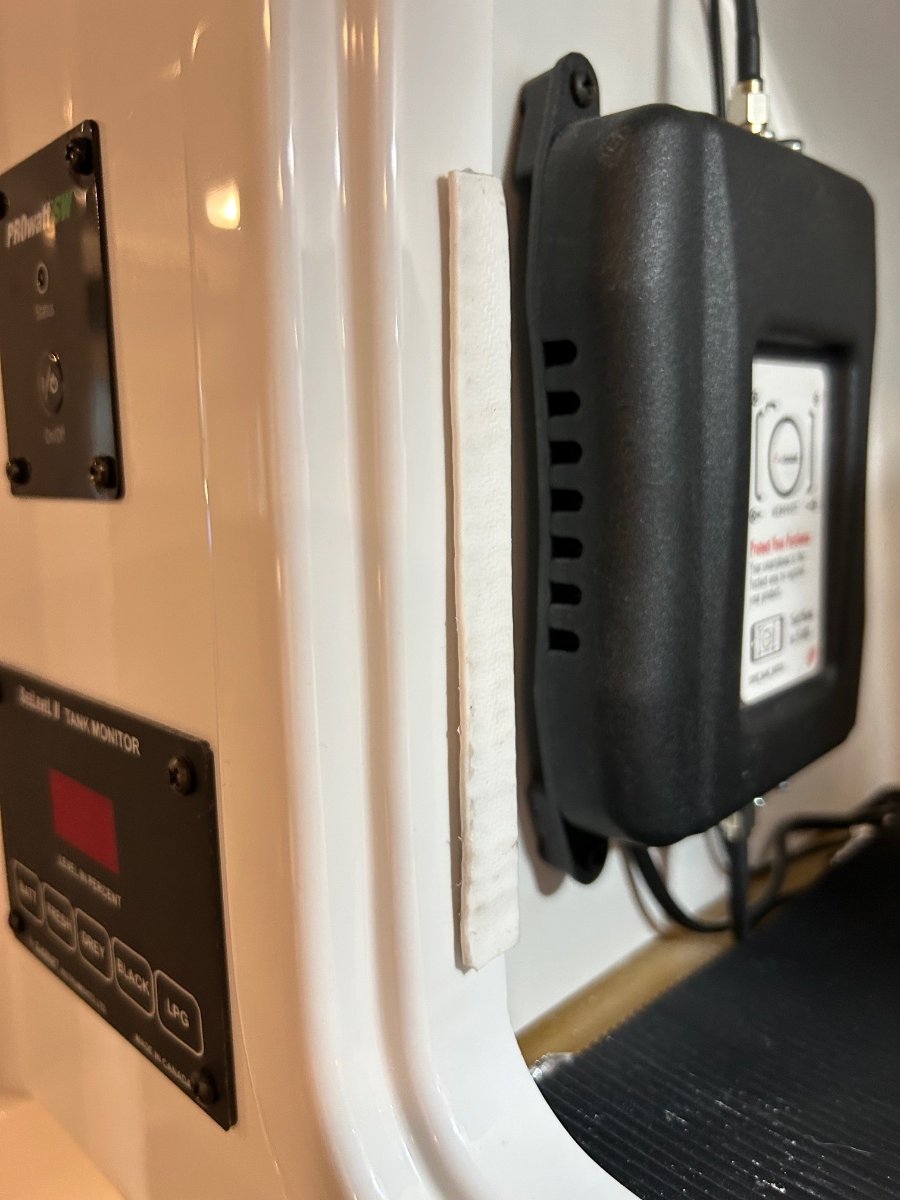
The "center mount" TV hardware arrived from Oliver (thanks to Ryder!) last week. So, we removed the curbside/aft corner vertical TV mount on our rig a couple days ago. We mounted the new hardware just aft of the LED light over the nightstand. I've still got the power & HDMI cables routed through the original hole, but thanks to mossimi, I'll cut a new hole aft of the TV mount (less conspicuous) and use moss' 2" plug that he sent me to cover the original cable hole. I was amazed how random the wiring was behind the bulkhead in the aft storage compartment. Cleaned a lot of that up. Also, the wiring set up had 2 massive (L, R, Video) cables from the TV through the original hole - one of which ran back to the Furrion controller - we removed them both, not needed.

Quite a mess back there.
We ordered a new 27" viewing size "Smart TV" to replace the original Furrion model (which the DVD player was INOP).
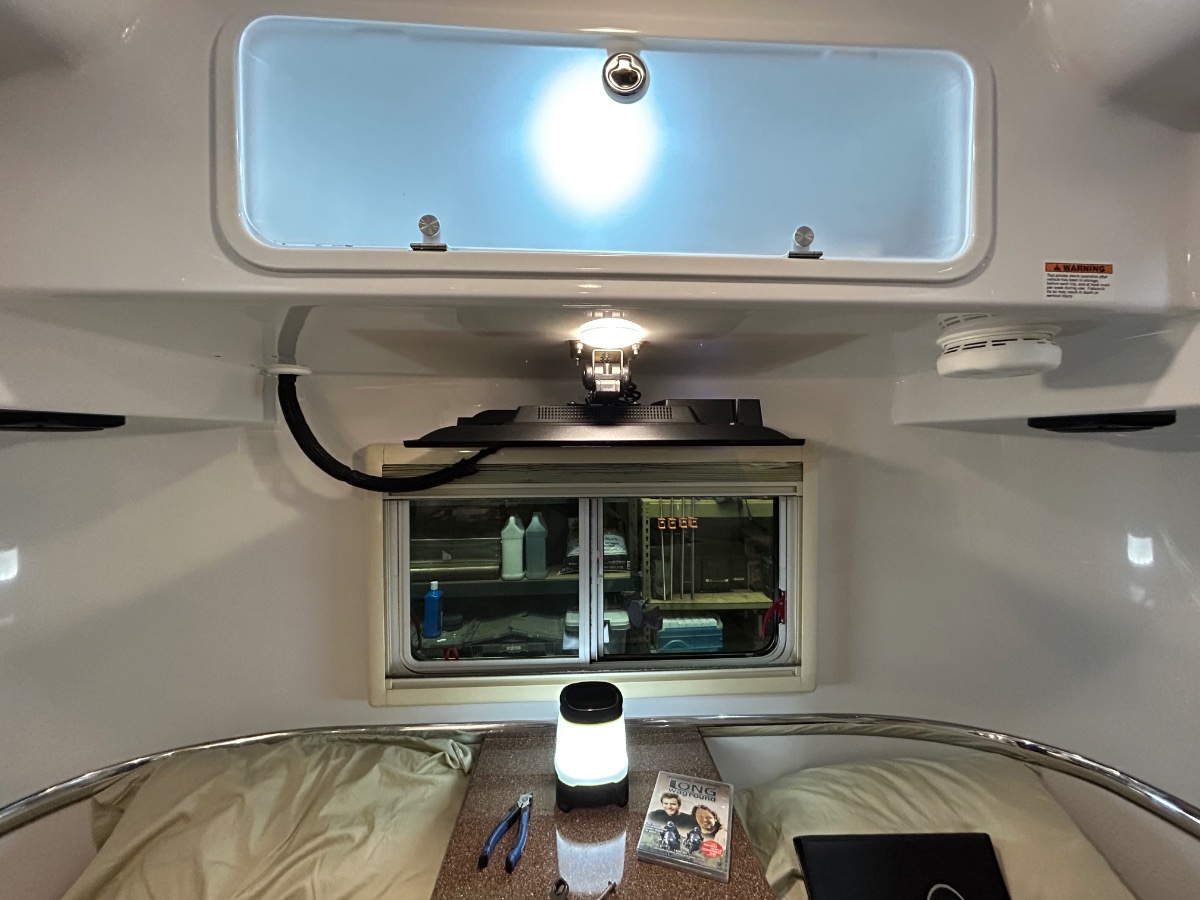
Tucked up nice and neatly. I've got some white wire/cable loom ordered to replace the black mesh that Oliver uses. I think the white loom will look more appealing than the black stuff... IMHO. We've also ordered a 12VDC Furrion subwoofer which can connect to the Furrion AV/Radio Controller which should liven up the tunes a bit whilst sipping on a nice chilled margarita...

-
3
-
-
On 3/29/2023 at 12:28 AM, MAX Burner said:
Good idea, Katjo! I'm on travel now, when I get home this weekend, I'll check the cabinets to see if it might work there and let you know...
KATJO: See pic below. The edge guard would totally work for your application. The cabinet door closes without obstruction.
You may need to heat up the edge guard material with a heathen to make it easier to go around the corners. Good luck - post pix of your upgrade!
Cheers,
-
On 4/2/2023 at 8:29 AM, MAX Burner said:
I'm planning to post a thread of my step-by-step Lagun retrofit project milestones later this week. I'll be making a mahogany folding tabletop that will function in either a narrow or "unfolded" wider mode as an earlier member posted, FYI. It will also serve as a gap filler between the twin mattresses with a puppy pad for Magnus' bed at night (WOOF!). Ha!
I'm hoping the order of the pix stays intact after posting. If so, each pic has a description below it, FYI.
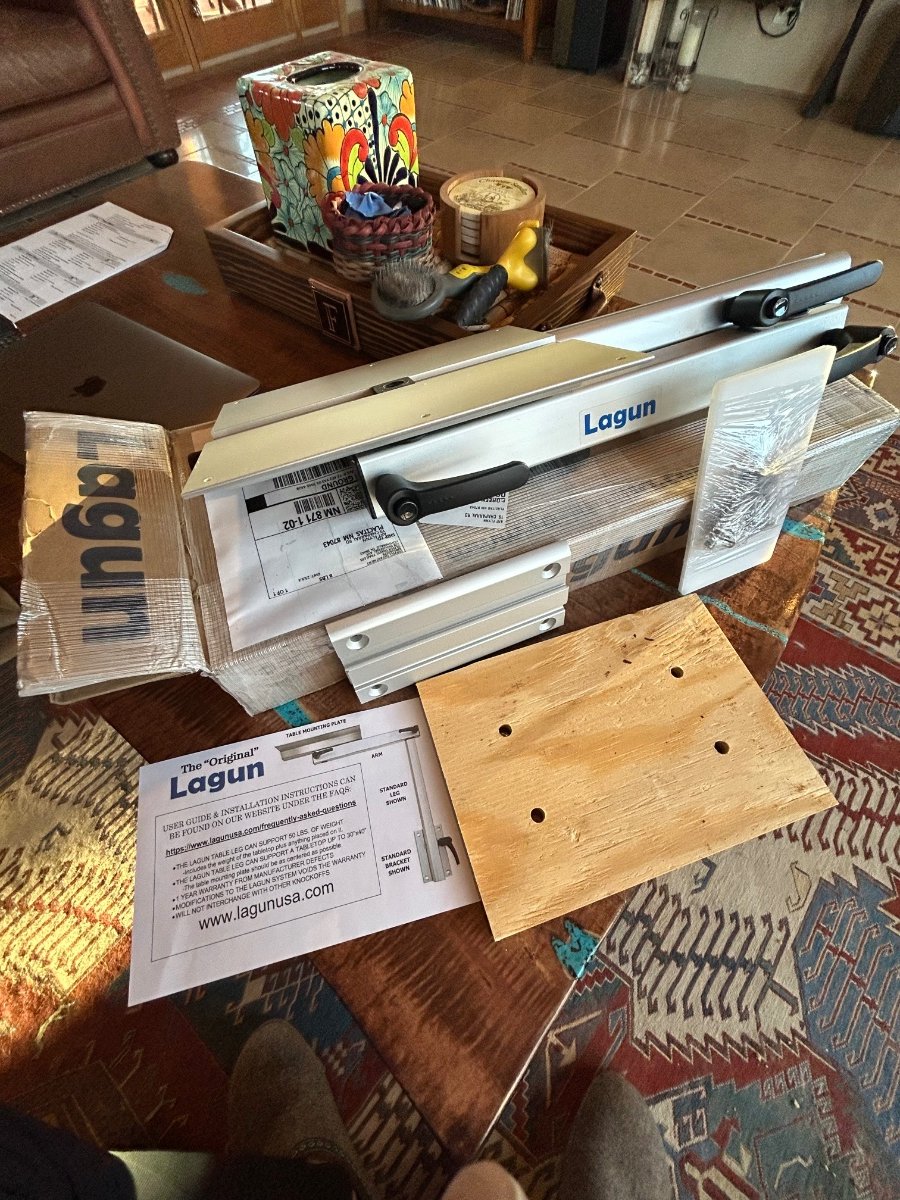
The Lagun hardware arrived here when I was on travel last week. We ordered it from Lagunusa.com directly.
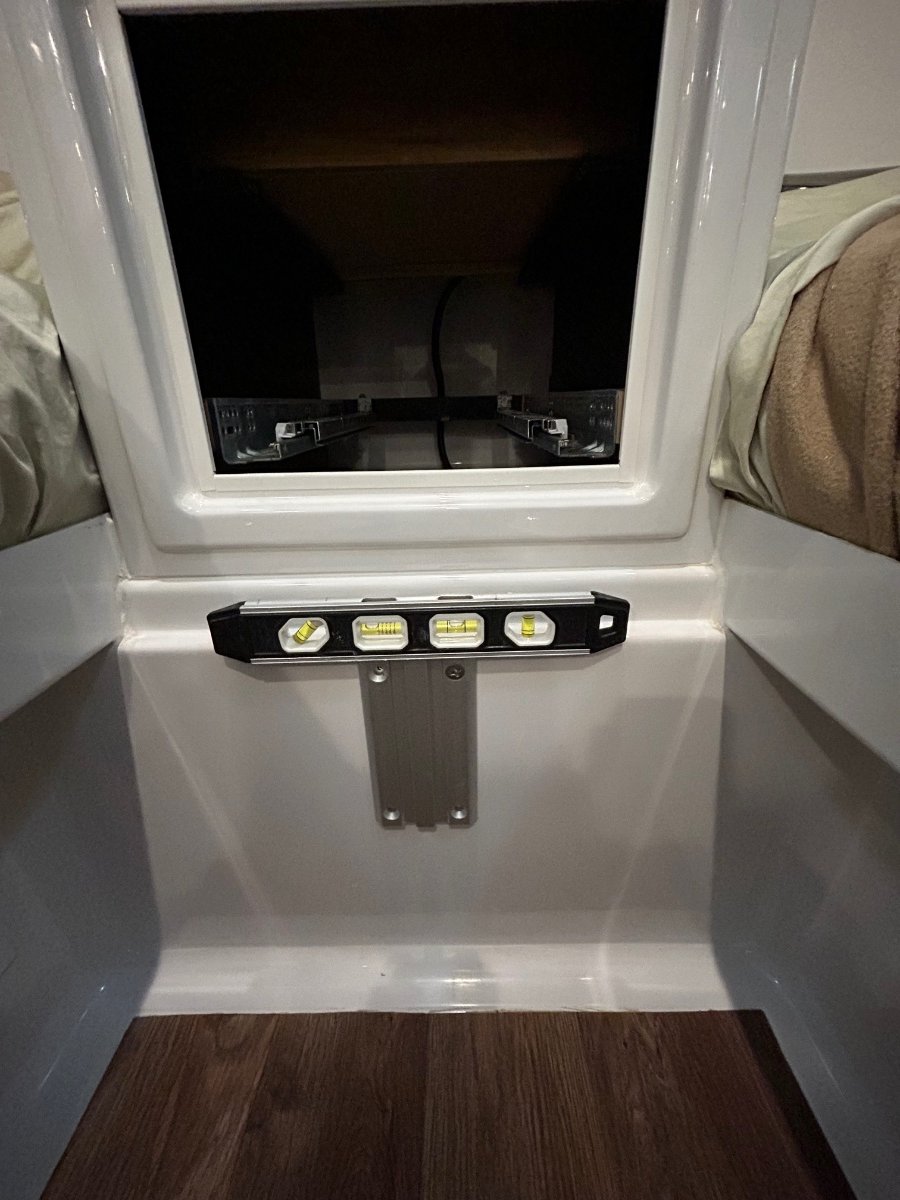
OK, so I started the Lagun Table installation a couple days ago. I installed the main leg mounting bracket first. Leveled rig fore/aft and port/starboard to get a good level on the bracket.
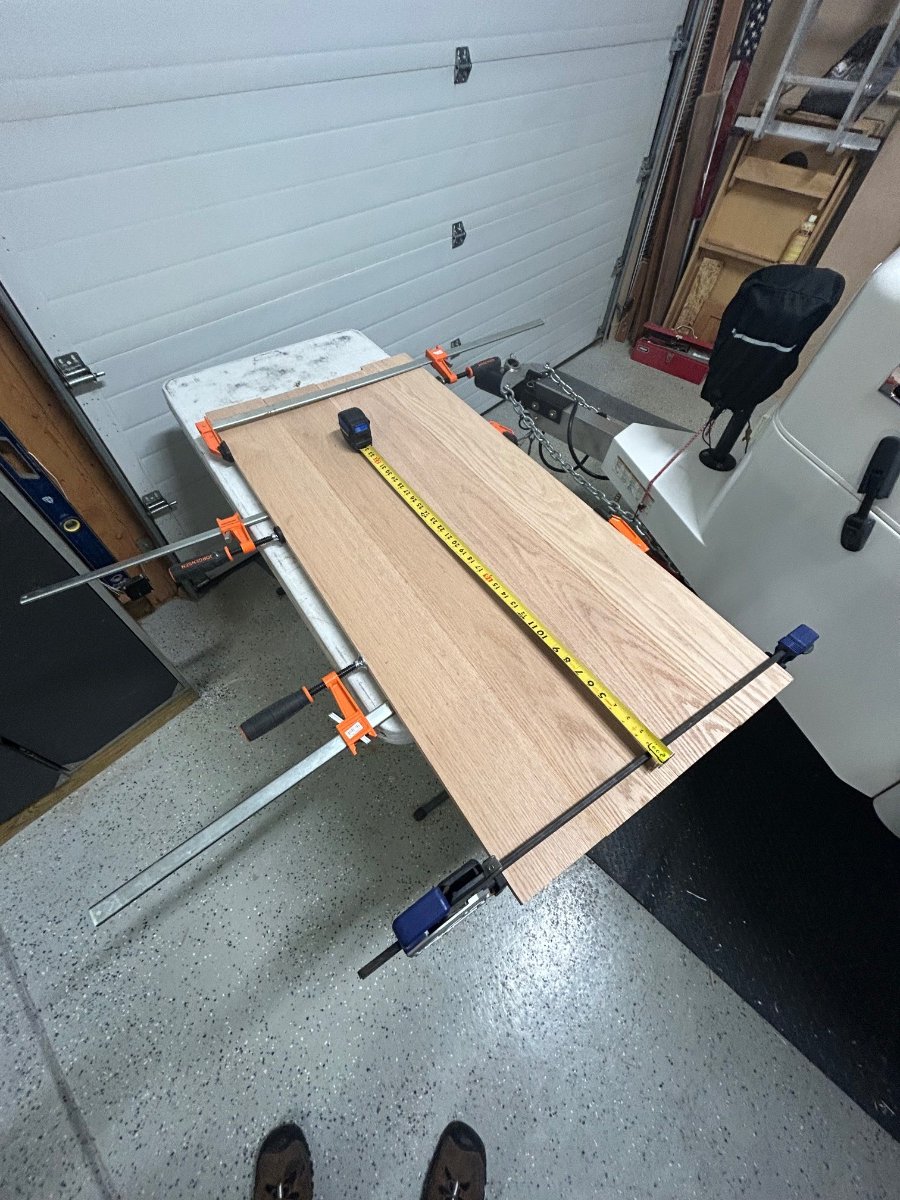
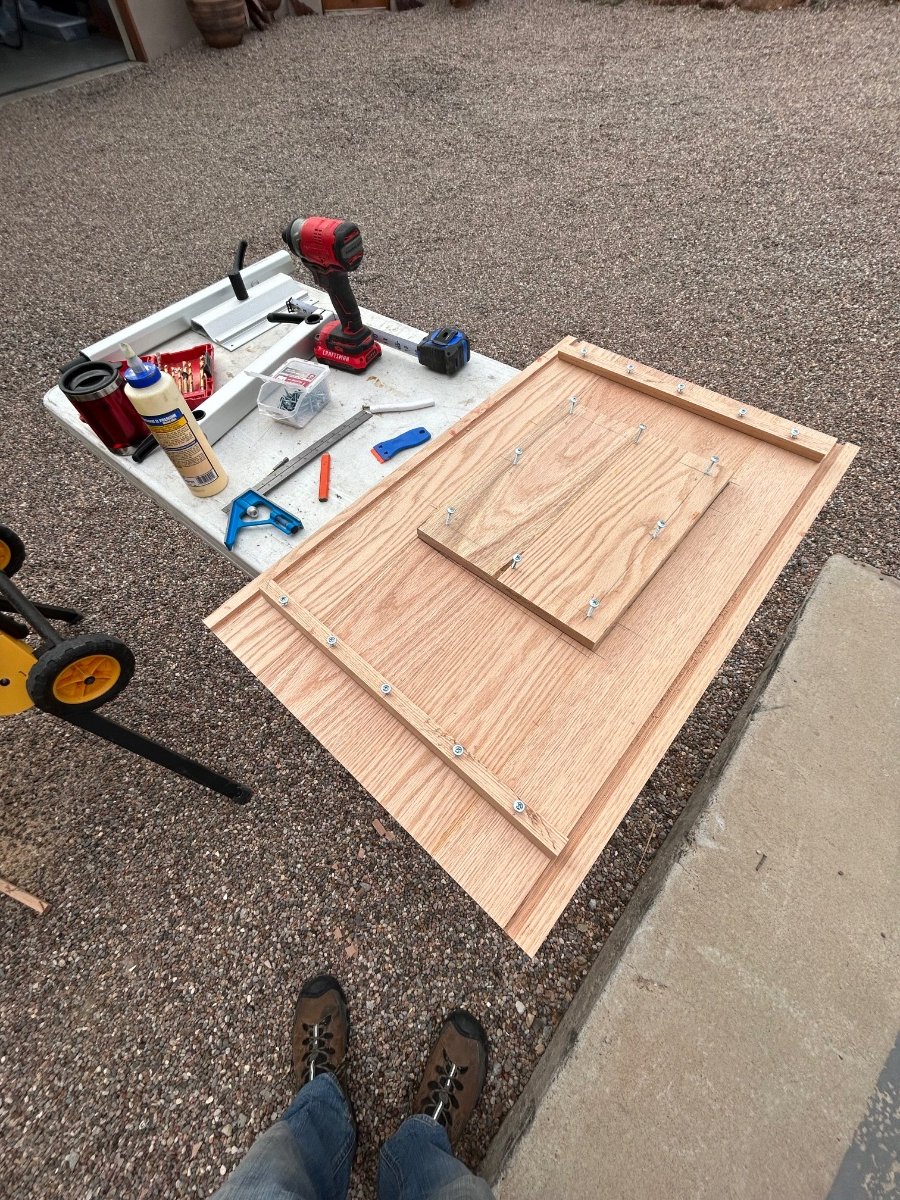
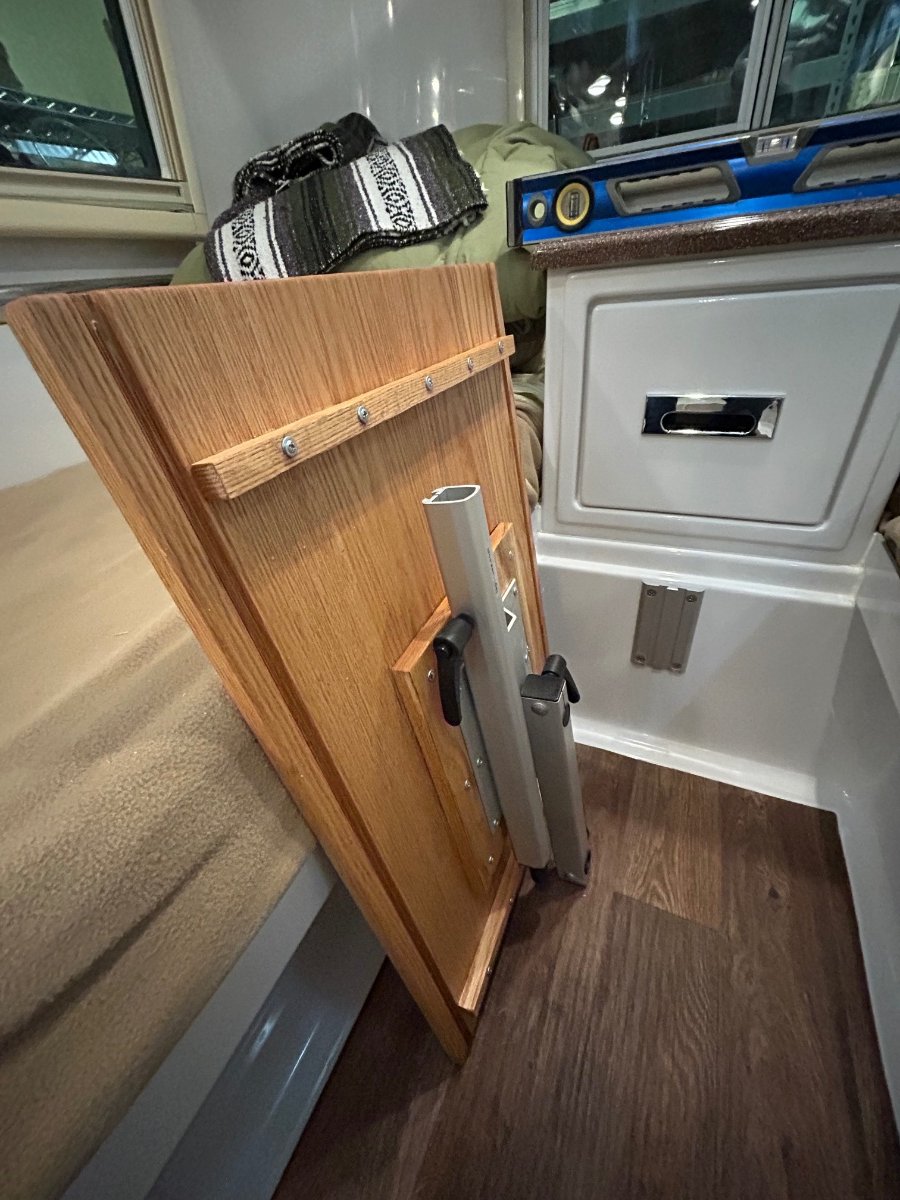
My hardwood lumber supplier here was totally out of mahogany, so I decided to go with American red oak instead, I know - heavier and not as interesting as mahogany, but we've scheduled a long weekend camping trip this Friday and I wanted to get this table knocked out. We'll call the oak version a temporary bookmark for the time being. I glued/dowelled 4 pieces of 1/2" x 5.5" x 48" oak to get a tabletop dimension of 20" x 32", FYI. I used the extra wood for the table mount plate and cross spars (shown in later pix).
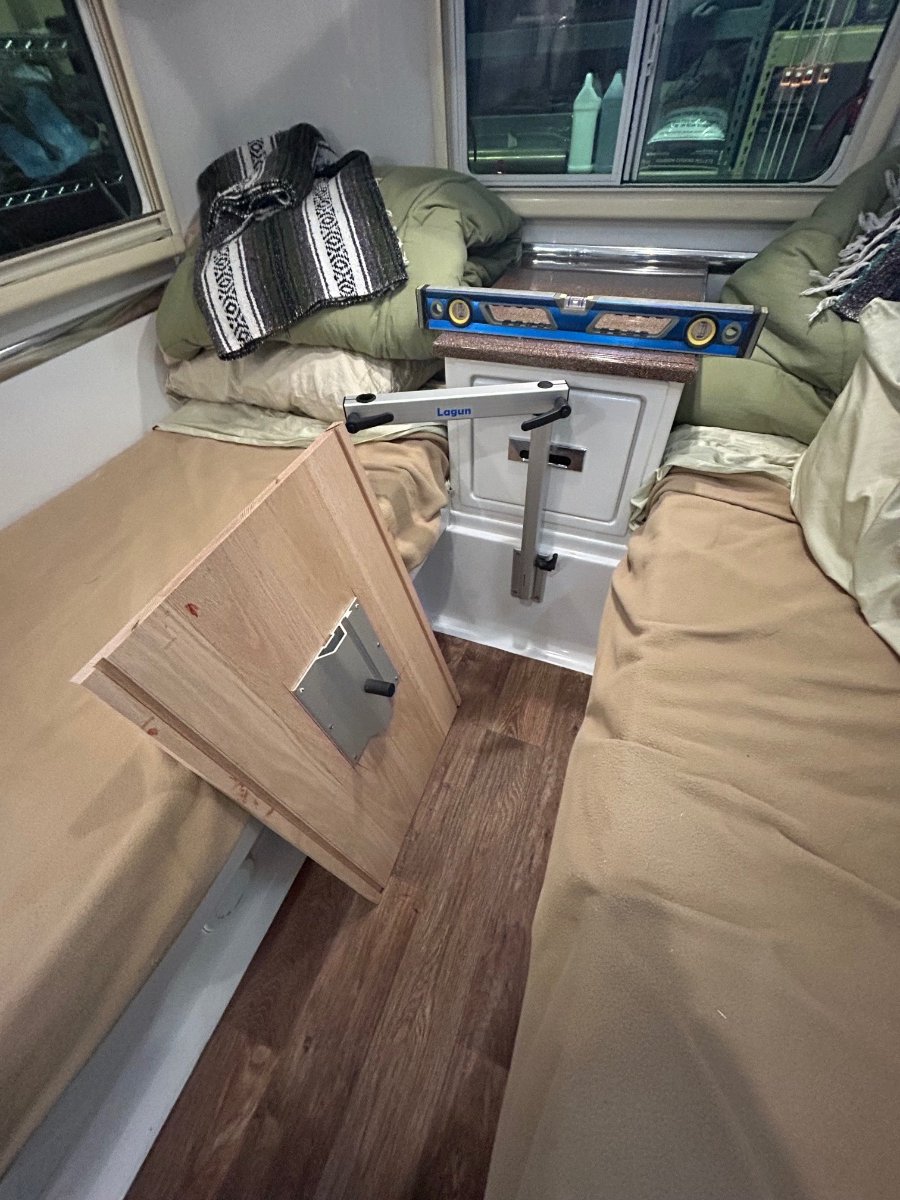
The second pic above, shows the grooves on either side of the underneath portion of the table - the grooves are for when the table is in the "Puppy Mode." They fit over the twin bed lips to hold it in position when either towing or when Magnus is sleeping on it. This stage was for fitting purposes.
This one illustrates how the grooves fit over the twin bed lip.
Above shows fitting cross spars and mounting plate on underneath side of tabletop. Spars and plate are glued and screwed to keep table flat and reduce cupping as humidity cycles up and down.
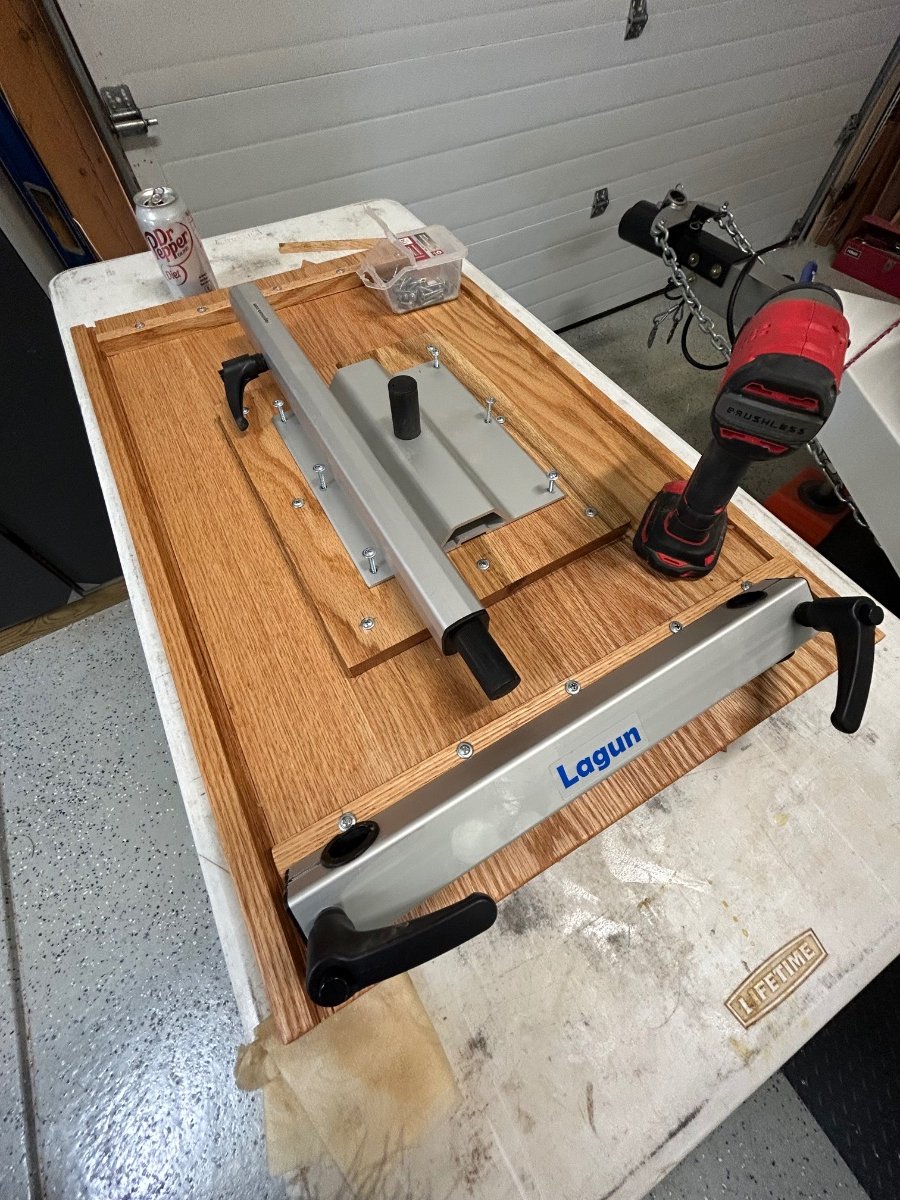
After a few coats of Watco natural oil/sealer, this shows the fitment of the Lagun hardware (in storage/Puppy mode).
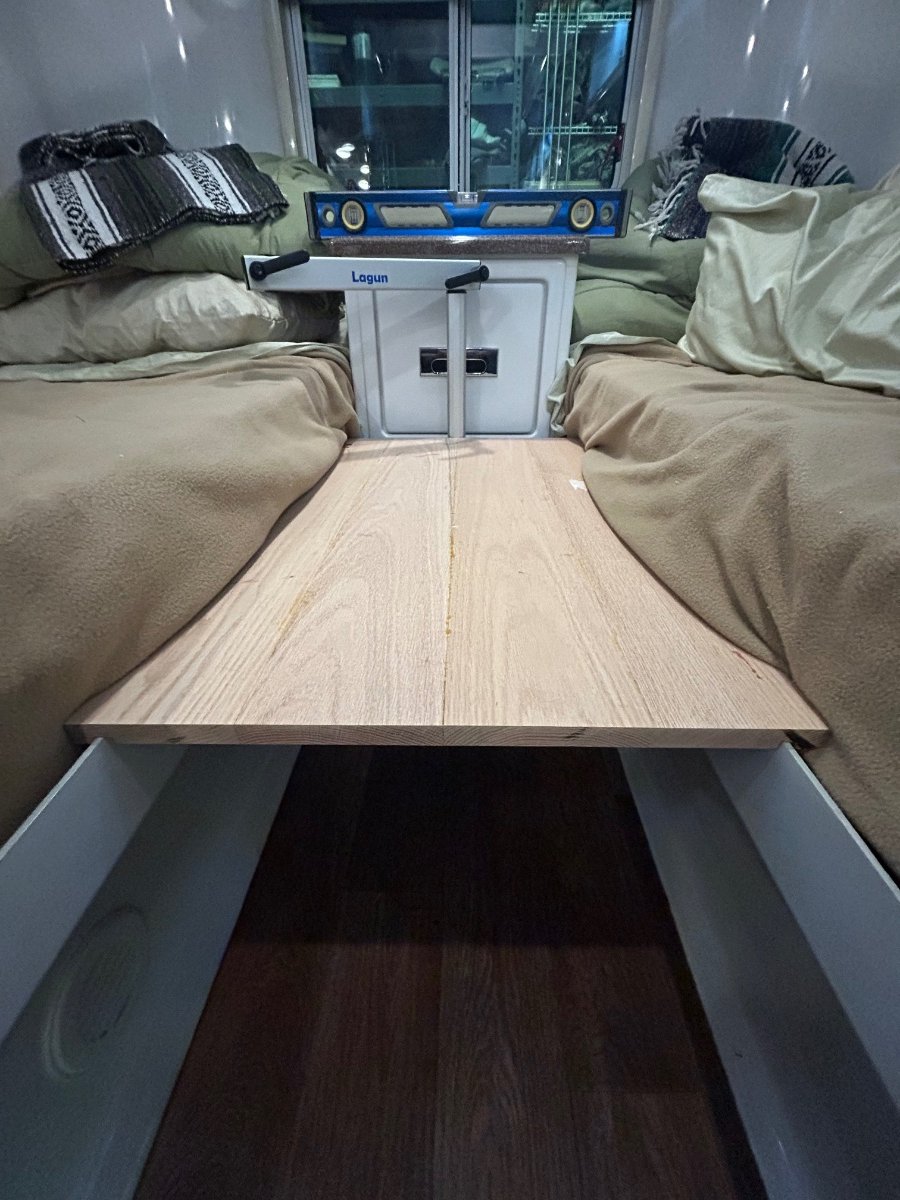
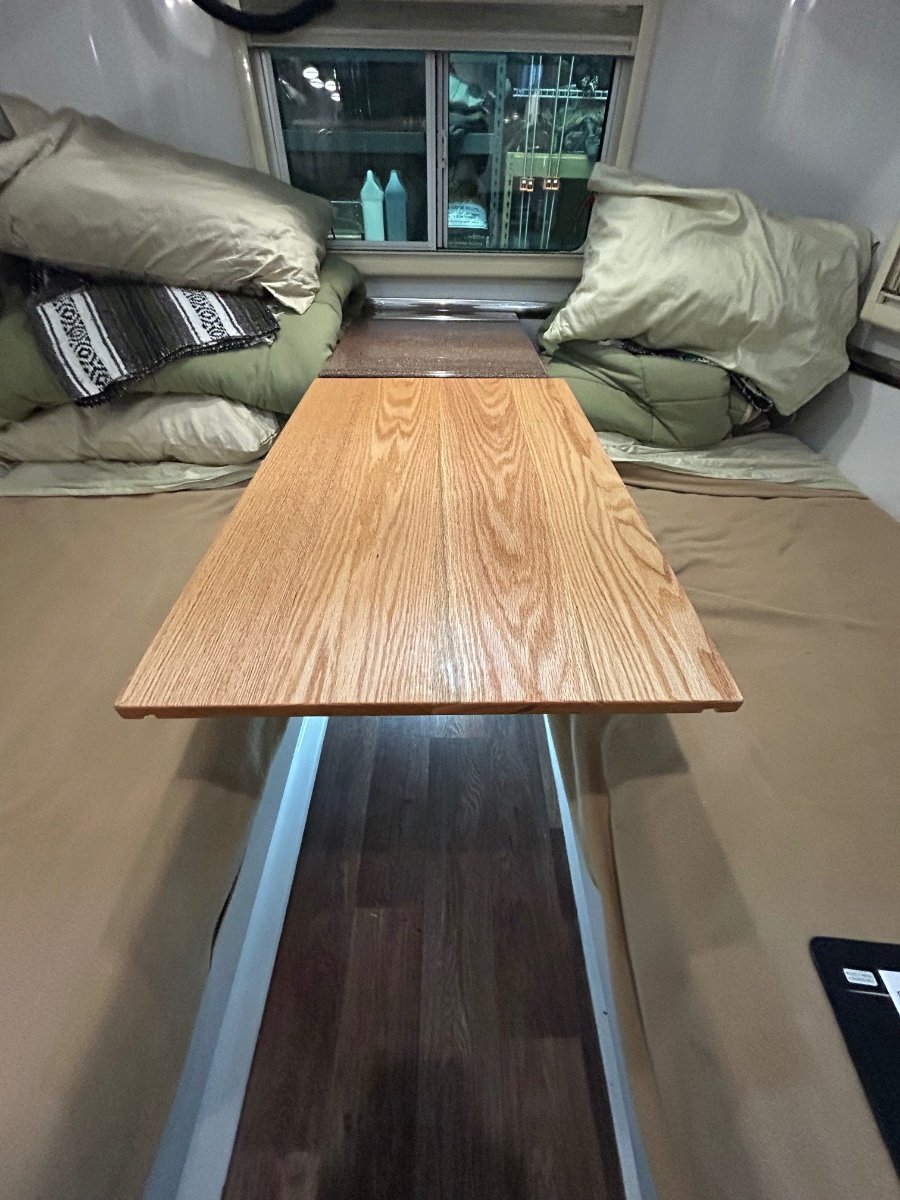
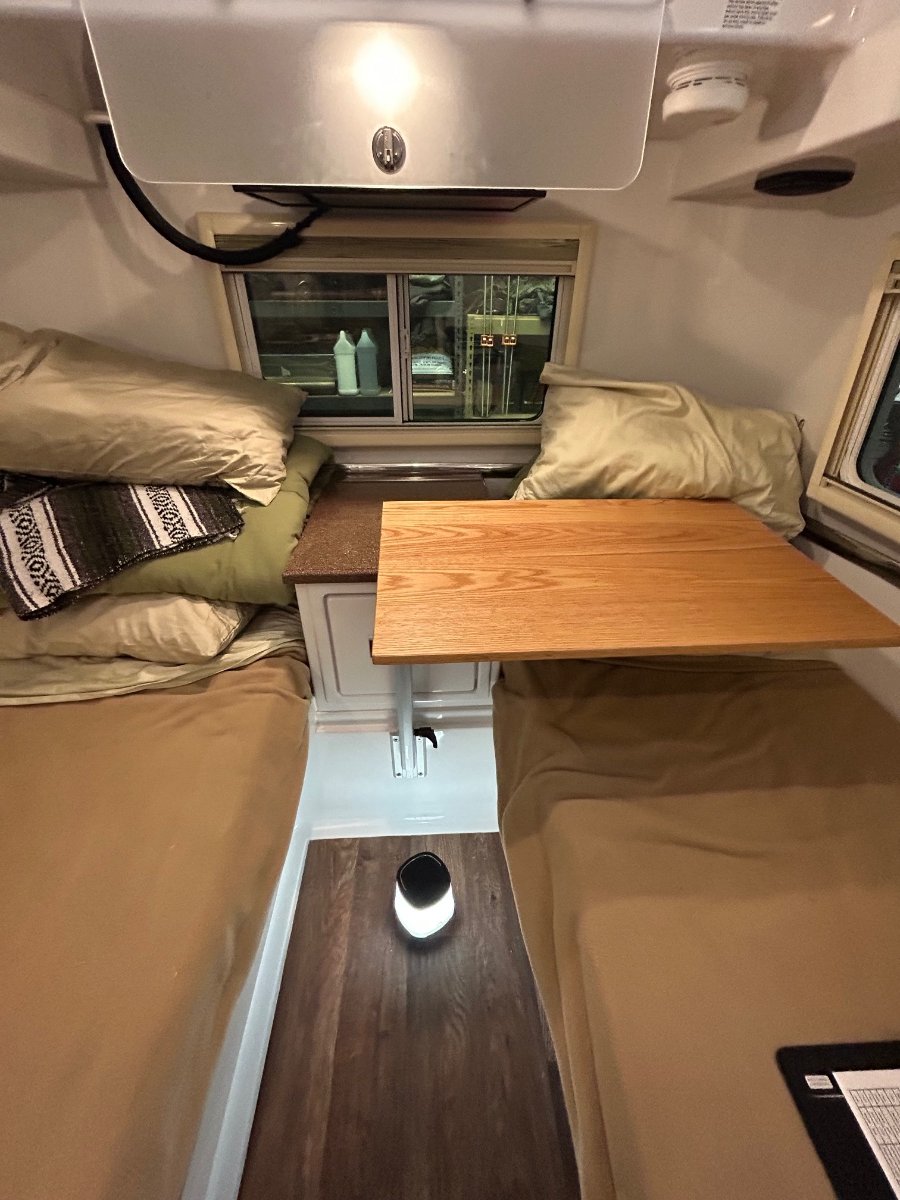
Ready to set up...
In tabletop dining mode - height is adjustable to well above nightstand so tabletop can be swiveled either direction...
If it turns out that we need more access to the nightstand drawer, we'll re-mount to the street side twin bed rail as described in earlier posts in this thread. The drawer is accessible in the Puppy Mode - so it can be opened at night for whatever is needed inside. I initially wanted to construct the tabletop with folding sides as described in another earlier post, but that wouldn't have allowed for the Puppy Mode. For now, the table configuration will get us thru this coming weekend trip! HA!
-
1
-
3
-
 1
1
-
-
Lagun Table Package.pdfLagun Table Package.pdfFYI: We've received our Lagun hardware this week and I'm looking forward to installing it onto the nightstand base below the drawer (because we don't have the storage hatch option). Should we decide in the future that we "need/want" the hatch I'll build the side mount designed by Overland that moves the table/assembly to the street side by attaching to the underneath surface of the bed lip and the vertical bulkhead just below it.
So, to answer your question: NO. You don't have access to the nightstand drawer (or the storage hatch, if so configured), but this is only when the vertical Lagun table is positioned in the mounting bracket. The side mount option allows the entire assembly to swing around to the street side giving access to the drawer (and the hatch). I know it's obvious but, if the table/assembly is stowed your drawer/hatch is accessible (DUH). The plus side to either table mount position, at least for us, is that should you have another person or couple over for entertainment, it allows for up to a 4-person seating arrangement.
The side mount is definitely a DYI project. I'm planning to post a thread of my step-by-step Lagun retrofit project milestones later this week. I'll be making a mahogany folding tabletop that will function in either a narrow or "unfolded" wider mode as an earlier member posted, FYI. It will also serve as a gap filler between the twin mattresses with a puppy pad for Magnus' bed at night (WOOF!). Ha!
Anyhow, hope this helps out some... Cheers!
-
2
-
-
10 hours ago, Wayfinder said:
I thought I had posted something about airing out the hull using a fan, but that was nearly two years ago and I can't find the thread, if there is one at all.
I wanted to update my findings on hull 110 (2016), which I purchased used in 2021. I had always noticed a "funny" smell from the trailer, especially from within the hull area. Not a horrible wet smell, but maybe more of a mechanical, glue-like smell.
Well, even today the trailer still smells MUCH better, even after sitting in the sun all last summer. The inner hull is still not nearly as bad as it was when I purchased the trailer.
I think Oliver, or more efficiently, the new owners, should air out their hulls a few weeks after they get them. Some owners get their new trailers so fast that I bet glue is still curing upon pick-up.
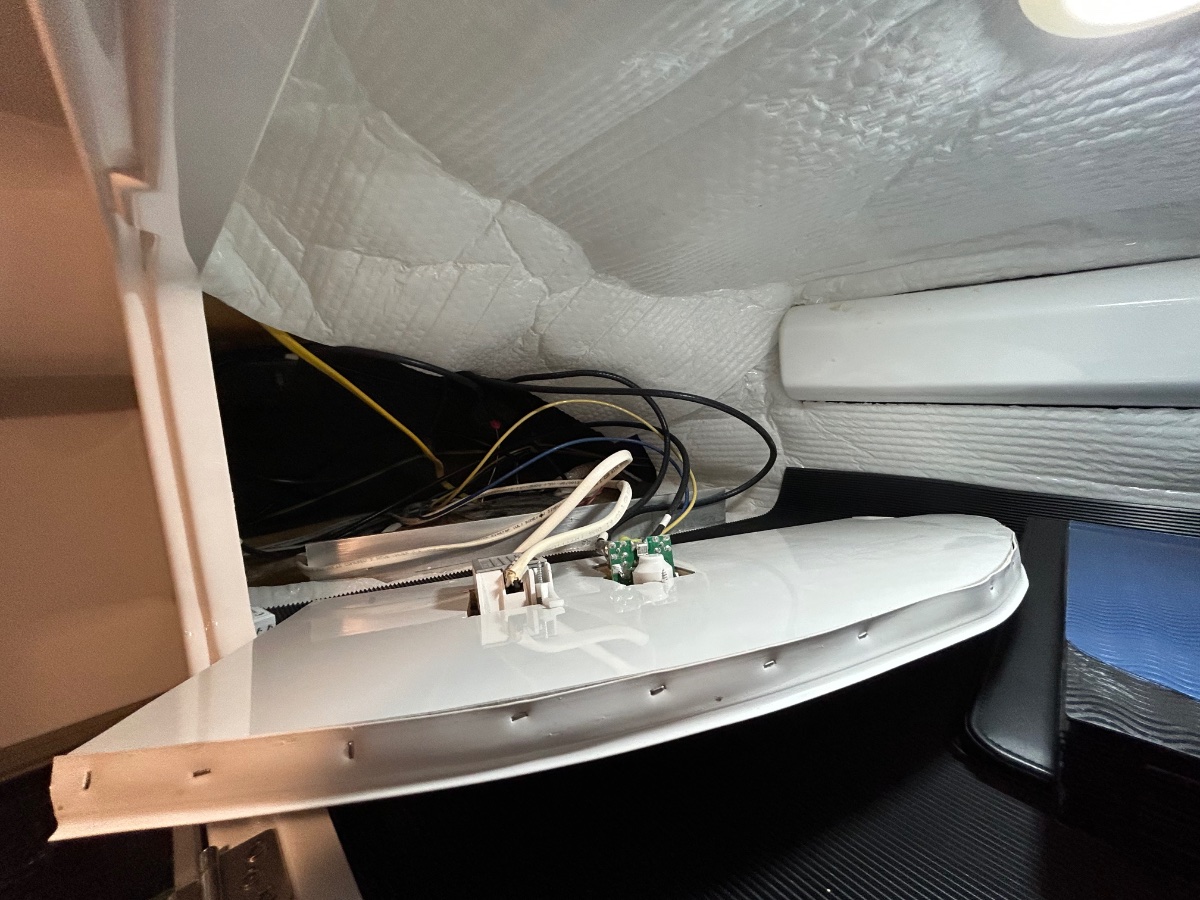
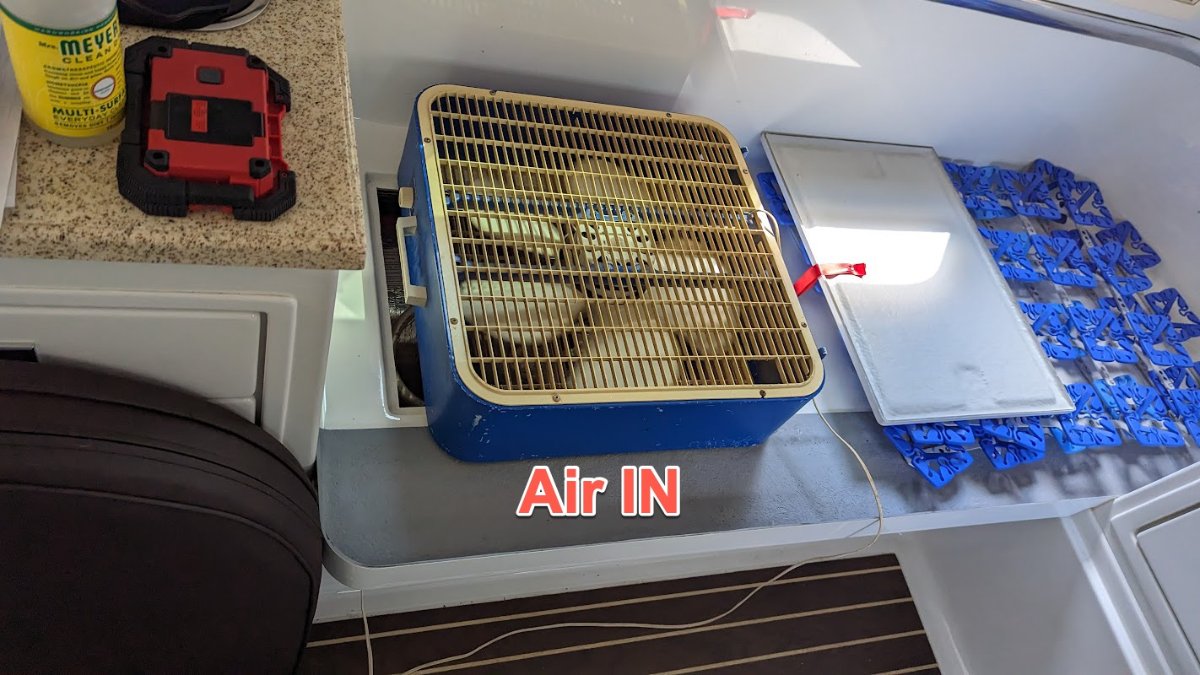
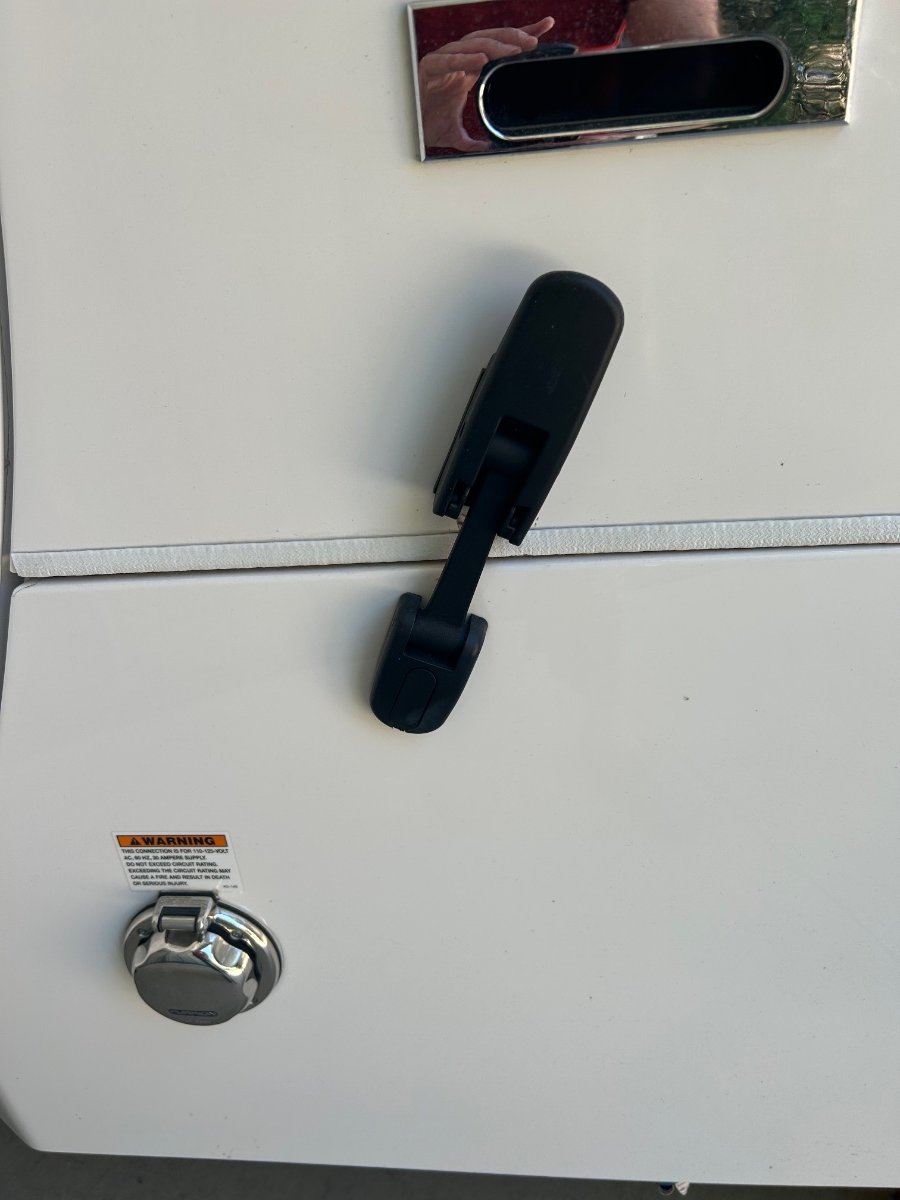
This is what I do. A 24" fan blowing into the passenger side bed hatch with the dinette hatch open, tyically the one closest to the bathroom (not pictured), along with all windows open and roof fans running at least on low. Try it, see if it improves the hull smell, even on older Olivers. Good luck. I ran mine for hours on a nice sunny day the first time.
I'm only showing the electrical hatch open, as that's where I was working replacing the CO detector today. 😉
Brilliant, Chris! This should be SOP prior to a trip after a long storage period. Thanks for the heads-up, brother!
-
1
-
-
On 3/22/2023 at 4:09 PM, MAX Burner said:
whoever is using the starboard (street) side rack.
Correction - meant to say, "whoever is using the starboard (CURB) side rack." My bad.
-
Slight deviation from the original intent of the thread... But,
Has anyone experience in adding a manual street side awning? I installed a Fiamma on my Casita - not tough at all, but the OTT awning is 4 feet longer. Could be challenging, I'm thinking.
-
FYI: I used the exact technique Trainman is describing above to remove a 6 year old awning seal after the seal had been badly oxidized. The 2-way adhesive on the seal is likely not as robust as the decal. It took very little heat, which was helpful for the plastic "razor blade" scraper (bought from Amazon - $15 or so with a couple dozen replaceable plastic blades) to remove from the gelcoat. There were a few small areas needed for touch up with GoofOff, the result was a perfectly clean surface. I'm planning to install the new seal this weekend.
I'm also interested in your project's result as we're interested in removing our front decal and side stripes.
-
Many years ago when the kids (now grown-ups) were small, we found ourselves coming home early from a long weekend camping trip after waking up to surprise heavy snow conditions in the Rockies. We were about 30 minutes on the road after departing our campsite and turned into a country store for some road snacks for the kiddos. As I'm walking back from the store to our rig parked some distance away, I immediately notice - NO BIKES NO BIKE RACK! #@%* me, so I inform the family that we're headed back to collect our errant kit. 4 or 5 miles back up the hill climb on the snowy mountain road I drive up to the site in question where the bike rack contraption and bikes came to a stop. There's a dude with a couple others loading my kit into their truck bed. "Woah, guys! those are mine and I'm here to take them back!" After some rather heated negotiations we all agreed it would be best to let me have my stuff back. I loaded the mess into my TV and drove home. We now have a 1UP and are very pleased.
Whew! The things you get away with in our younger years!
-
3
-
 2
2
-
-
On 3/25/2023 at 8:56 PM, bill s. said:
There is no place better to be in the summer than the Colorado Rockies.
Could not agree more, Bill! We've got it on our radar screen. Love it up in Leadville. We've backcountry skied into several of the 10th MTN DIV. huts near Leadville over the years. Plus it's just down the road from our place, less than 6 hours time. Flew in and out of LXV several times back in the day! One of, if not the highest elevation airport in the CONUS. Can't confirm right now, but I believe there's a real good chance we'll make, brother... Cheers.
-
1
-
-
Wish we could've made it to the rally - Diane and I are both all "jelly!" Besides I'm on extended travel overseas and back next week. The logistics gods were frowning on us - but with luck, next year! Y'all have a blast, take gigabytes of snaps and post them, all of 'em.
Cheers!
Art and Diane (Magnus, too - WOOF!)
-
1
-
-
Congrats on logging your first night - cheers to your first breakfast beverage in Curiosity! Very cool looking rig all around. Now go make some memories! Ha!
-
1
-
-
On 3/16/2023 at 1:21 AM, OliverCamper1 said:
Just joined.
We like to camp in Tennessee, Georgia, Alabama, and Florida.
We own an Oliver Elite 2017.
Anyone in Tennessee here?
TTYL

Welcome, OC1! We're only a few nights away from TN in the Rockies of Northern NM. If y'all ever get out this way, let us know, we've got a level 30amp/water/dump site at our place that's vacant most of the time! Ha!
-
1
-
-
A bit late to this thread of posts, but felt the need to jump in. Smacking a deer whilst moving isn't a good thing under any conditions. We survived a double deer strike on a mountainous road in the high country near Cloudcroft, NM a few years back. Two does vectored out of the trees on a left to right pass - the first hit the driver's door just below the mirror, the second managed to smack the front left corner of our Airstream. Fortunately, for us and the deer, we were only doing about 15-20mph. After stopping and struggling with opening the door, I looked back at 2 deer laying side by side on the dashed white centerline of the narrow road we were on. By the time I freed myself and out on the pavement walking back toward the animals - they apparently "came to", jumped up, and off they went! USAA coughed up just shy of $10k for the trailer damage and $4.5 for our 2015 RAM 3500, ouch! Our puppy never liked curvy mountain roads again...
-
 2
2
-
-
On 3/25/2023 at 5:28 PM, John E Davies said:
Thanks for posting, this is very cool! But %^*+! 😉 Please put a soft cotton towel under your whale tail. Or suspend it with a bungee cord under the coupler hole. Half of that Andersen weight is carried by the truck, after all.…. I used to weigh light aircraft, it was a task I greatly enjoyed. More than greasing the gear and wheel bearings. If you don’t mind, please post a pic of your hanger and what’s inside.
As far as redoing it all on your hanger floor goes, why bother? It’s a trailer, not a piano. As I was told more than once by my supervisors, perfect isn’t needed, just good enough. As an anal compulsive that is hard to hear, and much harder to do.
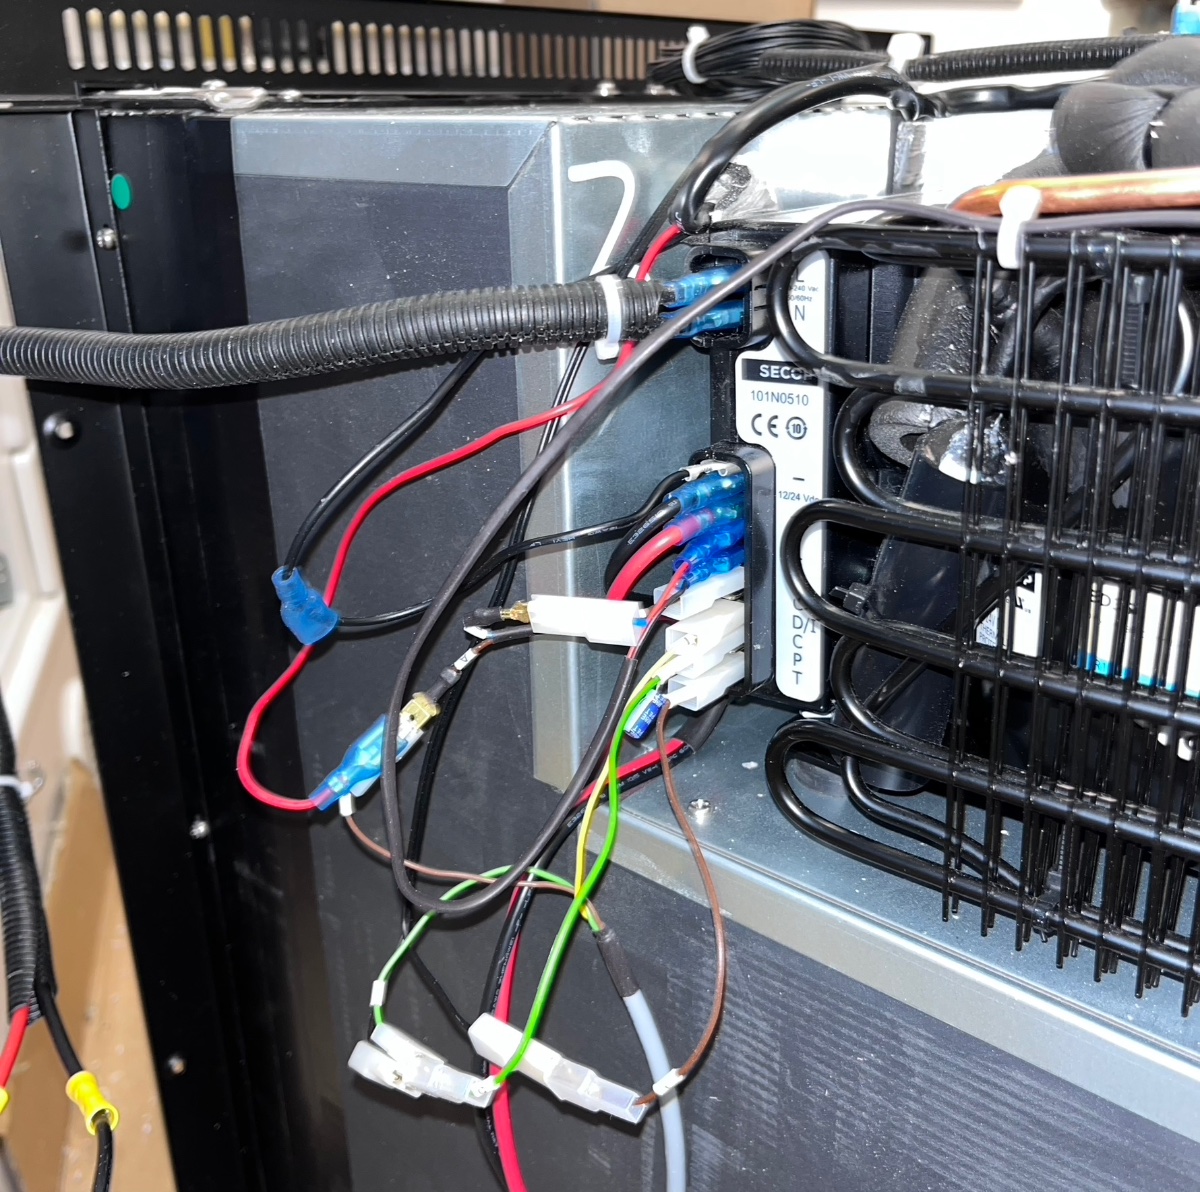
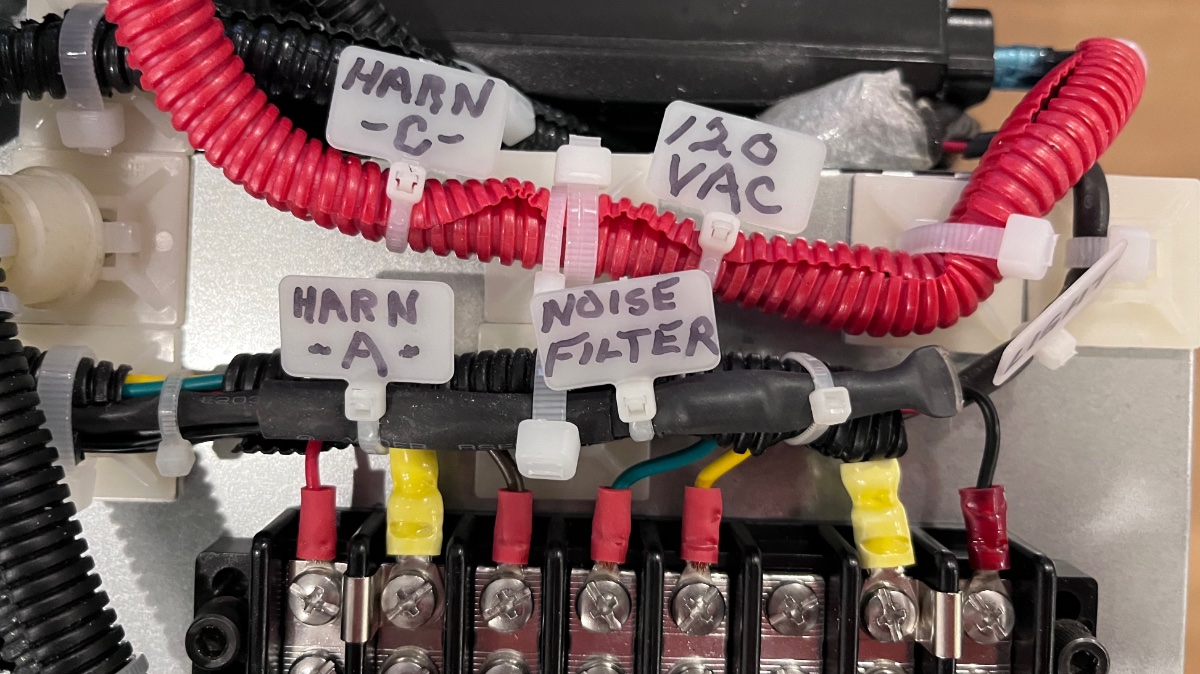
I can’t wait until I see your rearranged trailer wiring. LOL, here is my new compressor fridge digital control harness….. Isotherm’s “solution” during my initial smoke test:
And my solution to their solution:
We need more aircraft techs participating in this forum. I was lamenting to myself that I no longer have access to an avionics wire marking tool.John Davies
Spokane WA
Probably more pilots than A/C Techs in the forum - so, as we break 'em - you fix 'em, eh? Ha!
-
4
-
-
1 hour ago, Katjo said:
I’ve been looking for something similar to this to put around the upper interior cabinets, I’ve gouged my fingers so many times on the fiberglass edge taking things in and out of the cabinets.
I think this would be too thick for the doors to close??….. but I’m going to definitely grab some for around the bed rails, dog house and spare tire cover.
Good idea, Katjo! I'm on travel now, when I get home this weekend, I'll check the cabinets to see if it might work there and let you know...
-
3
-
-
3 hours ago, Geronimo John said:
Please do confirm the number of feet to do them all.
Thanks
GJ
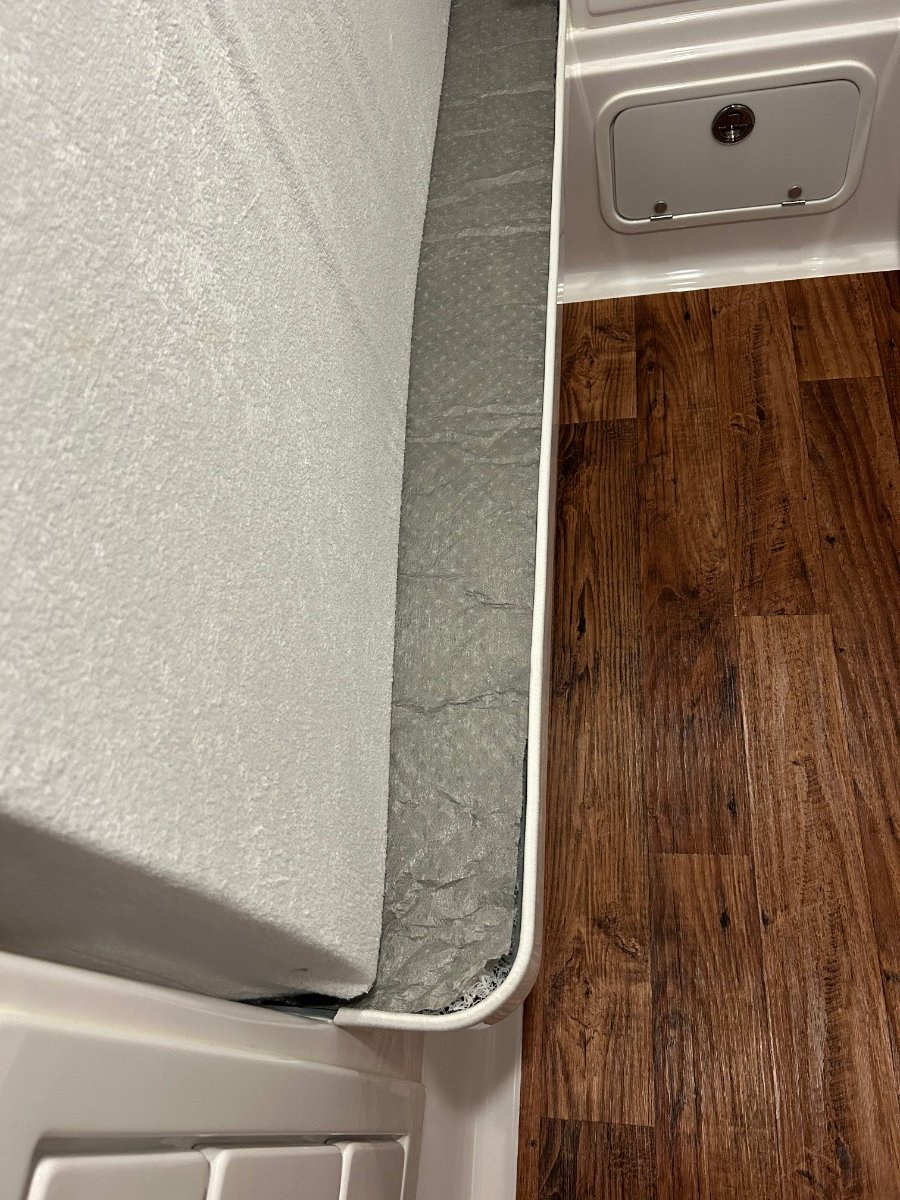
I ordered an initial 20 feet for the spare tire cover and only needed 13
feet for the job. The "dog house" LPG cover edging was in good repair, so I actually had enough for that if it was necessary. The bed edges (which is a brilliant idea on Patriot's part, IMHO) will take 12 feet to cover - I've ordered 10 more feet from Amazon. Hope that helps...
-
2
-
1
-
-
On 3/24/2023 at 5:21 PM, Patriot said:
Here are a few pics of the mod mentioned above -
Dog house
Edge of bed rails.
Patriot - just curious, what material are you using for the mattress vapor barrier? We are looking for something that really works well, haven't been successful yet.
-
1
-
-
2 hours ago, Geronimo John said:
Those are great filter units. Which one do you carry in your Ollie?
GJ
We've got the Katadyn Expedition base camp filter. Super heavy duty and not light weight (about 12lbs); fairly compact.
-
1
-
-
24 minutes ago, Hokieman said:
We’ve been using a Travel Berkey for several years also. When we are getting ready to leave our campsite, we drain all the water into a jug and put in the fridge, fill our travel water bottles, etc. Then we remove the upper half of the Berkey, invert it and nest it in the lower half. Set it in the sink and pad it with some towels. It travels nicely that way. We haven’t figured out a convenient place to put it inside the cabin while camping, so it’s usually outside on a portable table, unless it’s freezing.
HA! That’s exactly how we do it! Great minds…, rights?👍🏼😎
-
1
-


Spring Camping Prep - dewinterizing and decalcification and sanitizing the fresh water tank
in Mechanical & Technical Tips
Posted
ROGER, THAT!