

John Welte
-
Posts
637 -
Joined
-
Last visited
-
Days Won
3
Posts posted by John Welte
-
-
On 10/25/2021 at 8:24 AM, GAP said:
The problem is that all bike racks (I've found) that are "RV approved" require a 2" receiver. If you use an adapter for a 1.25" receiver, it voids the RV delineation. I was told by service at Oliver that the chocking down of their receiver was a result of some dummy using the older 2" receiver to tow a car behind the trailer. I understand their concern but the stickers they currently attach to the receiver area clearly states the weight and usage limitations. By supplying a 1.25" receiver, Oliver is charging $800 for a unit that should not be used for what it is intended to do. Safe or not, they are minimizing their liability by maximizing ours
I bought the OTT bike hitch for our #1290, but am having a problem finding a rack for your reasons too. It seems that all RV rated bike racks for trailers require a 2 inch receiver. I have a Thule rack bought a few years ago, but it's not RV rated.
John
-
 1
1
-
-
The chrome attachment that secures the outside hose inside is leaking. It's a hard place to hand tighten that coupling. Has anyone come up with a good tool to tighten that fixture. I was using the outside shower and I noticed water coming from the scuppers by the outside shower. I looked inside while the water was turned on and saw it leaking.
John
-
5 hours ago, Steve Morris said:
From the manual (and from memory, so I could be wrong), the difference between low an night is that at night the fan in the rooftop portion is also on low, making it quieter for those around you. Should use less of your battery, too.
At the rally we had ours on night mode all day, and could barely hear it sitting outside.
I could or should read the manual. That makes sense to be quieter outside on night mode. I can experiment to see if the sound is different. Usually I run it on low after running it high for a few minutes.
John
-
14 hours ago, johnwen said:
No difference on our retrofit. Jason E from OTT said that most people can't tell a difference between those speeds.
John
Thanks John. I couldn't either, but I like how quiet it is. After I turn the A/C off lately I have run the vent to maybe dry the inner parts of the unit. Not sure if it's necessary, but that's what I do now.
John
-
2
-
-
Hi all, we have the Truma A/C. It has four fan speeds. High, medium, low and night. I can't tell the difference between low and night. For those owners with a Truma A/C, do you notice a difference between low and nighttime fan speeds?
John
-
3
-
-
17 minutes ago, Steph and Dud B said:
No leak with the shower off? Sounds like the shower hose is loose/leaking where it attaches to the faucet, or the shower hose is cracked. Look under the street side bed.
Thanks
-
Hi all, I used our outside shower and noticed water leaking from two steel scuppers by the outside shower. Anyone else experience this? TIA. John
-
4 hours ago, Geronimo John said:
Use of blocks: Picture a 2 X 6, preferably treated and washed. Now take a chop saw and cut them into 2" X 6" X ?". The "?" is the iD of your milk crate less a bit to allow easy removal from the box. Mine are 2 X 6 X 11". Now stack them to nearly the top of your milk crate. That is the limit of my pre-planning on blocks. IE I can raise up my jacks on blocks one milk crate high. 🙂
When at my destination with soft ground, I use two blocks side by side laid flat on the ground. Then I stack other blocks so that they are 90 degrees from the ones on the soft ground. This is done to spread the load and not have Ollie burrying my blocks into the soft ground. That is not necessary on hard ground or paved areas. There I just stack up the blocks.
Slip Plane: This concept ir rooted in the coefficient of friction between to surfaces. Here is a web site that goes into some detail: http://www.slipalert.com/friction/
But to keep it simple: When we jack up our Ollie, the jack plate (the part on the ground) and the ground create a pair of surfaces that are pushed together. They create resistance (IE friction between them) that will resist their sliding apart if you try to drive off. This resistance (force to slide) can be measured and a "Coefficient of Friction" can be calculated. The two of them form what is called a "Slip Plane". Two surfaces moving relative to each other is resisted by friction. So if they have a high CoF (Lke dragging a locked rubber tire on concrete) then they don't want to slip.
Now pretend that you raise your Ollie on soft ground. You can expect to see the jack plates being pushed into the ground. If you were to drive off, you surely would damage your jacks. Now if you always without fail raise your jacks EVERY EVERY TIME before moving your trailer, you are golden. But about 80% of us have proven to ourselves that we are not in that elite group of perfect people. As a result, a lot of jacks have been damaged. Sadly avoidably.
So, if you place several sort of smooth timber surfaces together above ground, and if you move your trailer, they will 99.5% of the time slip relative to each other. Their doing so is a result of their CoF being much less than that of a jack stuck in the mud. Hence always having two blocks of wood or similar material in use under each jack.
Ok you may think that I now only need six blocks. Why fill the milk crate with them? Or, why not have two milk crates of them?
First, I only have room for one milk crate in my basket. A second reason is that there is a limit to how high we should even consider jacking up on a sloped surface. One is the limit for my risk assessments. And this is rooted in the concept of levers.
If you stack up blocks to raise the trailer a fixed number of inches, you reduce the extension of your jacks by the number of inches of blocks you use. By raising up the height of the jack foot, it reduces the distance from the foot to the jack mounting bolts. Doing so reduces the lever arm, and makes it much more likely that the boards will slip before the jack hurts itself.
For day to day routine use on firm ground, If I have used three of my blocks under each jack. Why three? Because it creates two slip planes. and if the first block is really stuck (maybe the ground is a littls soft), then I have another one to slip if my trailer gets moved. By slipping, it will save my jacks and as the jack foot moves off the blocks, it will fall a few inches and whispers to the entire camp ground it is not happy. Without going into the discussion of sliding vs. static friction... I utter a word or two .... and go pick up my blocks and raise my jack. Often looking around to see if anybody heard my OOPs.
One word of caution is that you never want to jack up your trailer to the point that your blocks and jacks are no longer, or could become no longer, perfectly vertical. Doing so is a recipe for disaster. Another reason not to have more than one milk crate of blocks. 🙂
Hope this helps.
GJ
"Hope this helps"
John, that is now crystal clear. Thanks very much for the explanation. I will start using the same method. If I put a 2x6 or two on top of the Camco jack stand, it appears that I would create that same effect and also limit the travel of the stabilizer jack even more. The goal should be to limit the travel of those jacks to be more stable with more of the jack in the housing. Then if I do drive off, there should be minimal damage if any to the jack.
John
-
 1
1
-
-
16 hours ago, Geronimo John said:
I carry a milk crate full of 2 X 6 blocks. I use three under all my jacks to act as a shear-plane. Should for some reason the trailer moves, I'll hear a clunk and recall that I failed to use my check list.I carry a milk crate full of 2 X 6 blocks. I use three under all my jacks to act as a shear-plane. Should for some reason the trailer moves, I'll hear a clunk and recall that I failed to use my check list.
In your hill park picture, I see you are doing your best to keep Ollie in place. You even have a block to act as your shear-plane if it moves. Bravo!
The two suggestions would be to:
A. Use a line and tie off your brake emergency cable to a tree. If the trailer moves at least your Ollie brakes will activate.
B. Bring more 2 X 6 blocks and shorten up the lever arm of the jacks as much as possible. GJ says:
"Jack up Ollie as you need, but keep the jack extensions as short as your pre-planning will allow"
"I carry a milk crate full of 2 X 6 blocks. I use three under all my jacks to act as a shear-plane. Should for some reason the trailer moves, I'll hear a clunk and recall that I failed to use my check list."
John, we use Camco yellow jack stands. Do you have pictures of how you use the 2x6 blocks? I don't understand the shear-plane concept. I do understand not extending the stabilizer legs too far. In the OP, he asked if there's anything wrong and the long extension is probably the thing that pops out in my mind. I would need more blocks in his situation, maybe a milk carton full of 2x6, but how to use them along with the Camco jack stands?
John
-
 1
1
-
-
On 4/18/2023 at 7:44 AM, Katjo said:
You can buy low pressure quick connect hoses and adapters to use with your Oliver propane port. Here is an example.
DOZYANT 12 feet Low Pressure Propane Quick-Connect Hose, RV Quick Connect Propane Hose, Quick Disconnect Propane Hose Extension - 1/4” Safety Shutoff Valve & Male Full Flow Plug for RVs https://a.co/d/3EucL5u
I see a rubber or stainless steel option. Any preference for either and what length is commonly needed?
John
-
1 hour ago, John Welte said:
Hi all. I was pulling on the gray water handle, but it was stuck and the entire wire came out. I have pushed it back in, but it is hanging up at the end of the housing. If I can get it to the aluminum pull rod near the blade, maybe I can attach it back in. It looks like an Allen set screw that tightens on to the wire. Any idea how to get the wire to travel all the way to the pull rod near the blade? Why is the blade stuck? Why are there any problems with a 6 month old trailer?
John
I fixed it. I loosened the Allen set screw and was able to get the wire past the housing end and back into the push/pull rod. How do I lubricate that gray water blade to prevent it from seizing up. I put some Dawn into the tank so maybe that helped.
John
-
1
-
-
Hi all. I was pulling on the gray water handle, but it was stuck and the entire wire came out. I have pushed it back in, but it is hanging up at the end of the housing. If I can get it to the aluminum pull rod near the blade, maybe I can attach it back in. It looks like an Allen set screw that tightens on to the wire. Any idea how to get the wire to travel all the way to the pull rod near the blade? Why is the blade stuck? Why are there any problems with a 6 month old trailer?
John
-
I searched the forum for my answer, but does anyone have a preference for type of tire covers? Ease of use and durability are qualities that I am looking for. We're in rainy Oregon, but eventually this seemingly infinite cloud will have an edge and we will see dry land and sun. We bought in November, so wasn't too concerned about covering the tires until now. Maybe I should have covered them even during the rainy season.
John
-
5 hours ago, Bioman said:
I have watched all of the videos and read all of the brochures and the Oliver's seem a cut-above. I am very impressed. We live in Texas, we are now both retired and are now planning on spending time RV'ing around the country as in a few months at a time. We camped when we were dating 45 years ago in a WWII pup-tent, moved up to a real tent, to a pop-up trailer to a 30' TT. WE love camping.
If we purchase one, this will be our third time jumping into RV ownership after swearing it off 15 years ago due to TT failures. So please be patient with my questions as the last RV was a disaster due partly to construction issues and also my own ignorance on how to maintain an RV. The issues involved multiple plumbing leaks, undetected roof leaks rotting a section of floor, rodent and ant infestation, furniture and cabinets coming loose due to poor fastening to structure, generally poor quality materials, a premature tire blow-out that took out a chunk of the bathroom. And lastly getting aforementioned repair done at a dealership who said up front that "since we did not buy from them, even though they were a dealer for that particular manufacturer, they would get to us when nothing else needed getting to" (turned out to be 9 months later and they messed some of that as well). So here are my concerns/questions.
1. Has Oliver resolved Truma AC installation issues that caused roof leaks (something to do with screws and or seals)?
2. Warranty and Post warranty service.
Not much of a list, but the second issues gives me a lot of concern. If I can resolve these issues to my comfort level we plan on placing an order soon..
1. Has Oliver resolved Truma AC installation issues that caused roof leaks (something to do with screws and or seals)?
Our trailer was the first one with the Truma package. #1290. We didn't have a leak until we had 6 inches of snow and when it melted, we had about a pint of water. This was discovered on month three of ownership. It was in for a gas leak which the local RV dealership fixed with parts and guidance from Oliver. Longer screws are coming soon to get the AC leak fixed, again working with Oliver service.
2. Warranty and Post warranty service.
Oliver realizes that most of us live far from Tennessee and in my case, they're working with a RV dealer in our area that I used for our pop up. It was a concern too for me but they appear to be quite willing to work with a local shop.
Not much of a list, but the second issues gives me a lot of concern. If I can resolve these issues to my comfort level we plan on placing an order soon..
John
-
1
-
1
-
-
1 hour ago, Patriot said:
Hey John,
Sorry to hear about your bike rack failure what brand bike rack was it? It might be helpful for others to know. Here is the rack we are using and are extremely happy with. It is pricey but I think the best made engineered two bike rack for the Oliver. We and other owners have logged several thousand miles with bikes on this rack with zero issues. Our bikes loaded including the rack itself weigh right at 107# well below the Oliver bike rack limit of 150#. A plus with the aluminum finish is looks and blends in well with the Oliver rear bumper. As stated in my previous post it will require a mod to the Oliver factory receiver.
https://www.1up-usa.com/product/2in-super-duty-double-bike-rack/
Hope this helps, happy and safe cycling.Patriot🇺🇸
"Sorry to hear about your bike rack failure what brand bike rack was it?"
Patriot, it was a hitch bike rack between our tent trailer and our tv. It was made in Portland, Oregon. The failure happened because they forgot to finish welding the rack! It had 1/2 welds and 1/2 tack welds if I remember right. Never having seen how it was supposed to look like, I trusted it was done right. I was just lucky that it failed so close to home and not at freeway speeds. Thanks for the info on the rack. I have the Oliver bike mount but haven't bought the rack yet.
John
-
1
-
-
35 minutes ago, Geronimo John said:
Vic:
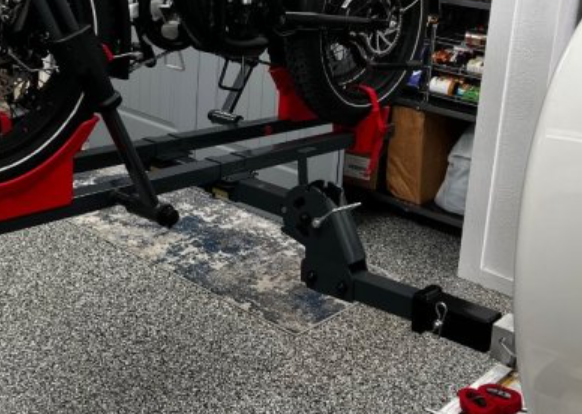
From an Engineer's perspective, the ultra long moment arm of the assembly loaded with two heavy E-Bikes gives me concern for even good highway use. However, with the G-Forces induced by rough roads, and worse if taken off-road, my concern rises to grave.
Under such conditions, be advised that:
- Due to the moment arm length and heavy load, that it would be prudent to counter balanced (by additional front of trailer loads) to somewhat restore your Ollie's great antisway characteristics somewhat.
- There is a significant potential for your added hitch, and/or the OTT components supporting it to unexpectently fail.
I highly recommend your shortening the moment arm to a minimum and reduce the load if possible. As pictured this design IMHO is an accident looking and waiting for the worst possible opportunity to fail.
GJ

I am not an engineer, but your comments make perfect sense and it would seem that it's not a good idea. We had a bike rack fail. Lucky for us it was 1/4 mile from home after a 4000+ mile trip. We were going slow so no damage to cars behind us. I want an over engineered rack and want to error on the side of caution.
John
-
1
-
4
-
2 hours ago, Patriot said:
You won’t need adhesive, this trim grips extremely well. No issues with it coming loose at all.
How many linear feet did you use for the beds, dog house and spare tire cover? I am guessing something like 30 feet. Thanks.
John
-
3 hours ago, Mike and Carol said:
We camped once when night time temperatures were mid-teens and daytime temps were high 20s. That was for about 5 days. No issues with water lines freezing. We’re not big fans of that type of cold and avoid it if possible.
The last time I had my basement partitions out I could see the water lines laying against the hull as they ran around the back of the trailer. It would be easy enough to either wrap those with insulation or lay some thick insulation down under the water lines. The back of the trailer seems like it is the most vulnerable area for the water lines. The lines under the bed seem more protected but should get some more insulation too. For the few times we’re in weather below 20 that might be enough.
Thanks to our cold weather campers for their experience. Mike
Mike, I read all the comments above in the thread. My understanding of PEX lines are that they can expand quite a bit without breaking. 3 times their size if I recall. Water expands something like 9%, a figure that wouldn't present a problem for the PEX lines. One source I read said that the temperature needed to freeze water in a PEX line that isn't insulated is 20°f. Two problems that I see happening in freezing temperatures are the inability to have water at the faucet due to the water now being frozen in the PEX lines and possible breaking at the non PEX junctions. Maybe if they use PVC fittings which I think are used, that wouldn't be able to expand like the PEX and they would fail. I would think that the water in the small PVC fittings would expand out into the PEX line laterally instead of pushing against the walls of the PVC fitting, in other words, the path of least resistance. I can't see myself camping in sub freezing temperatures, but a brief period of sub freezing temperatures might happen while pulling the trailer through mountains, for instance. Maybe for most of us, we don't have to worry about freezing lines. I winterized the trailer and will take it out when it's safely above freezing. Am I being overly confident in the ability of the trailer to withstand a little cold?
John
-
2
-
-
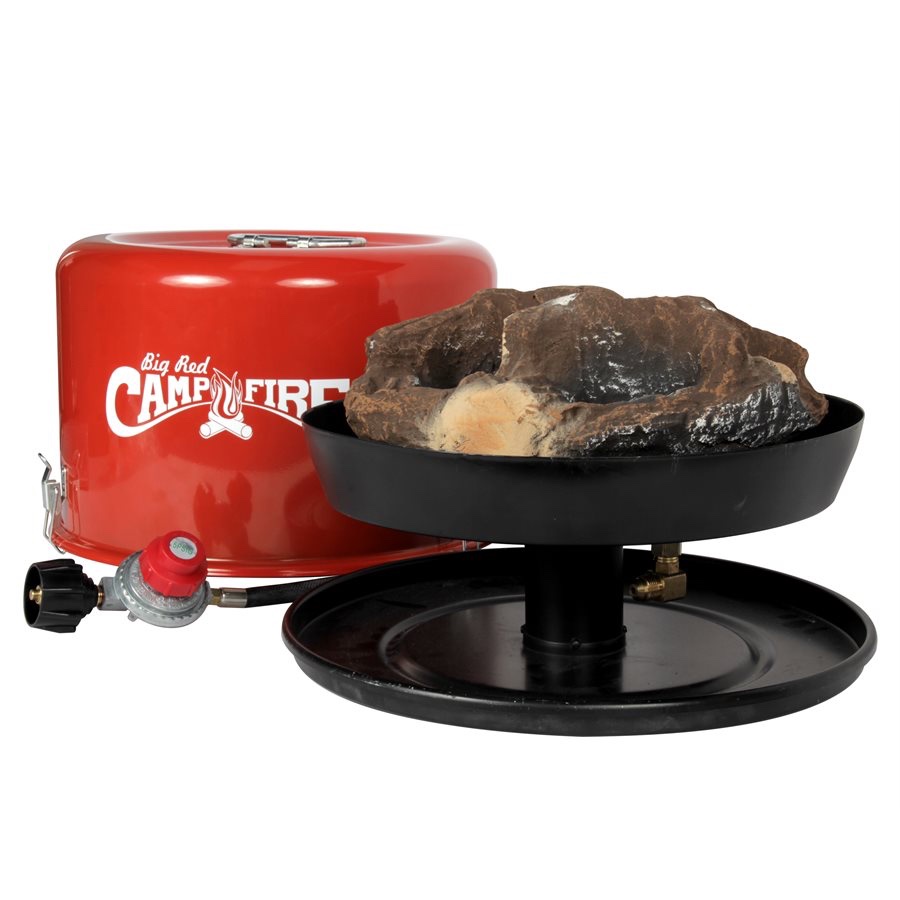
12 hours ago, Steve Morris said:
We have a Camco Big Red Firepit, which has a combination regulator/valve inline at the tank. I know that I can't use this with the Oliver's low pressure quick connect fittings, as I'd have two regulators inline with each other. I know some other fire pits have their regulator on the tank end of the hose and the vale on the firepit itself, so replacing the hose works in that case. Not on mine, though. Does anyone else have a propane appliance with the combo regulator valve? And if so, how did you work around this? I haven't found a hose with the valve only inline that I could substitute.
Thanks!
https://www.camco.net/big-red-campfire-olympian-58035
Steve, I was directed to Torjik company for any hoses I might need. They might be able to help you.
John
-
1
-
-
3 hours ago, Rivernerd said:
You have precisely described the leak we found in our Hull #1291 the day after delivery. When we took it back to Oliver, they also sealed the roof penetrations, which seems to have solved the leak issue.
I wonder if Oliver has yet figured out that all screws that penetrate the roof must be sealed during manufacturing to avoid leaks from the Truma AC unit?
There are six screws that hold the Truma AC cover that don't have any rubber washer or sealant. The screws sit in a small cup indentation about an inch across so any water on the roof will leak inside. That's the first area leakage. Seems crazy not to have some rubber washer under the screw head. The MaxxAir screws weren't sealed either. It's still in the shop waiting for Oliver to give guidance on how it should be remedied. Frustrated that a new trailer first had the gas leak, then this water leak. Hope to have it fixed before 2024.
John
-
 2
2
-
 1
1
-
-
1 hour ago, RustyMD said:
I had a water leak from my Truma AC in LE II #1304. It was right after our pick-up of our new trailer. It rained hard in TN at that time. We took it back to Oliver and they waterproofed the screws of the Maxxair fan and it fixed the problem. Water was running from the Maxxair between the hulls and to the Truma and drip, drip in the trailer.
#1290 is still in the shop. It was in the RV dealership lot for about a month, so moving into the shop area is progress. They will look at the MaxxAir too, in addition to the Truma AC, to hopefully move this trailer into usable condition instead of a decorative yard display. They plan to remove the AC and try to figure out where the water was coming from.
John
-
1
-
-
2 minutes ago, Rivernerd said:
rich.dev:
FYI, you should not need the longer screws. Your 2023 Elite II scheduled for delivery in mid-May will have the longer screws already installed. The short screws were only used for the first few Truma AC units installed back in 2022.
I wonder when they noticed the need for the longer screws. It looks like at least #1290 and #1291 got the shorter ones. We hadn't noticed any leak until the half foot of snow melted. We have had plenty of rainy days with no problems. Is your trailer under cover in Idaho?
John
-
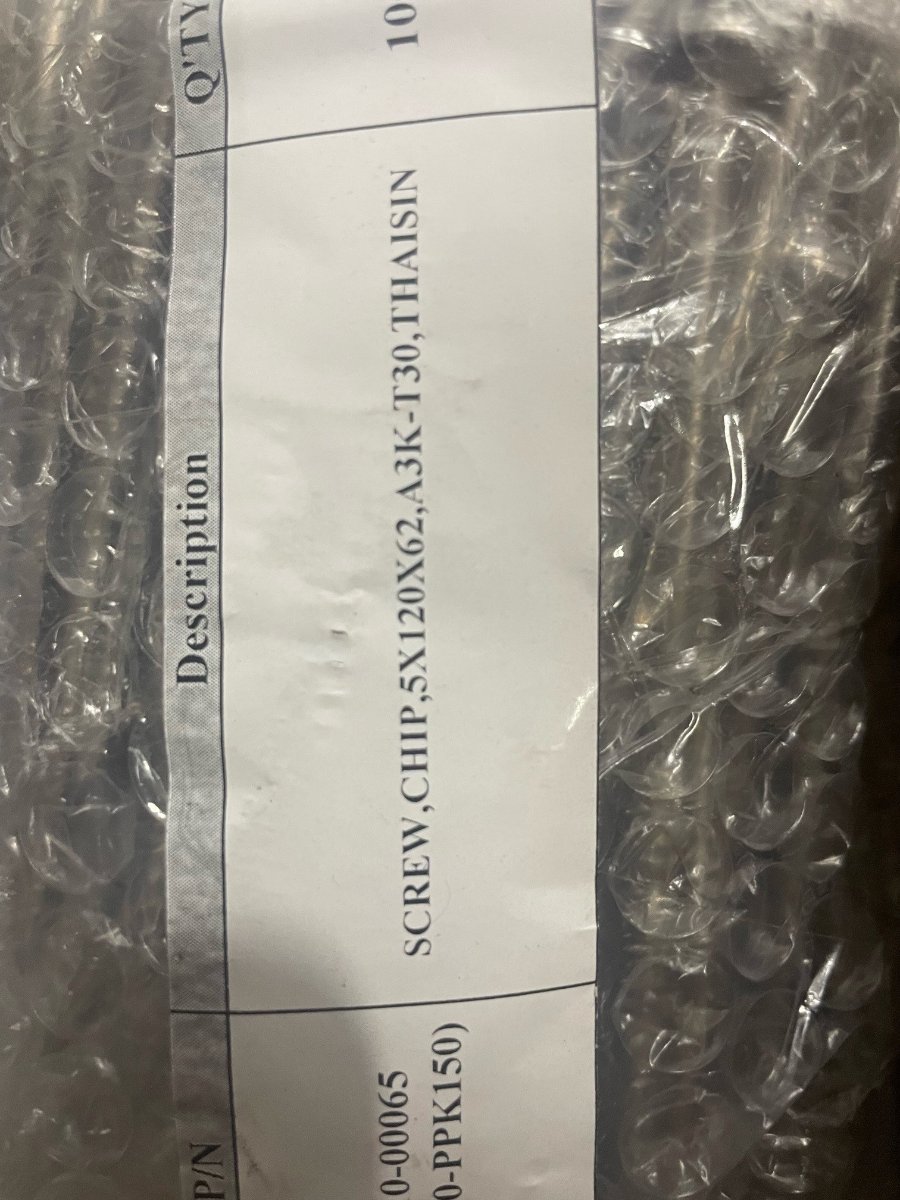
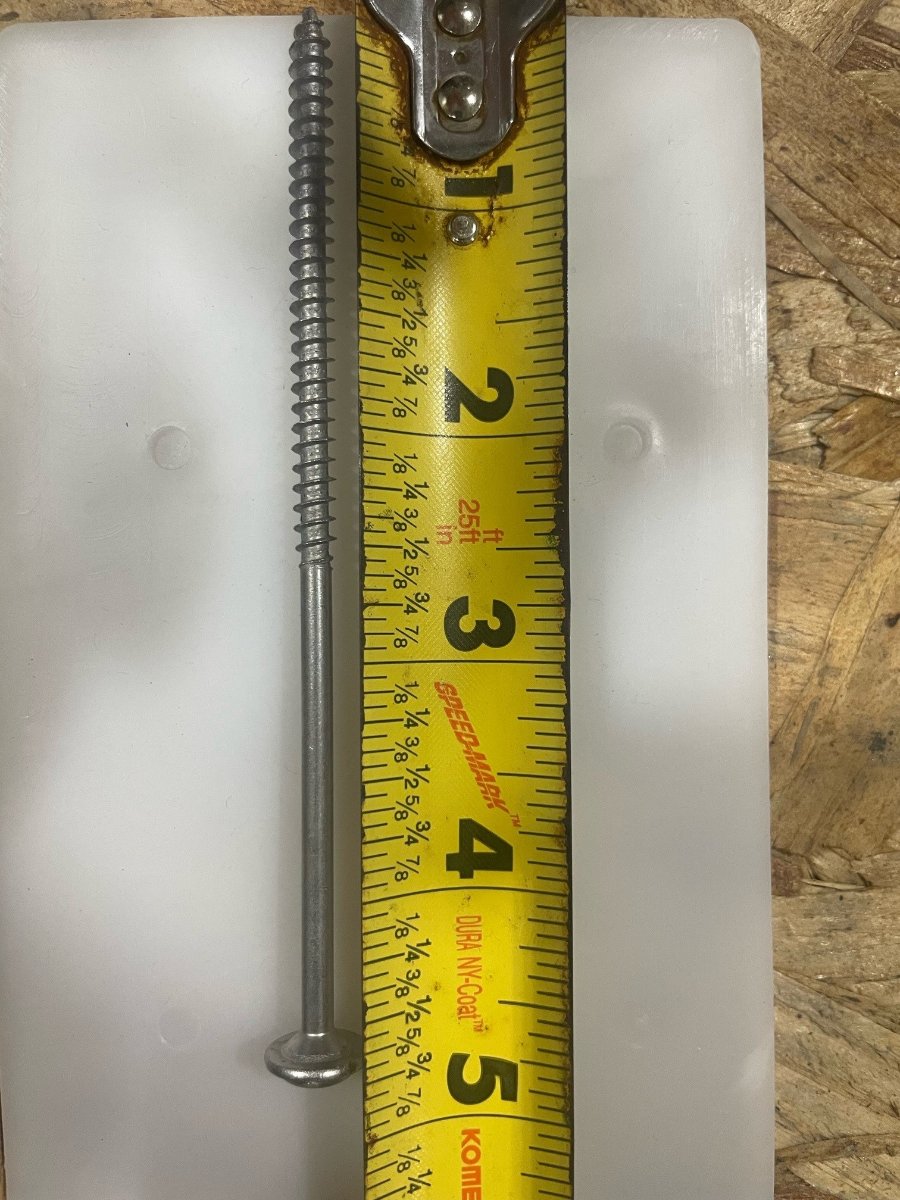
3 minutes ago, Rivernerd said:
They are 5mmx120mm T30 flathead wood screws. Photo below shows the bag they come in.
Next photo shows the length in inches.
A Google search so far has revealed no sources for 5mmx120mm wood screws. But, the approximate size in Imperial screws is #10x5". Those are readily available in the USA.
I figure if I have to address a leak around my Truma AC unit, I will buy some #10x5" screws and carefully try them.
I do wish that Truma would not be so compulsive about providing repair parts only to authorized service centers. I believe I am more capable, and careful, than most "knuckle draggers" employed by RV service centers these days, particularly in consultation with the excellent Oliver service team...
How are these screws used? I can see a bolt and nut being used, but there's no wood in the trailer except in the drawers.
John
-
1 hour ago, rich.dev said:
Did Oliver email you the info, if yes can you share it with us?
Oliver was made aware of the leak on Friday, so hopefully they're working on a solution. The service center sent 10 pictures to OTT after they removed the inner A/C cover. I also created a service ticket, which may be redundant as it's still in the shop after they fixed the gas leak to the Truma heater and OTT was made aware of it when someone was checking the gas leak and saw the water.
John
-
1
-
Bike rack weight limits
in Mechanical & Technical Tips
Posted
This seems like a good solution. How is it working for you?
John