
Spike
-
Posts
294 -
Joined
-
Last visited
-
Days Won
11
Everything posted by Spike
-
Thanks, bhncb. I did not see your message before I submitted my last post. As you can see, I have received conflicting advice of where and how to attach the cable. I may indeed wait to see if I can get some professional local assistance before we start our trip. Thanks for your suggestions.
-
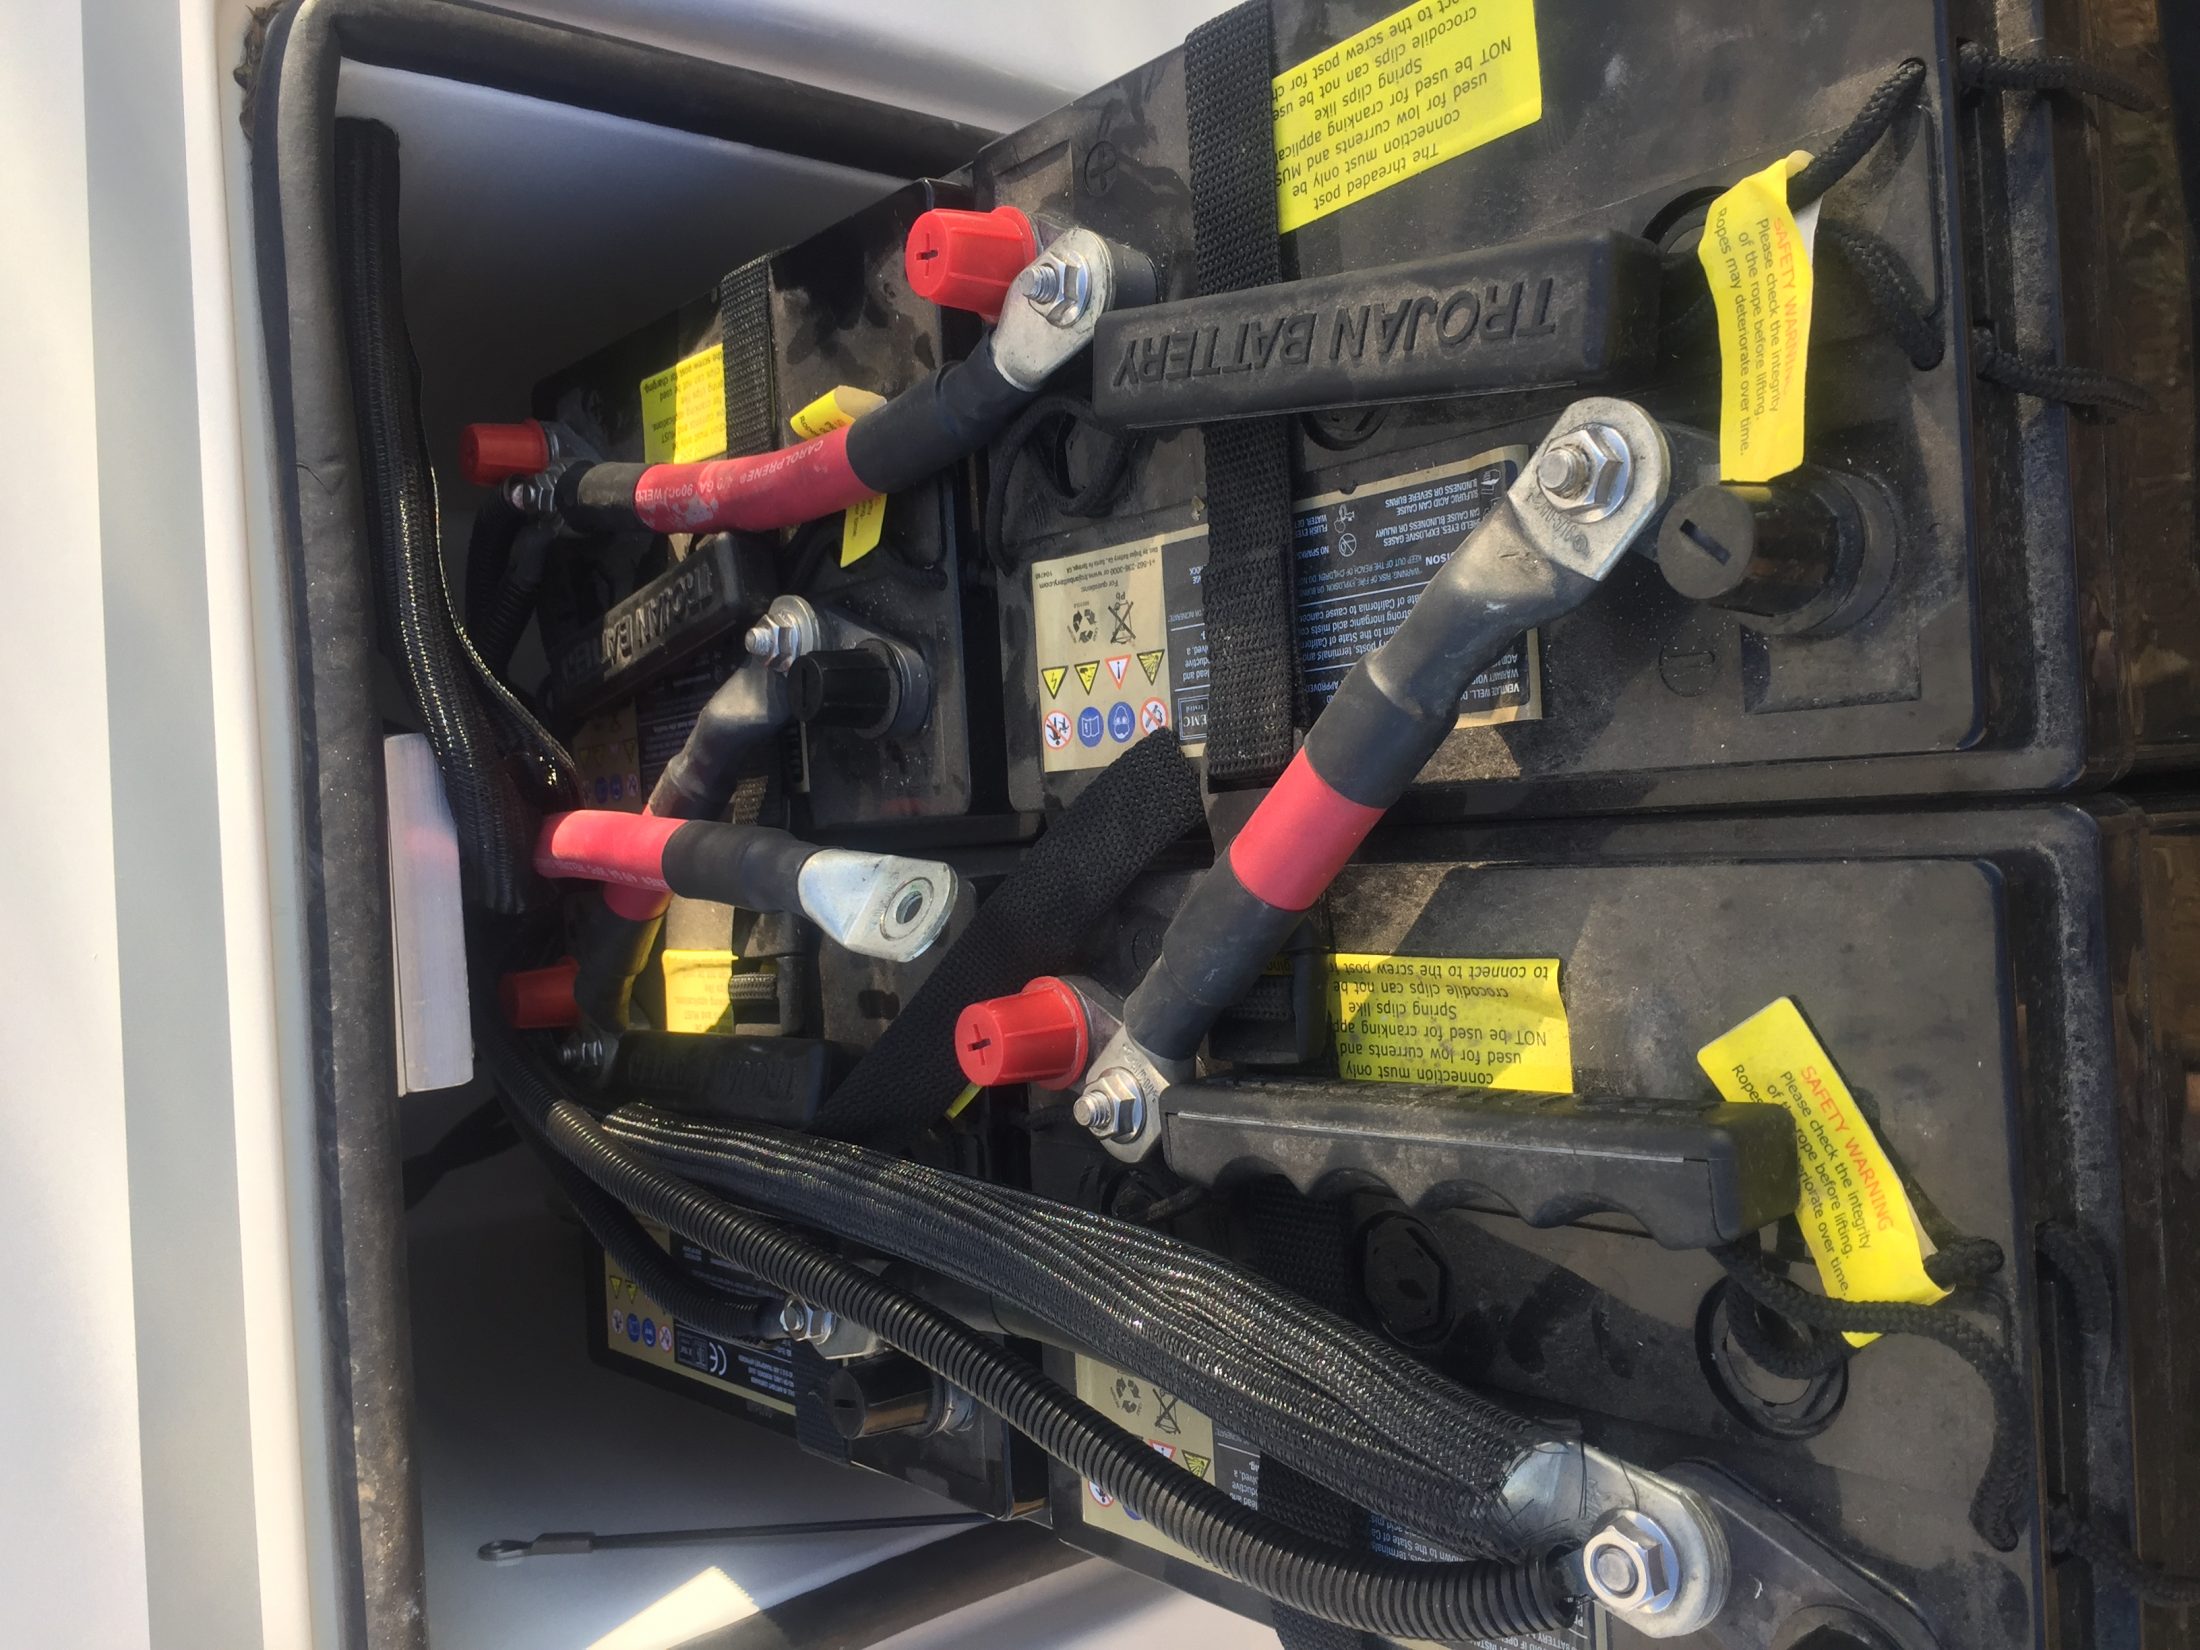
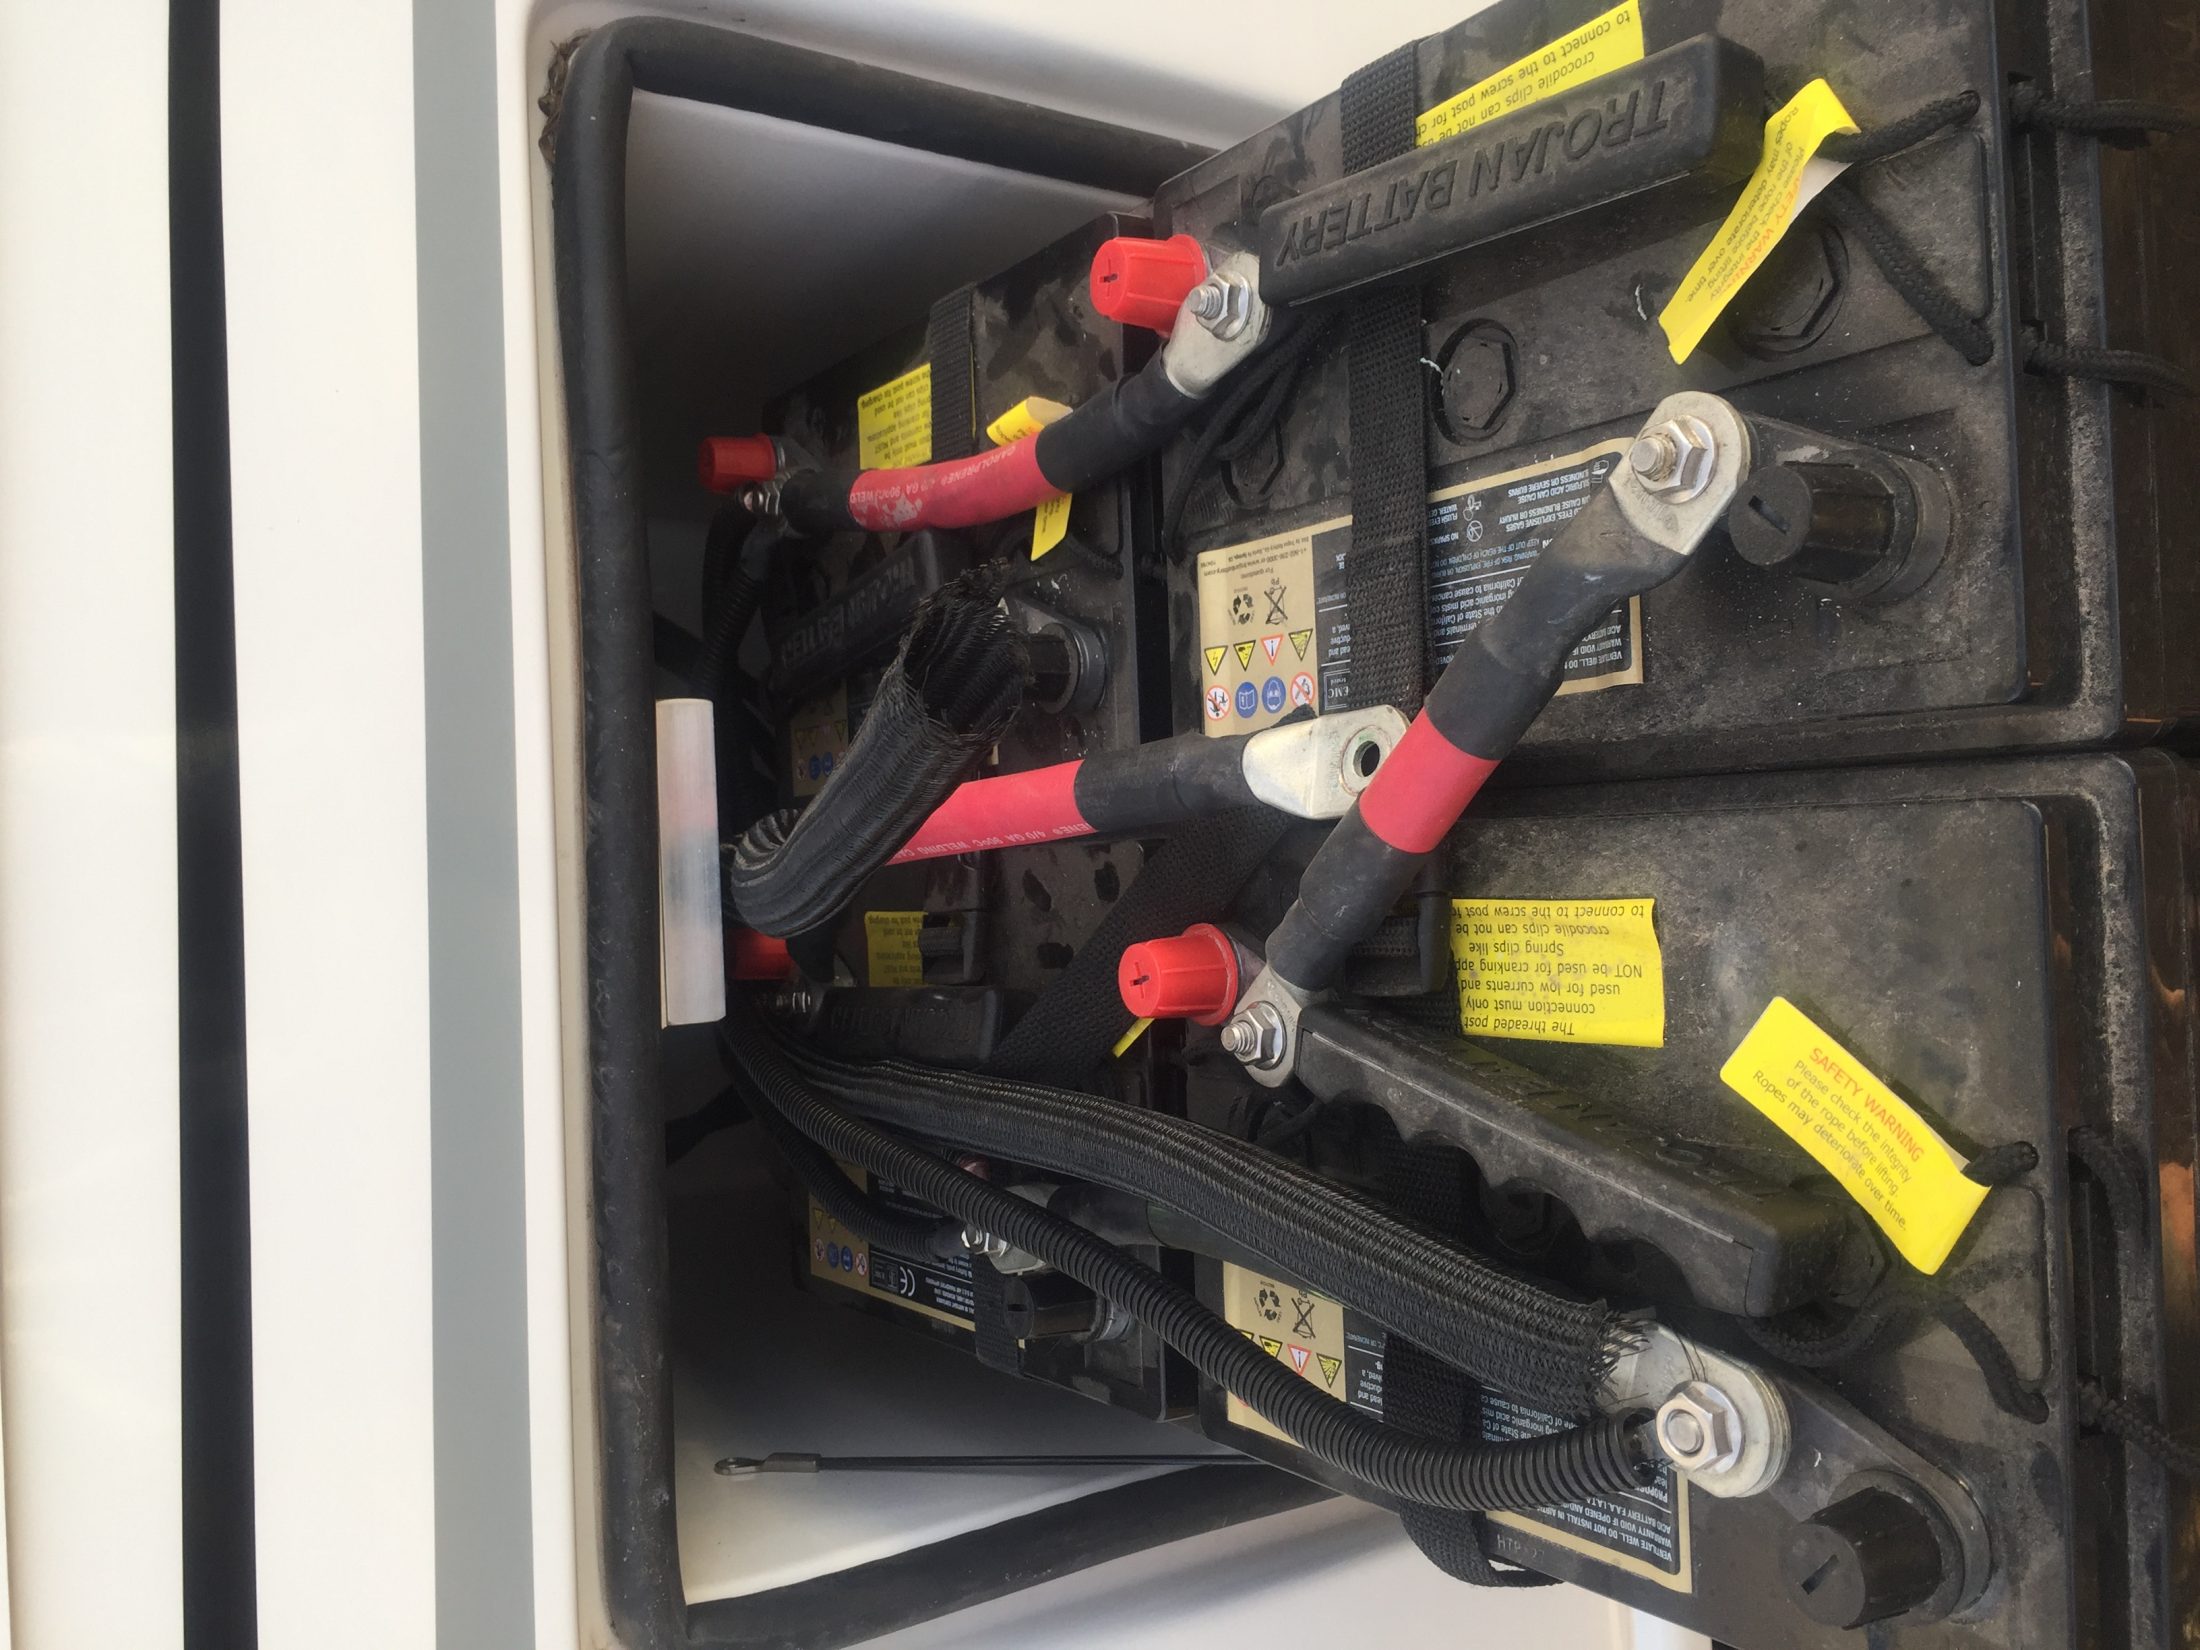
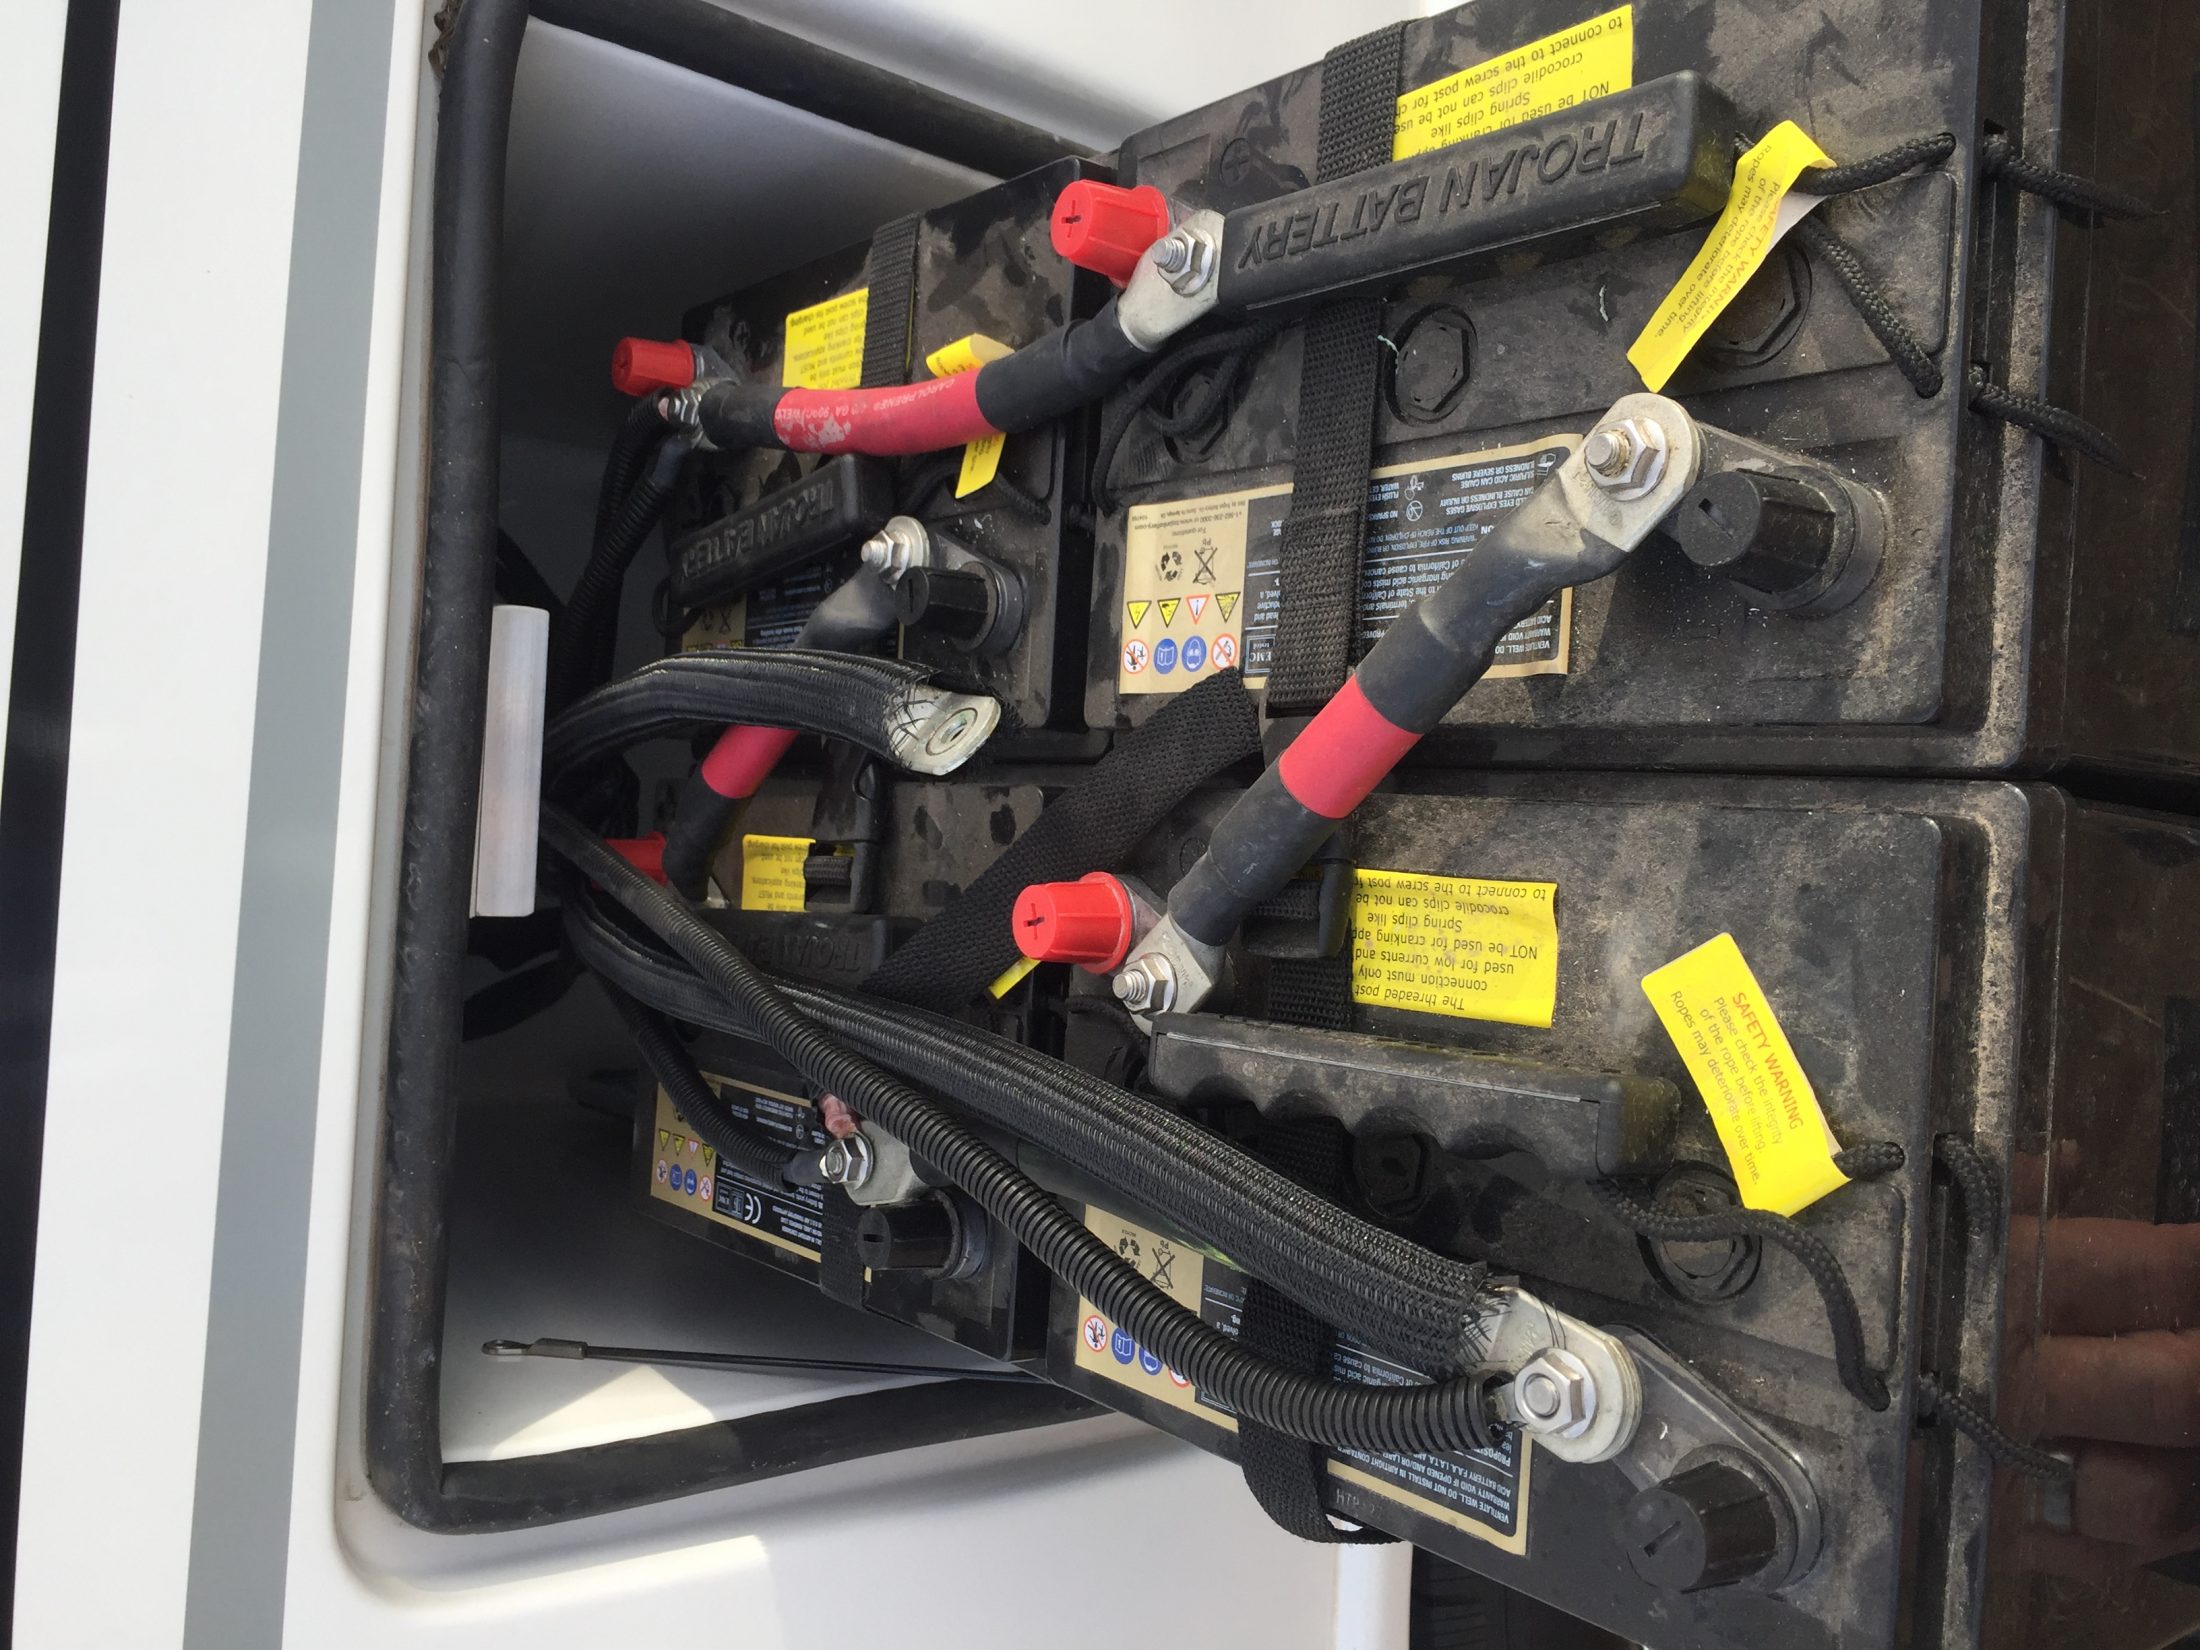
OK. I will try once more. I just took these two photos. One shows how the cable cannot be easily slid through the compartment to reach the forward battery terminals. The other shows the 8 terminals (though the photo has been turned 90 degrees in this display). I would like for someone, with a high degree of certainty, to tell me which terminal to attach the cable that delivers electricity to the inverter. (As reported before, I have received conflicting advice, and I don't want to risk damaging the system or myself.)

-
Just to be clear then, are you telling me that the cable going to the inverter needs to be attached to the right-hand terminal closest to me as I open the compartment? (I have received differing opinions on this.) Also (I just checked), the cable that you suggest pushing further into the compartment will not be pushed or pulled; it is secured to the compartment wall with a fixture seemingly meant to do so.
-
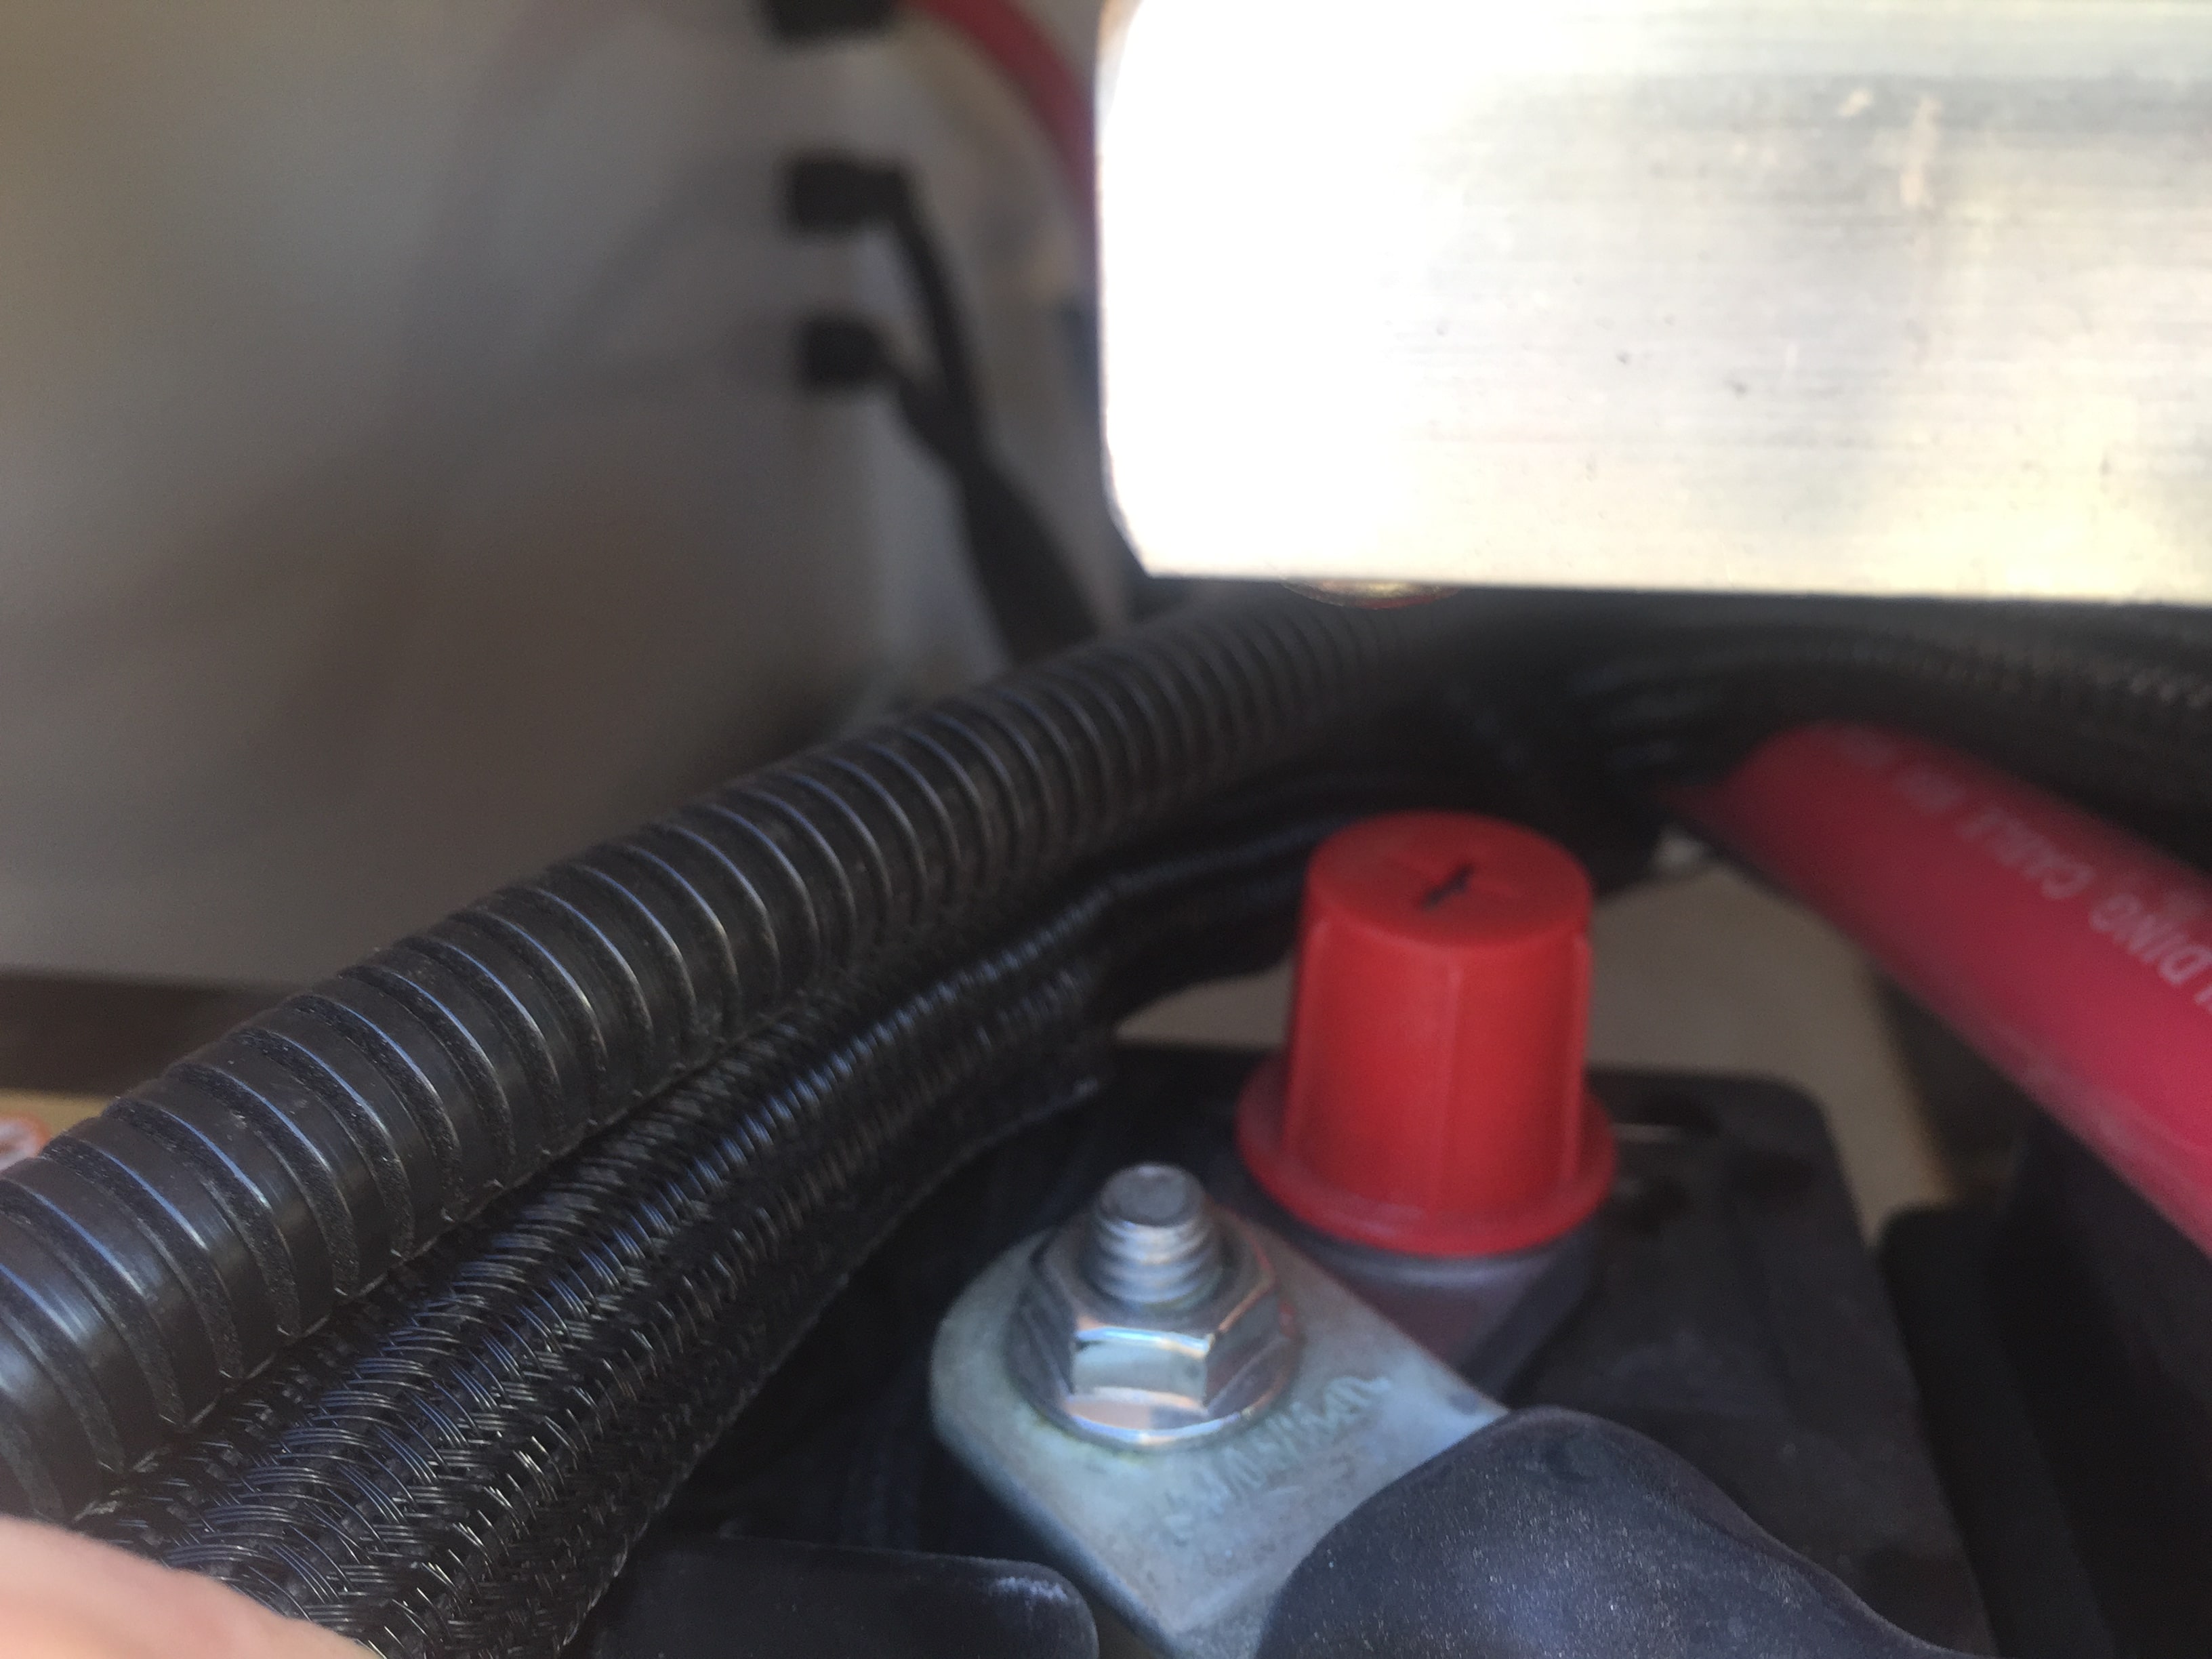
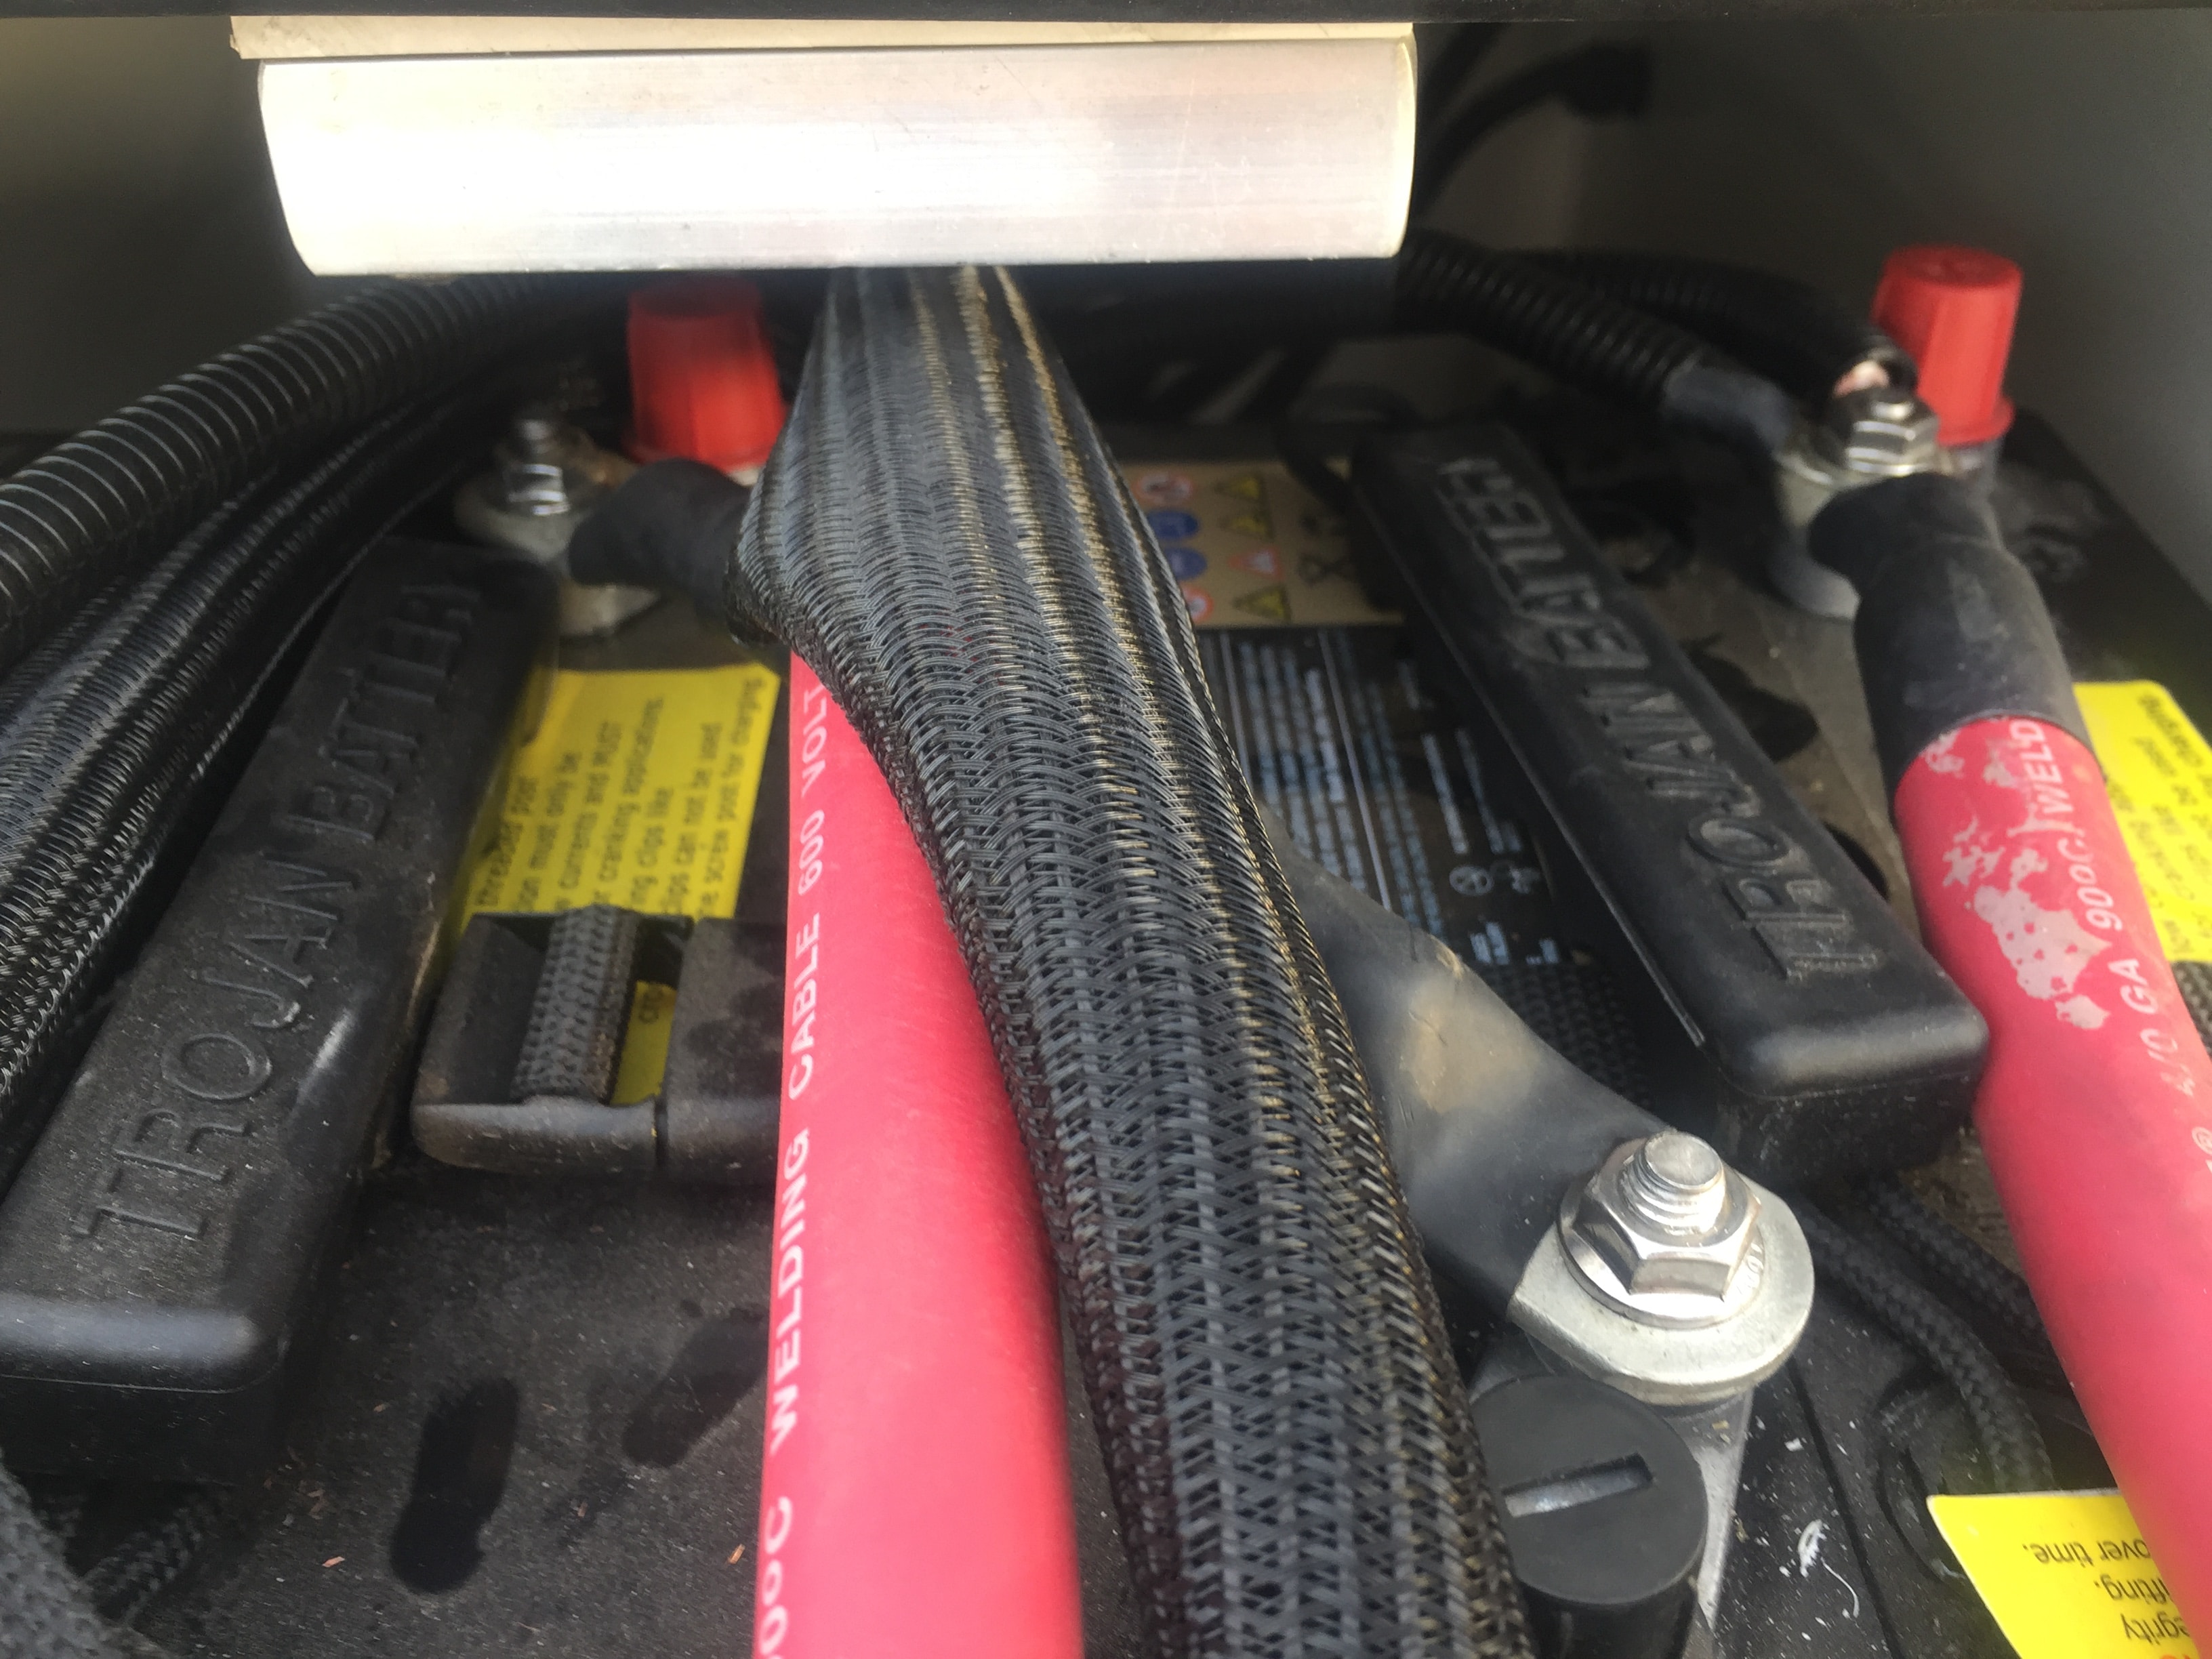
Sunday Update on Inverter Problem and Mystery Cable--and Three More Questions Thanks to mountainoliver and bhncb, I have ascertained that the mystery loose cable is indeed the cable that should be connecting my batteries to my inverter. This may, in fact, be good news, as it would seem to indicate that perhaps my inverter is not fried and all I need to do is reconnect that cable. I am still baffled about how this cable became disconnected, as there is no evidence of a nut having secured it to any of the terminals. I have never done any work inside the battery compartment, nor have I had any work done by others in there. All I can figure is that it was never properly attached at the factory. Perhaps a worker had thought he or she would just temporarily attach it to test the inverter, thinking that he or she would attach it properly later--and then forgot all about it. It is nonetheless weird that the set-up would have worked for two years before failing. Because I know next to nothing about electrical systems, and because I want to avoid damage to the system and myself, before attaching the cable to any battery terminal, I want to make certain that I am attaching it to the correct one. Thus I seek further advice. I present here two photos of the back of the battery compartment. (I have previously ruled out the suggestion that I attach it to one in the front, as the cable, when the tray is open, does not reach that far.) Question number 1: Can someone tell me with certainty to which terminal I should connect the cable? Mountainoliver advised me to test for 12v on both sides of the fuse under the rear dinette seat before attaching the cable. I am unsure of why this may be important, but I used the voltage tester pictured below, and I get a weak "beep" and only two bars lighting up as I do when I test things like a USB cable in the trailer--as opposed to a much louder sound and all of the bars lighting up when I test the 110 outlet in my house. (I do wonder, if the cable is not connected to any battery, why I would get any signal at all.) Question number 2: Does this mean that I should go ahead with attaching the cable to one of the terminals? Question number 3: Are there further things to consider to make certain that I inflict no damage on the system or myself when reconnecting this cable? I apologize for what might seem to be my overcautiousness and perhaps inexcusable ignorance. I AM grateful, however, for folks patience and help with this issue. Thanks!
-
That loose cable being attached to the rear inner battery--without going back out now to look at the situation again--would make some sense, for as I mentioned above, if it were attached to the front battery, it would prevent the tray from sliding all the way forward. I have had no one do any work the battery compartment, and I certainly have not done anything in there myself, and no one has worked on the inverter. If that cable has been disconnected by someone, that would be one hell of a mystery. As I wrote above, I will have to end the investigation for the time being. Thanks much for your input.
-
I want to thank everyone for their input and suggestions. I will have to call off the investigation for the day. I will take another look at the suggestions and the situation tomorrow. If I can't come up with a solution by then, I will try to contact Jason at Oliver and possibly my local RV guy. Thank you all!
-
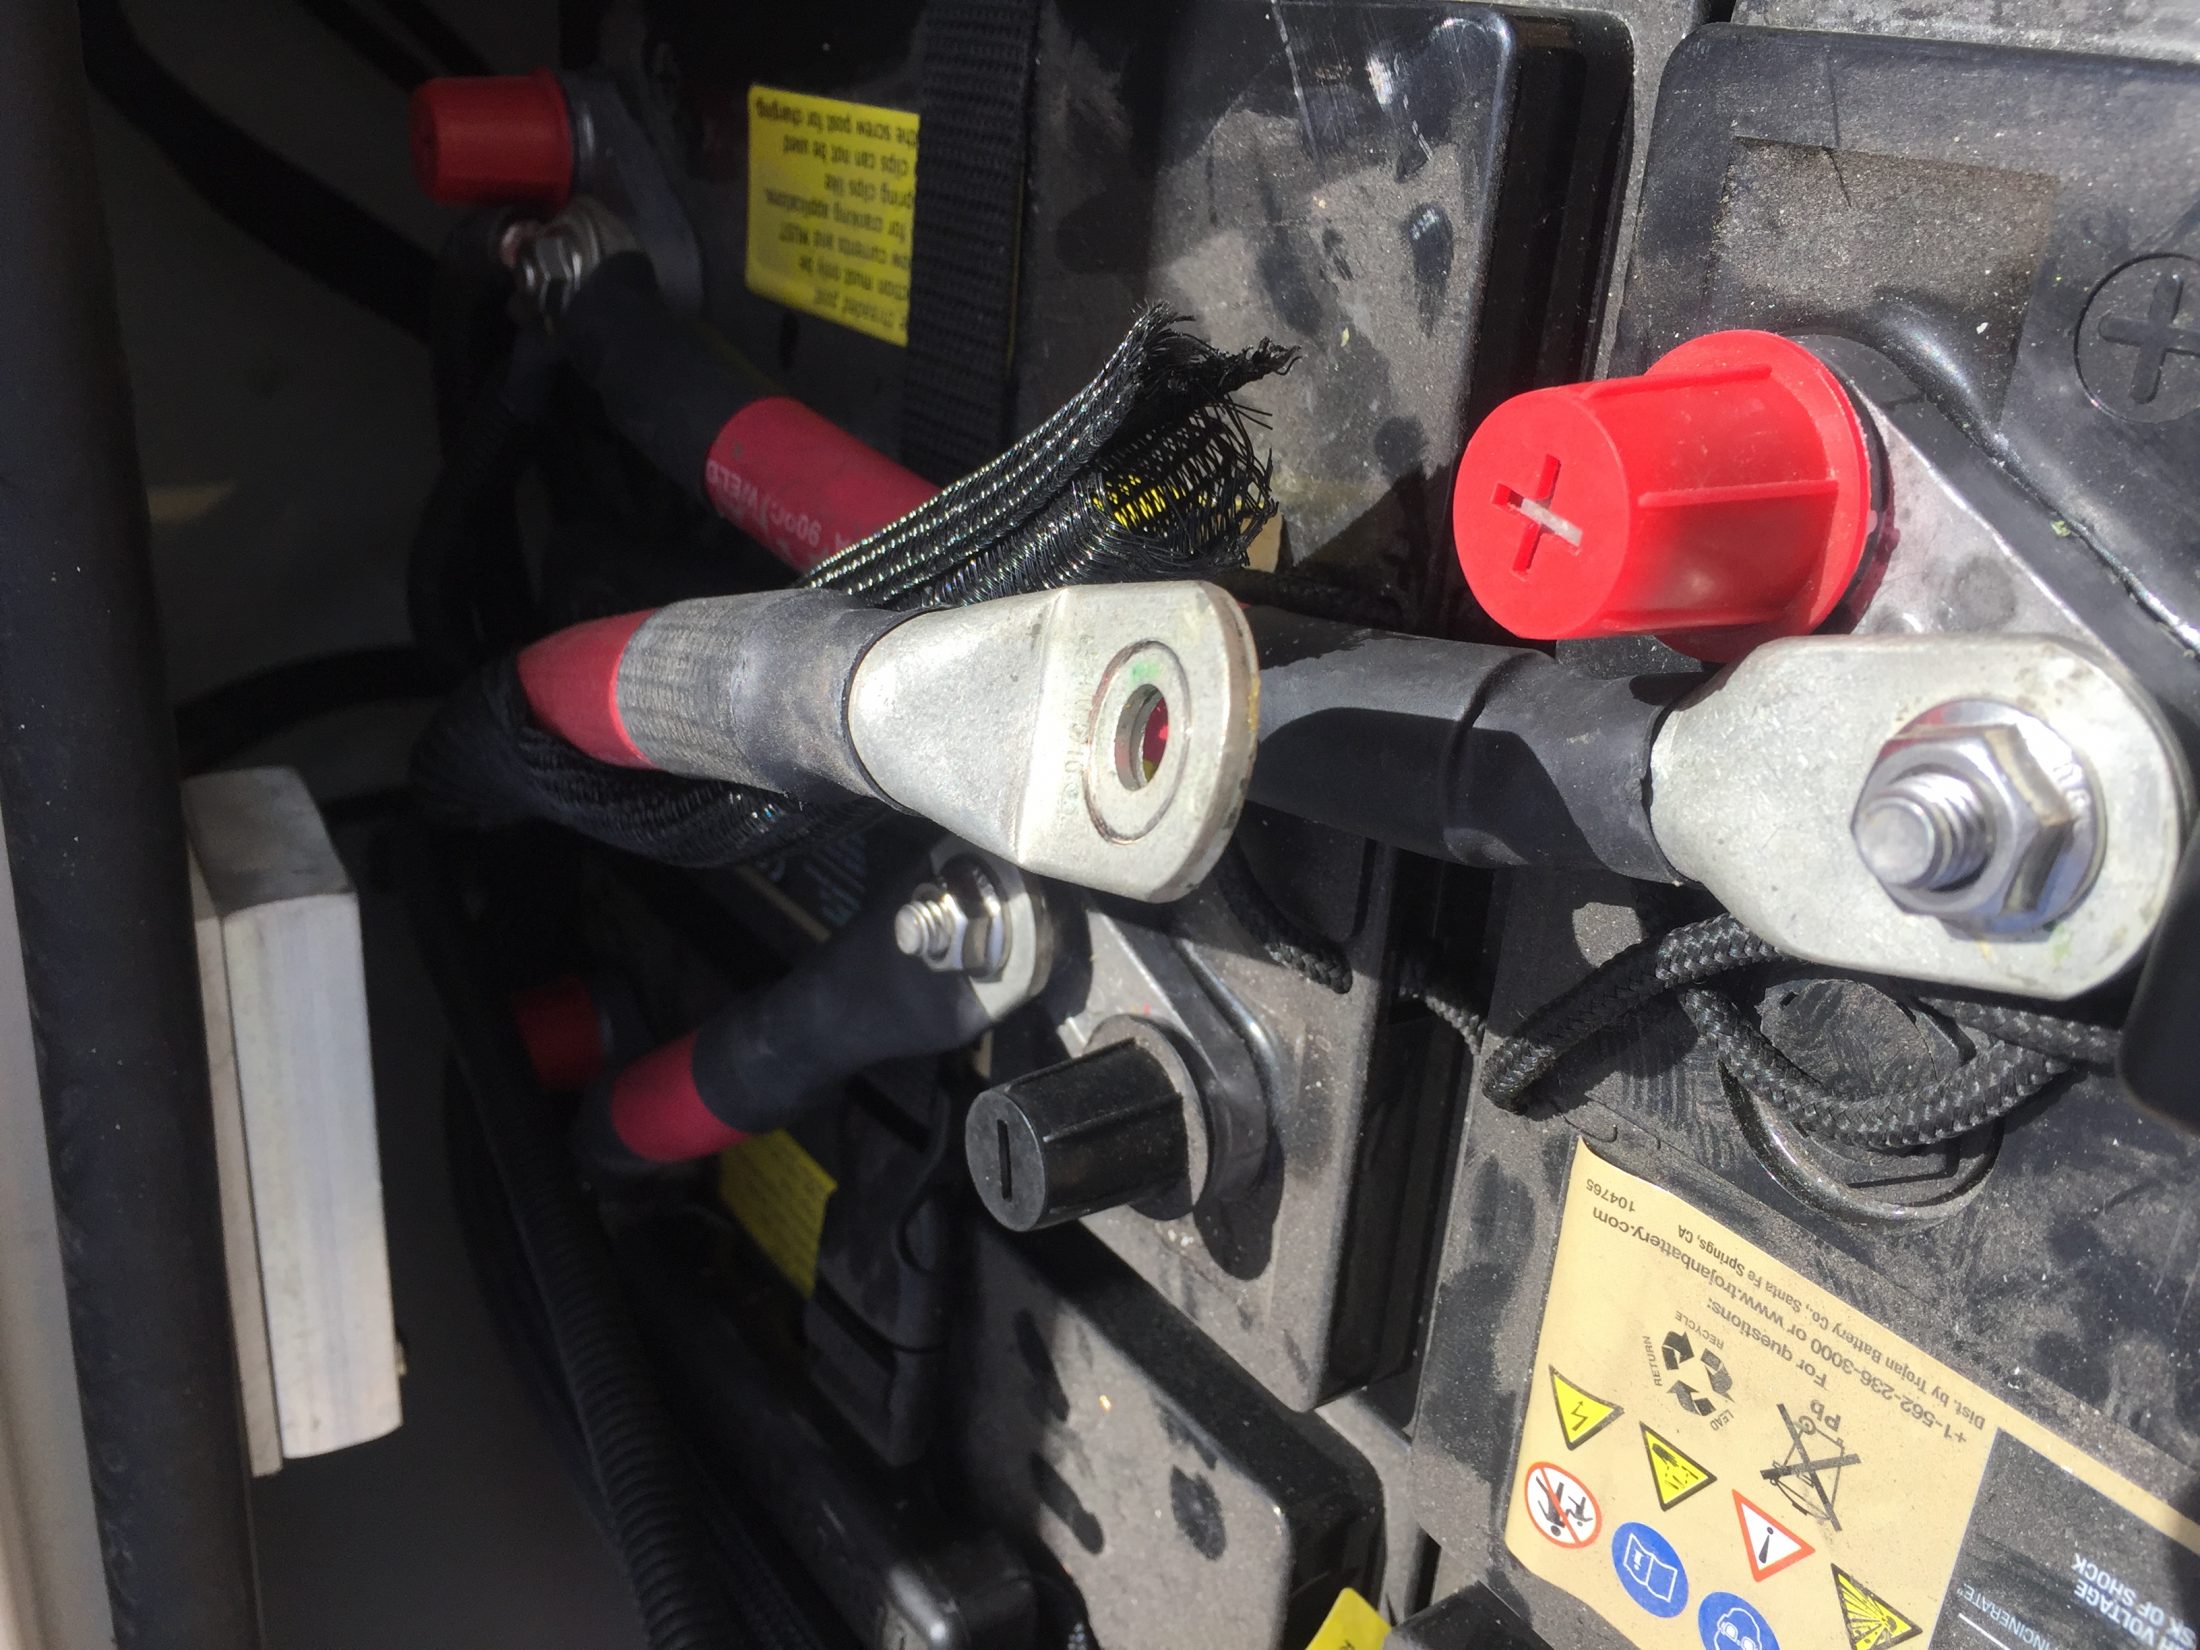
Well, if that indeed is the positive feed to the inverter, that would explain the situation. However, I see no indication that any of the terminals had this attached. Also, when the batteries, yes AGMs (see my original post), slide all the way out on the tray, the loose cable, if connected, would not reach the terminal that you mention. I think the attached photos are the best that I can get right now--one as a broader view, and the other more towards the back of the tray. I could, I suppose, attach this loose cable, but I am leery of doing so, for two reasons: 1) I don't want to damage something from my ignorance, and 2) it baffles me how it shows no sign (loose nuts, etc.) of ever having been attached. I will probably have to wait til Monday and have my RV repair guy take a look. Thanks so much for your input.
-
I have raised that lid, but I am fairly certain that the back of end of the inverter--the whole inverter--is in the compartment shown in my first photo. There is a red and black cable attached to that back end. Isn't that how it should be?
-
I could do that, but I can tell you that there are no terminals--I checked--where it could have been connected; they are all connected to other cables and the nuts are secure. OK, I just took that photo, which includes that loose cable.
-
Yes, both.
-
Do you have a suggestion on how to (safely) check that?
-
Bill, they just make me wonder what that cable with the loop at the end is in your compartment--something not in mine. Thanks, though.
-
Yeah, I was hoping it was something as simple as that, but the inverter has no response when the unit's button is pushed.
-
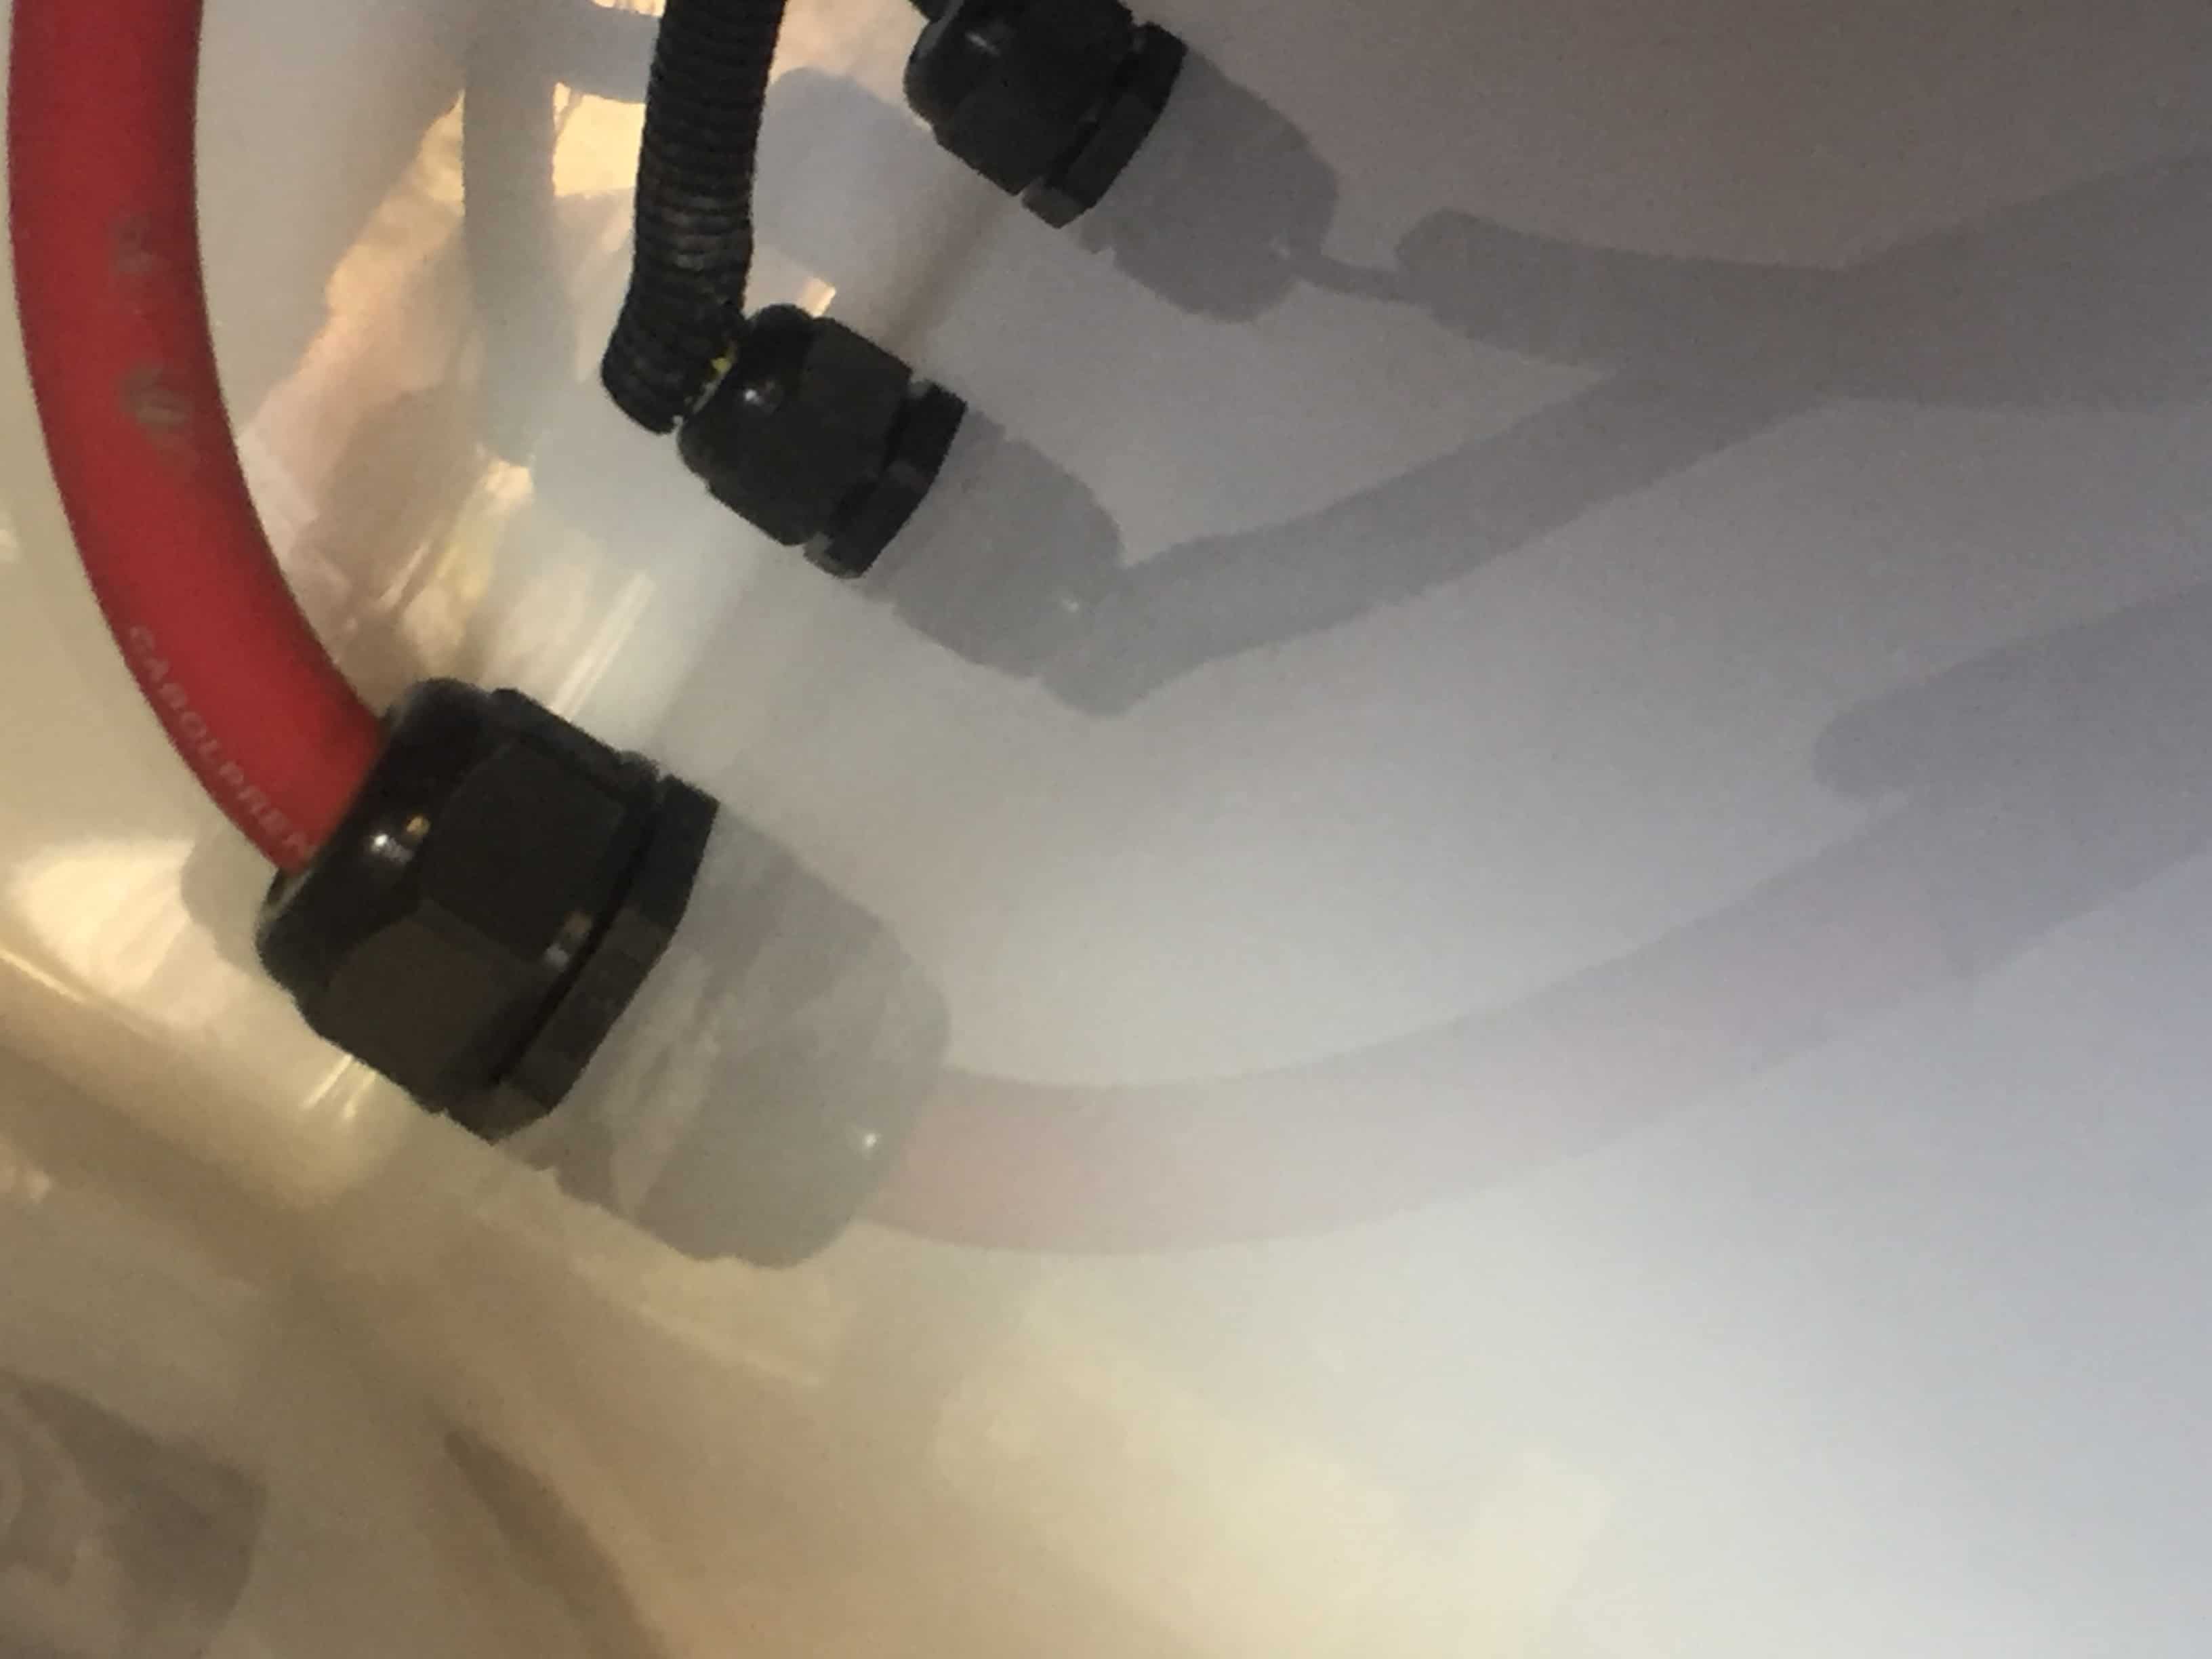
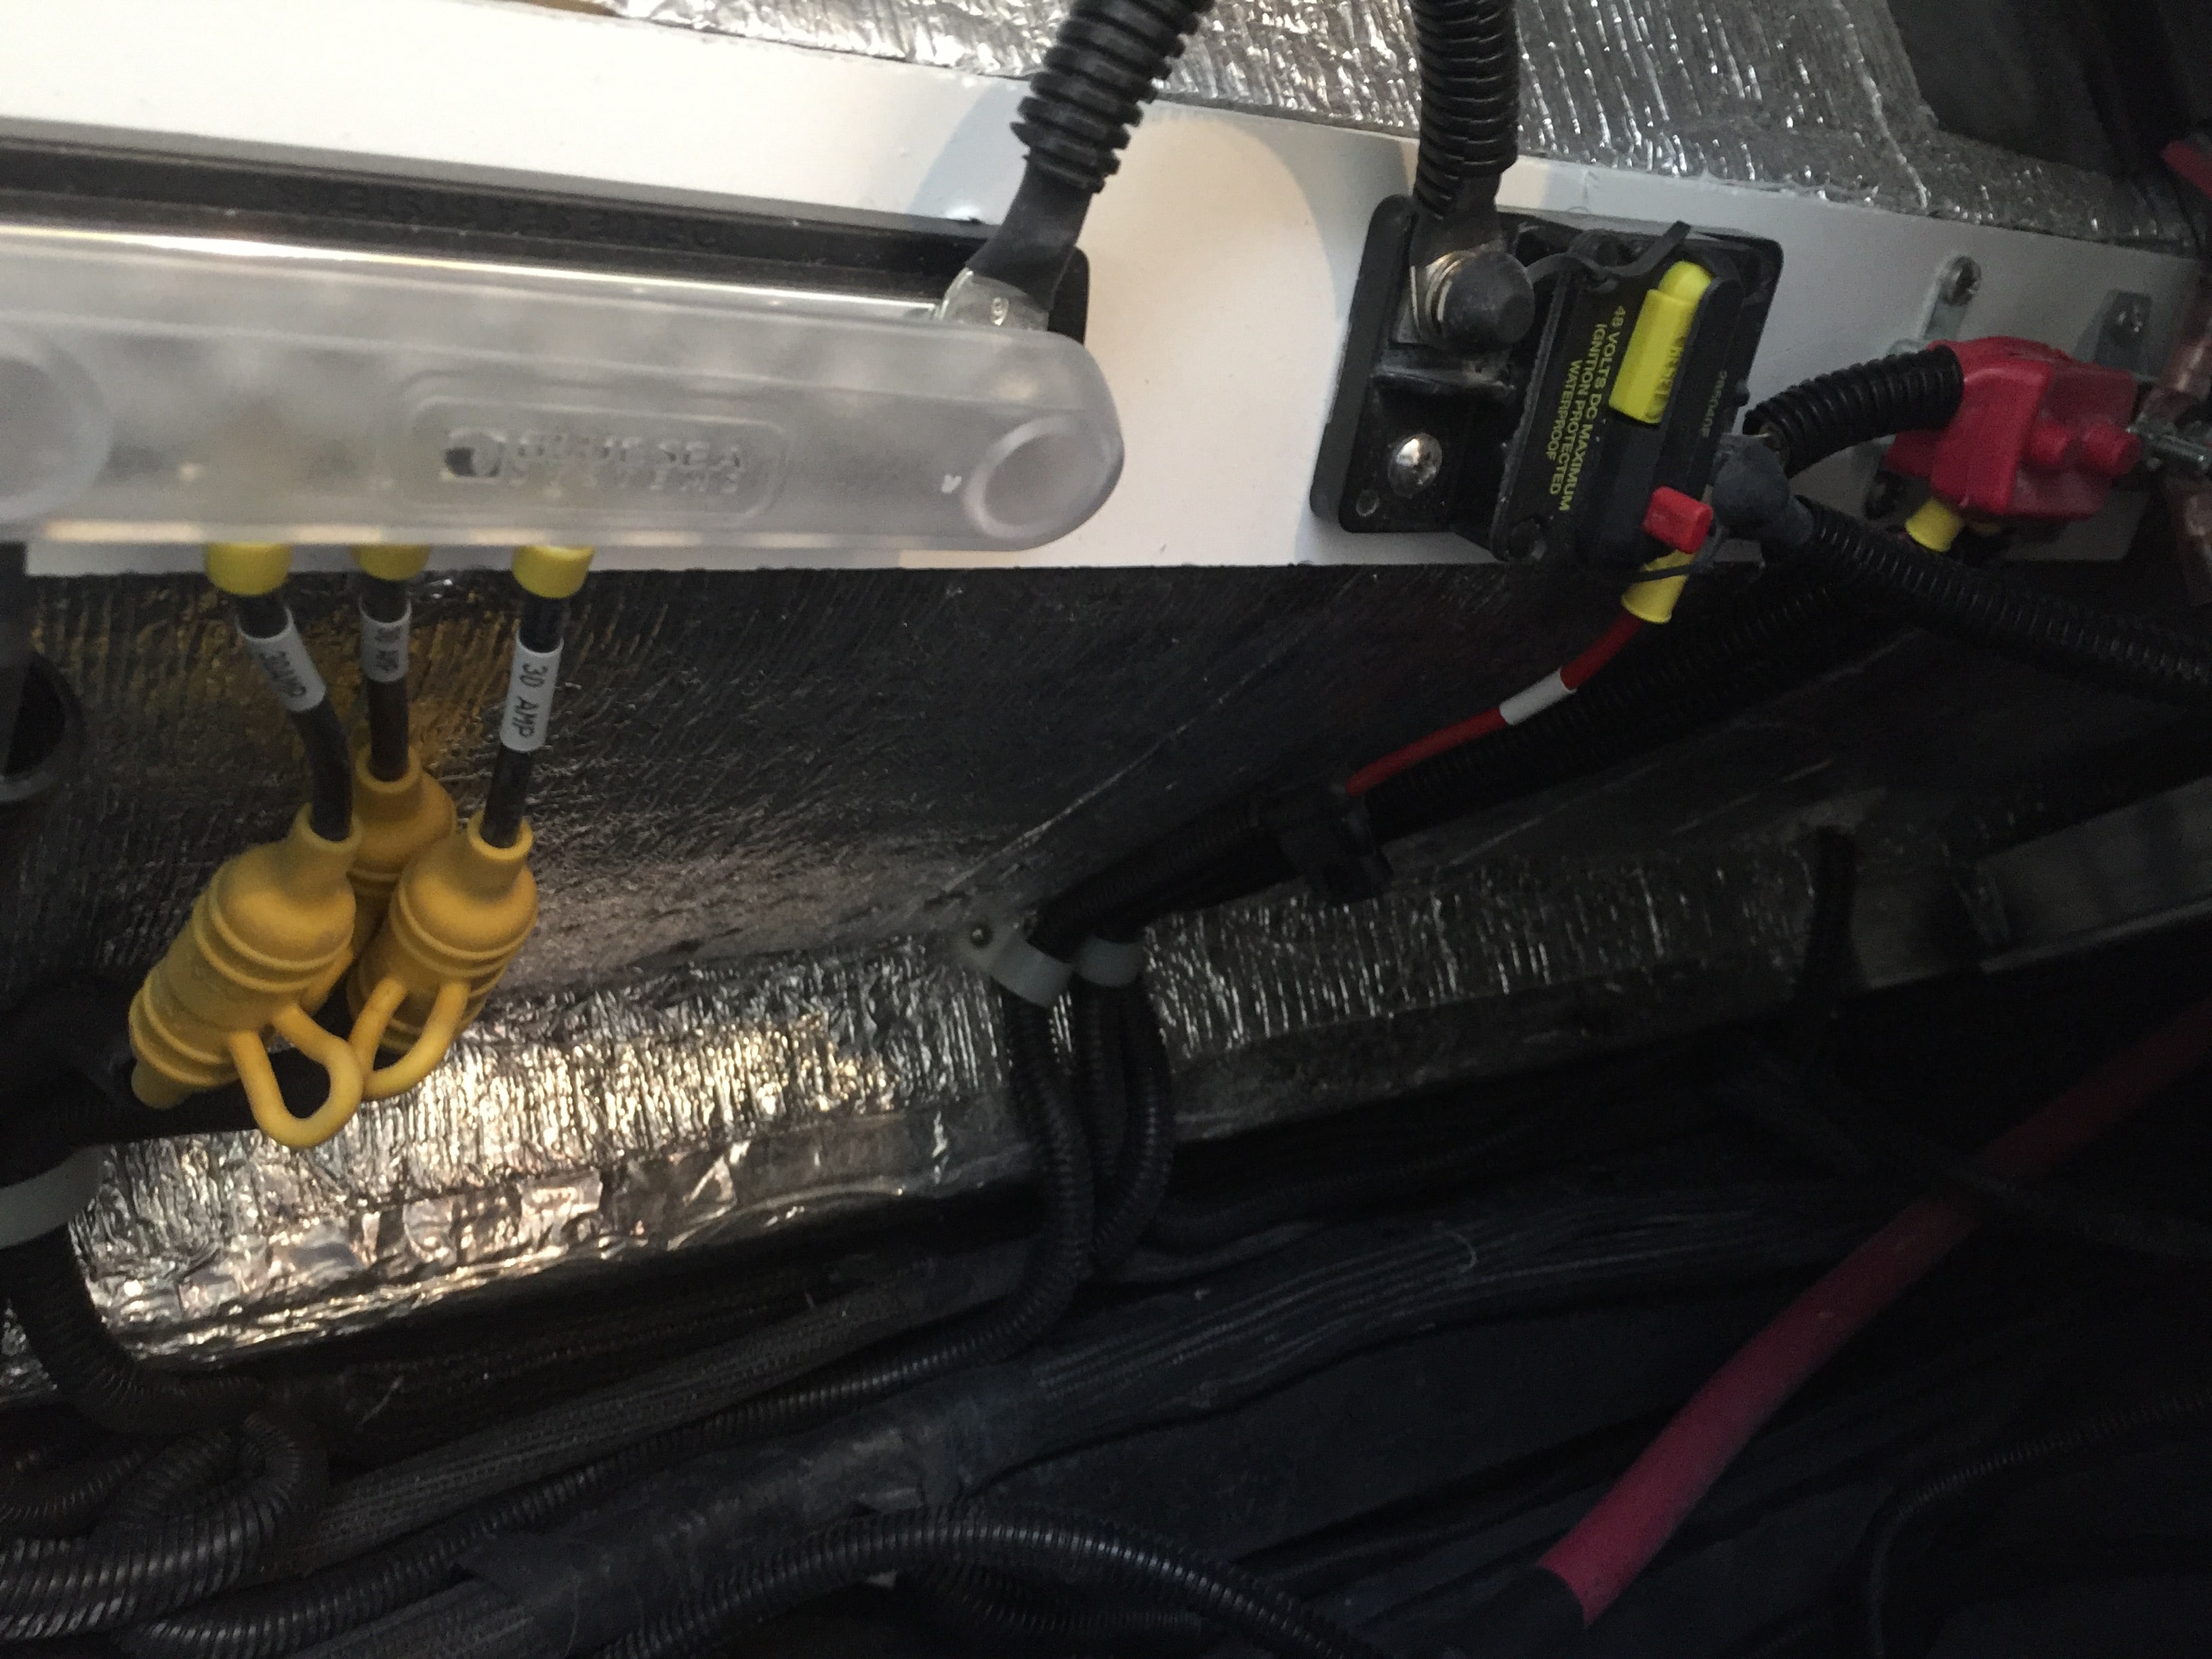
Inverter Problem: We are getting ready for an excursion to Flagstaff to play at the Flagstaff Folk Festival and just discovered that our Xantrex PROWatt 2000 Inverter is not functioning. We have a 2017 Oliver Elite II with solar and four Trojan AGM 6-volt batteries. Disconnecting the remote switch from the unit, I cannot get the unit to turn on with the unit’s main power button. There is no display or power light. I have fooled with the GFI switches to no avail. I am starting to suspect that the unit has gone bad. I plan to call the company and/or take it to my local RV shop on Monday if I have time. (We have to leave on Tuesday.) However, I am posting here to see if anyone may have an idea of something else to check. I have little knowledge of the electrical system in our Ollie or of electrical systems in general, so I will need some very elementary directions and vocabulary if someone has a suggestion of checking something that might be causing the problem—other than an inverter that needs to be replaced—and how to deal with it. Might there be a fuse somewhere that needs to be replaced? Something else? I am including two photos: one of the inverter inside the passenger side compartment nearest to the pantry, and one taken to the right of the inverter. Incidental Mystery: Seemingly incidentally, when checking the battery compartment to see if there might be a loose connection, I discovered, a cable with its end unconnected to anything extending into the compartment. It seems like it was never connected to any of the battery terminals (so it must not be related to the inverter), but I am wondering if anyone knows to what this cable may be intended to connect. Is it there for a feature not included in my Oliver II? One photo is of the end of the mystery cable; the other shows where the mystery cable exits the compartment--at the top left, above the other two wires. Can anyone solve this seemingly unrelated mystery?
-
I DO wonder about how much weight the bathroom or closet door could handle without compromising the door hinges.
-
 Speaking of KOAs and I-40, we have tried a few RV parks in Flagstaff, as we play every year--the end of June--at the Flagstaff Folk Festival. We have discovered that the Flagstaff KOA is by far the best for us--used by "real" campers, kids, etc. instead of stuffy, often uptight types in their class As. Flagstaff is also a great base for exploring a number of awesome local features, including the Grand Canyon.
 -
Here is what we do and use to level our Elite II. Use the rear stabilizers only to fine-tune the leveling. First use Andersen Levelers to level the trailer side to side as precisely as possible. With a little practice, these make leveling very easy: One just rolls up on them until the side-to-side leveling is reached. We place this Stanley I-Beam Level on the bumper to determine that side-to-side leveling. Once the side-to-side leveling is the best you can do using the Andersen Levelers, use these Camco Wheel Chocks on the trailer's wheels on the opposite side of the trailer. Use these (no more than four) Tri-Lynx Levelers with these Tri-Lynx Caps under all three stabilizers. Here are the advantage of using these: 1) It reduces the time and energy used to raise and lower the stabilizers. 2) It provides a wider base for the stabilizers so that they don't dig into the earth or damage any surface under them. 3) If you forget to raise the stabilizers before moving the trailer, you have less of a chance of damaging them. Use the I-beam level to check the front-back level of your trailer. We have discovered that placing the level above the top refrigerator vent, using the handle to secure it, gives us a good indication of front-back level, which we have ascertained by the way a dog leash hangs from a hook and the way the bathroom door will stay open at a 45-degree angle--not swinging towards the fully open or closed position. You may find some other surface a better place to put the level on your own trailer. (The floor does not seem to be a good place on our trailer.) You can fine-tune the side-to-side leveling with the stabilizers. I am a bit of a perfectionist, so I often go back and forth with lowering and raising all three stabilizers before I am satisfied with the final leveling. Use this Camco Wheel Stop-Stabilizer to increase your trailer's stability. I hope our method and suggestions help. I'm sure that others have different methods that work just as well for them.
-
Any opinions on using this universal socket? Would it somehow negatively affect the torque of the torque wrench?
-
I'm thinking that it might be best to risk getting some bugs in there than risk compromising the airflow.
-
Please let us know the result of your calibration as well as the brand and model of the wrench. I suppose other relevant info--such as factors that might have affected the calibration or the accuracy of the wrench--would be helpful. (I am reluctant to spend $150.00 on a wrench.)
-
Thanks, Overland-- It looks like I will be ordering the kitchen sink aerator. I am intrigued and have looked on Amazon for the shower head. I'm wonder if you could answer a few questions: I this the same one? What procedure would be needed to swap out the "entire faucet" as you recommend we do? What "oddball adapter" did you order (in case swapping out my faucet doesn't seem practical) and what modification did it require? Thanks for your patience with my request (even if you might have to pretend to have it). --Jeff
-
Welcome! An important benefit of being an Oliver owner is this forum, which I visit nearly daily. It should be considered an important, unofficial, part of Oliver's "customer service." The vast experience and knowledge gleaned from Oliver owners has been invaluable to me. Often a good source of entertainment as well.
-
That is a safe un-assumption. I appreciate it when folks giving advice don't assume I know more than I do. I did happen to have learned this earlier, but I thank you, Randy, for the detailed help. I feel more confident and torqued up to handle the whole torquing thing. I bet others are appreciative of the advice offered by you and others that might help them avoid a mishap similar to vector's.
-
Thanks, RnA for the detailed and very helpful response. The PDF would not open for me.
-
Yes, I hope someone with a lot more knowledge than I on the subject starts this new thread--or addresses torquing issues here. These are some of my questions: What is the best torque wrench for the Ollie II? (I put one in my Amazon cart, but will wait to see if it is indeed the best for my trailer.) What settings are needed to tighten lug nuts? (I understand that there are different stages when tightening them.) How often, realistically, should one recheck the torque? (I have read, somewhere, that it is best to do this during every stop, but this seems like it might be excessive--as well as a hassle.) What other nuts and/or bolts need to be torqued on the Ollie? (And how often?) What else should one consider about torquing? I have a 2017 Ollie II (Hull #222). I run 60psi in my trailer tires and use a tire pressure monitor system and the Hayes Sway Master Electronic Sway Control System.