Fritz
-
Posts
224 -
Joined
-
Last visited
-
Days Won
2
Everything posted by Fritz
-
Greetings from Michigan - upgrading to 2 5/16 coupler?
Fritz replied to Mark and Lorraine's topic in Introduce Yourself
We're using a 2-5/16" ball to tow an LE2 with a '21 Ram 2500. The larger ball may provide the most benefit if using the Anderson weight-distribution hitch (larger ball surface reduces wear). We chose it for the extra ball surface and extra strength (which is almost certainly overkill), even though we are not using the WDH. Oliver did upgrade the hitch to 2 5/16" -- there was an extra fee, but I don't recall quite how much. -
This might be in a TMI category (and if so, I apologize), but our solution for a shower when the trailer is winterized is to use a solar shower bag. We heat water from the jug on the stove, pour it into the bag, perhaps add a bit of cool water to get the temperature just right, and hang the bag in the shower. The only thing that might need attention in severely cold temperatures is to drain the gray-water tank more frequently, and add antifreeze to the drain trap. The shower bag and sprayer hangs lower than the normal shower head, so we sit on a stool for a shower. This also keeps incidental spray to a minimum (no shower curtain needed!). Actually, we use this shower-bag method whenever we're boondocking and trying to conserve water, regardless of season. We fill the bag at the galley sink with water heated from the tank, or heat water from an outside supply on the stove (or heat water from an outside supply in the bag by placing it in the sun for the day). The spray from the shower bag is finer than that of the installed shower head, so less water is needed. Using the shower bag saves the volume of water needed to fill the hot water line between the galley sink, and the amount of water normally needed to adjust the temperature at the shower. Between the composting shower and the shower bag, we can conserve tank water for a very long time, and extend the time to when we need to empty the gray water tank. ** Moderators: I'm responding to a post in this thread, but putting this response into its own thread might make it more searchable later... **
-
I think the craigslist title is woefully incomplete. It should read “Free, you haul. Bring front-end loader and dump truck. And skid-steer for cleanup.”
-
Living with Lithionics—Some Tips, Tricks, and Observations
Fritz replied to Fritz's topic in Mechanical & Technical Tips
I received this question as a private message (PM), but am posting it here as others may benefit from the discussion, or wish to weigh in... "Does the inverter automatically shut off when the batteries reach their full charge state? If so how would I know this? Is there any setting that would tell me this? Since our fan keeps running I am thinking in my head that the inverter is still trying to charge the batteries... I am thinking that the inverter is still drawing some power from our batteries when we are disconnected from shore power if that is at all possible. Maybe that is why our batteries are draining so fast with nothing on in the RV?" My understanding (which is very far from complete, and may in fact be flat-out wrong) is that the Xantrex unit really has two components: (1) a charging function and (2) an inverting function. When connected to shore power, the Xantrex unit is on, but its sole function is charging the batteries. The Xantrex unit is not inverting (changing 12V current to 110 volts) because it doesn't need to; the 110V outlets (and A/C, microwave, etc) are powered with shore power. The uppermost "esc" light on the remote panel is lit when the trailer is plugged into shore power and the Xantrex unit is set up to charge. The only way that I know to really "turn off" the Xantrex entirely is to trip the 300A breaker under the streetside bed. When in charge mode (i.e., plugged in to shore power) the Xantrex fan is running while charging. When the batteries are full the fan kicks on for about a minute every 15 minutes or so. When the batteries are full (or as full as you want them to be), you can set the charger ignition control in the Xantrex app to "auto-on" (again, thanks to NCEagle for this tip). In this mode the 110 outlets, the A/C, and the fridge get electricity from shore power, but the Xantrex unit is not charging the batteries. The inverter portion of the Xantrex unit is (or should be) active only when the trailer is not connected to shore power and the inverter is turned on (i.e., the button on the remote inverter panel is pressed in). The "bat" light on the remote panel is lit when the inverter is on. The Xantrex fan may run briefly when the inverter is first turned on (I suppose the fan could also run if the inverter is inverting to meet a large load). If the batteries are draining overnight there is likely another problem. Here are some ideas for troubleshooting the problem: Update the battery firmware to version 1.0.07 if you have not yet done so. In my experience, the SOC is completely unreliable if this is not done. Unreliable SOC might lead you to think there is a drain when there really is not. If updating the firmware, be sure to fully charge the batteries to 14.4 volts afterward to calibrate the SOC. When disconnected from shore power, turn off the solar (by turning off the the knob at the front of the streetside bed upper cabinet), turn off all lights, fans (including the toilet fan), etc., and check to see if there is a load on the batteries by checking the Lithionics app (2 upper right boxes below the SOC). The current and power should both be zero. Then... With updated firmware (and solar off, and no obvious load on the batteries), record the SOC and battery voltage on the Lithionics app. Let the trailer sit overnight and check again. The batteries should have a SOC and voltage very close to where you left it. If not, then... Turn off the inverter by tripping the 300 amp breaker under the streetside bed and letting the trailer sit overnight again. The SOC and battery voltage after a day or so should be the same as when you started the test. If this is the case, then there may be something in the inverter. If this is not the case, then there may be some other phantom load that is drawing down the batteries. (smoke, propane, etc detectors will draw down the batteries some, but it should not be very much over 24 hours). Record the SOC and battery voltage. Turn off each of the 3 batteries (button on top of the battery) and let them sit for a day or so. The SOC and battery voltages should be the same as when you started the test. This should confirm that the problem is not in the batteries. Next, .... Call Oliver. Any suggestions of mine are those of a well-meaning amateur, not to be confused with those of a real professional. They really should be able to help with this stuff; hopefully the results from some of the above-described steps will help them. Good luck! -
Living with Lithionics—Some Tips, Tricks, and Observations
Fritz replied to Fritz's topic in Mechanical & Technical Tips
The 3000W inverter is mounted vertically on the interior wall under the streetside bed (see photos below). Are 2000W inverters mounted in the same location? Do the 2000W inverters have high speed fans? What is the maximum charging amperage for the 2000W inverter? (The 3000W inverters can charge at up to 100 amps.) I'm not sure that stereo sound mat installed only underneath the inverter would fully accomplish the sound-deadening goal; the horizontal mounting bolts alone would would transmit vibration (and therefore noise) to the interior fiberglass wall under the bed (if the inverter were mounted horizontally, then the inverter could rest on rubber feet). Given the vertical mounting, what might be a better way re-mount the inverter so that the inverter remains well-secured but reduces sound transmission? Any re-mounting would be easiest if there were no wiring changes were needed. That said, I think sound-deadening foam (or stereo mat material) would be a good thing to add to all the interior walls in the under-bed chamber to reduce reverberation. The foam should probably extend under the battery box and into the space under the rear dinette seat, since the fan noise reverberates in this area as well. Ideas? -
Living with Lithionics—Some Tips, Tricks, and Observations
Fritz replied to Fritz's topic in Mechanical & Technical Tips
Thank you, John. You and others have set a very high standard! -
One way to isolate the inverter when connected to shore power should be to trip the 300 amp breaker that is near the inverter under the streetside bed (press in the button; you can start it up again by pressing in the little flag). To keep the batteries from charging from shore power is to set the charger ignition control in the Xantrex app settings to “auto-on”). In this mode shore power energizes the 110 outlets, the A/C, and the fridge, but does not charge the batteries. Turn the charger ignition control “off” to resume charging batteries with shore power.
-
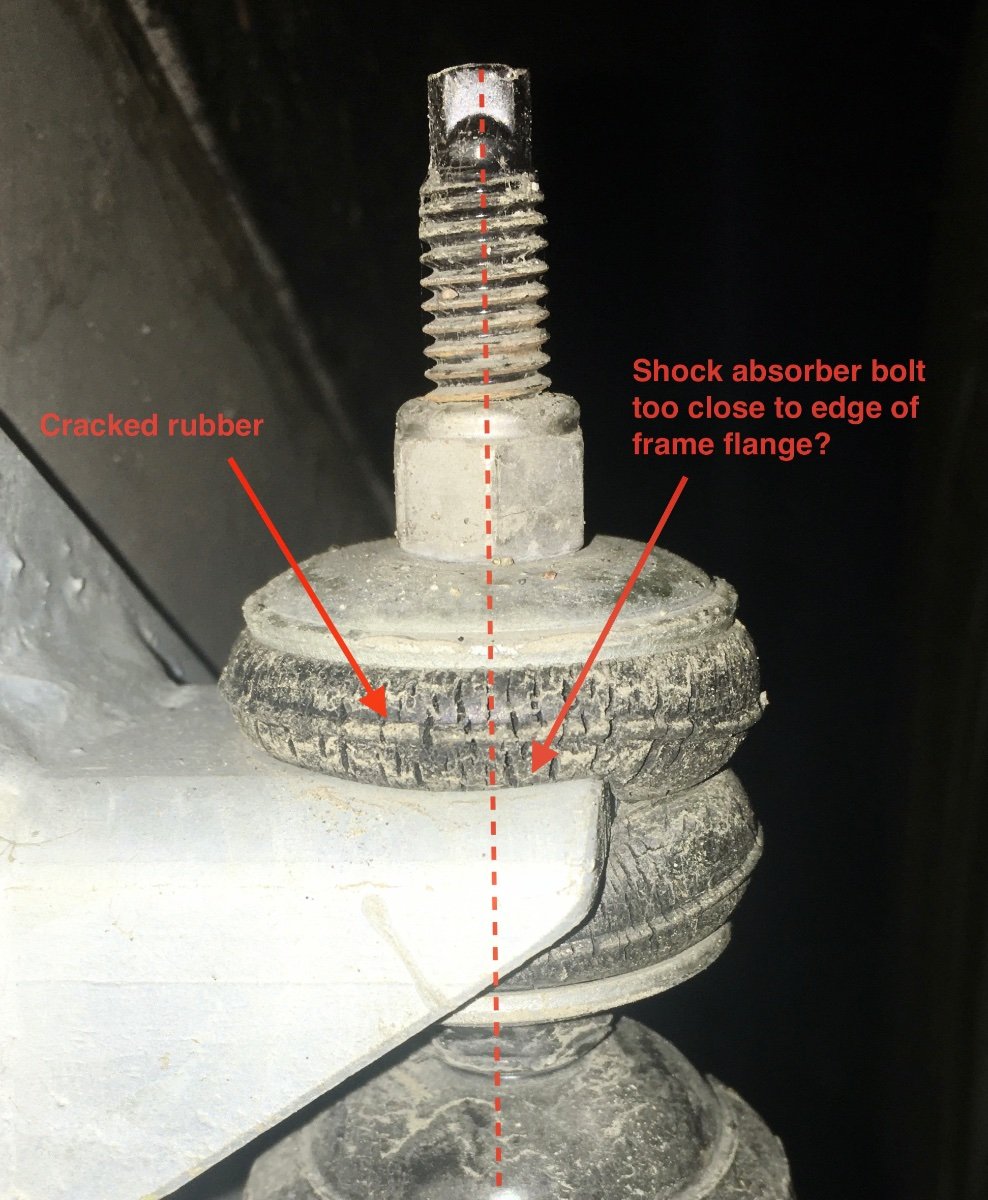
There have been numerous posts in this forum about Oliver’s lithium battery systems—about their usefulness, limitations, and value with respect to cost. Despite reasonable arguments against it, a number of us have purchased the lithium package. Reasons for purchasing the option have included the ability to run the air conditioner (A/C) for short durations (like at highway rest stops), greater usable energy (more boondocking in cloudy weather without needing a generator), faster charging, and longer battery life. This post summarizes things I’ve learned over the last 6 months about the Xantrex/Lithium/Zamp system. This post might also be titled “Things I Wish I’d Known from the Start.” This summary is a work in progress. Hopefully, with your corrections and additions, this thread will be of use to others that have purchased the Lithionics option or are considering doing so. At the time of this writing, manuals and other information for the Lithionics batteries are in the Service Center Knowledge Base — see links at the end of this post. I assume at some point Lithionics information will be compiled with all of the other trailer manuals in Oliver University. Battery State of Charge A key component of the Lithionics system is the app that lets users monitor State of Charge (SOC) and voltage (see links below). The reliability of the SOC values (which describes the amount of energy remaining in the battery) depends on (1) maintaining SOC calibration and having (2) up-to-date Lithionics firmware. The SOC should be near 100% at 13.6 volts, and about 50% (+/- about 10%) at 13.2 volts. If this is not what you’re seeing on the Zamp controller, Xantrex remote, or Lithionics battery app, then something’s wrong. By way of example, a couple times we’ve experienced the SOC readings of 60% when the batteries were dead -- not good. Note that the voltage reading on the app while there is a load on the system (e.g., electric heater) is different than when there is no load; the “resting” voltage may be higher. SOC Calibration The SOC requires periodic calibration. According to the manual for the 130 Ah batteries, the SOC can be calibrated simply by charging the batteries to 14.4 volts. The manual also states that fully charging the batteries to 14.4 volts should be done at least once every two weeks for battery life. Get the 130-Ah battery manual from Lithionics using the links below; at the time of this writing, Oliver has the incorrect manual posted in the Knowledge Base). When charging with shore power, it is not always apparent that the batteries have reached 14.4 volts, because when charging, the batteries only stay at ~14.4 volts for a short while before dropping back to about 13.6 volts. You can verify that batteries have reached 14.4 volts by monitoring battery voltage using the Lithionics app during a charging event. If you are unsure that the batteries are reaching 14.4 volts, you can at least confirm that the Xantrex charger/inverter is set to charge to at least 14.4 volts in the Xantrex app (https://support.olivertraveltrailers.com/portal/en/kb/articles/xantrex-remote-bluetooth-pair-operation) and, under Settings, check the custom absorption voltage. Ours came from the factory set at 14.6 volts, which is sufficiently high to get the batteries to 14.4 volts. Lithionics Firmware At least some of us that picked up our trailers in spring or early summer have batteries with outdated firmware. As I understand from Lithionics, more recent firmware versions have an improved SOC algorithm (our initial SOC readings were unreliable). You can check firmware version with the Lithionics app by clicking on a battery, then clicking on the settings “sprocket” in the upper right side, and then clicking on firmware. Our battery came with firmware version 1.0.05; I’ve recently updated to 1.0.07 by clicking on flash firmware. This has to be done with your phone in close proximity to the battery, and has to be done separately for each battery. Updating firmware comes with a “…this is a critical operation…” warning; you might want to check with Oliver or Lithionics if you have any questions about doing this. Has updating firmware improved our SOC readings? I’m not sure yet, but I think so. So far, the readings seem more reliable, but I’m still testing. SOC Calibration by Cycling A Lithionics rep told me that the SOC can be calibrated by “cycling” the batteries, and that this should be done every two months. Cycling consists of discharging the batteries to reserve voltage (e.g., ~12.1 volts) and then charging to 14.4 volts. However, the rep could not point to written documentation supporting this form of calibration. As the batteries support more partial cycles than full cycles (see graph below), calibrating by simply charging to 14.4 volts (assuming this effectively calibrates the SOC) seems better for battery life. Lithionics batteries will not charge from tow vehicle The standard 7-pin connection from tow vehicle to trailer cannot be used for charging the Lithionics batteries. Charging the batteries from the TV requires a DC to DC charger, which is an aftermarket installation. For more discussion on this, search for John Davies’ Redarc DC-to-DC charger installation description. Batteries Turn Off Twice now one or two of the three 130-Ah batteries have turned off when reaching low voltage (which happened because we were relying on incorrect SOC values). The SOC readings themselves looked OK, but the voltage did not correspond with SOC. The battery State in the Lithionics app reads “Off” for each battery when it is off. There is no flag on the Zamp or Xantrex control panel that alert the user to one or two batteries being off. The lesson (at least for me): monitor all three batteries, not just one, and note the Current, Power, State, and Status Code settings. If one or more batteries are off, turn the battery(ies) back on, and fully charge to 14.4 volts. Inverter Noise The Xantrex charger/inverter can be noisy charging the batteries with shore power (I’ve measured 60-64 decibels in the cabin when batteries are charging, and about 72 decibels adjacent to the inverter). The noise comes from (1) the charger/inverter fan and (2) the way in which the inverter is mounted (the fiberglass wall to which the inverter is mounted propagates noise into the cabin). The noise can be masked by turning on the A/C. Alternatively, the noise level can be reduced somewhat by lowering the charger current. In the Xantrex app, go to settings, and change the Charger Current from, for example, 100 amps to 30 amps. This will reduce fan noise. It will obviously take longer to charge the batteries with lower current. If you would like to be connected to shore power (to run an electric heater or the A/C, for example), but not charge the batteries (to avoid keeping them fully charged for long periods of time, or to reduce inverter noise) you can set the charger ignition control in the Xantrex app settings to “auto-on” (thanks to NCEagle for figuring this one out). In this mode shore power energizes the 110 outlets, the A/C, and the fridge, but does not charge the batteries. Turn the charger ignition control “off” to resume charging batteries with shore power. There are likely ways of re-mounting the inverter so that noise does not propagate into the cabin, with either a different mounting location or perhaps mounts using rubber bushings. Has anyone tried this yet? Xantrex Communication Errors Too often, I’ve gotten “Code 20” communication errors on the Xantrex remote panel. This can be resolved by pushing the red button on the 300A breaker under the streetside bed, waiting for at least 30 minutes, and then pressing in the little red flag on the breaker. Yes, this is a pain (I wish this breaker were more accessible), but it usually resolves the issue. Leaving the Xantrex inverter on battery mode for 25 hours or more will result in the Code 20 communication error. The time limit can be changed in the Xantrex app, but cannot be lengthened to more than 25 hours. As long as the inverter has not timed out, turning the inverter off and then on again at the remote panel resets the 25-hour time-limit clock. Battery Storage Lithionics provides guidance for storing the lithium batteries (see link below). Long term storage can include lowering the SOC to about 50%. Discharging to the appropriate SOC can be accomplished by turning on an electrical load (e.g., A/C or space heater) while in battery mode and monitoring frequently. Theoretically one could set the inverter cutoff voltage (in the inverter app, under settings), to something like 13.2 volts, but the highest cutoff-voltage option is 12.8 volts. Lithionics recommends keeping a log of SOC and voltage readings prior to and after storage for warranty purposes. ------------------------ Hope this helps. Again, please correct any errors that you see, and please add your observations and tips. Fritz ------------------------------------------ Relevant Links Lithionics battery app: https://support.olivertraveltrailers.com/portal/api/kbArticles/386680000012415191/locale/en/attachments/lpqvx861bbc9c842d48f7995281b07d0a193d/content?portalId=edbsnfe5dceb1ade7571879ff200cb63e14a94b62f48e3338c31a6401acd00130b0bc&inline=true). Lithionics battery manual: At the time of this writing, the Oliver Knowledge Base has links to Lithionics manuals for 125 Ah and 320 Ah batteries. However, our LE2 has three 130 Ah batteries as part of the 390-Ah package, and the manuals for the 125-AH batteries and the 130-Ah batteries are not the same. A manual for the 130 Ah battery can be found on the Lithionics website: https://lithionicsbattery.com/wp-content/uploads/2018/12/12V130-G31LRBM8-Battery-User-Guide-R1.pdf. Lithionics Storage Procedure https://support.olivertraveltrailers.com/portal/api/kbArticles/386680000012415191/locale/en/attachments/lrotz3ebee5a7020f42a58eb0d4db18a41356/content?portalId=edbsnfe5dceb1ade7571879ff200cb63e14a94b62f48e3338c31a6401acd00130b0bc&inline=true Lithionics FAQs https://support.olivertraveltrailers.com/portal/api/kbArticles/386680000012415191/locale/en/attachments/lrotz0edc34bc92ef4dce941bbb7f3f2d89db/content?portalId=edbsnfe5dceb1ade7571879ff200cb63e14a94b62f48e3338c31a6401acd00130b0bc&inline=true Xantrex Remote Bluetooth Pairing and Operation https://support.olivertraveltrailers.com/portal/en/kb/articles/xantrex-remote-bluetooth-pair-operation

- 54 replies
-
- 24
-

-

-

-
Oh, and 30 lb propane tanks and NH toilet....
-
Fully loaded with food and clothes for a month, solar, lithium, Truma, no basket or bike rack, full freshwater tank but empty gray and black tanks, our LE2 weighed in at 5,900 lbs. Of this, 5,250 lbs were on the axles, leaving a 650-lb hitch weight. Hitch weight is about 11% of total weight.
-
Thank you -- I'm glad I find the list useful. I have not updated it, but I see that Jim and Francis provided a link to an updated list (see earlier post in this thread). As I mentioned earlier, Oliver has addressed some of the things that are on the list (still worth checking, though). New items come up on this forum on a fairly regular basis (e.g., battery support bolts), and I expect that Oliver will continue to address these newer issues as well. Again, still worth checking. My general recommendation from our experience is to become very familiar with the electrical system, especially if you opt for the Lithionics batteries. In general, I'm satisfied with the lithium batteries, but it has taken more time and effort to become comfortable with how the trailer's electrical components work as a system. An electrical schematic for the electrical system would be SO helpful.
-
Battery Box Support Bolts Missing
Fritz replied to Ralph Mawyer's topic in Mechanical & Technical Tips
Thanks. I filed a ticket on October 5. I received this response: "Battery Box Support - I am turning this in to our Quality & Engineering team. Production uses a flange nut at this connection but I believe a Nylon Lock nut, Lock Washer & Nut or even a double nut would be better. We can have some nuts shipped to you but hopefully I will hear back from engineering to see what they say as far as any recommendations for the type of nut used." Haven't heard more on this yet. In the meantime, I put the flange nuts back on temporarily but will replace them with nylon lock nuts. -
Battery Box Support Bolts Missing
Fritz replied to Ralph Mawyer's topic in Mechanical & Technical Tips
The nuts from my battery support post bolts were also off -- I found them down below.... -
Monroe shock absorber warranty? Two blown and leaking!
Fritz replied to John E Davies's topic in Mechanical & Technical Tips
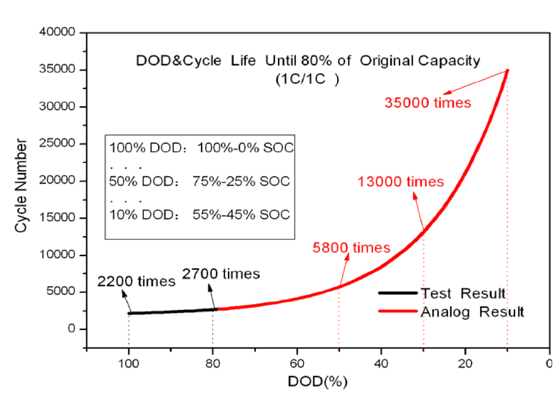
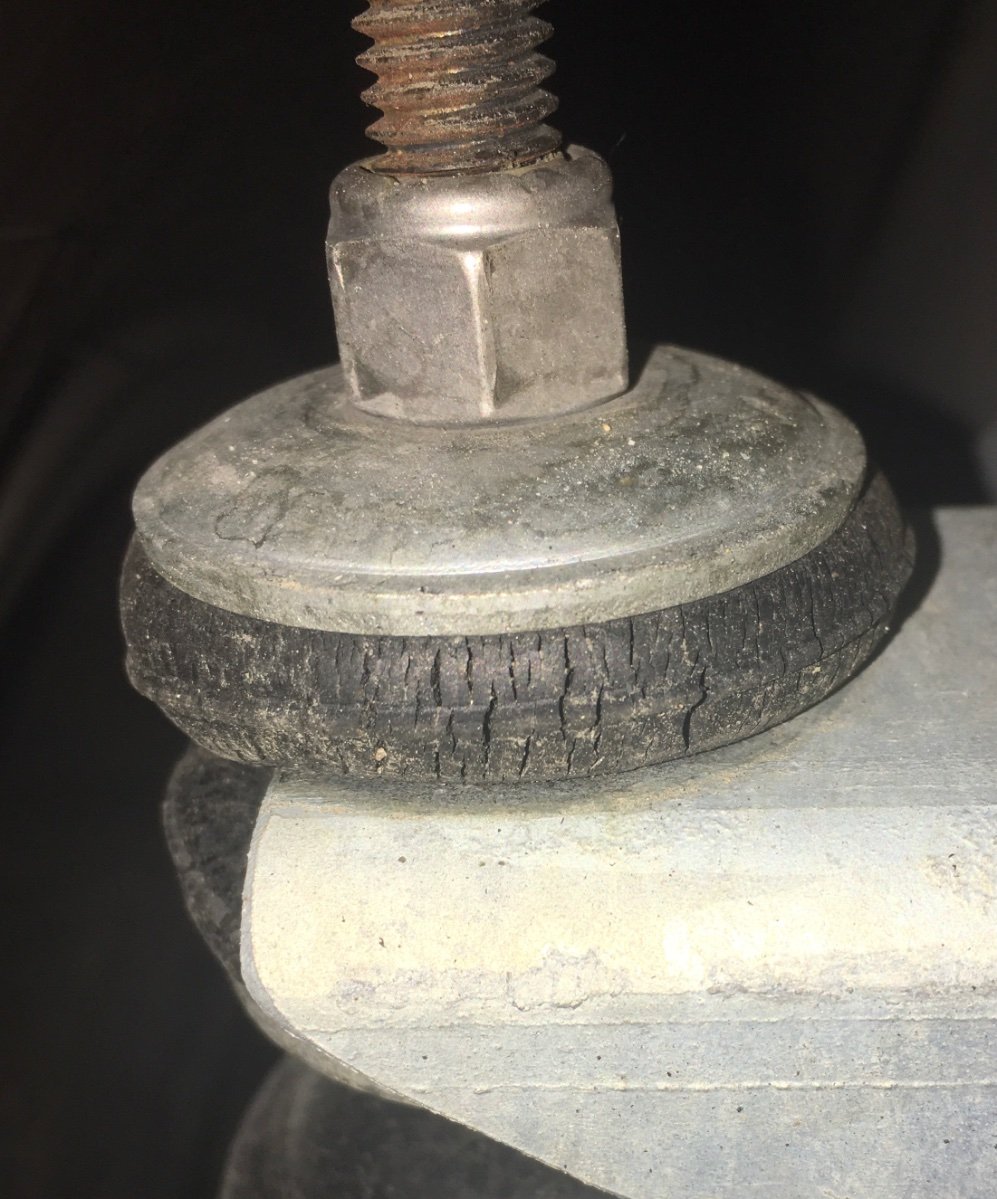
I opened a ticket on this topic with Oliver early last week. I sent them these two photos from our trailer, and commented that I would like assurance that the shock absorbers are properly mounted and safe (it does not look like the best of designs when the rubber gasket and mounting plates overhang the frame bracket). I received the following answer: " I looked under a couple of the camper and the spacing looks to be the same on all of the units as it is on yours. The cracking is normal as well." While the shock absorber mount may be the same on all of the current units, it is clearly installed so that only a portion of the rubber bushing is doing its job—the other portion doesn’t touch the frame mount. While this is probably safe enough, the shock absorber bolts might not need to be tightened as much if the entire bushing had contact with the frame mount, and in which case the rubber bushings might not be cracking so early in the life of the shock. In any case, the shock absorbers would not come with a full rubber bushing if the manufacturer intended for only a portion of the bushing to have contact with the frame. My next step was to send an inquiry to the shock absorber manufacturer, but without removing and inspecting the shocks closely, I do not see a brand or manufacturer's name. Does anyone have more information on these black shocks with no apparent brand name? I like JD's suggestion of installing a heavy flat washer on the upper mounts. For those of you with older trailers: what have you chosen for replacement shock absorbers?
-
We have the LE2, but I've looked at the LE1. Its appeal? smaller, more maneuverable, requiring smaller tow vehicle, better fuel mileage. But for me, however, at 6'2", it felt cramped. The ceiling height is 6'1", the upper cabinets are shorter, the bathroom is shorter, the closet is smaller. I think it is good for less tall folks. There have been various threads on what general layout changes might improve either the LE1 or LE2. Some folks have suggested a larger LE3. Owners of the LE1 will have a more informed opinion, but I think there would be a market for an LE1 that has a taller ceiling height, perhaps moving the galley to the street side in place of the current dinette (resulting in a larger cooking and storage area), and building a smaller dinette (or perhaps couch/bench with Lagun table) in the current galley area. This (IMHO) would make for a terrific solo traveler for the taller individual. Alternatively, the refrigerator and stove could be moved to the street side adjacent to the bathroom, leaving a small sink counter on the curb side (with a flip-up counter extension in the doorway); this would leave space for a seat on either side of the isle adjacent to the bed, and a dining table could slide out from (or at least be stored under) under the bed. This arrangement would allow for beds to remain made up, result in a slightly larger galley, and provide a dining area for two.
-
A forum search for "delivery inspection checklist" will lead you to a thread listing items to check when you pick up your trailer. Most of the items on the list are there because someone had to repair or change these items shortly after pickup. That said, some of the problems listed are more or less one-offs, and many of the items listed are now corrected in the manufacturing process and/or routinely checked by Oliver prior to delivery. But as with any evolving manufacturing process, new items seems to show up on a semi-regular basis, hence the ongoing thread.
-
Monroe shock absorber warranty? Two blown and leaking!
Fritz replied to John E Davies's topic in Mechanical & Technical Tips
While winterizing a few days ago I noticed that the rubber on these shocks are cracking (trailer is 6 months old), and also the shock absorber bolt seems pretty close to the edge of the frame flange. Do these things seems normal to you?
-
Has anyone found a good way to make window blinds open and close more easily? Some sort of lubrication, perhaps? One of ours slides very well with one hand, but the others seems sticky even with two hands. Ideas?
-
This is probably a dumb question (and no offense intended), but are you sure that the filler hose extended into the bottom portion of that antifreeze jug?
-
Thanks, all, for your help. And one more question for complete peace of mind.... Our trailer has a composting toilet (and therefore an unused black water tank). There are water lines under the front dinette seat, but no flush valve under the front dinette seat (as is mentioned in the winterization video). I assume (but can't seem to verify by looking) that these lines are not connected to the primary water system, and consequently there is no way that fresh water can enter this portion of the water system without actually using the blackwater tank flush port on the streetside front of the trailer (for which there has obviously been no need because of the composting toilet). Therefore there is no need to winterize this part of the system -- is that correct? Or...?
-
Thanks – that helps me see where some of the other plumbing goes as well. I was not able to get water to come out of the drain after opening it, but that is probably because I pumped most of the water out of the tank with the pump. I will try tomorrow to add a little suction to the drain port just to make sure that I’m getting fluid (in this case, maybe a little bit of antifreeze) to come out of the drain.
-
Are you sure that the hot water bypass valve is turned so that the handle faces the rear of the trailer? The bypass valve is featured beginning about 1 minute into the winterization video. .... (now this is an example of the blind attempting to lead the blind 😉)
-
And.... just to be clear, our trailer has a composting toilet and therefore does not use the black water tank. It does not appear to have a black-water flush valve under the front dinette seat. I assume (but can't seem to verify by looking) that there is no way that fresh water could enter this portion of the water system, and that therefore there is no need to winterize this part of the system. Is that correct? Or...?
-
Ah, thank you. I see that this valve won't be able to drain all of the tank, because is connected to a discharge port about 3/4 inch from the bottom of the tank. But I guess that's OK...
-
I feel like I'm missing something obvious, but where is the drain valve for the fresh water tank on the 2021 LE2? The drain location is not shown in Oliver's winterization video. Or is the way to empty the tank simply to pump it (mostly) dry?