mjrendon
-
Posts
183 -
Joined
-
Last visited
-
Days Won
1
Everything posted by mjrendon
-
My water pump will not pull antifreeze in from the rear inlet so I decided to partially fill the freshwater tank and try to pull in water from there. After filling the freshwater tank to 45% and turning the valves back to normal, I found that the pump would not pull any freshwater either. Note that the pump sounds normal and I checked the clear filter housing next to the pump for debris and found none. I was in Palo Duro Canyon a couple of week ago and the night before I left the temps dropped down to 25'F (was below freezing from 10:30pm until 7am). I had drained my tanks and unhooked the water hose before it started getting cold. The temperature in the water pump area never dropped below 38'F. Has anyone had issues with the LE2 vapor locking? Any suggestions on getting the pump to pull water/antifreeeze again? I am in Austin, TX so I am not in a big hurry to winterize yet and could use the blow-out method if needed.
-
John, 100ft seems long for 10-AWG. This calculator estimates a 4V drop from 14.5 V with 20A. https://www.calculator.net/voltage-drop-calculator.html?material=copper&wiresize=3.277&voltage=14.5&phase=dc&noofconductor=1&distance=100&distanceunit=feet&eres=20&x=0&y=0
-
Victron Smart Shunt - alternative to the BMV-712
mjrendon replied to Overland's topic in Ollie Modifications
I am also prepping my Elite 2 for this upgrade and not certain which busbar to get. Is the 250A Blue Sea 4 terminal appropriate with 5/16" studs? The 600A bus bar has 3/8" studs which I believe are too big for the connectors on the 4/0 wires that will be connecting. -
A quick update after our 12 day trip from TX to VA. The two new Battle Born batteries were really great. No issues at all. Installation of these two batteries was pretty straight forward, being able to re-use only the existing cables. Thank you to everyone for the guidance. We had two long drive days (12+ hours) where the we started out with a full charge on the 2 batteries and by end of the drive the voltage had dropped to 12.8V with only the fridge and rear camera on DC. Note we do have the ZAMP PWM charge with 340 watts solar, so I was a bit surprised that the solar was not able to keep up with the fridge better than this. My next step will be to install the 2 additional Battle Born batteries for a total of 4 (400AH), a smart shunt and most likely one of MPPT solar chargers. Still deciding which solar charger to get. Please offer your opinion if you can recommend on MPPT charger for the the Eliite 2 setup. For the four battery parallelization, I am considering using custom copper bus bars rather than wiring. Copying Overlands layout but using six 7 inch copper should do the trick according to my test bench layout. I am wondering if the bus bars connected to each terminal might be too rigid for an RV environment? Thanks again for the help and responses. Mike
-
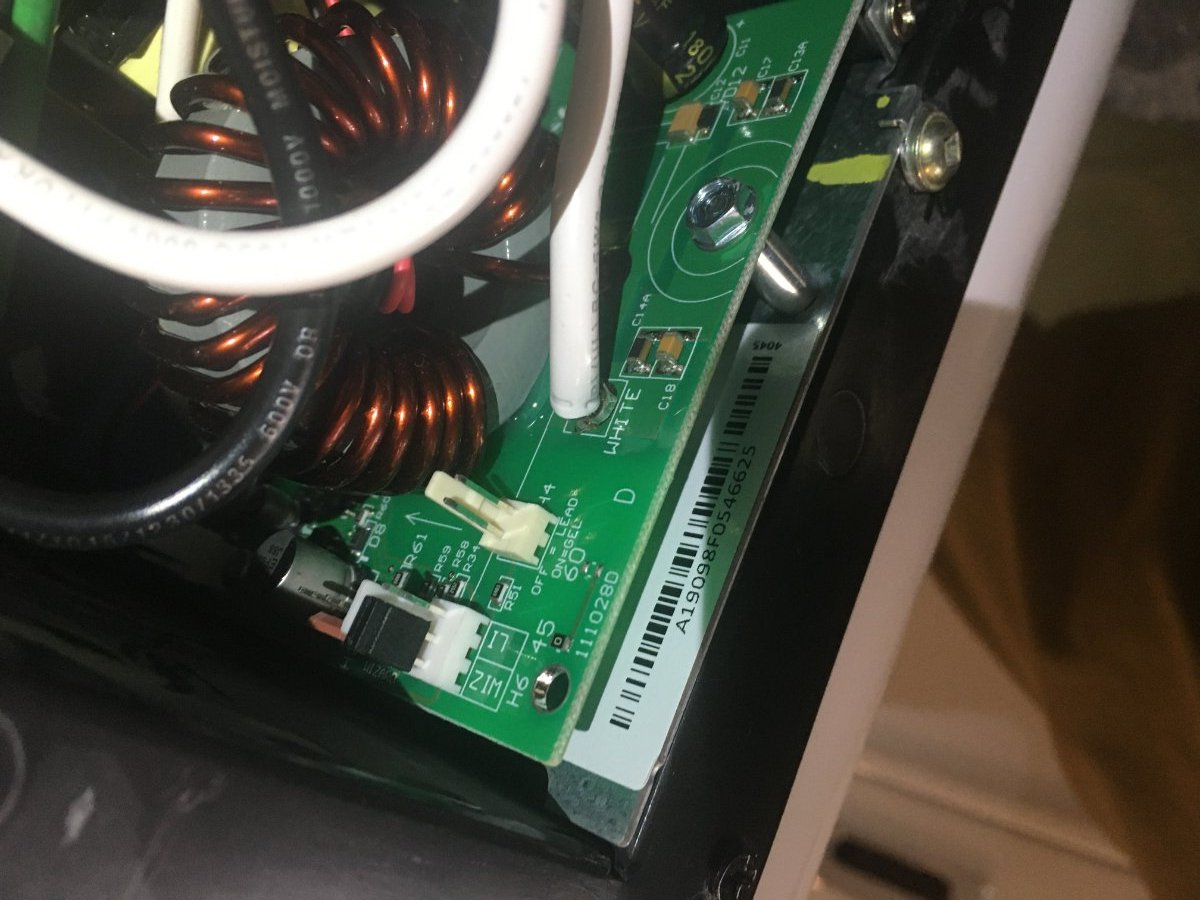
To check which version of board that I was using I had to remove the cover ( 1 square head screw) and then the cover unclips. At the top left corner is where I took the picture previously posted showing the WiZ/Li settings. https://olivertraveltrailers.com/forums/uploads/monthly_2020_10/IMG_3672.JPG.0f08d982adc35e6fe28251580c169ba8.JPG

-
John, If you see my post from 3 hours earlier, there is an image of the PD control module jumper with the pins set to WIZ (lead acid wizard I supposed). I simply moved the jumper to the LI side for lithium as directed by the Progressive Industries support team. It is worth noting that the module from my 2017 LE2 was replaced last year and luckily for me it included the capacity for Lithium battery support.
-
The Battle Born batteries arrived today so I removed the AGMs and started fitting the new batteries while re-using only the existing cables. Initially I tried fit just one of the new batteries but found it easier to install two, as the length of the existing cables seemed to work better that way. The ZAMP and Progressive Industries configuration changes were simple and I plan to test out those changes tomorrow. I will post pictures of the setup once it is completed.
-
John, Thank you for your reply. I have noted that hydraulic crimper. I still need to choose cable, lugs and tie downs. bhcnb posted a link to imperial supplies which has quite a selection. I had my Progressive Dynamics module replaced under warranty last year and the new module is Li compatible according to Progressive support team. Otherwise I would only get small portion of the new Lithium battery filled when attached to shore power. The ZAMP controller will support Lithium as well with a small adjustment to the settings. I will be in Hohenwald next week but unfortunately they will not be able to do a Li retrofit yet (2021). I will ask them to check out the charging system, if that is not part of the annual service.
-
Sorry everyone. I replied to the wrong topic.
-
ScubaRx, All connections except the one noted above as removed were tightened. Only the two back batteries remain in the circuit. back right = 6.3V, back left = 6.8V front right = 3.9V, front left = 6.9V (swollen on top) I see voltage drop immediately when turning LED Lights on (Main Cabin only) on the ZAMP from 13.6 to 12.5... continuing to drop from there in less than a minute to <12V.
-
While camping this weekend I found that my remaining 2 AGM cells would no longer lift the trailer. Since I am leaving this Saturday for 10 days, I plan to remove all of the AGM batteries and install a single lithium 100ah battery since I do not have the cable building tools, cabling or lugs yet to install all four. The other three will have to wait until I get back from this next trip. Note: This should be fine for lifting the trailer since the jack has a 30A fuse and the single battery has a max draw of 100A. Any suggestions on what type of materials and tools to get for making the new cables and tips for a 4 battery layout? Overland's pic above is very helpful. Is there anything under the batteries on the tray, like matting?
-
Andrew, That has been on my list since I bought the trailer. It is good time to put one in with the new batteries. I believe there were some threads on the older forum with pics and details.
-
Overland, Thanks again. I knew about the setup changed on the ZAMP but I was unaware of the PD module swap out. I will call them tomorrow to get the correct module ordered.
-
Thank you to everyone that replied. I am going to cancel the order for the BB GC2 cells. I have measured my tray/compartment and it has inside dimensions of 14"W x 21"D x 12.75H to the aluminum block for the door latch. Overland's photo verifies that the standard batteries work without any modifications, other than the custom cables needed for the connections. Does that black tubing contain the main lines to the distribution panel and solar? There certainly no end to the different types of lugs in the link that bhncb posted. What tooling is needed to make your own battery cables?
-
I should have asked this in my previous reply. Does anyone have advice on fitting 4 Battleborn GC2 cells in the Oliver Elite battery tray? Thanks, Mike
-
Hopefully this helps someone else with the four AGMs that runs into similar problems. With the left front cell swollen I decided to take the front 2 cells out of the circuit by removing the connection between the right front negative and the left front positive (see yellow arrow pointing to this lead). Now with solar active the voltage on the rear right and left cells in series is 13.2V. The left front is measuring 6.6V and the right front is 4.2V. I am thinking that this is workable until the Li GC2 cells arrive and can be installed. Mike
-
I have an appointment at the factory service center in less than two weeks and noticed late last night that my 2017 Elite 2 had difficulty lifting the front up while when I was getting ready to tow it home in prep for a short trip this weekend. Voltage inside read 10V, it was getting dark out and I have the solar package. This morning I opened the battery compartment and it was obvious that the front left cell was swollen on the top. I would install Li batteries at the factory, however, the new Li package will not be available for retrofit until next year. I am hesitant to spend money on lead acid now but I am sure that at least one of the AGMs must go. What other options should I consider in the short and long term? Regards, Mike
-
Have you got front and back Voyager wireless cameras?
mjrendon replied to bradbev's topic in General Discussion
Hobo, I can't really say if you are missing something here since I only have the single rear view camera. It seems like it would be handy to have a second camera for backing up to the hitch. Rather than starting a new thread, I revived this older one, in the hopes that I could find out if there still was an option to mount a second camera. Mike -
Have you got front and back Voyager wireless cameras?
mjrendon replied to bradbev's topic in General Discussion
To make a long story short, I have one installed camera on the rear of the Elite II as well as a new monitor and an extra camera. My question is should I bother installing the second camera, and if so, where do you recommend I place it? Thank you, Mike -
Sorry, I was not implying that your house battery voltage dropped, causing the failure, but rather that WifiRanger added this component to their systems to address what some of their users have experienced when they were plugged directly into the house battery and the voltage dropped to below 12 volts. The 24v step-up transformer addresses this issue, but at the expense of adding another failure mechanism.
-
Something like this would be a handy backup item to have for when the step up transformer fails. auto to 5.5x2.1mm
-
It is likely the 24v step up transformer that has failed. The router uses a common 5.5x2.1mm DC connector and can run on anything between 10v and 50v. The step up transformer is used in RVs to reduce router performance issues that sometimes occur when the house dc voltage drops below 12v.
-
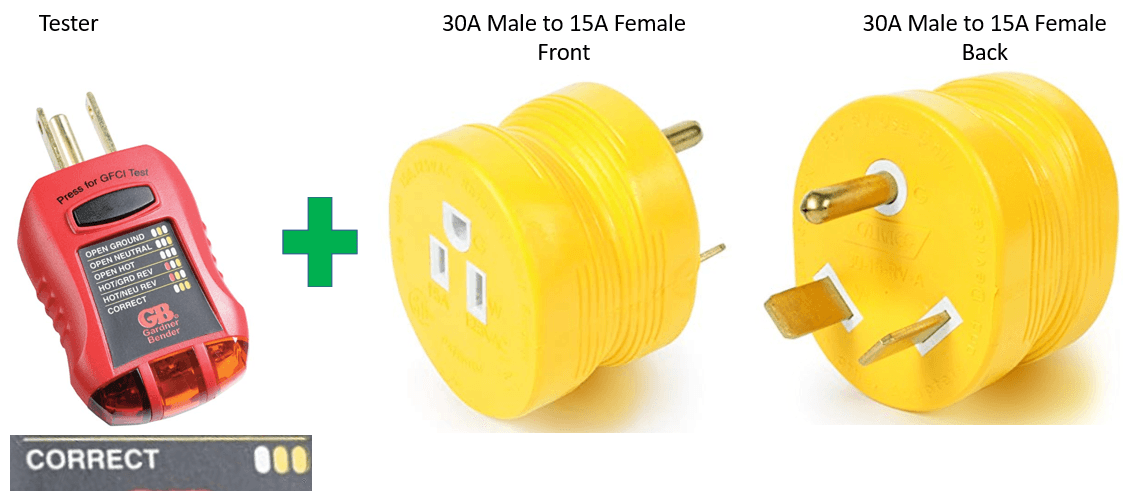
To clarify the testers use for a 30A setup, I also keep a 30A to 15A converter with it so that I can use the tester on the power source before plugging into the RV. If you don't see the correct output (off, amber, amber lights), you will likely have an issue with the power surge suppressor. The 30A converter is also $5 at amazon - Link
-
I carry one of these in my tool kit for checking 110V AC lines. It will point out the most common issues. $5 at Amazon - link
-
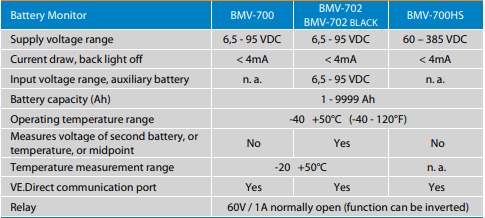
Great discussion and thank you for posting your results of research. I believe the battery monitor would be a very useful tool for keeping track of the charge state of the batteries. The BMV-712 has a current draw of <1ma vs the BMV-700 & 702 <4ma. They all have pretty small current draw. The risk is that without any charging they will eventually drain a battery... completely. With Li batteries, they can be ruined by doing so. The BMV-712 will take 4 times as long for this to occur vs the BMV-700 & 702. Mike