

Galway Girl
-
Posts
551 -
Joined
-
Last visited
-
Days Won
17
Posts posted by Galway Girl
-
-
I'll be watching for that...I'd not heard of that issue but I could see how that may happen if the USB charger is using a switcher supply inside.
Some good ground shielding on the bottom of the tray and a choke on the ground line could mitigate that if it happens.
If I have that issue I'll report back.CS
-
 1
1
-
-
I followed Topgun2's advice and executed a similar install to enable a swivel arm in our new F350.
(EDIT - I also pulled the 20A fuse for the Power Port before doing this work.)
1) I started by removing the dash tray (I used painters tape to protect your dash from scars from the plastic pry tools).
2) Snap off the "speaker cover" it is hard to pull off as it's secured by clips in 4 corners.
3) Remove 2 - 7mm bolts in the front (windshield side) of the tray.
4) Remove the 2 - 7mm bolts on the top of the radio stack front surround.
5) Pull out the radio stack surround, and loosen 2 more 7mm bolts below the radio facia to remove a retaining facia (holds on the side trim stacks.)
6) That allows you to pull straight out on trim to the right of the radio which includes the a/c vent and more importantly access the back of the power point (cigarette lighter).
7) Splice onto the wires from the Cig Lighter port. Feed the wires up into the area above the radio and below the speaker tray.The wiring diagram below was supplied by the Ford BBAS service for 2021 F350.
The Cigarette Lighter B+ is the Green/Brown Stripe wire, and Ground is Black with Blue Stripe.

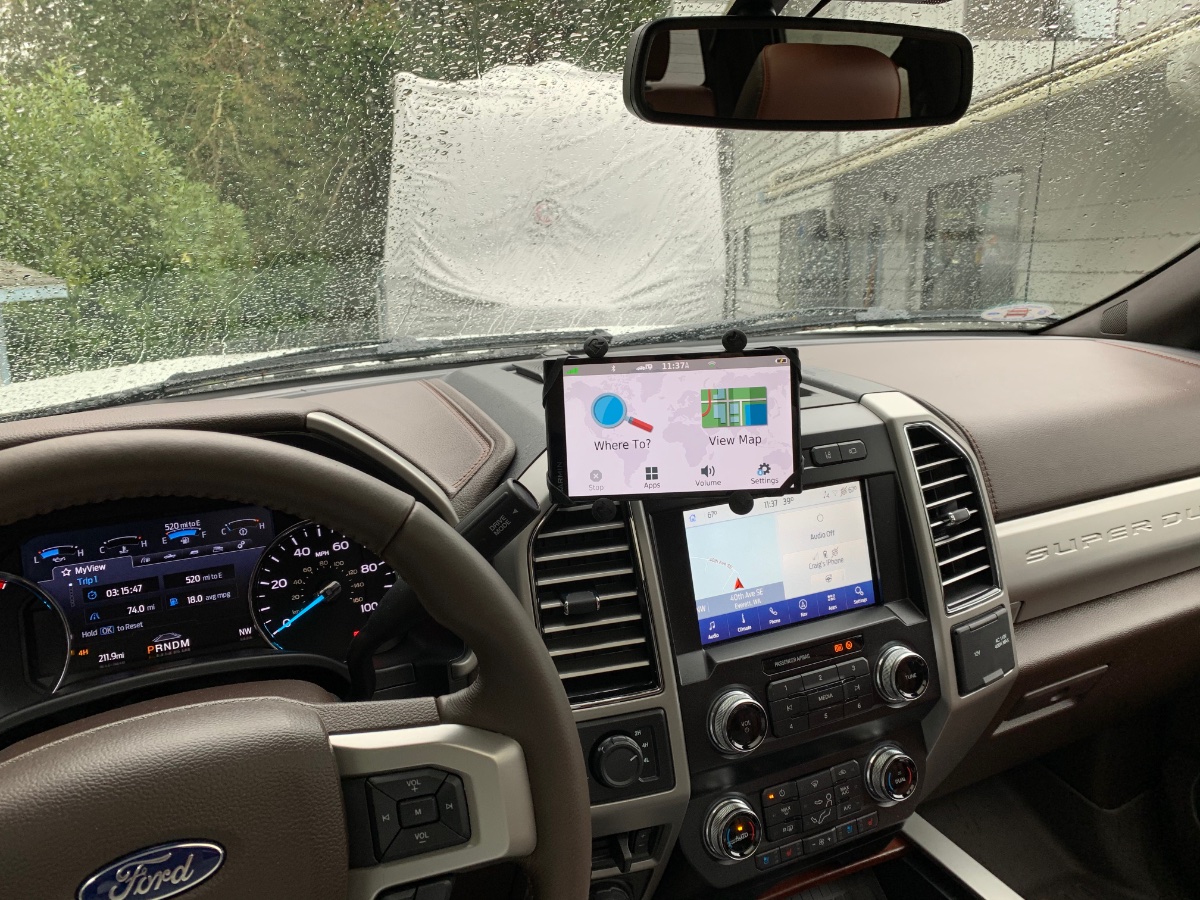
Finished install with Garmin all setup.
Since the tray removal and wiring was a little tricky I made a quick video showing tray removal and re-install.
I considered using the up fitter switch, but realized that there wasn't enough current draw to warrant all that effort and using up a switch.
Also, I learned that the "through the firewall" wires ended up making me wish Ford would allow 6" more wire for the "through firewall" feeds.
They are so short, you need to completely remove the fuse panel to get access to the bundle of 4 through firewall wires. So I stopped that effort.I wired into the same dash 12v power port circuit as Topgun2.
That port dash circuit has a 20Amp fuse, and my devices don't pull more than a couple of amps normally.
My backup camera plugs into the 12V power port in the tray, and my Garmin into one of the 2 USB ports.
Here's the video showing dash tray removal and reinstall.-
3
-
 1
1
-
-
I think this thread from the Mobile Internet resource center may lead you to some ideas:
-
We'll be in Colorado next fall (October) and maybe we'll see you around.
Craig & Rose
Hull 505 - Galway Girl
Here's our Blog which features write-ups on NW Campgrounds, Some Maintenance Items and an Amazon Oliver Trailer Outfitters list...which includes comments on how the items work for Olivers.
-
1
-
-
Perfect thanks for the info.
-
 1
1
-
-
Propane:
Propane use also depends upon if you've decided to use propane for outside fire pits, BBQ's or Gas Grills.
We love having a gas fire pit as it provides heat but cuts down on smokey smells into the trailer.
We also have often used either a weber gas Grill or our CampChef grill system for cooking outdoors.
We bought and love the propane quick connect option.We find we use those external devices as well as running the fridge on propane.
With all those gas uses, we decided to buy the 30lb tanks and have been happy to have more rather than less propane as it doesn't go bad.
We've even found that when we stop to have the tanks refilled that the person filling them will lift them in and out if you simply ask. (In a couple cases, we had drive up filling service.Batteries:
As to your comments about batteries...we didn't have the option in 2019 for factory lithium.
I would have gone right away to lithium, but as normal with newer technology things are changing fast in the market.
If you decide to upgrade later to lithium you'll want to make sure to upgrade the "Progressive Dymanics Charge Converter" that is within your trailer. (It's where your breakers and fuses are also available)
The default on board Progressive Dynamics battery charger is designed for Lead Acid/AGM's.
There is a different version that works for LiOn battery chemistry.
(You might check with your salesman as now that on board charger may be lithium compatible with a switch setting, if so you'll be ready when you want to upgrade to Lithium in the future.)
Here's our BLOG it may have some useful info and includes the "Oliver Trailer Outfitters" list on Amazon.Blog for Hull 505 - Galway Girl
(PS - Our daughter lives in Madison and is the set designer for PBS Wisconsin...we plan to come back there next September (if COVID is dropping off.)
Hull 505 - Galway Girl
-
1
-
-
2 hours ago, SherMica said:
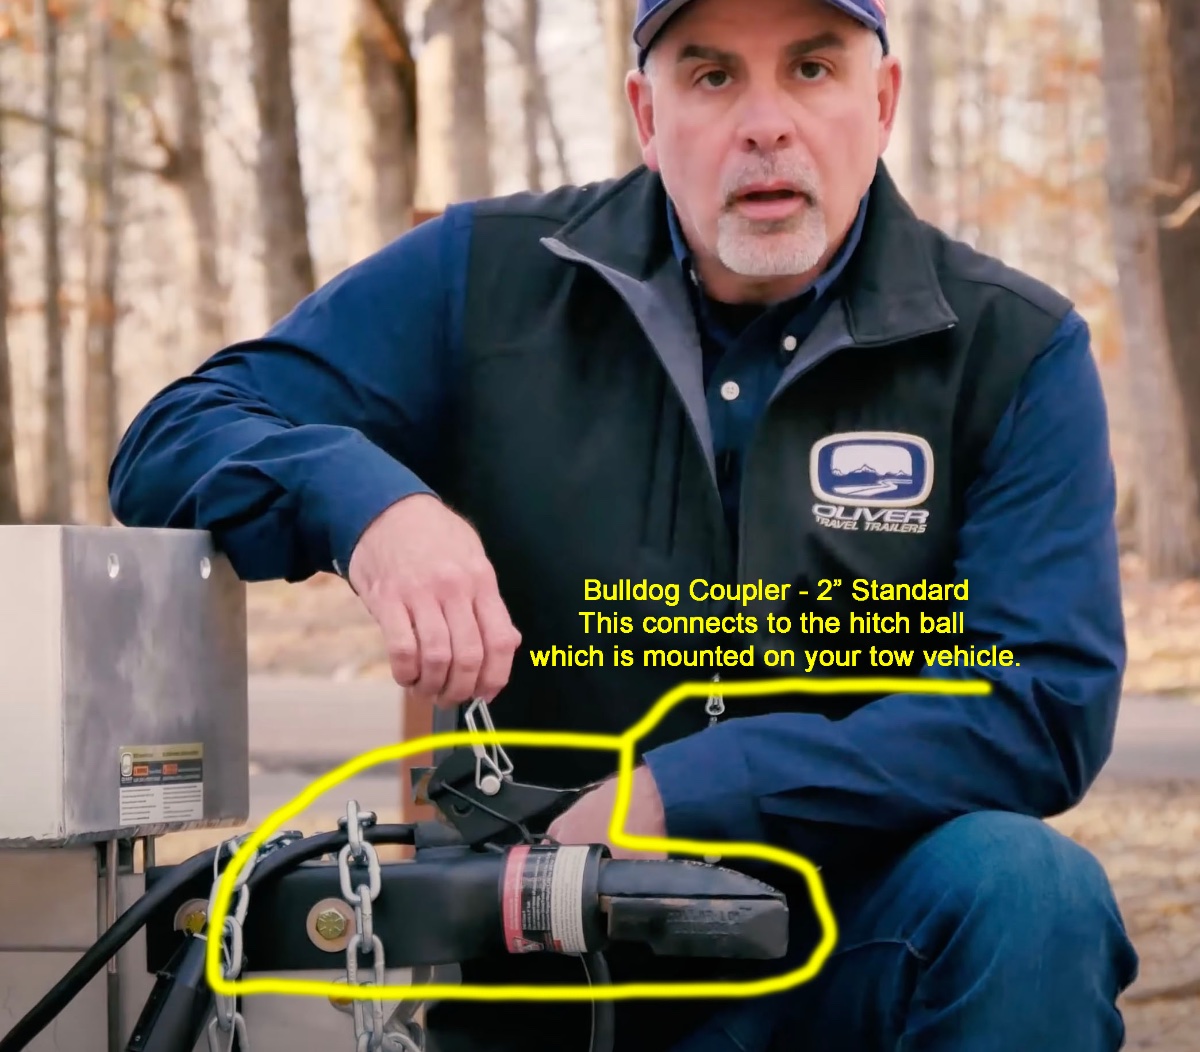
not part of the “bulldog” and “Anderson” I am getting with the Elite 1?
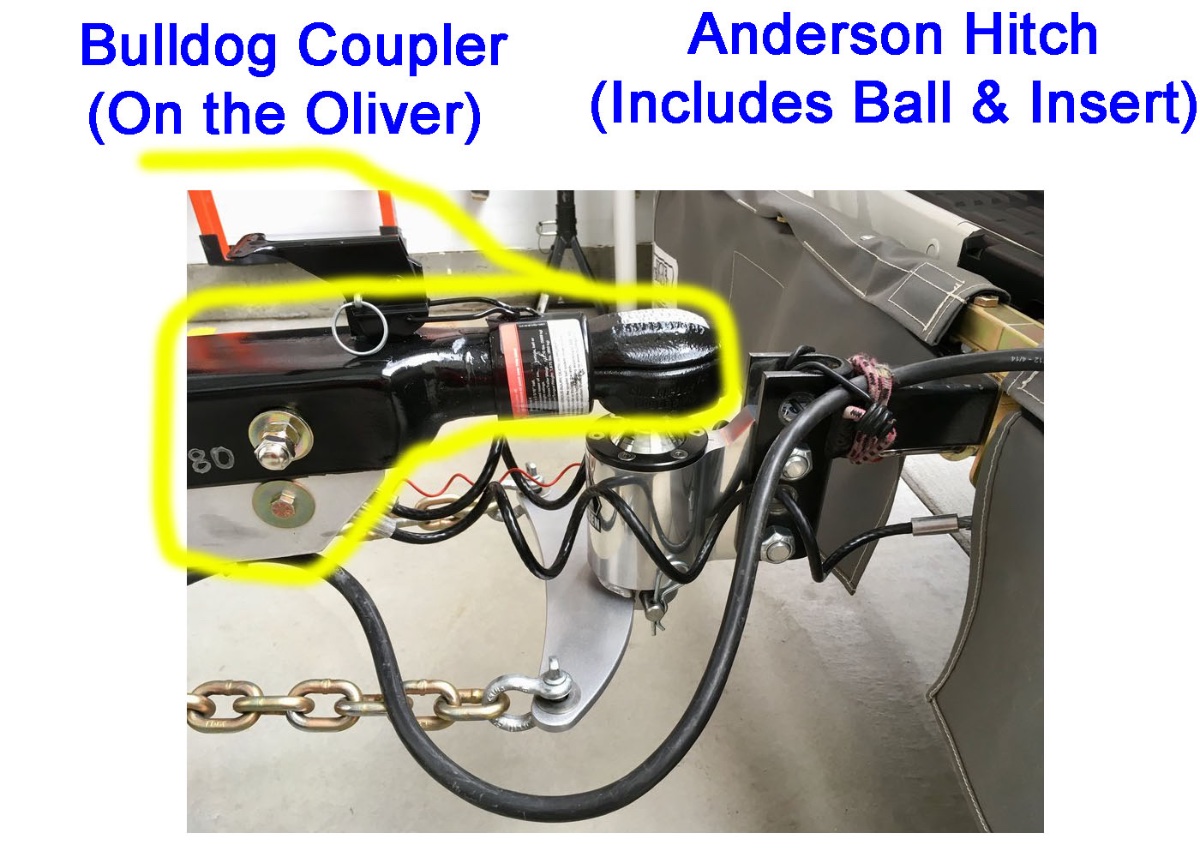
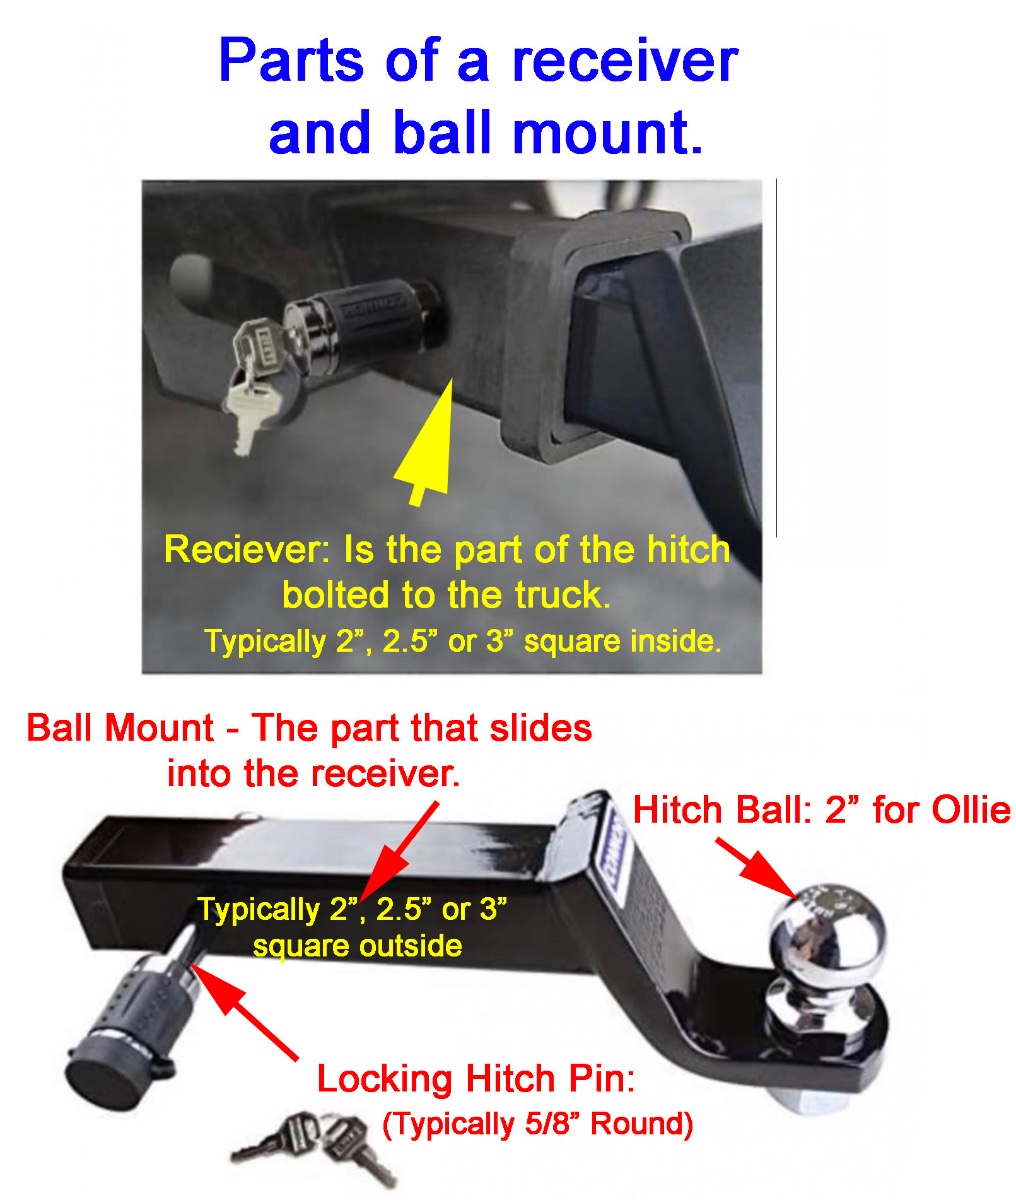
The "bulldog coupler" is the connection point bolted on the trailer. The bulldog coupler connects to the Anderson trailer hitch ball which is slid into the "receiver" on the tow vehicle.
When you hook up that the "Bulldog Coupler" is lowered down onto the "Anderson Hitch Ball" as shown below:
That picture of the hookup is from John Davies...(thanks for the great post John.)
Have fun with your new Ollie.
CS-
2
-
3
-
-
On 12/14/2020 at 11:31 AM, topgun2 said:
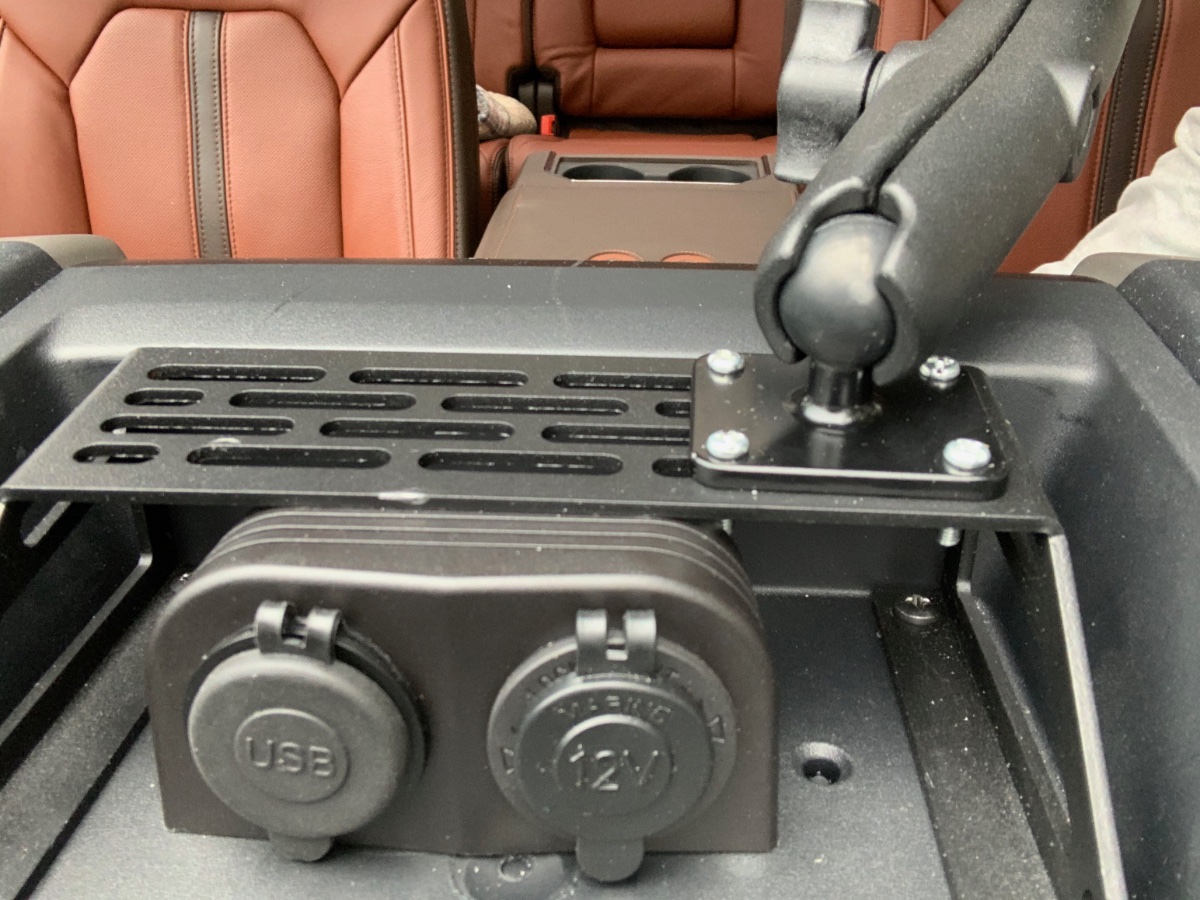
Hardwiring the 12 volt/2 slot USB that used 3M double sided tape to attach to the underside of the Builtright rack was a bit un-nerving but not really difficult - let me know if you want details.
Bill,
Fantastic install ...thanks for posting.
I would like some more info on the 12V adapter. Did you wire in a USB/12V outlet plug into that upper tray?
I'd be interested in knowing the part for that plug.Craig
-
1
-
-
Hitch parts definition based on your pix...you'll be fine and we hope to see you on the road some day.
-
2
-
1
-
-
SherMica,
If you camp somewhere and leave your camp to drive off...you may want to consider adding a lock for the whole coupler like this one from Progressive Industries. (The big yellow thing the rep is telling you to buy is another form of this type of "Wholer Coupler Lock".
They are hard to defeat (compared to other locks) but they are not cheap.
We use this lock for peace of mind when we leave our trailer alone and take our truck out sightseeing.The model for the 2" coupl the Progressive Industries 2178-B: *B stands for Bulldog Coupler*
https://www.provenlocks.com/collections/2-trailer-coupler-locks/products/model-2178-bHere's a "youtube" video here to explain how it fits on the Bulldog couplers used with Olivers.
Video of Progressive Industries Lock for Oliver
Finally, here's a pix of it on our Oliver.
We put this on any time we're disconnected from the trailer and plan to be away from our campsite.
Craig & RoseHull 505 - Galway Girl
-
1
-
2
-
-
Roughneck 24 Gal -
Outside Dimensions 26.000 in. L x 18.500 in. W x 17.000 in. H
Inside Dimensions 20.000 in. L x 14.500 in. W x 15.000 in. H-
1
-
-
That descent was what finally caused my wife and I to upgrade to a F350 Diesel.
-
2
-
 1
1
-
 1
1
-
-
Thanks John...as ever your posts help us all improve our Ollies.
CS
-
Xuxu
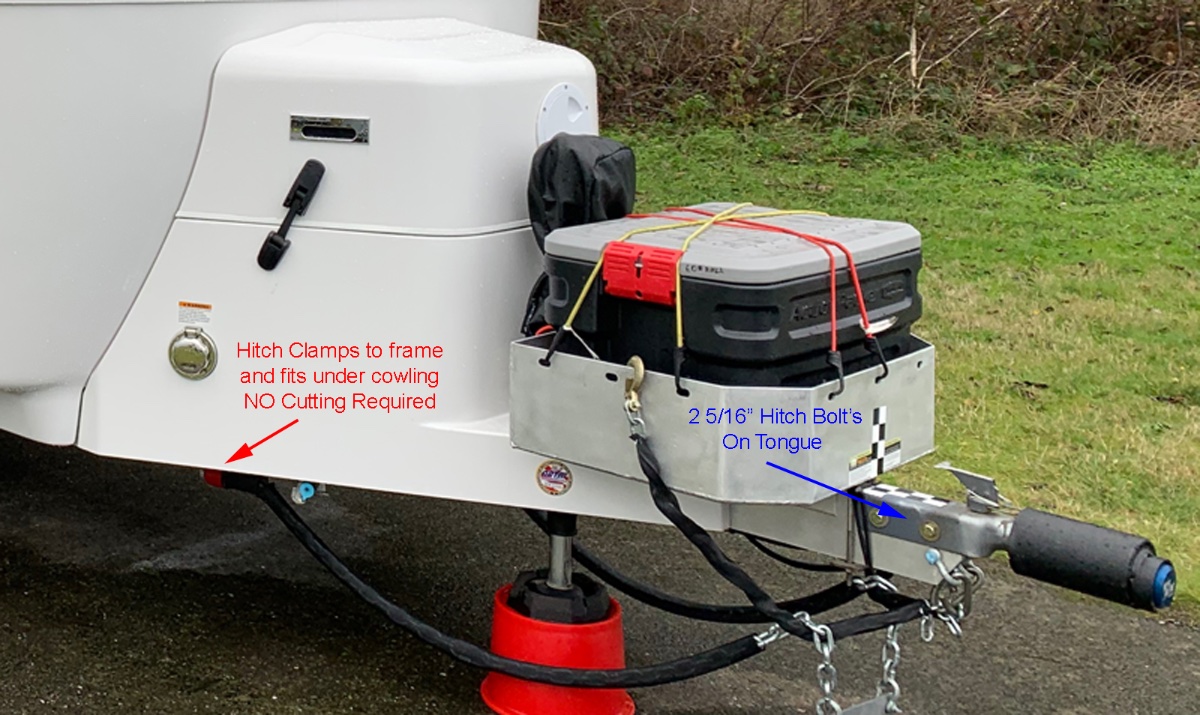
Here's a pix of a 2 5/16" Coupler and how the Anderson Hitch Parts Fit on the Tongue.
They fit perfectly under the fiberglass without cutting.I added chain shrouds to our Anderson Chain's to keep them from getting scratched up and preventing rust.
Since we've upgraded to an F350, we won't be using the Anderson Hitch with 2 5/16" ball much longer so it's posted for sale in the classifieds section as is our "Towtector" rock guard system.
Craig
-
1
-
-
On 12/23/2020 at 10:44 AM, John E Davies said:
I am going to mount three of these Perko vents (used in the battery compartment door) directly below the join seam with the pantry, to exhaust the heat out of the battery area.
I'm following this closely.
From what I've read am I interpreting the location for the redarc correctly and the venting in/out?
1) You will mount the Redarc unit under bed (street side) of the trailer.
2) Your source to power for Redarc will be a connection to cables that are currently running to the batteries from the 7pin of the trailer.
3) For cooling, you are bringing in cool inlet air into the battery box with a small fan mounted under the battery box.
4) You will open up some inlet holes into the under seat area for the box fan to pull in air from near the floor.
4) The outlet air from the fan pushing into the battery box will go back into the trailer from the battery box...and through new chrome vents just under the pantry.I'll re-read but I'm very curious what you learn as I'm just a month or two behind in a similar project.
Craig
-
1) Awning - I have 2 domestic awnings, (camp side electric), street side manual. I think the regular electrics now offered would be fine without upgrading.
2) Battery Choices: Here's an interesting article (and video) about Lead Acid, vs. AGM, vs Lithium Batteries to help you decide:
https://mortonsonthemove.com/best-rv-battery-test-results/
For our use case we are trying to get the longest run time out of my battery for boondocking, so I'm planning to upgrade to Lithium, and added solar.
3) We have a truma. Pro - it sips fuel, weighs less as it's not a 6gal tank, Con - you still need to run out about a liter of water out to get to the HOT water but then it's continuous.
We also take navy showers...I suppose the standard 6GAL water heater has some advantages...but I'll let owners with those chime in.4) That change can be done later for sure. A lot depends on how you plan to camp. For the composter, there's no current way have it direct urine from the Composting Toilet into the Black Tank so you'll still need to dispose of urine on a timely basis. The weakness with a standard toilet comes if you plan to boondock for longer times. For two of us we can make it about 4-6 days before we are full on the black tank. If we had a composter we could likely go 2 weeks.
5) We have only seen one trailer with standard white and it looked great as well.
6) Again a lot depends upon your specific mobile data use case. Cell Boosters vs. WIFI Boosters
The newer cell systems all use MIMO technology so your hot spot device (or phone) actually has multiple antennas built in and they have wider bandwidth because they use signal diversity to combine together the "best signal" possible.
If the "cell booster" antenna is a single channel small whip, it may only be useful when the signal levels are extremely low...otherwise your device will have better BW running off it's internal MIMO Antenna.Here's a good article from "The internet resource center" on this topic.
https://www.rvmobileinternet.com/guides/mobile-cellular-boosters/The WIFI booster can also have a "modem" installed in it and that would make it also a CELL booster in function.
If I had it to do over, I would simply buy the WIFI Booster, and put in the Modem for my carrier (AT&T)...
That kills both the WIFI and cellular boost capability and it also provides a plug in for hotspot's via USB input.
(So you can put your phone or hotspot into that wifi booster, and create a VPN for your campsite.)MUST Have - I wouldn't be without solar.
There are so many things that solar can provide, one is the ability to charge your batteries while you are in transit.
Most of today's 7 pin connectors only drive about 3-5 amps of current, so they can only KEEP your batteries charged, but they don't really recharge while you drive.
(In the worst case, if you drive with your fridge on DC, you'll actually get to camp with batteries much lower than when you left. Solar helps a ton keep those house batteries charged. Another other option if you don't have solar is to add a dc to dc charger unit. that directly connects to cables your vehicles battery back to Dc to Dc charger which would be near your trailer batteries.Final take:
If I were buying right now...I would1) Buy standard awnings but put on both sides of the trailer (key to controlling heat in southern locations)
2) Buy as much solar and lithium as I could afford.
3) Buy the WIFI booster but add the modem insideIn the long run those investments will pay back mightily improving your camping experience.
Hull 505 - Galway Girl
-
1
-
3
-
-
Dent Acre's Campground - Idaho -
Dworshak Dam - Army COE Campground with Full Hookups .
This campground has a tiered system so each row of trailers is higher than the ones below so there are great views of the lake.https://www.recreation.gov/camping/campgrounds/233487
-
3
-
-
Thanks for that info and link ...I just spotted that yesterday as well.
I see several folks doing upgrades so I'll try to learn from what others have posted as well.
I'm in investigation stage for several upgrades:
1) Replacing 4 - 6V AGM's with Lithium at some point. (My AGM's are 16 months old and not sure what typical life will be..)
2) Also adding a smart shunt to better monitor battery state.
3) Add Dc to Dc Charger for the trailer so the Lithiums can be charged while driving from the Alternator.
4) Adding a battery in the back of our truck for running our ARB fridge which will be mounted in the truck. (That would also need a DC/DC and Solar Suitcase)
5) Adding more solar on the roof.Main Suppliers in Consideration : Comments/Feedback welcome
Redarc for the DC/DC charger's because they are rugged and can be in the weather if needed.
BattleBorn and ReLion for batteries.
Victron for the smart shunt monitor (Bluetooth only version)Any Ideas / comments welcome as I'm in the planning stage.
I've not yet calculated my LOADING and Cable Requirements yet but I found this really great page for Calculating DC Loading and Wire sizes.
This is from an RV'r who's been around the block and also been a power systems designer in Automotive.Hope the link is of some use:
http://www.rv-project.com/masthead/index.php
http://www.rv-project.com/tips/wirecalc.php
http://www.rv-project.com/tips/dcwiring.php
Craig
-
1
-
-
Just a nudge that I have upgraded my Tow Vehicle from an F150 and have several items that are available in the classifieds area.
Posting here just to update.
Still available:
-
Anderson Hitch ( 2 5/16" Version)
-
Towtector - a gravel control system that bolts onto the hitch.
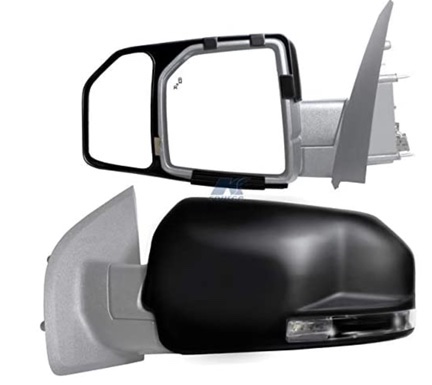
- Mirror Extensions for F150 (never used).
And a few other items.
Other items including the water filters, the Swingcase tool boxes, the Canopy and Sumo Springs have all either sold or been traded in.
C. Short
-
Anderson Hitch ( 2 5/16" Version)
-
Bryan,
Looks like the battery straps have metal T clips that pass through a slot the rail, instead of a j shaped hook that gouges the battery.
Is that what we see in your first photo?
CS -
6 hours ago, Susan Huff said:
We purchased the plug protector, but our 2021 Elite II will not have the storage basket. Where might be a good place to install?
Option one - use zip ties and attach it to the round pipe that the power jack head is on...
Option 2 - as Frank showed in his Facebook Post, he simply attached with stainless bolts with larger backer stainless washers on the back side of the cowling for stress relief.
-
2
-
-
I think this is the raw data used for making the Table John Posted at the start of this thread about 2 years ago. *the data seems to match from 40 PSI up...
Just putting it here in case the original data set get's lost as those tires are no longer put on Olivers...nor appear to be mfg in Canada.
-
1
-
1
-
-
We are also planning a trip to the SW in Jan/February.
I thought I'd share a screen shot of the RV Trip Wizard plan we're developing.
One thing I'm also concerned about is availability.
My spots down the coast are locked in but after my last stop in Death Valley in Feb we are OPEN...
I've not traveled into AZ or Mexico with a trailer before, and I think we may end up being kind of late for planning sites at State/NP.
In any case the planning tool is very helpful.
Craig
-
1
-
1
-
-
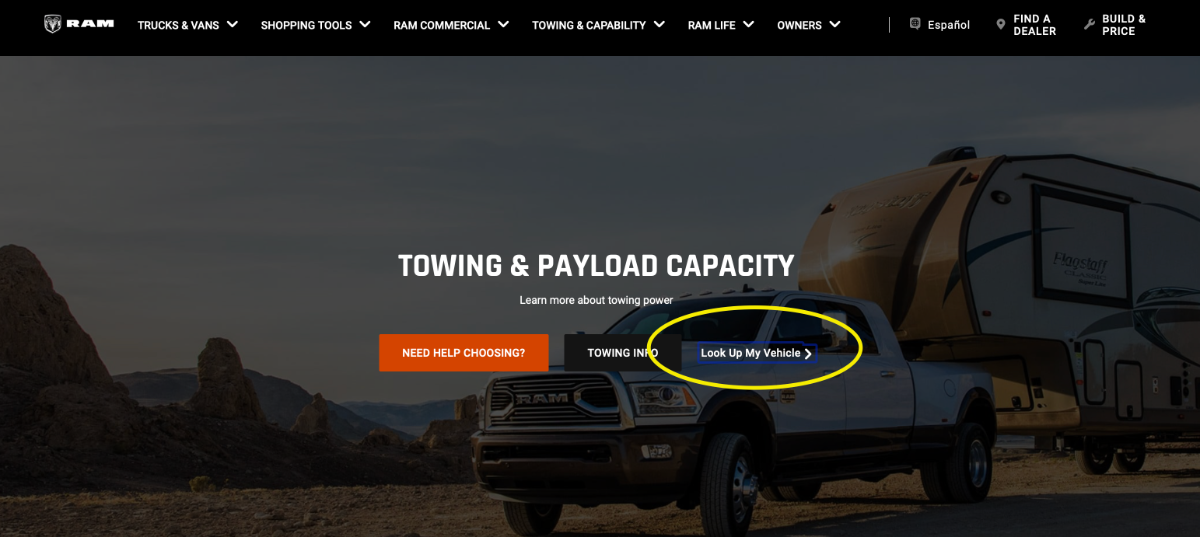
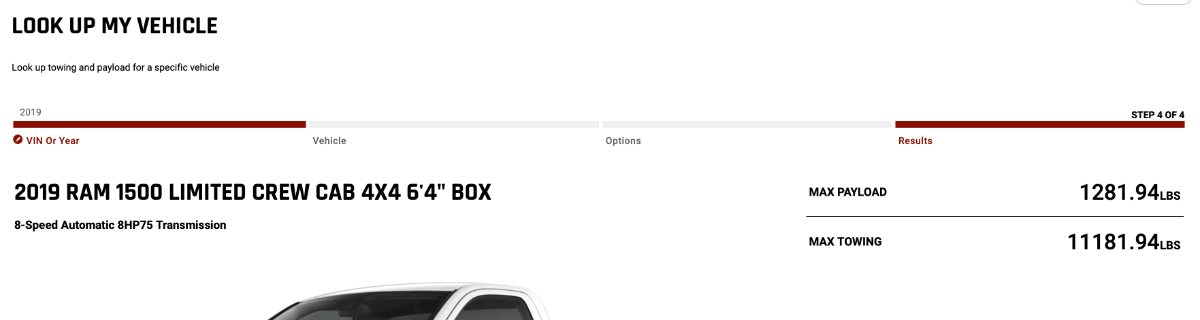
Also for RAM's when you find one outfitted the way you want, don't forget to check the PAYLOAD sticker on the Door Frame before you sign off.
If you can't see the vehicle on the lot, RAM has a way to lookup the payload based on the VIN.
https://www.ramtrucks.com/towing-guide.html
Once you put in the vin you'll see out the door of the "factory" payload. *See the image below*
While the picture isn't ever correct (see the disclaimer below the picture of the truck) , it should be the correct payload and tow rating.
One thing for sure....don't under buy on Payload...the more glitz in the truck, the lower the final payload.
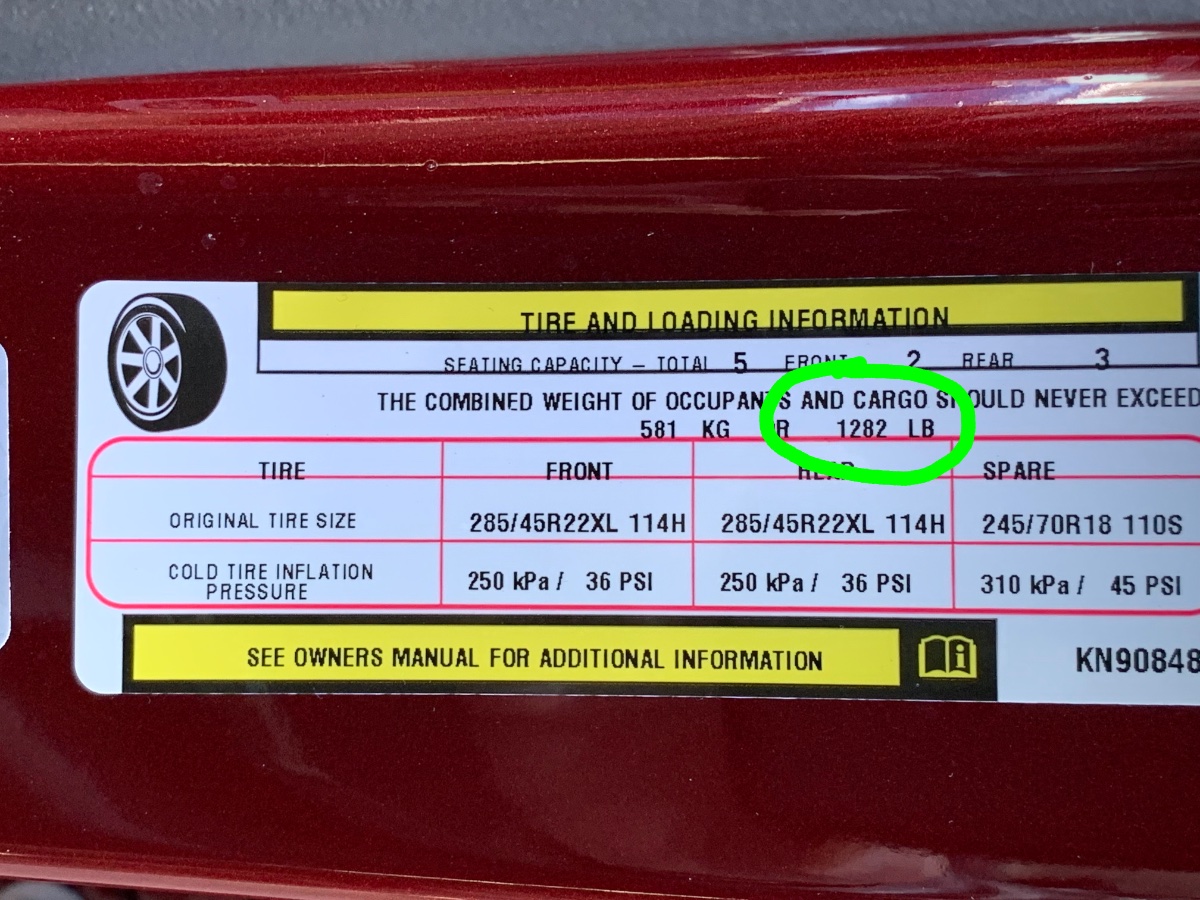
Then as a final check, ask for or go take a PIX of the door jamb Payload Sticker before you sign.
I found that on some RAM's their ONLINE payload stickers didn't match the final sticker upon delivery.
This one matches with a bit of round up to 1282 lbs payload. (This was a fully loaded truck) one with a much lower trim level had a 1700 lb payload.
-
2
-


Garmin 890 and F-150 install
in Towing an Oliver
Posted
This video explains the issue of interference between after market accessories and the TPMS systems.
Before I retired, I worked for 40 years in a Test Equiment and Solutions business that provider Radio Frequency monitoring and testing systems to customers doing EMI and RFI emissions tests. (Like the FCC , and almost all radio manufacturers.
If the USB device I installed causes issues, I’ll yank it out and take it back to my Local Office and run an RFI test and let you all see the results.
CS