Galway Girl
-
Posts
781 -
Joined
-
Last visited
-
Days Won
25
Everything posted by Galway Girl
-
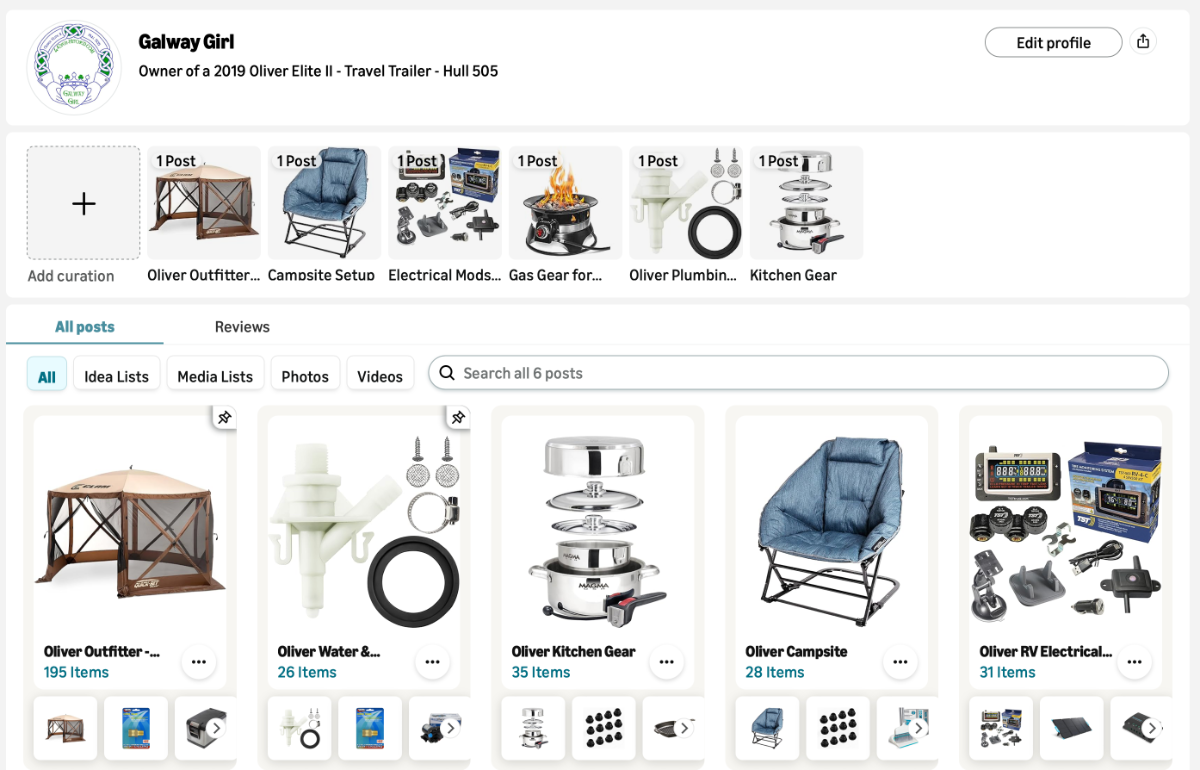
I just finished updating my blog pages to include some parts that have become hard to find for our older 2019 Elite II. I've been maintaining this guide for 3 years and many parts and equipment specific to Oliver EI and EII trailers are included. For example...the grommets for the stove that were used in many trailers from 2019-2024 or so.. I listed them in the Oliver Outfitters guide in both the "Oliver Outfitters" main page and in the Kitchen Gear sub category as shown below: Here's the link to the overall page: Oliver Outfitters Guide on Amazon Full Disclosure for Moderators and Viewers: I do make a small amount if people by off this page, it's averaged $3/month...so not big beans. Mostly I'm trying to chronicle parts, pieces, gear that is used or needed by many Oliver Owners. Craig

-
- 4
-

-

-
Welcome from another 2019 owner (in Washington State) . Craig
-
As is the south loop of Kalaloch CG in Olympic National Park ...where some bright summer crew member sent to repaint arrows, made a mistake. People have just had to live with the result for multiple years as the same intern also changed the maps to match the mistaken arrows. (Heard all that from a Ranger.)
-
Part number of OEM Filter is AquaGo Replacement Filter # 77000-00251
-
As an aside...while Truma is very clear that they only want their technicians doing any updates or changes...I believe Oliver did a bunch of installation of new burner units . Be sure to turn in a "ticket" to both Oliver and Truma. See my PM for some more suggestions. CS
-
Please read my detailed report that I sent in on this topic attached....I've had truma's replace 3 times. First potential cause - Truma didn't properly tighten the brass fittings internally that feed the burner assembly. Second potential cause - Truma didn't crimp the burner tube assembly correctly, and with travel they rattle out (the burner tubes are like in a bar-b-q and can fall off which causes raw gas to be injected into the burner area for explosive ignition instead of gentle start.) This blog post has 3 goals and was SENT to NHTSA for evidence of why Truma needs to do something to fix their defective mfg process. 1) List symptoms we experienced with our Truma and use photos to illustrate the 3 firebox events. 2) Describe 2 different Truma reported manufacturing defects and show photos illustrating those issues. 3) Describe the in field solutions for each of the 2 manufacturing issues. 4) Show a pictures of the current Truma Burner Unit with all Manufacturing updates in place. The attached PDF is in full detail with picture of what is likely the issue or issues causing explosive ignition. Truma Issues.pdf Hope that helps...remember...you need to report this to both Oliver and Truma in order to get any warranty coverage. Craig Short
-
Same with us so we just put down the 21st in the oliver form.
-

"Best" low profile AC replacemet
Galway Girl replied to Gliddenwoods's topic in Mechanical & Technical Tips
Thanks for that intel. Does anyone know if it’s the unit with heat pump, model # , btu rating, and if it’s a drop in replacement? -
Rally Early Registration is open and saves you $ as price will go up later. Rally link: https://olivertraveltrailers.com/events/oliver-owners-rally/ See Jason on the Morning Coffee Youtube just released...he also discusses the Rally Registration and Fee's in the video.
-
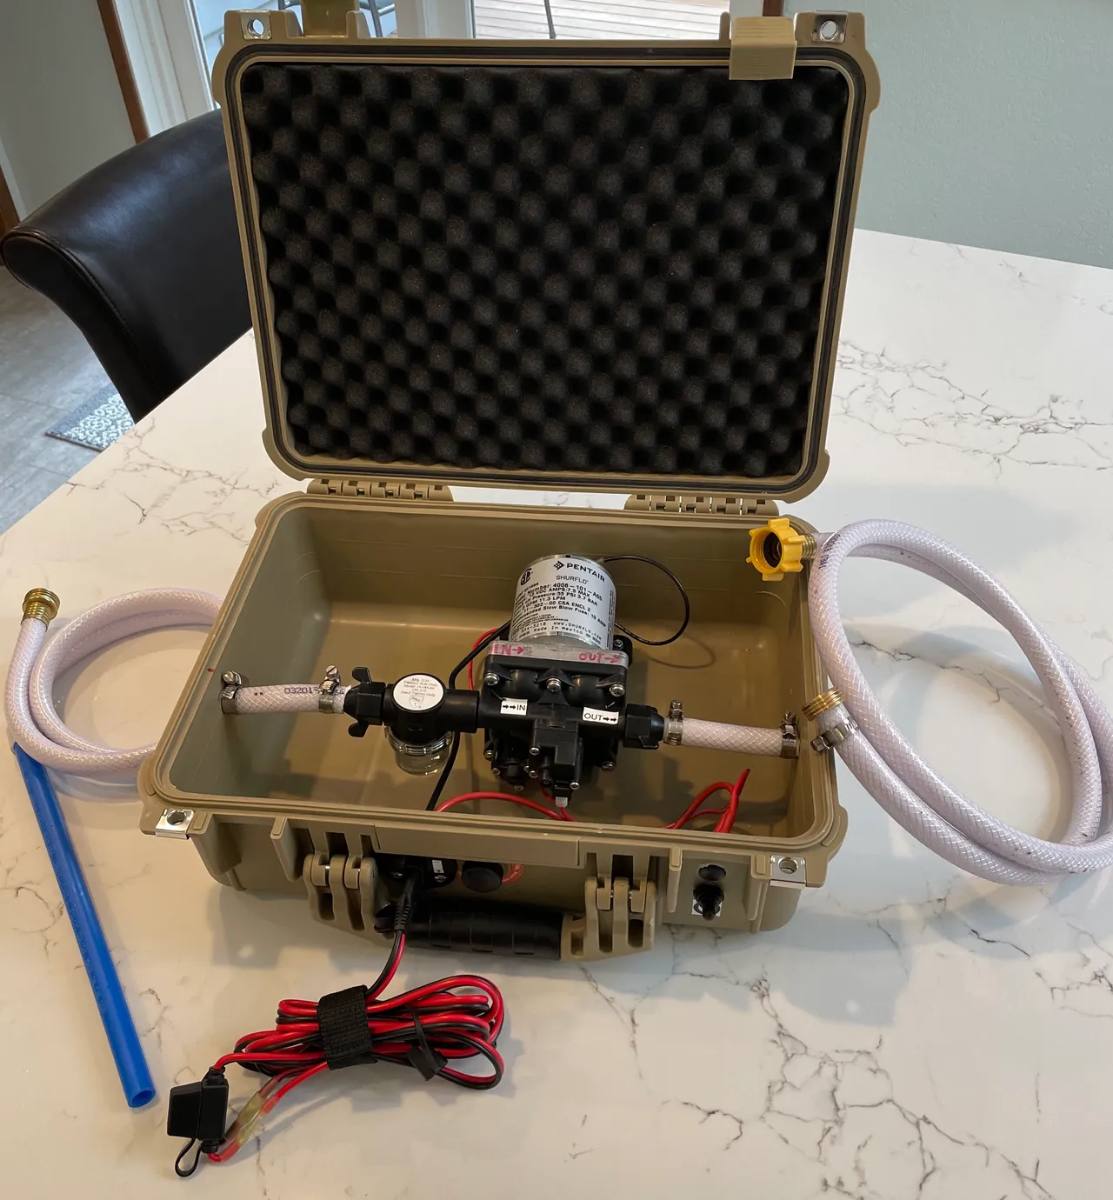
I carry a backup pump and have had to use it to fill through the normal fill port (not the rear suction port.) If you ever want to build a backup pump system...here's our article on that topic. Backup Water Pump Hope some of the comments like the one above about checking for air leaks have helped. Let us know your outcome.
-
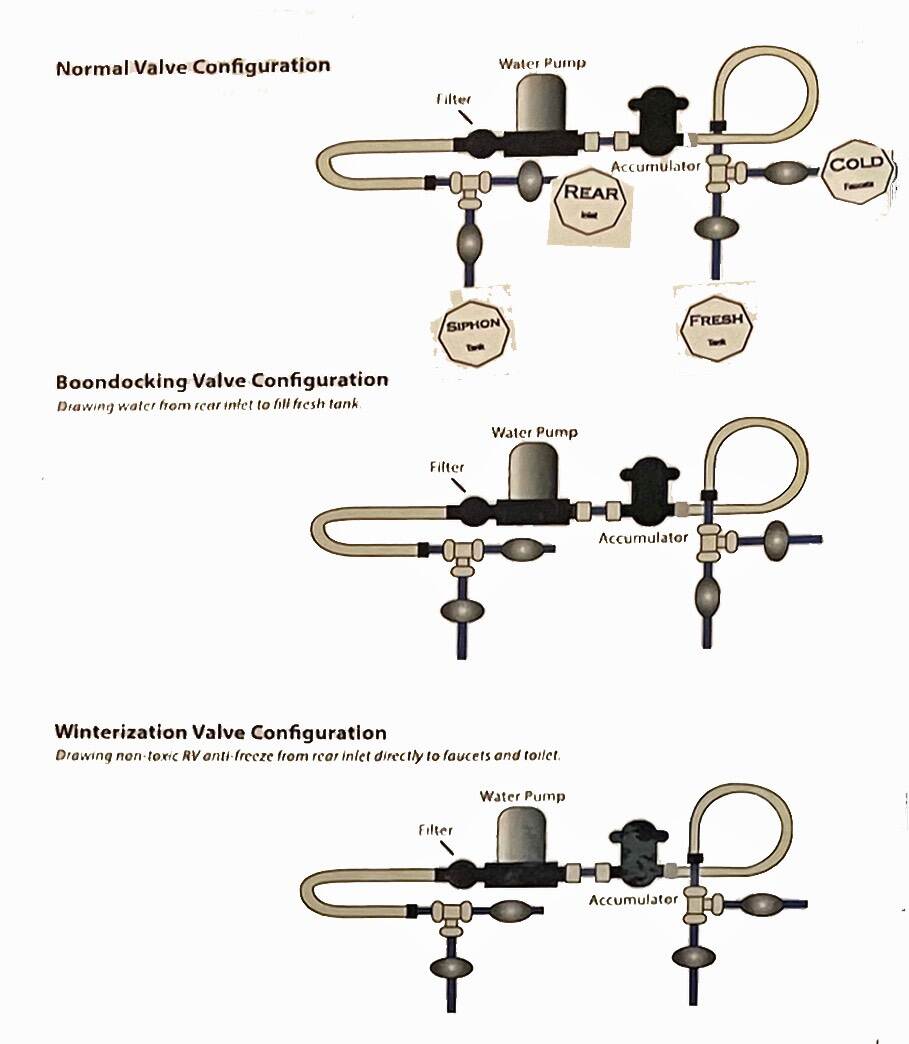
I assume you are trying to fill your fresh tank from a "container" using your rear boondocking port to suck in water through the on board pump. Q) Was the pump able to pump any water out of your tank before you started? It may have lost prime. If you lose prime you can often get it to reprime by either removing and checking the water filter (near the pump) or by opening and closing each of the valves and ending back on the boon docking configuration. Our 2019 Has this Valve Configuration...not sure if it's the same for you but just as a cross check for sucking in thru our rear port.
-
"Best" low profile AC replacemet
Galway Girl replied to Gliddenwoods's topic in Mechanical & Technical Tips
I had just asked last week about what they are upgrading older units to now days at the factory, Dometic Freshjet was the reply. Price was $4600.00 for upgrade. -
Portable solar panel with legacy elite 2 platinum package
Galway Girl replied to Brian H.'s topic in General Discussion
We use 200w Renogy panels when dry camping or boon docking for more than 3 days in one place. See our article. External Solar Kit Details - Hull 505 We've found that it's helpful when the trailer is shaded by tree's and we want to keep things topped off for longer stays. CS -
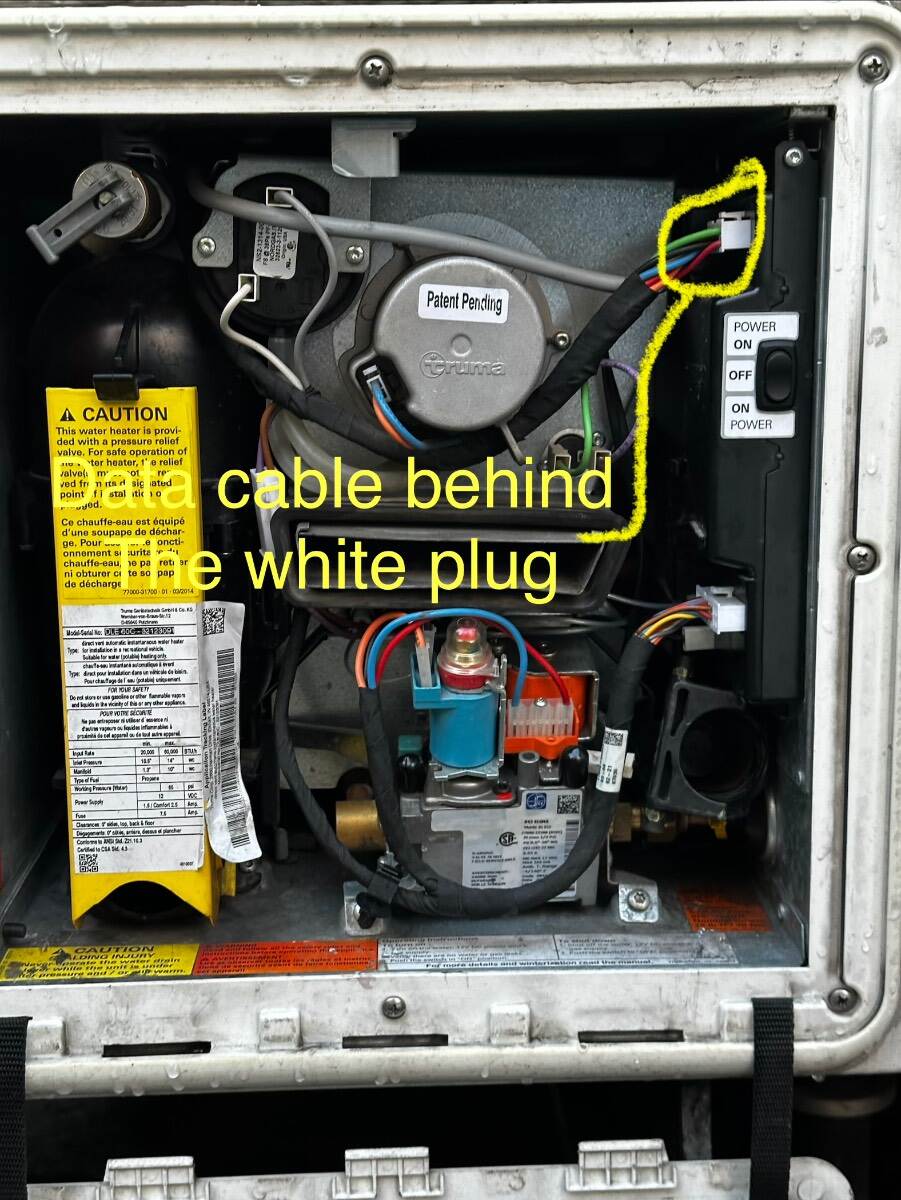
For truma communications between devices on the inside controls they use a data cable with network or phone style connections. There should be one plugged into the right side of the water heater looking from the outside above the power switches and behind the larger white cable connector. If it’s plugged in then check the other end at the control panel. IMG_7831.mov
-
So to add an interpretation: that tag it tells you that "weigh carrying" capacity (which is direct downward pressure from the tongue) is 500lb's without a weight distribution hitch and 1160lbs if you have a weight distribution hitch attached. Since Oliver EII's loaded are usually around 600-700 lb range...then you'll need a WDH for that particular hitch on that particular vehicle.
-
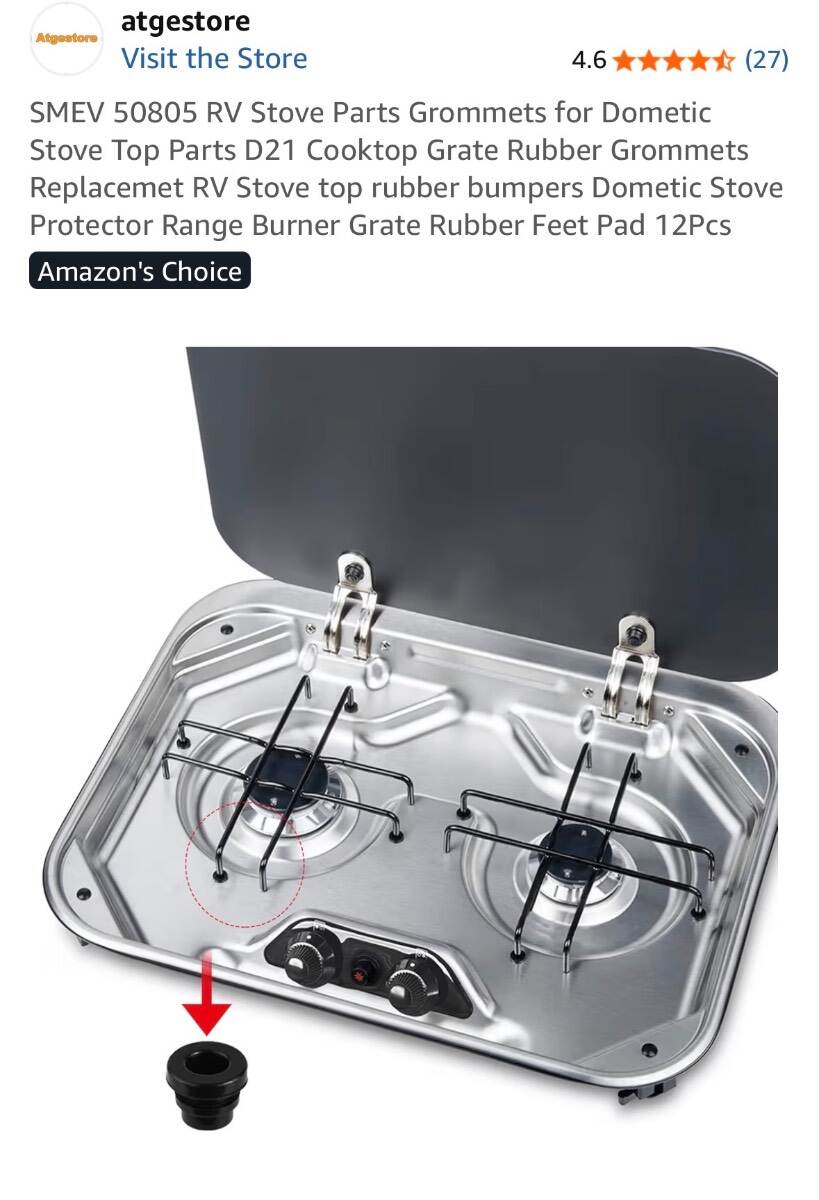
Stove Burner Grommets PI 8022
Galway Girl replied to Galway Girl's topic in Mechanical & Technical Tips
At the Oliver Rally I plan to put out various parts for free that may fit other Oliver setups as I’ve bought many replacement parts (like stove grommets) that aren’t for our version by mistake. -
That looks like the knockout panel on the furnace is missing . You can seal it with silver furnace tape or find a sheet metal piece to put in place. Please post the pix to oliver as a service ticket!
-
Had a tricky time finding grommets that fit the hole for our burner bases on our Dometic PI 8022 2 burner in our Hull 505 EII Added them to the outfitters guide here: Oliver Outfitters Guide Cheers, Craig & Rose Hull 505
-
Tow hitch/ weight distribution advice needed.
Galway Girl replied to Mroth's topic in Towing an Oliver
We upgraded from 1/2ton F150 with eco boost 6 for that same reason. The downhill compression breaking in the diesel engine makes a world of difference and no need for an Anderson hitch as the new truck has antiseay brake controls. -
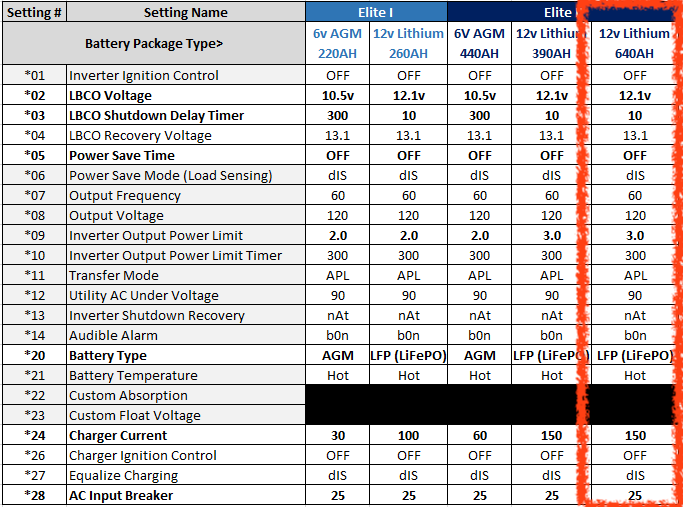
I vaguely remember needing to reset a parameter within the settings of the Xantrex to avoid that problem. The battteries blink When charging so that’s normal. I n our case the LOW Battery Cutoff Voltage setting was not set properly after an update to our system....and it would do the beeping thing. The settings are easily changed in a data table on your xantrex phone app. Your settings would be the column to the left of the red column below: LCBO Voltage can be set from 11.5-12.1 FURTHER INFO: Here's some data from the web: A beeping sound from a Xantrex inverter charger is an audible alarm indicating low battery voltage, an electrical overload, or internal overheating. The system uses the beep to protect the internal components and the connected battery bank from permanent damage. [1, 2, 3] Most Common Causes Low Battery Voltage: The battery bank has dropped below the low-voltage cutoff threshold (typically around 10.5V for 12V systems). This can happen if the batteries are drained, a battery cell is dead, or the charger is disabled. AC Output Overload: The continuous power draw from connected appliances exceeds the total wattage capacity of your Xantrex unit. This triggers a warning beep before the system shuts down to protect its circuits. Overheating (Thermal Shutdown): Poor ventilation, blocked cooling fans, high ambient air temperatures, or heavy prolonged loads can cause internal temperatures to spike. High Battery Voltage: An external charging source like an un-regulated solar controller or high-output vehicle alternator is pushing voltage above the upper safety limit (usually >15.5V). Bad Cable Connections: Loose, corroded, or undersized DC cables cause a sudden voltage drop across the connection terminals under load. The inverter reads this localized drop as a dead battery and triggers an alarm. [1, 2, 3, 4, 5, 6, 7, 8, 9, 10] Troubleshooting Action Steps Check the Digital Display: Look for error codes like E01/E05 (Low Voltage), E03/E06(Overload), or E04/E07 (Over-temperature) to pinpoint the exact failure type. Verify Voltage with a Multimeter: Test direct DC current across the battery terminals. If it reads under 12V, plug into shore power or run a generator to engage the battery charger. Shed Electrical Loads: Unplug high-draw appliances like microwaves, coffee makers, or hair dryers to see if the beeping stops. Inspect Physical Connections: Tighten all cable terminals. Clean off any green or white corrosion crust with a wire brush. Ensure the cooling fan spin freely and the air vents are completely clear. Perform a Hard Reset: Turn off the unit. Completely disconnect all sources of AC shore power and DC battery power for 5 to 10 minutes to reboot the internal microprocessors. [1, 2, 3, 4, 5, 6, 7, 8, 10, 11]
-
Wonder what that will weigh?
-
Saw this a while back and they hadn’t started shipping yet. The earlier video showed very rough cutouts in the cabinets ( no trim out) were as it was first prototype. See they went with Battleborn.
-
-
Check your 7 pin. If it gets water in it the on board 12v battery will trigger. see this posting https://4-ever-hitched.com/blog-articles/f/why-were-my-tail-lights-on-all-night tail lights on ??
-
Running gear looks the same , just a wheel & tire change and some black accents. At least they are trying something different. If they changed up the suspension for better off road that would make a difference.