

Galway Girl
-
Posts
551 -
Joined
-
Last visited
-
Days Won
17
Posts posted by Galway Girl
-
-
Attached is the 2022 Brochure....below are the color choices for 2022.

-
 2
2
-
-
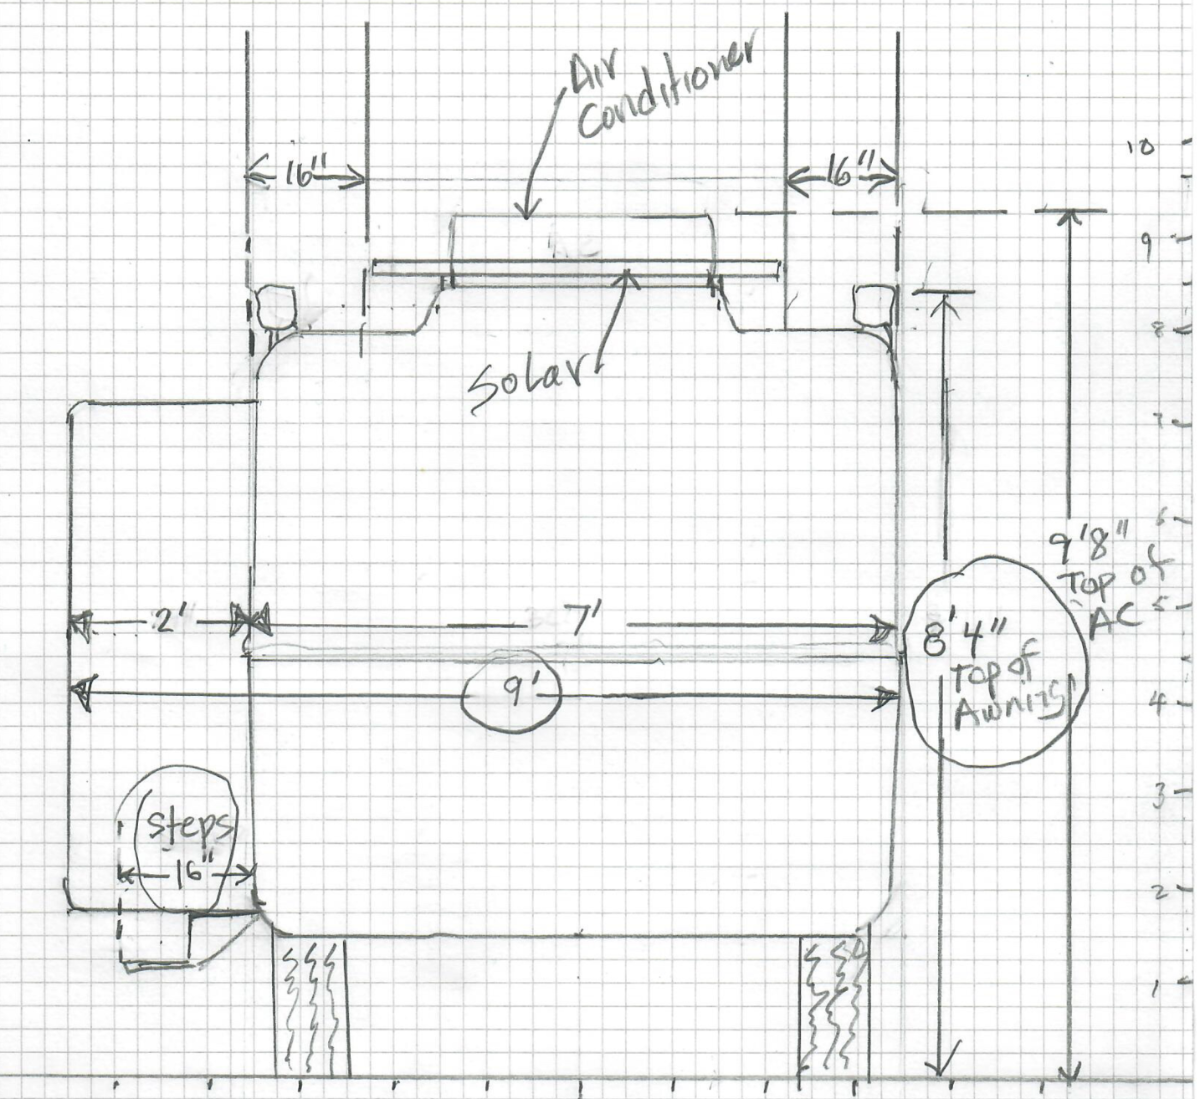
We showed our trailer last week and the party wanted some quick measurements after the visit to make sure the EII would fit beside his garage.
What he asked for prompted me to do this extremely rough sketch for him...and I thought dropping it here might be useful.
It looks at the EII from the FRONTAL view, with the door and steps open.
Text that went along with the sketch:
Here are the measurements you asked for and a bit more on the front view sketch with Steps and Door Open.The drawing is at a scale of 3” per square, or 4 squares / 1 foot.Height: (To see if it will fit under your overhang area.)Height from Top of Awning to Ground - 8’ 4” (102”)Height to Top of Solar Panels - 9’ 1”Height to Top of AC - 9’ 8”Width: (To see if it will fit between the house and the hedgerow.)Trailer Width Door Closed - 7'Trailer Width with Door Open - 9’ (Door sticks out 24” from belly band.)Steps - Stick out 16” from trailer when fully open).Solar Panels are 16” from edges of trailer on either side.Hope that helps you plan your parking spot.If anyone has an actual 2d drawing of the Oliver from Side , Front and Top Down profile (which is the floor plan I guess) it would be nice to have.
Craig - Hull 505
-
4
-
 4
4
-
-
Thanks to both you and John for answers.
-
Nice looking installation.
Wondering - on 14.6...does the converter fan shut off when batteries are full? Sounds like it runs all the time now?
When I had my AGM's the fan would run for a time while charging but shutoff after batteries were full.According to Progressive Dynamics this is what they told me about the converter and it's behavior:
"Whenever you have shore power (or generator power if you have one), the converter is supplying the DC power for the 12 volt accessories and fuse board.
If you disconnect the black and white converter wires that feed the 12V panel, or shut off the breaker feeding the converter, then the battery only will be supplying DC power to the fuse board. You can turn off the AC breaker that controls the converter to turn it off in-between charges. - Source Andy Giesen - PD Support"CS
-
I have a better weigh that I received as a retirement gift.
Used it a few times and it was within about 5% of scale weights.
It's not a substitute for an accurate tongue scale or weighing at a weigh station, but accurate enough to be an interesting quick check tool.Craig
-
2
-
1
-
-
John,
Watching as we’re planning for a 2022 Alaska trip July-Mid Sept. We would go up to Canada from Everett and Loop Back through Spokane to hit Jasoer Glacier on way back.
If you need a milepost book we have a spare 2020 I could ship to you. PM me if you want it.
Craig
-
We moved away from the orange packets and blue variety to Happy Camper and it really works.
We put a scoop in toilet, fill to rim swish to dissolve and flush. Also couple quarts & 1/2 scoop for the sinks.
-
3
-
-
Alan,
NCEagle (John) found a slick use of a SW feature and sent this to me earlier in a PM when I asked that same question:
"... I use the software switch called "Charger Ignition Control". If "auto-on" the charger won't work without a car ignition - which the Ollie doesn't have so the charger is off when that switch is on. Conversely, when the ignition control switch is set to "off" the charger will charge the battery whenever it has the power to do so."
Craig
-
2
-
-
Andrew,
That's an EXCELLENT point, if you have the PD4060 it is on a 15 Amp AC breaker.
Flipping that off will only allow the solar to charge your batteries.
That would pretty much negate the negative side effects of having the PD4060 converter.I wish I'd thought of that one!
Craig
-
1
-
-
Ray and Susan - the pix John is posting are of things likely not in your trailer either because he's added them or they from the earlier model year EII's.
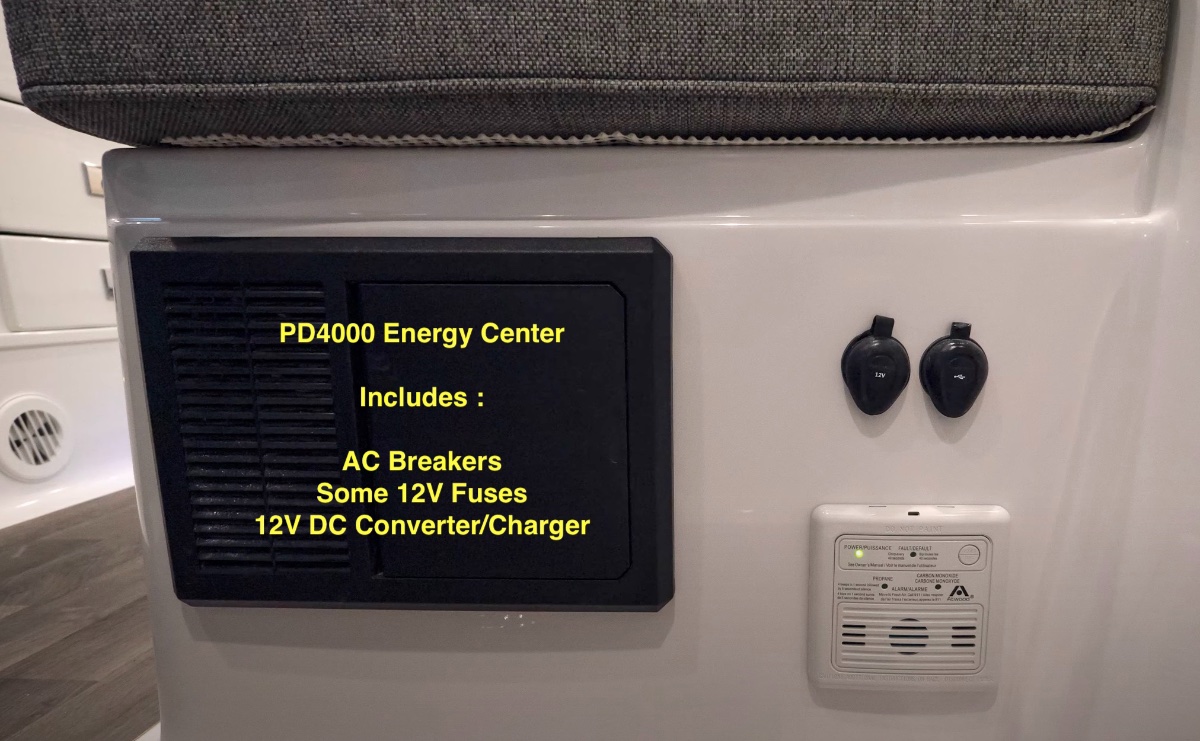
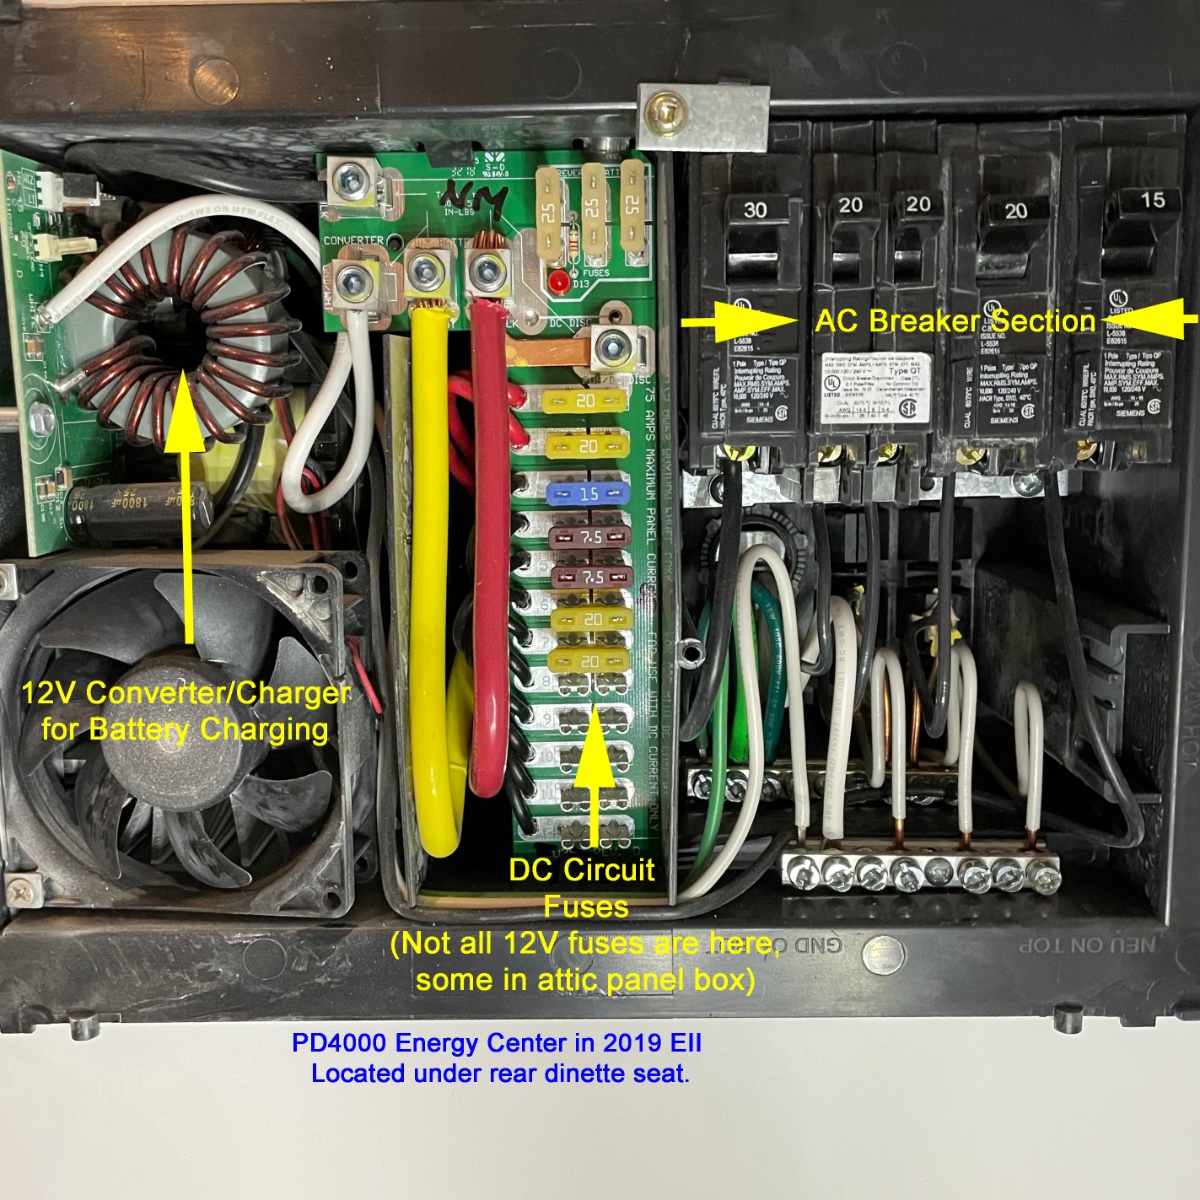
Earlier models up through 2019 had a Progressive Dynamics 4000 Energy Center under our Dinette Seat.
(PD4000 Energy Center under dinette seat, but with Cover OFF) -
The PD4000 unit housed AC Breakers, SOME DC fuses (but not all) and the power Converter that charges our batteries.
The rest of the DC Fuses were in a small fuse box in the attic next to the surge protector display.
In the newer models like yours they switched to a new set of energy panels for AC Breakers and DC Fuses (all in one convenient place under the dinette) as shown in your pix. They also changed to either a 2000 W or 3000 W combined Xantrex inverter/charger...which is able to be programmed for a charge profile for Lithium Batteries from a variety of vendors.
So looking at some of our posts for other pre 2020 unit pictures could be a bit confusing if you are thinking your missing some new or special feature.
Craig-
2
-
-
Very nice job.
I need to get some of those wire tags.
I've been tracing wires like crazy trying to figure out how Oliver hooked things up as I prepare to swap out my existing factory installed Xantrex ProWatt Inverter for a new Xantrex XC2000 Pro Inverter Charger and new Lithiums.
Scratching my head as many of the wiring diagrams are missing...for example, I don't have a wiring diagram at ALL for the 2000W ProWatt Inverter circuit.
The AC power input to the ProWatt comes from the AC breaker panel and connects through an auto switch in front of the ProWatt 2000.
The ProWatt AC inverter output from the auto switch runs forward and connects to the GFCI Outlet that is under the front dinette seat.
That circuit loops all the way around the trailer and includes the microwave, fridge and all the outlets, and ends up connected
back at a 20A AC breaker in the PD4000 distribution panel.
Craig-
2
-
-
I'm in agreement, that there is a real need for a drop and go LI upgrade.
You can in fact do a drop in LI's if you have the PD4060 with LI setting in your Oliver and be down the road pretty quickly.I planned to do that as well but I decided after research to upgrade to a smart charger/inverter along with the new LI batteries.
Backdrop:
Trailer manufacturers (including Oliver) are shifting rapidly away from the older "CONVERTER" technology as typical from Progressive Dynamics to newer Smart Charger/Inverters as they provide more benefits to customers and programmable profiles for Lead Acid, AGM and Lithium's which all can have different profiles.
They are also looking at newer trailer control and wiring schemas to have touch control centers for all loads, batteries, solar etc. The benefits to the customers are single points of control for the multiple systems, and for the Trailer Mfrs a reduction in the time to integrate and wire up the trailer systems.My current hull 505 (2019 EII): has a PC charge converter and a separate 2000W Prosine Inverter
My Load Center is from Progressive Dynamics, is the PD4000 line, and under the dinette seat.
(Covers off the load center)
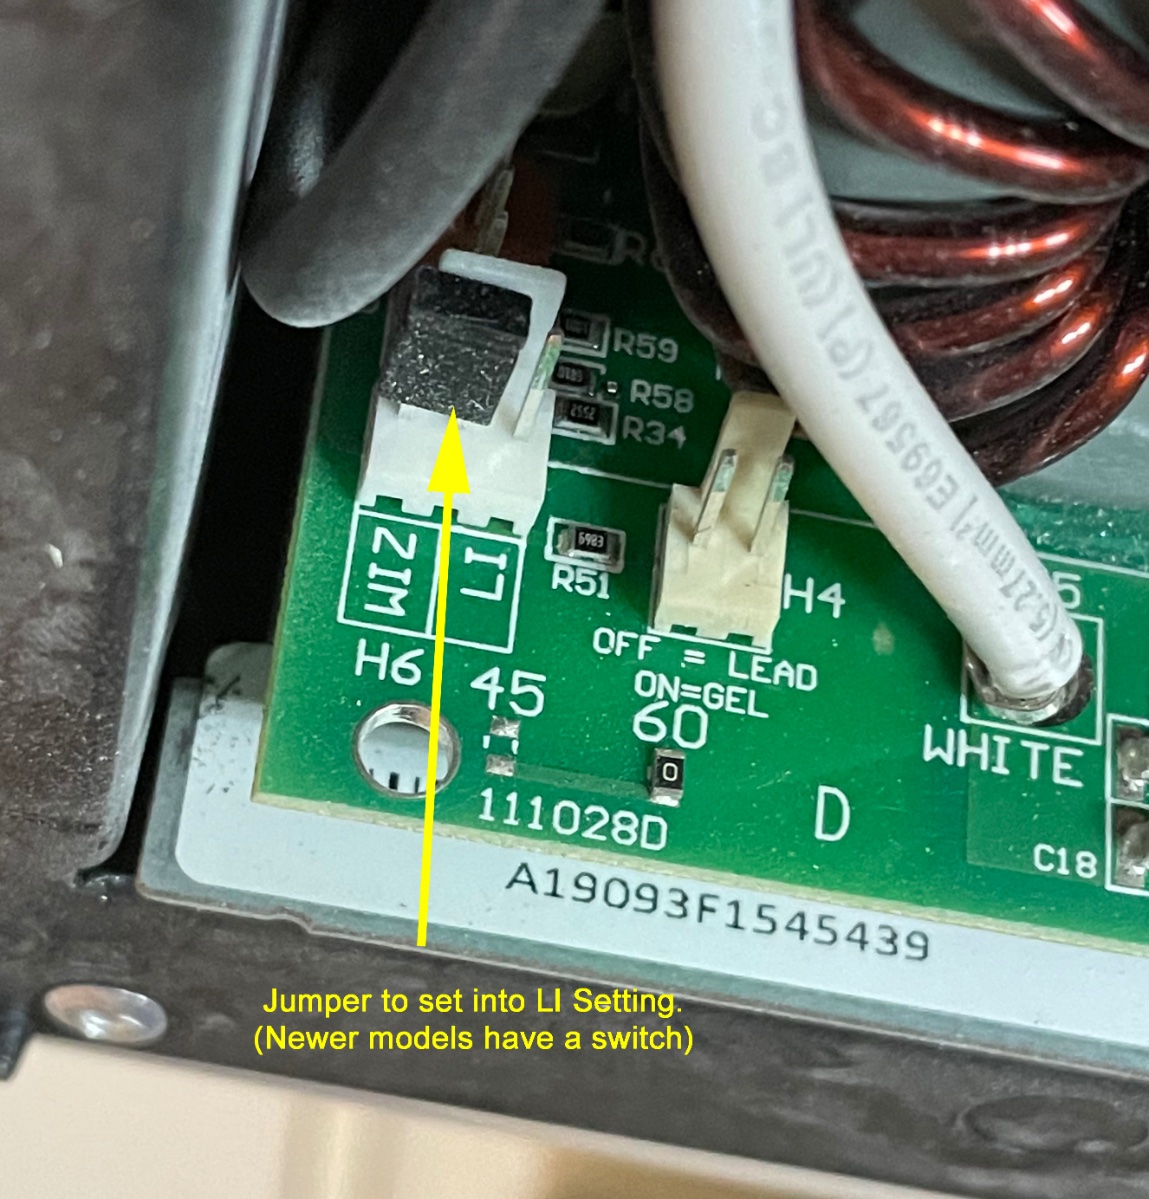
That power center includes the AC Breakers, about half the DC Fuses and the the PD converter model PD4060K which has a charge wizard for Lead Acid/AGM battery charging and and a built in Lithium Setting Switch. That LI Switch on the PD Converter when set, outputs a constant 14.6 v, but is NOT a smart charger by any means.
I also have a separate Xantrex ProWatt 2000 pure-sine inverter.
Battery Shopping :As I shopped for batteries I started with Battleborn support and learned a few things about LI battery charge profiles.
They are different for each chemistry, and each battery manufacturer and each battery management system (BMS) has it's own specific charge profile that is "BEST" for battery cycle life.
Battleborn said their products will work well with the Progressive Dynamics Converters that have the Lithium Setting, but they said at the end
that the ideal setup is to have a SMART charger with a customer settable Lithium Charge profile.
They encouraged me to consider upgrading my charger if I had the budget and space to a smart charger....but said the LI setting would work.Smart Charger ? to PD:
My next call was Progressive Dynamics Support to find out if they had a newer LI smart profile converter that would plug into the PD4000 load center...no joy.
Speaking with Andy (Svc Mgr) at Progressive Dynamics I learned that the PD Converter units on LI setting outputs a constant 14.6V to the batteries.
Andy said they do not have an available LI specific smart charge wizard from PD for the basic converters in the PD4000 load center.
A smart LI wizard would drop from 14.6 bulk charge back to a LI Specific float voltage around 13.4.
Andy said while they don't have a plug in converter with smart lithium profiles yet.
He closed by saying the PD 4060 unit works to bulk charge Lithium you may not be Optimally Charging and delivering the longest life for the new LI battery.Oliver's newer choice - Inverter Charger combos:
What I also learned, is that in the newer inverter/chargers Oliver is using like the Xantrex XC 2000 or XC 3000 , (or Victron Inverter Chargers) they include a smart programmable battery charger specifically designed to be able to set a lithium profile to exactly match whichever battery specs are provided by the Battery Manufacturer.
This charger replaces the former PD4060 converter section. In the 2021 and newer trailers Oliver no longer uses PD4000 energy center. Oliver has moved ahead to the newer technology of smart inverter chargers.The Benefit of these smart inverter/chargers are much longer battery life for the Lithiums while also delivering inverted power to the trailer.
Summary:
So while I know I could do a simple drop in of Battleborn's into the Oliver with the PD 4060 Converters set to LI and add the "victron smart shunt" , I found that the end result will be a LI battery pair with a somewhat reduced overall life.
Finally when I then spoke with Lithionics directly about my upgrade, they said they would prefer that I upgrade to a smart charger and away from the PD4060 converter as they don't meet the charge profile that would provide the longest useful life of the Lithionics batteries.
Hope that's interesting to those who are following this thread.
Craig
-
8
-
6
-
-
On 4/2/2021 at 3:33 PM, Ray and Susan Huff said:
I hadn't heard from Oliver about the 20 error code so I sent Jason a message through the service ticket portal. Our ticket has been classed as "on hold". I now see it is labeled as "open".
Jason's response:
Hey Susan,I just received some new information from Xantrex on how to perform a reset and check the software.- Remove AC & DC Power - Disconnect shore power and trip the 200a Inverter breaker located under the street side bed area.
- Wait about 2 minutes
- Reset the 200A Breaker to allow DC power back to the inverter
- Turn the Inverter on at the remote display
- Scroll thru the settings to verify software U3 01 06 at the main display located under the streetside bed
- Double check the remote display to ensure it also shows the U3 01 06 software
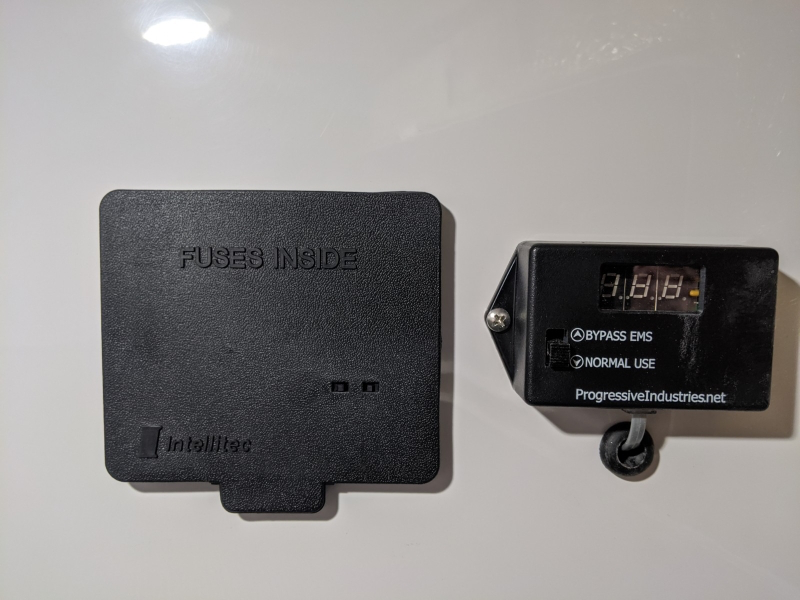
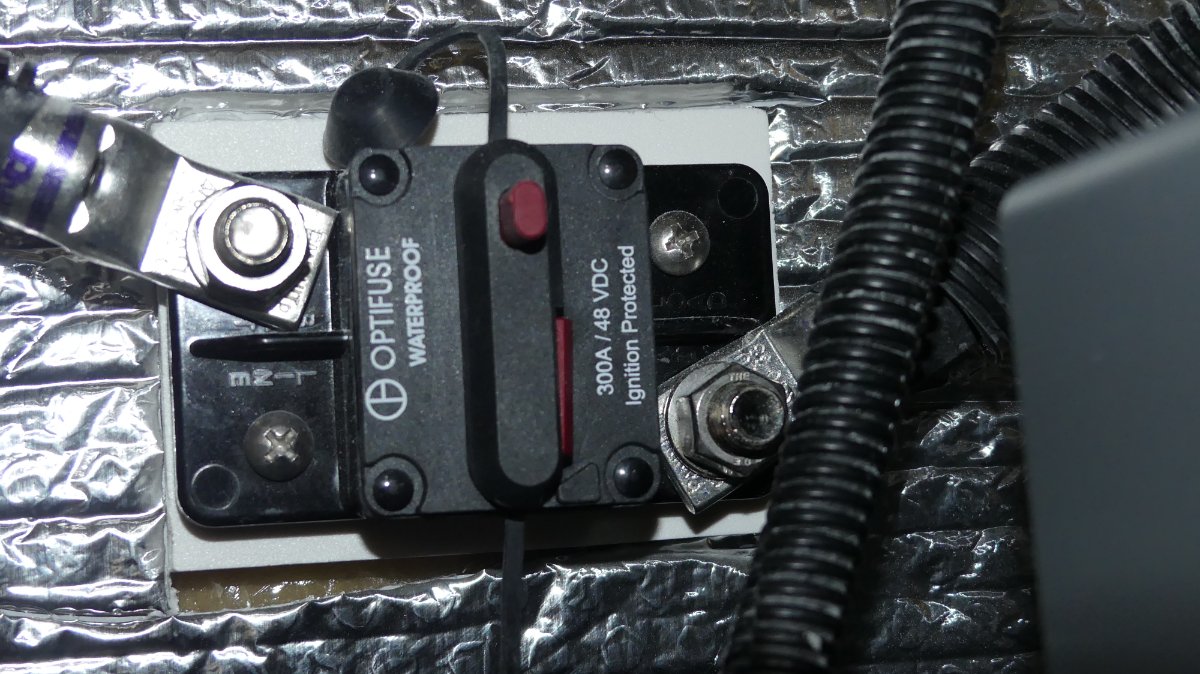
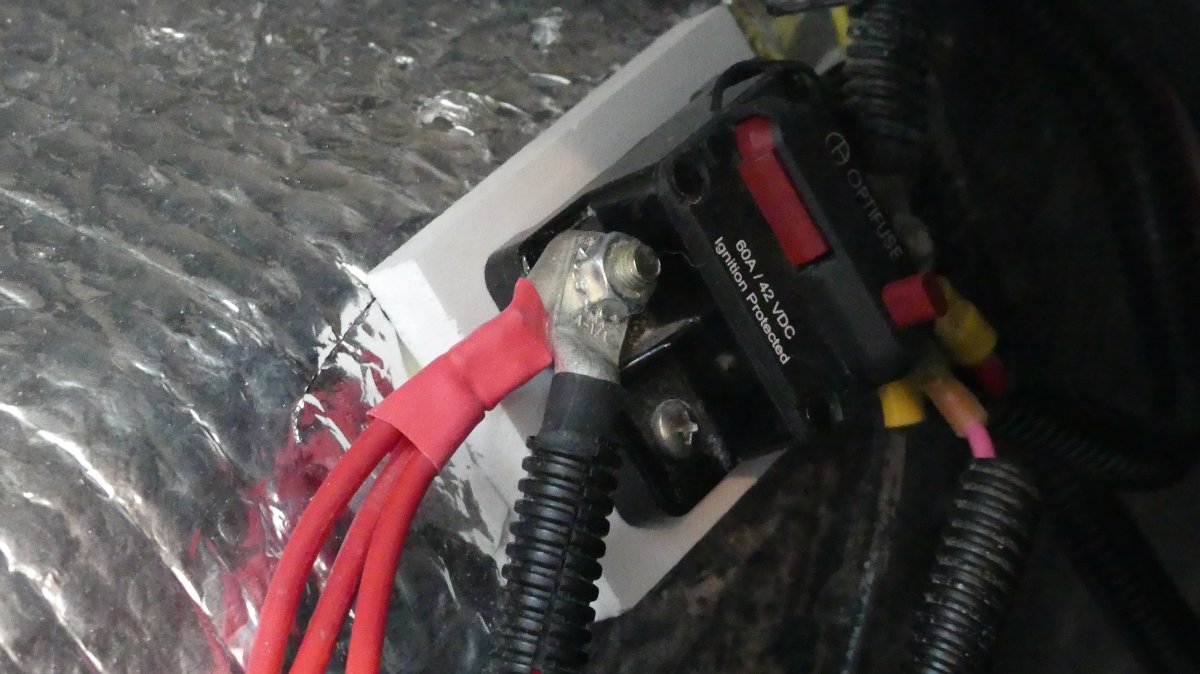
At this time I don't have a failed remote to test this on so I am depending on Xantrex. I do have a customer who has already performed this and it has resolved the issue so far.I'm preparing to do the reset but want to confirm that I have the correct breaker (located under the street side bed on the wall of the battery compartment)Jason said "200A" but this is 300A.Is this correct: Push the red button to disconnect; the red lever on the bottom to the left of the button will pop out; push the lever back in to reset?I hope this resolves the problem with the remote panel not functioning.Also: there is another similar breaker switch (60A) attached to the top of the wheel well. Can someone tell me what this is for?
That second breaker (bottom pix) is the main 60A Breaker for all the 12v loads for the trailer.
Some leads run over to the DC power panel with 12V fuses for various circuits like Lights, Fans etc.
There are a few of the lines to the right side of the 60A breaker are for things like the Propane Detector.
-
1
-
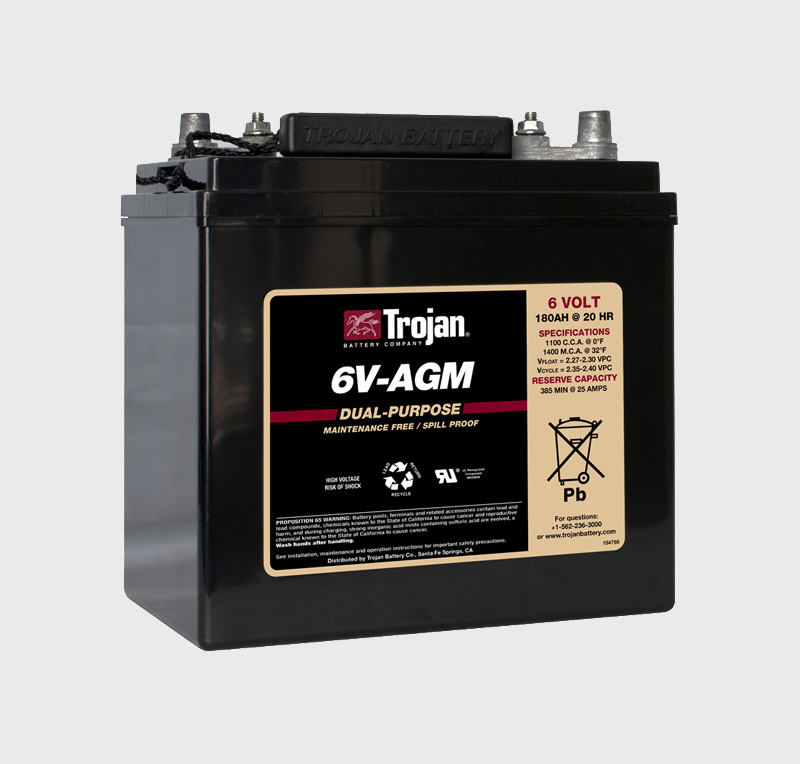
Just sharing the specific "Trojan" Battery that shipped with our Oliver and all 4 died within 16 months.
They were maintained per the standards set forth for warranty support.
Properly charged using the onboard Progressive Dynamics Charger and the Zamp Solar.The Trojan Service contact stated these are made for them by a Chinese Manufacturer as their OEM line.
He said they do often have problems with them but as they are only warranted for 12 months...I was not offered any compensation.
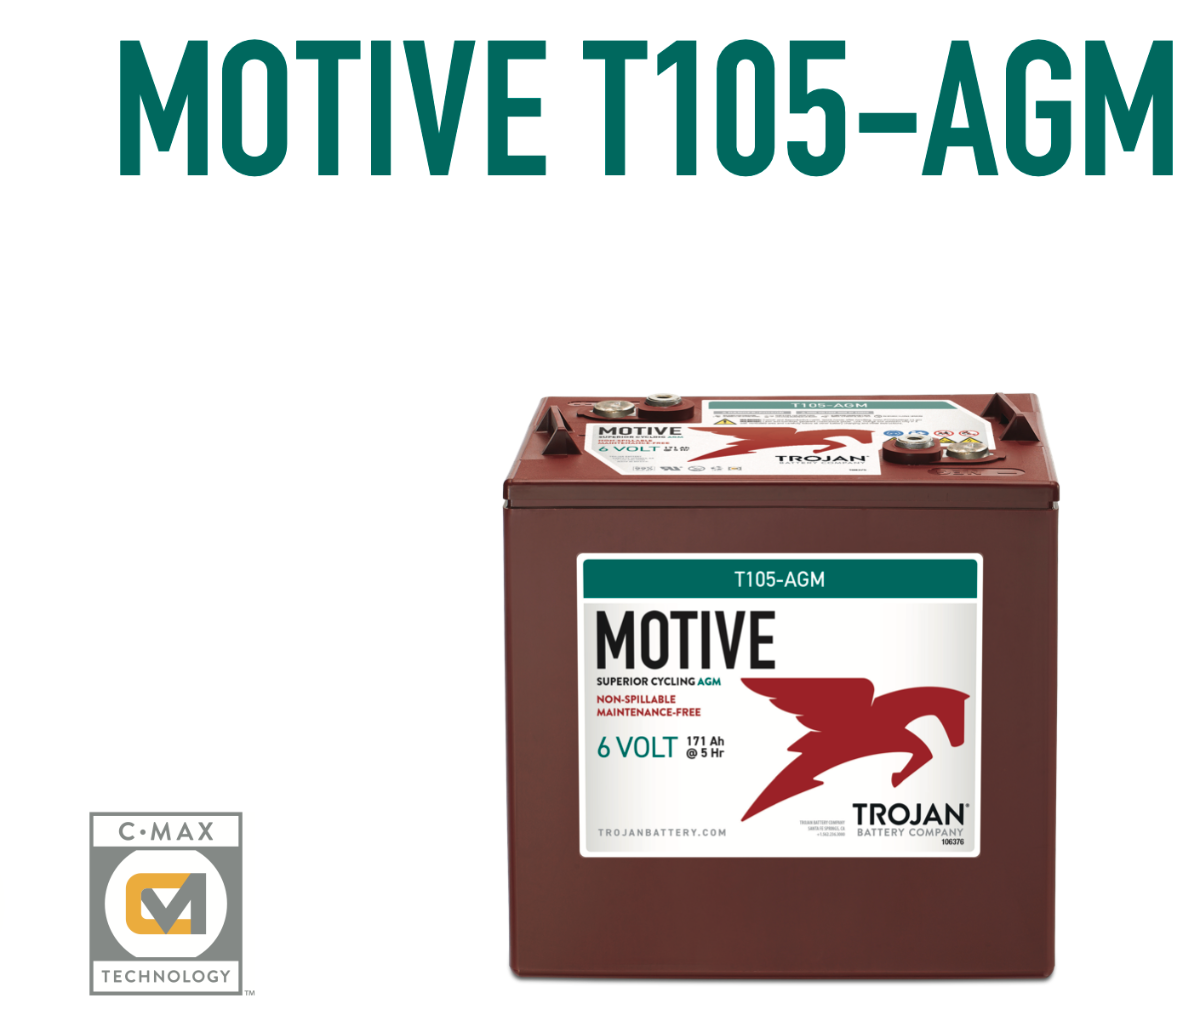
Finally, the rep told me to buy the "Maroon Case" trojan if I want a good battery as they start with a 2 year warranty.
Below is the "preferred" High Quality Motive T105-AGM 6V recommended to me during my support call with Trojan.
They have a 2 year warranty but are known for lasting 4+ years when properly maintained.
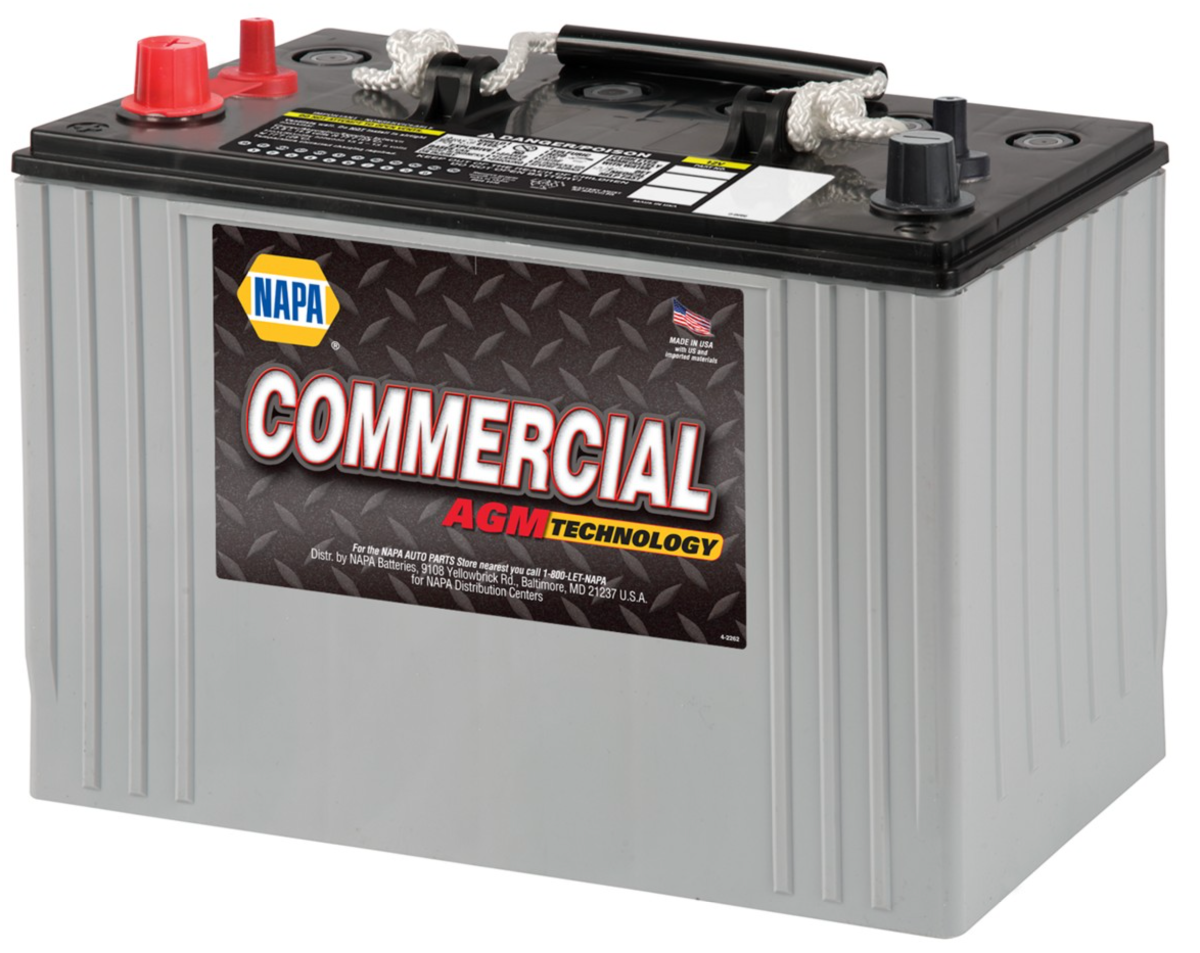
In the end, I bought two of these Napa Branded 12V AGMs to get us buy until we are able to install our Lithium upgrade.
My nephew is the West Coast GM and said try East PENN as he's toured many of the battery manufacturer for Napa, and found that East PENN Mfg. (a US Company) has better quality than off shore OEM brands.They came with a 12 month full replacement warranty, and added 3 year prorated.
NAPA Commercial AGM Battery BCI No. 31 800 A Glass Mat
Part #: BAT 9831DT 105AH (Dual Terminals)Manufacturer : East PENN
You can see my progress on the upgrade by following this thread in the Forum: -
Forgot to say....to move from wet lead acid to AGM the change can be simple, depending upon the converter that’s in your Progressive Dynamics power center under the dinette seat.
Also, do you have Solar (Zamp)?
-
My 2019 shipped with 4-6v Trojan Black AGMs.
They died after only 16 months.
I was told on a call to Trojan support that black case AGM Trojans are not true Trojan batteries but an Oem’d brand Trojan Remarkets for cheaper price and only had 1 yr warranty
If you want to buy 6v Trojan AGMs, buy the Motive T105-AGM maroon case Trojans which are a longer warranty battery.
Craig
2019 Hull 505
-
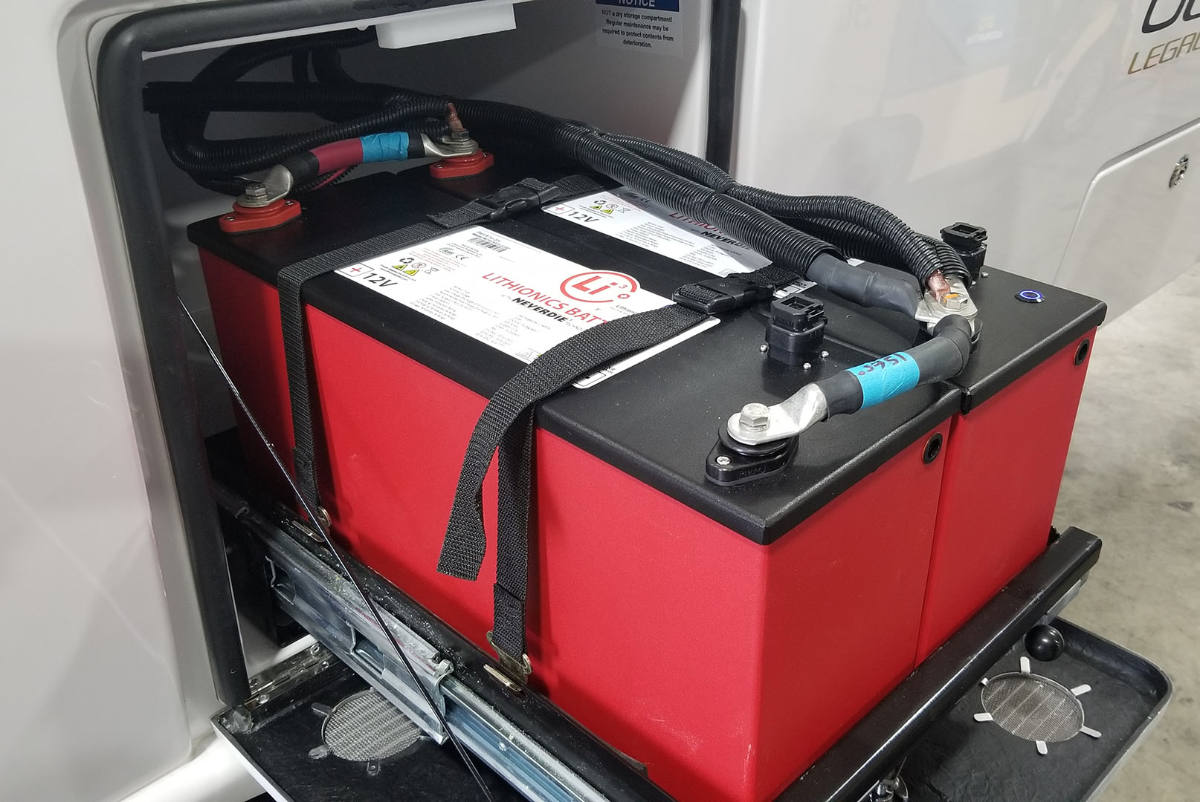
Just jumping in to say I'm also doing an upgrade to Lithionics GTX 315 Lithiums in May.
I"m going big and doing dual Lithionics GTX 315A Batteries.
These batteries are currently deployed into motor homes, and designed to fig in wheel wells of Winnebago's and a couple other Motorhomes.
2 Fit Perfectly in the Oliver EII battery tray.
I thought about just doing 1 (which is close to 3 battleborns) and my wife encouraged me to go big...so I decided not to argue.I know there will be issues with enough solar to fully charge in one day, and needing to install a DC/DC charger...I've decided to GO for It.
We will install added portable solar arrays, upgrade from the PD4060 Converter to a Xantrex XC 2000 Pro charger/inverter, and add a Victron DC/DC charger.
The thread for the upgrade is over here it you want to follow along.
I've completed design and am now ordering all the surrounding components I'll need.
My batteries will arrive in late April.
By Mid May the install will be completed and I'll do a complete post.Craig Short
Hull 505-
4
-
 1
1
-
-
I think my wife's sister and husband are very near your site at Big Bend as they sent us this PIX...is it you?
Hull 571
My wife sister says they have a broken slide in their motor-home and awaiting a repair man.
They are golfers as well...and have done the Maine and Novia Scotia trek in their motorhome...so maybe some common ground if you're interested.
Put a private message to you as well.
Craig & Rose
Hull 505
-
David,
Very good reminder... I'll check mine again before my next trip.
CS
-
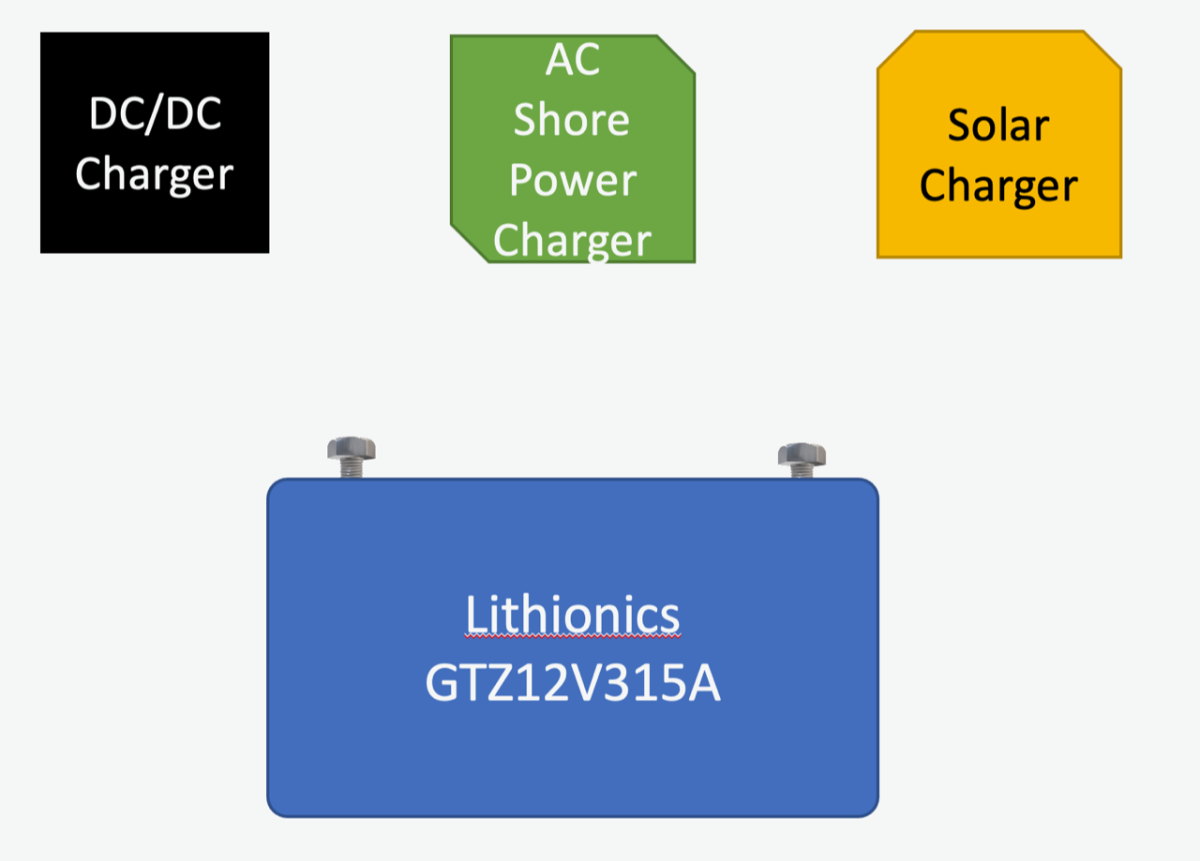
I'm working with Oliver and Lithionics.
Lithionics doesn't sell direct to consumers.
Xantrex is used because that's what Oliver Factory is using and supported by Lithionics.
-
9 hours ago, NCeagle said:
Lithiums don't like to be topped off and kept at 100%
John -- So having the ability to turn on or off the charger is useful...and that I should let the lithiums drain down further before recharging.
Does that mean while connected to shore power I should turn off the Xantrex 2000XC Pro charger until the batteries are down to 50% ?FYI:
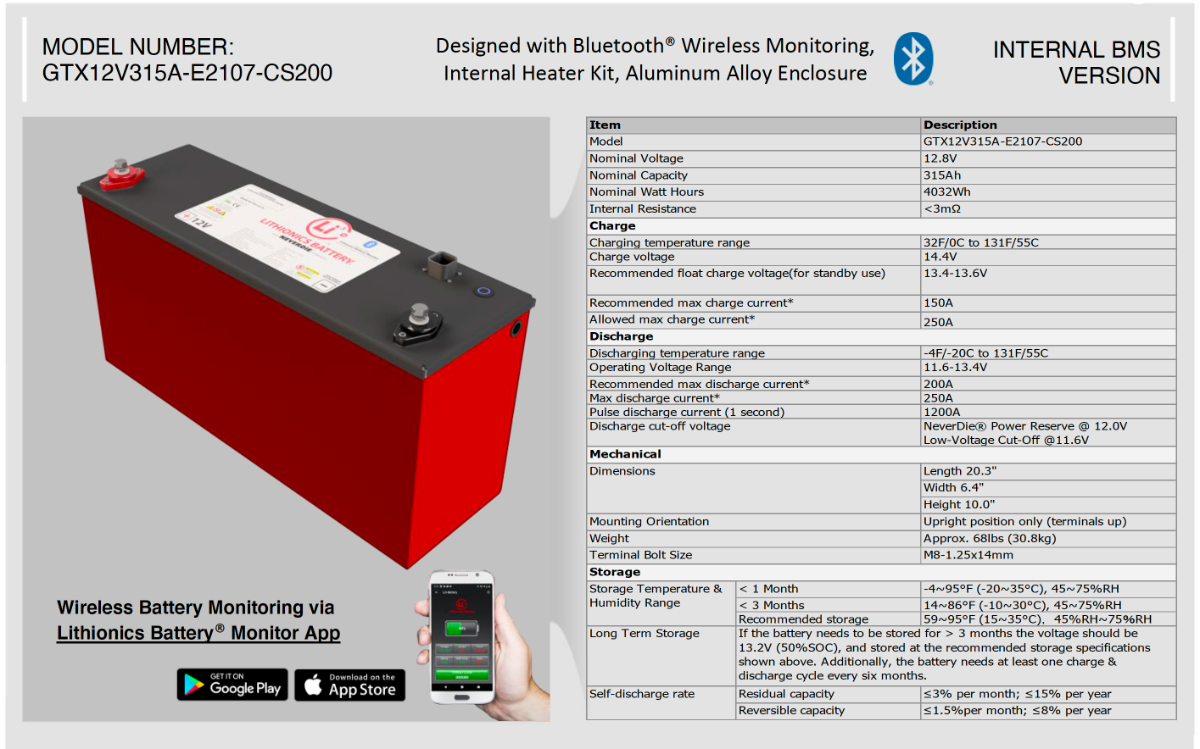
The batteries I'm using come from Lithionics and are internally heated with embedded wireless BT monitors.
They also have integrated ON/OFF switch for cutoff of power for safety and storage.
They are now being offered by Oliver as part of their new Lithium Platinum Package.
Attached is the full data sheet on the Lithionics GTX 315A battery.Two of these batteries will perfectly fit into the existing Battery Tray.
Based on the dimensions, and Oliver testing they have ~1/2" space each side for spacer blocks to keep batteries tightly secured along with the strap system.
Once I get the batteries in hand I'll be doing a set of schematic drawings.
I'll be taking pictures of tear out, and reinstall and any other mods I need to make along the way.I'll also be adding a Xantrex XC 2000 Pro - Inverter Charger with BT Monitor/control panel.
********** Picture and text below from the Oliver Website including the picture of batteries in the existing tray *****************
https://olivertraveltrailers.com/travel-trailers/legacy-elite-2/upgrades-add-ons/
The 2022 Oliver Lithium Platinum Package includes...
- 630 AH Lithium Batteries Package (2 Lithionics GTX315A)
- 340 Watt Solar Package with Charge Controller (Zamp PWM Controller)
- 3000 Watt Inverter - Xantrex XC 3000 Pro
- Micro-Air soft start capacitor for the A/C
-
3
-
-
I'm starting a Lithium upgrade on a 2019 Elite II Hull 505 - I've reviewed many other posts and projects (thanks for your postings) and decided to start this one to document my project to install new Lithionics batteries. Comments from those of you with experience very welcome:
Overview: Lithium Upgrade Project:
Reason I'm upgrading:My 4 AGM's finally died this spring.
I've got some time now to do this project now before a 9 month road trip later this year.There are three ways that batteries get charged in hull 505:
1) From Alternator/7PIN
2) From AC Shore Power
3) From Solar:
1) Alternator or DC/DC CHARGING:
Our Oliver's batteries get charged through the 7 pin connector while driving.
This is considered Alternator Charging or DC/DC charging.
For Lead Acid Chemistry this charging method works fine as the amount of current drawn by AGM's or WET Lead Acid's is relatively low because they have higher internal resistance.
Many of you know that you can't rely on that 7 pin connection to fully re-charge your batteries but they can keep them from declining.
Hull 505 was built with a 20A breaker in this 7 Pin line to protect the wiring and Tow Vehicle alternator.
For Lithium batteries with very low internal impedance this current draw can be many time higher, and result in overloading the tow vehicle alternator or cause wiring overloads.
To make charging more consistent and protect the alternator a DC/DC charger is the preferred choice for LI batteries.
My Plan: I will be adding a Victron DC/DC 30A Charger on board the Oliver.Installation Research and feedback from Oliver Service says that I need to:
- Carefully inspect the existing 7 pin wiring and do load calculations.
- Worst case I'll be running a new pair of dedicated 6 AWB charging wires from engine bay of Truck all the way back to the DC/DC charger.
- Figure out my location to mount for the Victron DC/DC charger. Must be near the batteries and have some cooling space and dissipation plate under the charger.
- Run new 6AWG wires from my Truck Engine Bay all the way back to an Anderson Connector on the Rear Bumper of my truck.
- On the Oliver, run 6AWG wires back into the same bay as the DC/DC charger.
2) AC Shore Power Charging - Upgrade to Xantrex XC 2000 Pro Inverter/Charger - provides 100A Battery Charging
In my specific hull 505 I have a Progressive Dynamics 4000 load center. This houses the AC Breakers, DC Fuses and a converter section for battery charging.
In my PD4000 there is a PD 4065 Converter section (65A) with Lithium Jumper for Battery Charging.
In normal operation that charger is set to WIZ (or Lead Acid) position and it follows a profile that's perfect for lead acid batteries and AGM's.
If I move the switch (or jumper) to the LI position, it now has a constant output at 14.6V which is OK for Lithium but not optimum for the Lithionics batteries.
Lithionics prefers that I use another charger with a programmable LI profile.
My Plan: I'm upgrading my current PD converter charger and separate Prosine 2000W inverter to an integrate Xantrex XC2000 Pro Charger/Inverter.
Note: I don't plan on running my AC off the batteries so the 2000W inverter is plenty for my needs. In the Platinum Package Oliver installs the XC3000.
Installation Research and feedback from Oliver Service says that I need to
- Disconnect the existing PD4065 converter charging leads that go to the batteries and tape them up.
- Leave the charger block in the PD4000 load center cage - just in case I need to downgrade later back to AGM's.
-
Remove the existing 2000W Inverter and Auto Transfer switch.
(The load and AC wires go back into the new XC2000 along with the 4/0 B+ and GND leads)- Mounting issue: I'll need to figure out how to attach the new inverter to the same spot under the street side bed.
3) Solar Charging - No Change at this timeIn my Hull 505, I have a Zamp 30A PWM Solar Controller.
This controller isn't as efficient as an MPPT controller, but it is already installed and works.
In keeping this first install simple, I'm leaving that in place.
My Plan: I'll be leaving Zamp 30A Charger in place for now, and will upgrade to a higher power MPPT controller in the future along with more solar panels.Installation Research and feedback from Lithionics says that I need to:
- Install a breaker on the solar + line so I can Isolate from batteries.
4) Decluttering the battery box -
It looks like many of you have moved all the loads and negatives to common bus bars as a way to declutter the battery box area.
I want to do the same...I've read the posts so far but wonder what's been the most difficult part of those change overs?
I plan to wire in a cutoff switche for the main B+ power (Big Red Knob) and a breaker for the Solar Inputs so I can cut all power for winter LI battery storage.Comments welcome before I get to the start line.
Craig
Hull 505
-
1
-
4
-
Just for fun you can look at the Oliver Outfitters List on Amazon for all kinds of electrical adapters, testers, hoses, filters etc.
For most items there are comments above and to the right of each item that are specific to Oliver use cases.See it here:
Check out reviews of campgrounds we've had our Ollie here:
https://4-ever-hitched.com/around-the-northwest
Craig Short
Hull 505 - Galway Girl
-
2
-
-
Very great job again! I'll look for the main post for the project when it arrives.
I'm starting my designs for a Lithium Upgrade so I'm drafting behind you.
Loved that you used what I assume are MBRF fuses on each lug. Great space saving safety feature.I can wait for the main posting but I'm curious, how did you mount those red and black through terminal studs?
Is there room on the backside of the battery enclosure to reach up and put on backing plates for the hole down bolts etc?When I looked under the seat of the dinette (red stud side) inside it looks like you would need to reach a hand up inside quite a ways to be where your through studs are mounted. Haven't looked under the bed side yet.
CS
-
3
-


Tongue Storage
in Ollie Modifications
Posted
Jumping in as we use them as well... size of Action Packer that fits the Oliver Front Tray.
Not suggesting you buy from Amazon, just using it to show the size etc.
Craig