Danno and Donna
-
Posts
66 -
Joined
-
Last visited
-
Days Won
1
Everything posted by Danno and Donna
-

dripping bathroom faucet
Danno and Donna replied to Danno and Donna's topic in Mechanical & Technical Tips
mmm ... what are the additional features of an accumulator? ... I had mine in place for only a short time, only to judge any reduction in noise ... please advise. My unit already has the braided stainless steel lines, so no need to make a change there. I'll give the added insulation a try soon. Cheers, -Dan -
dripping bathroom faucet
Danno and Donna replied to Danno and Donna's topic in Mechanical & Technical Tips
So ... update ... the Scandvik cold water valve/cartridge developed a small crack in the plastic internal workings ... I spotted it with a magnifying glass! So, the water would shut off but then works its way thru this tiny crack and into a drip ... drip ... drip. Found a Kohler insert/cartridge at Home Depot that looked identical in all dimensions so I thought would work ... it fit the internal workings ok and in the "shutoff" position resolved the drip. However, upon trying to reinstall the knob I discovered that the splines were differently spaced and the screw threads on the original knob were different (metric vs std?). I didn't want to ruin the valve so tracked down the proper Scandvik cartridge (cold side only) on Amazon ($22.23) - scheduled to arrive tomorrow. On a related note, I discovered this problem as I was in the process of installing an accumulator tank - hoping to reduce the noise from the water pump (as noted by John Davies, above, the 2015 models did NOT have accumulators). Interestingly, in researching I referred to my handy 2015 Oliver Owners Manual which provided some detail on the water pump. I found one statement in the manual very interesting - because the ShurFlo 4008 is a "by pass" type pump, "❚ No need for an accumulator with bypass pumps" ... not sure I understand why this is the case ... but ... That said, I installed the accumulator anyway (pretty easy really) just to see if it made a difference ... sorry to say that it did NOT help the noisy water pump at all! So, I'll be tapping some collective brain power at the rally in May! -
dripping bathroom faucet
Danno and Donna replied to Danno and Donna's topic in Mechanical & Technical Tips
Hey John ... I've not tried the vinegar flush ... will check the online threads and give that a go. Thanks! -Dan -
Group ... I own Hull# 069 ... a 2015 Elite II ... the bathroom faucet has developed a drip ... not a leak or trickle, but a steady drip. The drip is confined to the bathroom (all other faucets seem to be fine). The drip stops when I close the valve to the bathroom (under the curbside bed) and resumes when I open the valve again. Even with the pump turned off the drip continues, though I'm guessing that's due to the latent water pressure remaining in the lines. With faucet knobs open, both hot and cold flows are good ... it's only when turned off that it continues to drip. I can't imagine trying to sleep at night with that going on! So ... any suggestions? I believe it to be the original Scandvik setup and have not ever had the issue before. Hoping to avoid a full faucet set replacement, is there a cartridge that may need replacing? An "O" ring to replace? If so, has anyone actually done this? Stop the insanity!
-
HOW TO: Progressive Dynamics PD4045 LITHIUM upgrade
Danno and Donna replied to John E Davies's topic in Ollie Modifications
Thanks gang ... same recycle rules here ... so, I'll wait for the next electronics pick-up. Cheers, -Dan -
HOW TO: Progressive Dynamics PD4045 LITHIUM upgrade
Danno and Donna replied to John E Davies's topic in Ollie Modifications
AH ... but yours was a functioning unite - correct? ... I replaced mine because it was not working ... shall I just toss it in the recycling bin? -
HOW TO: Progressive Dynamics PD4045 LITHIUM upgrade
Danno and Donna replied to John E Davies's topic in Ollie Modifications
John ... at one point in your posting you'd indicated that the old unit might get a few bucks on ebay ... who would want it? ... do they refurbish them? ... what would you guess its worth on ebay? Cheers, -Dan -
Update - SUCCESS! So, I'd bought a charger/maintainer on the road but never took it outta the box ... the solar struggled along keeping charge, diminishing the batteries a bit each day (actually had a net positive a few of the days!) ... while driving we turned the AC/DC refrigerator off (it's electric only - the one "sizable" draw source) and only turned it on when plugged in at a campground (about every 2nd or 3rd night) ... by the time we arrived home on Sunday evening the batteries were down to 41%. The replacement converter section I'd ordered had arrived ... installed it today using John Davies excellent instructions - was actually pretty easy... and, yes, John, it was one of the new LI-capable ones (thanks for that tip). And ... voila! ... Ollie is now charging batteries like a champ. Went 17 days without a shore charge on the batteries. Hoping I didn't damage the batteries ... at one point was down to 11.8 V ... now, charge IN is around 13.8 with a 35+ amp flow ... should be back at full by tomorrow. Thanks, guys, for the insights and for giving me the confidence to keep going. Cheers, -Dan
-
Hmmm? ... problem solved! So, I determined it was not a propane issue as the gas stove was working fine. Then I figured perhaps all the dust that was stirred up while traversing the Pawnee Grasslands gravel roads was a possibility. I opened the hatch to the water heater and simply blew out the compartment (yeah, with my own mouth/breath) - then tested the water heater and it fired right up. Then, blew out the intake/exhaust ports of the furnace. From there went inside, opened the access hatch to the furnace (curb side rear) and learned that it would be very difficult to do any disassembly given the cramped quarters in there ... but, for the heck of it, used some compressed air (in a can) and blew through several of the vented openings and into the collar where the wiring exits the box. Viola! ... turned the thermostat switch back on and set the temp at 75 degrees ... fan kicked on (just like before) and a minute or so later the furnace fired up! Thanks guys for the thoughts and suggestions ... when I get back home will need to do a thorough cleaning and check everything closely. Cheers! -Dan
-
OEII #069 (2015). Camping last night in Evergreen, CO (altitude of approx 7700 feet) ... pretty chilly this morning so turned the furnace on (its been working fine the past 6 days of our trip) ... fan kicked on, but then after a few minutes the heater failed to ignite and the fan shutoff. Same with the water heater - doesn't seem to ignite. I thought perhaps was out of propane but the stove works perfectly (indicating propane supply is ok) ... but, to be certain, I switched to the fresh #2 tank ... tried the furnace and water heater again with same result (not working). Two possibilities now come to mind ... 1) high altitude is affecting the ignition of the units, or 2) traveling washboard gravel road in the Pawnee National Grasslands yesterday has rattled a connection (or two) loose. Certainly not a life threatening concern, but a little inconvenience. Anyone have any thoughts? Thanks in advance. -Dan
-
Thanks Gents! I was hoping that was the answer. John - thanks for the LI advice - I'll check my order and go that route. Happy Travels All! Cheers, -Dan
-
OK group ... need battery help. OEII #069 (2015) with 4 AGMs (about a year old). After some troubleshooting I've concluded the converter section of the Progressive Industries power control system (which includes the charger control) needs replaced - have it ordered but won't be able to install until I return home in two weeks. Since I'm traveling now without the onboard charger, can I just buy a charger at an auto parts store and charge the batteries overnight while at the camp site? if so, what is the proper way to hook up the charge to the batteries? Will I need to disconnect everything first? Note that charging from shore power and charging from the TV are neither one working, but the BlueSky Solar charging appears to be working ok (but not enough to keep them full) - do I need to disconnect the Solar charging before connecting the external battery charger? Back on the road shortly, but will check back in here later today for any responses ... thanks in advance! Cheers, -Dan
-
Replacing Window trim - what brand is it?
Danno and Donna replied to wolfdds's topic in Mechanical & Technical Tips
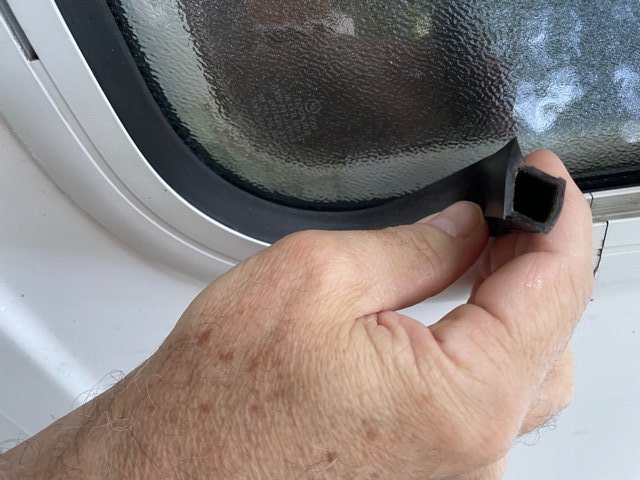
HMMM? ... for some reason, I can't seem to reply to individual comments ... however ... I've not yet call Oliver service ... but based on another thread I believe they now only provide the newer style ... but I'll call 'em anyway The pic is actually turned sideways ... bottom of the window is on the left of the pic ... it is the bathroom window, the lower sash is visible ... it is moveable. the gasket appears to allow water to flow down into the track and exit via the weep holes, which I've thoroughly cleaned ... "a small piece of the Pelland gasket for test purposes if needed" would be helpful ... although I had a response on another thread where the guy said he'd had the same issue, the factory service folks sent him what they had but it was the new style and wouldn't fit right ... I've confirmed no leaks from the street side lights or the bath fan ... looks like the track fills up and the weep holes can't evacuate the water fast enough ... You're correct ... "Honestly. It's ok. It's the bath, and if it ever leaked, it would leak into a total fiberglass area" ... so, it's not caused any "major inconvenience" (wet feet in the middle of the night) ... but it'd still sure be nice to have it fixed ... I'm thinking that because the gasket has shrunk, leaving a one inch gap on each side just below the middle cross bar, it is now allowing just enough water into those gaps that the weep holes can't keep up ... so, a new gasket blocking those gaps may be just the trick As well, I've ordered some of the EZ Gutter material & will apply just above the window & wrapping down the side past the gaps ... Persistence and diligence will get to a solution somehow! Thanks for all the input. Cheers!, -Dan -
Replacing Window trim - what brand is it?
Danno and Donna replied to wolfdds's topic in Mechanical & Technical Tips
So ... working on a leaky bathroom window (2015 LE II) ... As always, postings on this site provide the answers ... the window gasket on my 2015 LE II (pic below) appears to be different than shown at the beginning of this thread (per QuestionMark - H109-376 from Pelland Enterprises) ... did Oliver change window manufacturer in later models? ... or, perhaps the previous owner had replaced them already with a different type/style of gasket? ... checked on "pellanddent & they don't seem to have the profile I have (pic below) ... any thoughts or suggestions? can I assume the "H109-376" will work? Cheers, -Dan (re-posted here as my original post appeared in a year+ old thread & rec'd no response - apologies for redundancies).
-
Weather stripping around the windows
Danno and Donna replied to Foy_Mirna's topic in Mechanical & Technical Tips
So ... working on a leaky bathroom window (2015 LE II) ... the window gasket appears to be different than shown in this thread ... did Oliver change wondow manufacturer in later models? ... or, perhaps the previous owner had replaced them already with a different type/style of gasket? ... checked on "pellanddent & they don't seem to have the profile I have (pic below) ... any thoughts or suggestions? can I assume the "H109-376" will work? Cheers, -Dan
-
Gang ... any update on this? ... curious to hear any feedback as I'm thinking about getting one ... ah hell, I'll just order one from Amazon & return it if I don't like it.
-
Extend the tongue - best methods?
Danno and Donna replied to John E Davies's topic in Ollie Modifications
So ... just talked with ScubaRX (great guy! ... & his wife was perfectly pleasant too!) ... first, to confirm, my tongue does not have the second bolt (vertical under the LP tanks) ... ScubaRX informs me that the 2nd bolt came into play later around 2016 when someone reported the nut had come loose from the bolt on the main tongue bolt ... only happened once, but in being cautious the Oliver folks began using a 2nd bolt for safety thereafter. Otherwise, Scuba too indicated a small amount of play/rattle is not unheard of. So, again, I think I'm good to go. Thanks all! Cheers -
Extend the tongue - best methods?
Danno and Donna replied to John E Davies's topic in Ollie Modifications
BTW - Jason's conversation matches with the pics provide by djpinaz earlier in this thread ... thank you djpinaz! Except that in djpinaz's pics I don't see the vertical hole that Jason had mentioned ... not a big deal I suppose, but worth noting. Cheers -
Extend the tongue - best methods?
Danno and Donna replied to John E Davies's topic in Ollie Modifications
OK ... just spoke with Jason at Oliver ... keep in mind my hull #69 is a 2015 model ... he tells me the tongue design for that vintage is a simple insert (slide-in) with two bolts ... one main bolt horizontal on the outside near the bulldog, and one vertical under the LP tanks (I'll check that one on mine) ... this set up allows for easy extending of the tongue if preferred - simply unbolt and slide outward to the next set of bolt holes. And ... given this arrangement, it could appear a little loose and allow a small amount of rattle. To eliminate the rattle, he suggested drill a second horizontal hole set further back (thru both the heavy frame member and the inserted tongue) and cinch down with a bolt - this would eliminate any pivot point and make more secure. He also indicated there is enough strength in the frame that this would not violate the strength and integrity of the frame. Otherwise, if I can live with the small amount of play (rattle), there's no problem. Thanks Jason! ... Cheers group! -
Extend the tongue - best methods?
Danno and Donna replied to John E Davies's topic in Ollie Modifications
Thanks guys ... I'll PM ScubaRX and I think I'll check in with Jason at Oliver as well ... will post what I come up with. Cheers. -
Extend the tongue - best methods?
Danno and Donna replied to John E Davies's topic in Ollie Modifications
A related question: I recently purchased and installed an Andersen Hitch ... in the process, discovered that the Oliver's tongue is loose where it is inserted into the frame's receiver, secured by only a single pin-thru bolt. Based on this thread, I learned that the tongue bar is designed to be movable (slide in or out to preferred length) ... but, does it fit snugly or is it somewhat loose and able to rattle? ... and, is it correct to be secured by only the single pin-thru bolt?, or is there supposed to be more than one bolt securing it to the trailer frame receiver tube? Someone please advise as I'm about to launch on my first long-distance trip and fear that a loose tongue may be an issue (I think there's an old WWII phrase about loose tongues but can't remember it at the moment). Thanks, all, in advance ... Cheers, -Dan -
Thank you David! I just acquired Hull #69 from "try2relax" ... your lists will not only help me with maintenance, but will serve as a good training tool for familiarizing myself with our new-to-us Ollie. Cheers, -Dan