John E Davies
-
Posts
5,759 -
Joined
-
Last visited
-
Days Won
243
Everything posted by John E Davies
-
I think he means not using hookups, not leaving the trailer winterized while in use. If you are going to use your plumbing systems in winter, you will have to re-winterize when you get back. There is no getting around that requirement unless you leave heaters running or store it indoors. I just did a partial winterization - I bypassed and emptied the hot water heater, injected antifreeze into all four outside water ports and shower - but left the fresh water tank full so I can use it if needed. It cannot freeze where it is parked, but I might want to take it out in freezing weather or use it if there is a severe power outage. If the weather is truly bitter (it gets to -20 sometimes here) I would feel really uncomfortable leaving water in those outside parts, regardless of how hot I kept the trailer inside..... in milder weather they are not a big concern. John Davies Spokane WA
-
 Here is a comprehensive yet easy to understand discussion of SAE vs metric threads and fasteners, and of “best practices”... Bottom line, if the fastener diameter and thread pitch do not match, the connection will either be really weak and possible fail, or the parts will seize together and be permanently damaged. https://www.parktool.com/blog/repair-help/basic-thread-concepts Oliver as a company has a serious problem with this concept. I already encountered and fixed MANY places where the wrong diameter and thread size nut was run onto a smaller diameter screw (all the outside access and inside overhead cabinet latch hardware- 10/24 coarse nuts were run down onto 8/32 fine screws). In this case, the parts did not seize, the nuts fell off and then the screws fell off. Luckily the doors did not fly open and get damaged. http://olivertraveltrailers.com/topic/how-to-fix-your-overhead-cabinet-latches-wrong-hardware/ I personally would be delighted if Oliver never installed an SAE part, everything should be metric. But the RV industry is stuck on American sizing. When you start adding “Euro” appliances like the instant hot water system, you run into hardware incompatibility! I wonder where they sourced these metric sewer cables, and why....?!! This was probably a lot more discussion than anyone cares about, but it is very important to inderstand about using the correct parts, especially when you are faced with a do-it-yourself repair in the field. The RV tech should know the difference. But I would not count on it. John Davies Spokane WA
 -
Ah, another good old etrailer,com expert.... I can screw a 6mm bolt into a 1/4 -20 hole all day long and it will never “fit”; it just cross-threads and seizes up. LOL ... Those Volterra handles are not metric. Thanks for the humor. John Davies Spokane WA
-
That is so funny, that poor woman has no business using either that head or hand tools. When operated properly this simply will not happen. If you abuse a regular RV black system it will also give you serious problems, different ones surely, but just as gross. With a composting toilet you NEVER EVER pee in the poo section. They tell you that in the manual and it isn’t rocket science.... don’t every let a guy use it while standing up! LOL. What a gross looking toilet. John Davies Spokane WA
-
Found at Messy Nessy: I don't quite understand why anyone would actually want to land an aircraft on the top, when you could, I don't know, just land in a nearby field or parking lot.... It would be amazingly awkward with any kind of tree cover, or in your typical KOA. The 10 x 25 foot sundeck is WAY cool. This was before you had to actually put other stuff on the roof, like air conditioners and solar panels, so it was basically unused acreage. I bet it was a very nice place to lounge on a mild day. http://www.messynessychic.com/2017/11/01/oh-lord-wont-you-buy-me-a-caravan-yacht/ John Davies Spokane WA
-
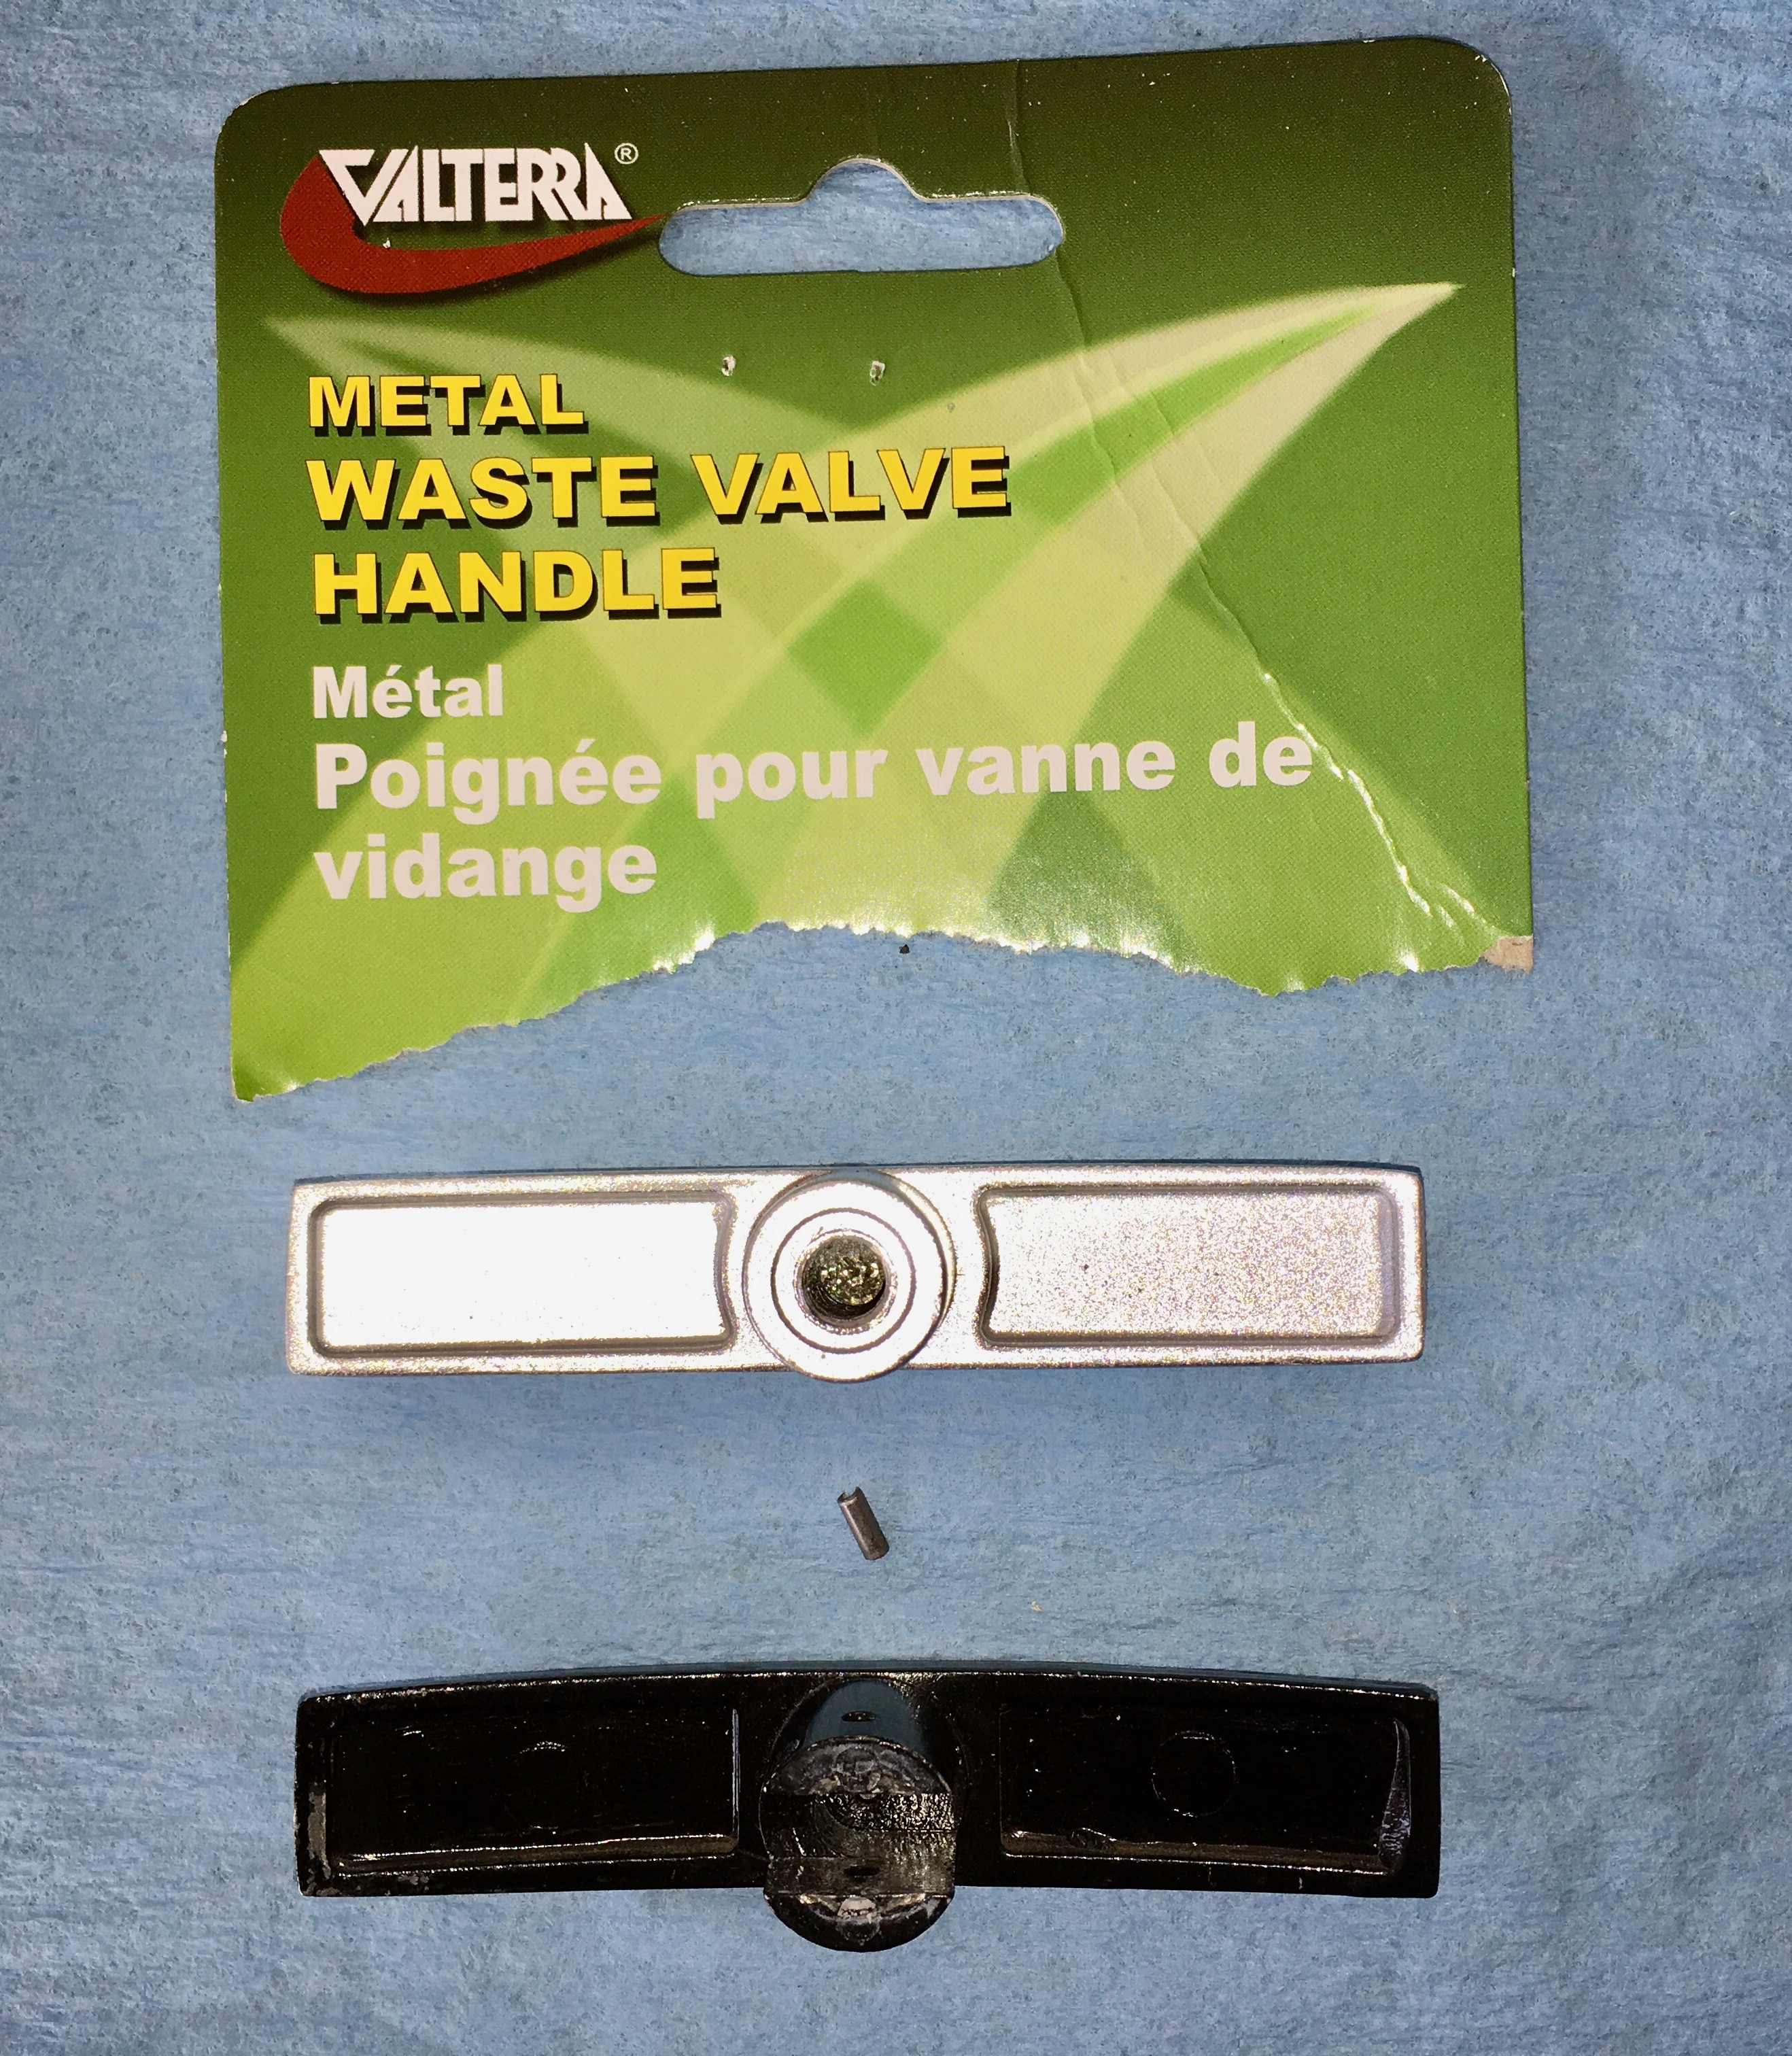
Bill, that is a great idea, if I don’t come up with a metric handle I think that will be an easy and permanent fix. Since I now have a new silver handle, I can mod both the rear cables, with a black handle for the black tank and a silver one for the gray tank - color coded! - and then I will have a spare I can drill to use up front, if that one ever fails. Thanks, John Davies Spokane WA
-
Randy, the black tank and all its associated plumbing is installed but nothing is going into it - there is no opening on top of the tank. I had to winterize the black tank flush line, and drain what little bit of water was in the tank after doing that. I used pliers on the nut.... I actually opened up the rear access panel a few months ago and found the handle busted and lying in the bottom, it did not happen while I was actually pulling on it. Regardless of the black tank, the other two will also fail because it is a beyond stupid way to secure a highly stressed part. John Davies Spokane WA
-
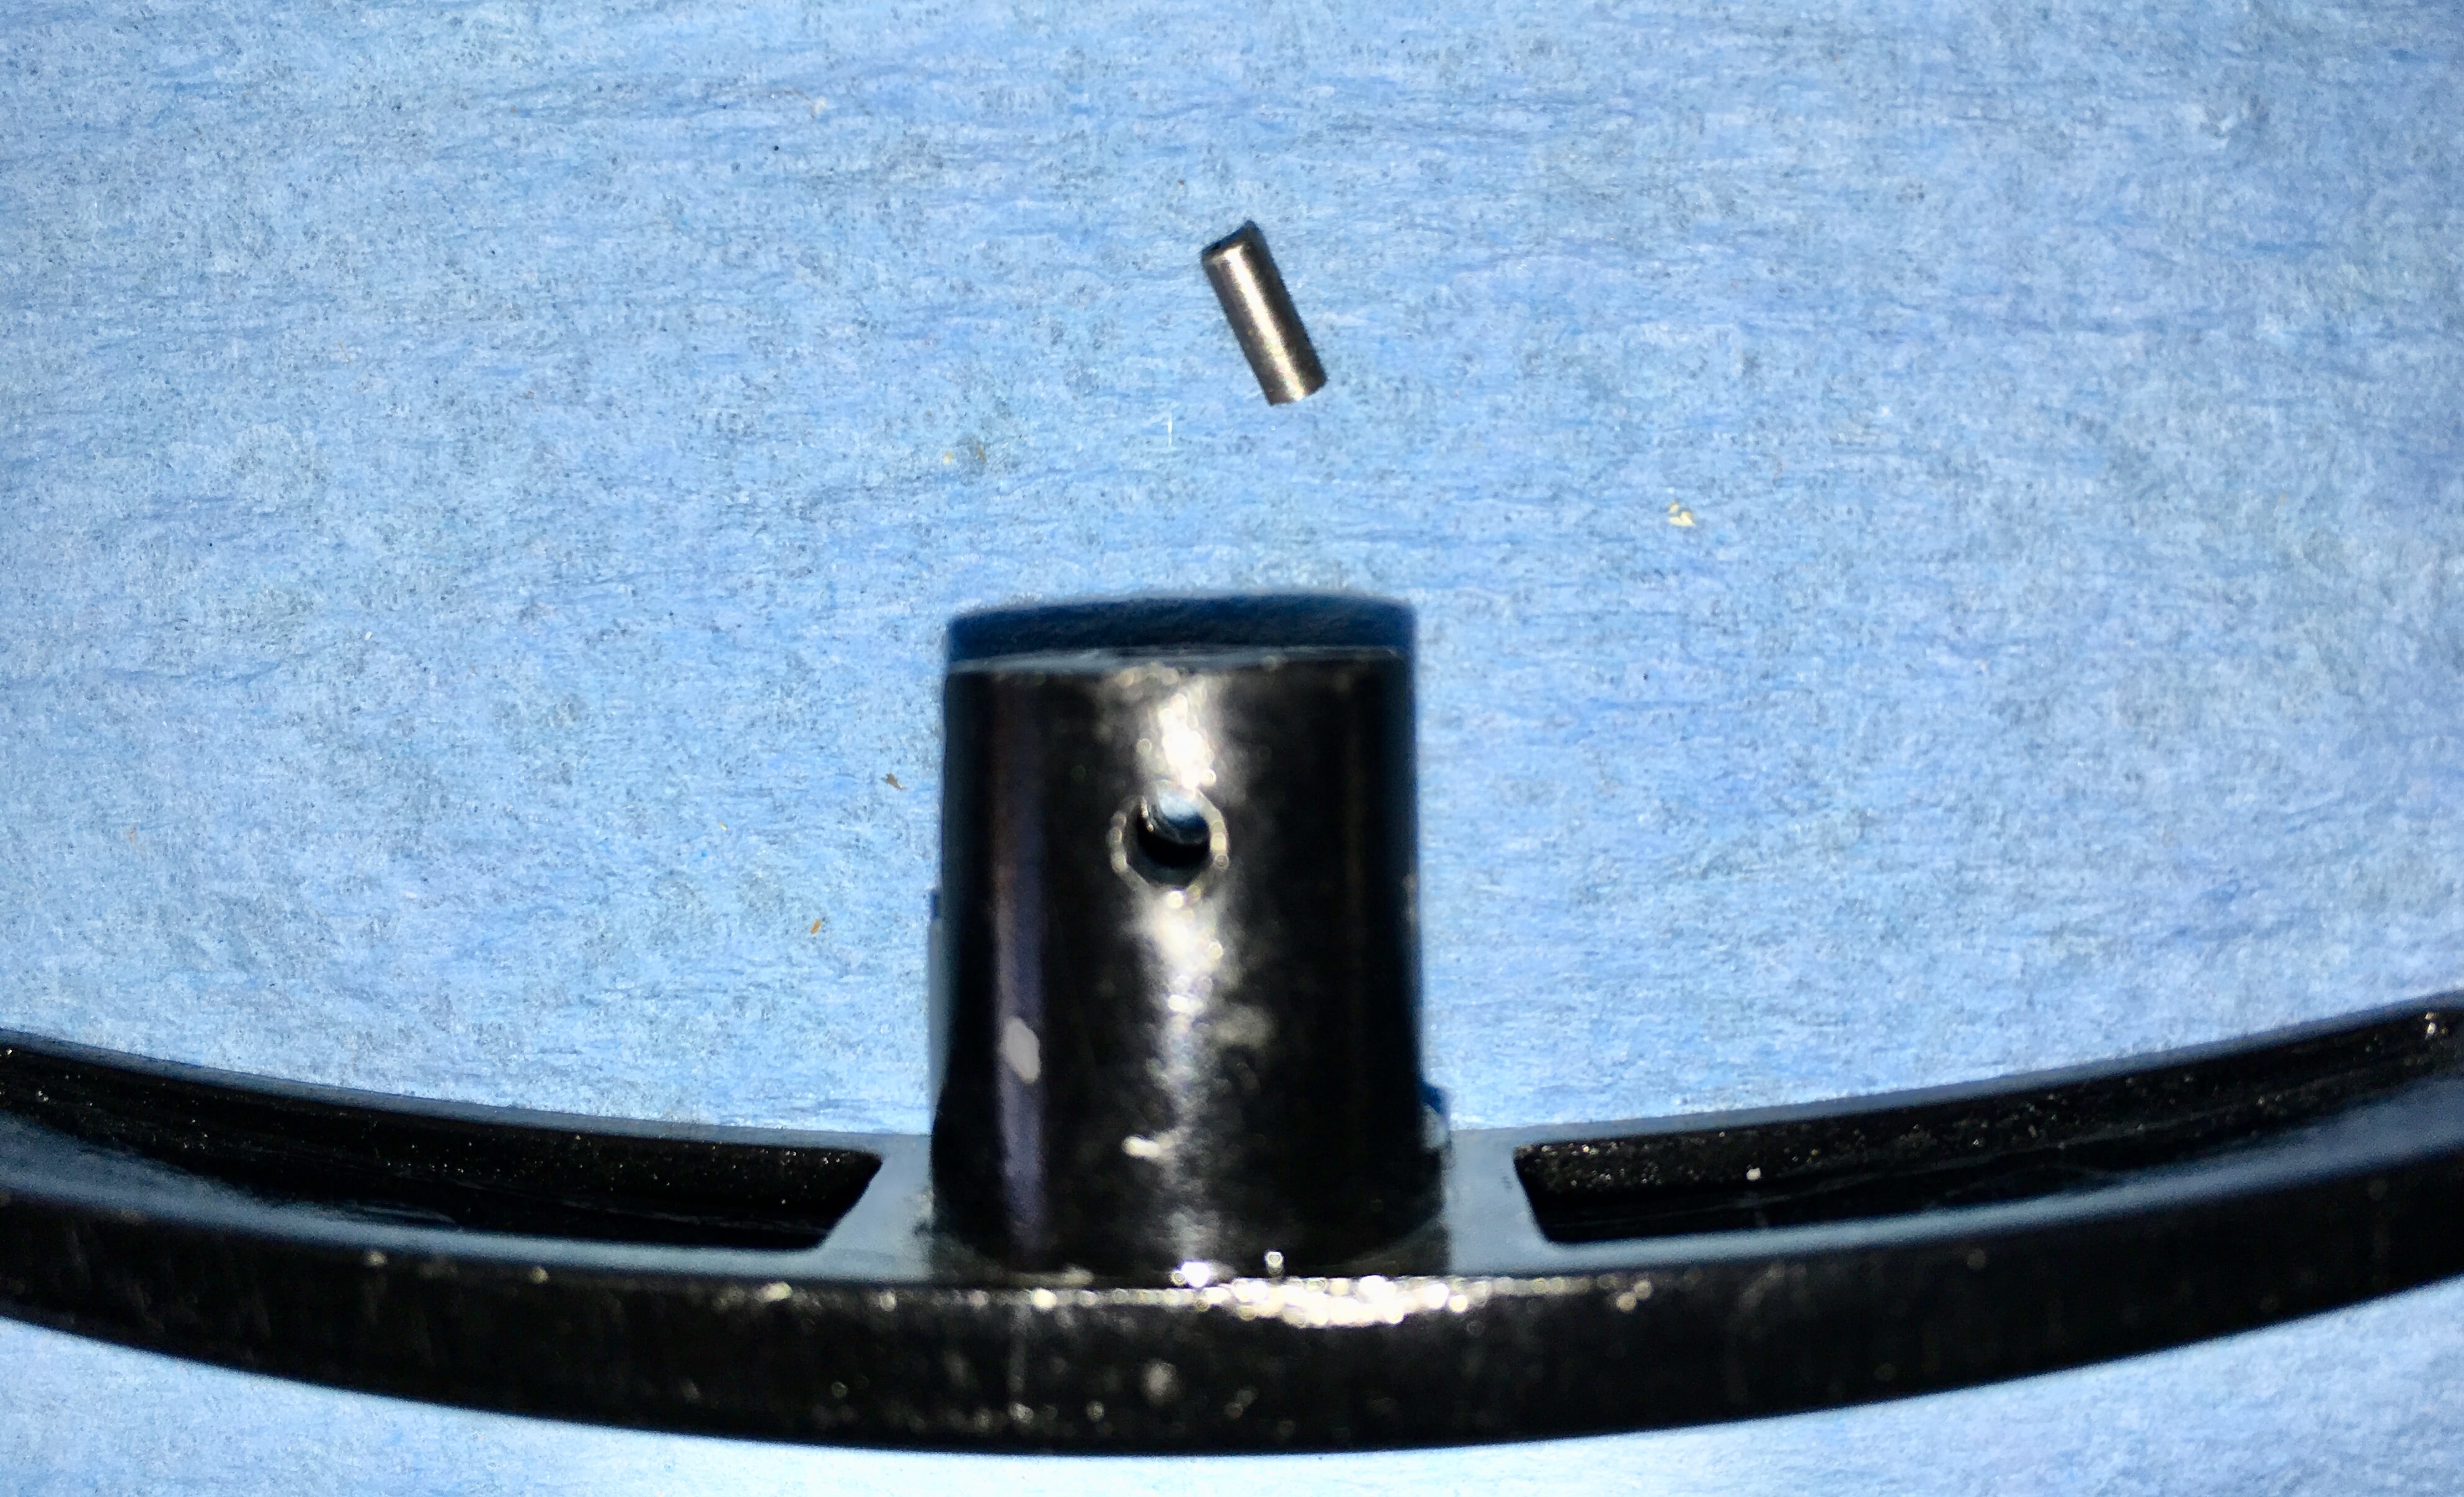
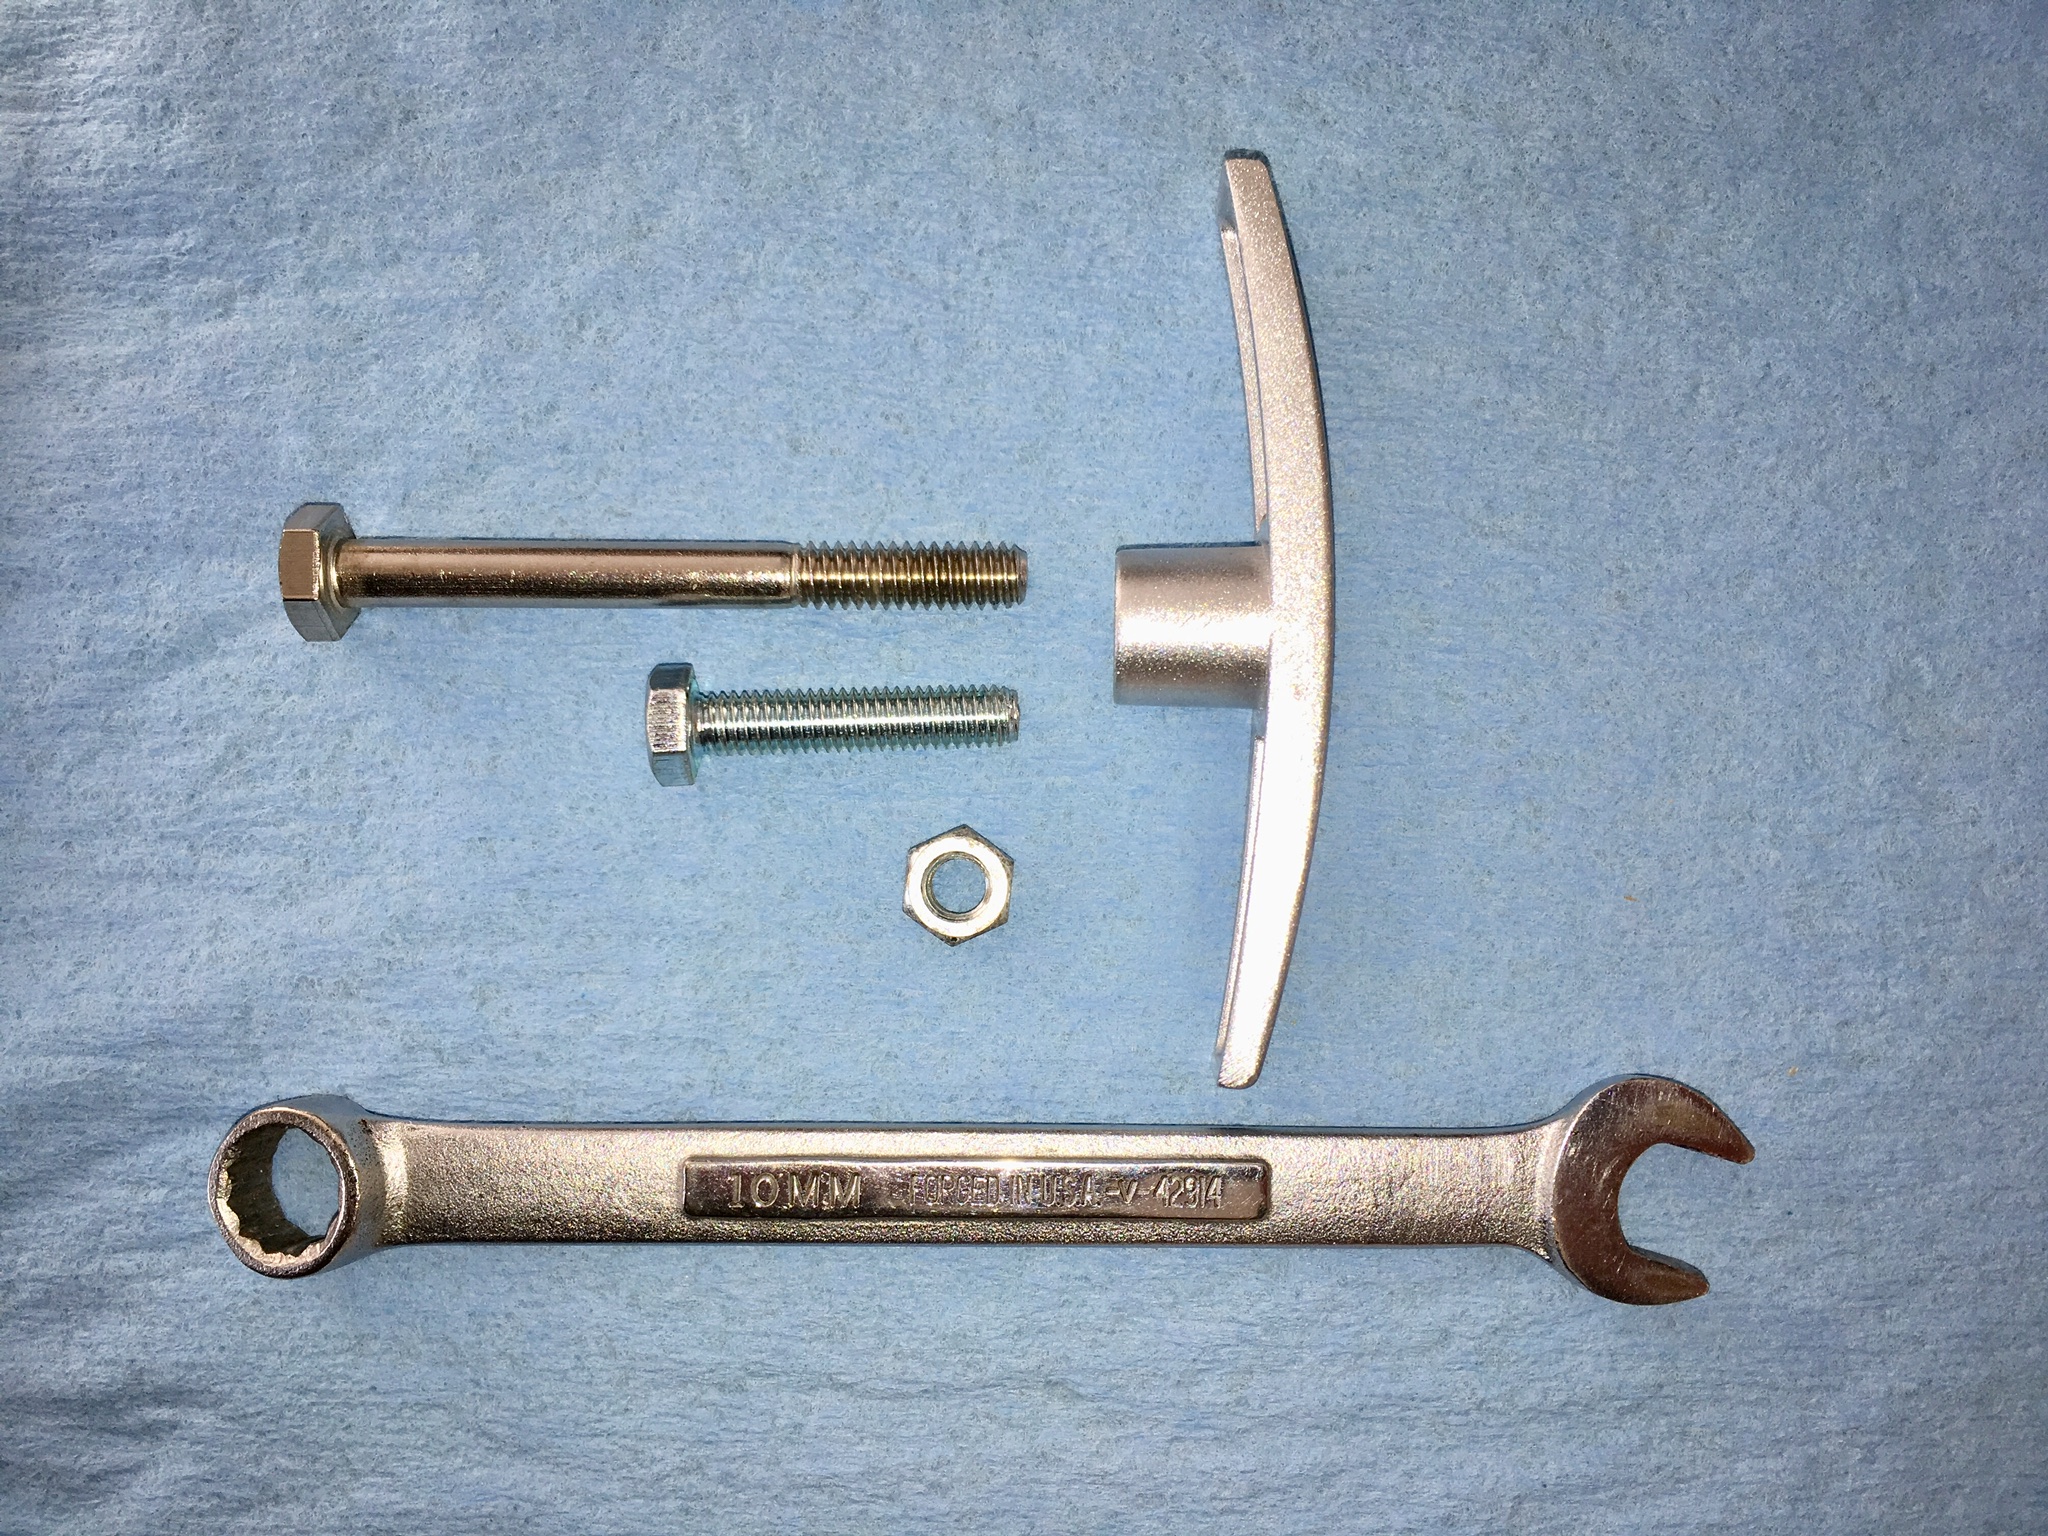
The supplied handle for my black tank fell off because it is held on with a 1/16 inch roll pin. I kid you not. The pin sheared and off it came. (BTW I have only operated the handle twice.) There are no threads in the large hole, which is actually a sloppy fitting slot. All the stress goes onto that teeny little pin. The others are the same way. The shaft is threaded with a jam nut, so I ordered a standard “metal” handle. It doesn’t fit, the threads are 1/4-20 and the cable end is 6mm.... Here’s the handle with a 1/4-20 bolt, which fits, and a 6 mm bolt for comparison: Here’s the 6mm cable, with the busted off pin in the hole: Does anyone know where I can get a threaded handle for the metric cable? The alternative is to drill out the threads and install a 6mm helicoil insert into this SAE handle. This is so stupid I could scream.... I already asked Oliver several times and all I received was a 3 inch waste valve assembly, without handle. Does anyone else have pinned handles? Have the pins broken? Thanks, John Davies Spokane WA

-
Quartzsite, AZ Gathering - February 5-11, 2018
John E Davies replied to ScubaRx's topic in Events & Rallies
I’ve never been there, is it dusty from vehicles passing by, and from the high winds? How about loose pets wandering and getting into mischief? Late night parties and noise? How is the star gazing? How crowded is it after the big show ends, do most of the hundreds of thousands of visitors leave? I have to admit that I would like to check out the vendor displays but this kind of overpopulated camping does not appeal to me in any way, other than the boondocking aspect.....do the pluses outweigh the minuses? Thanks, John Davies Spikane WA -
Nice setup, but I hope you aren’t actually driving with your trailer cord dangling way down like that.... it needs a bungee cord around the tow bar to keep road debris from trashing it. I’m glad you are enjoying the truck, do you feel it does well without a WD hitch? Any serious bounce on choppy jointed freeways? John Davies Spokane WA
-
Where do you live, and do you plan to tow across steep mountain passes? If you live above 4000 ft and need to go over high country, you need more truck. Welcome to the forums. John Davies Spokane WA
-
I just remembered another reason I decided against copper.... the risk of splitting when the tank contents freeze. It might only affect an inch or two of material right at the bottom, but that would prevent it from drawing from as far down next season. PEX is much more tolerant of freezing. I’ve had a couple of residential copper lines freeze in really severe cold and I don’t care for that, no way....! In regards to restrictions or using smaller tubing, that might work but it is not the best solution. For a suction line, there needs to be minimal restrictions (narrowing or sharp bends) and ideally the suction line should be the next size larger diameter all the way to the pump. With the small pressure and flow rates that RV pumps are capable of, it isn’t a big deal, but you should be aware of this when you start thinking about changing stuff.... John Davies Spokane WA
-
Dave, lots of good questions here. This entire scenario is one big compromise, since ideally all fittings should be above the static water level from the every start.... Siphon tube in bottom hole: Access is a real problem, you still would have to remove both sets of lines to reach the area, and if you had a leak in the siphon, you would have to take both apart to repair it. With the tube on top, the bottom fill line does not have to be touched, and the fill line is the only one that has positive pressure in it, so it is most likely to leak. It is prudent to just not mess with it a second time. Siphon tube in top hole: Easy access after the installation, the static water pressure on the connection is less (less water that high up), so it is less likely to leak. Ideally, one mounted on the very top surface e of the tank (like the factory mod) has zero static water pressure, so it can never leak unless your are towing. Draining the tank: It should not be a problem, When the line is full (no air pockets) it will drain naturally and do so until it sucks air. If you try to drain the tank after towing, there will be air in the line and _maybe_ nothing will happen. Simply turn on the pump and it will fill the line. If you want to get anal, open the ball valve that sends water to the tank and the pump will recirculate water in a loop and completely clear the line of bubbles. Once the air is gone, the siphon will start when you open the drain valve. Or you could just raise the tongue 6 inches, as you normally would, and it will force a siphon action by piling the water up in back. No sucking on the pipe under the trailer! You still have to raise the tongue regardless to get the remaining few gallons out.... Spin weld fitting: I can't answer your questions since I have never even seen a spin weld tool in person. The fitting that Oliver sends in the kit looks the same to me, except it has a back flange to slip into the tank wall.. Hole in the tank: It is 1/2 inch, you cannot slip a 1/2 inch PEX or copper tube through it since they both measure 5/8 inch outside diameter. When you are talking about a CURVED tube, you need even more room for the bend. PEX vs copper tube: I thought a long time about this and I considered the environment that the tube would have to endure. A fixed tank in a structure does not have any water movement. An un-baffled water tank in an RV, especially a long and low one like this, can sometimes have incredibly violent water motion. When full, the water can't slosh when you slam on the brakes. When 3/4 full, you have a large amount of water that is thrown forward by inertia, then it rebounds and sloshes back and forth. Water has a lot of mass (have you ever had anybody throw a five gallon bucket of water at you?) and that force gets transmitting to the tube in back. A copper dip tube will have no give and much of the energy will go up to the compression fitting. I would be really surprised if it did NOT develop a leak over time. A PEX tube has a significant amount of flex and will dampen out a lot of the force. I actually pursued this idea at first, since when I got my parts from Oliver I thought all the tank fittings were 3/4 inch, like the one they supplied in the above picture. Not everyone has the ability to heat and bend a tube, so I thought using off the shelf Home Depot parts would be a good compromise. It does require a PEX crimping tool, however.... Here is a standard $6 "stub-out" going through the drilled out fitting supplied by Oliver: [attachment file=76435] Pretty slick, eh? I was proud of it! I drilled three angled holes around the closed end and it is very nice to look at, but it won't go through the existing holes on my tank. Maybe yours has 3/4 fittings installed, in which case this would work fine. However, there is a significant restriction where it is swaged down into a nipple for the tube, plus it has the risks I mentioned above. So I can't really recommend this. PEX tube and the compression fitting: I think this is the weak spot of this design, no doubt about it. If there was a good way to insert a thin metal sleeve where the crimp occurs, it would be better. The fitting Oliver supplies for the top location has an o-ring under tension, so it should theoretically remain leak free. You still have to drill it out though, they do not supply the correct fitting for a pass-through. For my Beta test pipe I used a 3/4 inch Forstner wood bit. I pushed a piece of tubing all the way into the fitting to protect the o-ring, drilled out the restriction, until I hit the PEX tube, then pushed the tube all the way through, de-burred the end, and pulled it back out. It's really easy if you have the bit. It takes about five minutes. I think my setup is as good as it gets, using the two factory holes. I think a 3/4 or 1 inch spin welded fitting on the flat upper surface would be better if you can get it done. I will keep an eye on mine as I tow, and if it doesn't work out I can easily put it back the way it was. Did that cover all your concerns? As a final comment, if I am ever back in TN (doubtful) I will have Oliver add a top fitting and plug it. Even if my setup hasn't leaked by then, it might in the future and then I would re-route the suction line through the new top opening and return the rest of the plumbing to the original configuration. But I would probably just plug the bottom hole and rely on only the top siphon for draining. John Davies Spokane WA
-
I did not mean the tank was born in TN, but that it was installed there, I probably mis-phrased that comment. The fittings are not molded in (just look at the pics), rather they are spin welded in place afer the holes are drilled, thus there are shavings inside. The company that made it should have flushed out shavings after manufacture. But we all know how these things work. Lots of RV owners have found much worse in their tanks, like 3 inch discs of plastic. It is very important to check the pump filter routinely, at least until you no longer find manufavturing stuff in it. For those who haven’t ever done it, the bowl screws off by hand and you can easily swish it and its mesh screen under running water to clean it. It takes about a minute to do, once you have the access panel open. Only a tiny amount of water will spill, and you can catch that with a couple of paper towels. John Davies Spokane WA
-
Thanks for the comments, I might try one. I do suggest that you not leave it on the floor while towing. Olivers have pretty strong brakes and if you have to make an emergency stop you will find the heater smashed up against the bathroom bulkhead. This happened to my rear (bedside table) drawer, it busted out the too short screws and travelled the length of the trailer. And it was empty..... How about setting a towel in the sink and putting the heater there? Easy access and no way it will go flying..... if it does you will have bigger things to worry about. Have fun on the trip. I am close to the end of my camping season since soon snow will be falling in the NW passes and the road crews will start spraying mag chloride all over the streets. Yuck. John Davies Spokane WA
-
Mike, have you a plan for securing that bladder during transport? It will roll around like a hyper excited puppy otherwise. It is not really designed for transport. Keep in mind, these tanks are made and warrantied for a static environment so if you're going to use it some other way, please make sure to secure it tightly and keep it away from sharp objects. 30 gallons leaking out into the bed of your truck might be bothersome.... John Davies Spokane WA
-
Reed, I have never used a bladder, but I think it would be awkward at best, I assume they have tie-down grommets? How hard is it to clean out and dry off-season? I was considering something like this, and then my pickup truck went away. I think they are available in smaller capacities. This one is 48 gallons: “It's a little hard to get totally empty, but excellent for those horses who won't drink anything but home water. The shut off valves that come with are plastic- probably want to pick up metal ones from a local home improvement store for $5 and then this thing is bullet proof. Functionally everything you need, lightweight to mount on top of the trailer in the hay rack, and has indentions where it's easy to use ratchet straps to lock it in place. Overall very pleased with the tank after upgrading the plastic valves for metal.” https://www.valleyvet.com/ct_detail.html?pgguid=59683DCB-1ED0-47C7-B732-D487536EF290 You could go by an equestrian/ ranch supply house and talk to the folks there. LOTS of extra water is a really common need for horsemen. John Davies Spokane WA
-
Reed, I was concerned that a rigid dip tube would be hard to work into the opening since the maneuvering room in the compartment is a little limited. A plastic tube has enough flex that I did not envision any trouble. It indeed went right in, once it had the correct sized hole. If the side tank fitting were 3/4 MPT instead of 1/2 MPT, then maybe a copper pipe would go in there. I know you did this kind of stuff for a living, I would greatly appreciate any comments and tips. John Davies Spokane WA
-
Summary: It remains to be seen how well the dip tube connection endures the rigors of trailering with 32 gallons of water sloshing around. If it seeps, I will tighten the nut. If it continues to be a problem, then maybe the official spin-welded fitting will be needed. I will not know for quite a few miles, but I think it will be fine. I can imagine a situation where the suction dip tube has air in it from trailering, and you can't get water to flow out the tank drain. Simply turning on the pump should clear the line of air and start the siphon going. Attached are the original water capacity placard I made up shortly after I got Mouse home, and the new one I just made. There is quite a difference in usable water, I think this mod is definitely worth doing, unless you are forever connected to city water at your campsites. Note that while I did measure capacities while filling and emptying using 5 gallon buckets, there is some error and the numbers are not 100% accurate. I plan to print the new placard,laminate it and place it above the Tank Monitor in the trailer for easy reference. I checked the water filter after a few minutes of operation and it was FULL of white shavings, but I have never cleaned it before, so that may be a present from its birth in Howenwald. I plan to check and clean the filter every few hours until I see no more plastic shavings. Comments, questions and possible improvements are welcome. Oh yes, I never planned to run naked outside the trailer to raise the tongue if my shower ran the tank dry. I would most likely scream at my wife to do that.... with clothes on. John Davies Spokane WA Fresh-Water-Capacity-Placards.docx
-
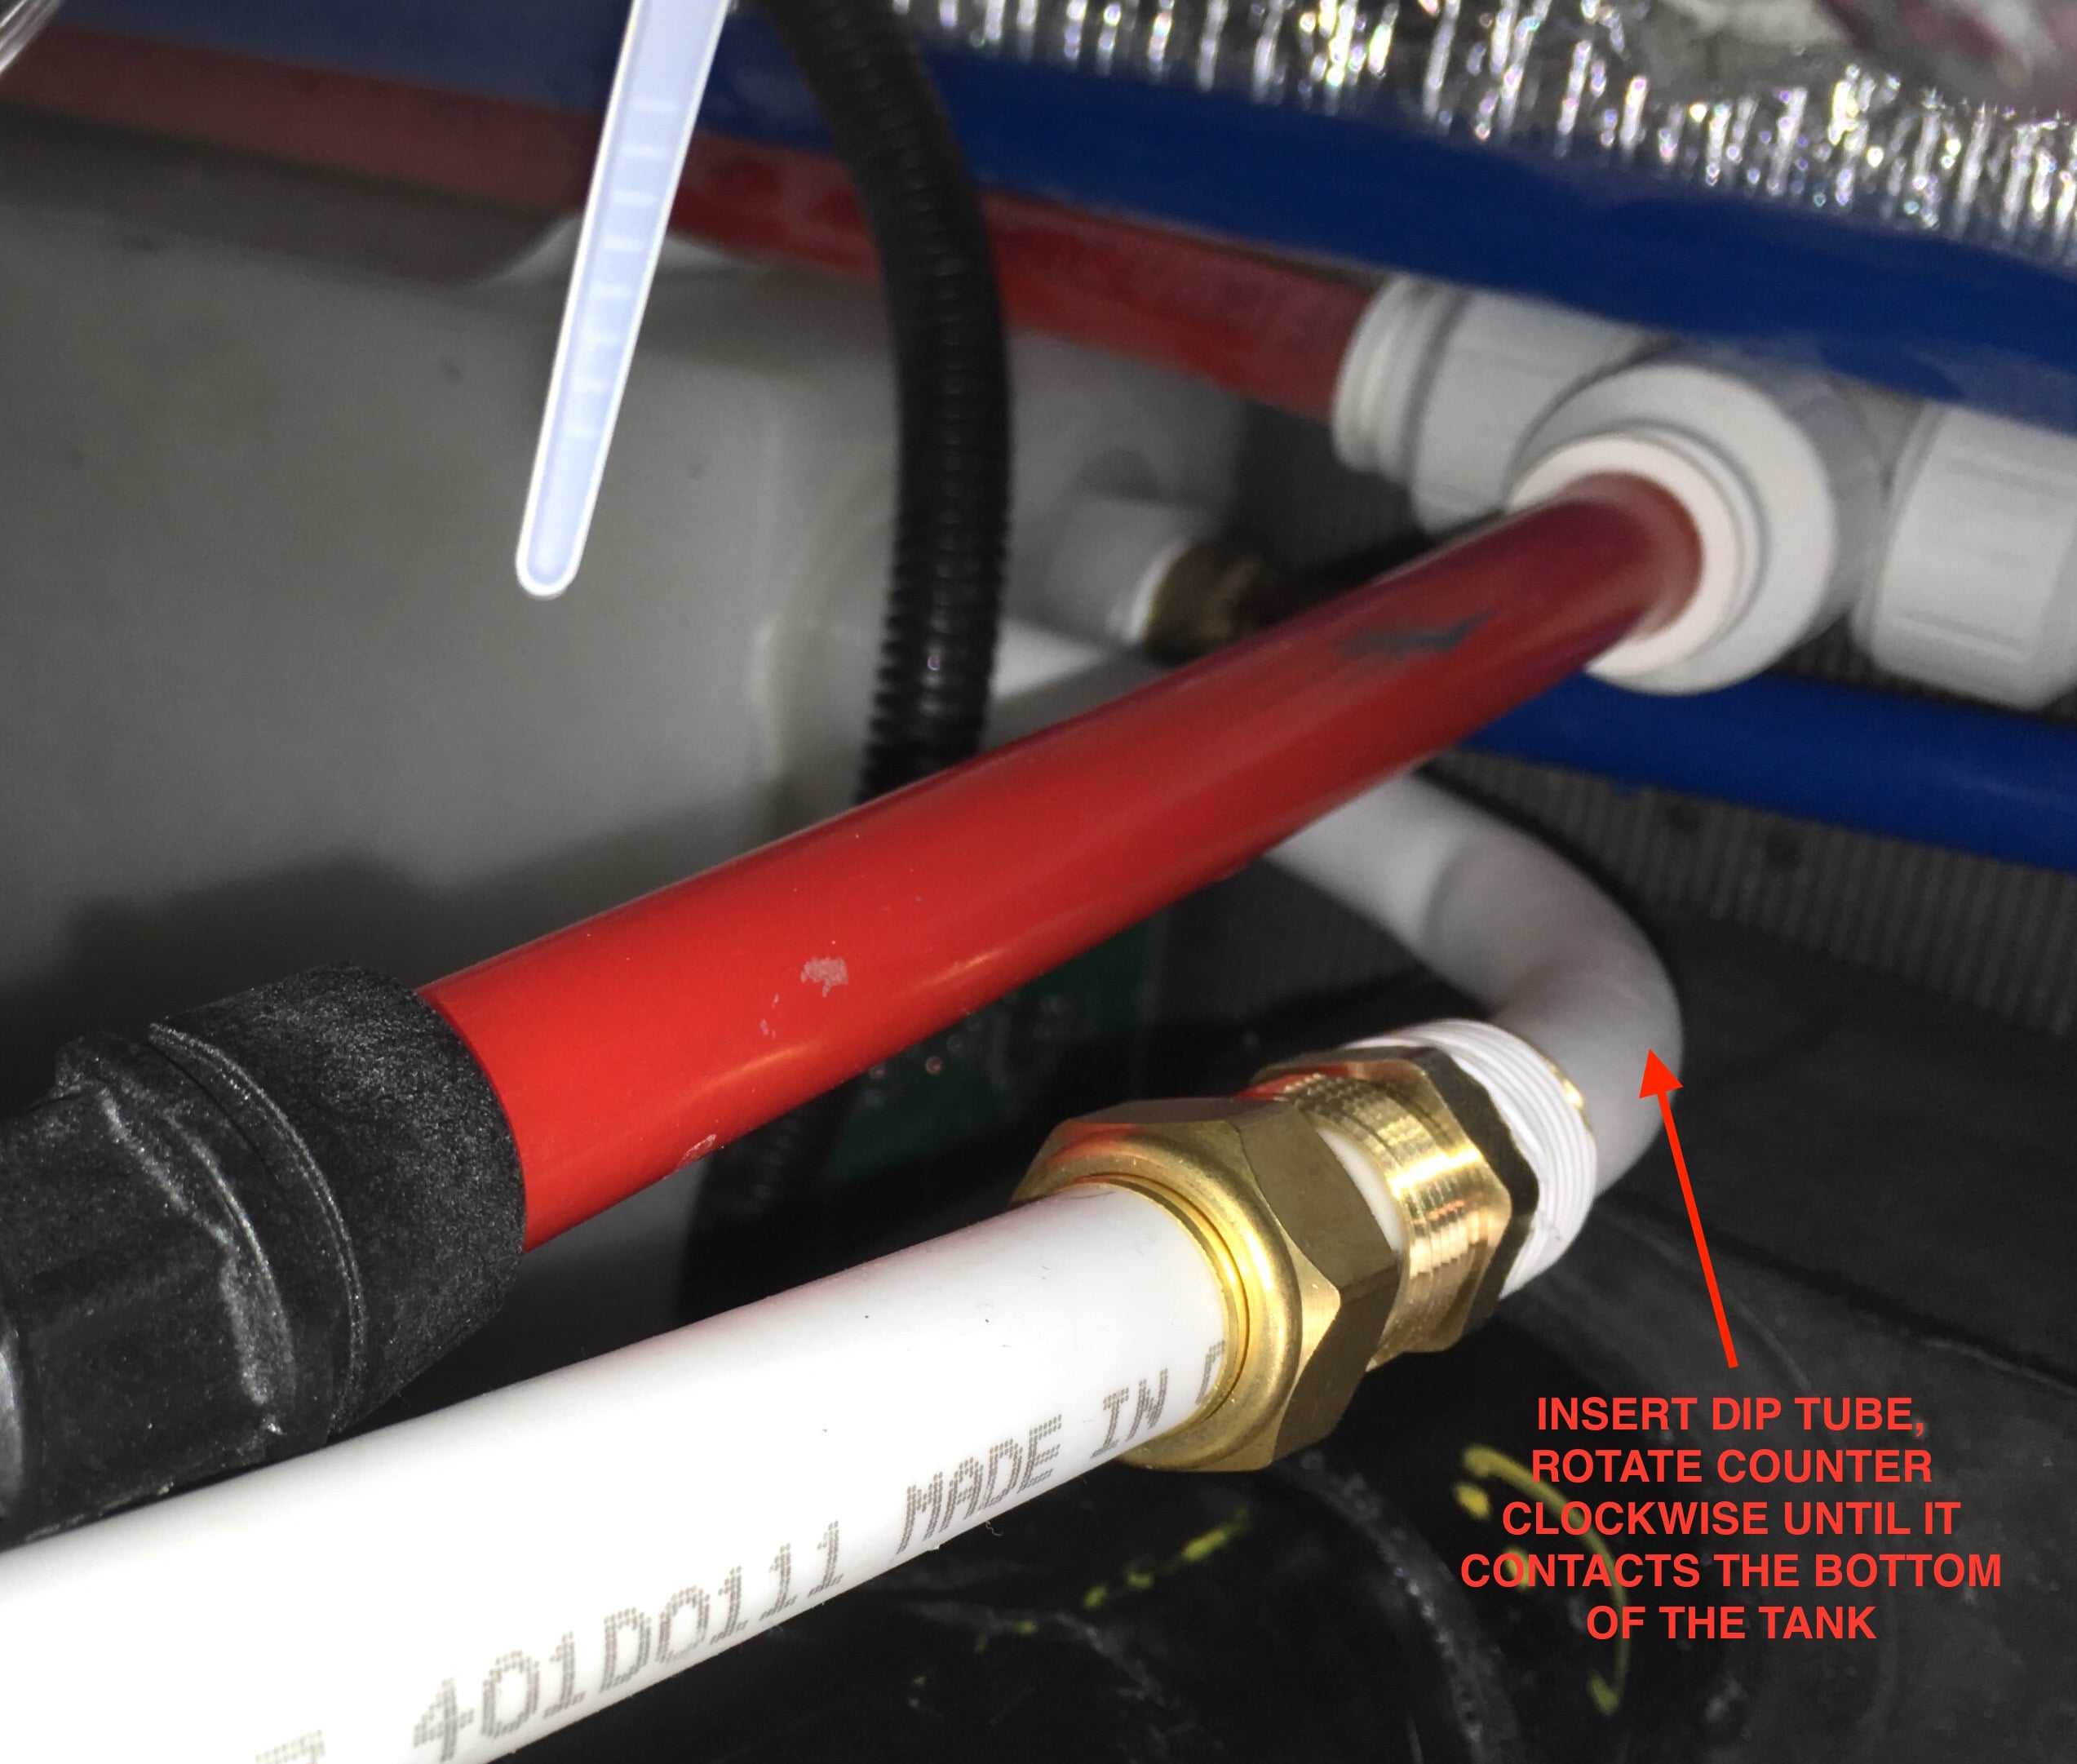
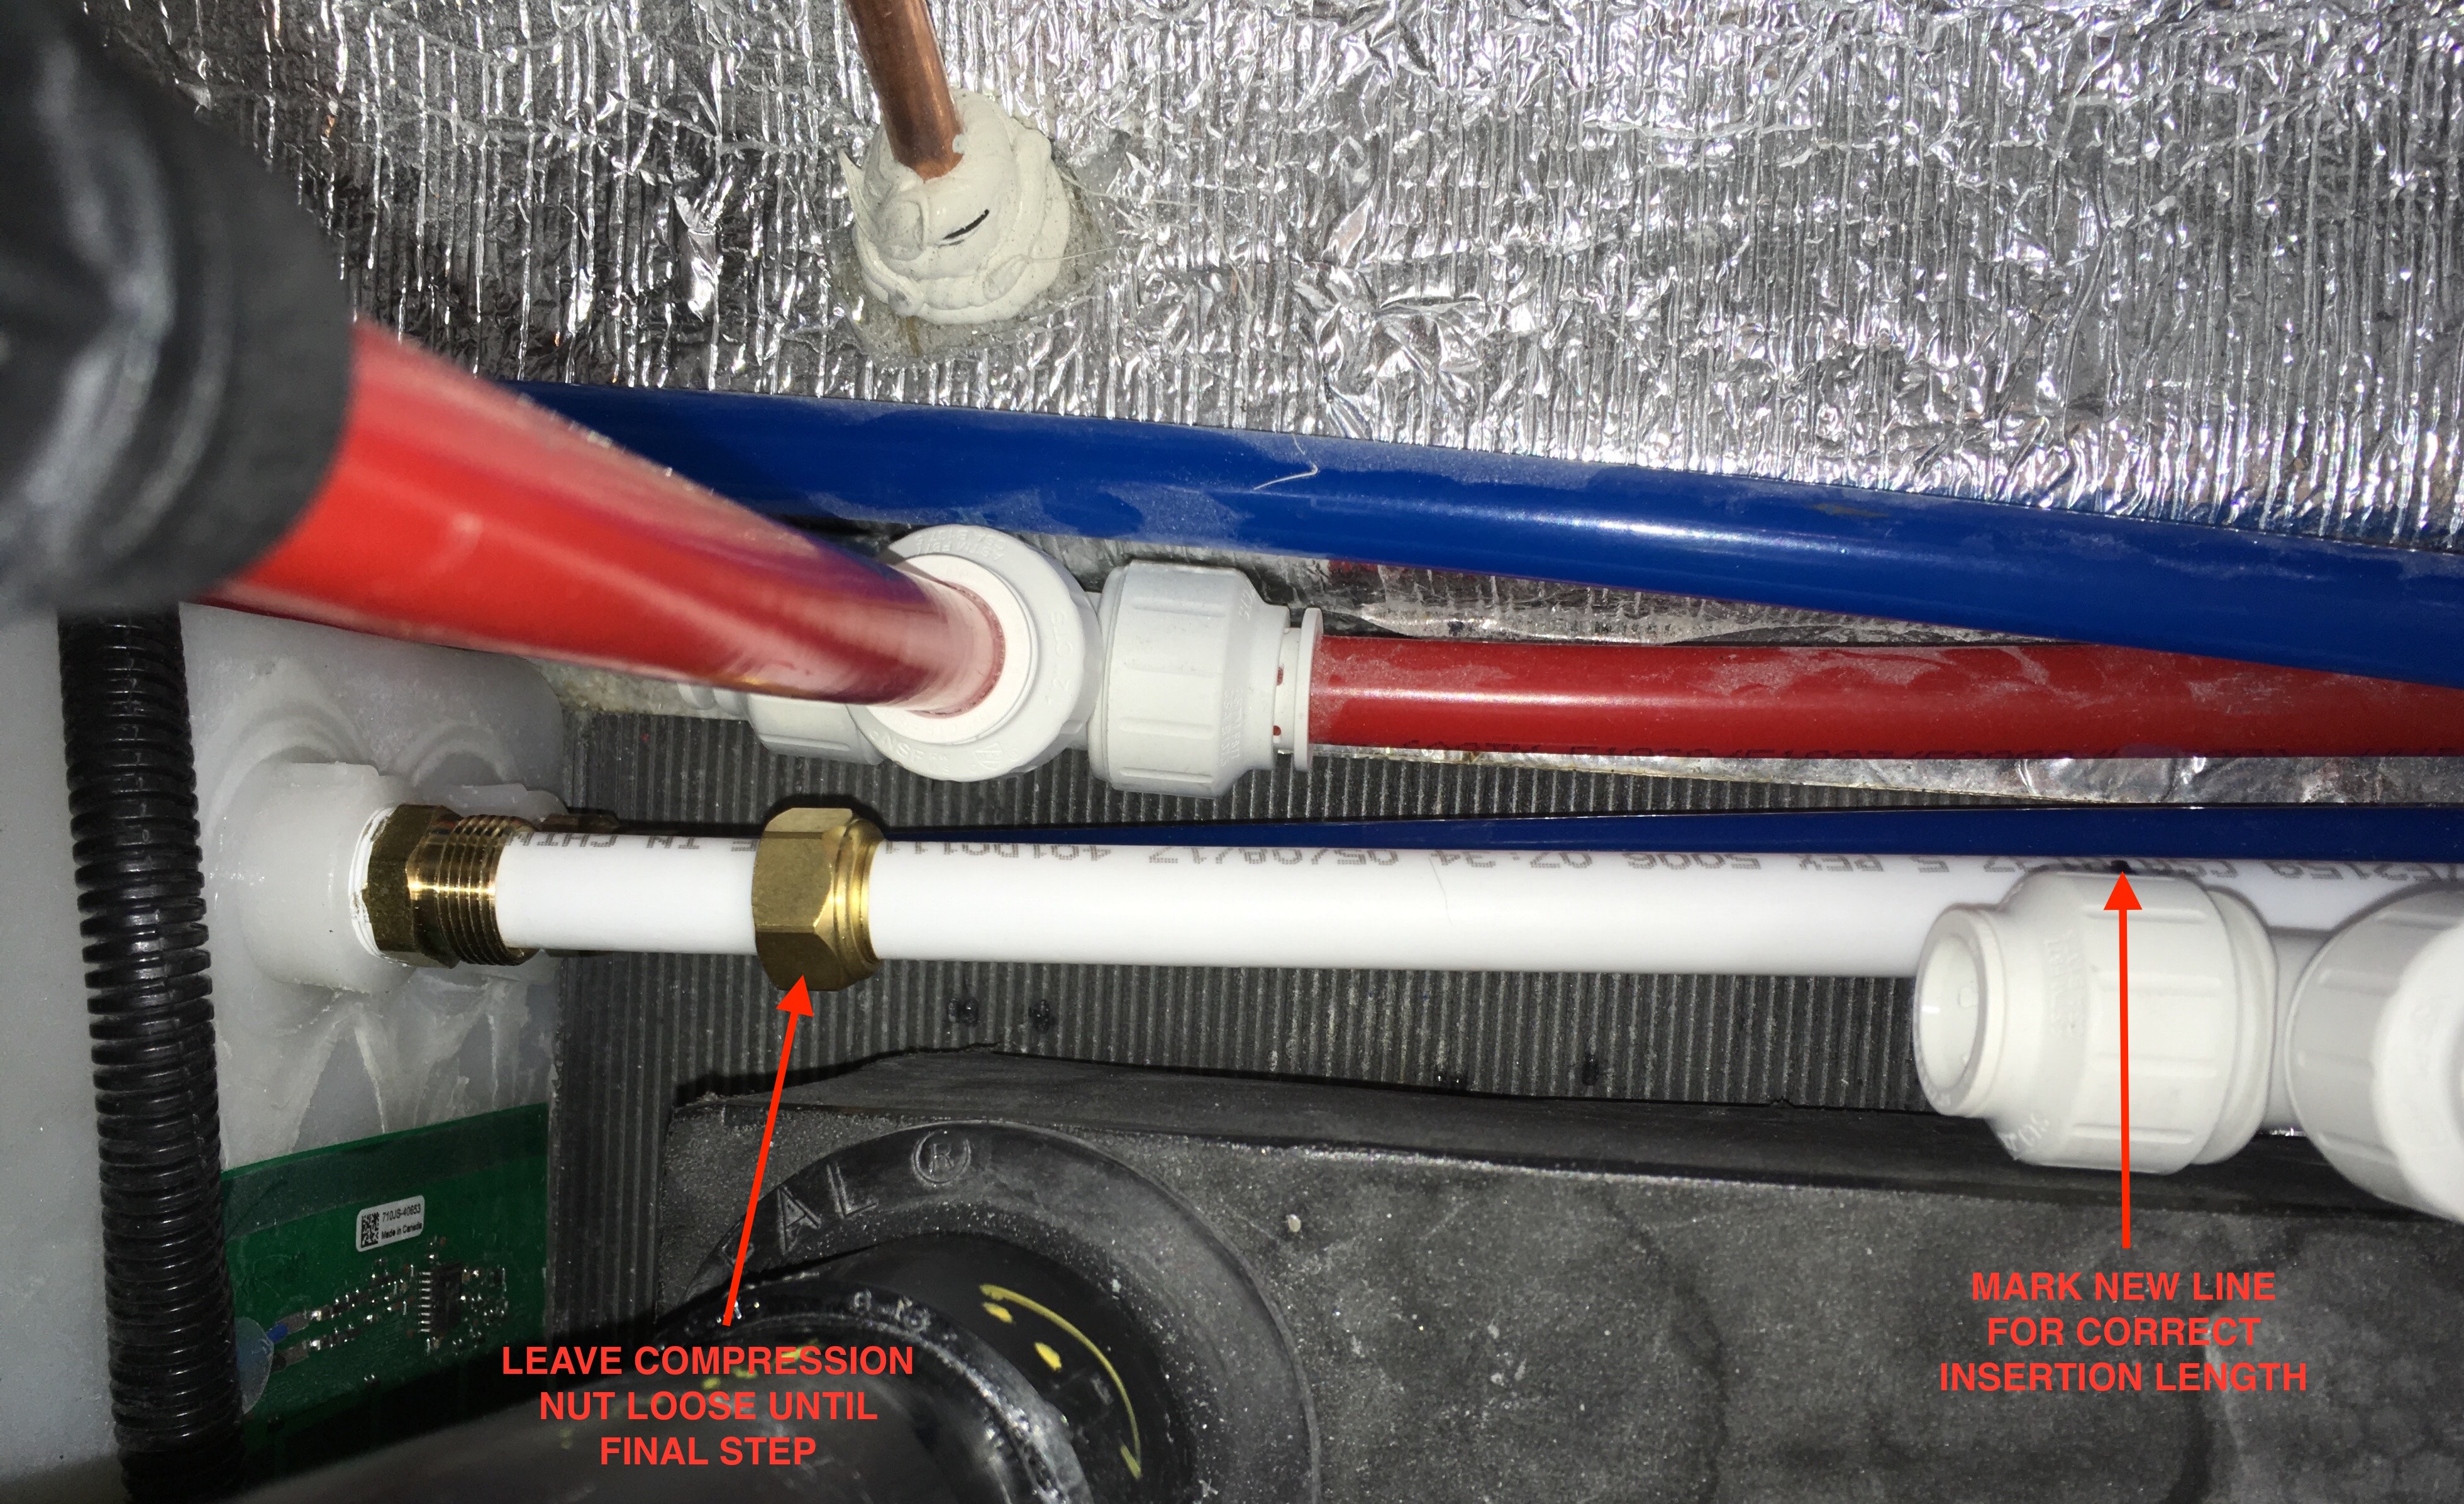
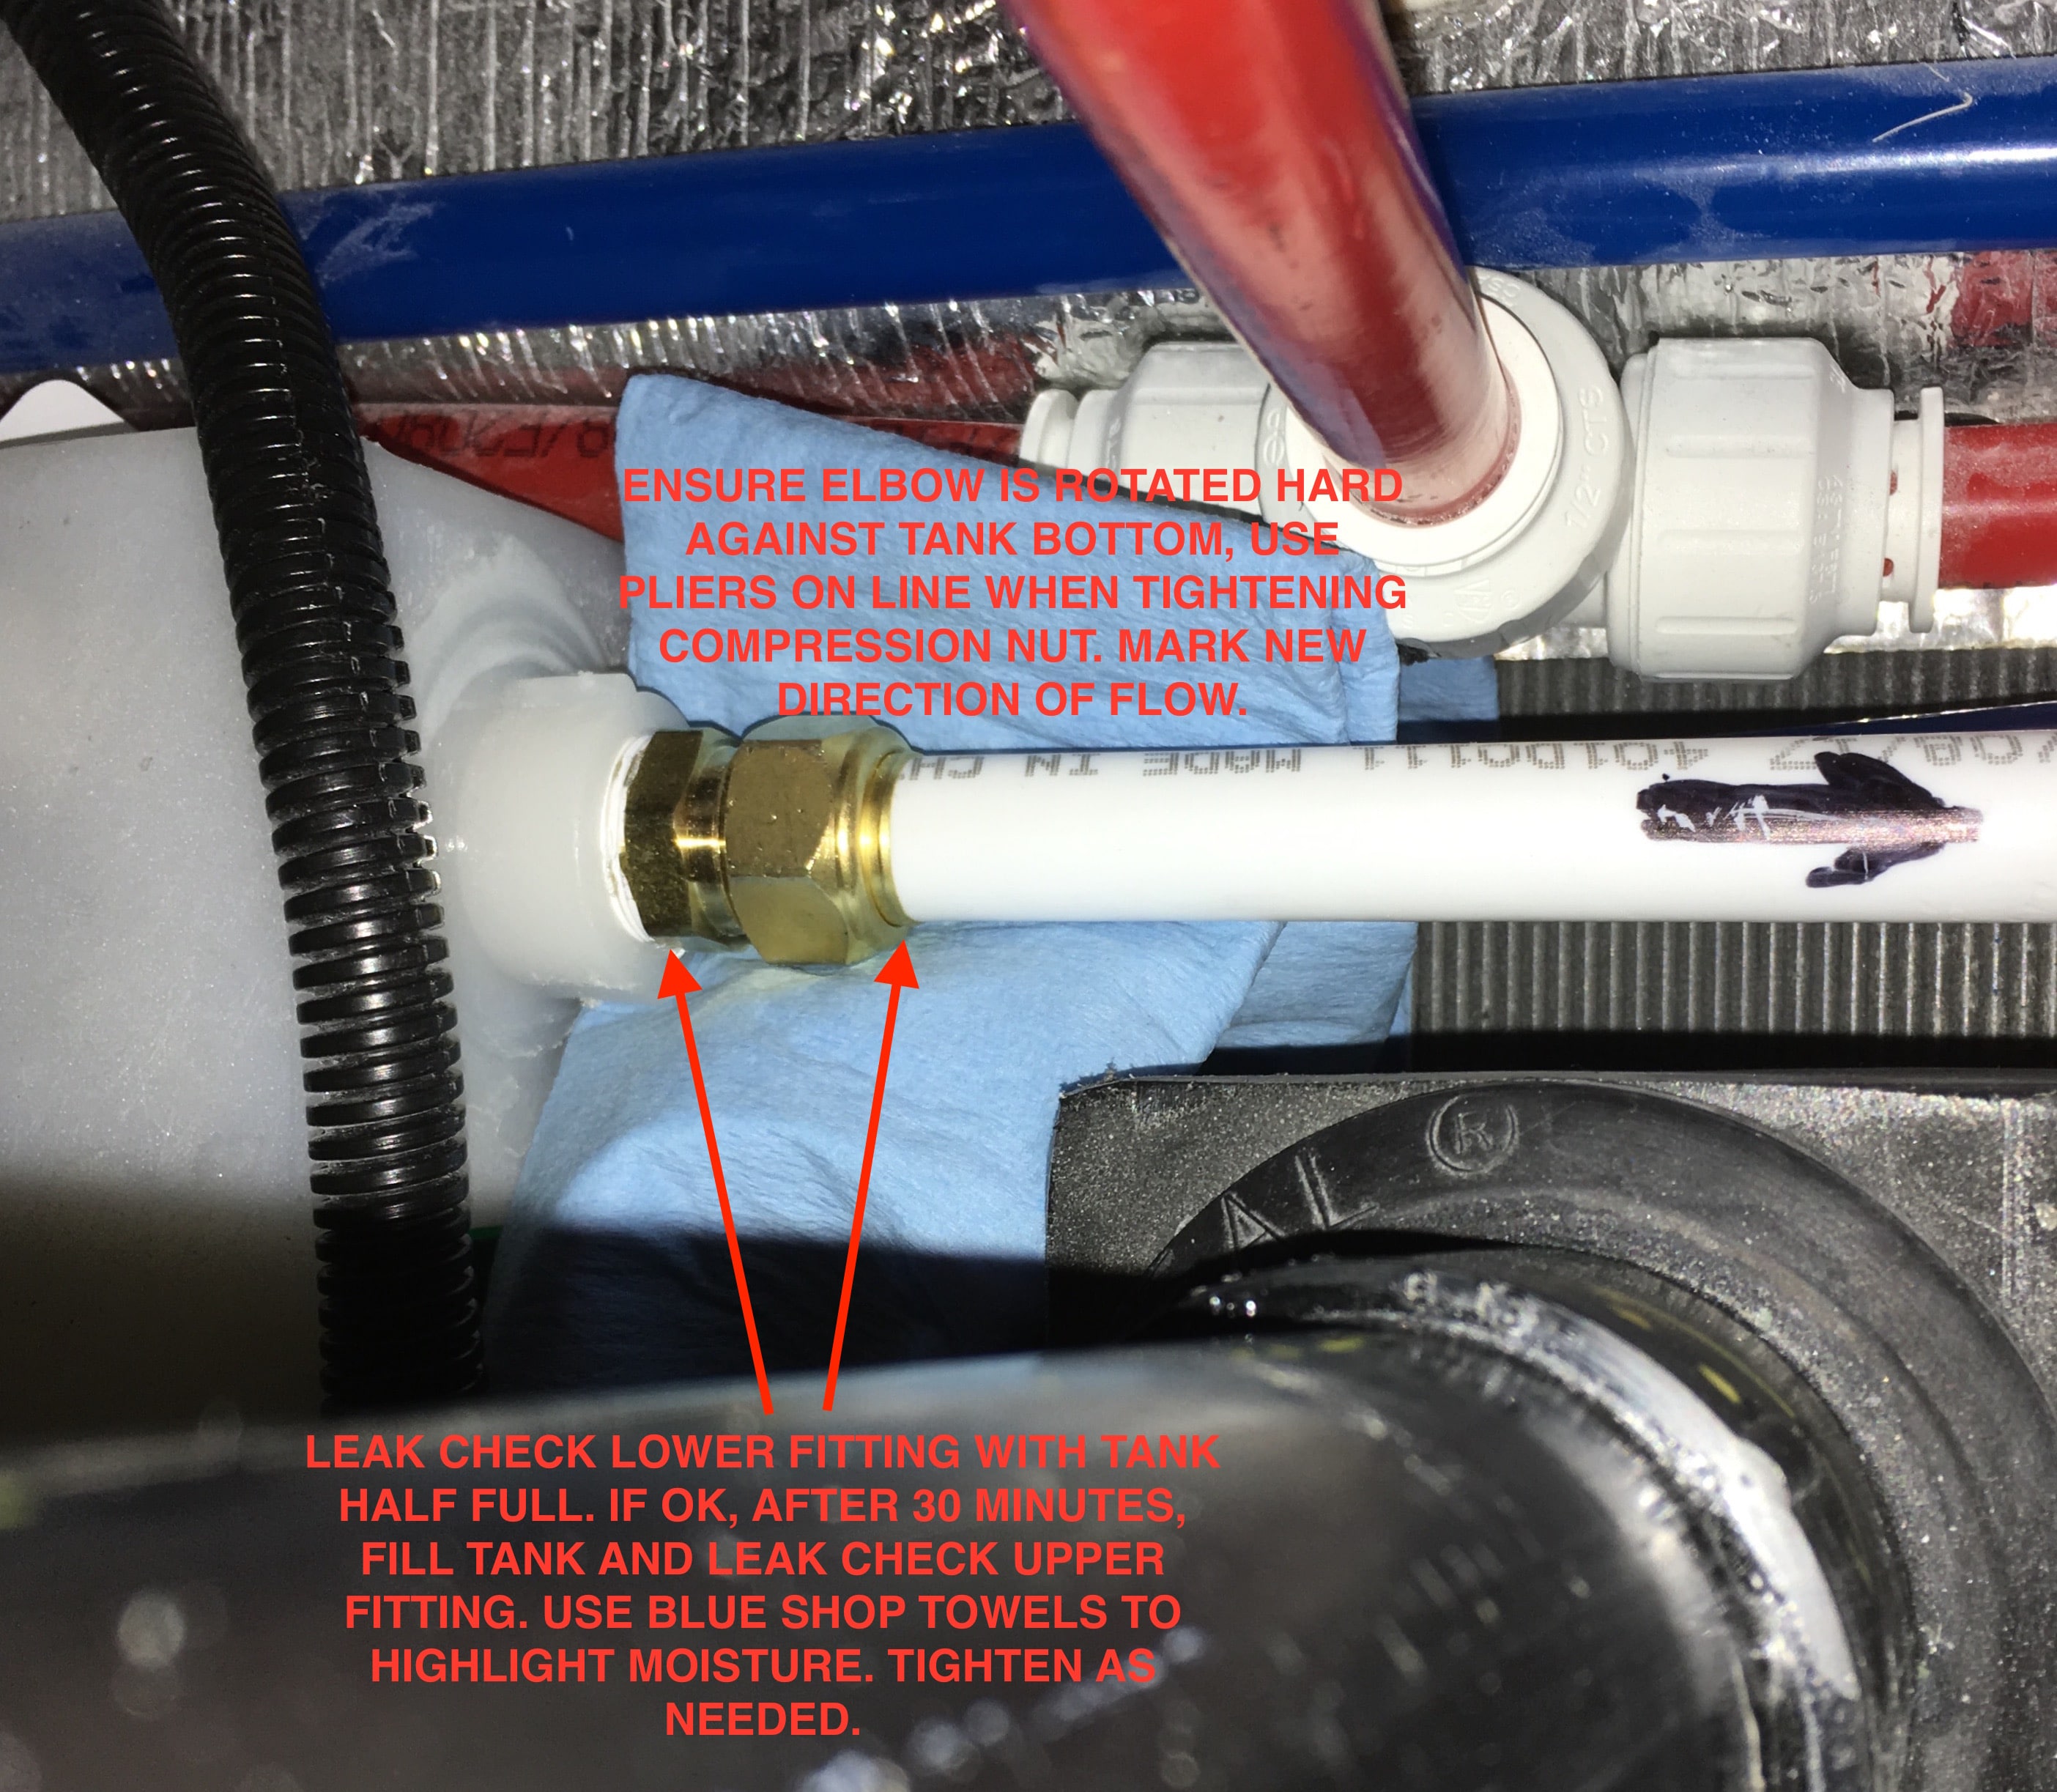
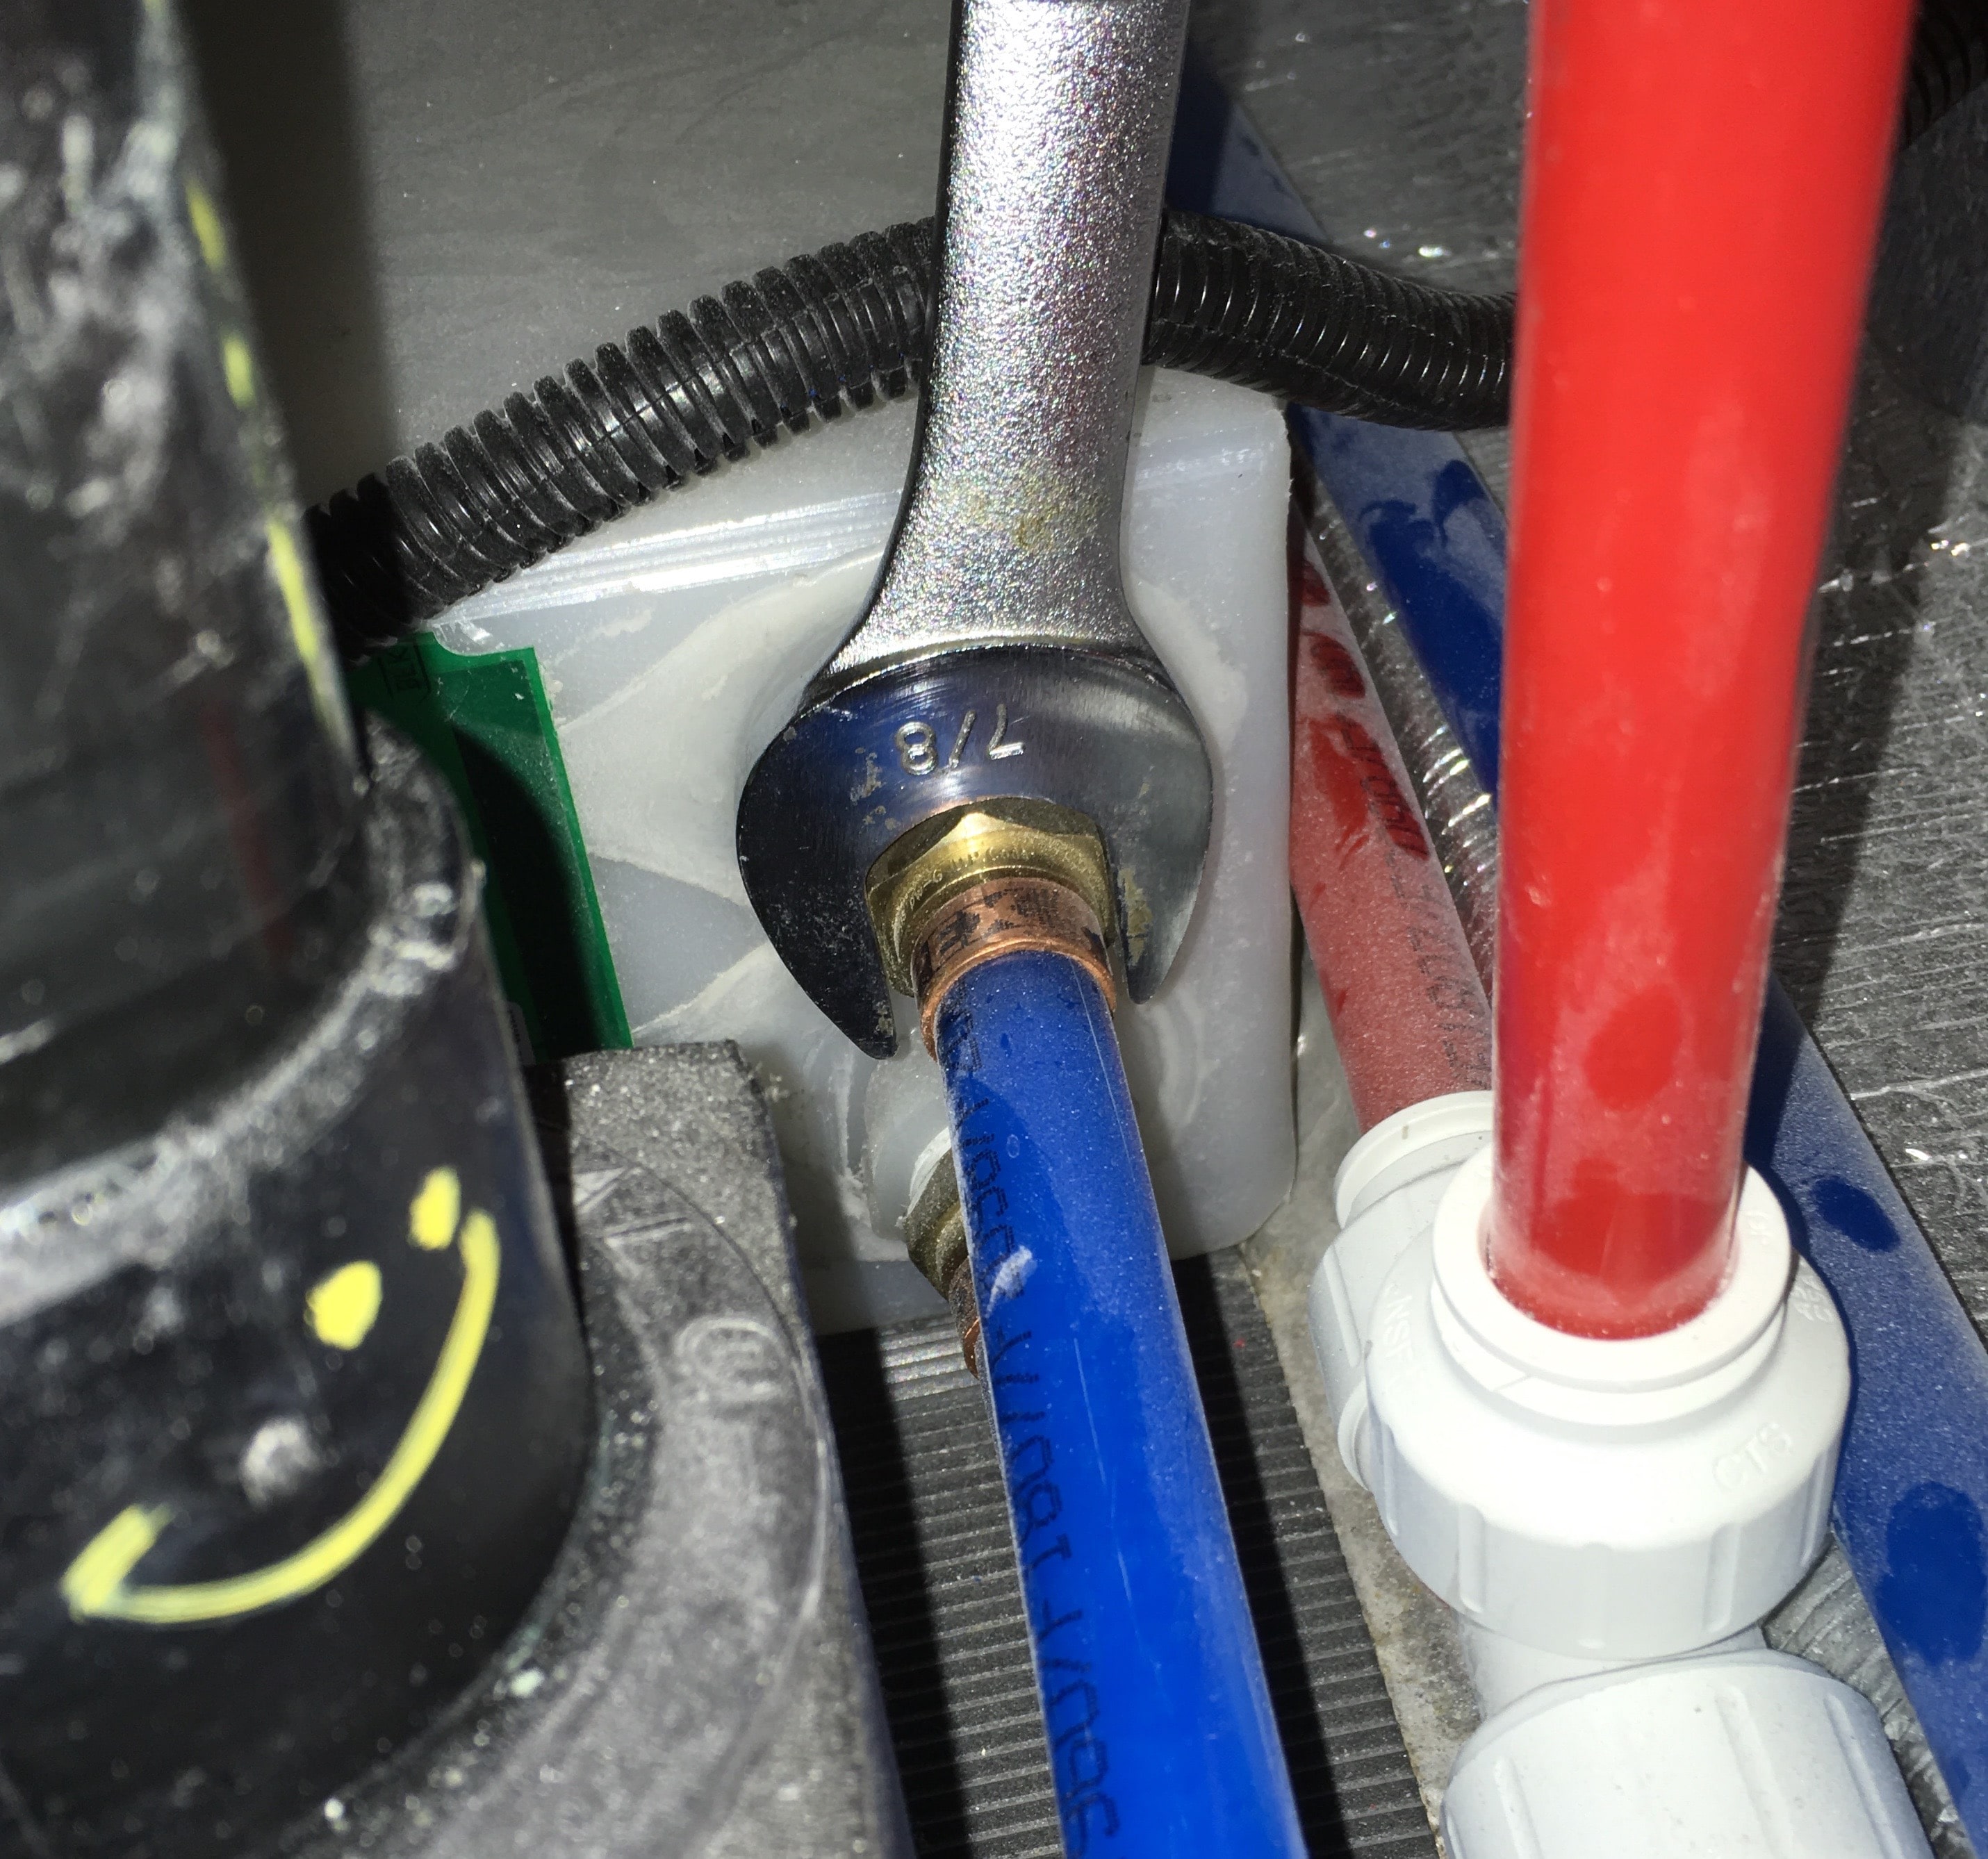
Installing the curved dip tube. Insert the short end into the top opening and push it inward while rotating counter clockwise. This rotation will keep it from colliding with the top of the tank. Screw in and tighten the pipe fitting. Do not over torque, light pressure is all that is required. Do not connect the compression nut yet. Pull outwards (to the back) on the dip tube to position the other end as far back as possible in the tank, and mark the location of the cut. Make sure the length is correct so that the end is well past the o-ring. about an inch from the opening of the fitting. Push the tube forward into the tank and cut the line. Insert the cut end into the tee fitting. Do not tighten collar. Pull back as hard as needed and rotate the dip tube toward you so that it is hard on the bottom. Make sure the newly-cut is past the 0-ring! Tighten the 1 inch compression nut while holding the line with large pliers to keep it from turning. Also use a 7/8 inch wrench on the tank fitting so that it doesn't turn. It really needs three hands, but you can position the wrenches so that you squeeze with one hand while holding the line with the other ... or you can borrow a helper. It's hard to tell how tight to adjust the compression nut. I did it moderately, checked to see if the tube would turn, tightened a little more, until the tube was tight and could not be turned easily with pliers. With the dip tube secured into the tank, insert the short elbow line into the tee and appropriate fitting on the manifold. Secure the collars. Draw an arrow on top of the new tube showing flow. Before securing all the clamps on the manifold, it is necessary to leak check the system. Fill the tank with a few gallons of water using the outside fill port and turn on the pump. WOOHOO, it works! Check for leaks in all the pressure connections - it should be easy to see them. For the suction and fill lines it is harder. I like to use a blue paper shop towel folded up and placed underneath a fitting. If there is a leak, even a small seep, it will show up as an easily visible dark spot. I filled the tank half way and checked the bottom fitting for leaks. None were present after 30 minutes. I then filled it to the top and checked the top fitting. There was an immediate leak at the compression nut. I turned it about 1/3 turn until the leak quit. I left the towels in place overnight and they were dry in the morning. A leaking tee may be fixed by repositioning the line slightly, but you may have to try a new tee or line. I was pleased that the repositioned lines did not leak. I expected at least one leaker.... Clean up the area, secure the manifold tees with their clamps, check for left-over tools, reposition the heater duct. I left a blue shop towel in the bottom as a tell-tale in case of future seepage. More to come. John Davies Spokane WA
-
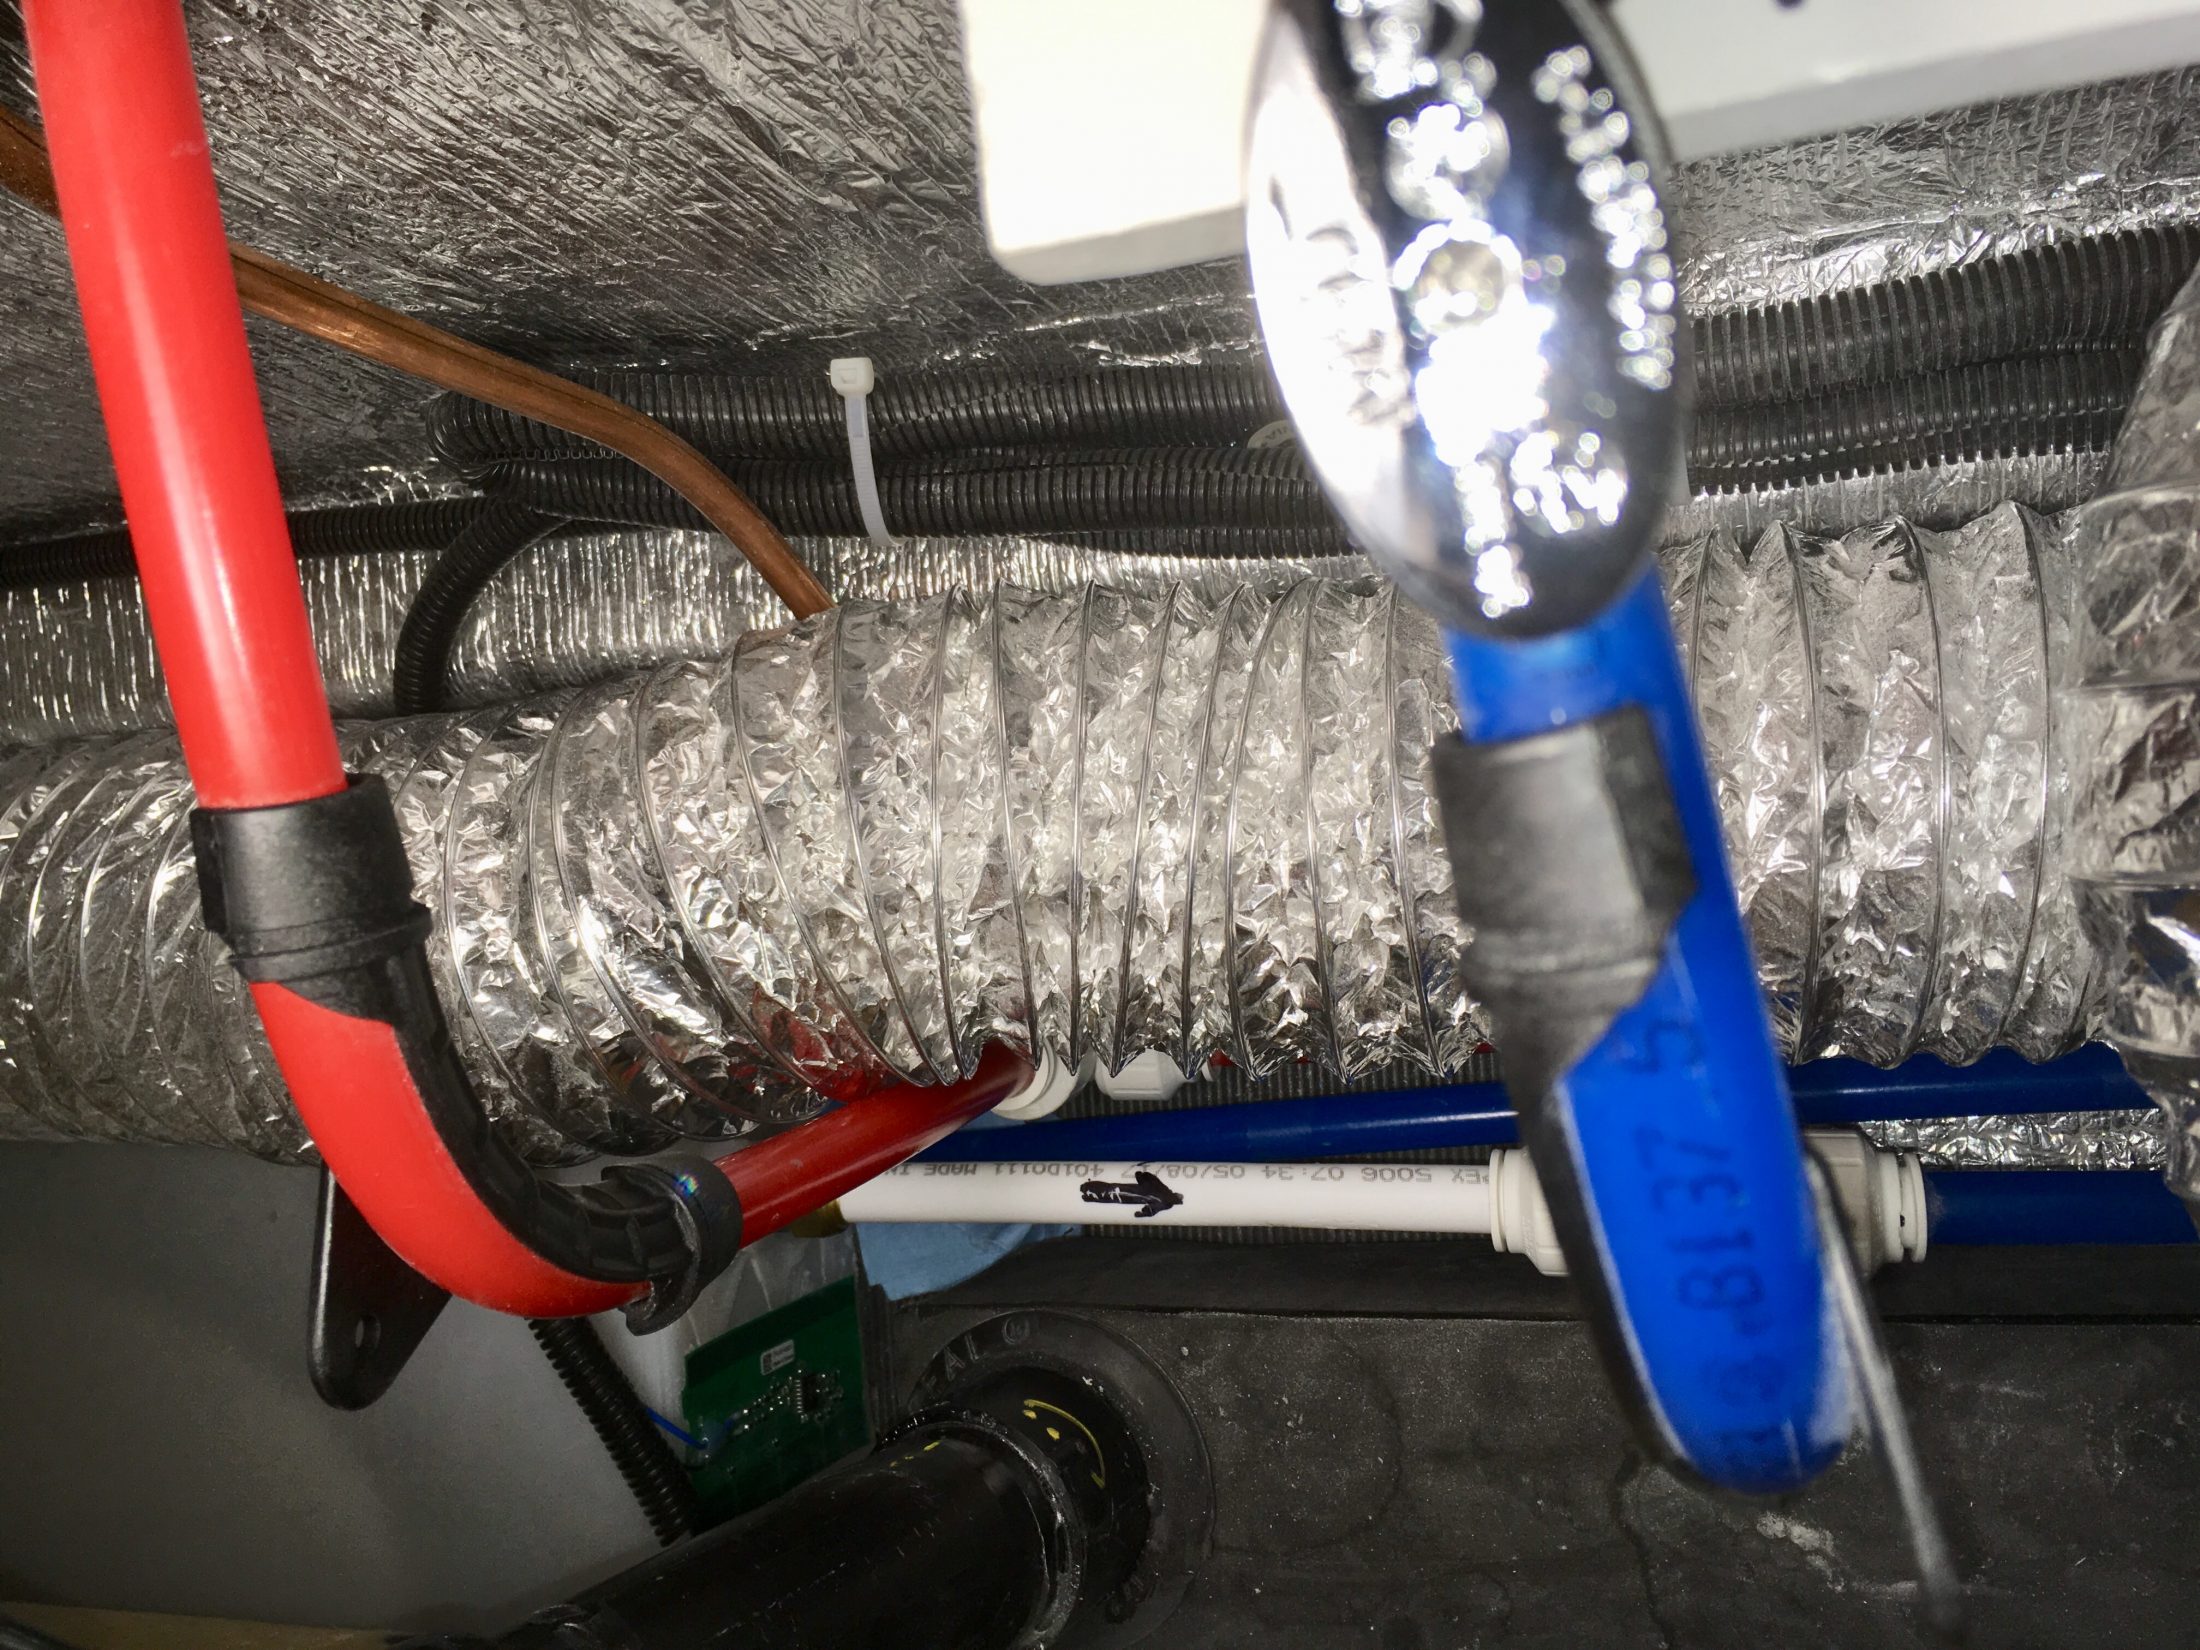
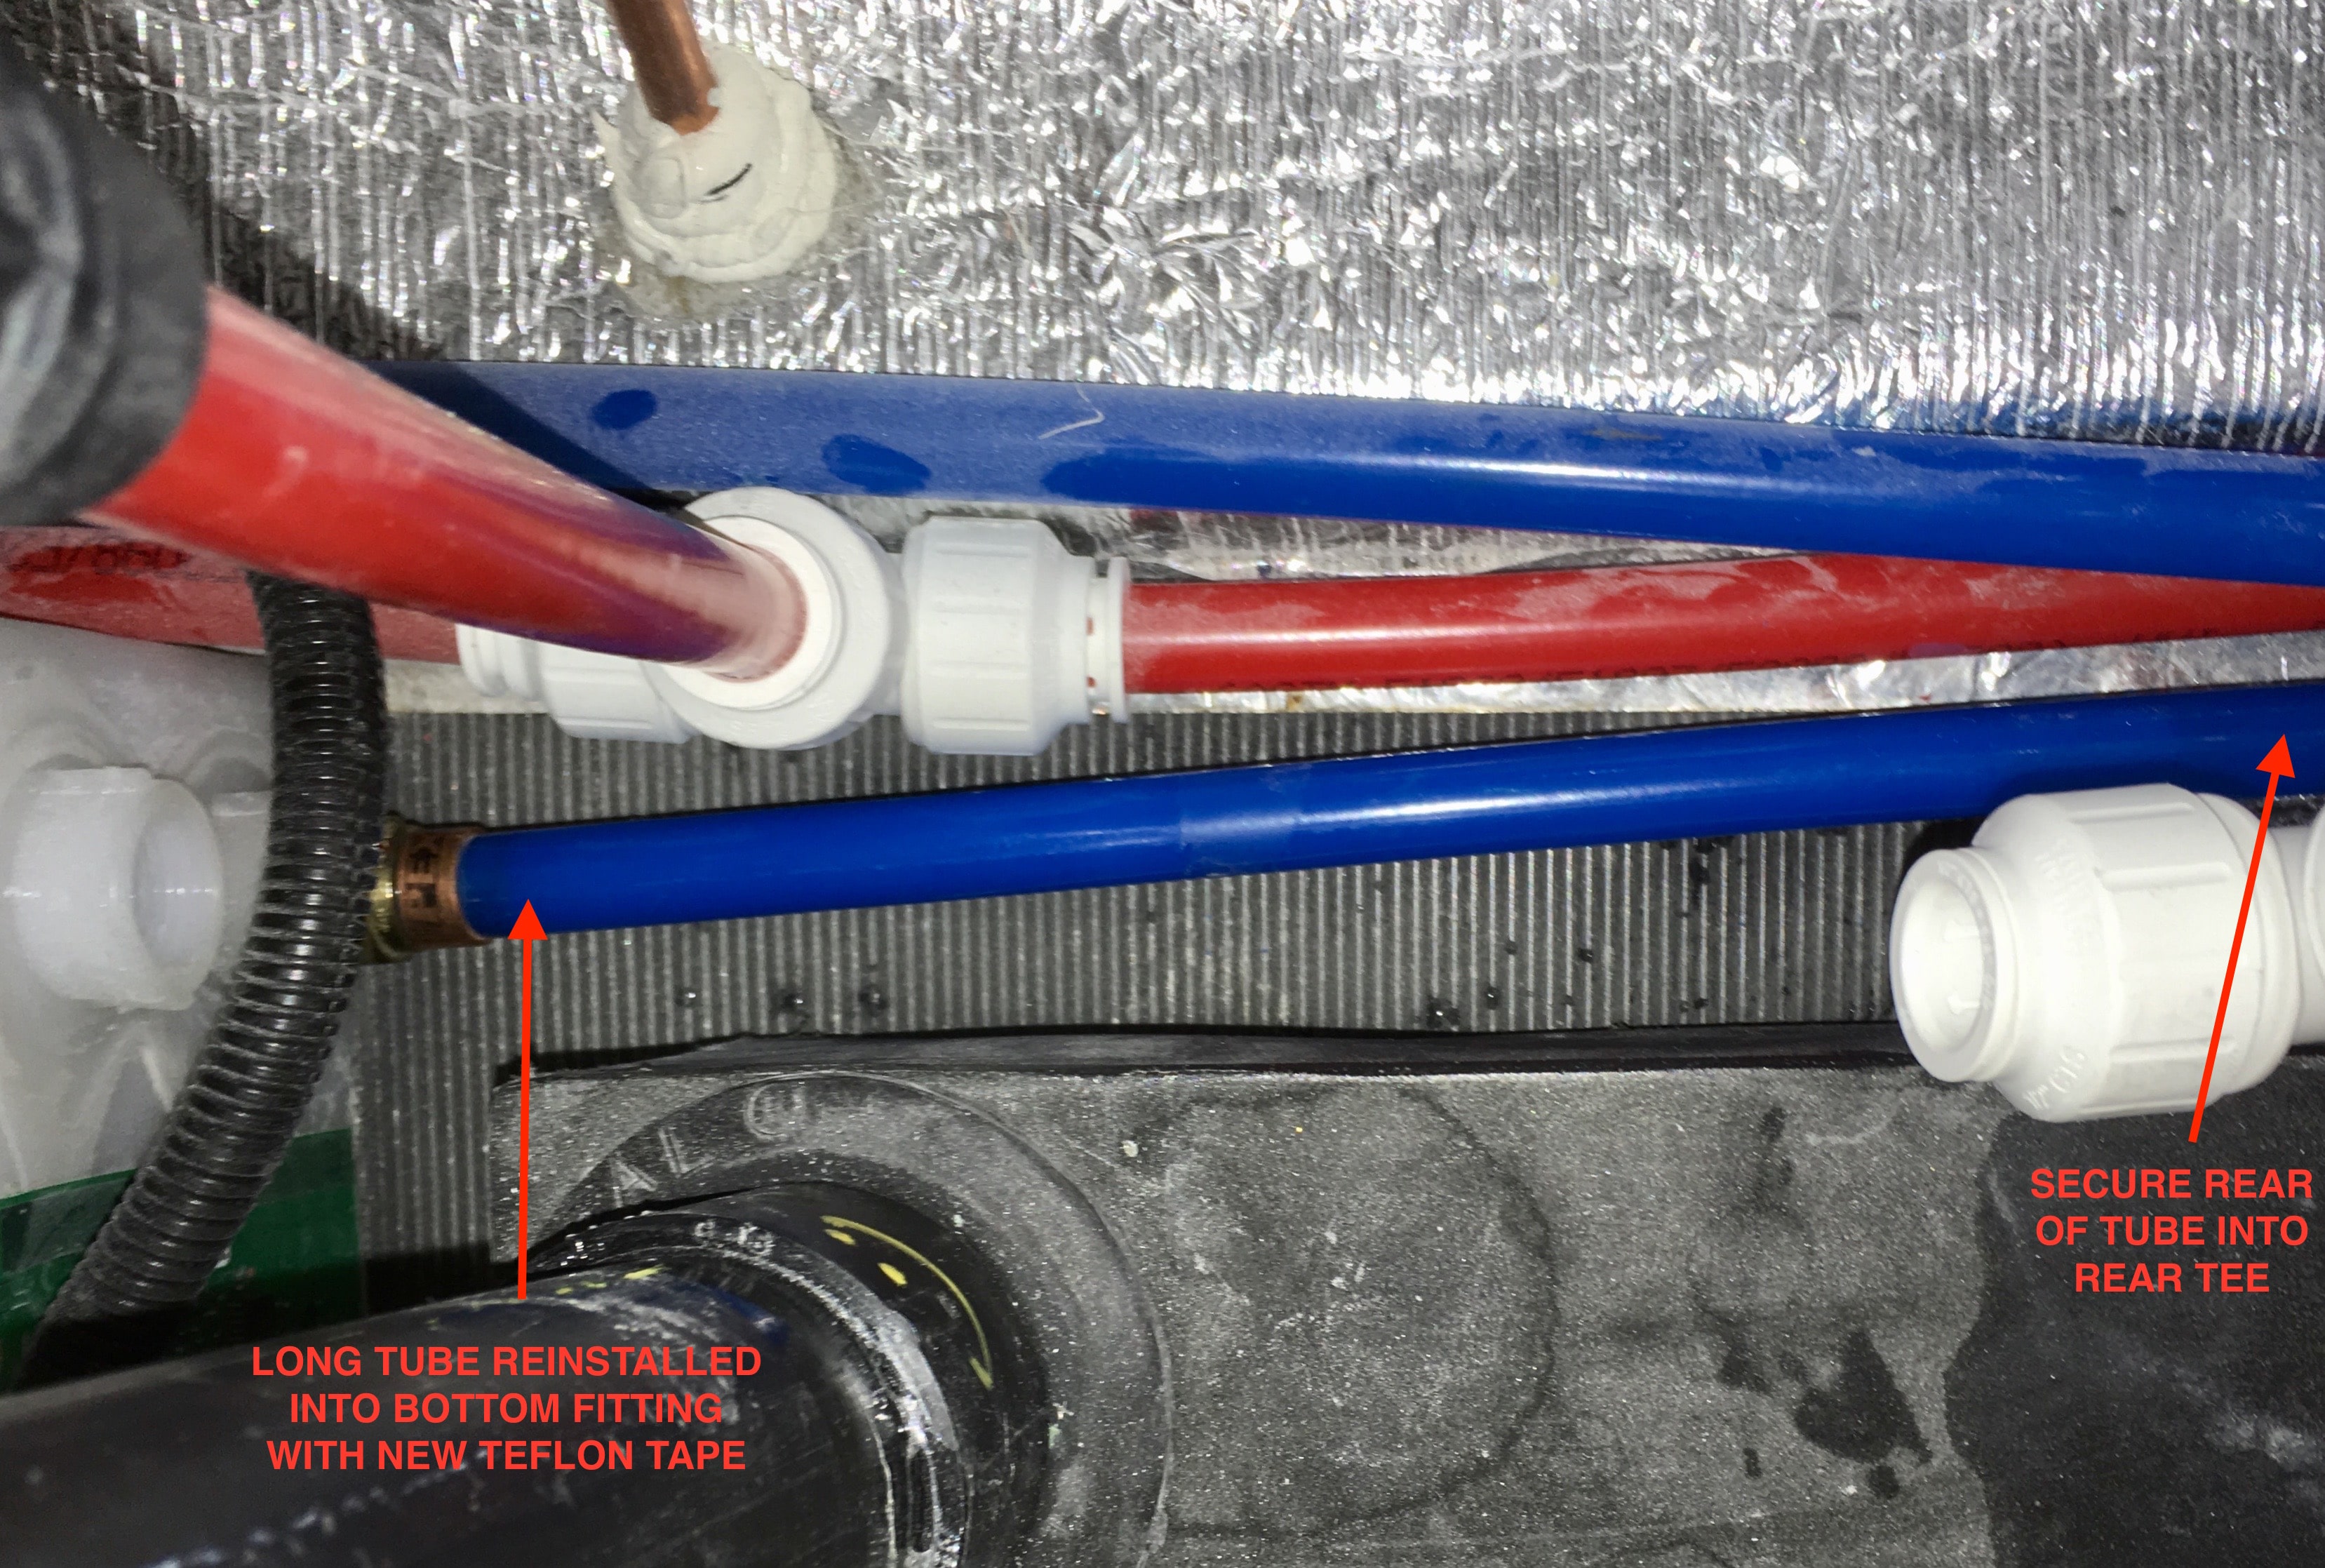
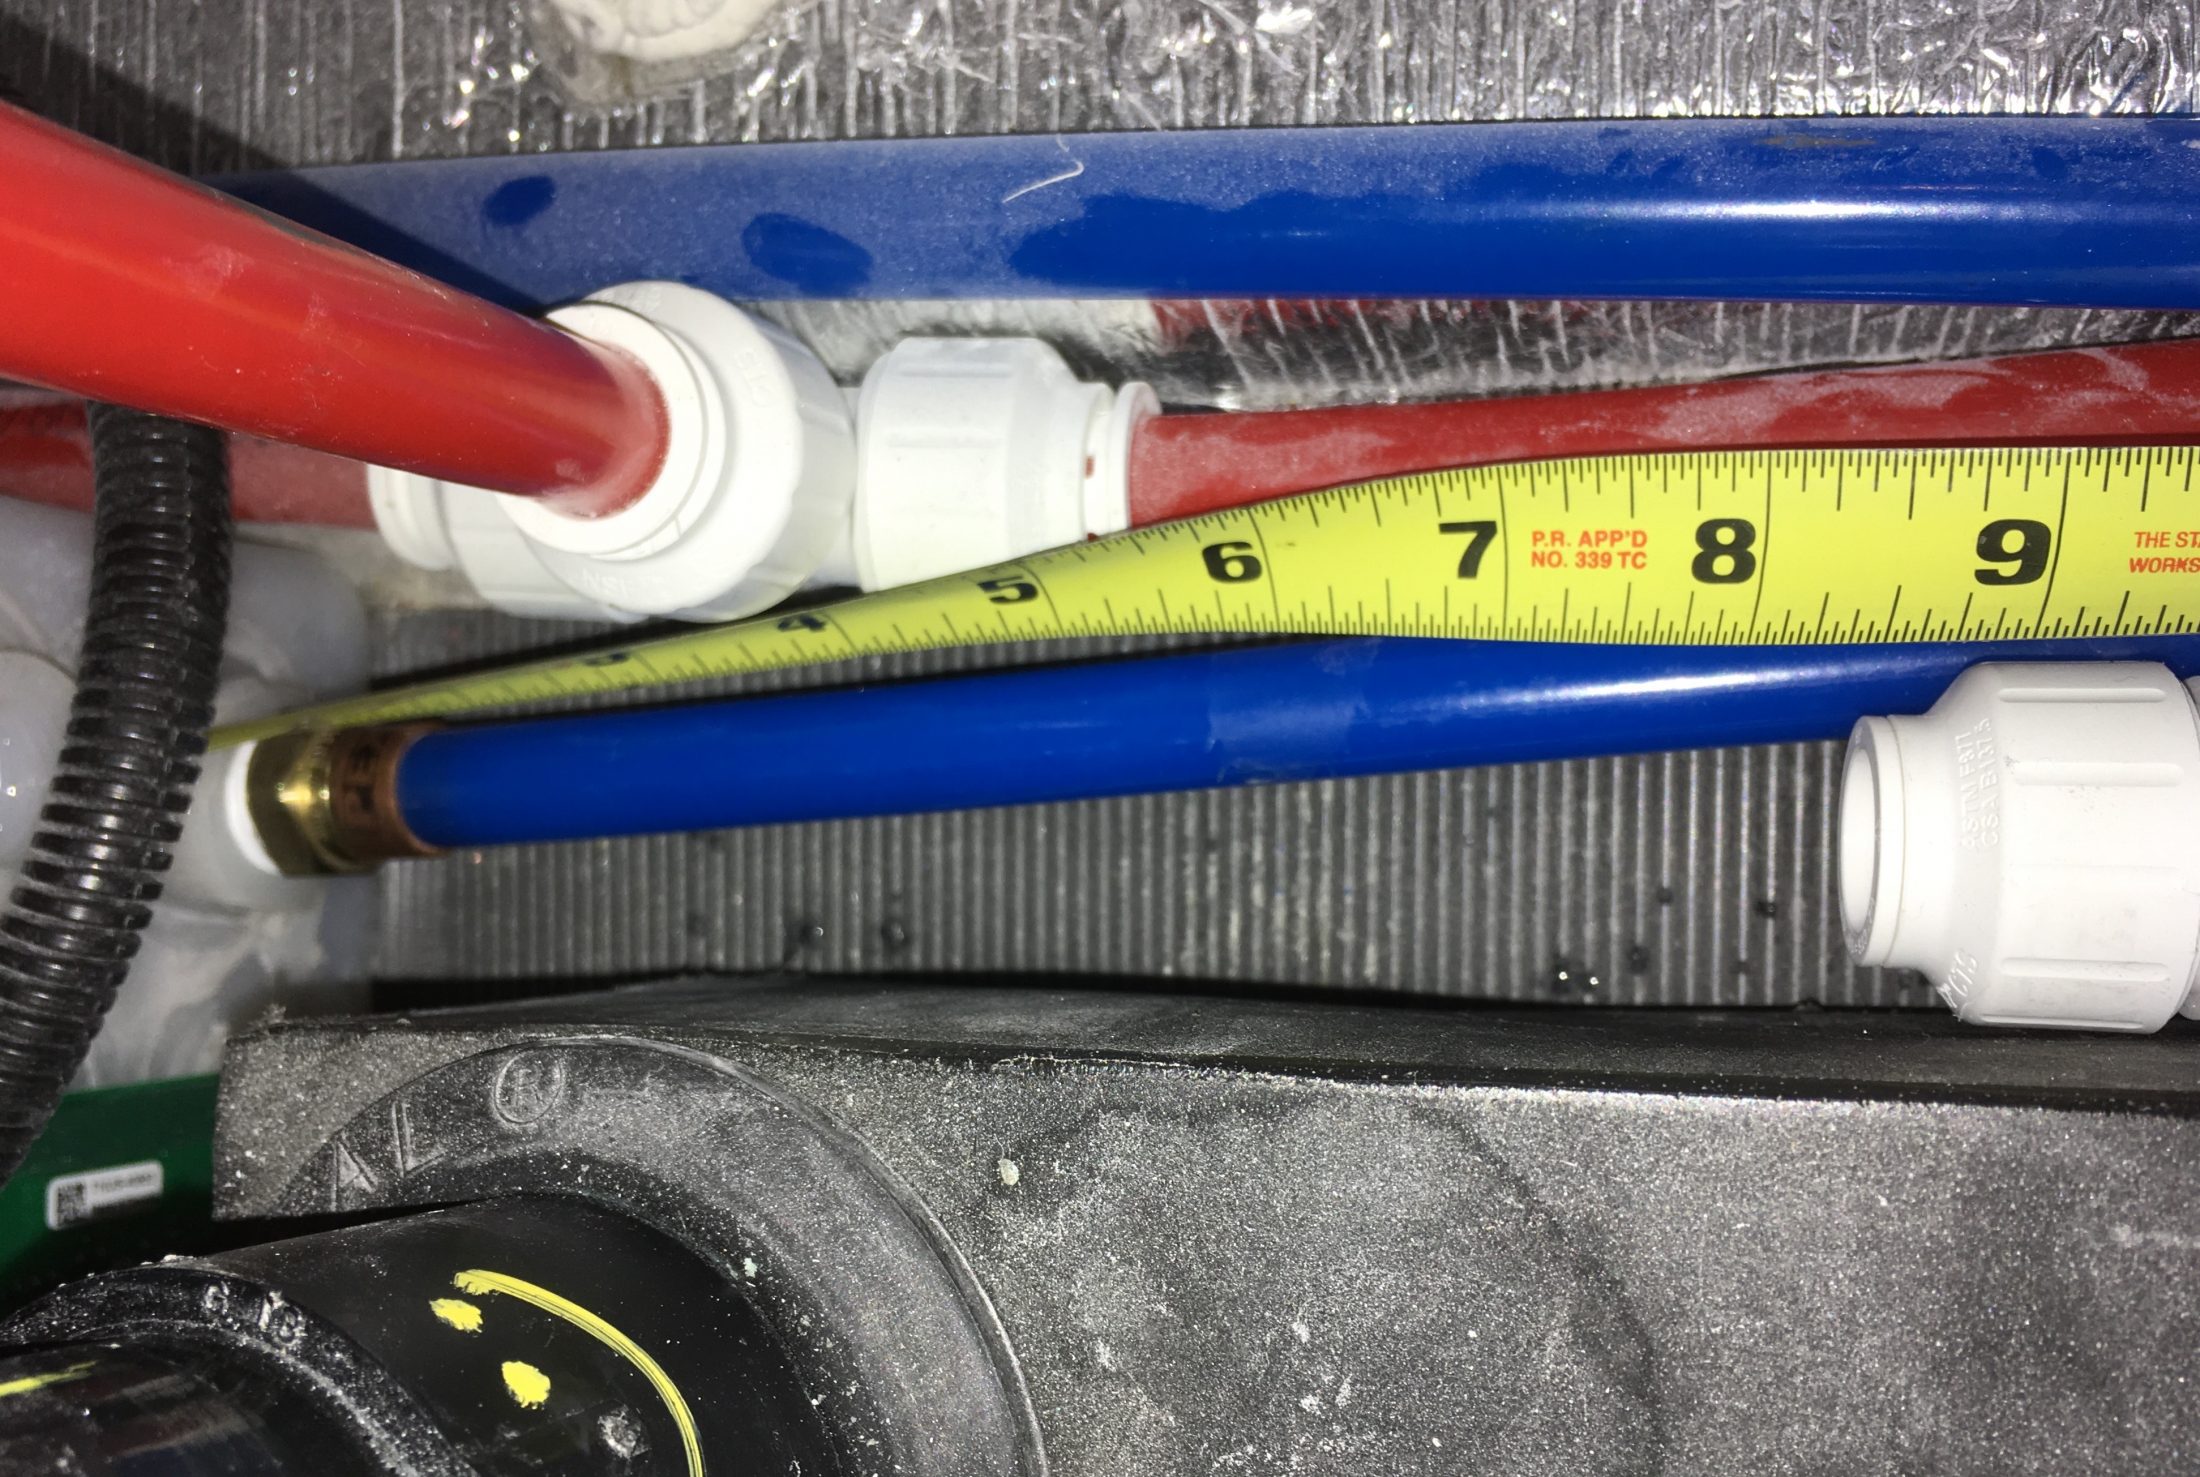
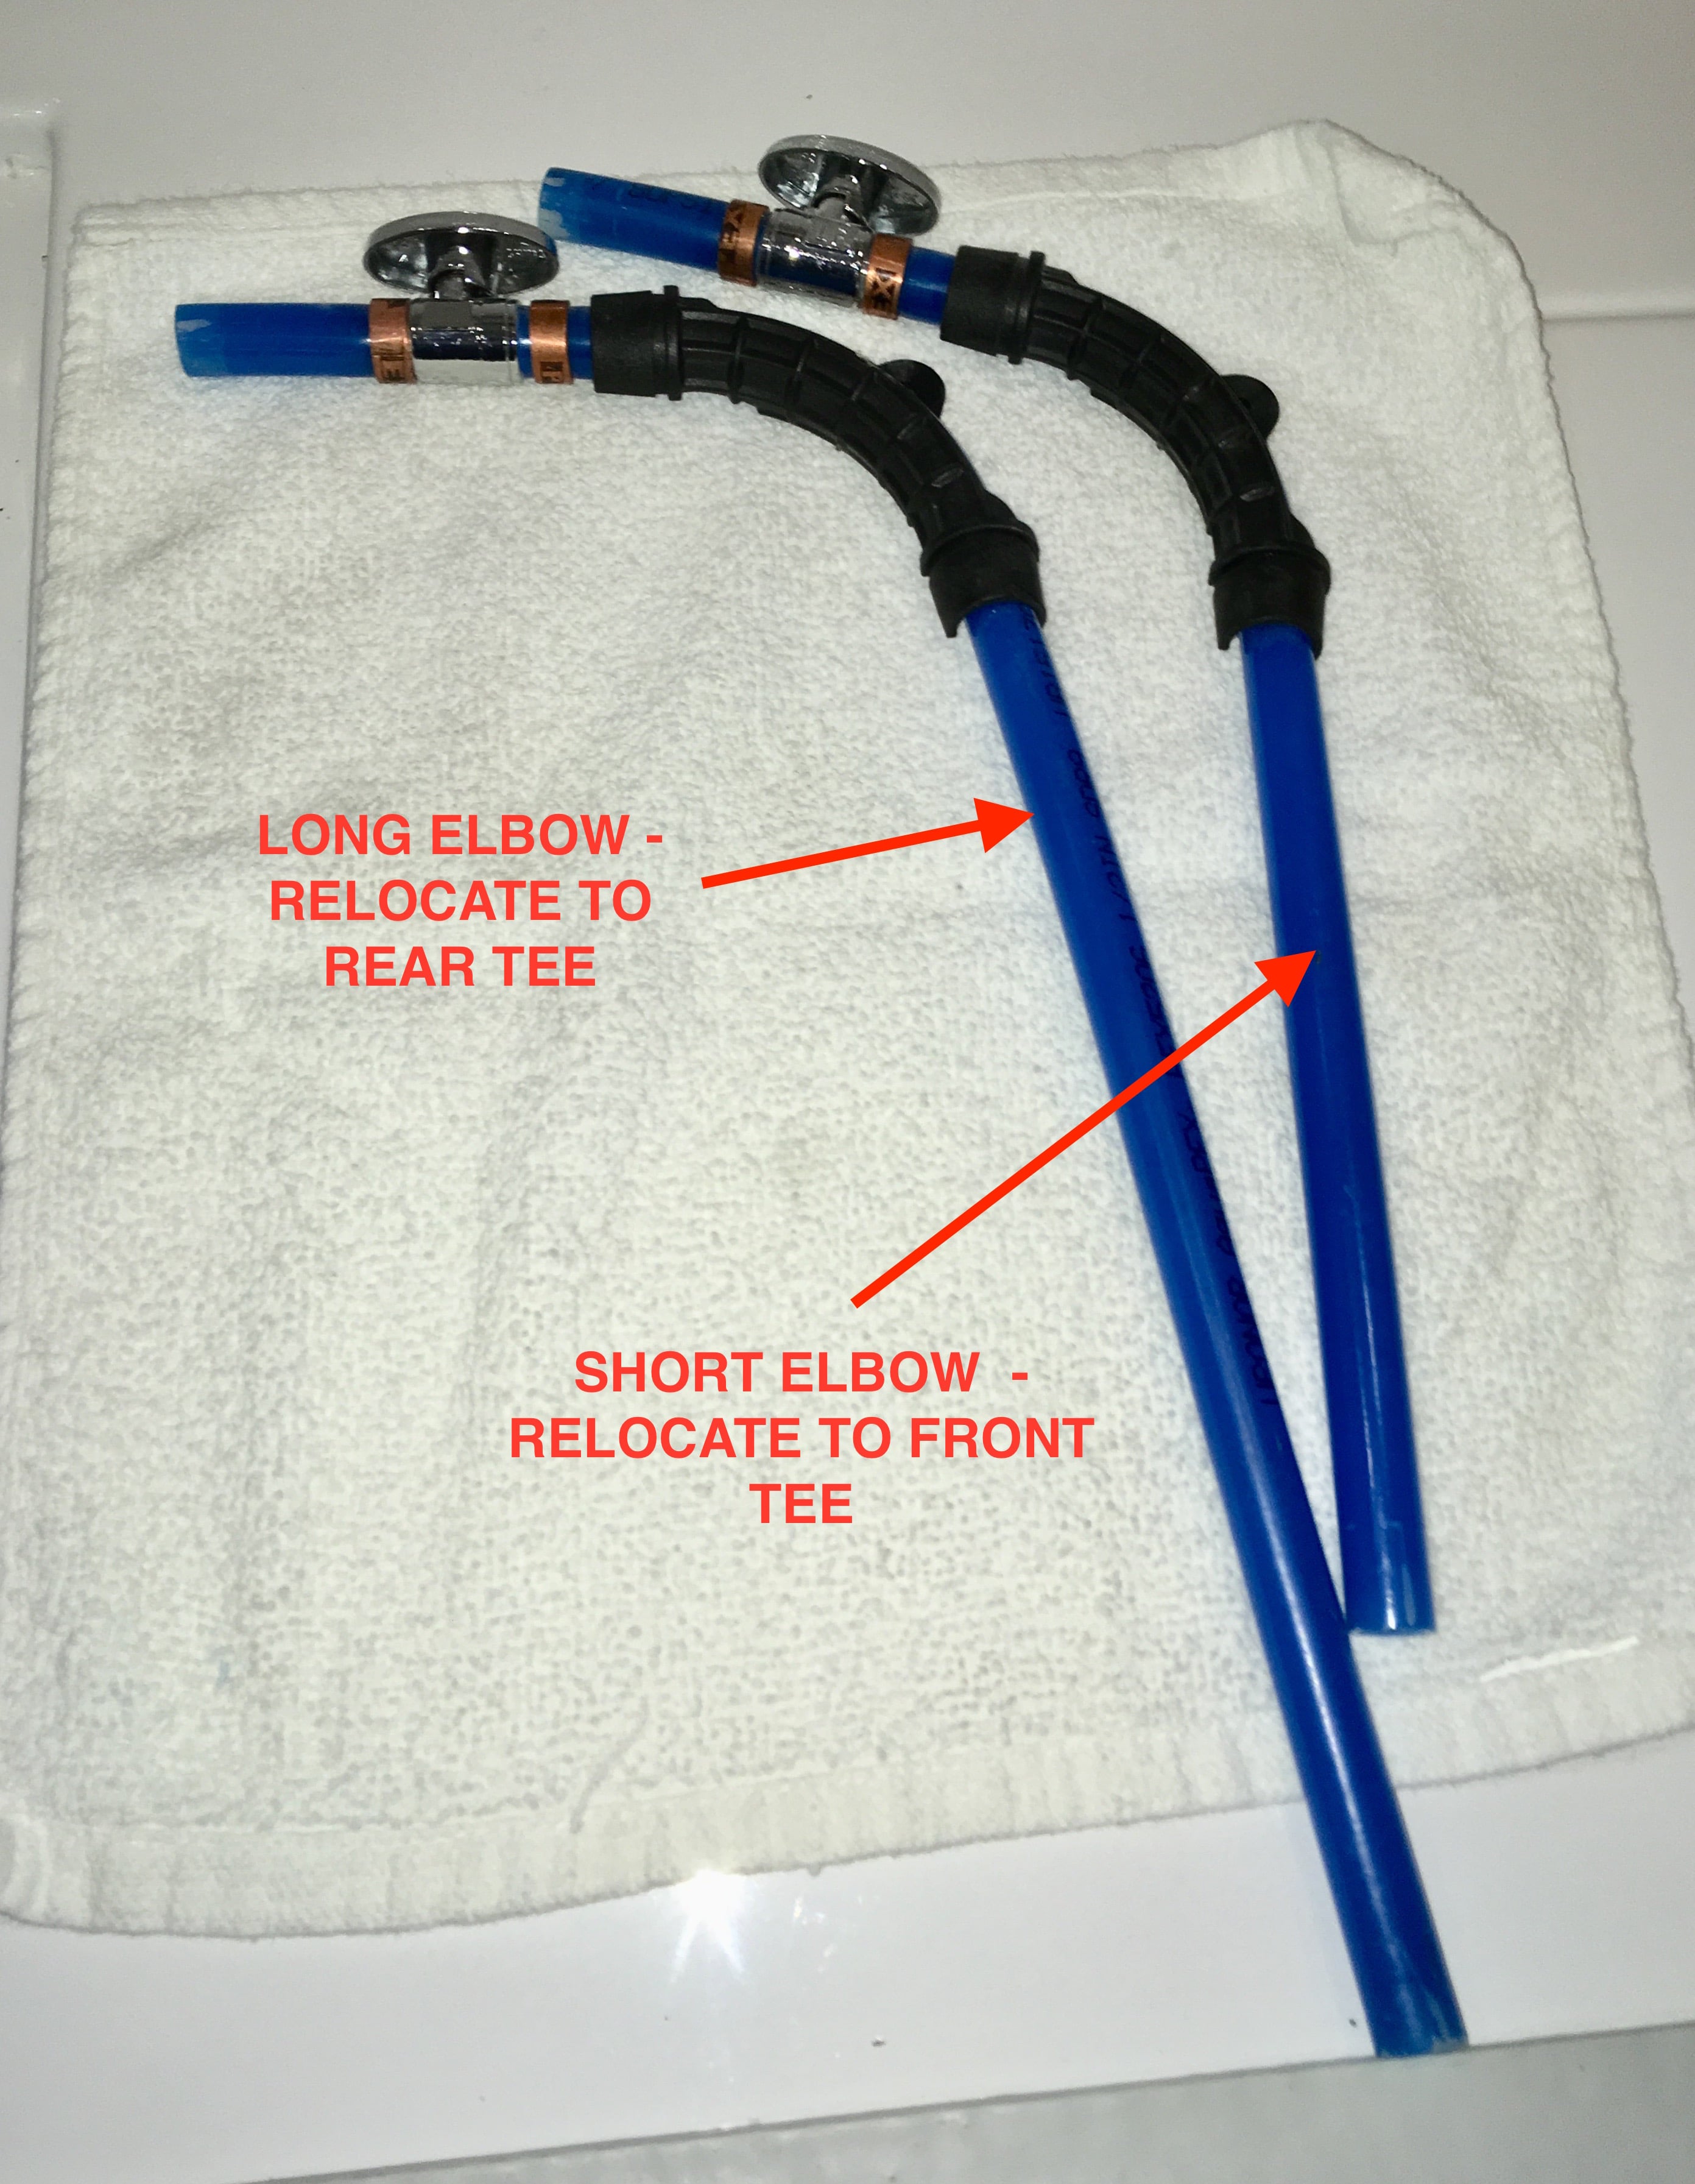
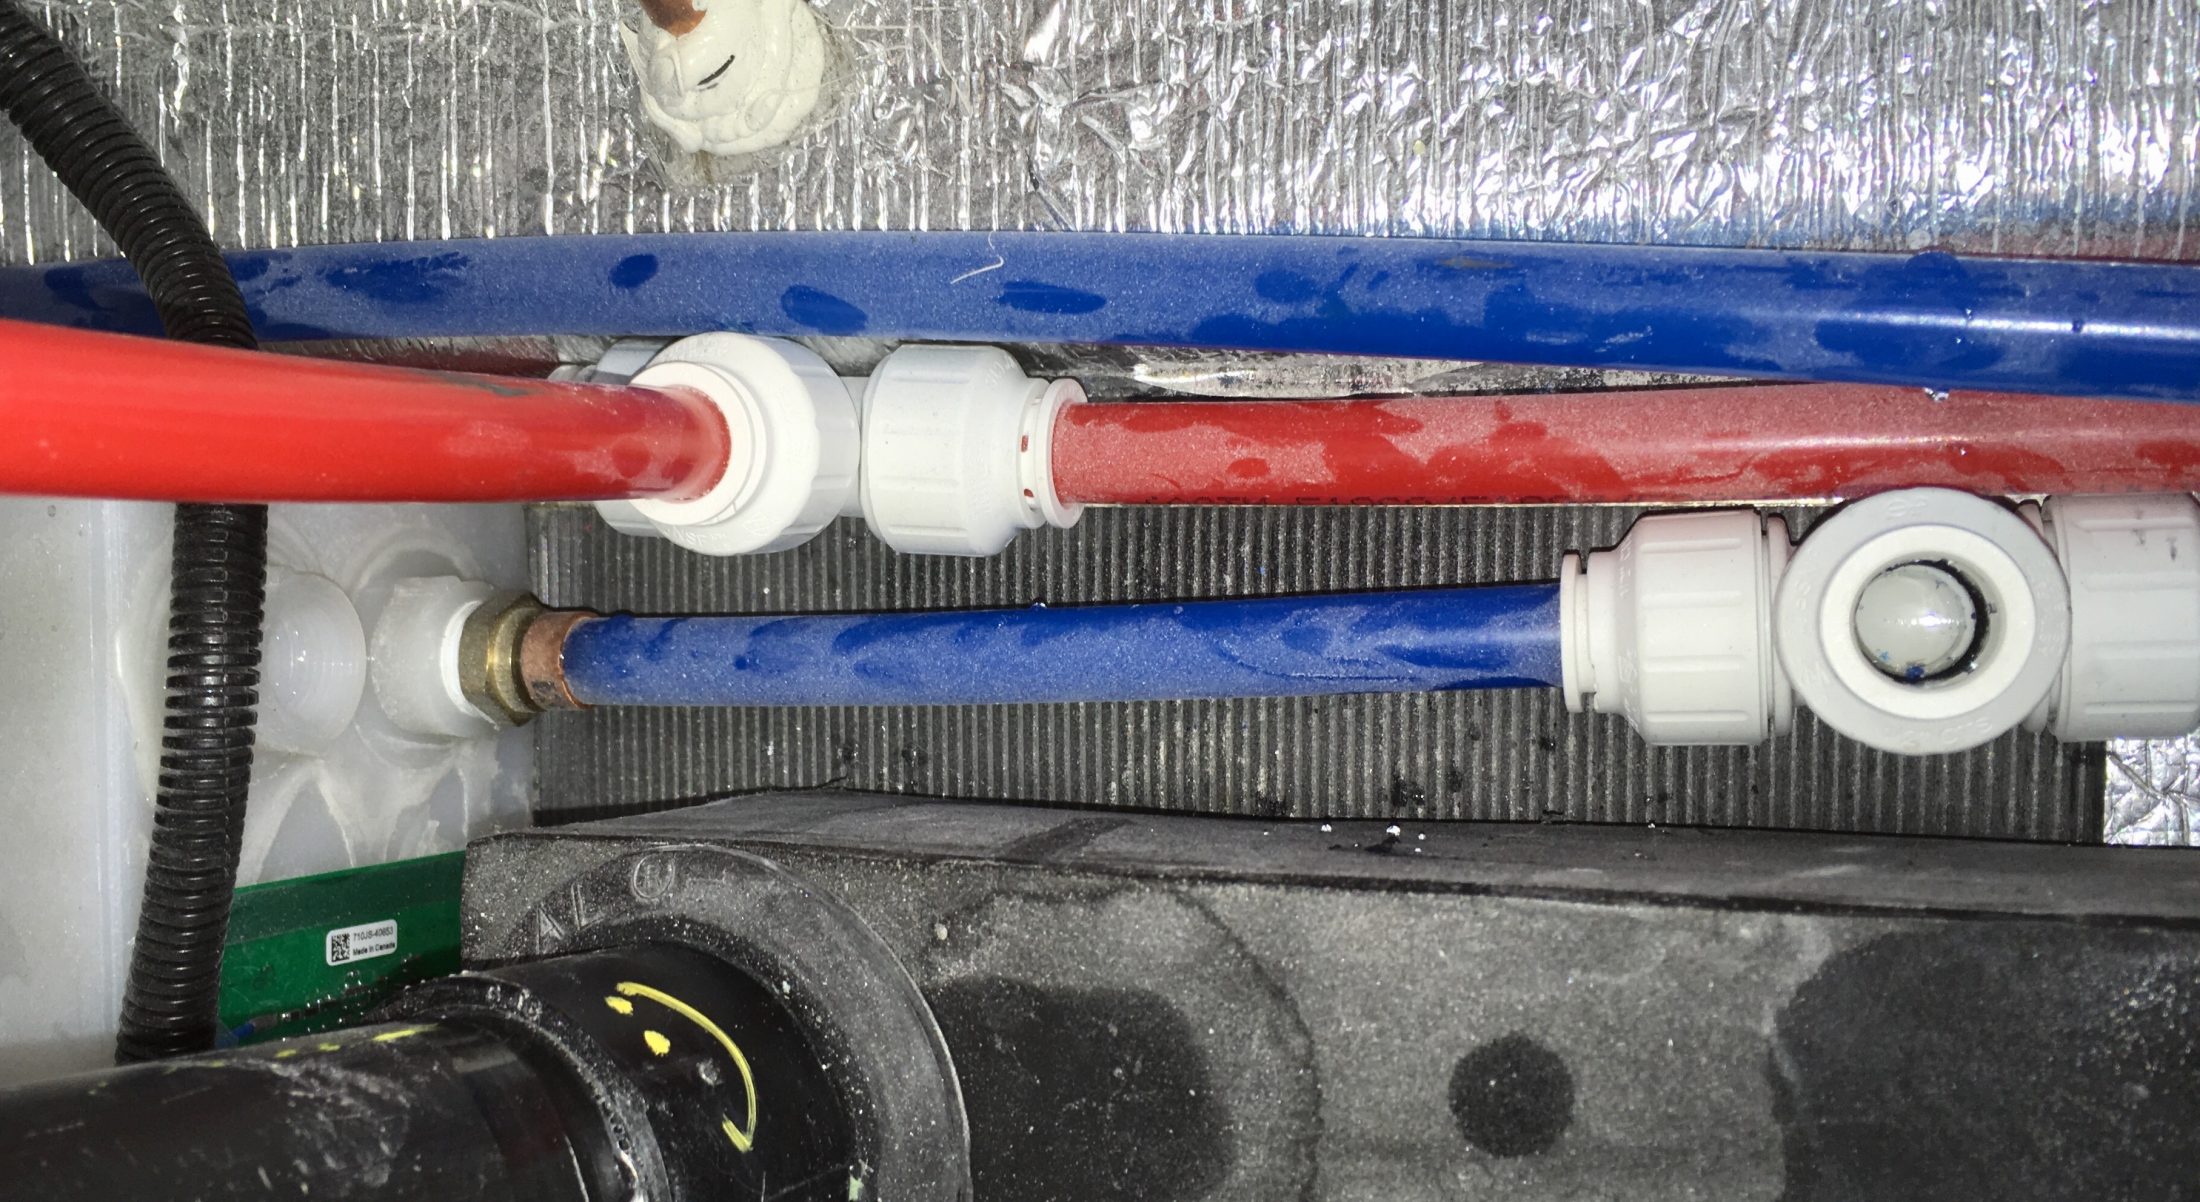
Reinstalling the factory plumbing. Install thread sealer on the CLEAN pipe fitting of the long line and install into the bottom port and also the rear tee. This line will lie nicely on the floor. Raspy recommends in the second post to use Rectorseal #5 for a better seal. The factory uses tape, and I had no leaks using tape. Insert the long elbow line into the rear tee and the appropriate Tank Fill fitting on the manifold, as shown. Secure the tee collars down below since they will be harder to access afterwards. View of the lower hose installed, showing that you will need about 9.5 inches of extension to properly seat the new tube into its tee fitting, past the o-ring; make sure you have MORE than this length left when you make the tube. You will trim to length after installing it. Test fit the new tube into the upper port. I was expecting it to slip right in, but the hole in the side of the tank was drilled undersized (1/2 inch). This is poor practice since the barrier will trap water and possibly cause freeze damage. There should be a small weep hole drilled at the very bottom of any vertical opening to keep it water free in winter storage. The guy who welded these fittings on could have done that in about a minute. Note, this is pretty hard to see without a good mirror, I just stuck my cell phone down low and looked at the pics. I had to open up the hole to allow the 5/8 inch OD tube to go through. I used a coarse, large rat-tail file (with HANDLE so I could not lose it inside the tank!) while sucking up shavings with a shop vac. Any residual shavings will collect in the filter for removal. Be very careful if you have to file, to prevent damage to the pipe threads or it will leak. It's not pretty, I guess you could use a straight soldering iron to melt the edges.... but the fraying doesn't really matter. I marked the approximate location of the old Water Line, where the pump will suck air and cavitate, and also the location of the new line. This difference represents a lot of extra usable water. Make SURE this is very clean before installing the new tube. I used a blast of compressed air. More to come. John Davies Spokane WA
-
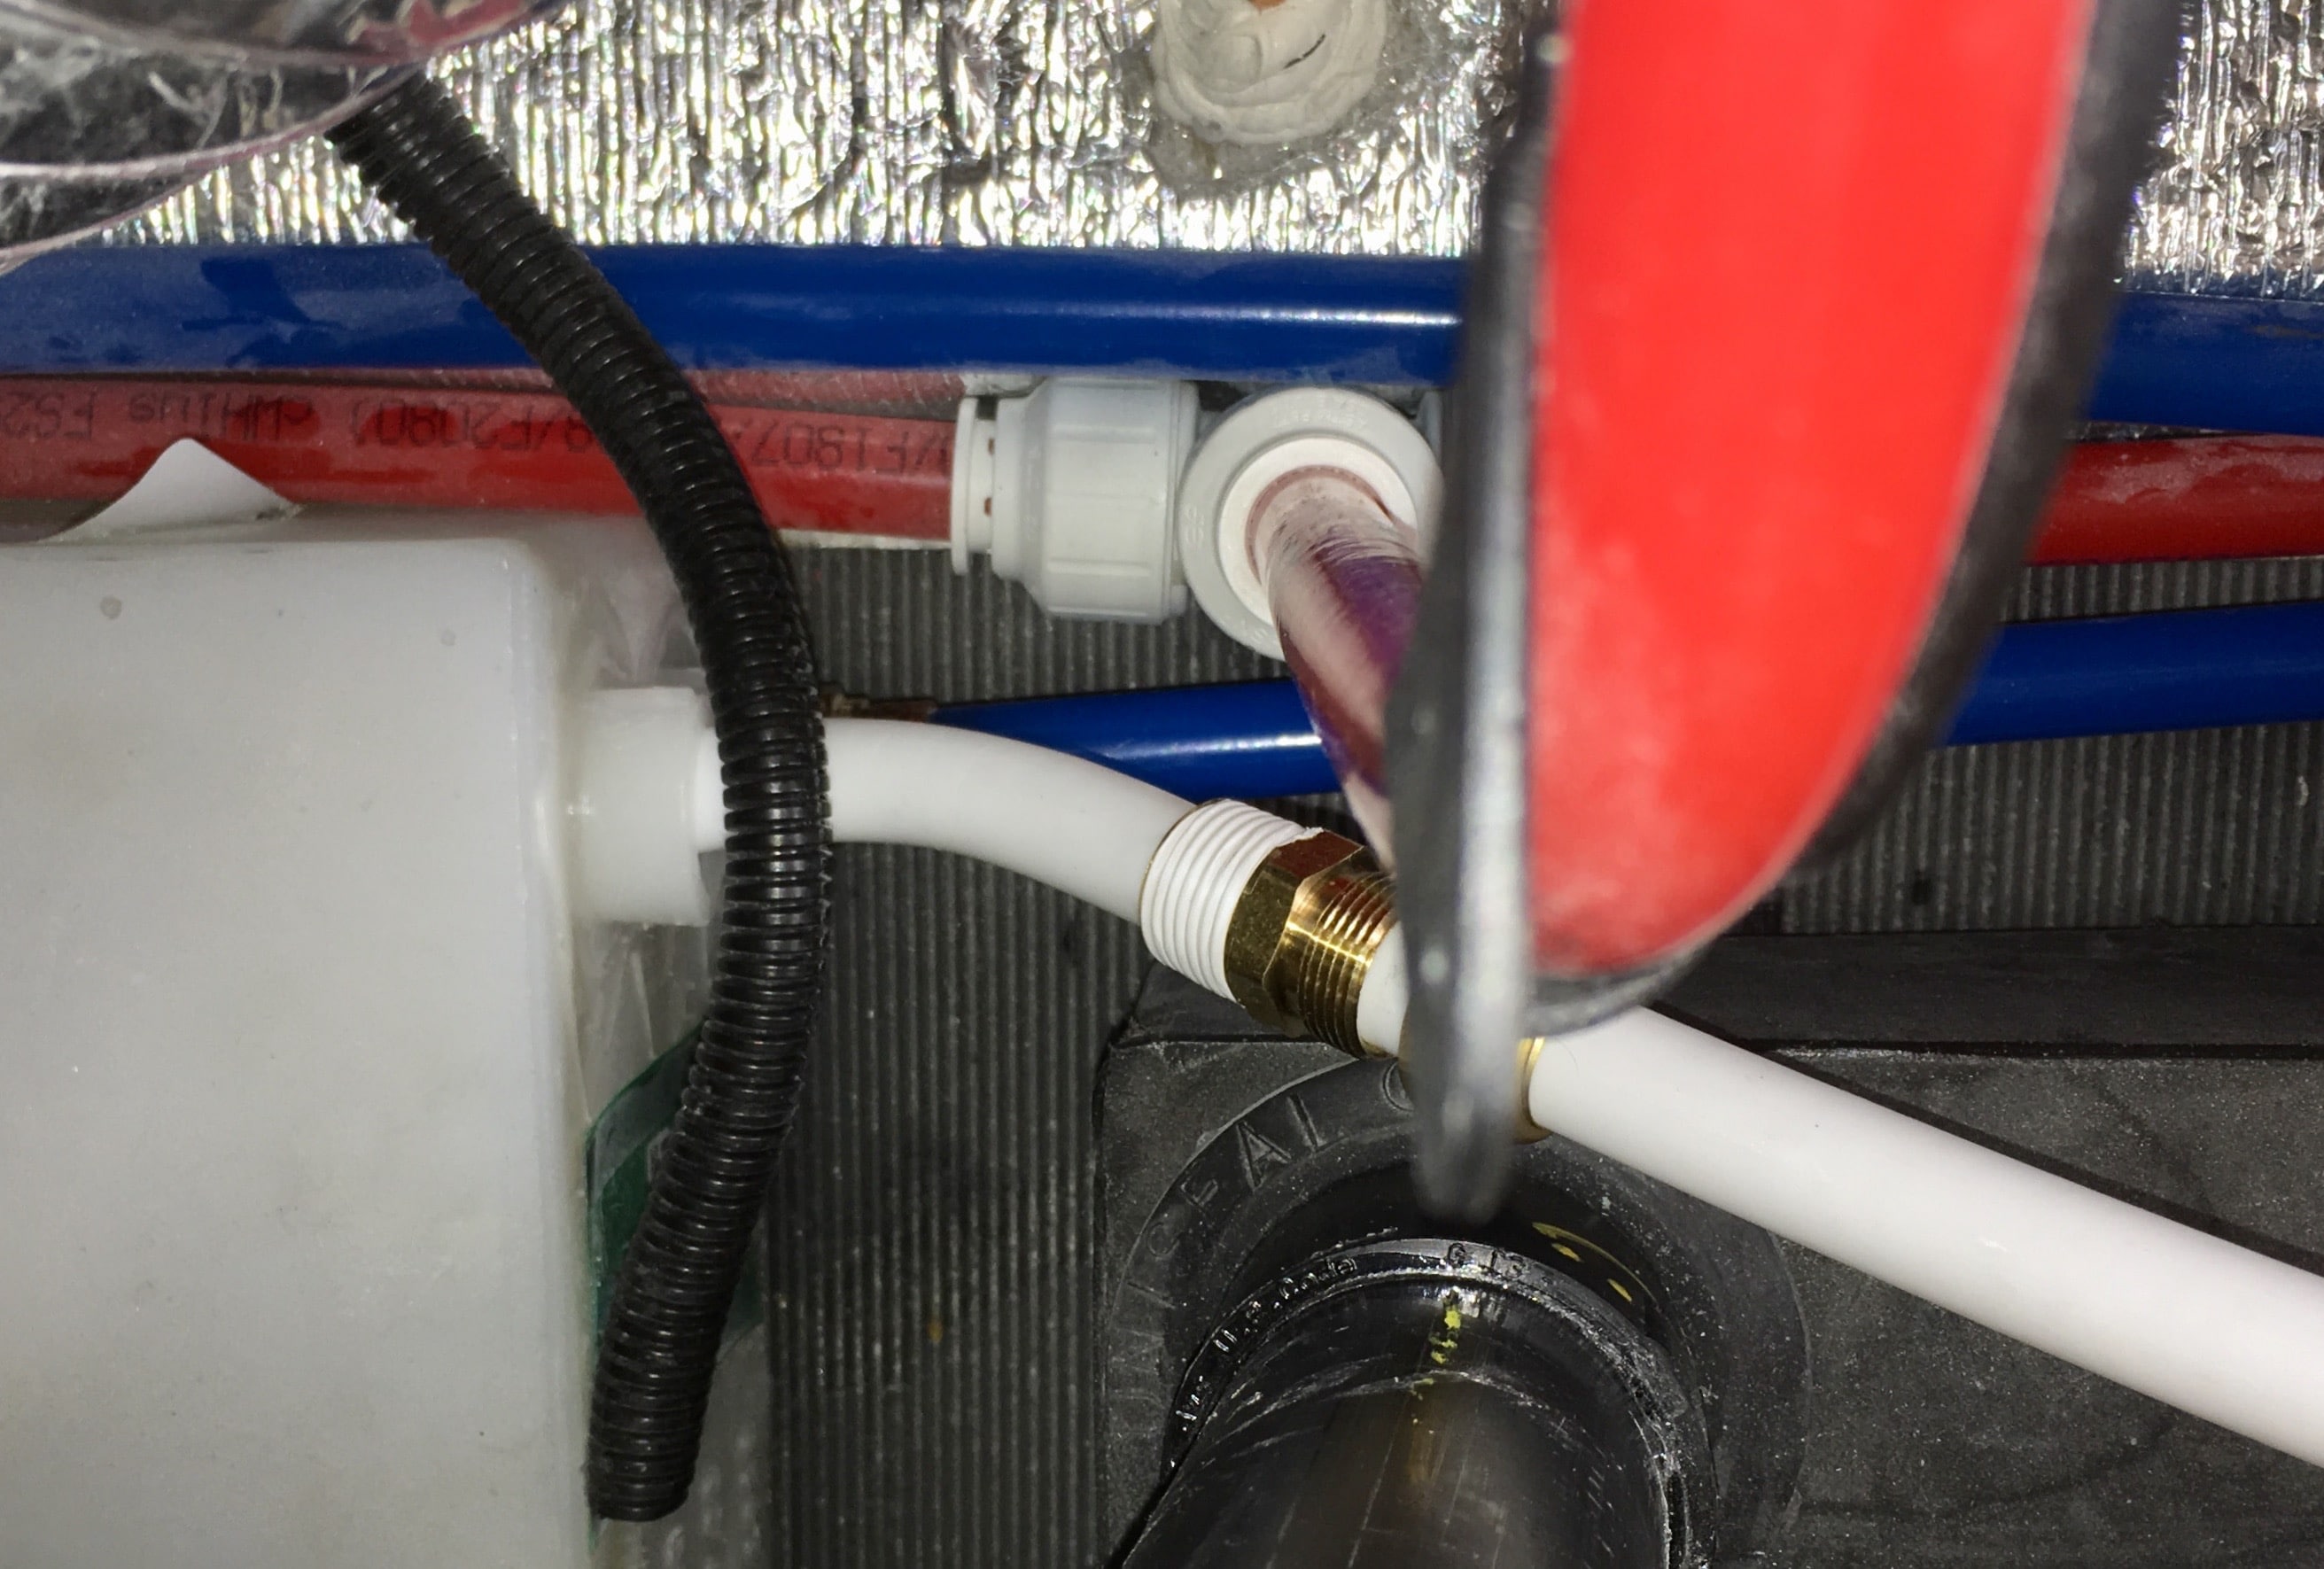
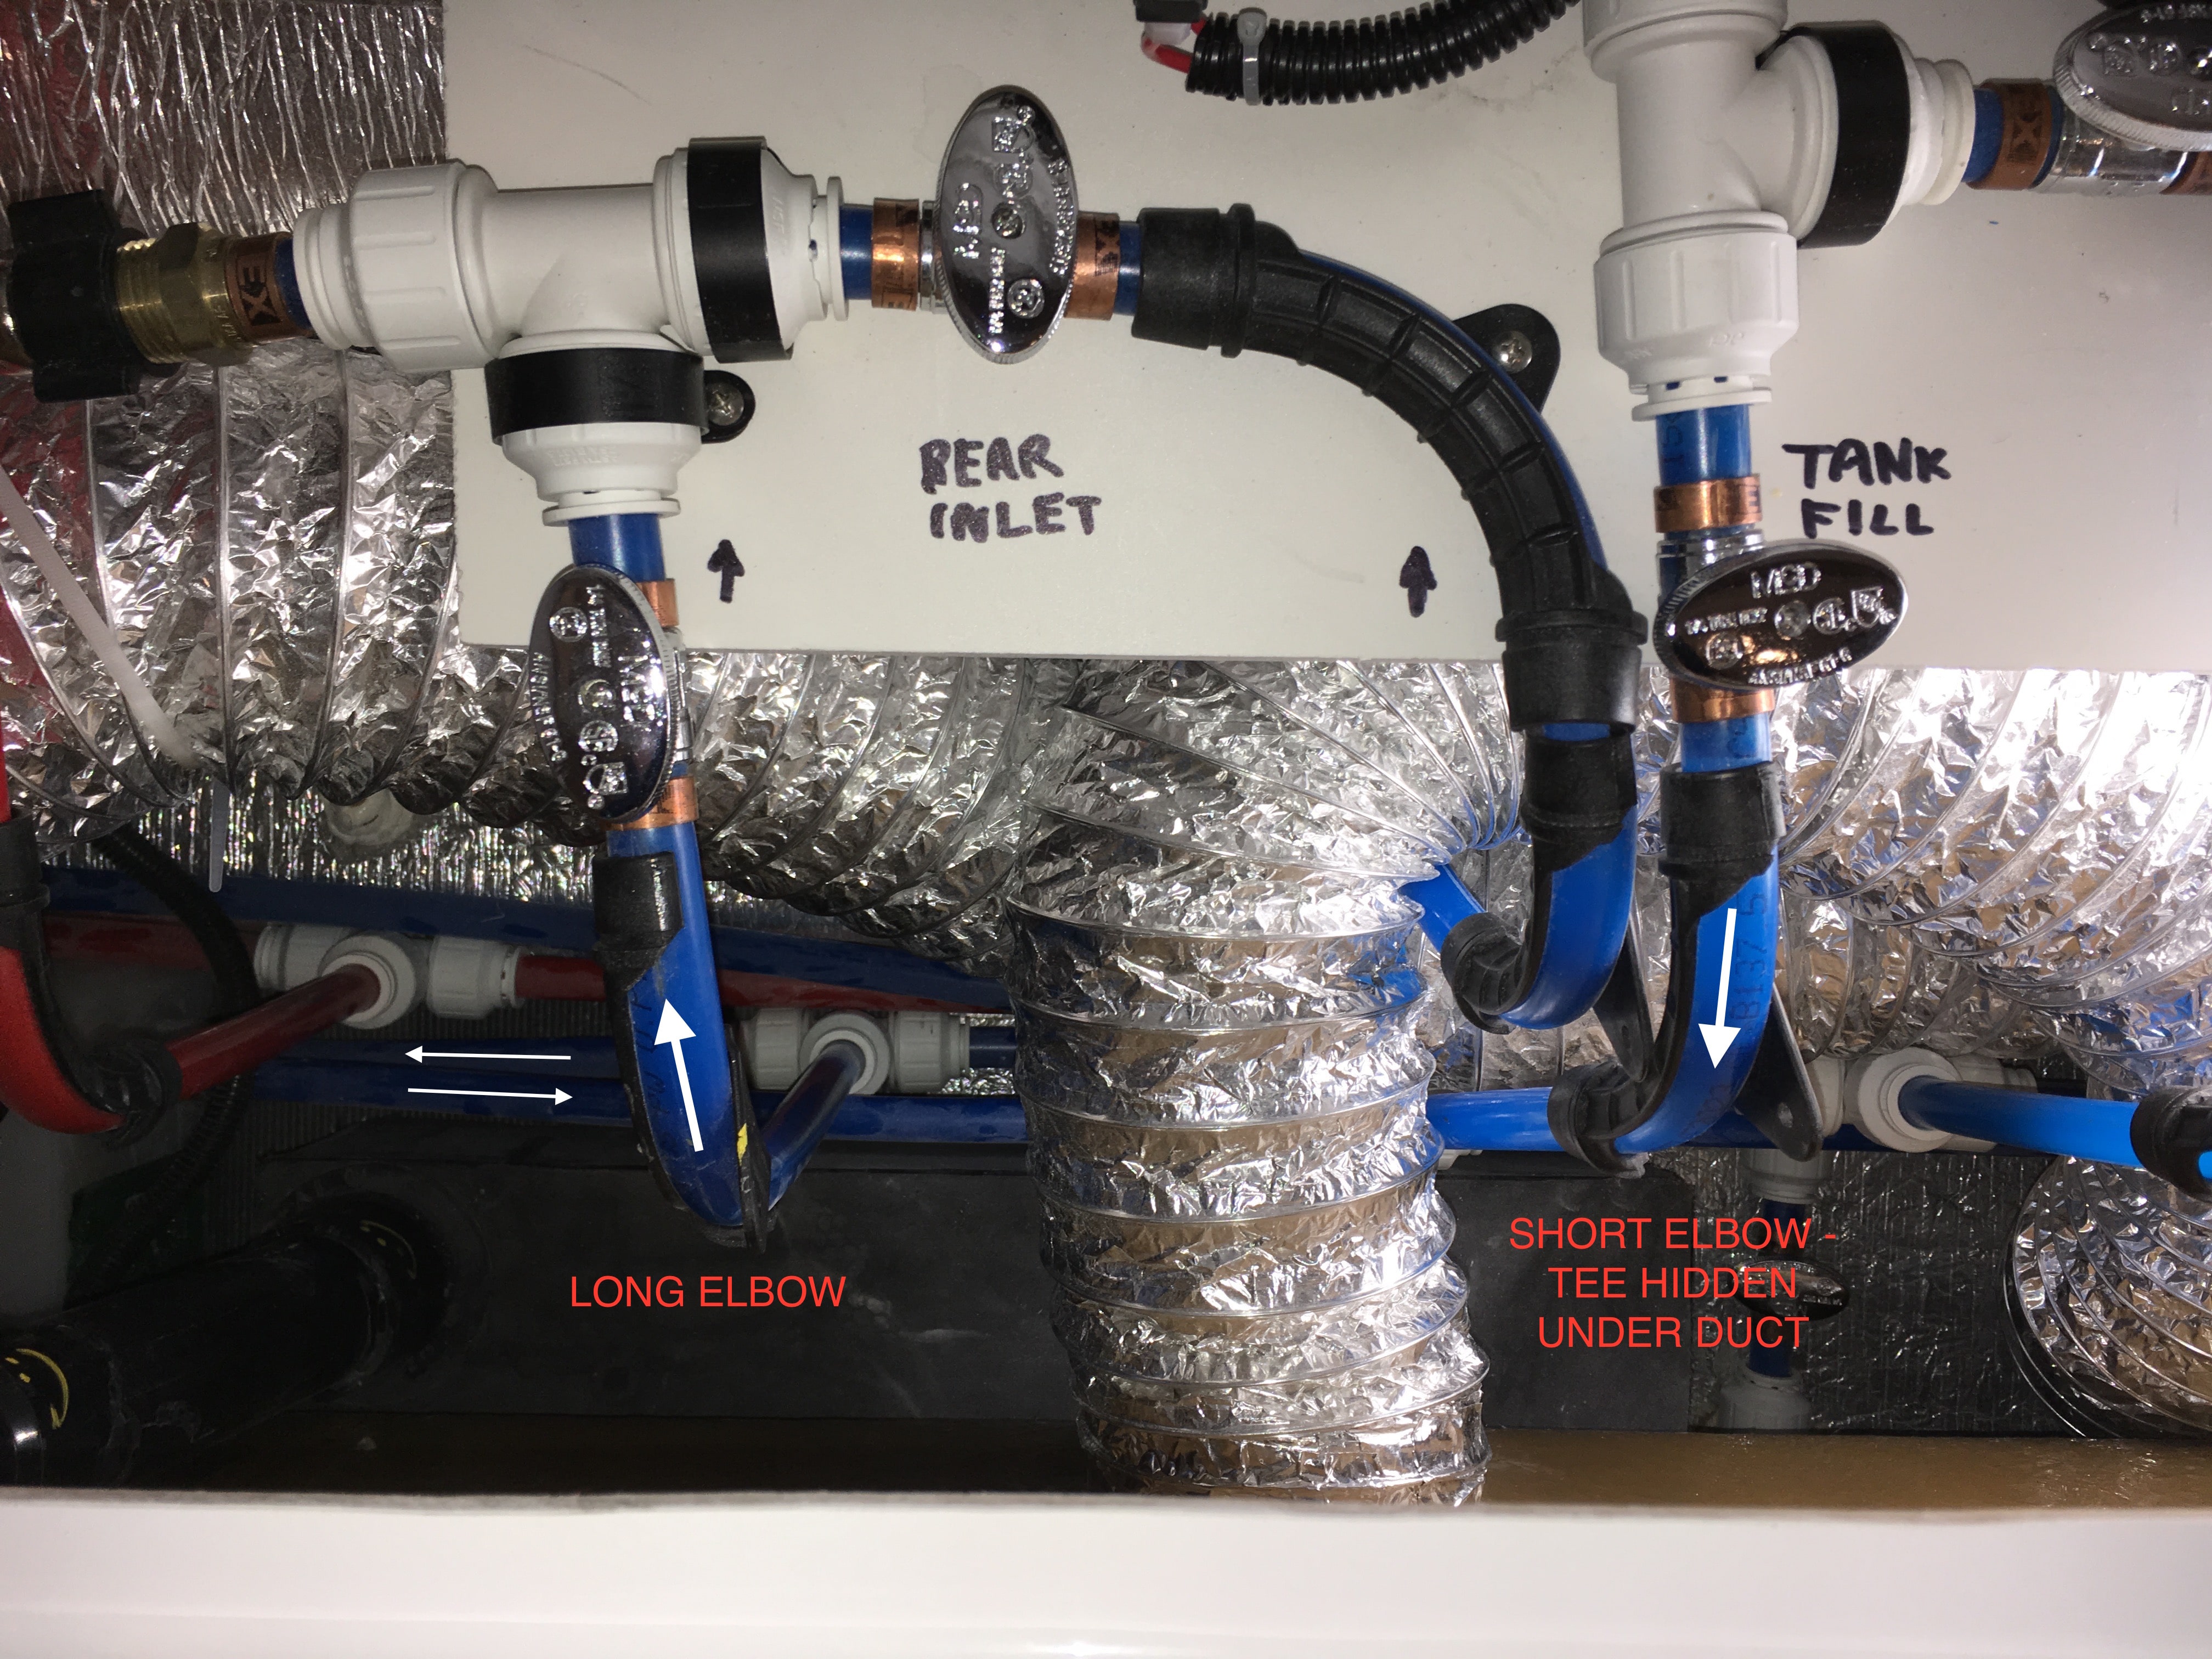
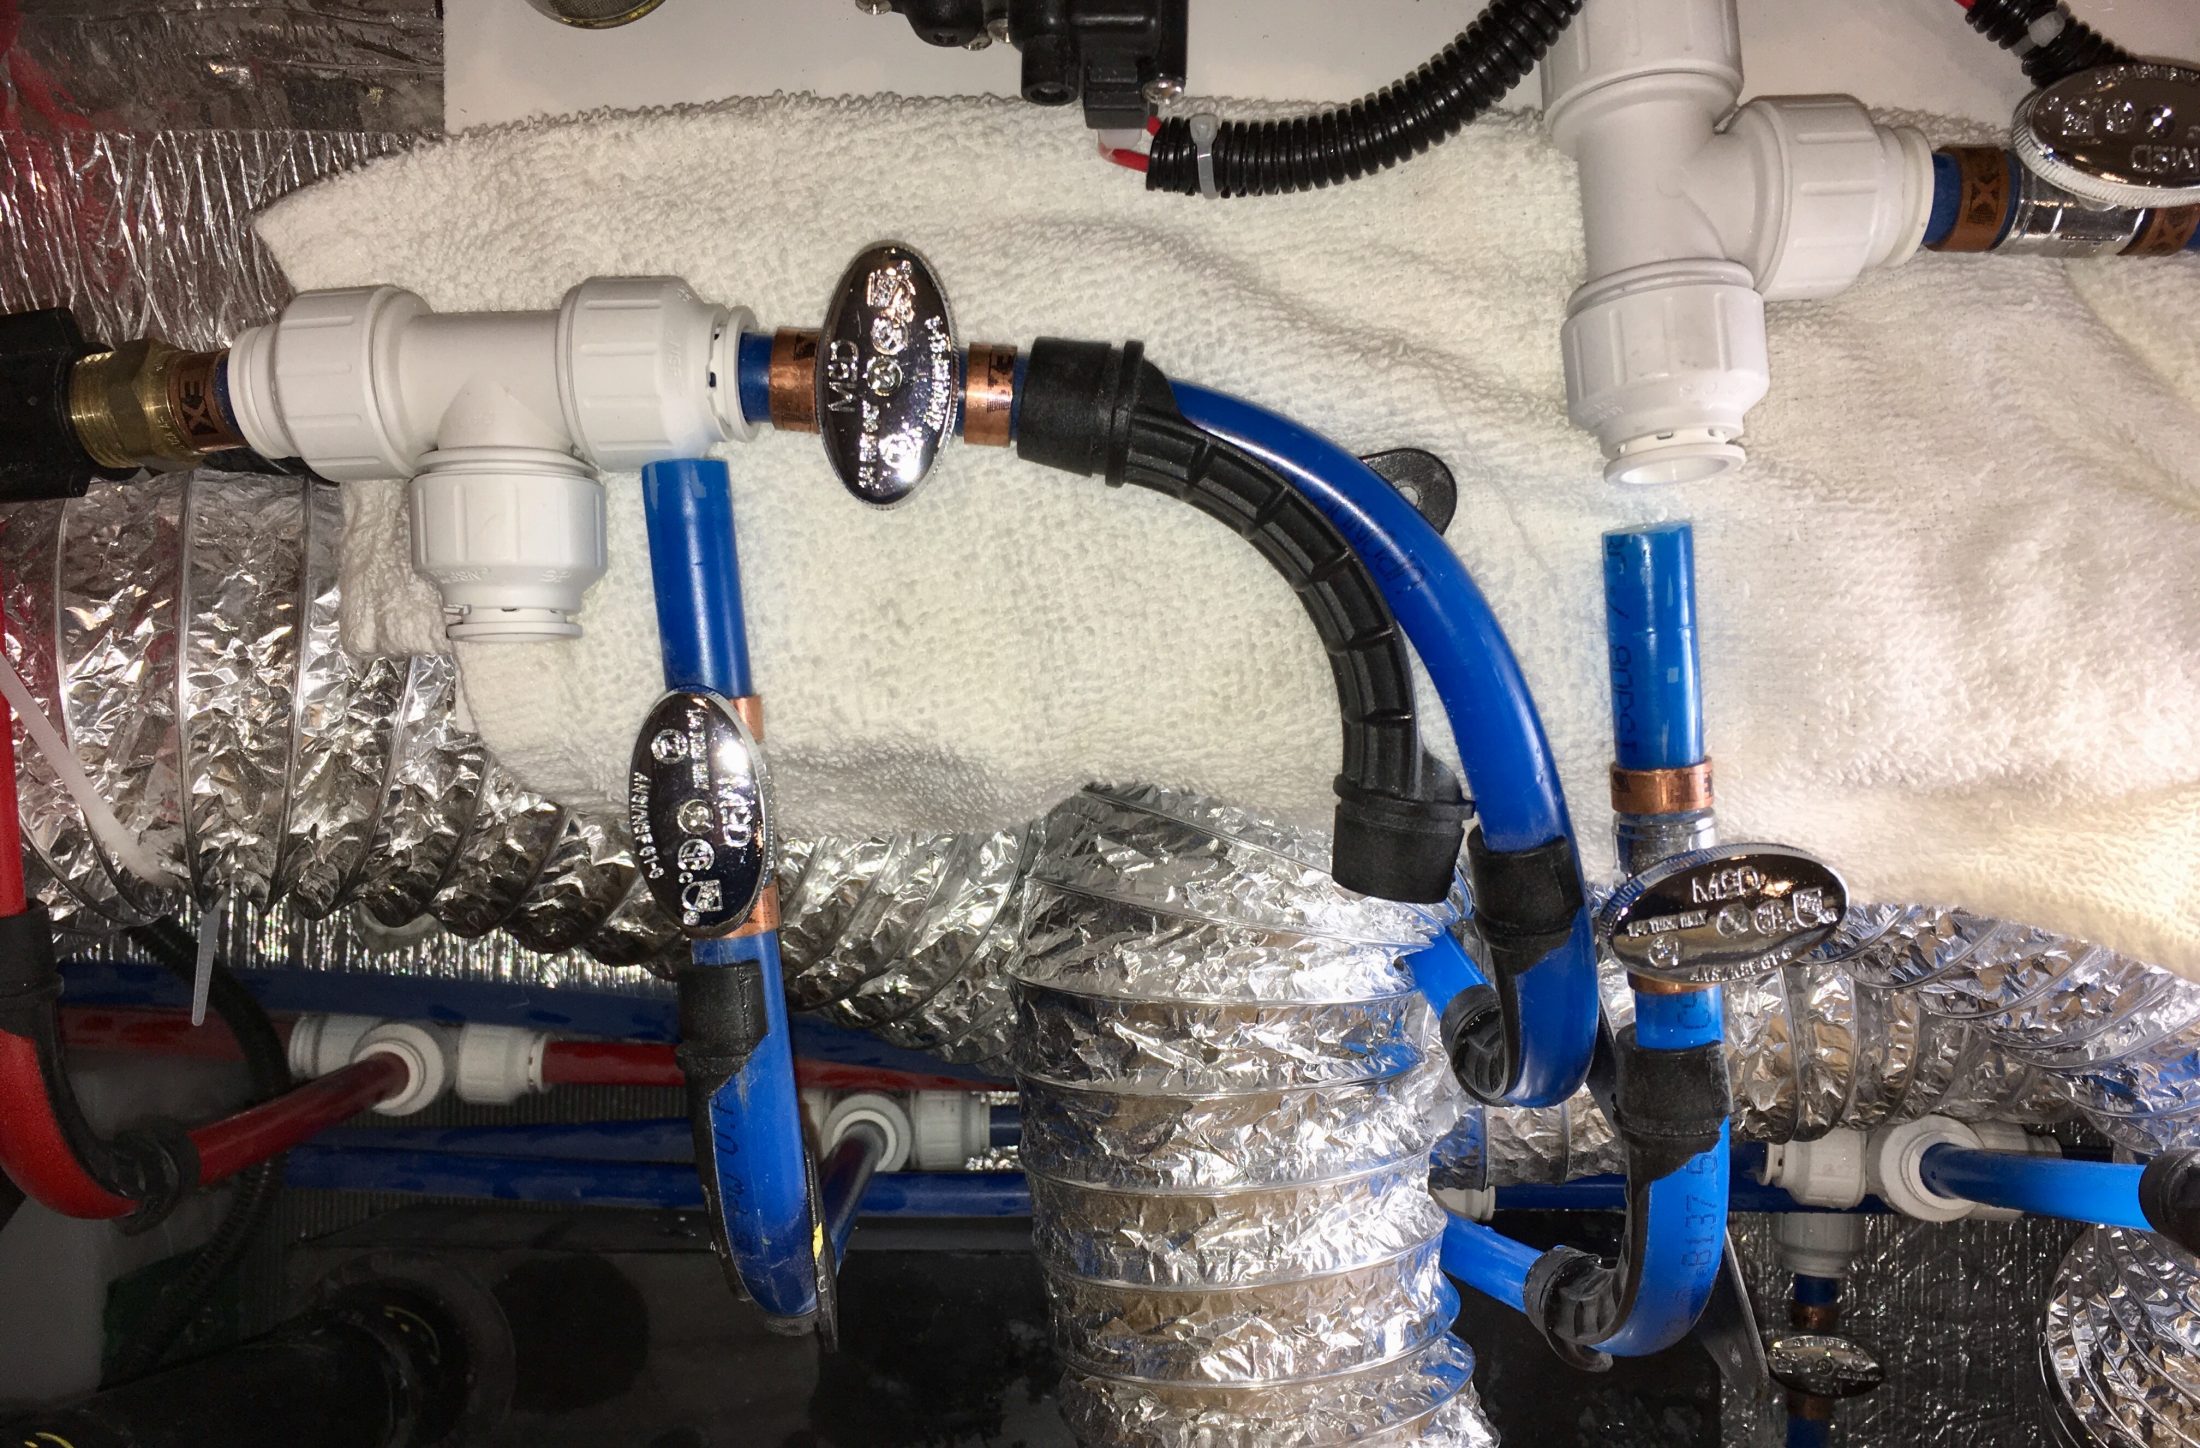
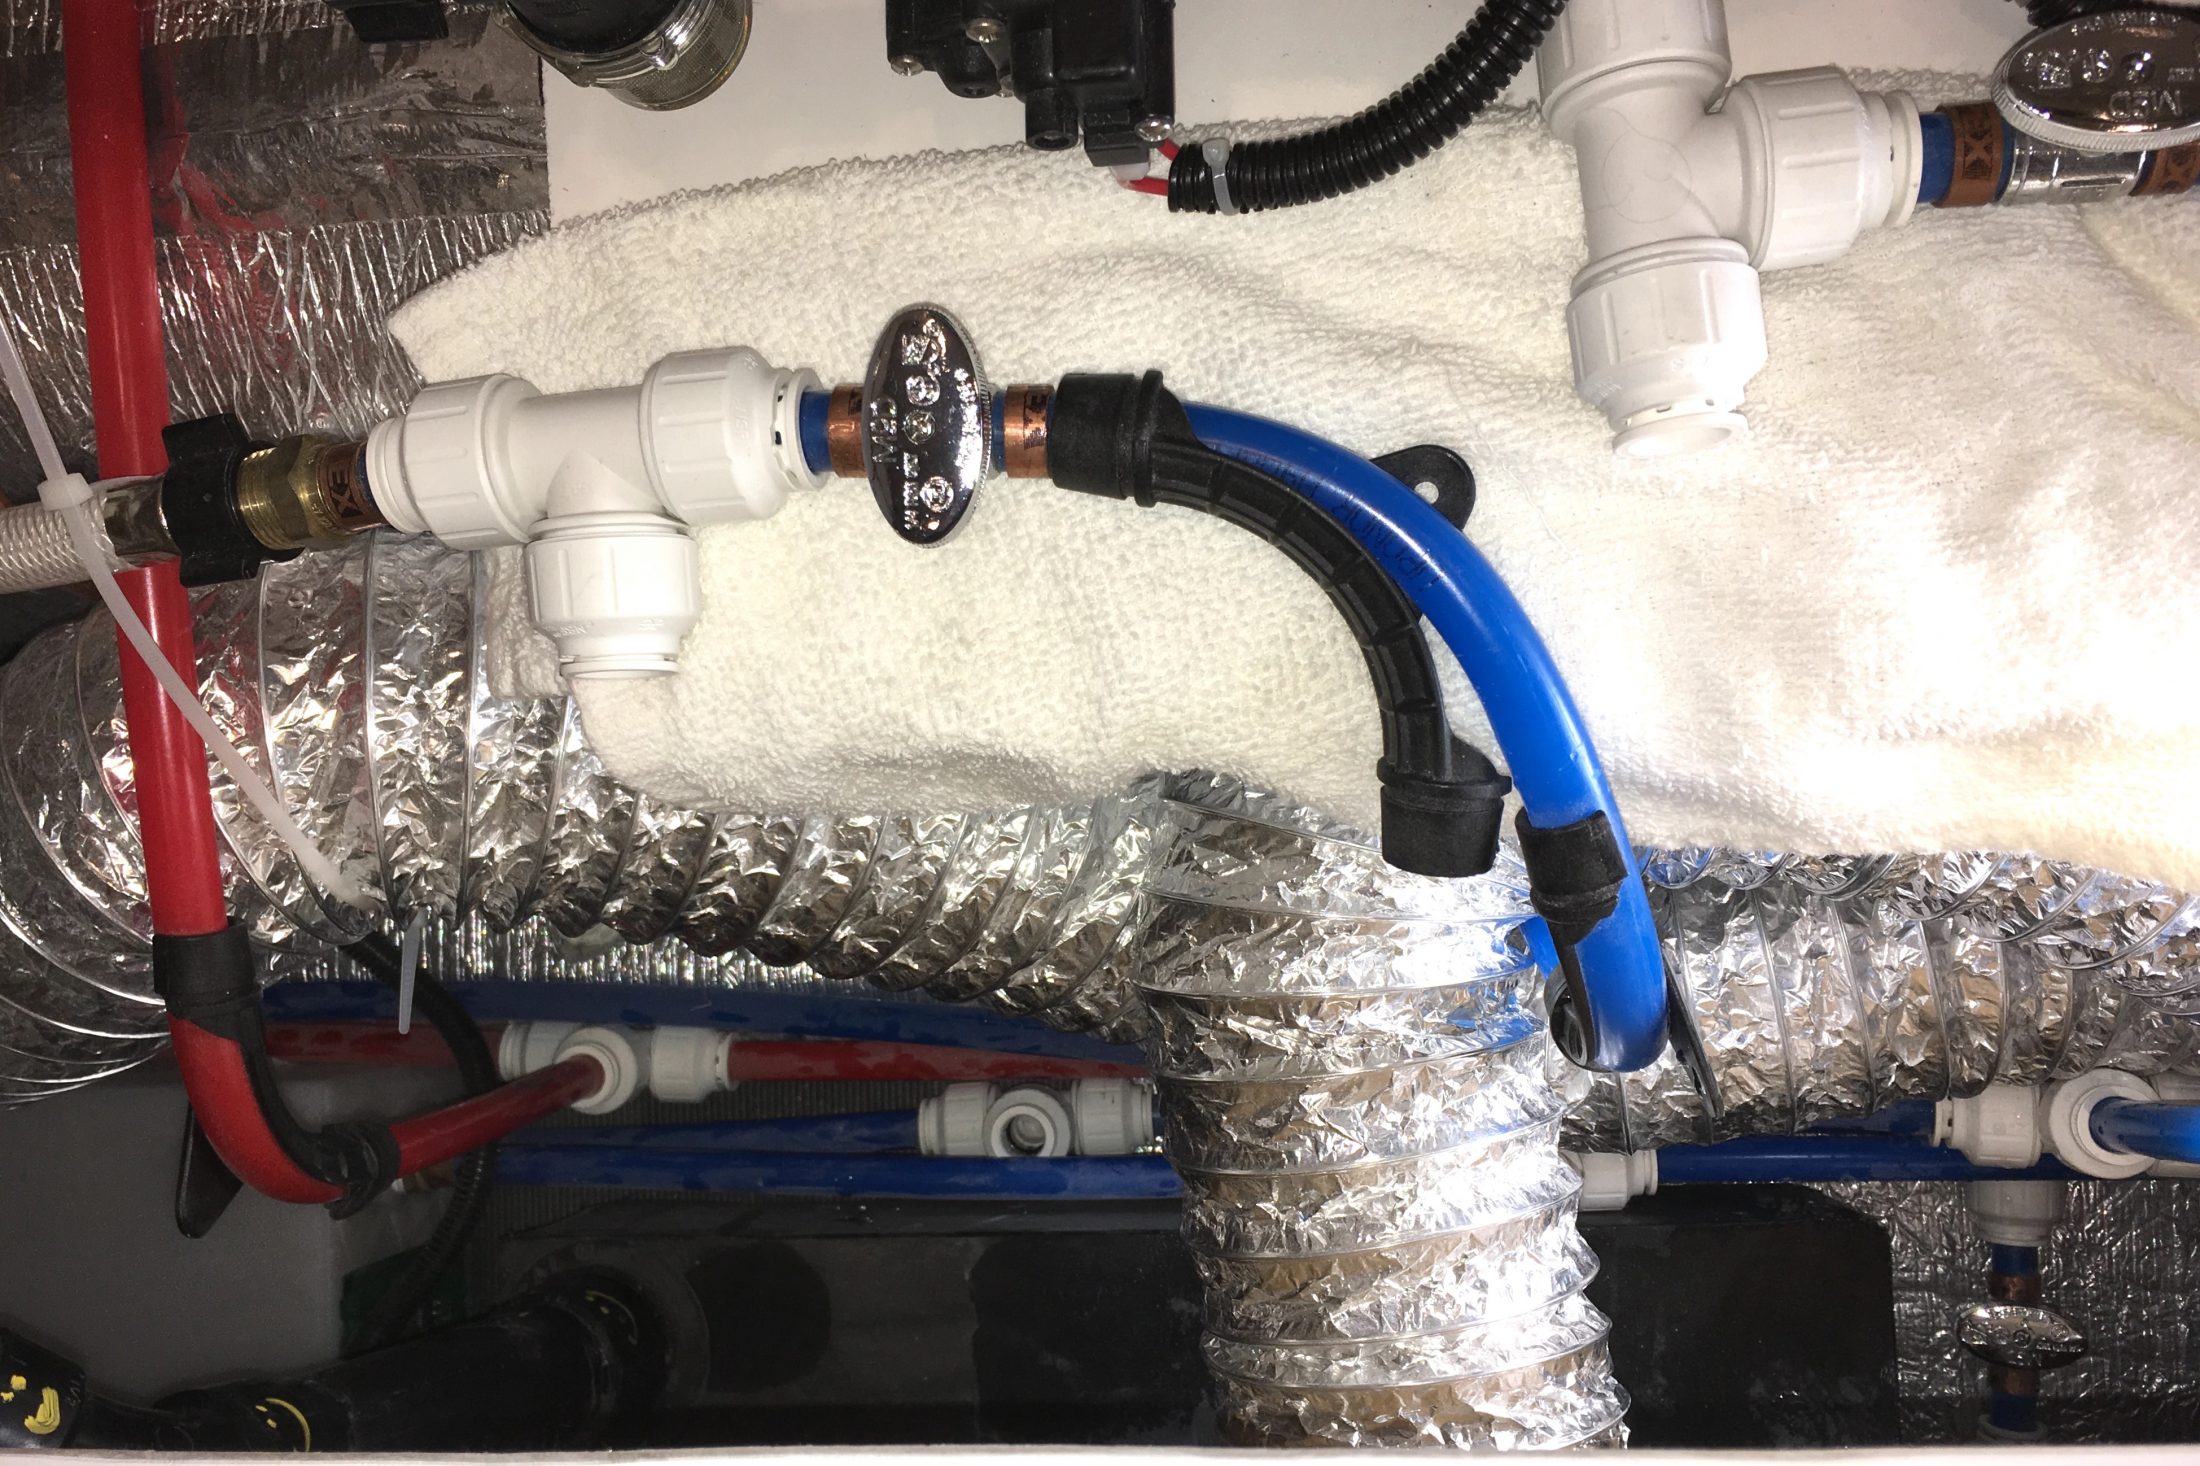
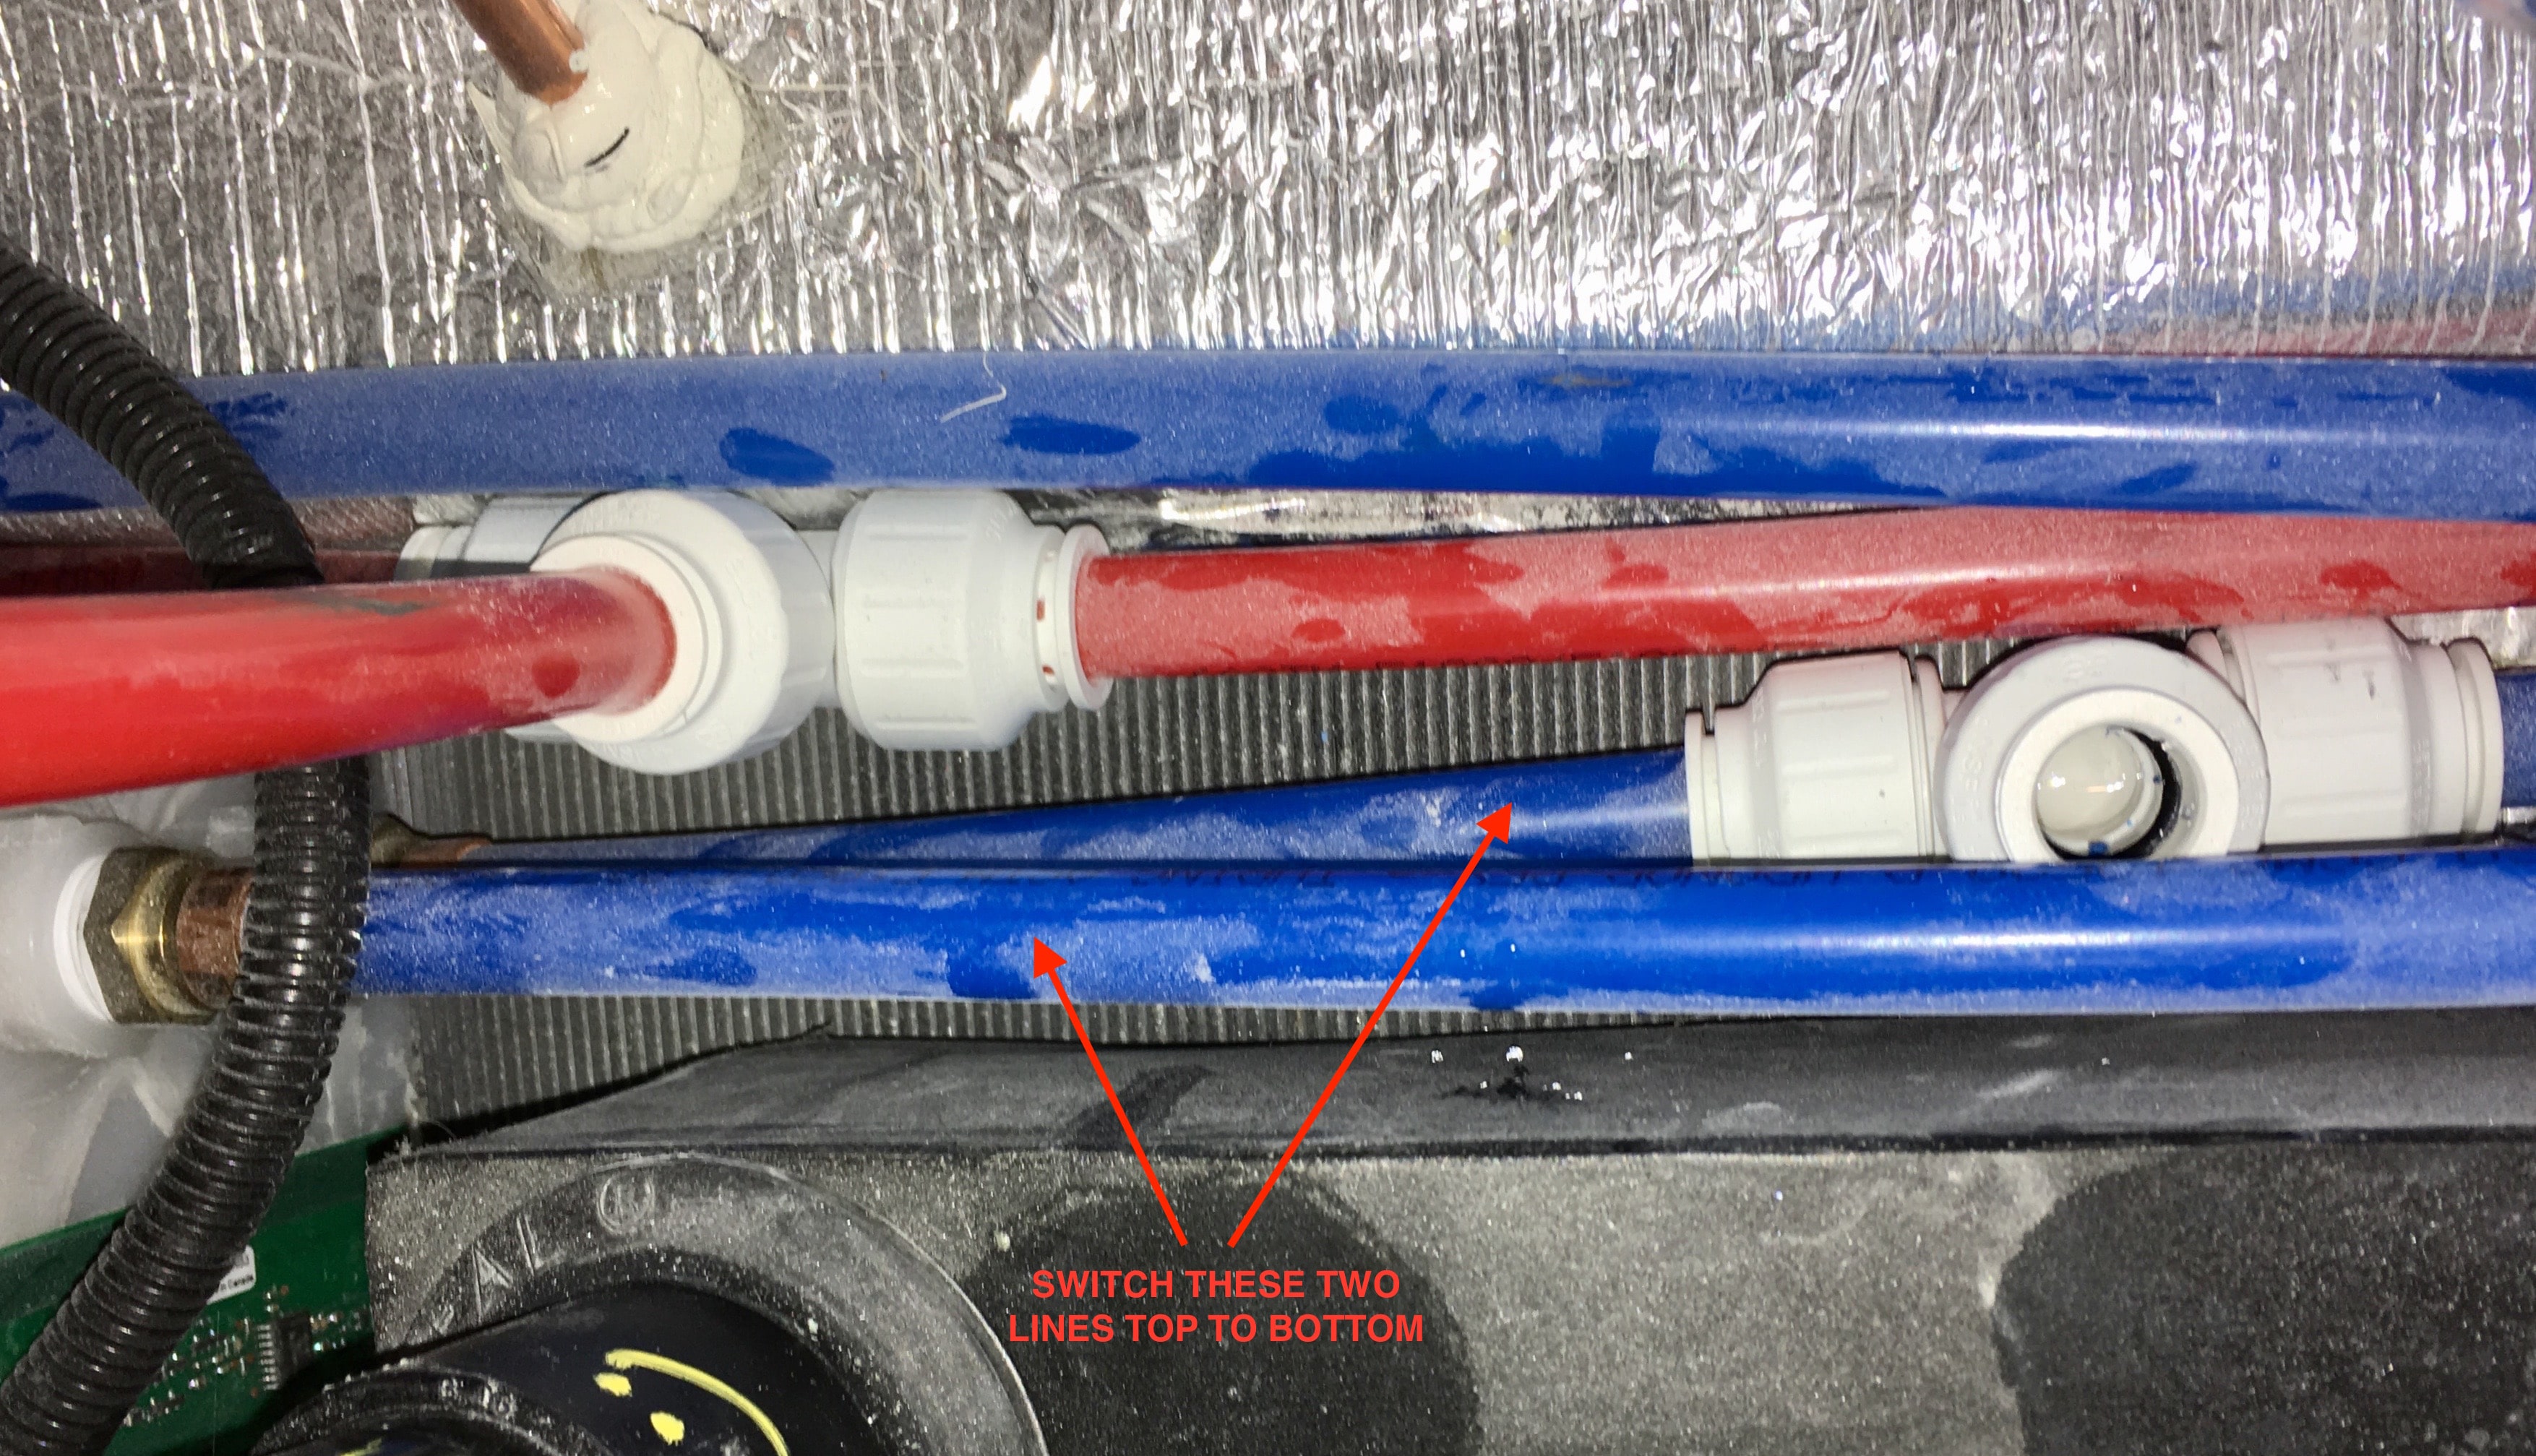
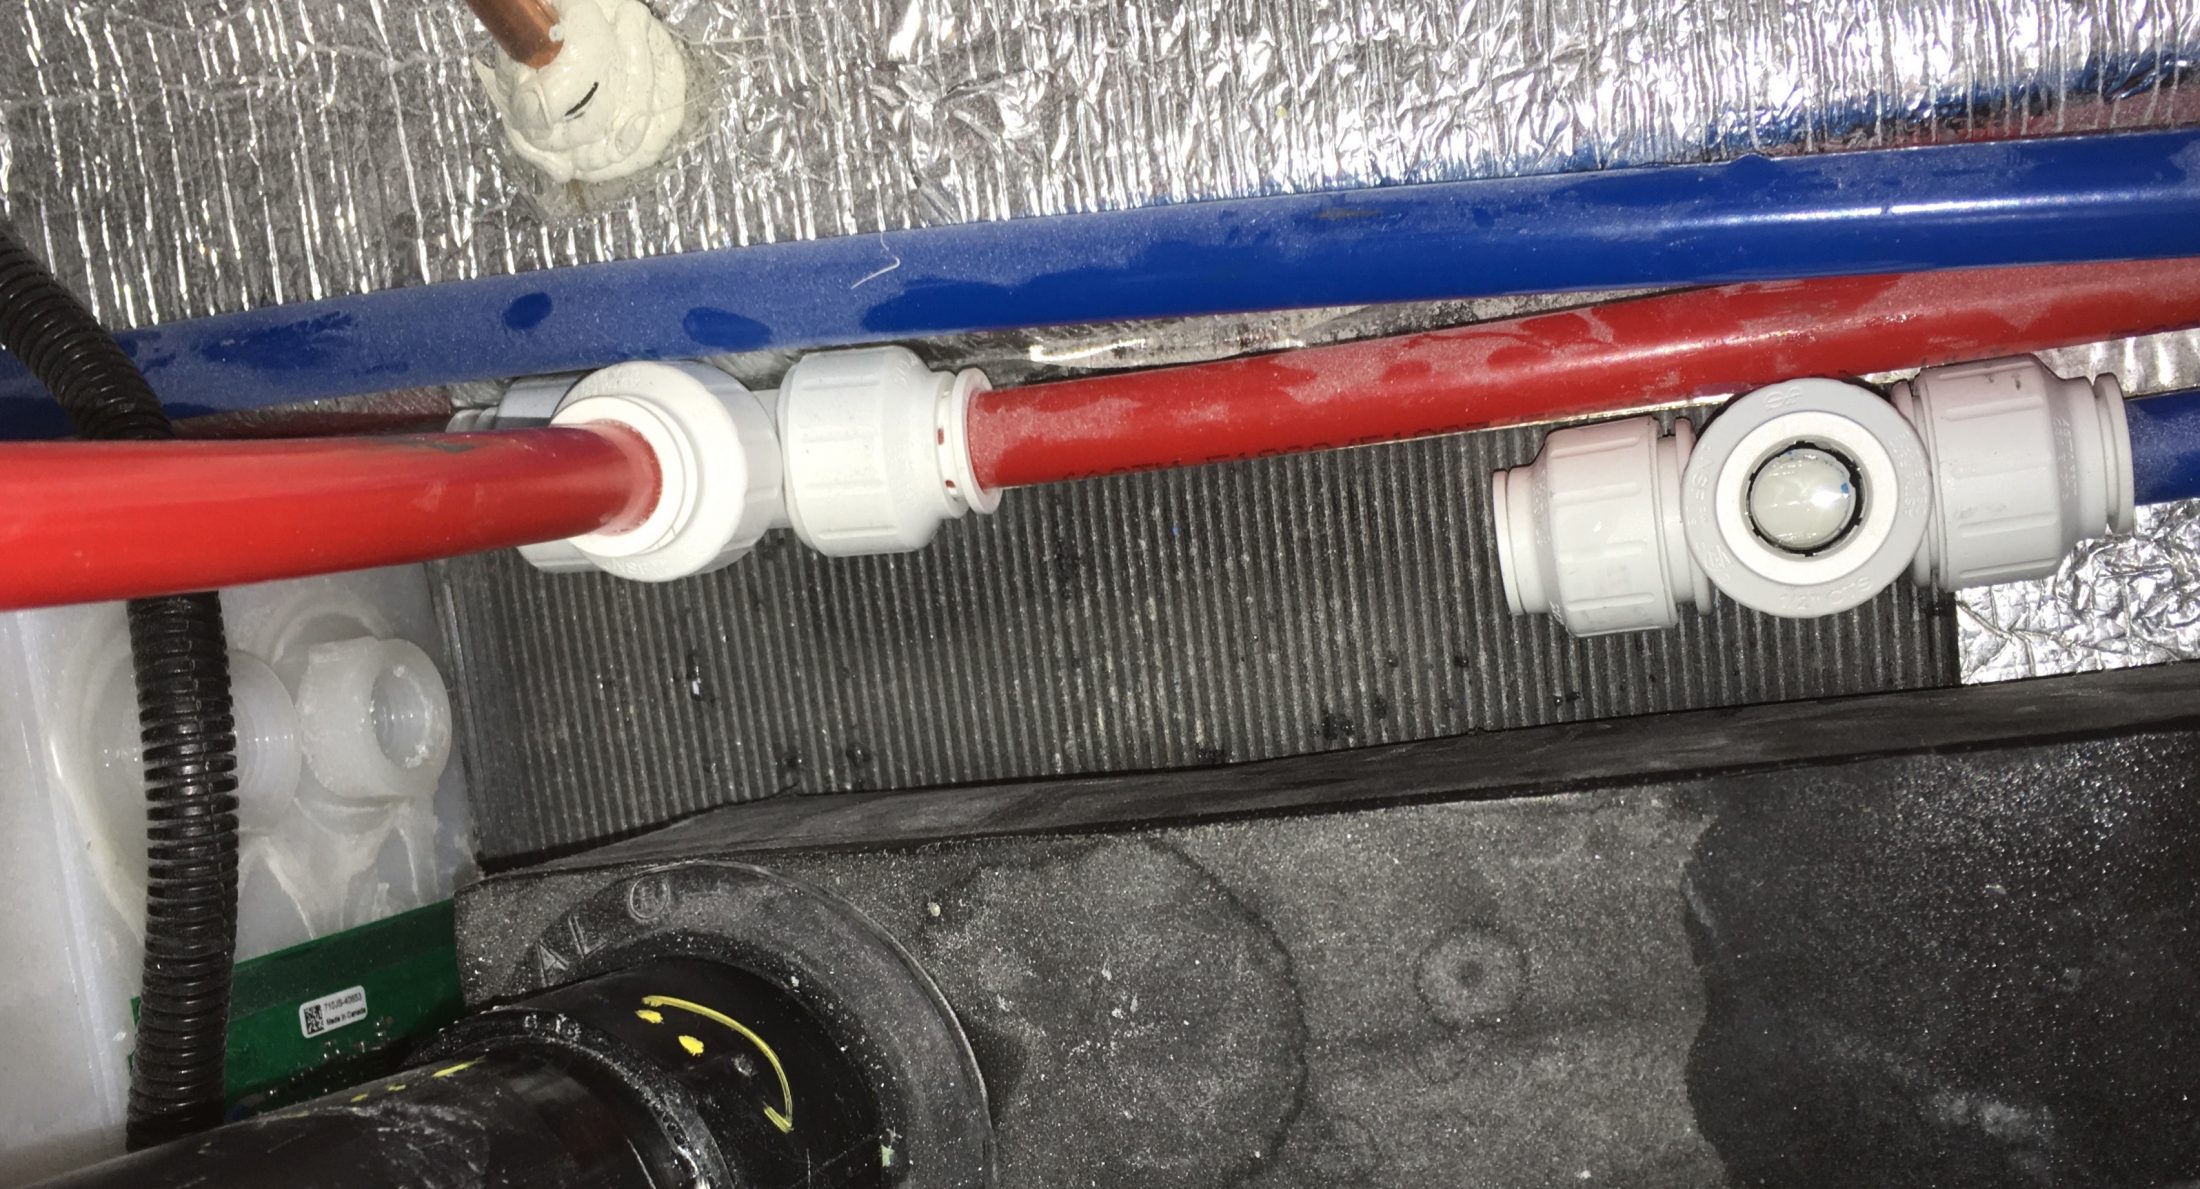
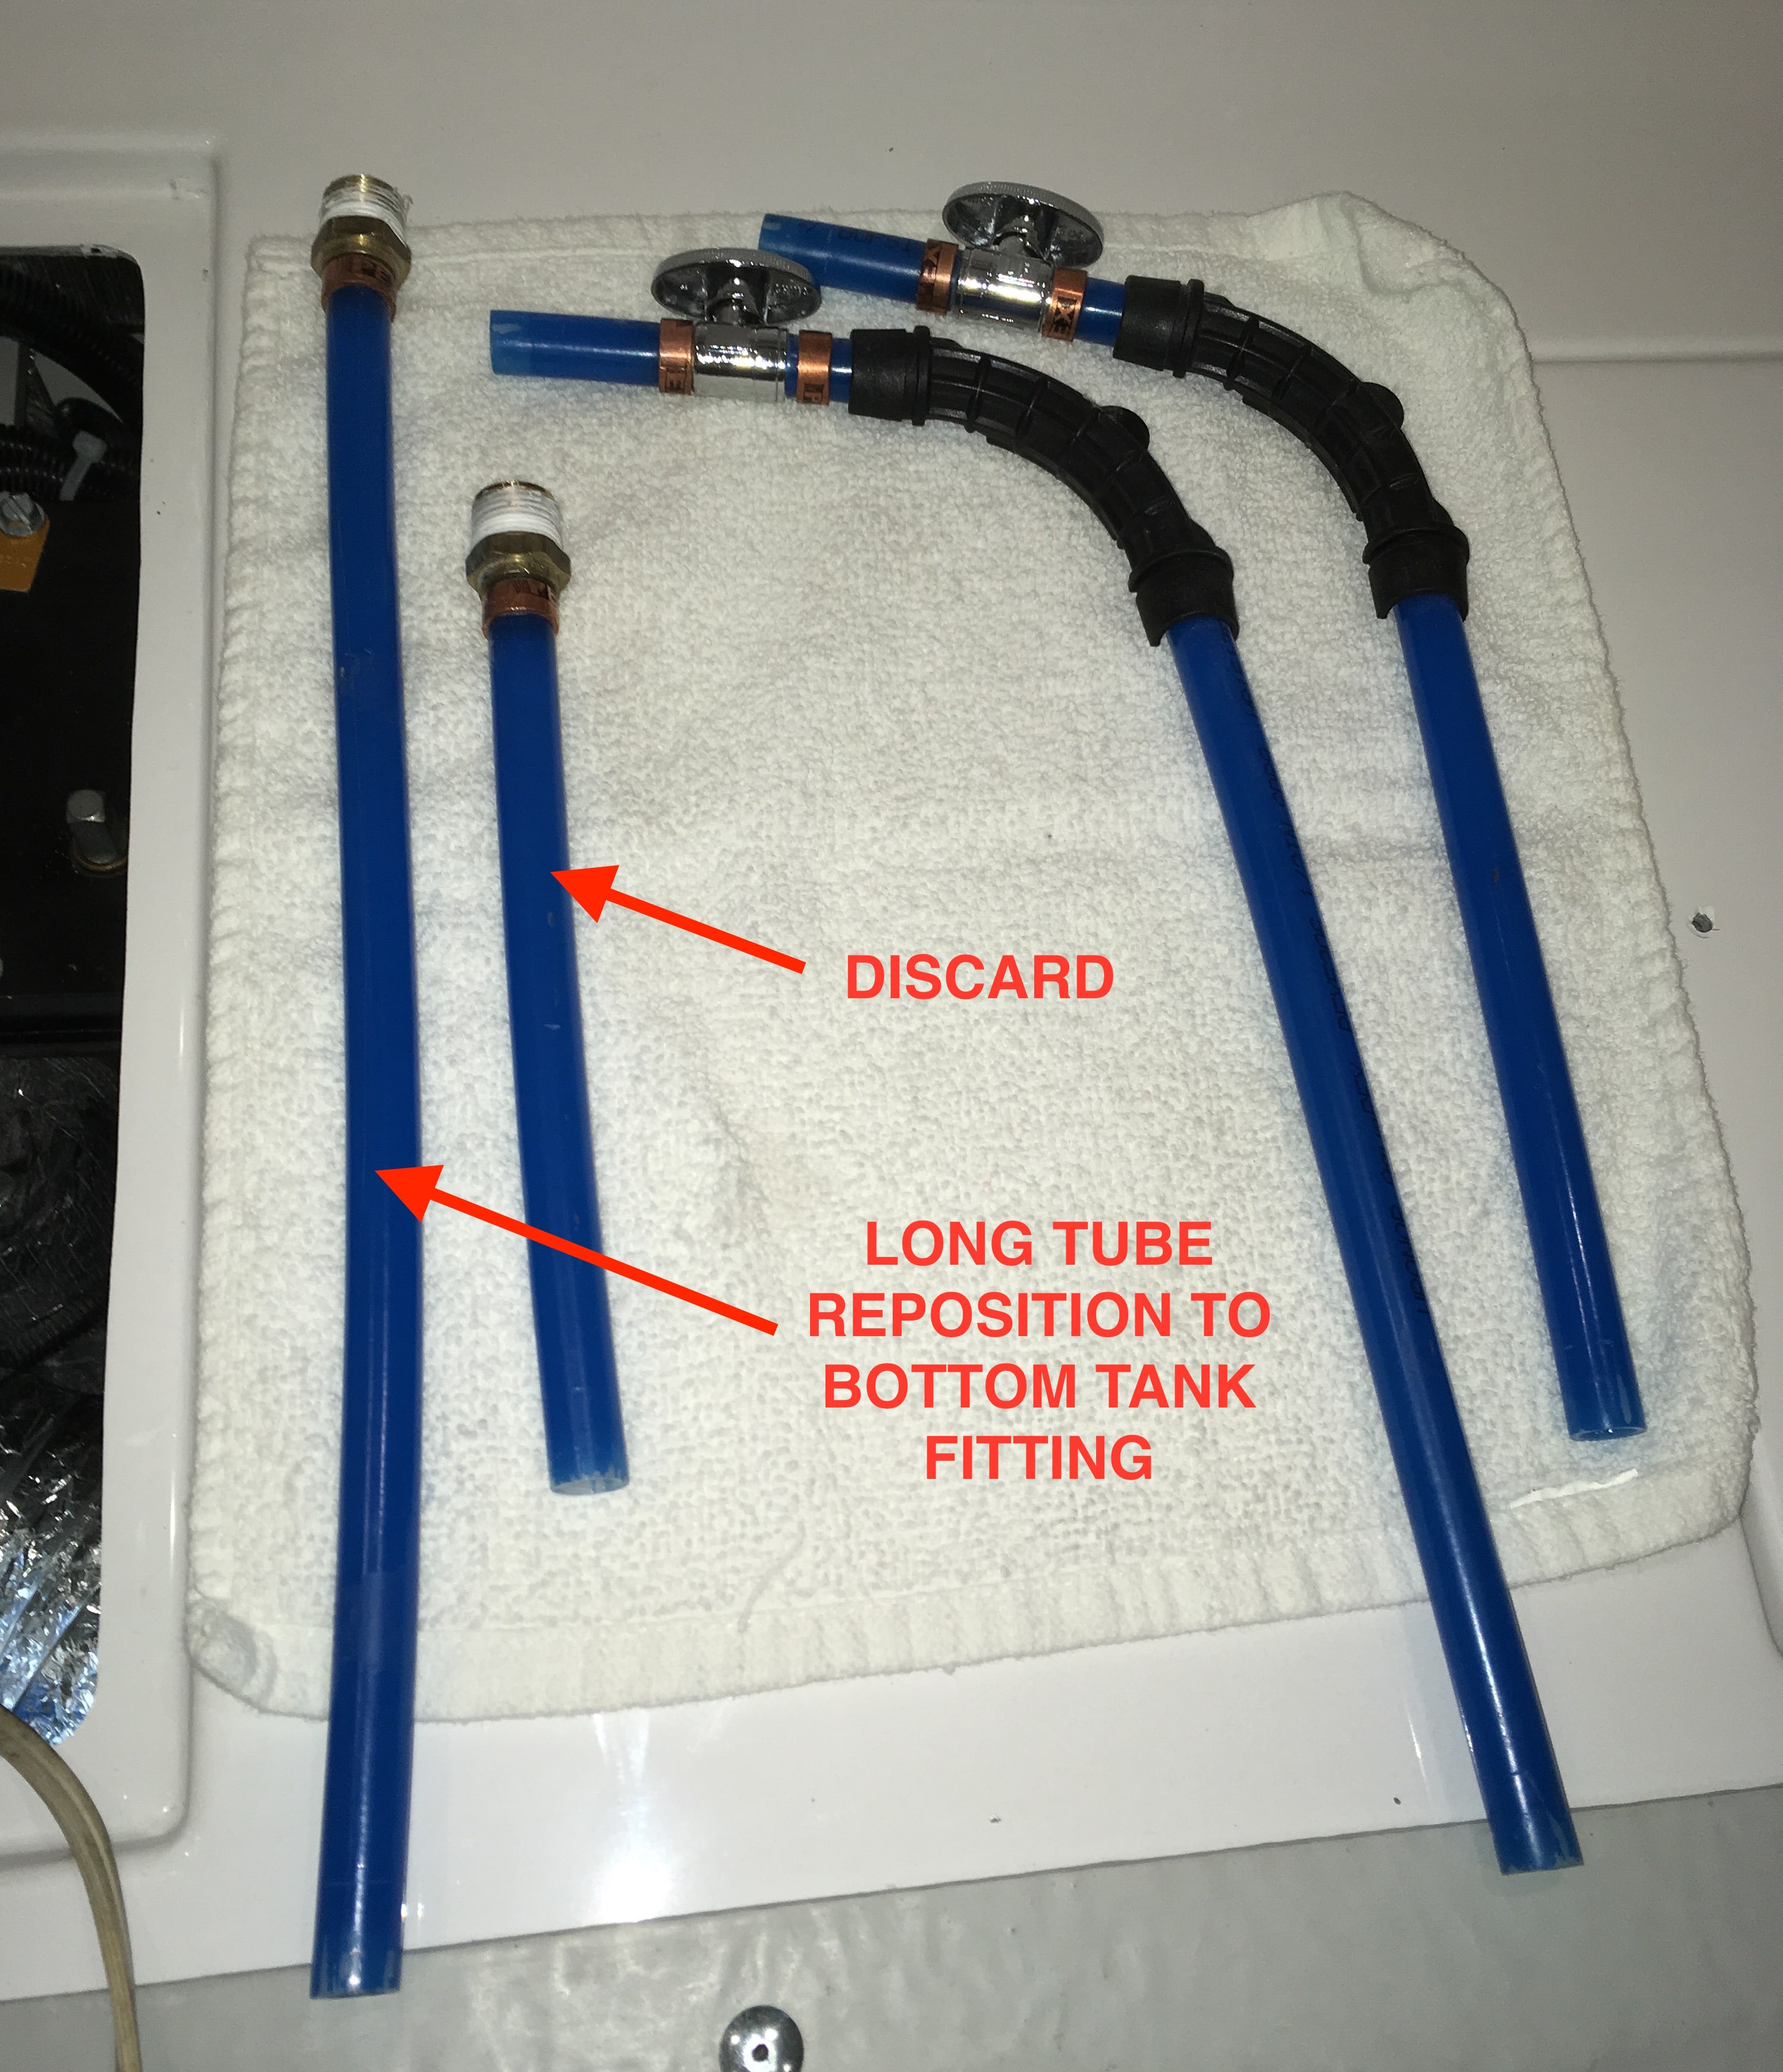
Disassembling the factory plumbing. A word on the quick connect fittings. To remove a line, rotate the collar counter clockwise 90 degrees. The inner sleeve will push out. Press the sleeve inwards with a finger or tool and that will release the pressure from the o-ring.Pull the line out of the fitting. Assembly is opposite, just be sure all parts are clean. View of the system, white arrows show water flow. The flow in these locations is NOT changed. The two elbow sections (with white arrows) will be swapped since the lines they connect to down low will have different heights. One will drop 3 inches, one will rise 3 inches. There is a tee visible to the left in the shadow, and another hidden under the duct at the lower part of the pic. Remove any black clamps as needed to gain working room. Do not drop any of the stainless clamp screws down into the hull - they are non-magnetic and may be very hard to retrieve! Disconnect the two upper elbow lines. Use a towel to catch any water. It isn't necessary to label any parts. Working at the lower tees, disconnect and remove both elbow lines. Here is a closeup of the two lines we need to swap to different ports. The shorter section will be discarded and replaced with the new curved dip tube. Remove the lines from the tank using a 7/8 inch wrench. There is adequate room. Be aware of the circuit breaker board for the water level sensor, do not short it out! You could cover it with duct tape if you feel klutzy... Here are the bits that have been removed. All will be reused except for the short straight section which can be tossed or placed in a junk drawer. I worried a little that reusing old pipes in new locations would result in leaks, but I had none. Your mileage may vary. You could always install new line and fittings if you are a worrier. More to come. John Davies Spokane WA
-
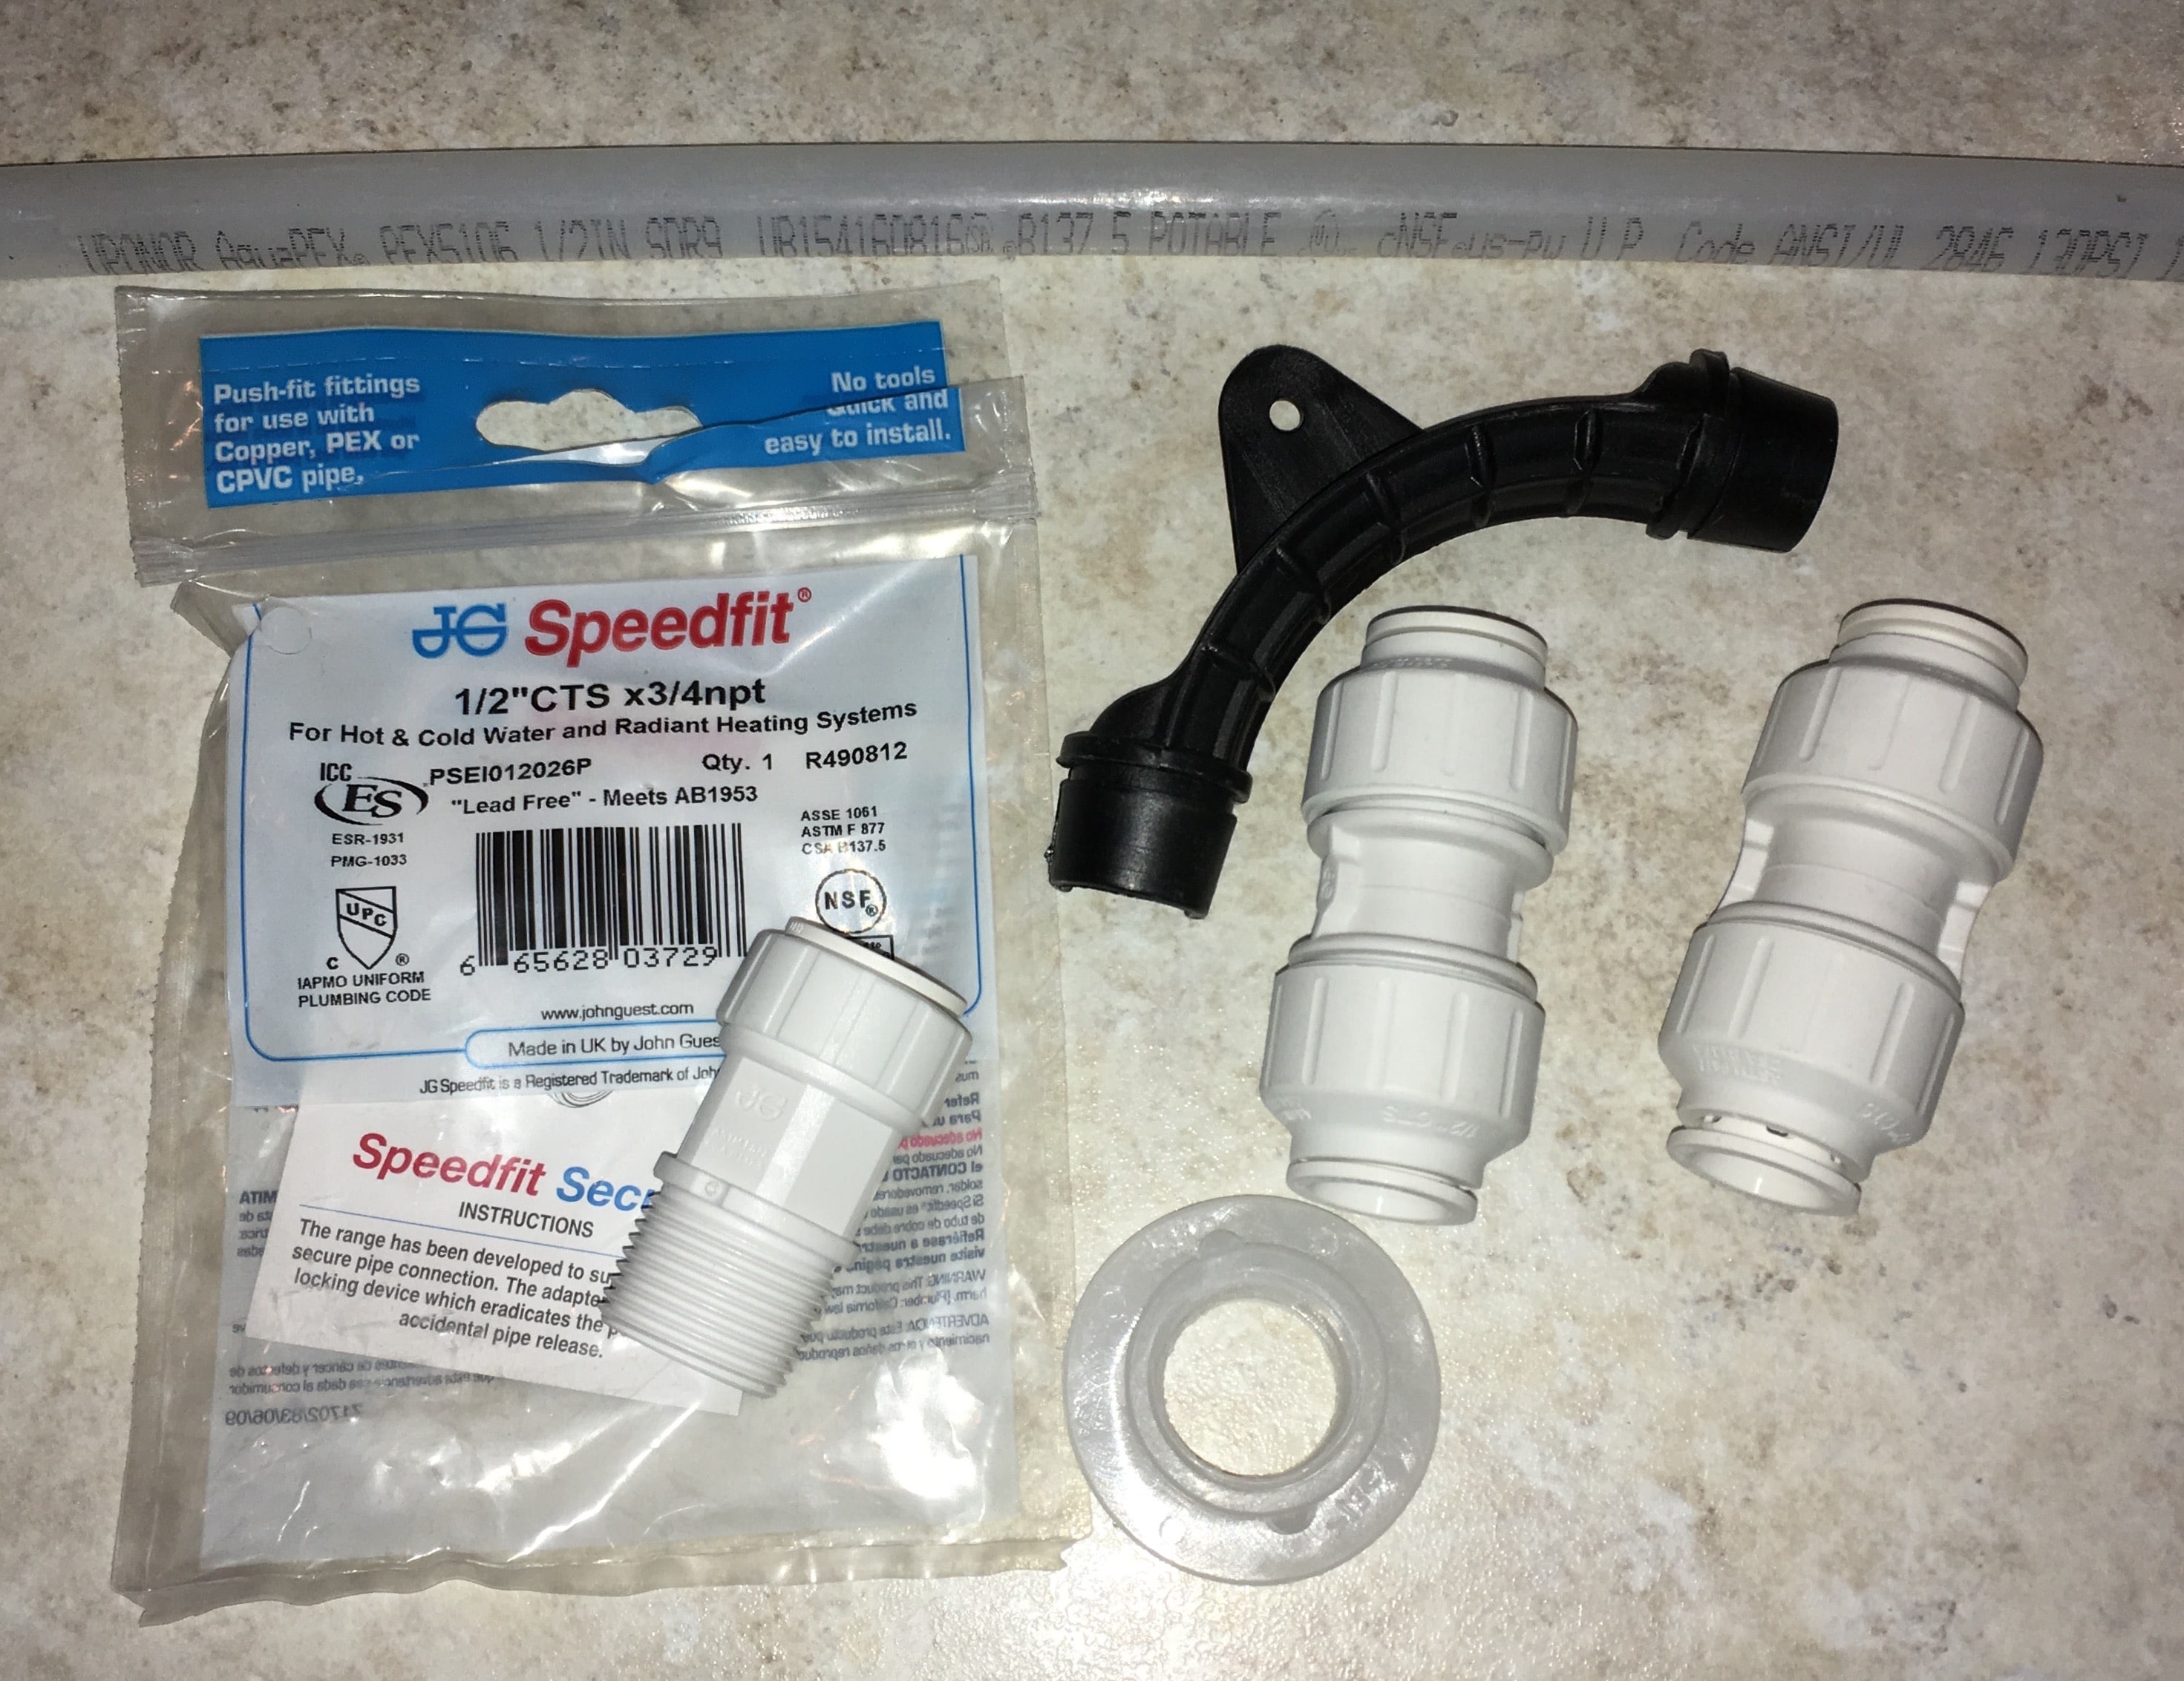
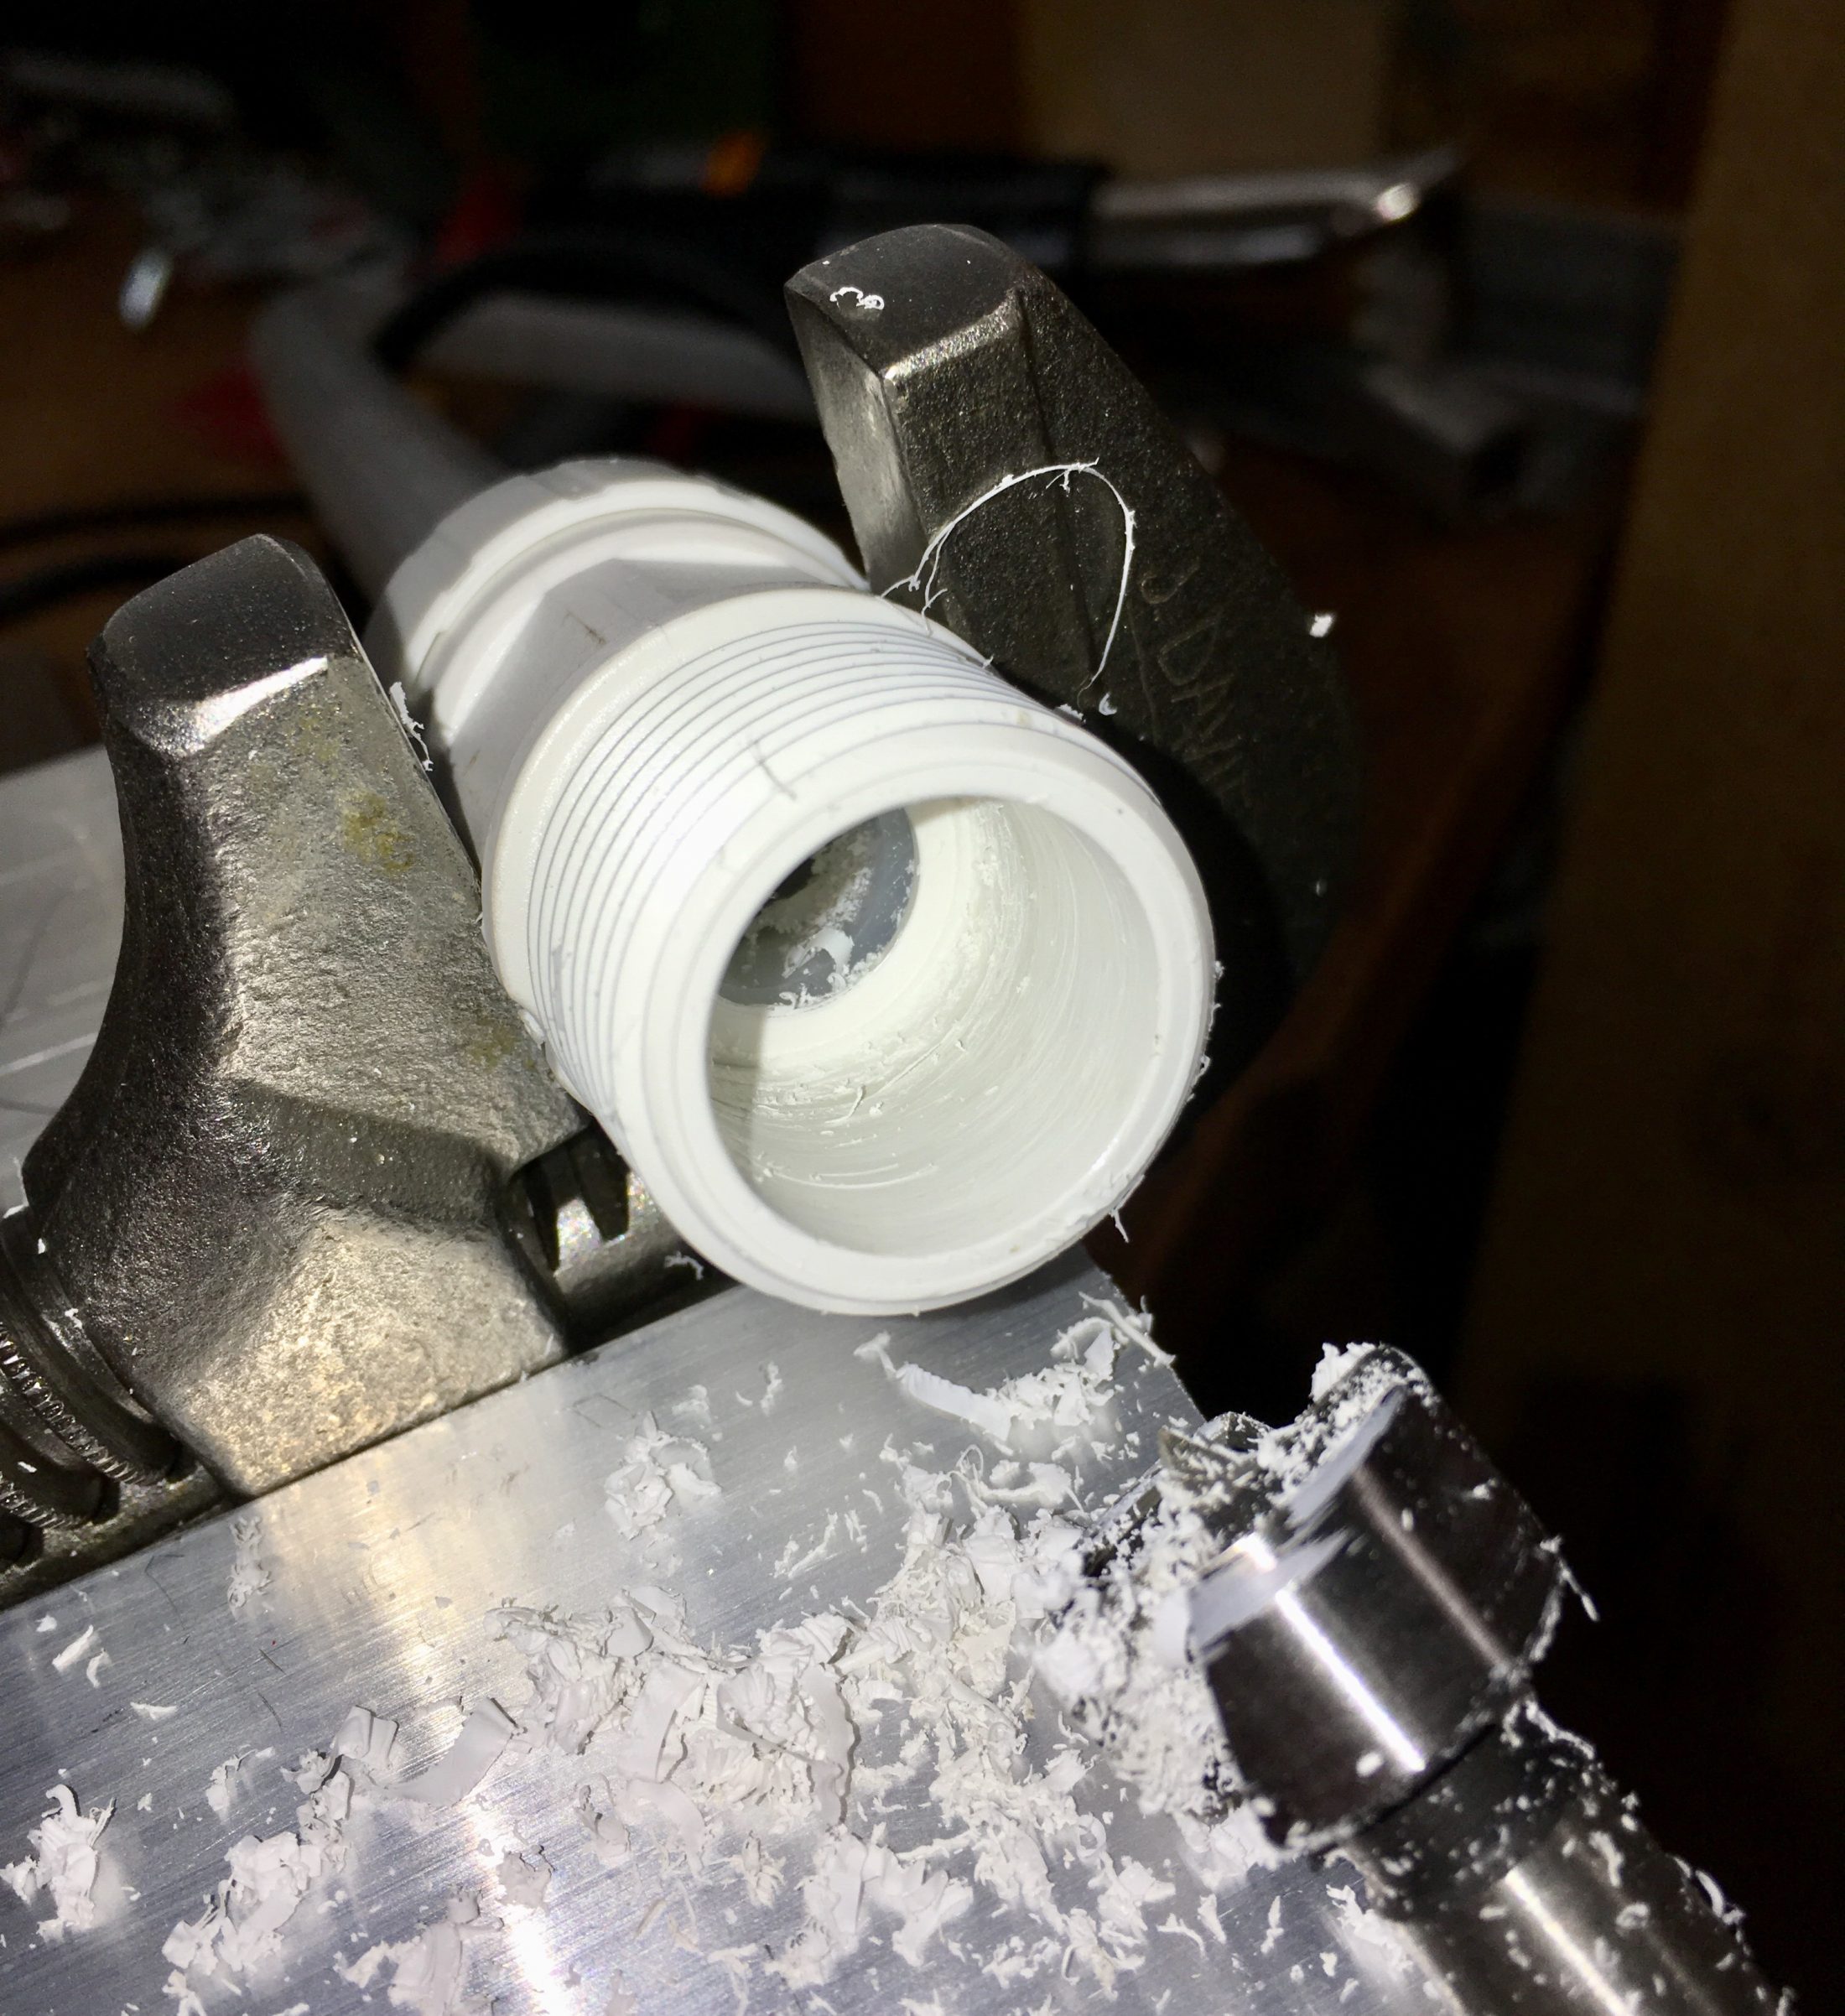
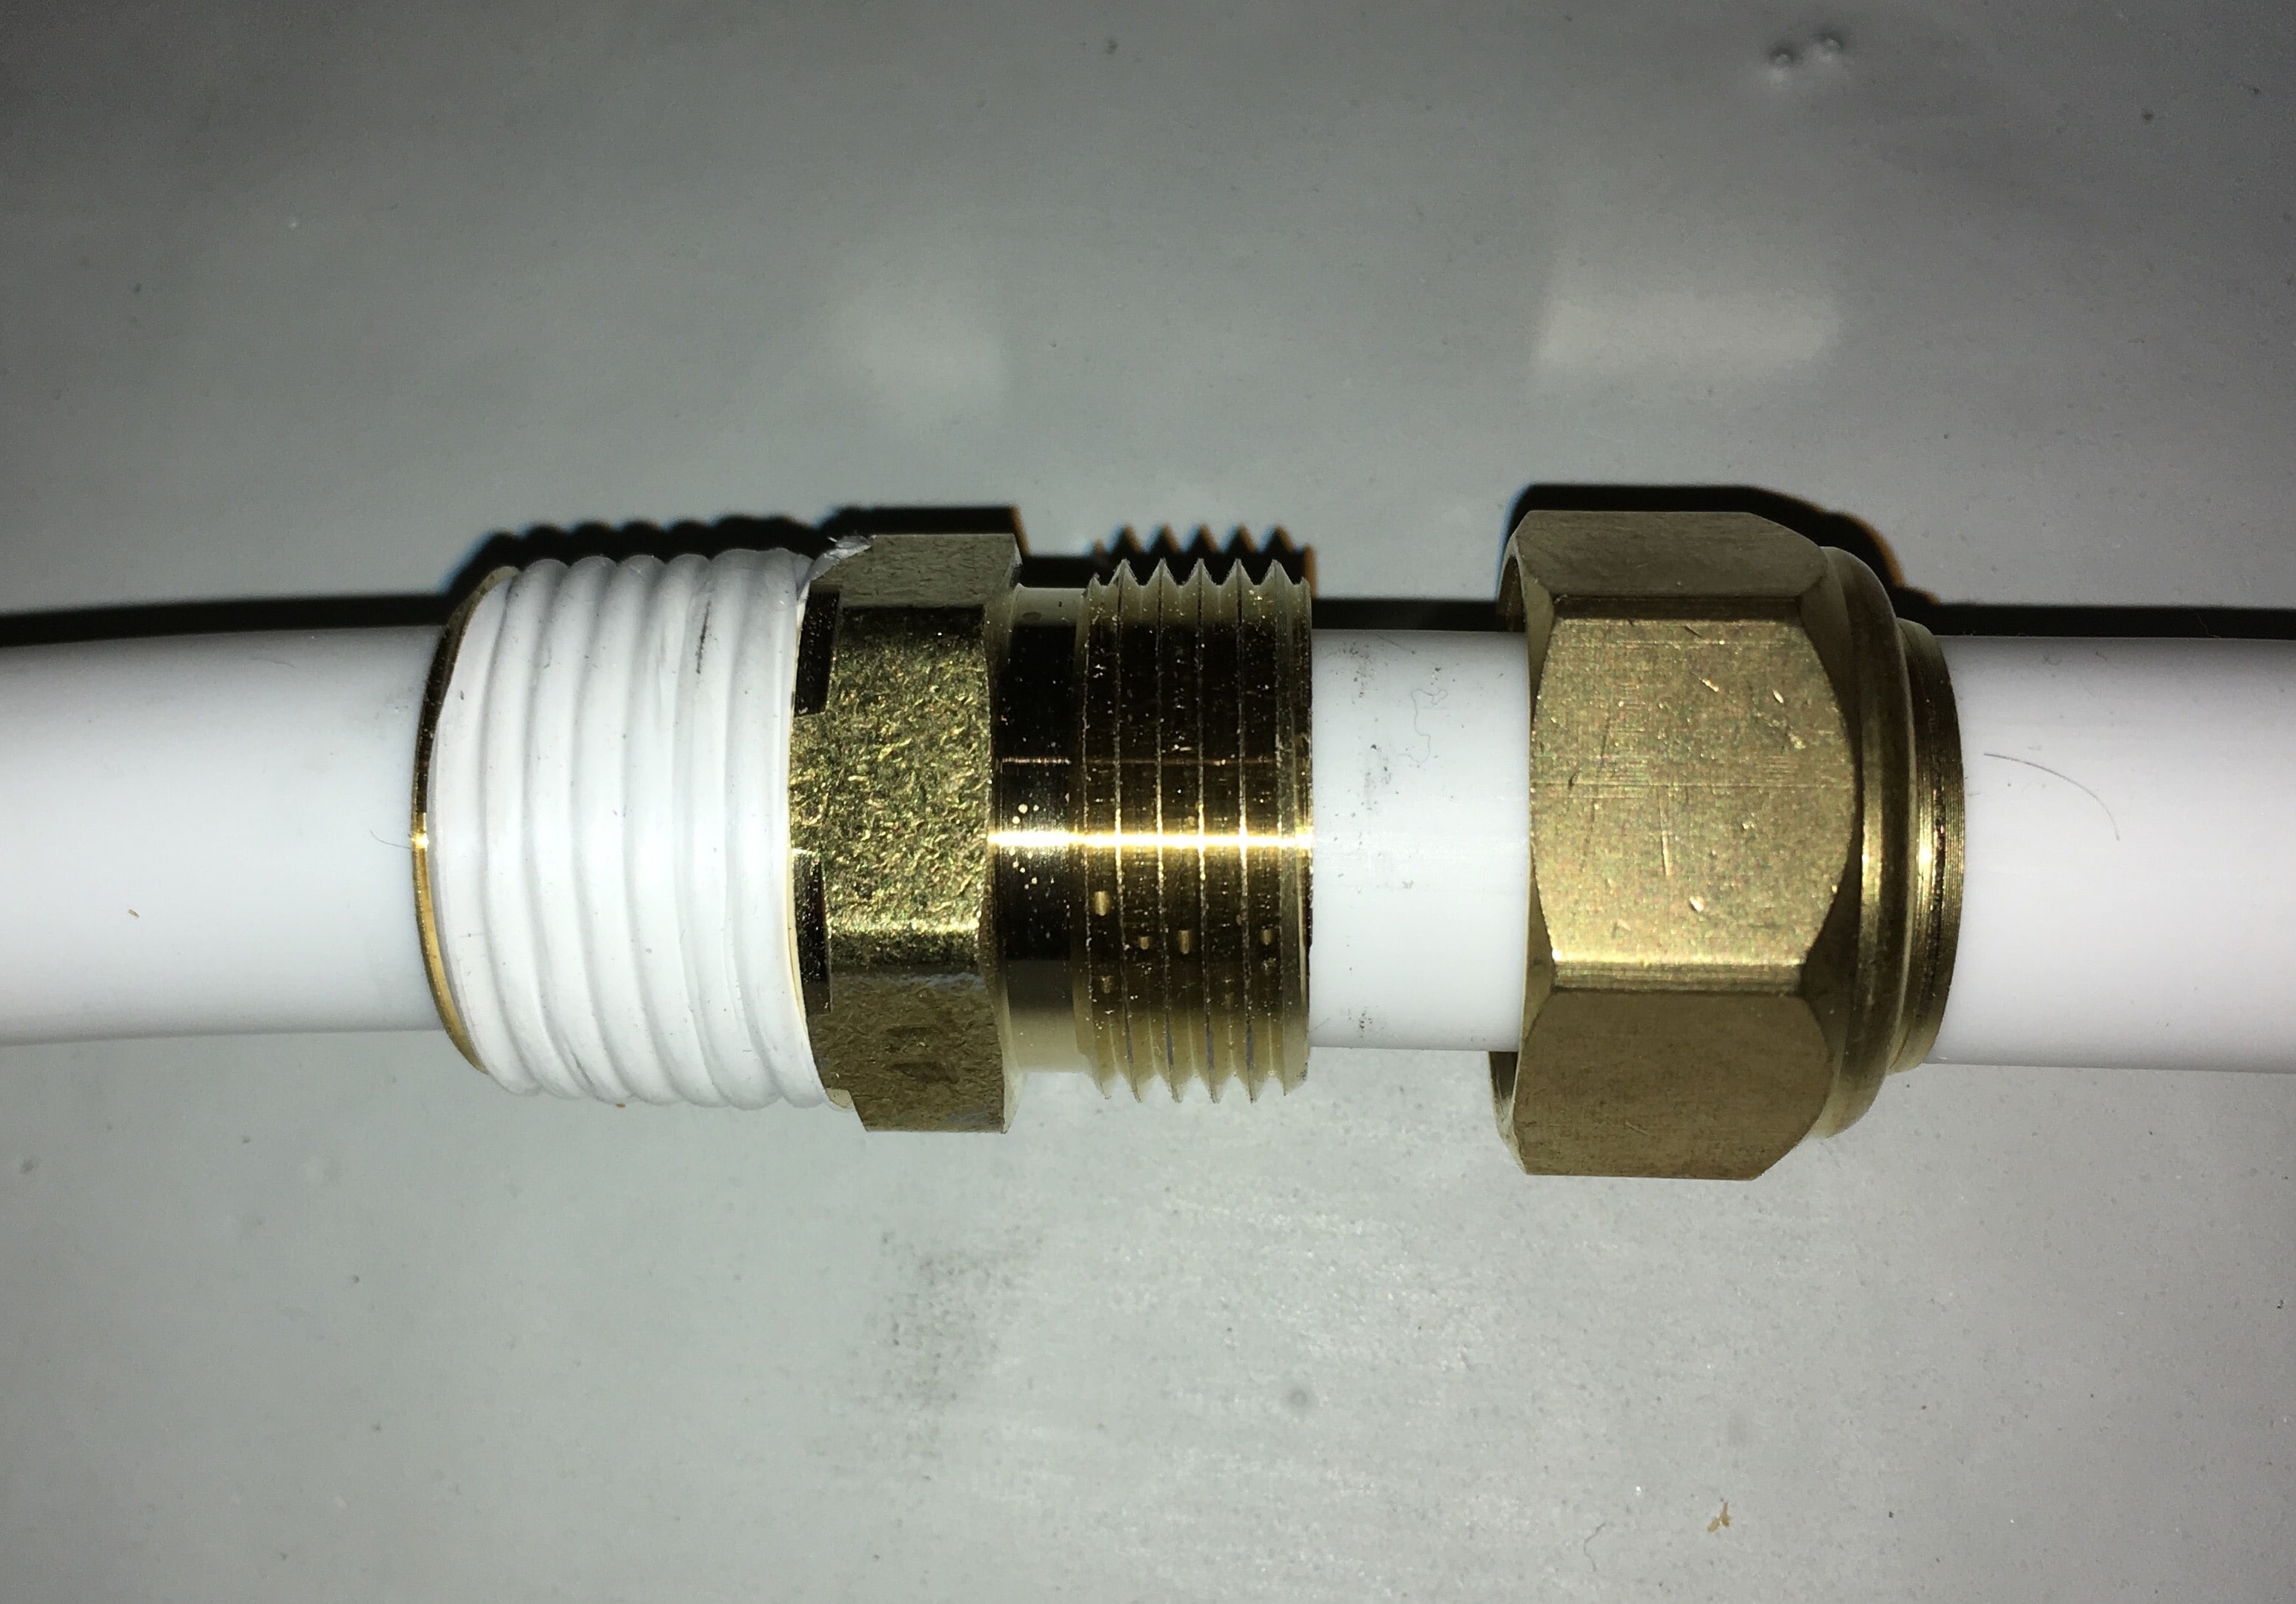
Compression fitting. There is a "pass through" version available, but it is not commonly found in box stores. I used a regular version with internal stop, and I removed that section. The threaded port is 1/2 inch FMP, so we need a fitting with a MPT and also a 5/8 inch opening (the PEX hose is 5/8", as is a copper pipe). I drilled out the passage way using a regular 5/8 inch bit, followed by a 5/8 inch Forstner wood bit to clean up any rough gouges. You can do this with a file but be careful not to damage the cone seat on the left side, or it will leak. Ideally a PEX tube should have a metal insert inside to help support it when you tighten the nut. This is not possible in this case. More to come. John Davies Spokane WA
-
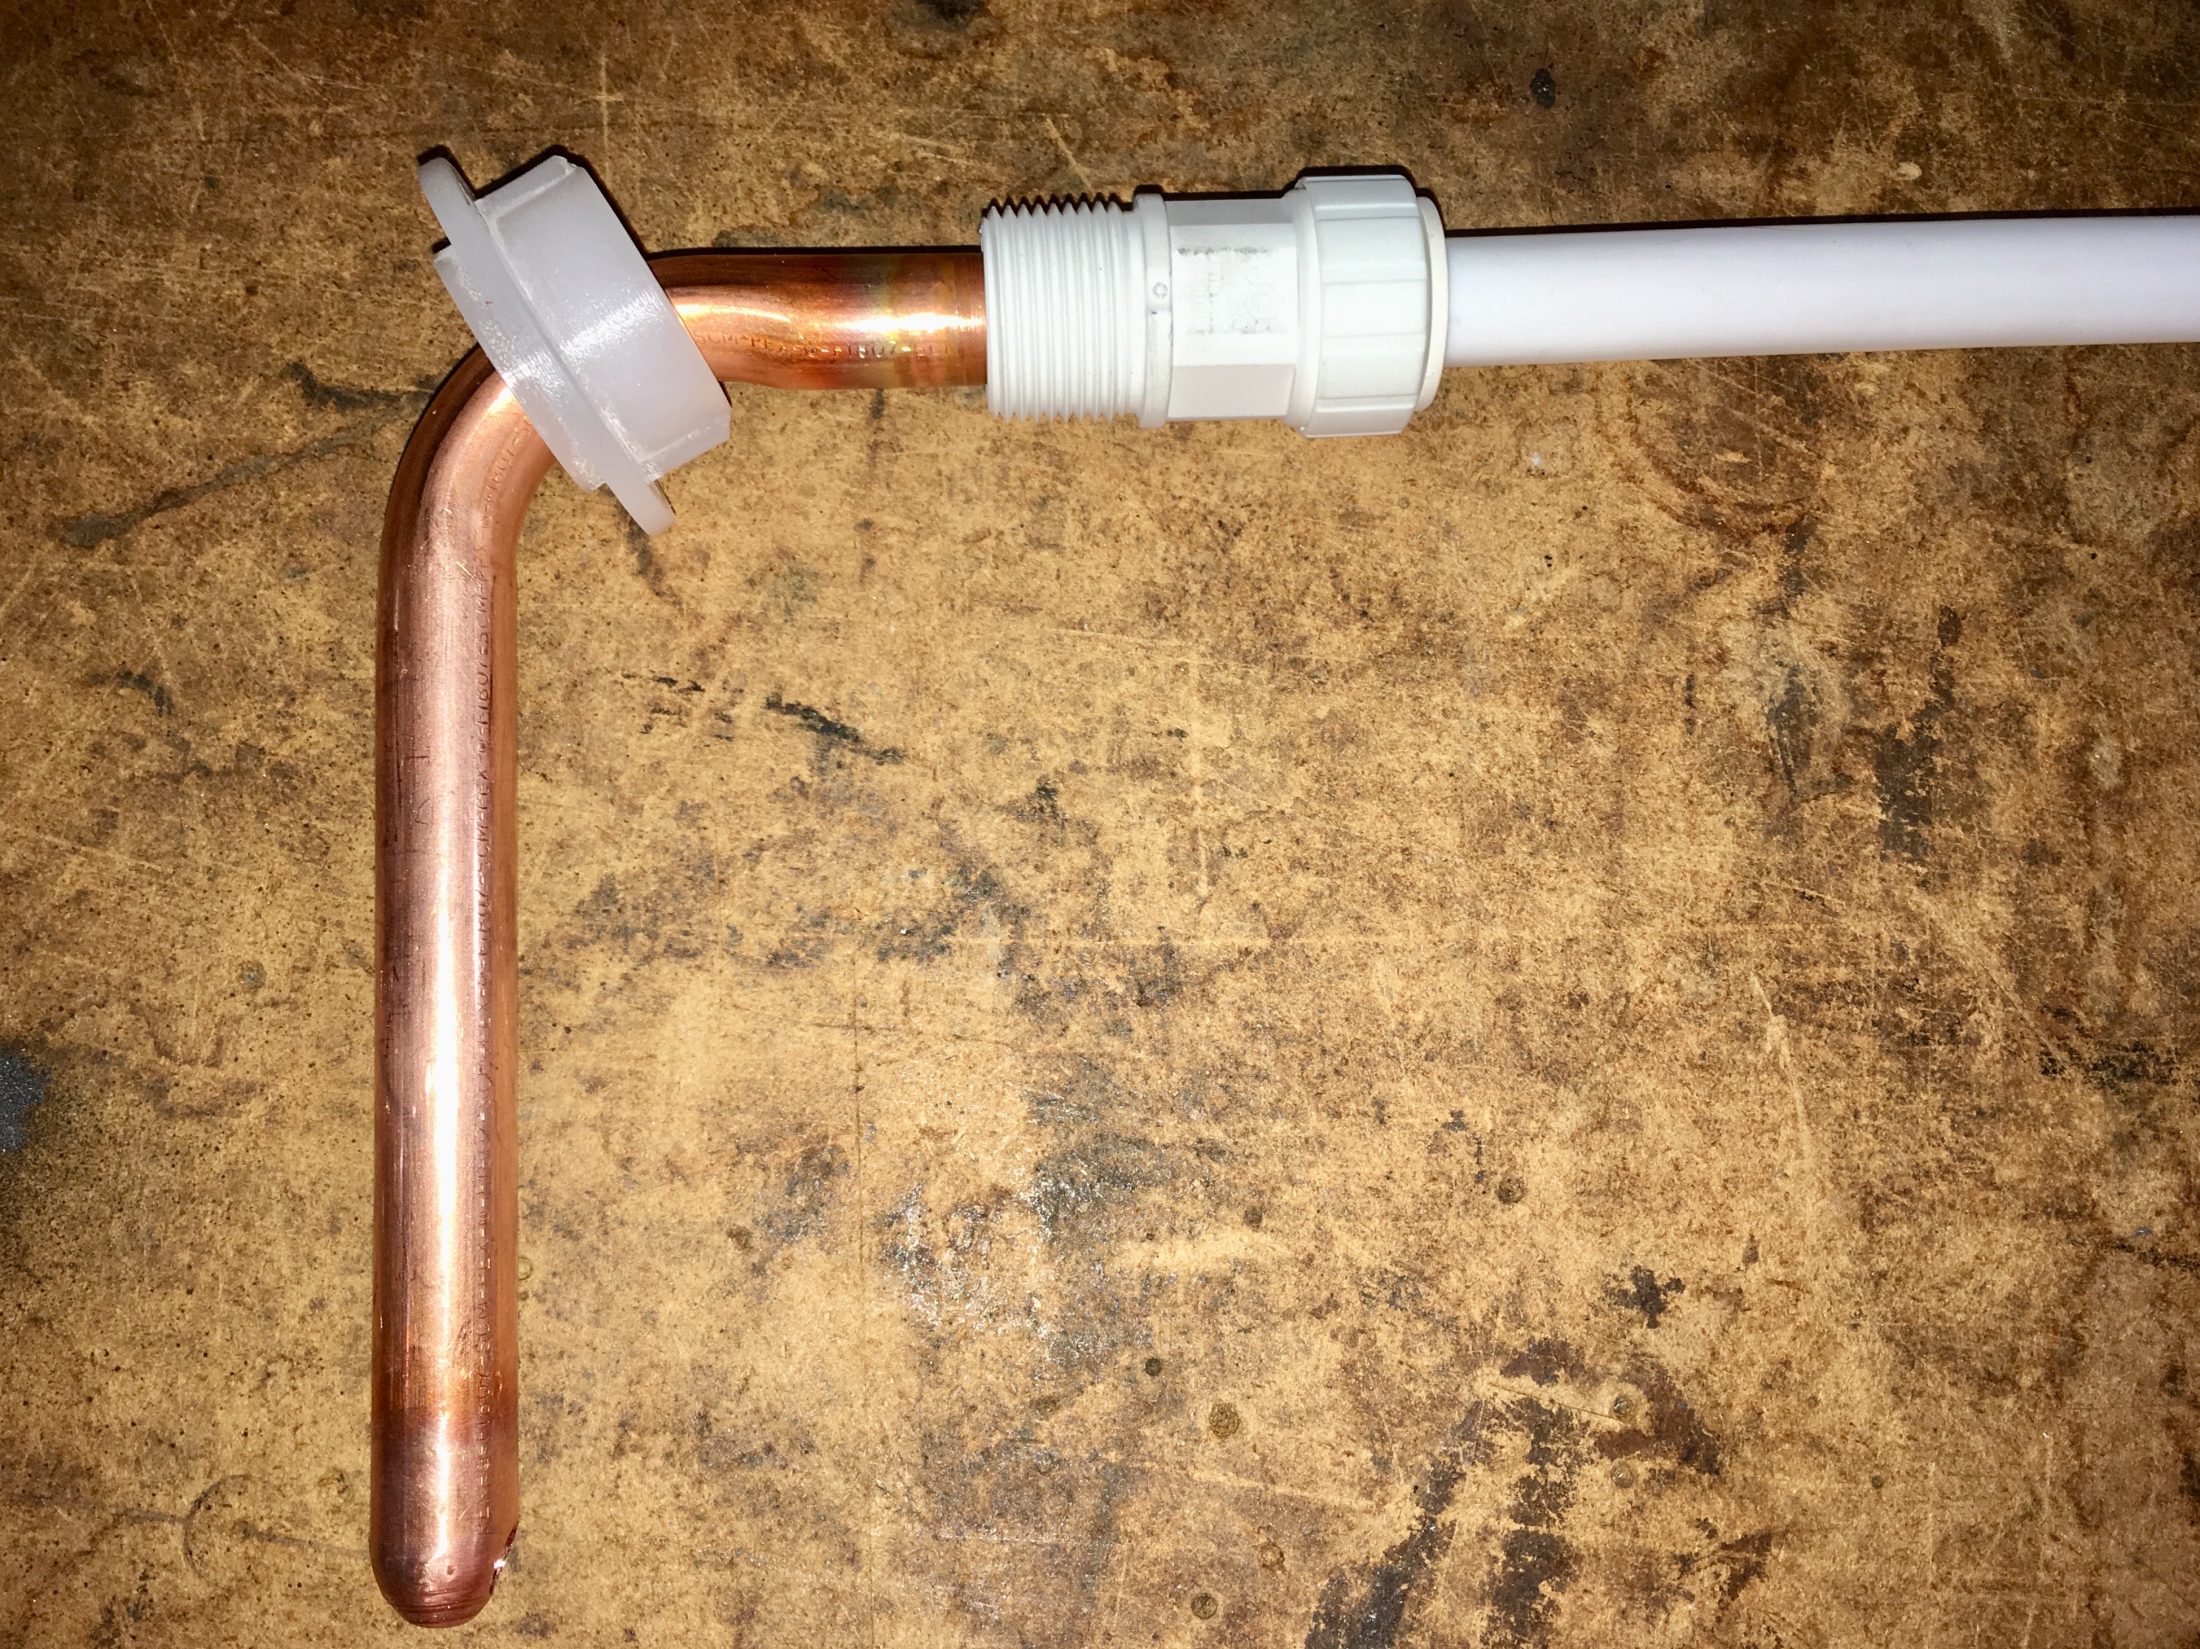
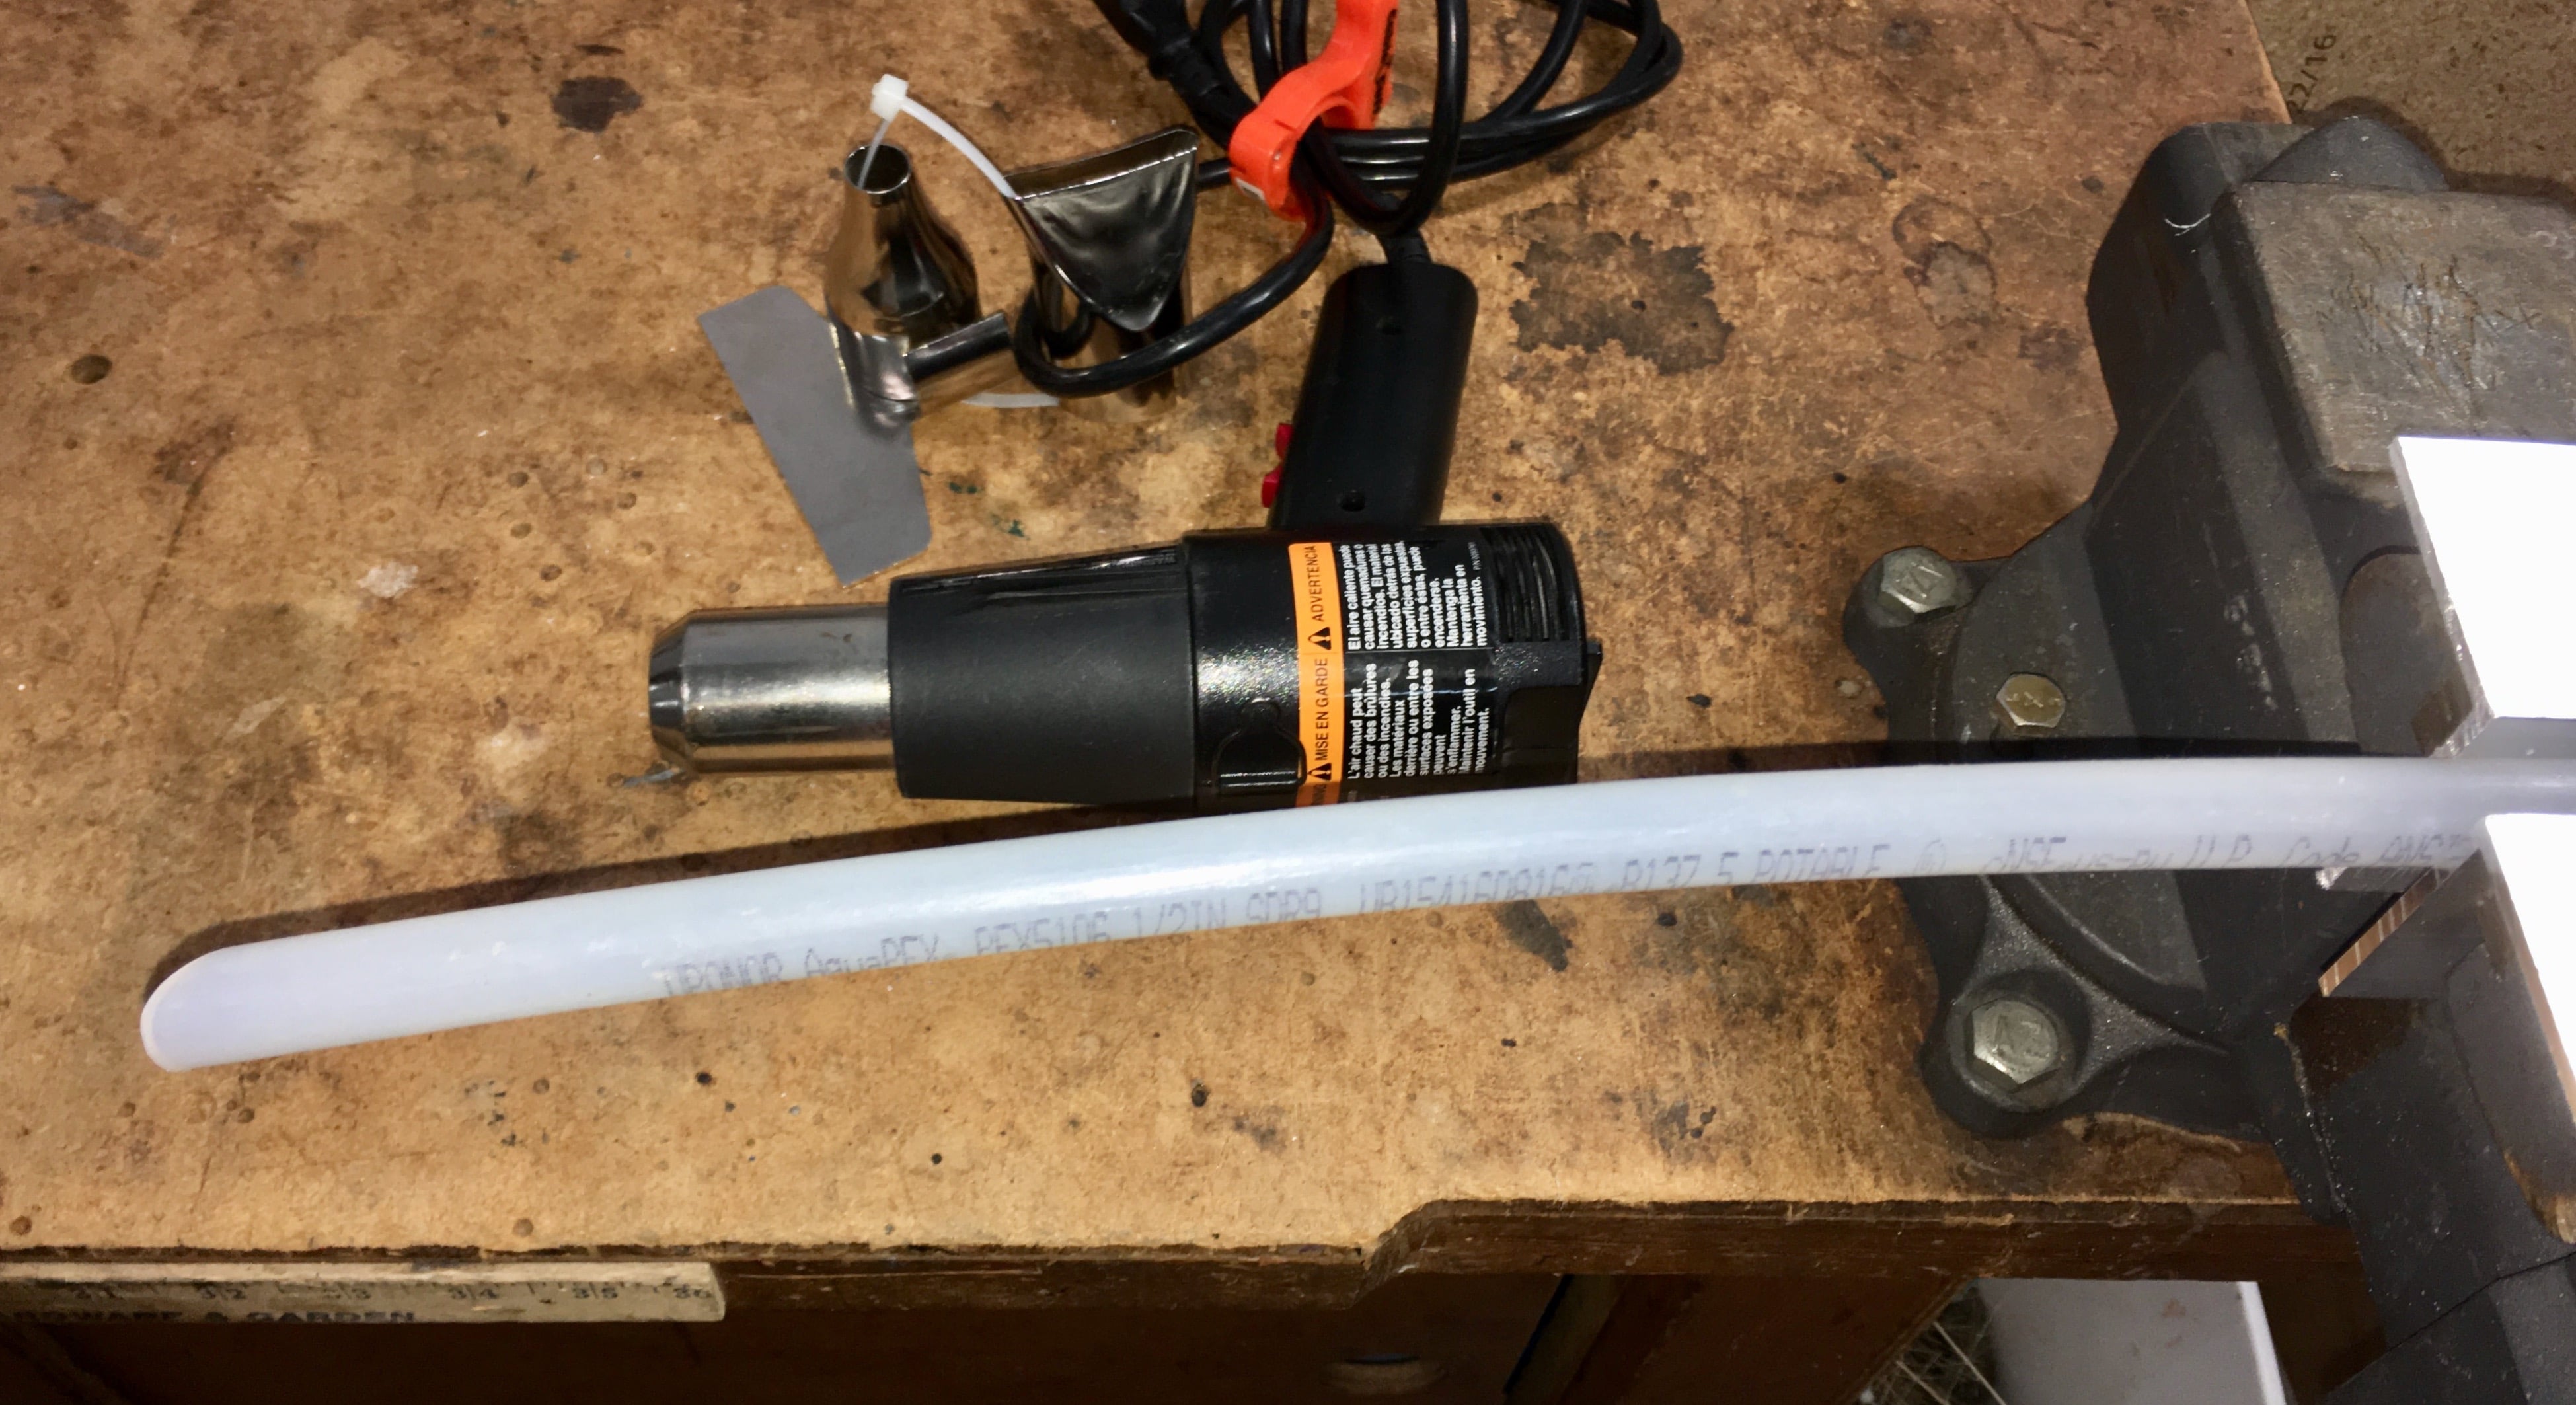
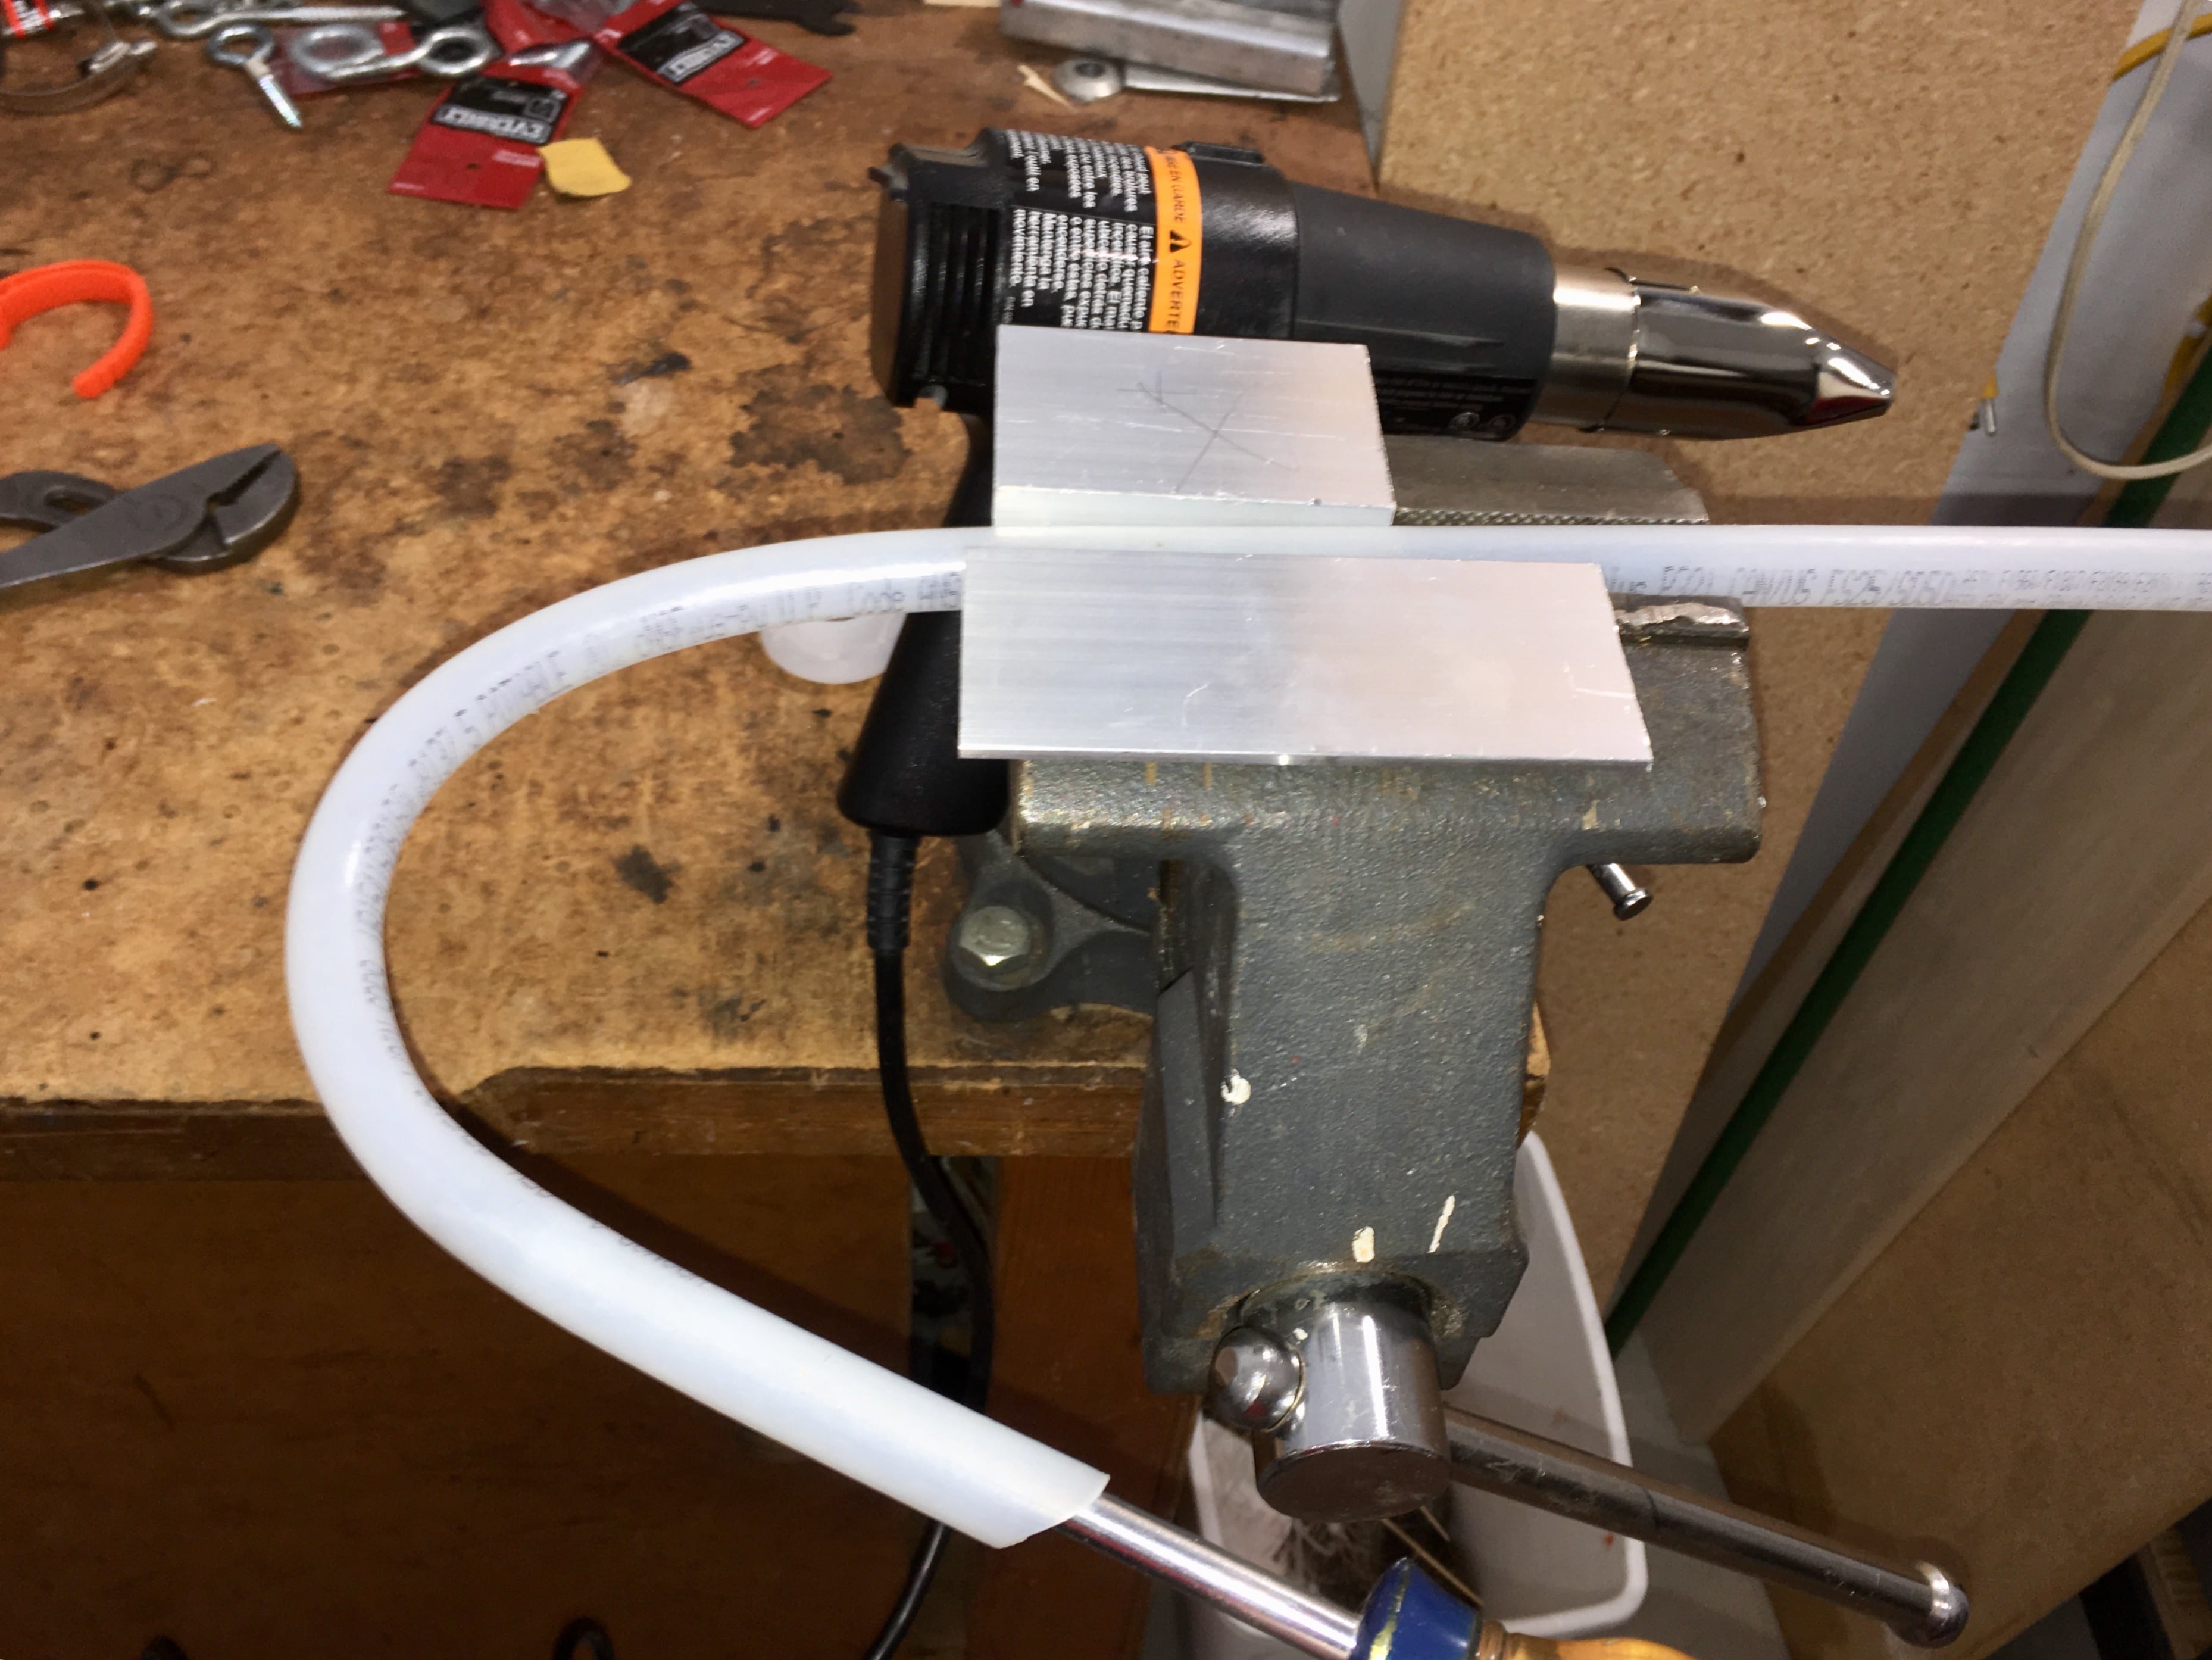
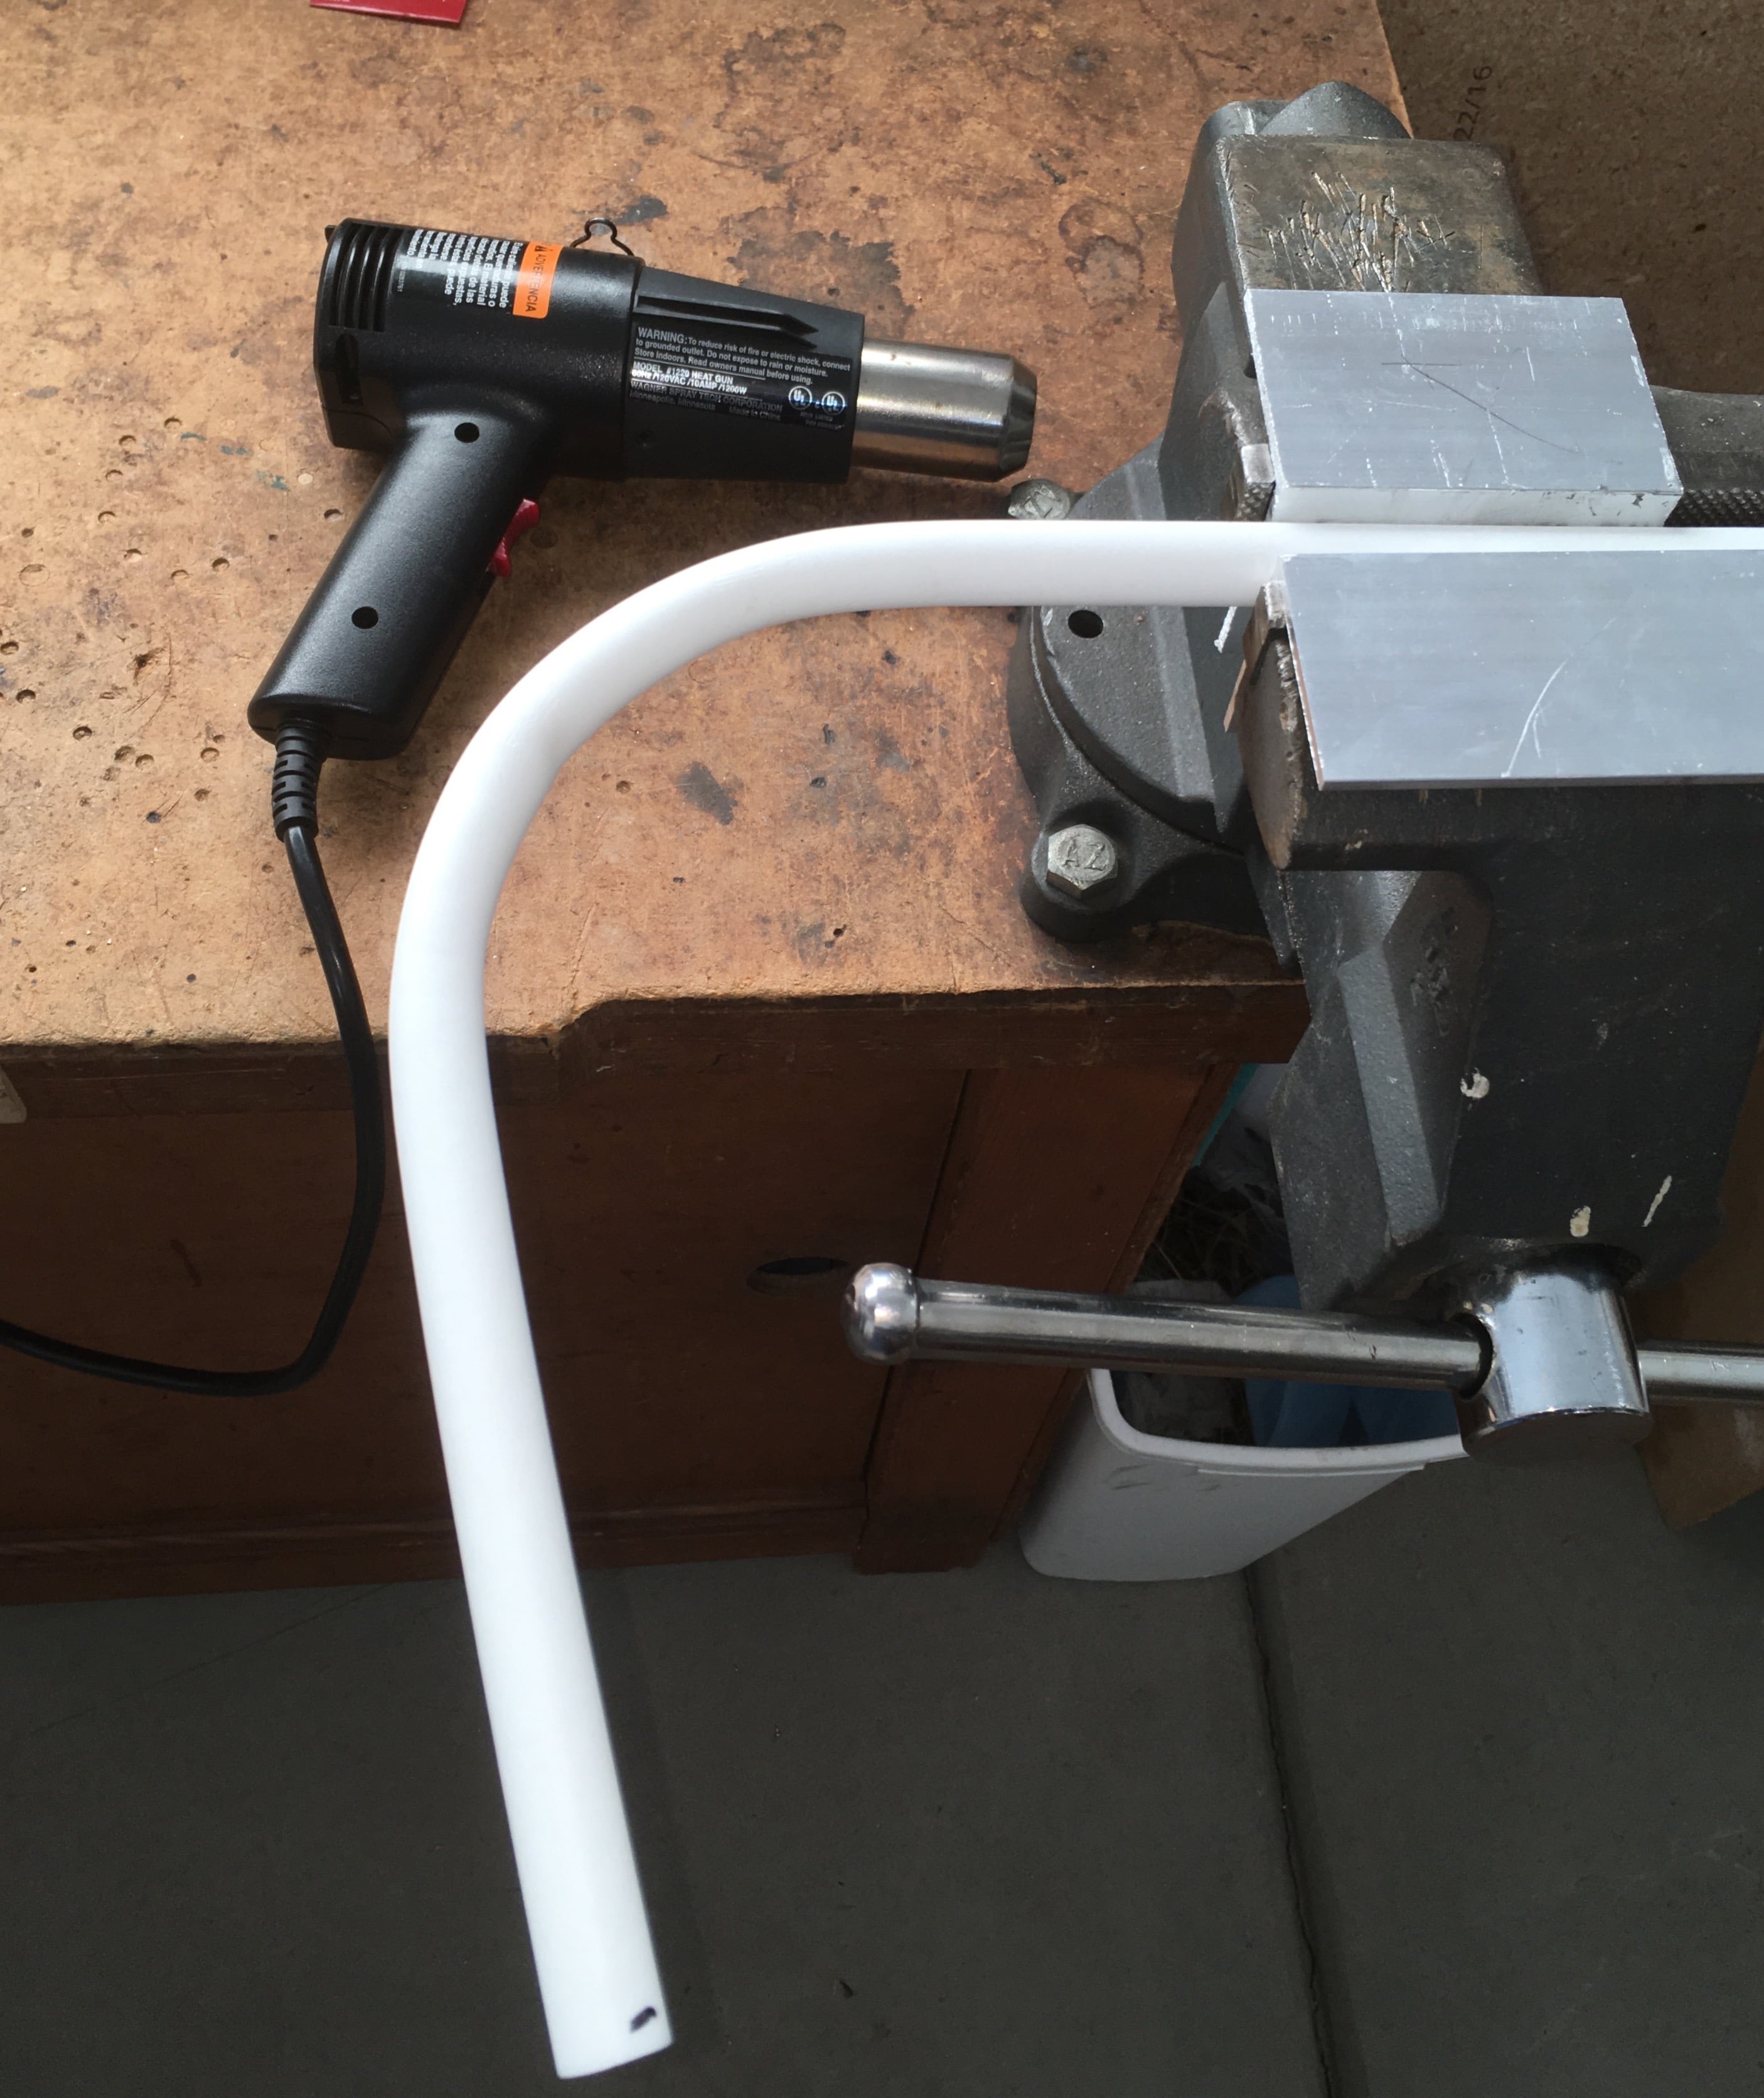
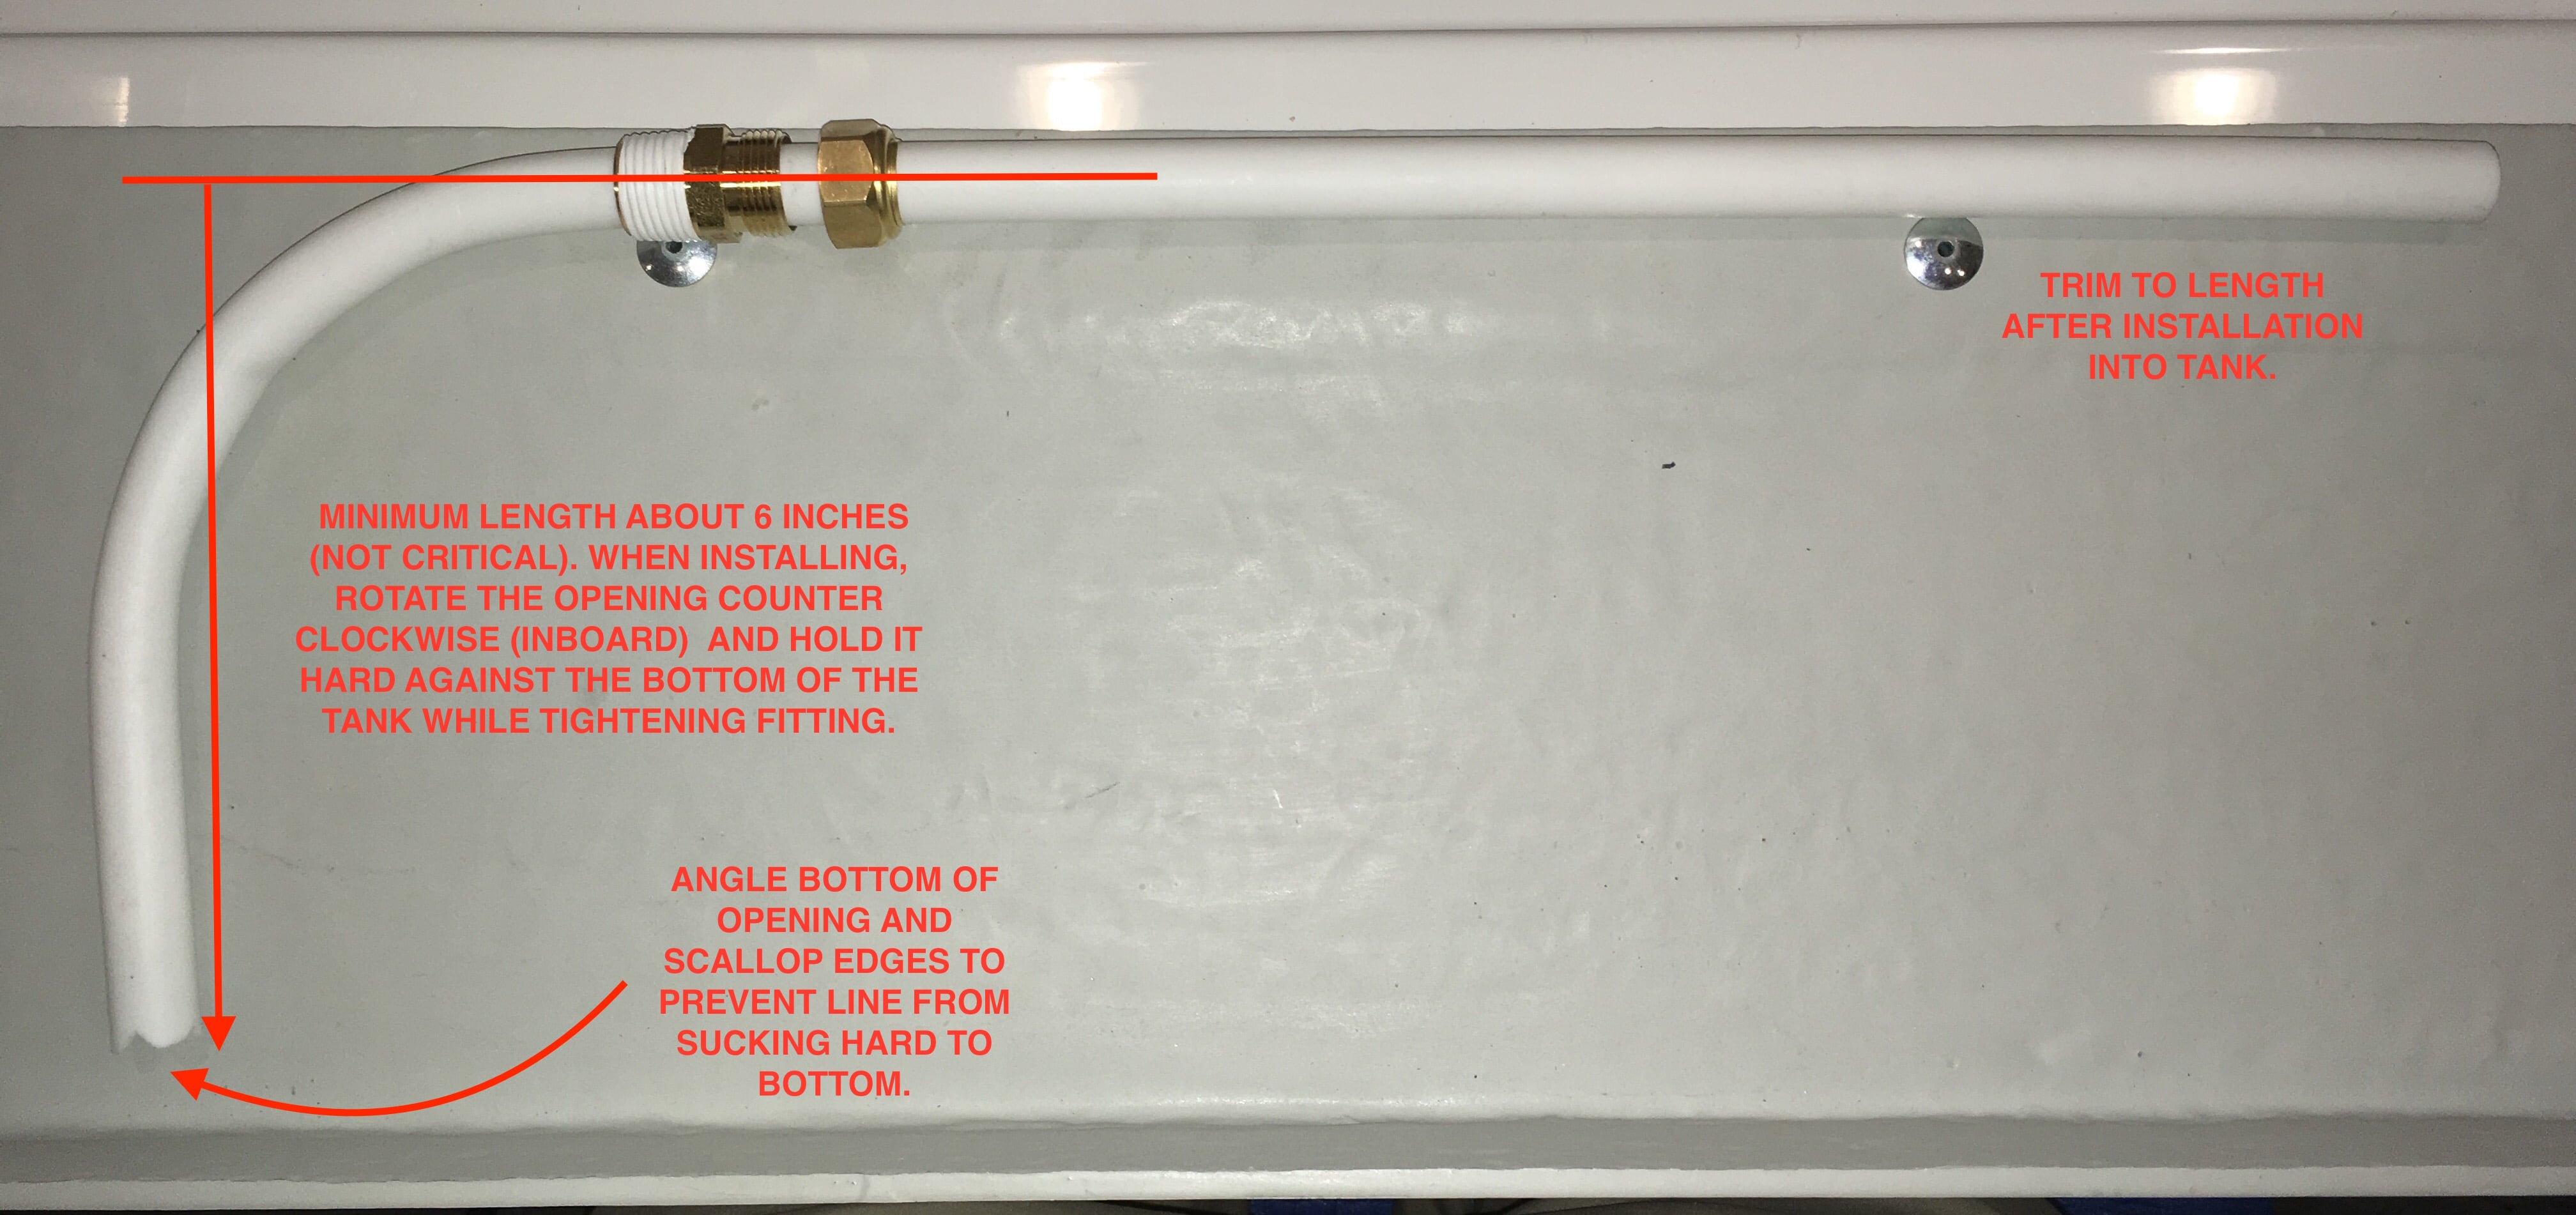
!!! NOTE: THIS MOD WORKS WELL ON MY ELITE II, HULL NUMBER 218. EARLIER HULLS THAT DO NOT USE QUICK RELEASE PLUMBING FITTINGS WILL BE MORE DIFFICULT. Even if your trailer has these newer fittings, your configuration may be slightly different which will require some re-design. As always, do this at your own risk. It will not void your factory warranty, but Oliver certainly will not help you with stuff that your altered from the factory configuration, without charging you for their labor. _____________________________________________ Here's the full installation, with pics. I will answer specific questions after I have finished, to avoid repetition and confusion.... I noticed that the two lines attached to the water tank are parallel and about three inches apart, the same spacing as the holes in the tank. After a lot of pondering, I decided to swap the lines so that: The lower Pump Suction/ Gravity Drain port becomes the Tank Fill port. The upper Tank Fill port becomes the Pump Suction/ Siphon Drain port. I think that this is an elegant solution since you can easily reposition the lines top to bottom, and also easily swap the two existing elbow sections that go vertically to the pump manifold. So the only fabrication involves making a new curved dip tube to go into the top hole, and a few unexpected but easily fixed problems associated with doing that. The system is not really changed except that the water now flows into the tank at the bottom, and the water is sucked off the bottom of the tank through the top port, and can also gravity siphon to drain it through the same line. And it is all easily (but not quickly) reversible to put the system back to "factory configuration". I would really rather have a new spin welded fitting on top, but I can always do that later if I decide it is necessary. I never understood why there are fittings on the side of the tank anyway. They are not needed and they just develop leaks. ALL functions of a fresh water tank system can be done through the top of the tank, where leakage risk is very minor. View of the original system, with the heat duct lying in the way. The heat duct is pulled up and to the outside and secured with long nylon cable ties. Access is pretty easy with it held there. The white arrows show direction of water flow. We will be REVERSING those. First and most important, manufacture the curved dip tube. Once that is made correctly, you can start disassembling lines and fittings. Clamp the 1/2 inch PEX hose in a vise, leave lots of its length extended to work with. You need a good hot heat gun, not a hair dryer, to get the plastic warmed up enough to soften and reform. Once cooled it will maintain its shape. Stick a big screwdriver in the end and carefully heat the curve over a span of about 6 inches, moving the heat gun back and forth and around so that you do not melt the plastic. If it starts to turn gray you are over heating. Apply pressure to force the bend, you will feel it start to move. Do this SLOWLY and always keep pressure on the screwdriver. The inside will try to kink as the outside stretches. That is OK unless it is major collapse, in which case you need to try on a new section of tubing. You will have to drastically over-bend the curve since it will spring back about 45 degrees when your are done. The hose will try to flatten. A little is OK, but you can squeeze it with pliers to force it back to a round shape. Keep heating the plastic! When you are happy with the curve, remove the heat and hold the screwdriver in place for at least a minute for the plastic to cool. release tension on the tool and the pipe will spring back to about 90 degrees, a little more is better than less. It took me two tries to get this right. I wanted about a 100 degree bend. Anything more and it will be hard to get into the tank opening. Less will move the pickup opening away from the rear wall of the tank, which is the most desirable spot. This is the finished shape. Elbow length is not critical, it needs to be at least five or six inches from the unmolested section. I cut the area that will lie near the bottom of the tank at a steep angle, to lower the top of the hole (which is the first place that will suck air). It is important to keep the angle steep, say no less than 60 degrees, since you do not want the cut to be perfectly parallel with the bottom of the tank, or it will suck down and block the opening when you turn on the pump. You want to scavenge as much water from down low as possible. I added scallops - vee shaped cuts - at a few places on the end to increase the opening size and also make it impossible for the tube to suck down hard against the bottom. They are probably not needed, but they will not hurt. The length of the straight section is not critical, leave it long since it will be trimmed after installation into the tank. More to come. John Davies Spokane WA
-
Mike, how durable is this unit? Does it seem fragile, like at the air slots? I dislike lightweight plastic stuff for RV use since I worry that it will get damaged during storage and travel. My old cube heater is tiny, and the size and shape makes it dead easy to store. OTH it is not nearly as good as this Vortex in providing even heat everywhere in the room. Thanks, John Davies Spokane WA