
Galileo
-
Posts
309 -
Joined
-
Last visited
-
Days Won
8
Everything posted by Galileo
-
Winter heating with a small electric heater
Galileo replied to Carl Hansen's topic in General Discussion
We’re wrapping up a 7 month camping trip that included some higher elevations and temps down to high teens in NM, Utah, Nevada. We used a plain old “milk house heater” that Ace or pretty much any hardware store carries. It says it’s 1500 watts. I haven’t tracked down the major air leak at the rear curbside of our LE2 - that’s a project for December. But suffice it to say that with the amount of cold air that blows in the furnace outlets - the “leak” is serious. In cold weather and trying to keep the thermostat at 68 - we’ve gone through a 20# tank of propane in just two or three days - so electric heat is a huge savings as we rarely boondock. Im actually going to be looking for an electric furnace or duct heater to have a more elegant option than the space heater. I’m also looking into adding one or more electric point if use water heaters - as the having the propane water heater located 15 feet from the bathroom sink is an epic engineering fail. -
We do pretty much the same as you JD - except we always dump before departure - unless the campground has no dump station or sewer connections. I’ve found as you have that without a good degree of rearward tilt on the Ollie, that tanks drain slowly if at all. I generally can get away with just using the front jack and a jack block to lift the nose a bit. I can usually spot a bit if an incline at the dump station and take advantage of it. Often having to pull in “the wrong way” to capitalize on the grade of the dump station. I haven’t found a huge need to elevate the curb side to get the grey tank to empty. Unless the dump station pavement is really terribly pitched.
-
Our original manual black tank dump valve was angled outward as noted above. Seems like the others who reworked their cables got some improvement, but still not optimal. Probably why OTT service said the “fix” was going electric. We’re about 6 weeks short of wrapping up our 2026 camping season (from January to beginning of August) - so that’s 2 seasons of using the electric valve. Has been performing without a hitch being operated every 3 to 7 days. So I’m quite happy with the upgrade. Just to clarify - out issue with the original 12 foot cable with two 90 degree bends was that the force required to open the valve was high and getting worse with every use. The force to close the valve was always very low. So simple “binding” or lack of lubrication was never the likely cause. I’m still convinced that wear of the steel core against the plastic sheath at the inner radius of one or both 90 degree bends was the culprit. Having had to replace throttle and transmission shift cables on a ‘92 Catalina 30 yacht with a similar L-O-N-G cable run with tight bends convinced me of this kind of wear and the resulting forces required.
-
All windows leaking except exit window when washing.
Galileo replied to 2008RN's topic in General Discussion
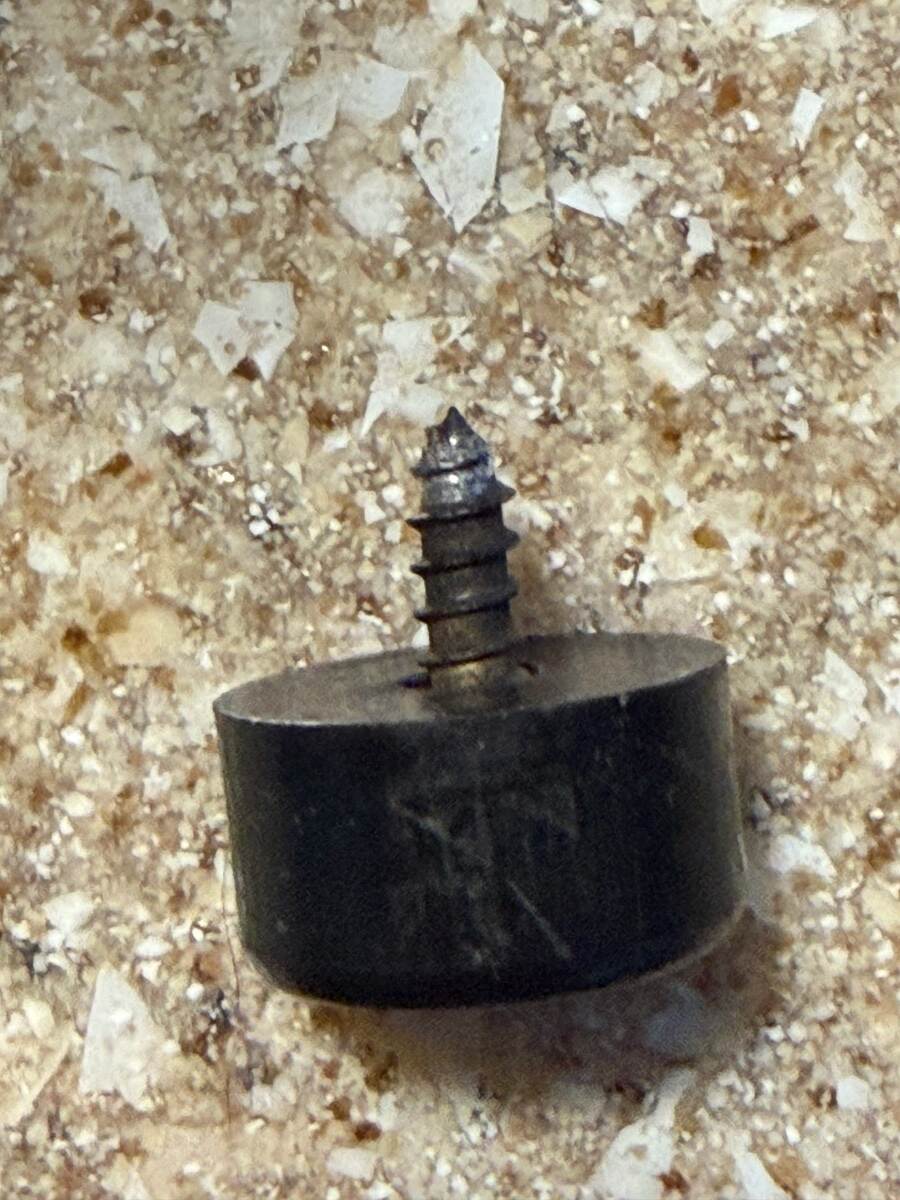
I don’t know if this is a revelation or if somebody else has figured this out - or if I’m completely wrong - but - Unless the drain holes - inner and outer - are blocked so badly that the window tracks overflow entirely - there’s no reason why water would leak inside the trailer. From what I could see there was only a tiny bit of water in the bottom of the tracks that was visible through the holes in the plastic track guide. However - there’s IS a stop/bumper at the forward travel of the lower window track. It’s a rubber “foot” like you might see on the bottom of an appliance to keep it from scratching a countertop. On my leaky window - this screw was quite loose. I noticed when I removed it to try to clean out the track. The stop (hole in the frame) does happen to be right above where the water is leaking into the trailer. The leak is between the window frame and the inner wall of the trailer. As I say - I might be smoking something, but I’m thinking this is the only(?) place where there is a hole low enough in the track to leak water inside the trailer unless the track is filled with water. I plan to dry out the track, make sure that hole is clean, then reinstall the number and screw with some sealant in the threads. Update to follow. added: Looking at the frame and inner plastic track/guide - I can’t tell if the hole for the screw actually goes through the frame. I figured that for the stop/bumper to have any strength, it would have to. And the screw looks long enough. There’s also a coloration difference at the tip of the screw that indicates it was into the aluminum frame. Either way, drilling a hole through the bottom of the frame is a pretty dumb way to add a window stop.
-
All windows leaking except exit window when washing.
Galileo replied to 2008RN's topic in General Discussion
Maybe it’s been addressed in another thread, but I have a “detail cleaning” of our windows in my schedule for tomorrow. we’ve had several days of very heavy rain here (Chicago area) and the whole bed was pretty soaked. The folks at the delivery “event” with us were adamant about keeping the drain holes clear - but the didn’t mention the drains in the slider tracks - which - if clogged - will let water drain into the interior. Pretty poor design IMHO. -
Furrion Stereo Upgrade: A Sound Choice
Galileo replied to Snackchaser's topic in Ollie Modifications
We had the Furrion DV1230 in our LE2 and it failed after about three seasons. We mostly play DVDs as we’re often in no-signal areas. Basically, the CD/DVD drive failed. Founds an exact replacement on Amazon (where all good things come from) and dropped it right in. With the full-sized remote, it seemed like we were back in business. Passing through some town a few months ago, we found a complete 8-season DVD set of the West Wing at a church thrift store in Pagosa Springs, CO. While I wasn’t a rabid fan, it looked too good to pass up. $10 for the whole 30+ DVD set(!) We enjoyed the whole first season in about 4 days. We had a small about of skipping and drop-outs that I attributed to scratched or dirty discs. Hitting season two - I couldn’t get any of the discs -except- the “special features” ones to play at all in the Furrion. That was true for all the remaining seasons. My brain started working. On a hunch - we visited another thrift store in Washington, UT and bought a used/donated Sanyo Blu-Ray/DVD player for $7. Another $2 bought an HDMI cable. Hooked it up to an unused HDMI port on the ROKU/OON television we replaced the original on with. EVERY disc played perfectly! Verdict: If you didn’t’ have enough to dislike about the Furrion DV1260 - add to it that it won’t play some DVDs. I’m guessing this has to do with the “multi-layer” technology of some high-capacity DVDs. The Sanyo Blu-Ray player now resides in the cabinet above the television. The remote even works through the translucent cabinet door. Cool! Im debating mounting the player under the cabinet above and to the left of the television. That will make changing discs a lot easier. I can likely use 3M “Command” strips to mount it without drilling and keep it damage-free. -
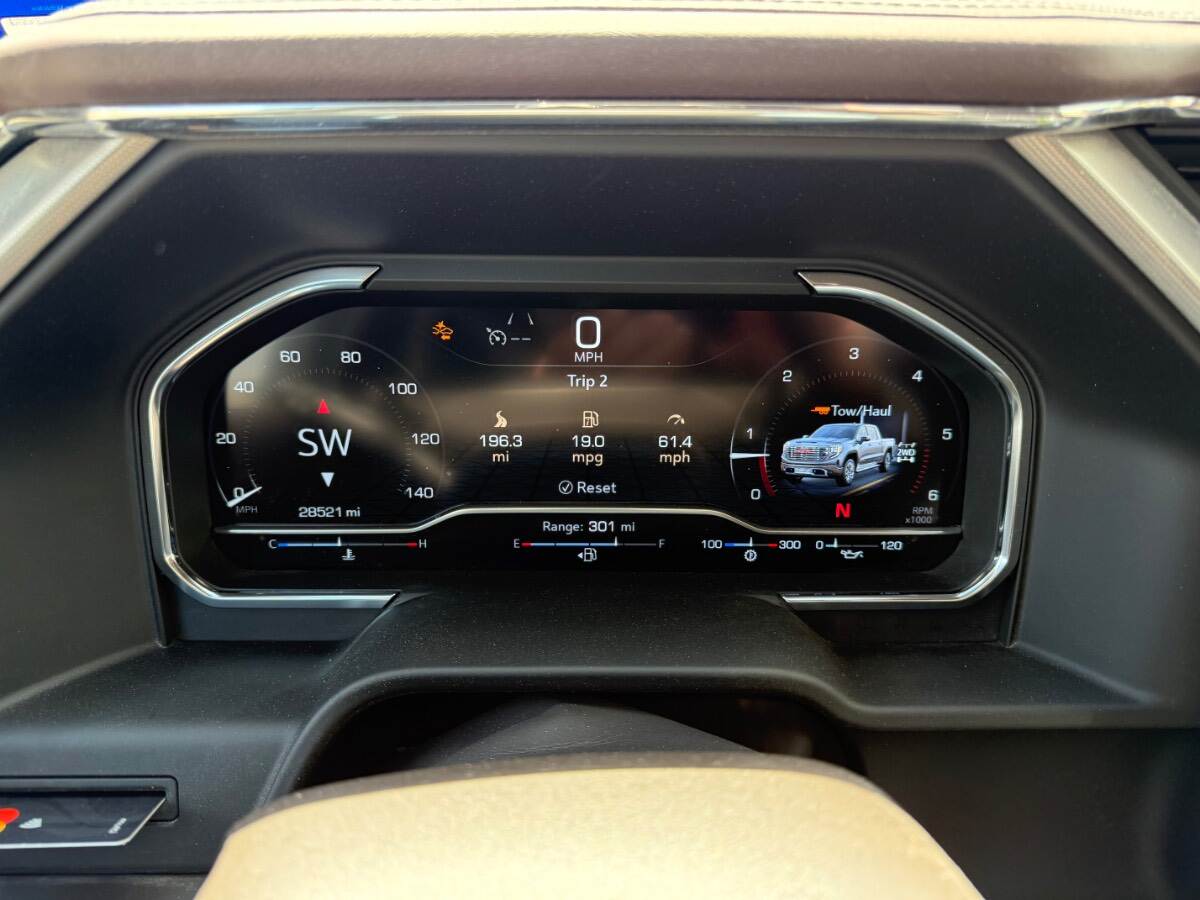
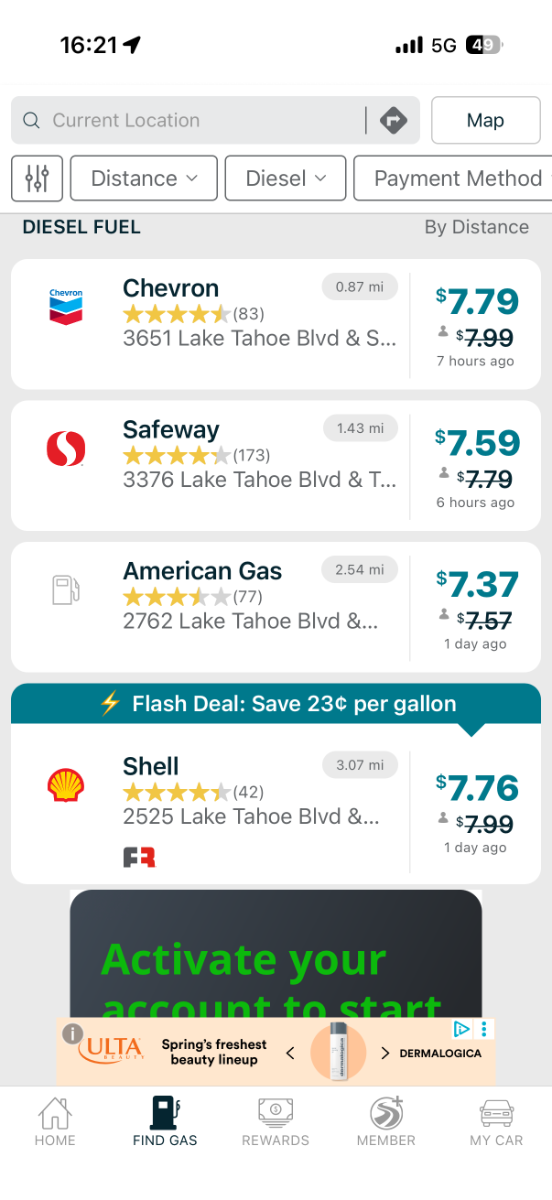
Looks like the RAM REV 1500 (Range-Extended EV) or whatever they’re calling it this week - won’t be hitting the dealers until closer to 1Q27. I was hoping to have an option for when I’m ready to trade in the 2025 Sierra Denali. I like to trade vehicles while they’re still worth something. Though - seems the rig I have is still the most efficient one available - and I’m getting great mileage. Which is nice thanks to the $6+ a gallon diesel. (Considerably higher in touristy areas!)
-
A different take on hot water recirculation
Galileo replied to Snackchaser's topic in Ollie Modifications
Thanks for this! I’d really limited my use of the hot water on our Oliver because the system is so poorly designed. I suppose it’s fine if you’re hooked up to city water - and a sewer connection - but for other situations it’s pretty terrible. I don’t know if I’d go through the trouble of the timers or temperature sensors, but knowing that somebody has done this is reassuring. It’s bad enough when someone designs or builds a home with the water heater long distances from the points of use, but in an RV with limited tankage, it’s really ridiculous.- 1 reply
-
- 2
-

-

-
Looks like a much better mounting method! Wouldn’t an “L” shaped piece of stock do just as well?
-
We’ve always had one shade that was never seated properly - the one at the aft seat at the dinette. I’d know because I’d lead on it and it would pop on, then pop right off when I un-leaned on it. We found one broken clip and got a “free” replacement when we passed through Hohenwald. The problem has gotten worse as time went by. We’re to the point that that shade now falls off every time we hit the road. (So I’m taking it off -before- we leave today!) Upon closer inspection, we found that one channel where the clip snaps into is spread - from pressure and heat I’d guess. Another area of the channel is actually cracked at the “root” of the channel. I tried moving the clips to locations where the channel was still good, but that didn’t really help. The shade over the curb side bed is now starting to show the same malady. So - seems some have resorted to “gluing” the shades on with RTV or similar. I was hoping for something a little less permanent and/pr requiring keying the thing off when desired. My current thinking is some 3M adhesive wire tie mounts - little 3/4” square pads with foam tape on the back. One on the wall by the window, and in on the shade frame. In two or more places around the window. Add a wire tie and it -should- stay in place. Downside: visible and could look jury-rigged. Looking at the relationship between the window frame and the window shade, a square “U” clip could do the job - if I could find one the perfect size and shape. Guess I’ll look. Aside from replacing the shade and all the clips - which will likely fail in time just as the original ones have - has anybody found a permanent and esthetically pleasing fix?
-
Late-Model RAM Owners - how do you like your “tech”?
Galileo replied to Galileo's topic in Towing an Oliver
I figured there had to be a fallback. Even so - with the flakiness of the GMC infotainment and tech in general - I’m happy I don’t have it. One more distracting glitch is the last thing I want. -
Much, MUCH better than the stuff coming out of Elkhart… That said, dropping the ball on a cosmetic issues on a LOT of units (based on comments above) gives a black eye. Our interior “belly band” started falling off on the curb side after a season or two. I suspect that improper/lacking surface prep combined with a heavy material - and likely shrinking with age - caused it to pull out of the corner(s) and progress from there. Back in the golden days (late ‘70’s - early ‘80’s) I used to install body side molding on new cars. Very very similar to this belly band material. Clean surface (acryl-sol) and heating the material were key to good adhesion. Even then, the material would try to return to its original coiled shape and start to pop loose at the ends. I purchased enough 1/2” 3M “VHB” tape to re-apply the band - but have not done so yet for two reasons: As with auto body side molding - getting this stuck on -straight- is damn difficult! I used to have a magnetic guide bar to assist - but that wouldn’t help in this case. I just don’t want some wavy install reminding me for the next 5-10 years what a half-fast job I did. I also don’t want the durn thing falling off again. Im thinking a much thinner, lighter type of trim tape would be a better solution. Actually, I just thought of a replacement that -may- be acceptable: https://www.3m.com/3M/en_US/p/d/b40068317/ I’ve used this to temporarily seal up holes or cracks on our sailboat until a permanent repair can be made. I do find that it doesn’t stand up long-term when exposed to sun, but inside the boat, it seems to hold up pretty well. I’d like it it were thicker - so that the holes below the seam didn’t “print” through, but lacking a thicker tape (or thinner piece of trim) it may be an acceptable option. Being white and easier to work with, it’s less likely to go on with curves and undulations, and less obvious if it does. Anyway, I’ll read the rest of the thread to see if anybody else can up with a better trim material.
-
Late-Model RAM Owners - how do you like your “tech”?
Galileo replied to Galileo's topic in Towing an Oliver
Though our 2025 Sierra does interface nicely to Apple CarPlay, I find that I have to pick up my phone to kick off certain apps. That’s something I’m pretty rabid about not doing. Our 2021 GMC Canyon had apps for The Weather Channel, and Audio Books. Seems I can’t get those any more as GMC ended their contract with TWC - so now - not even a basic Weather app that’s native to the truck. If I’m spending $50-$80K on a truck, I -don’t- expect to have to bring my own phone to get the most utility out of it. As it is, by the time I pay the monthly OnStar subscription - and the additional $$$ for data, I honestly shouldn’t need to involve my phone. Digital rear view mirror was an option, but I figured one more thing to go wrong and leave me without a rear view at all. There are a dozen cameras on the Denali anyway, so parking is already pretty easy. My side mirrors do fine for driving straight ahead. I'm debating paying another $3-$500 for the “transparent trailer” camera that uses the infotainment system display. Though we do have the Furrion back-up camera on the Ollie (“electronics package”) I’ve only used it once and put it aside. That display and cable are just too much clutter in the TV cab for 45 seconds use once every few days or weeks. I’ve gotten pretty good at backing this beast into sites, and if I need eyes - I have my better half and copilot to provide intel. As for the Ollie Electrinics package - the only thing I find useful is the keyless door lock. (Though I’ve already had to replace it.) the cell booster does nothing, and I’ve already mentioned the backup camera. -
Hi RAM drivers, I’m thinking of switching from my GMC trucks to RAM in 6 to 18 months, and was curious what you thought of the technology of late-model RAM trucks. I love my GMC diesels - but I find the technology to be more than a bit flaky: nav systems that stop working, features that are fine one day, and missing in the next, the rare - and impossible to replicate - infotainment system glitches. Frankly, they seem to promise more than they can deliver. I find my “Google Mobile” infotainment system to have considerably less utility than one that doesn’t interface so tightly to Google. I’m looking at the 2026/2027 Ramcharger 1500 hybrid. Most likely I’ll let the 2026 one pass me by as I don’t care to be a beta tester. Depending how well that model goes I’ll likely be ready to pull the trigger on the 2027 model. thoughts?
-
Unless you can engineer and build your water system with large-bore plumbing end-to-end, the 1/2” ID hose isn’t going to affect your water flow much - if at all. The typical “hose Bibb” all of us hook up to a campgrounds are usually of the style shown in the attached picture - with an internal restriction of about 1/3” - so using a half inch diameter hose isn’t gonna slow down you water flow. If you look at your household plumbing, you almost certainly have 1/4” supply lines to your sinks and toilets. It doesn’t matter if your PEX, PVC, Copper, or galvanized iron piping is 3/8”, 1/2”, or even 3/4” - it all goes through those 1/4” supply lines before it hits the faucet. Most aerators and shower heads have far smaller offices - like 1/8”. Back when we had the farm, I replaced all the hose bibs with 3/4” ball valves and GHT adapters. I wanted my irrigation systems to have maximum flow. For that matter, I also liked to be able to fill a 5 gallon bucket (which small farms are built around) in under a minute. In that case, a 1/2” hose would be the choke point. With RVs, we don’t wanna have a lot of flow. Our holding tanks are the limiting factor. Unless you’ve reworked your water system, I’m pretty sure the piping in the Oliver is all 1/2” PEX. So there’s your restriction. I suppose inquiring minds who just gotta know for themselves, try an experiment by timing how long it takes to fill a bucket with a 1/2” vs a 3/4” hose. Unless you’re attached to a spigot with a ball valve (and no choke points upstream) I’ll bet your fill times will be virtually the same regardless of your hose. The case FOR the 1/2” hose is that 50 feet of 1/2 hose is smaller and lighter than 50 feet of 3/4” hose. In the world of having to tote stuff with you - that’s a bigger deal than flow rate.
-
Yes, I switched to the Zero-G (was on a prominent display at Camping World) after I got tired of the Camco white hoses. I’ve found those can’t take being hooked up to even regulated (30-35psi) water for extended periods. They swell and don’t inspire much confidence. They also kink pretty easily. I’ve never seen a grey Zero-G hose. I was just attracted to the light weight, smaller coiled size, and - so far - no leaks. Front basket? While you drive? I’ve never left anything in there while moving except between the registration booth and our camp site, and then the dump station. My cords and hoses get tucked in the “basement”. I’m eyeing the SeaBiscuit cover, but hesitating due to the $$$. Dunno what they bill the difference between the blue and the grey as being. Perhaps I got a later one that doesn’t have the issues you experienced. ’Course, now I’ve jinxed myself and I suppose the damn thing will explode on me tomorrow…
-
I just snapped up a male GHT “repair” hose end with a bard, and a 3’ piece of heavy vinyl tubing to fit from the local hardware store. Though I generally only need to use it for winterizing, I did have to press it into service to boondock 10 gallons into the tank at a campground with electric only hookup.
-
Been using the blue Zero-G hose for two years and 4 long trips. No issues other than I don’t care for the fitting metal. I don’t imagine that hose will be very forgiving of manhandling the hose near the fitting, but I don’t, so it’s fine.
-
I was surprised to find how much a smooth bs bunny road can effect MPG. Interstates are generally pretty smooth, but I49 in Louisiana between Shreveport and Lafayette is pretty bouncy. That, and 75 is considered “pokey” on that stretch. More obviously, hilly stretches can knock a couple of mpg off as well. Strong head or crosswinds also take a toll. Not sure I get the point about 62-65 being much easier on the suspension than 70.
-
I think I’ve only engaged the 4wd on the previous TV once with the Ollie attached - when I fumbled into the wrong park road and had to turn around and go uphill in sand. No problem, just kept speed up. Used 4wd -once- in snow in Chicago. I try to avoid that since I enjoyed that kind of fun for 60 years before I moved to Texas. That, and I try to keep road salt off my nice vehicles. Haven’t kicked the 4wd on our new TV yet. I did want 2wd for lower drag/better mpg, and fewer parts to wear out. But I got 4wd on first TV because that’s what the immediately post COVID marketplace had available. Got it the second time for better resale value.
-
Probably why we have that phrase “Your Mileage May Vary.” We travel pretty much all the time and have rented cars in several European and British Isles countries. Unlike the US, they’re always small - and always incredibly fuel-efficient. 50 or 60 mpg is pretty standard. Then again, most Americans wouldn’t be caught dead in a 3 cylinder, 2.2 liter engine vehicle. Dunno why a Prius - even with 4 pro footballers would only show 12 mpg. Keep in mind that “average” mpg is the goal, not the mileage displayed during some short-trip, 100F day with the A/C cranked to 58F. My Prius would often show “99 mpg” on my 8-1/2 mile rural trip from my farm to the local hardware store. It was cool for bragging rights, but I realized it was the perfect storm of a fully-charged battery and hardly running the ICE at all that made that display possible. I’m sure it made up for it at other times. HOW one drives is - and will remain - a factor in what mileage you get - regardless of the technology or fuel source of your vehicle. Hard acceleration, high speeds, high accessory loads, “tankering”, and failing to coast when it’s advantageous will earn you poor fuel efficiency. I drive with the fuel efficiency display primary on my TV and did the same with the Prius and any time I drive a vehicle that has the tech. I do my best to keep the instantaneous MPG number high, or the display on the “economy” range. Pretty much the opposite of a Paris cabbie. I always have to smile at the type-A guy who has to pass me up at extra-legal speeds, only to have to brake hard and end up with me smirking at him when we stop at the next light together. Hey - if he wants to get 12 mpg while I’m getting 28 - that’s his prerogative. I’m still looking for the most efficient speed to drive the TV/Ollie combo. It looks to be about 62 mph. Of course, smooth, level, dry pavement gives a huge advantage. If the speed limit is 70 or even 75 - I’m still puttering along at 62. Maybe 65 if I feel like it or going downhill. I just have to pad the ETA my GPS gives me. I’m at a place in life where I don’t “need” to sweat burning an extra gallon of dead dinosaur juice - or feel obligated to find the cheapest gallon of motion lotion - but I do it anyway because it’s a feeling of accomplishment that gives me pleasure. I picked the diesel drivetrains for my last two vehicles because they are head and shoulders more efficient than the gas engine offerings in the same models. Yeah, I paid more for the engines - but I got back more in trade because they had more life left in them as well as the same fuel efficiency offerings. Likewise, I picked a 1500 Sierra because it will capably handle a gross weight Ollie - both speeding up and slowing down. The exhaust braking of the diesel even gives me a little more capability going down long grades than a gasser can provide. Previous TV was a “mid range” GMC Canyon - also diesel (2.8l) that had the specs that said it could handle the Ollie as well. Three years and half a dozen 90 day trips backed up what the specs promised - including several crossing of the continental divide - up to about 9,000 feet if I recall. (Turbos are nice!) If anything, I prefer the Canyon over the Sierra. Though I’ve been driving for darn near 50 years - 20 years of that full sized van and pickups - I find the Sierra too damn high. Even the lowest-slung standard suspensions make for a nipple-high hood that’s impossible to see obstructions over. Even though the footprint is only slightly bigger than the Canyon, the height makes it a chore to park and makes driving through narrow areas an “exciting” experience. Anyway, you pays your money and you makes your choice. I like the “less is more” approach. Those who prefer “bigger is matter” can do as they like. Unless I’m gonna start hauling intermodal containers, I don’t need the Souper Doody TV.
-
Late Model GMC/Chevy Drivers (Infotainment System)
Galileo replied to Galileo's topic in Towing an Oliver
Just did an update about a week ago…. Unlike the previous update, I have no idea if this one adds any new features (bugs?). The last one let me roll down my windows with the fob. Probably bite me is the A$$ by doing that when the cat sits on the remote in the middle of the night during a typhoon… Anyway, the “going nuts” likes to pop up every so often on ours as well. Two days ago, when leaving a campground and doing a couple of short start/stop/restarts, the DIC (apt acronym for the Driver Information Center) just refused to come up at all. Zero. No gauges, Speedo, tach, nada. Luckily, it revived on a subsequent restart and has been normal ever since. The old “joke” about a vehicle with a Windows OS is WAY too close to bringing true. (Your car dies on the highway, you coast to the shoulder, get out, open and close all the doors, and it restarts - and be on your way.) I just hope the flakey stuff stays limited to superficial and non-critical systems….. -
I’m surprised that it didn’t show an increase… My Prius would definitely show significant increases in SOC even with relatively short regeneration runs. I would guess it’s because the size of the battery is a lot smaller than a full EV battery. Probably like a gallon jug will be noticeably fuller if you add a quart to it - but a 55 gallon drum won’t look much different with a quart more in it. I rented a Fiat hybrid in Sicily a couple of years back. (I think Fiat just did that to qualify for a subsidy or to prove they could do a hybrid.) The battery in that toy car was so small that you could discharge and regen charge it back to “full” in a city block or two. Still, the hybrid powertrain has a ton of advantages that pure ICE can’t enjoy: The ability to use regeneration to “put gas back in the tank”, use regen to control your speed going downhill, reduce or eliminate brake fade, and brake pads that last 100,000 miles. I guess the proof of the pudding will be the mileage estimates the Ramcharger EREV turns in. I’ve gotta believe it will top those of V8 and even V6 ICE 1500 trucks, and likely even better than my 3.0 diesel 1500. I think the design is gonna hit a sweet spot that a full hybrid like a Prius misses: the ability to drive short trips without starting the ICE - since it will have a considerable bigger battery.
-
Sounds like there are several good options - and - the failure of existing lights provides the opportunity to upgrade. Life is good(?)
-
Late Model GMC/Chevy Drivers (Infotainment System)
Galileo replied to Galileo's topic in Towing an Oliver
We have the “Google” version of the Infotainment system. Whether that’s good or bad I can’t say. I’d -prefer- to have my vehicle system be as independent of my phone as possible. It would be great if there were great apps available to install on the GM infotainment system. There used to be better ones: Weather Channel, Audiobooks, etc. Now, there’s only some dodgy, no-name apps available. I’m looking at RAM for my next TV as they are coming out with the 2026 Ramcharger 1500 Hybrid. I guess I’ll check out their tech…