jd1923
-
Posts
3,596 -
Joined
-
Last visited
-
Days Won
276
12 Followers


Recent Profile Visitors
3,904 profile views


jd1923's Achievements
")


-
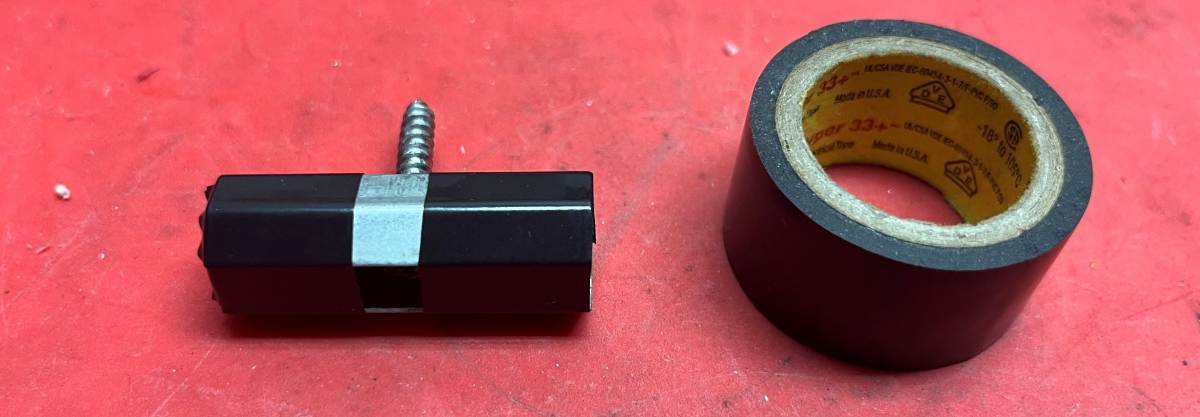
Yeah, I tried this today and you are correct. I hosed our blinds this week with a fine mist spray setting. I did this 2 years ago and it was about time again. When I reinstalled I found a couple of clips where the mounting screw needed tightening, so check for this first. Then of all the 24 clips, 6 per window, only one would not seat properly (guess we're lucky). I removed it, tried to stretch it wider on my vise and no-go on the spring steel. So this is my solution and it worked great, tight as can be! just one wrap of electrical tape. 😎

-

Cleaning the gap around the linoleum floor
jd1923 replied to Ken Root's topic in Mechanical & Technical Tips
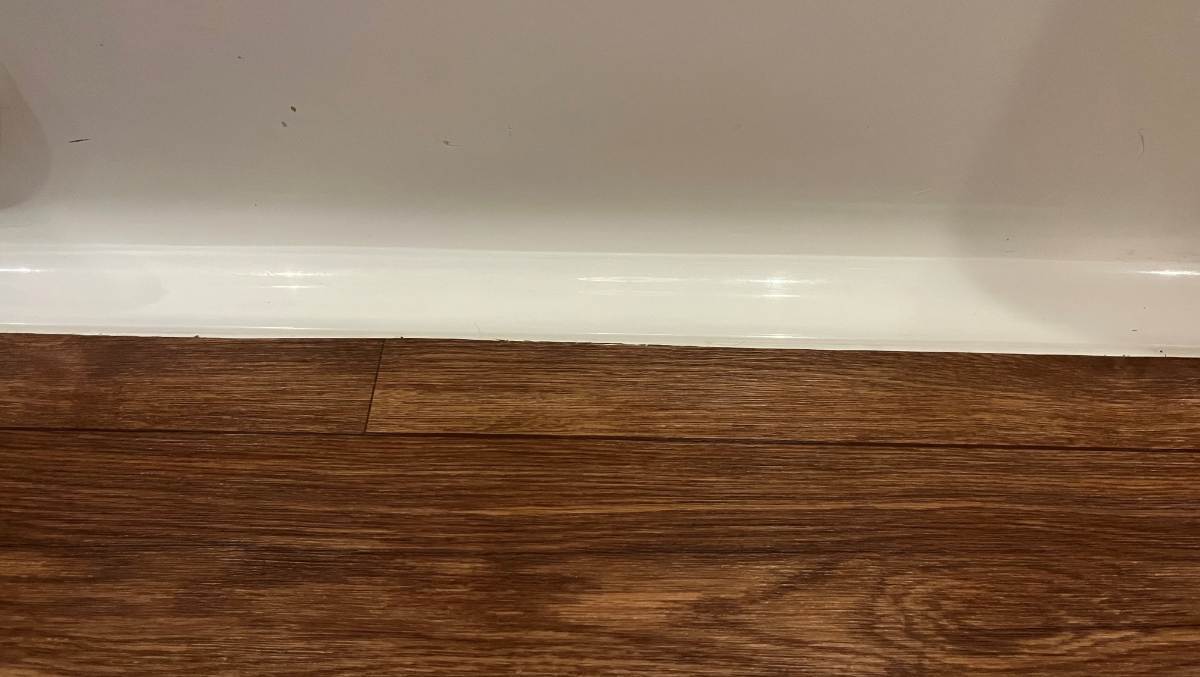
Why is there a gap? We don't have one. It get's me when OTT has the right approach and then it changes through the years.
-
Furrion Chill Cube – Product Review and Installation
jd1923 replied to jd1923's topic in Ollie Modifications
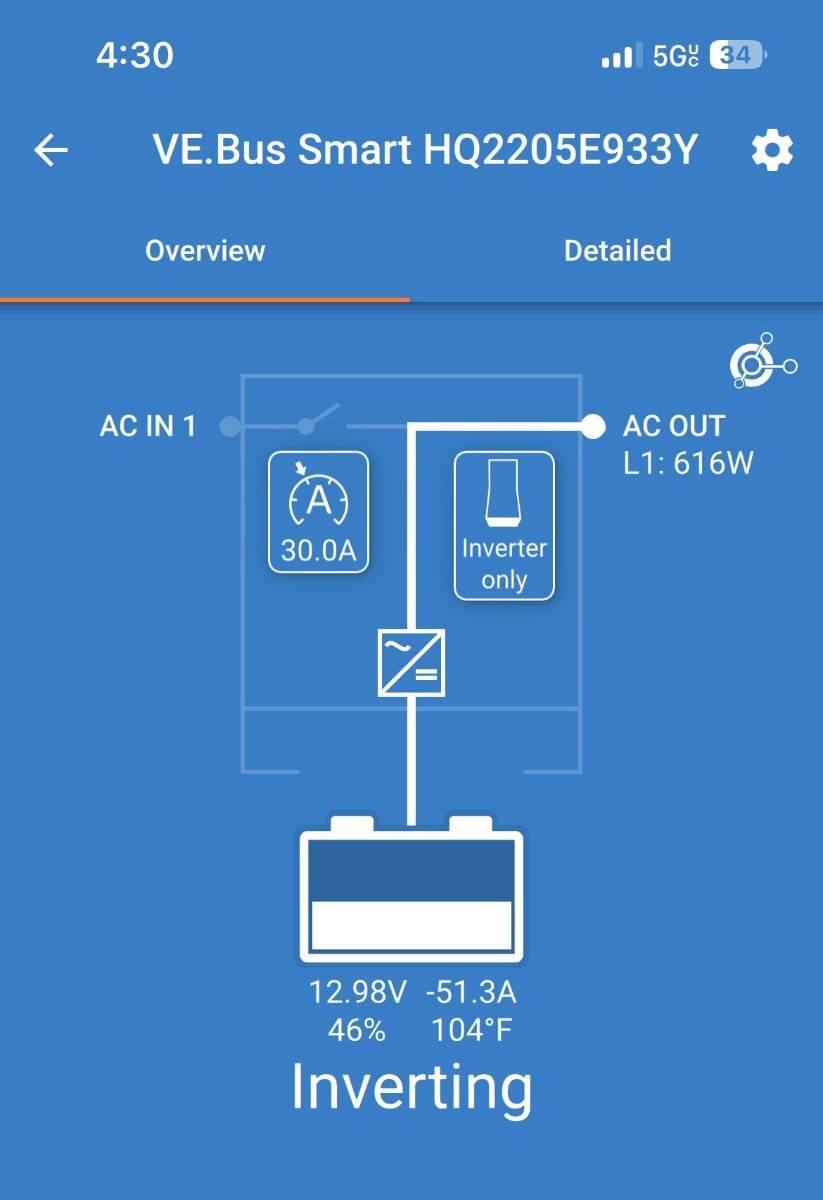
Was reinstalling our blinds today after cleaning them, so working inside the Oliver. Set temp was 76F and I lowered it to 68F and turned on the Turbo setting which activates the evaporator fan at the high setting. Outdoor temp was 94F, 110F on the roof, 104F in the basement under the streetside bed where the Victron MP2 is installed (see temp reading on picture). After I heard the compressor ramped up, I took this screen print. About 620W was the highest number I could see. The picture shows wattage inverter out and the A/C was the only 120VAC appliance on. The Chill Cube is rated at 18K BTU which we know is BS since the compressor rating is about half that. The Chill Cube night not be the best choice for those who plug in regularly and live where you need powerful cooling. The Tosot may a better choice for those who plugin at campgrounds, but we rarely plug in even when parked at home. The Chill cube in Turbo mode is not real quiet, but still less than half the noise of others. It's whisper quiet when sleeping at night when cooling needs are lower.
-
Furrion Chill Cube – Product Review and Installation
jd1923 replied to jd1923's topic in Ollie Modifications
That is correct. However, solar is more efficient at elevation and we had full mid-summer sun every day of the test. I'd like to measure the amount of Ah produced by solar over a 24-hour period. I believe the IPN Remote on our old Blue Sky SC has a display variable for that can be reset to zero. But without an app interface it's truly painful to kneel down there and go through the menus! -
Furrion Chill Cube – Product Review and Installation
jd1923 replied to jd1923's topic in Ollie Modifications
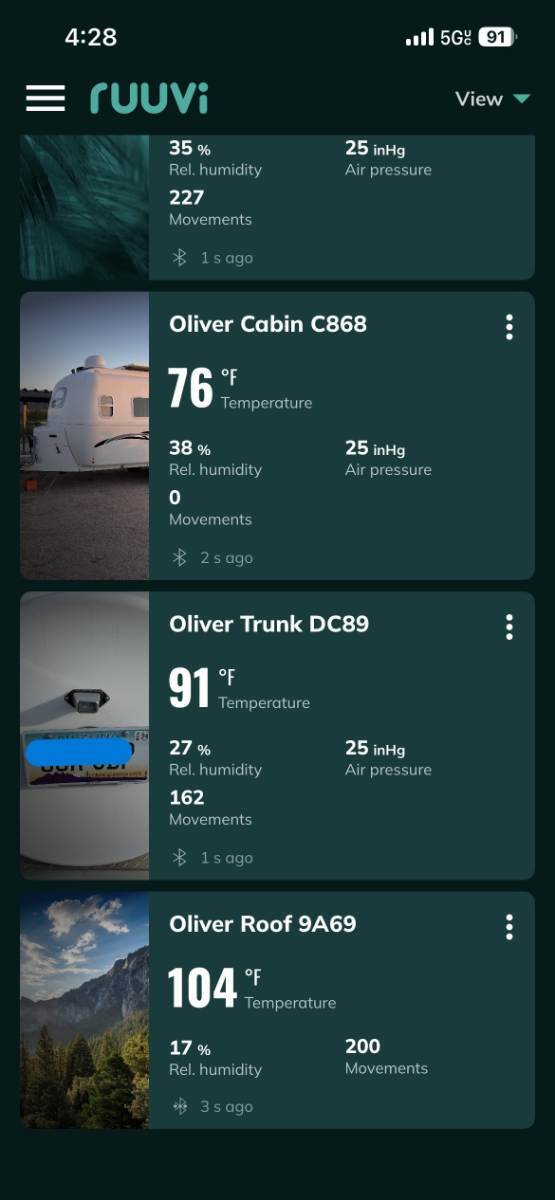
Performance update => I was able to run the Chill Cube 24x7, thermostat set at 74F, for 4 days producing this data. Data was recorded each day later afternoon 5PM +/-. The Chill cube did not quite produce the set temp in the heat of the day but did so the rest of the day. The high of 76F was still quite comfortable in the cabin. Off course our Oliver was unplugged, but in addition to battery power, our 320W rooftop solar was adding power consumed by the A/C. The table shows Ah used daily. Keep in mind this is with the A/C running 24x7 which is rarely our use case! Having 900 Ah it appears I can count on running the A/C 24x7 for 3 days, 4-5 days if it’s off during portions of the days. With 600 Ah you could truly count on two full 24 hour days. The picture below shows cabin and outdoor temps one afternoon during the test at 4:30 PM. The cabin temp is read by a Ruuvi sensor mounted above the kitchen sink. The sensor titled Oliver Trunk is positioned in the rear basement, near the incoming water lines down by the 4" drain plumbing. For "Oliver Roof" I placed a sensor rooftop under the solar panels so that it is in the shade. If I took this picture 1-2 hours earlier in the day the roof temp would certainly be above 110F! I had no idea these results would be so positive and being the avid boondocker, it's great to know we can now count on A/C cooling anytime/anywhere! When you have the old-school A/C, with the basic single-speed ON/OFF compressor (Dometic, Truma, Tosot, Houghton, etc.), you will use approx. 100 Ah per hour in the heat of the day (assuming 1400W while the compressor is ON). The inverter or variable-speed A/C will consume in 24 hours what the standard A/C will consume in just 2 hours, OMG! (BTW, the Dometic P2 will produce worse results since it uses 1800W when ON, or 150 Ah/hour). The technology capability today is amazing. Time to stop waiting on the next great product. We’re not getting any younger! 😎
-
Adding Water Accumulator to pre 2018 Elite II
jd1923 replied to bradbev's topic in Ollie Modifications
They're all about the same. Plumbing connections should be the same. Make sure you set pressure on your new accumulator based on its instructions related to the pressure spec of your water pump. There is a Shrader valve on the accumulator where you can check pressure or connected a pump or compressed air. -
Say they're about equal, your wattage being a little higher to handle the humidity of Florida.
-
Yes, mods and upgrades are a personal choice. We chose to have every possible convenience. We can disconnect, but we wouldn't travel without the capability to connect anytime/anywhere! 😎 A reading of -60A on the Victron Connect App is the highest number I've ever observed set in Turbo mode. That's only 786W figuring 13.1V. Med-High setting will draw 48A (576W), low 14A (168W) and when ambient temps drop at night, the fan runs extra slow using as low as -2A. It's CRAZY. If these numbers are close enough, we can say the Chill Cube uses half the power of the Houghton 48v at high settings and even better when the cooling need is low. Keep in mind we are at 5440 FT elevation with RH = 20% so my numbers are likely better than when at sea level with humidity. And where the Houghton and every other single-speed compressor A/C will cycle full power more often.
-
Chris, I like the idea, but why is this true?
-
So, you're not glamping, but we sure are! 🤣 I would say an OEM Oliver, one purchased without any lithium package, little to no owner mods/upgrades, yes that shiny fiberglass is only skin deep. Leaky windows, the Dometic P2 A/C and with other OTT installation issues, it is hard to be comfortable. Glamping means comfort! Yeah, the G is for Glamour, but nobody is glamorous parked in a campground or anywhere else without all the creature comforts you desire! When you seriously upgrade the Oliver, at some point you're no longer roughing it! To start with, throw out the little $89 TV that OTT installed and replace it with a Samsung 32" 4K TV monitor, on a better mount and add a soundbar. Then correct the awful furnace ducting, vent the closet, bath and basement, and do something about those leaky windows! And it will take a while to move all those misplaced switches, water valves and breakers out from under the beds! And speaking of beds, all the OEM cushions and mattresses are way too basic to be glamping. The next item going to the junkyard is the common RV microwave (I use a Craig's Free Stuff ad and a driveway full of stuff is gone in hours)! A small Emeril Air Fryer fits there perfectly. We have 6 ways to cook indoors and outside, including the dual-burner Napoleon grill/griddle, cooking on the fire ring, a mini pressure cooker and an induction cooktop. Not hotdogs and smores, but glamorous meals for sure. It's not glamping when you get stuck somewhere making life uncomfortable. Or you can't use the bathroom or run the A/C while on the road or taking a break. Got to have freshwater tanks full, the one onboard and 35 gallons extra in the TV for if/when needed. With two 30# LP tanks full, 900 Ah LiFePO4, 720W solar, a 50A DC-DC charger topped off with the Victron MP2 3KVA inverter/charger, we can be VERY comfortable for a week or more and even throw some loss sole a 10 AWG extension cord to power their trailer overnight. And of course, remove the old-school rooftop cameras and nobody uses Wi-Fi repeaters anymore, or campground cable or Wi-Fi, OMG! Got to add a cellular router and antenna and the Starlink Mini is a must. Can't be glamping if you're not online 24x7! Then you could be riding on the lame Oliver OEM suspension or upgrade it with new D52 axles, Alcan Springs, Bulldog shocks and speaking of Bulldog upgrade the hitch coupler too. I can't believe OTT went with the 4-leaf Alcan Springs on this odd X23! Just so they could derate it to a 7k suspension? The tires are so out-of-place on the white egg! My forecast, OTT stops making the X23 after 2 years of meager sales. There are several REAL off-road trailers in the marketplace, and if that's what you want, it's not an Oliver. Some old guy said, after having a knee replacement, "I should have done this years ago!" Just like those of you who have that freight-train-engine sounding Dometic P2 still sitting rooftop! Even if you claim, "We hardly use it." You're fooling yourself and either way, once is enough! Our Chill Cube keeps the cabin cool on battery for 3 full days with daily highs of 94F outside! And at nighttime when outside temps drop, you can hardly hear it running while it's sipping 2Ah. Why did I wait 2 years? This is only the half of it and then there's the TV! I won't bore you with the technical details but the 45L CFX5 fridge in the truck bed never runs out of cold drinking water in our desert. With room for new groceries, it's much easier than adding to the fridge inside. Pantry full and closet floor lined with adult beverages and soft drinks, craft cubes in the freezer - yes, we're glamping! I was 3 nights camping in The Valley for a major sinus surgery. Everything I needed to recoup was at arm's length, only a few paces to the bathroom, truly all the comforts of home. Spending nights in a hotel was not an option, not near the comfort. Love our Oliver!😎 Our first RV was a 39' Fleetwood Discovery diesel pusher with 3 slides. Thought the way to go, was to go BIG! It had the big screen TV, but otherwise, it was awful. The Class-A is only comfortable on US Interstates and large paved lots in RV Parks and must have 50A service. If you get stuck, you have to run the generator because unless you spend another $50K in solar and lithium, all you power you have unplugged is enough to reheat up a cup of coffee in the microwave! Don't try big city streets or much in dirt roads. Only ex-truck drivers are comfortable in a Class-A. BTW, generators and glamping do not mix. 🤣 So, when you're done with all these electrical and mechanical system upgrades, you gotta make it look as good outside as it runs inside. We know it, but it's the only way people will know we're glamping too! 😎
-
Yep, that's about it! They're just for looks. Besides A/C efficiency... Ah = Ah! 🤣 He already converted the 100 Ah 48v battery to be equivalent to 400 Ah on a 12V system. 600+ Ah on 12V is 200+ Ah better. One problem that can occur in a 48V RV system, is when the 48/12 DC-DC converter fails, you cannot use your trailer jacks, any cabin lighting, the CO detector, USB chargers, the fail-safe for the trailer brakes and every other 12VDC device (unless they also integrate a 12V battery).
-
Wow, two new members just today - Welcome!
-
RVLock company stands behind its product
jd1923 replied to Snackchaser's topic in Mechanical & Technical Tips
And you are a forgiving person. For me the first call is pressure, and I certainly wouldn't bother with the second, let alone a 3rd or 4th call! Earlier this year, I purchased a Fairview LP regulator. It failed in two weeks camping. I asked around and found out Fairview is not considered the better make. I could have done a warranty claim for the $50 I spent, but not worth my effort. Why, because I would get the lesser product replaced after all the time and hassle. So I purchased a Marshall Excelsior regulator, spent new money for the more reliable product. Happy I spent $60 on a new manual lock. I could have spent triple for keyless with all the issues cited in this and other threads. I expect the manual door lock to be out-of-sight, out-of-mind, for another 10 years. 😎 -
RVLock company stands behind its product
jd1923 replied to Snackchaser's topic in Mechanical & Technical Tips
Calls to Customer Service or Tech Support, filing warranty claims, submitting Service Tickets… Are Quite the Opposite from the song line in The Sound of Music, “these are some of my favorite things!” 🤣 So, when the new one fails, are you going to go through this again? -
The Ugly Duckling – the Restoration of our 2016 Oliver Hull #113
jd1923 replied to jd1923's topic in Ollie Modifications
Thank you very much, Martin & Linda! New Oliver and new Forum Members for a month now - Congratulations! 😂 A lot like us 3 years ago. Our 2016 was 7 years old at the time as your 2019 is today. Keep working your required maintenance, fix or mod your top-of-list items and very soon enjoy some travel and good camping! 😎 We keep improving our Oliver way-of-life with several major modifications and all the many little things, while getting away 180 overnights so far! This cosmetic restoration and our new Chill Cube A/C were our last big projects. Please add a simple forum signature when you get a chance. Search here and ask questions re your "heater" (furnace or HWH?). You may be on the right track thinking "sail switch" but of course first make sure you're getting LP and 12VDC. Welcome, thanks again and best wishes, JD