
KenB
-
Posts
113 -
Joined
-
Last visited
-
Days Won
6
1 Follower

KenB's Achievements
")


-
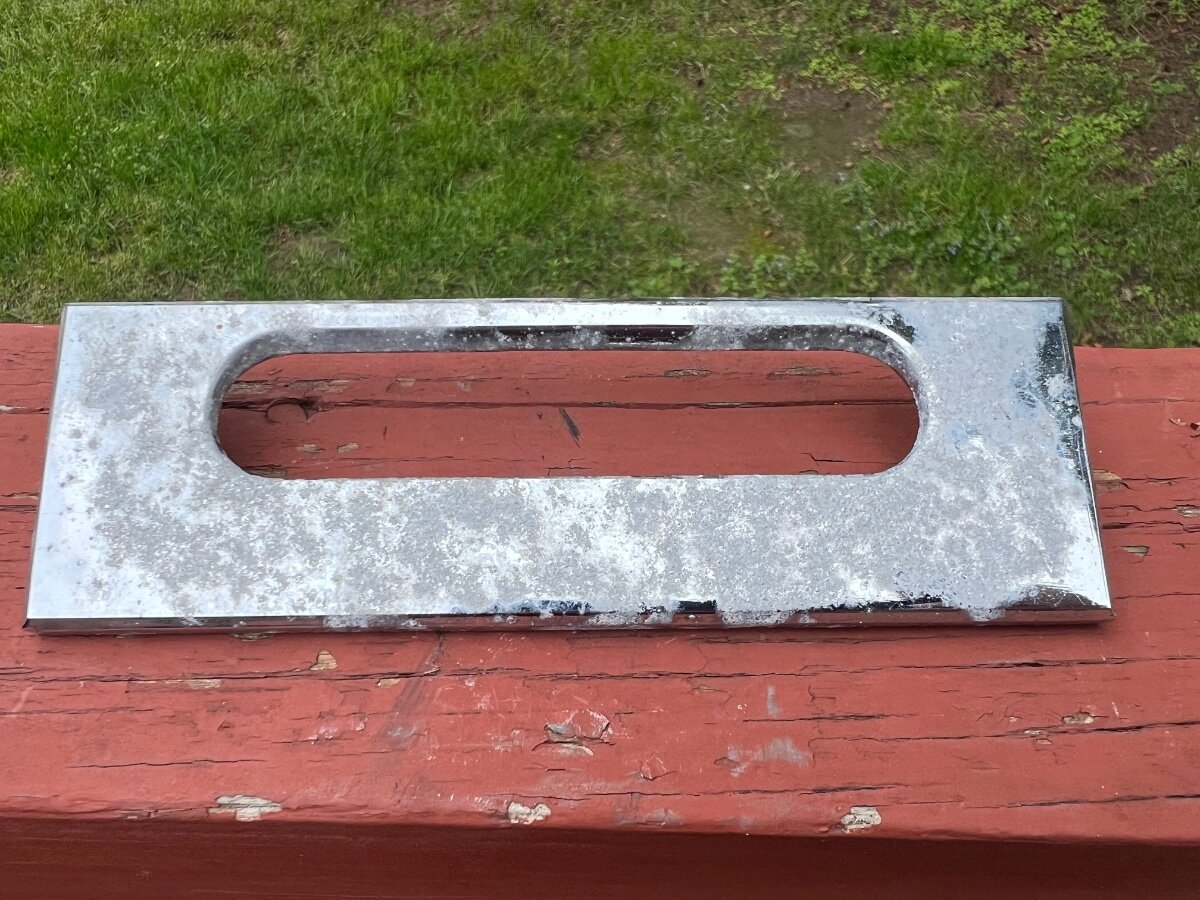
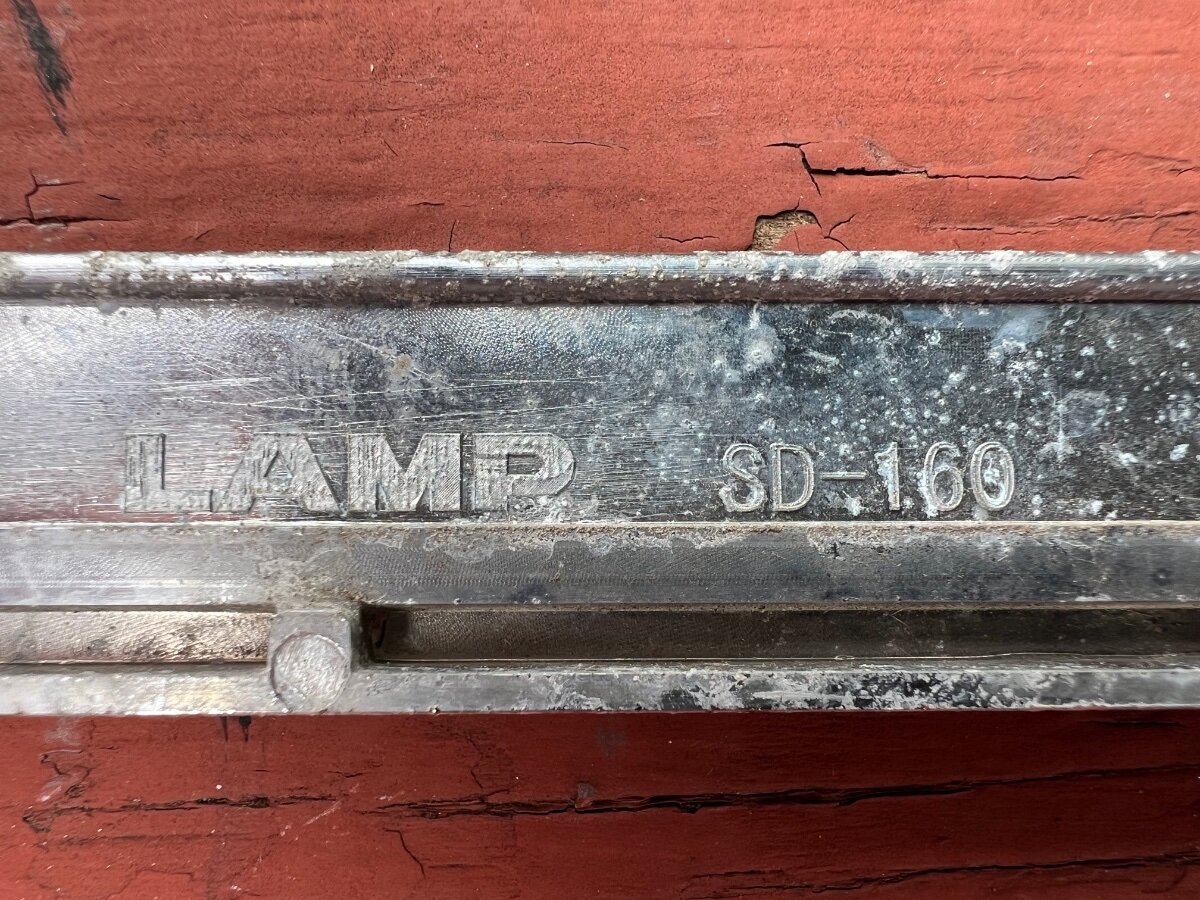
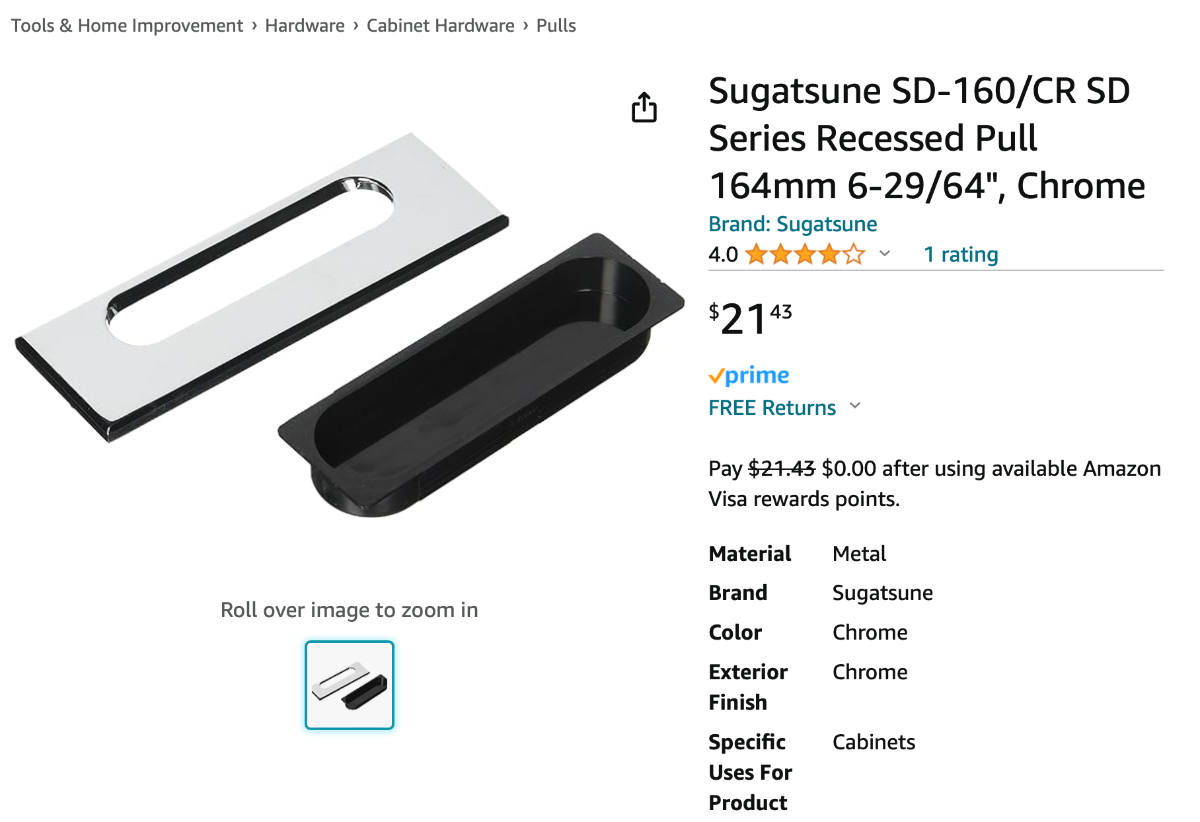
If you're going to replace all of those, you might as well replace the handles on the propane cover too. It's just chromed pot metal and while it works fine indoors in the Oliver kitchen, it's very susceptible to corrosion outdoors due to getting blasted by winter road brine if towing during fall or winter. I bought mine from Oliver, but if you type the part number off of the back of the pull into a search engine you'll get a few options for purchase. They are very easy to replace. Just unbolt and bolt the new one on. No sealant or anything. A photo is attached to show how bad my handles had corroded.

-
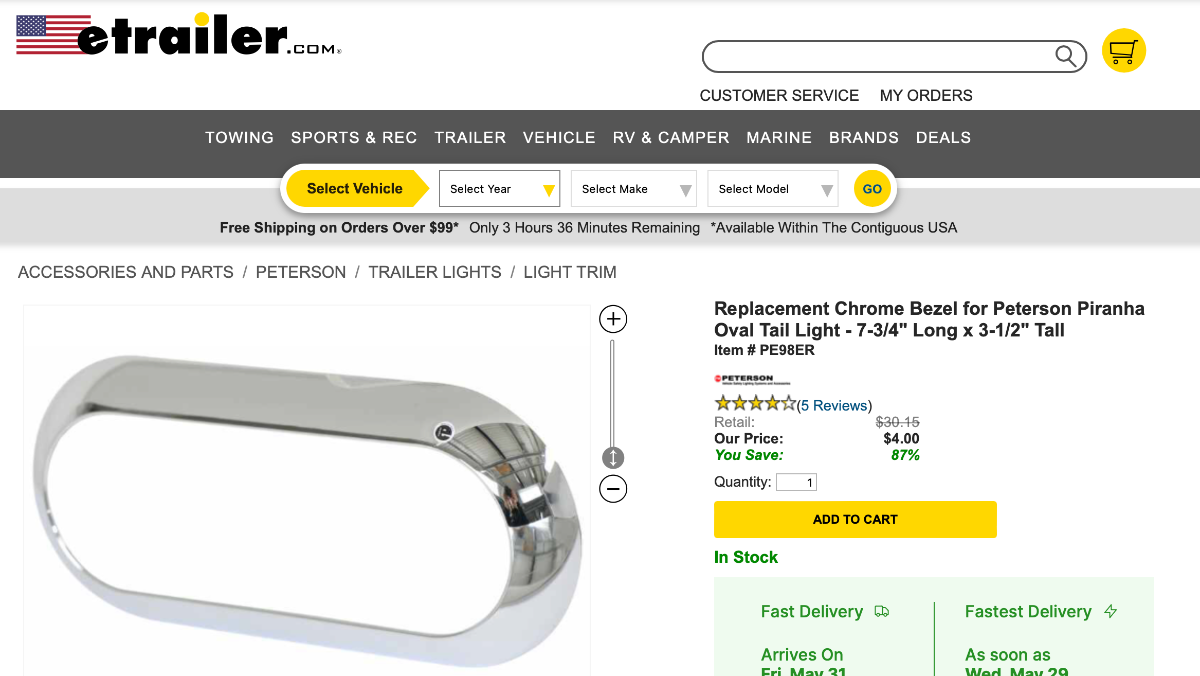
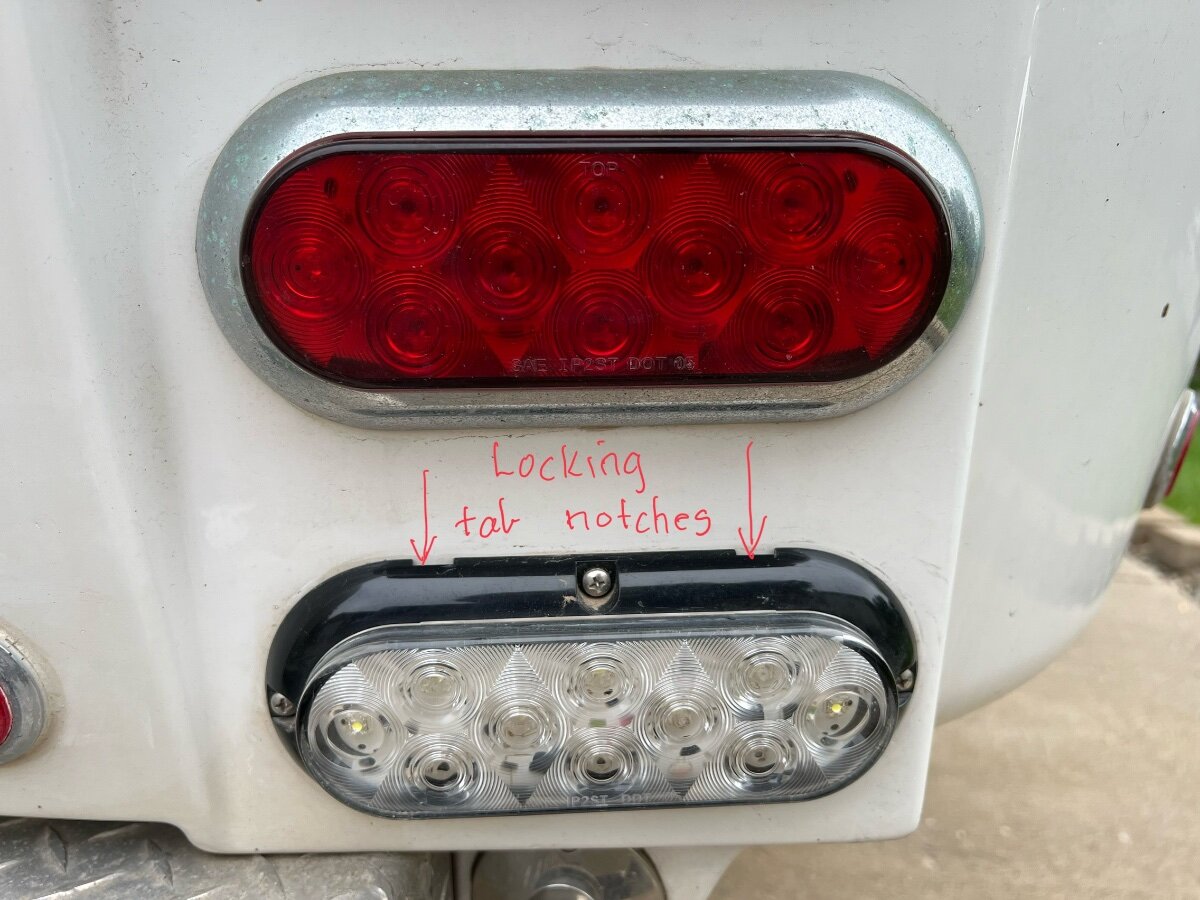
Hello All, I've been reading the forum regularly since 2017 and don't remember anybody mentioning this. The chromed taillight bezels on our 2018 tail lights were turning a gross matte green from winter road chemicals used in Minnesota and maybe a Colorado trip over I70 on my way to Moab in March a few years back. I found that etrailer.com sells just the chrome bezel separately and that I didn't need to buy the whole tail light if I wanted the taillights to look nice again. The replacement bezels are only $4 each, so I bought a set of six. Since they fit and are inexpensive, I may just buy another set and put them away for a rainy day. They are held in place by four tabs on the back of the bezel and old bezel just pops off. I've attached a photo of where the bezel tabs lock in on the light housing. There are four bezel tabs, two on the top and two on the bottom. I used a few thin screwdrivers and an old fillet knife to get them to pop loose. After learning where the tabs are on the first one it made removing the next five much easier. There are many other items on my trailer that are ugly due to unrepairable road chemical corrosion, but at least this one is fixed. Hope this helps someone else with their northern winter use trailer too. Ken
-
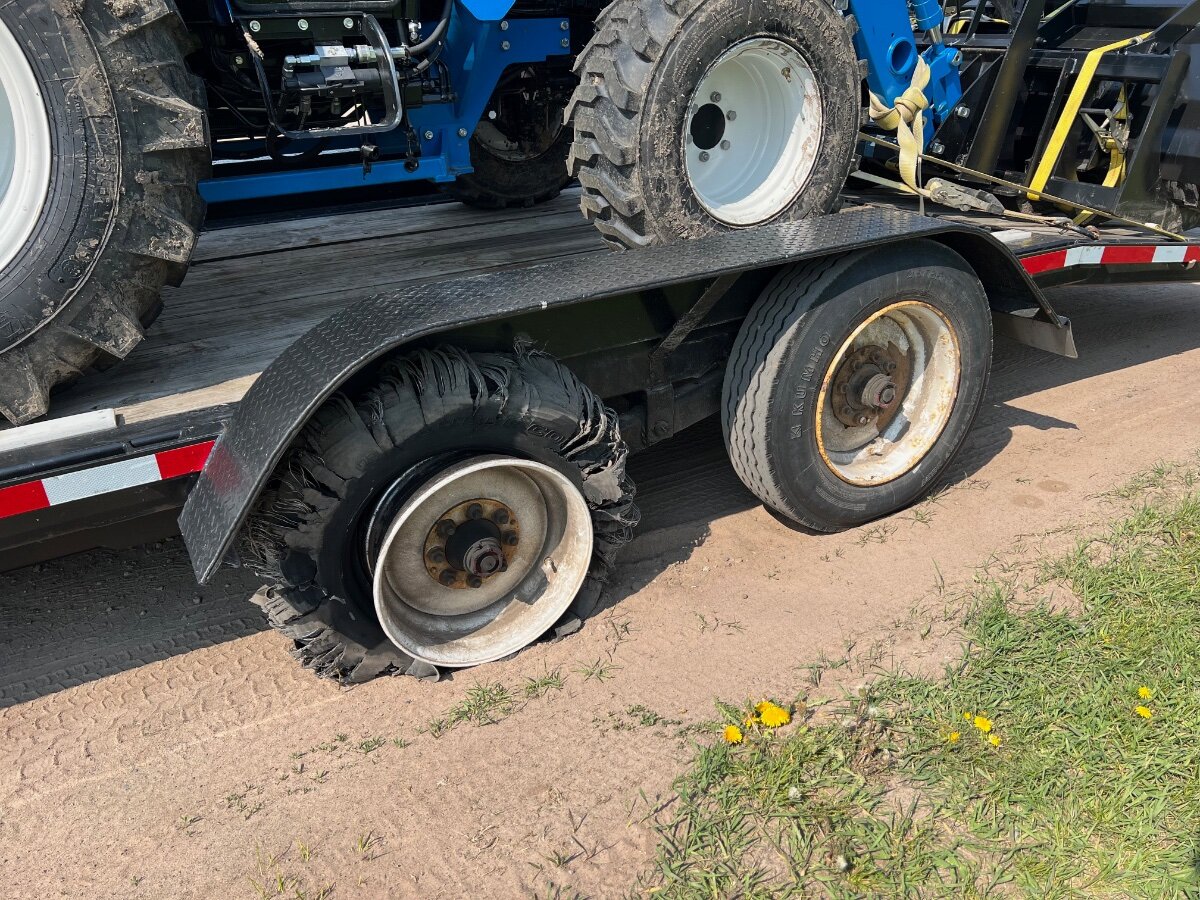
Slight hijack and not an Oliver tire, but this is the result of an old tire on a 14k equipment trailer I borrowed to move my compact tractor about 130 miles earlier TODAY. I've been home just long enough to get something to eat and to feed the pets. We were about 50 miles from home, moving at 65 mph on the freeway heading north towards Duluth, MN when this happened. Nothing damaged except my VISA card since the borrowed trailer didn't come with a spare. Fortunately there was an emergency tire repair service station a few exits back and I was back on the road in about an hour. They came to me and replaced the tire with a new one in the parking lot of a bait store.
-
I'm guessing around 20-25k miles. Could be less, probably not more.
-
Thats what I installed last weekend too. The Bulldogs are very slightly longer than the Monroes. I had to compress the bottom rubber mounts just a little bit by tightening up the bottom mounting nut/rubber assembly before the top threaded mount would slide into place in the upper Oliver bracket. It was much easier to do that than try to compress the new shock and slip the top mount in place. You'll see what I mean, easy.
-
I replaced shocks this weekend along with replacing the original wheel bearings and greasing the suspension. Three of the four shocks had dead spots and were not working correctly. I don't think we have 50k miles on ours like the OP, but we have at least half of that. Tires are still looking good, but I know the tires were manufactured in November of 2017 and should be replaced just because of age. Original wheel bearings looked good, but I replaced them anyway with Timkens because I already had them apart and new bearings were on hand. This was the first time I'd been into the wheel bearings on this trailer.
-

3Way Refrigerator Fan - Advice/Photos Please
KenB replied to Wandering Sagebrush's topic in General Discussion
I don’t think you get to blame that on a previous owner. I also have a 2018 and that’s the same way mine looks too. That IS the stock condition. I’ve had to re-tape the factory job, and then take another swing at it a year later after my 1st try came loose. It looked like they used scrap styrofoam and dunnage they picked out of the dumpster to make up spacers to wedge our refrigerators in place. Not only was it poor workmanship, mine was mounted in the opening crooked, mosquitos and road dust get into the camper around the refrigerator because it’s not sealed well against the outside, the refrigerator eventually worked its mounting screws loose, but the biggest disappointment was the refrigerator was delivered DOA. It seems 2018 was not a good year for Oliver refrigerators. I am the original owner. -
We stayed in Fort Collins in our camper last summer for a Toyota Land Cruiser event. There are boon docking campsites and a few electric sites up and down the Cache la Poudre River. There are YouTube drive-thru videos on-line of every campground along the river to help you pick a site. There are lots of sites up at the Horsetooth reservoir that might fit your needs. We couldn't get one, they were all booked months in advance. A very popular spot. Maybe if you keep looking you'll find a cancelation. In the end we ended up at the Fort Collins KOA. Not my ideal solution, but it was clean and well run. We just needed a spot to park and sleep, so we didn't avail ourselves of any of the park amenities. It was just an expensive spot for us to sleep for a couple of nights.
-
I've installed several dozen rivnuts and would not consider installing them in a fiberglass hole. They take too much effort to expand and I think they would at a minimum bulge the surrounding fiberglass. I wasn't familiar with these, but looked them up. I especially agree that the aluminum version would be great solution. The literature specifically mentions use in fiberglass as an application. If you have a Rivnut installation tool I bet it would work with these too.
-
I saw this earlier in the day and have been waiting for someone else to challenge this statement. I agree with the general statement that as AC frequency increases, current will as well. It just doesn't apply to those of us who connect our camper to the power grid. Maybe if you were boondocking and running a crude generator the frequency could change with a change in load, but not if powered by the grid. AC frequency in the US is fixed at the power plant at 60 Hz (in Europe and many other places it's 50 Hz). As far as I know there is no changing the AC frequency with any of our appliances or by loads at the campground. The purpose of having the EMS display a code for frequency is because you could be running off of a non-inverter generator, such as a PTO driven farm generator. You can end up with high or low frequency AC power if the tractor's PTO turns the generator input shaft too fast or too slow. It's very unlikely that this is the issue. A normal multi-meter doesn't have a setting for measuring AC frequency. A specialized multi-meter or an oscilloscope would be able to measure AC line frequency. Most of us are not carrying those specialized tools in our camper. HTH, Ken (I took a couple of electrical engineering classes a long time ago as engineering degree electives. If I've got it wrong myself, I don't mind being corrected. It's not something I use everyday.)
-
Truma Aqua Go hot water heater leak
KenB replied to srthomsen's topic in Mechanical & Technical Tips
A search for 'Keg Lube' will return a food grade o-ring lubricant brewers use on their brewing equipment. All the fittings in a brewery have o-rings in the mechanical connections in hoses and tanks that handle liquids. You can be assured that if they are being used in a brewery they won't impart and flavor or taste to the beer or your Oliver water supply. I'm not sure the same can be said of the tubes of silicone lube you'll find at the hardware store. You can buy keg lube in sizes that vary between 1 oz and 55 gallon drums. A 1oz tube would last forever for most people. And it'd be food grade. If I was on the road, I'd probably just use some cooking oil of some sort with a plan to replace it when I got home. It'd eventually go rancid. This is the keg lube I use.
-
I have a little experience with corroded stainless steel. My experience is from when I TIG welded the stainless steel brewing fittings together for my home brewery. I already knew how to weld mild steel, but had to research the specifics of welding stainless steel and how to maintain its stainless characteristics. Are you using a chlorine bleach based cleaner on your sink? Stop doing that. Chlorine can dissolve the protective oxides on a stainless steel surface, exposing the metal surface to the environment which leads to rust. How about cleaning the sink with steel wool? That's not good either. Iron fragments can get microscopically lodged in the stainless which leads to rust. Use a ScotchBrite pad or bronze wool instead. In order to passivate (establish the protective chromium oxide layer) the recently cleaned spot on your stainless steel sink, you need to use a product containing oxalic acid. As mentioned earlier, Bar Keepers friend is one product. Others include Klein King Stainless and Copper Cleaner, and Revere Copper and Stainless Steel cleaner. Bar Keepers friend comes in a powder and a liquid. I always make a paste out of the powder and scrub the area clean with a ScotchBrite pad to passivate any recently welded stainless steel fittings. A paste of Barkeepers Friend powder and a green ScotchBrite scrubby pad should take care of the issue on your sink. Just keep the chlorine bleach products away from anything stainless steel. HTH, Ken
- 8 replies
-
- 15
-

-

-
I'm going to disagree that the cracks are merely cosmetic. In the parts of the country where we get snow and rain, water and ice melting chemicals get between the steel core and the stainless steel covers. The steel core rusts and bulges the covers. Now a socket won't go over the stainless cover or fit correctly, even if you pick a bigger socket. Since the core can turn to a rusty mush, the cover falls off and you're left with a vaguely hex shaped nut that doesn't fit any tools in your box. Your best attack is taking an undersized impact socket and hammering in onto the rusted, undersized, nut. I've also used a pneumatic chisel and a plasma torch to cut them away. I hope you have a full set of tools on the side of the road if you have a flat tire and bulged lug nuts. Cracks in the stainless cover exacerbate this problem. My opinion is from 25 years of teaching high school shop, including auto mechanics. 16 year old kids that bring their cars into the shop are usually driving rusty hand-me-down cars. GM vehicles come to mind as consistently having an issue with these type of lug nuts. I think I had to replace all the nuts on my kids Honda Element for the same reason too. In the SW you'll probably never have an issue, but for anyplace with regular snow and moisture, in the long term they're a bad idea. It's not just a cosmetic problem for many of us.
-
Nothing earth shattering, but I thought I’d share some observations regarding freezing or not freezing items inside the camper during cold weather. Our Elite II is often parked on a piece of lake property we own in north central Minnesota. It’s strictly boondocking. We were up last weekend and ran the heat for about 24 hours before we headed home. We shut off the heat when we left. Tonight I’m back up and noticed some items were frozen, some were not, depending on their location. The weather has been in the low 20’s to mid 30’s during the last three days since we left on Sunday noon. It’s now Wednesday evening and I’m back. I’d winterized everything on a previous trip, so I’m dry camping. The composting toilet makes this possible. My analog recording thermometer is mounted above the microwave and to the left of the cabinet door. It recorded a low of 20°F. My digital battery shunt said it was 25° in the battery compartment when I got here around 5pm. The 1 gallon dog bowl on the floor of the bathroom is frozen. A 1/2 full 5 gallon water jug stored on the bathroom floor is frozen. There were four disposable one gallon plastic drinking water jugs from the grocery store on top of the composting toilet. None were froze at all. The contents of the pantry including drinks and canned goods were all fine. The contents of the refrigerator were all fine. This included eggs, pickles, beer, drinking water, and condiments. (In the name of science I opened and enjoyed several cans of beer tonight just to be sure cans from both the top shelf, bottom shelf, and door were all fine!) The take away? Don’t store anything on the floor that you don’t want to freeze. Anything off of the floor or in a cabinet was fine. Not sure how long it’d be fine, but for this one data point it works out. (Saturday is the start of Minnesota firearms whitetail deer season. I keep the camper up north all fall as a base to bird hunt ruffed grouse with my pointing dogs. Since the orange army is taking over the woods for a couple of weeks, I’ll move the Oliver home for the winter and put it away in the back yard under a carport.)
- 1 reply
-
- 7
-
-

-

-

-
I asked Service the same question while upgrading to Battleborn batteries this spring. Here is a copy of their response: