2008RN
-
Posts
293 -
Joined
-
Last visited
-
Days Won
1
1 Follower
Recent Profile Visitors
3,752 profile views





2008RN's Achievements






-

High Pointe Convection Oven Tripping CGFI Breaker
2008RN replied to 2008RN's topic in Mechanical & Technical Tips
Thanks it does. It gives me some structure to start with. I will ohm on a cold baseline with several components before I try heating. I wish it would fail on the bench. It would make it easier to troubleshoot. Maybe decreasing the amount of airflow on the back and sides may simulate the Oliver environment and help to cause the failure. I can hold the cover and 2 shields in place with 4 screws. Try to induce the failure, and then remove the covers and have time to do the testing. Otherwise I will run it in Grill/convection mode for 20 minutes then remove the covers, and then use a heat gun on possible failure points. Question: If the cord was the failure point, would I feel more heat in the area in question on the cord? -
High Pointe Convection Oven Tripping CGFI Breaker
2008RN replied to 2008RN's topic in Mechanical & Technical Tips
We have a mixture in our home, with CFGI outlets, and a GFCI breaker. I added a pole barn for the cars and where I do most to the mechanical work. I have several 20Amp GFCI circuit breakers in the panel for outlets. -
High Pointe Convection Oven Tripping CGFI Breaker
2008RN replied to 2008RN's topic in Mechanical & Technical Tips
Thanks I will get back with you. My electrical knowledge is very rudimentary. I saw the capacitor and the large transformer that feeds the microwave emitter. My spidy sense was turned on immediately. I remembered being warned years ago: use only one hand when working around capacitors, the other is behind my back. Thanks for reinforcing the safety. I spent a few years around ME, EE, and Electrical techs, and electricians, but that was 30-40 years ago. They help me with a couple of different projects. I built a timing comparitor circuit with relays to turn off a cleaning pump while an automated feeder was running on an 150 gallon tank. I also rigged up a bunch of heavy duty resistors in parallel to a motor and measure voltage drop (I think) across the resistors to calculate amperage of the motor under different loads. Since my microwave failures happened in 3 different modes grill, convection, and microwave. Heat and moisture would be involved in all 3. Although each has it's own separate heat source. ie: 2 different burners, the microwave emitter. The way I am doing testing only one heat source is on at a time, and the convection fan only operates in the convection mode. There is a main fan (below the electrical input PCB. that operates when any of the 3 modes are active. I haven't looked closely at this fan. It does have an external winding next to the fan in the fan assembly. I haven't seen this before. I will take a physical look at the burners, insulation, and closeness to the chassis. I will look for anything that could be close to shorting to ground. I will inspect the main fan assembly while I'm mucking around. After that I will contact you! it might be a couple weeks, I got some other stuff planned. -
High Pointe Convection Oven Tripping CGFI Breaker
2008RN replied to 2008RN's topic in Mechanical & Technical Tips
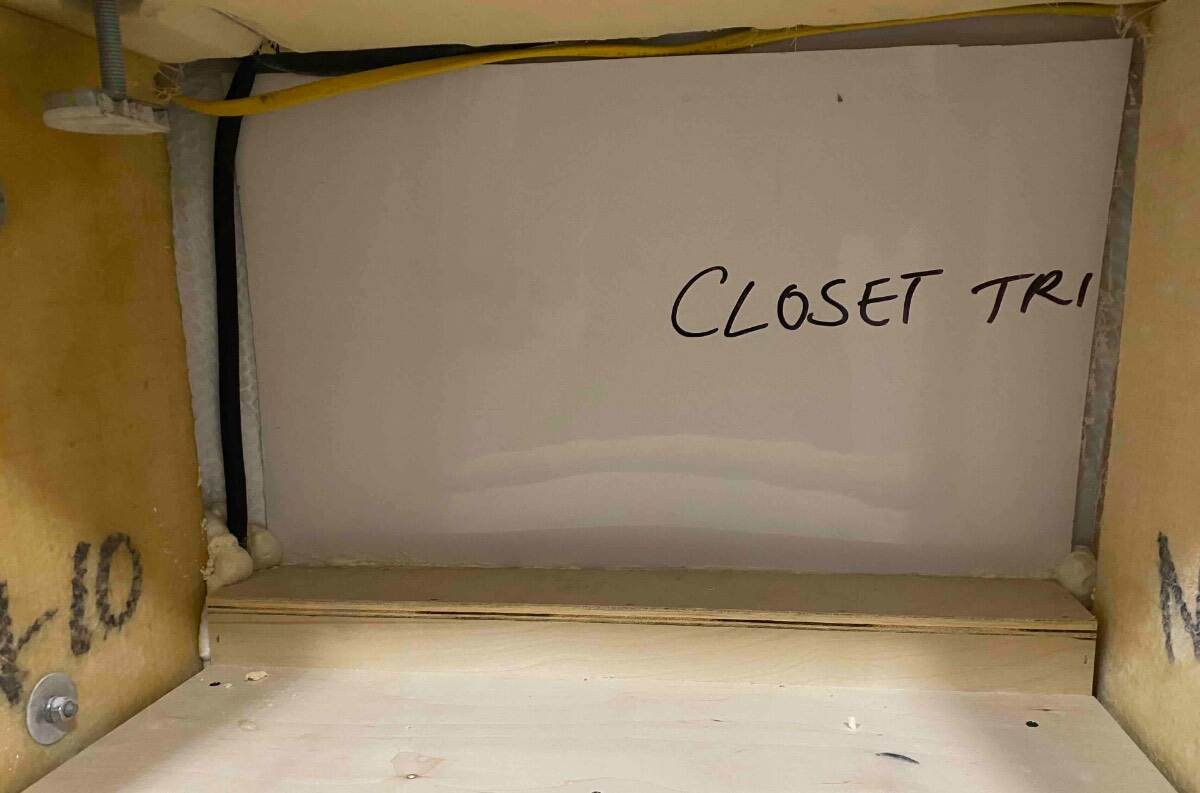
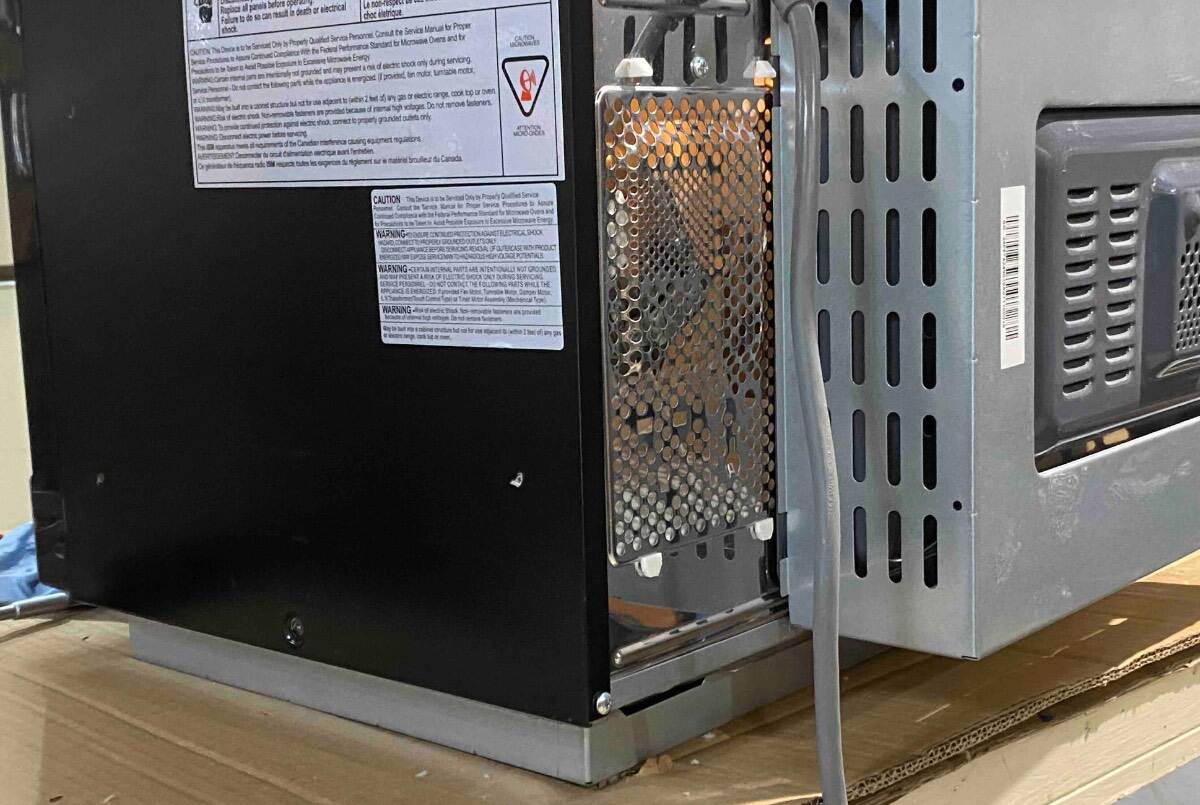
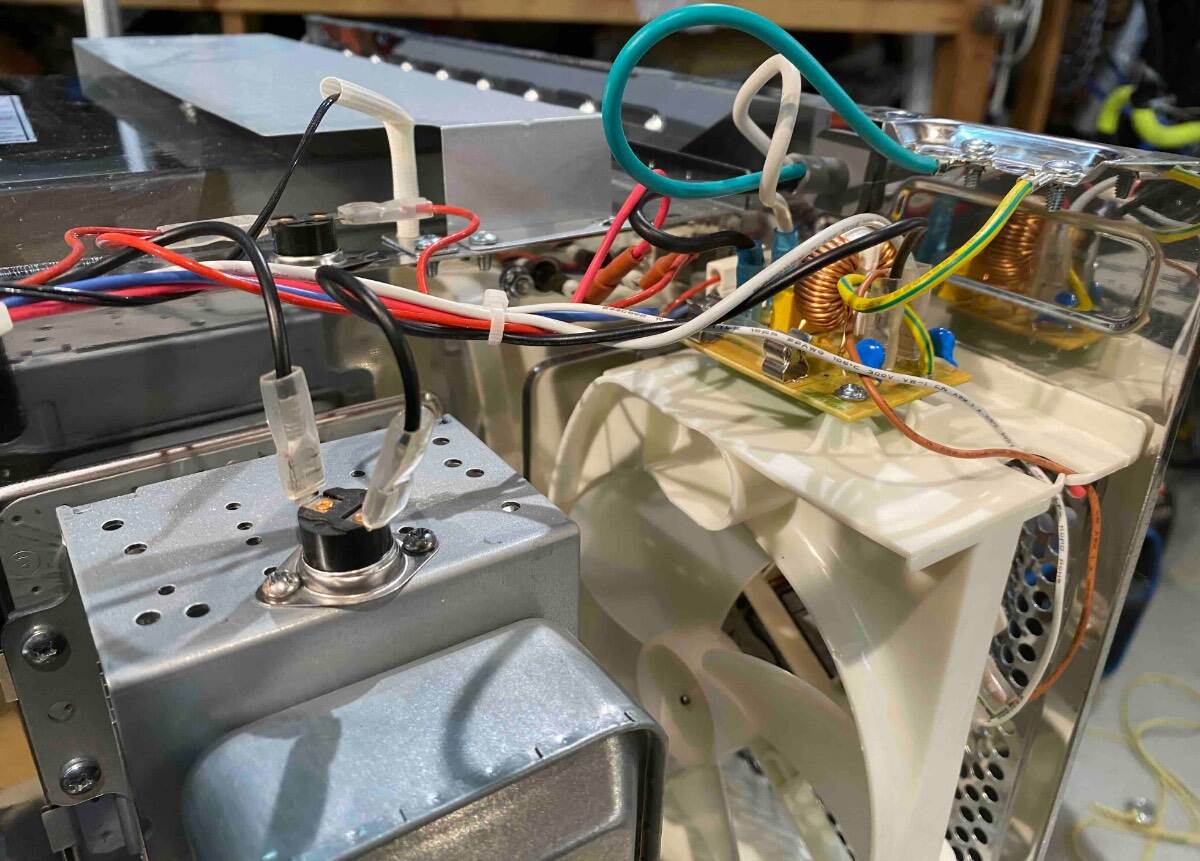
Sorry, I have got side track on this project. We went to Colorado first couple week in August. I left the Microwave in place and we decided to just microwave things. Well we had some frozen homemade soup, and forgot to thaw it out. My wife just put in the microwave at full power. After about 5 minutes, the Microwave popped the GFGI switch in the camper. It has never did this microwaving before. So this has happened on grilling, convection and now microwaving. After the trip I connected the microwave directly to a garage GFCI outlet with a 100' 20Amp extension cord, and tested again with the Convection. It popped and It seems to take more time to reset itself. So I started looking at microwaves to see if I could find a replacement microwave, but without removing it and taking outside dimensions. Also the size of the front panel and door needs to fit the trim plate, and cannot find that data online. So I stalled out, and planted more grass at home and then took another trip. I had a couple of days to play with the Microwave and pulled it out and removed all of the sheetmetal covering the unit. i looked at every wire, connector, PC boards and nothing looks a miss. No signs of over heating. I am not an Electrical tech or EE, so I can do a few basic things. First I was surprised that the PCBs were through-hole and not surface-mount technology. Last time I have seen a through-hole board was in the late 1990's. I found 3 thermal circuit breakers. One feeding the Grill mounted to the top inside sheet metal. This feeds the Grill burner only. I found another thermal breaker for the convection in the back next to the Convection fan on the cover of the Convection burner that protects the burner and fan. Then last and not least is the thermal breaker on top of the cover to the actual microwave emitter. This connected to the main incoming circuit. The power comes into the microwave and connects positive and negative to a PCB and the ground goes to the frame, and then another wire from the frame goes back to this PBC. There is a fuse and some other components that I don't know what they do. I ohm the 3 thermal breakers at 0.02 ohms and the fuse at 0 ohms. I decided to test the Microwave. I tried each mode with the covers off for about 15 seconds, ensuring all fans were working correctly and they were. I put the main cover back on and then used the convection mode at 350. It went 15 minutes, so I stopped it and put the rear and top heat shields/vents on and then restarted and went for 20 minutes, then started the grill and ran for 20 minutes. I changed the water for new cold water in the bowl and then used the microwave to heat the water for 10 minutes. The top left rear got around 130-140 degrees I am guessing. Hot enough that I could only touch for about 1 second but it did't burn me. The Microwave unit never failed. I measured the inside cabinet and the microwave, and found for the depth was less than 1/2" clearance. In fact I problems getting the microwave to set back in, and it was so tight that I think the cord got caught between the back. Also there is a little shelf in the back and the rear shield sets directly on it. covering up 1/2 of the rear vents. Also the way the side of the trailer slopes in I was very close to touching the top back side to the side of the trailer. Also Oliver had ground a small section out of bottom of the storage cabinet above so the top rear left corner would fit in there. Darn that is tight. I had never tried the convection/grill until I started this thread, but the previous owner did use the convection. I remove the microwave in may/june to add the refrigerator fan upgrade. When I used a coat hanger wire to go from inside the microwave area into the external fridge compartment for the wiring it dropped through and down into the fridge area without resistance. The taping inside the upper corners of the fridge was poor at best. So after I pass the wire and 1/2 sheathing from the switch panel down into the fridge area with no problems, i re-taped several areas long the top of the external fridge area, with higher quality aluminum tape and sealed this whole section up. I have probably been getting some CO in the microwave compartment from the propane burner in the fridge. I decided to seal the area between the microwave cabinet and the fridge exterior compartment with spray foam. I also think I sealed the area between the hulls when I did this so I was not getting any air coming up from the basement. I am thinking that everything was so tight in the cabinet, that reducing that small amount of possible airflow caused increased temp and the main thermal breaker to open. I'm not exactly sure how this popped the GFCI unless there was arching when it opened. I have thought about testing this theory, by running in convection mode with all of the covers off, and getting the main thermal breaker positioned so i can get a heat gun to heat up the breaker and see if it trips the GFCI breaker when thermal breaker opens. I am thinking of removing the small step/shelf in the back of the cabinet. Removing the white board in the back removing some of the bubble insulation behind the microwave and then digging some of the Foam insulation to possibly get some air-flow from the basement. Questions 1. Do you think I am on the right track? 2. If my theory is correct. and the Thermal breaker has been opening. Should I replace the thermal breaker just because it has opened at least 10 times in all of my testing? You can see the shelf in the back that covers the bottom vent holes, and the white panel in the back, as well as the foam I sprayed in on the sides. Back of the microwave, the sheet metal cover that sits on the shelf. The main thermal breaker and the PC board for incoming power.
-
Good Call. I didn't put it together until you said something. I lived in Colorado for 40+ years. Low rust, and you had to take extra care with rubber revitalizers a few times a year.on the cars. In Arizona I'm sure it's much worse. In Oregon rust is a big problem. My Dexter Axles tubes started rusting in 9 months. When I put the Alcans on, I sanded down the Axles, put a rust inhibiter on, Primed and painted. I finished by coating the tubes and backing plates with Cosmoline, In Oregon we rarely see the sun for 8 months of the year with very high-cold humidity and I don't see weather checking, but I had rubber softening on 12 year old tiers on a truck I bought.
-
I have been lucky, I have only had to place one O'ring over the years. I use Eley silicone grease on the Male fitting O'ring at the beginning of each season. I like the Tee on the 6" extension coming from the RV hose bib. Great when you need water for another need.
-
thanks @topgun2
-
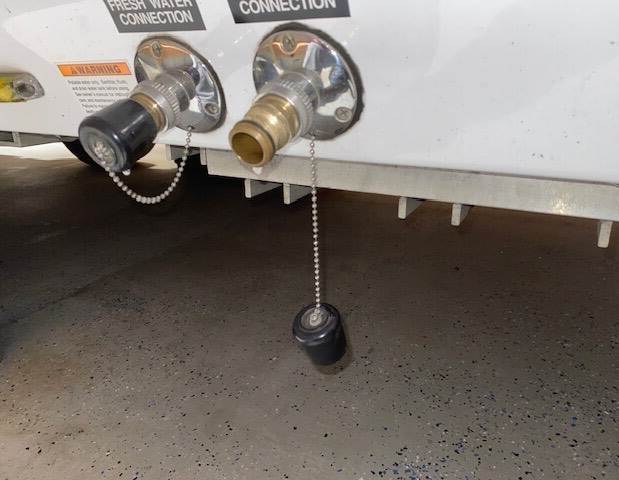
I used Eley Hose quick disconnects. I have used Eley products for around 15 years. They are superb products although expensive. I used the hose leader as shown above to hook to the RV Hose bib. Then the other side is the Female Quick disconnect. I have 3 different hoses of differing lengths with the quick disconnect fittings on them. I have a 2 stage filter with dial pressure regulator and eley shutoff valve and Eley quick disconnects. Finally the city water, Fresh water, and boondock fill all have the Male disconnects on them. I removed the screw in stoppers and connected 1" rubber Chair leg Caps to the chains to seal the male quick disconnects. With all of the disconnects I am able to connect everything up in just a couple of minutes. I do have to lean over for about 10 seconds, but that's it. Sorry for the upside down picture. Just an Eley plug. We have 2 acres, and we bought 2 Eley hose reels with one with 175 ft hose and the other 200 ft. (My wife does want automatic sprinklers) I went through several $150 reels lasting a couple of years each before failing before finding Eley. All of my hoses have Eley shutoffs and sprinkler accessories all have Eley quick disconnects. Everything Eley is 5/8" inside diameter all the way through and my hose bibs are 3/4" with 1' pipe feed from the well. I have never had a problem with any Eley products. In the long run, I have saved money on not replacing hoses and reels on a regular basis.
-
That is a great thing being able to talk to someone. Difficult with the Dometic
-
We updated our Dometic last year when Oliver was giving a deal on the Truma Adventa units. My wife hated to spend the money, but she was happy after the unit was installed. We have a Lagun table, so it has become the table we eat at, play cards, and holds drinks and snacks while we watch Movies. The difference was incredible. We can carry on a normal conversation without raising our voices sitting on the beds at the Lagun table. Watching a movie is no problem. Sleeping with the AC on is a little loud, reminds me of staying at hotels with the AC units in the wall. you don't really notice them until all is quiet. As @Boudicca908 said there is information about different AC units on the forum. Some have even included -dB noise levels.
-
I am trying to plan itinerary to go Alaska through British Columbia (BC). I was looking at trying to go on the Sea to Sky highway going North and then pick an alternate route coming back. We are looking to start our trip in July. Has any one traveled the Sea to Sky highway with our Oliver, and what was your tow vehicle?
-
This has been mention before. The ride is stiffer, the ride smooths out as the springs get worked out. I noticed this at first, I got used to it, then after a 1,000 miles of a 8K trip I paid attention to the ride of the trailer and roads we where on, and noticed a nicer smooth ride. The only thing that are still a problem is larger imperfection in the road, cause movement front to back. as the truck hits a large bump/ pot hole and then the trailer hits the bump and you get that front to back movement and feel it in the truck. Heavy washboard dirt roads are still tough. I just no long get the side to side just front to back movement.. The Oli on the original leafs was like a drunk sailer doing the bob and weave, and that was on nice highway. Inside the truck on rough roads it was like the truck became a bucking bronco. I did upgrade my shocks on the truck when I did the upgrade on the Oli. Now I like it, and you almost forget the Oli is behind you.
-
I left after the split, after I had to let go of my first employee. The head over IT for the Corporation came out in 2000 and said, We where going to be getting rid of 50% of the end user systems next year and we needed to figure out what system and legacy procedures/systems we needed to sunset. Not what I signed up for. I had a friend At IBM that had been trying to get me over to IBM for several years. I gave him a call, and I had a job within 3 months helping to designing network and system security, also some software testing and integration for the Government. In the late 90s HP was the 2nd largest employer in Colorado, the largest was the state government. Agilent/HP in Loveland, CO had 3500 employees when I left. Within 5 years they had 300 people left. The site was empty by the end of 2010. The HP site in Fort Collins, was over 3200 people in the late 90s and are now down to about 1000, between HPQ and HPE. The Greeley site was shuttered in late 2000, losing 1000 employees. Some were absorbed by Fort Collins. There is no way I was staying around for all of that blood letting.
-
I started in 1978, It was referred to as Bill and Daves Daycare center by some vendors. I remember Beer Bust about 10-15 time a year depending on how the company and division was doing. I thought one of the best benefits besides health care was Hermit Park, a big chunk of land with cabins and Boondocking sites for employees close to Estes, Colorado. We also had the family picnics there. Well enough reminiscing. I worked with both the Test and Measurement in Loveland, and the Desktop Computer Division in Fort Collins.
-
Ya, I remember those days. Never meet Bill, but I met and talked with Dave a couple of times when he came out to Colorado. Really down to earth person. Dave would fly into the local little airport. Some low level person would drive out and pick him up. Dave would then take one of the Fleet Ford Taurus to drive around. Many places in HP treated people like family with a common goal. Many employees would sacrifice their time with their family to help out HP in a crunch. I remember in the 80s when financial times where tough and no one was laid off, We all worked one less day every 2 weeks. Compared to Carly Fiorino that showed up with a bullet proof Limo and body guard entourage, with all meeting being locked down.