

Ronbrink
-
Posts
896 -
Joined
-
Last visited
-
Days Won
20
Posts posted by Ronbrink
-
-
2 hours ago, jd1923 said:
Temp solution: run off the truck batteries and generator while towing, plug it in when at camp off house batteries and inverter.
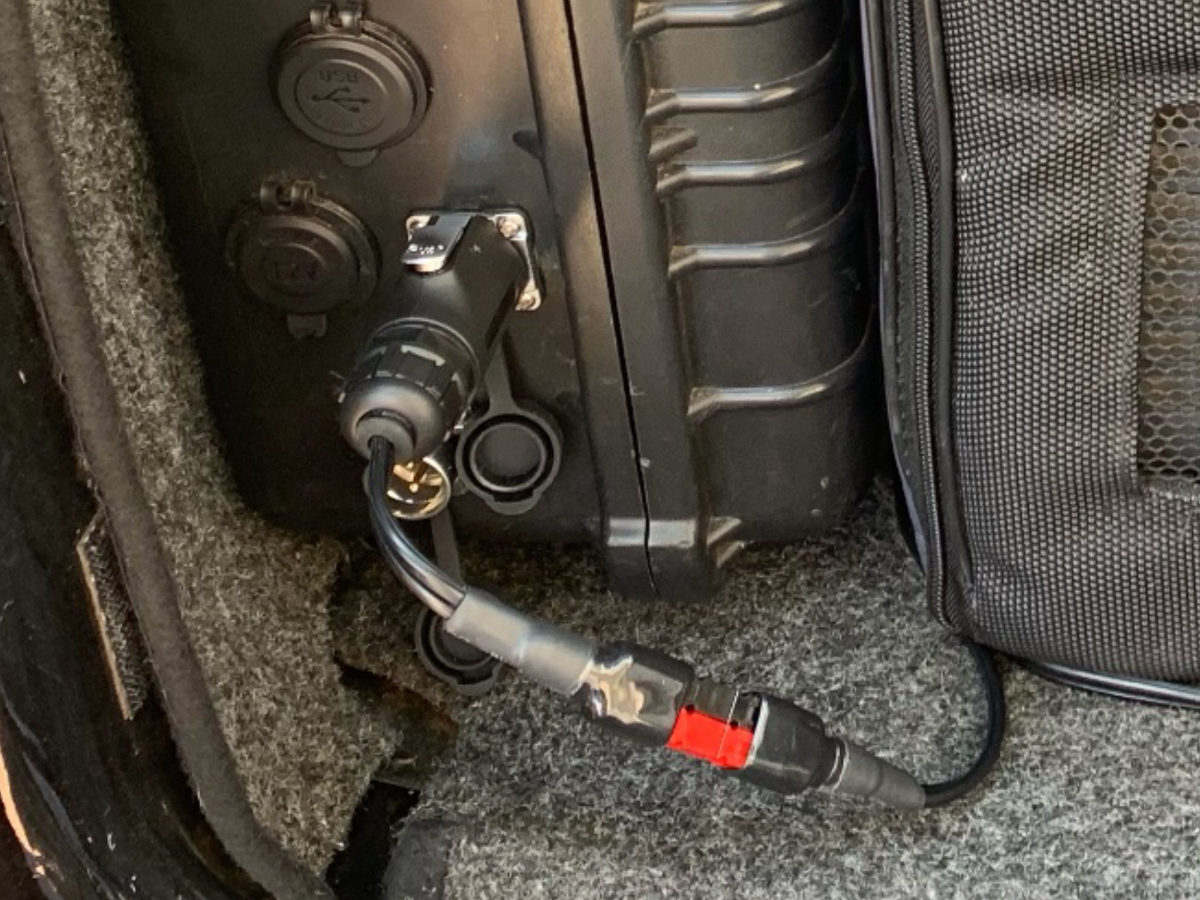
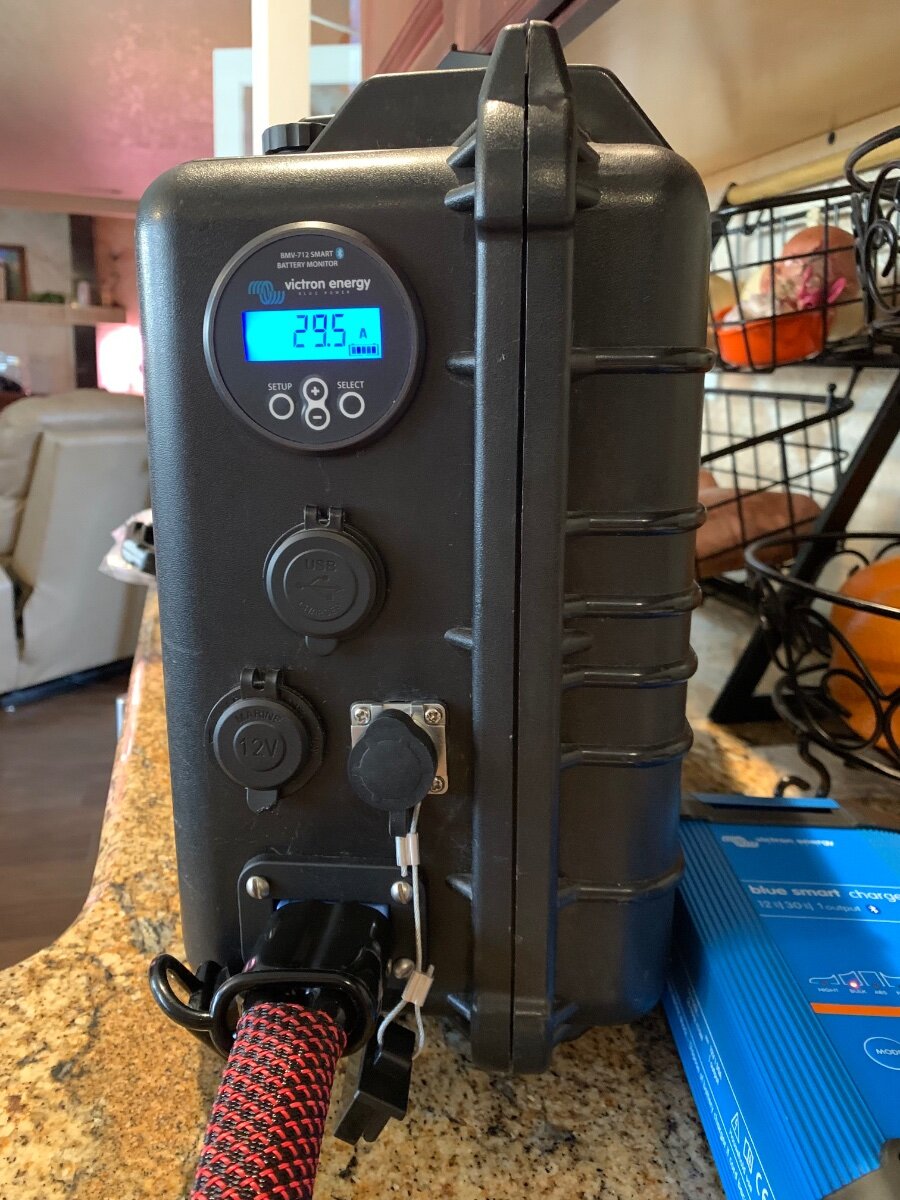
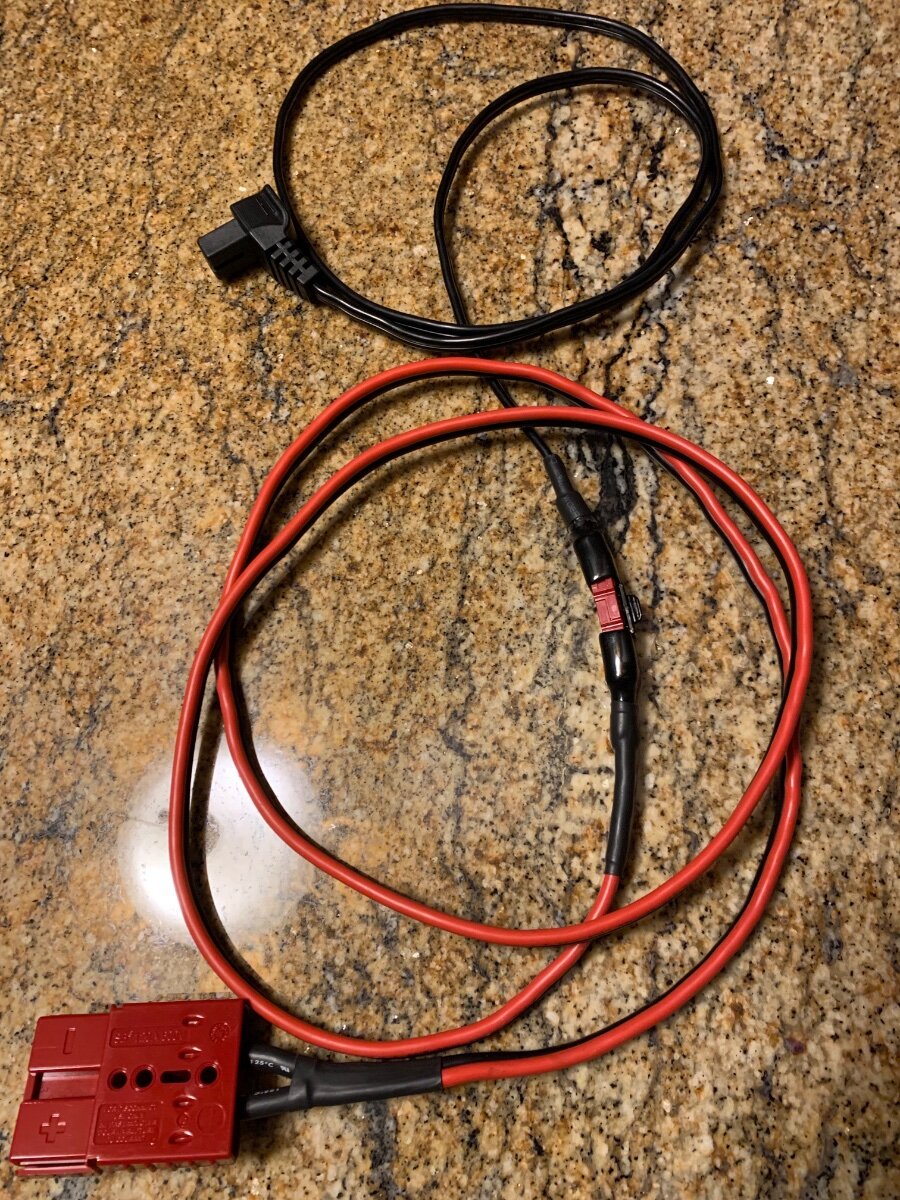
I use the forward AC outlet installed at the front of the propane housing, and simply run an extension into the van to the Dometic’s AC cord to power via the inverter/battery bank when underway; not during inclement weather, of course. When staged in camp, same setup with shore power. When leaving camp, the extension is unplugged and my 100ah LFP portable power station is then used, which can run the Dometic over 30 hrs without solar input. I modified the DC cord by replacing the cigarette lighter plug with a 2-pin power connector, much more secure connection! My former TV had a dedicated 200W solar array on the bed cap for the power station; installing a larger array on the van is my plan when time allows (you know the gig!). I have a Victron 30A smart charger to maintain the power station, as needed. As a backup, I made a 12V extension that plugs into the rear DC-DC Anderson port to connect to the Dometic’s DC cord.

-
 1
1
-
-
1 hour ago, jd1923 said:
I have a question for @Ronbrink or anybody else that has owned the Dometic CFX. Can the AC and DC connections be wired simultaneously and will one circuit preempt the other?
No, at least not on my model. The CFX manual specifies either a DC OR AC connection, as well as the CFX3 per this screenshot:
Check your CFX5 manual, but I would be surprised if they are any different.
-
 1
1
-
-
On 7/6/2025 at 7:22 PM, Dirt Duff said:
Based on the attached photo Cree
Actually Gree, not Cree:
-
23 hours ago, Steph and Dud B said:
While we're taking about jacking, has anyone else experienced: using the official Oliver jacking point forward of the wheels lifts that entire side of the trailer? Both wheels come off the ground. Apparently that's the balance point on our trailer.
When I had metal valve stems put on my trailer, Discount Tire used the jack points and commented it was the first trailer they ever saw with a designated spot to lift. Further comment was they wished all trailers had them, made their job much more easy.
-
2
-
-
Our Oliver has been an escape pod for two hurricane evacuations and a winter storm retreat when power was out for several days. Times like these is when our COW (Condo-On-Wheels) and the Westinghouse iGen4500DF are put to good use in survival mode!
-
5
-
-
11 hours ago, Tideline77 said:
edit to add my confession,
I raised the Oliver off the slab in the shop using both rear leveling jacks and the front jack , while I had it up about 3-4” the tires on both sides sagged back down to touch the floor…….i was stumped, apparently that was the shackle flip 🙄🙄🙄. Now I have one shackle on port and starboard flipped
it dawned on me this afternoon reading about shackle flip
this was a failed attempt to put the Oliver on car dollys so I could shoe horn her sideways into its storage spot in my workshop.
I continue to impress myself with my accomplishments
—————————————————————————————————
Please …….Explain to me how to determine if you flipped a shackle ?
Andhow you used a curb to flip it back ???.
does this happen on the 2022 models with the bigger axle and springs ?
I think I have one side flipped after I used the leveling jacks to raise the trailer…….
but I raised both sides 😵💫😵💫😵💫
thank you
I feel your pain! I made the novice mistake of using the rear stabilizers to lift all four tires off the ground to level the trailer for a night’s stay, still connected to the TV. Slept great, other than being awakened once to a loud thud. When getting ready to depart, the realization hit me like a ton of bricks. All four shackles had flipped at the Dexter E-Z Flex equalizers, no bueno! With jack in hand and hours later, toiling in the Texas summer heat, all was back to normal. We learn by our mistakes and that of others.
-
2
-
-
‘Very entertaining the squabbles they are’, as Yoda may have said it!
-
1
-
 3
3
-
-
35 minutes ago, jd1923 said:
It will work, but the Oliver has an issue with the shackles flipping and this occurred using this jack.
I bought my Rapid Jack prior to taking Oliver ownership and soon learned afterwards about the shackle flip issue. I’ve since had opportunities to try it out, but the stabilizer jacks were less troublesome and thus, the preferred method for lift to change a tire. Not one to let good money go to waste, started using it for the front stabilizer support.
-
1
-
-
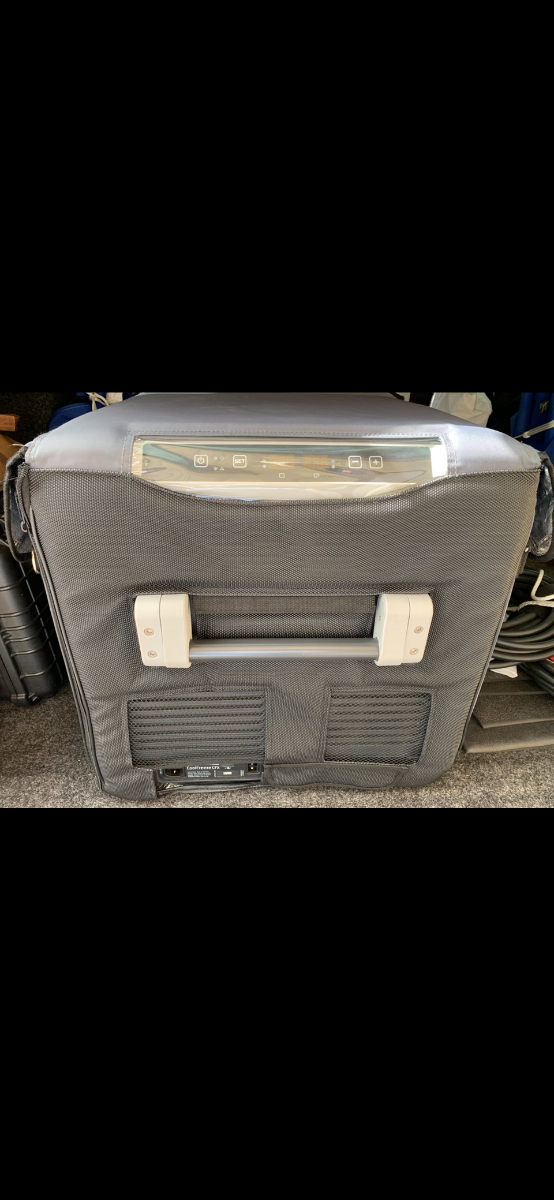
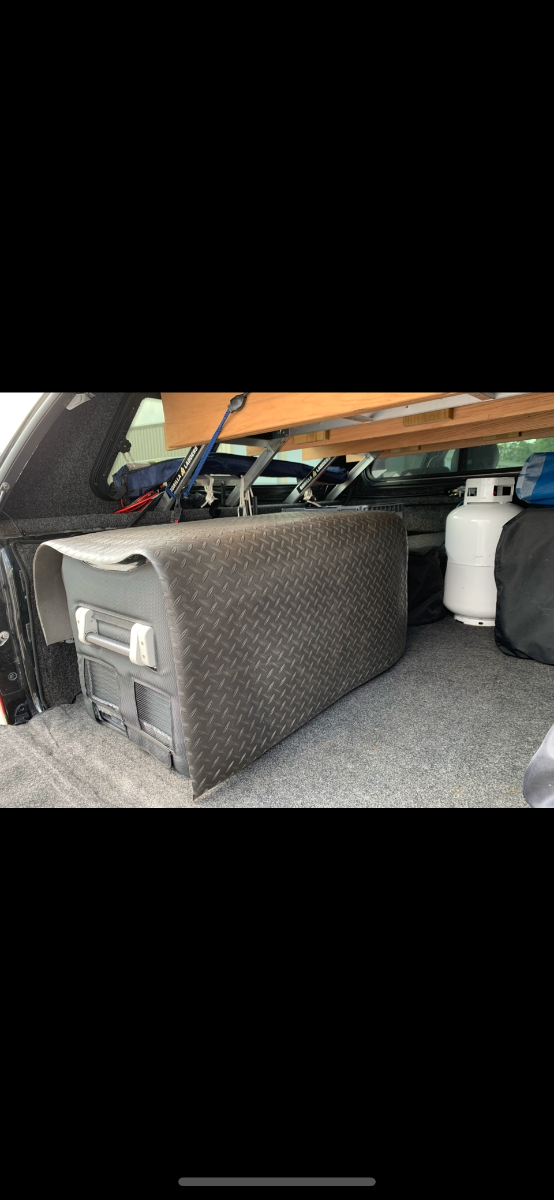
19 hours ago, jd1923 said:
We got the Dometic CFX2 45L model.
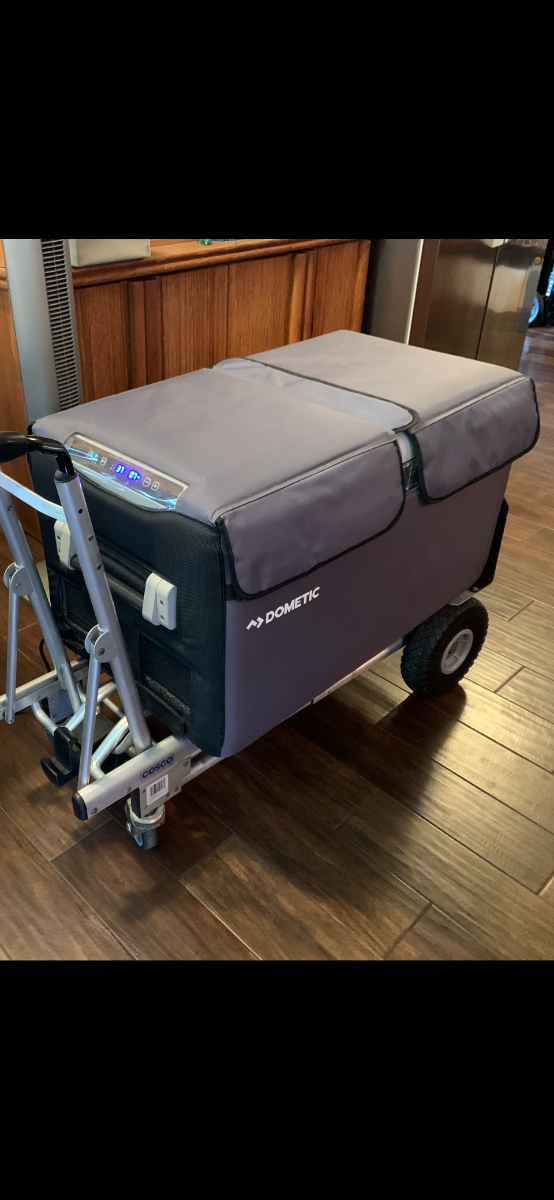
Good choice, I’ve been very pleased with my 75L DZ model. You may already be aware that Dometic offers a protective cover for some of their units; good way to protect an investment and potentially improve efficiency. Claim to be good for outdoor use, as in weather durable and waterproof; however not leakproof at the handles and other cutouts. Furthermore, I drape a neoprene mat over the top for added protection/insulation and even installed an inner lining of Reflectix for good measure.
-
1
-
-
19 hours ago, Tideline77 said:
😳 I didn’t carry a Jack specifically for the Oliver on our very first trip. I do have the big red Andersen drive on lift that I had intended to use for changing a flat. Have not ever used one before. The thing is beefy and heavy.
I think you are referring to the Anderson Rapid Jack. Although it is primarily designed for changing a tire on a tandem axle trailer, I use it as a block at the front stabilizer, as well as two of the Anderson Jack Blocks at the rear stabilizers.
-
2
-
-
14 hours ago, Patriot said:
This one - https://www.amazon.com/Powerbuilt-620471-6000Lb-Unijack
Appears to be similar if not identical to @Galway Girl jack.
Yep, I carry two!
-
2
-
-
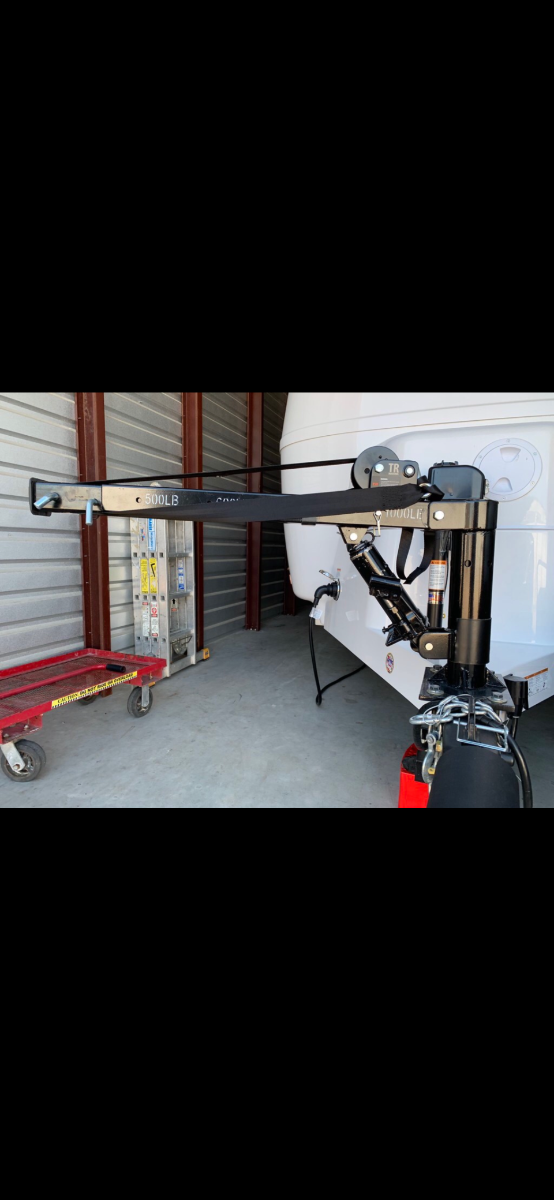
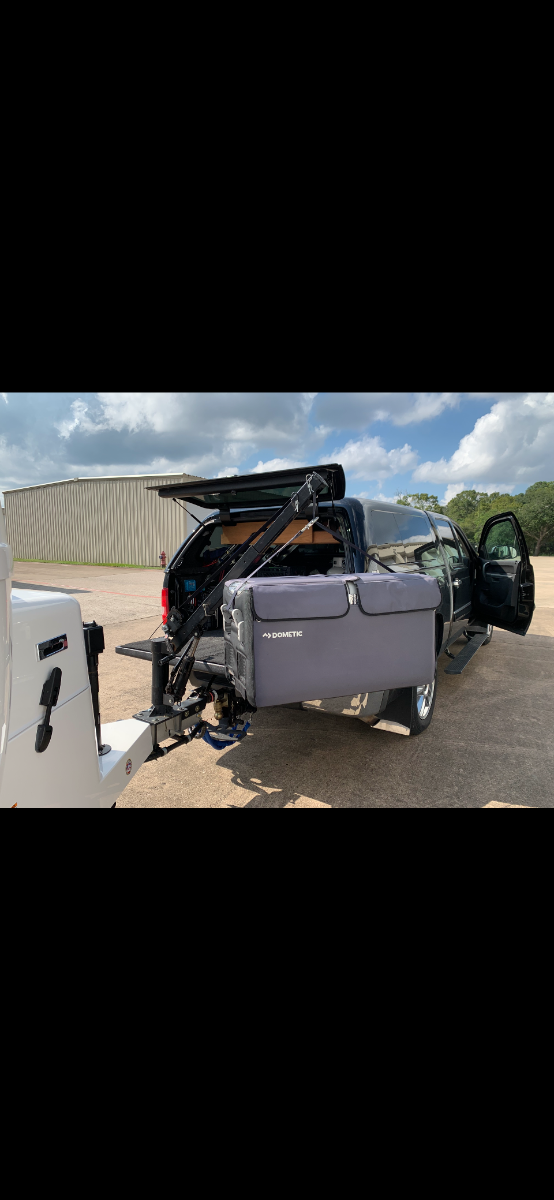
On 7/6/2025 at 8:08 PM, jd1923 said:
Looking for your advice. Looking at products on Amazon which seem to be overkill, but maybe not. Perhaps this is right product as-is or with some modification in height and arm length. Let me know what you think. 😂
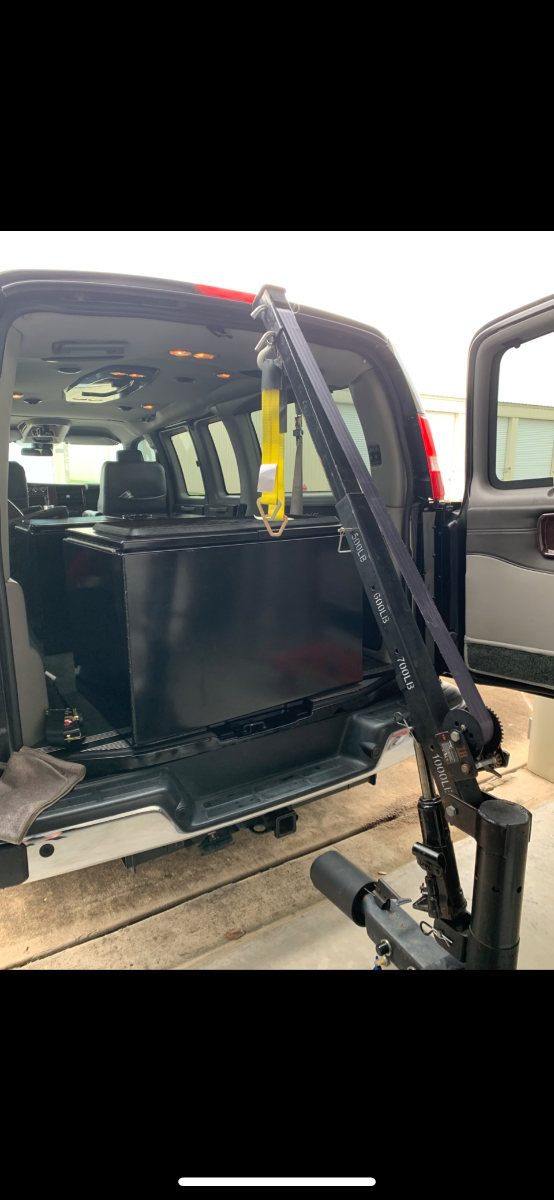
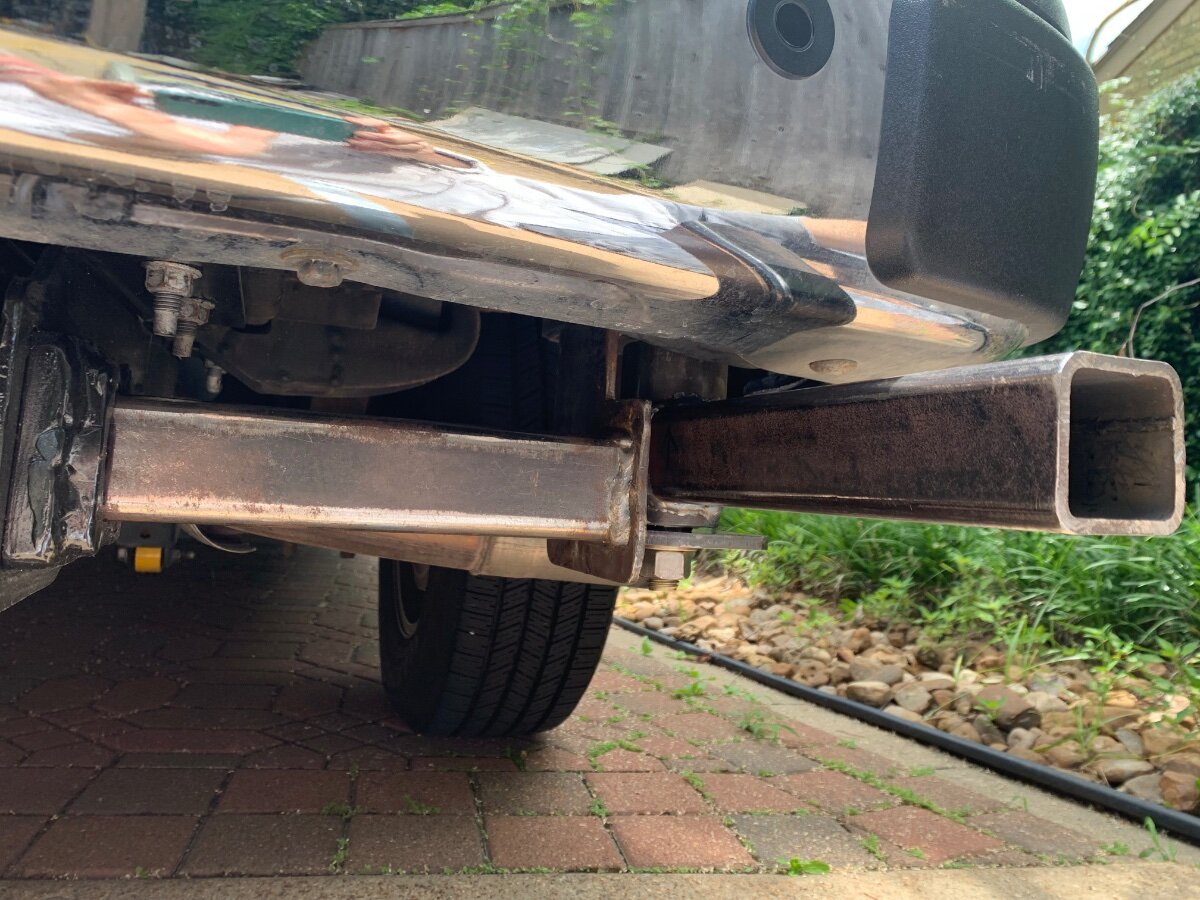
My hoist is a basic Ultra-Tow 1000# capacity hydraulic truck crane from Northern Tool, to which I added a strap hand crank winch and modified the arm end with rollers for ease of lifting. I think a strap, rather than wire rope, would serve you better; less abrasive and more user friendly. Whether looping around the handles on my 75L Dometic DZ cooler fully loaded, frames of our expensive ebikes, handle/valve guards on 30# propane tanks or the plastic molded generator handles; worry of marring is completely eliminated. However, lifting straps could be used in conjunction with a wire rope setup, and that product you linked may meet needs you have other than just camping. Proper reach from the truck bed to a point directly over the propane tank housing is important, but the post height could definitely be reduced, as you eluded. No regrets installing my hoist within months after Oliver ownership, its been a real back saver! And now it is proving to be even more useful in lifting the cargo boxes in and out of the Savana van. Here’s a few pics to ponder:
-
1
-
1
-
-
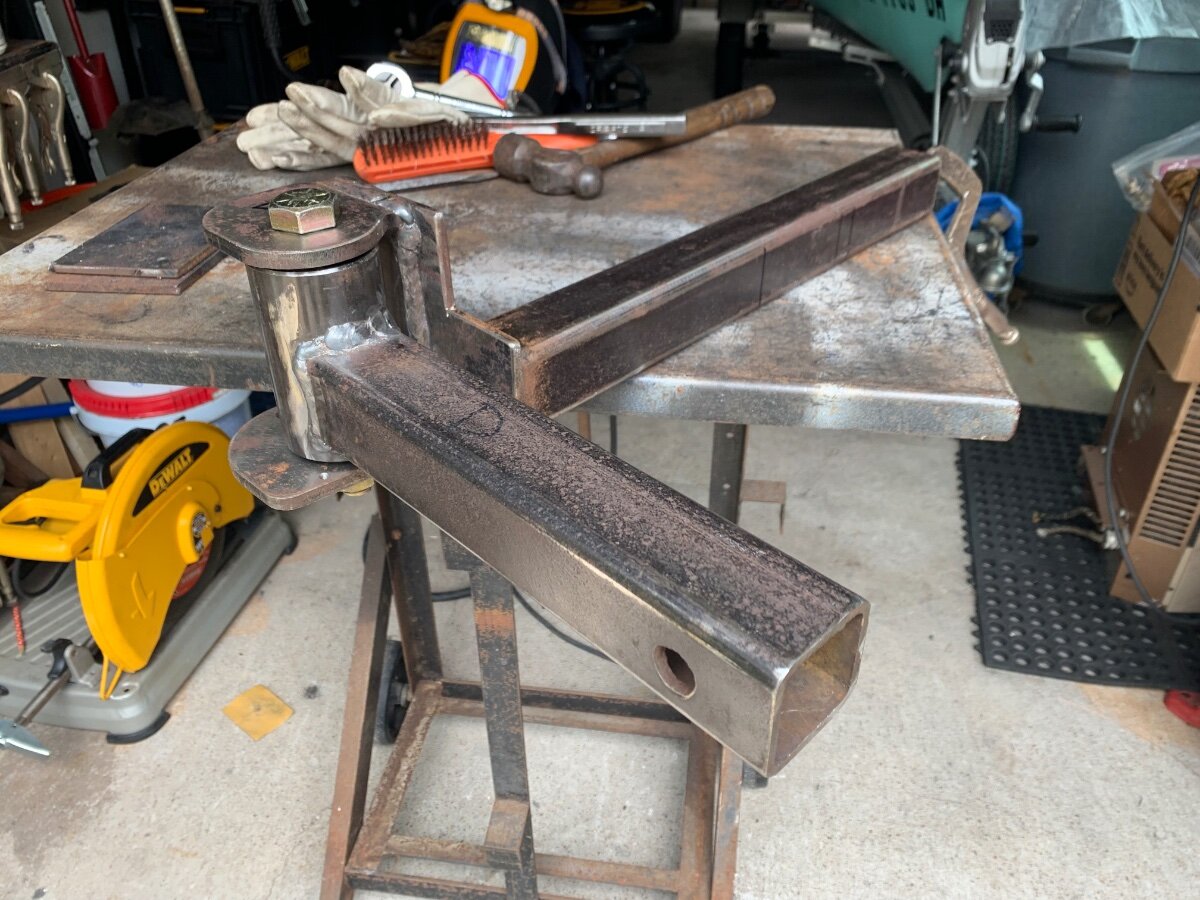
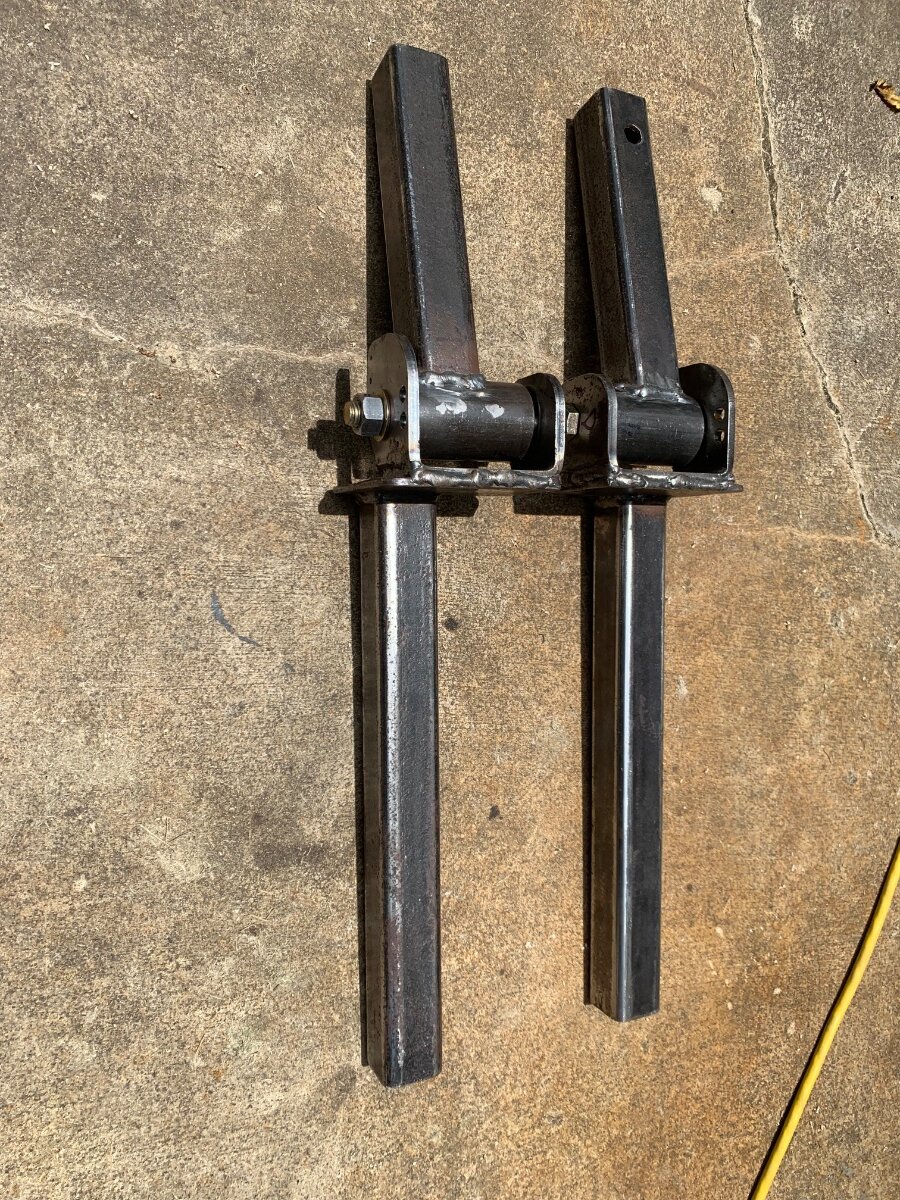
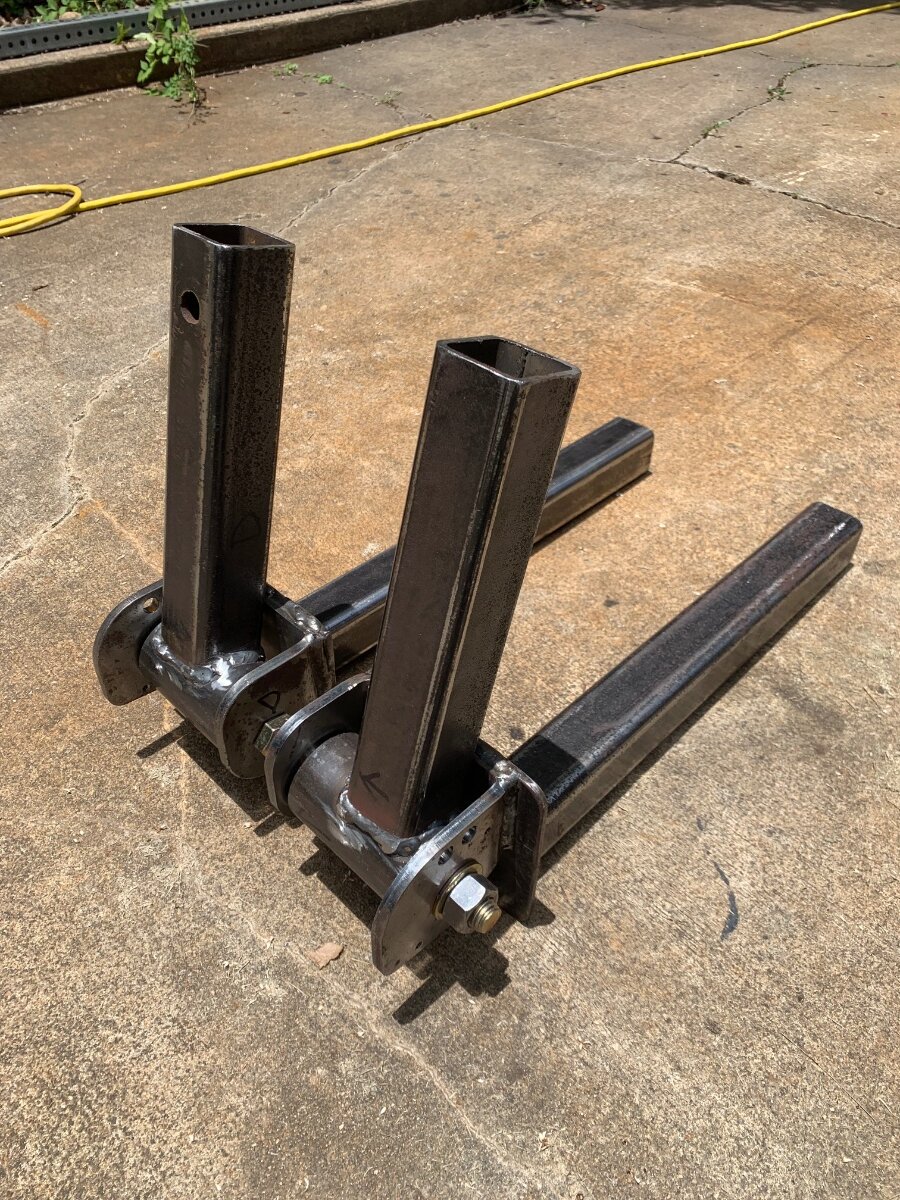
This is a slow progression, but my design-as-I-go method of doing things usually works to my favor. Each of the swing racks will have dual articulation to provide adequate clearance to enable the rear cargo doors to fully open. Here are some pics of the two primary pivot and arm assemblies. Awaiting delivery of additional supplies to further fabrication of secondary components. Standby!
To anybody having the patience or curiosity to continue tracking this build, you are appreciated. I’m aware this may be beyond scope of the forum, and even though such tow vehicle mods are oftentimes of personal and individual importance, they should be shared in interest of others.
-
1
-
-
16 minutes ago, Jim and Frances said:
Texas heat management! I also place a fan on the platform and a cold drink in the cup holder. This side tray is very handy for staging supplies and equipment.
-
4
-
-
1 hour ago, rideandfly said:
Agree, I'm keeping the Metaltech in the airplane hangar with Ollie and the Vagabond to keep them out of the weather. To transport it used a trailer to keep it in one piece. I had it in the garage for a while with a table underneath, Debbie did not have any trouble with it, but when I put things on the table occasionally bumped my head, glad I'm hardheaded. 🙃
That's what I like about this forum, for folks that may be buying a scaffold, this lets them know real life application of a product, good or bad.
Bottom line working off of a scaffold on Ollie is great for increased safety, ease and faster than working off of a ladder. 🙂
It definitely helps to have the space to keep the scaffold nearby and fully assembled for immediate use. To @Patriot’s point, they are heavy and can otherwise be cumbersome to store and setup, as needed. The locking rollers that come with the MetalTech work great for moving and positioning.
-
1
-
-
11 hours ago, jd1923 said:
But let me get one thing straight! I've used this as pictured to remove the Winegard dish, replace the bathroom exhaust fan and repair all the top-front fiberglass. Soon, I will use it to replace the A/C on top of our hull. But, no way in the world am I getting up there to wash and wax, to make our hull pretty! 🤣
Anyone using or thinking of using scaffolding should take notice to John’s setup; specifically, the top rail for fall protection. This is a necessary precaution when working at any height and should not be ignored, so please take heed! Alternatively, as a cost saving measure, I chose to make my safety railing; four-sided railing with locking swing gates on the ends. Shown here when using the scaffold to install the Dreiha Atmos 4.4 last summer and during my last waxing cycle. As a side note to address concern expressed regarding the wooden platform’s exposure to water, I cover it with a large door mat; which also offers better footing.
-
2
-
-
10 hours ago, Patriot said:
Just listing the few important reasons which I based my decision on to invest in the Little Giant system. This might help others who wish to quit hanging off a ladder. As always roll with what works best for your individual and SAFETY needs.
Given the narrow space within your “Ollie Hangar”, your system is perfect! The adjacent wall(s) offers necessary fall protection whether preforming maintenance, repairs or upgrades; which would not be the case if the same or similar setup was used outside with no such backing or protective rail. Thanks for the SAFETY reminder!
-
2
-
-
16 minutes ago, Treasure Coast Vault said:
@Ronbrink did you mention there's a way to have the fan continue running for a few minutes after compressor shuts off?
Per the June 2 post in my Dreiha Atmos thread:
“The following has been found beneficial in ‘Setpoint’ selection in Comfy Mode, but may be applicable with use of Comfy Max Mode, as well; TBD. It is important to know that a setpoint one or two degrees below the upper range of temperature selected will have the fan run more than the compressor prior to power shutdown; whereas a setpoint of three or four degrees will have the fan and compressor turn off in sync, and the outside blower fan runs a half minute or so before total shutdown of the unit.”
I have tried it both ways and works as described.
-
1
-
-
1 hour ago, Treasure Coast Vault said:
Here is the way the Pioneer cycles in the Ollie 2.
It is my understanding that these inverter a/c units are designed for always-on cooling, wherein the fan and compressor run continuously at variable speeds for better dehumidification and energy efficiency. It will be interesting to see any differences noted in normal operation of your unit compared to that when using the Cielo in Comfy Mode.
-
Good to know information on and my experiences with the Cielo Breez Max, buried in my Dreiha Atmos 4.4 Home Install thread, got some attention. Thanks @rich.dev for the mention!
-
On 6/2/2025 at 6:26 AM, Ronbrink said:
I’m sharing my experience in hopes of helping other Oliver owners resolve the inherent humidity issue, regardless of the brand of a/c unit they may have. If found to work with a particular unit, perhaps others can share their experiences.
To the Moderators: Since I have shifted the emphasis of this post from installation of my Dreiha Atmos 4.4 to specific features of the Cielo Breez Max thermostat to better control humidity, could consideration be given to changing the title of this thread to draw more attention to that matter? If/when any interest in the use of the Cielo for said purpose gains momentum, I’m amiable to starting another tread to further discussion of other’s comments, experiences or findings. Thank you!
-
 1
1
-
-
17 hours ago, Geronimo John said:
Finally, an RV A/C MFG who is listening AND understanding the need for a modern control system of RV AC's in a small space that operates in a very wide range of environmental stressors.
They likely will in a few years be THE design standard for any A/C MFG that wants to remain in this business. I am thrilled.
Hopefully the roll-out will produce a reliable track record and many happy campers!
Thanks for being our pioneer on this unit.
11 hours ago, Geronimo John said:Ron:
Thanks for the PM.
In response to GJ’s above comment I sent the following PM, which he thought should be shared:
“In your last comment, it is actually the Cielo Breez Max thermostat that is controlling the Atmos to enable the fan to turn off, not the Atmos itself. Supposedly the Cielo will work with any A/C having an IR remote, that remains to be seen if true with the most common roof top units on Olivers. Sure, the Atmos has some great features IMO, but not that much different from the majority of makes and models for RVs. I’m with you on A/C MFGs improving their design standards, but the Atmos isn’t there yet and thus, credit to the Cielo for advancing our current unit capabilities.”
and his reply:
“This info would be of interest to a bunch of Houghton and other owners that have this weird cycling problem by design of the MFG. Would you consider posting as a response. I have no problem with your doing so. But others would be interested on how it works and what it costs.
I am totally not familiar with what a Cielo is. That would be good info to post too!”
Thanks GJ for the positive feedback, especially from someone of your great stature in this forum community!
-
9 hours ago, Geronimo John said:
I did not even know what a Cielo was or even remotely how it works. But for $99 on amazon you have my attention for sure.
Although Cielo offers several models, it is my understanding that the Breez Max is the only one featuring the ‘Comfy Mode’ that has been the subject of my discussions in this thread. A bit more pricey, but well worth the benefits reaped!
-
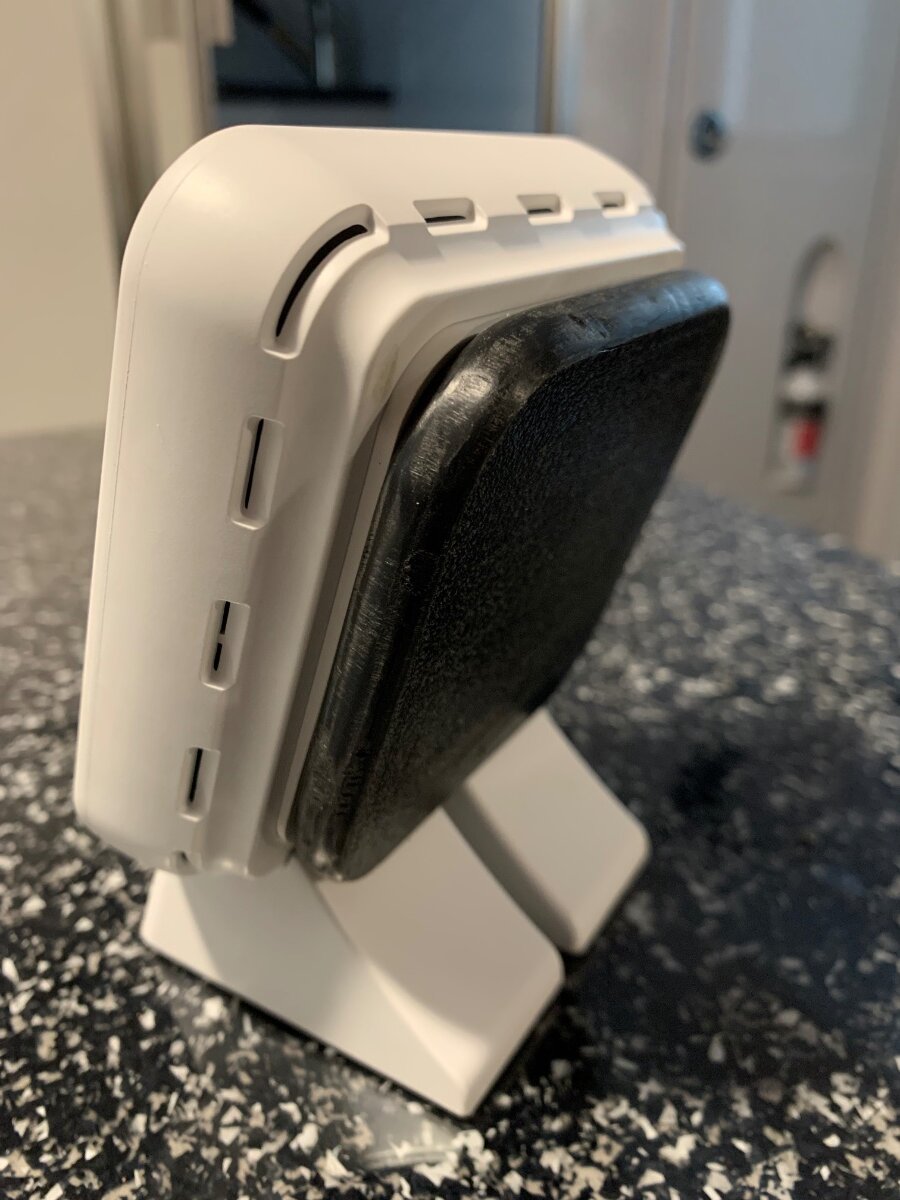
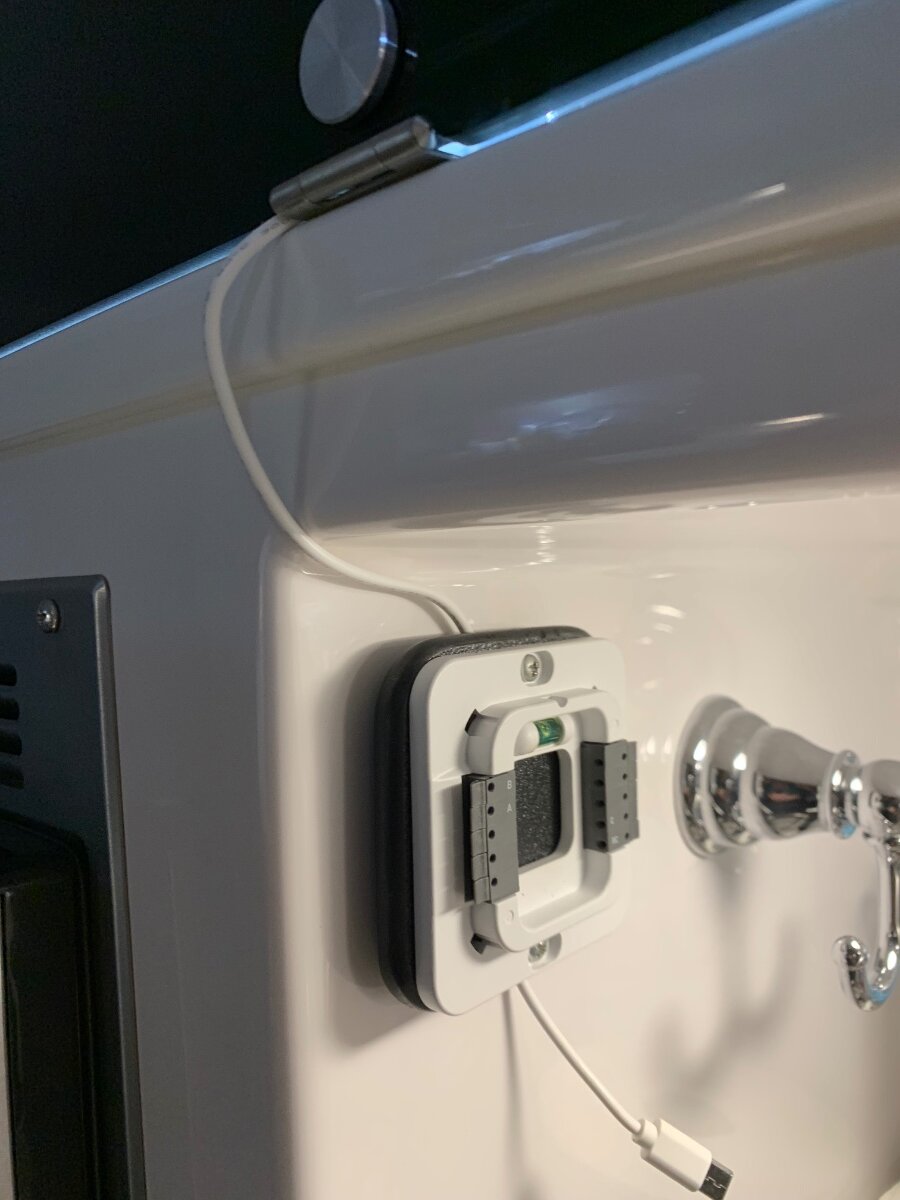
On 5/30/2025 at 6:15 AM, Ronbrink said:
Finally I placed it as shown in the pic, whereby the cord runs in and out of the galley cabinet and plugs into said USB port. I used Velcro for the mount, and may eventually hardwire the Cielo through that upper cabinet and tap into the wiring within the access screw port for a cleaner installation.
I have made a couple of note worthy alterations since the above statement. The use of velcro was a great idea, but the Cielo’s wall plate lacked enough tangible surface area for adequate adherence and thus, an additional backing plate was needed. A square of StarBoard Marine HPDE was screwed to the Cielo’s wall plate and 3M Dual Lock used to affix to the fiberglass wall. Care was taken to ensure the Cielo could still be mounted on the supplied base stand, if ever the need.
The Dual Lock was positioned vertically to facilitate routing of the power cable between and behind the backing plate.
With the Cielo mounted, said cable was plugged in at its bottom and the other end routed into the above galley cabinet. Unlike the previous install the AC outlet, where the microwave plugs in, was utilized with use of a slim fit USB 5V adapter as the power source. The excess cable was then tucked in along the edge of the black cabinet liner. As installed, hardwiring is no longer in consideration.
-
1
-


Portable Refrigerator Suggestions
in Ollie Modifications
Posted · Edited by Ronbrink
Actually, a solenoid was installed to trigger power to my suspension air-bag pump when the engine is on. The DC-DC is only powered with the key in ACC ( to power my VIAR) or ignition (engine run) positions. I do know that these Dometics have a staged built-in battery protection system to prevent complete draining of the vehicle’s starter battery. The limit of draw can be set and can allow for deep draw on dual batteries, as I recall.