

Ronbrink
-
Posts
496 -
Joined
-
Last visited
-
Days Won
5
Posts posted by Ronbrink
-
-
11 hours ago, rferg800 said:
We also bought one of these. Good to know it will fit in this compartment. I was always worried about someone taking it in a campground.
Exactly, number one reason many mount them inside an RV plus they’re heavy to cart around! I sized up a potential spot for mounting prior to purchase, but for best fitment had to deviate a few inches and in orientation. My original thought was to mount it directly over and a couple inches above the grounding bus bar (yellow wire grouping), but ended up simply repositioning the individual wire runs to the right (in pic) and turning the Autoformer 90°. I plan to install a couple pieces of aluminum angle for horizontal and vertical support, and mounting of the securement bracket. I will detail that process with a pending update to my post.

-
I am aware that some owners use the Hughes Autoformers, even in combo with one of their Power Watchdog surge protectors. Although designed for easy use outside at the shore power post, they can be installed inside an RV which is what I decided to do. Without going into much detail, the Autoformers (available in 30A and 50A models) boost voltage when drops occur, as well as provide surge/spike protection. Surprisingly enough, a ‘search’ of this Forum did not show many results for these Autoformers.
As a cost saving measure and matter of convenience, I passed on their Internal Hardwire Mounting Kit and simply made use of a new 10’ 30A RV extension cord.
I did however, opt for their Mounting Bracket due to space limitations and ease of removal for service needs.
Upon disconnecting all power sources, I proceeded with removal of the exterior street side Furrion 30A Twist Lock male plug. Although I never experienced any problems in the past, I did find the ‘white’ neutral wire connection loose, probably from vibration. You’ve heard it before and now again, routinely check your wiring connections!
I then opened up the Automatic Transfer Relay and disconnected the individual wire ends of the stock 10 AWG Boat Cable. I was pleased to find my unit had the Wago Lever-Nuts wire connectors! The clamp connector was loosened and cable removed, all 24” of it. Note: I opted for the front 30A convenience plug for generator use, thus the stated ‘relay’.
The female plug end of the aforementioned 30A RV extension cord was cut off, measuring ~35” of cable length below the red plug and subsequently connected it to the Furrion Twist Lock plug. I used the removed cable to gauge how far to strip back the outer cable cover and individual wire ends. Again, pleased to find that the individual wire inserts on the Furrion were color-coded to ensure proper wiring. If you forget to position the neoprene gasket prior to connecting the wires, just know it can be ‘gently’ fitted over the Furrion’s cap and base. The mounting screws were then aligned with the gasket and hull holes for reattachment.
The installed female plug extension was laid out and connected to the remaining length of the male plug extension; the end of which was then fed into the relay to mark where to make another cut. For clarification, the cable right of the red plugs is the whip on the Autoformer, the left is the excess length to be trimmed.
As before, the former cable was used to gauge necessary wire stripping. The cut length measured ~38” of cable below the red plug and subsequently attached to respective Wago connectors/ground. The cable clamp was then tightened and lid placed back on the relay.
By connecting the two red plug ends, the circuit loop is restored to the original configuration, but now longer and modular. The connected cables can now to tucked away when bypassing the Autoformer. Note: the final position and orientation of the Autoformer will differ from this pic.
The plug ends can now be disconnected from each other and connected to the Autoformer, as necessary, to bring it into play. These pics show the final position and orientation. Note: the ‘yellow’ light on the Autoformer indicates it is boosting, I have known for some time my storage facility voltage fluctuates and just another reason for this install.
The above two pics shows a mockup of the Autoformer, which still needs to be properly mounted. I will update this post when undertaking that task.
-
 2
2
-
 4
4
-
-
8 hours ago, Jason Foster said:
As a semi-retired rancher, I've been beat up, trampled and broken by nothing more than pasture raised cows.
Know what you mean, I have a herd of cattle; working them is a treacherous task, indeed!
-
1
-
-
1 hour ago, Jason Foster said:
Those things are notoriously bad tempered. Glad you got away with it.
I’m a retired wildlife biologist, been up close and personal with many critters much more dangerous than buffalo!
-
4
-
-
3 hours ago, Jason Foster said:
Did this actually happen to you?
Yep, free-roaming buffalo!
-
2
-
-
‘What if’ the local residents disapprove of your site selection!
-
1
-
 7
7
-
 1
1
-
-
16 hours ago, Geronimo John said:
LOL! Come on guys it's obviously the base mount for an "entertainment pole"!
🙂
GJ
I will have to ‘entertain’ that thought!
-
1
-
3
-
-
1 hour ago, mossemi said:
I was reading Galway Girl's Blog about their DC System upgrade and found another pipe flange installed on the interior top of the SS wheel well.
I noticed that, as well. Their 2019 OLEll 505 and my 2020 OLEll 579. I have a feeling ‘we are not alone’!
-
1
-
-
Now there’s a thought, I have a piece of plate metal begging to be put to good use! Last welding task was a roller skid plate for the front TV bumper mount to protect the QuikrStuff bike rack and secure our ebikes; pic of roller mockup during fabrication.
-
1
-
-
20 hours ago, MAX Burner said:
Concur, 100%, @Patriot - Very sano mod, indeed. Practically, however - they keep from chipping the black paint/powdercoating off the bulldog if they're wrapped over the top... Good thought, David!
I had just enough leftover web sleeving after covering my bike security chains to treat the Oliver tow chains. Marring the bulldog is one thing, but very expensive ebikes is another!
-
1
-
2
-
-
3 hours ago, mountainoliver said:
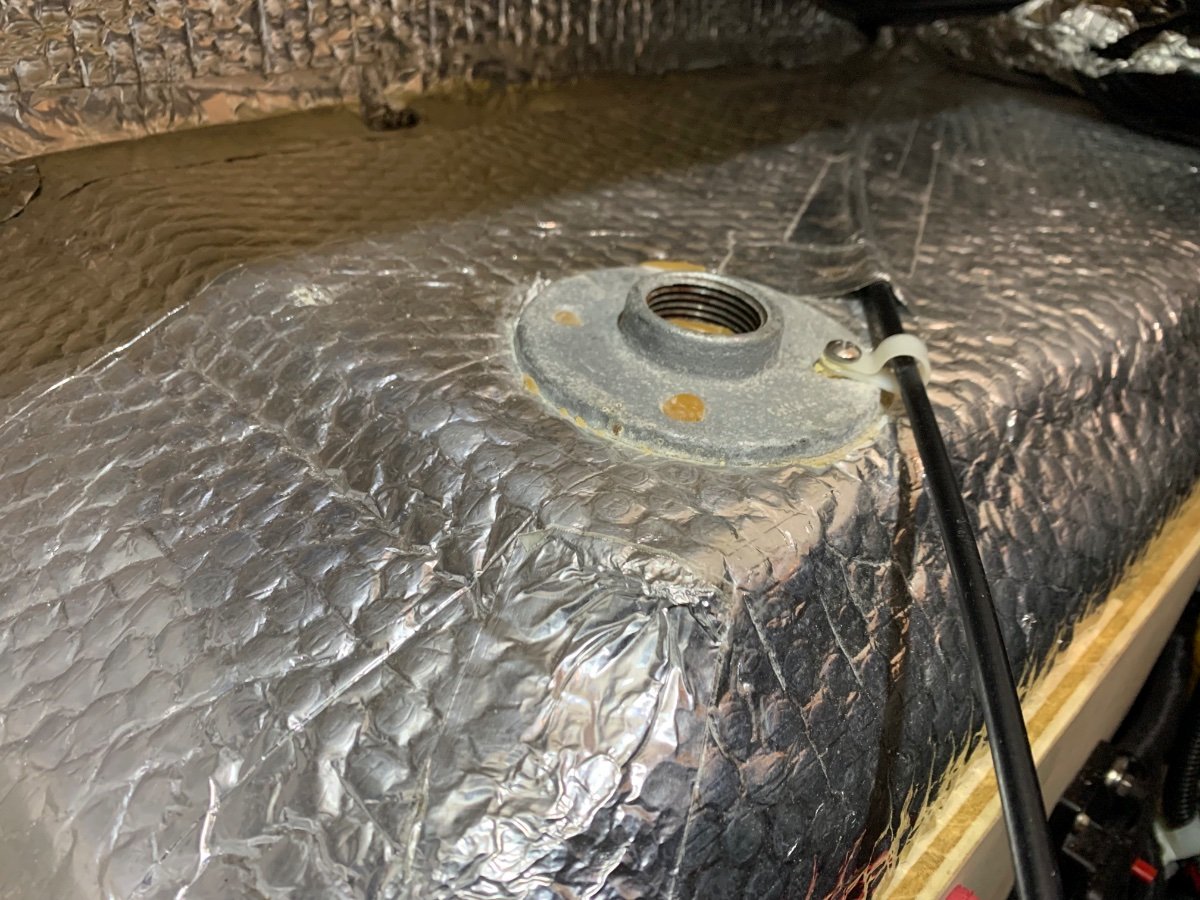
You can see the honeycomb material in the upper part of the picture.
Thanks, your pic confirms what I suspected. I assume the reflective insulating material is first removed to ensure an appropriate bond of a mounting plate to the honeycomb material. BTW, I quoted you in my reply to topgun2!
-
2 hours ago, jd1923 said:
Unless you purchased yours new, somebody must have added that galvanized threaded pipe mount! I can't imagine a purpose for such a large ugly mount in that location.
I bought the Oliver new, maybe someone will be able to solve the mystery!
-
1
-
2
-
-
3 hours ago, topgun2 said:
As far as I know - the material under that insulation would simply be the inside of the hull. I'd be very careful putting screws through it because it is highly likely that your tires are under there.
To quote mountainoliver “The material on top of the wheel well is fiberglass reinforced with the honeycomb material that Oliver typically uses. The honeycomb material is saturated with resin.” I saw this same honeycomb material in mods on the underside of the nightstand and Lagun tabletops when cutting them, as well as the center raised area under the Lagun and dinette tabletops when repositioning the swivel base and support post, respectively. In both instances, screws were used into the honeycomb material in mounting each. The honeycomb material on top of the wheel wells appears to be even thicker and with care, could probably be screwed into enough to fasten the small, lightweight equipment I’m looking to install.
-
5 minutes ago, topgun2 said:
In that vintage of Oliver - most (if not all) were glued.
Bill
This is a pic of my street side wheel well. Although the galvanized floor pipe flange is clearly glued, I am interested in knowing what material lies directly under it; whether that raised area can be screwed into to mount electronics. Any idea what purpose that flange had, maybe a production support?

-
7 hours ago, jd1923 said:
the first to see overall location under the streetside bed
Your pic shows a ‘white’ mounting plate under the components, was it glued or screwed down? I was wondering what material occurs immediately under the insulation layer on top of the wheel well, specifically the ‘raised’ platform under the ‘white’ plate.
-
10 hours ago, Jason Foster said:
I haven't added wheel well storage yet, but this looks like a decent option for a bill.
I had a similar product mounted under a RetraxPRO Tonneau Cover, but ditched them soon after converting to an A.R.E. bed cap. These boxes require a lot of ‘swing’ space for convenient access (as designed) and are very restrictive as to the size of items placed within. Although they can be accessed in place simply by opening the lid, one would have to crawl onto the tailgate to get into it. Honestly, I found them useless when the bed is packed to the tailgate with camping gear and better use of the space they encumbered.
-
2
-
-
17 hours ago, rich.dev said:
And please if you don’t have a slide, your ideas/suggestions are also welcomed!😊
Resurrect indeed, your bed liner, slide and cap are great additions!
I carry two Wavian NATO Jerrycans stowed in front of each wheel well; one with spare TV fuel (E85), the other non-ethanol fuel for the gennys (can be used for the TV in a pinch, but more-so for my two duel fuel generators when propane is not the best for given situations). No slide, but note the loft for ample stowage.
A portable 100Ah power station is staged behind the driver-side wheel well for use with a Dometic dual zone unit. It is charged via a 200W solar array atop the bed cap.
A folding winch hoist is staged behind the passenger-side wheel well for use in handling heavy cargo, as well as the OTT’s 30# propane tanks.
-
3
-
-
15 minutes ago, rich.dev said:
I was thinking of doing exactly that, then I saw the recommended duct lengths in the Truma manual (attached) just recently! It might still work, but I haven’t sat down yet to really mull it over!
I have the Dometic furnace in my 2020 OLEll. I can’t imagine an extended run length to the other side of the basement would exceed that of the distance to the bath. I didn’t look, but maybe the Truma manual is referencing total combined length limitations. It will be interesting to learn what’s determined when you “really mull it over”!
-
On 1/22/2024 at 10:40 AM, Chukarhunter said:
My primary concern is the ability to keep the plumbing from freezing even when the cabin is warm. I have placed internet connected thermometers in the basement by the outside shower hoses and other spots, and found that the basement temperatures can fall to 30 degrees or more below the cabin temperatures when outside air temps drop into the low 20's or teens.
Just brainstorming here, but if one were to disconnect the duct hose from the aisle grille below the curbside bed and route it over to the outdoor shower components within the street side bed rear hatch, heat may then be sufficient enough in that area, and maybe even the basement, during extreme conditions. The abandoned grille could then be closed off to lessen concerns expressed by some, regarding short cycling of the heater due to that grille’s close proximity to the main furnace return, as well as too much heat at the rear of the cabin. As discussed, additional return vents fore at the bath and/or dinette seat, and aft at the street side bed area would improve air flow within the street side hatches and cabin areas.
-
On 1/31/2023 at 11:52 AM, GAP said:
-
4 hours ago, Snackchaser said:
We like doing dishes outside with hot water from the outdoor shower hose.
I do the same, it’s so convenient and less clutter inside; plus less water in the gray tank. I carry a collapsible wash basin and dish drain in the basement, as well as dish soap and a sponge; a dedicated table is transported in the TV and deployed when setting up camp. The stock shower hose length has not been an issue, but good to know it can be easily extended. Thanks for sharing the mod and reminder to all on use of the outdoor shower in this manner.
-
2
-
-
2 hours ago, Mike and Carol said:
Discount Tire put 75psi in the new tire, because that’s what their policy is. I just winked at the guy and corrected it when I got home.
I had DT install metal valve stems on all wheels last summer on a return trip from West Texas, had two rubber stem failures (with mounted TPMS devices) likely due to extreme heat at the time (110°+). Upon leaving, I went directly to a nearby Walmart and deflated the tires to 55 psi.
58 minutes ago, topgun2 said:Interesting:
When I had my new Cooper's installed at Discount Tire, they asked me what psi I'd like to have.
Local policy perhaps?
Bill
That would be my guess.
-
1
-
-
19 hours ago, jd1923 said:
I believe it states the Cerbo GX has built-in Wi-Fi and if it has Wi-Fi you do not need the Bluetooth Dongle, as Wi-Fi is a stronger connection and can be network based.
Thanks for the your very informative reply, much appreciated! However, I have the Cerbo-S GX, which is a less expensive model with limited functionality. I would like to install the VE.Direct Smart Dongle with BT to hopefully be able to monitor the battery bank from the driver’s seat via the app. Despite what I have read (GX devices are not compatible with said Dongle), maybe someone with practical experience can prove that wrong. Then again, maybe Wi-Fi is the ticket! Again thanks!
-
On 1/18/2024 at 8:27 AM, MAX Burner said:
I'll try the 3rd one for the Dongle and check the signal strength in the TV.
Curious, have you tried this yet?


Surge Protector
in Mechanical & Technical Tips
Posted
I posted my Hughes Autoformer install yesterday in Ollie Modifications, it may be of interest if you.
