

John E Davies
-
Posts
5,759 -
Joined
-
Last visited
-
Days Won
243
Posts posted by John E Davies
-
-
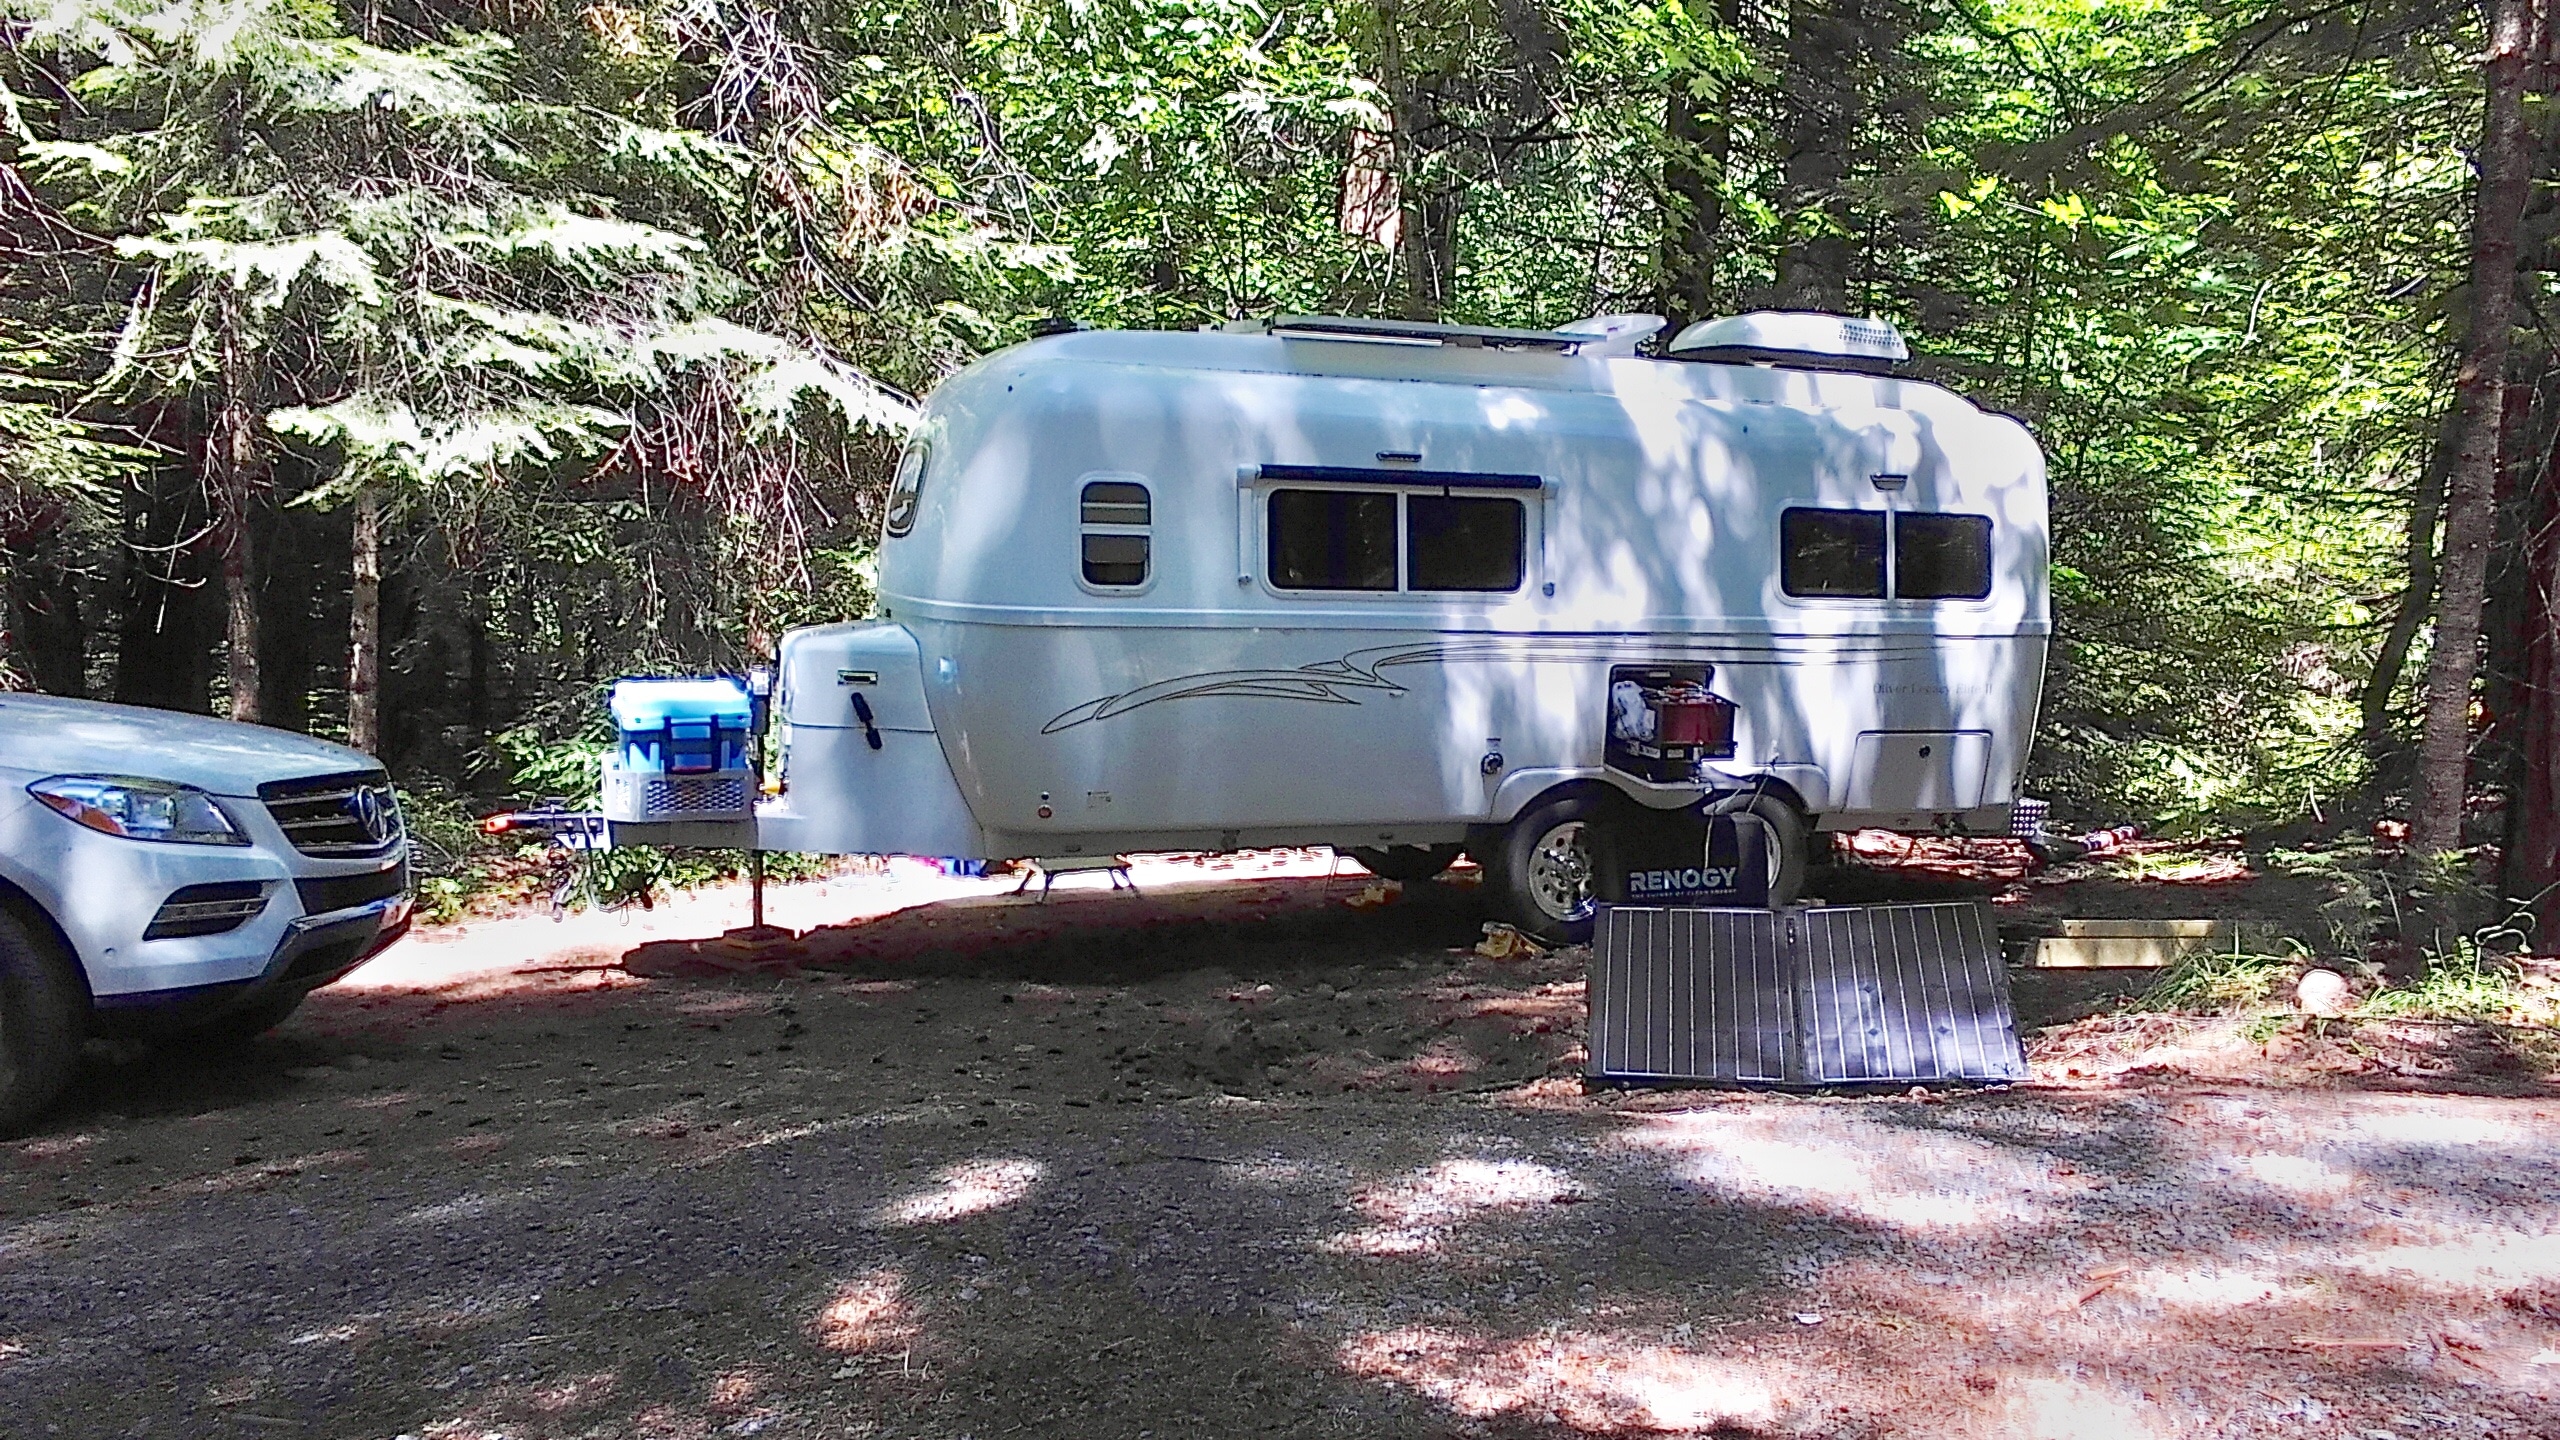
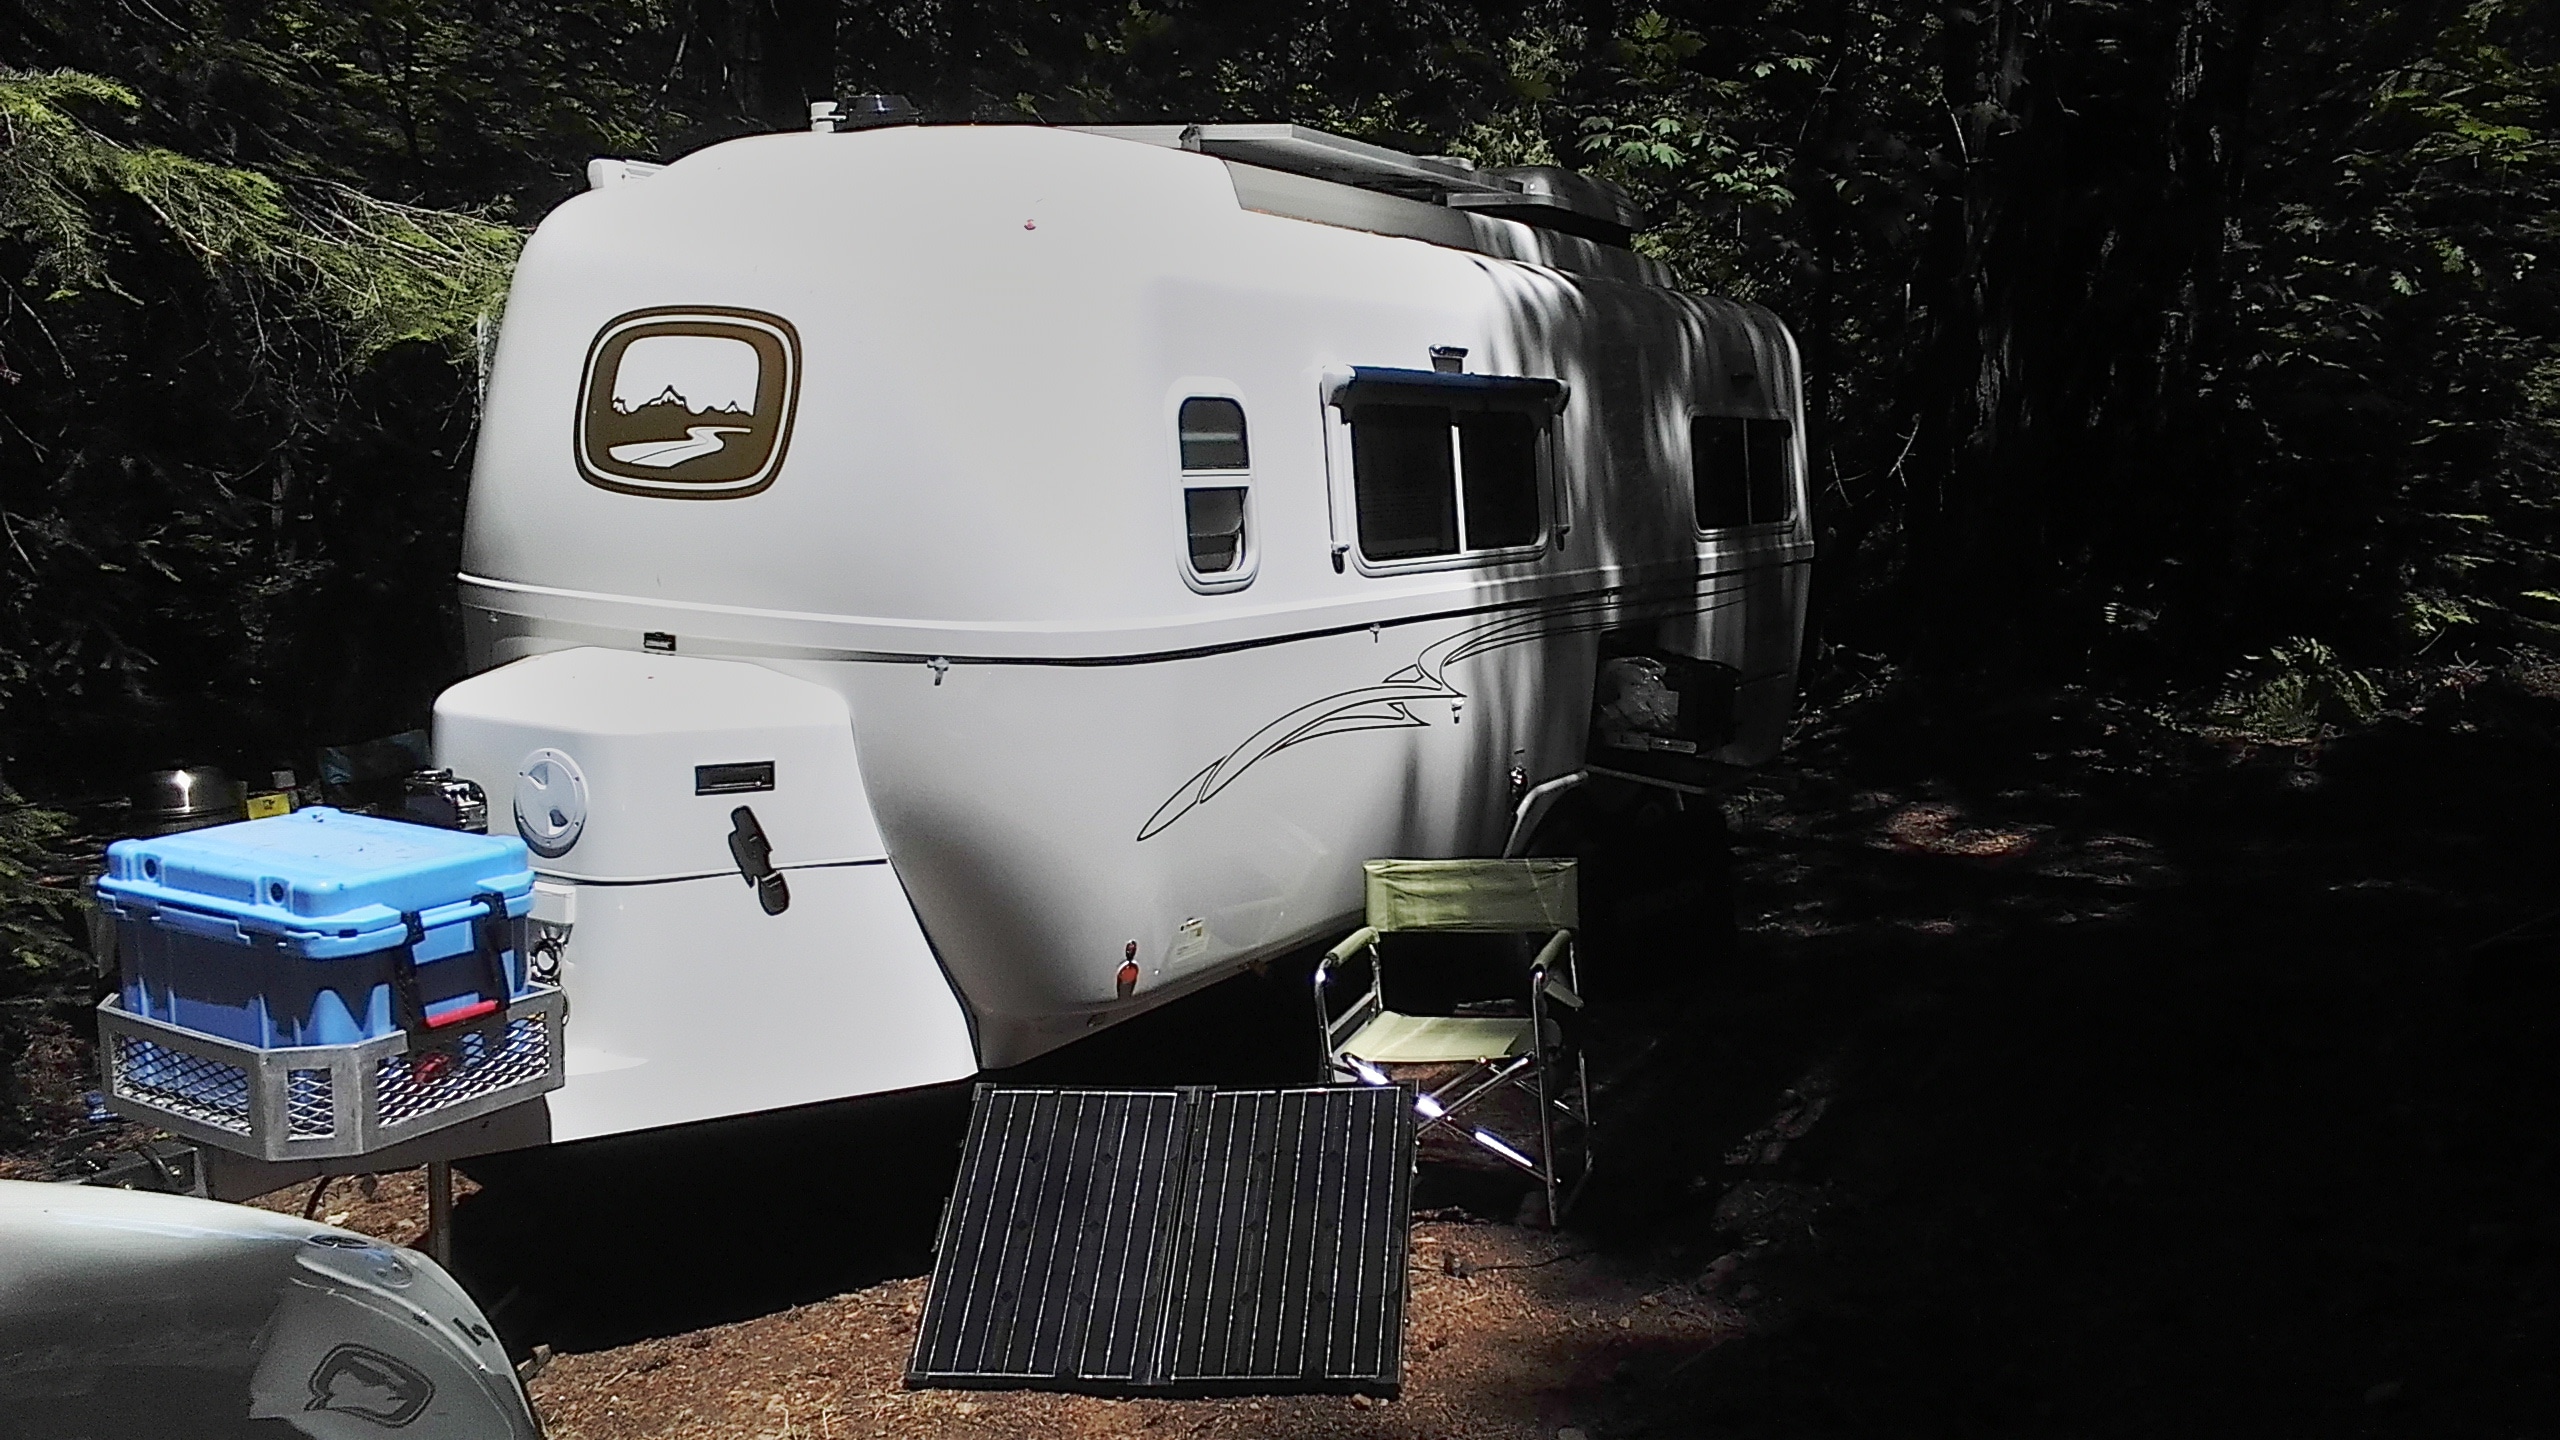
Just a couple more pics to share. As I said solar doesn’t do much good, lol. And makeshift generator shelter.
I love the middle pic. Can you please take another from the very same spot when the sky turns blue? That would be great shot for a Christmas card.
John Davies
Spokane WA
-
I have a Zamp 160W suitcase also but it has a 15amp charge controller that blew the 10amp fuse that is inline on the port. I installed a 15amp to replace it.You may be OK with the 15amp fuse but I personally would not do it. The outside receptacle is rated at 10 amps max. Your 160 watt panel should connect to a pair of receptacles to share the load. It would be easy enough to add a second circuit and make a heavy gauge splitter cable.
Stay warm. Neat pics.
John Davies
Spokane WA
-
My Messaging seems to be working now.
John Davies
Spokane WA
-
 2
2
-
-
I can’t get the math to jive though. .... So either there are errors in the numbers shown on monitor or I’m getting less out of my batteries than advertised, or a combination.
Calculations on paper never equate to the real world. There are a lot of hard-to-quantify errors and losses involved in converting sun to battery to inverter to air conditioner to comfortable occupants. Many steps, many sets of losses - battery condition, monitor error, compressor start-up surges, resistance losses through wires and connections .... no way you can get what you think you should get. Sometimes close has to be good enough.
Thanks for doing the experiment. Your results are impressive anyway. I will take my cookie now.
John Davies
Spokane WA
-
1
-
 1
1
-
-
Ken, I don’t think using just the two center screws with a backing plate behind would be nearly strong enough. That would be a lot of stress on two small fasteners. By riveting the plastic backing plate the load is shared evenly by six fasteners, not counting those two great big honking 1/4” screws that used to hold the TV up.
I do plan to leave the fan locked in the down position normally, that will place less stress on the cam lock mechanism when towing. Most of the parts are plastic, I think the fan will hold up OK but I would not take chances with it.
John Davies
Spokane WA
-
That storm came through here a couple of days ago and dumped a bunch of rain, we have had some severe localized flooding. It was essentially stalled out, so any cells really put down some water. I hope it moves quickly past your spot.
My advice is, take lots of pictures. Stay warm. Wait for the snow to go away before hitting the highway.
John Davies
Spokane Wa
-
1
-
-
Reed “karenlukens” with Hull 200 had a small street side small awning installed at a Casita shop, I think he was very happy with it. I can’t find that thread. He has not been active in a long while, you can try sending him a Message if that works for you. My messaging is broken.... here is his page.
http://olivertraveltrailers.com/my-profile/karenlukens/?profiletab=forums
EDIT.... I found a couple of pics

here. .... http://olivertraveltrailers.com/topic/reed-karens-blog/page/6/
But again, I can’t find the thread where he discussed it.
John Davies
Spokane WA
-
1
-
-
Why mount that huge regulator onto the plastic cover of the gennie, rather than leaving it loose? It seems like it would be really easy to damage the mounting area, and transporting the gennie in a different way would be risky and awkward. I really like the concept but I have some big reservations about the method.
Is there a smaller low pressure regulator that might work?
Does the Eco throttle still function?
Are there any jets that can be altered for high altitude operation?
I have that same unit and it is a great generator.
Thanks.
John Davies
Spokane WA
-
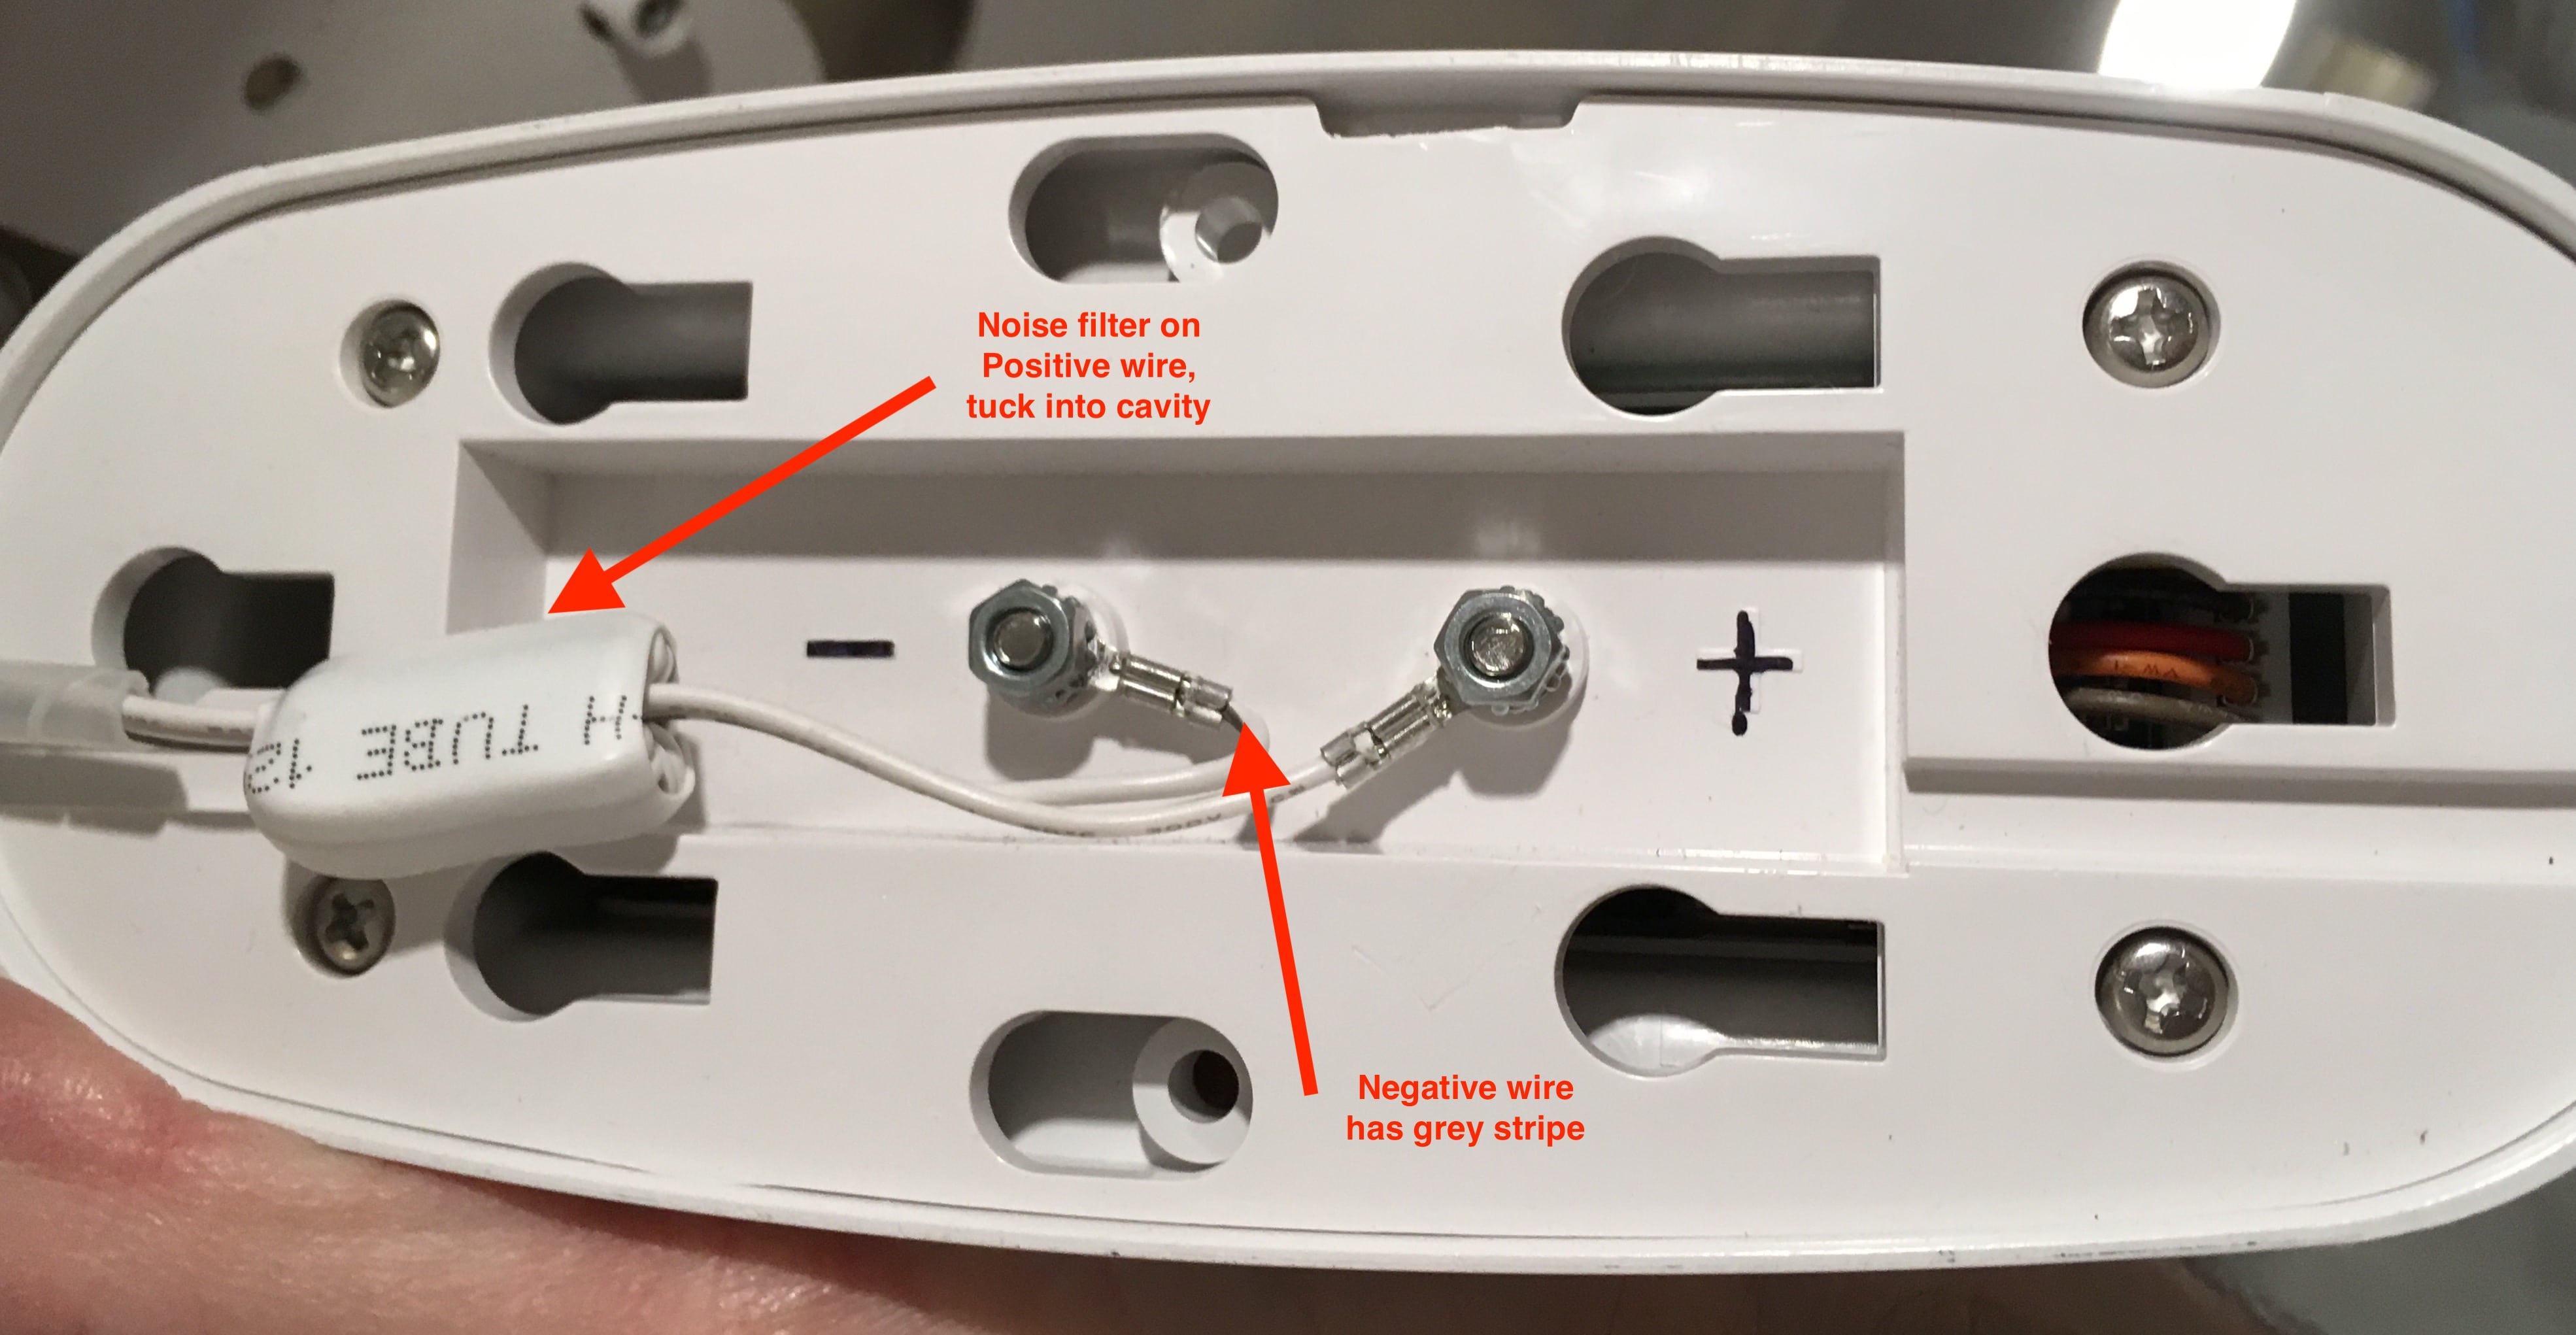
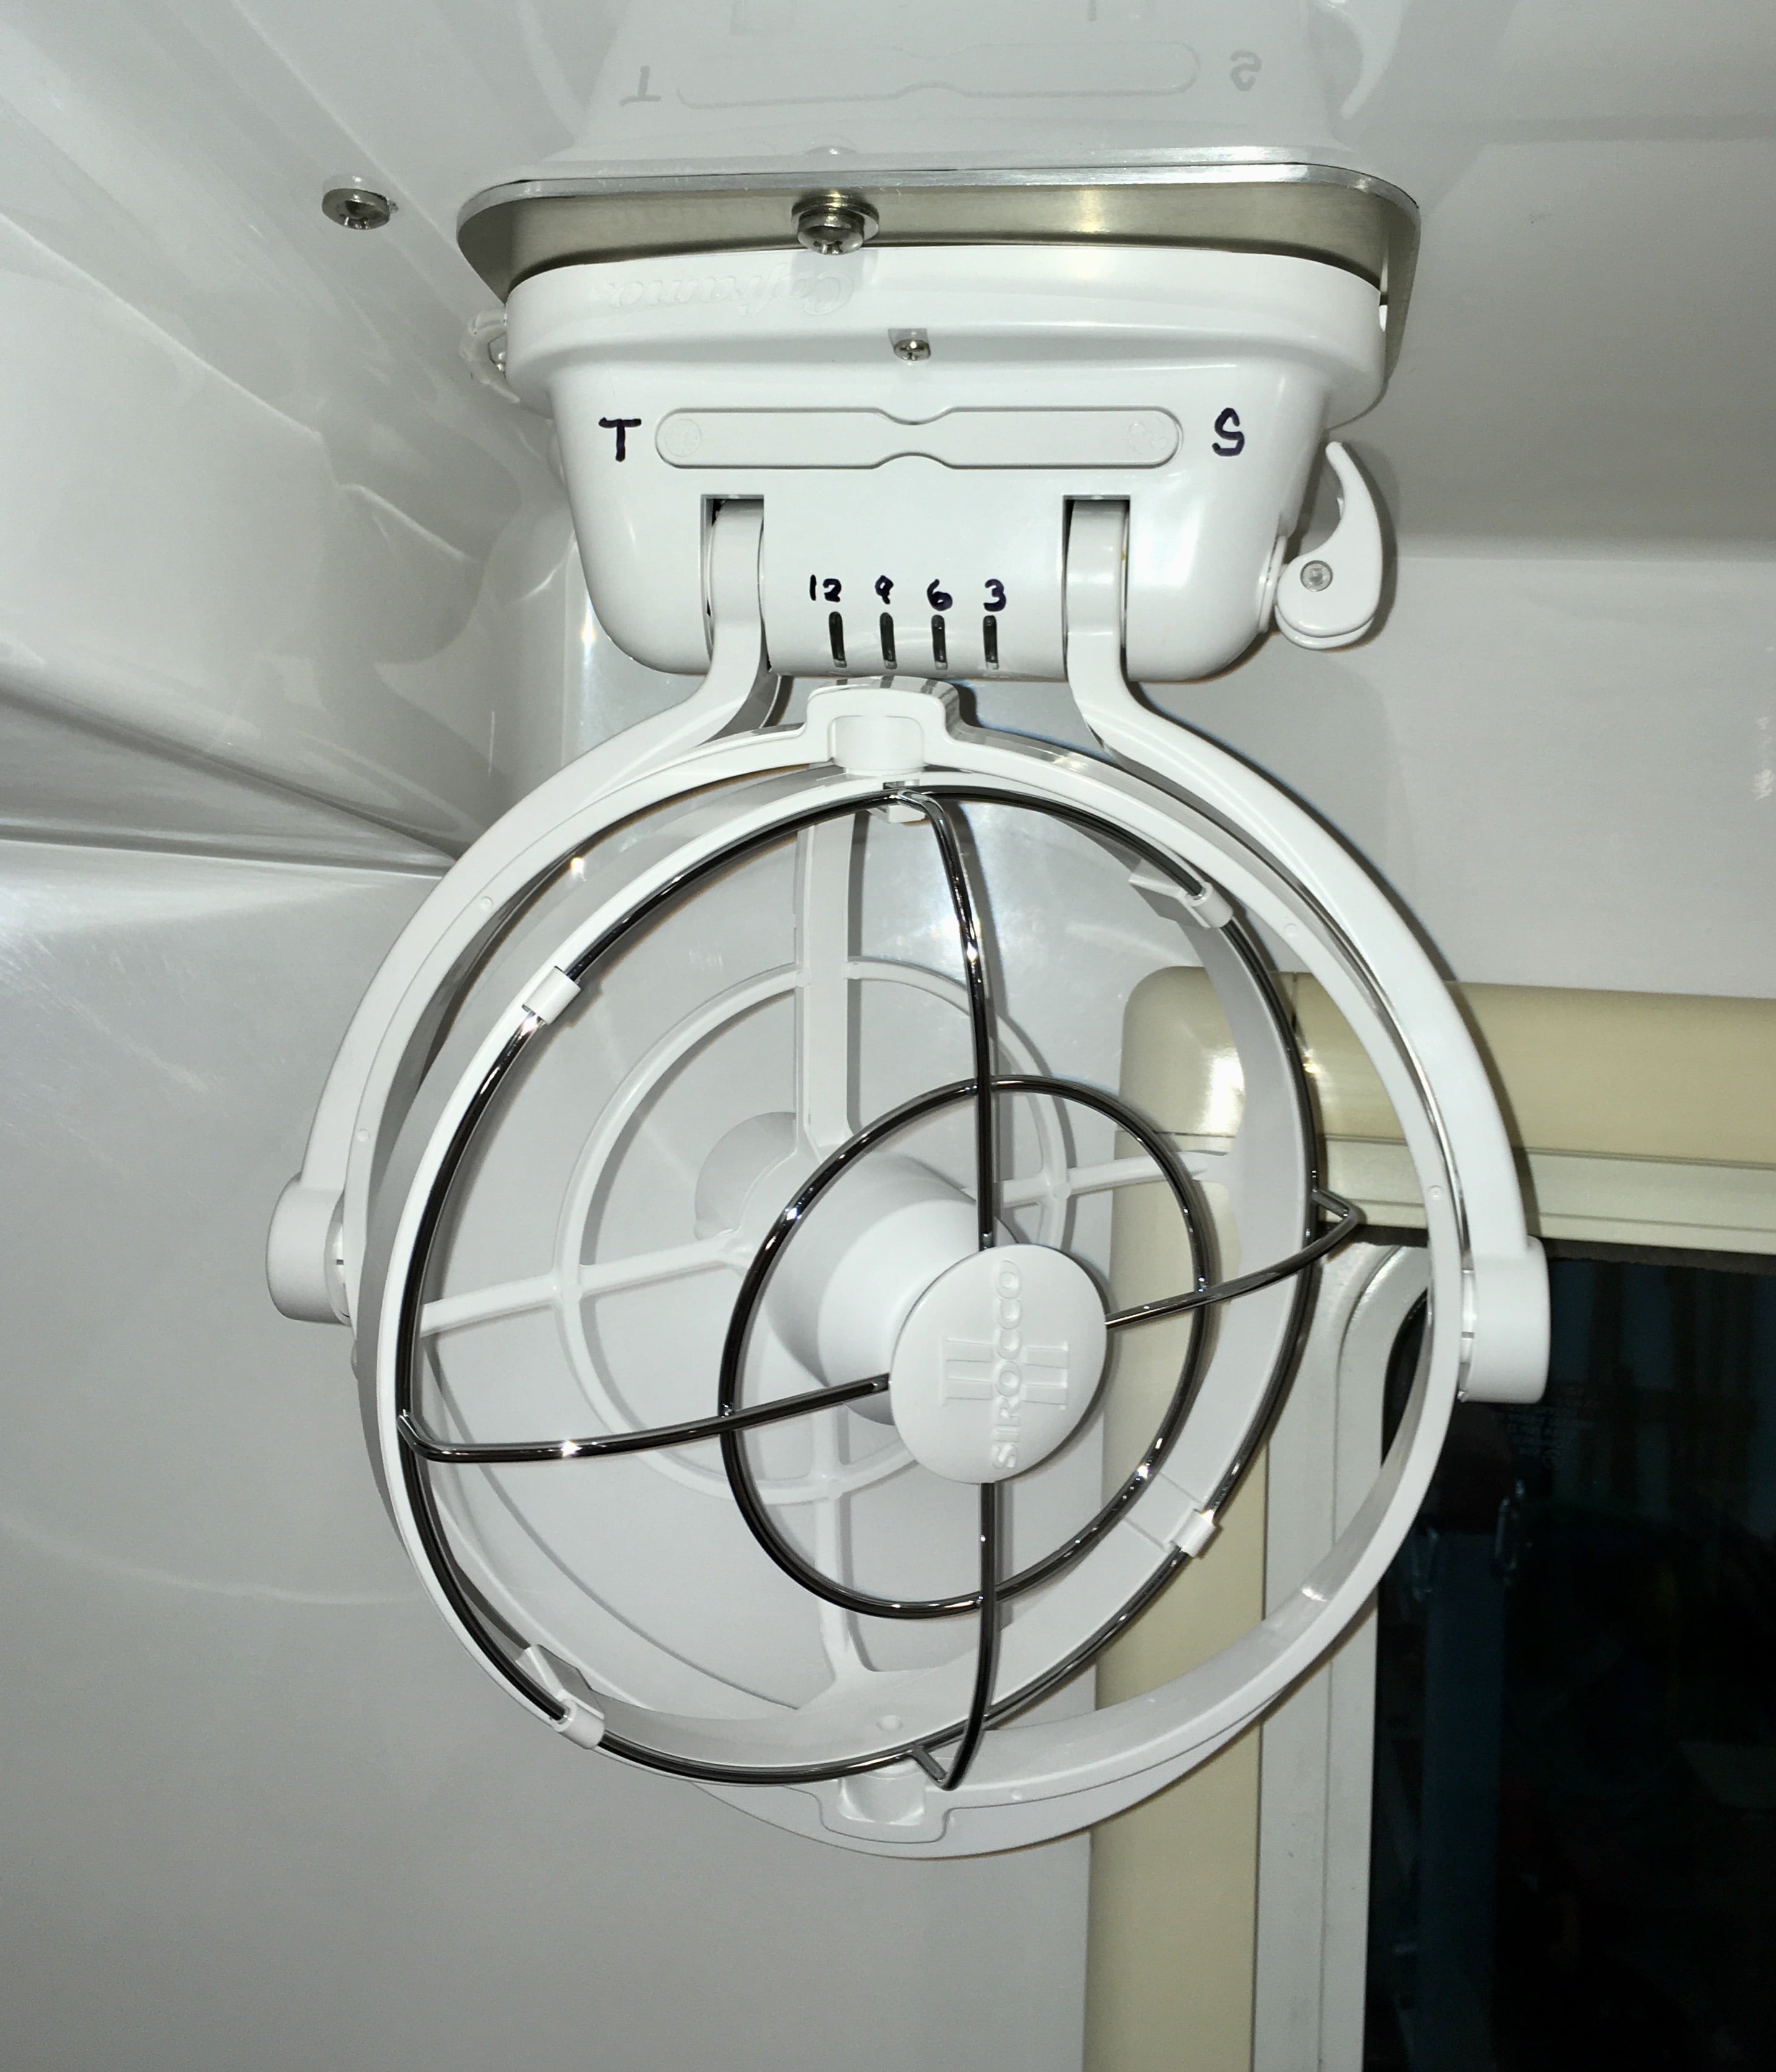
Attach the supplied wire harness and electronic noise filter. I ran into a problem here; one of the nuts would not go onto a stud. After a couple of minutes of fumbling and some bad words I realized that it had no internal threads. So I went down to Ace Hardware and found a couple of new ones: size M4-.7. These are really fine thread and may be hard to find locally if you are unlucky enough to need any. Here is the hookup:
The wires run out the side slot then up through the TV cable hole into the overhead. I used a white spiral wrap protective sleeve on the two wires and secured them to the cabinet with a short "service loop" using a stick-on wire mount. I spliced into a power and ground wire that supplied the 12 volt round receptacle there, adding a 3 amp mini blade inline fuse in the power wire.
I then added some labels with a black Sharpie so I would know what was what:
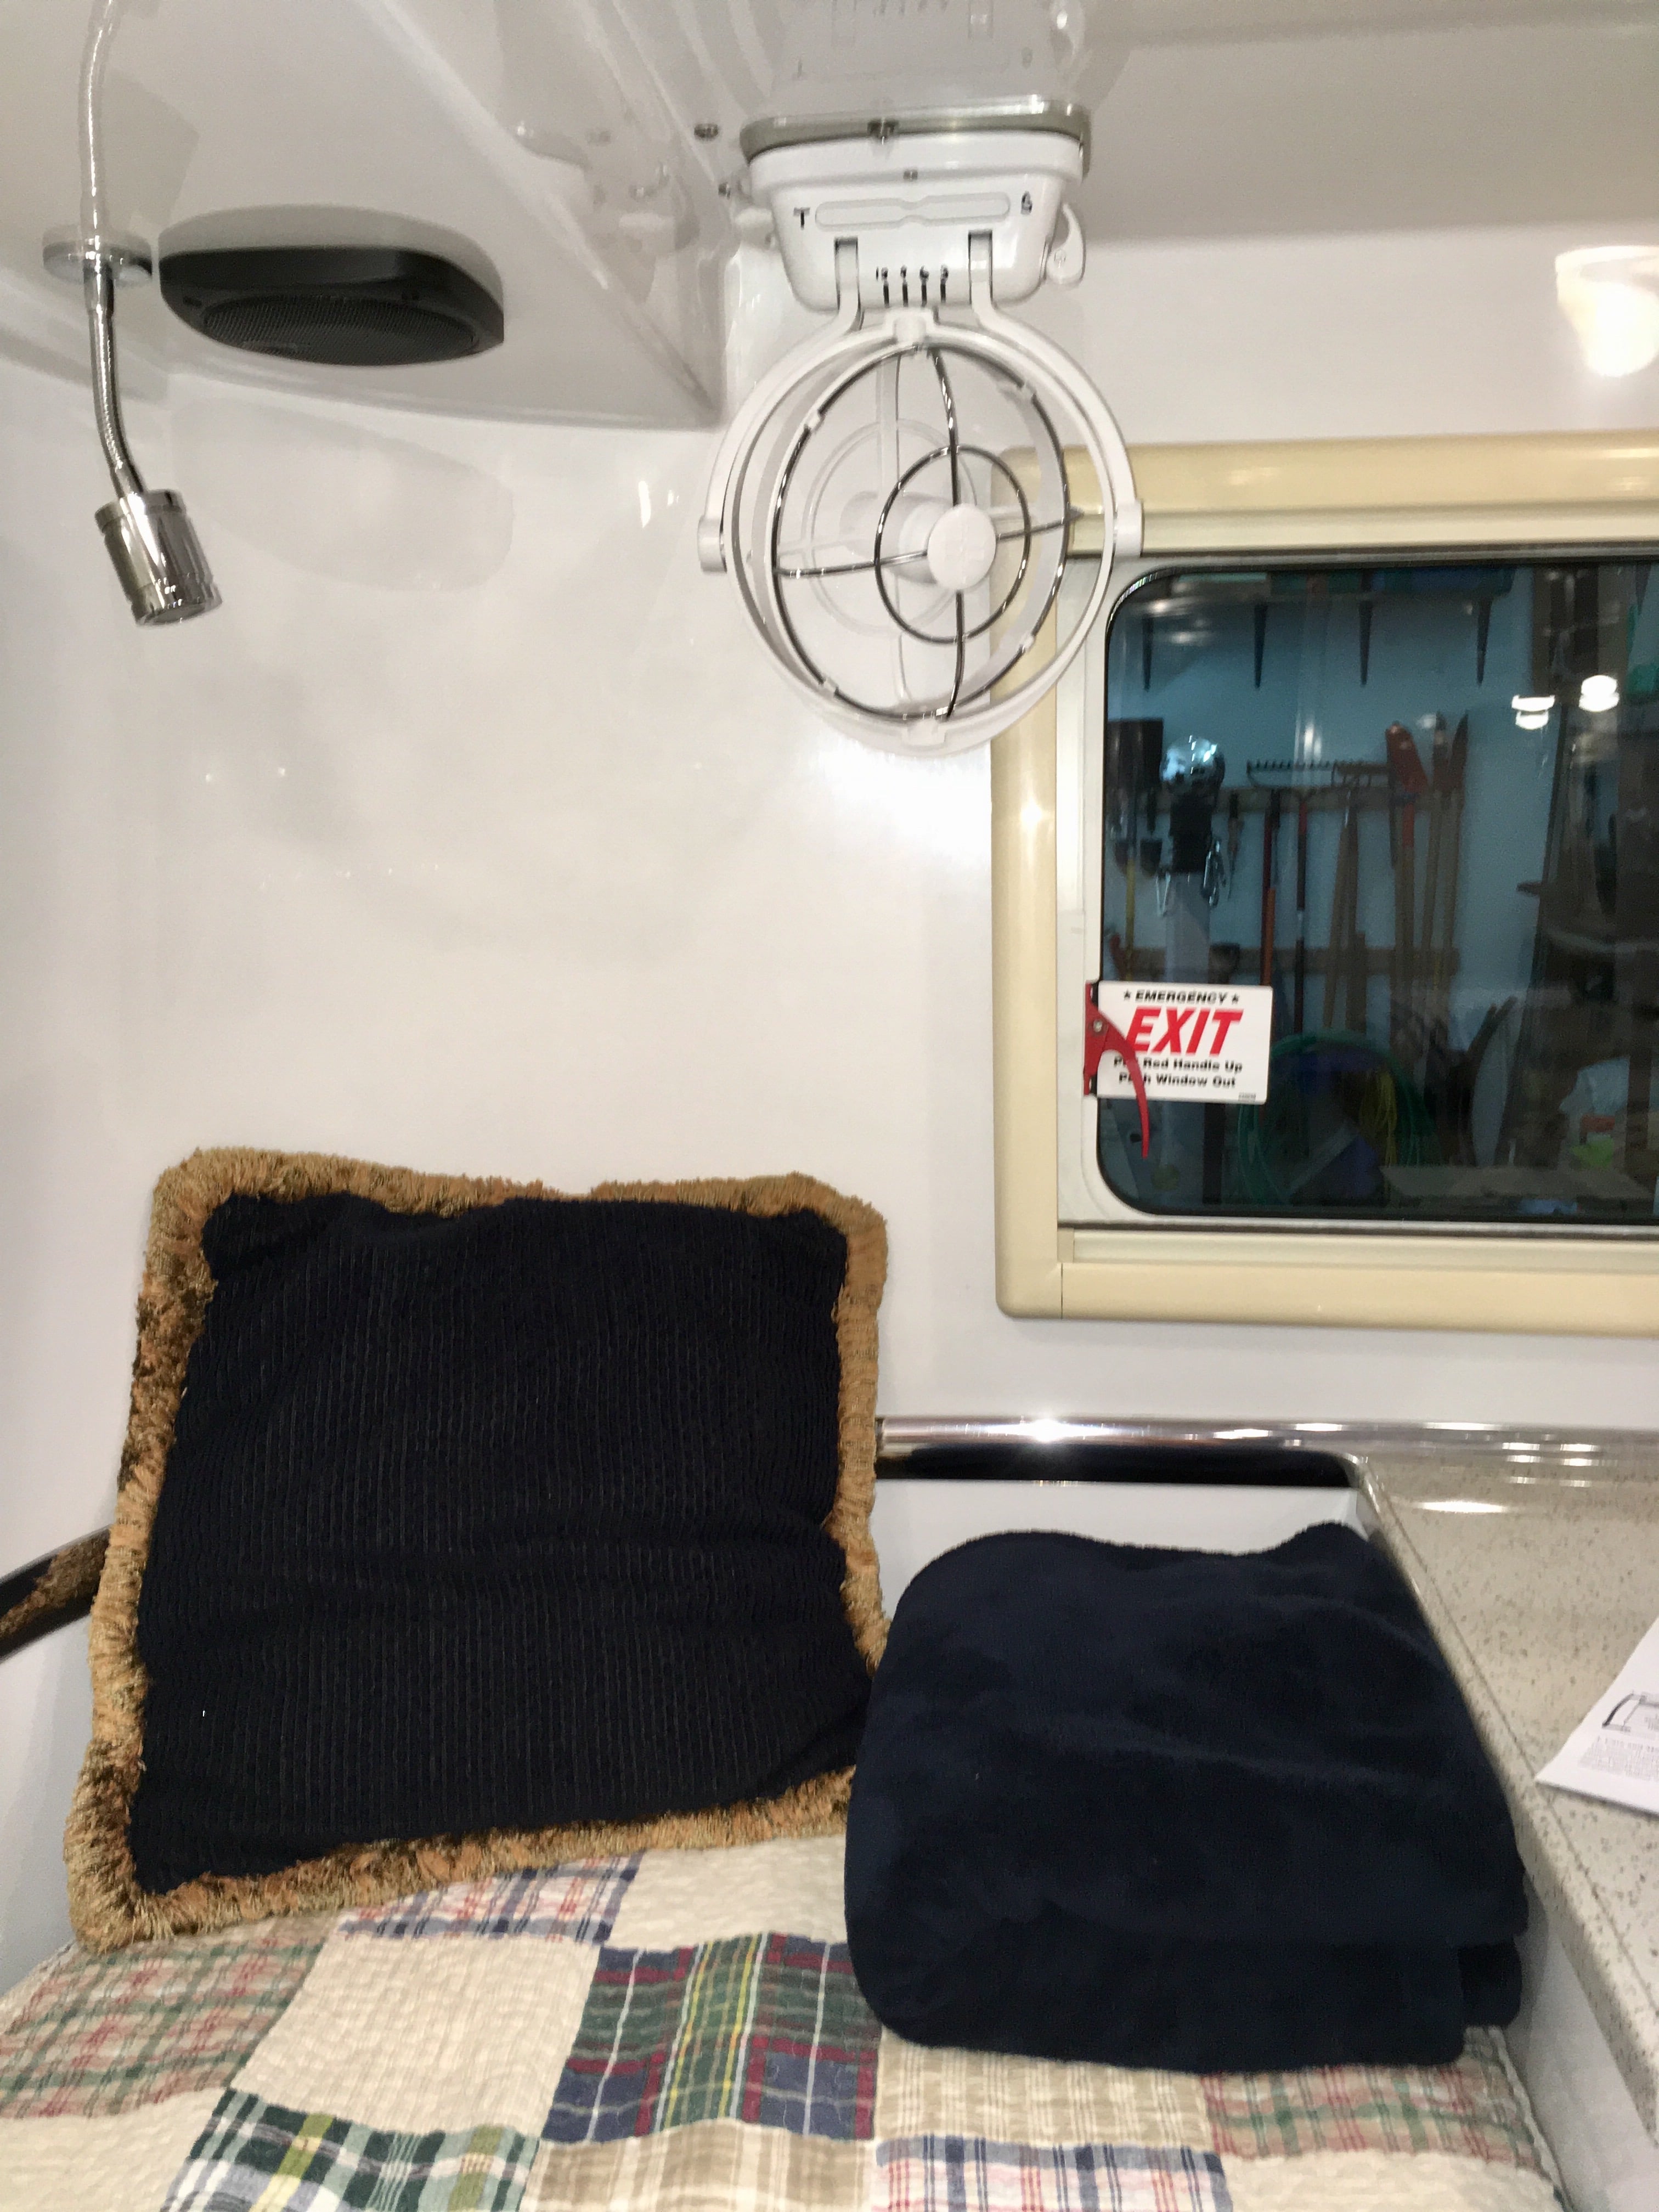
The gimbaled mount allows you to swivel the airflow in any direction. If I want to crack open the rear window for ventilation the fan will draw that air into the cabin. For working around the bed you can fold it up and out of the way.
Nifty.
John Davies
Spokane WA
-
1
-
1
-
-
I had been using a 120 volt desk top Vornado fan (which was very effective, though a little bulky) but I wanted a built-in one that used less power and did not require continually running the inverter. This is the well regarded Caframo Sirocco II, made in Canada. The price varies a little, I bought it when it got down to $100.
https://smile.amazon.com/gp/product/B01LDY4TE4/ref=ppx_yo_dt_b_asin_title_o04_s00?ie=UTF8&psc=1
It has three speeds and a "time delay off" function. Amp draw from the small DC motor is very minimal: Low: 0.12 amp, Medium: 0.22 amp, High: 0.35 amp (at 12 volts). Max airflow is 140 cubic feet per minute on High. That is not nearly as much as the Vornado on Low, but it is plenty adequate.
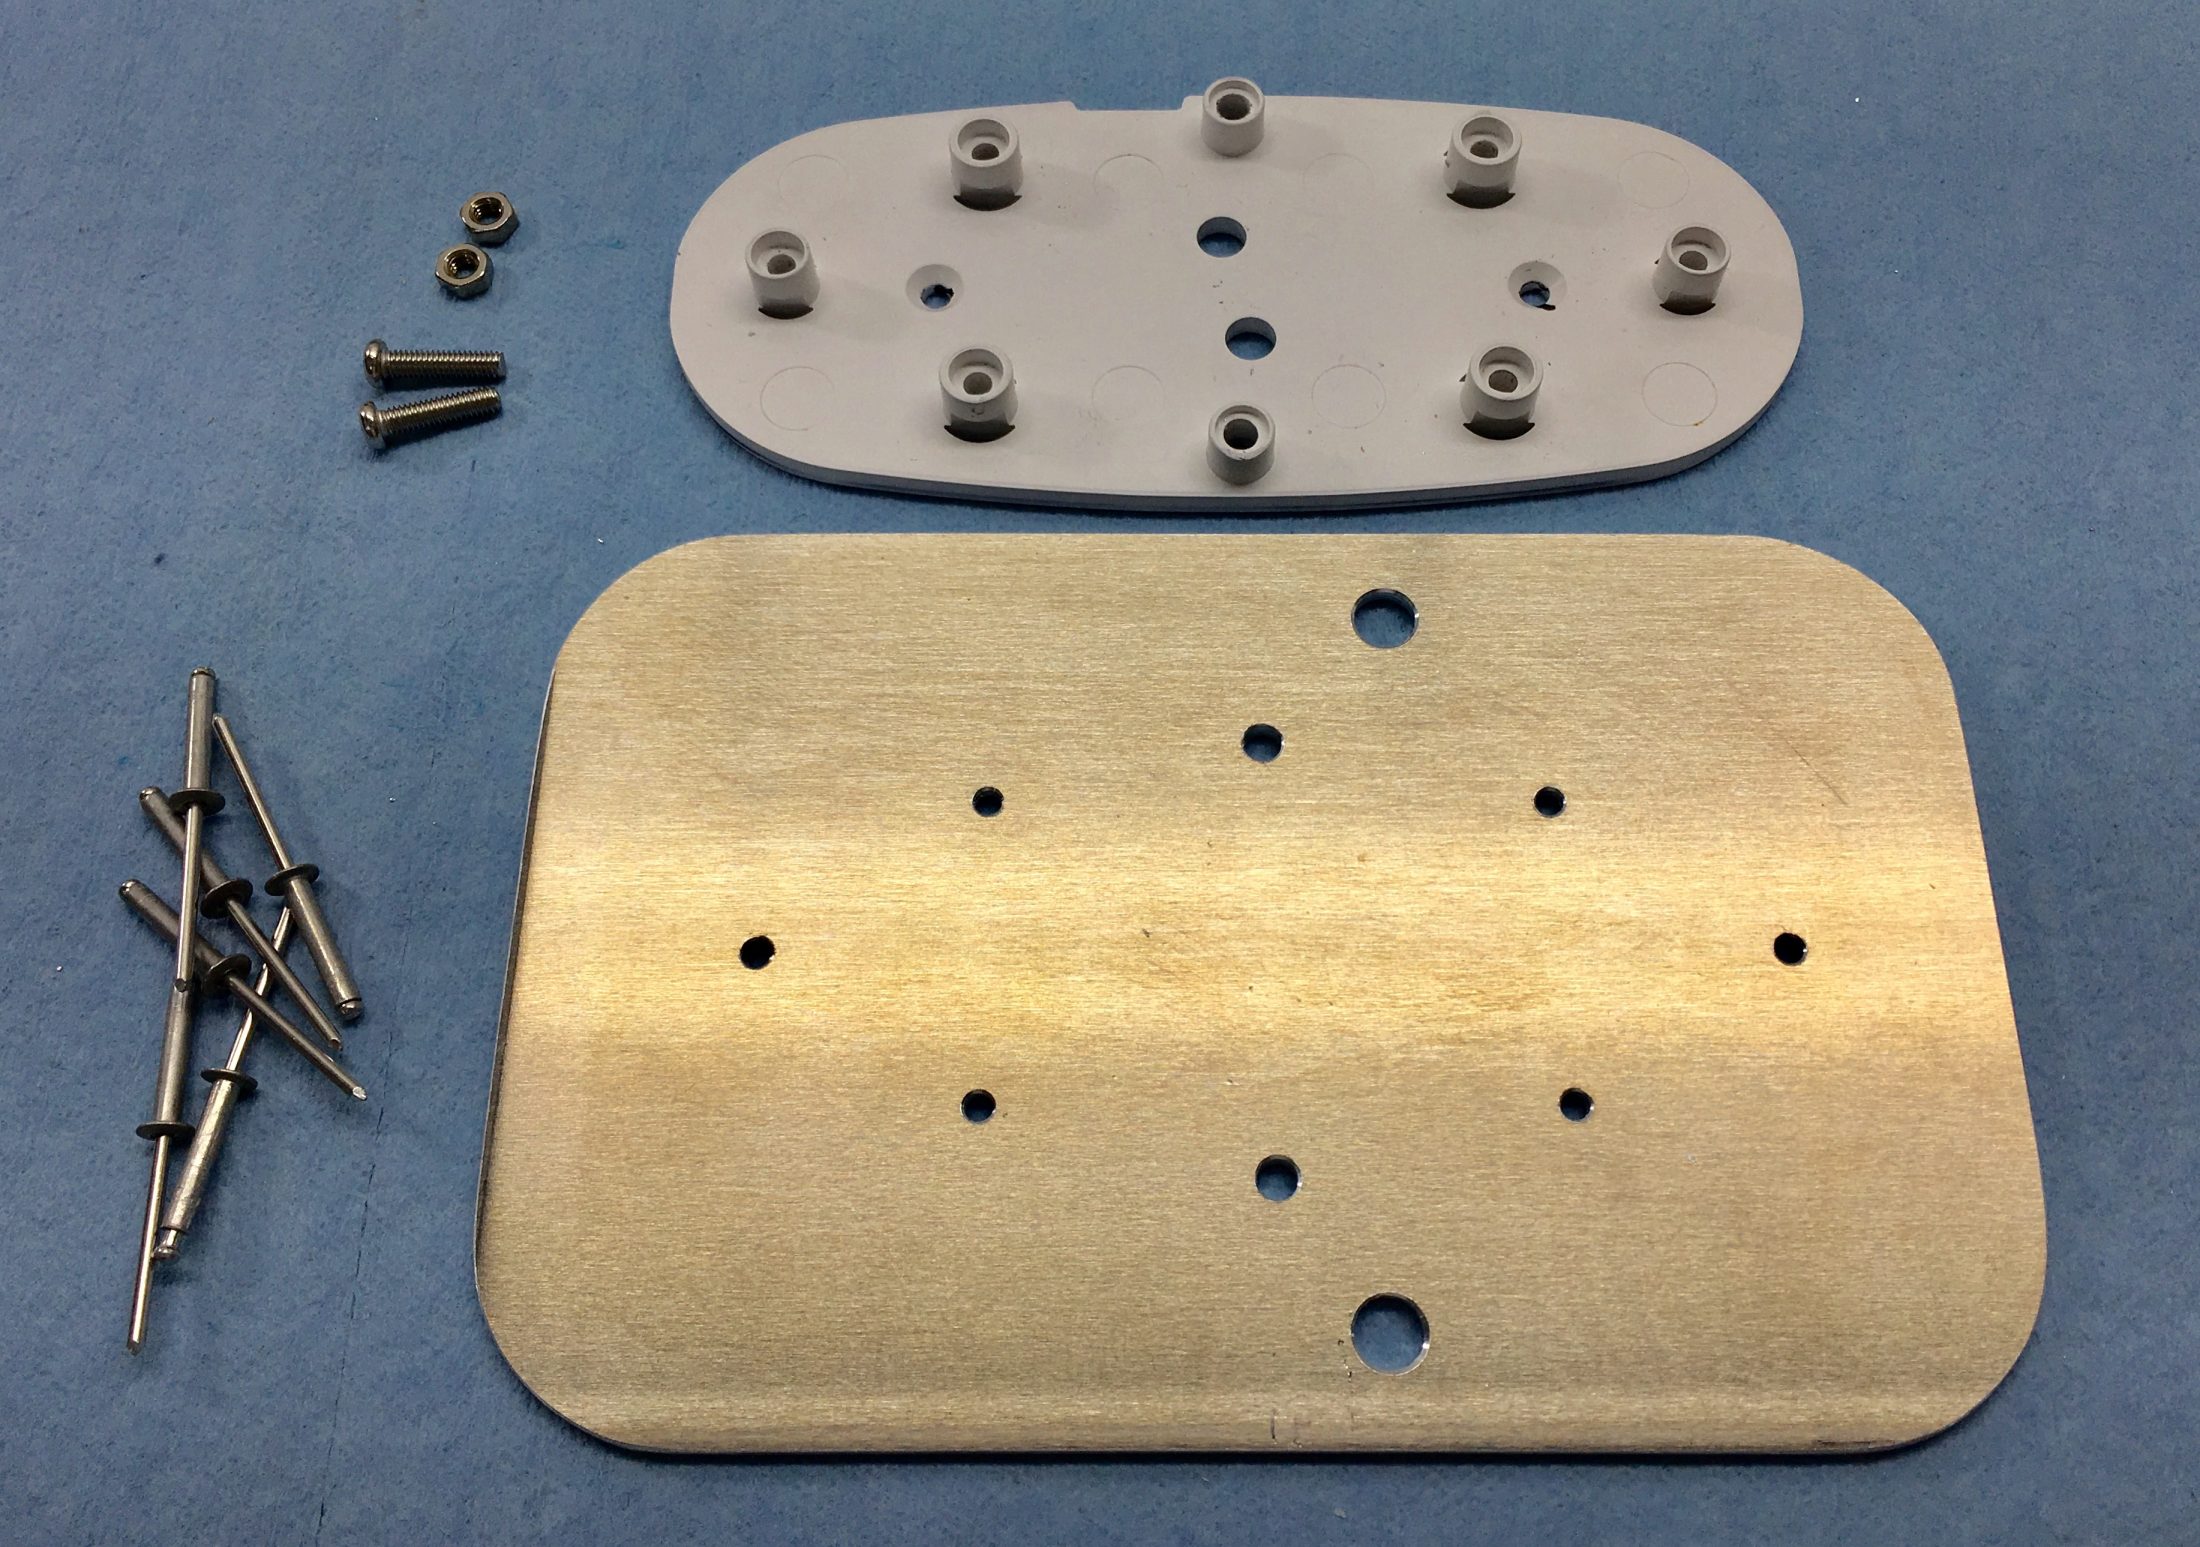
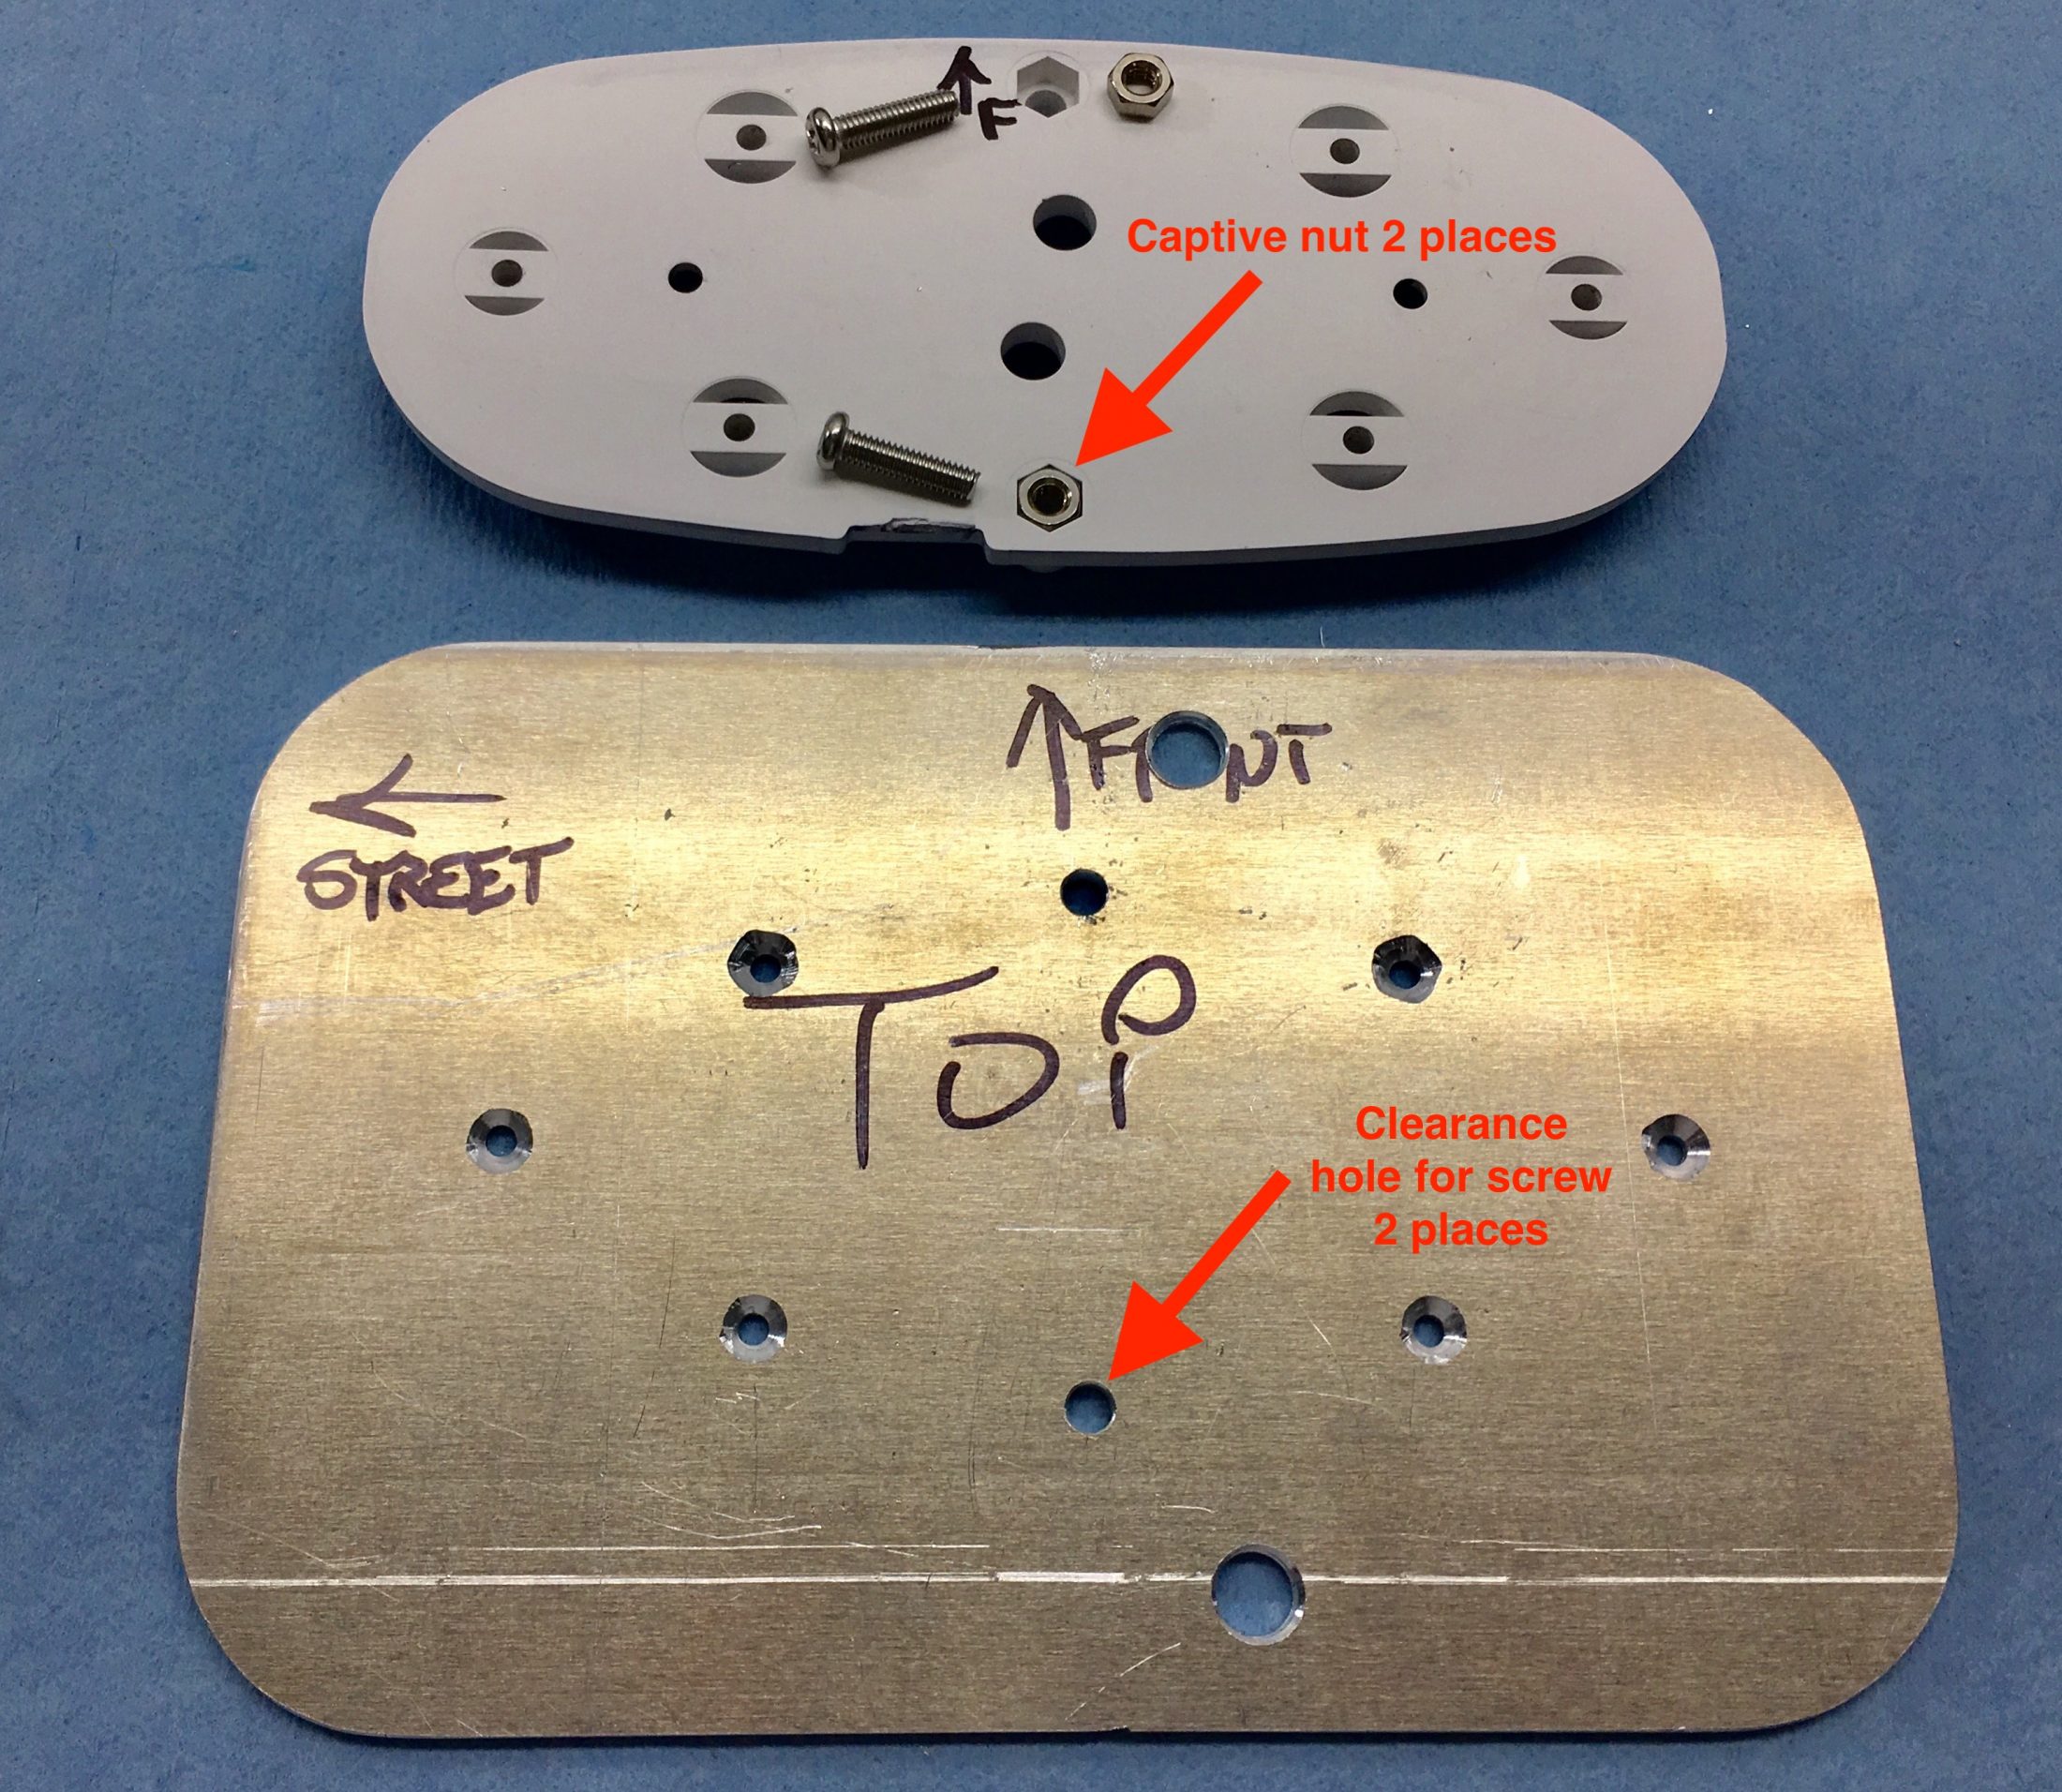
I had already removed the fixed TV and mount from the back curbside corner, so I mounted the fan there. Since there were already 4 big holes, plugged by the original screws, I did not want to drill any extras. I made a plate out of 6061-T6 1/8" thick aluminum plate, attached the fan mounting plate to that with rivets, and bolted the plate to the bottom of the cabinet using two of those big screws.A future owner could remove the fan without leaving behind any extra cavities... and the location is good for sleepers and does not get in the way when folded up.
The fan mounting bracket is designed to mount to a flat surface, then you slide the fan sideways onto the plastic studs and secure it with two long machine screws. I used common long 1/8" diameter aluminum pop rivets.
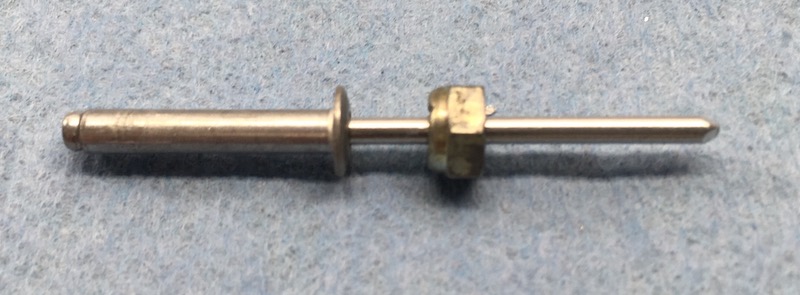
Because each rivet head was down inside a cavity, I added a teeny nut to the shank before pulling it.
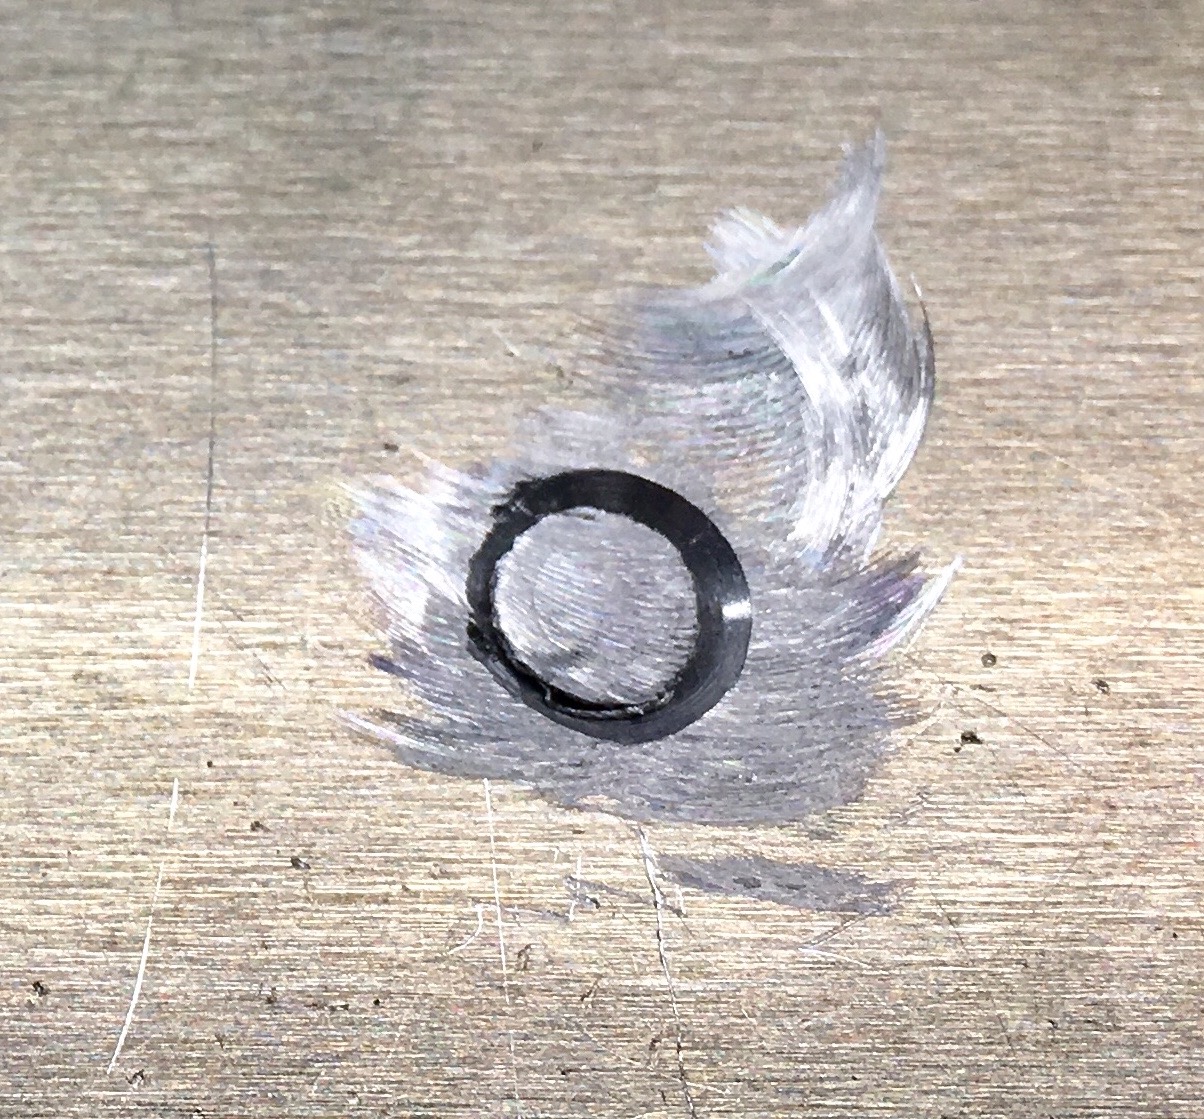
The back side of each rivet hole was countersunk most of the way through the material:
I used a small flat pin punch in the vise and a bigger one on top of the tail to drive it into the countersunk part:
And ground each tail flush using a little Dremel grinder with a sanding disc:
By grinding the tails flush, they would not damage the nice gelcoat of the overhead cabinet. Here is the assembly screwed in place:
John Davies
Spokane WA
-
6
-
-
The receiver is just held on by u bolts? Checked the pictures and sure looks like it. I would prefer welding. I am not sure I could build my own. But will check on etrailer thanks for the suggestion,
The Oliver rack and receiver is completely custom, they make them from aluminum in-house (or maybe subcontract it). I don’t think you will find an aftermarket steel one that will just bolt on. Have you considered asking the factory if they could make you a 2” one out of aluminum, with the understanding that it might void the warranty on the rack? If not, a local custom fabrication or machine shop could easily build you something if you unbolt the 1.5” receiver and take it to them.
Steel is acceptable for a replacement as long as you are careful to put some insulating material between the steel and aluminum parts to prevent dissimilar metal corrosion. Plus it will rust where the bike support enters, and that can be unsightly if the stain runs down onto the rack and bumper...
I think Oliver bolts the receiver down because if it wears out that would be way easier to replace than a welded on part. The ubolts appear to be the same ones that they use to secure the cargo tray to the tongue.
John Davies
Spokane WA
-
1
-
-
Welcome to the forum.
In spite of being a 2"x7" tempered aircraft aluminum beam, the rear bumper is actually non-structural, it can't support a heavy vertical load. It is fine for whacking into a tree. It has two small hinges at the bottom to allow it to rotate down for access to the stinky (waste hose) compartment. The frame mounted Ollie factory bike rack is the only current off-the-shelf solution. The little receiver is there to limit how much stuff you can hang off it, the load limit is 100 pounds of rack and bikes. You could replace the receiver with a 2" one but you would be on your own and have no rack warranty. There were a couple of previous versions and some of us have built racks of similar materials. For bikes it is essential to guy the trays forward to the frame to eliminate as much sway as possible. The rear of the trailer is a fairly violent place to carry stuff, with lots of vertical motion.
Look here: ... http://olivertraveltrailers.com/topic/how-to-move-the-factory-cargo-tray-to-a-rear-rack/
John Davies
Spokane WA
-
1
-
-
You cant have my jack. Probably the most valuable thing I have with me that I’m willling to part with is a chocolate cookie.
Rats.... OK, I would take the cookie instead.
Do you have good enough Internet speed to upload some pics?
John Davies
Spokane WA
-
What were the 10:00 AM outside and cabin air temperatures? Are your shades down and awning(s) deployed? Which air conditioner do you have? Lithium batteries? Without that info we are simply guessing. I guess 3:17 PM Eastern.
Are you giving a prize for the closest guess? I will take your Xtreme jack.... I’ll pay the shipping. ?
Please take and post some pics of the rally for those of us stuck at home.
John Davies
Spokane WA
-
It can be very hard to understand the interaction of systems that operate off both 12 volt DC (the battery bank) OR 120 volt AC. When you are not connected to shore power it is best to switch everything you can to propane (the fridge, water heater and cabin heating), then manually select what else you want to run off the now-independent AC power supplied by the generator, by disconnecting unused circuits using the breakers under the dinette. If your generator can only supply 15 amps of 120 volt AC current (1800 watts) continuously (not peak current, which is always a little higher) you need to decide if you want to run the air conditioner only, or a combination of outlets and converter. The air con draws too much power to allow you to run other stuff simultaneously.
How depleted your trailer batteries are in the morning determines how much AC current the power converter is using to recharge them.
Understanding how much generator power your stuff consumes (and what time of day) is important; you can run the outlets, microwave and converter (to charge the batteries) in the morning when it is cool outside and you are making your morning coffee and toast, and switch over to just the air conditioning in the heat of the day. Use too much AC power at once and your generator will go off line, telling you to reduce the electrical load. It won’t hurt the generator, that is how it is designed.
Having solar really helps because you don’t usually have to worry at all about recharging the batteries, that is all transparent and very efficient if there is any significant amount of sunlight. In dark times (shaded site or rainy day) you have to be much more careful of your power management.
This is why some owners like to carry a big generator, so all the 120 v stuff can operate at once. That is a big plus, but whether it outweighs the many negatives like higher cost, fuel consumption, weight etc , is up to you to decide.
Did that help? Labeling your circuit breakers with a sharpie will help you to find the right one to switch on or off when running the gennie.... observing the amps reading of the remote display of the surge suppressor is very educational. ... http://olivertraveltrailers.com/topic/how-to-relocate-the-surge-suppressor-remote-display/
If you are hazy about amps, watts and features, there are a bunch of generator FAQs for you to study. Picking the right size and type of generator is very important.
John Davies
Spokane WA
-
2
-
-
Nitrogen filled tires for the average application are more or less a scam , just use air and don't fret about a non-issue. I used to fill high performance jet aircraft tires with N2 when I was an A&P, since it is bone dry and marginally better at staying at a set pressure during wild temperature swings, but all the smaller planes got good old shop air....
It is best to use air that has gone through an effective moisture separator, especially in a humid climate. You really don’t want water inside your tires, since it can corrode the wheels and valve stems. If you have a small compressor at home, consider adding one inline with the regulator, if you haven’t already, and be sure to drain the main tank often. Dry air is good air. It preserves your air tools and is absolutely mandatory if you want to paint using an air sprayer.
If you have to fill at a gas station, just hope their system is adequately maintained.
https://www.popularmechanics.com/cars/a3894/nitrogen-in-tires/
John Davies
Spokane WA
-
1
-
-
Well, I got both those messages and could not reply to either one. That is with my iPad.
On my iPhone, I can see the list of senders on the left, but no messages load at all.
I don’t think this is a hardware problem at my end.
John Davies
Spokane WA
-
I learned that some Dometic RM2454 fridges have cooling fans located between the upper and lower coils, in an area that is completely inaccessible without removing the unit entirely. Jason in Service told me that they started receiving these units in mid-2017 (mine was delivered in May '17), and that previously there was NO Dometic fan installed. On those units Oliver added their own fan, positioned up high above the upper coils where it was easily reached, and I believe these fans also had an inside On/ Off switch. Yay! Good thinking.
Last summer my fan started squealing when the outside air temperature got really high, and there was no way to shut off the nasty noise without killing power to the entire unit. It has no manual switch, rather it is activated by a an inline temp switch that is in the positive wire, near the fan itself. How very inconvenient for the owner.... The squeal went on long into darkness before the outside temp fell enough to shut it off.
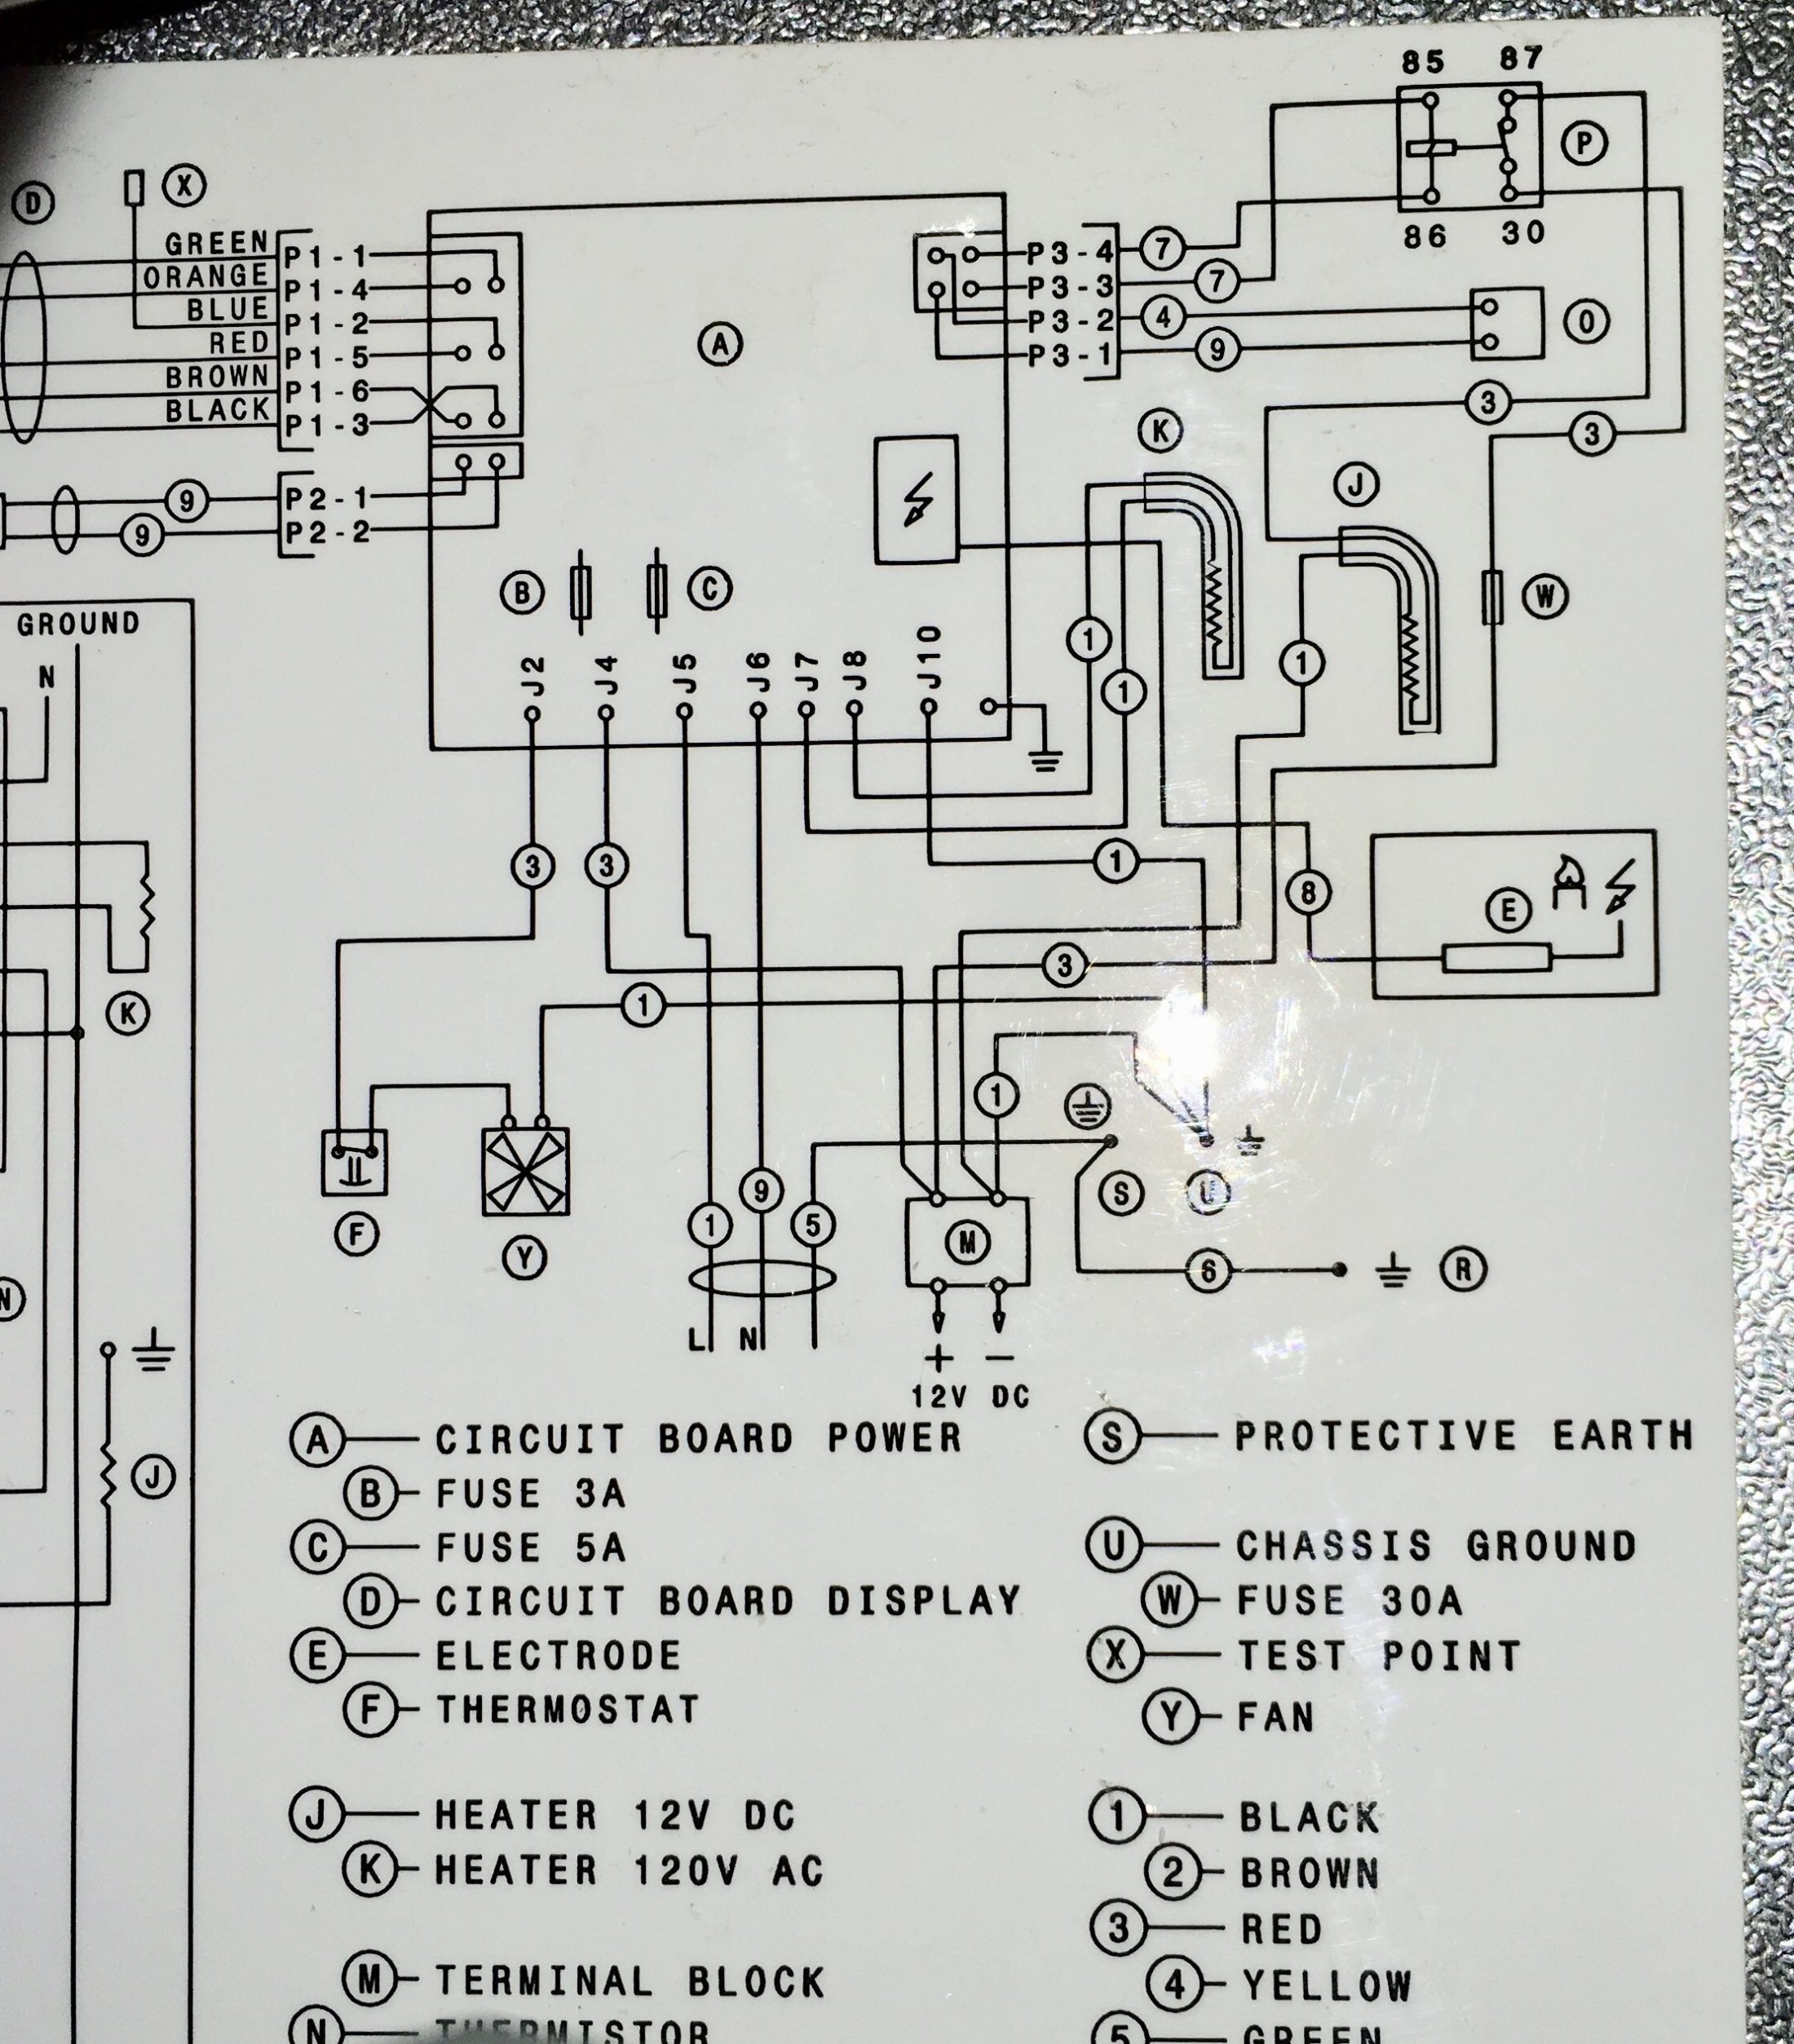
The Dometic Owners Manual and the Oliver Owners Manual wiring diagrams do NOT show the fan, but the diagram inside the backside of my fridge does; it is located on the far right behind the gas valve. The fan is labelled "Y".
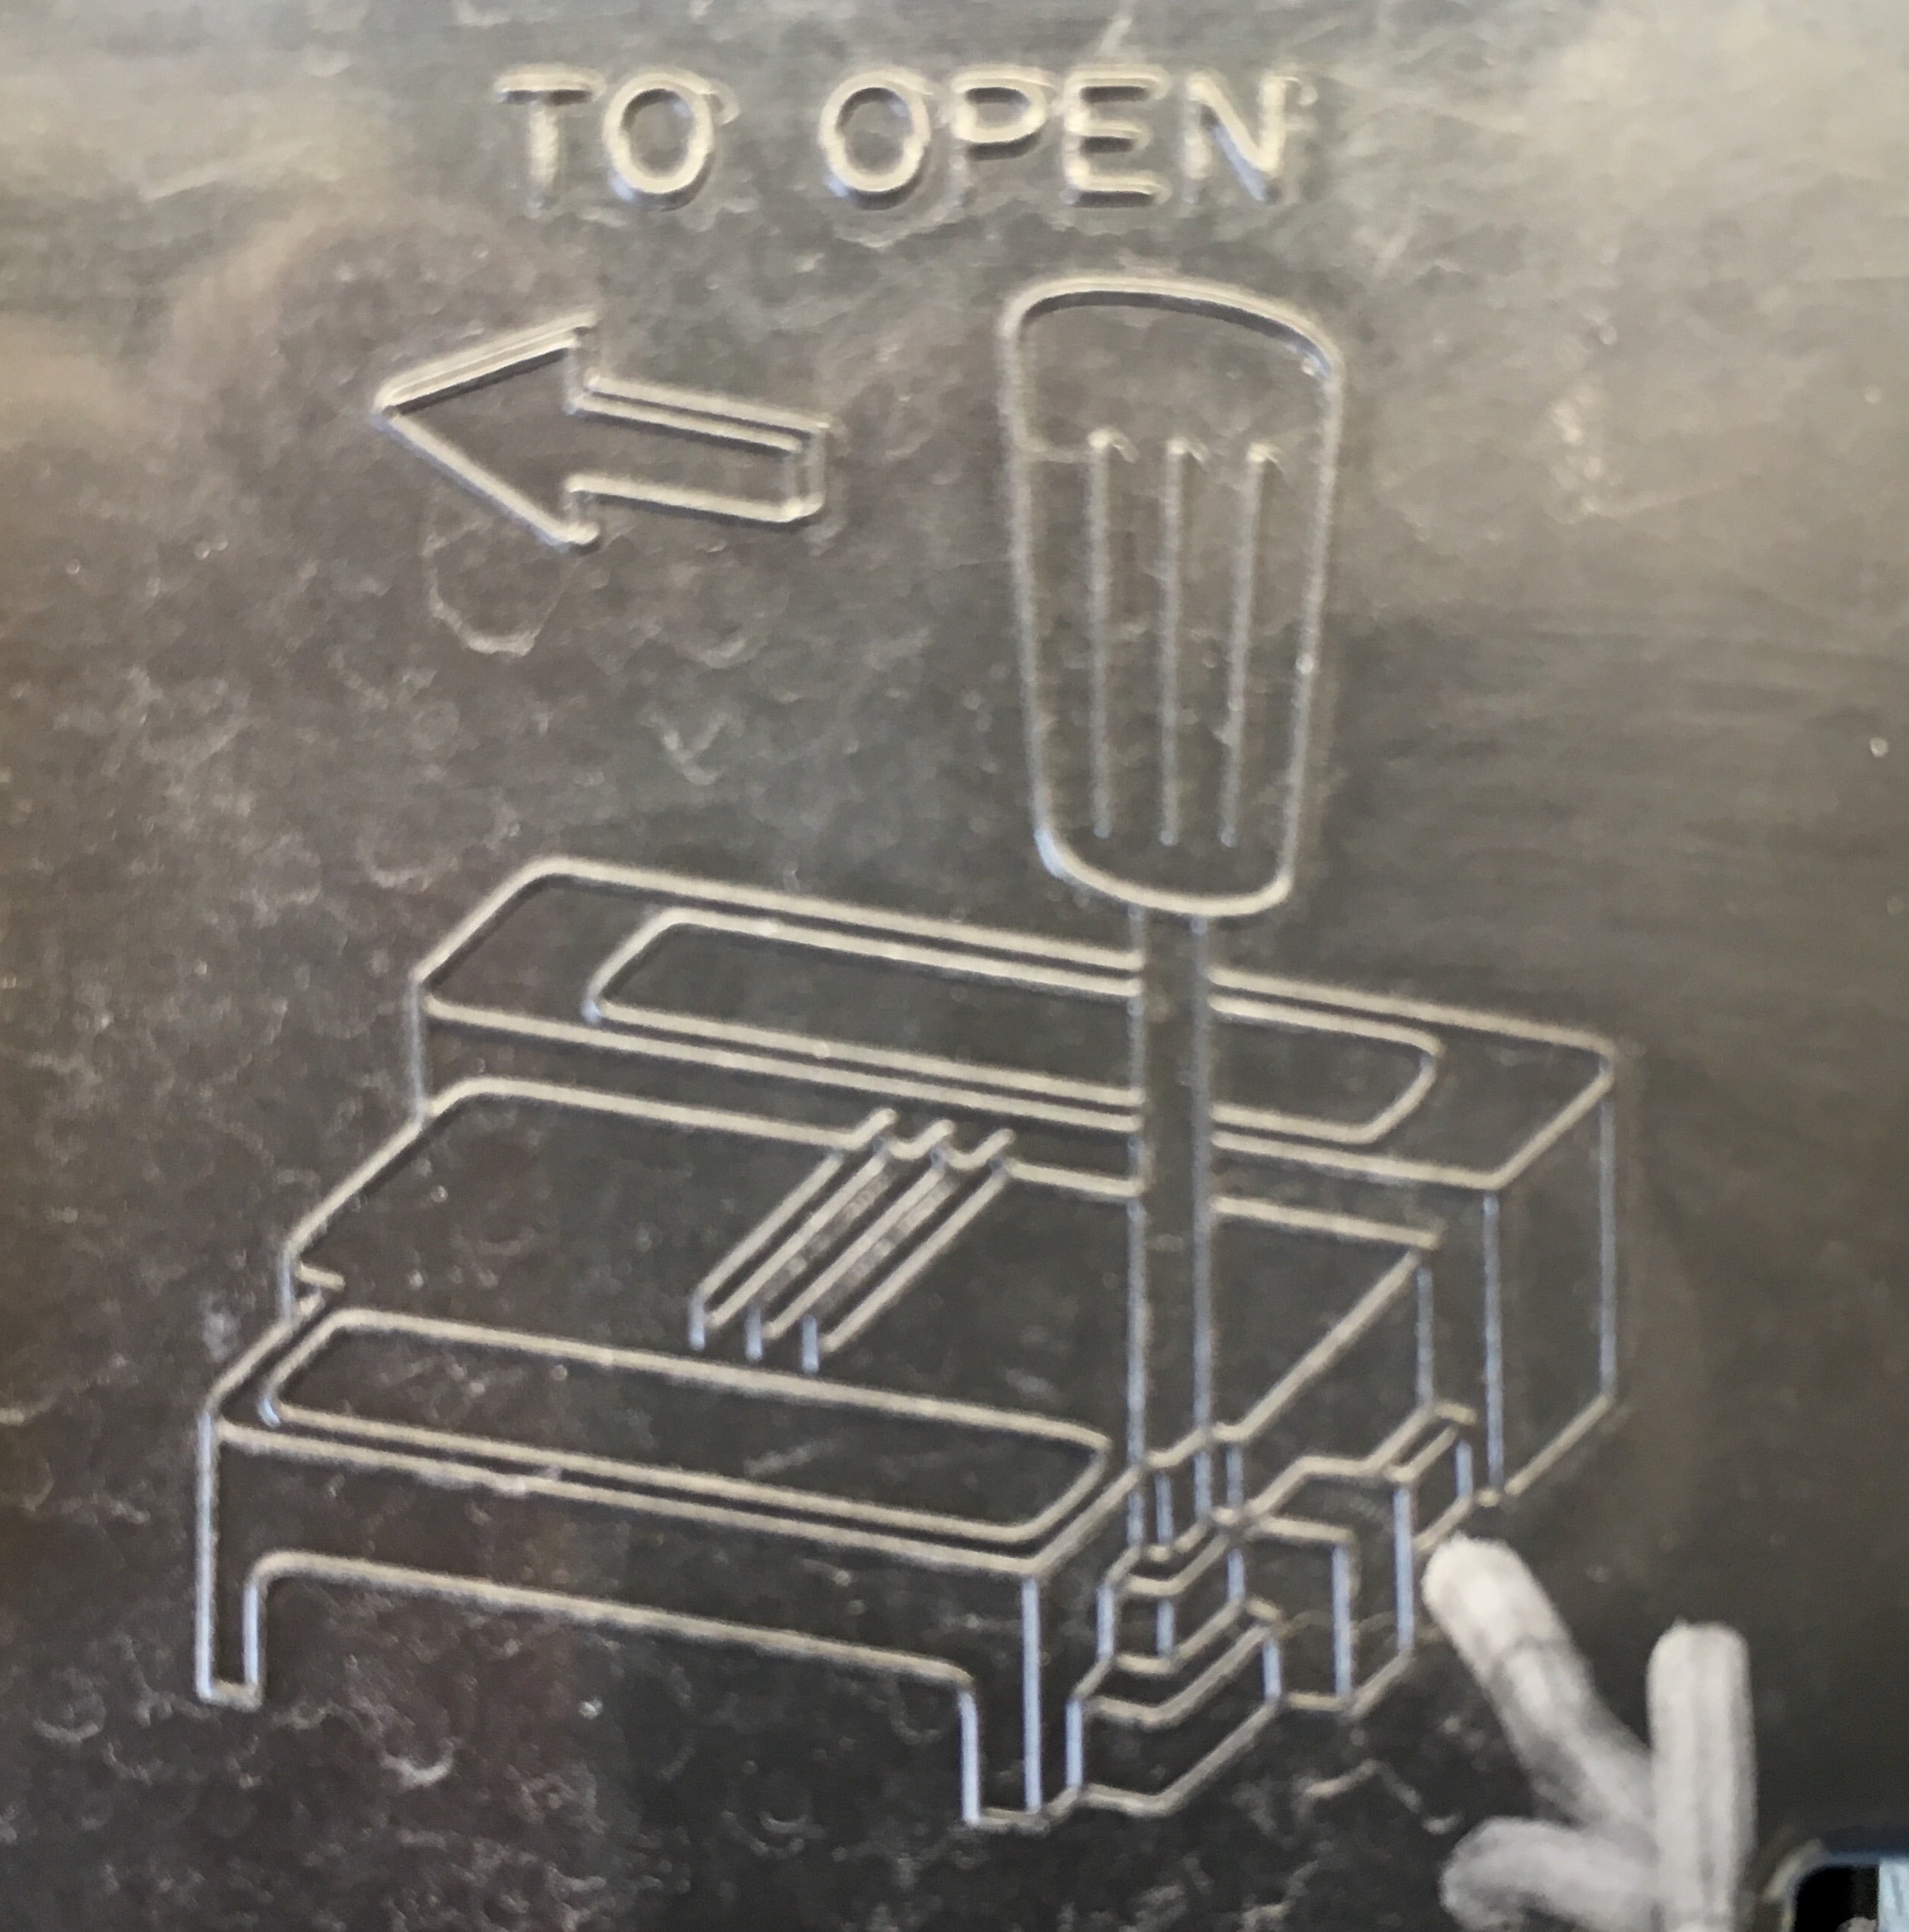
Here's how to disconnect power from the fan so you don't have to remove the whole unit. it takes about ten minutes if you are slow. If you are careful you don't need to power off the fridge, I did not bother. The electronic control box is covered by a square plastic cover.
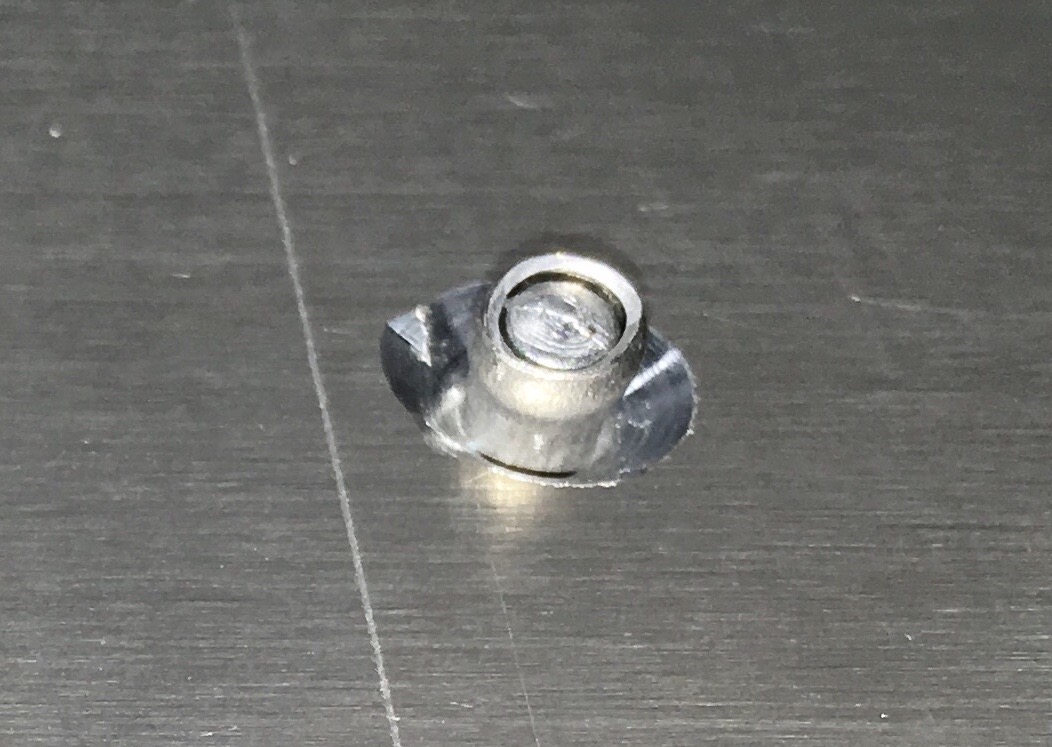
Remove the single Phillips screw at the top, use a magnetic screwdriver if you have one. Don't lose the screw. There are two spring loaded hooks at the 4:00 and 8:00 o'clock positions. Insert a thin flat bladed screwdriver into each slot, lever the handle gently away from the slot while pulling out on the cover. The hooks should release. Remove the cover.
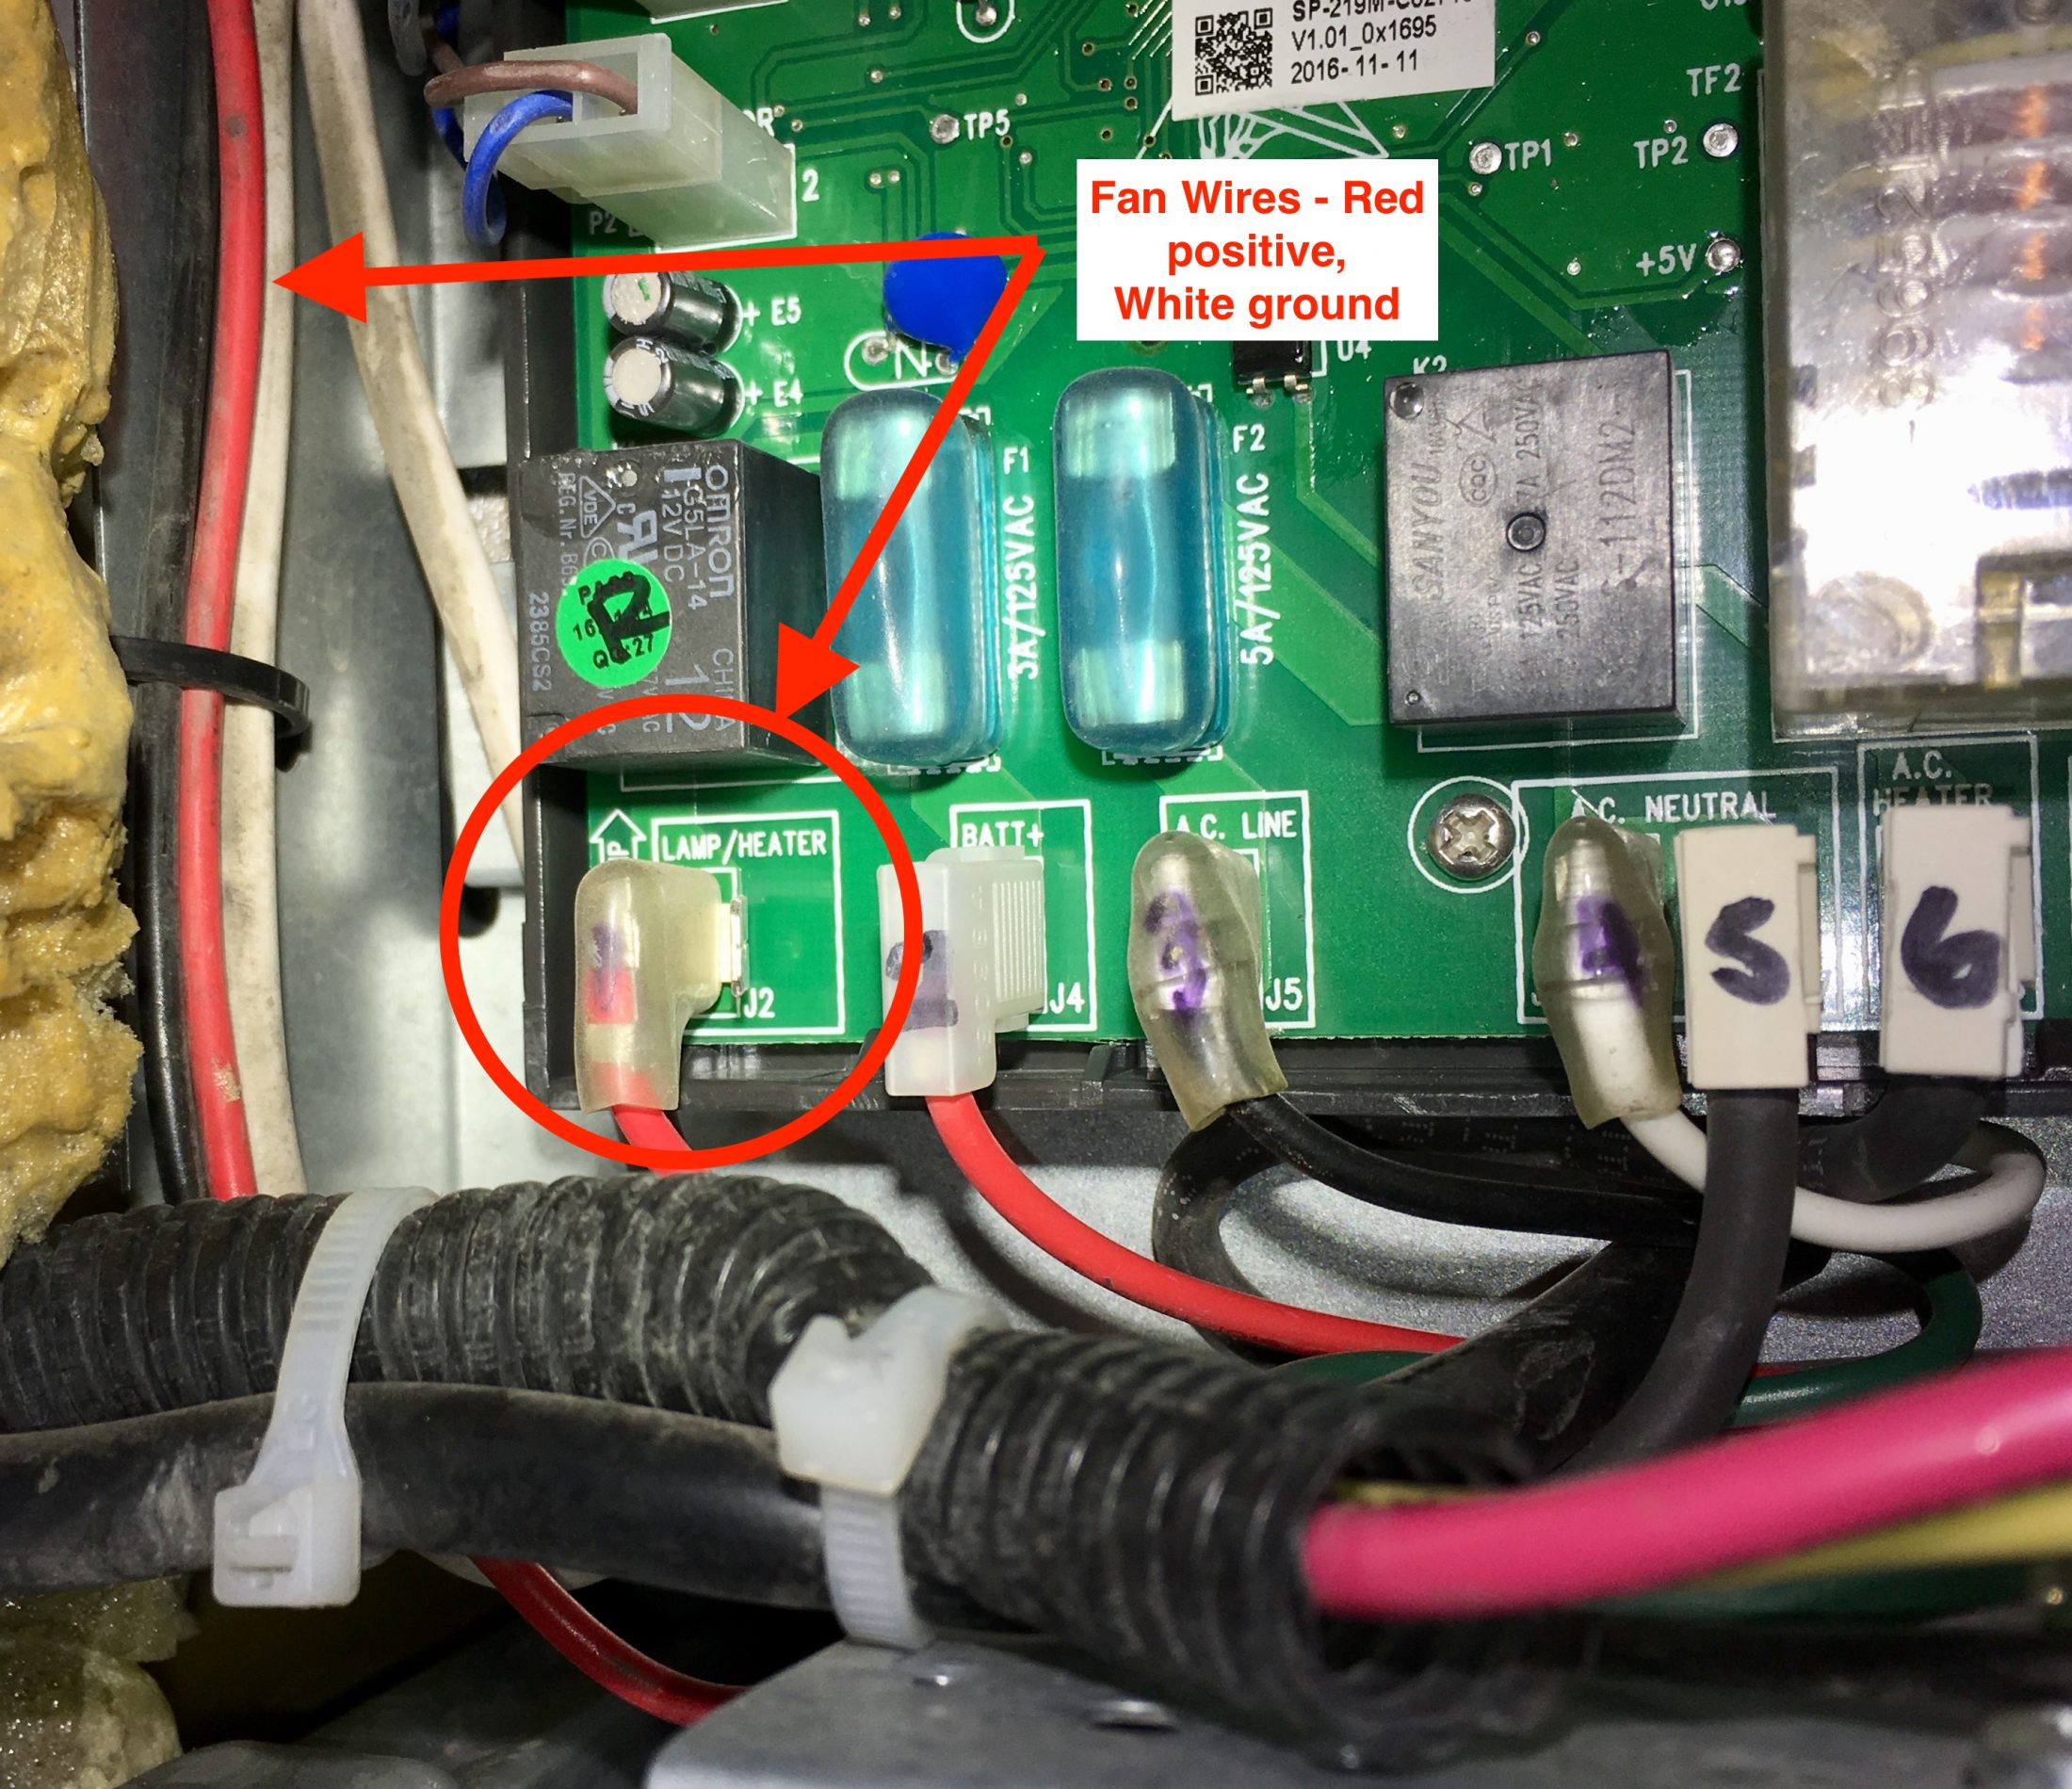
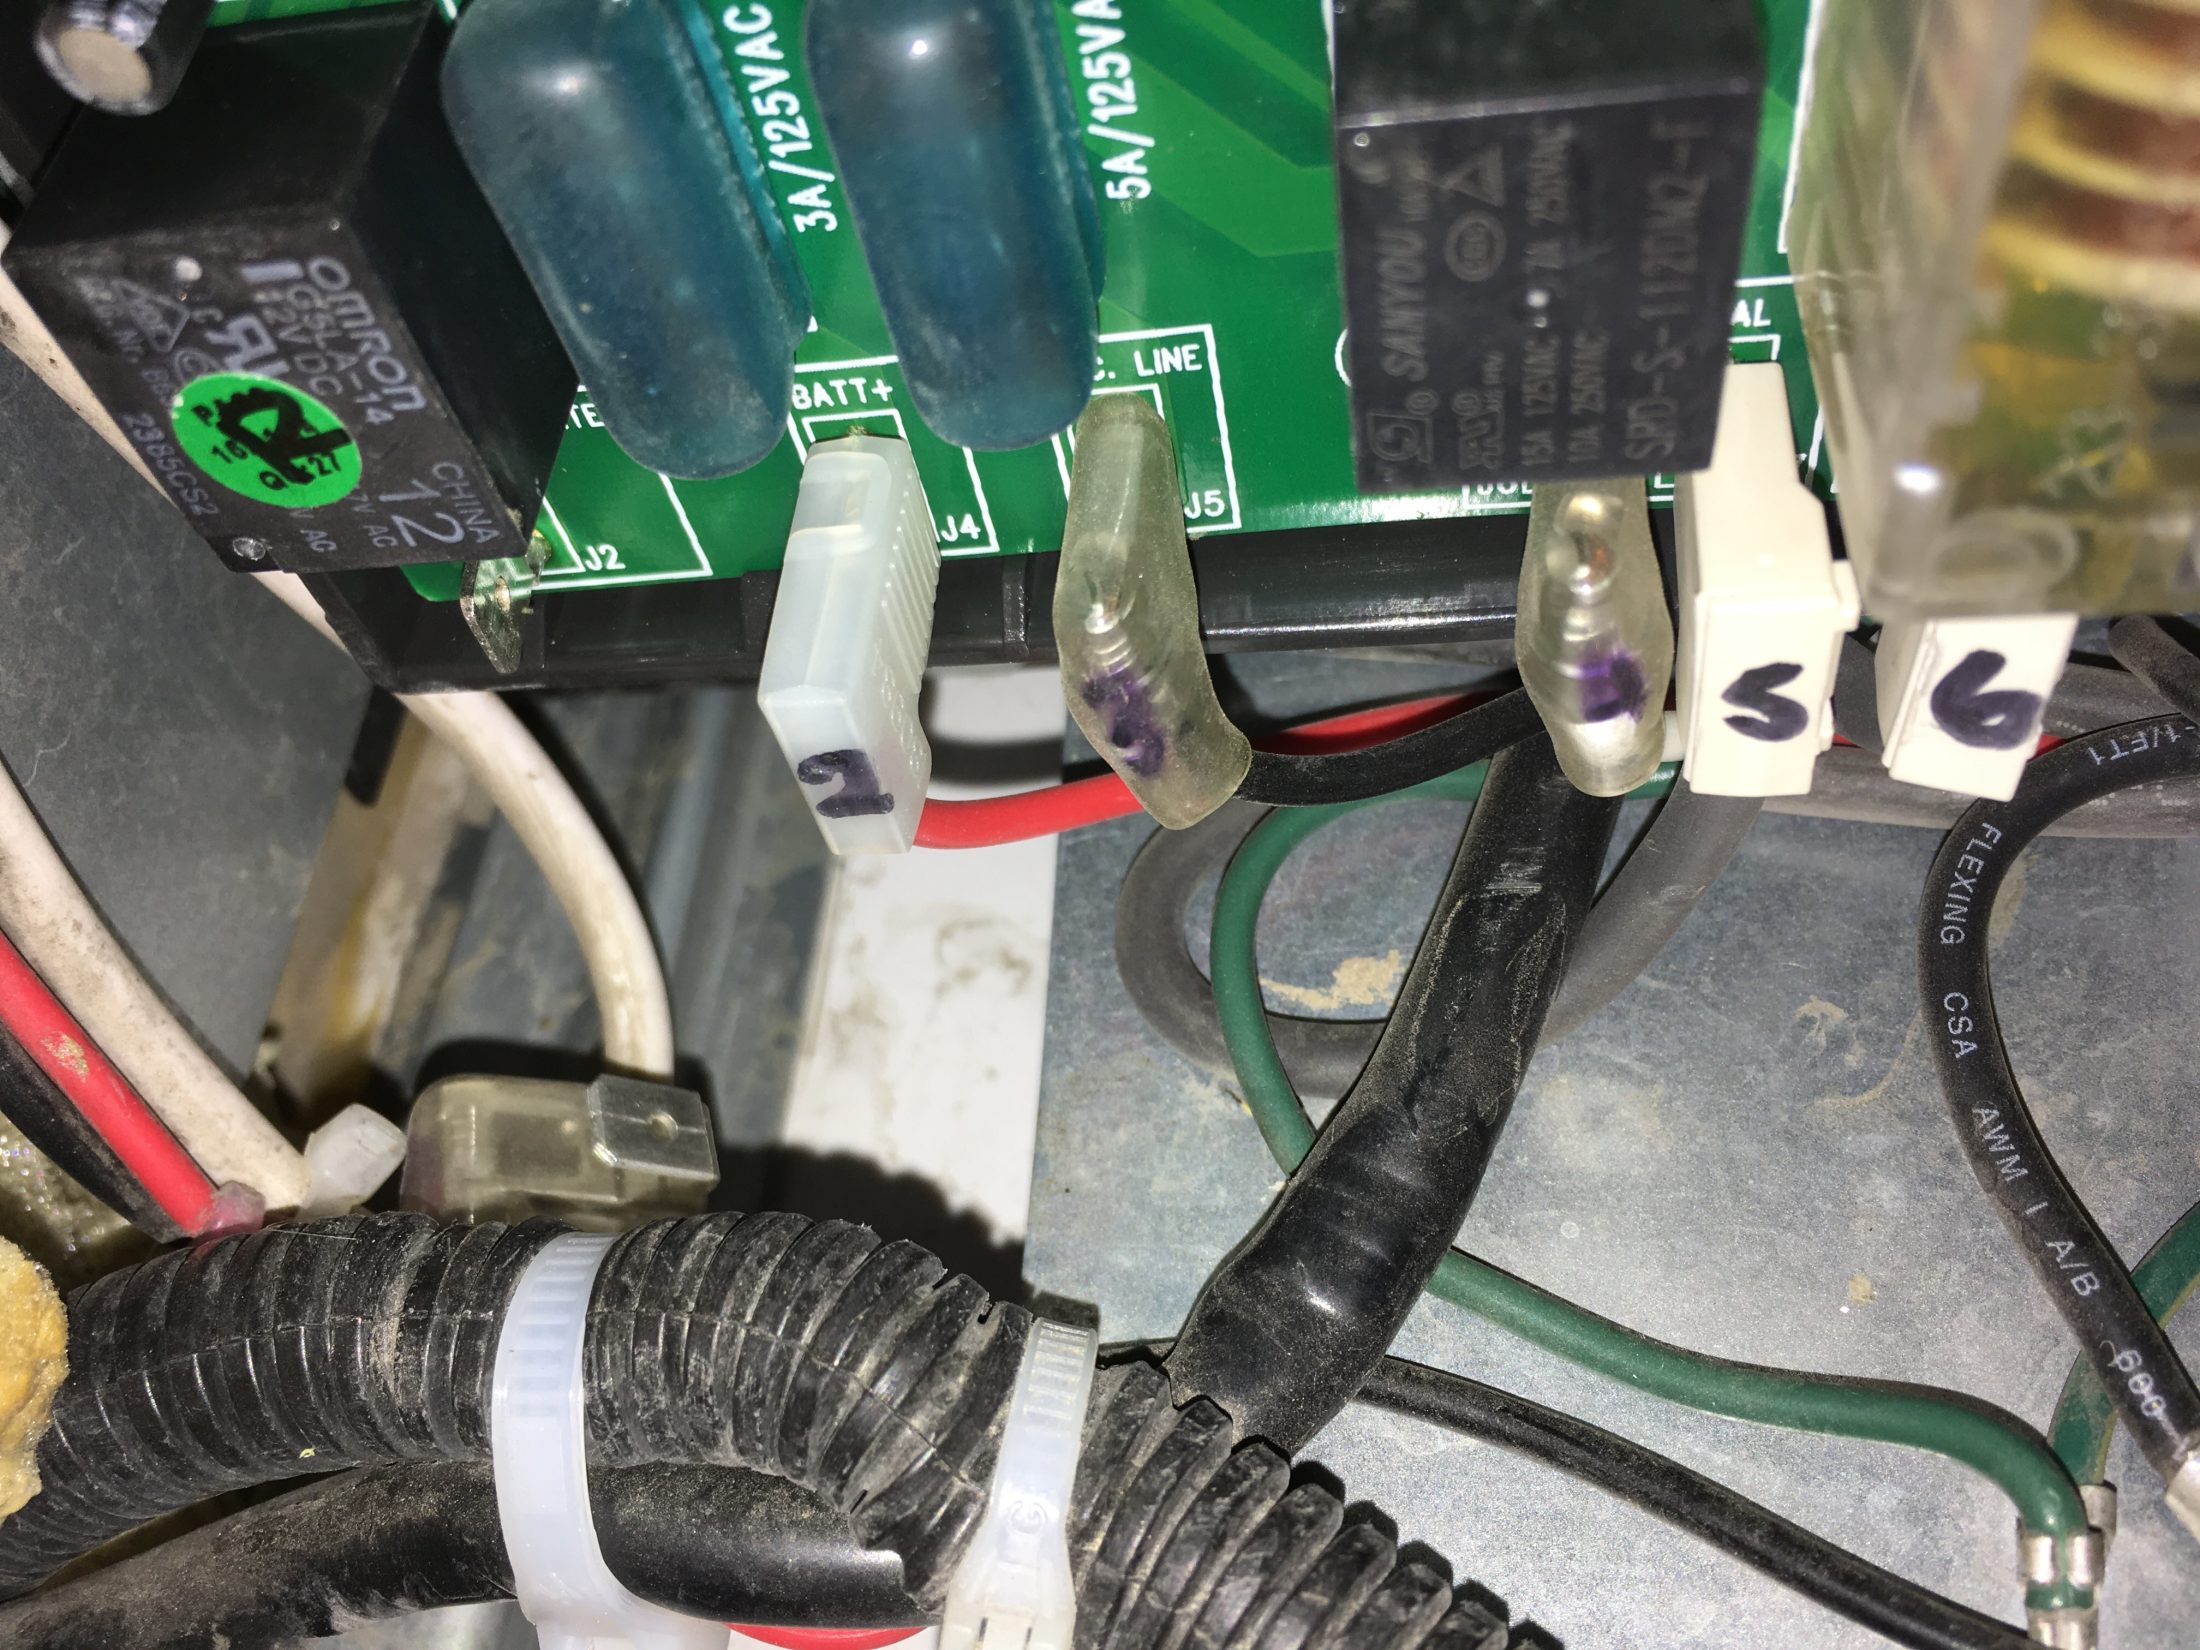
At the bottom of the circuit board you will see a row of wires. (In the pic they are numbered - that was my idea for when I disconnected them all in a previous project.) The bottom left terminal (J2) has a red 90 degree spade connector which is the fan power wire. Grab it carefully with fingers or a pair of pliers and pull it off the terminal.
Secure it to the nearby harness with a nylon cable tie.
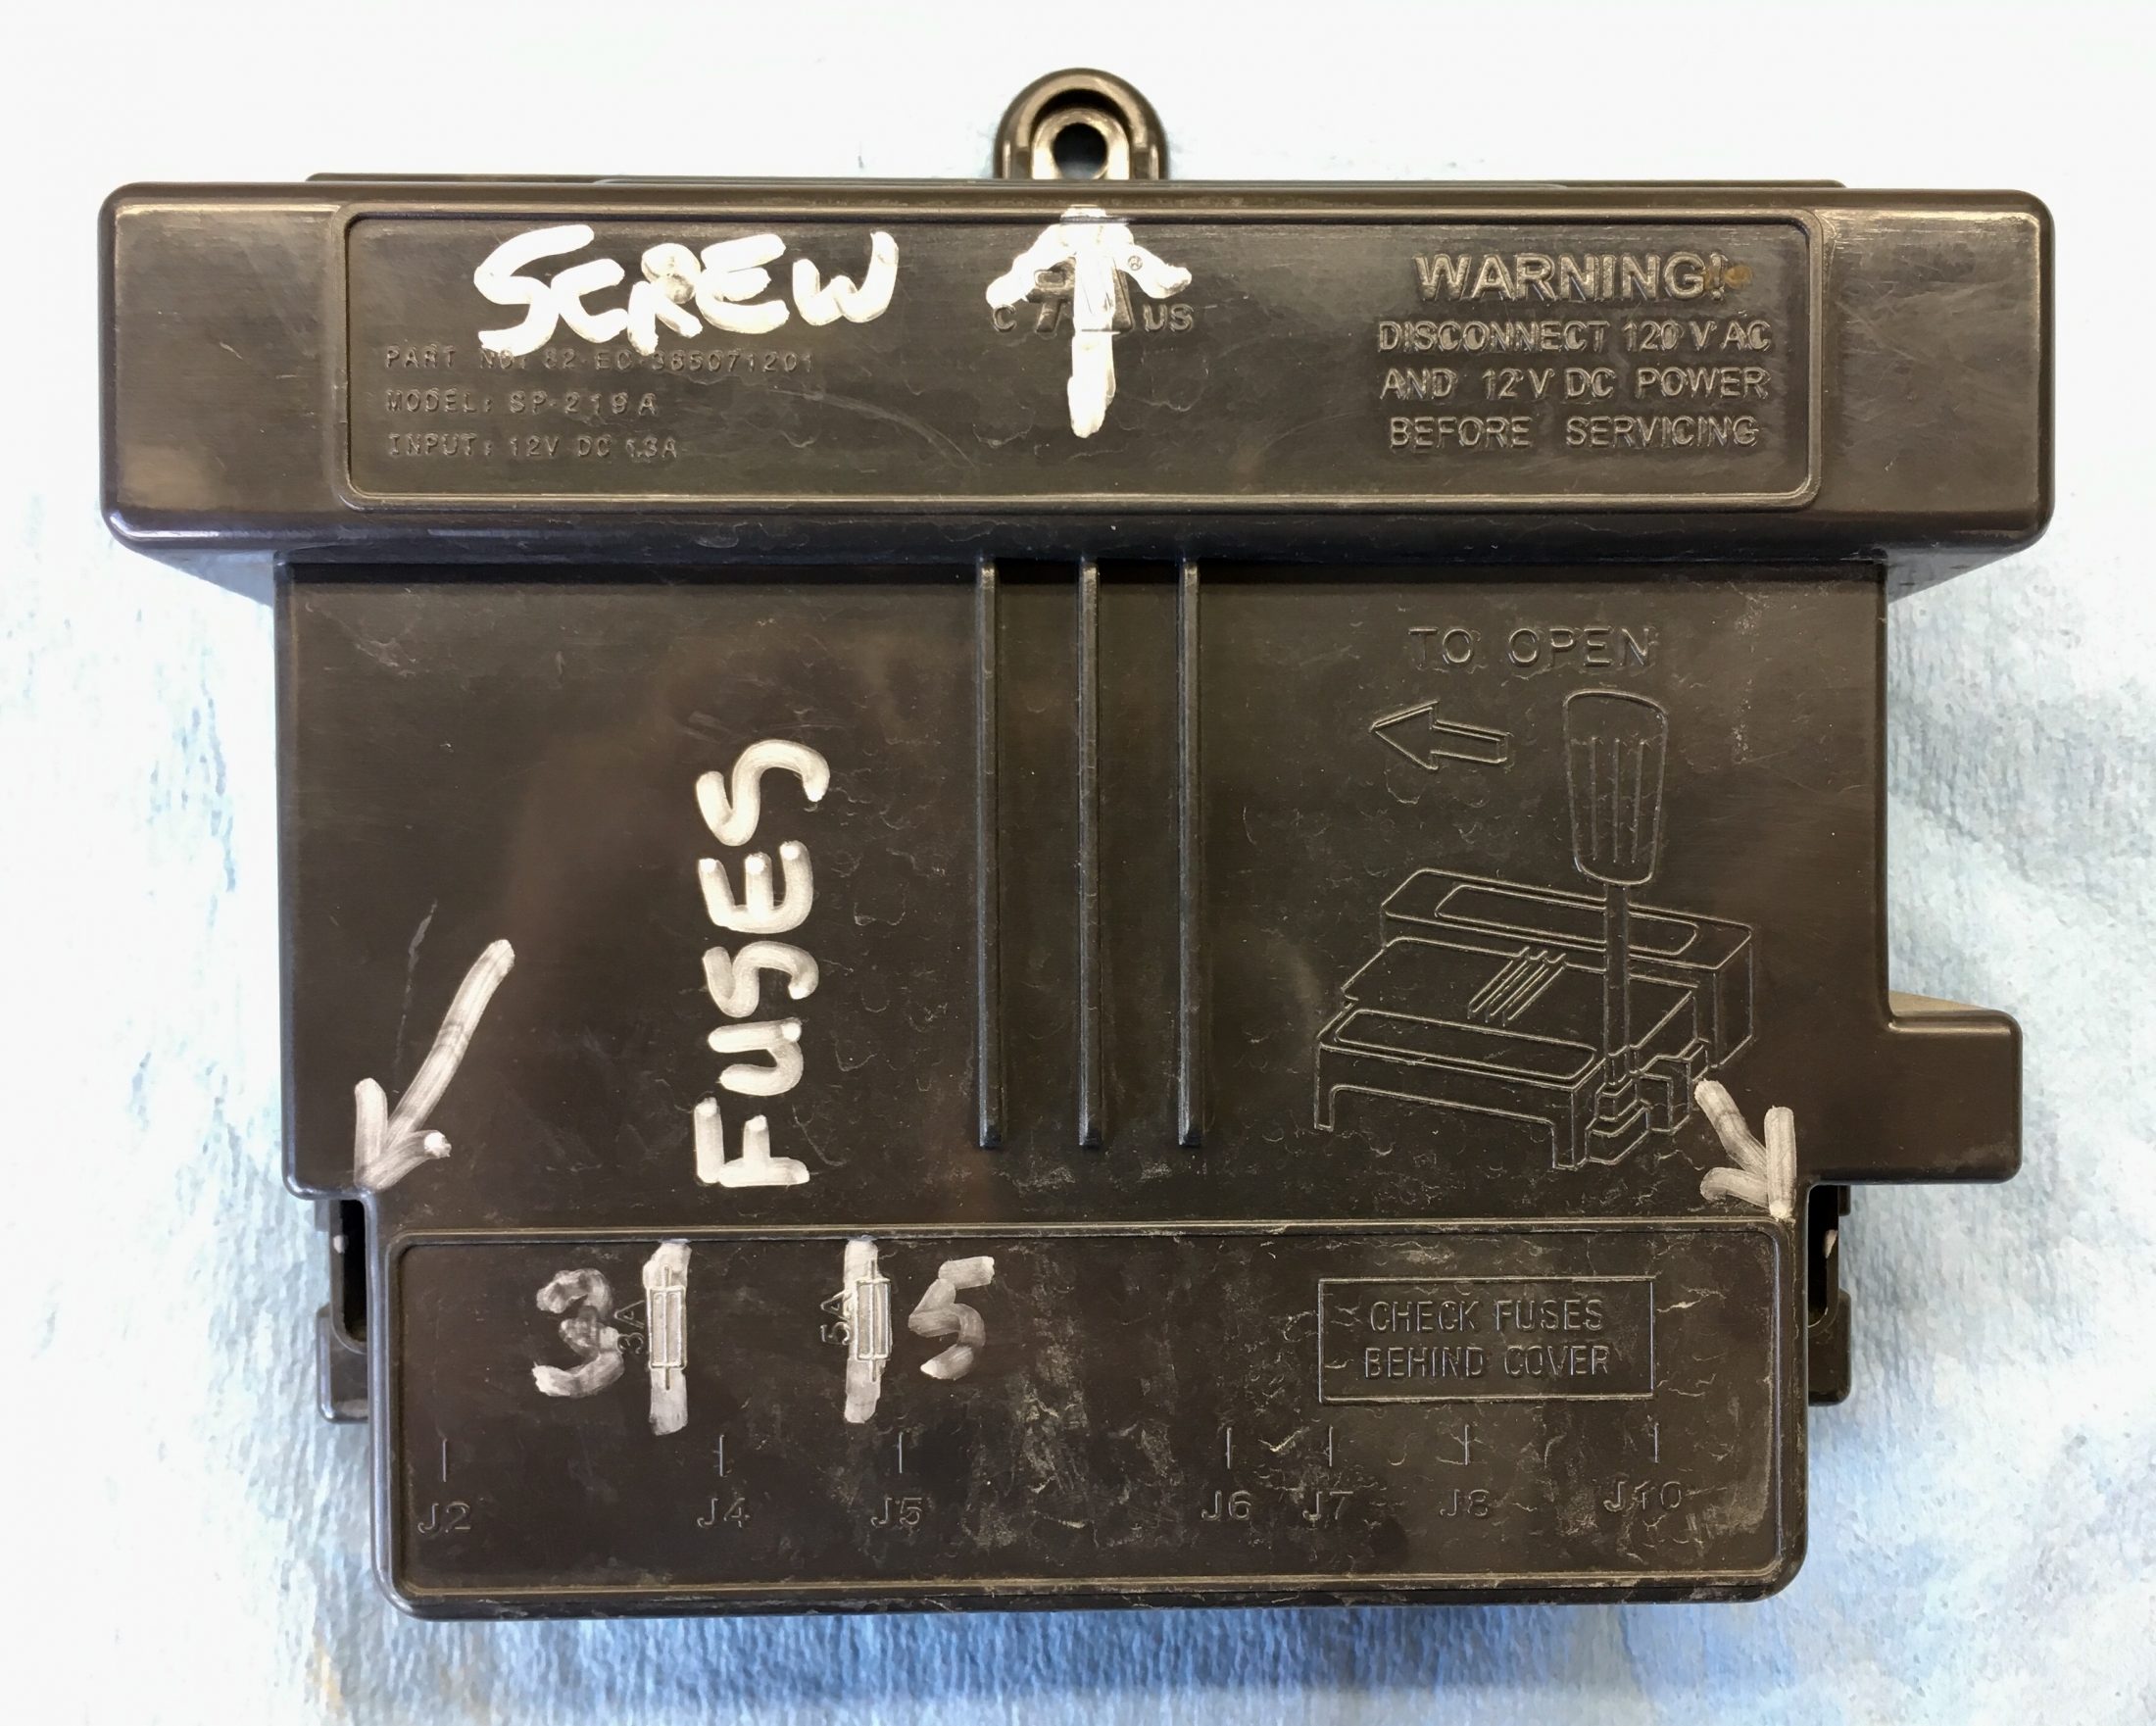
You can mark the cover as I did with a silver Sharpie to help you remember how it comes off the next time. Also notice that there are TWO glass fuses (3 amp and 5 amp) which are visible in the pictures above and to the right of the J2 terminal They have translucent rubber covers to keep off moisture. It would be good idea to blow this whole area clean with compressed air if you have it.
Reinstall the black cover and go get a beer.
Video showing the fan wire with the fan operating. ...
... The fan noise is not too bad in this video since it isn't super hot. To get the fan to run, I opened the fridge inside door, turned the temp to Coldest, stuffed some paper towels in the upper vent and waited ten minutes. The fridge coils won't get hot enough with the electric heating element, you have to run the propane flame. Needless to say, it would be smart to keep your paper towels well AWAY from the right side of the coils where the burner exhaust comes up. Do NOT leave this unattended! Please do NOT set fire to your Ollie!You don't actually need to force the fan to run. Disconnecting the red wire will kill it, IF your circuit is like mine. Compare your wiring diagram first!
If my fridge cools adequately without the fan I will leave it this way. If it struggles I will remove the two louvered covers on hot days to increase natural airflow. I will be able to test it by mid-summer. Maybe I will have to remove the fridge after all...
John Davies
Spokane WA
-
3
-
-
Bill, thanks for being my liaison, I still can’t send. Will you please send me a message to see if I can receive?
Ta.
John Davies
Spokane WA
-
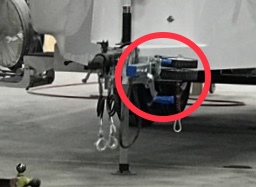
Overland thanks for the pic, I agree that the full lift looks pretty dorky and unstable. OTH...
I am still anxiously waiting a thread about your off-road tongue jack.....
Please.
John Davies
Spokane WA
-
Maybe i’m Just over simplifying the issue, but if you just want additional lift, why can’t you just get new springs with an additional 2 in lift in the arc. A while back I had to replace both springs on a 49 year old boat trailer, I took the springs to a local shop and they asked if I wanted any additional lift, they reproduced the same spring with a 2 in lift with the same # of leafs, the only problem I could foresee would be the shocks.
New springs are a possibility, how much did yours cost?
I am a little reluctant to go this route since if you have a problem on the road, getting a replacement would be MUCH harder than buying a complete new set of Dexter ones. I guess you could have an extra one made, and bolt it to the frame somewhere, as a spare. I carried the old heavy springs this way on a utility trailer when I installed lighter ones.
Would taller springs have more side to side instability, and stress the hangers?
Did you install bump stops on your trailer to prevent excess motion, which can lead to failure?
For a regular cheap trailer suspension I think it should stay close to stock... a spring over axle conversion is common and only changes the position of the mount. For a high quality custom suspension, like trailing A Arms with coil or air springs, you are relying on a higher level of materials and a better design rather than ease of finding parts.tho even a high dollar suspension should have easily changed spindles and use common sized bearings.
Thanks.
John Davies
Spokane WA
-
Is anybody else having this problem? I can fill in the text box but the Send Message button stays grey and nothing happens. I noticed this mid-day May 13. I also haven’t received any Messages for several days but that could be a coincidence.
Safari on an iPad.
John Davies
Spokane WA
-
JD – check your PM.
Messages are down, I will try later.
John Davies
Spokane WA
-
Here is a cool video about a custom Icon suspension on a Turtleback Adventure trailer. Most of it is fluff but starting at 9:00 you can watch one wheel articulate.
Since I do want to add disc brakes, that would be best the time to go to 5200 lb 2” drop axles, mount the stock springs on top and put on rubber bump stops. That sounds like a winner to me. I would like a little extra ride height, for tail dragging reasons.
Would sourcing longer shocks be an issue? Can you search by length?
Thanks for the comments.
John Davies
Spokane WA
-
1
-


Need help in Chattanooga, TN
in General Discussion
Posted
Bill, I personally would be reluctant to assume the liability. Any commercial towing recovery company can do it safely and professionally and they have insurance that will cover any damage. They would need a door key so they can make sure stuff is secure inside, plus a key to a coupler lock. That is the method I would use if I were in this situation.
I would also contact the campground owner to ask them to make sure the trailer is left leveled, locked and chocked with the roof vents open. The tow driver can leave the keys with them.
BTW this is a scenario we as older owners should think about and plan for. I hope things work out .
john Davies
Spokane WA