John E Davies
-
Posts
5,759 -
Joined
-
Last visited
-
Days Won
243
Everything posted by John E Davies
-
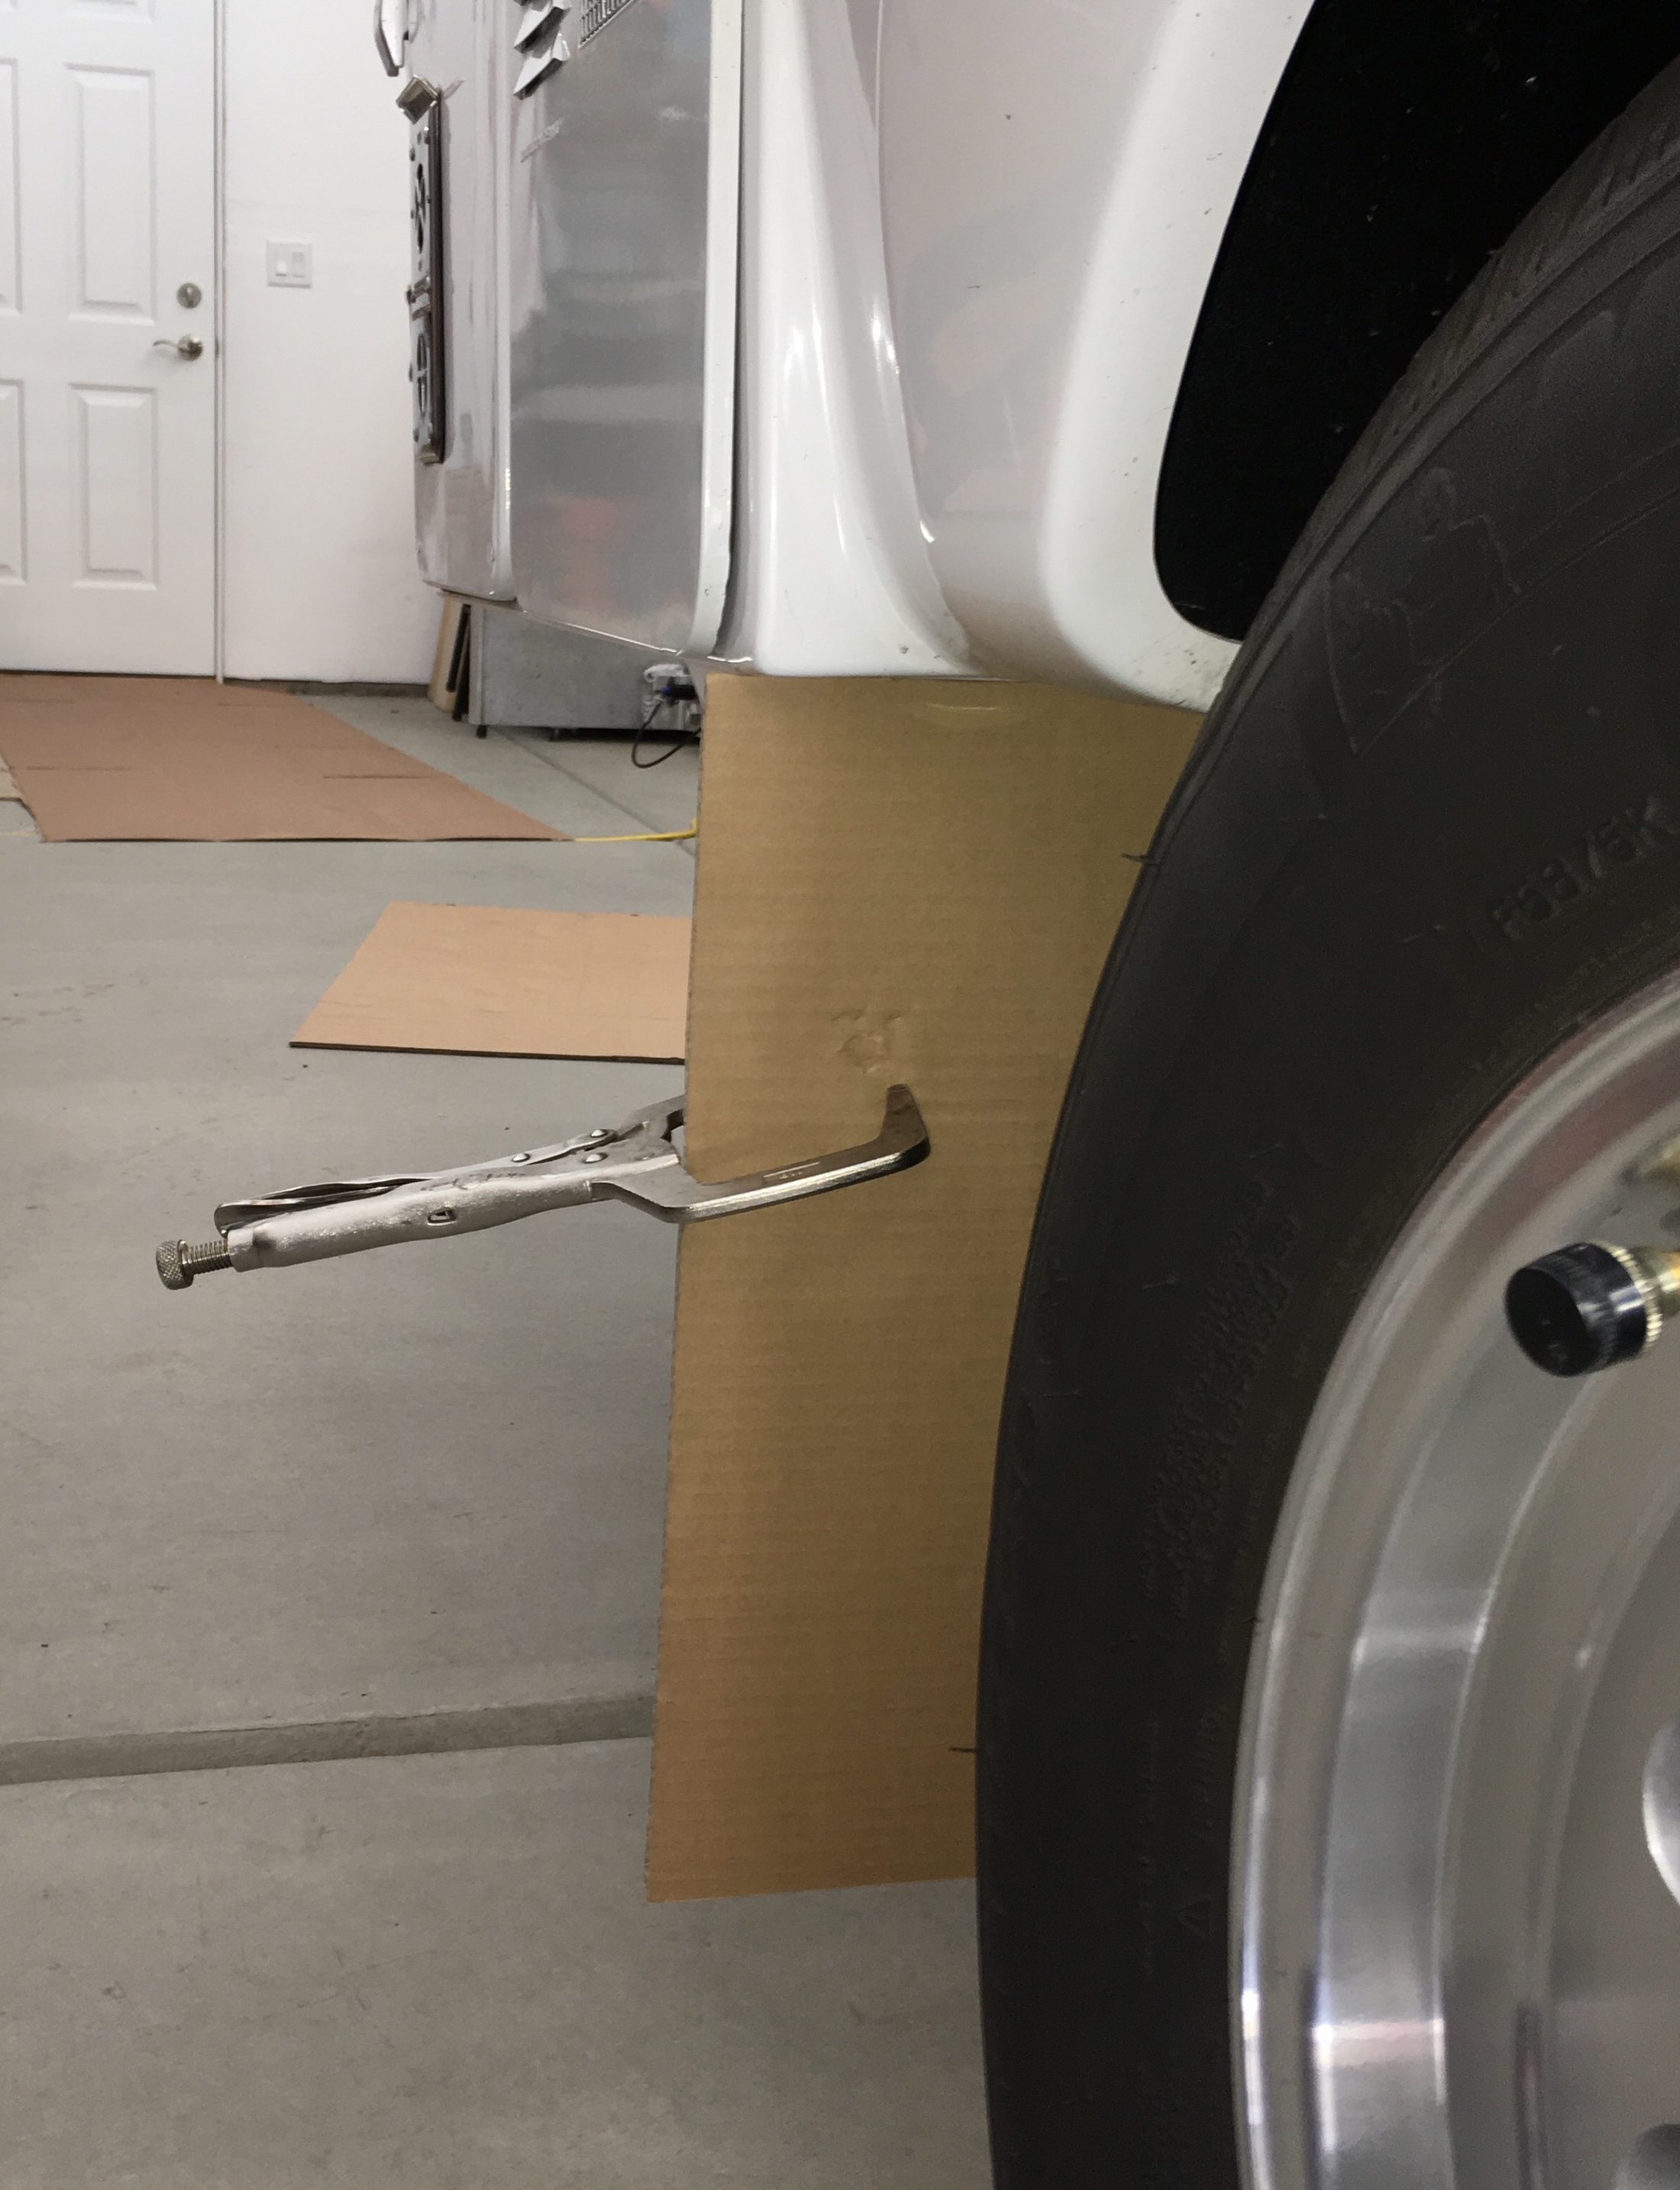
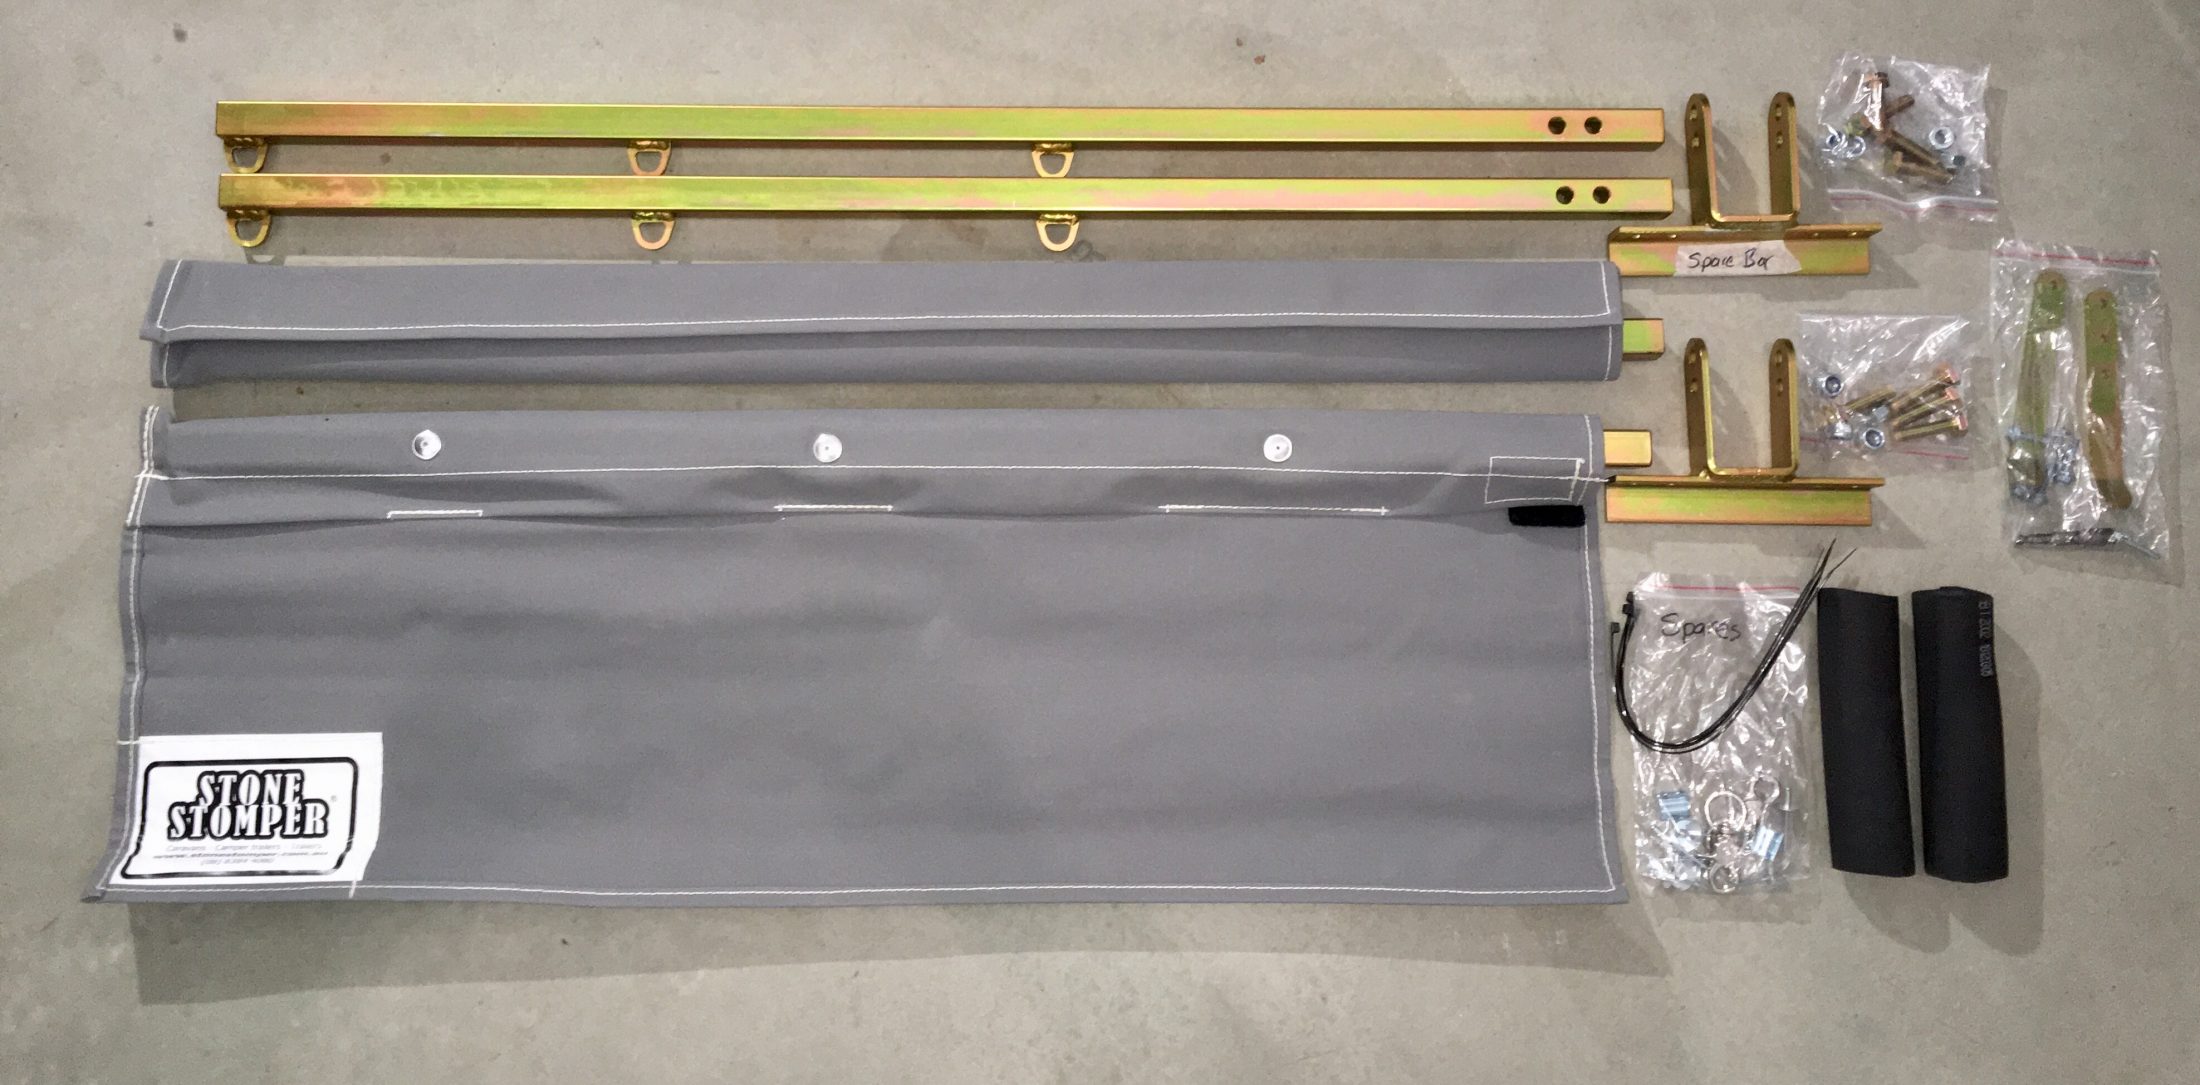
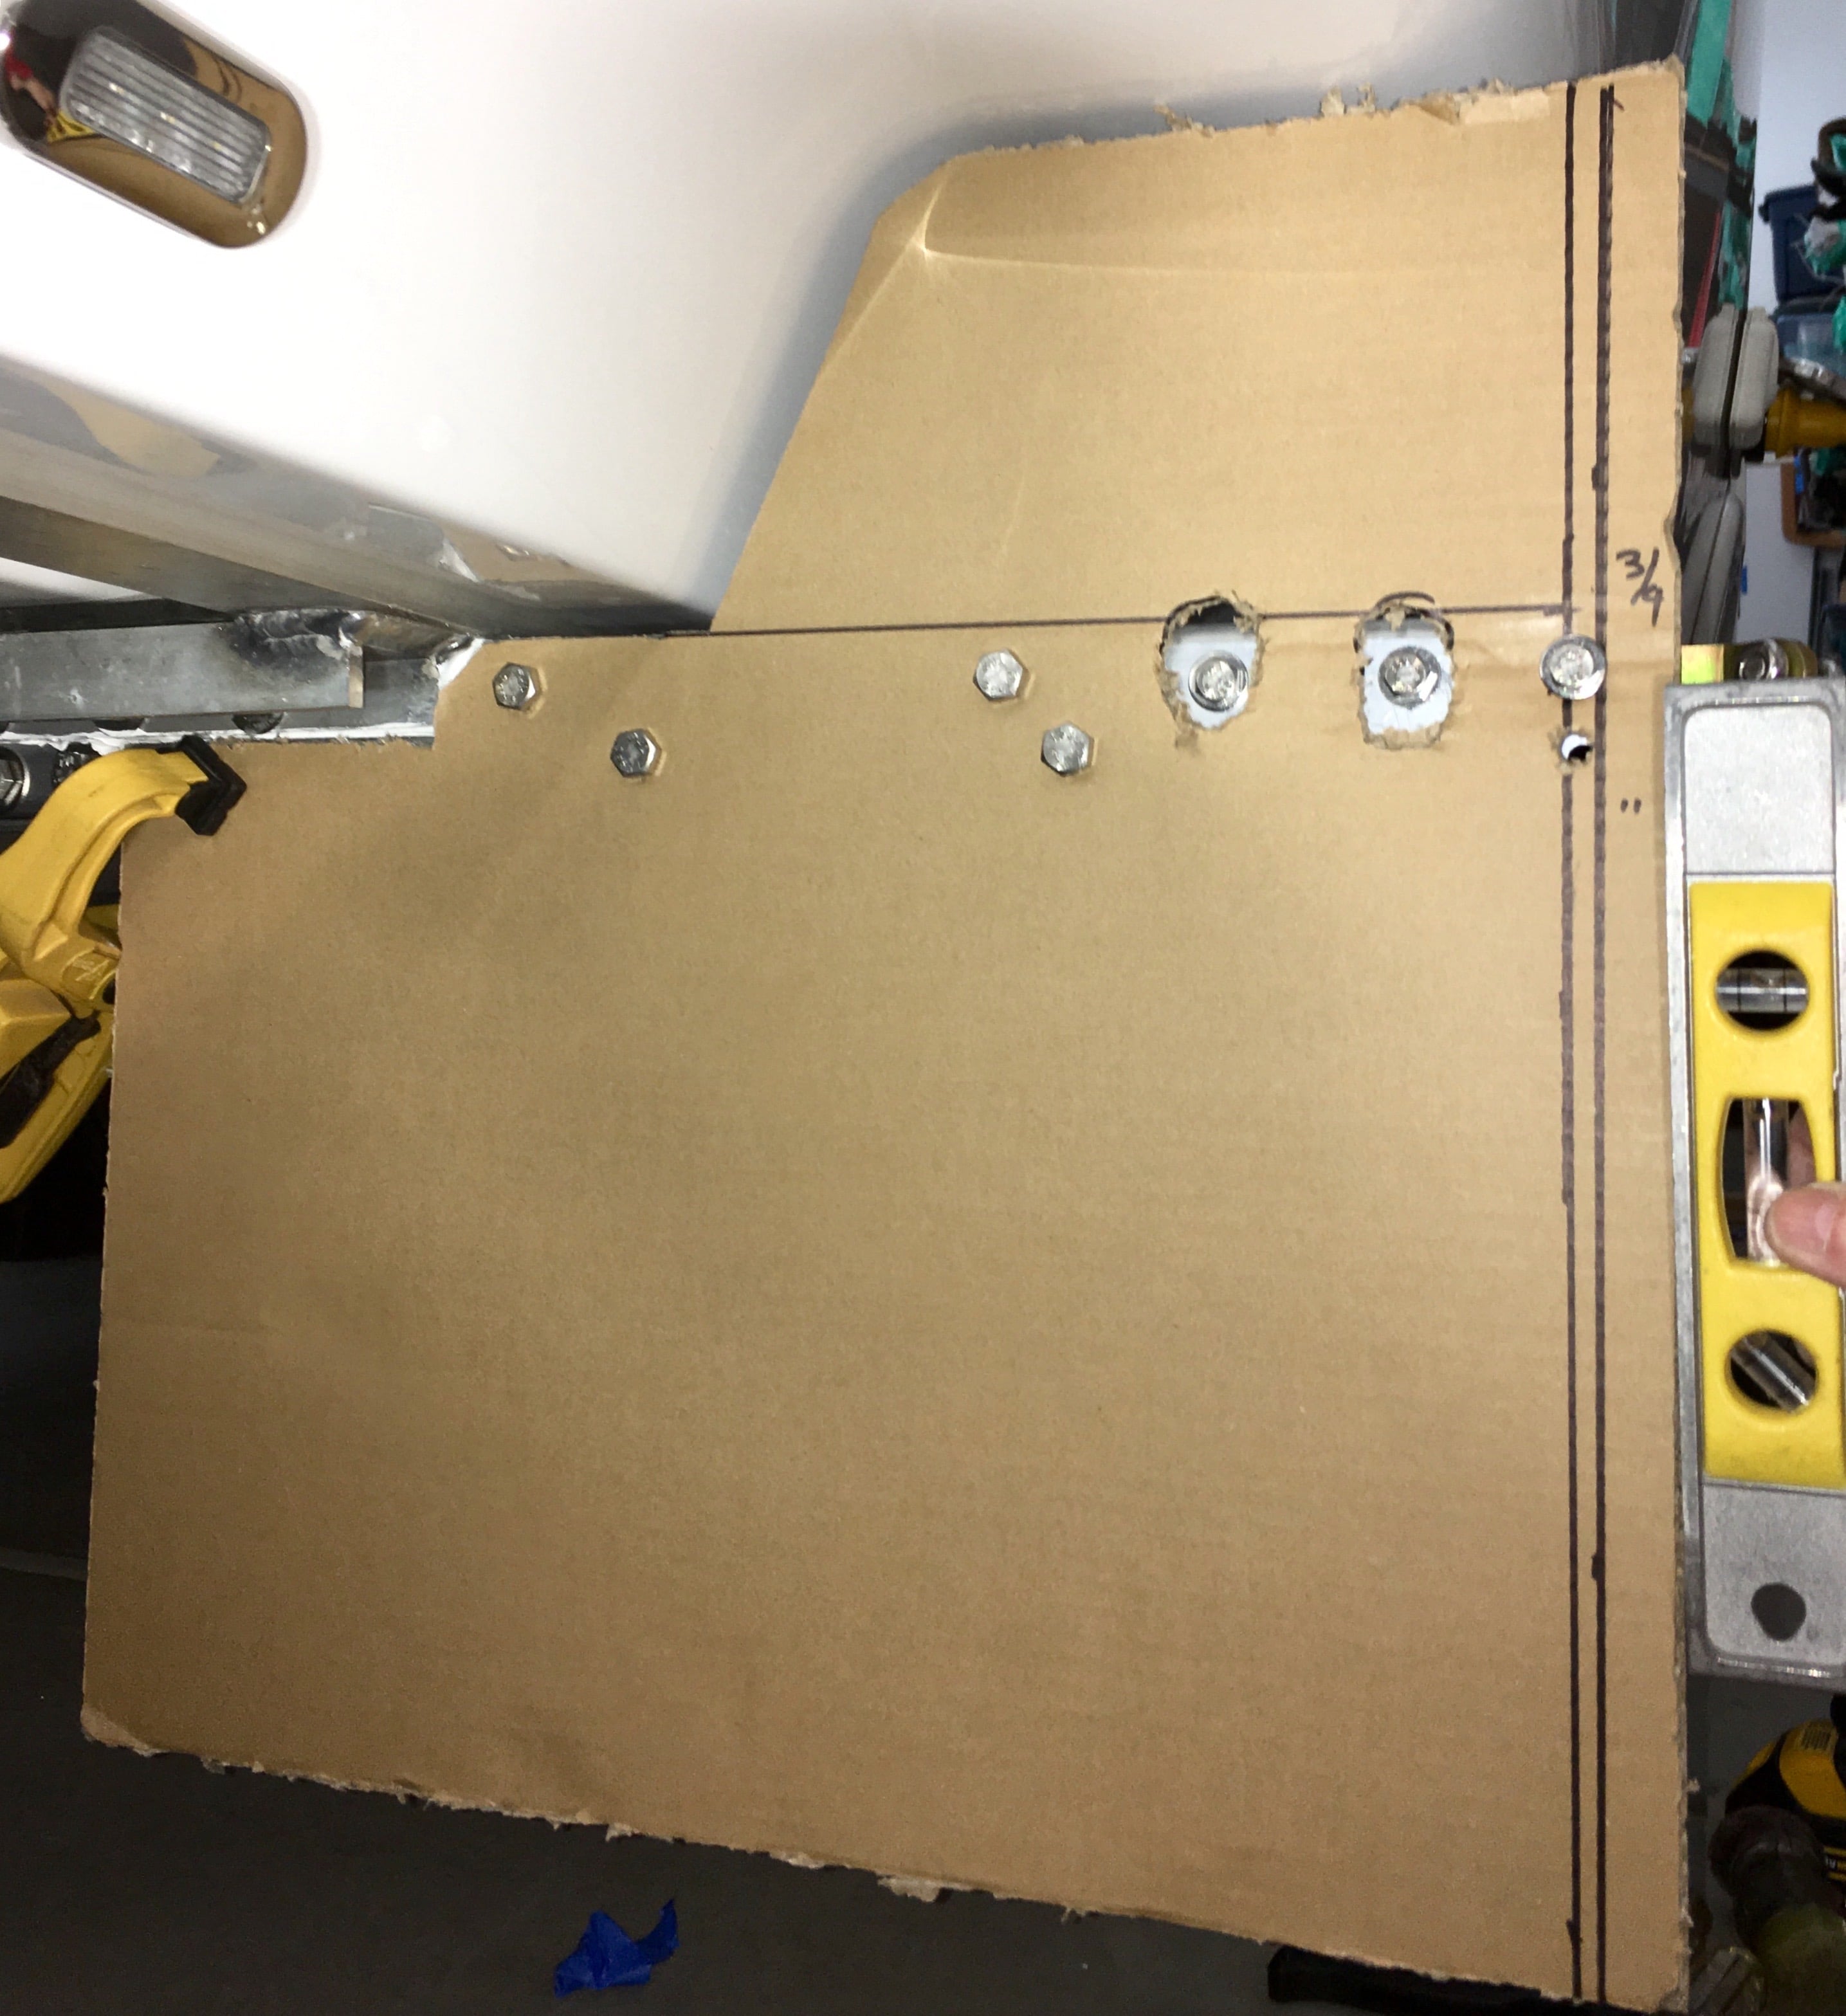
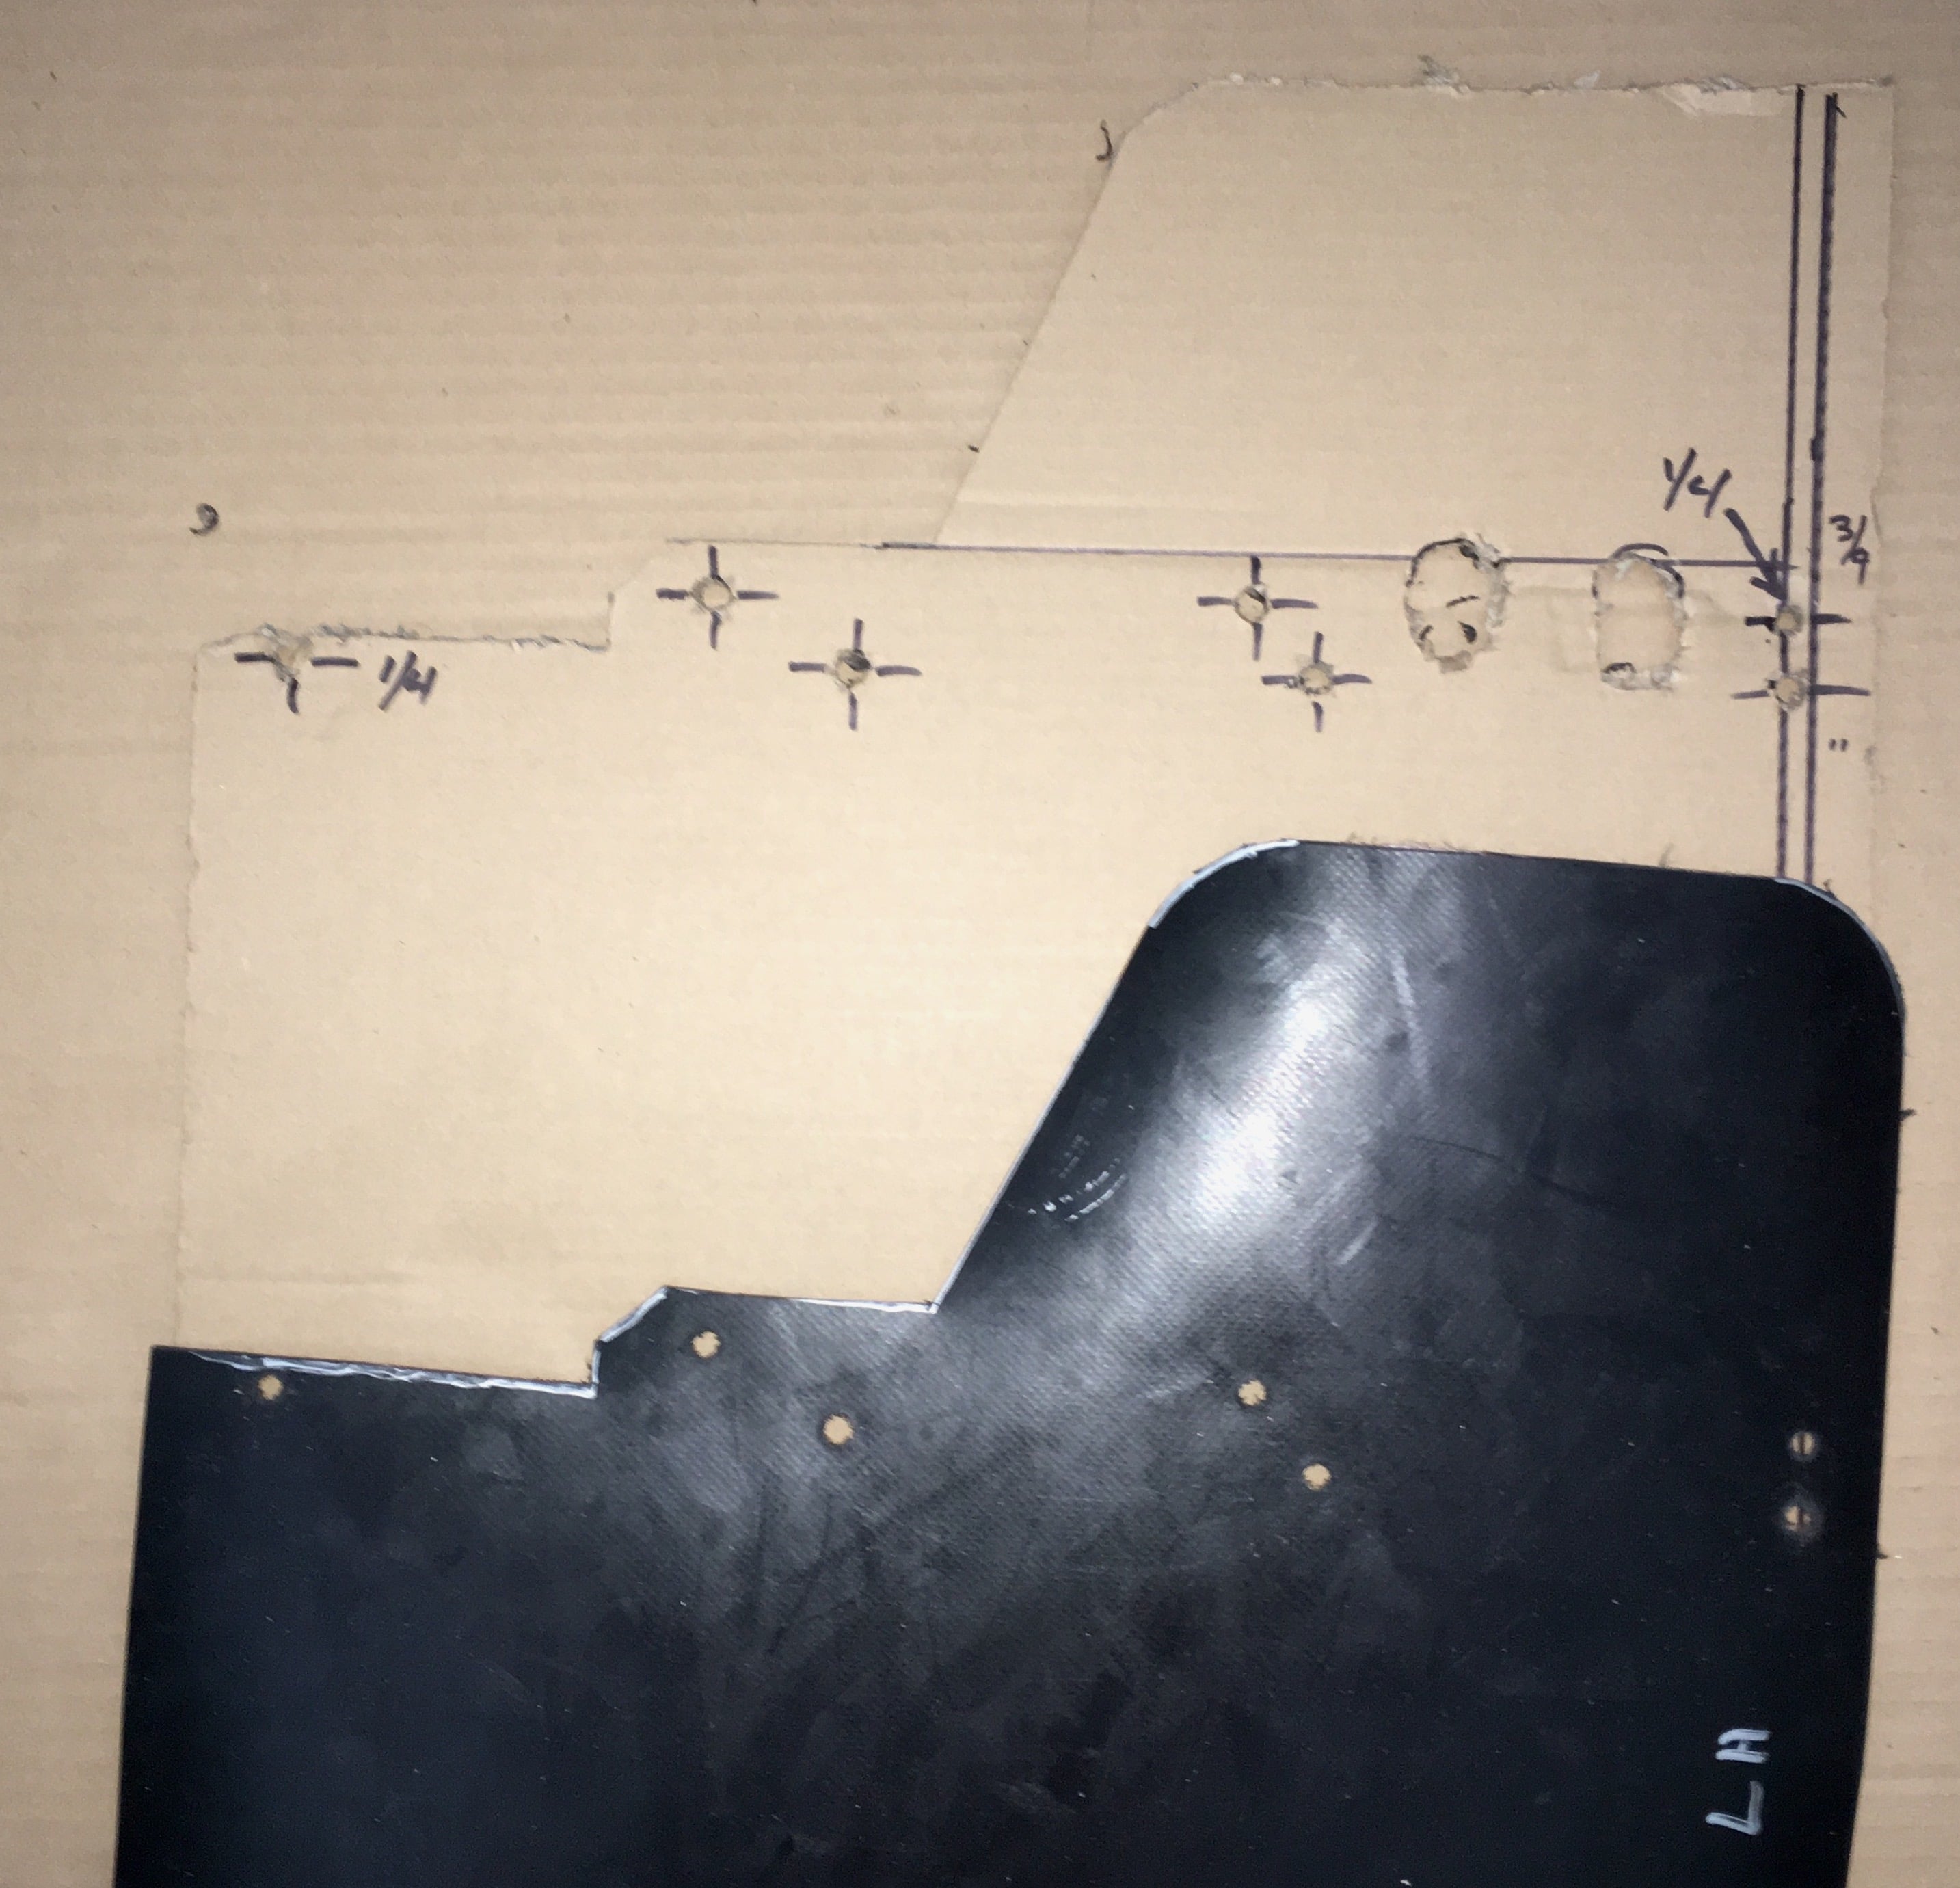
This thread won't have much How To info, mostly pictures. The two aluminum arms were installed using the same methods described in this thread - refer to that if you have questions. ... http://olivertraveltrailers.com/topic/how-to-stone-stomper-gravel-guard/ Note: The steel subframe should be electrically isolated from the aluminum arms as much as practical. I used stainless hardware and bedded the two parts in a thick layer of 3M 4000 Adhesive Sealant. The flaps are universal ones, 12 inch by 18 inch, that I found at a local ranch supply for $18. The size was perfect, all I had to do was notch the inside to clear the hull. They are this same brand but the embossed pattern is a little different: ... https://smile.amazon.com/dp/B0002MA68M/?coliid=I1N0SYMJAAHKPN&colid=1X5H11EH41351&psc=0&ref_=lv_ov_lig_dp_it I mocked up a flap using cardboard to mark the cutout.

-

HOW TO: Stone Stomper Gravel Guard.
John E Davies replied to John E Davies's topic in Towing an Oliver
Road test report. I took the trailer out for a 30 mile tow on paved roads. It works fine, with a couple of cautions. When turning hard at full lock, going forward, the shock cords are at full stretch on the outside and the cords and fabric sag on the inside. I have to admit that the last pic bothers me, it seems like inadequate room for maneuvering on uneven terrain. Nothing hits, but it is darned close. When backing hard, the plastic center support bar will contact the rear corner of the truck, and the steel front bar will go under the basket. On uneven ground, the steel bar could run into the basket. I have contacted Anderson to see if they will build me an extended "rack" for my hitch. I asked for an extra 4 inches reach. I think that will open things up here enough and make me worry less. Plus it will get the ball coupler out from under my open tailgate. I could remove the basket entirely, but that would be a last resort, since I need it for gas and water cans. Here is a view underneath, right side, showing the fabric fully folded during a normal full lock front turn. It clears the ground by about 6 inches. Here is a look at the left side, at full lock turning left, where the exhaust pipe is located: The Land Cruiser already has a fully turned down tip. If your tow vehicle has exhaust(s) that exit more out the back, you will have to install turn down tips or risk burning a hole in the fabric. I need to remember to not park long term at full left lock while the engine is running ;) So, for a first run I am satisfied, I need to get more room and the extended Anderson shank is my best option. Moving the front SS bar forward 4 inches on the shank will really help. Extending the tongue would also work, and I may need to go down that road eventually, but is a much more involved operation. Regardless of how I get additional clearance, it is easy to shift the position of the fabric forward, using extra carabiners or even short lengths of crimped steel cable. If there is a gap up front, the gray flaps will stop any rocks from passing through it. John Davies Spokane WA
-
Off-pavement recovery - equipment and best methods
John E Davies replied to John E Davies's topic in Towing an Oliver
Well, I never once mentioned serious offroad, that was never my intent. Mark went into that area. I do appreciate the effort he took to provide all those cool links. I used to do that and learned how hard it can be.... when the road just ends in a rockfall. If I wanted to go offroad in my travelling home, it would be in an Earth Cruiser. I chose Mouse because I decided that my strategy would instead involve setting up a base camp and exploring further into the back country in my highly capable Land Cruiser.... so maintained forest or ranch roads are the worst I would tow upon. I won’t tow over icy packed snow or wet clay soils, so the worst mishap I envision is sliding off a gravel shoulder or perhaps getting hung up crossing into an undeveloped camp site beside the road. All the scenarios I would attempt should be within reach of a commercial tow truck, using my AAA RV coverage (200 mile ) .... and I can use my SPOT to summon assistance if required. NO OFFROAD, I just need to know how to get unstuck, not unbogged, without causing further damage. I think some factory guidance is appropriate, especially since the trailer is heavily marketed as a boondocker, and I know that they are taken routinely off pavement... For those who may not know this, your RV “roadside assistance” insurance becomes invalid once you get off maintained roads. Think about that if you are considering going across country to a remote site, the White Rim Road in Canyonlands, for example. You could easily get your Elite 1 back there if you have an excellent TV, but any rescue or repair costs will come out of your own pocket...! John Davies Spokane WA
-
I sent in this request to Oliver, I thought that it would be good to also discuss this in the open forum. Hi, I plan to do a lot of travel off pavement in National Forests this summer. I have not read a word from Oliver about safe and effective methods of recovery, using a tow truck and also using more primitive methods..... (self rescue - jeep with a winch). Where would you hook up a recovery strap or chain in back to prevent damage to the aluminum frame? In the front? Would it be possible for me to add strong steel recovery hooks or rings in the back? if so where and how? Please let me know what the factory feels about this, and issue a bulletin for other owners. I don't plan on getting stuck, but if it happens I would like to know how to deal with it and minimize damage. Would it be OK to mount a pair of these on the aluminum frame just forward of the rear bumper? Discuss. John Davies Spokane WA
-
I won't go into all the small stuff, but you definitely need a cheap compact ladder, preferably one that telescopes and will fit in the closet. You need to be able to get to the roof in case of a repair or stuck tree branch. If you are a heavy fellow, buy a good quality one for safety. Rock protection for the truck, since you will be going off pavement. Mudflaps at the very least. Gravel roads will trash the finish on your Ollie very quickly unless you drive dead slow ALL the time. If you have to drive 30 miles out of the national forest, driving at under 10 mph is just not practical ;( Spares for the composting toilet - peat, cleaning spray, extra fuses. Check yours since they seem to always install a too-small one. It needs to be 2.5 or 3 amp, not 1 amp, which will blow. Read my thread on the Natures Head if you have not already. You already talked about shovel, you need a little extra stuff for recovery if you get the trailer stuck. For example. consider ahead of time how you would go about pulling the trailer out of a deep rut. "Trailer offroad recovery" would be a good subject for a new thread since I can't recall anyone talking about it. Who wants to start? John Davies Spokane WA
-
HOW TO: Stone Stomper Gravel Guard.
John E Davies replied to John E Davies's topic in Towing an Oliver
BUMP TO THREAD, First 4 sections have text added. -
Extend the tongue - best methods?
John E Davies replied to John E Davies's topic in Ollie Modifications
Mark, thanks for the comments. I would NOT want to do any permanent cutting/ modification to the Oliver frame. I would want to (relatively) easily be able to put it back to the standard configuration for resale. I’m not sure about having stuff hanging below or above the frame, but having a 2x2 steel receiver tube inline with the existing tongue, but extending say 8 inches out to the front, would work. As I mentioned, I do not need a wide adjustment range, just a little longer. I would like to see some closeup pics of the original Oliver tongue, if somebody could post them. John Davies Spokane WA -
Bulldog coupler destroys Anderson ball
John E Davies replied to John E Davies's topic in Towing an Oliver
Do you think it would it be possible to redrill the new coupler or the tongue itself to move the coupler out a little, say three inches, beyond the factory position? I am away from home, or I would run out and look. Thanks, John Davies Spokane WA -
Bulldog coupler destroys Anderson ball
John E Davies replied to John E Davies's topic in Towing an Oliver
Bill, I am pretty sure that would never fly, they have to be able to couple up each trailer to move it around the production line and the coupler goes on when the frame is built, essentially Step 1 of the build. I would be willing to bet that there is a factory policy to have just one coupler size only. While a 2 5/16 inch Bulldog coupler, which is self adjusting, probably would stay connected to a factory tug with a 2 inch ball, there is no guarantee that it would not pop off at the worst possible time. Their rear service lot is pretty darned lumpy and I can imagine a brand new Ollie coming loose and swinging into an adjacent new unit, or one belonging to a customer waiting for service.... oops, that would be a really hard thing to explain and also a liability nightmare. They probably don’t hook up the safety chains or breakaway cable when moving them around at a walking pace. Though they really should. As an aircraft mechanic I often moved VERY expensive small planes around (outside) by myself, but never ever without a spotter when near a building; I would have been crucified if I had not followed all safety guidelines. I wonder how hard they enforce the rules about moving trailers within the factory? Having two different ball sizes would significantly complicate normal operations. Just thinking. John Davies Spokane WA -
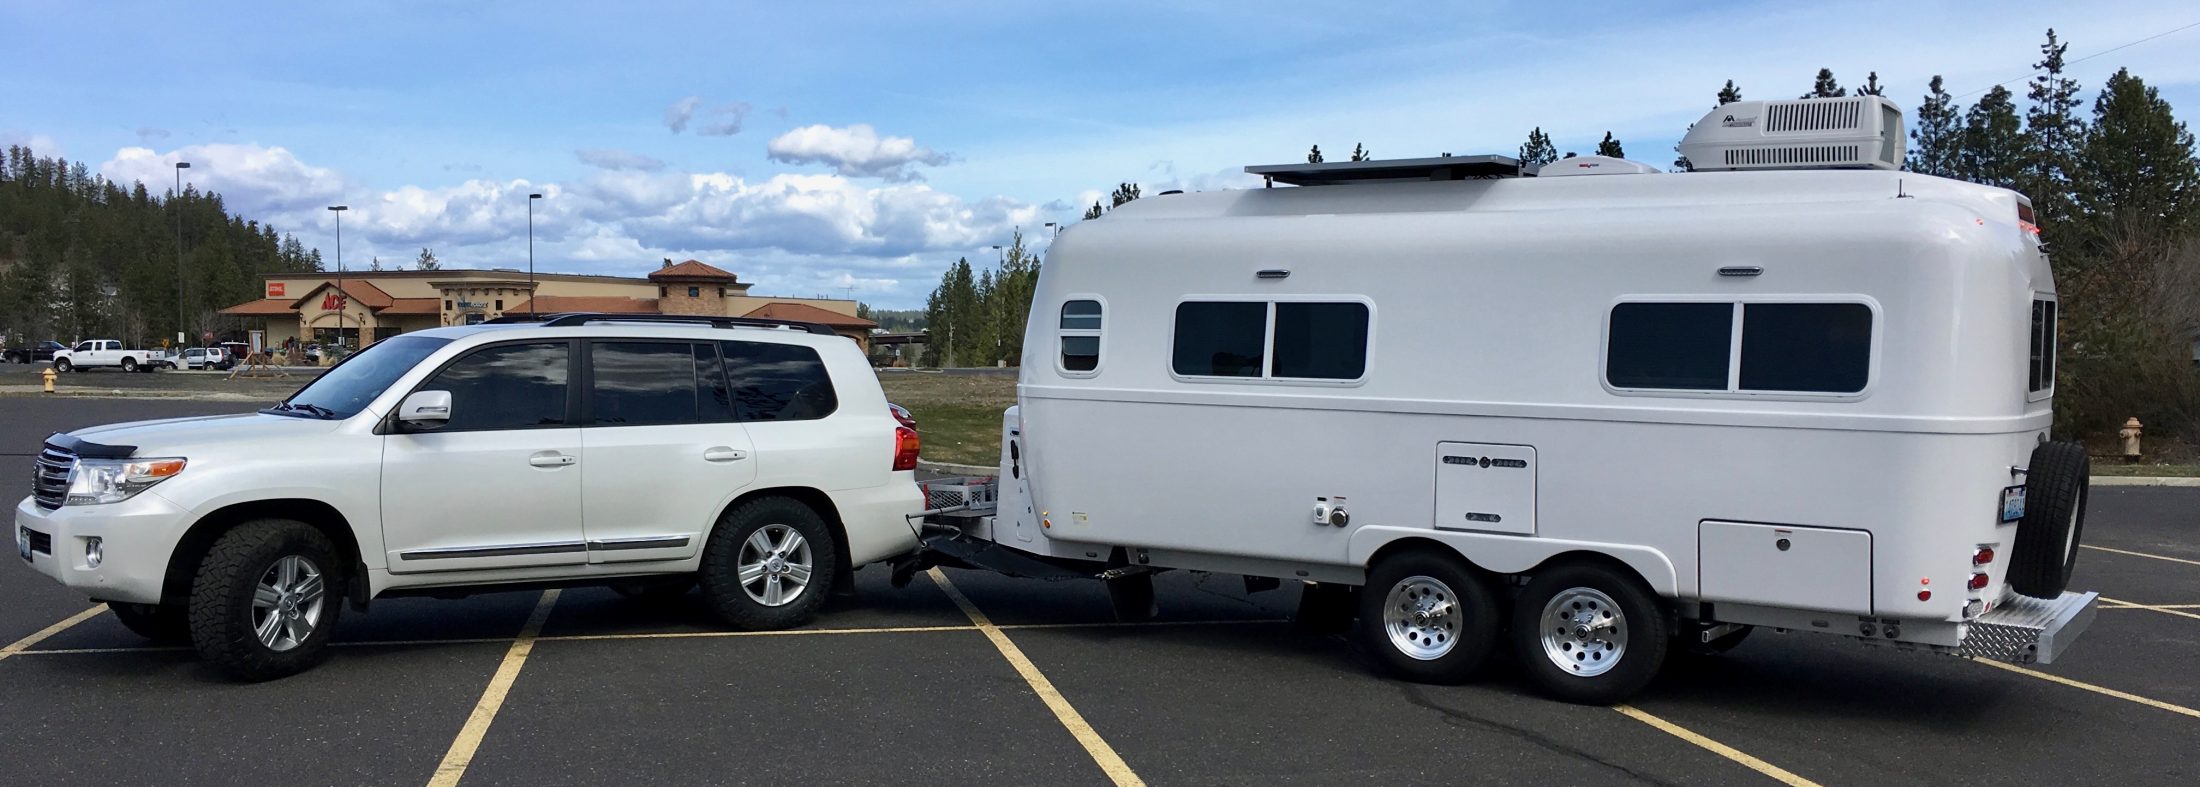
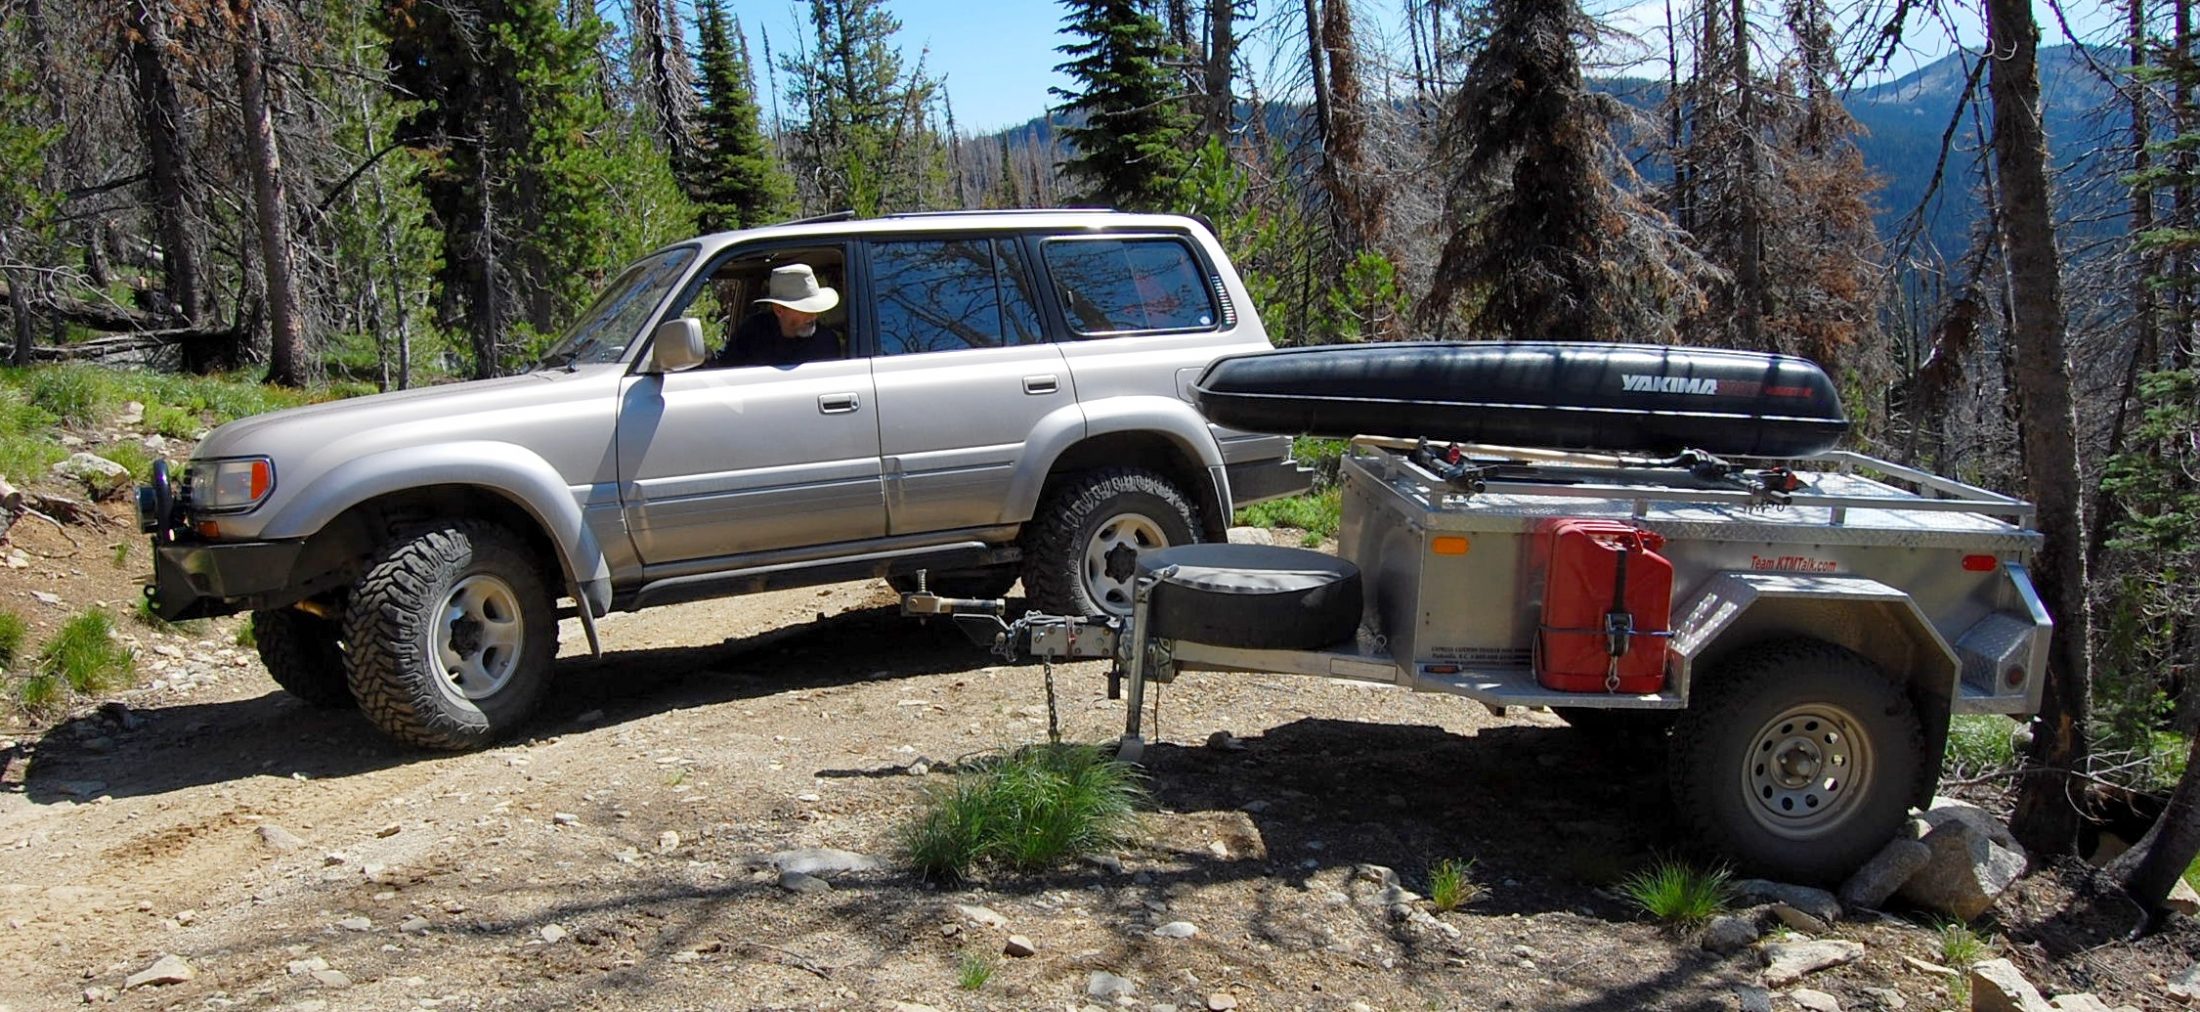
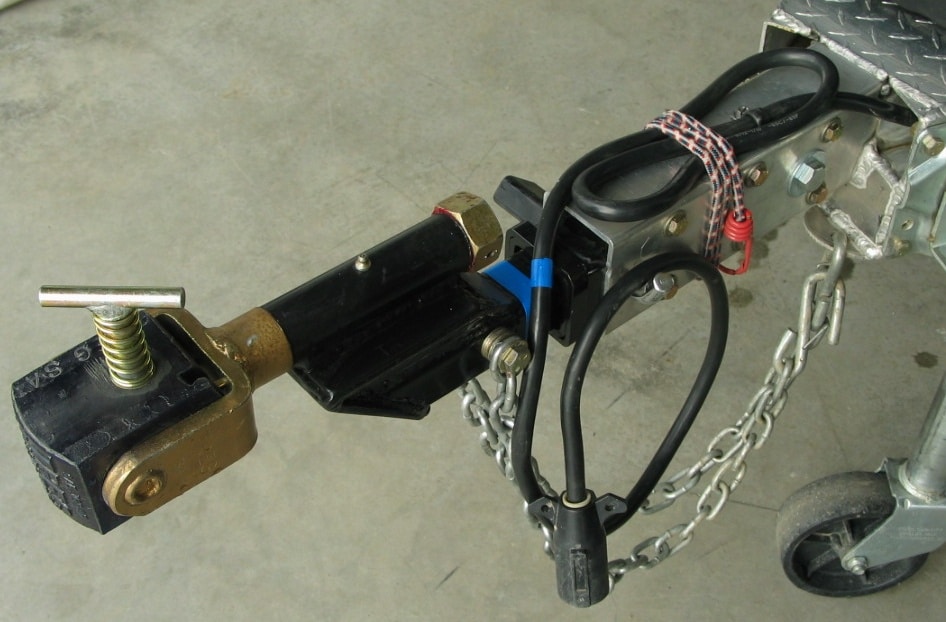
For a number of reasons I would like a little extra towing clearance. The easy solution would be to order a custom Anderson hitch bar with a longer shank, but that increases tongue weight. I personally avoid easy solutions because I prefer the best solution, and do not mind the extra work getting there.... as long as it is not too costly. How would one go about lengthening the tongue on an Elite II? Preferably with a square 2 inch receiver so the actual tow bar with coupler could be removed, or a different type swapped. I understand that the early trailers had this feature. Was it discontinued for any particular reason? Anybody have pictures they could share? Here is pic of the tongue of a custom utility trailer that I sold a year ago to make room for Mouse. It had a 3x5” aluminum tongue, so it was relatively simple to insert a 2x2 steel receiver inside it. Something similar to this would be great. Since the Ollies have a 2x7 tongue, I just can’t quite figure out how.... On that particular trailer I could extend the coupler bar up to 30 inches for long loads, or swap out the Treg offroad coupler for a light duty ball coupler. I would not need a wide adjustment range on Mouse, just “longer than stock” or “removed for storage” modes. Thanks. John Davies Spokane WA
-
http://www.doityourselfrv.com/rv-macerators/ They can work very well, when they are working. They tend to be rather high maintenance... John Davies Spokane WA
-
Were you referring to my thread with the Towing Checklist? The attachment somehow got screwed up, and I can’t edit that post!!! I reposted the doc further down this page, see if it works for you now. http://olivertraveltrailers.com/topic/my-tow-camp-checklist/#post-125009 Let me know by PM if you are still having trouble and I can email it to you. John Davies Spokane WA
-
For some reason the checklist will not download, nor can I edit the first post. Try this: OLIVER-TRAILER-CHECKLIST-021818.docx John Davies Spokane WA
-
HOW TO: Stone Stomper Gravel Guard.
John E Davies replied to John E Davies's topic in Towing an Oliver
A lot of your questions will be answered when I write this up, so I would rather not get too much into specifics yet. I am travelling at the moment. I will make a few comments. Nope, no hinged bar, the system works with bungees and always has. The front of the fabric is anchored to the ball mount, the rest of the mesh “floats”on the three bungees on each side, and I assume it shifts around some. I would like to video it while moving. The six bungees are tensioned, to support the weight. I wanted the front bar wider than the track, the distance between the sidewalls right to left. This is to maximize coverage of gravel flying up from the back tires. I am not super concerned with whacking it. (But I did order an extra bar set, just in case.) I don’t think the middle bar will contact my truck. In a hard forward turn, full lock, I have plenty of clearance between bumper and cargo basket. When reversing hard, I will need to be more cautious. If your truck nearly contacts the hull in a normal turn, you need to extend your ball mount and/ or your tongue. Preferably the latter to reduce tongue weight.... The reason they specify schedule 40 plastic conduit is for flex, UV resistance and cheap replacement cost. The bar will move a lot or even break if smashed into something. Like your truck... Go for it, I used Stone Stomper guidelines. The only thing I changed was using two short pieces instead of a single long one. I do plan to make extras to carry. The material is only 40 cents per foot and can be found literally anywhere. I give up for now, most of this will be described fully later. I did fix the attachment for the measuring and ordering doc, you should now be able to download it. It will answer some of your questions. See the first post. Hang in there... John Davies Spokane WA -
Geronimo John, Thanks for the kind words and the headsup on the material. I did not know where to find it used. My new stuff is probably a lot prettier;) The reason you want to use standoffs is to keep crud and moisture from collecting and sitting against the steel. With about 3/8 inch distance, dirt will tend to wash out naturally, and you can always shoot the area with a pressure washer. You could probably use stainless spacers, but I think inert plastic is a better choice here. The sealant is to preserve the raw steel where you drilled the holes by completely excluding air and moisture. Finally, the reason I chose thin material is that it is lighter, it will “sail” at high speeds to hopefully lessen drag, and the steep angle will deflect gravel down towards the pavement. A heavier, more vertical flap would tend to ricochet them back up onto the underside of the hull. At slow road speeds the thin flaps will tend to hang more verically. John Davies Spokane WA
-
Teaser: rear mudflaps, a future thread: John Davies Spokane WA
-
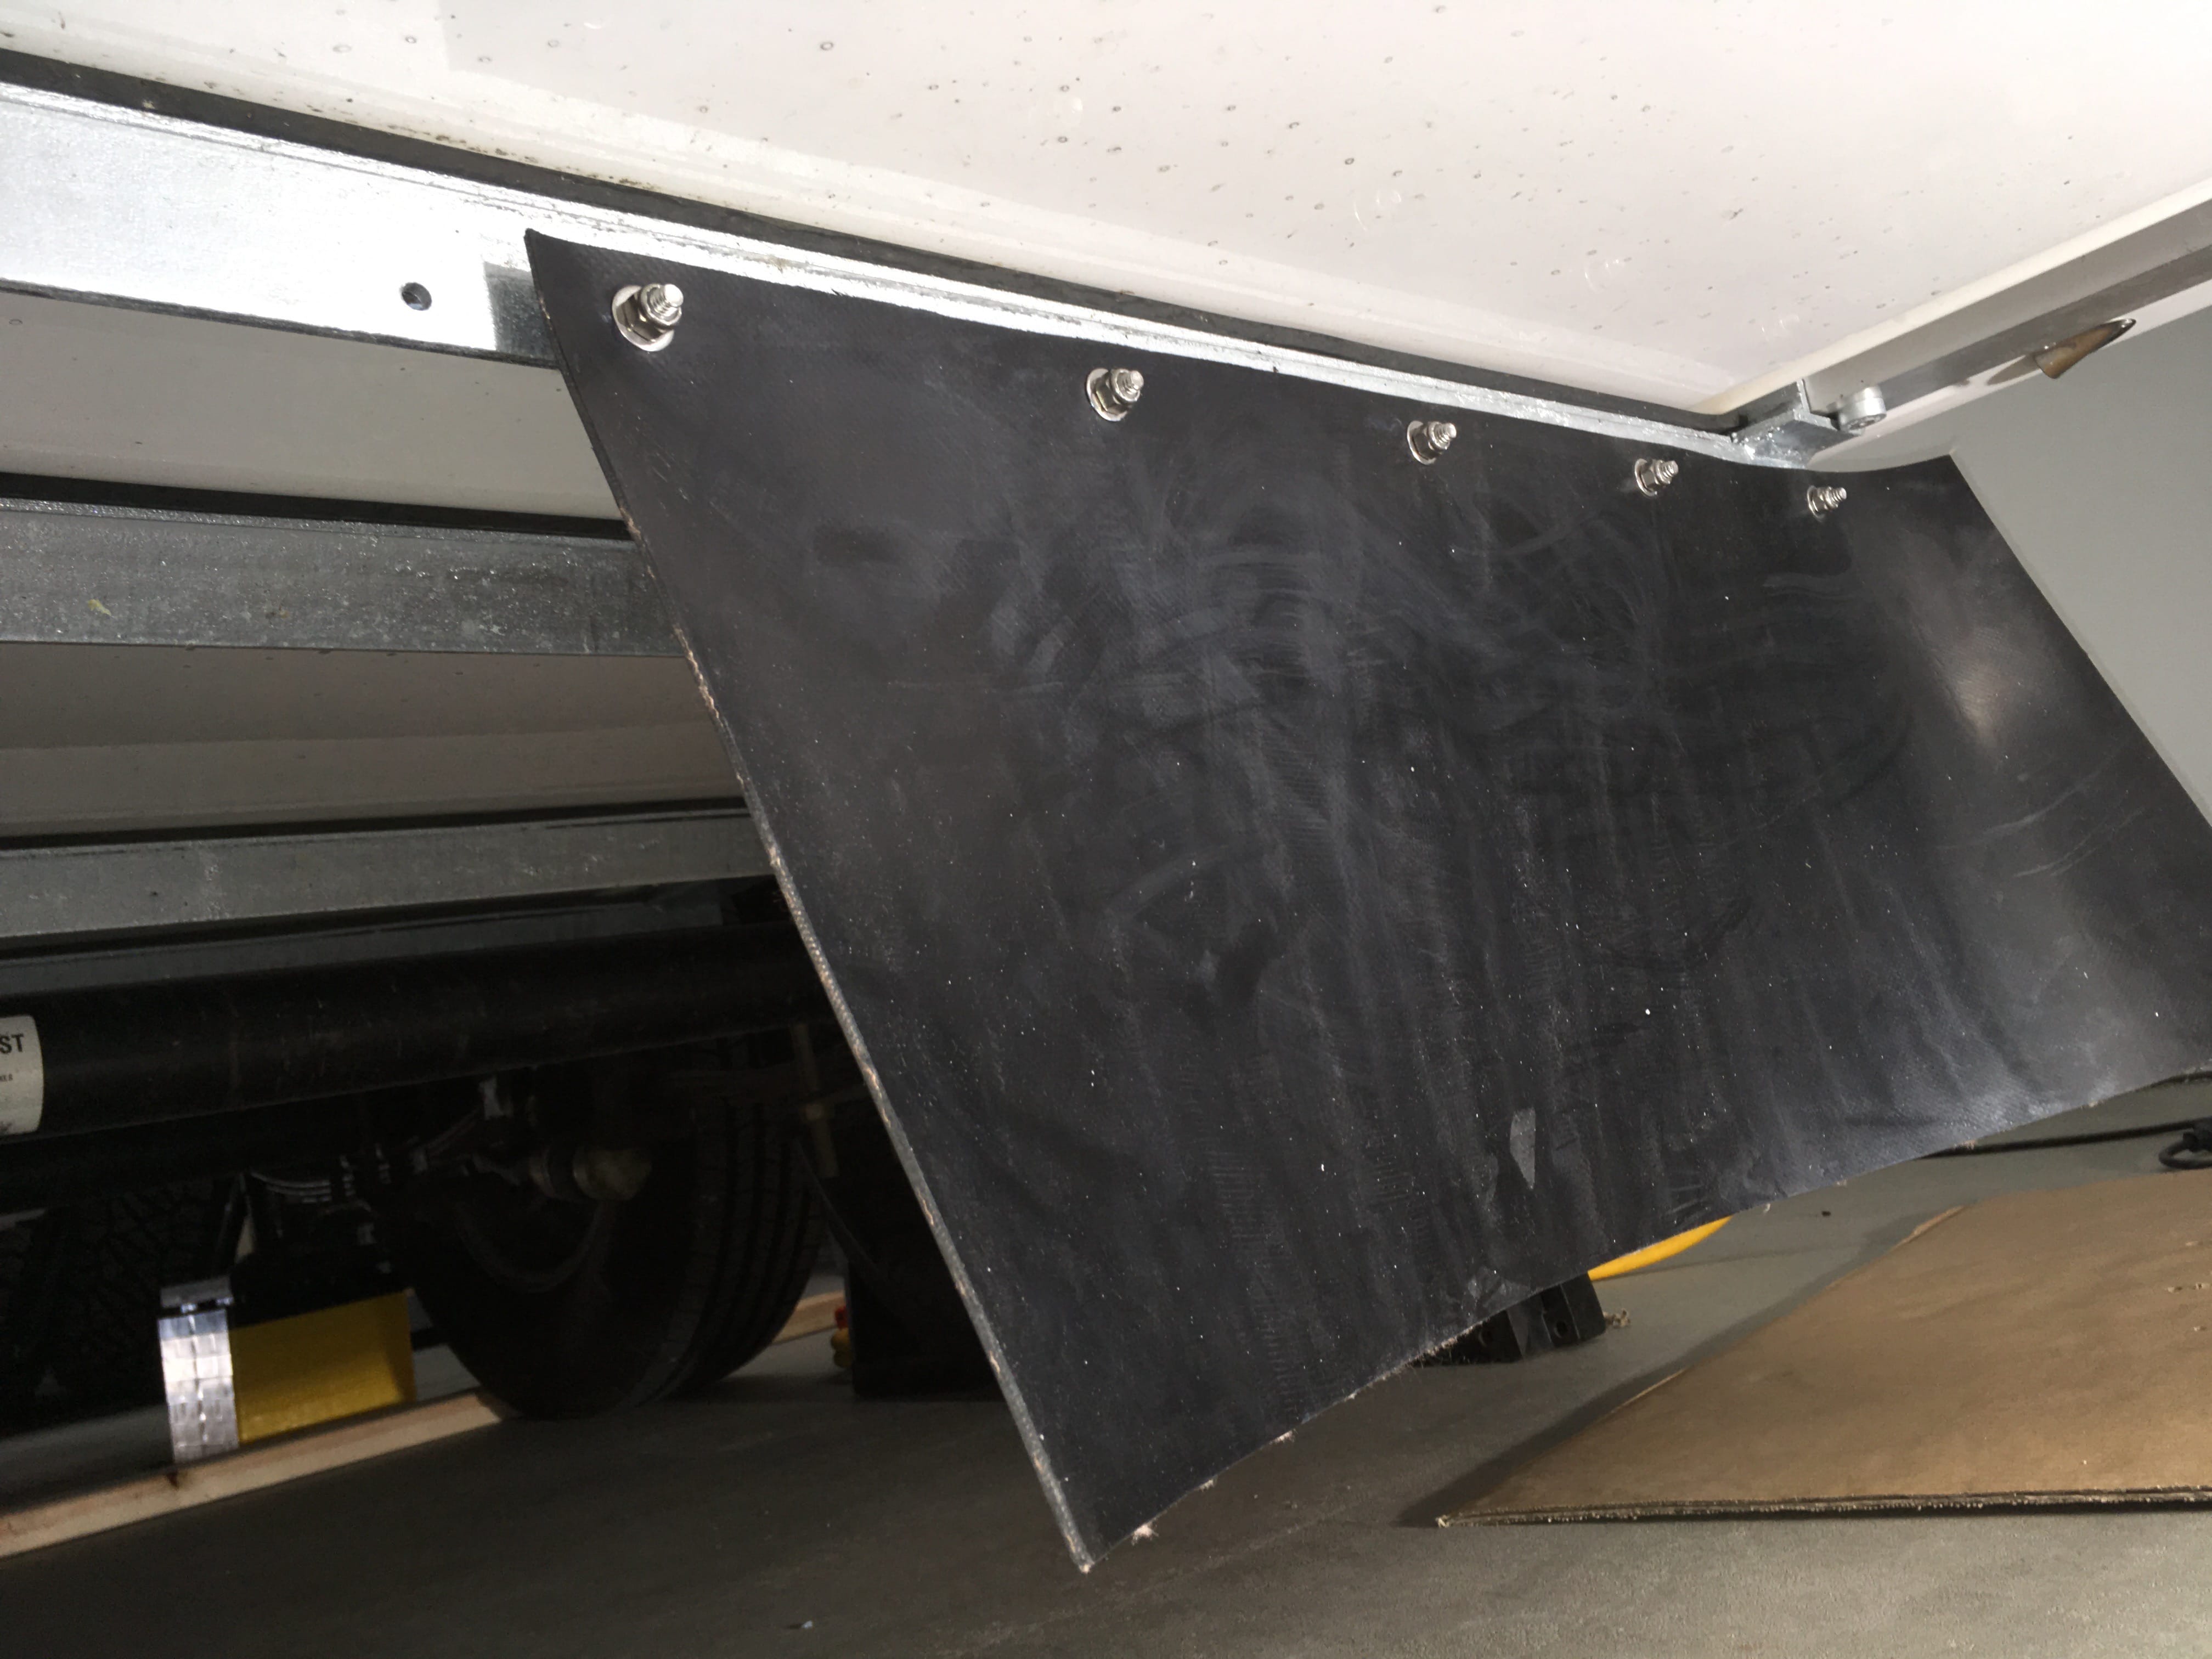
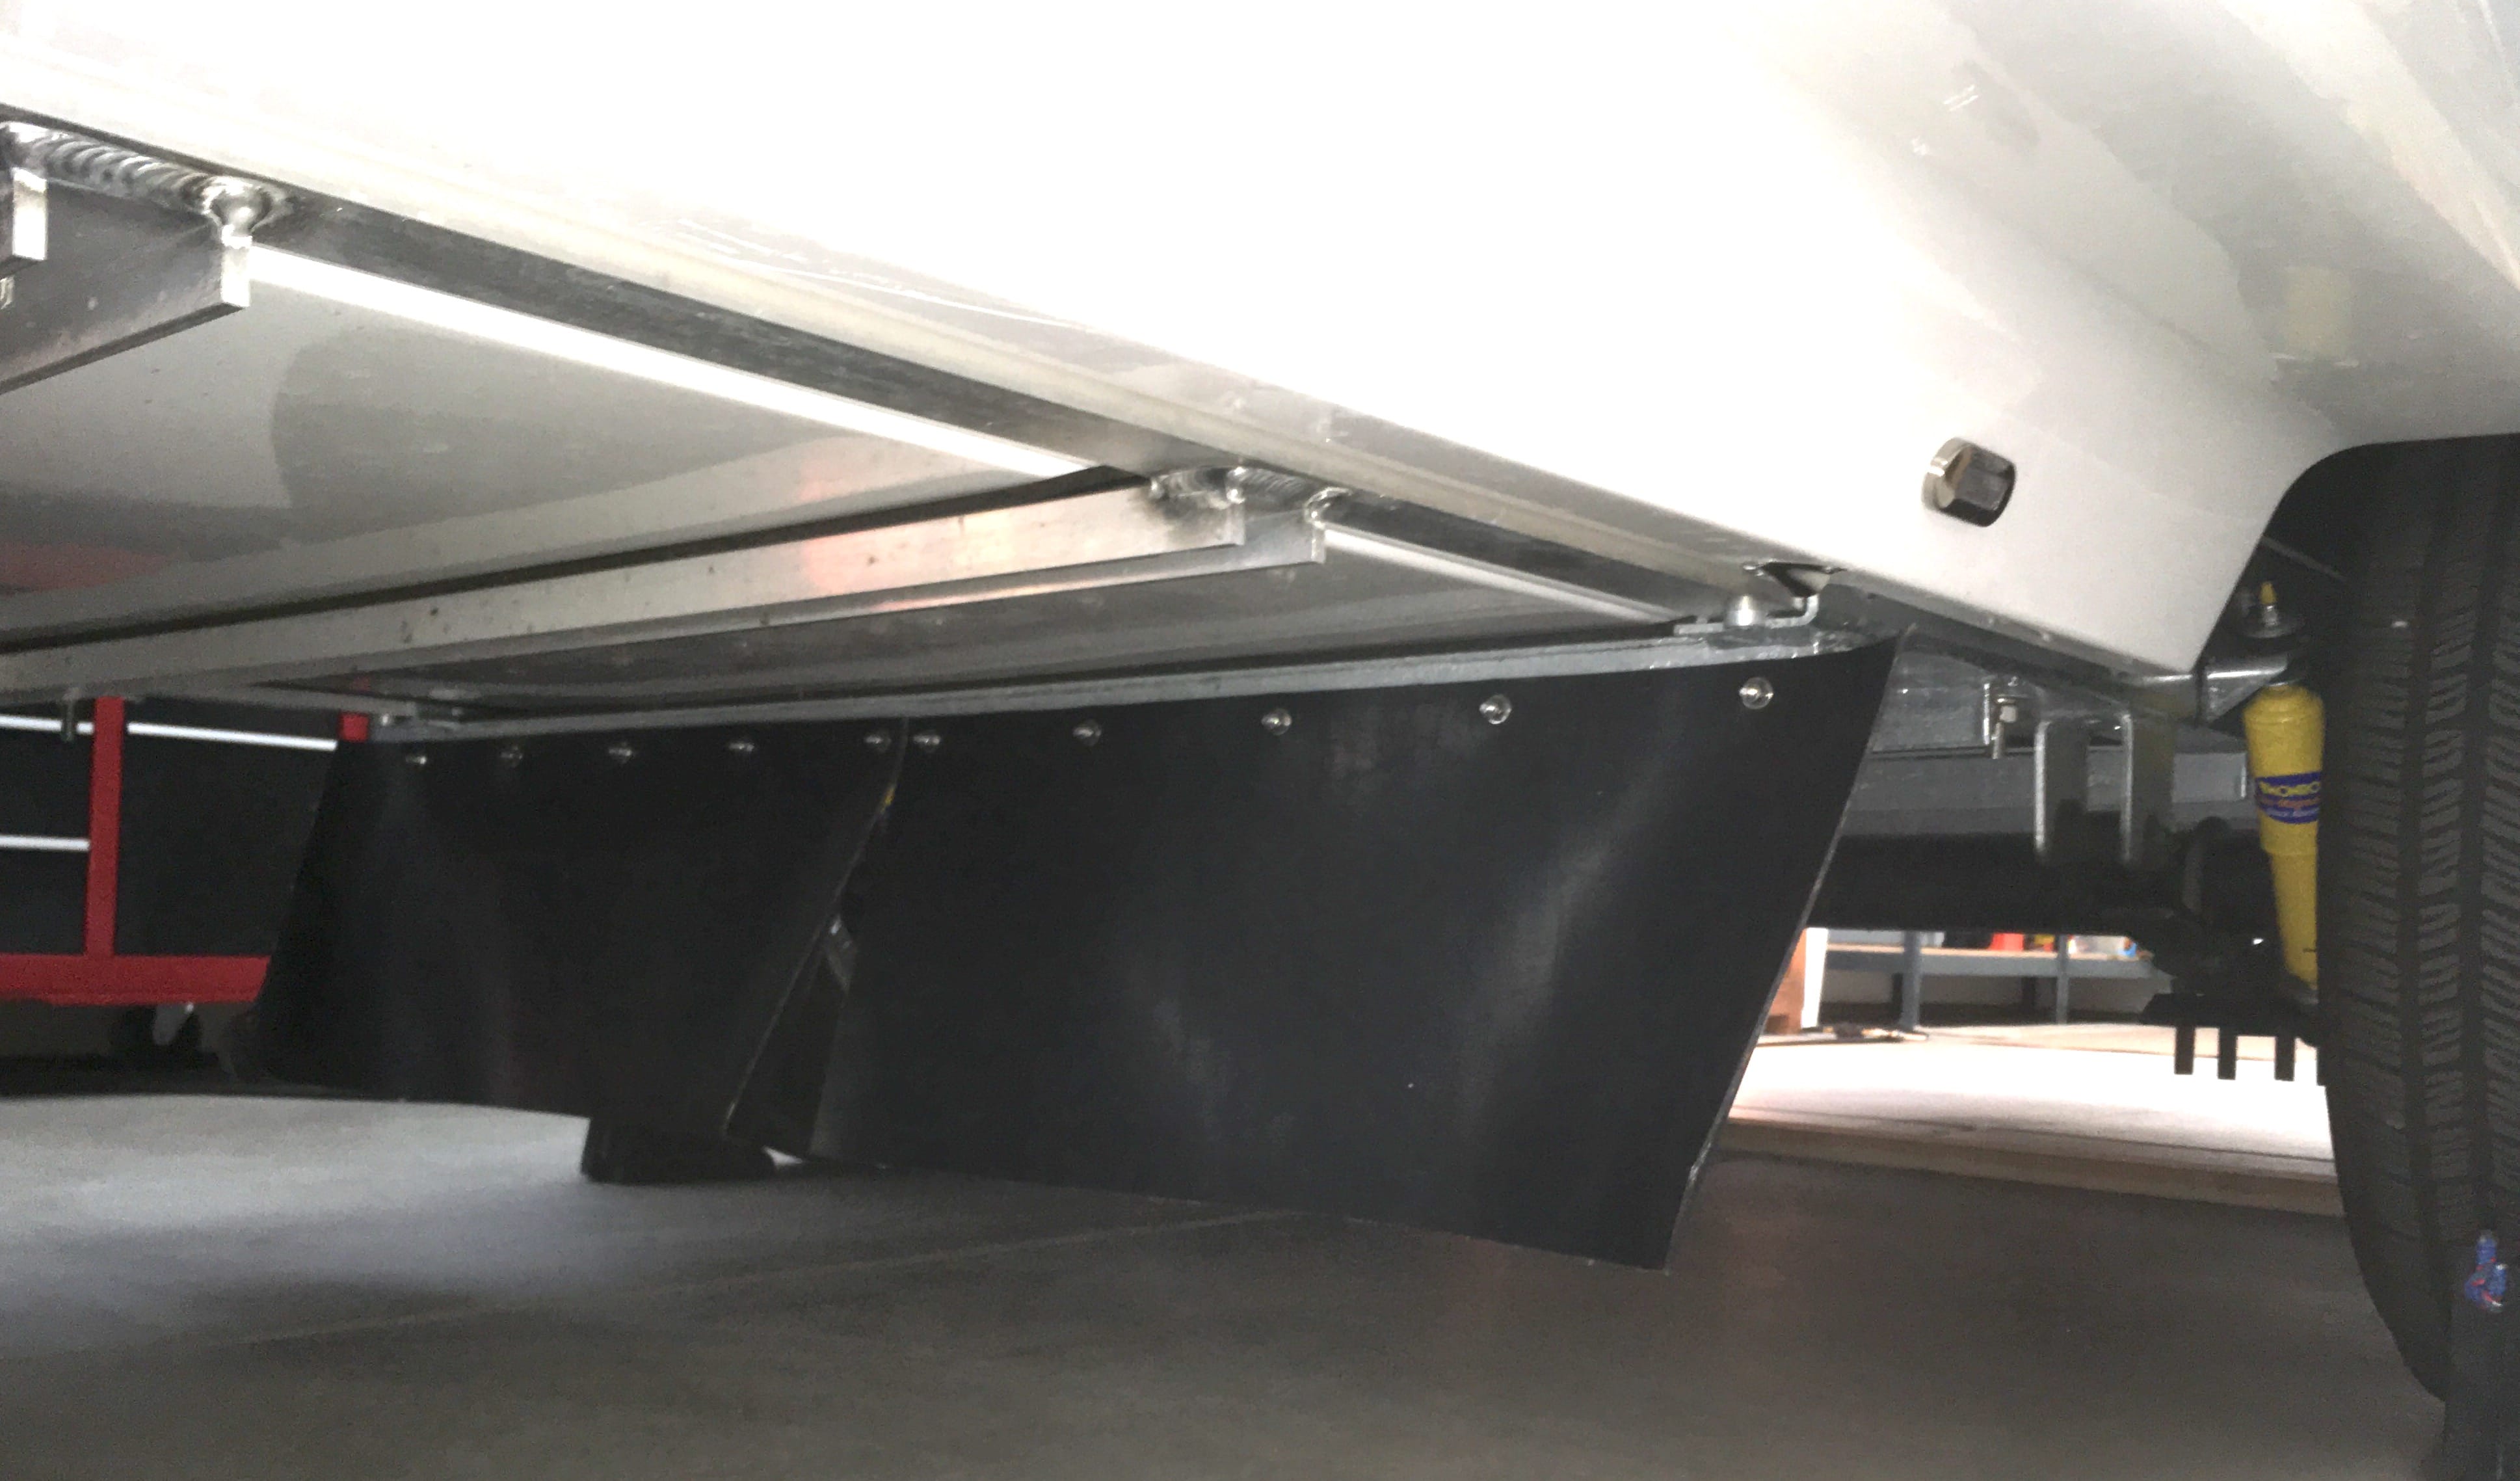
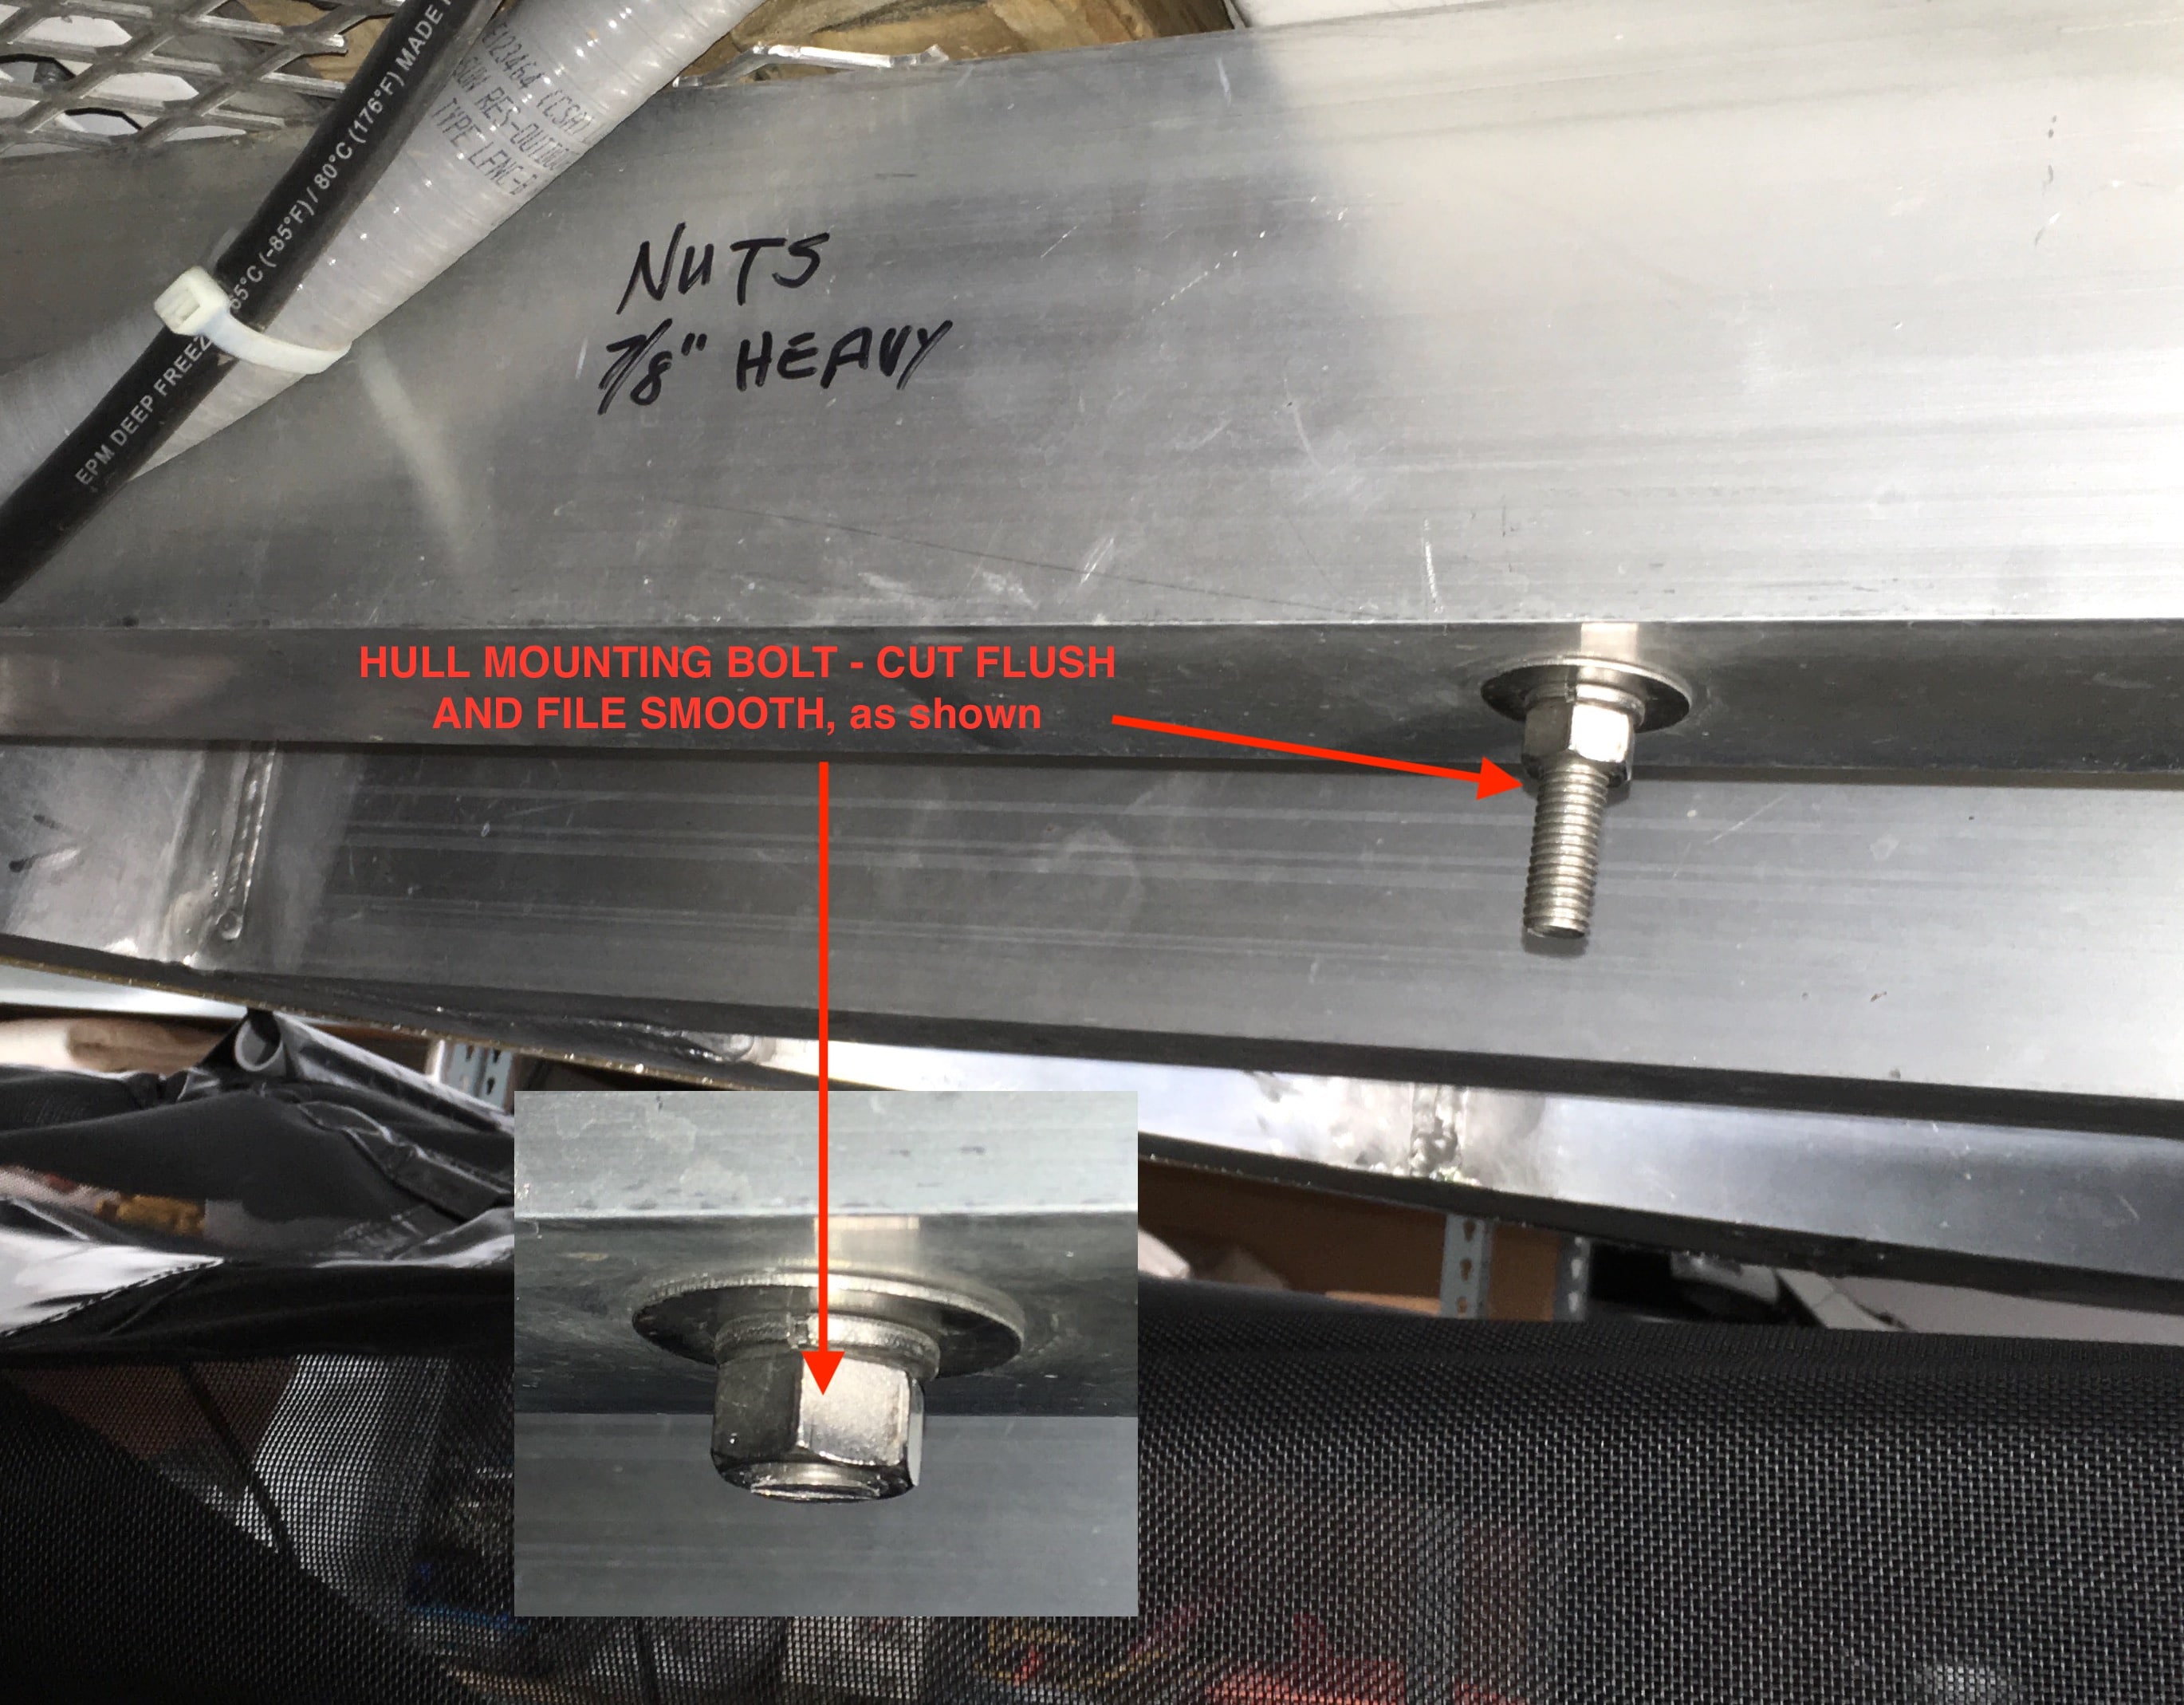
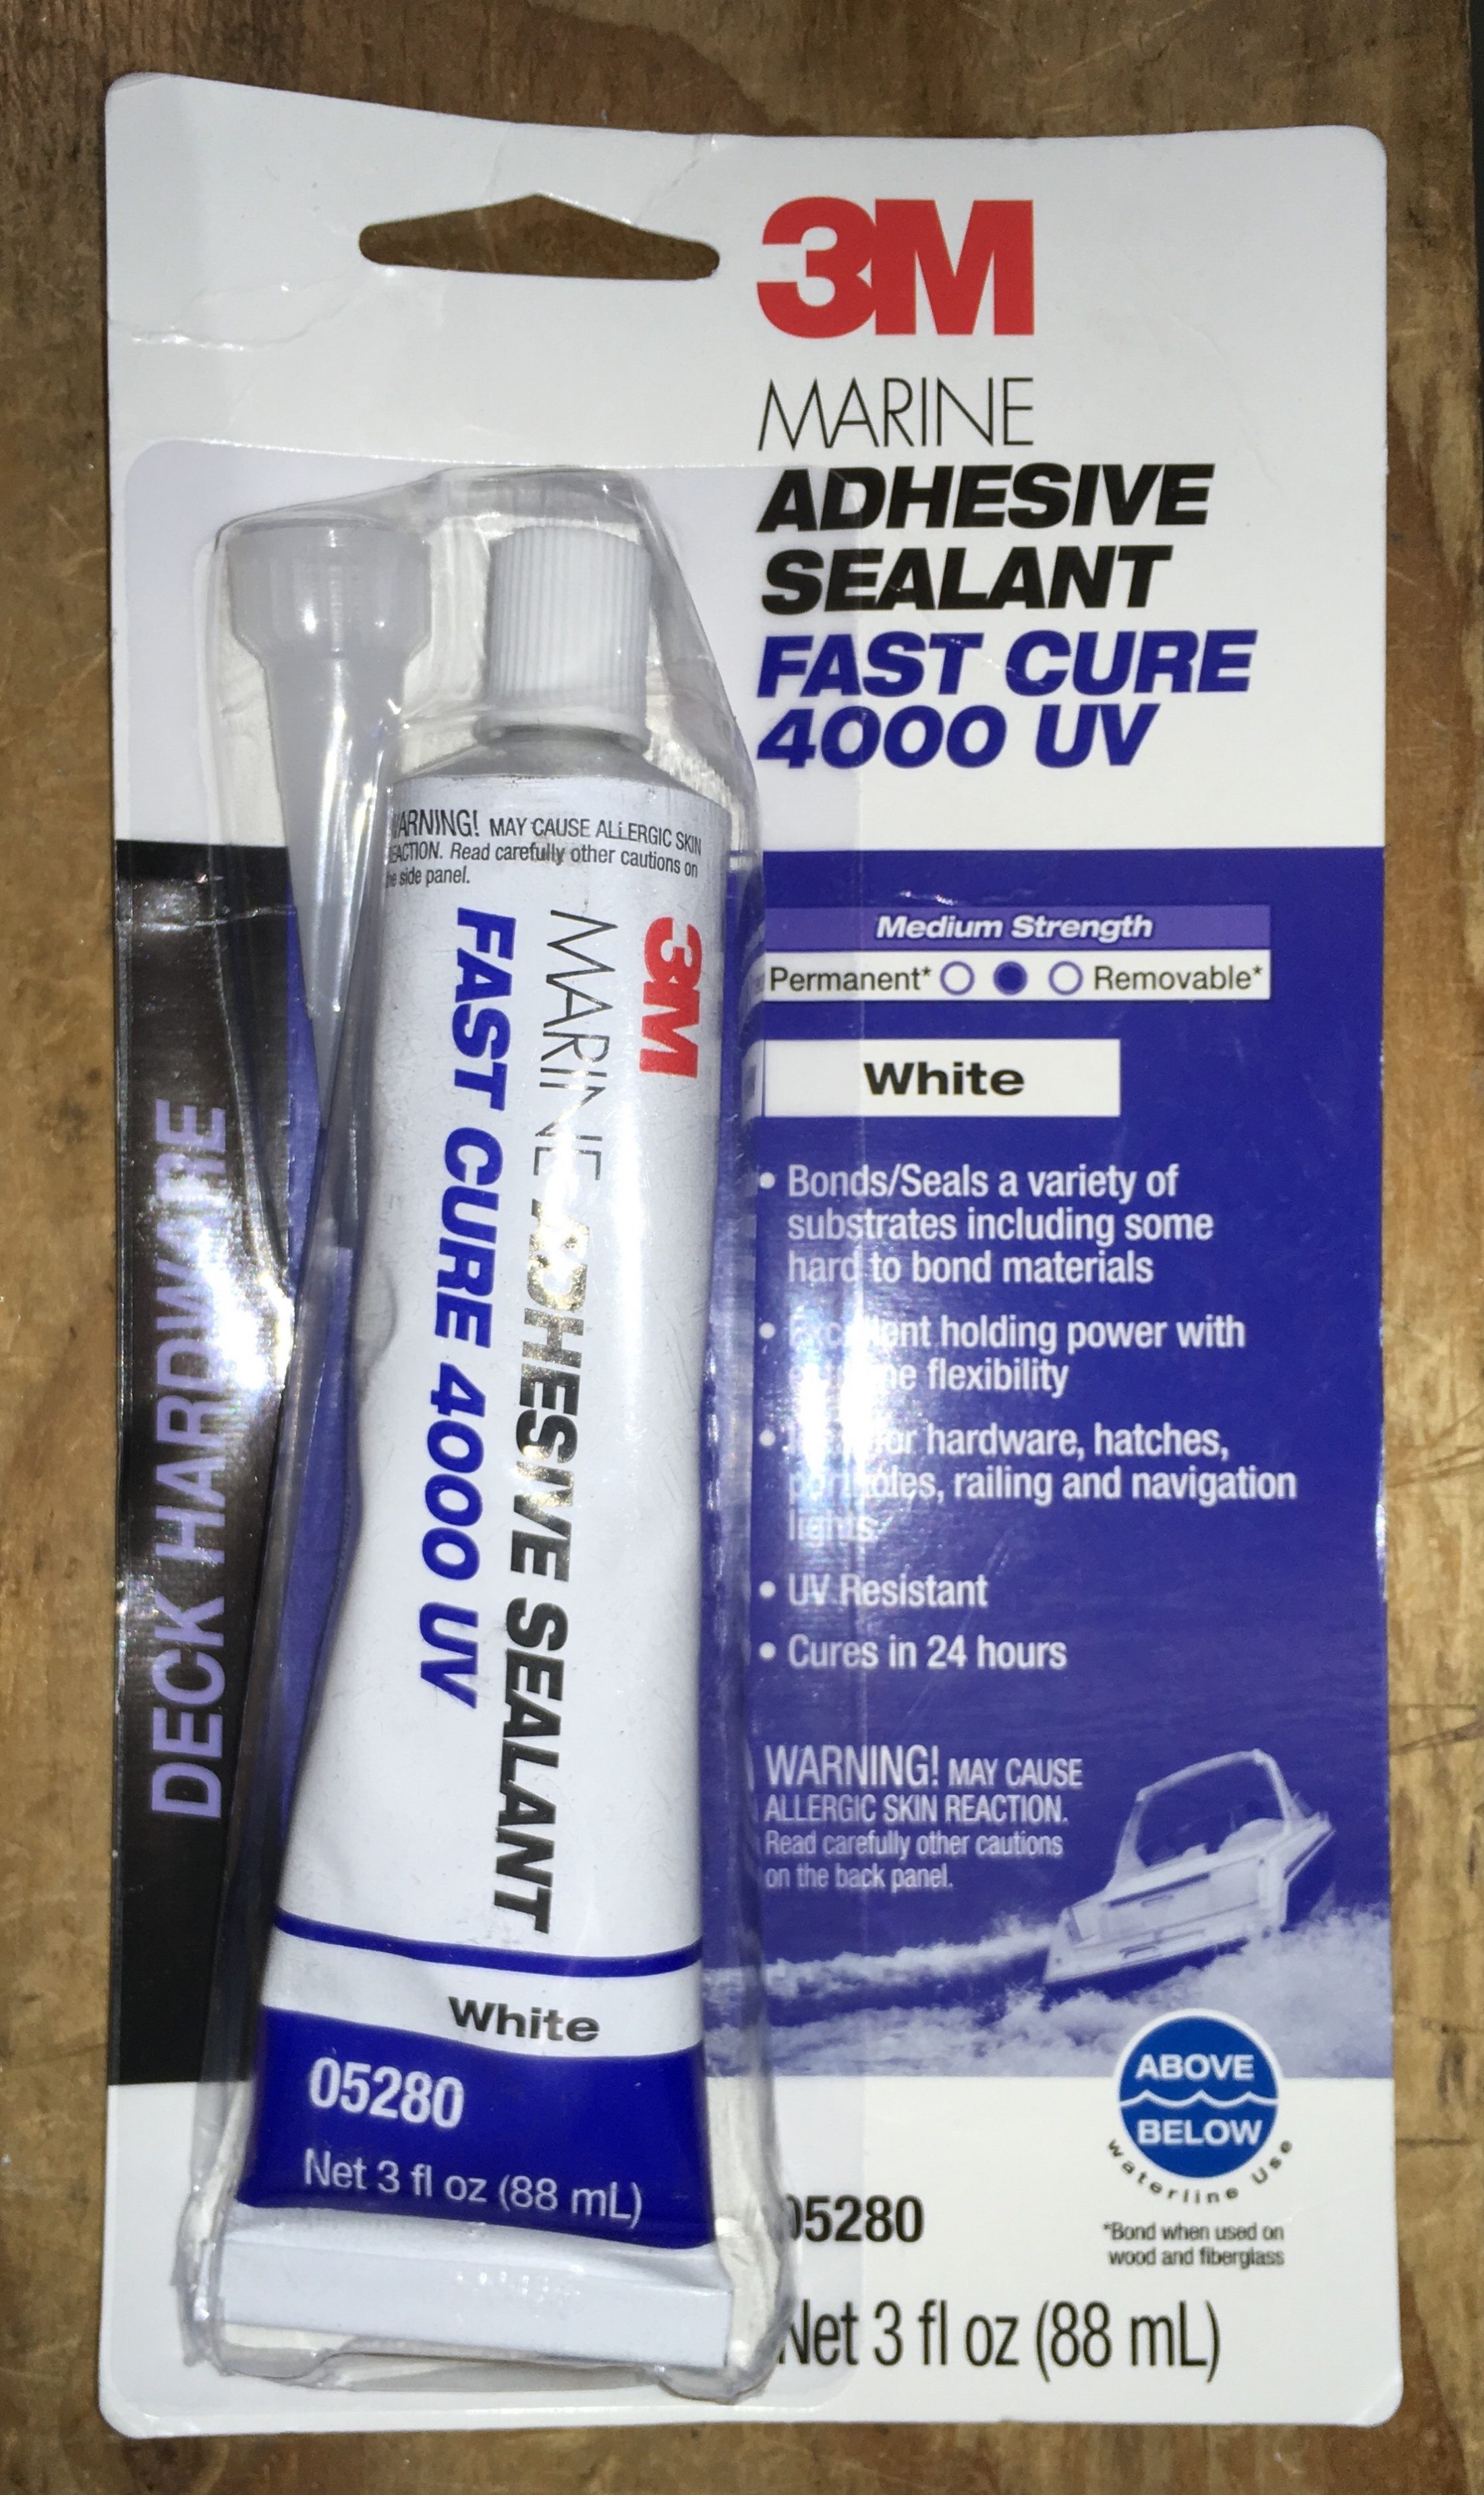
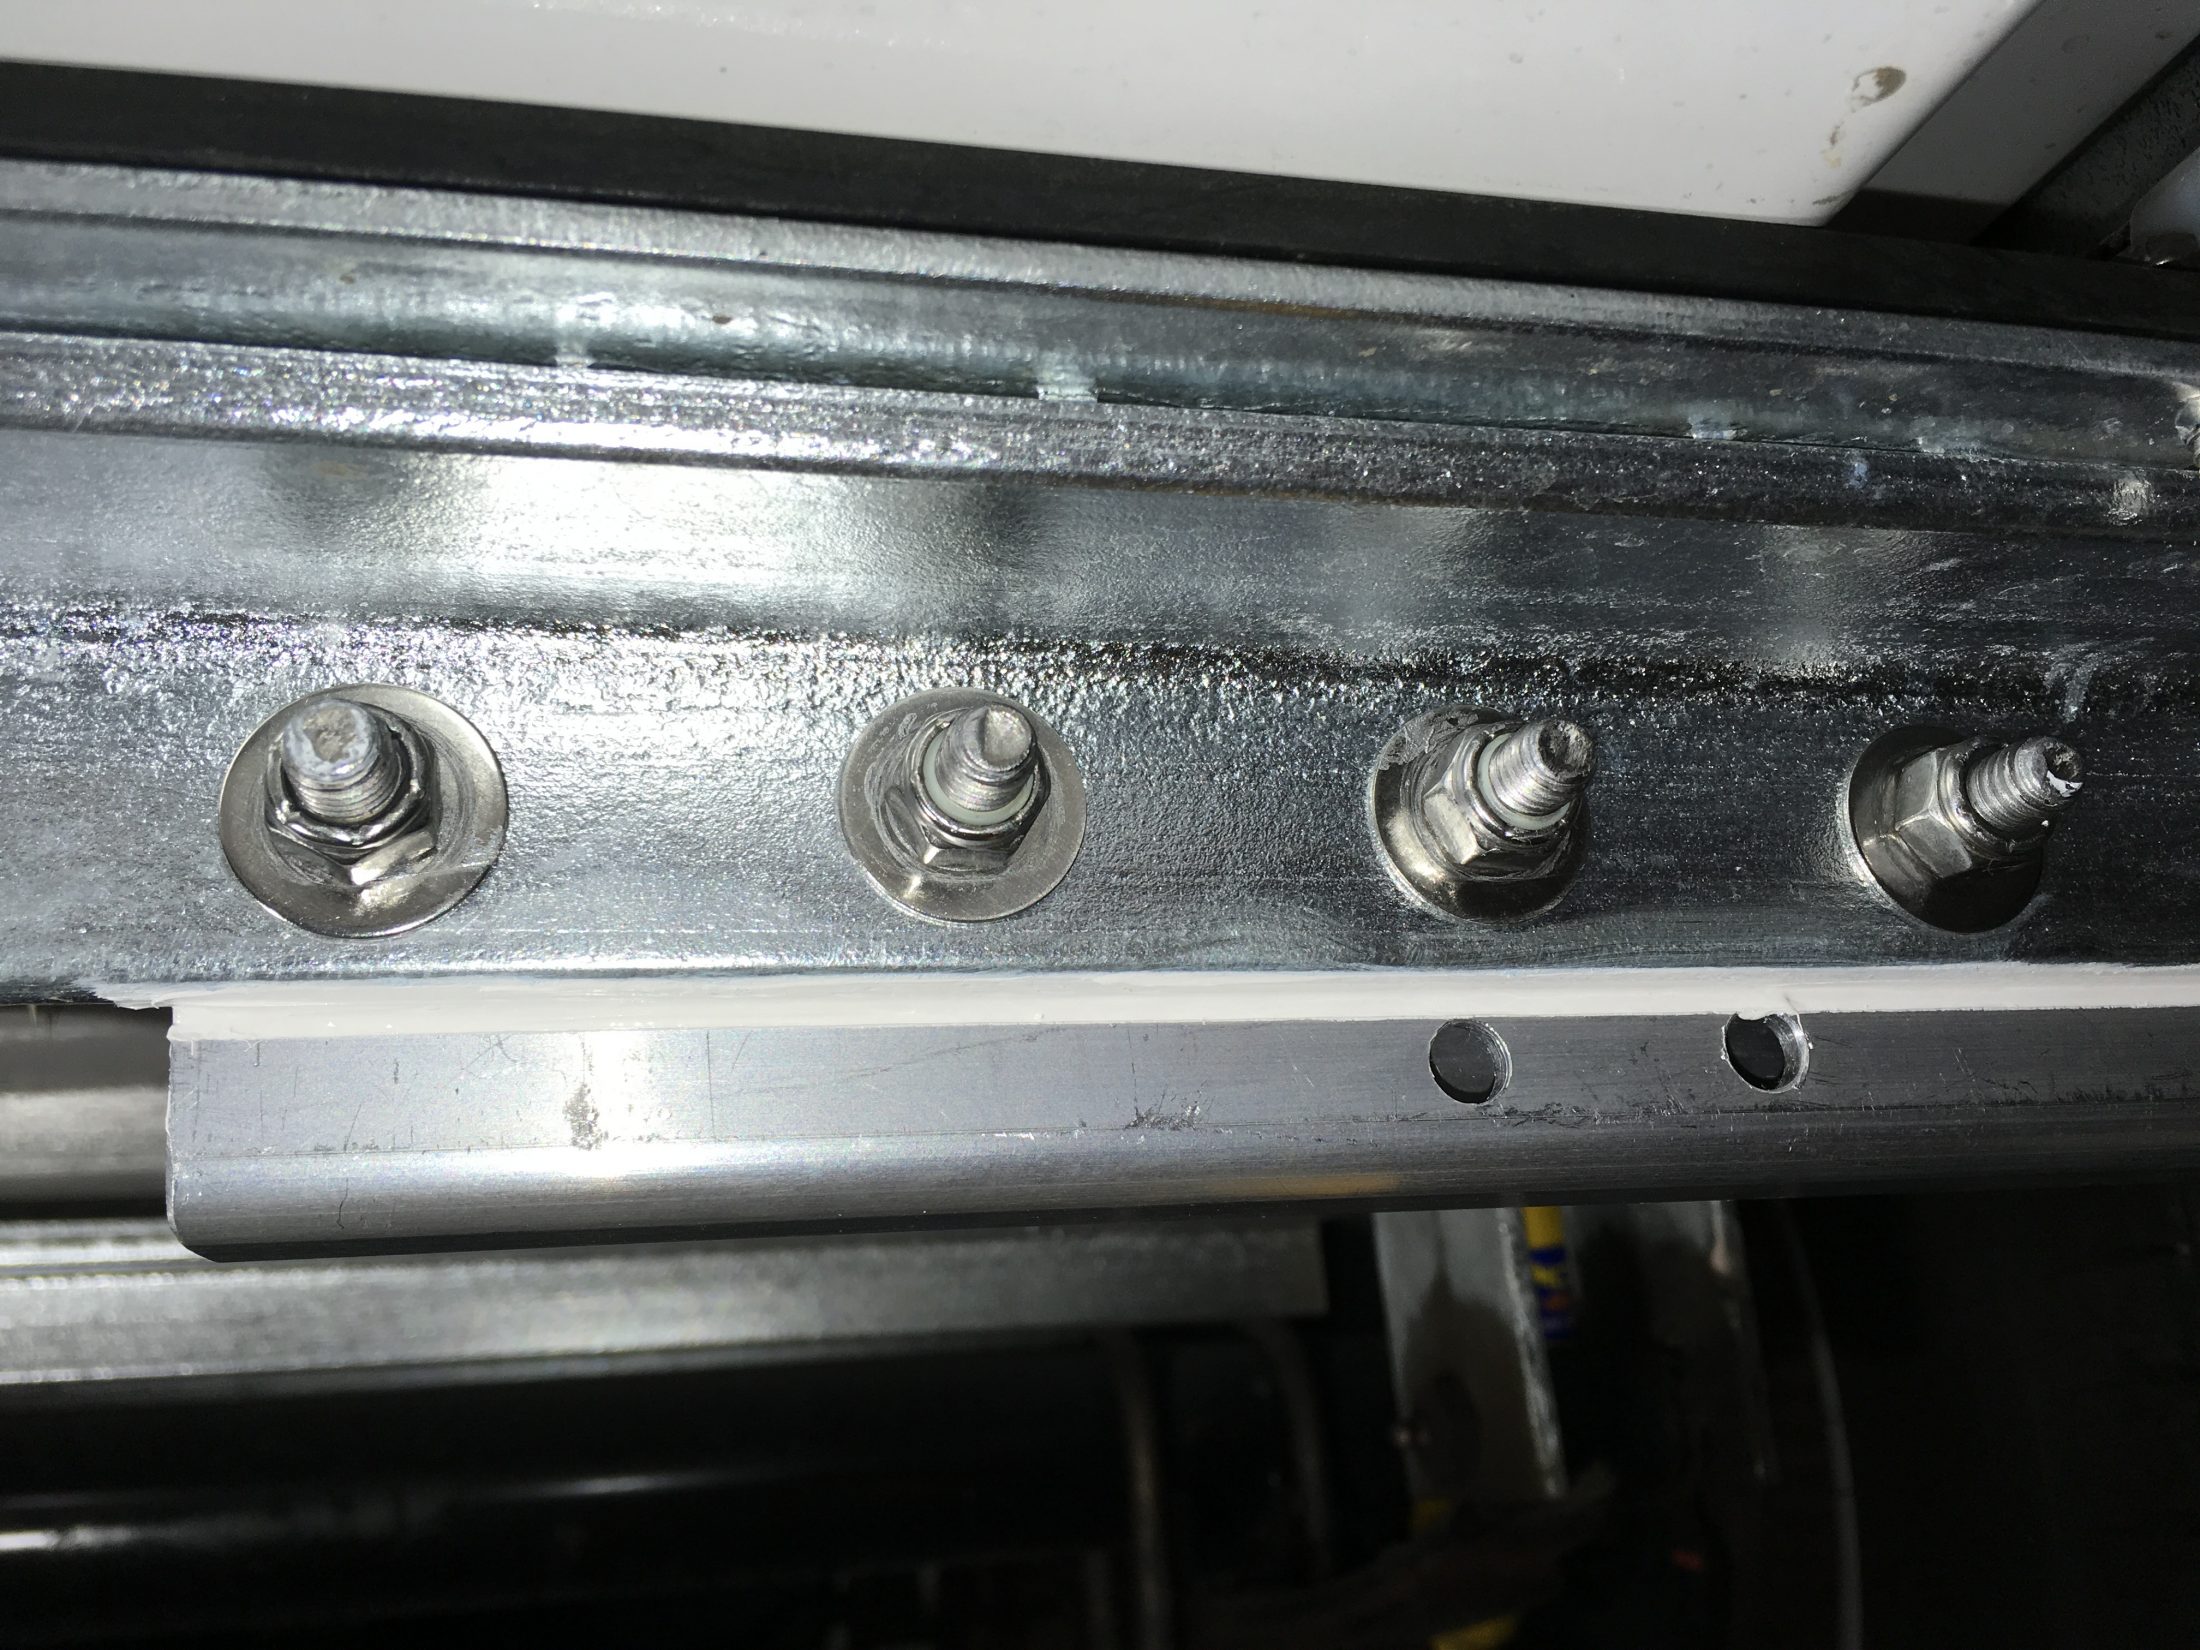
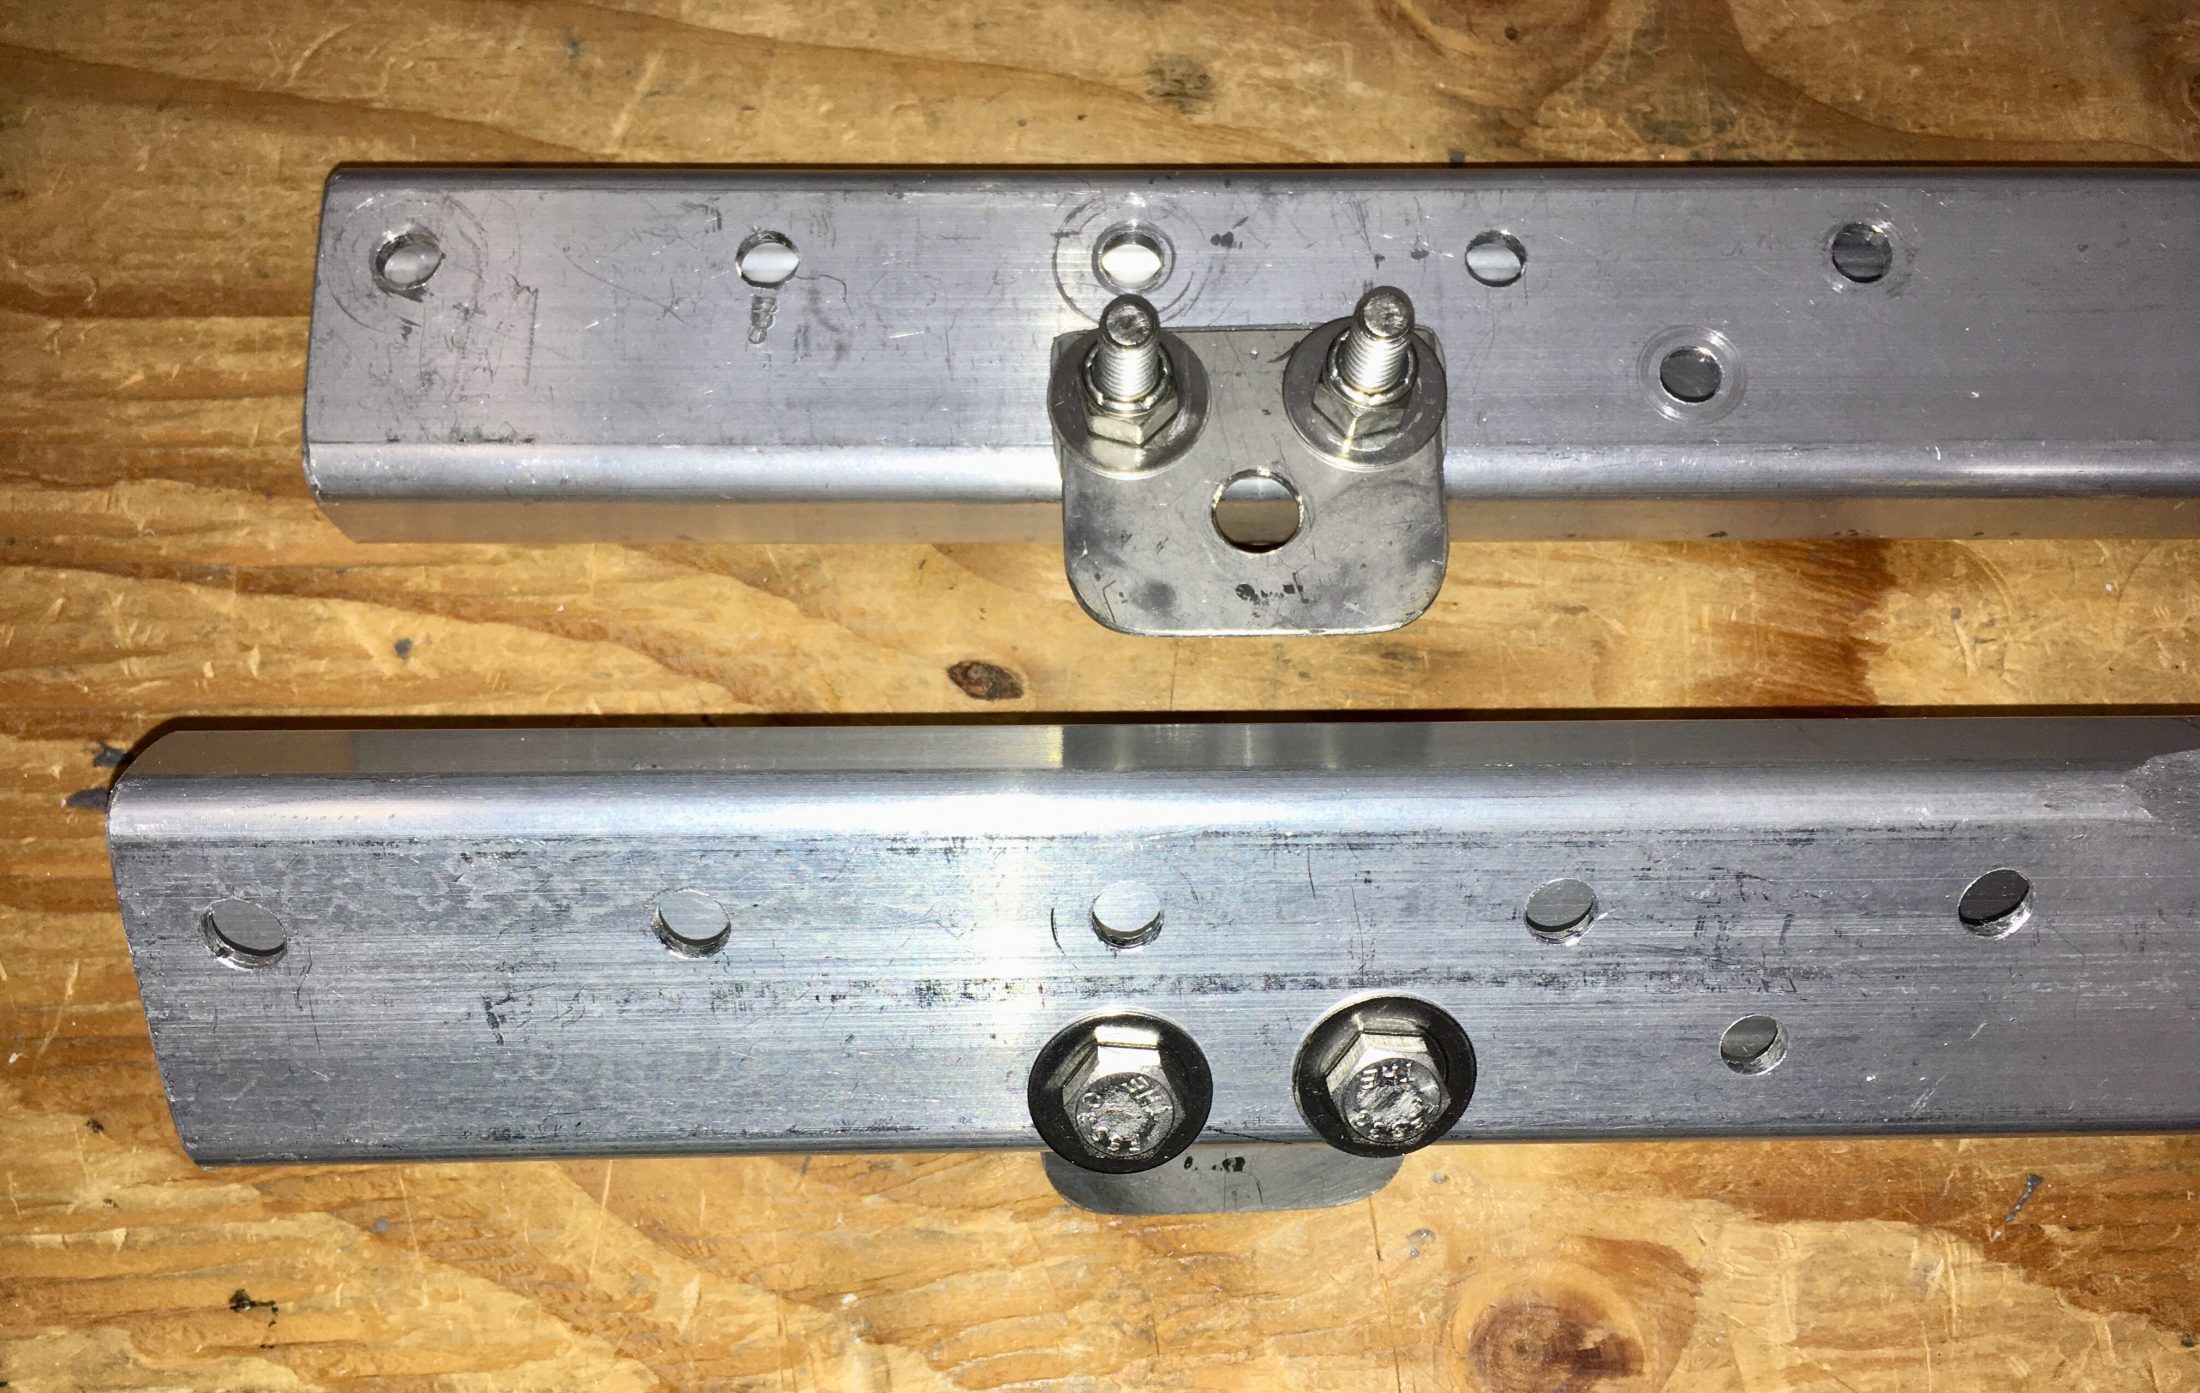
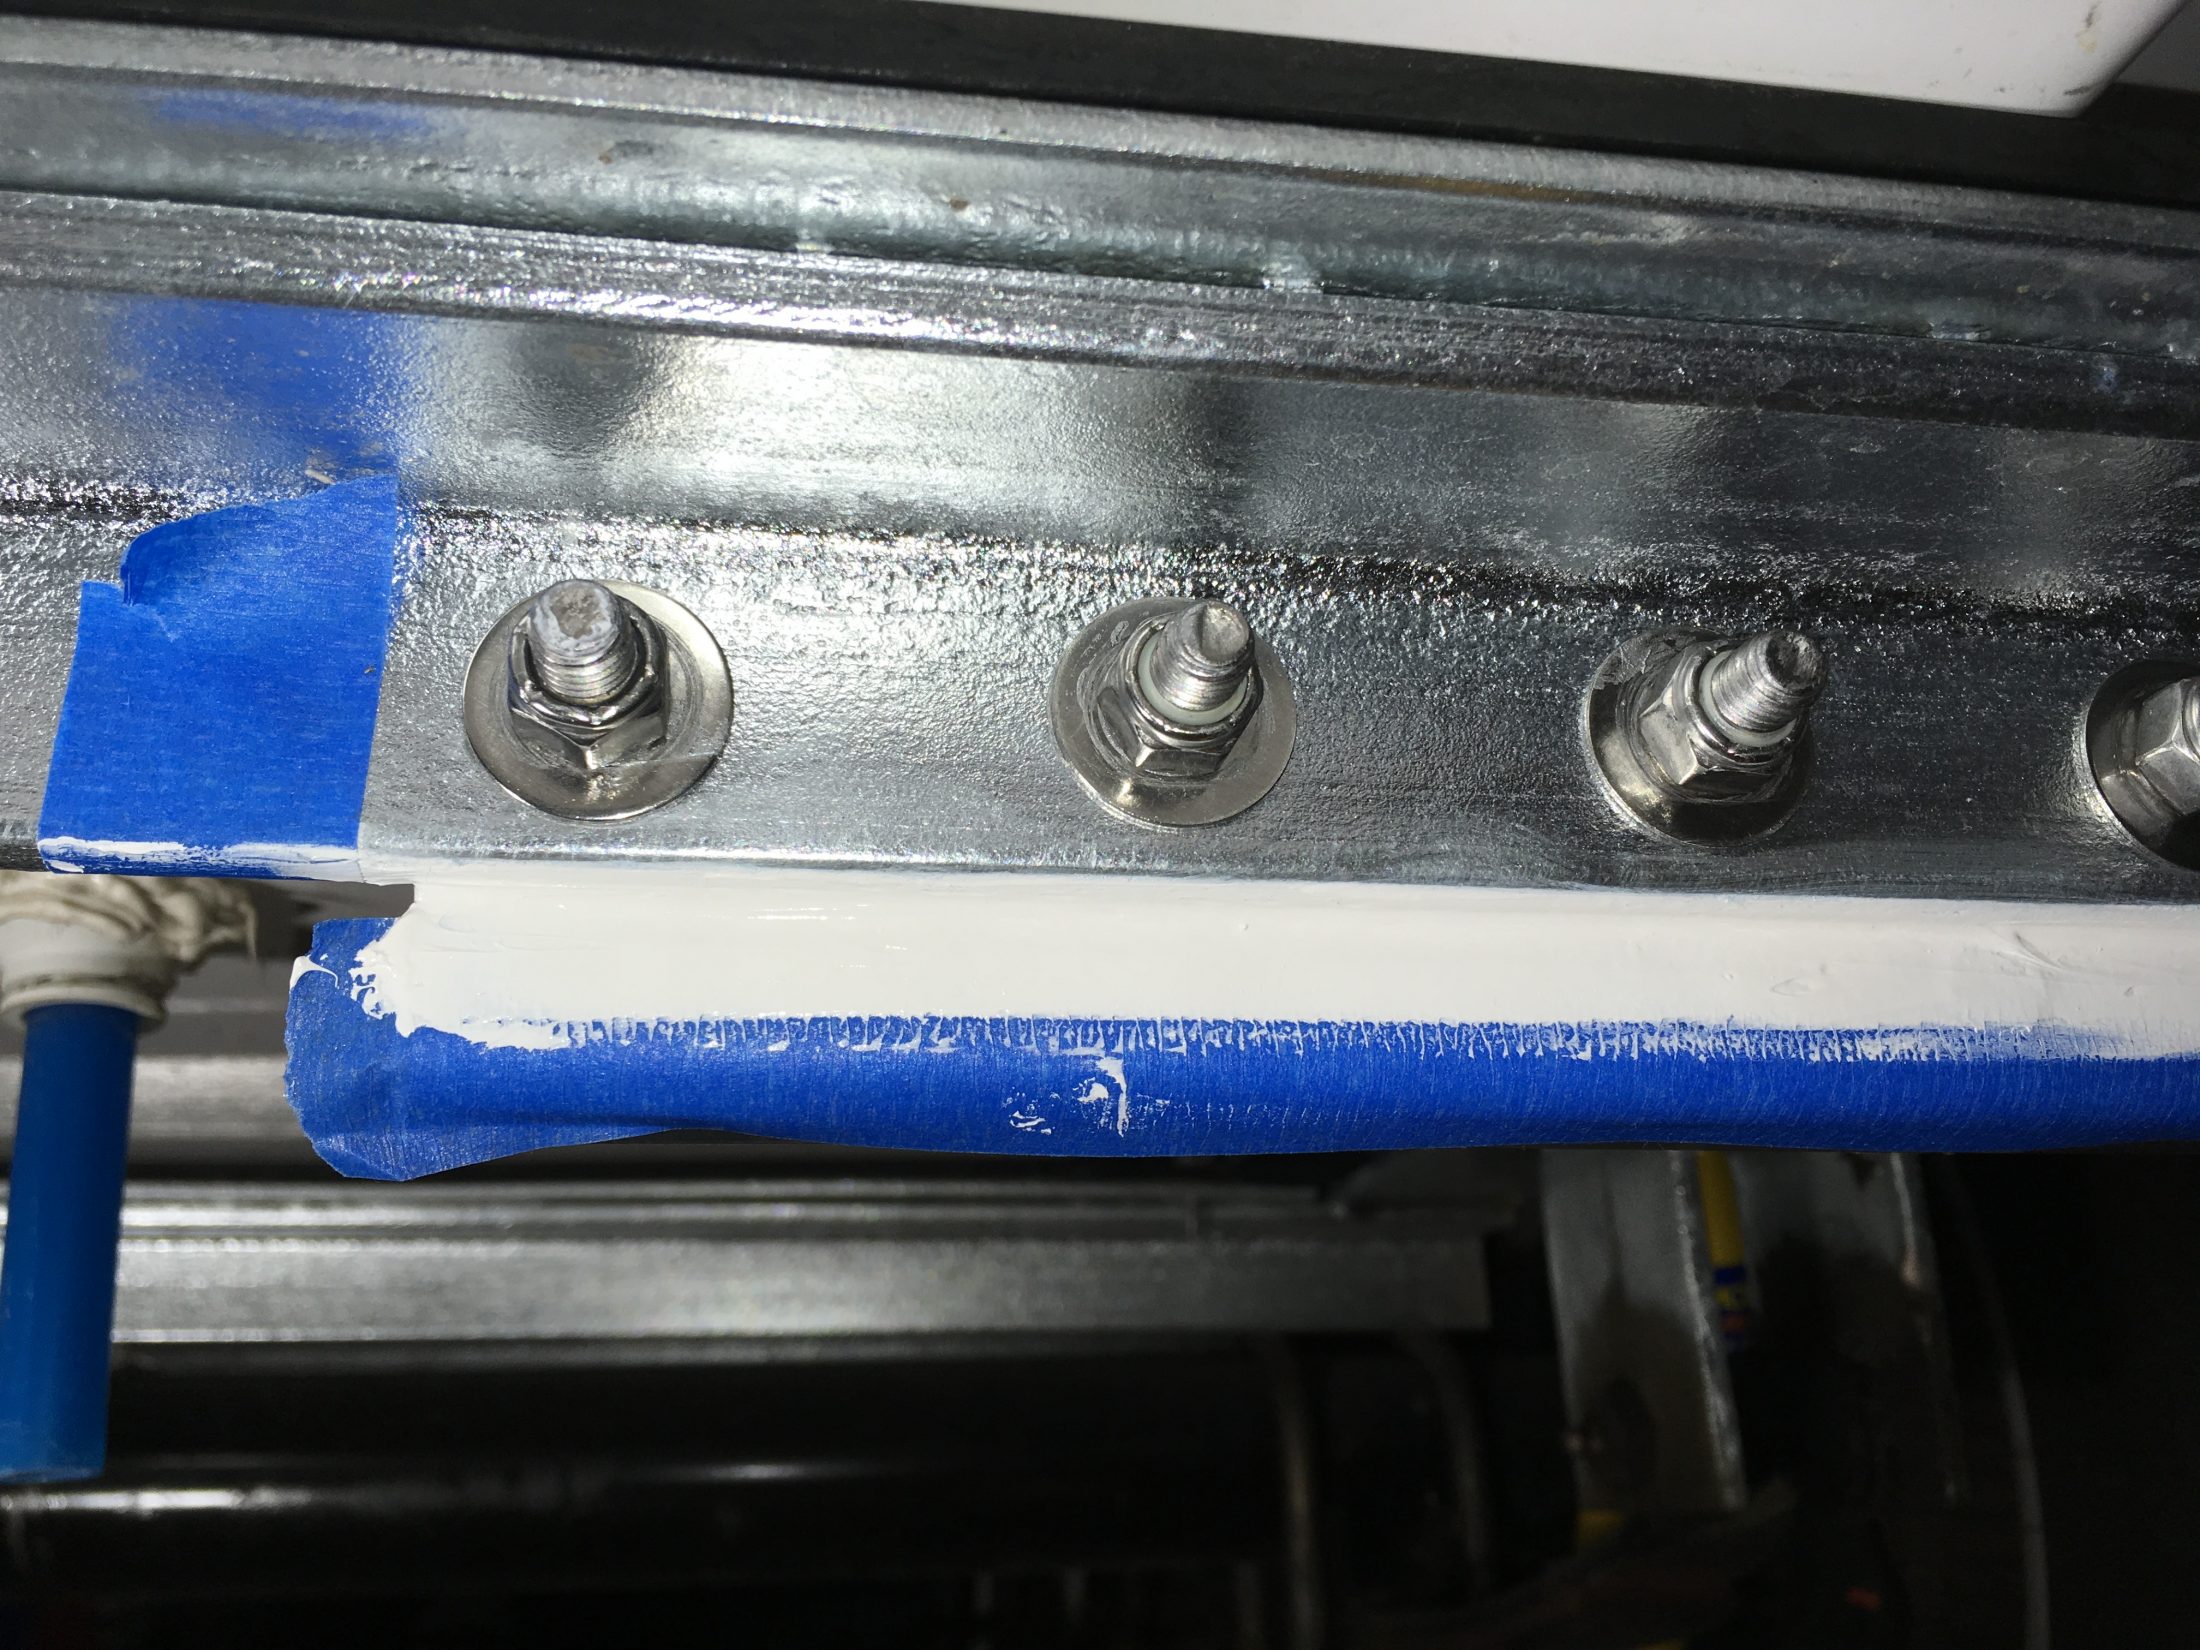
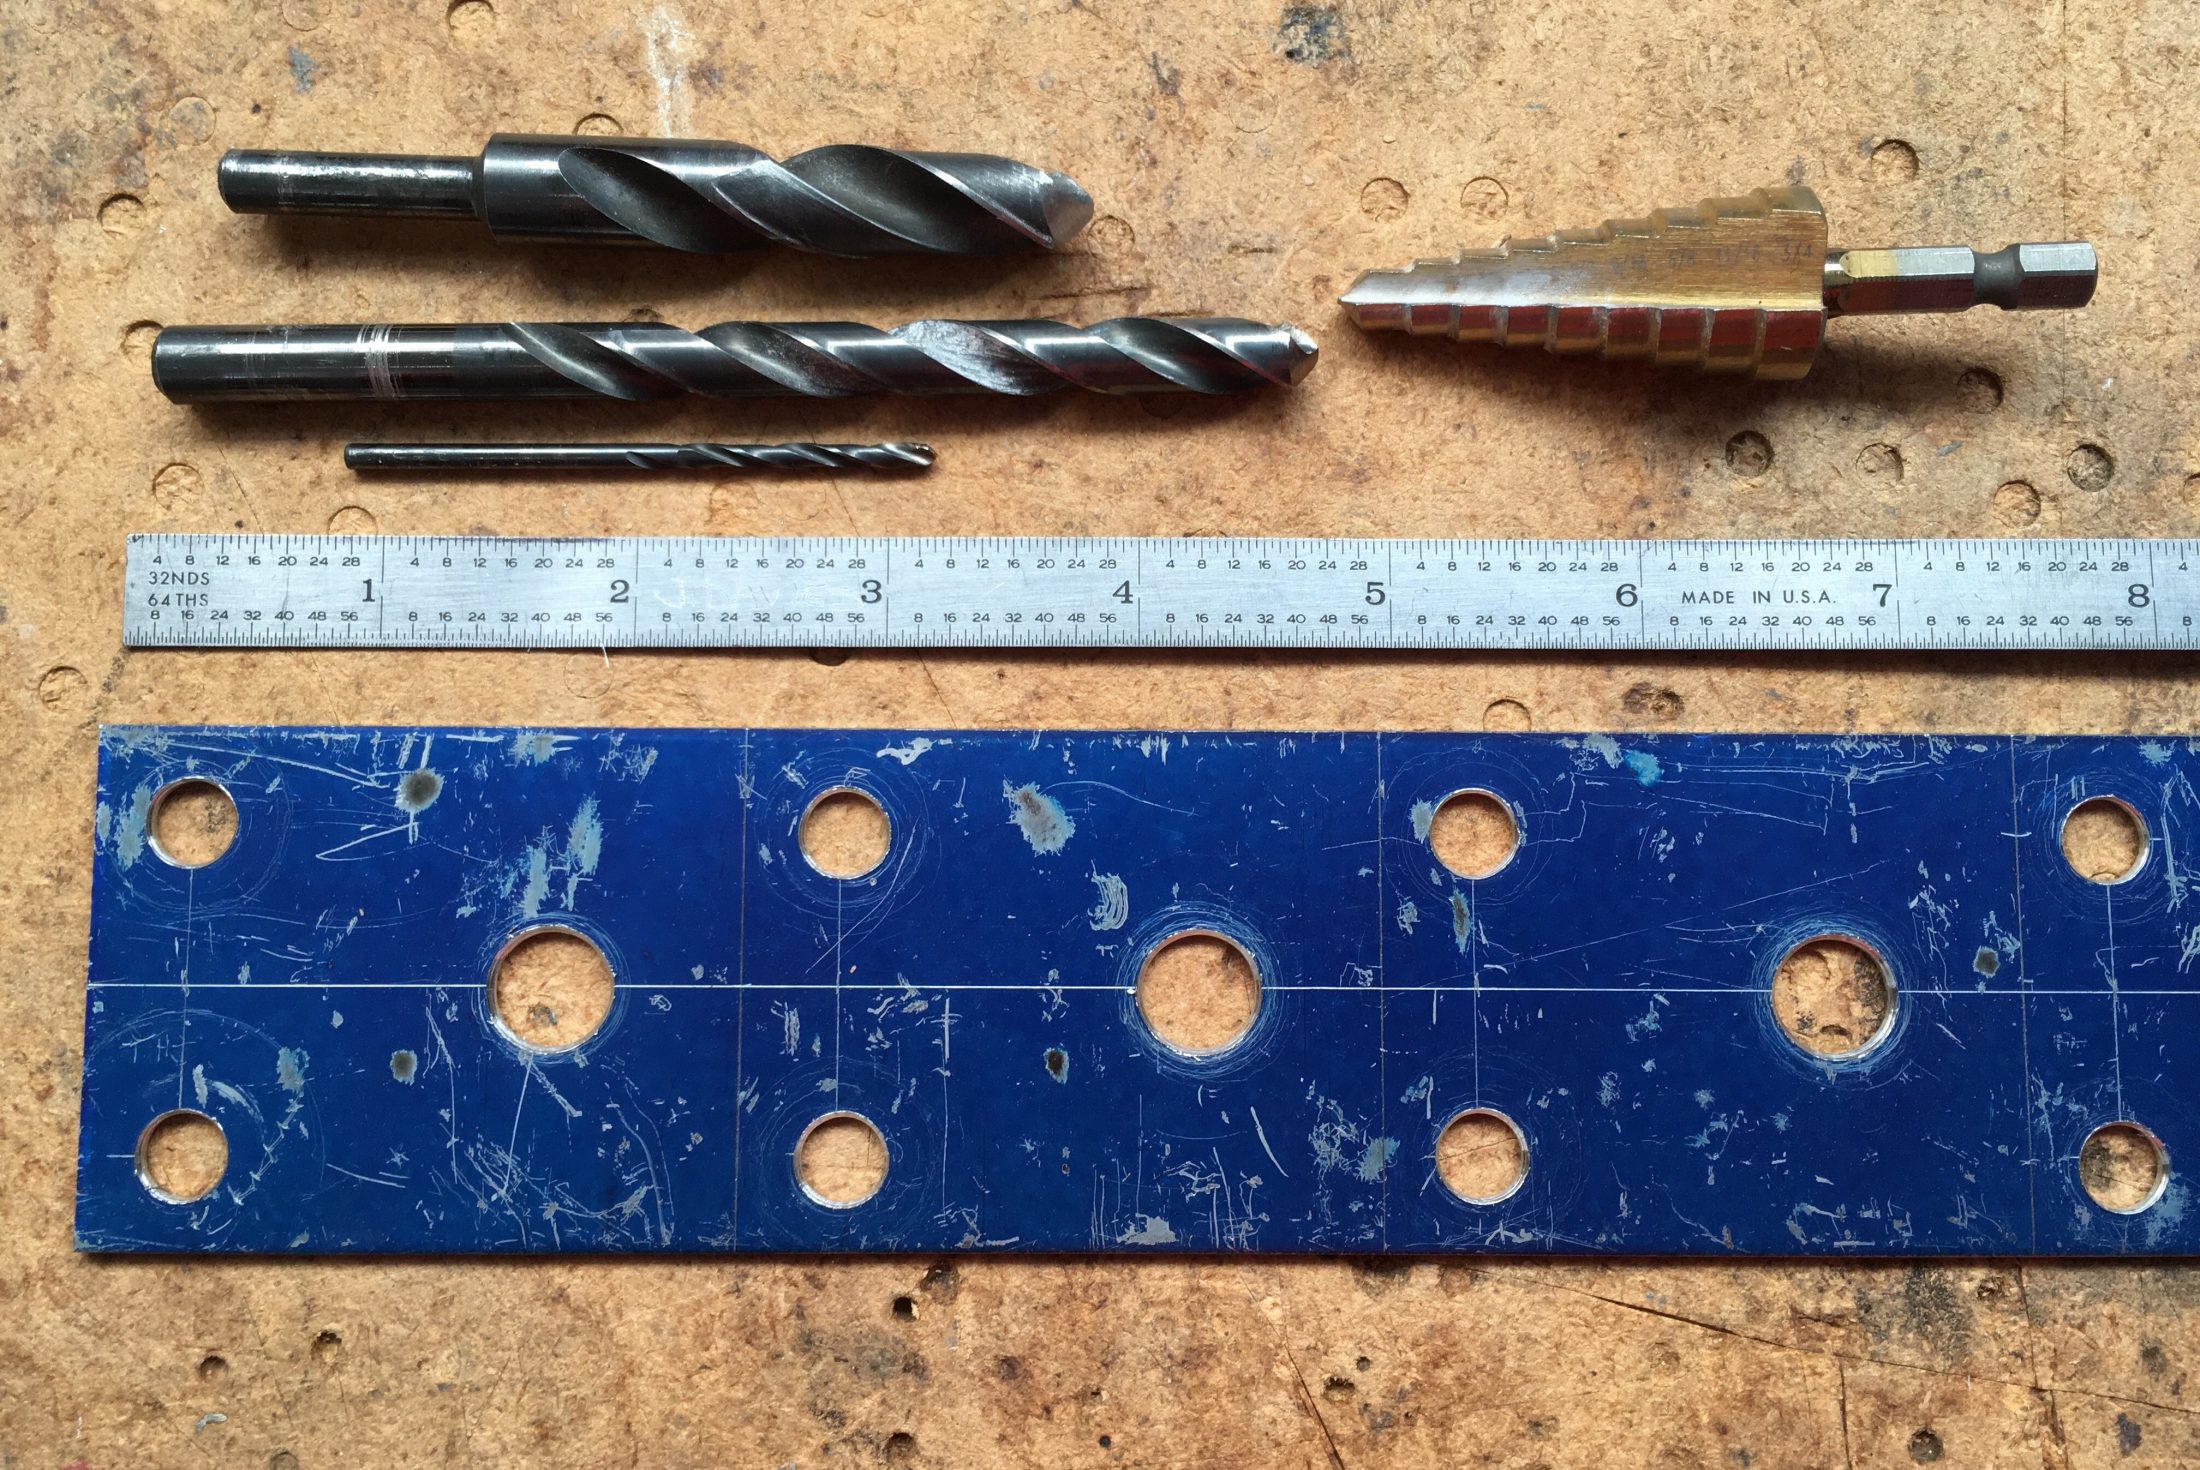
This could go in Modifications, but it really has to do with protecting the suspension and subframe from gravel rash and water while towing off pavement. Moderators, you can move it there if you like. This is an easy mod, you just have to get over your fear of drilling into your frame. Why would you want to do this? It will stop the paint on the axles, hubs and shocks from eroding and rusting (gravel rash). It will help to protect the plated finish on the steel subframe. It will reduce or at least soften the high pressure water blast that sprays up onto your spring bearings in wet weather from your tow vehicle, washing out the lubricant. It may help to reduce the blast on the rear bumper and bumper compartment. And it looks cool. The material is 1/8 inch sheet neoprene, cloth reinforced. I think it is used for conveyor belts. I located it in bulk at a local rubber supplier. A 3 x 4 ft sheet cost $90. The rest of the material was used elsewhere on Mouse. I cut two strips 12"x 26". They meet in the center and extend about 3 inches beyond the frame angle. The extended part will protect the shocks, which are pretty far outboard. Hardware is 1/4" x 1 1/4" stainless bolts, washers and nylocks (locking nuts). To keep the rubber off the steel I used 5/6-18 nylon nuts (full plastic, no steel) as spacers. They are a little hard to find - the box stores and Ace Hardware keep only a few in stock. You might be able to use circular nylon spacers, but these nuts work fine and are half the cost (about $0.60 each). Drill a neat row of 1/4 inch holes at 6 inch spacing along the bottom of the front-most steel cross angle. Use a sharp pilot bit first and it is not difficult, just a little messy. Wear eye protection and old clothes! Drill the rubber to match the spacing using a 5/16" bit. Clean the steel with a good solvent, not alcohol. Use of alcohol for prepping the parts before sealing will prevent the sealant from curing! Install the bolt and washer with the threads facing forward, with a dab of 3M Fast Cure 4000 or another excellent marine sealant under the head. Add another dab of sealant on the shank and push the nylon nut into place, and add a flat washer. Place the flap onto the threaded part of the bolt, add another washer and a nylock. Repeat for all the holes and tighten evenly. Unless you were frugal with the sealant this could be MESSY! You can use a good solvent like Acetone or MEK to clean up any messes. The rubber I used is curling since it was in a tight roll for six weeks. I think it will straighten out when exposed to wind blast and heat, if not I can install some stainless strips along the bottom to weight them down. John Davies Spokane WA
-
HOW TO: Stone Stomper Gravel Guard.
John E Davies replied to John E Davies's topic in Towing an Oliver
More 8 - Unboxing. This is the last section, feel free to comment but I may not be able to respond for a while. John Davies Spokane WA
-
HOW TO: Stone Stomper Gravel Guard.
John E Davies replied to John E Davies's topic in Towing an Oliver
More 7
-
HOW TO: Stone Stomper Gravel Guard.
John E Davies replied to John E Davies's topic in Towing an Oliver
More 6
-
HOW TO: Stone Stomper Gravel Guard.
John E Davies replied to John E Davies's topic in Towing an Oliver
More 5
-
HOW TO: Stone Stomper Gravel Guard.
John E Davies replied to John E Davies's topic in Towing an Oliver
More 4
-
HOW TO: Stone Stomper Gravel Guard.
John E Davies replied to John E Davies's topic in Towing an Oliver
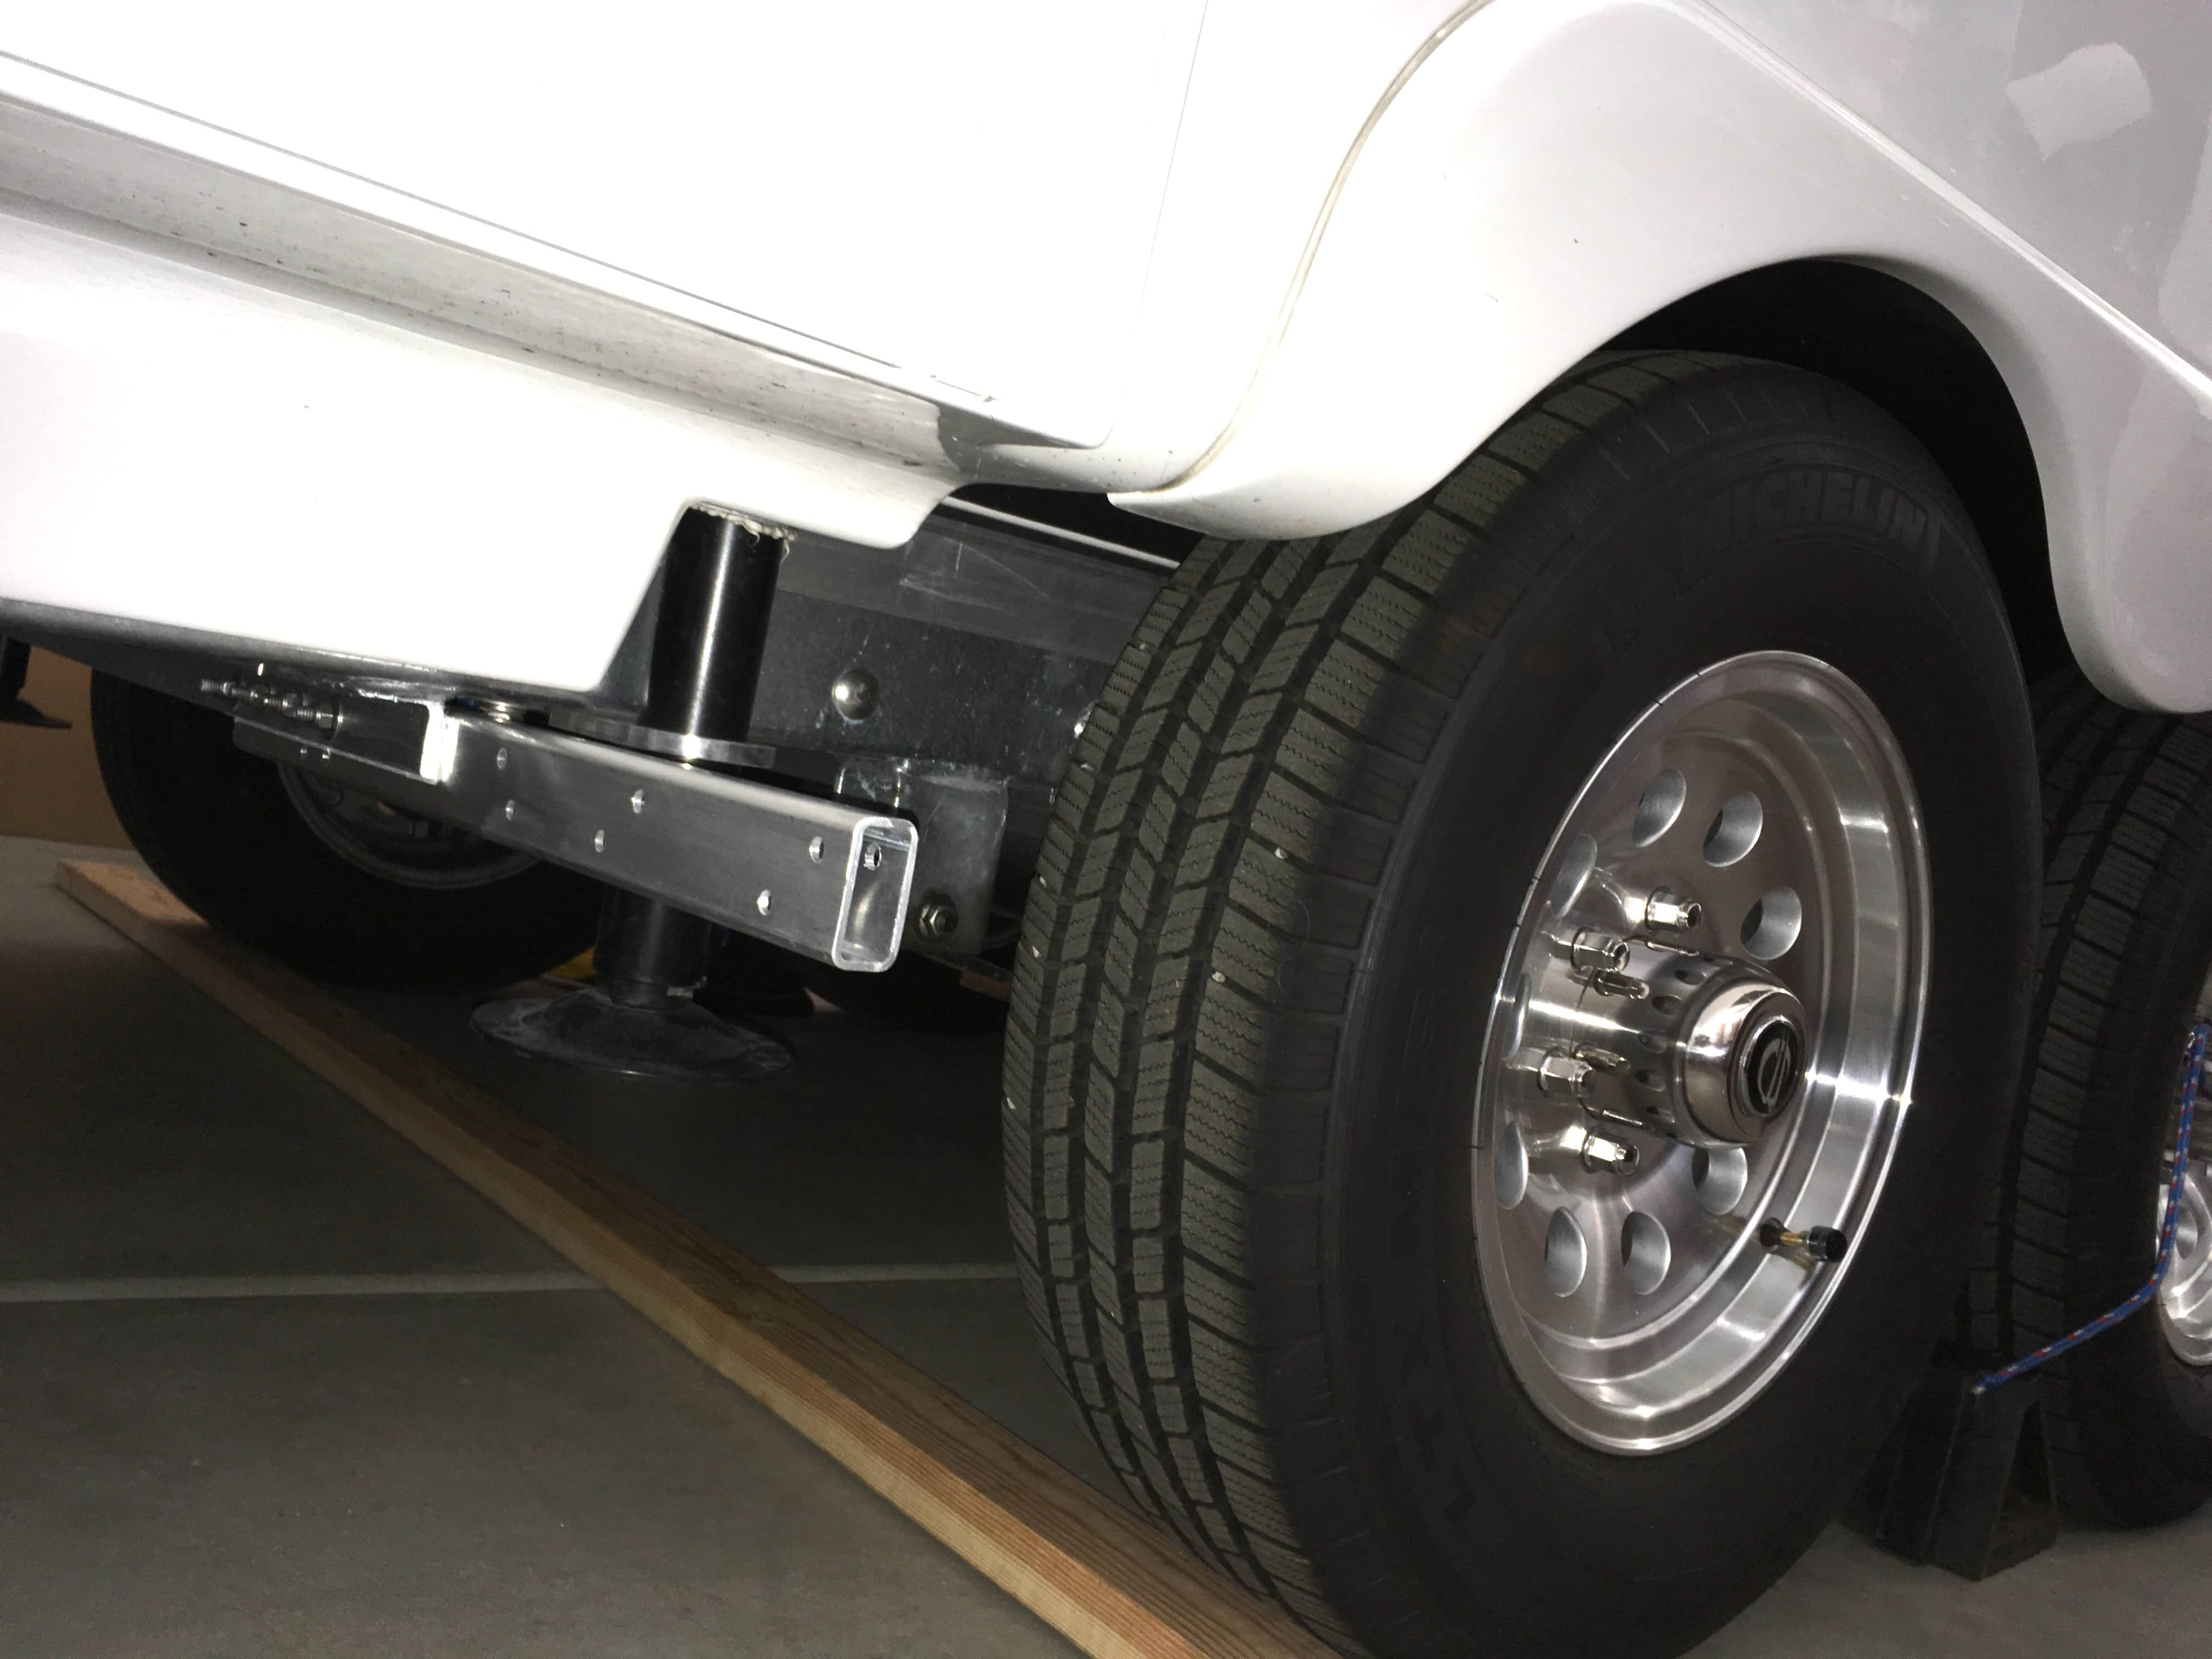
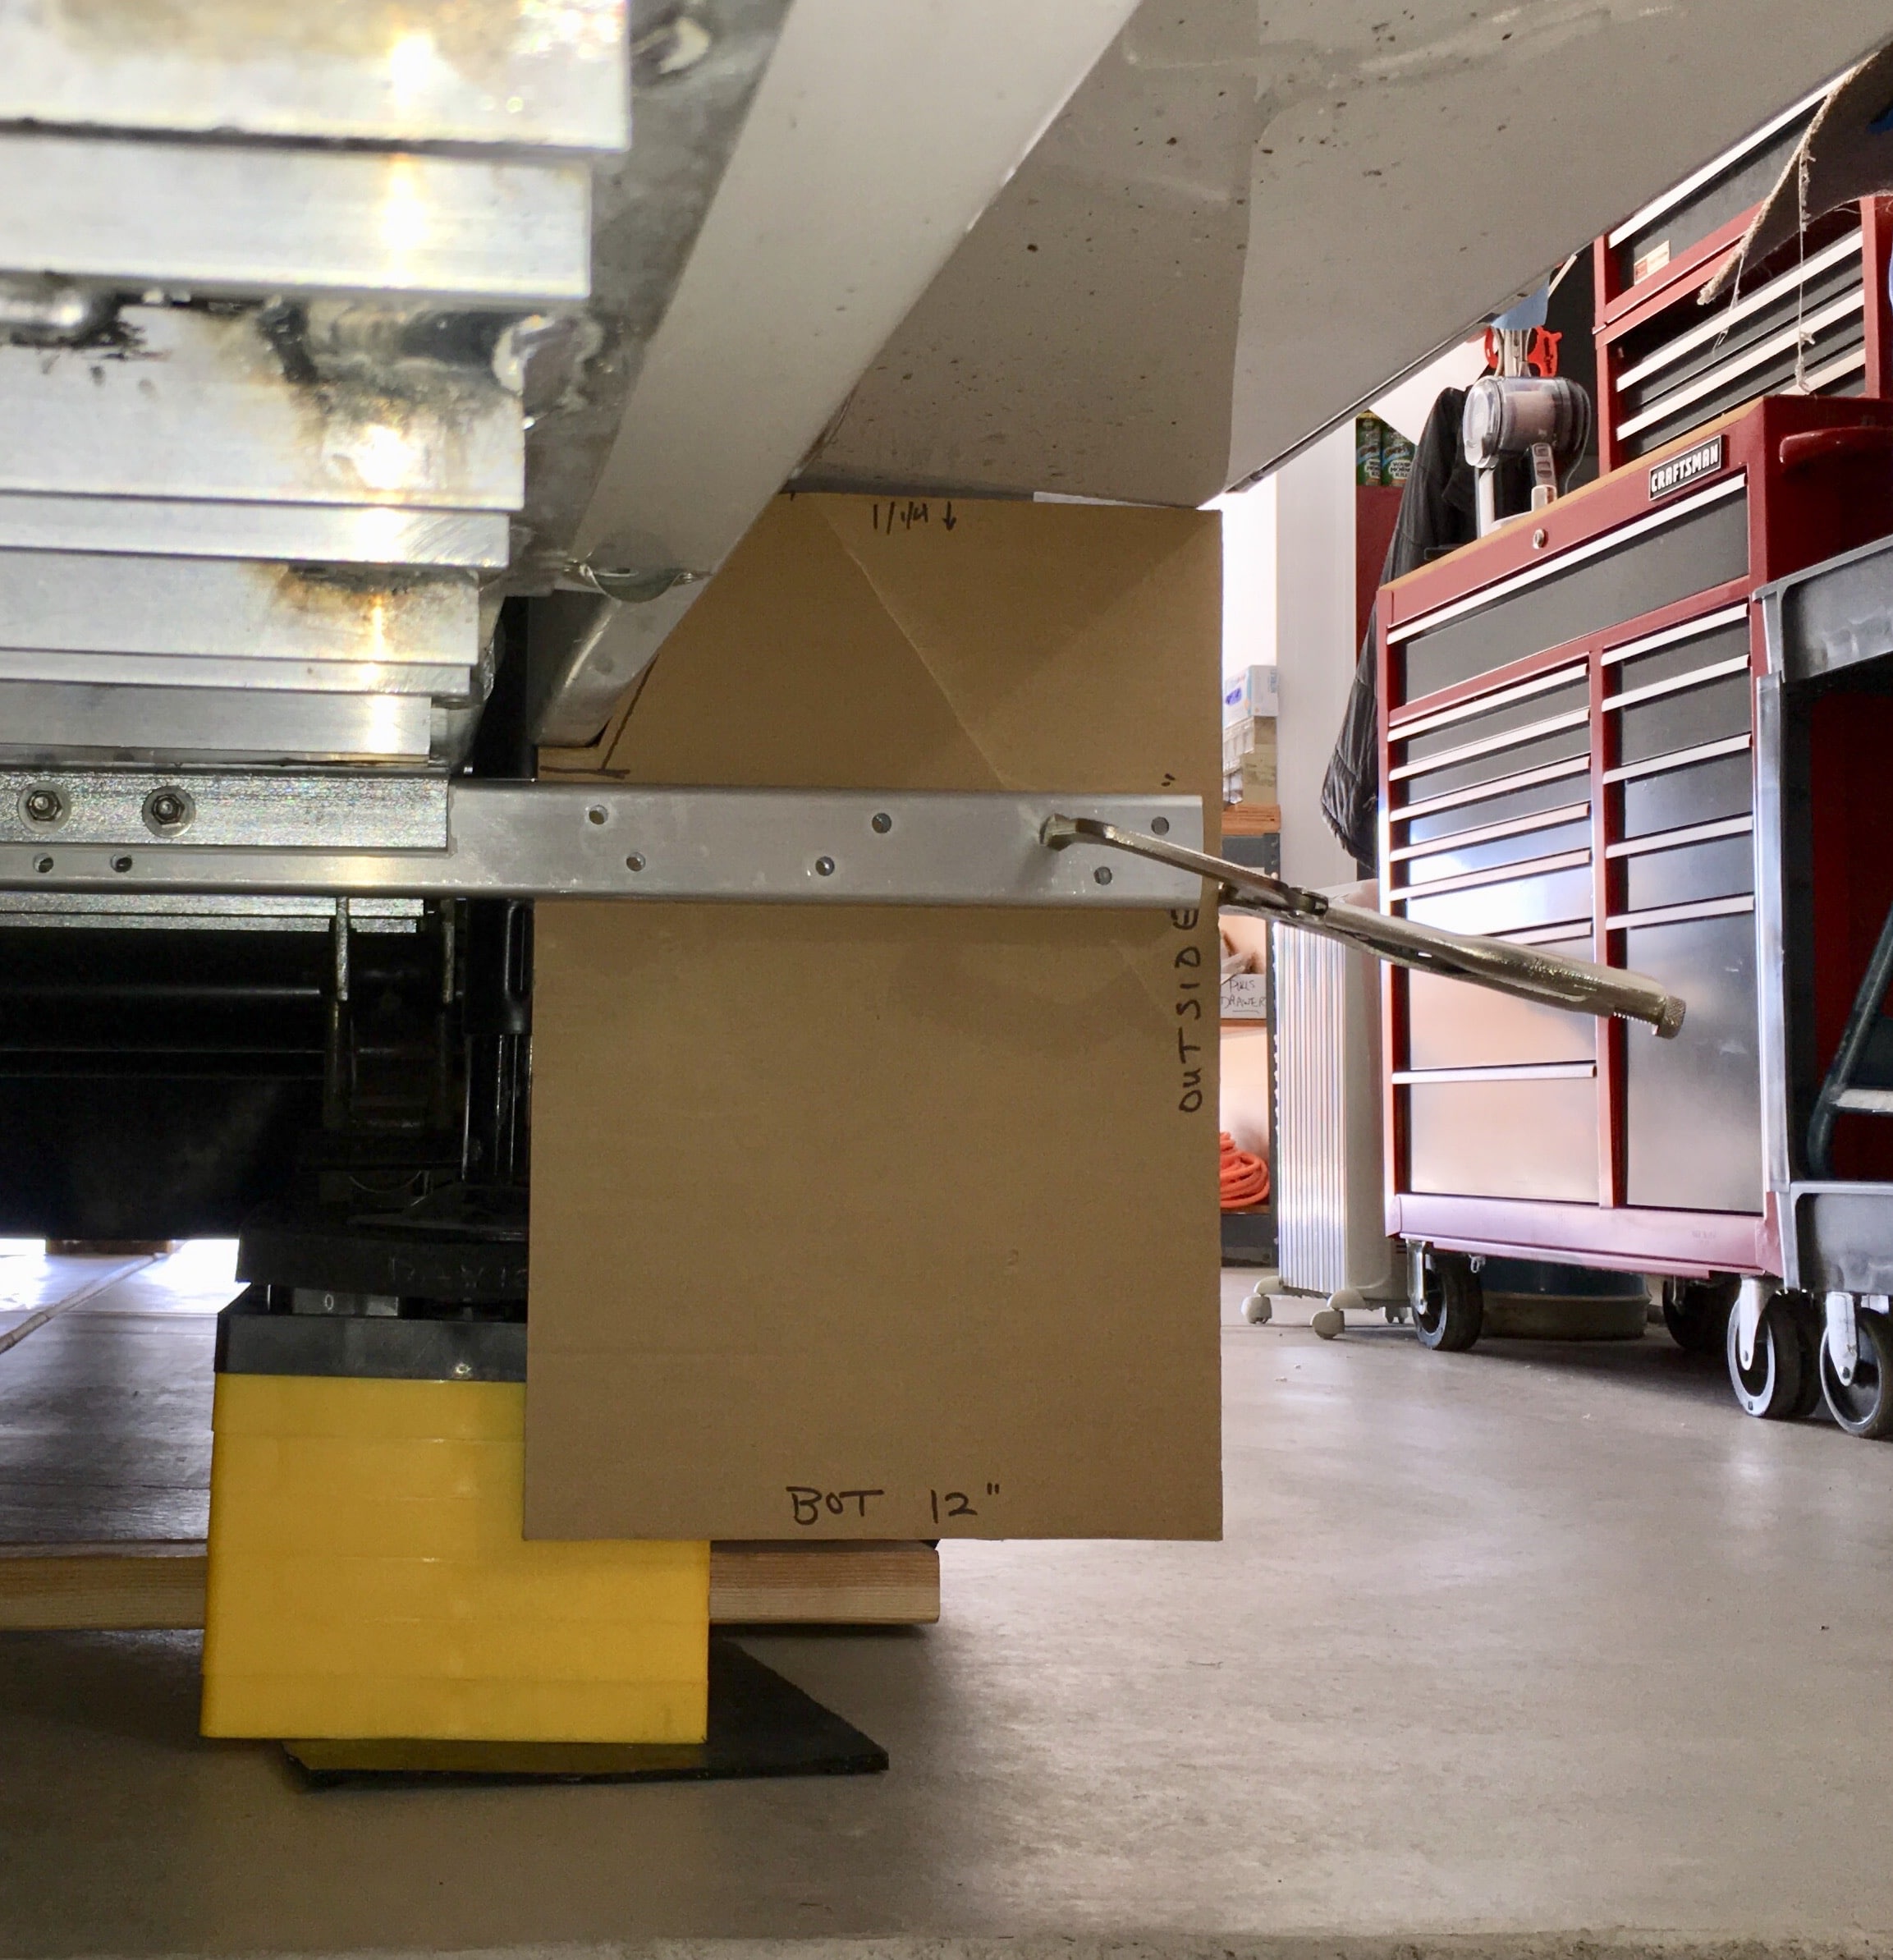
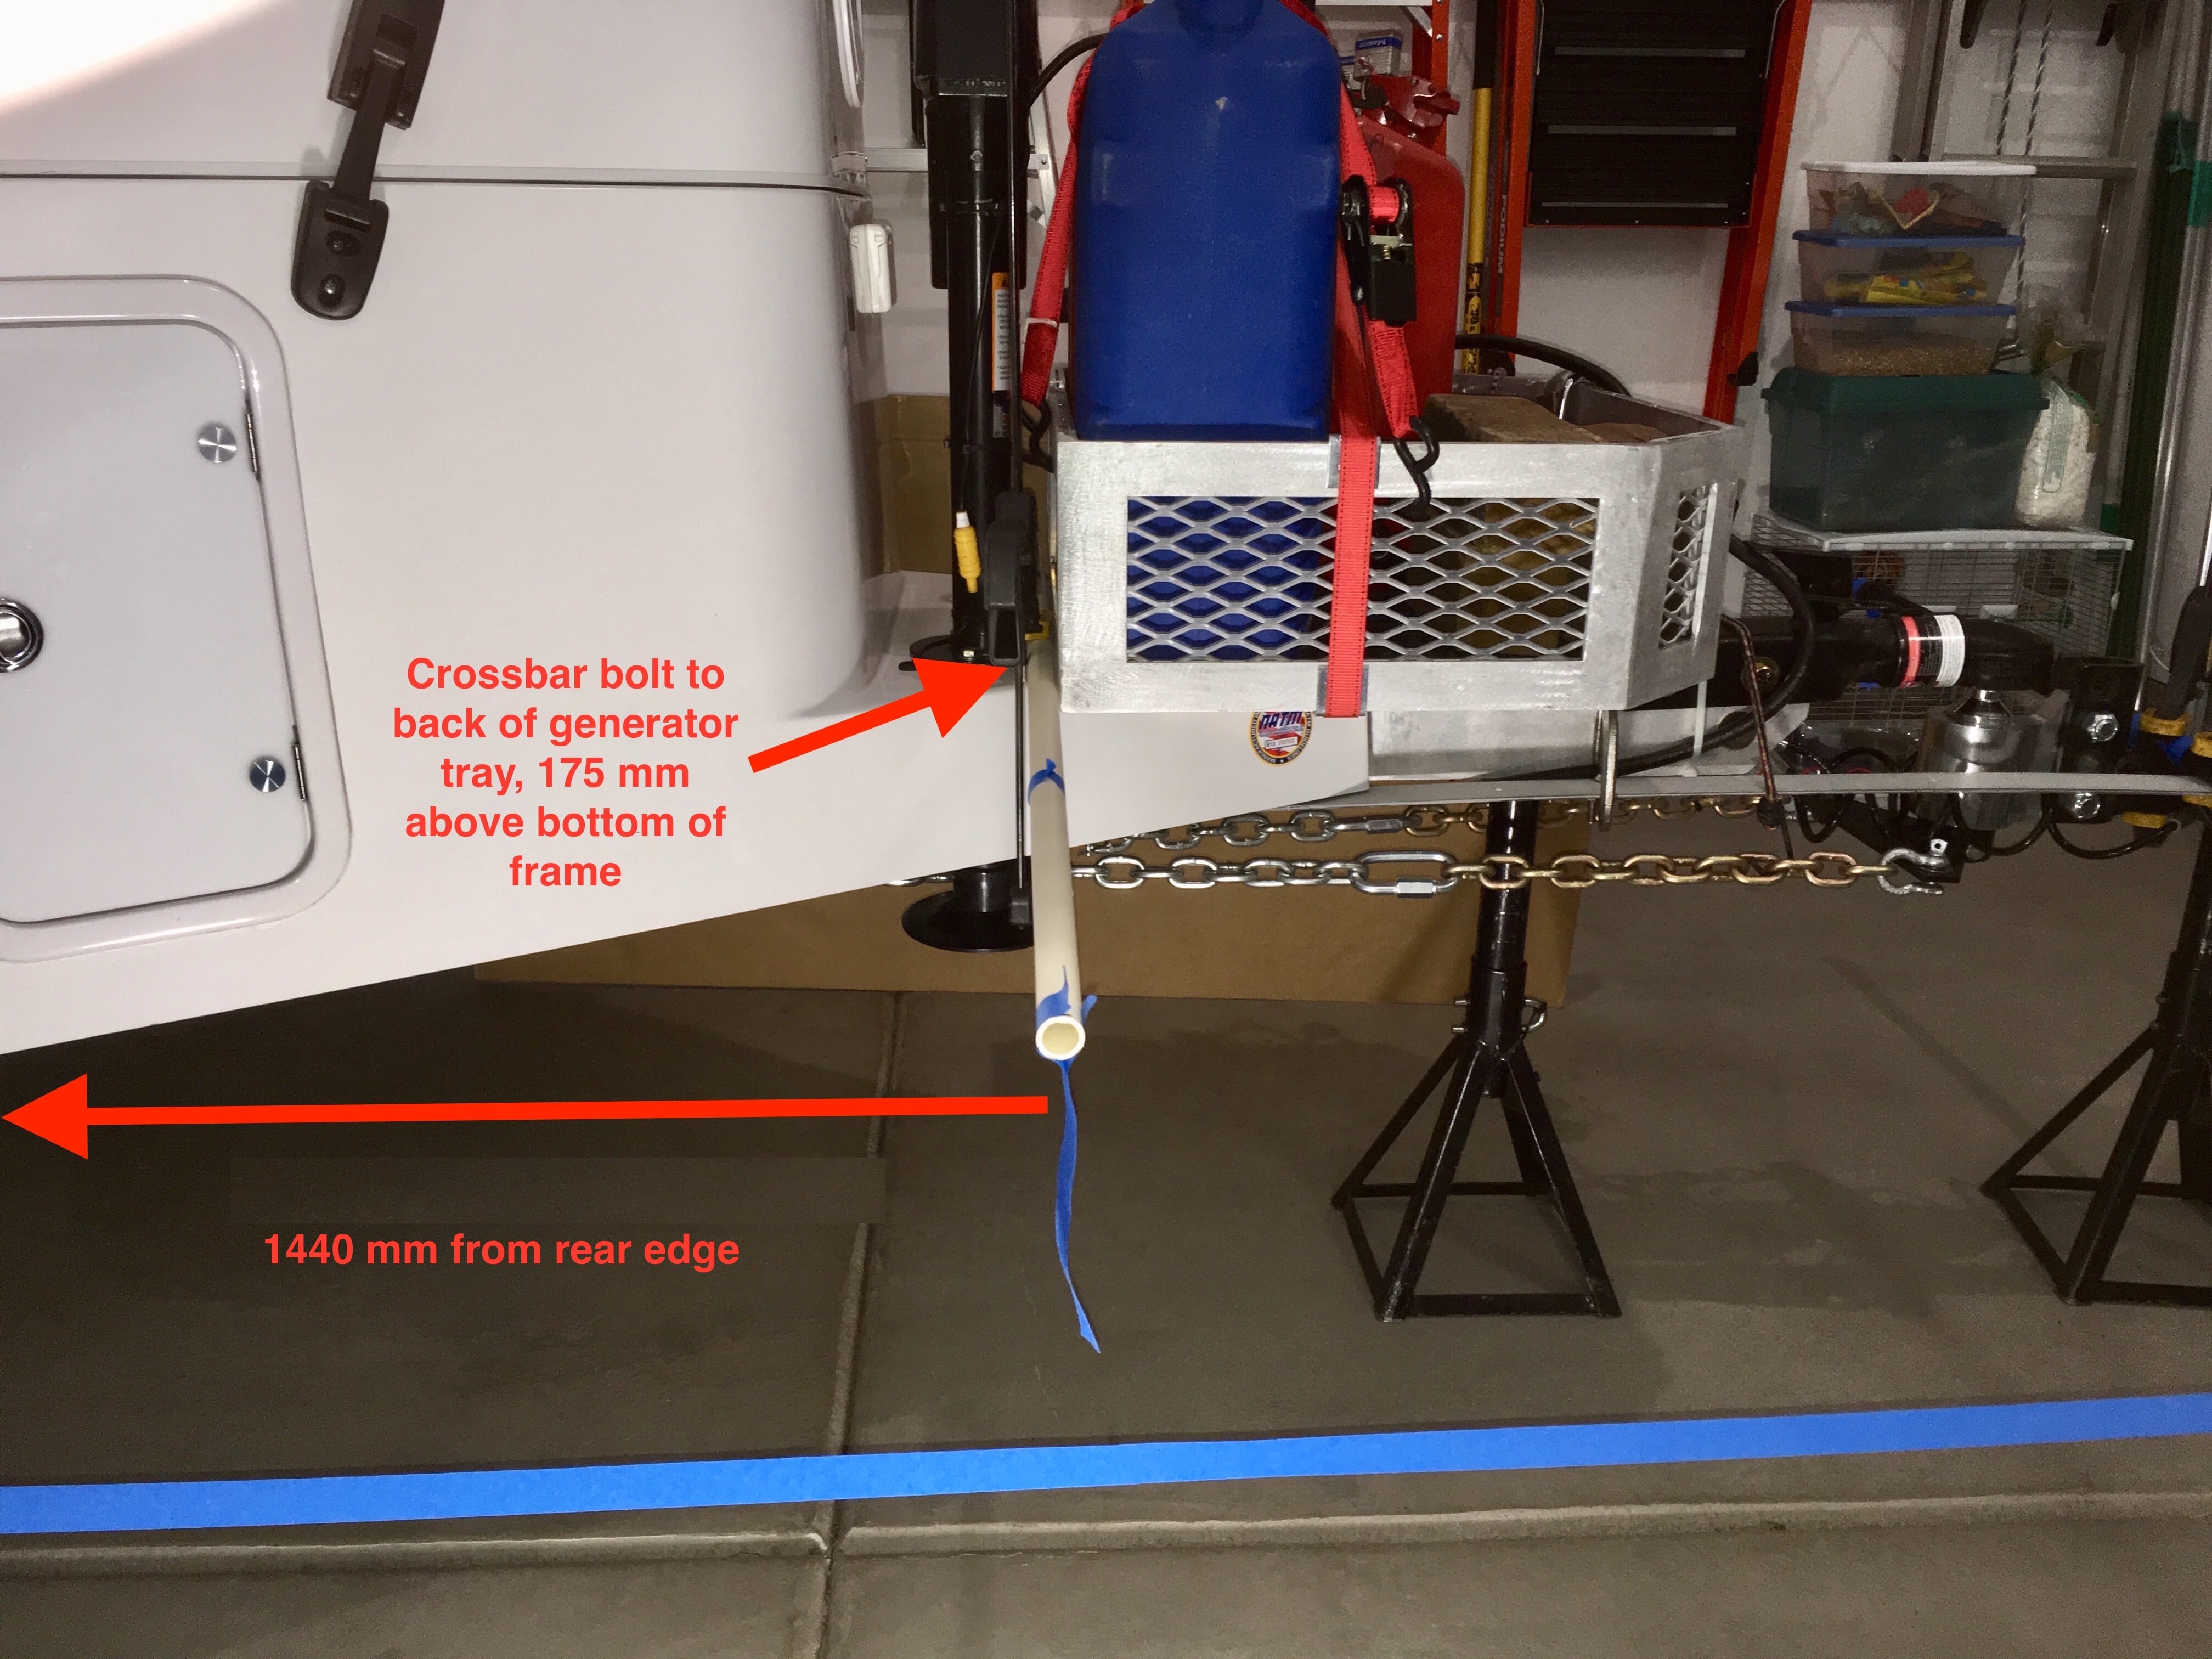
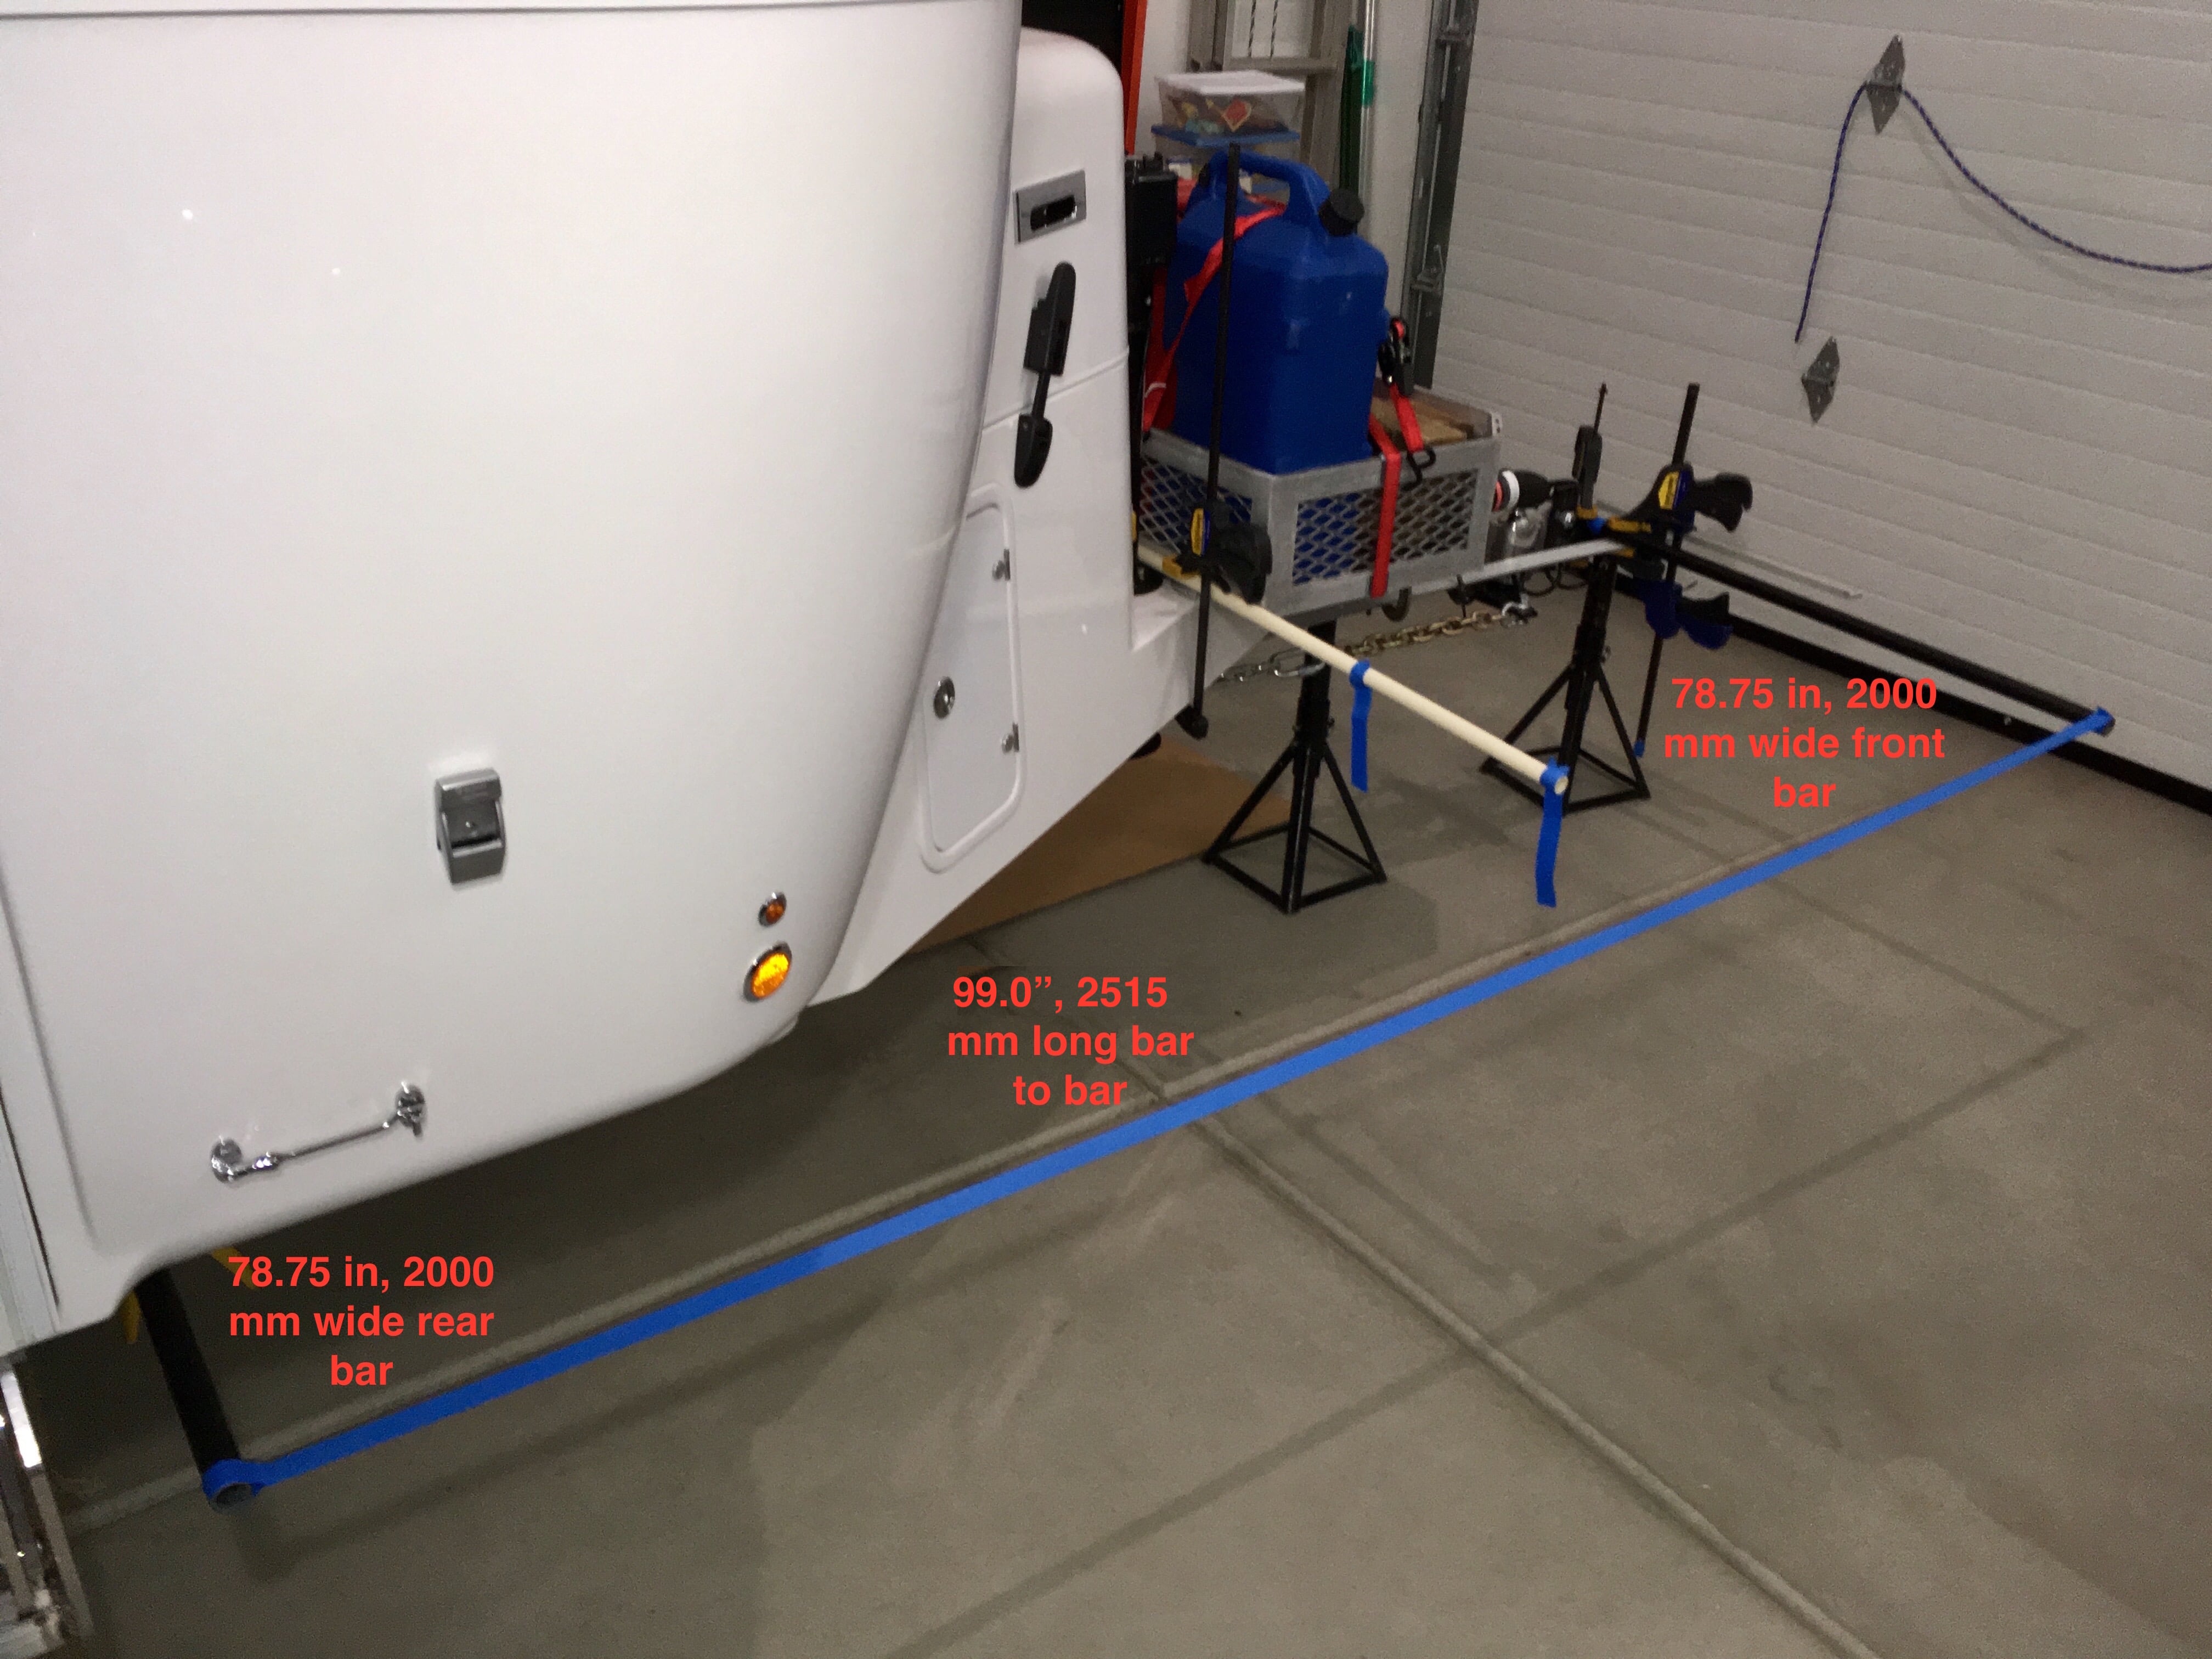
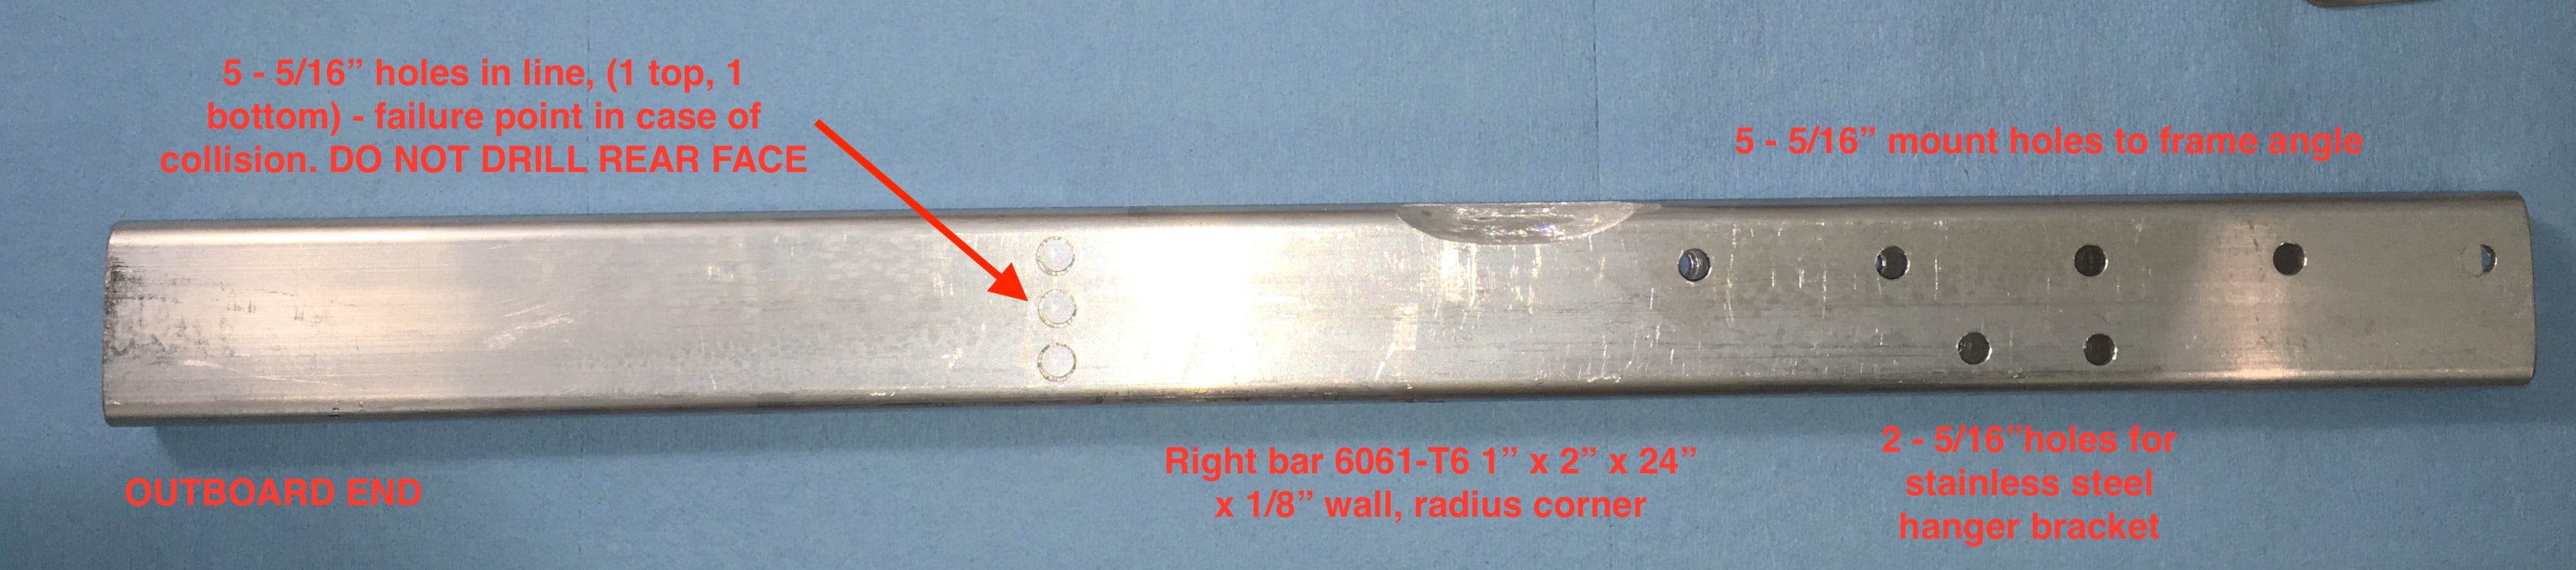
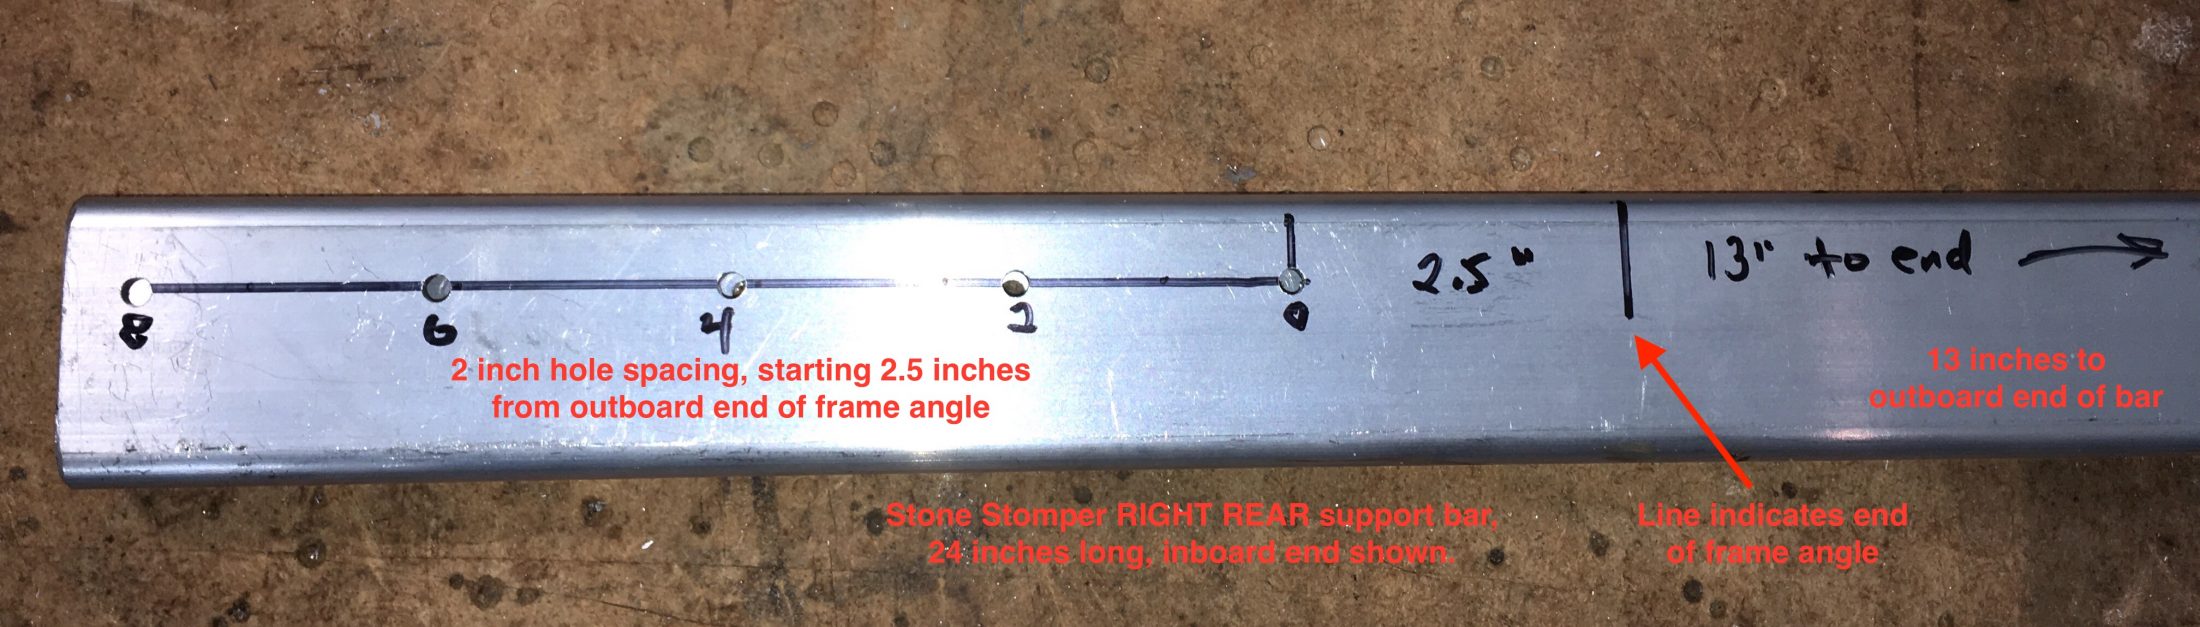
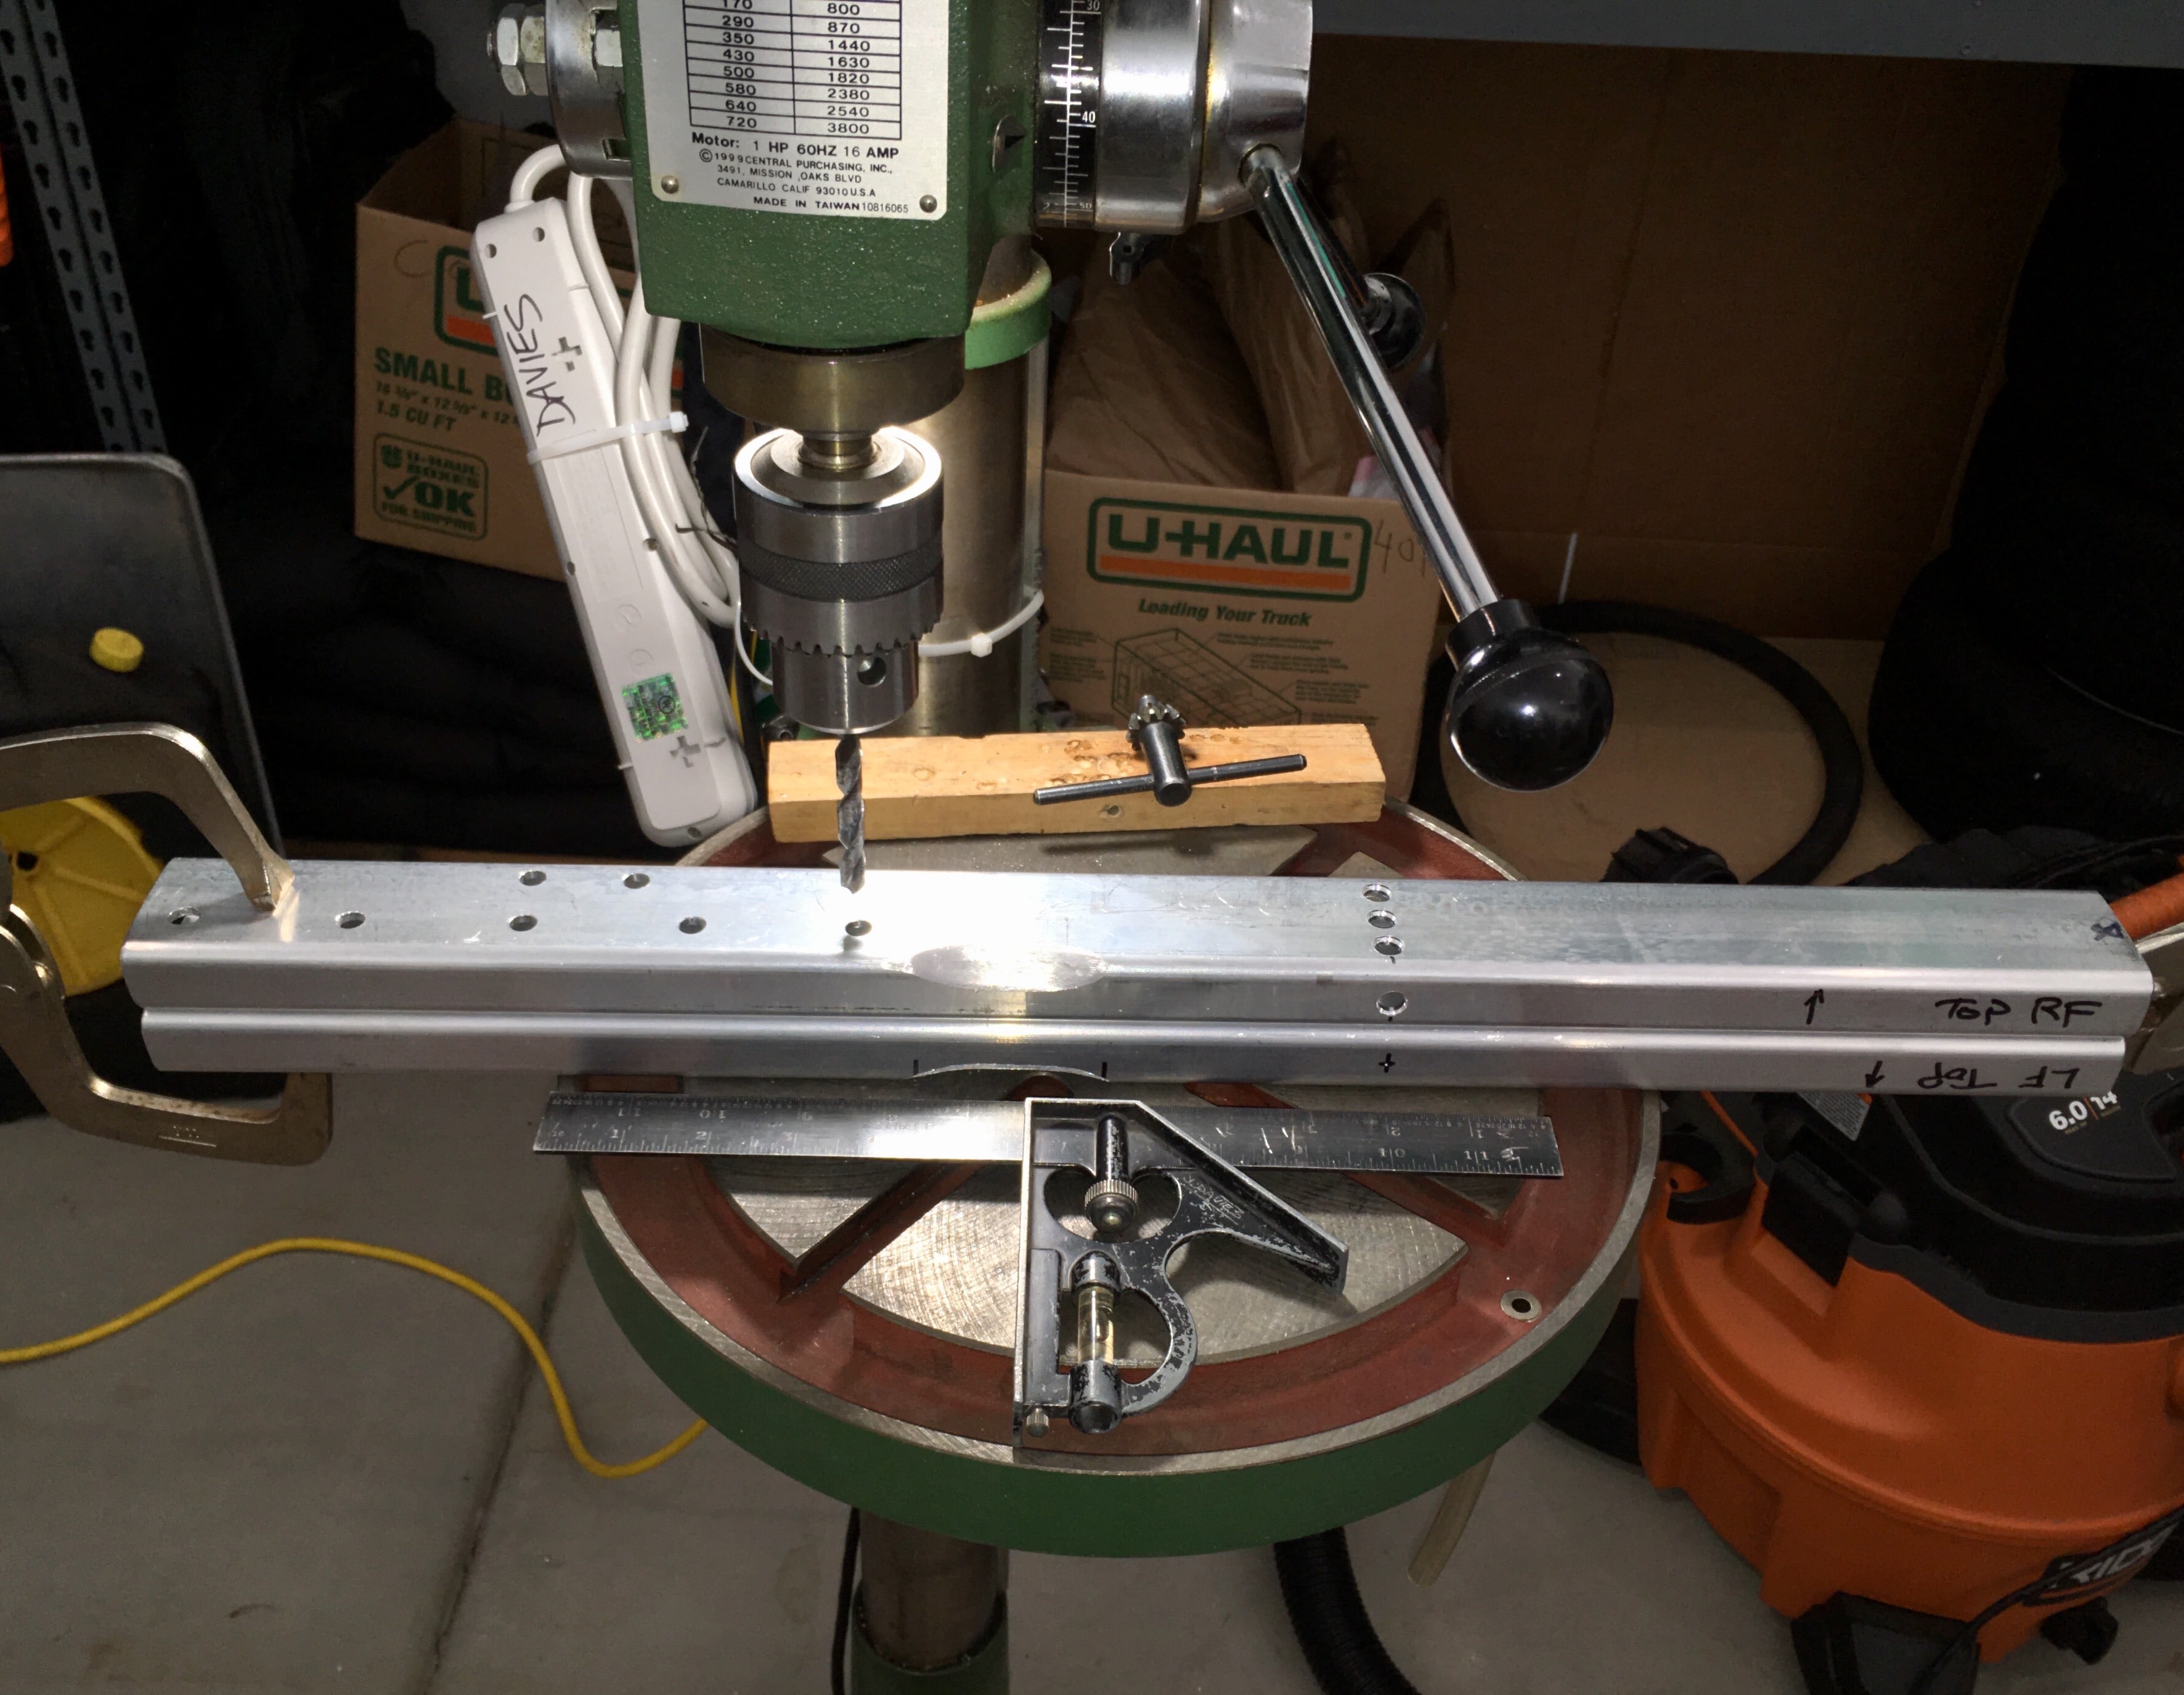
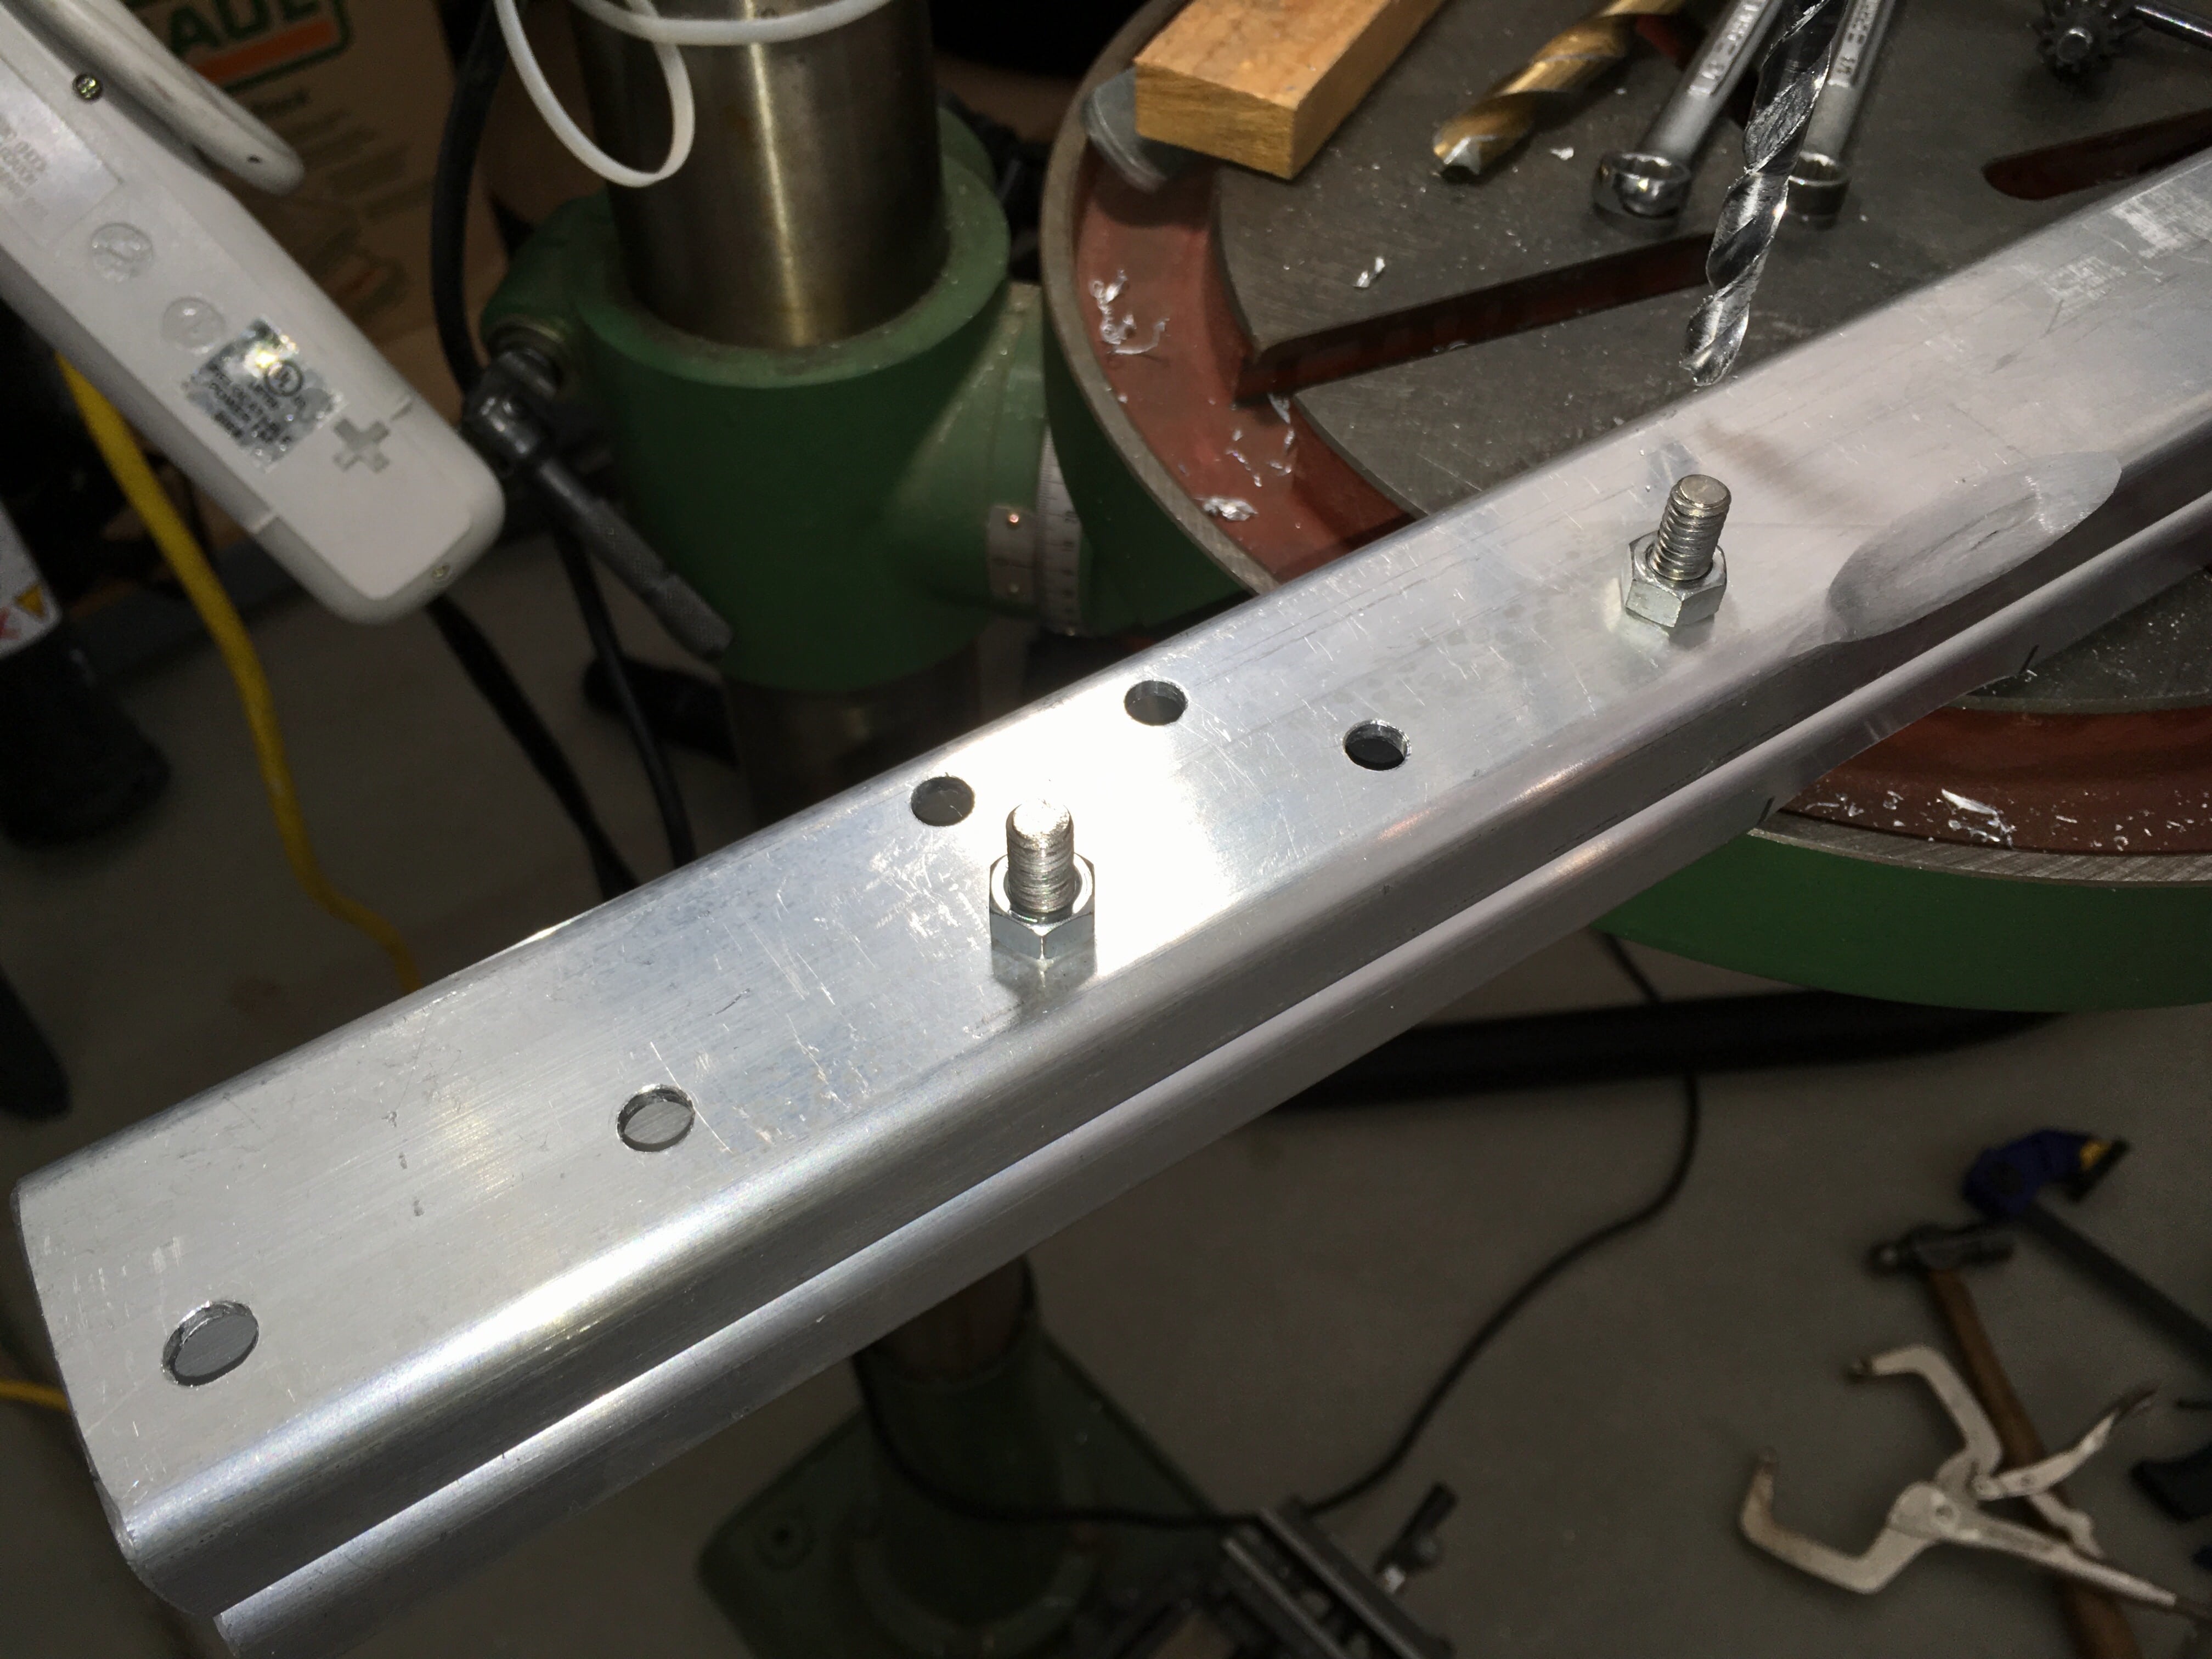
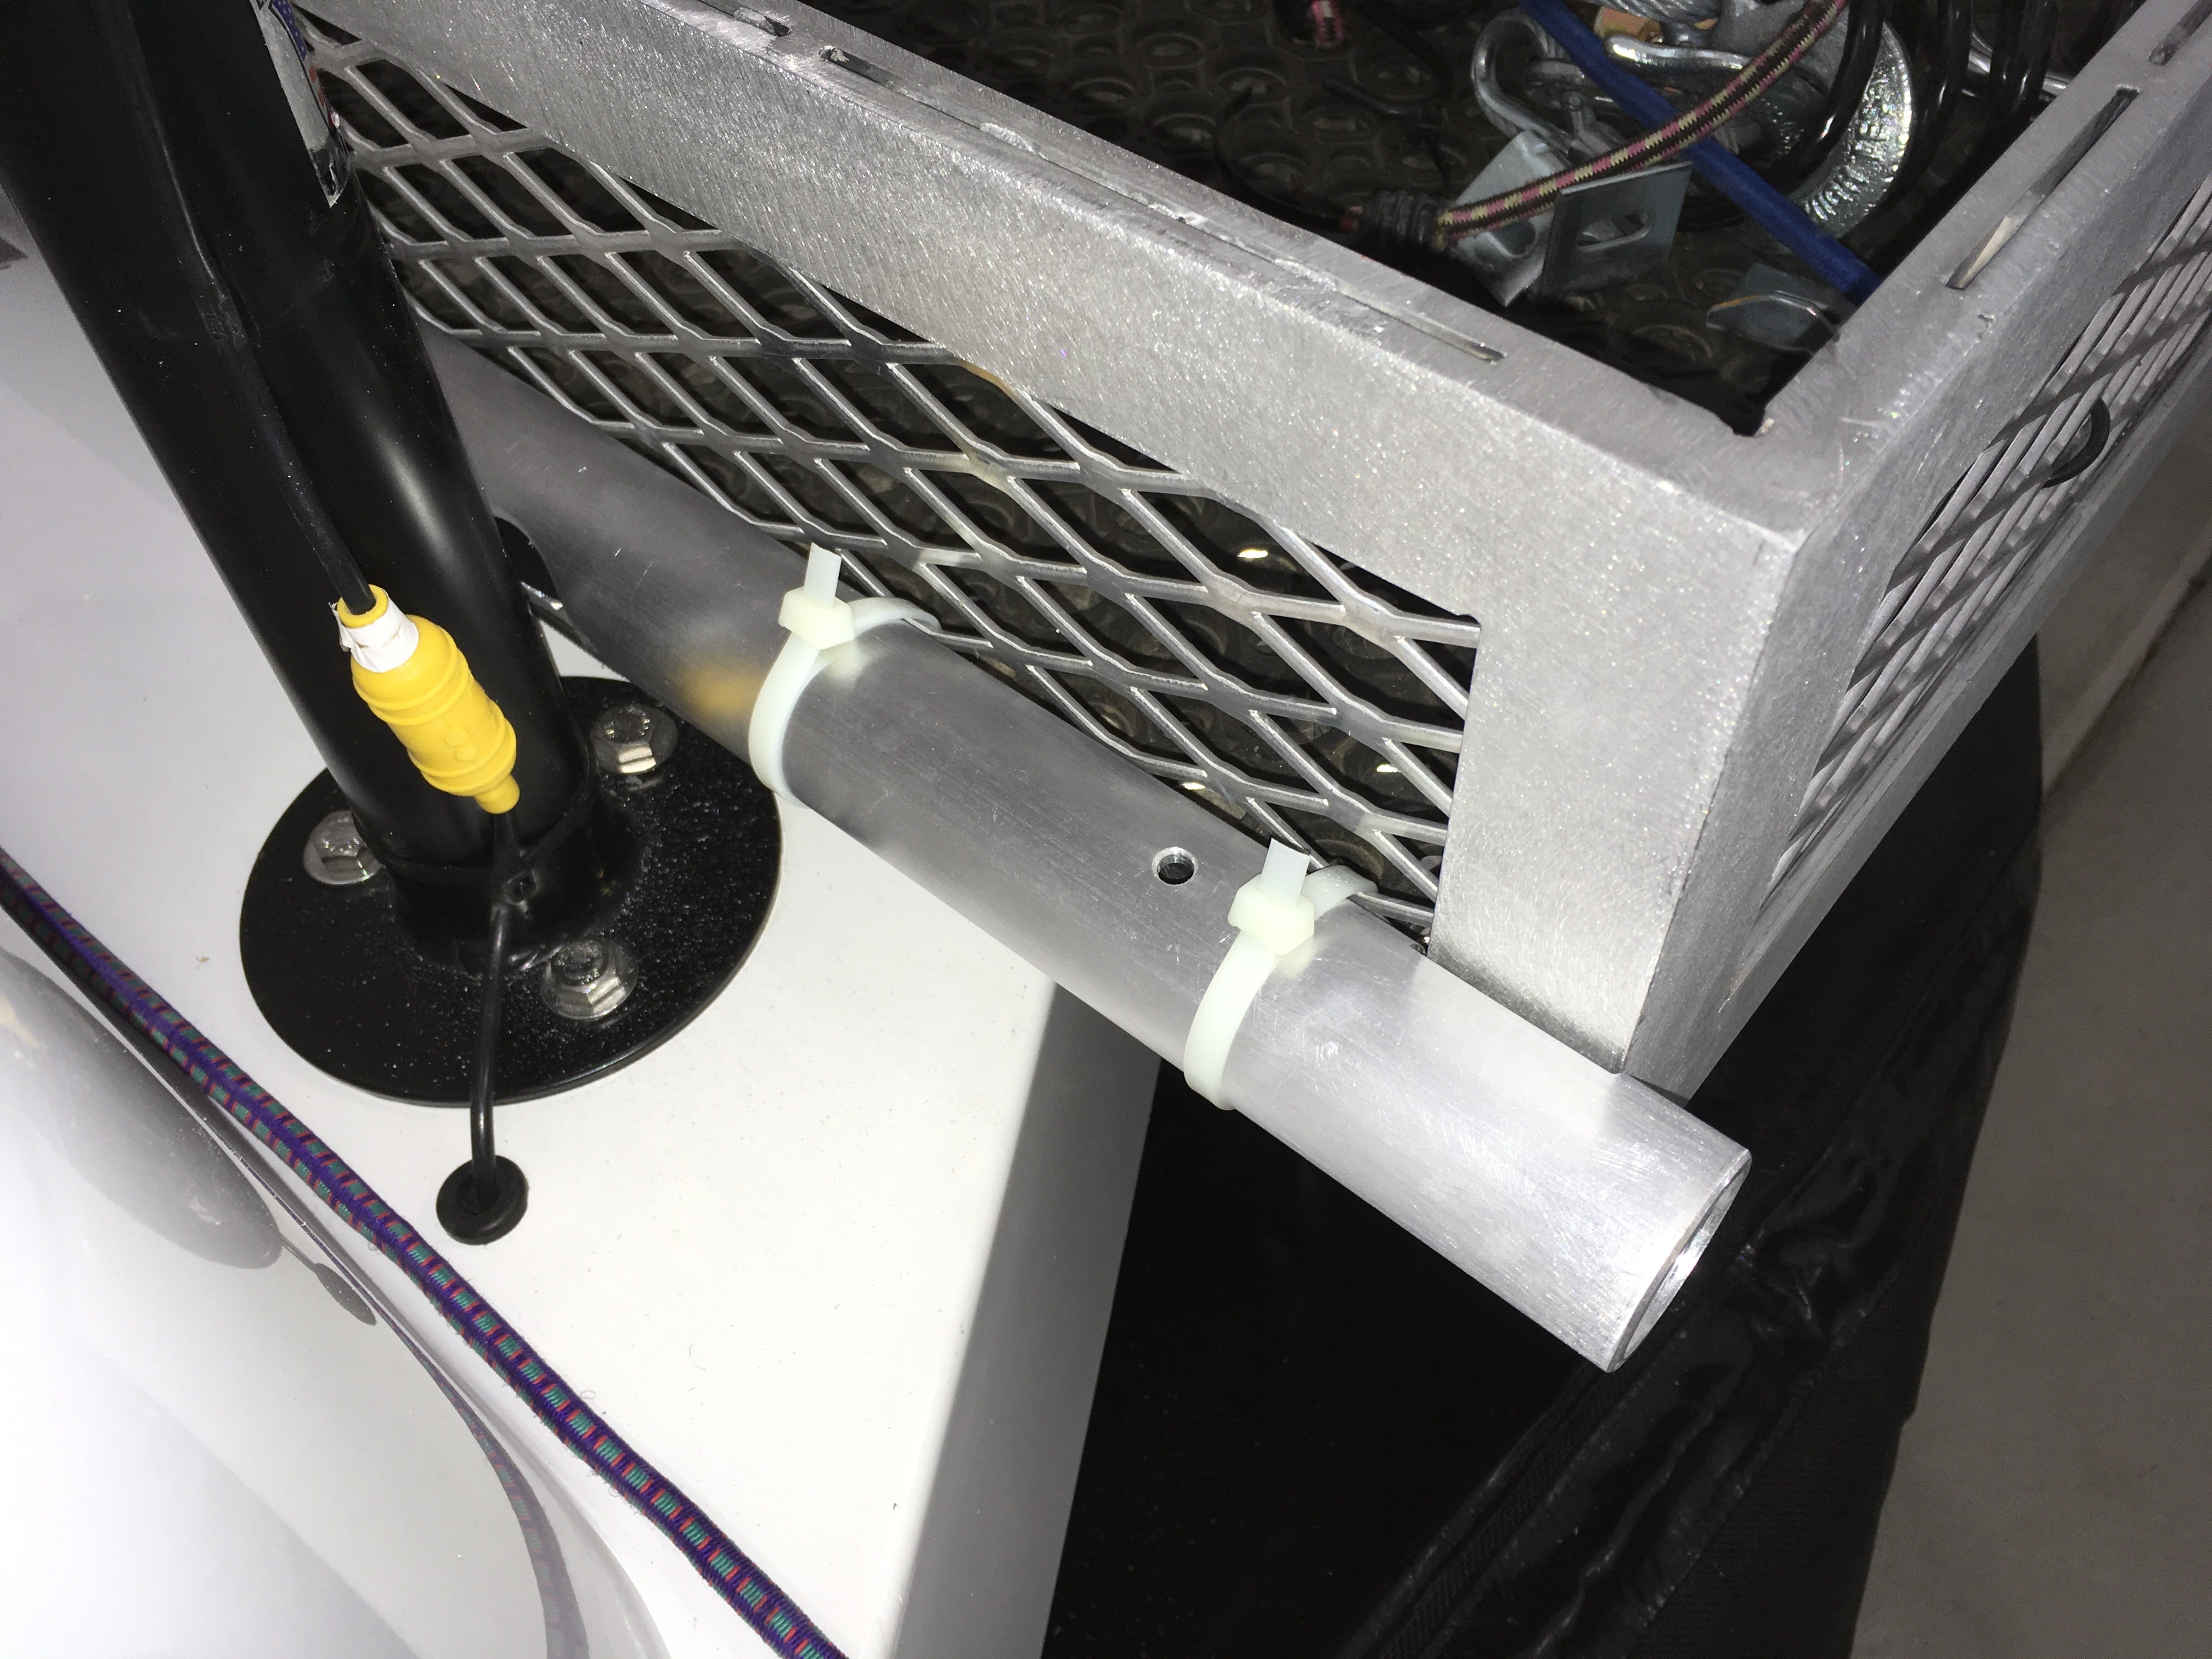
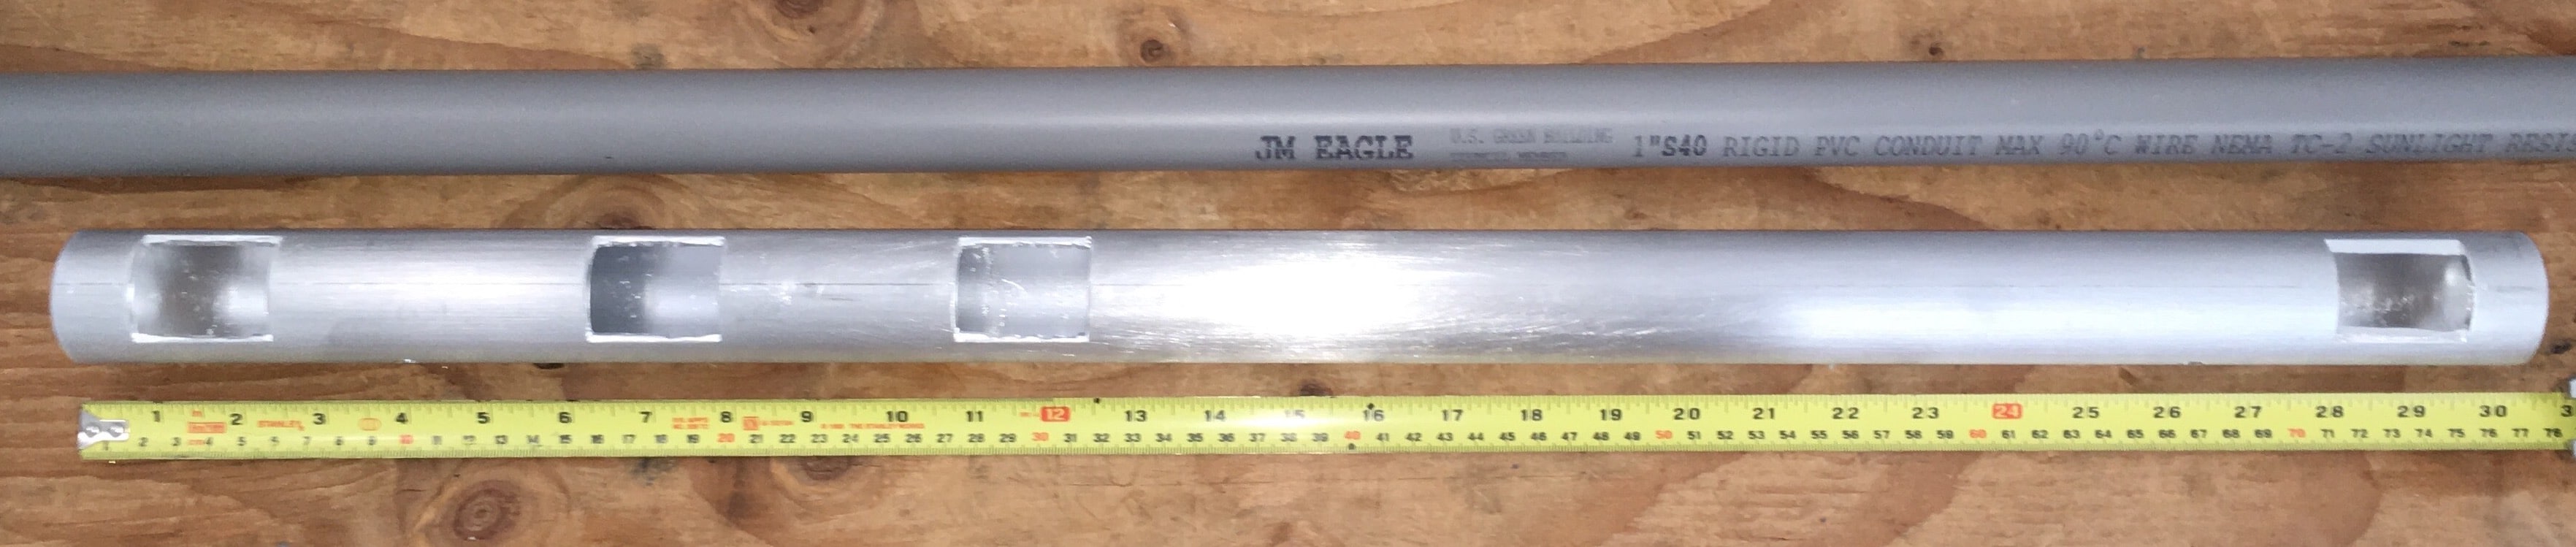
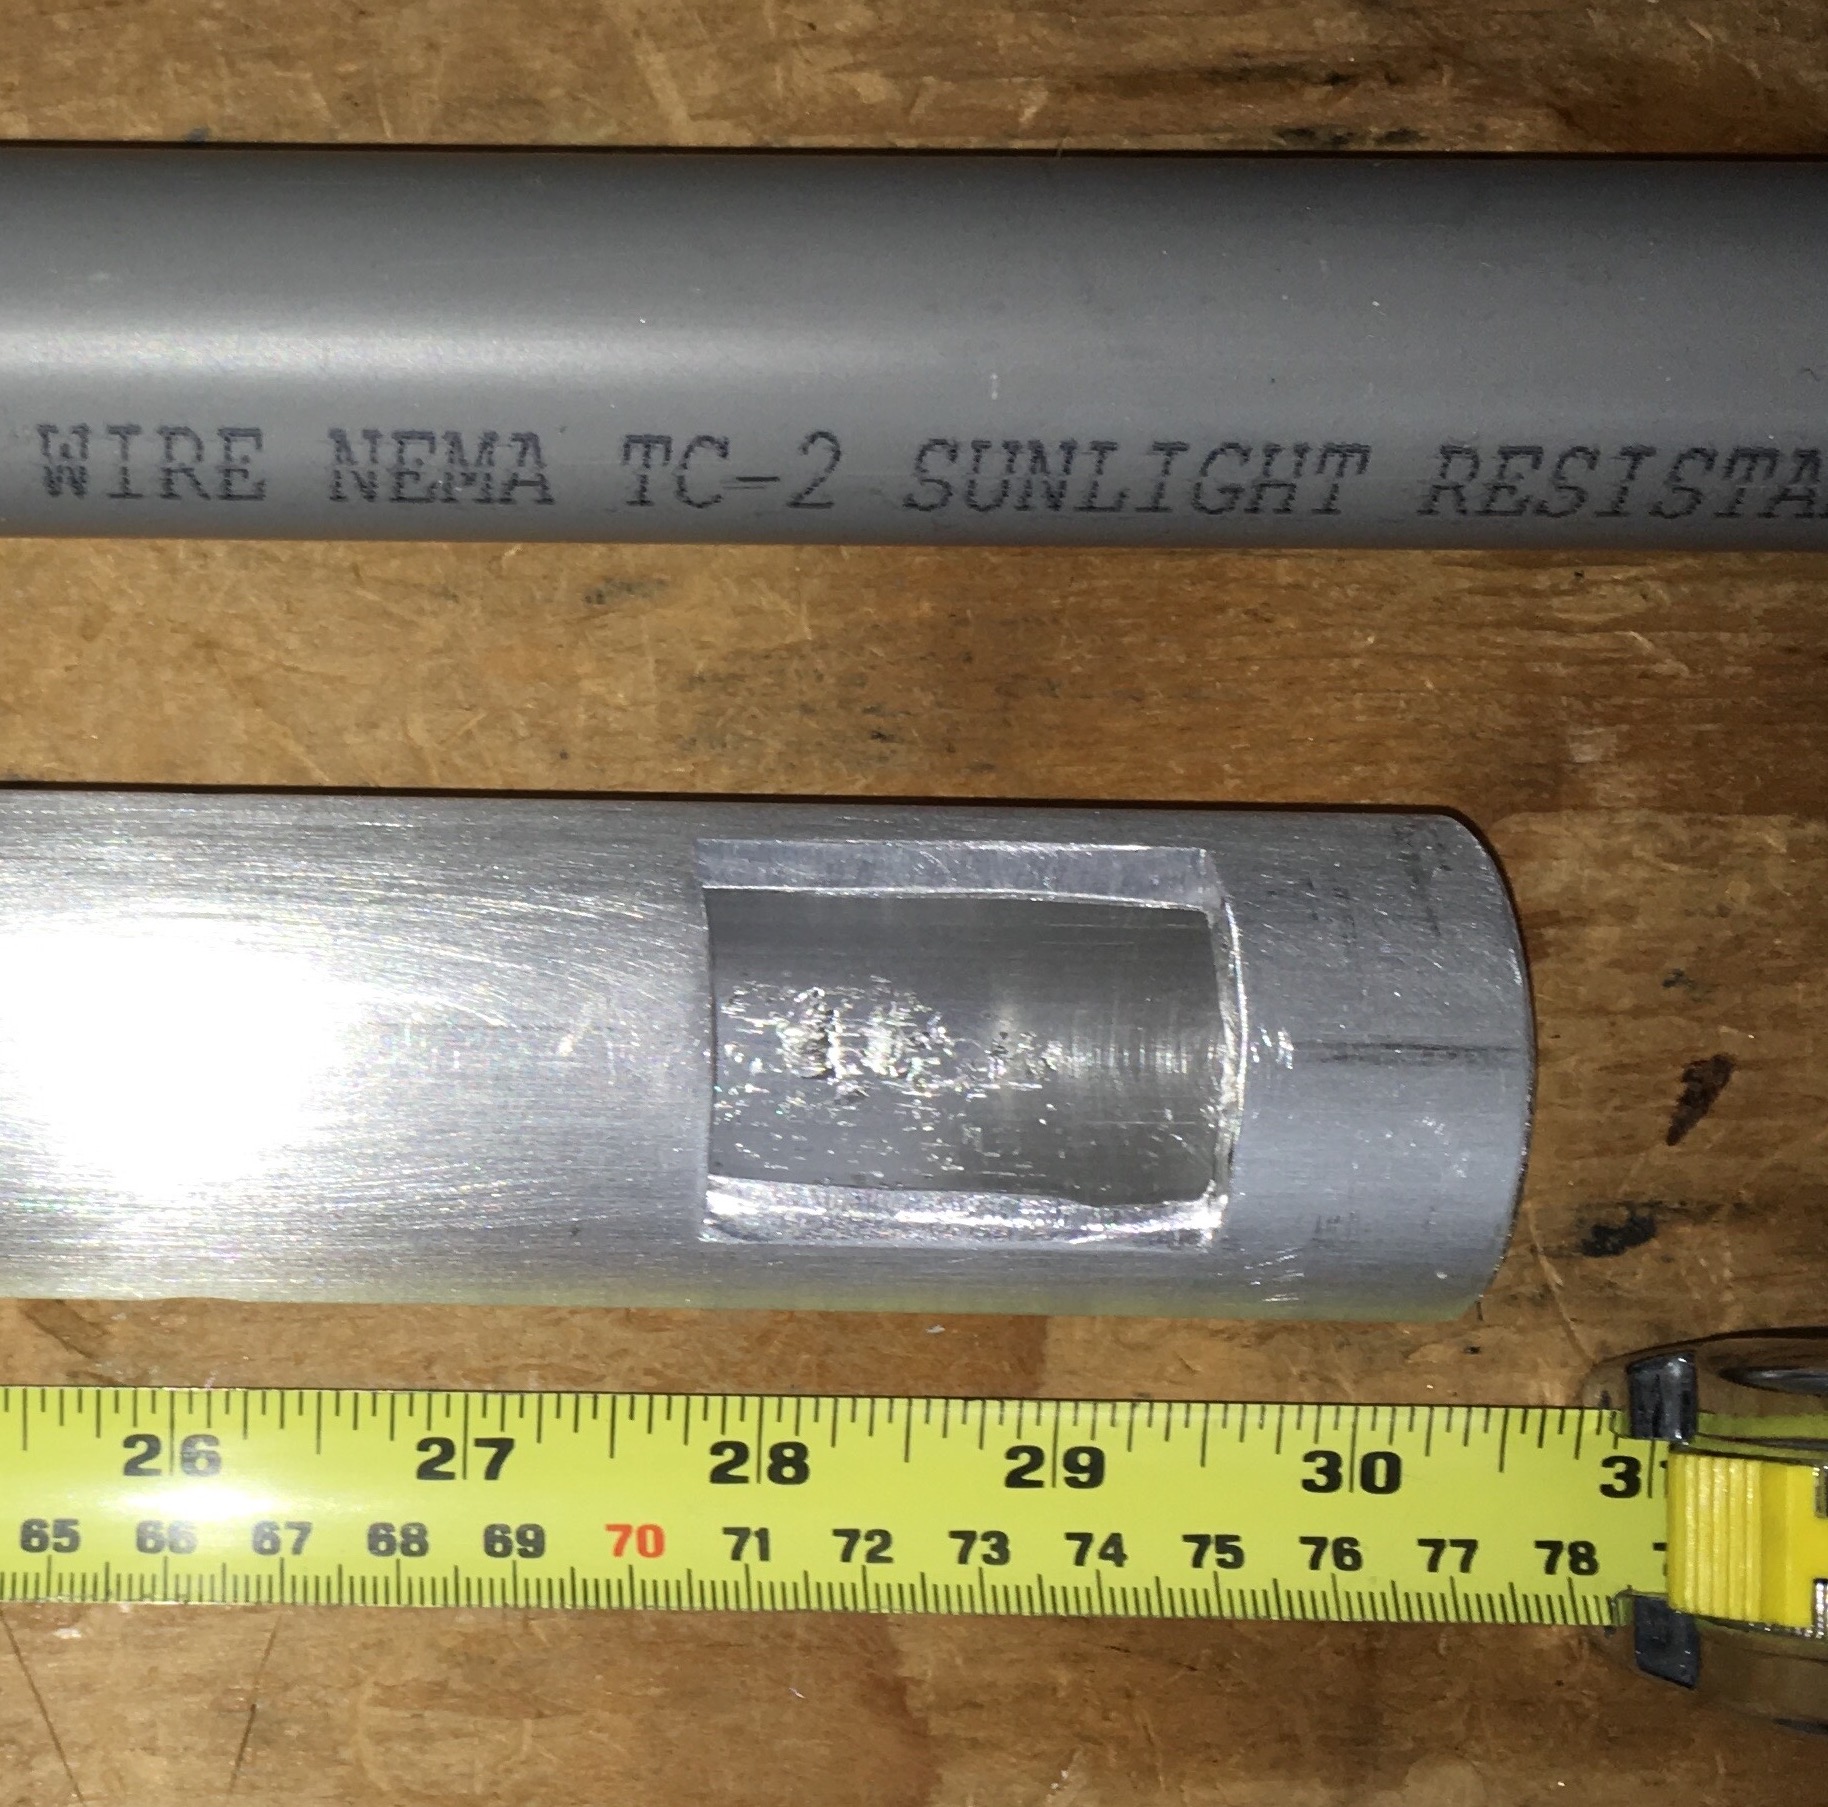
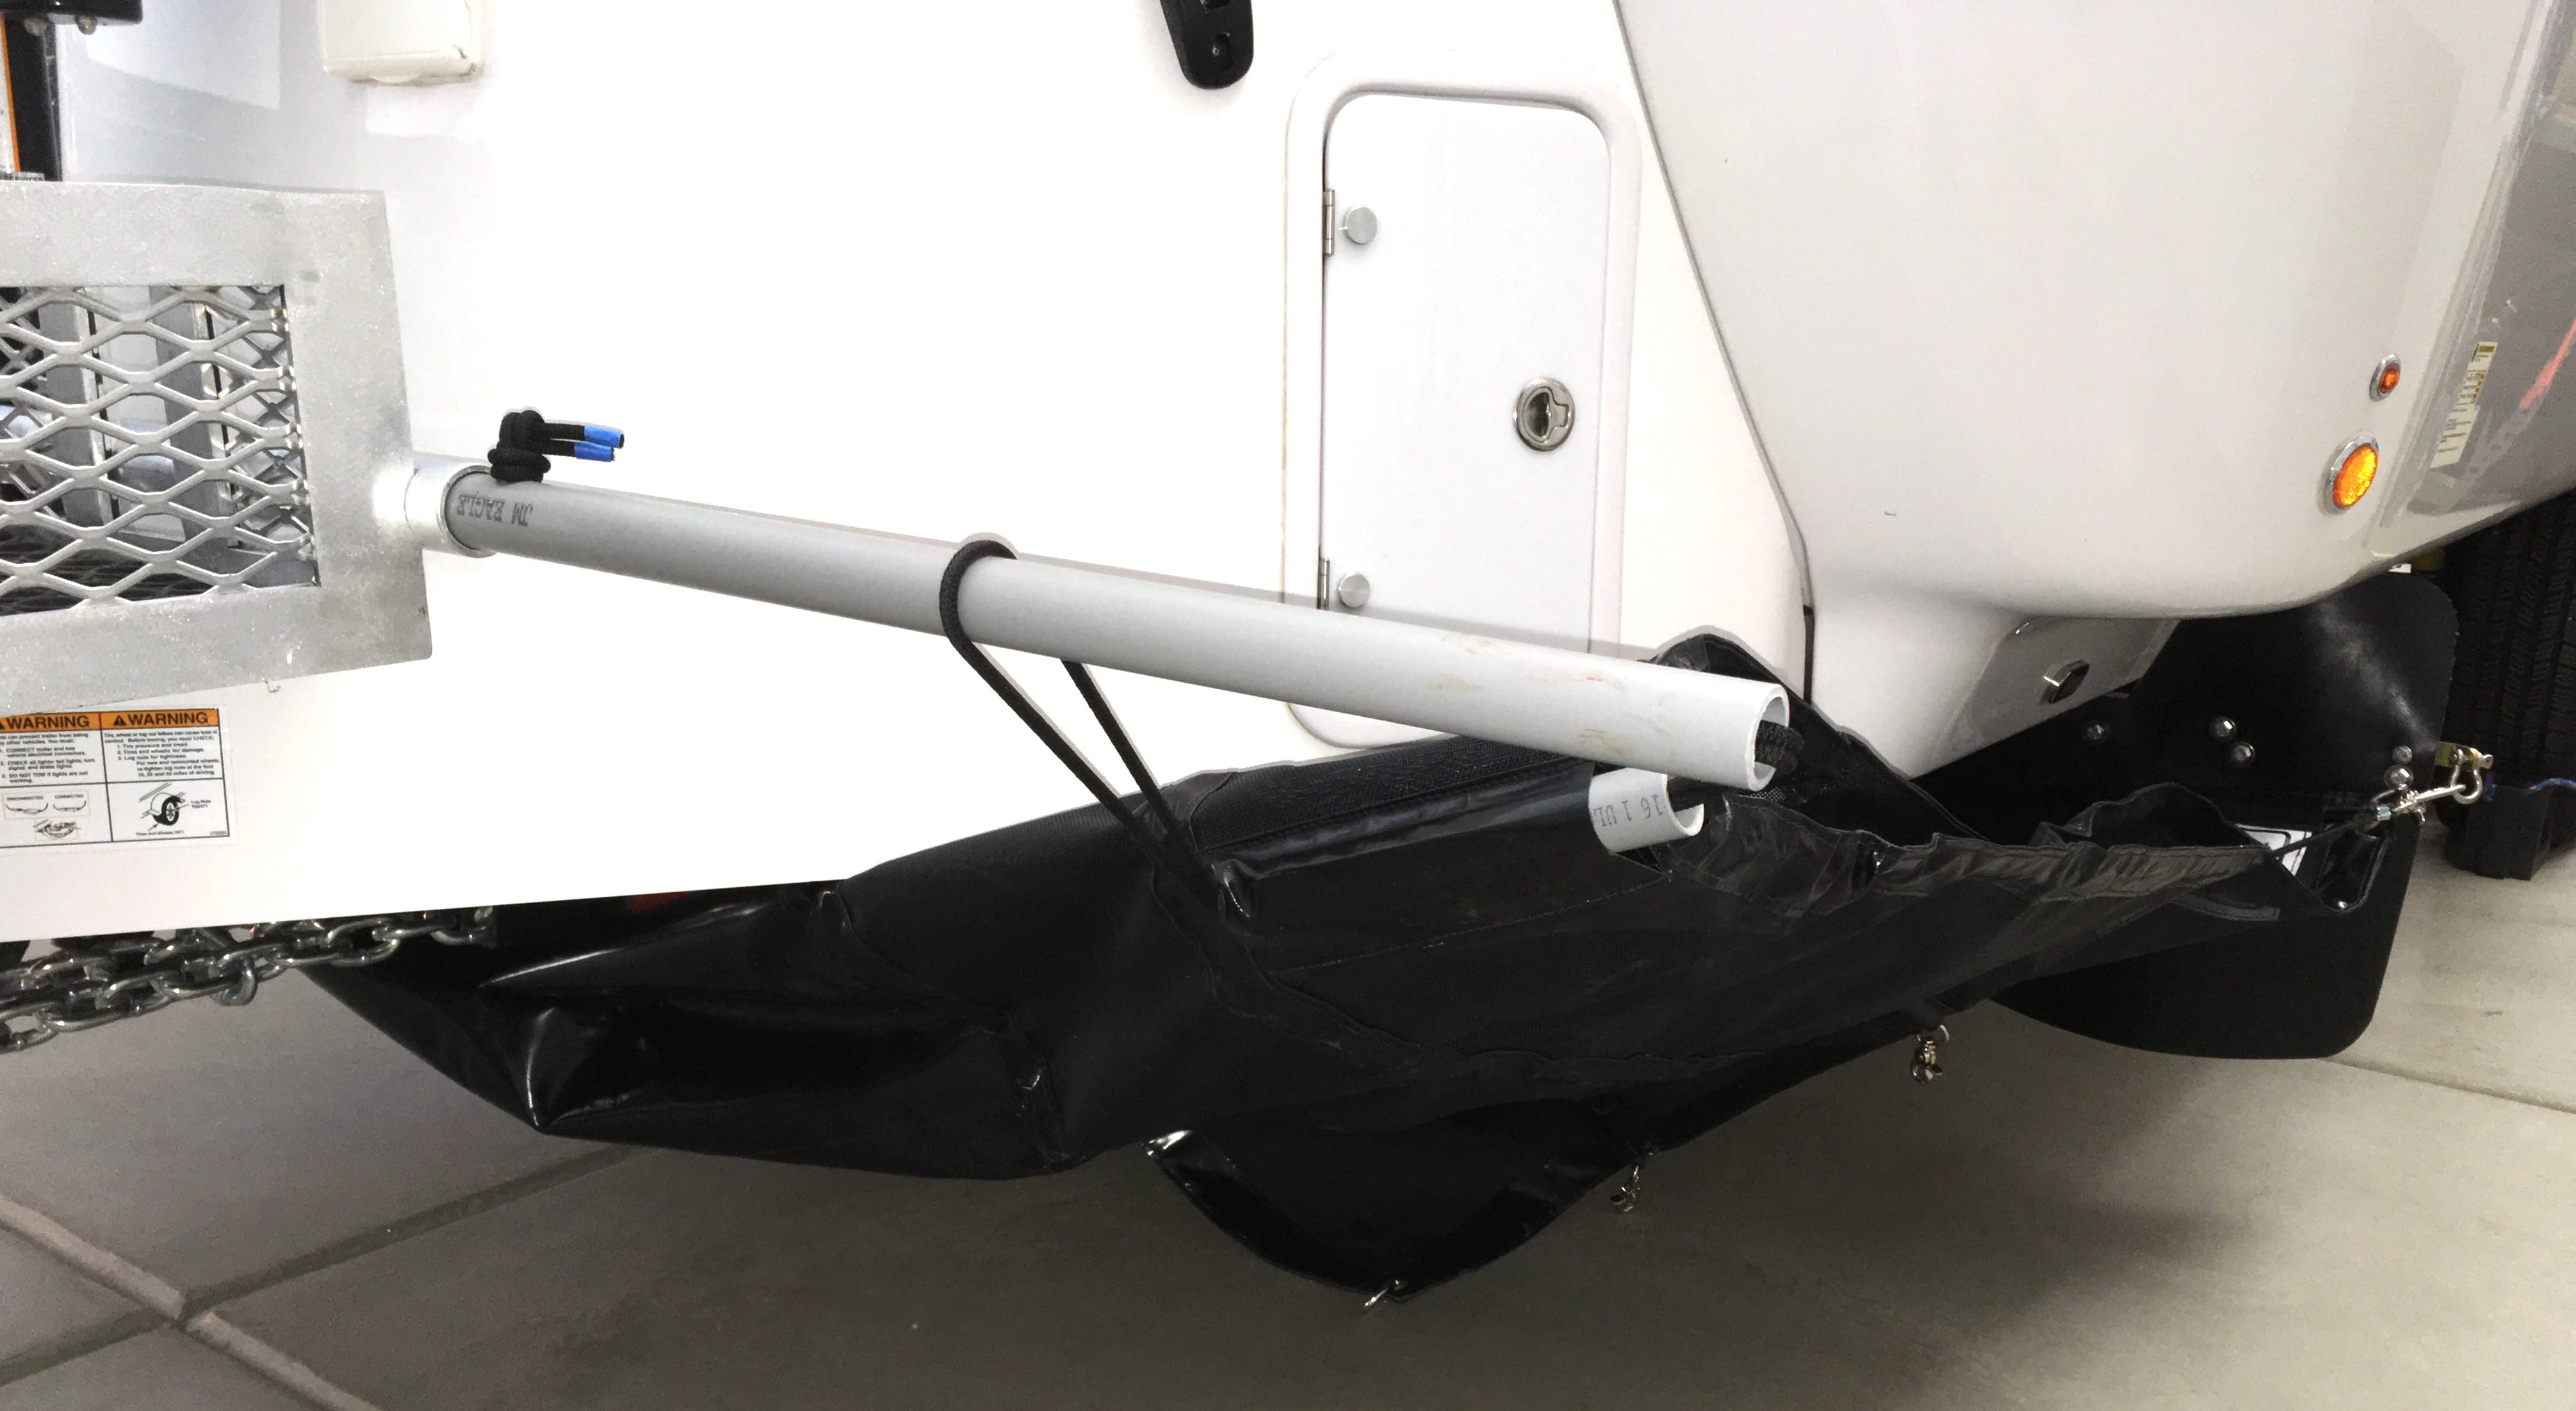
PART 4 EDIT 03/27/18 CENTER SUPPORT BAR The bar mount is made of 6062T6 aluminum tubing, 1 ¼ ID x 1/8 wall (Schedule 40). I had to cut and grind clearance pockets so that I could nest it in between the basket and the jack. It is a snug fit (needed to be tapped into place with a mallet) and is secured with four great big nylon cable ties. It is rock solid but quick to remove if needed, to remove the jack for example. I did not want to weld or drill into the basket. If you have access to a GOOD welder, a permanent welded join would be better overall. But you would have to remove the basket for jack access. Detail showing the two plastic inserts that go in the mesh sleeves (9.25”) and the two main support tubes (36.25”). They are ground to clear the basket frame, I drilled then for retaining pins but I do not think they will be needed. MORE TO COME. John Davies Spokane WA
-
HOW TO: Stone Stomper Gravel Guard.
John E Davies replied to John E Davies's topic in Towing an Oliver
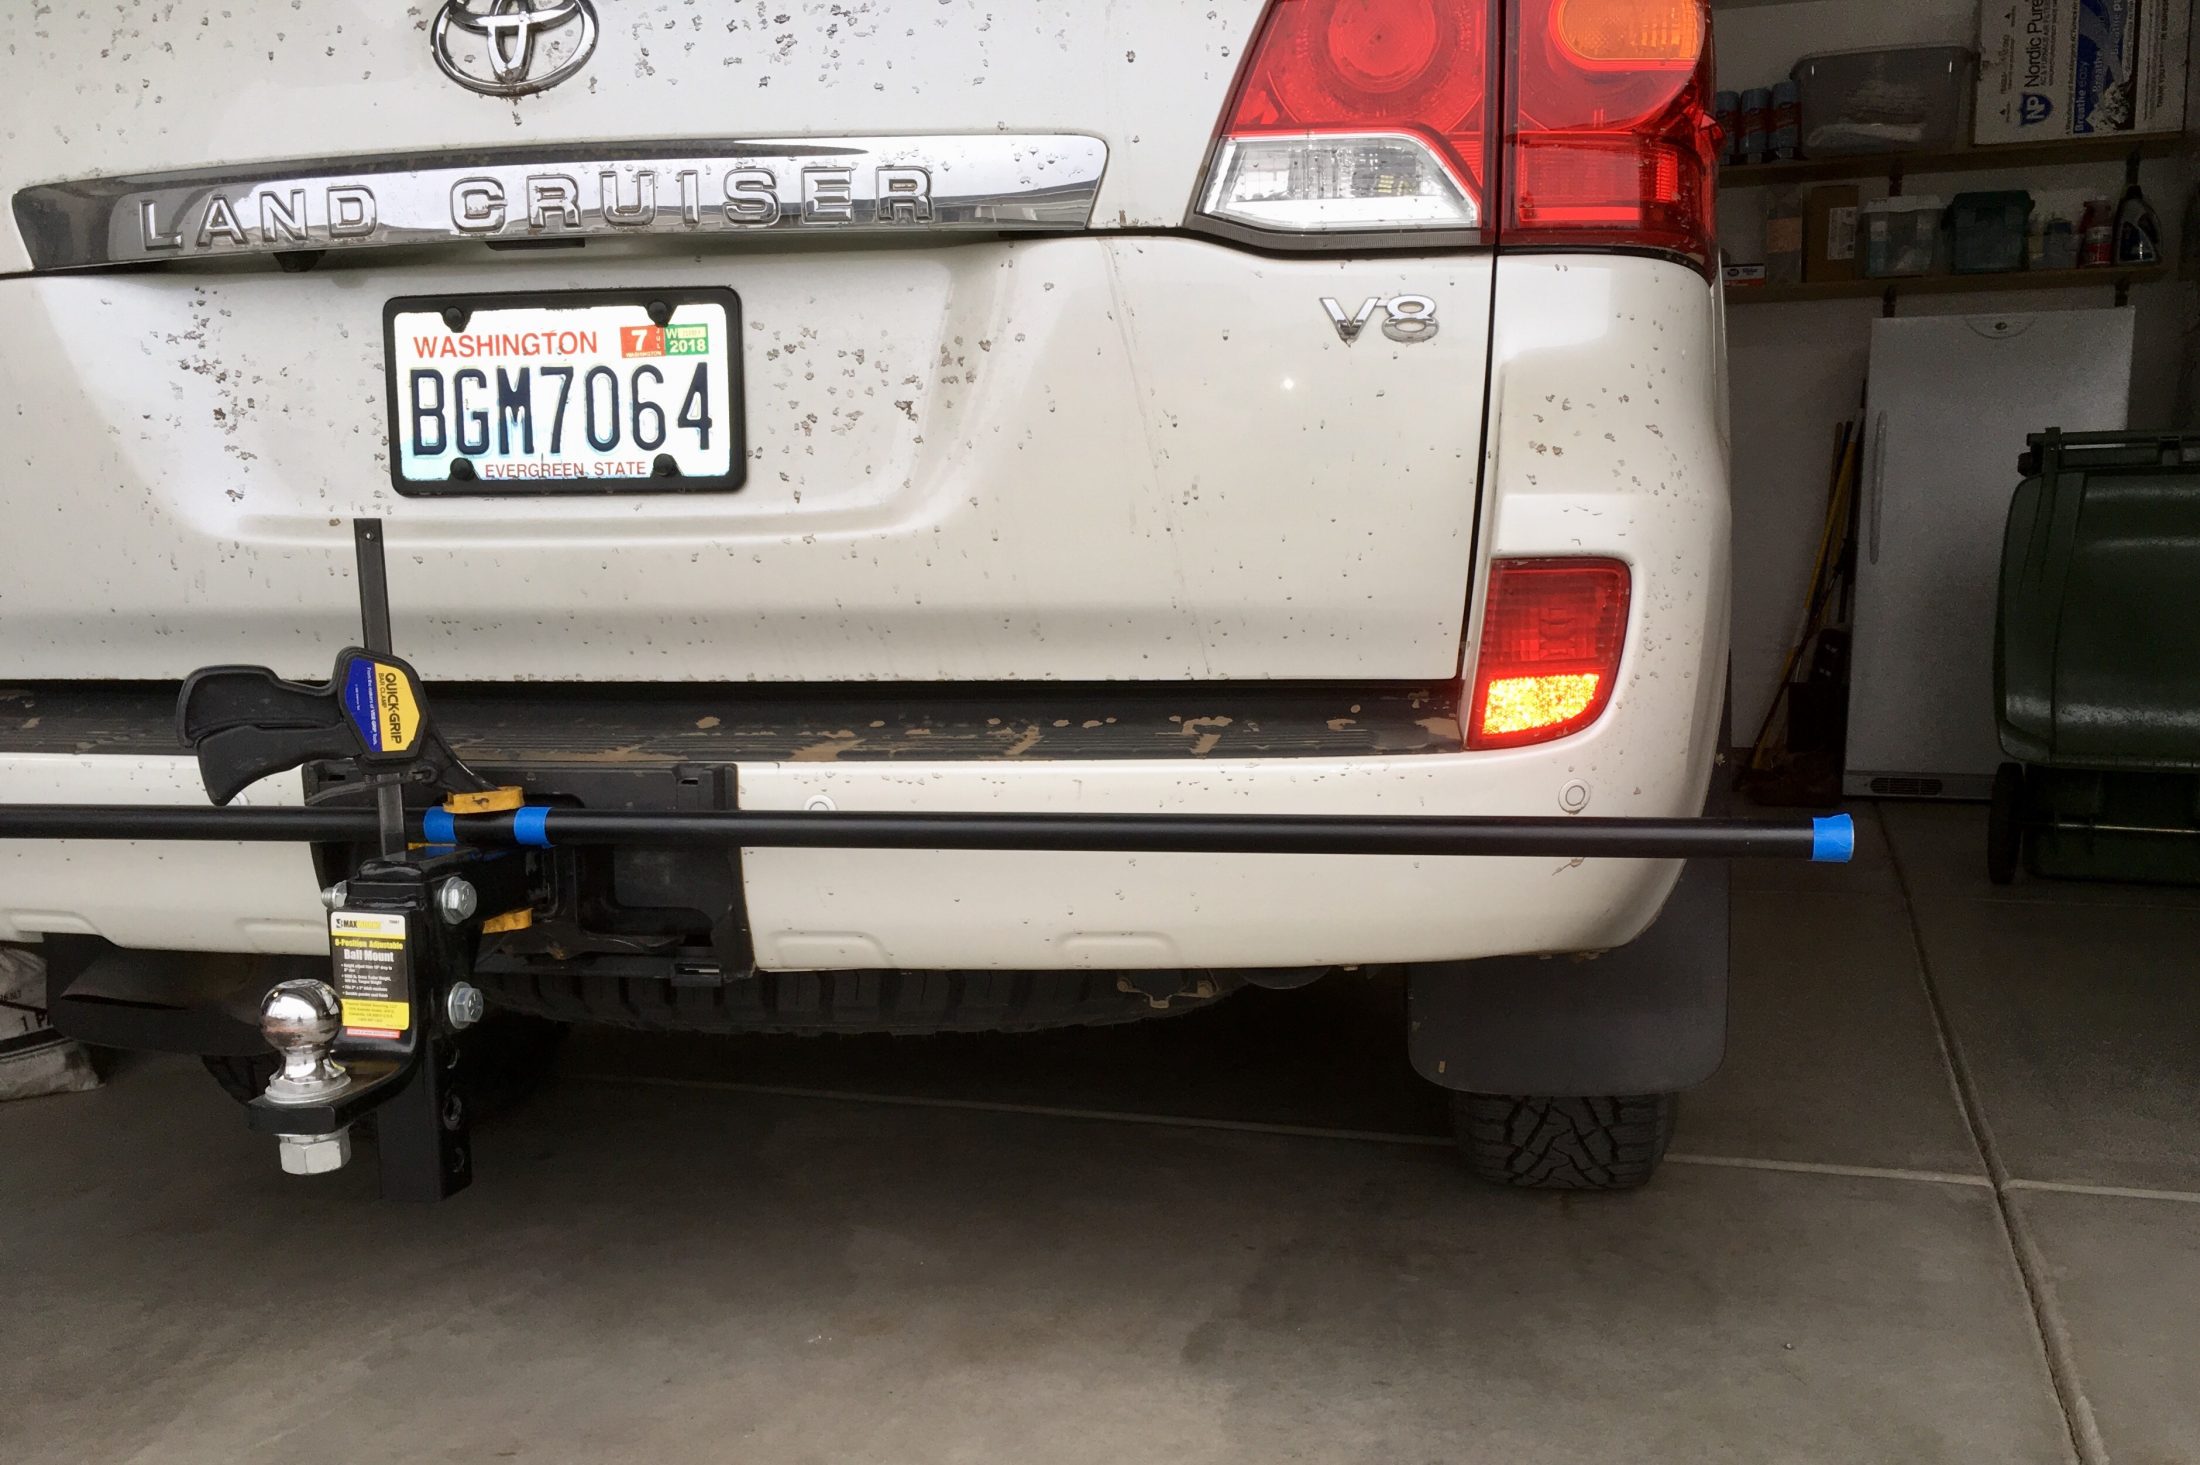
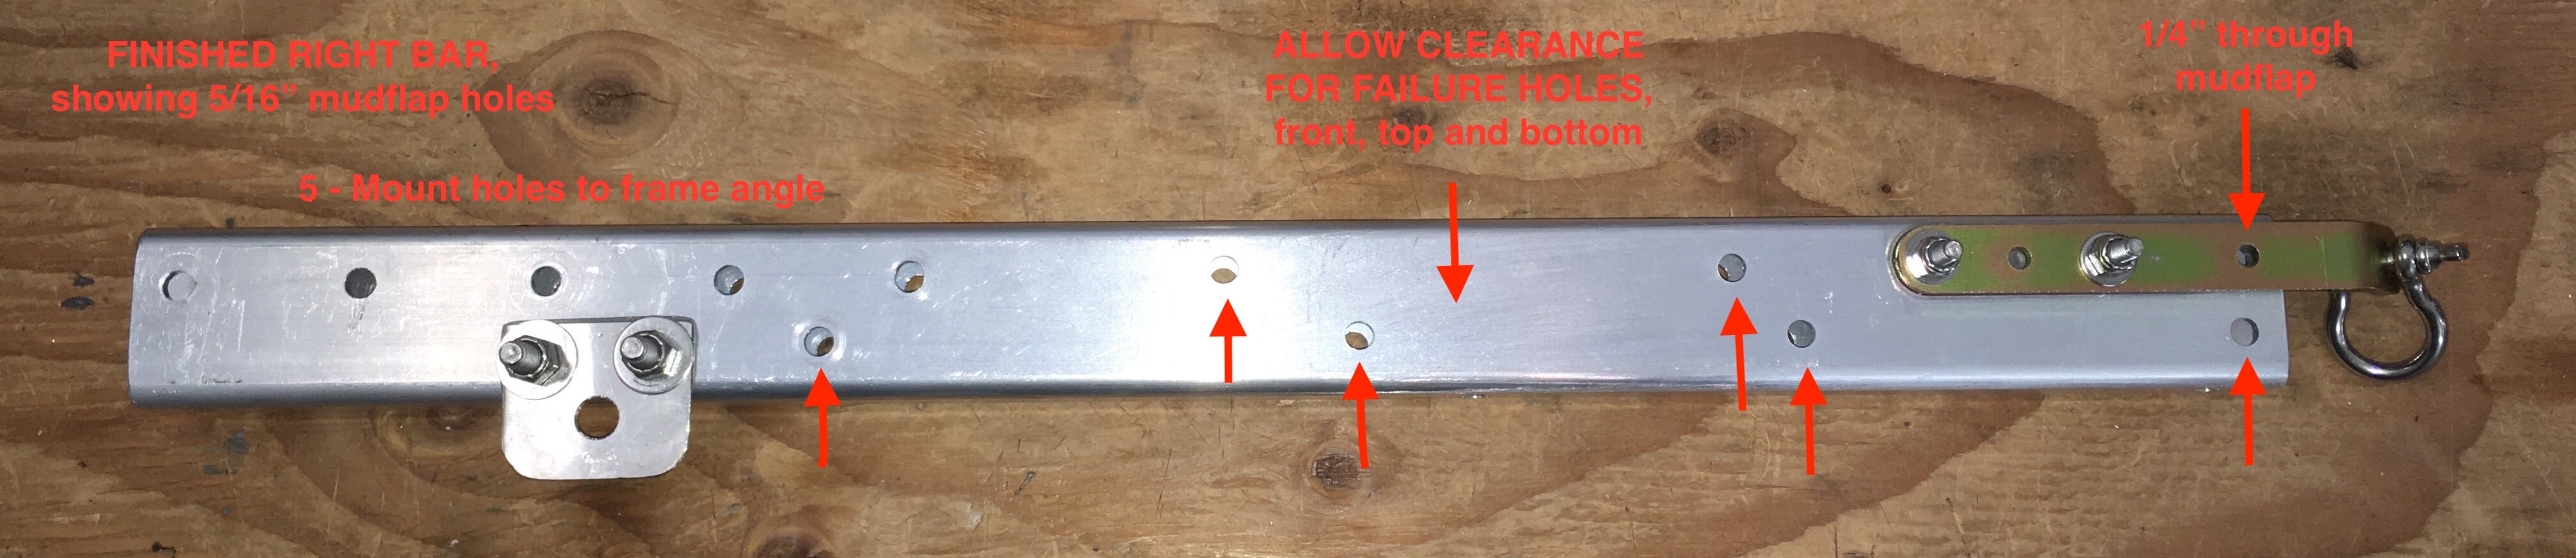
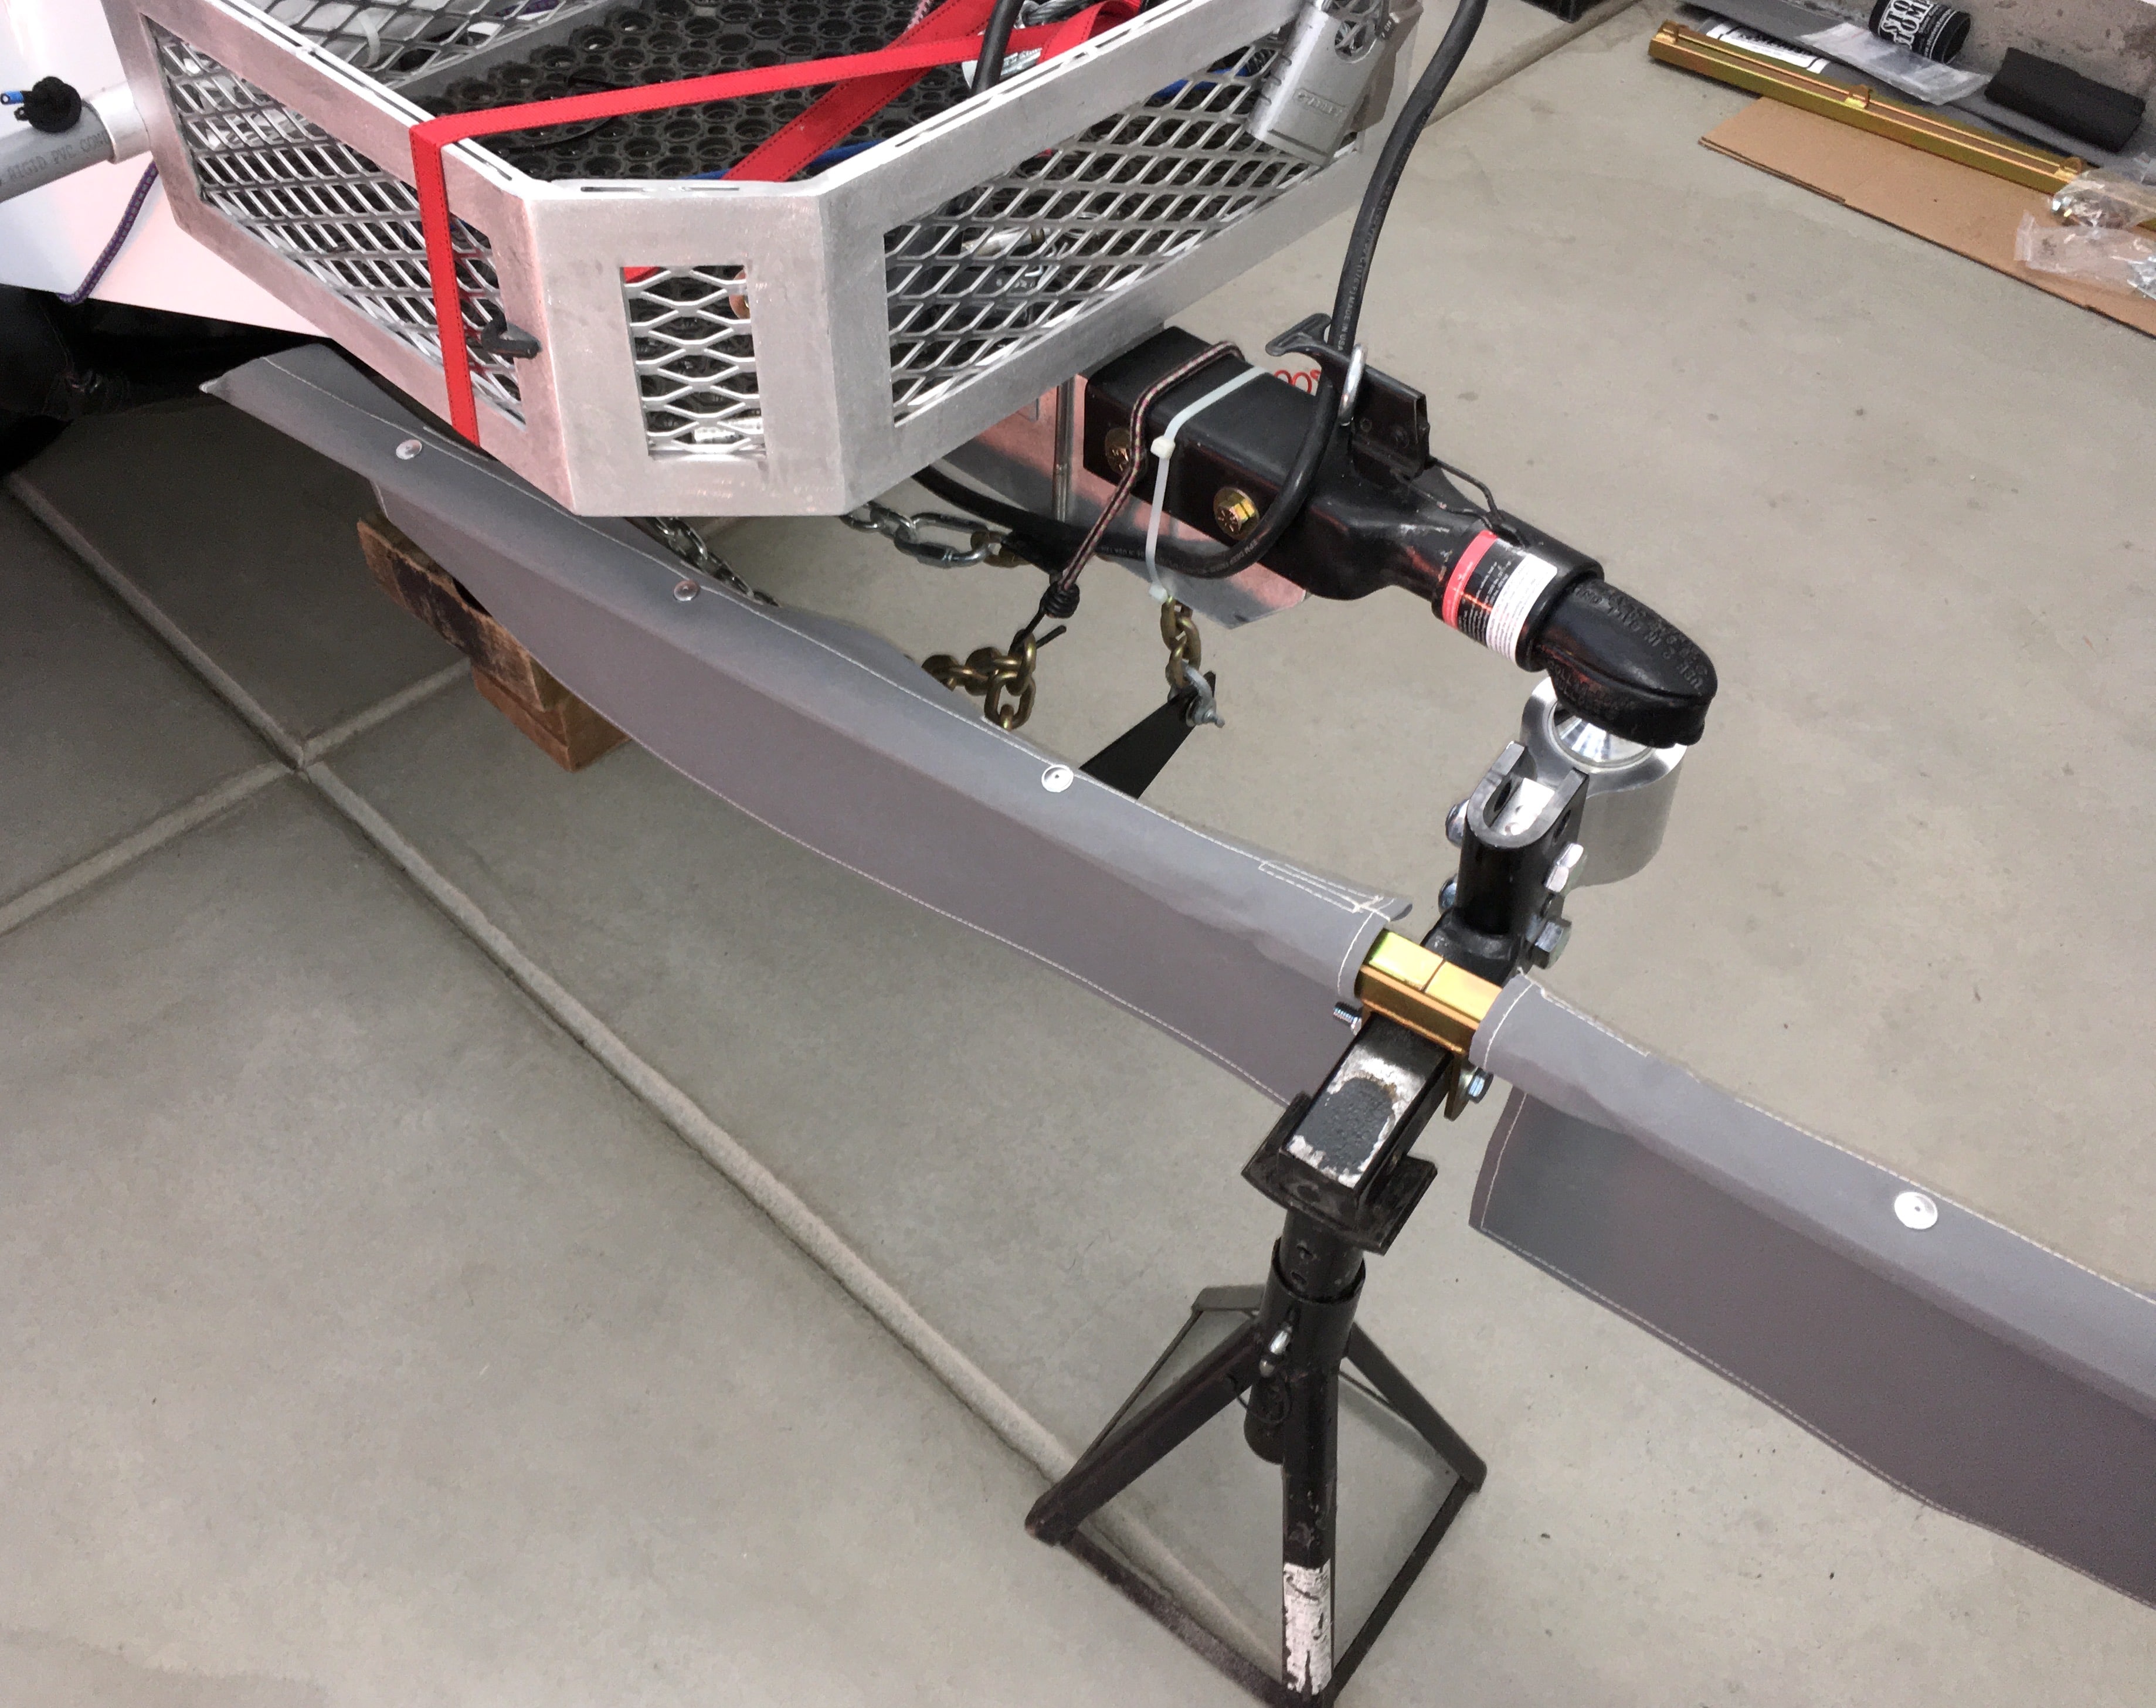
PART 3 EDIT 03/27/18 FRONT BAR DETAILS The steel bar on my SS is 2 meters end to end and it does clear my storage basket at full “jackknife”, a position I would never achieve. My rear bumper and quarter panel would hit first. Views of the front bar and hitch connected to the Land Cruiser. The sleeves are installed and they are longer than the bar itself, which extends out just past the width of the sidewalls of the rear tires. For more on this, refer to the pics at the end of the thread. MORE TO COME. John Davies Spokane WA
-
HOW TO: Stone Stomper Gravel Guard.
John E Davies replied to John E Davies's topic in Towing an Oliver
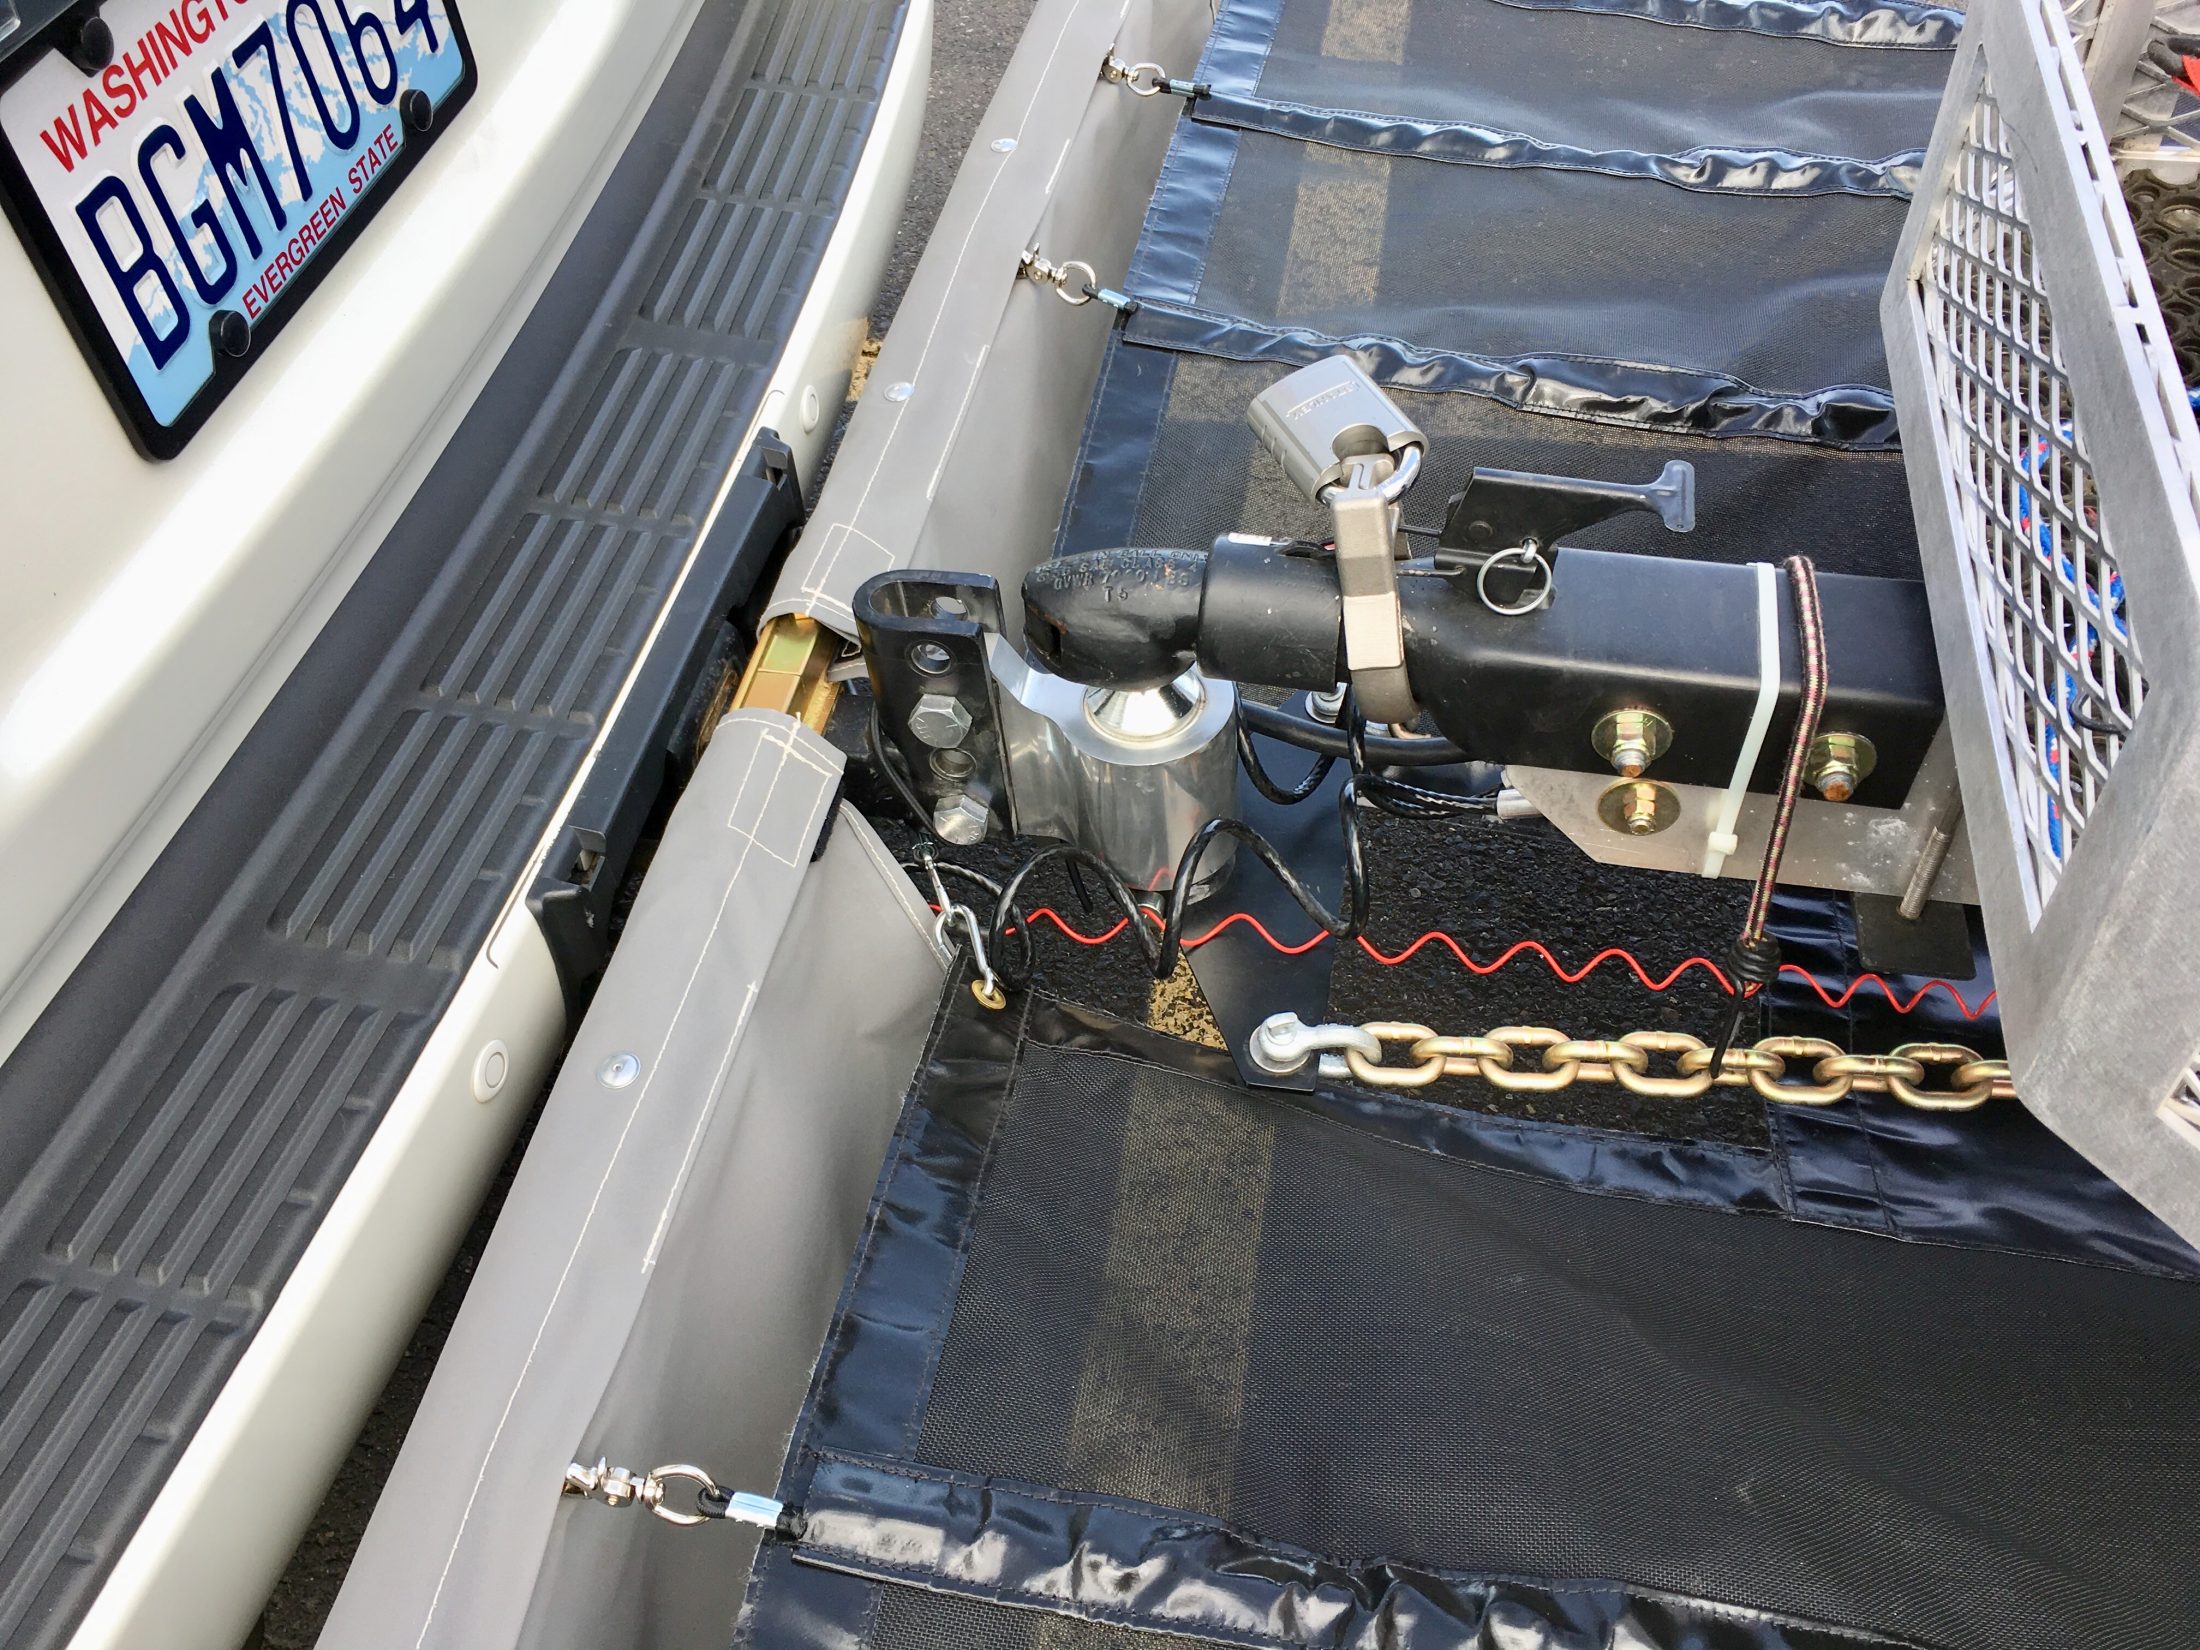
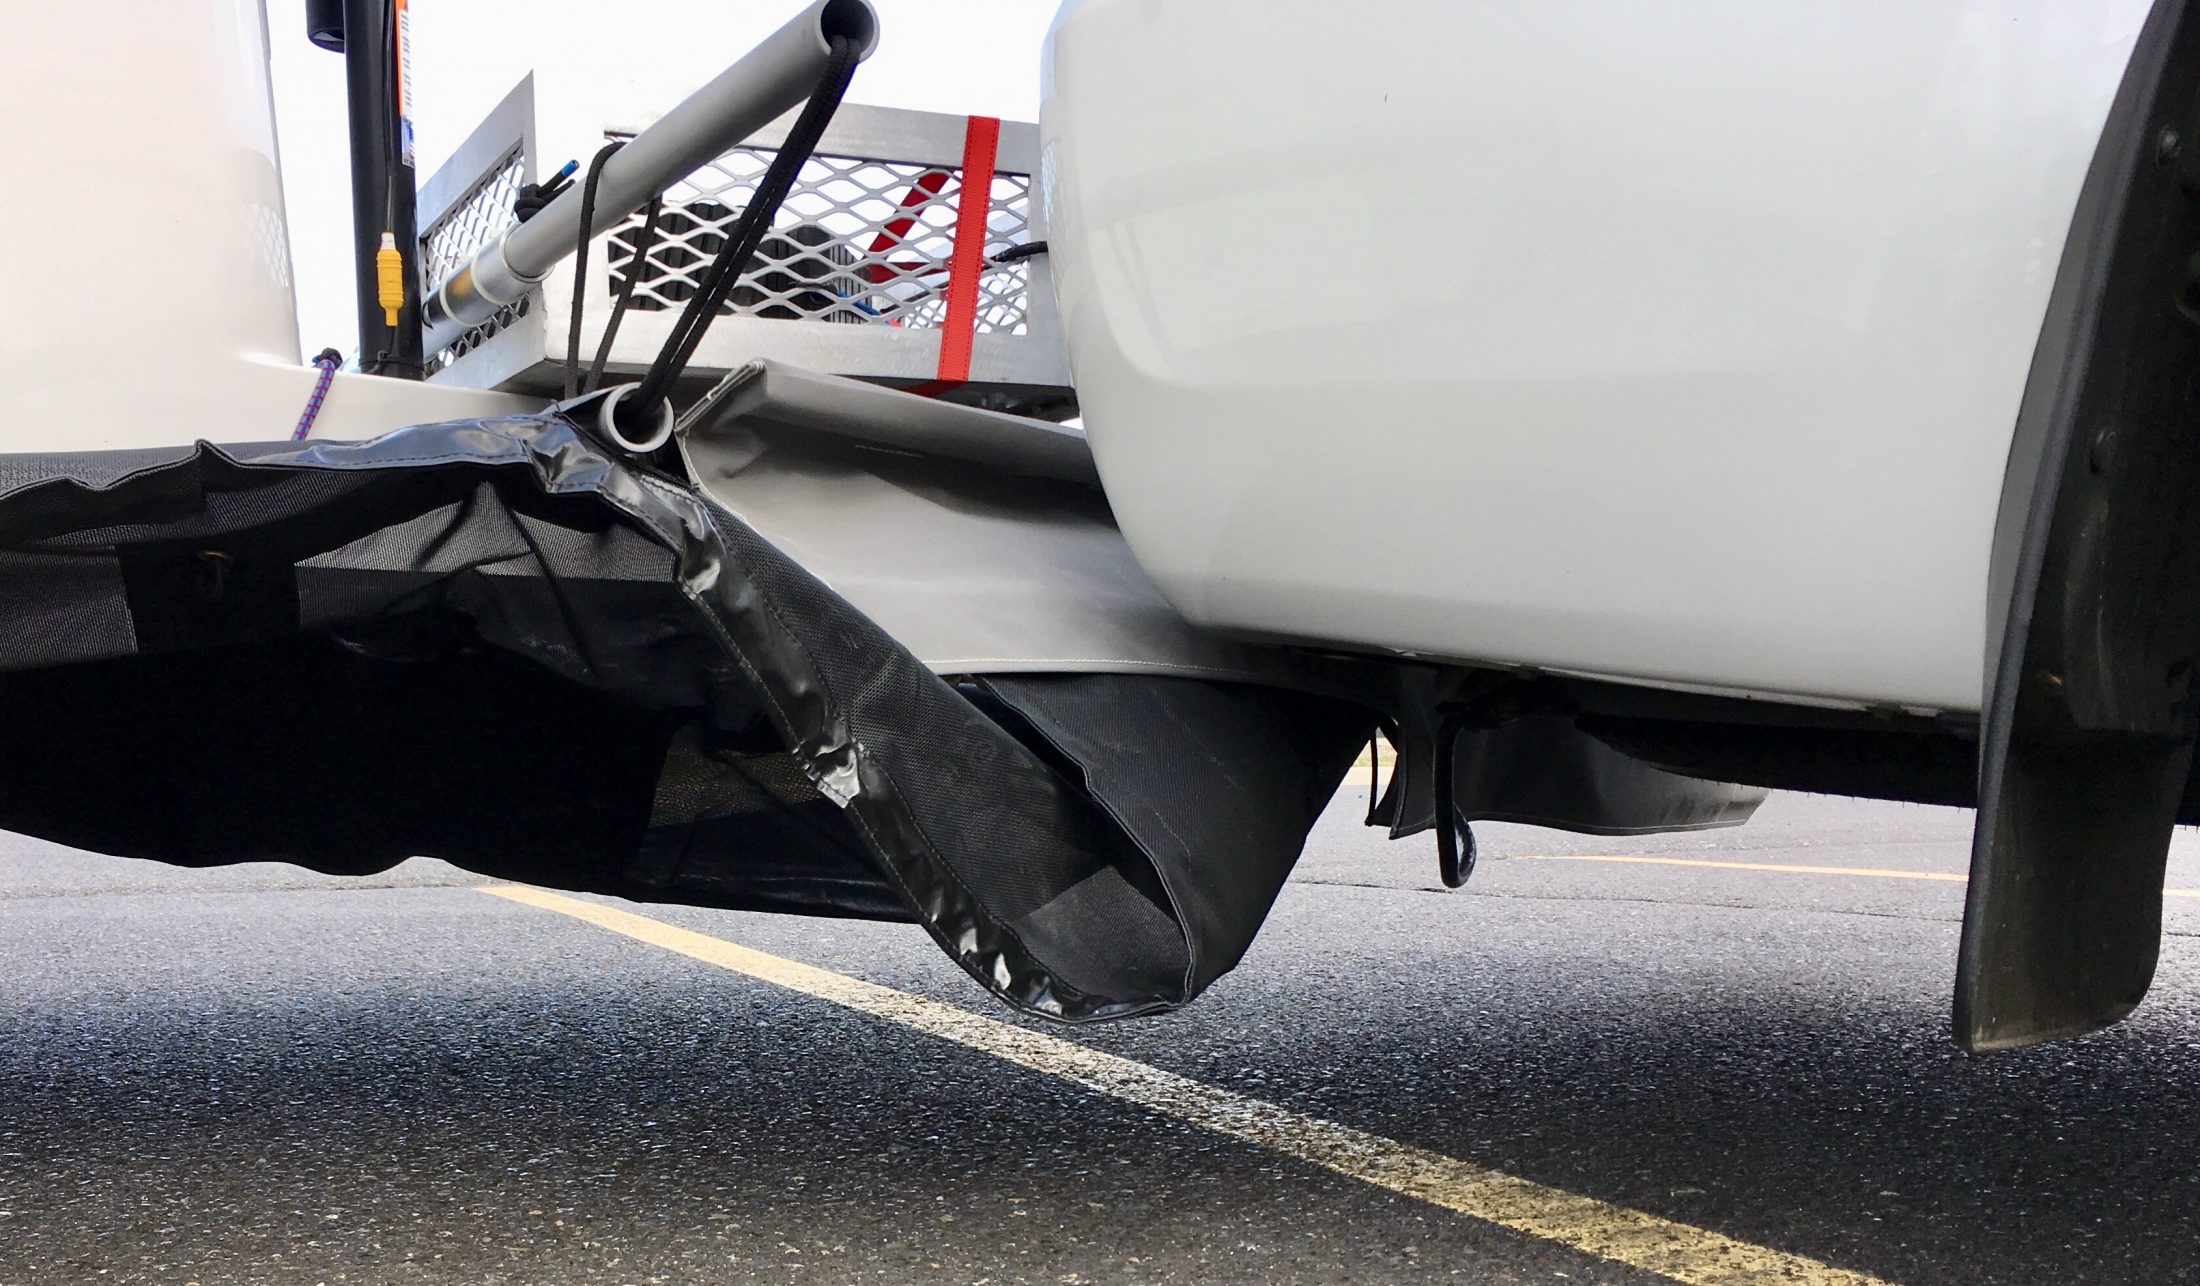
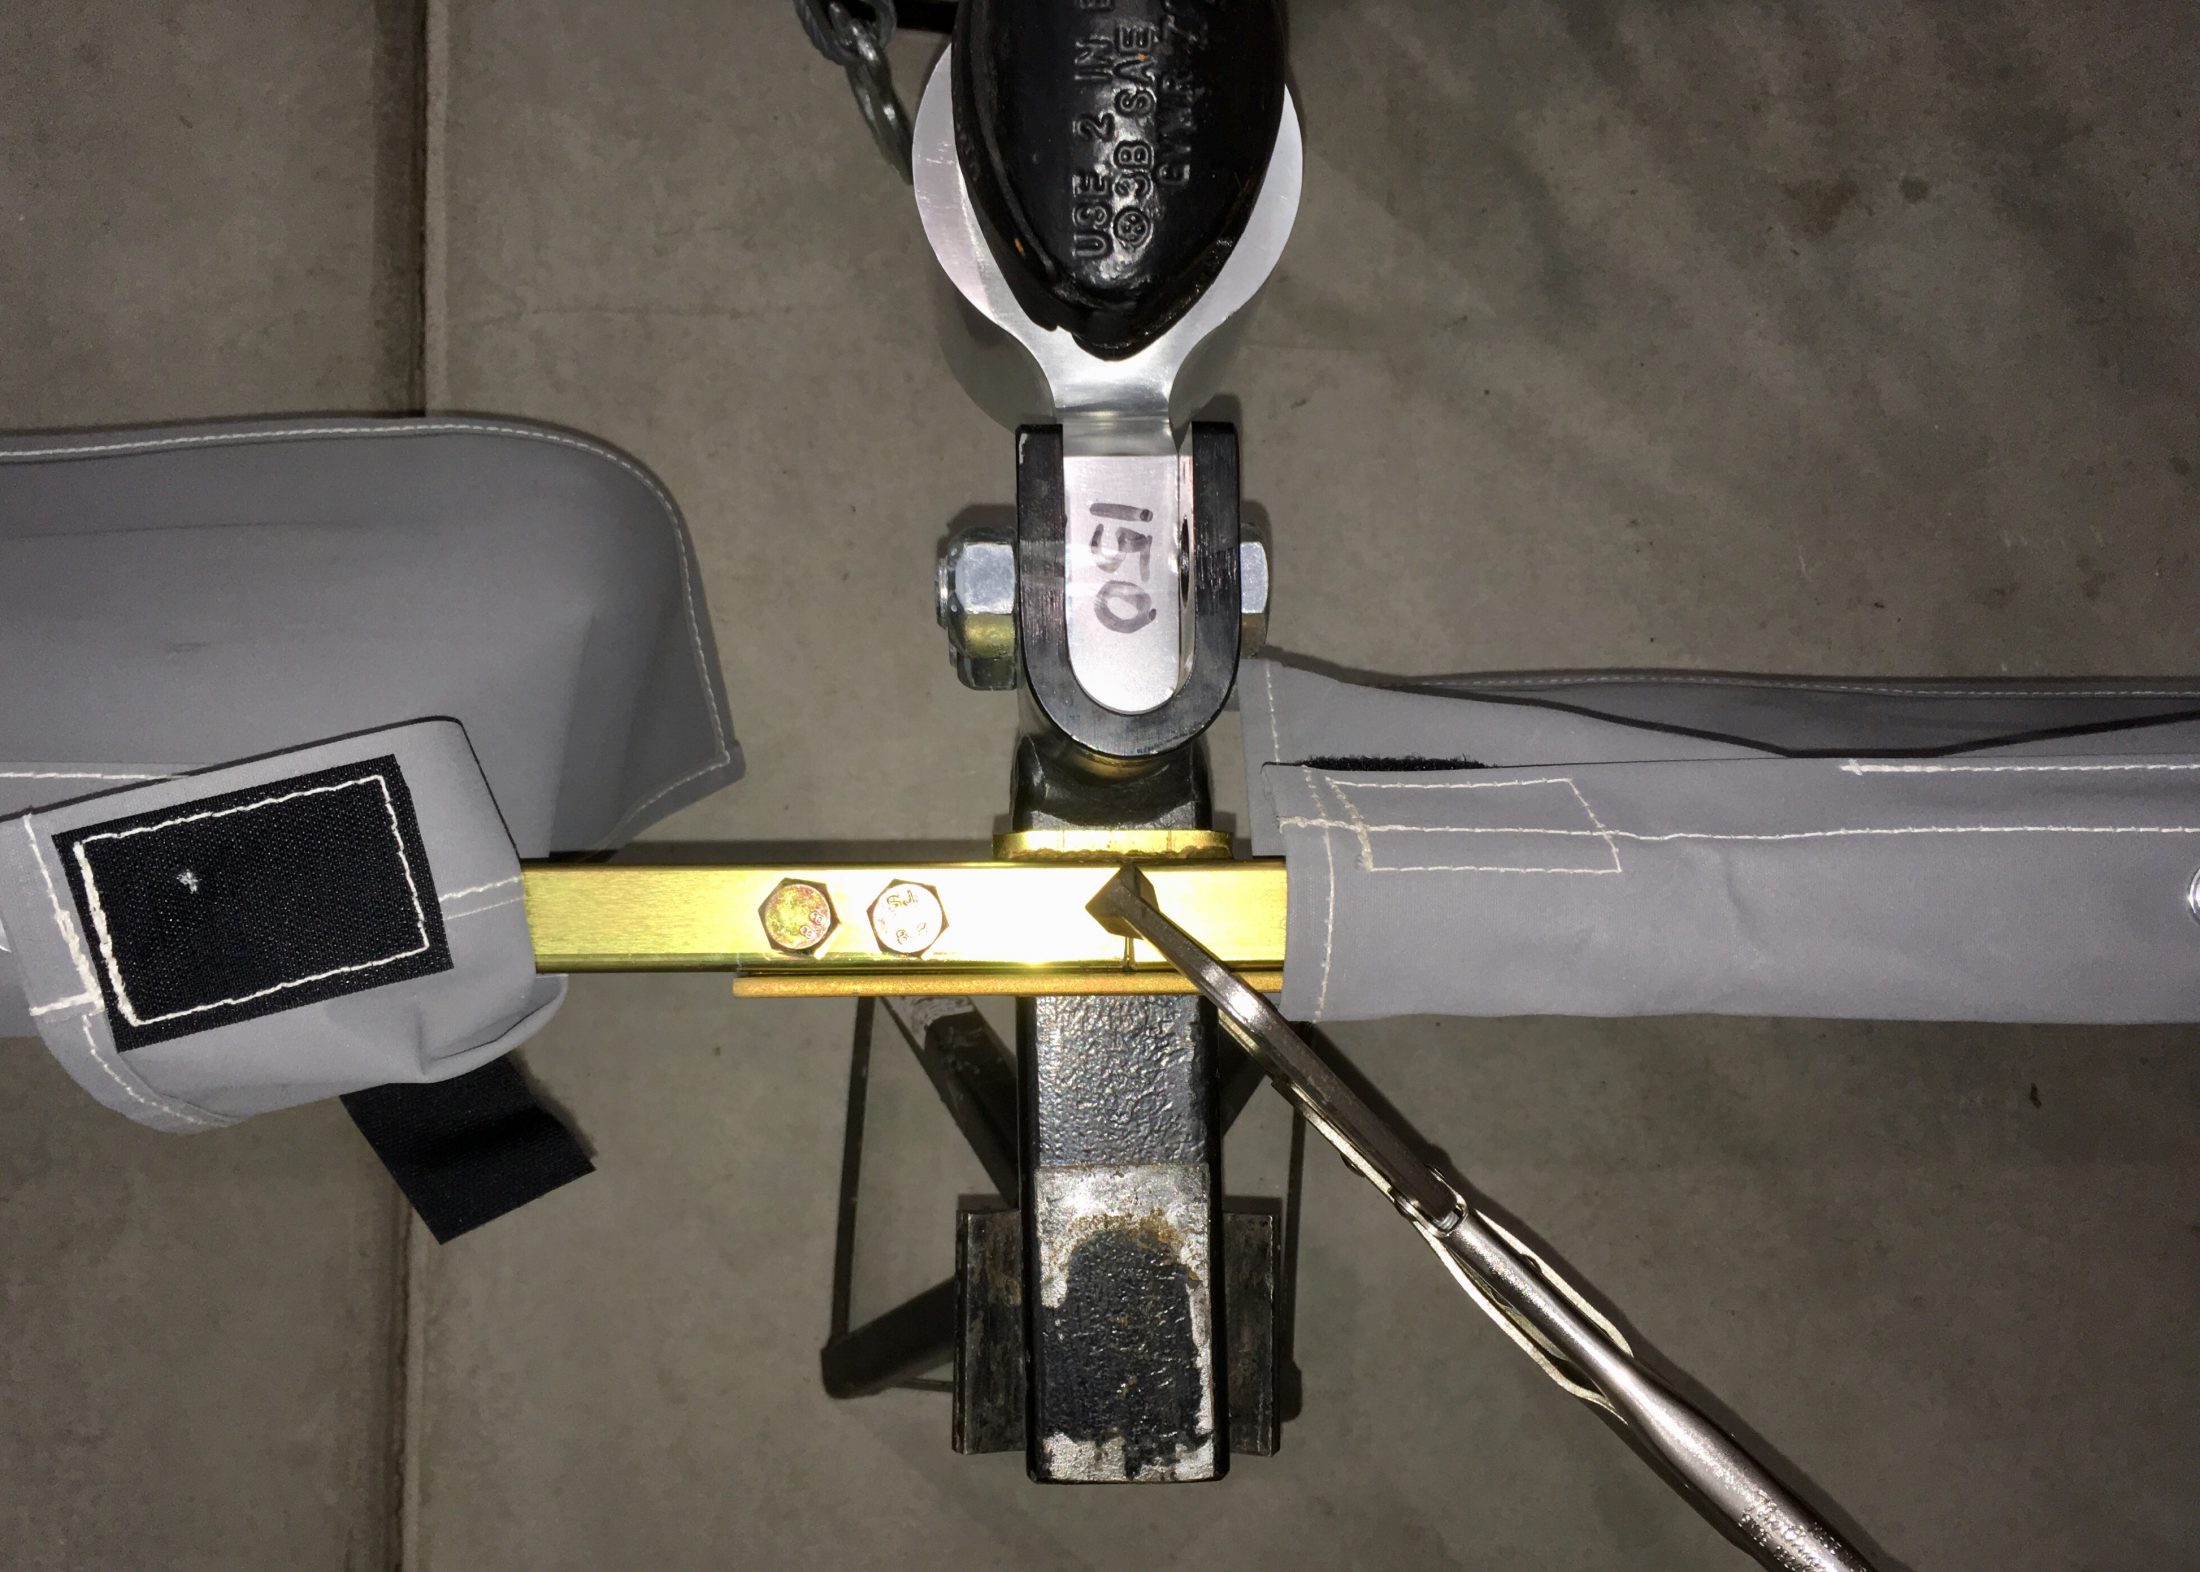
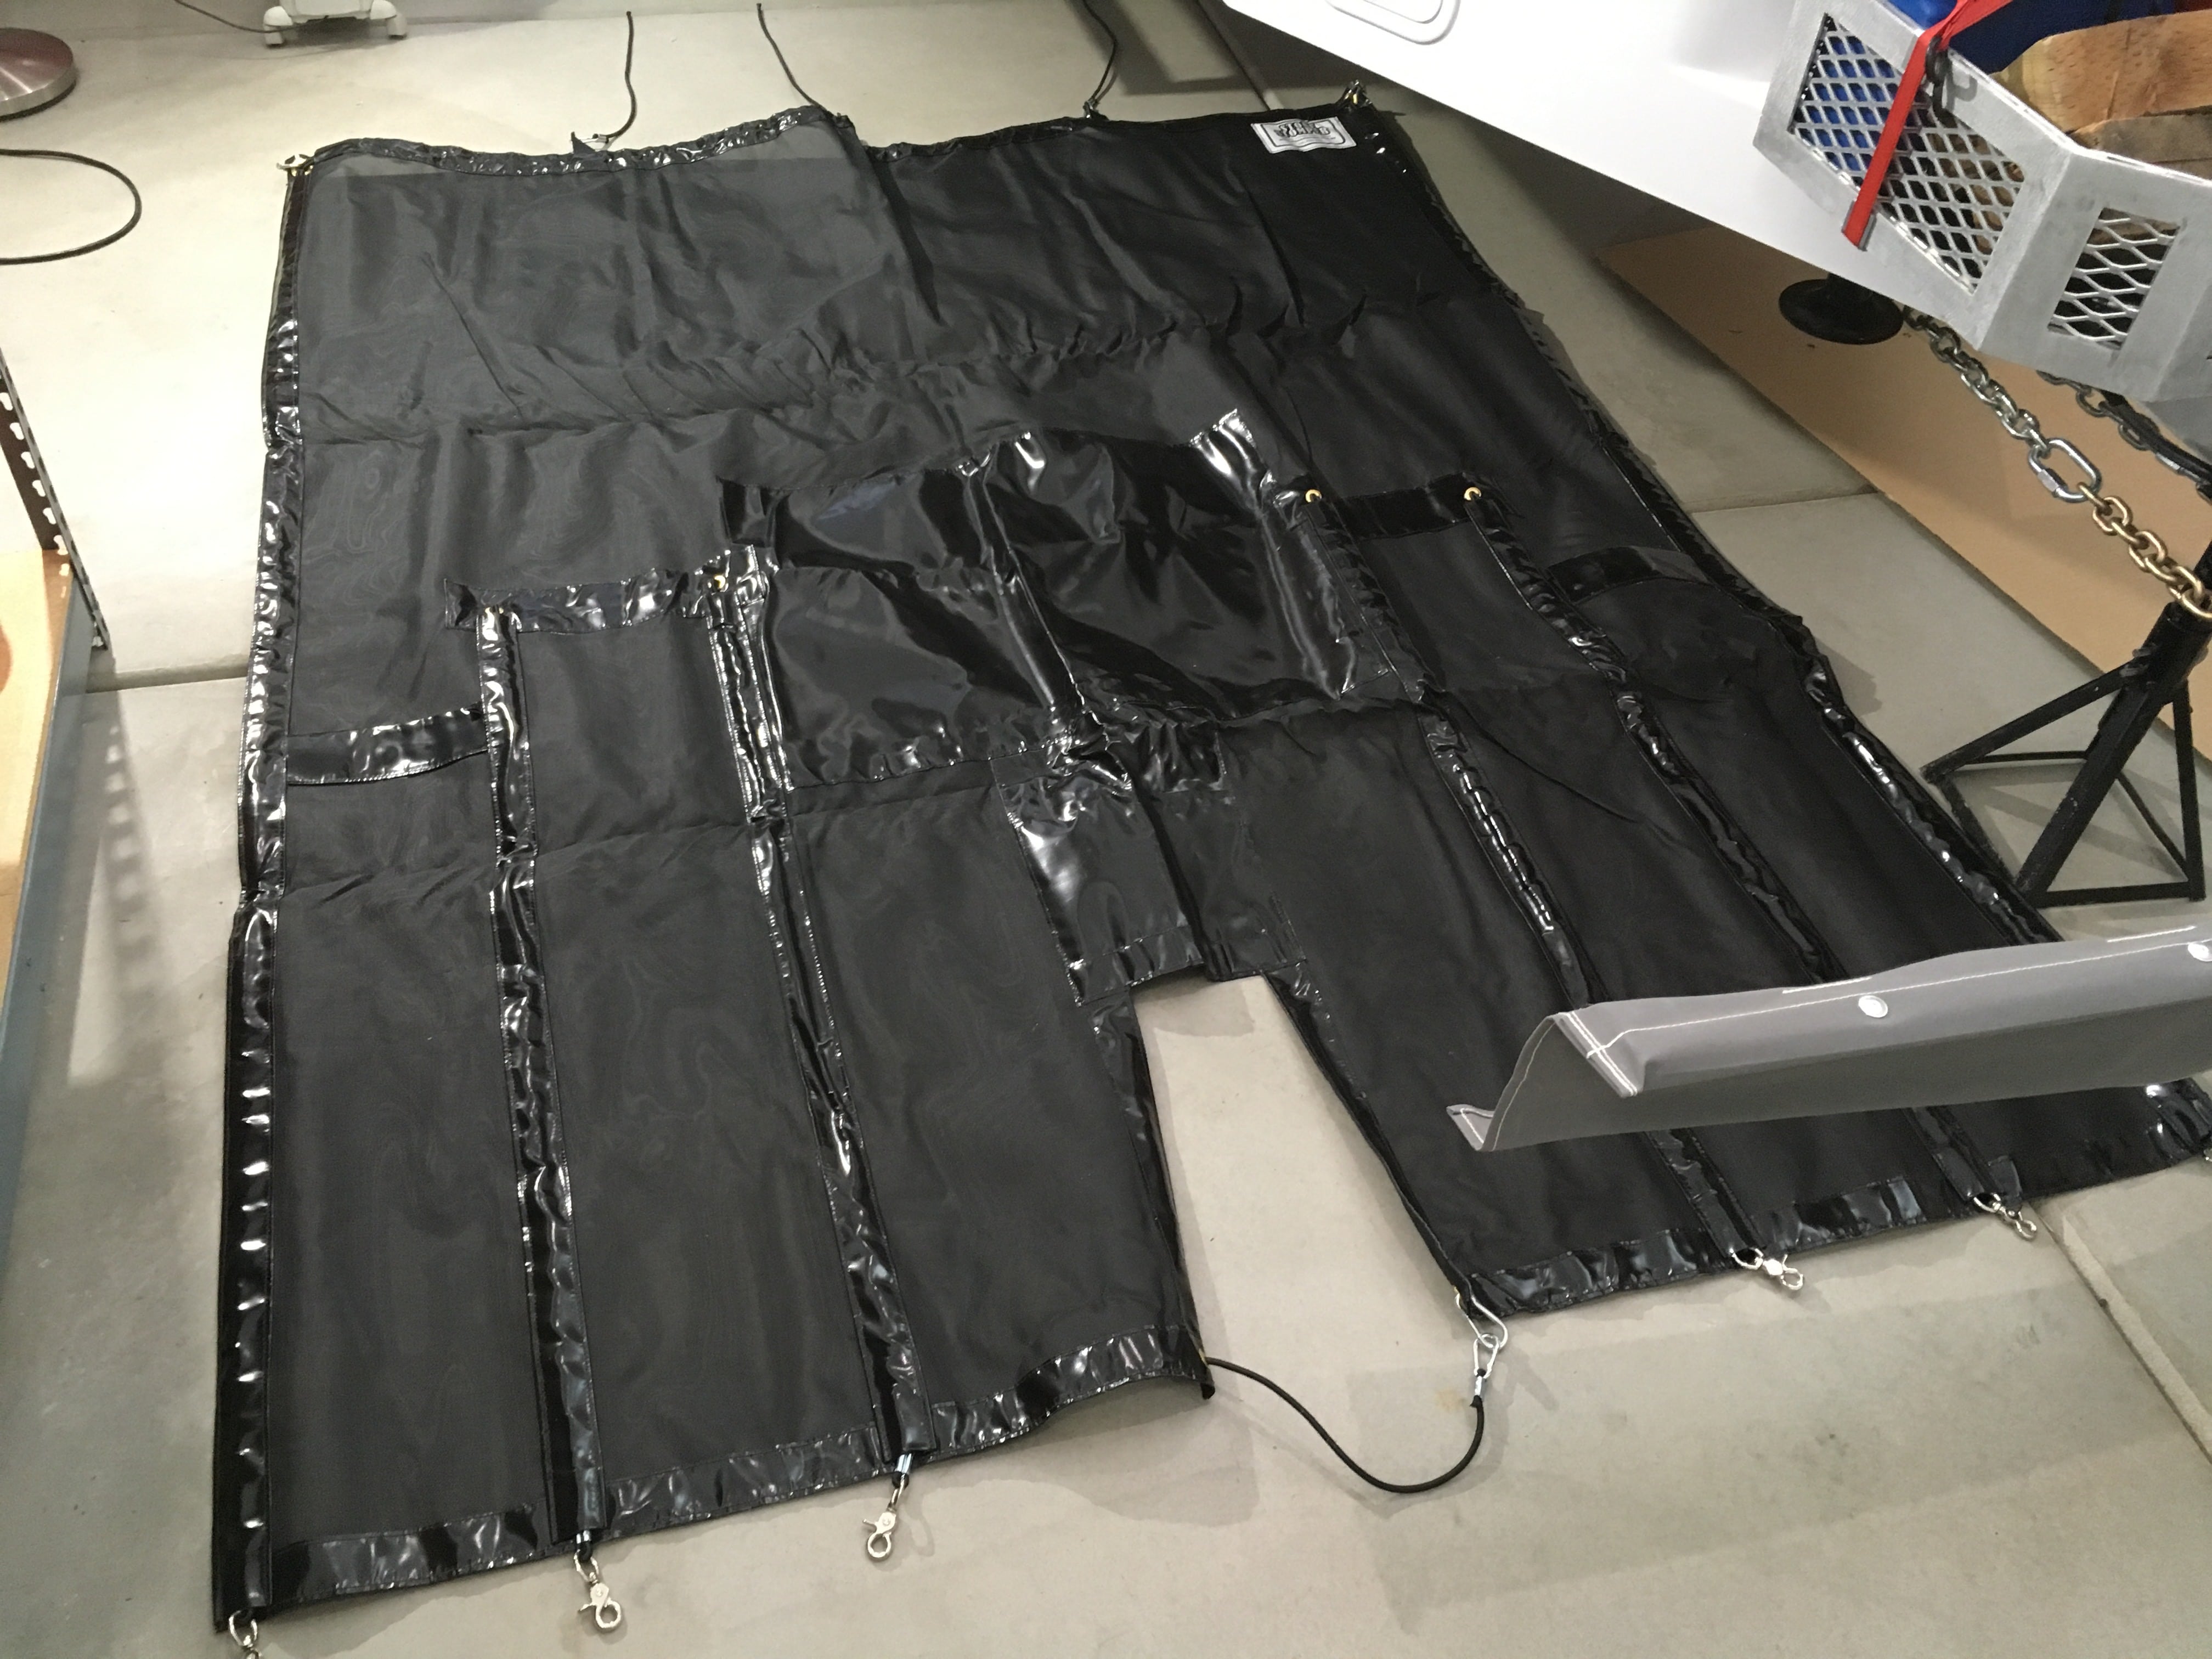
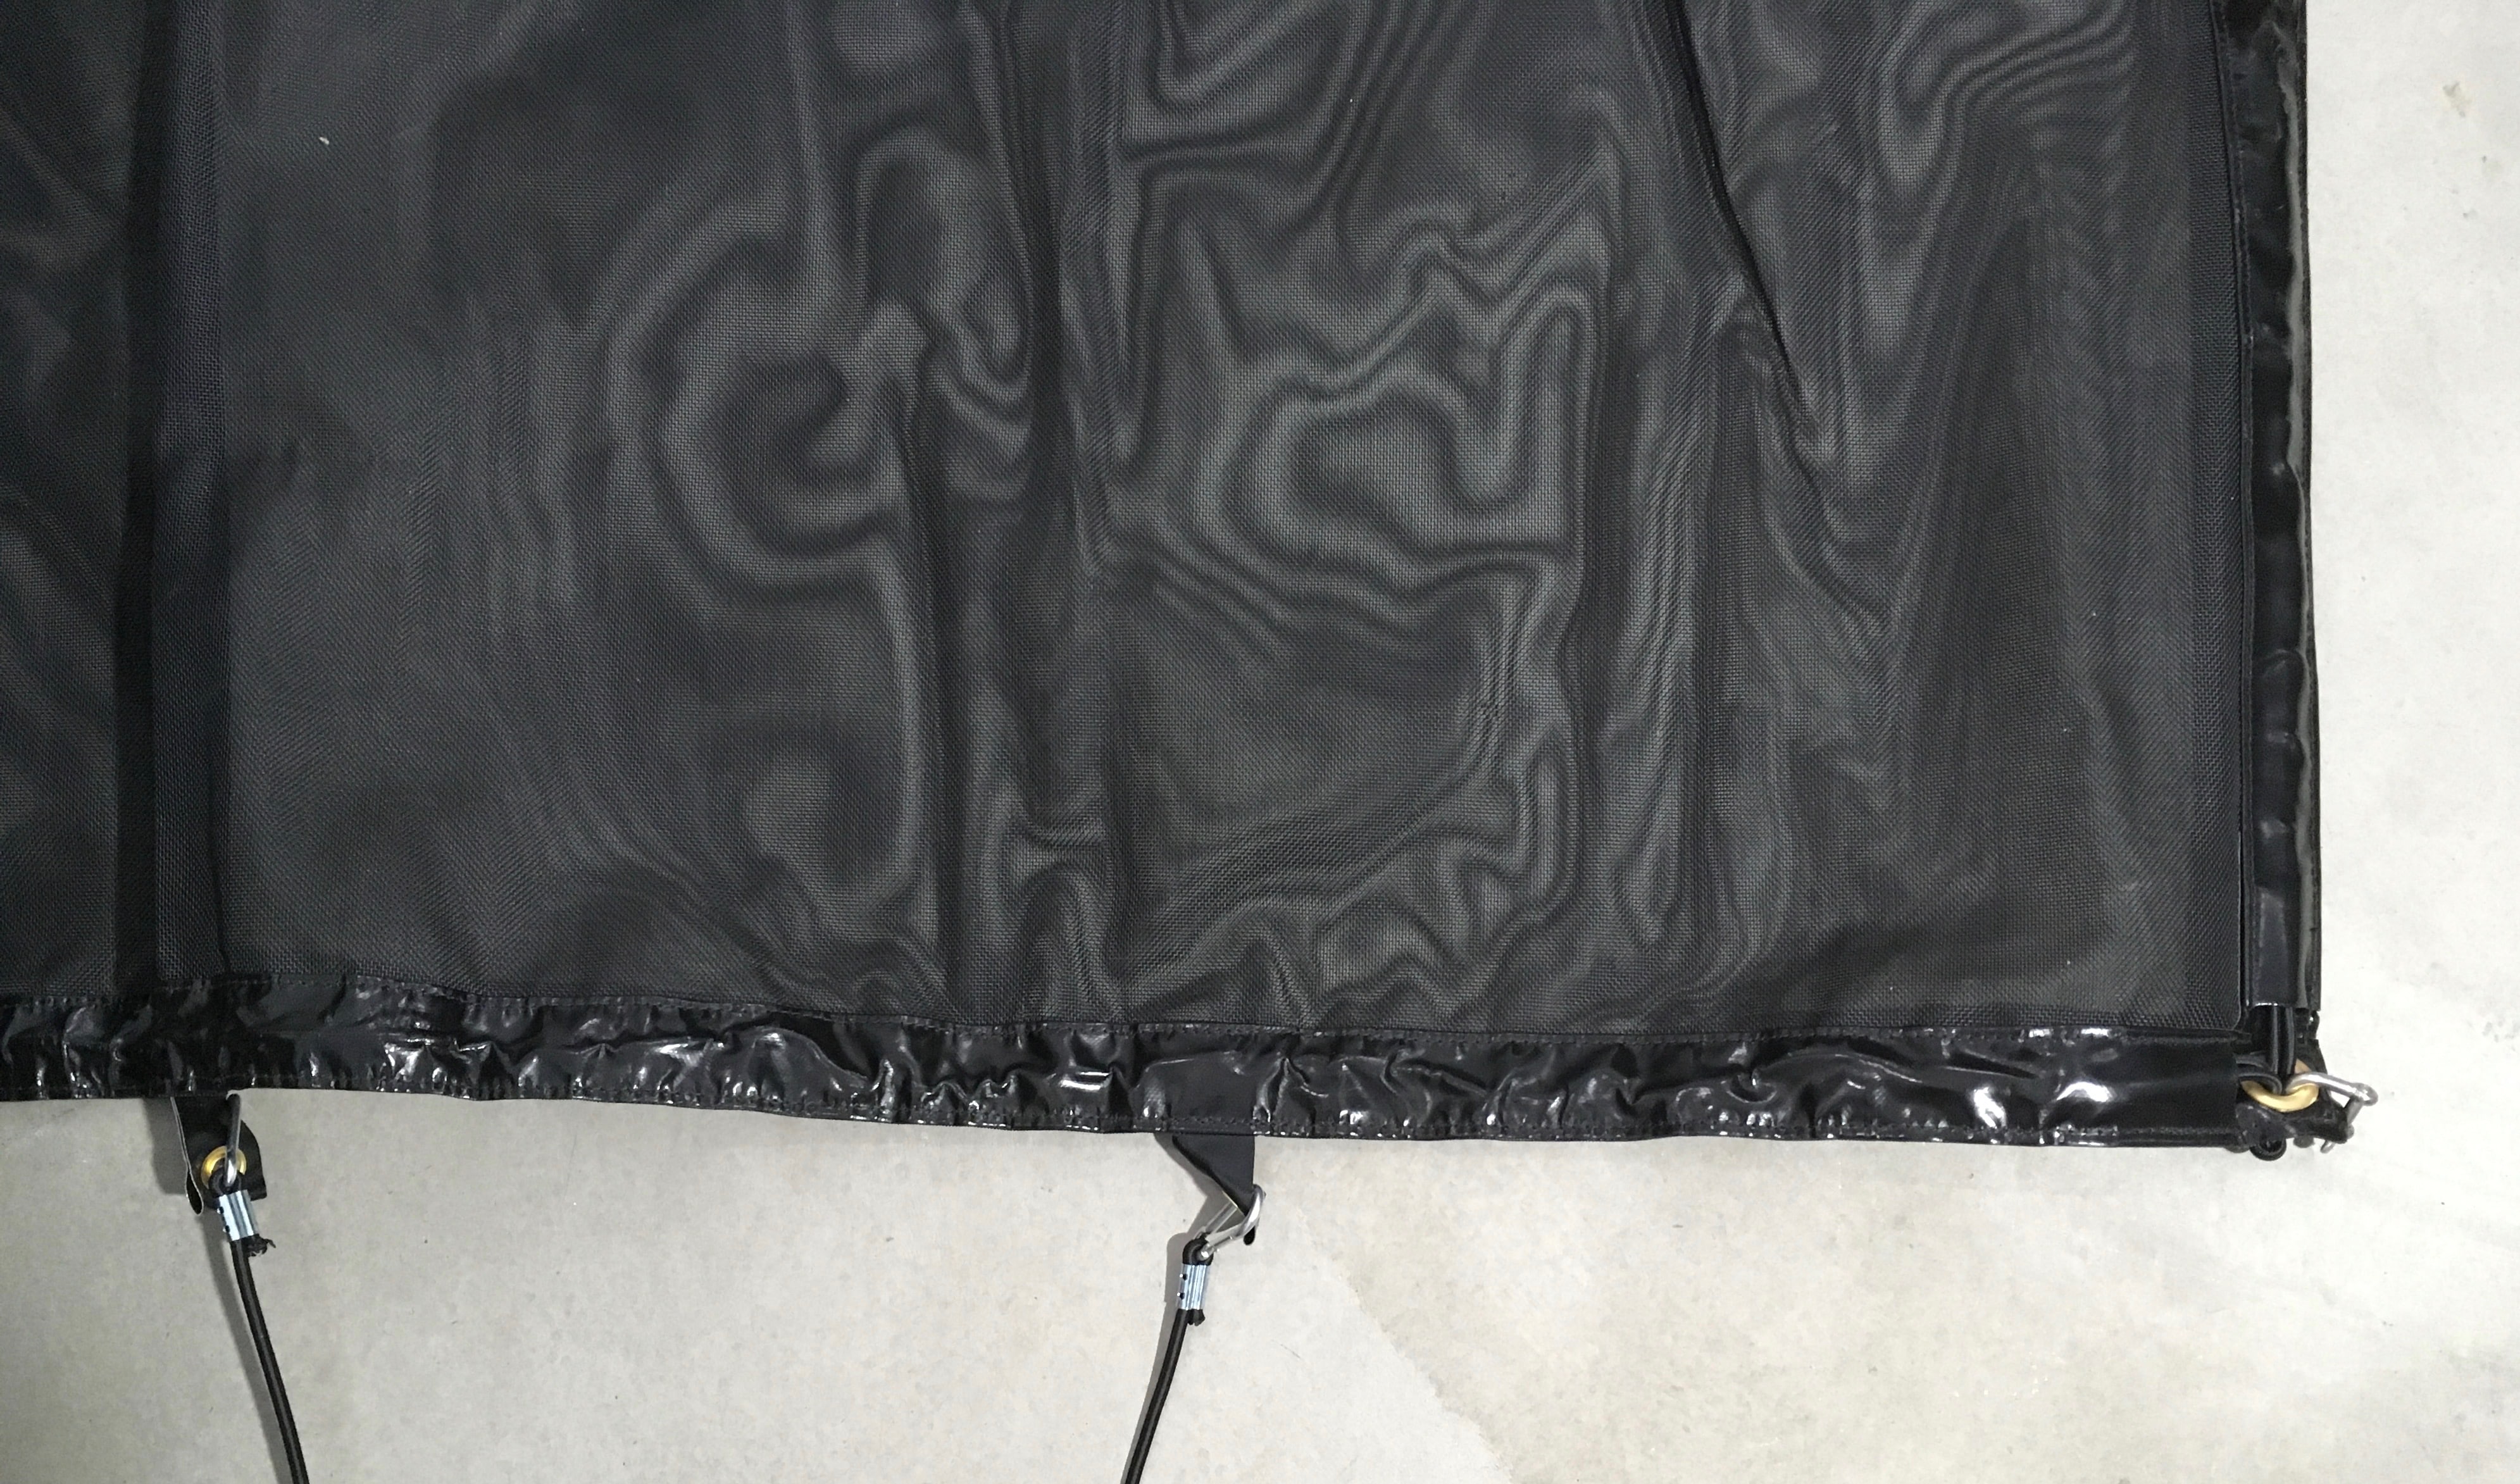
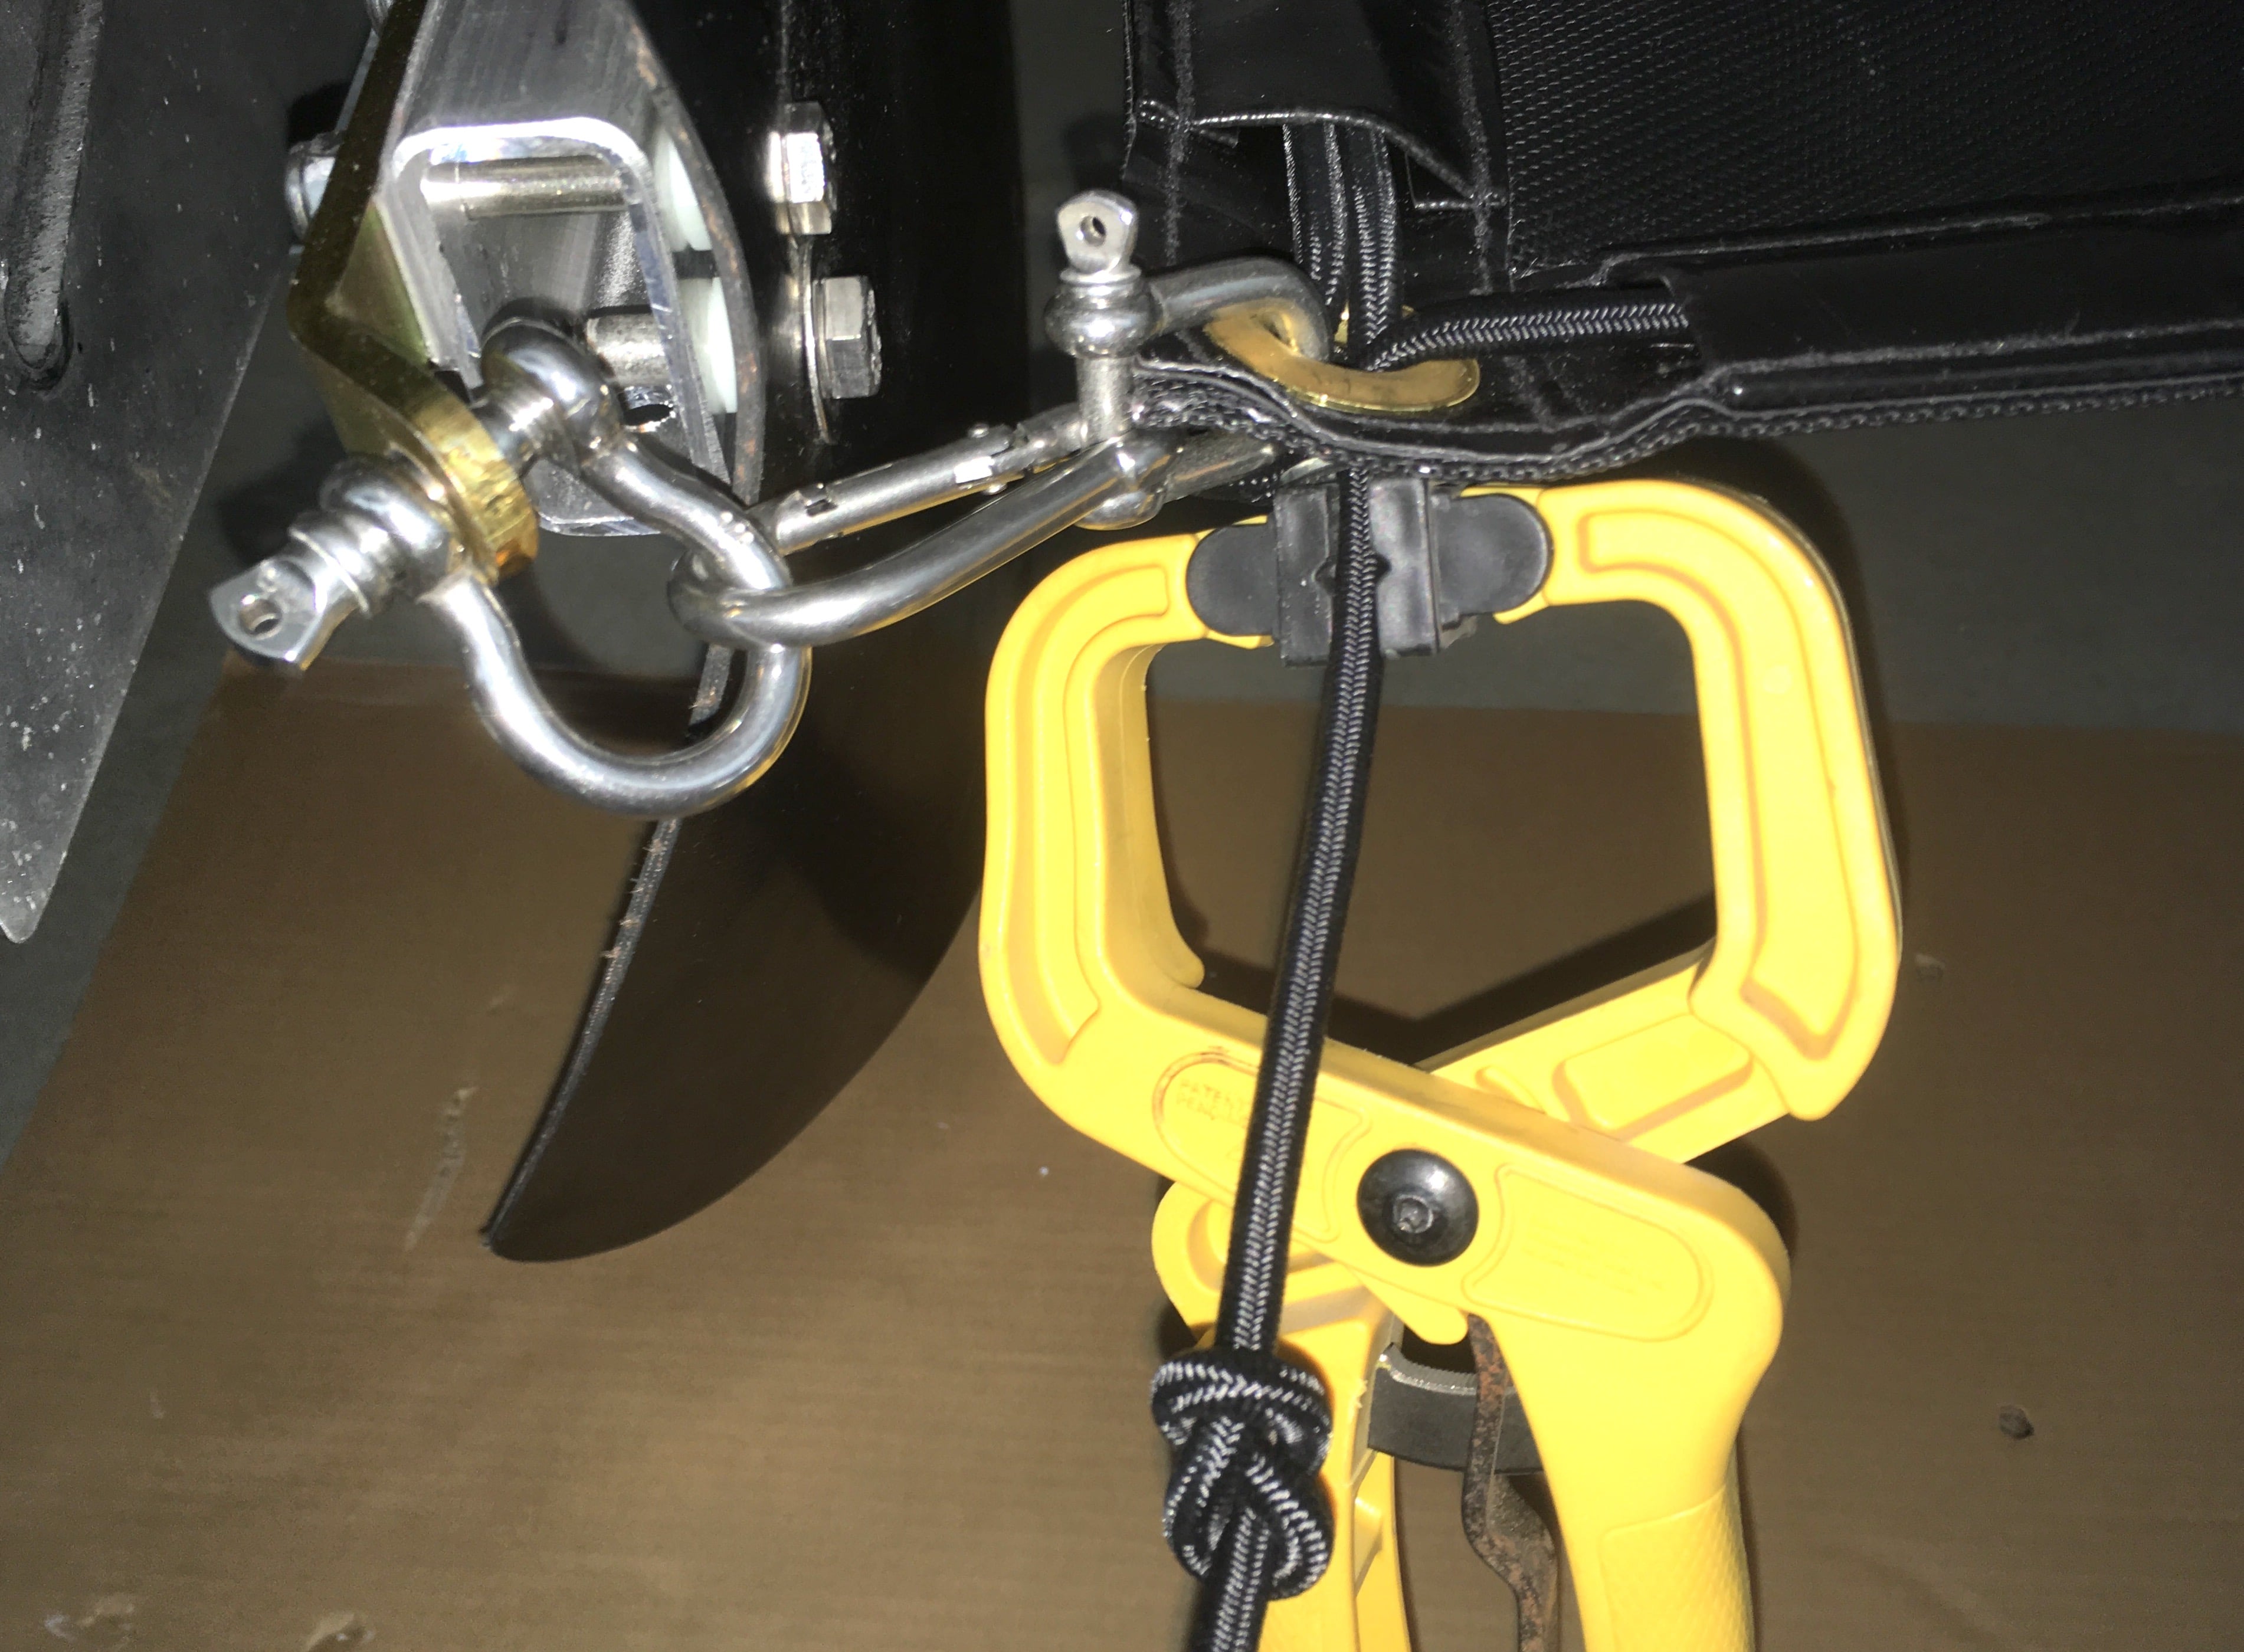
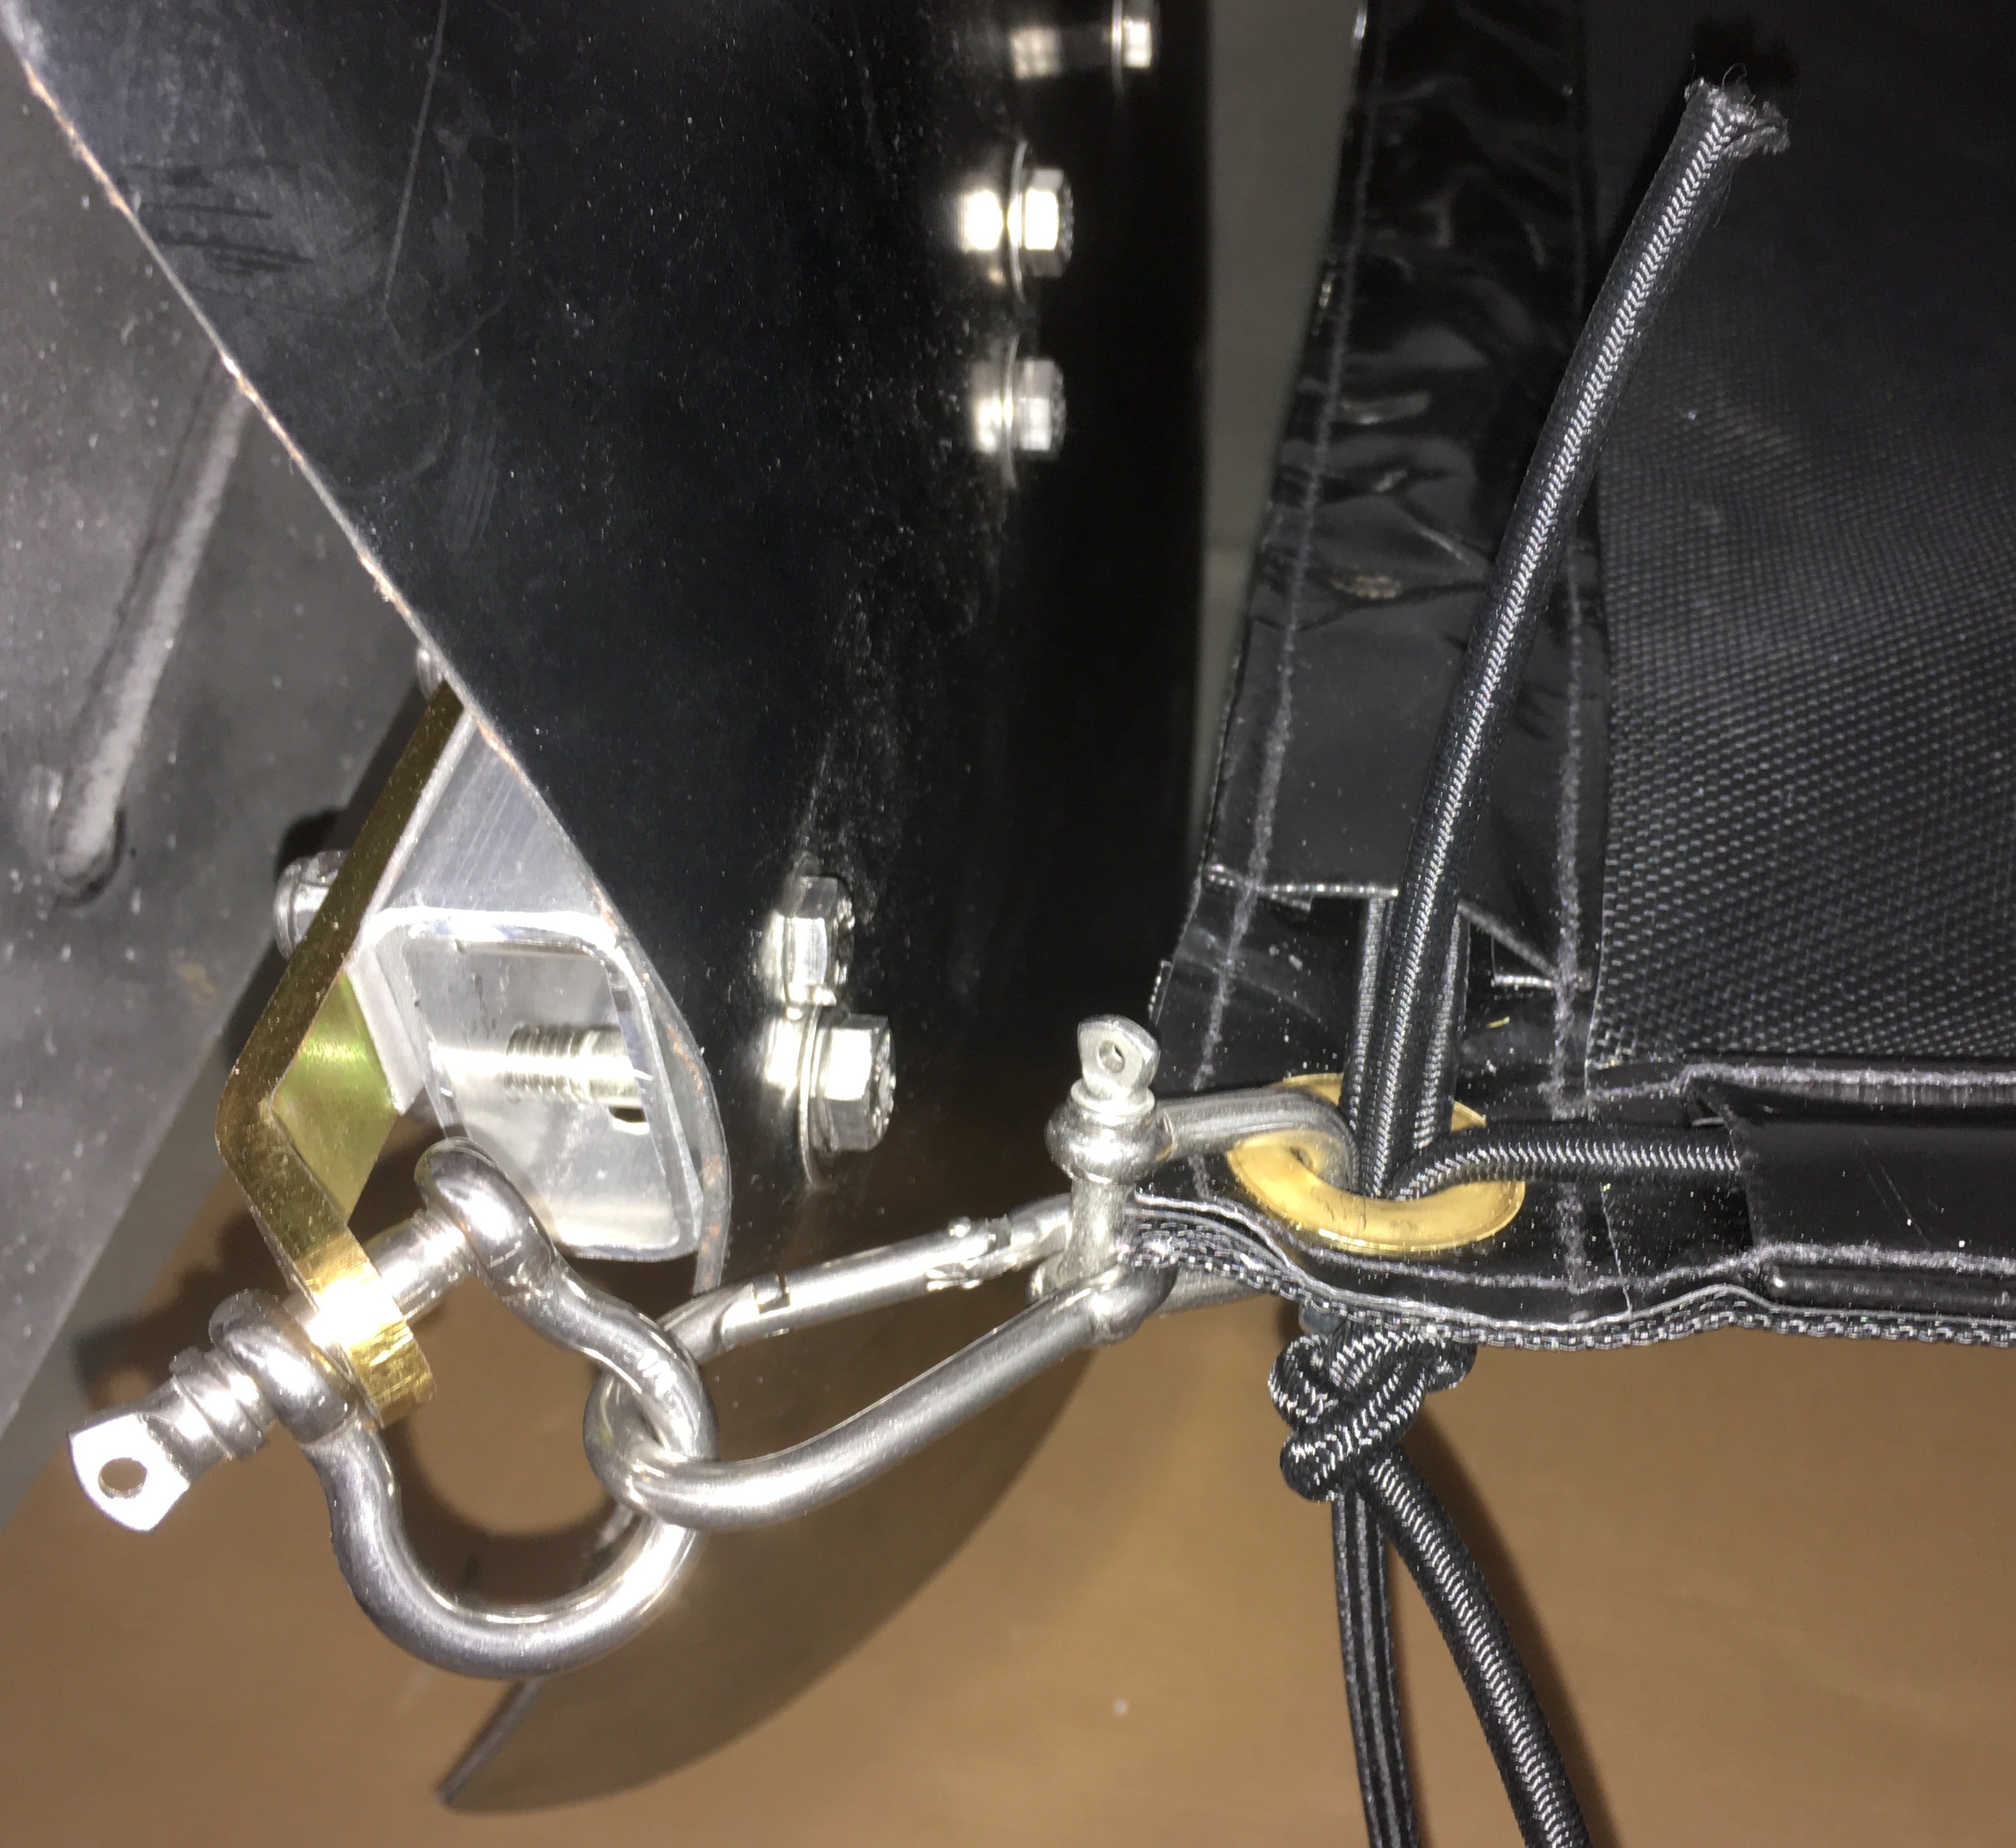
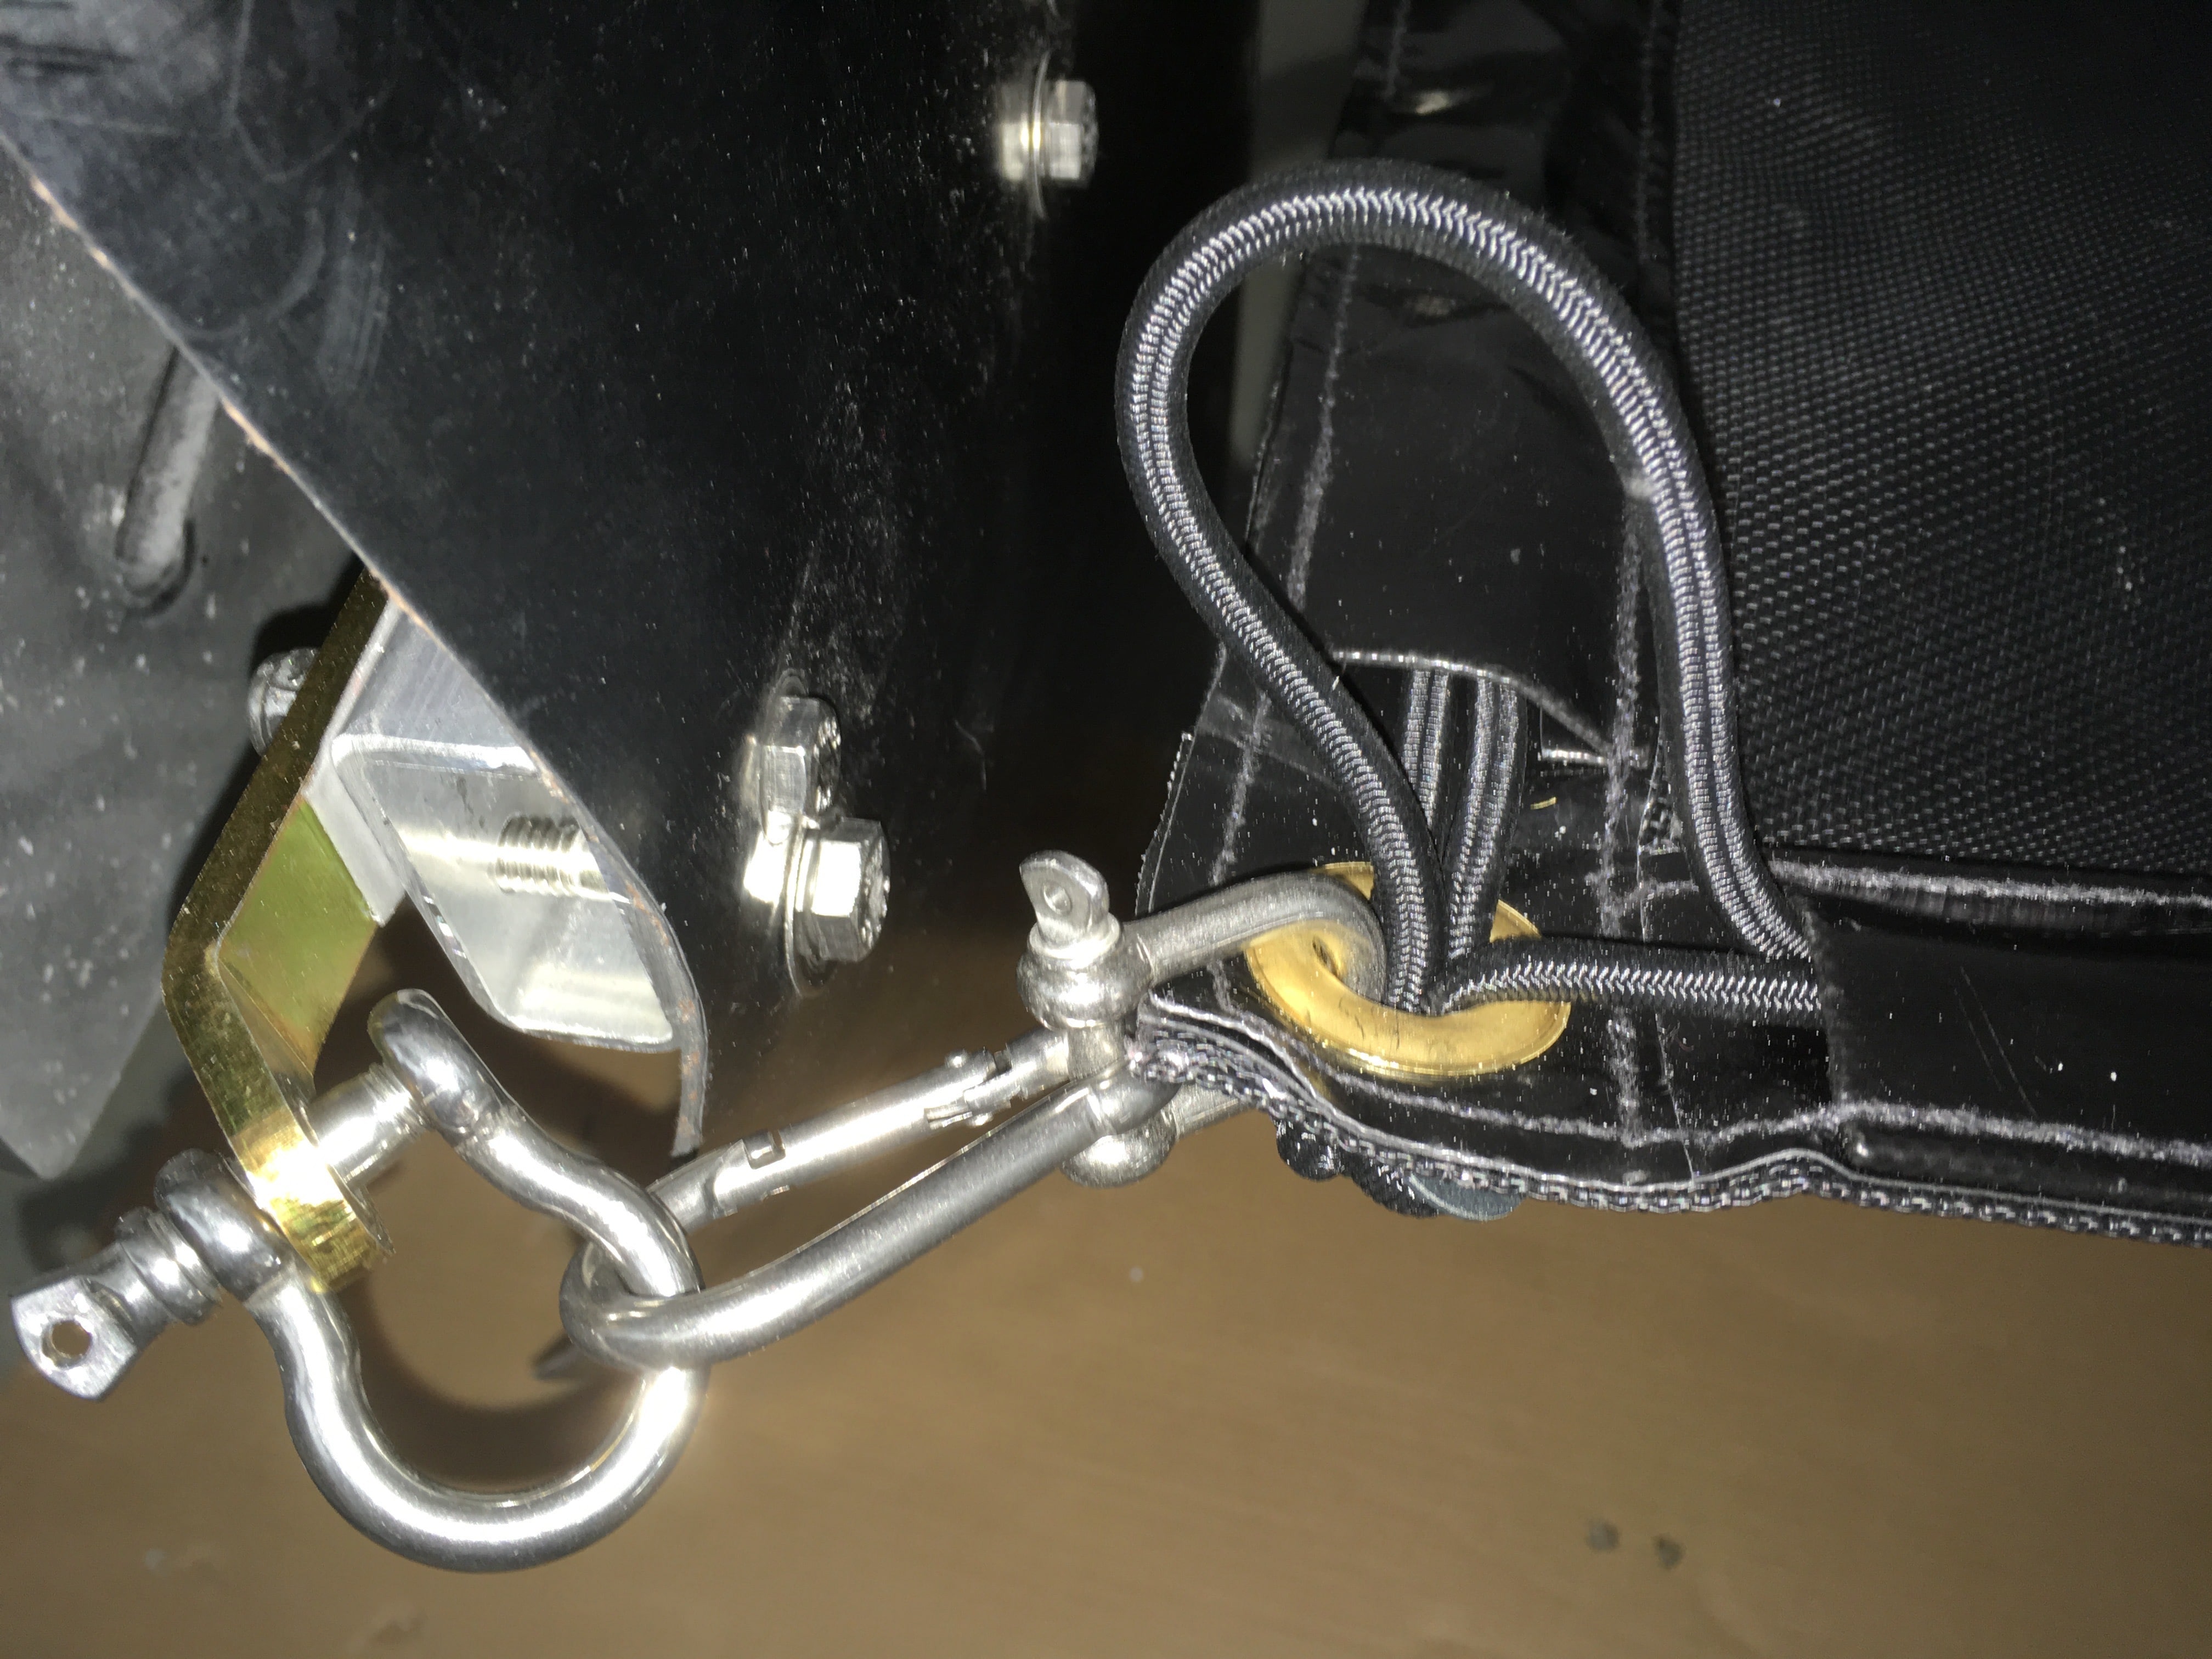
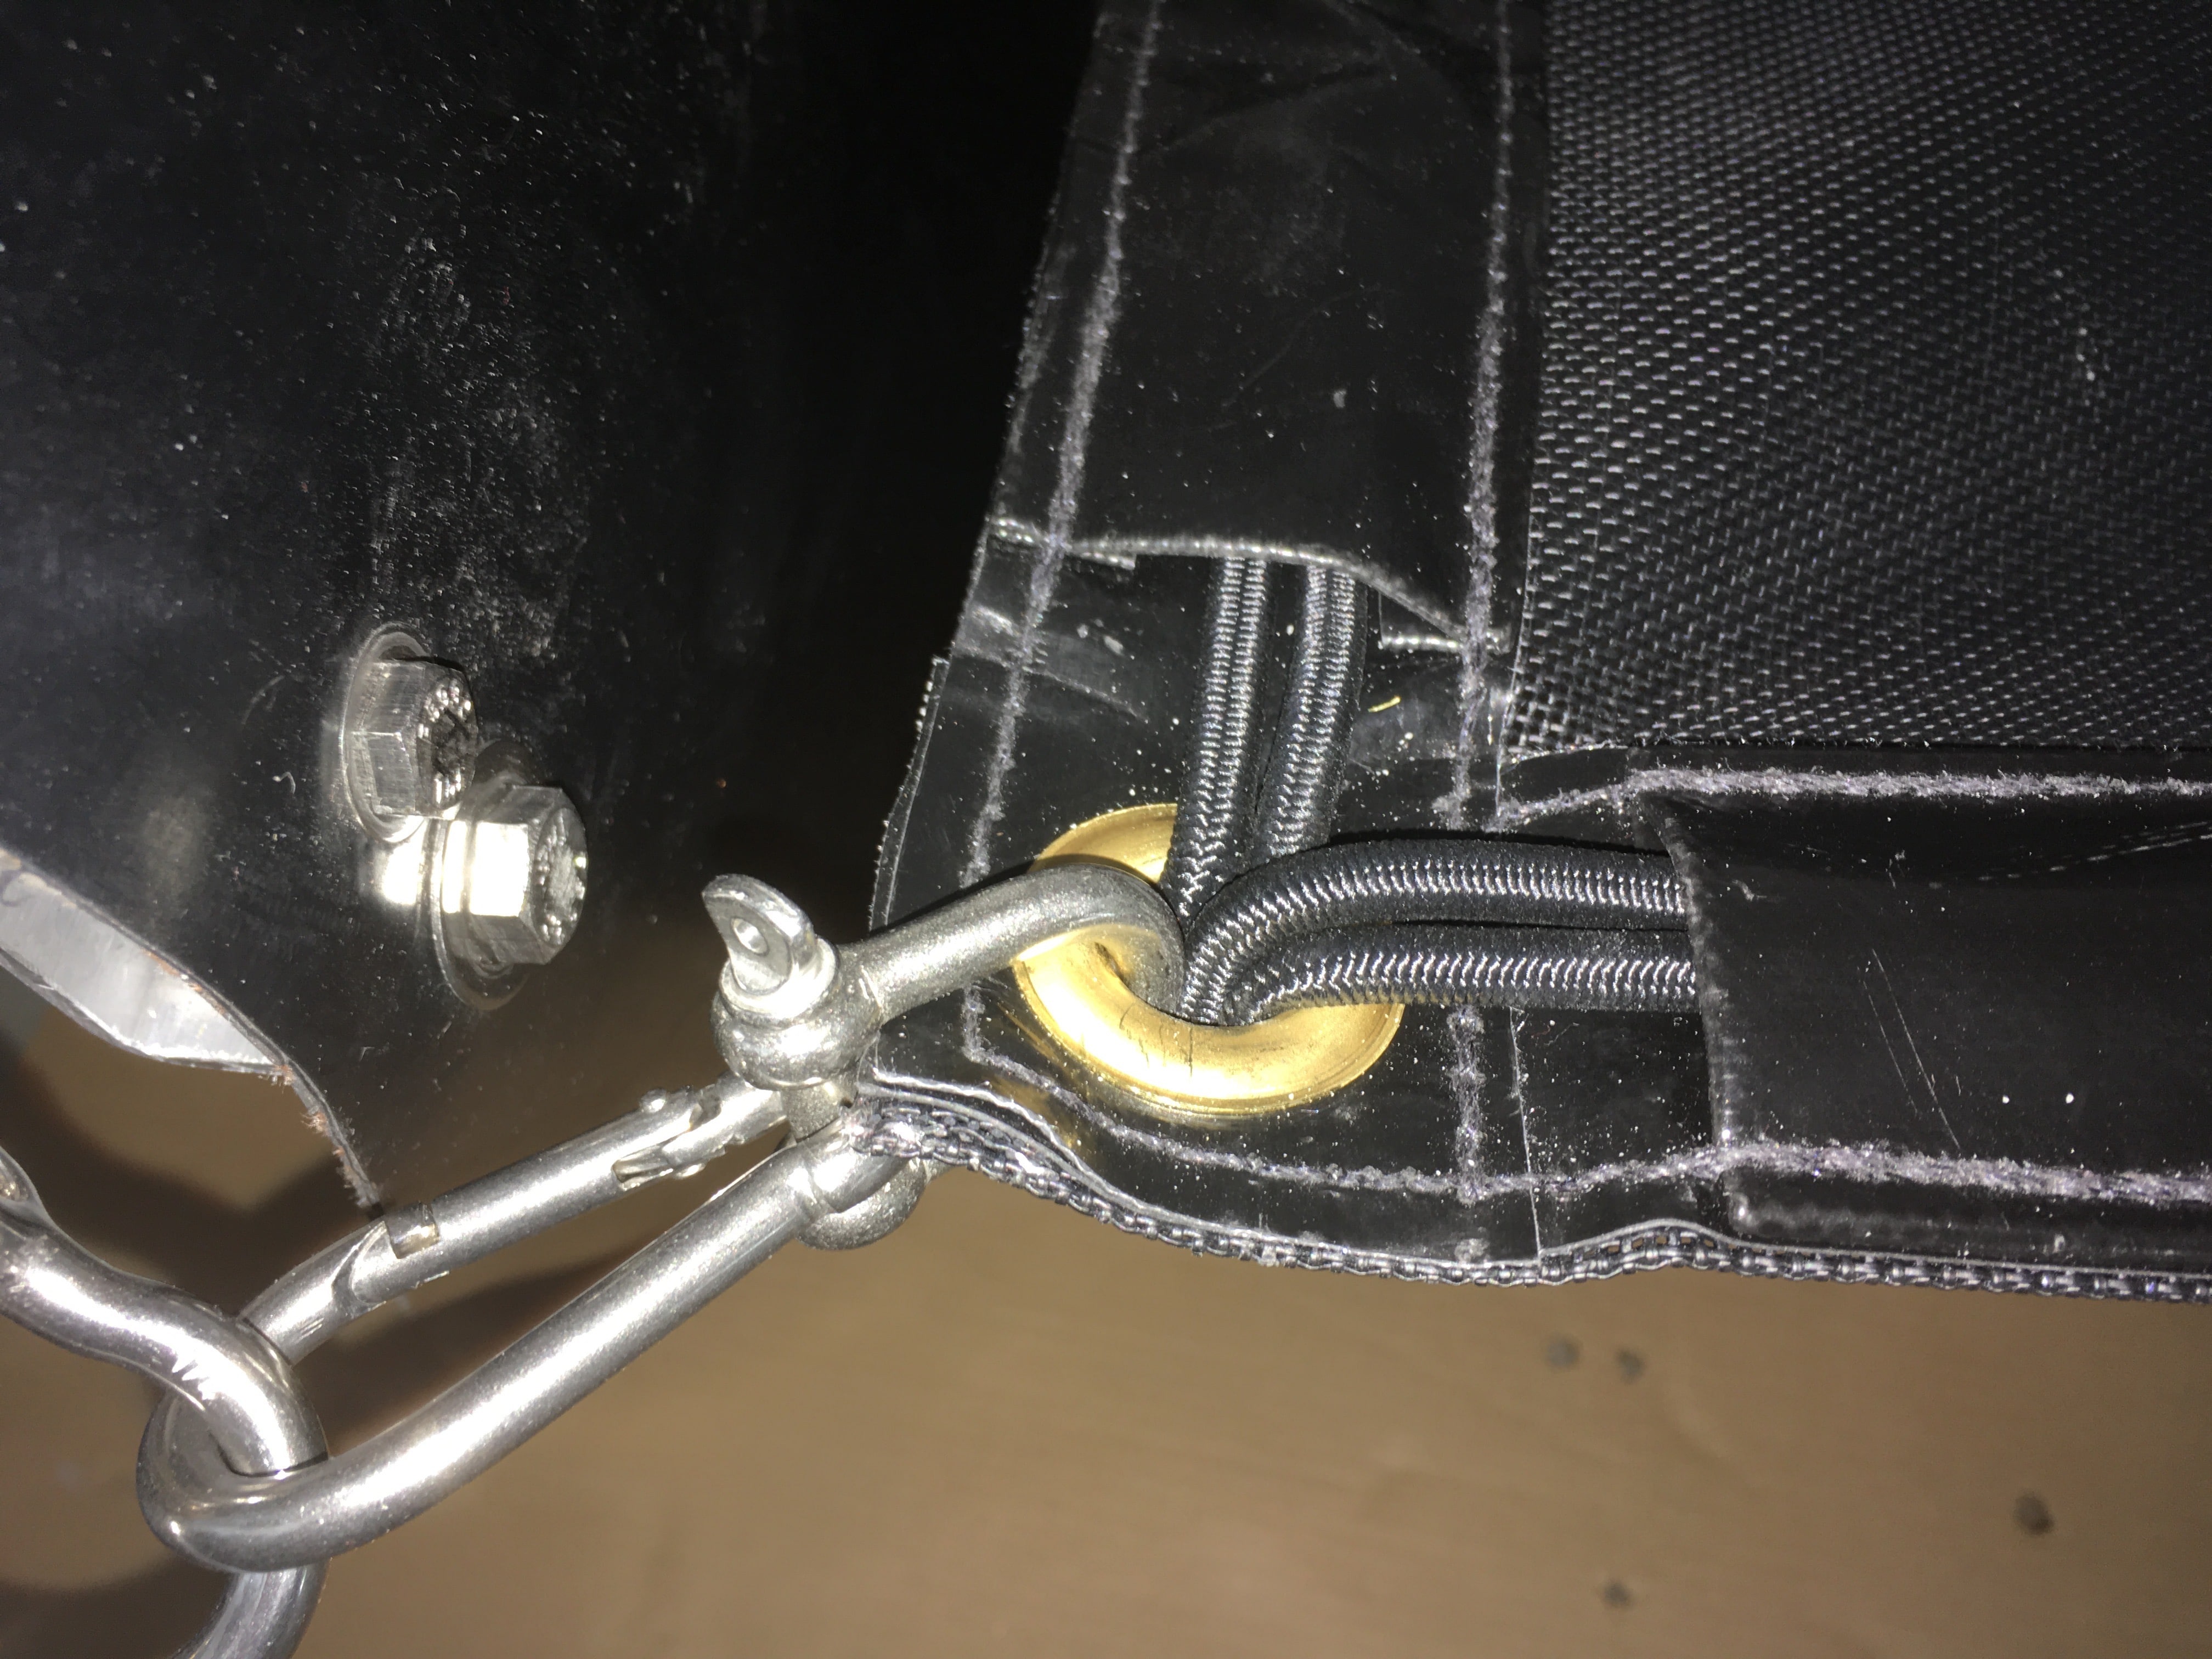
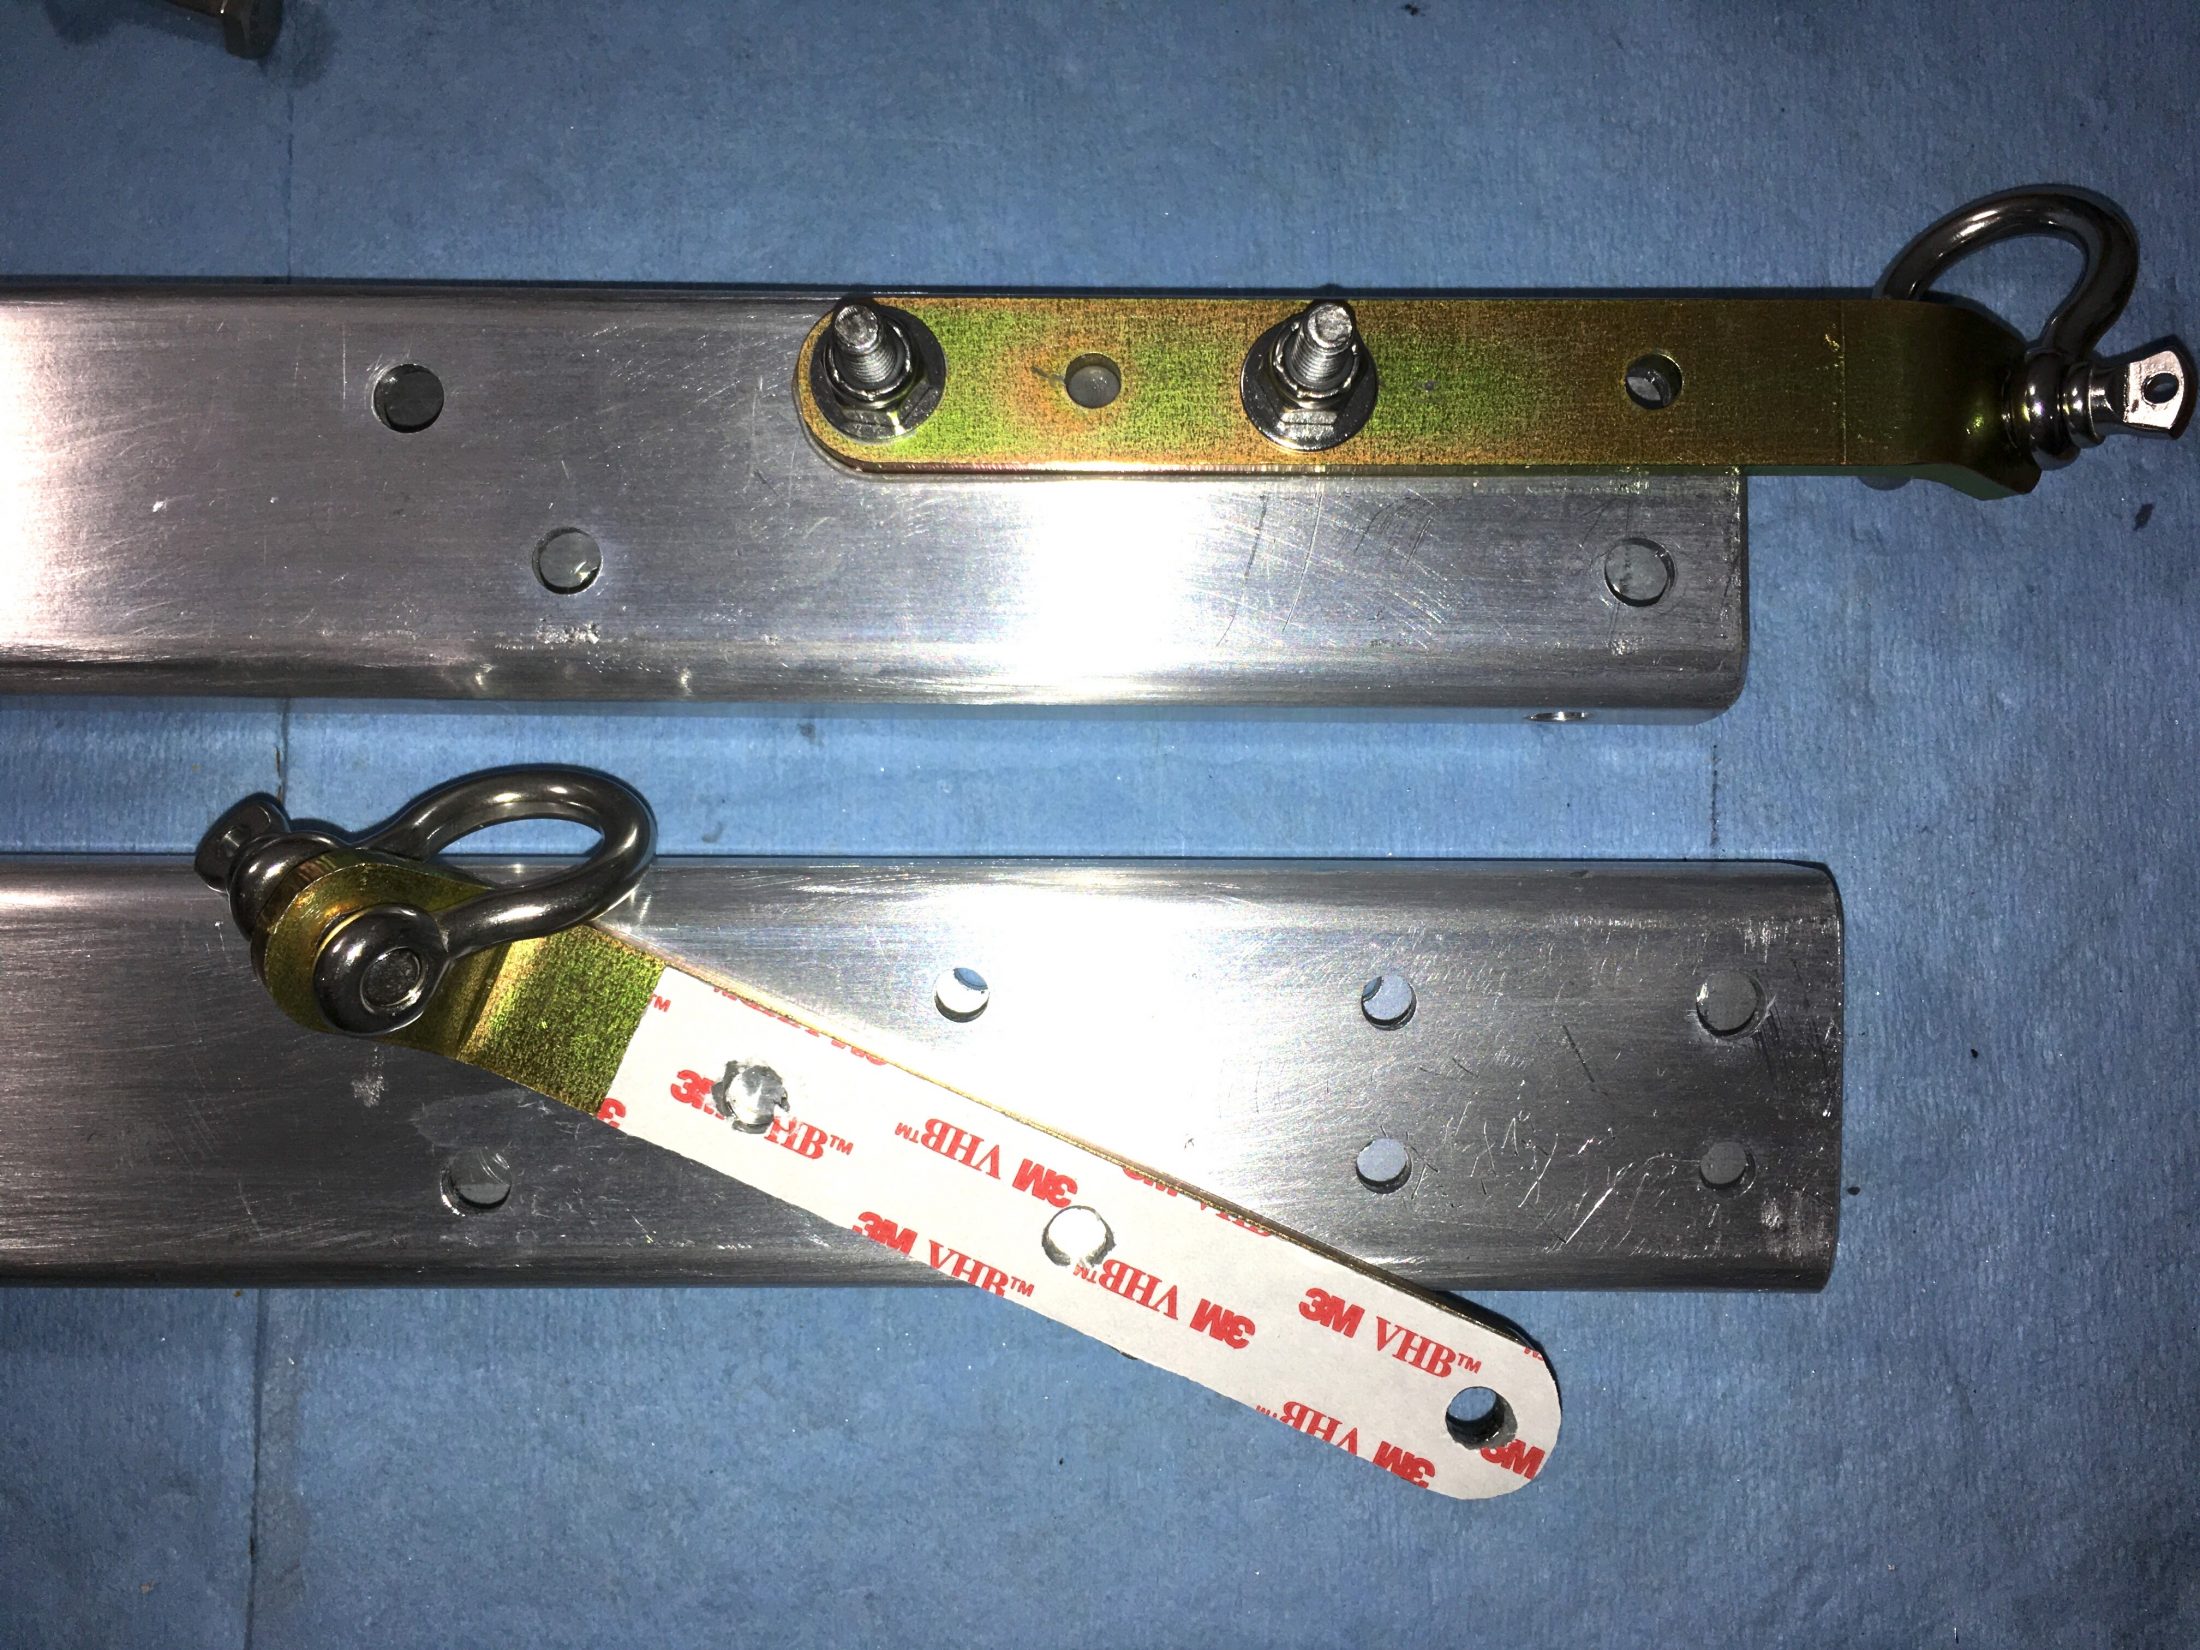
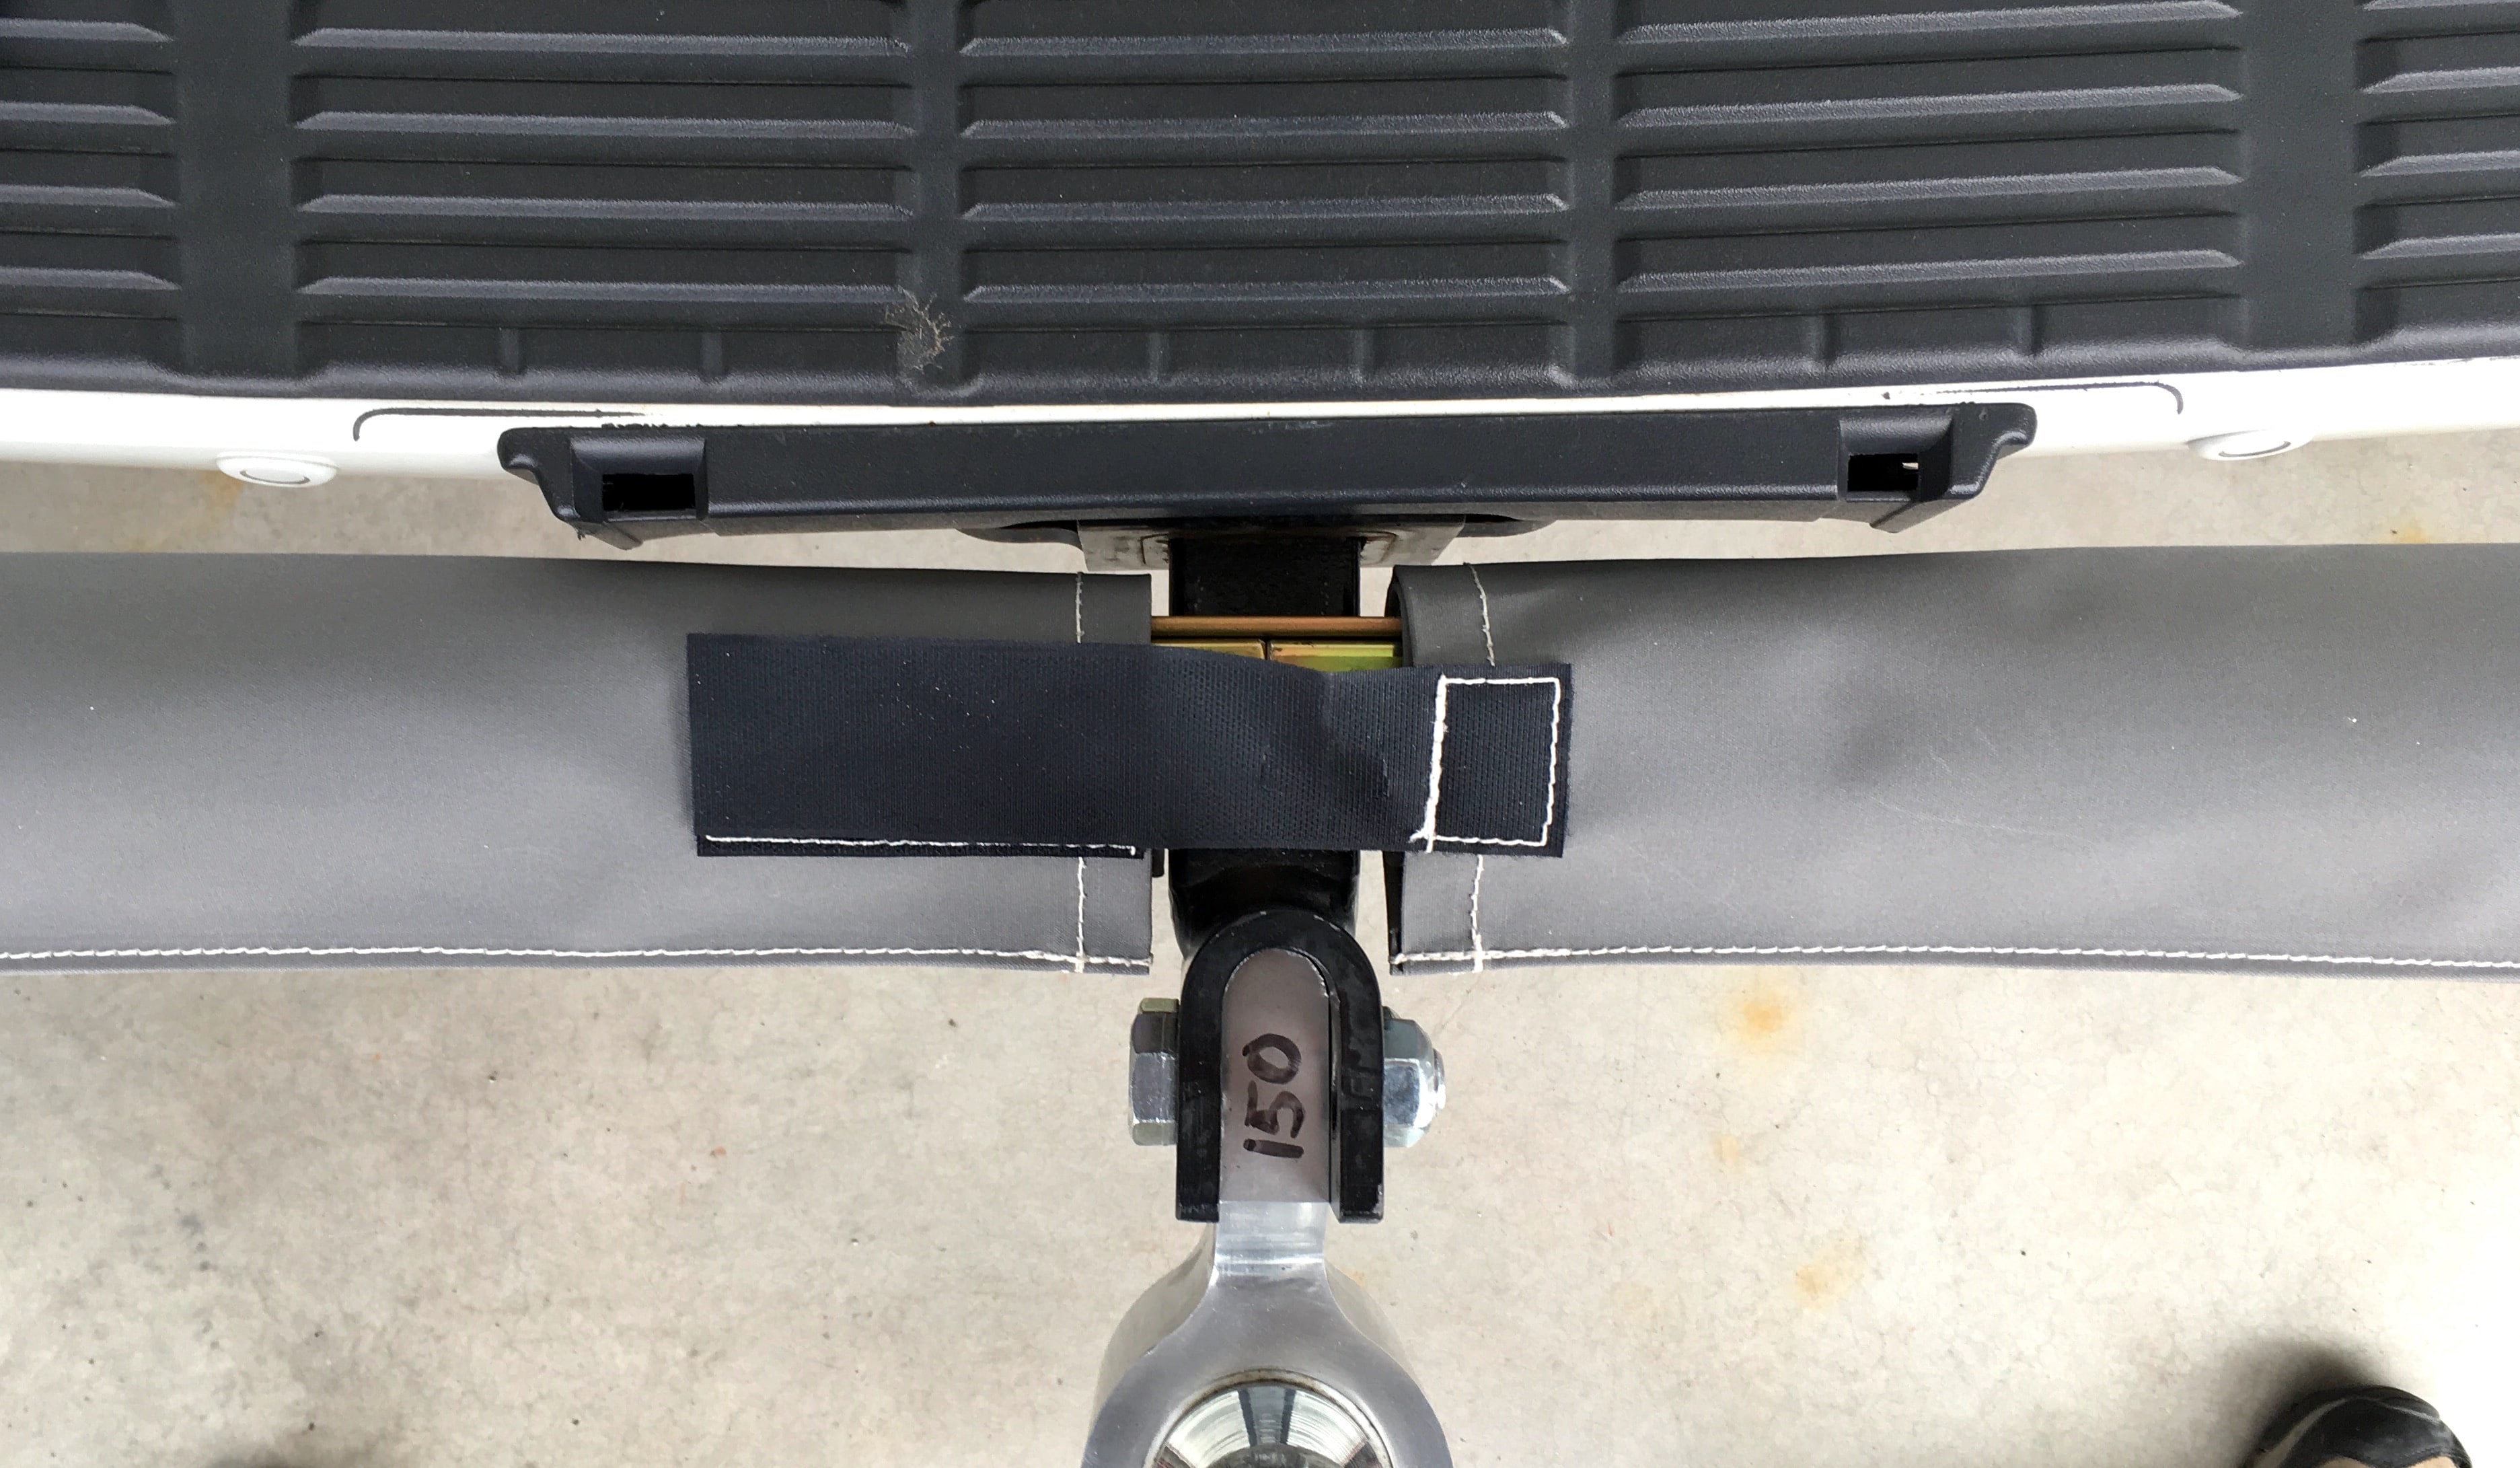
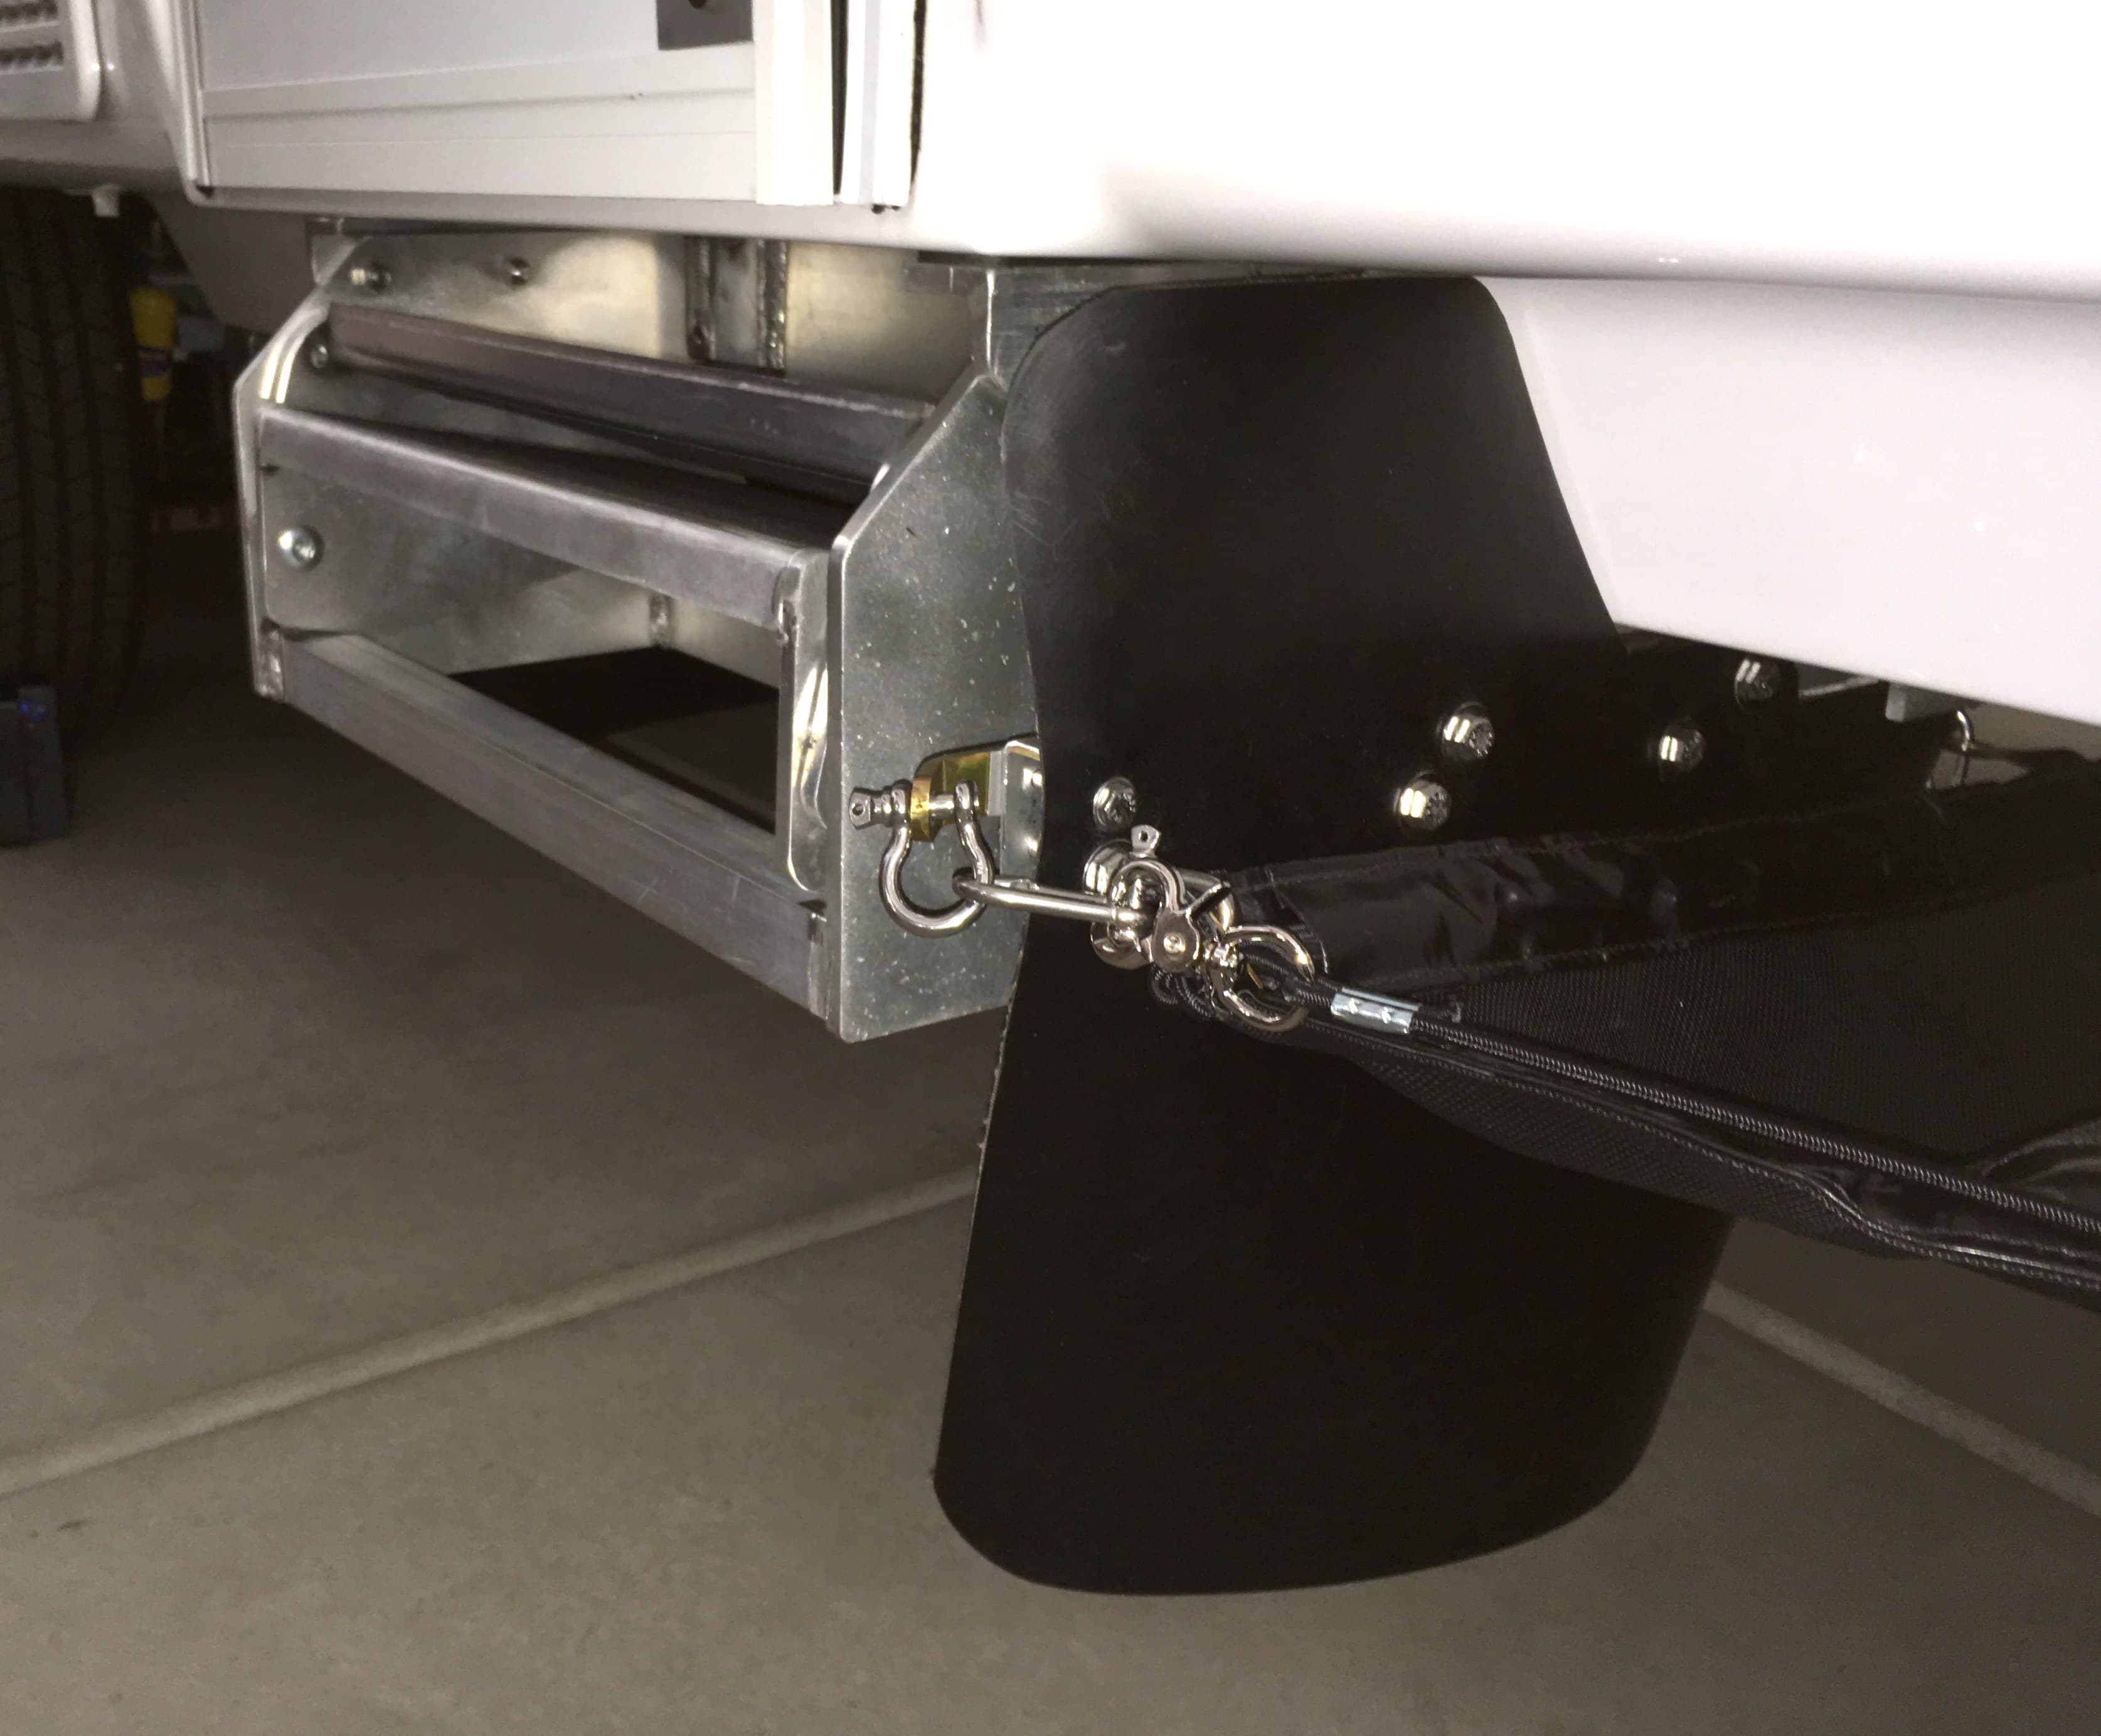
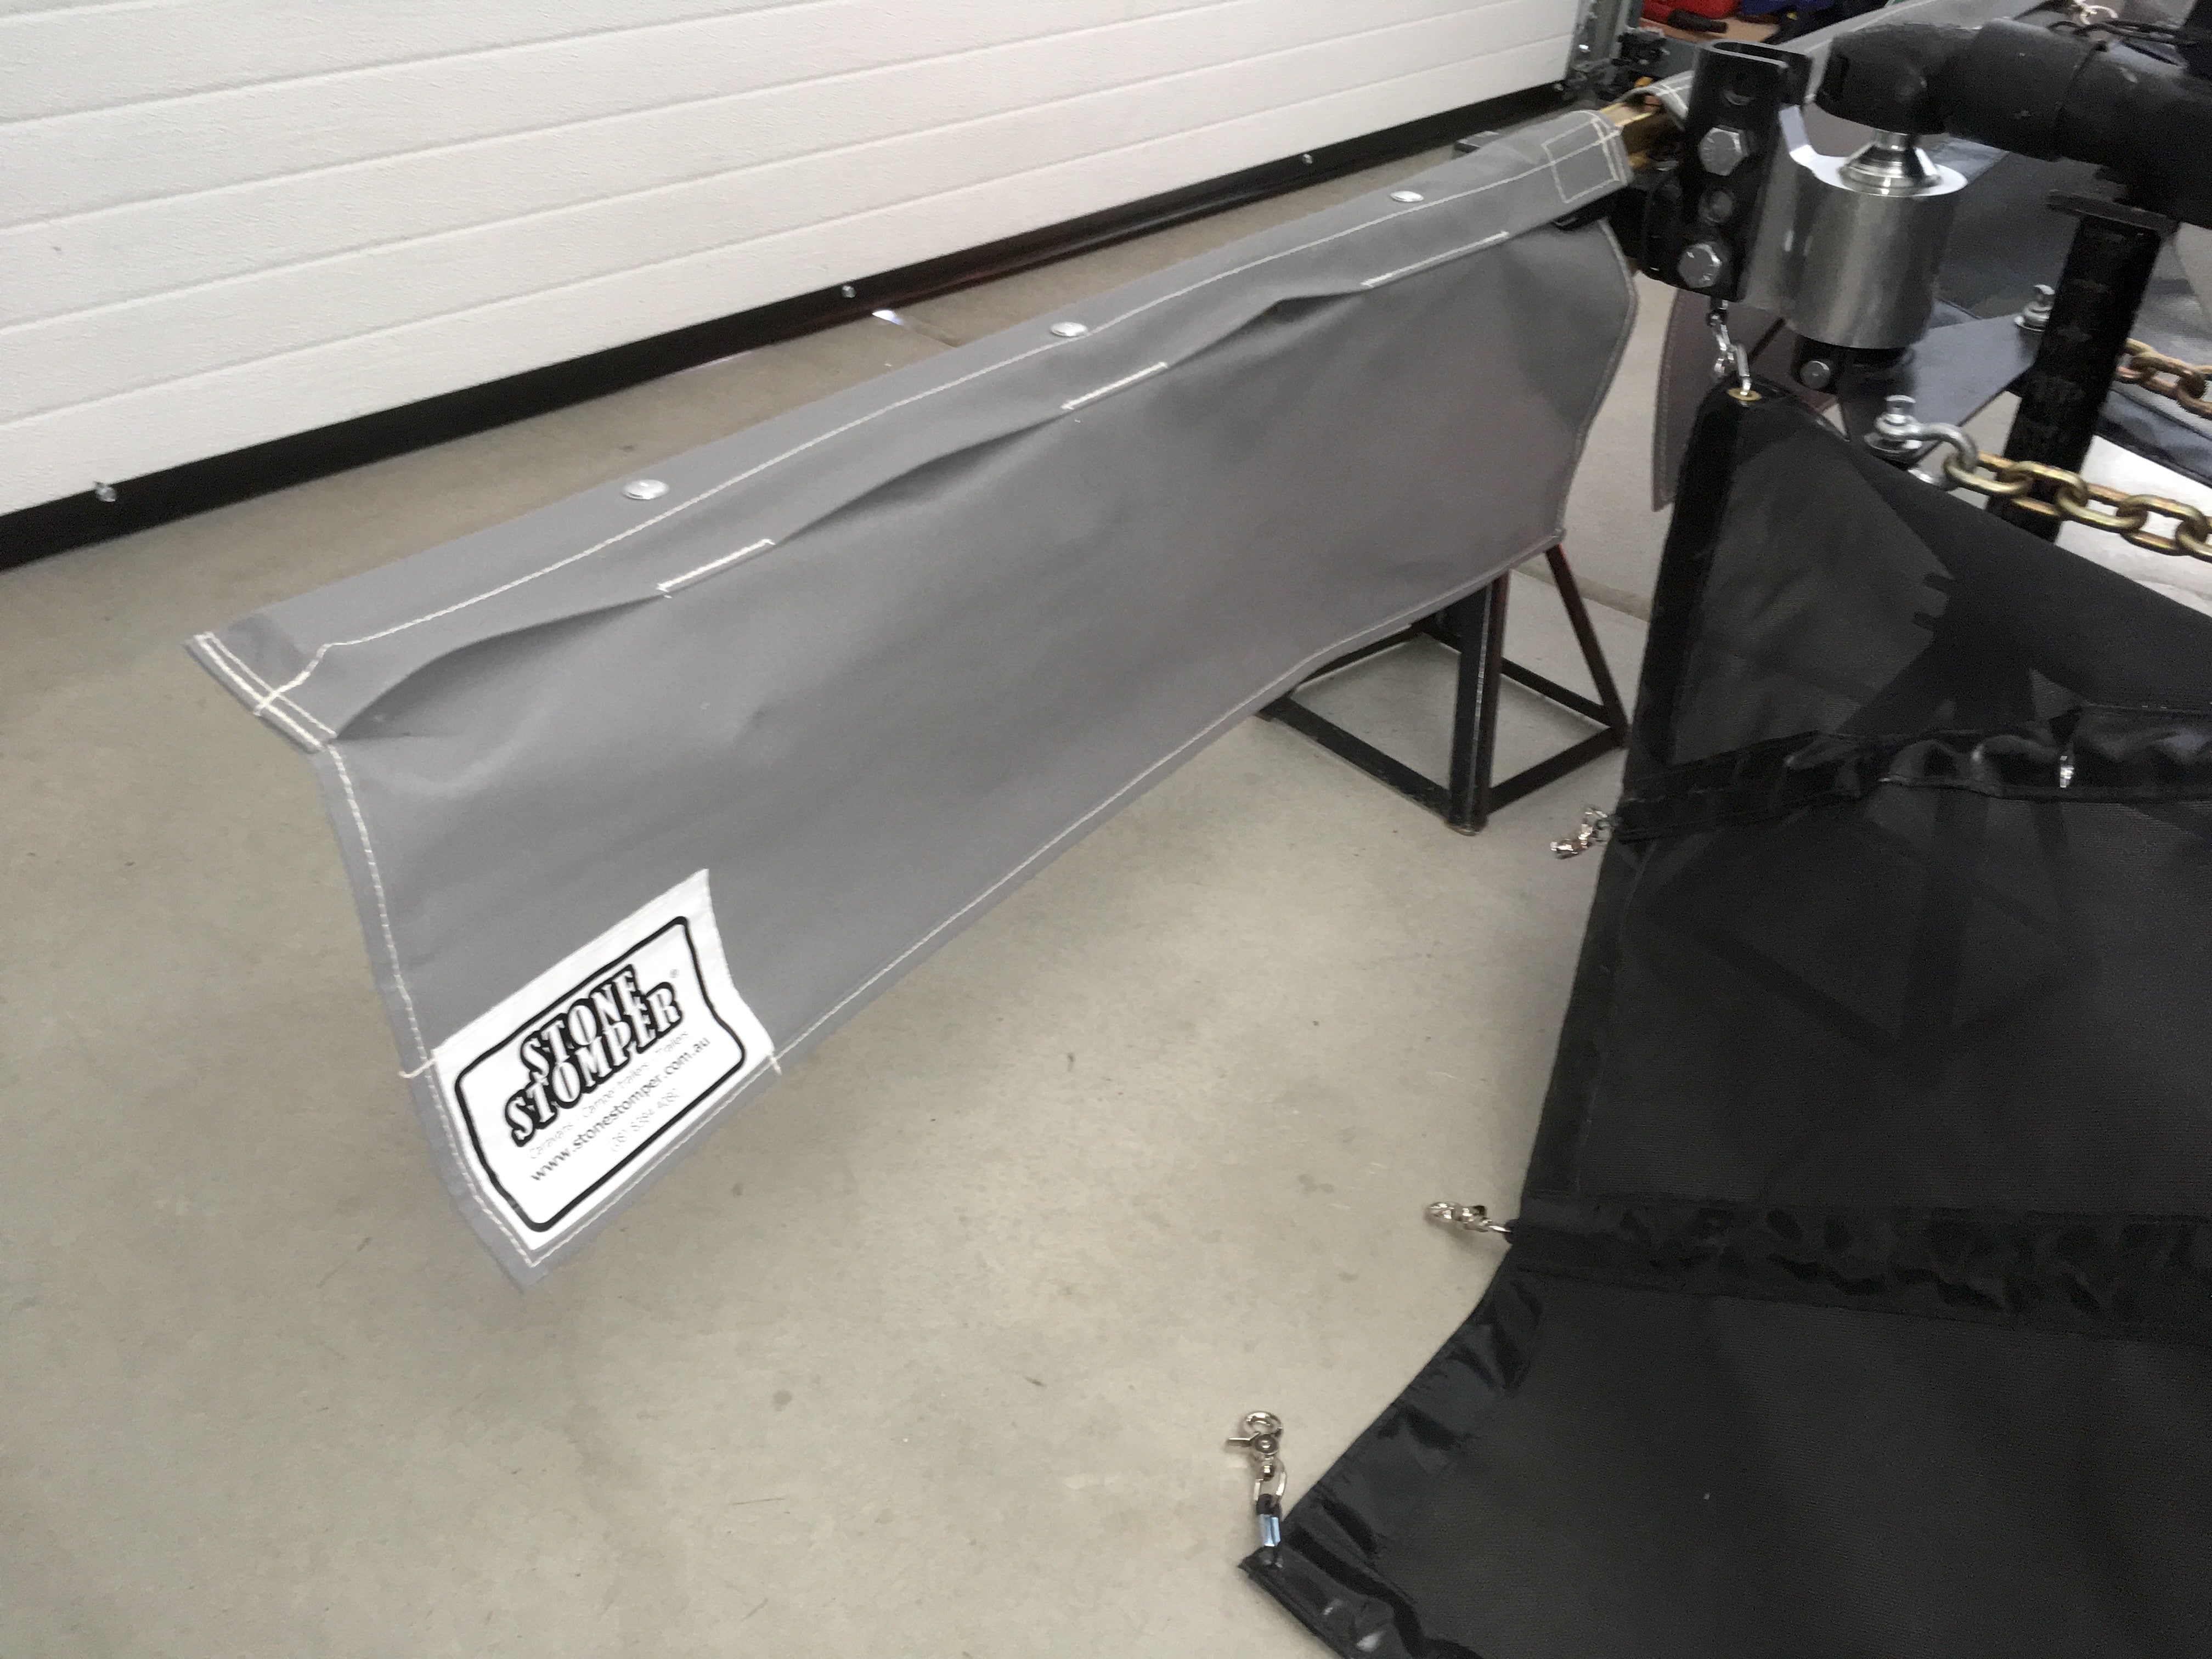
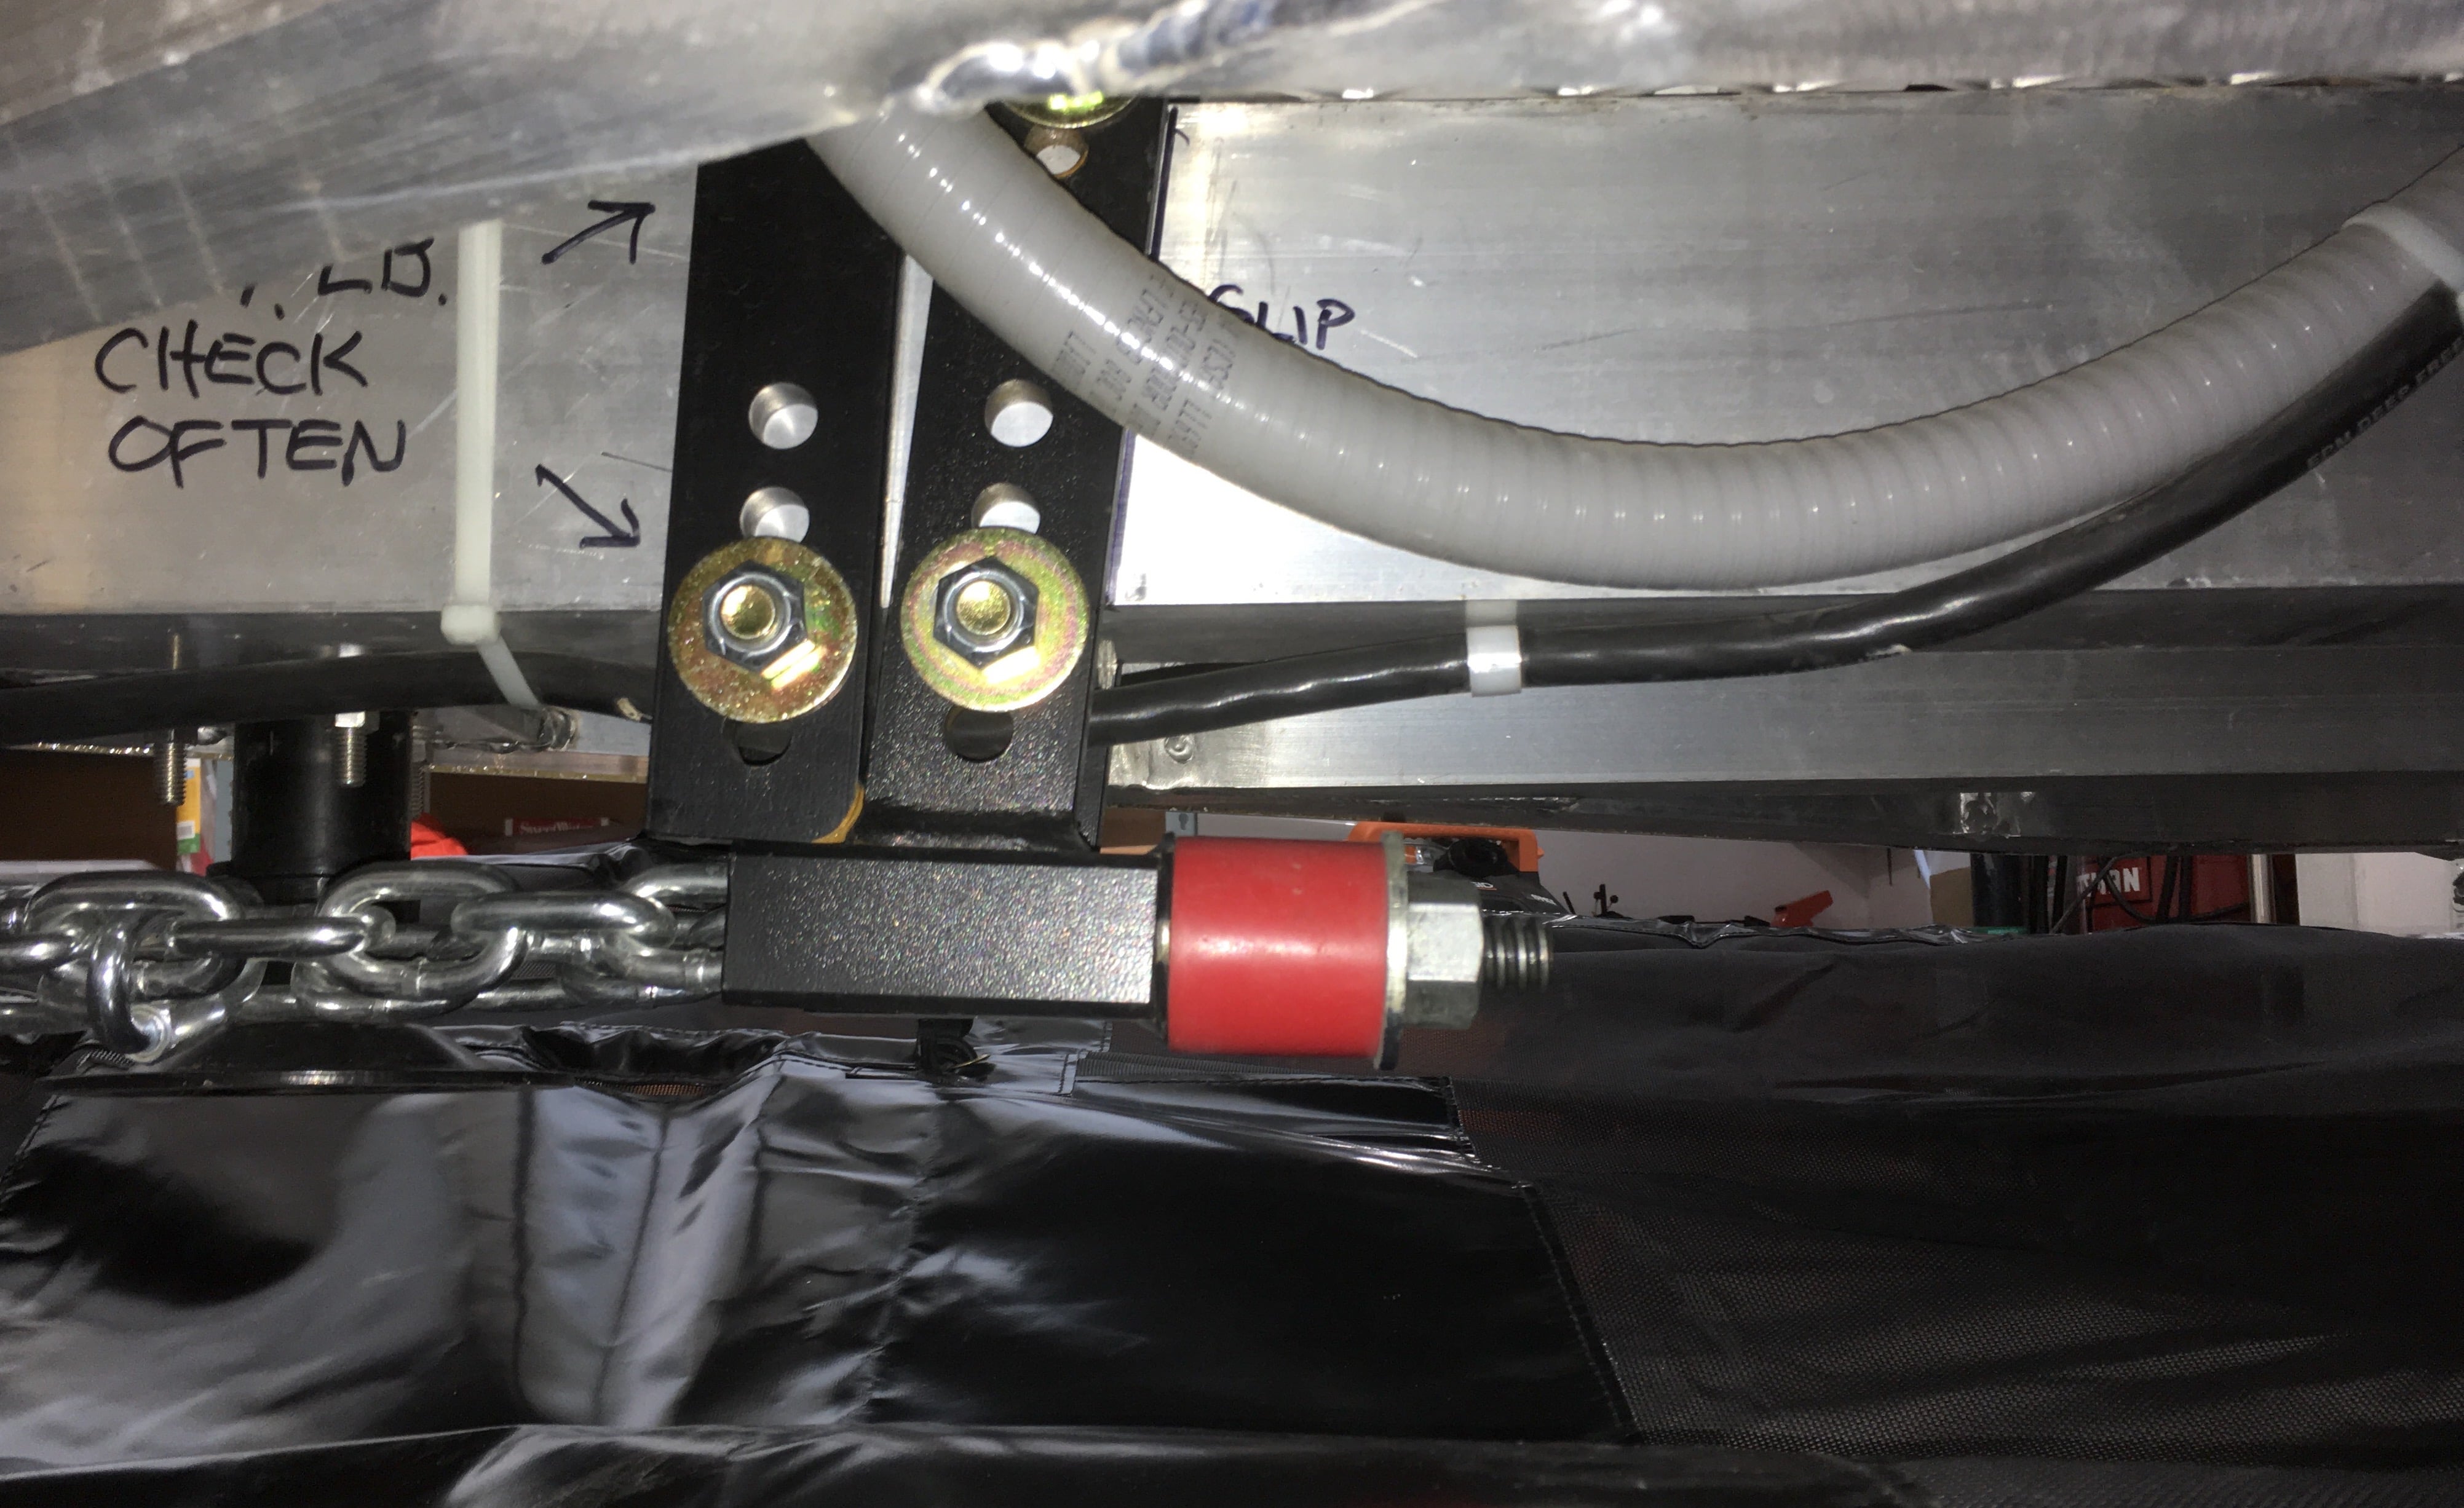
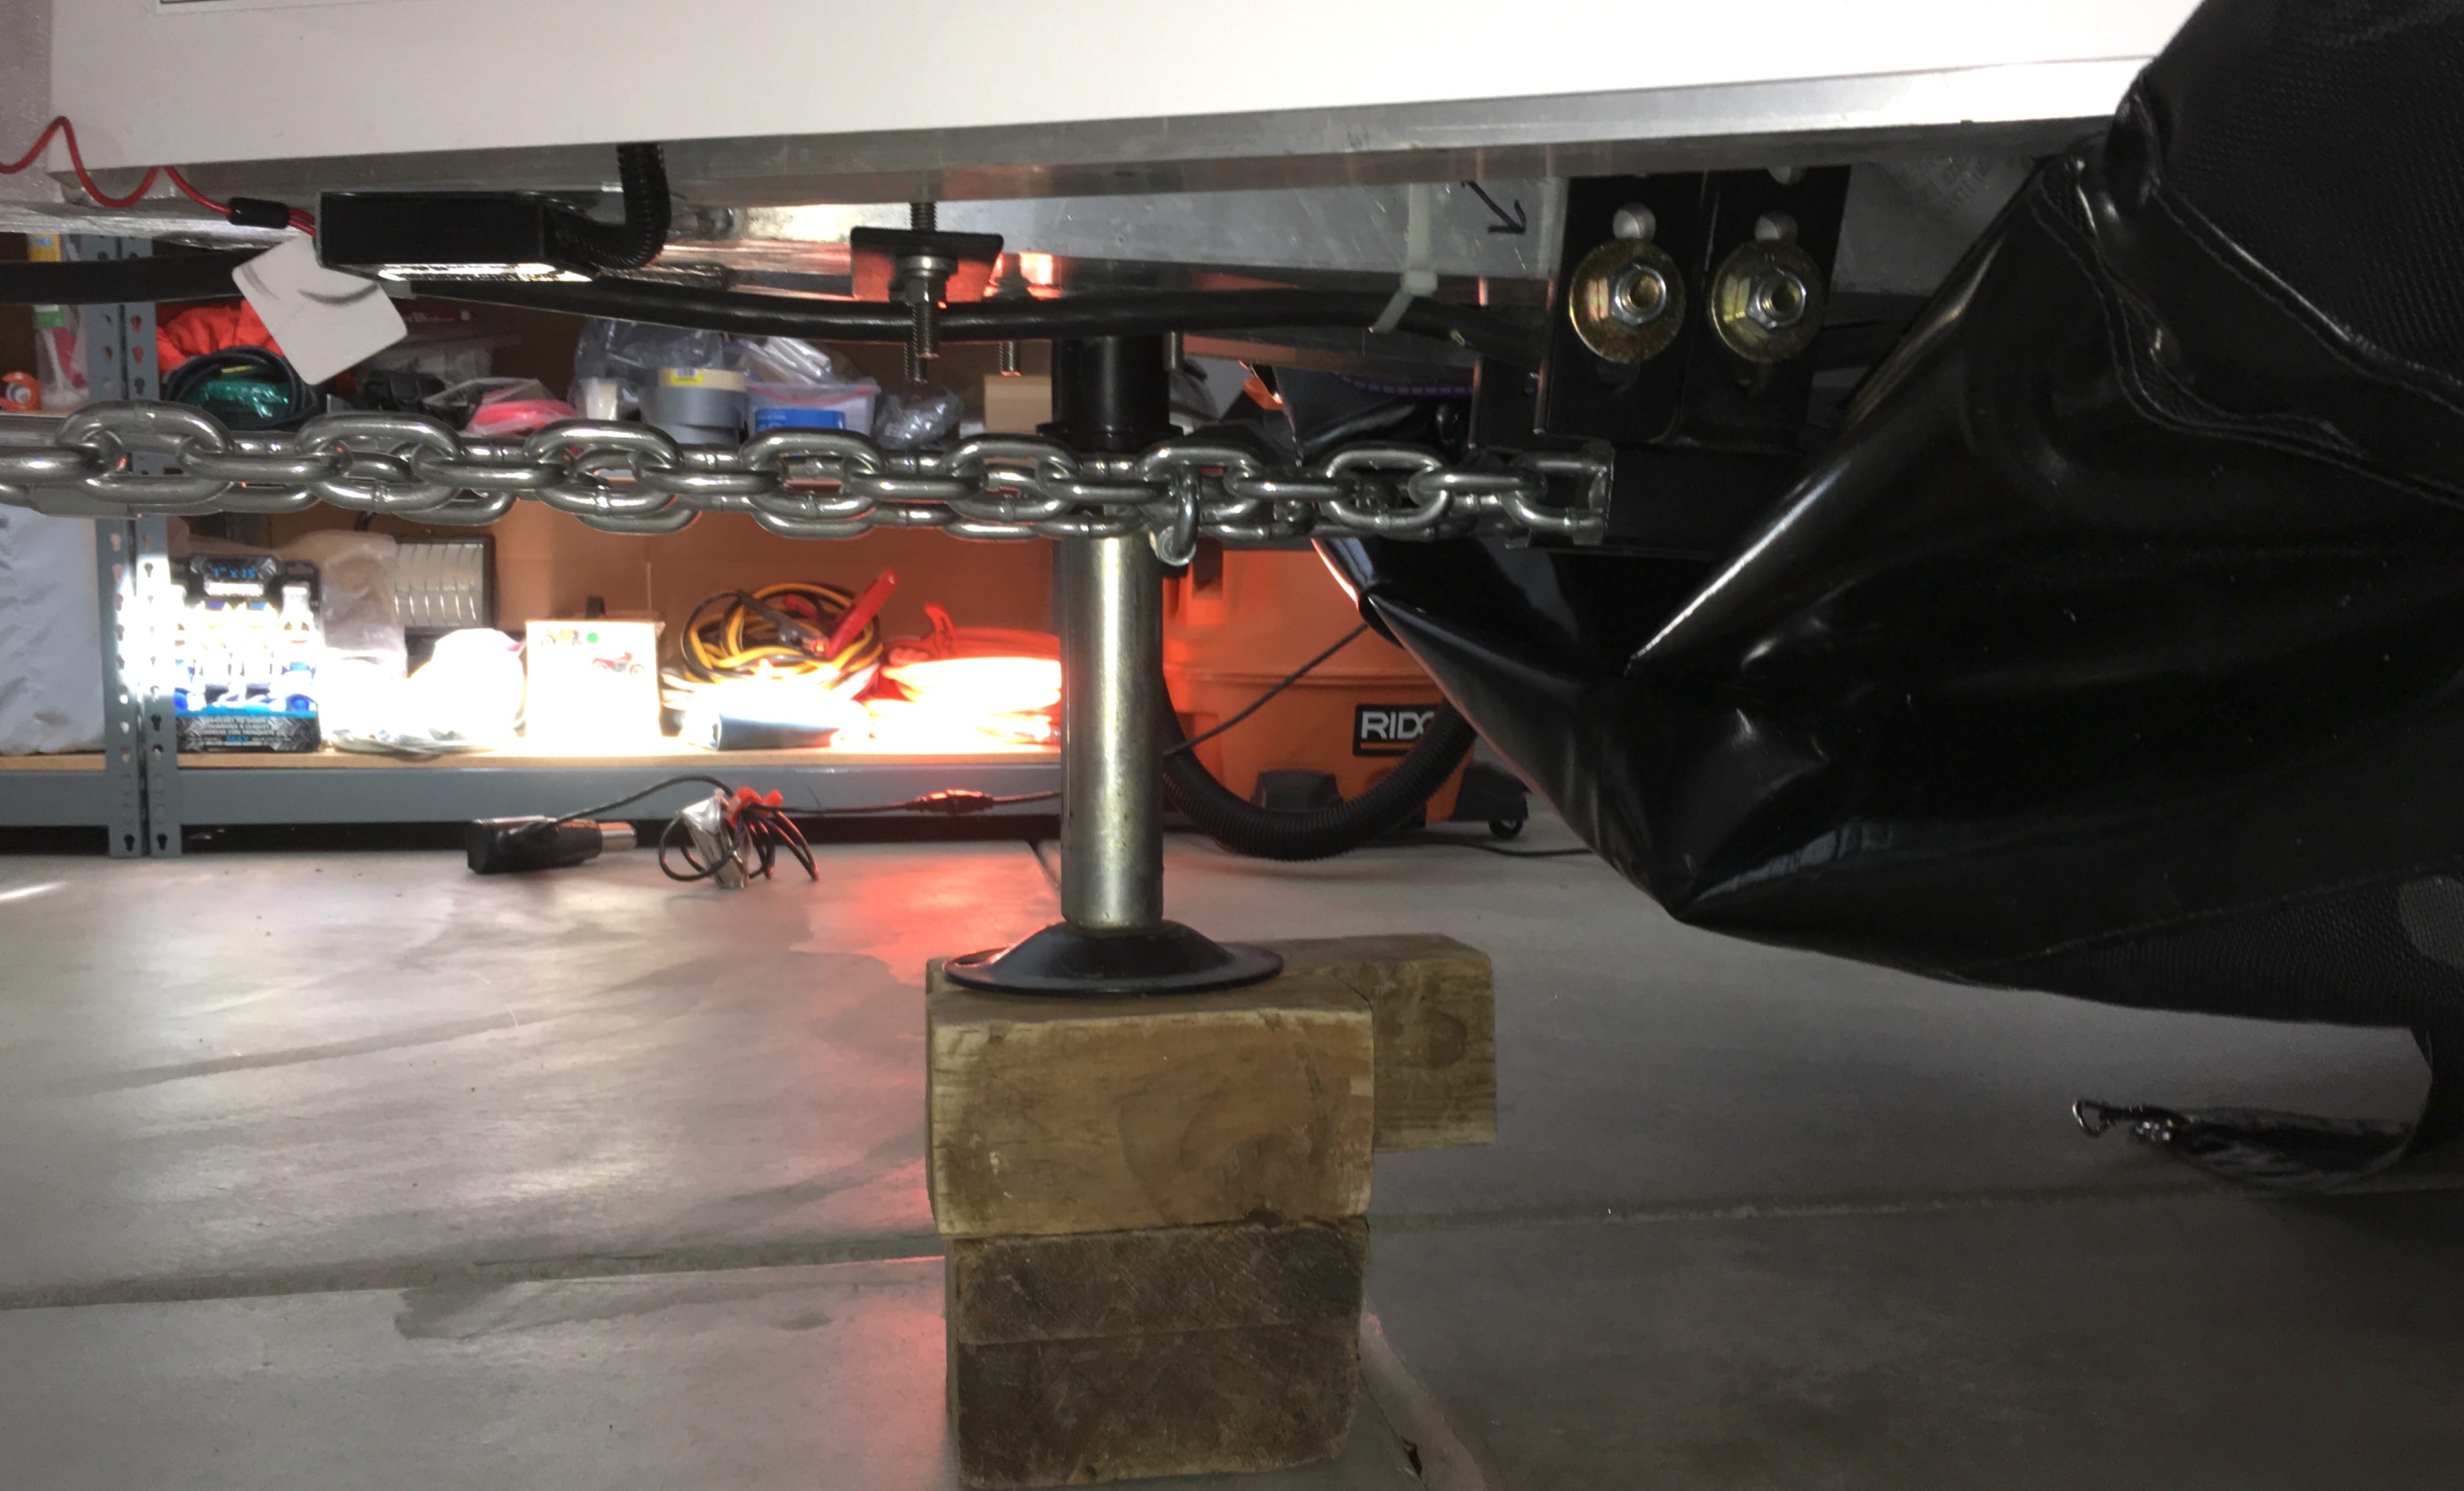
PART 2 EDIT 03/27/18 DETAILS OF FINAL INSTALLATION Detail of the front, showing how the fabric is cut out to clear the Anderson mount and chains. The opening is reinforced with heavy fabric, and there is another heavy chafe patch underneath the tongue jack, the chains and rear brackets. The small front (central) bungee anchors everything to the hitch and holds the two corners of the mesh cutout together. Detail of the right rear attach design. The SS bracket is the bright plated steel bar that the stainless shackle is connected to. Note how well the steps are protected by the extra flap. In this shot the SS is in the “Parked” mode, folded back underneath the tongue and the right front SS bungee is clipped to the rear shackle. This keeps everything off the ground and also away from the jack shaft and foot. Detail showing the front left three cords unclipped from the bar, the center one remains attached. The clips are quick and easy to manipulate. In this mode you might be accessing the rear hatch or the bed of the TV. Also, this allows the fabric to droop and you can get easy access to the rear Anderson nuts under the tongue. This shows the view under the tongue when “Parked”. The fabric clears the jack and support blocks and stays clear of the ground. Finally, this shows the left center support bar removed and lying down on the fabric. This lets the fabric lie on the ground and gives the best access under the A frame, short of actually removing it entirely. MORE TO COME. John Davies Spokane WA