John E Davies
-
Posts
5,759 -
Joined
-
Last visited
-
Days Won
243
Everything posted by John E Davies
-
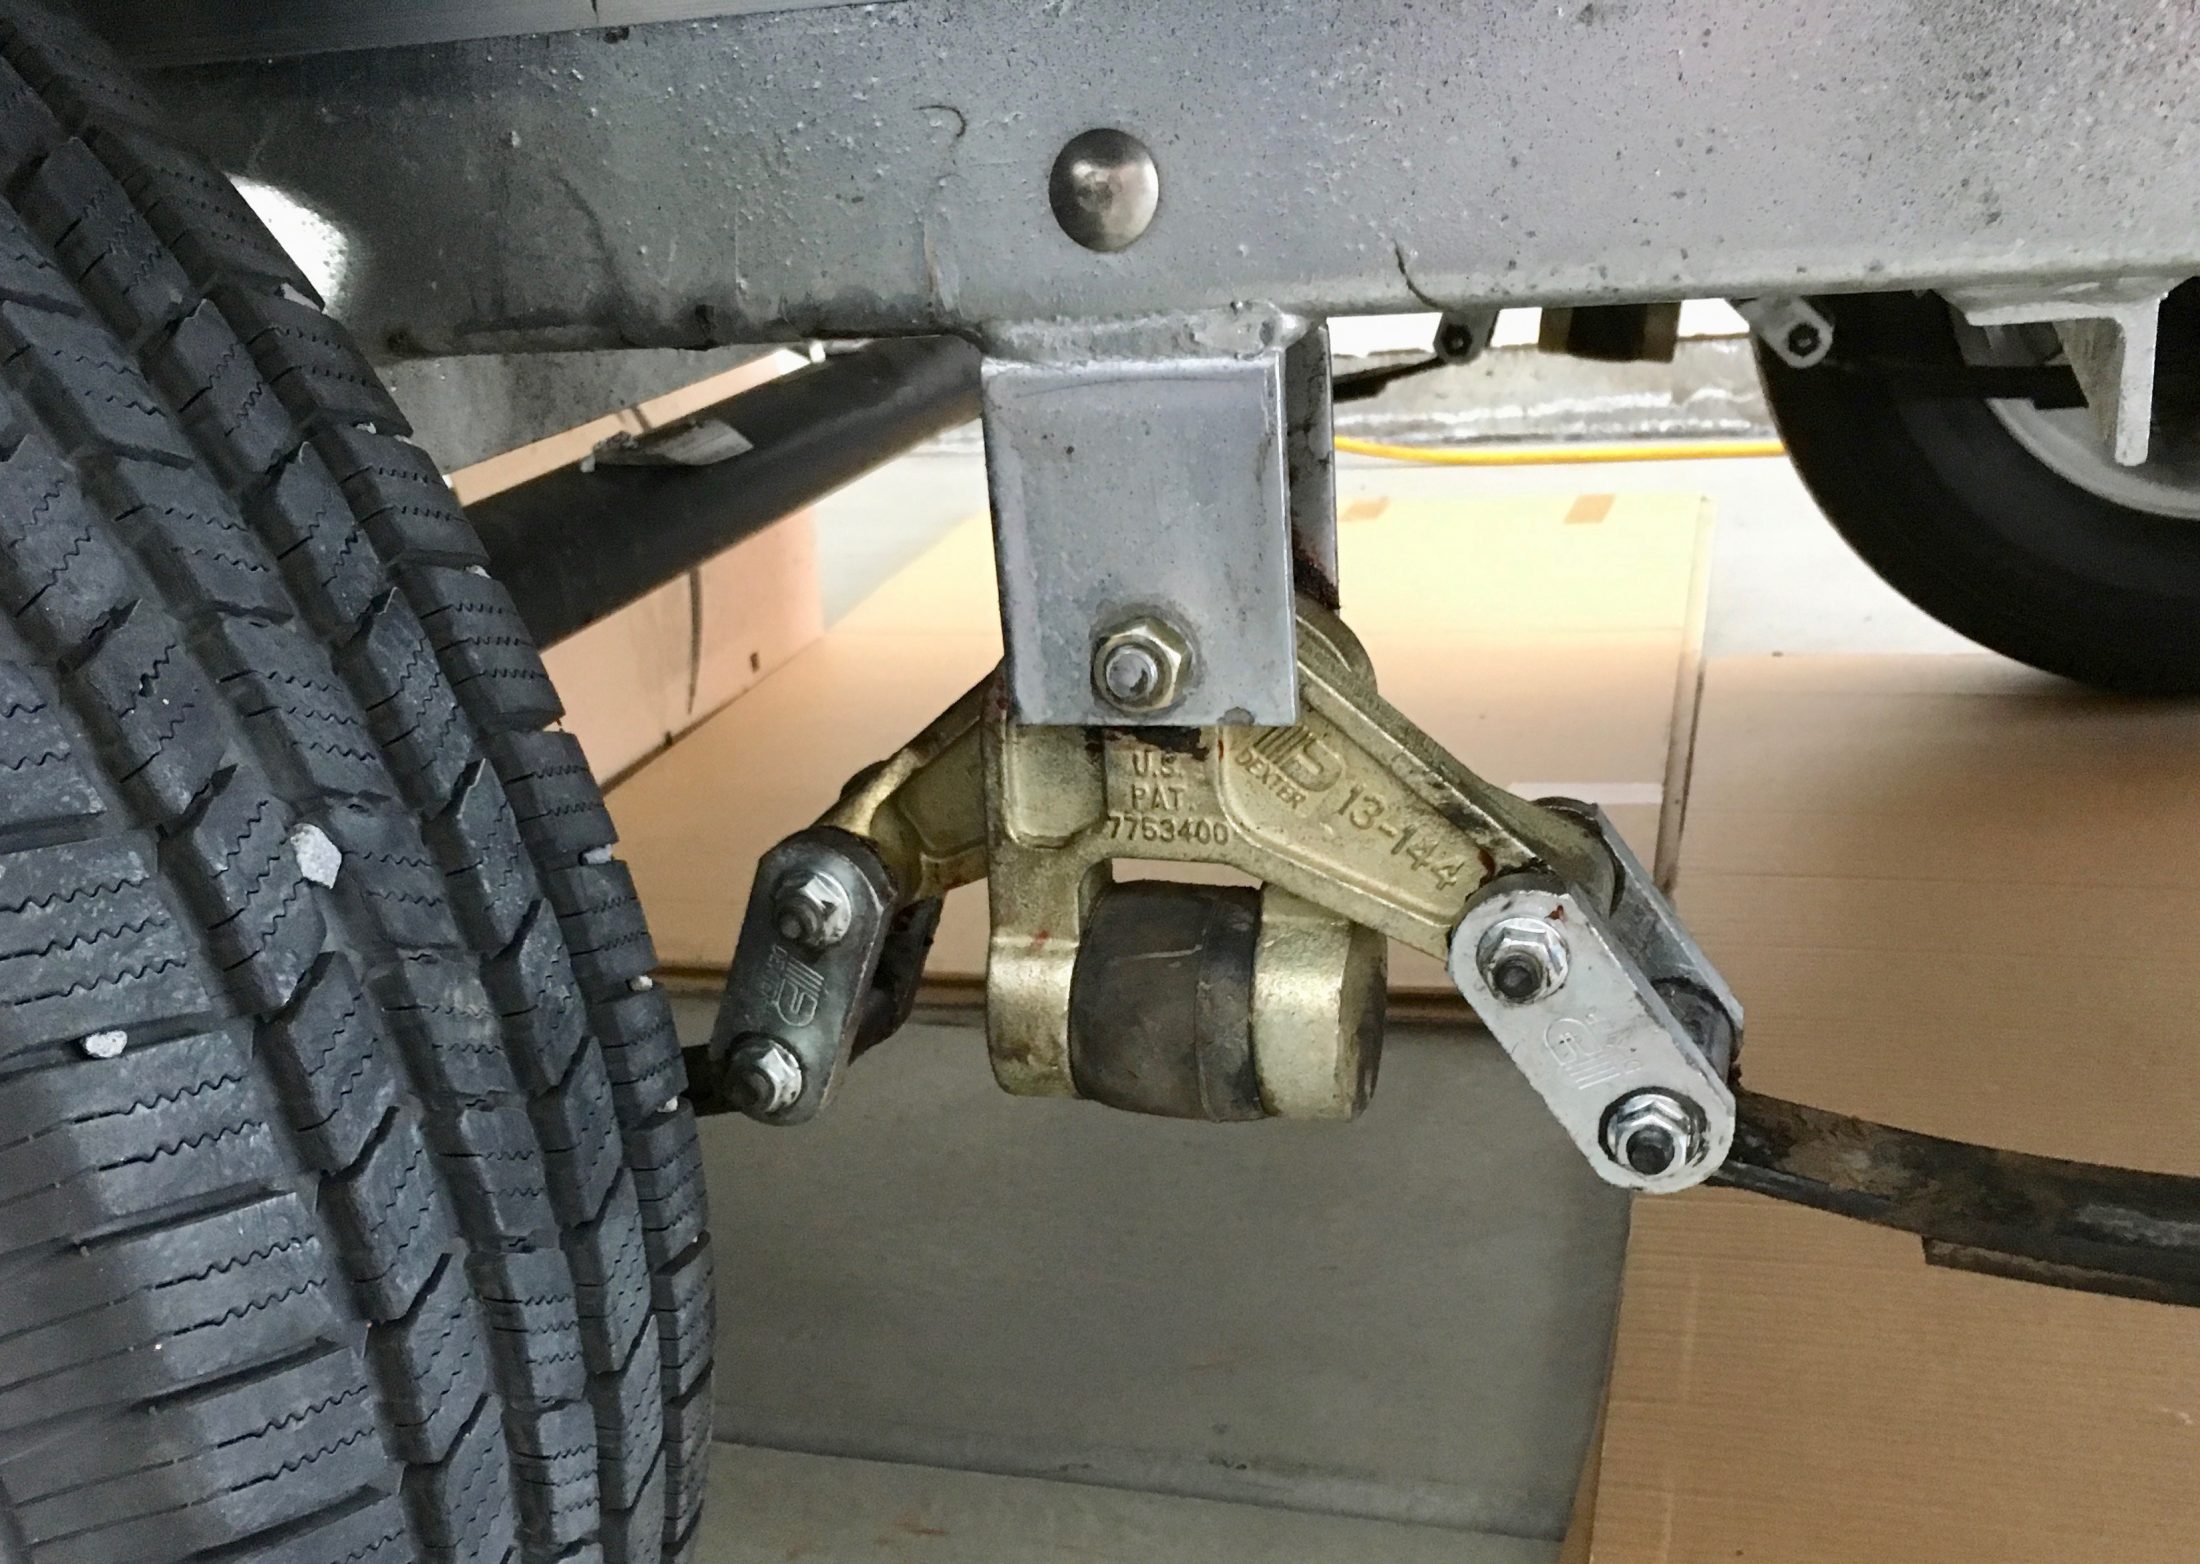
 I tried jacking one wheel, then when the equalizer reached max travel, I used a bottle jack to push up the other one over center. That worked but I never could get the other one to invert to the correct position. I thought “screw it, I will just lower the trailer...” and they all popped over without a sound. I have to wonder if the geometry is off, I really thought that tandems wouldn’t do this unless under really unusual circumstances. In regards to the zerks, I had the factory install them to the inside. With wheels off, I can reach around with my flex hose and swivel tip and grease them easily. With wheels on, I have to crawl under..... John Davies Spokane WA
 -
Shreds of Plastic in Water Pump Filter
John E Davies replied to Spike's topic in Mechanical & Technical Tips
It's normal to find that at the first cleaning, check it every few months, if debris still keeps appearing, then you should worry a little. I expect it will clear up on its own. Probably the guy who drilled your tank was not real careful about the chips. I would have used a shop vac while drilling, to catch most of the shreds.... or sucked them out of the hole afterwards. John Davies Spokane WA- 25 replies
-
- 3
-

-
- water pump
- debris in water lines
- (and 1 more)
-
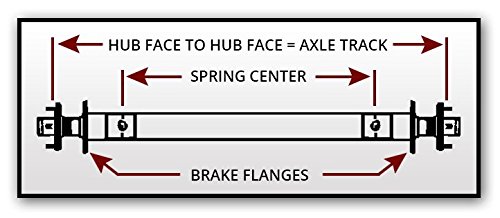
I was spinning all the wheels and operating the brakes from my truck, and I managed to flip the shackles somehow. Is this something to worry about and does it mean there is a problem with the spring length or equalizer length? I thought this should not happen with correctly sized parts. I found a video showing how too fix it by jacking up the axles one at a time, but it is rather violent and not something I want to do if it will correct itself when I lower the trailer... Comments? I suspect it is too late to catch anyone in Howenwald. Found this - good advice? Find a piece of wood (like a 1x1, large enough to fit and not allow for any wobble) that will fit through the equalizer hanger and on top of the leaf springs and shackles. The springs won't drop when you lift the trailer by the frame. We use this method when we finish building a trailer for my company since we only put the rear tires on to make the thing easier to move around with a dolly; and it always works after 2300+ flats and tilts made. Thanks. John Davies Spokane WA

-
They are used on 4wds (Wanglers etc) and usually they install different wheels with a high offset, because the spacers are a couple of inches thick. If you used them on an Ollie with the stock wheels, they would stick out far past the fenders, and you would probably rip them right off the hull. Plus the added leverage puts a huge stress on wheel bearings (and ball joints on a truck). While they can work, there are usually better, but more costly, solutions. Bad idea, yes.... John Davies Spokane WA
-
Updating an older thread, how about the Correct Track? This gives you two inches lift with no mods to existing suspension other than extending the brake wires.... A skilled owner can do it at home. https://www.etrailer.com/Trailer-Suspension/Lippert-Components/LC87220.html As a bolt on kit, I would be happier if the brackets were welded at the top to prevent any looseness. I would still like a little height to improve the departure angle. The alignment capabilities are secondary and not likely to be needed. Two inches lift is not great, but it is better than none. John Davies Spokane WA
-
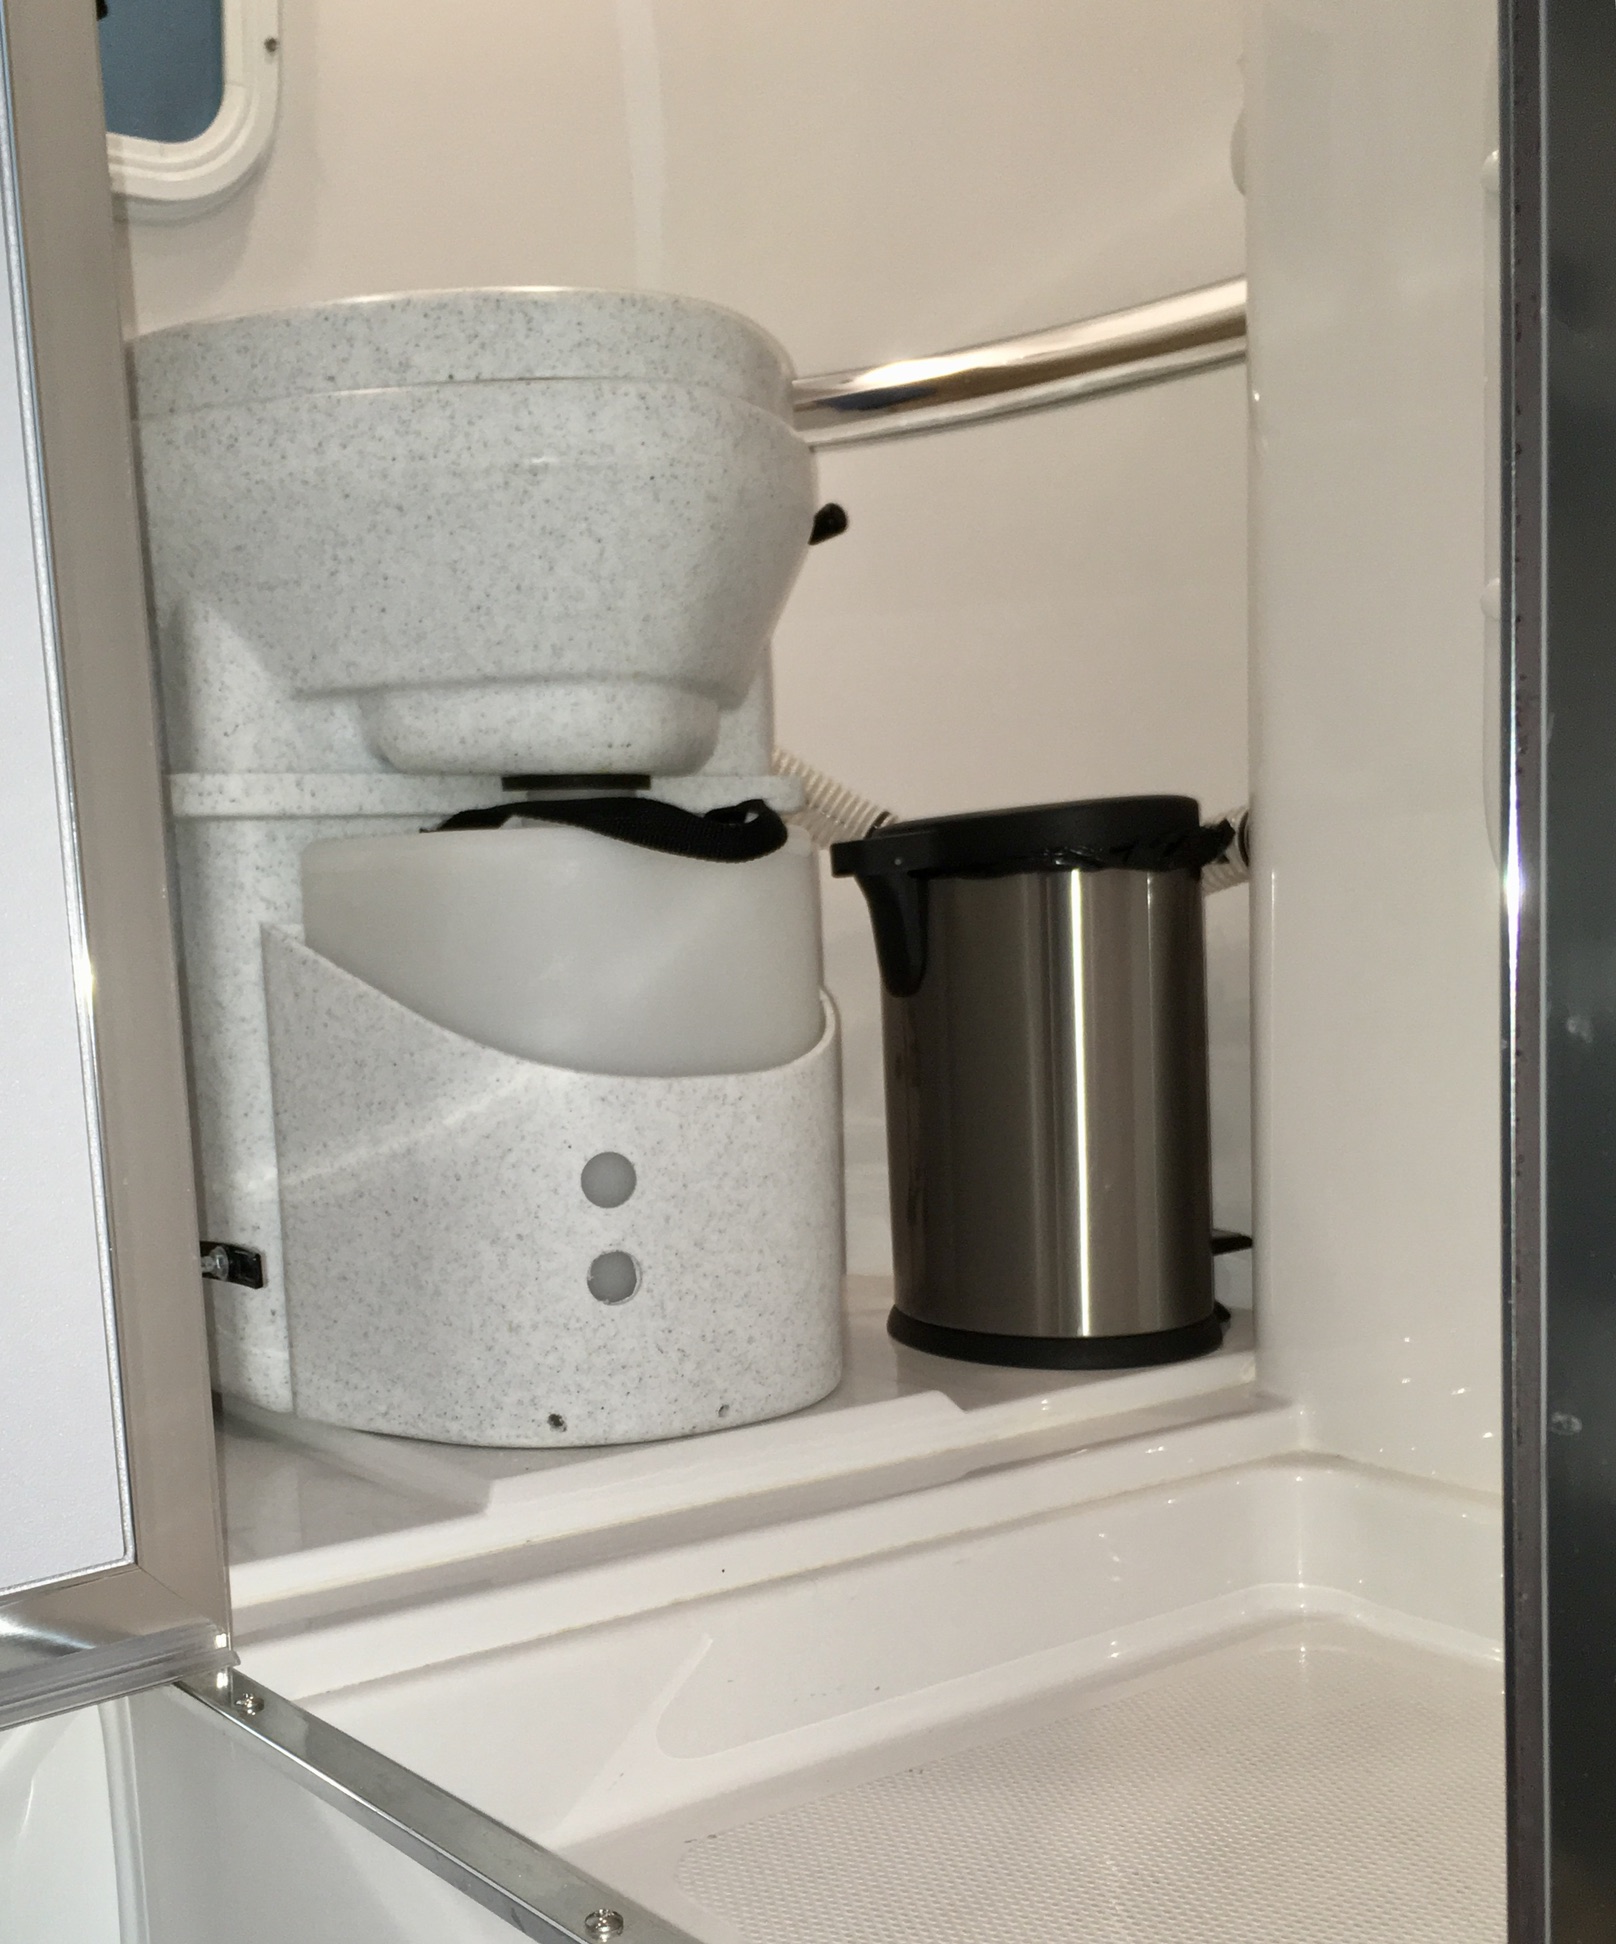
I usually just spritz water using the shower function, washing dust, lady hair and debris from around the toilet and out onto the pan, then I lift it off with a paper towel and rinse the really small stuff down the drain. Wipe dry with a small microfiber towel. So far that is working fine. The more I use the Nature’s head the more I like it, and I am so glad to have the extra fresh water and not have to stop at dump stations, other than for an occasional quick gray water dump when I cannot drain that tank on site. John Davies Spokane WA
-
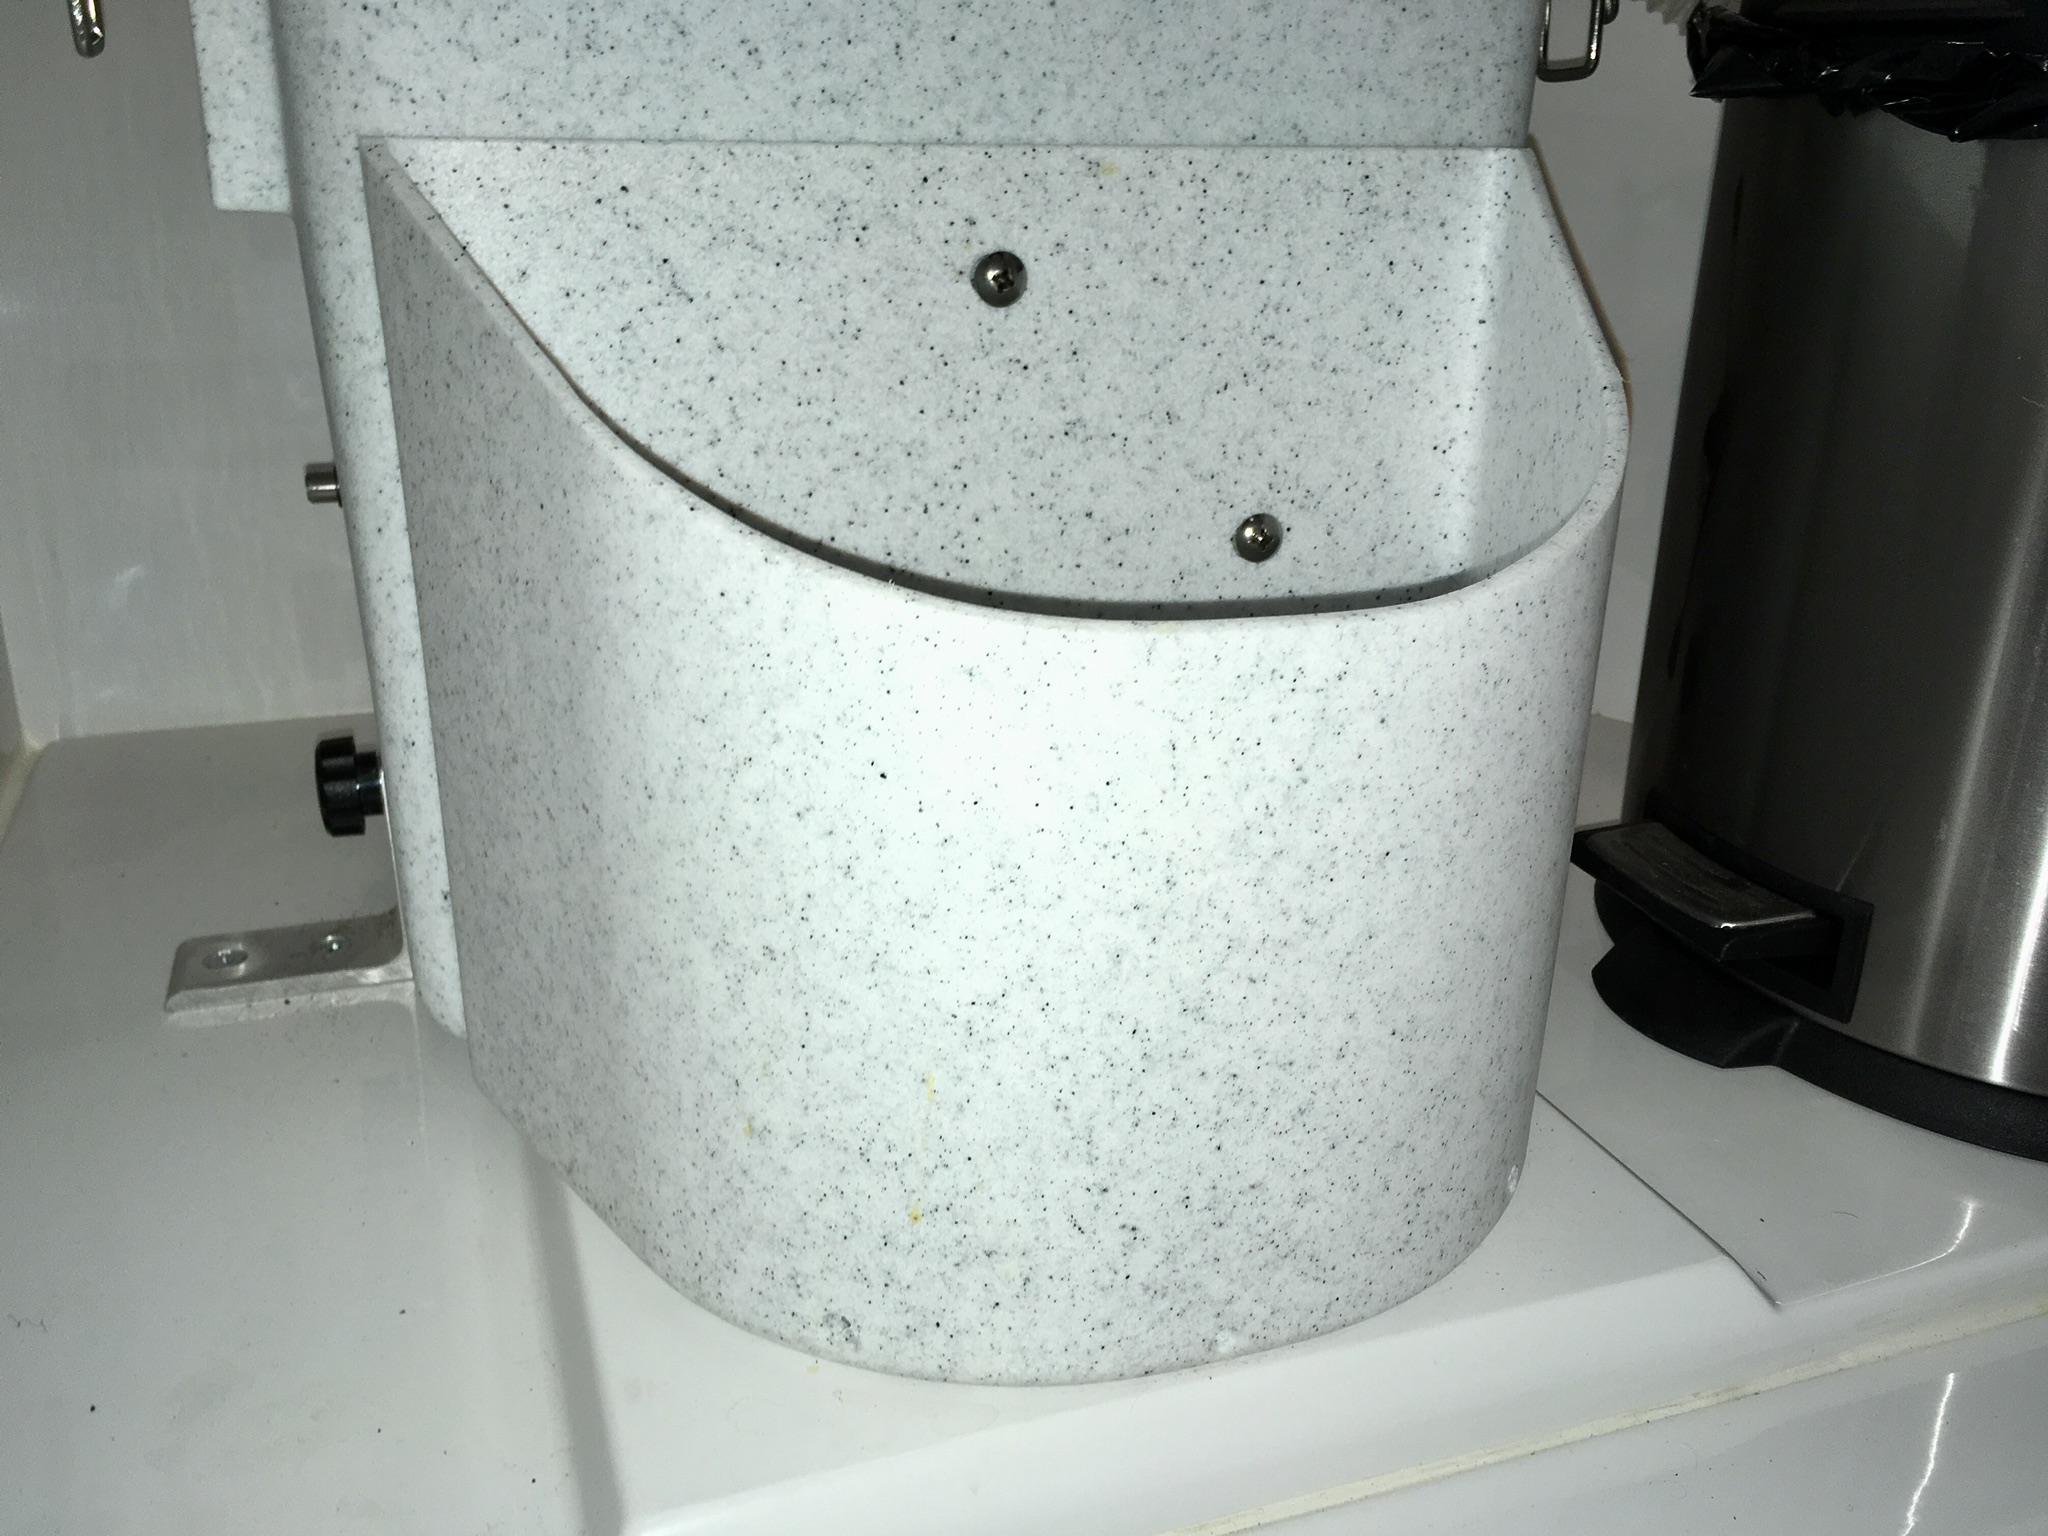
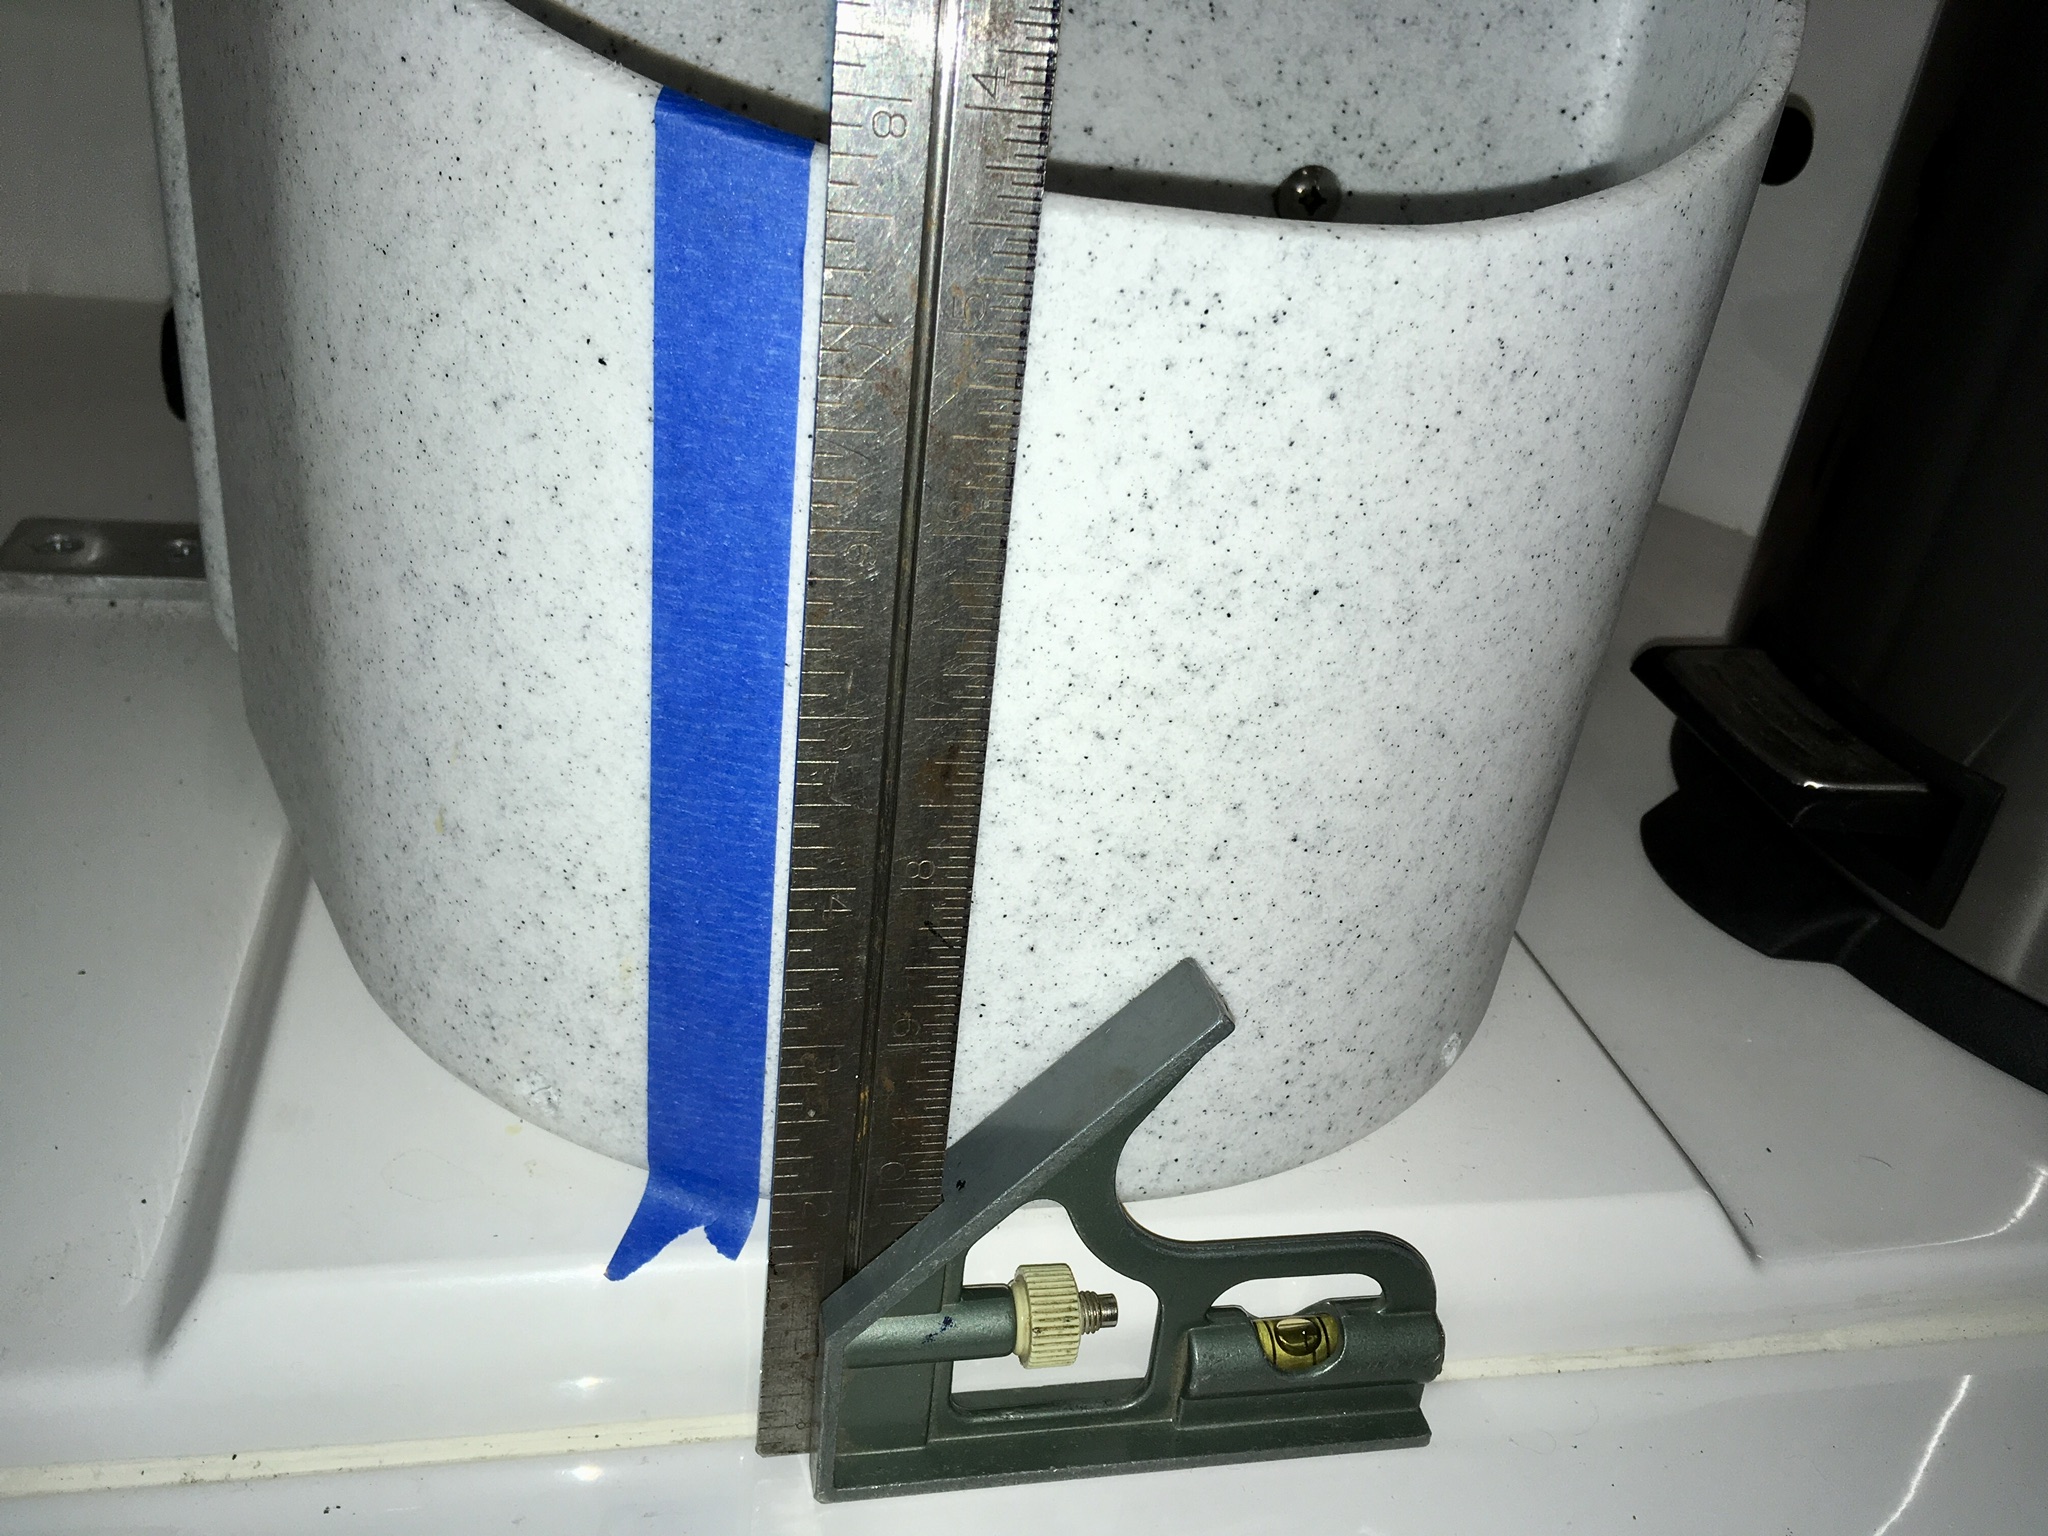
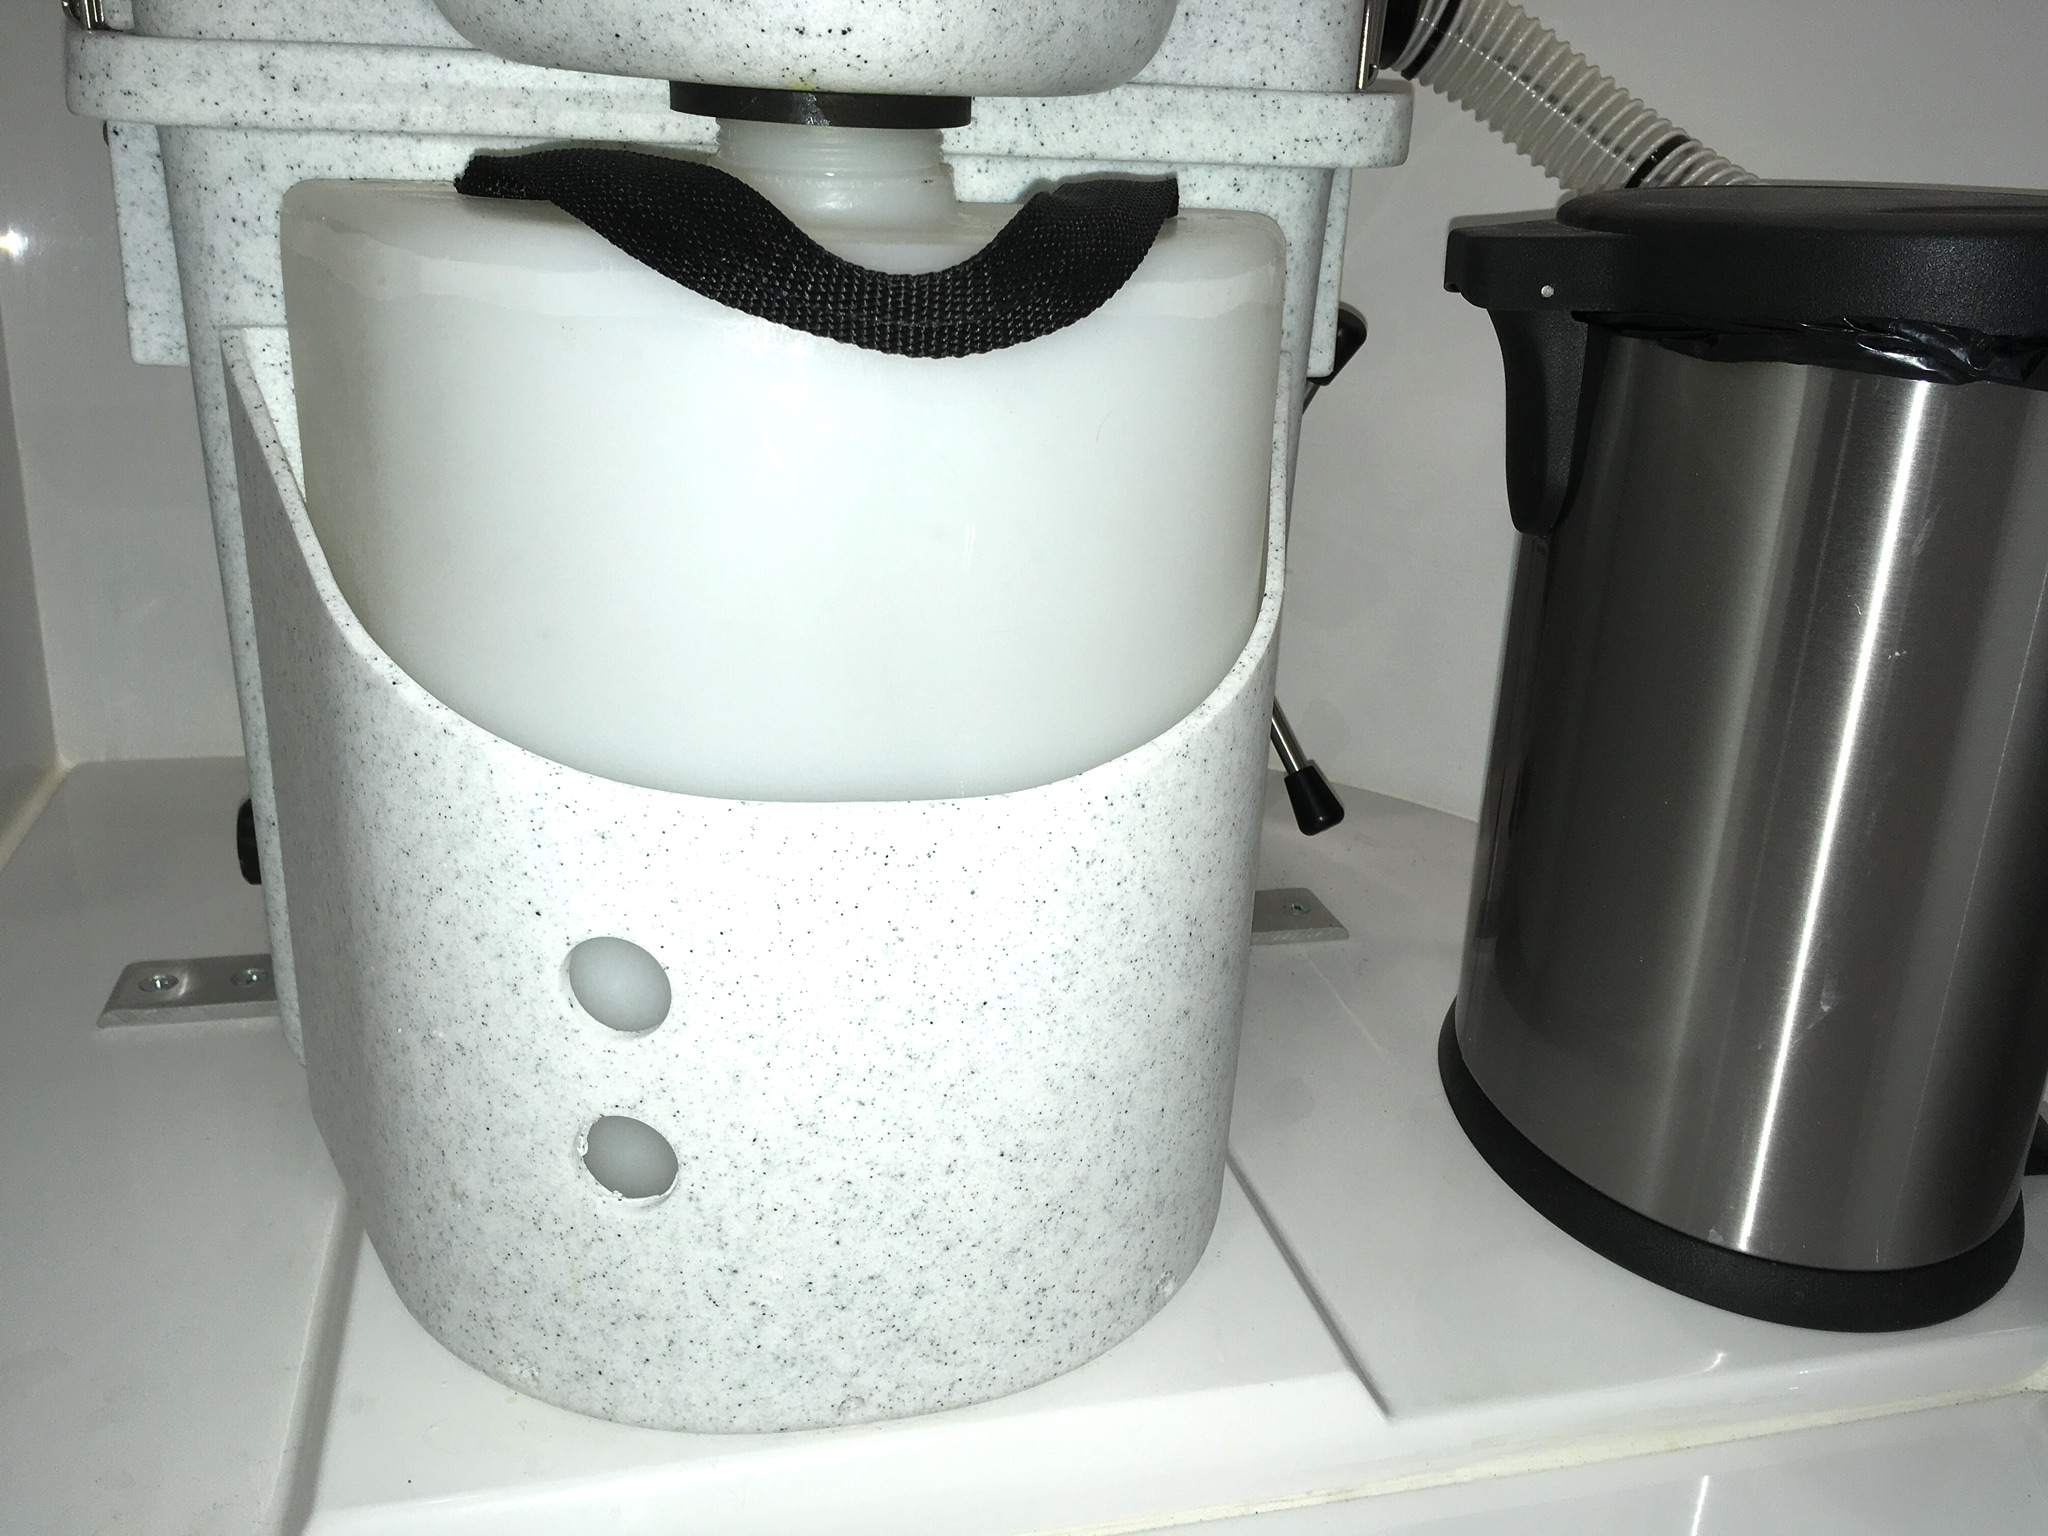
Update. Added large sight holes in the receptacle for the pee bottle, visible from standing outside the entry, so I do not get surprised. With two or three adults using it full time the level goes up pretty fast, full in maybe three days (depending on how hydrated your users are!) Set a vertical tape guideline, do not eyeball it or it will be crooked. Drill a couple of 1 inch holes evenly spaced. I used a step drill and it went through the plastic like butter and left pretty holes. View from outside (also notice the small weep holes at the bottom for shower water to drain): I will see how it works next trip and report back. Daylight should illuminate the transluscent pee tank and the “contents” should show up in the holes. Maybe.... I hope. John Davies SpokaneWA
-
Here is what I just sent.... Hi Anita, Are there Oliver branded products that we can purchase? I am especially interested in a high quality full zip fleece vest, long sleeved sun shirt, or uninsulated windbreaker with small Oliver name and mountain logo on the front. It needs to be a mature and classy color and design. Columbia would be a fine choice: https://www.columbia.com/mens-flashback-windbreaker-jacket-1589321.html?cgid=men-jacketsVests-windbreakers&dwvar_1589321_variationColor=963#srule=MostPopular&start=0 These are great, I have one with an Earth Roamer logo that is my favorite. I would love to have a similar Oliver one: https://www.columbia.com/mens-silver-ridge-long-sleeve-shirt-AM7453.html?cgid=men-shirts-longsleeve&dwvar_AM7453_variationColor=413#start=3 I know there would be much interest in mugs, clothing, etc, what’s up? Father’s Day is soon and I need to find a trailer specific gift to suggest to my kids. I hope you are busy and well. Who else wants Ollie Gear (cool name for a store) and what would you like to buy? Post links please. John Davies Spokane WA
-
How to: Fix and flip your blinds
John E Davies replied to John E Davies's topic in Ollie Modifications
Thread bumped at Spike’s request. John Davies Spokane WA -
Legacy Elite II.... which Dexter axle?
John E Davies replied to Rleog's topic in Mechanical & Technical Tips
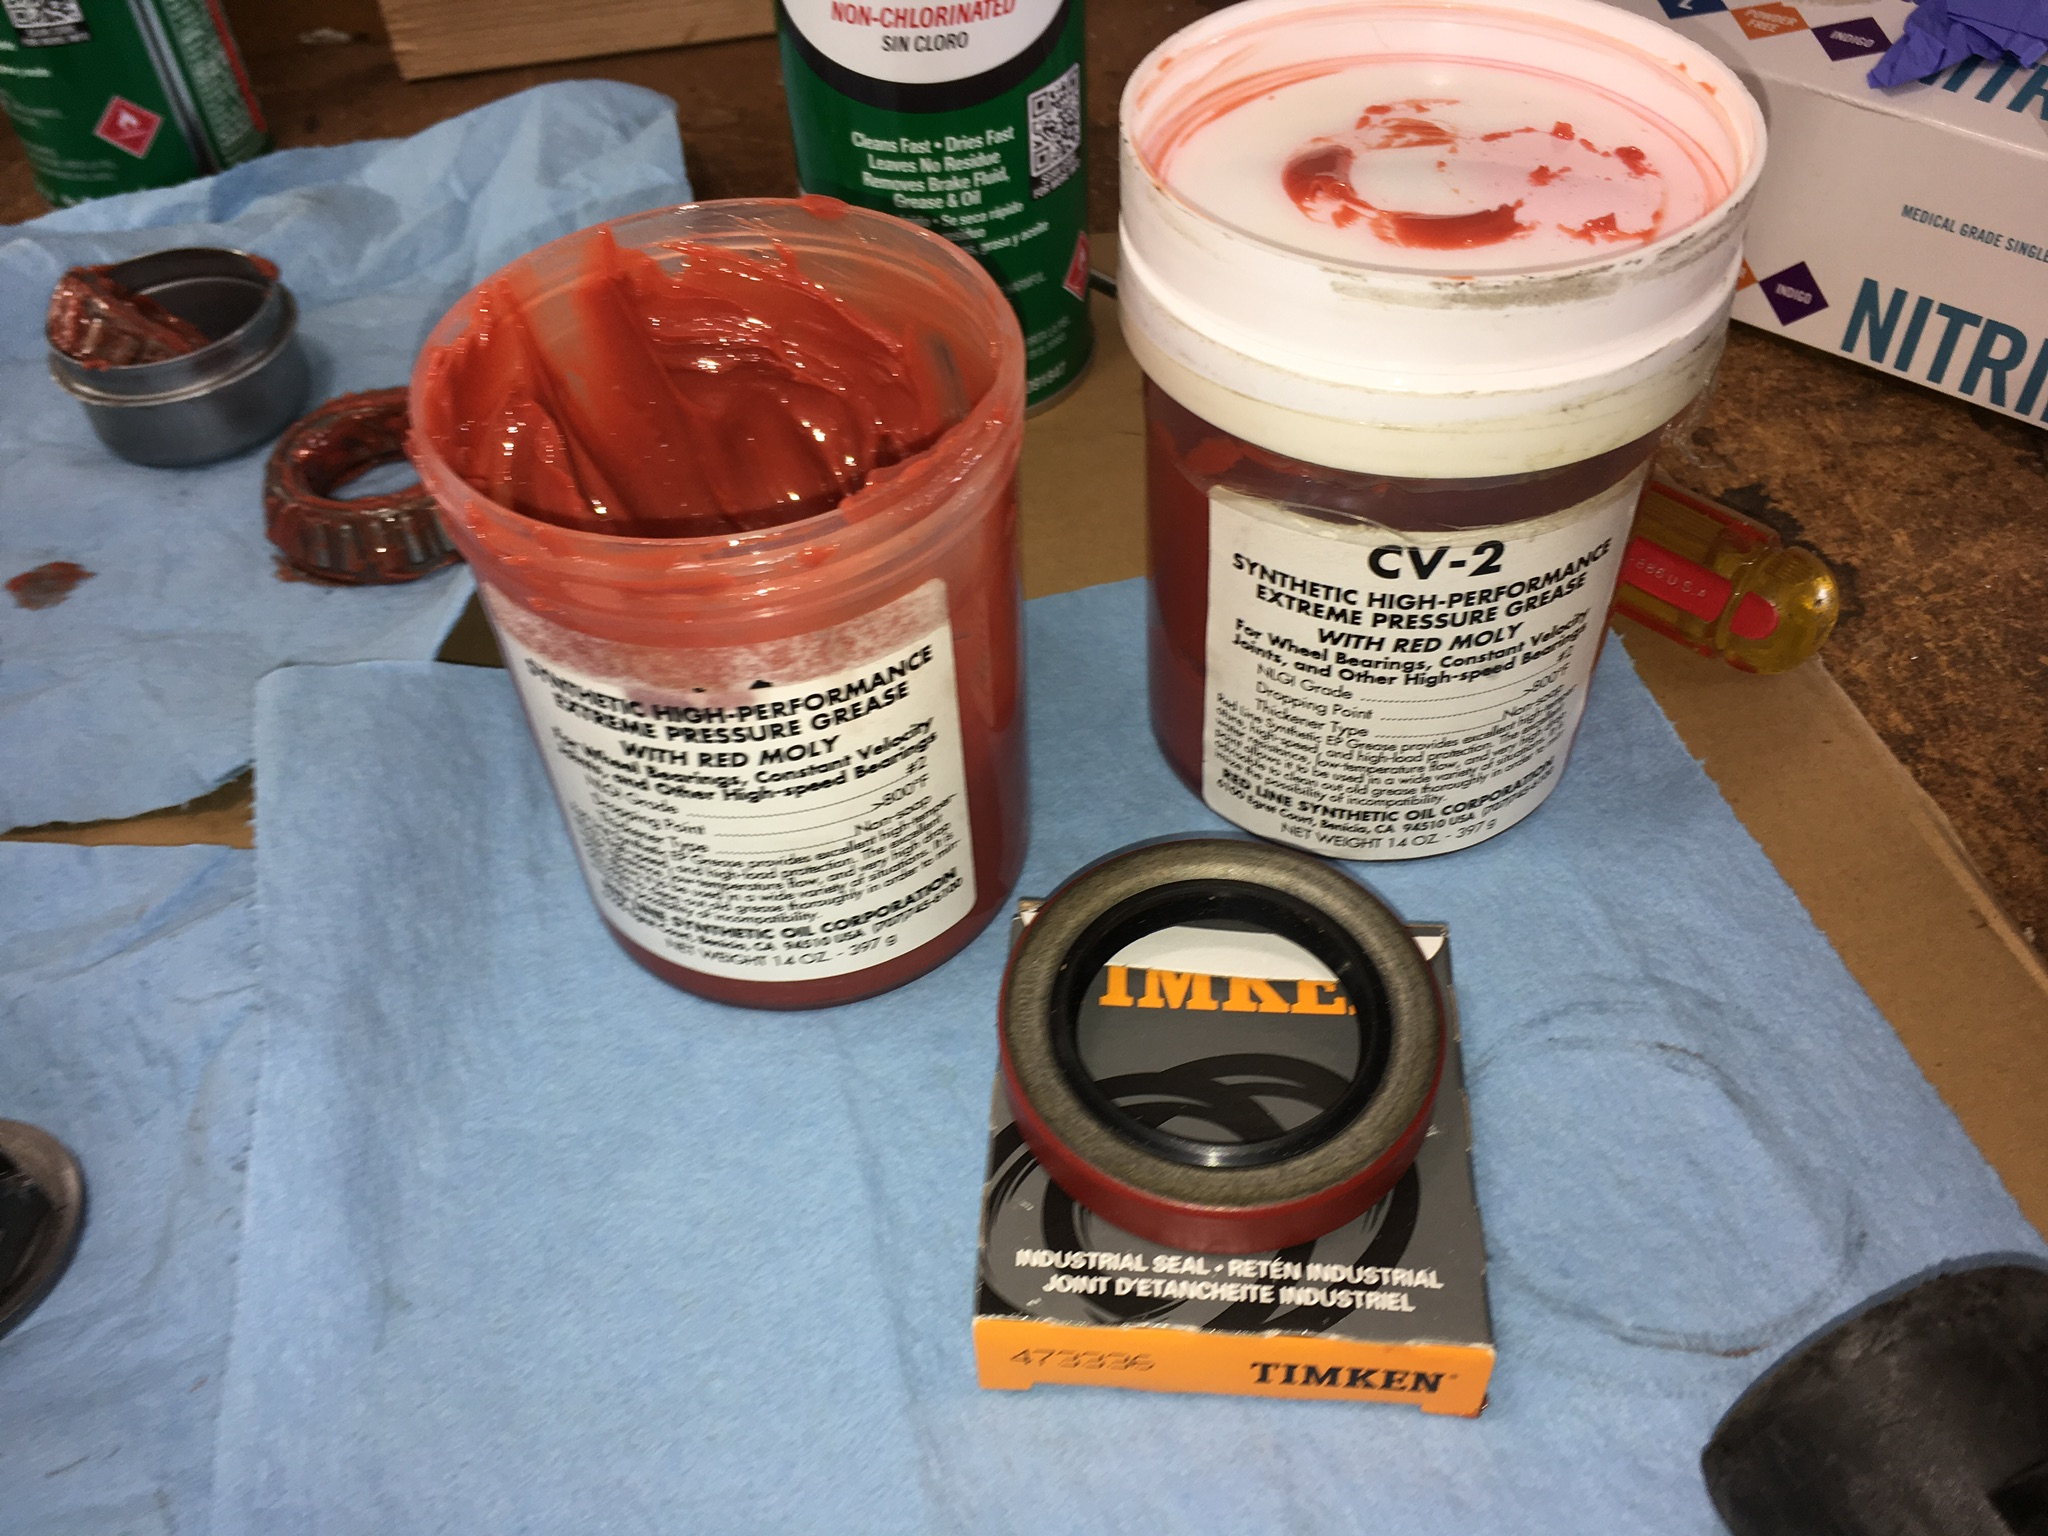
Your axles take standard 3500 axle bearings and seals, no need to call Dexter. https://www.etrailer.com/question-181919.html You can get a generic bearing kit but I strongly recommend buying high quality Timkin seals at your local bearing supply company. All the $1 seals, including those sold by Dexter, are Chinese made garbage, they have very minimal quality control and will eventually leak and screw up your brake linings. These are about $20 plus tax for five, I always get an extra one for when I screw up during installation... like forgetting to insert the bearing first ;( Or here, for a lot more.... https://www.amazon.com/Timken-473336-Seal/dp/B001544U88 John Davies Spokane WA
-
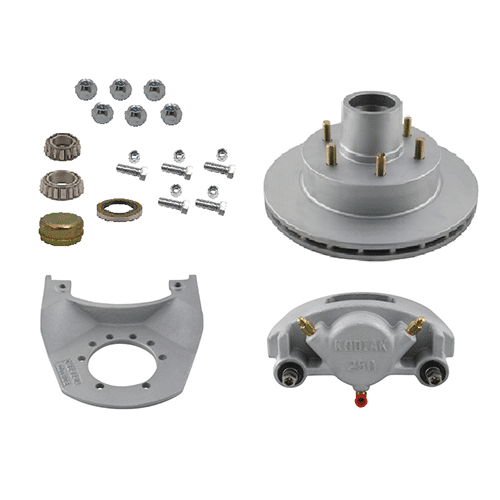
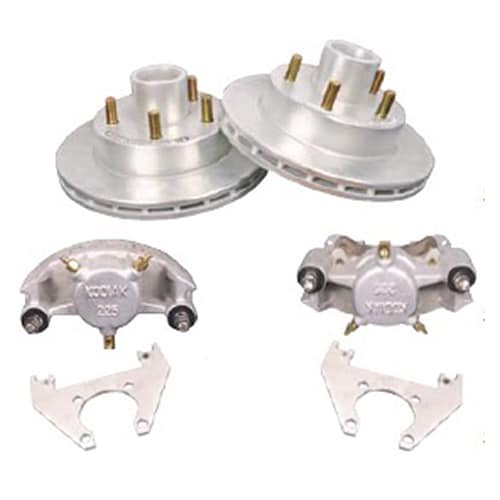
Had a thought.... it is so simple, it scares me because it probably won’t work. Install these 3500 idler hubs onto the OEM axles. https://www.etrailer.com/Trailer-Hubs-and-Drums/Dexter-Axle/84655UC1.html Buy this kit. .... https://www.kodiaktrailer.com/product/2rcm-10-dac/ Have a machine shop redrill the hole pattern to 6 on 5.5”, and rebalance the rotors if needed. This shop near me (Portland OR) charges $45 for two rotors. ....https://dutchmanaxles.com/services.html ... but I bet any good local shop could do it. Install the parts and have a lightweight 3500 disc setup that retains the OEM wheels. Any reason this will not work? Will the 10 inch rotors physically fit over those idler hub flanges? It might be necessary to reduce the outside flange diameter, I don’t know.... I emailed Kodiak (and also Etrailer.com) asking if this was even possible, and if they could offer custom drilled rotors for us unfortunate Oliver owners to get us out of this dilemma. It would be a cost effective, very painless solution, one that the Ollie factory might want to get involved with, to be able to offer a good disc option. Five idler hubs would cost $288, which is way less than an axle swap, and a much better solution. I still like the idea of idler hubs since they are so darned easy to change in the event of a bearing failure, IF you carry a spare one. As inexpensive as they are, it makes sense. EDIT: if you wanted to save $100 you could buy five of these No Name hubs.... https://www.etrailer.com/Trailer-Hubs-and-Drums/etrailer/AKIHUB-655-35-K.html Looking at the Kodiak scematic, it looks as if there is plenty of hub flange clearance. .... https://www.kodiaktrailer.com/pdf/RCM-10-SECTION.pdf Comments? John Davies Spokane WA
-
Mark: Cost and features. They are over three times the price for the hub/ brake components, and they only offer one coating, which is basically the same as the low end Kodiak coating. They come with Never Lube sealed bearings, which suck and are expensive to replace when they fail on the road. Even at half off, they are costly (this is for ONE brake, not a pair!): https://www.etrailer.com/Trailer-Brakes/Dexter-Axle/K71-647-00.html Compare to a higher end Kodiak: https://www.etrailer.com/Trailer-Brakes/Kodiak/K2HR526D.html The Dexter actuators are decent, but they take up a lot of floor space compared to a HydraBoost which is only 3 inches wide and marine rated (and unvented, no moisture or dust entry). Kodiak has been doing this forever and they have a stellar reputation in the marine industry (especially salt water trailers). Dexter owns them now, I think, and just recently spun of their own brand. Plus Dexter does not have a kit to fit our trailers. I am no fan of Dexter, I think they publish artificially high MSRPs, price gouge with their component parts, and heavily discount assemblies, so you are forced to replace entire units and no retail stores or RV shops are willing to carry any of the small parts. Example: $15 for a 10x2.25 brake shoe adjuster, when you can buy the entire (not Nev-R-Adjust) brake and backing plate unit for less than $30! Example: an entire 10x2.25 brake with Parking Brake (an extended cam shaft and a lever on the back of the plate) is $200 and (it used to be) nobody discounts them (special order only). Now Etrailer.com carries them for $70. They are selling the brake for over 60% off! Price gouging on Dexter's part. John Davies Spokane WA
-
The brakes he used are for a heavy axle. If he would post some close-up pics I could tell a little better ;( ....his description is: "Kodiac 12" Trailer Disc Brake assy, Dacromet #1HRCM12 DACKIT" which is this 5200 brake: ... https://www.kodiaktrailer.com/product/1hrcm-12-dac-kit/ 5200 pound version, 12 inch rotors: 3500 pound version, 10 inch rotors: Its a little deceptive because they are not to scale ... notice the 5200 has a five hole mounting plate, and hubs with 6 on 5.5 studs, which is fine for our wheels, but it won't work on a 3500 pound axle (four hole backing plate and smaller bearings). The heavy axle uses a #42 spindle (2.25" OD) and the 3500 uses a #84 spindle (1.75" OD). A 5200 axle is heavier but has WAY stronger spindle and bearings. I would not mind that at all. Oversized 12 inch rotors and bigger pads run cool and will last forever on a 6000 pound trailer. As you commented, the downside is more unsprung weight. How important is that on a travel trailer? Rough roads? John Davies Spokane WA
-
I have not seen a Kodiak kit that will go on a small spindle with four hole backing plate, with a 6 on 5.5 bolt pattern ... https://www.kodiaktrailer.com/product-category/3500-lbs-axle/3500-lb-axle-10-brake-sets/ I don't want the expense of heavier axles, I would much rather just keep the 3500 axles and add discs. I do not want a Dexter brake system. Having a hybrid (actually a bastard) axle system utilizing special components derived from two different axle systems is stupid as can be. Why did OTT choose to do this? Did they get a special group buy on six hole wheels? I simply do not understand the logic of bolting heavy duty wheels onto light duty spindles and bearings.... It's frustrating. John Davies Spokane WA
-
"Thank you for your interest in our braking systems. According to Dexter you have 6 Lug 3,500# axles with 1/2 wheel studs. Currently there is no disc brake available to fit your application. Converting to disc brakes would involve upgrading your axles to 5,200 or 6,000# axles. Please give me a call if you would like to proceed." This is from StopYourTrailer.com Am I screwed? What did those of you do, switch to a 5200 lb axle set? I would not have ANY problem adding two heavier axles with idler hubs, then I could use the slip-on discs instead of the ones with integrated hubs. But it would be an extra pain and also maybe $550 extra expense with shipping. With idler hubs, I could carry a complete hub with bearings, ready to go, and swap out one with a failed bearing in 30 minutes by the side of the road. That is pretty cool. https://www.southwestwheel.com/p-2303-5200-lb-standard-spring-dexter-trailer-axle.aspx Does OTT supply straight or arched axle tubes? I do think it is hard on customers to have a special order axle set on their trailers. I would much rather have an off-the-shelf 5200 pound set that is stronger, with the 3500 pound springs. Can anyone supply the 0em specs? [attachment file=41Rnrrj7c+L.jpg] Comments please! John Davies Spokane WA
-
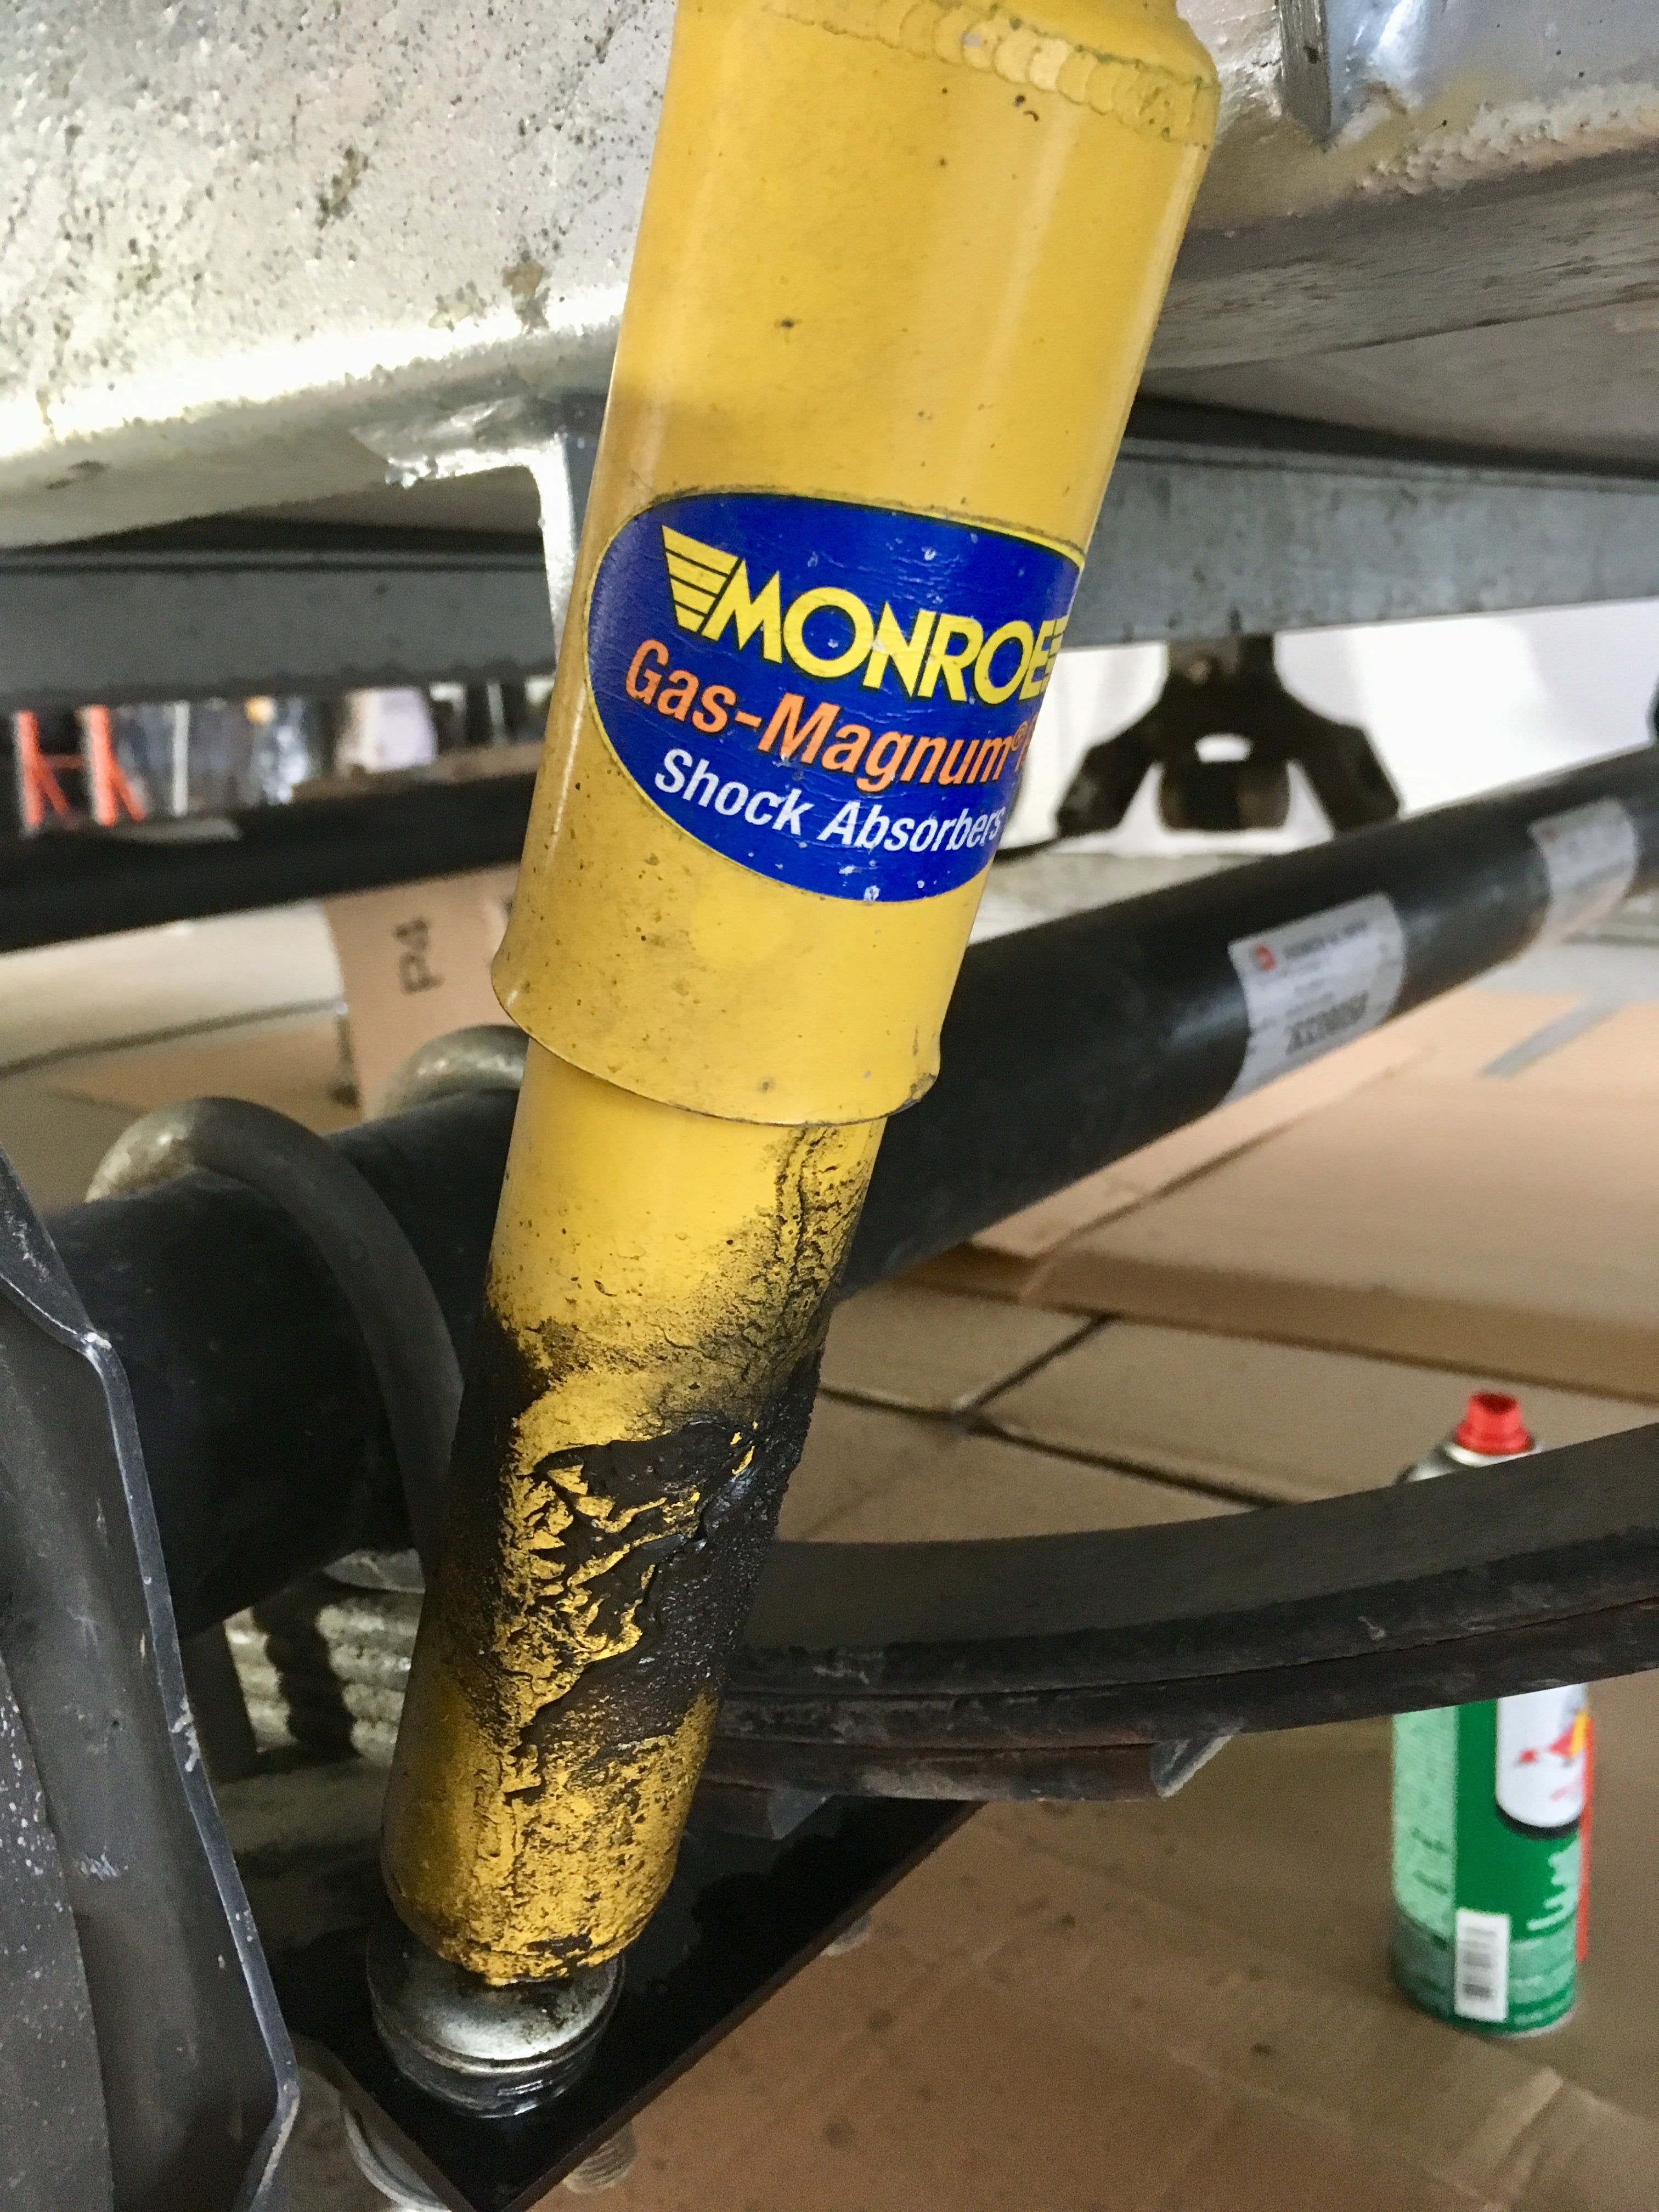
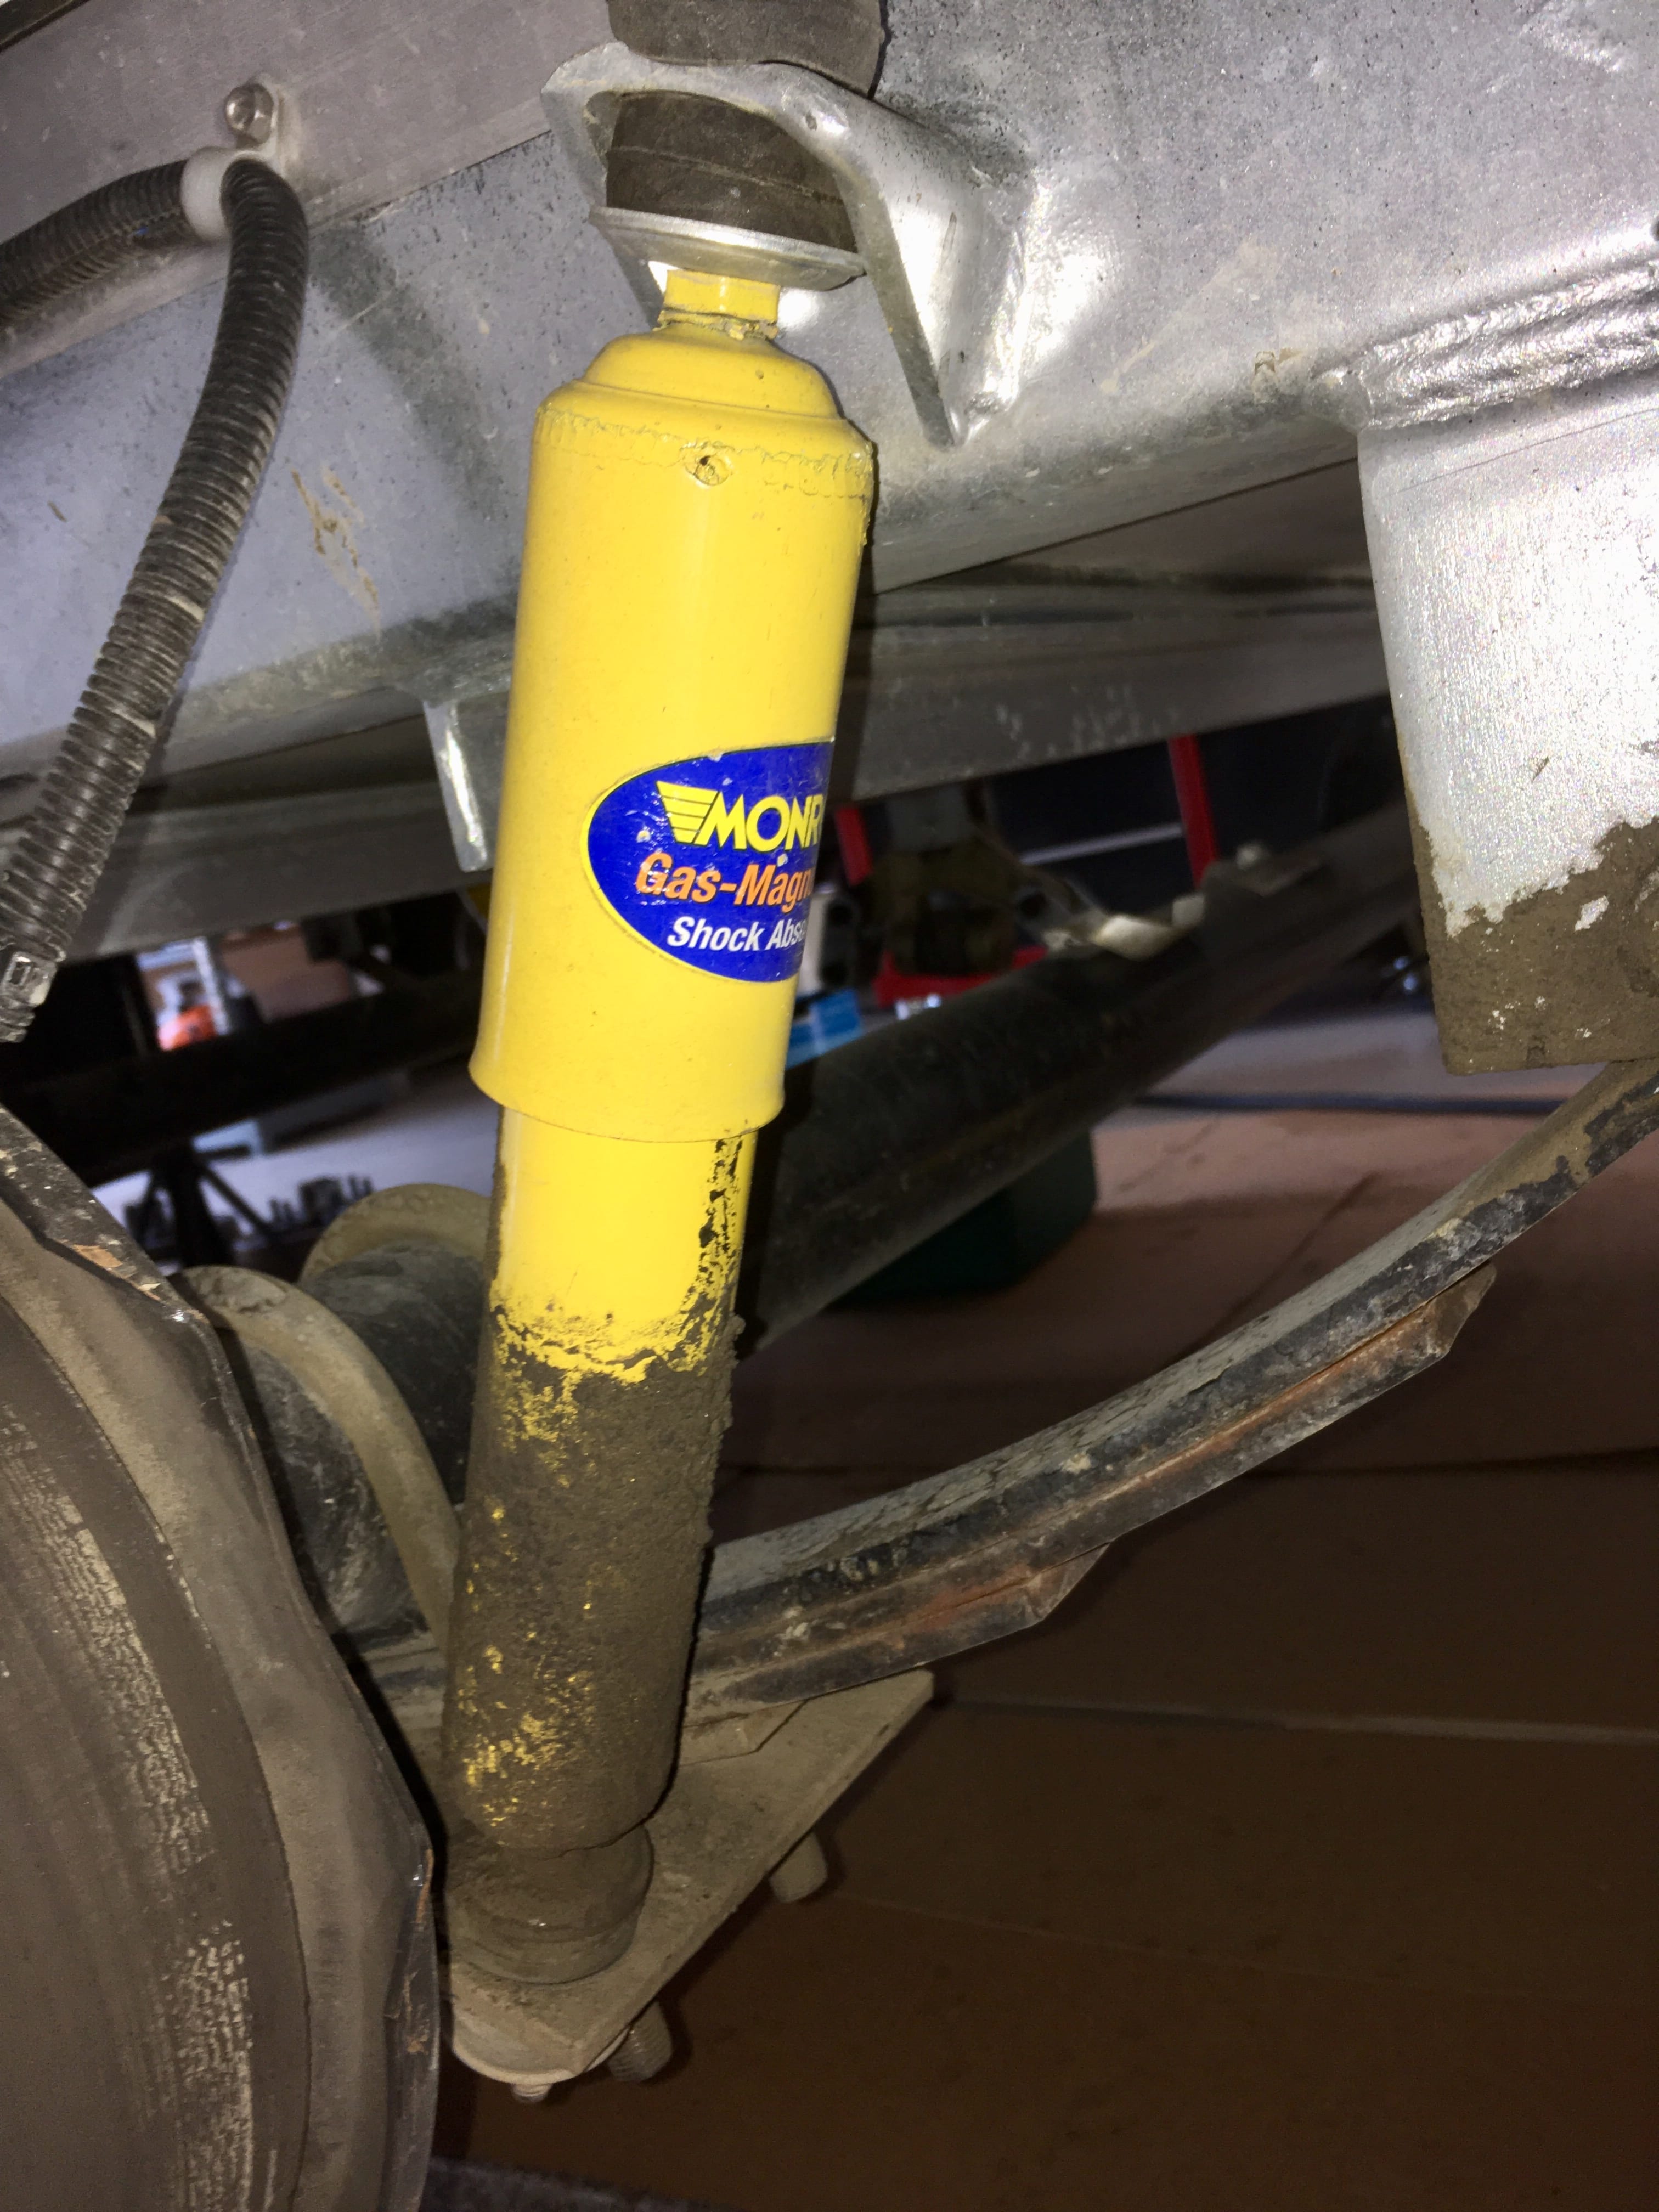
I contacted Service and they told me: Monroe shocks are shipped to RV manufacturers and have no Monroe warranty. The shocks are covered in the 1 year Oliver trailer warranty. It would be good to know if shocks bought locally or online would have the Lifetime Warranty. Maybe I will email Monroe. I am just outside that time, but Jason graciously agreed to send me two at no charge. Thanks to Oliver Service! As far as tire pressures go, I am running 60 psi at all times. If I venture onto potholed gravel I will lower them to 30. So far the unpaved roads I have used are not rough. Well, I cannot log in to Monroe, I created an account and it will not accept my info. There is no email or phone number. Can someone please go here, log in and ask if the 555001 shocks have a lifetime warranty if purchased individually? http://www.monroe.com/en-US/tech-talk/ Thanks John Davies Spokane WA
-
Fender problem with larger rims/tires and E-Z Flex
John E Davies replied to Foy_Mirna's topic in Mechanical & Technical Tips
I would really like to see the factory offer this as an option. https://www.etrailer.com/Trailer-Suspension/Lippert-Components/LC87220.html#exp-productdetails=.all-description I am thinking about doing this just to get the 2 inches of lift without altering the factory suspension. I could use a little extra departure angle (rear bumper scrapes) but the alignment capability would be a big bonus. If you don’t mind the lift, the 1/2 inch adjustment would probably correct your issues. I asked Jason to comment, and if it would affect the frame warranty significantly. John Davies Spokane WA -
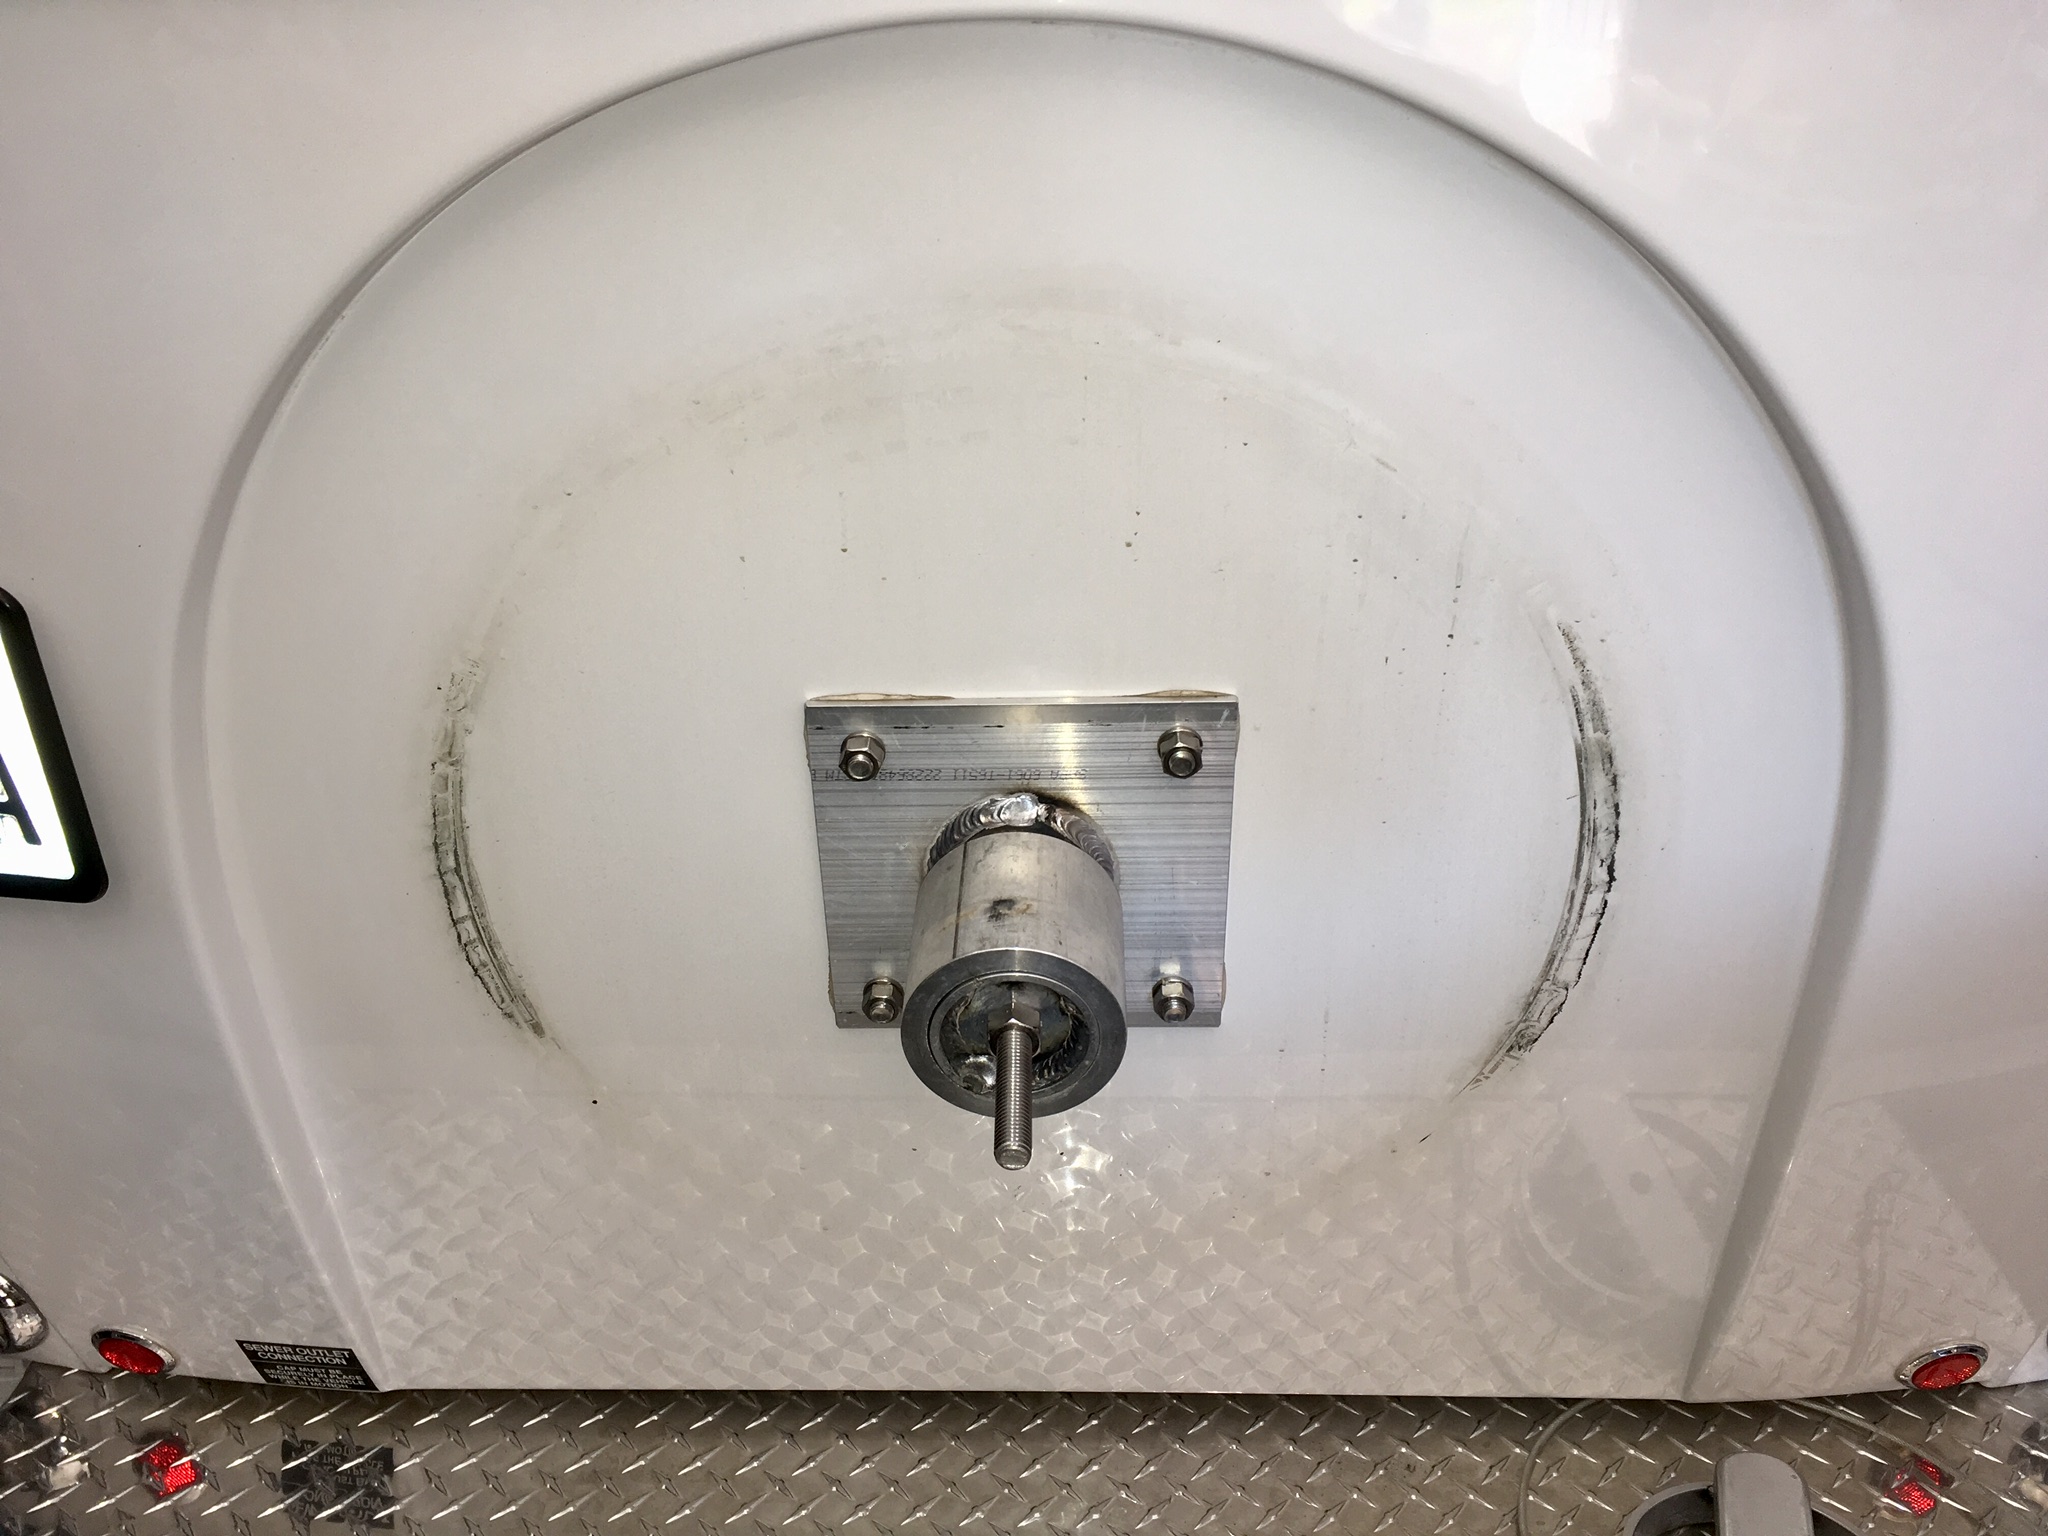
HOW TO: protect the gelcoat under the spare tire
John E Davies replied to John E Davies's topic in Ollie Modifications
Forgot.... if you don’t run a TPMS sensor, you can put this on the spare to let you check and adjust pressure without removing it. I have used these on many cars with “buried” spares, but they may develop a slow leak as the rubber ages, and should probably be replaced about every five years. https://www.amazon.com/Accu-gage-Chek-Spare-Valve-Extender/dp/B0006O2S8M If I still used the cover, I would drill a hole, add a loose fitting rubber grommet, and have the end of the hose accessible by flipping down the plate holder. If there is room, you could even screw your TPMS sender onto the end of the hose....How very cool is that? I may add the hose to my setup, since I lock the mount and it takes longer to remove the wheel. John Davies Spokane WA
-
HOW TO: protect the gelcoat under the spare tire
John E Davies replied to John E Davies's topic in Ollie Modifications
Well, “Mouse” does get very dusty there, without a doubt! - however, a completely unsealed white cover won’t keep out much dust. If you never drive off pavement at all, then yours may look much better, but I guarantee that eventually there wll be some chafing and gelcoat damage. It is unavoidable due the design which clamps a flexible sidewall against a fixed cosmetic surface. I check the pressure bimonthly, and use the spare in the tire rotation, so I see underneath more than an owner who might never remove it. ? I do think it is worth checking your pressure, cleaning the area, and taking a look, even if you run a TPMS sensor. If you see white staining on your good sidewall, you have a problem. If your tire pressure gets very low, the damage will likely be greater since the sidewall will move much more. Keep the clamp cranked down as hard as possible by hand! It’s an absolutely beautiful piece of craftsmanship but I think the design of the mount could be greatly improved. I would be a happier if the tire could be carried good side out, clamped hard by lug nuts to a flat plate.... at the very least it would make routine access to the valve stem simple, because the factory way is frankly stupid in this regard. Future project, but way down on my Honey Do list! John Davies Spokane WA -
Noise from Progressive Dynamics Power Center
John E Davies replied to Townesw's topic in Mechanical & Technical Tips
The fuse clips are very weak, and if you apply any side force to the fuse while inserting it, the ears can spread and then you have a poor connection. I had intermittent fridge operation due to this problem. Check EVERY single fuse by carefully removing and reinstalling it straight! If one fuse is loose, tighten the clip by gently squeezing the little ears together to make a narrower gap. You can use a set of narrow tipped needle nose pliers, and you could do it with power connected if you tape the tips and are brave like me, but it would be best to disconnect power entirely. I am less than impressed with the choice of this unit for an Oliver when there are better marine grade units out there. I consider it to be an unacceptable shortcut on their part foe a premium trailer. I too found an incorrect fuse. The Natures Head one should be 2.5 or 3, they had a 1 amp that blew on Day 2.The mistake was probably due to a simple failure to read the installation manual, it is clearly listed there. John Davies Spokane WA -
HOW TO: protect the gelcoat under the spare tire
John E Davies posted a topic in Ollie Modifications
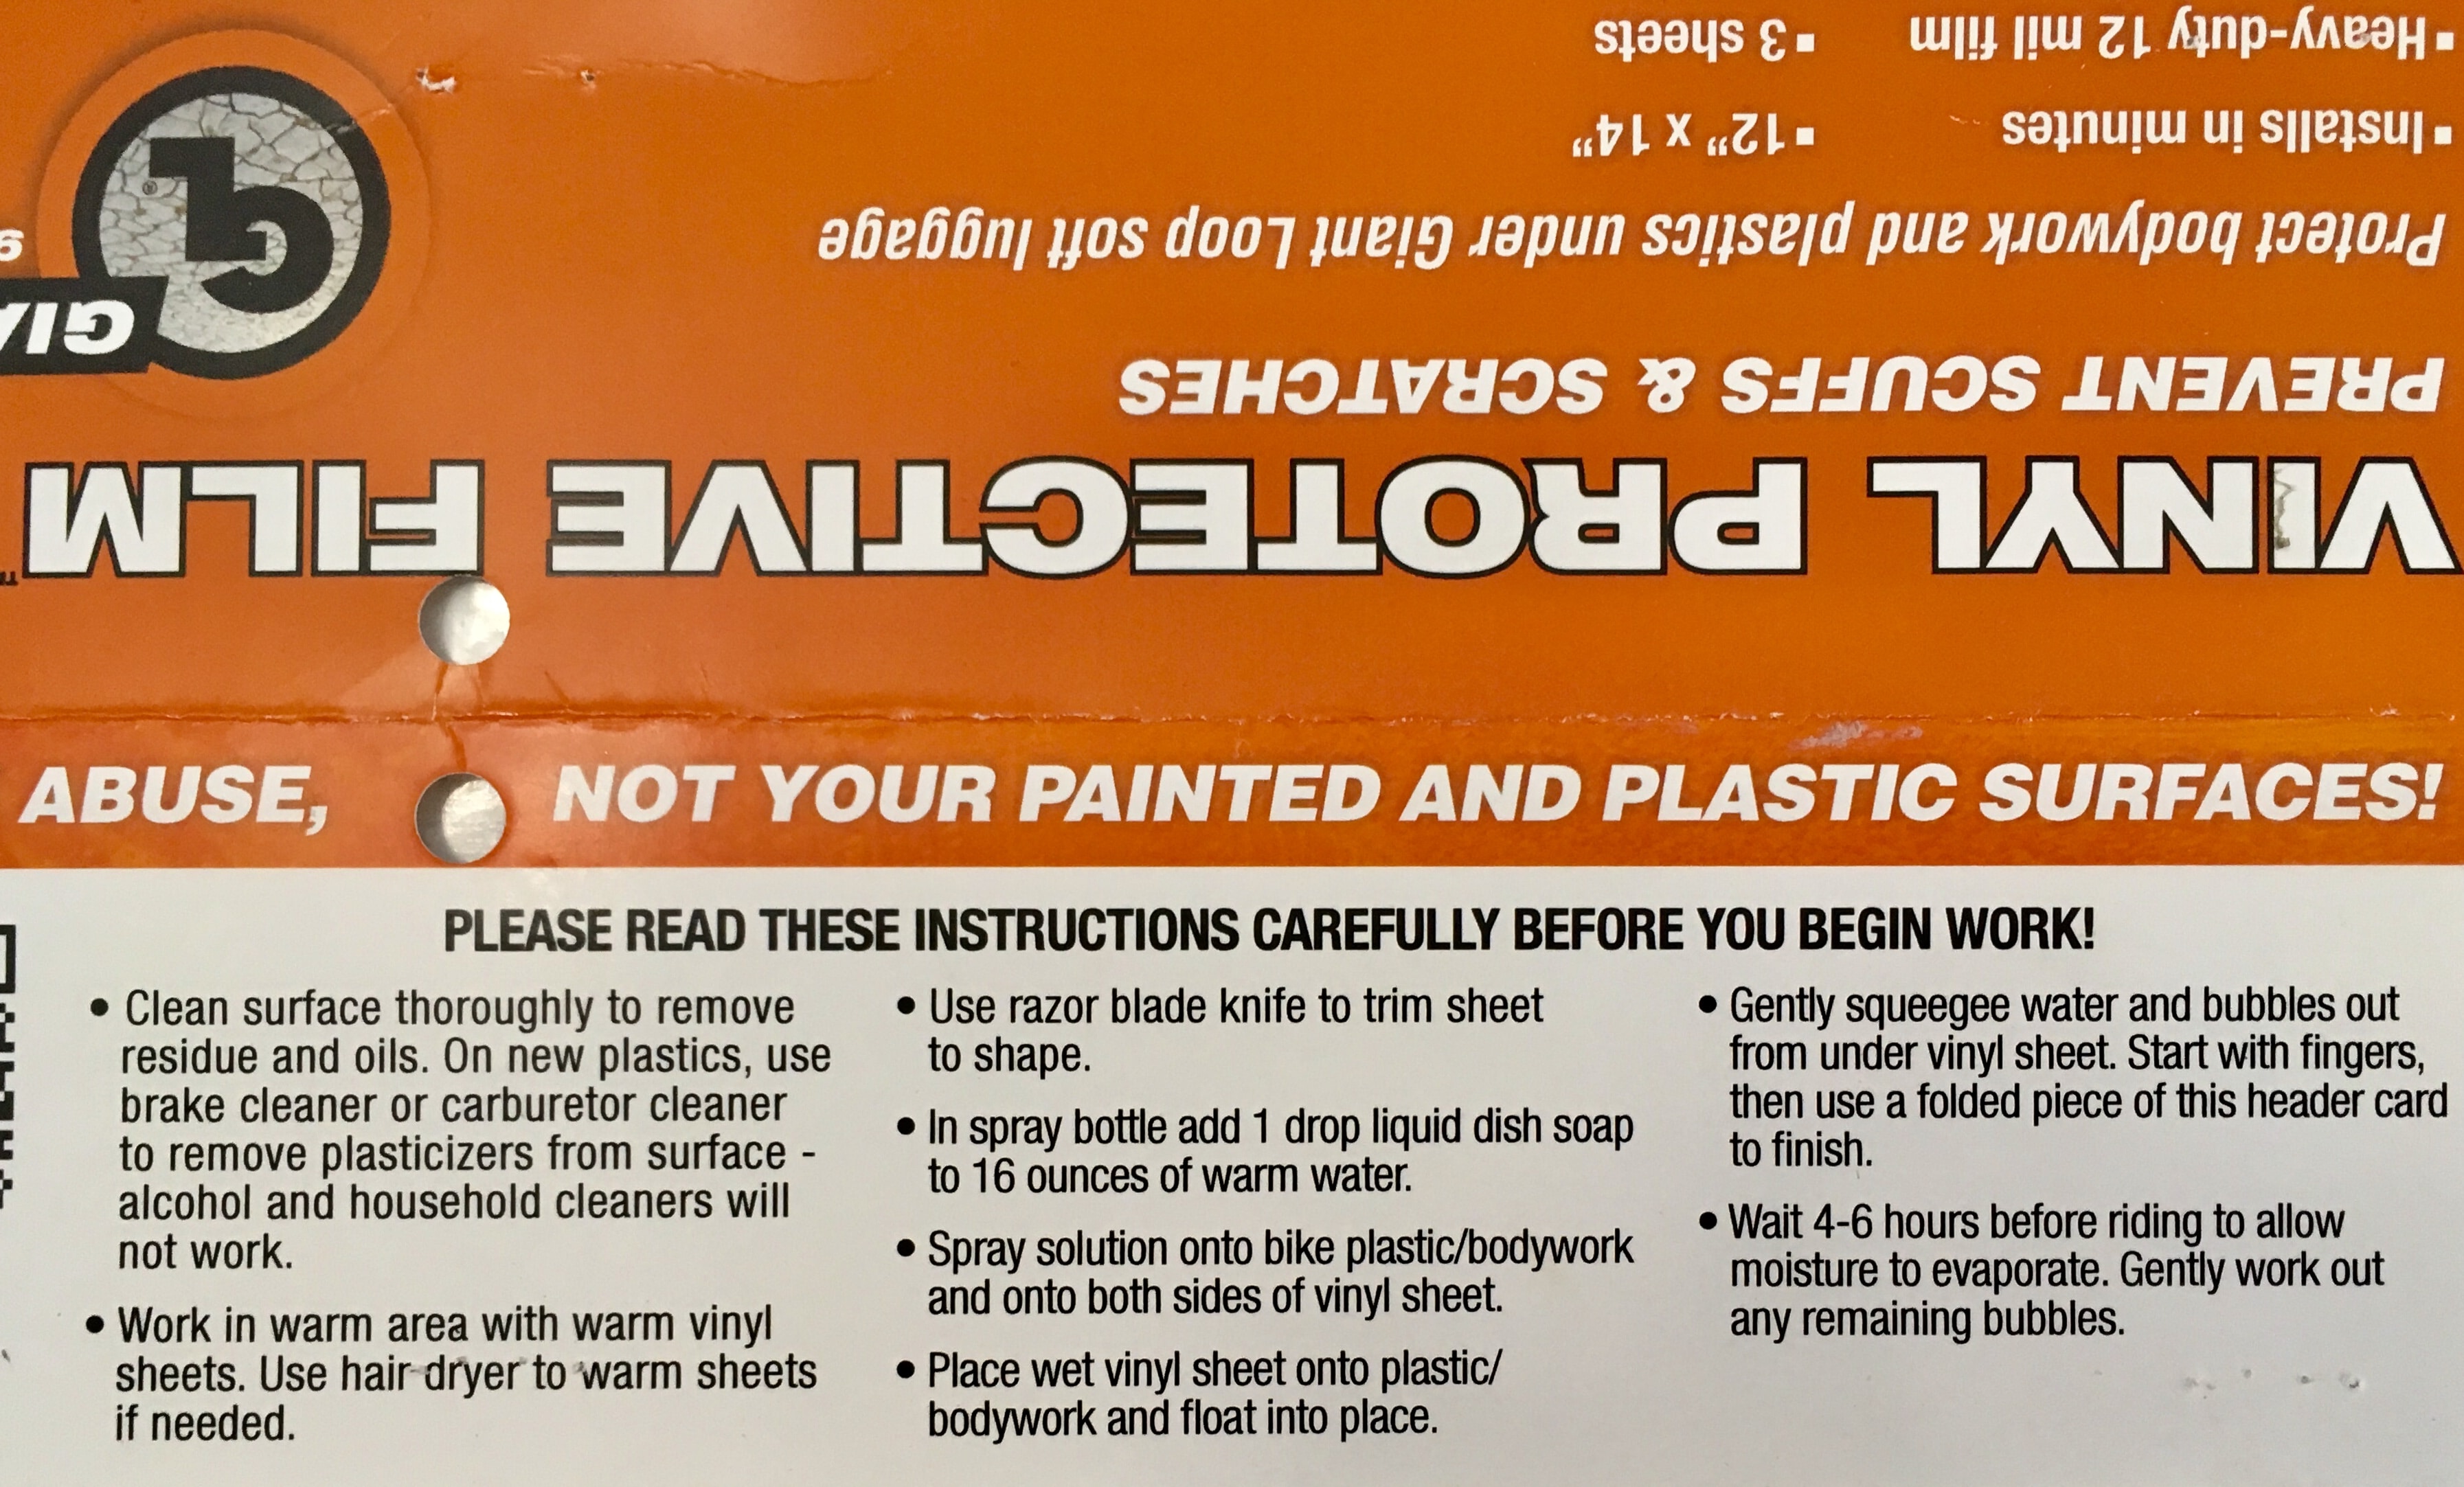
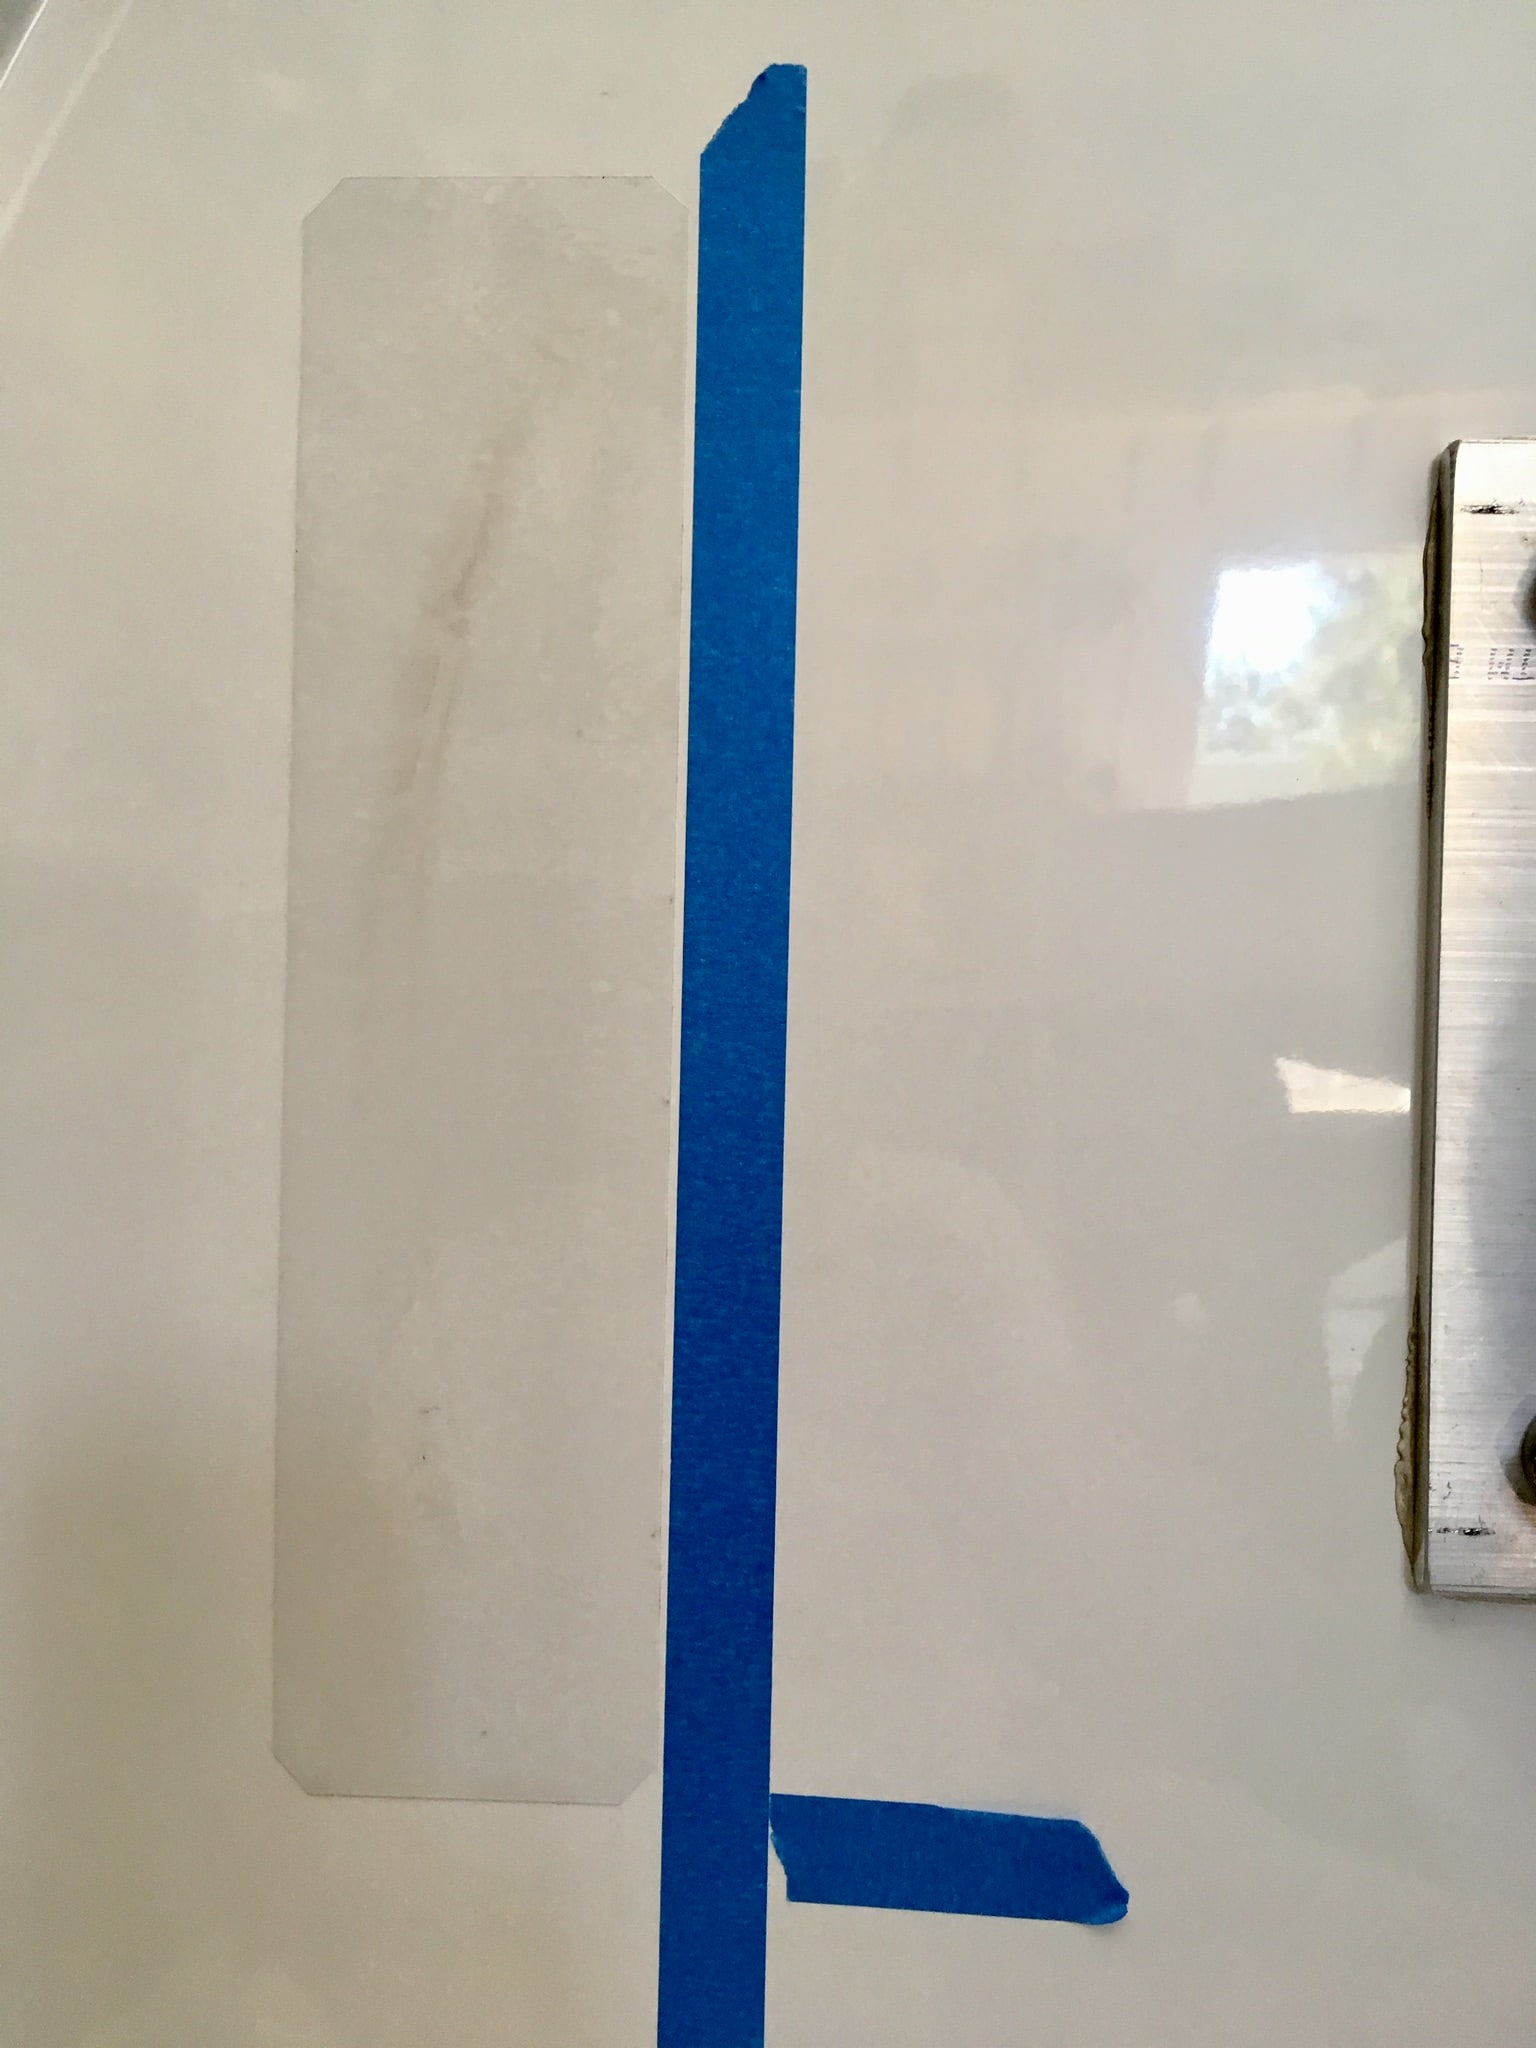
This is an easy mod, you just need some heavy urethane film, such as is used on headlights as stone guards. It needs to be thick, not the thin stuff used as a car bra. I used 12mil (0.012”). I noticed that the spare tire was chafing pretty badly in two places, so I decided to install a pair of pads. After cleaning with 3M Adhesive Cleaner, all that glop came off, but the gelcoat was pretty scuffed. I used some film I already had, cut a couple of 3”x12” strips, and installed them as per the instructions using soapy water. I laid out some pieces of tape at 5 inches from the tire mount to act as guide lines, and I used a 3 inch rubber roller to get the bubbles out rather than a squeegee or piece of plastic. [attachment file=136477] This area is invisible normally, but I feel better knowing it is protected,and it will stop gel coat from getting on the outer sidewall of the spare. While I was in there I applied RejeX, to get that mirror shine and repell dirt. ... https://www.amazon.com/Rejex-High-Gloss-Protective-Finish/dp/B00GM6NF0I Here is the source for the film I used. ... http://www.giantloopmoto.com/product/vinyl-protective-film/ John Davies Spokane WA
-
I love the furniture chute, where the stapled together, raw pine cabinets come crashing down. No wonder they fall apart while towing. Scary stuff, I thought at times that the video was speeded up, do they really spin an entire frame assembly that fast, and do workers actually RUN? In fact, I would run, not walk, from a job like that. I would rather live under a bridge than do that kind of mindless, intense assembly work. I wonder what the worker turnover rate is...? Watch and compare how they build classic Capri truck campers, that is the only stick and staple RV worth owning. John Davies Spokane WA
-
Very cool find. It looks safe to me. I wish I had the room to store such a platform, I hang ladders vertically on my RV bay wall: an articulated “ladder bot” Werner for washing, and a big fixed “16 foot reach” Werner platform ladder for the high ceiling. Neither take up any floor space when not being used, and minimal wall space. I did have to rig a block and tackle to allow me to get the big one up there by myself, it is awkwardly long and heavy for my aging muscles.... John Davies Spokane WA
-
Noise from Progressive Dynamics Power Center
John E Davies replied to Townesw's topic in Mechanical & Technical Tips
Any idea if the hinge is swappable? I never understood why this unit does not have a removable cover instead of a hinge, which is very much on the wrong side for the mounting location!!! The only practical way to work inside the front (replace fuse or tighten fuse socket) is to completely remove the table, which is an extremely poor design for a “quick access” breaker/ fuse panel. Thanks, John Davies Spokane WA -
My shocks are just over a year old, 6000 miles and two are blown. ;( I think this is the correct part. ... http://www.monroe.com/en-US/e-catalog/555001/# Can anyone confirm? The regular automotive Gas Magnum shocks have a lifetime warranty, any idea about these RV units? I have not yet called the Ollie factory. https://images-na.ssl-images-amazon.com/images/I/71ITrU+GhyS.pdf Is there a better shock available? These not impressive, nor are they especially cheap ($38 at Amazon), Thanks. John Davies Spokane WA