John E Davies
-
Posts
5,759 -
Joined
-
Last visited
-
Days Won
243
Everything posted by John E Davies
-
 Well, I do love projects. Thanks for the kind words. I am truly a little worried about poorly sealed circuit boards, in the outside areas mostly, but also inside the hull. Normal dust is not a real issue. But the red rock dust in most of southern Utah is .... it is up to a few percent iron oxide, and it becomes conductive when moist. If an unsealed board or electrical connexion (which most are in RV appliances) gets heavily coated in red dust, and then is exposed to moisture, it can cause corrosion and board or connector failure. I have experienced this directly after a 4wd vacation in Canyonlands. Inside the trailer, the completely exposed boards for the water heater, water tank level monitors, inverter, etc etc, as well as every single wire connection and unsealed switch are at risk. Besides this special concern about “Moab corrosion”, regular dust inside is a general nuisance and an eyesore. Why not just keep it out? I like a clean interior.... The outside components are still at risk tho. I would really like to hear from long time owners if they have dealt with dust inside the trailer, and how they did it. I realize that only a few ever get off pavement, and fewer still are like me who might drive for three or more hours on really dusty ones. BTW, I did consider cracking the roof vent and running the fan on high in reverse, but that would bring in unfiltered air. You could add a filter under the fan, but changing it would dump dust all over you and the interior. Keeping the filter mechanism outside is best. Also, I had been thinking about this since well before I ordered Mouse. I started a thread 15 months ago and got minimal response... John Davies Spokane WA
 -
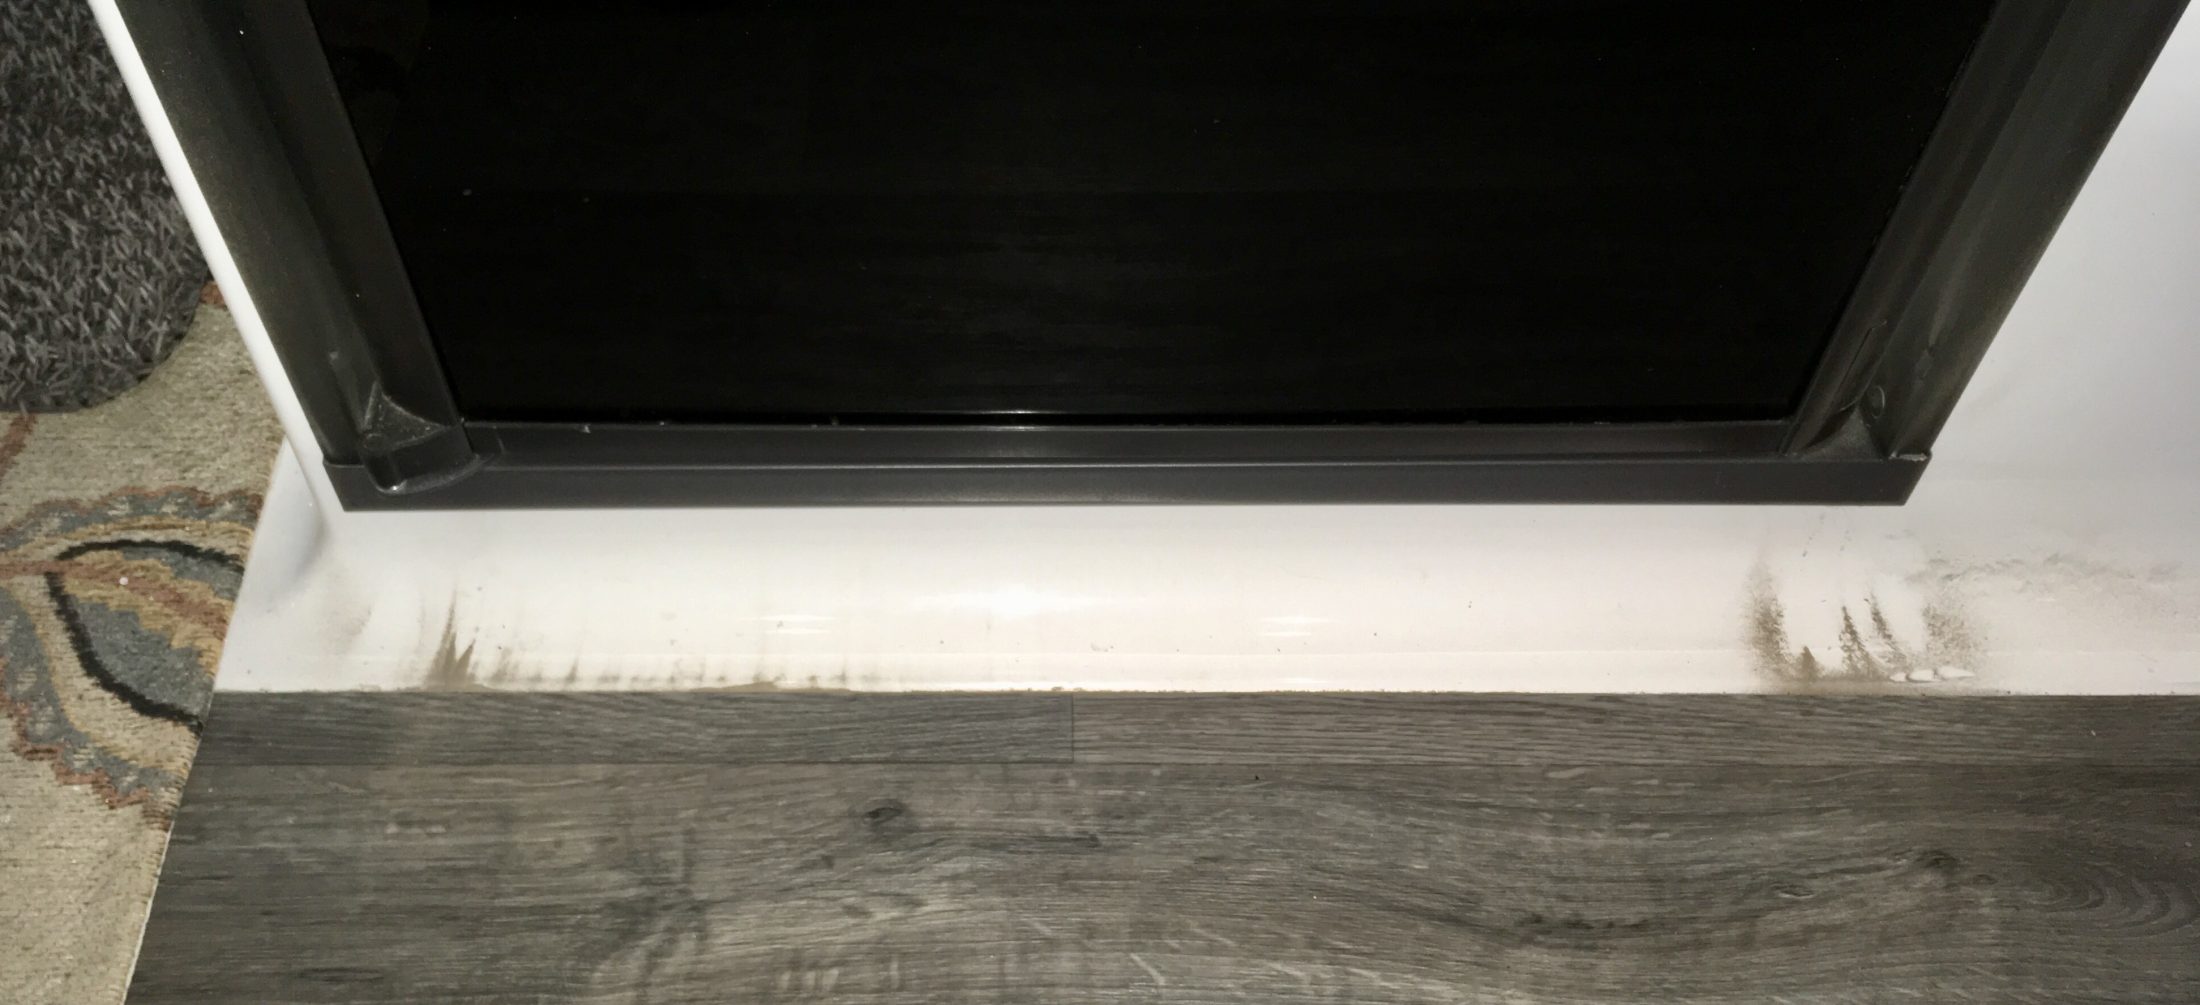
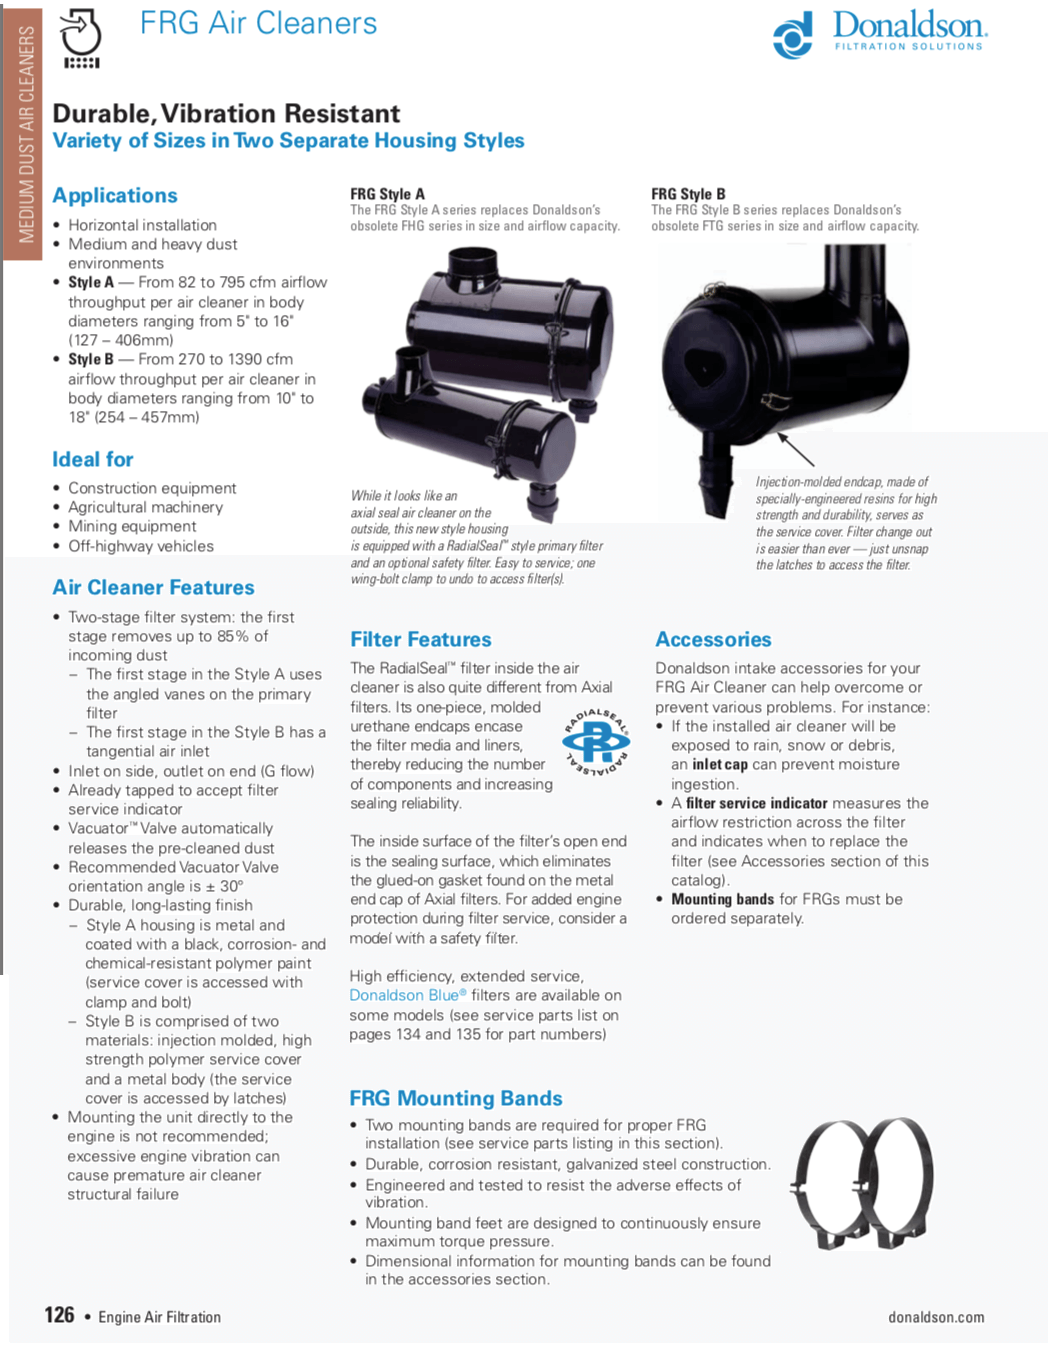
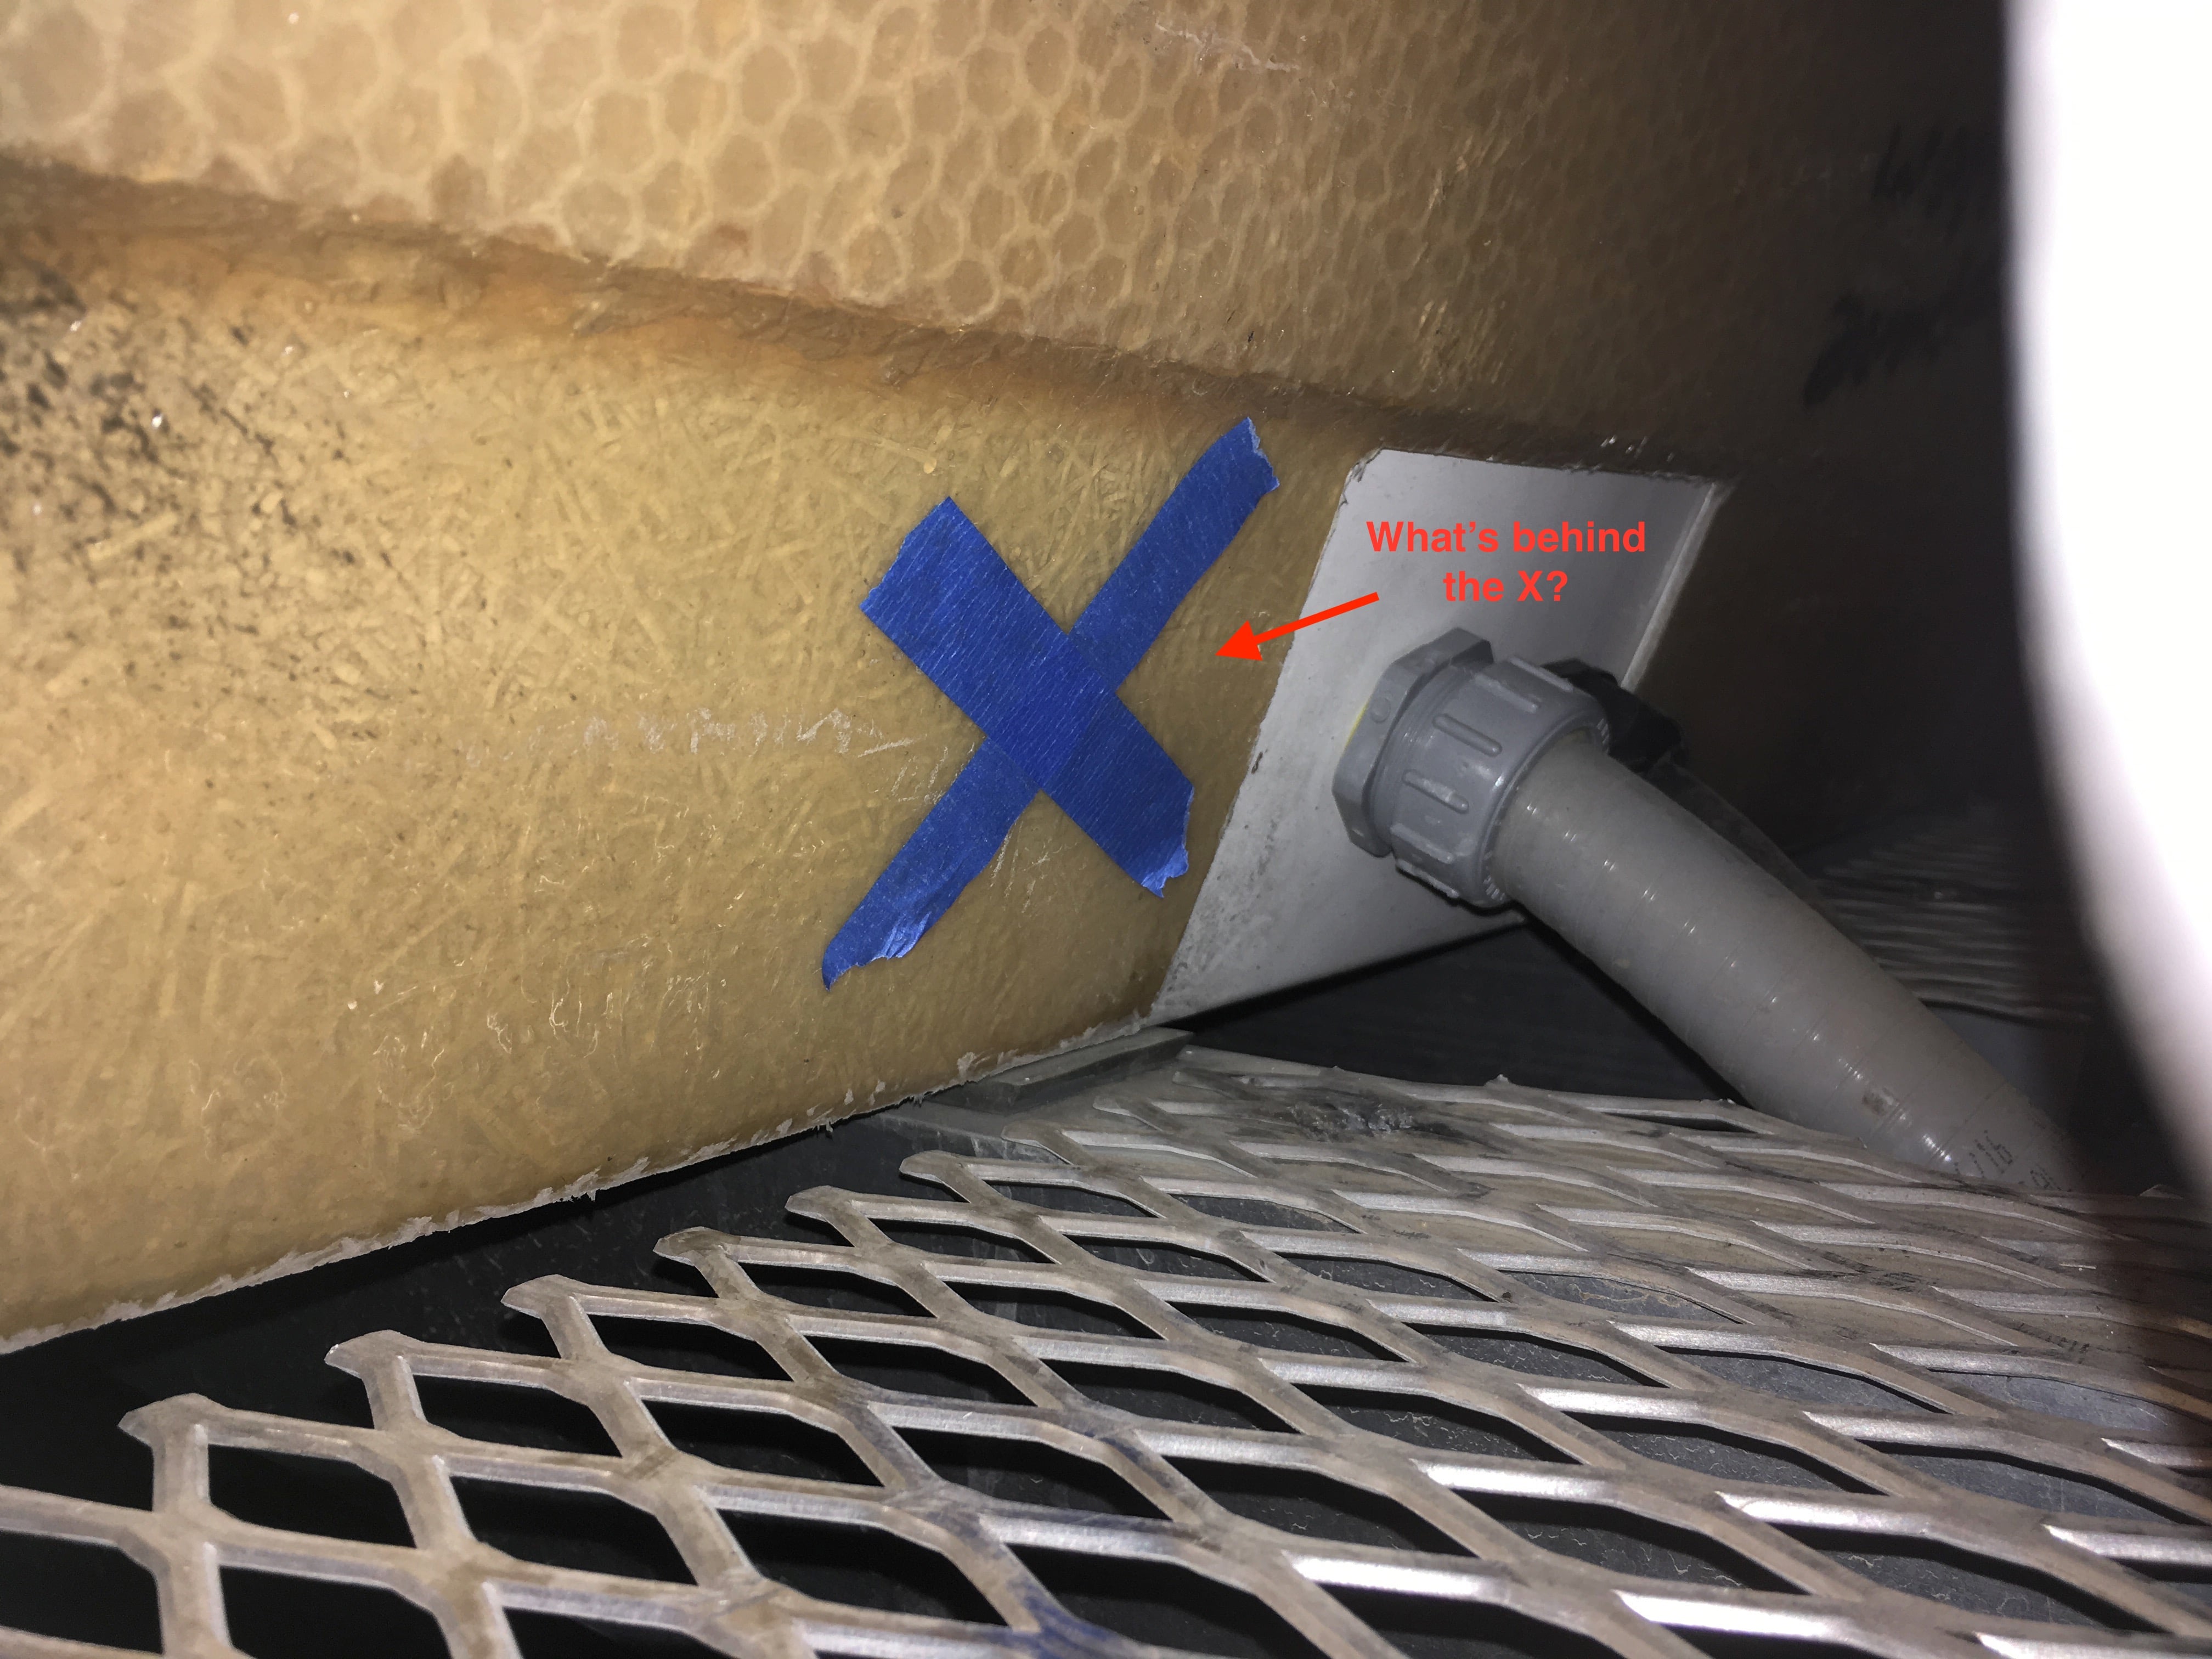
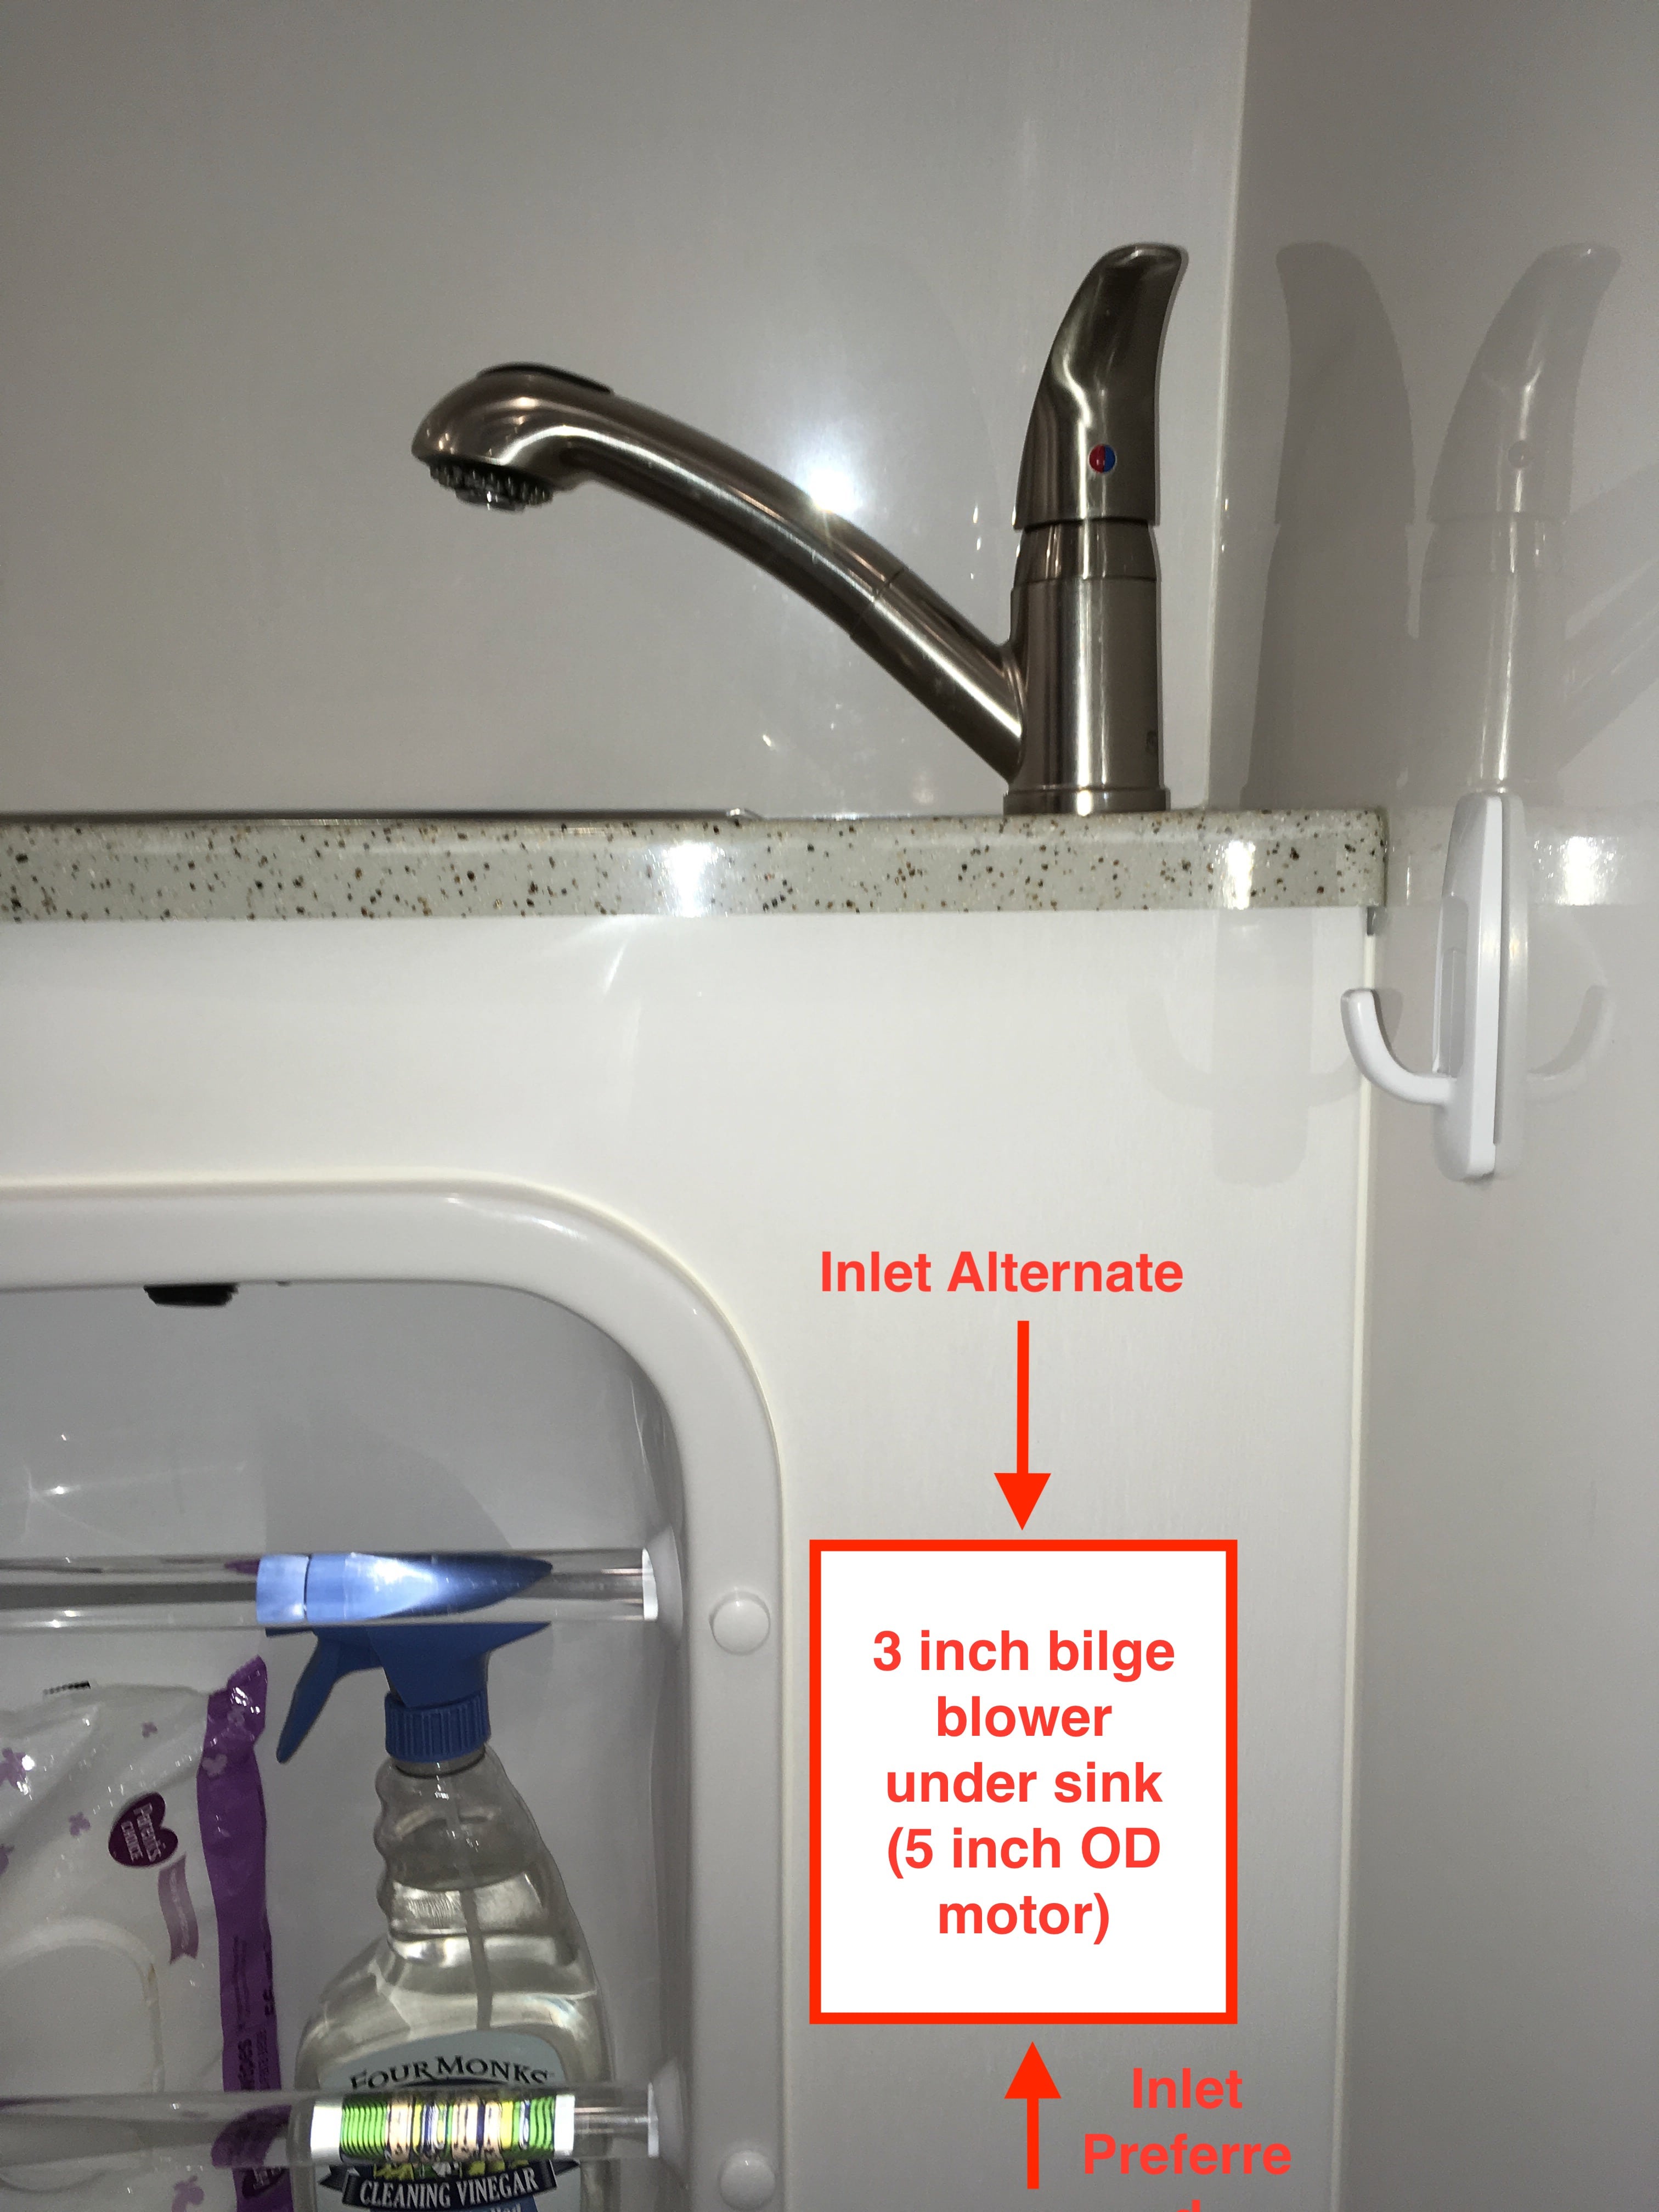
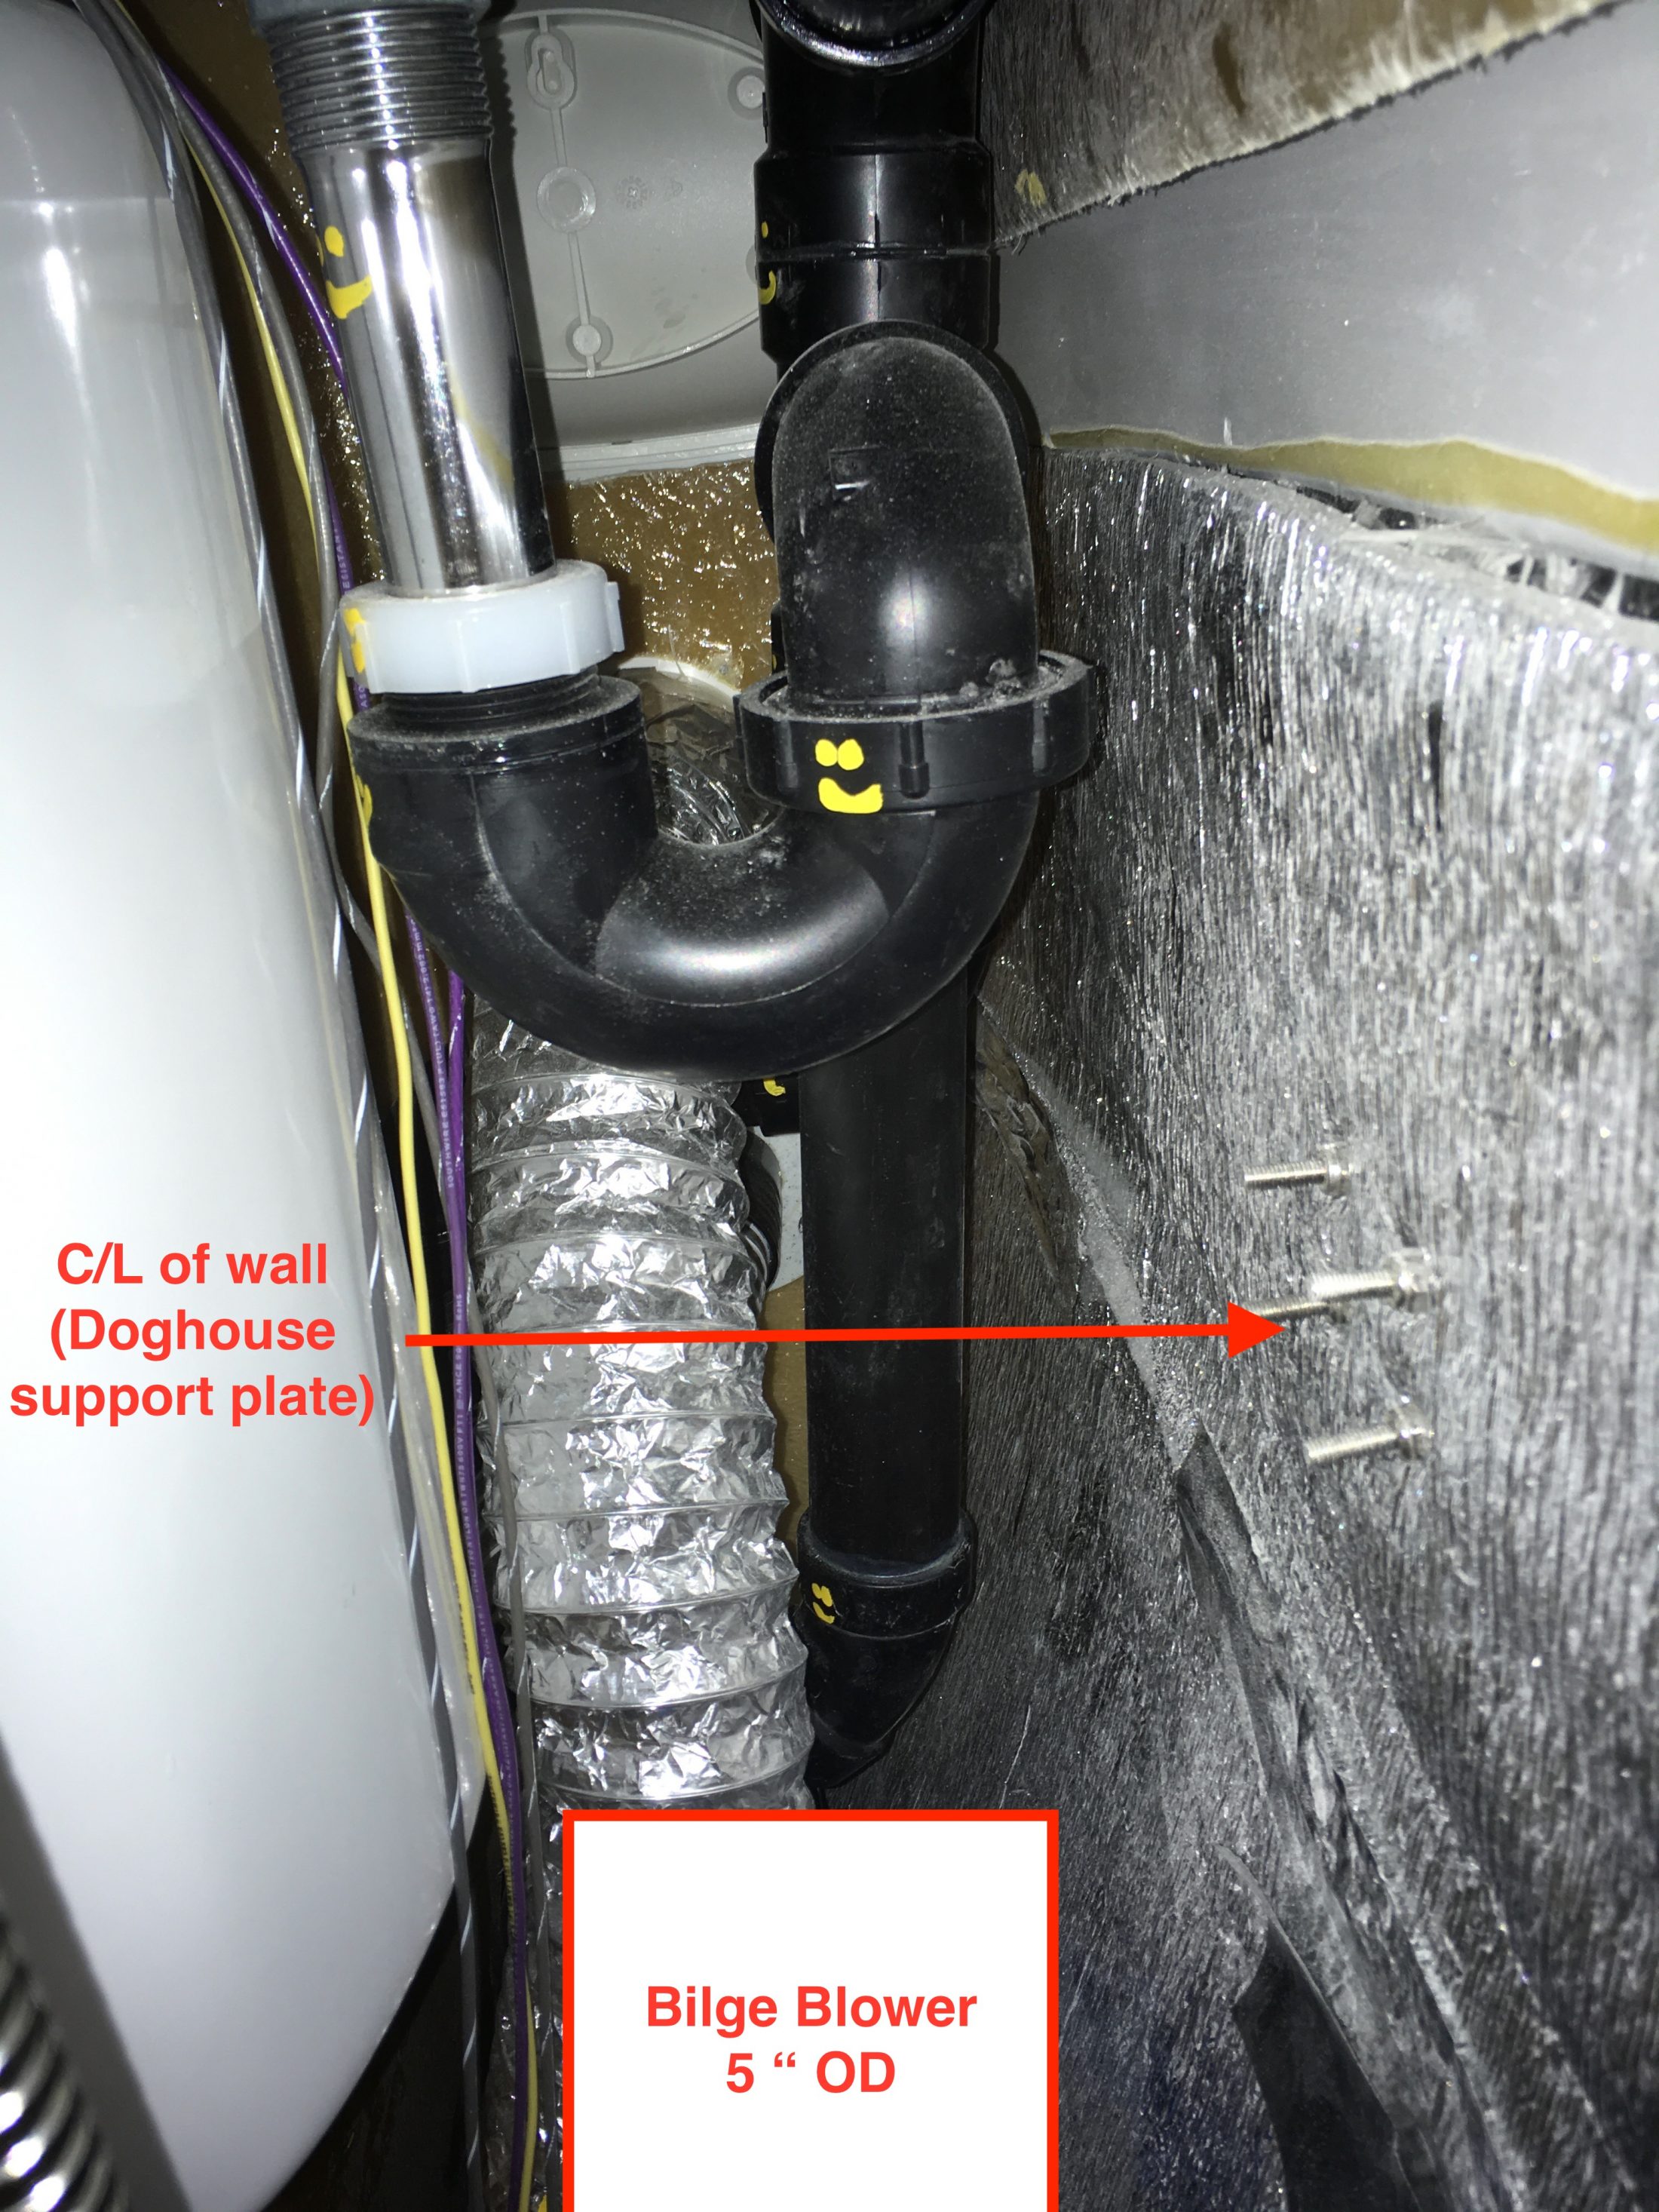
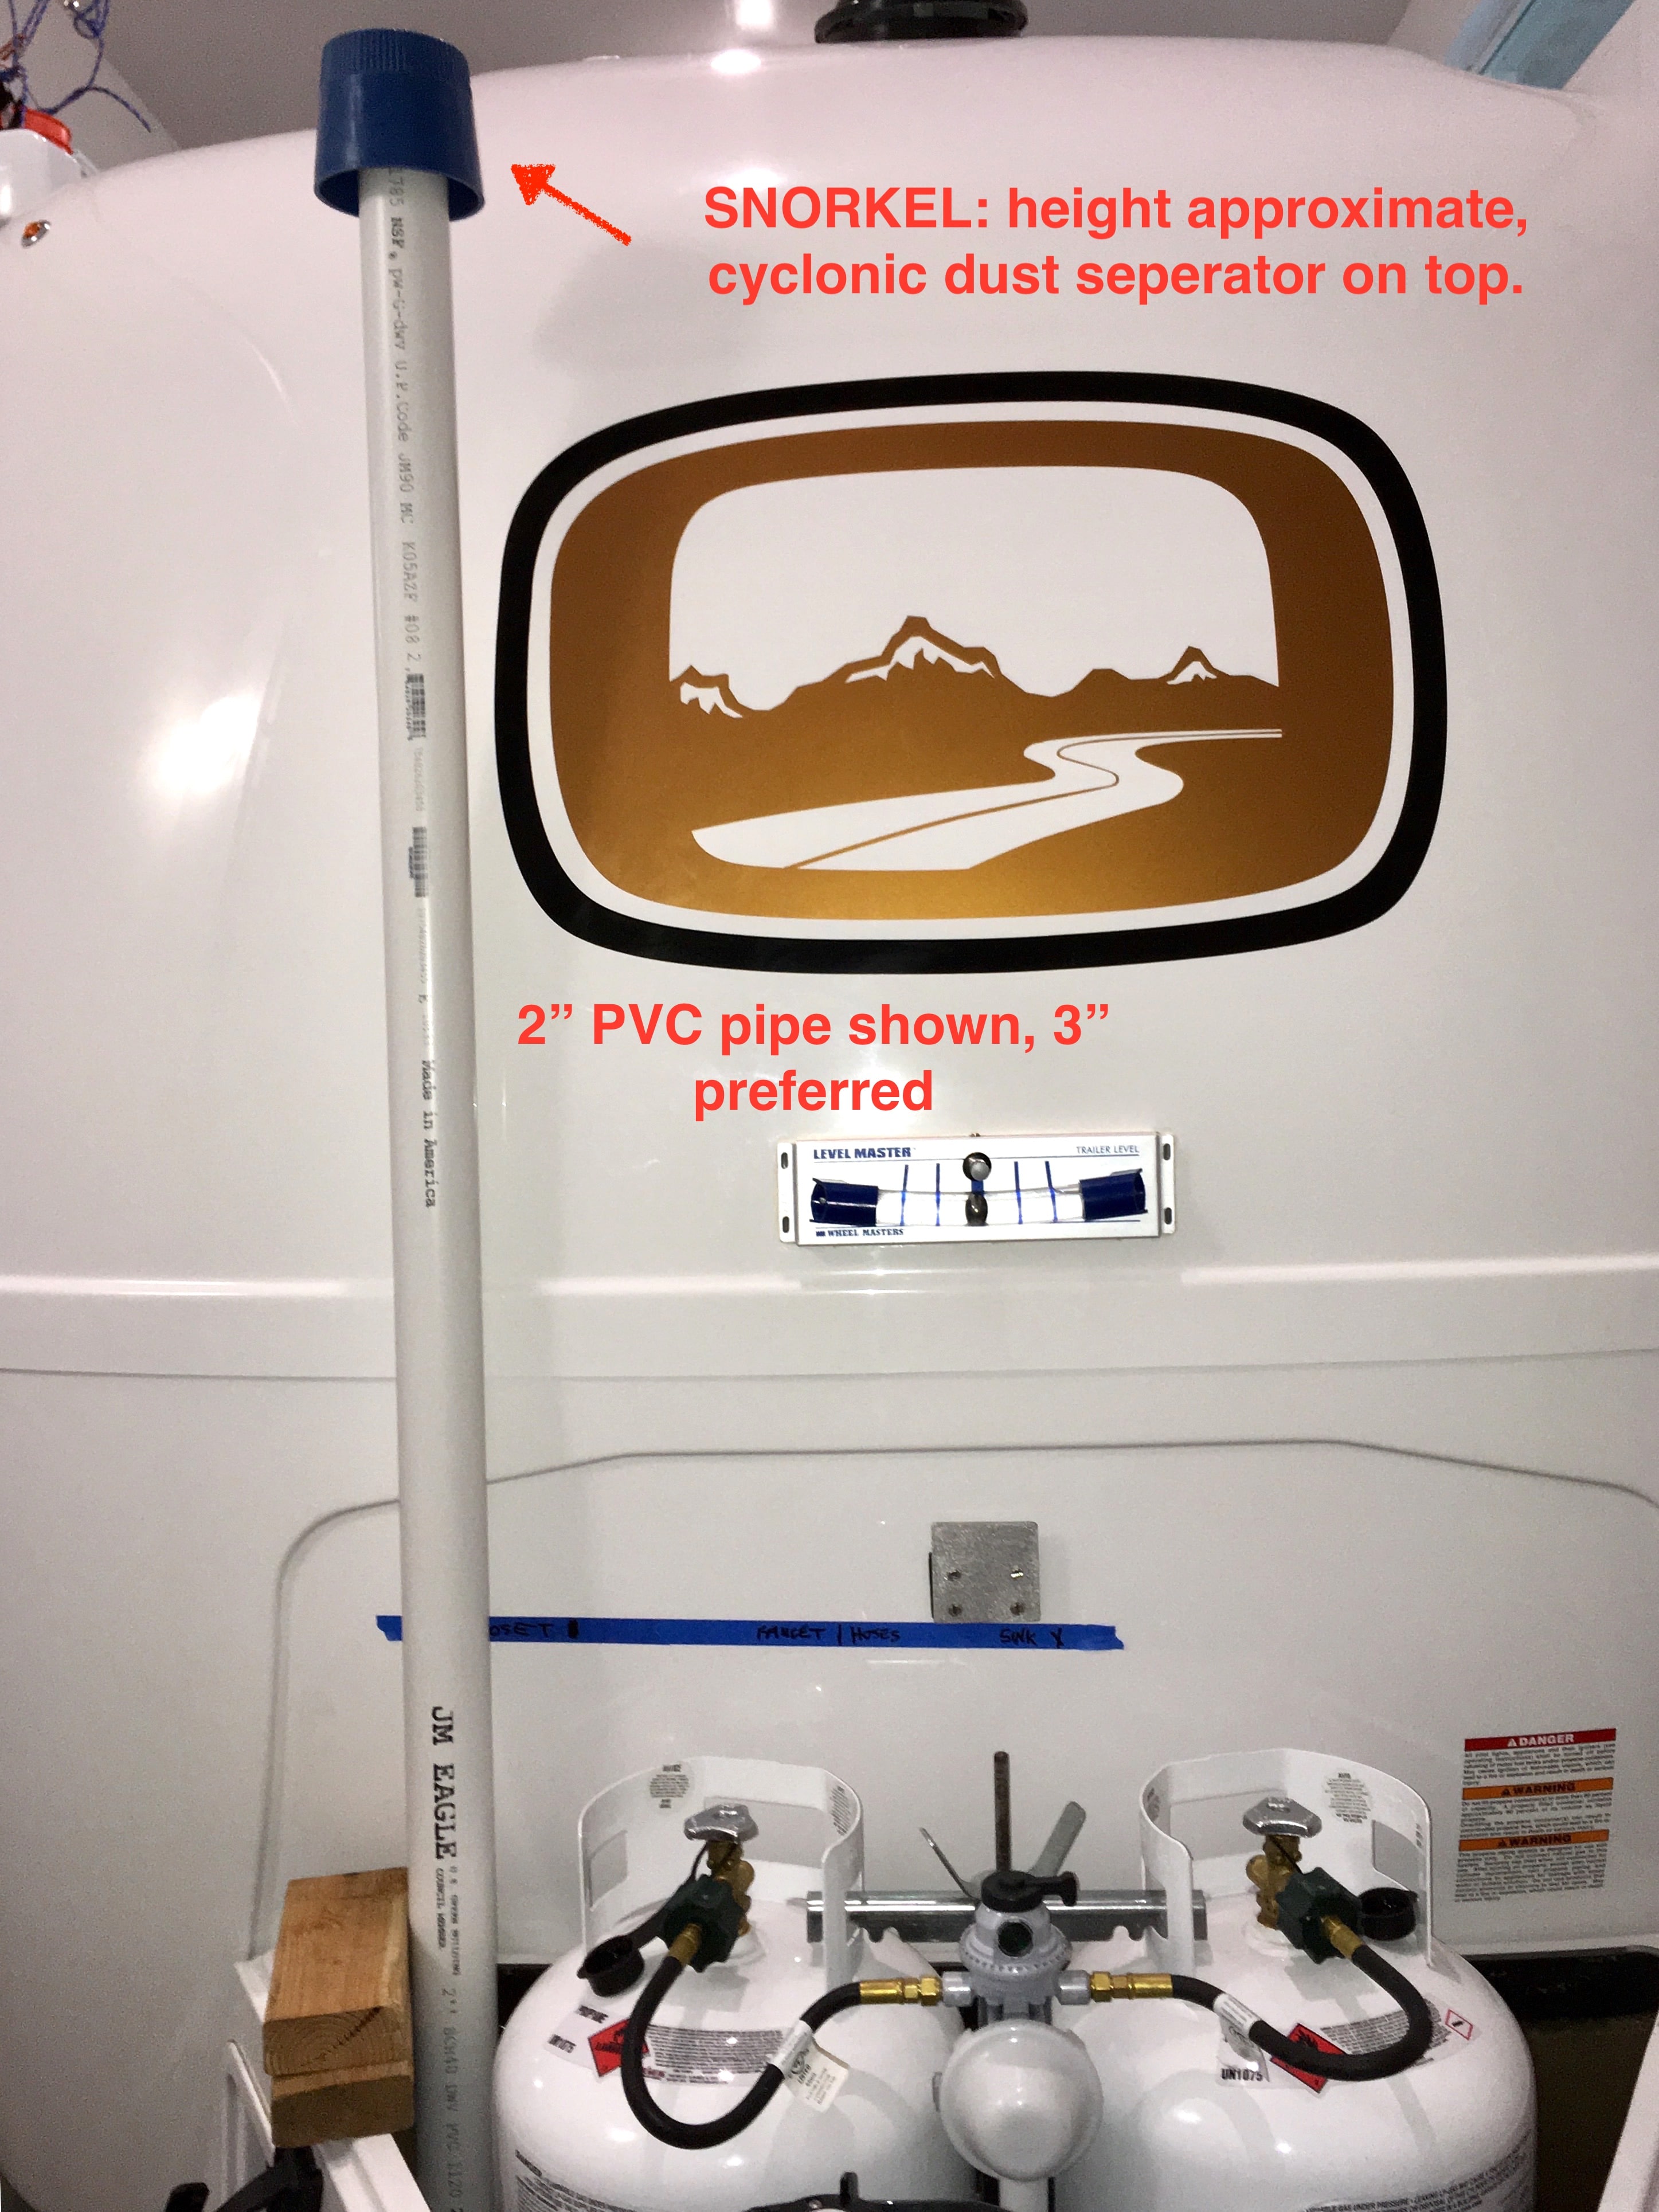
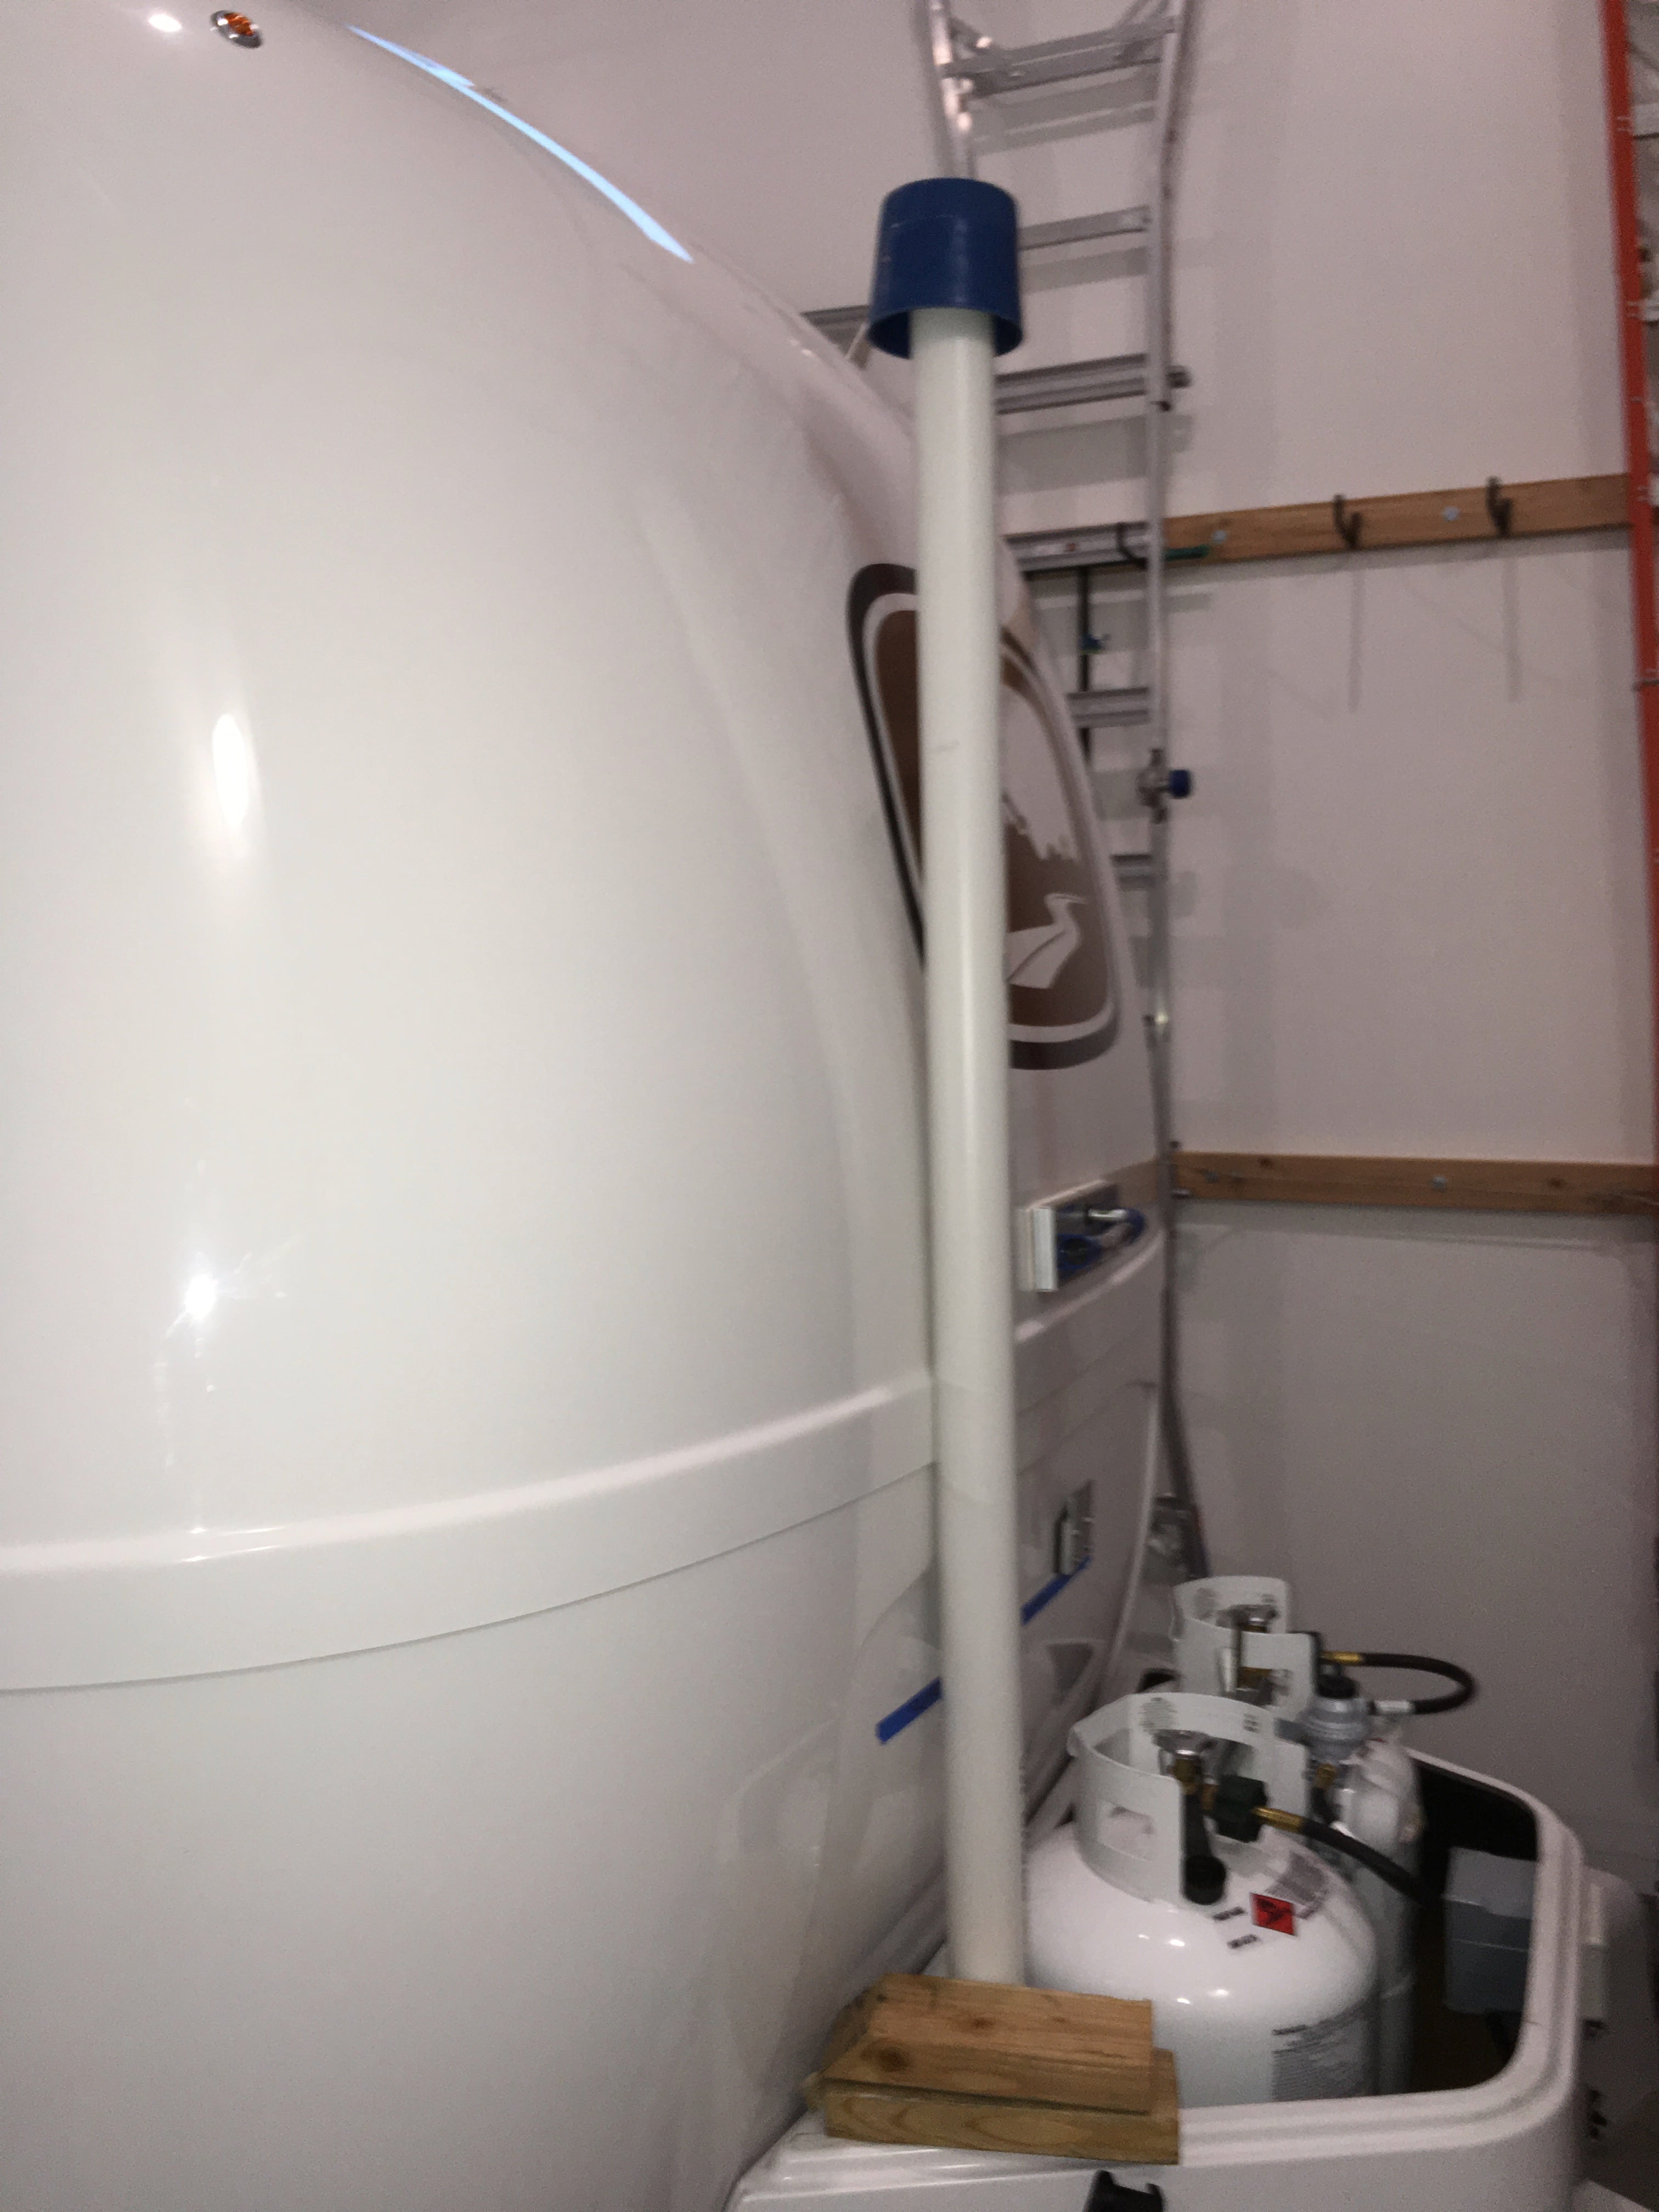
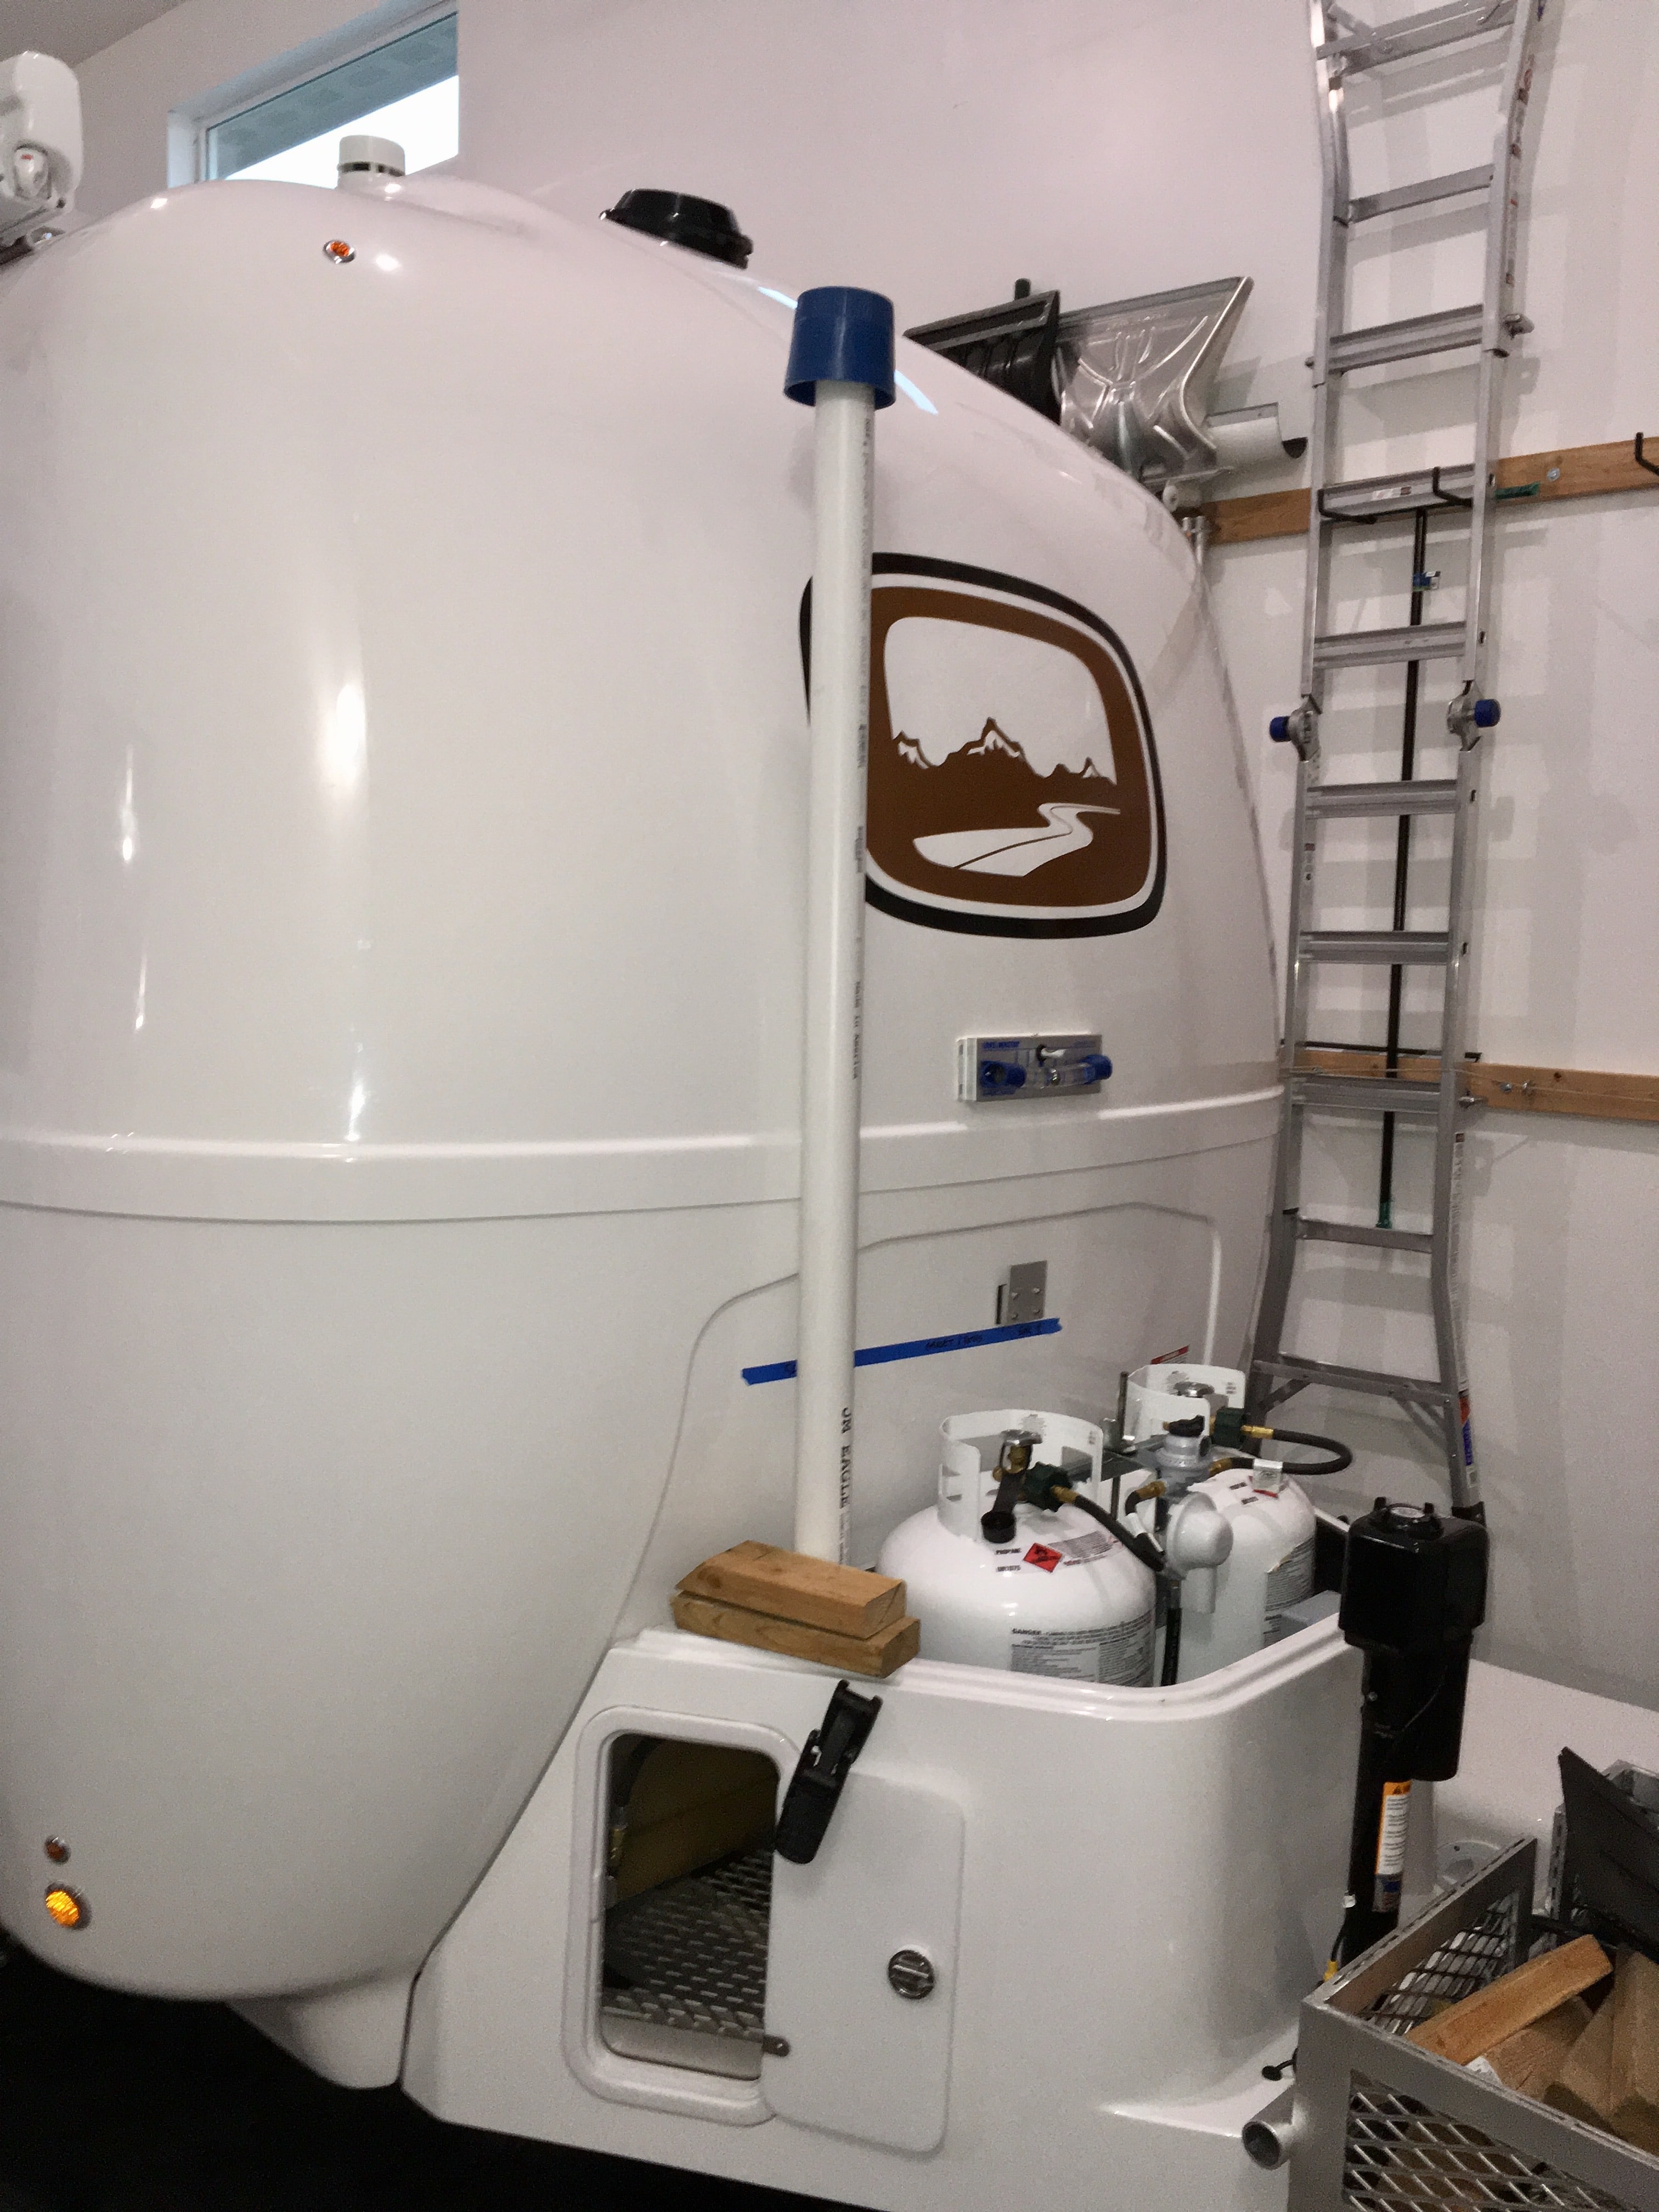
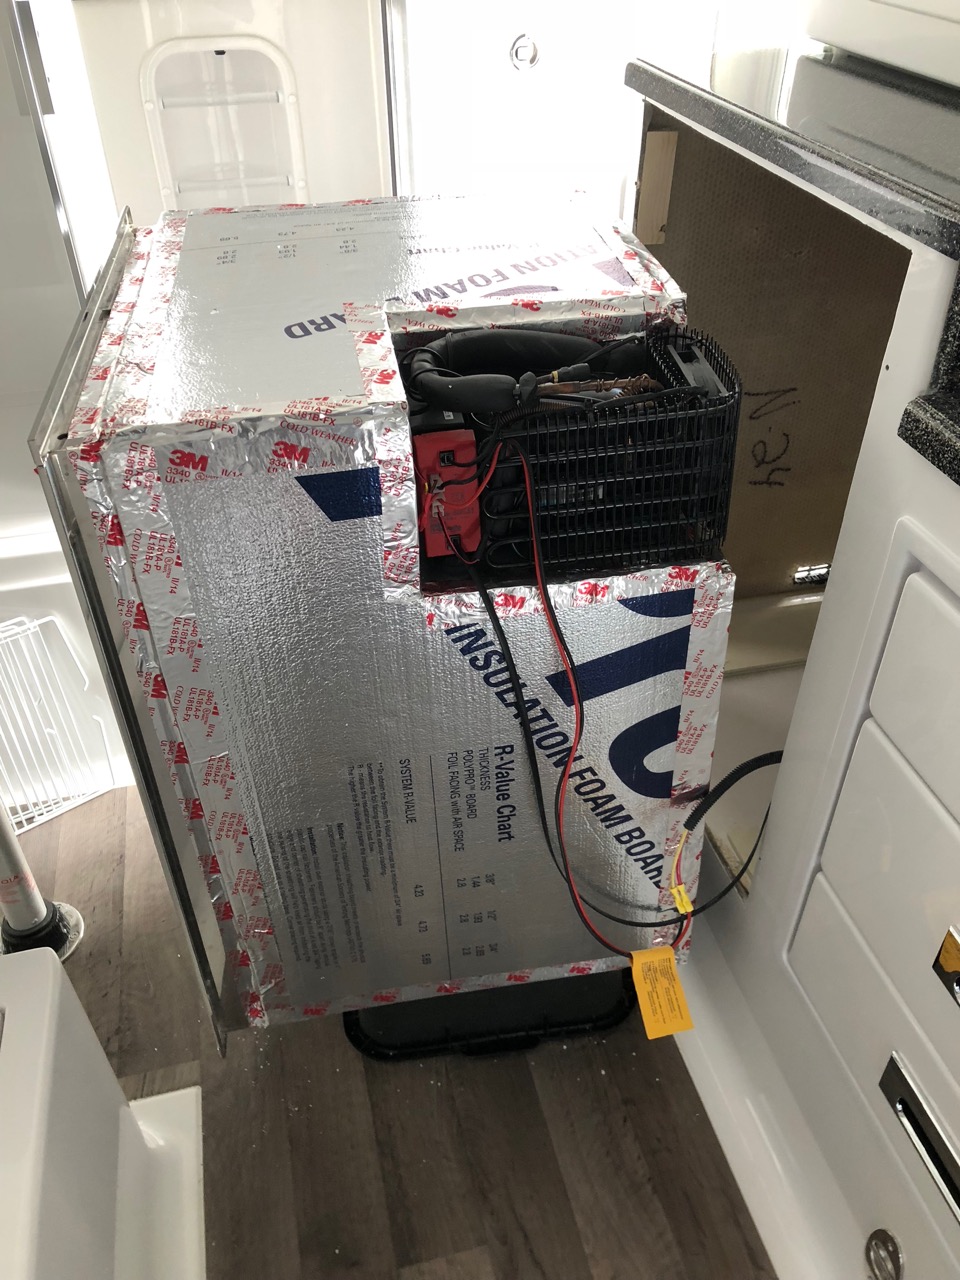
Teaser: I am sure dust is leaking into lots of places I haven't seen yet, like all the scupper drains and the roof vent. For sure I see it around the door seal near the hinges and the bottom, the aft outside storage door near the shower, and I am getting serious leakage under the fridge ... but that one is most probably a bad seal behind the flanges of the unit that I can fix: The Aussies do this all the time to deal with "bull dust". The basic idea is that you add positive pressure (clean, highly filtered air) to the cabin, shut all vents and openings, and the air leaks out any places dust would normally enter. As tight as the ollie is, it would not take a lot of airflow to be effective - 100 cfm should be more than plenty.: [attachment file=Aussi Dust syatem.JPG] I mocked up a system on Mouse and think I could duplicate that one for less than $300, using a smaller filter assembly. [attachment file=Donaldson FRG filter screen cap 03.png] That unit will fit behind the street side propane bottle, I already have side access doors. It will be easy to remove the end cap for filter replacement, and the dirt purge valve will point down to exit around the frame members. Excuse the poor graphics: [attachment file=IMG_4920 Labled.jpg] The inlet can go into the cabin here, I think. Does anyone know what is behind the X? I am almost, sort-of, sure that it is clear under the bathroom vanity. [attachment file=IMG_4916 Labled.jpg] An inexpensive 3 inch bilge blower will fit here: [attachment file=IMG_4838 Labled.jpg] Because there is lots of room on the faucet side of that cavity: [attachment file=IMG_4841 Labled.jpg] Getting the pipe in would be simpler if the X location were available, if not it could be brought in from higher up but that would complicate the plumbing. Power is there at the water pump switch (the fan motor draws less than 4 amps) and I could add another waterproof switch. Air entering the vanity would diffuse throughout the floor and enter the cabin through the heater grill and other openings. The inlet pipe from the air filter would go straight up between the two bottles, 90 degree elbow to the street side and then 90 degree elbow up to a snorkel tube: [attachment file=IMG_4927 Labled.jpg] If you wanted a totally stealth installation you could elbow down and install a washable pleated filter but that would be maintenance intensive, and the air under the doghouse is not too clean. Here is the snorkel: [attachment file=IMG_4933 Labled.jpg] Side view, it would fit pretty close to the front hull seam. You would have to notch the doghouse cover to clear it.: Thoughts? Am I insane? I think it would look totally cool..... John Davies Spokane WA

-
Connecting rear camera to Tow vehicle
John E Davies replied to hardrock's topic in Mechanical & Technical Tips
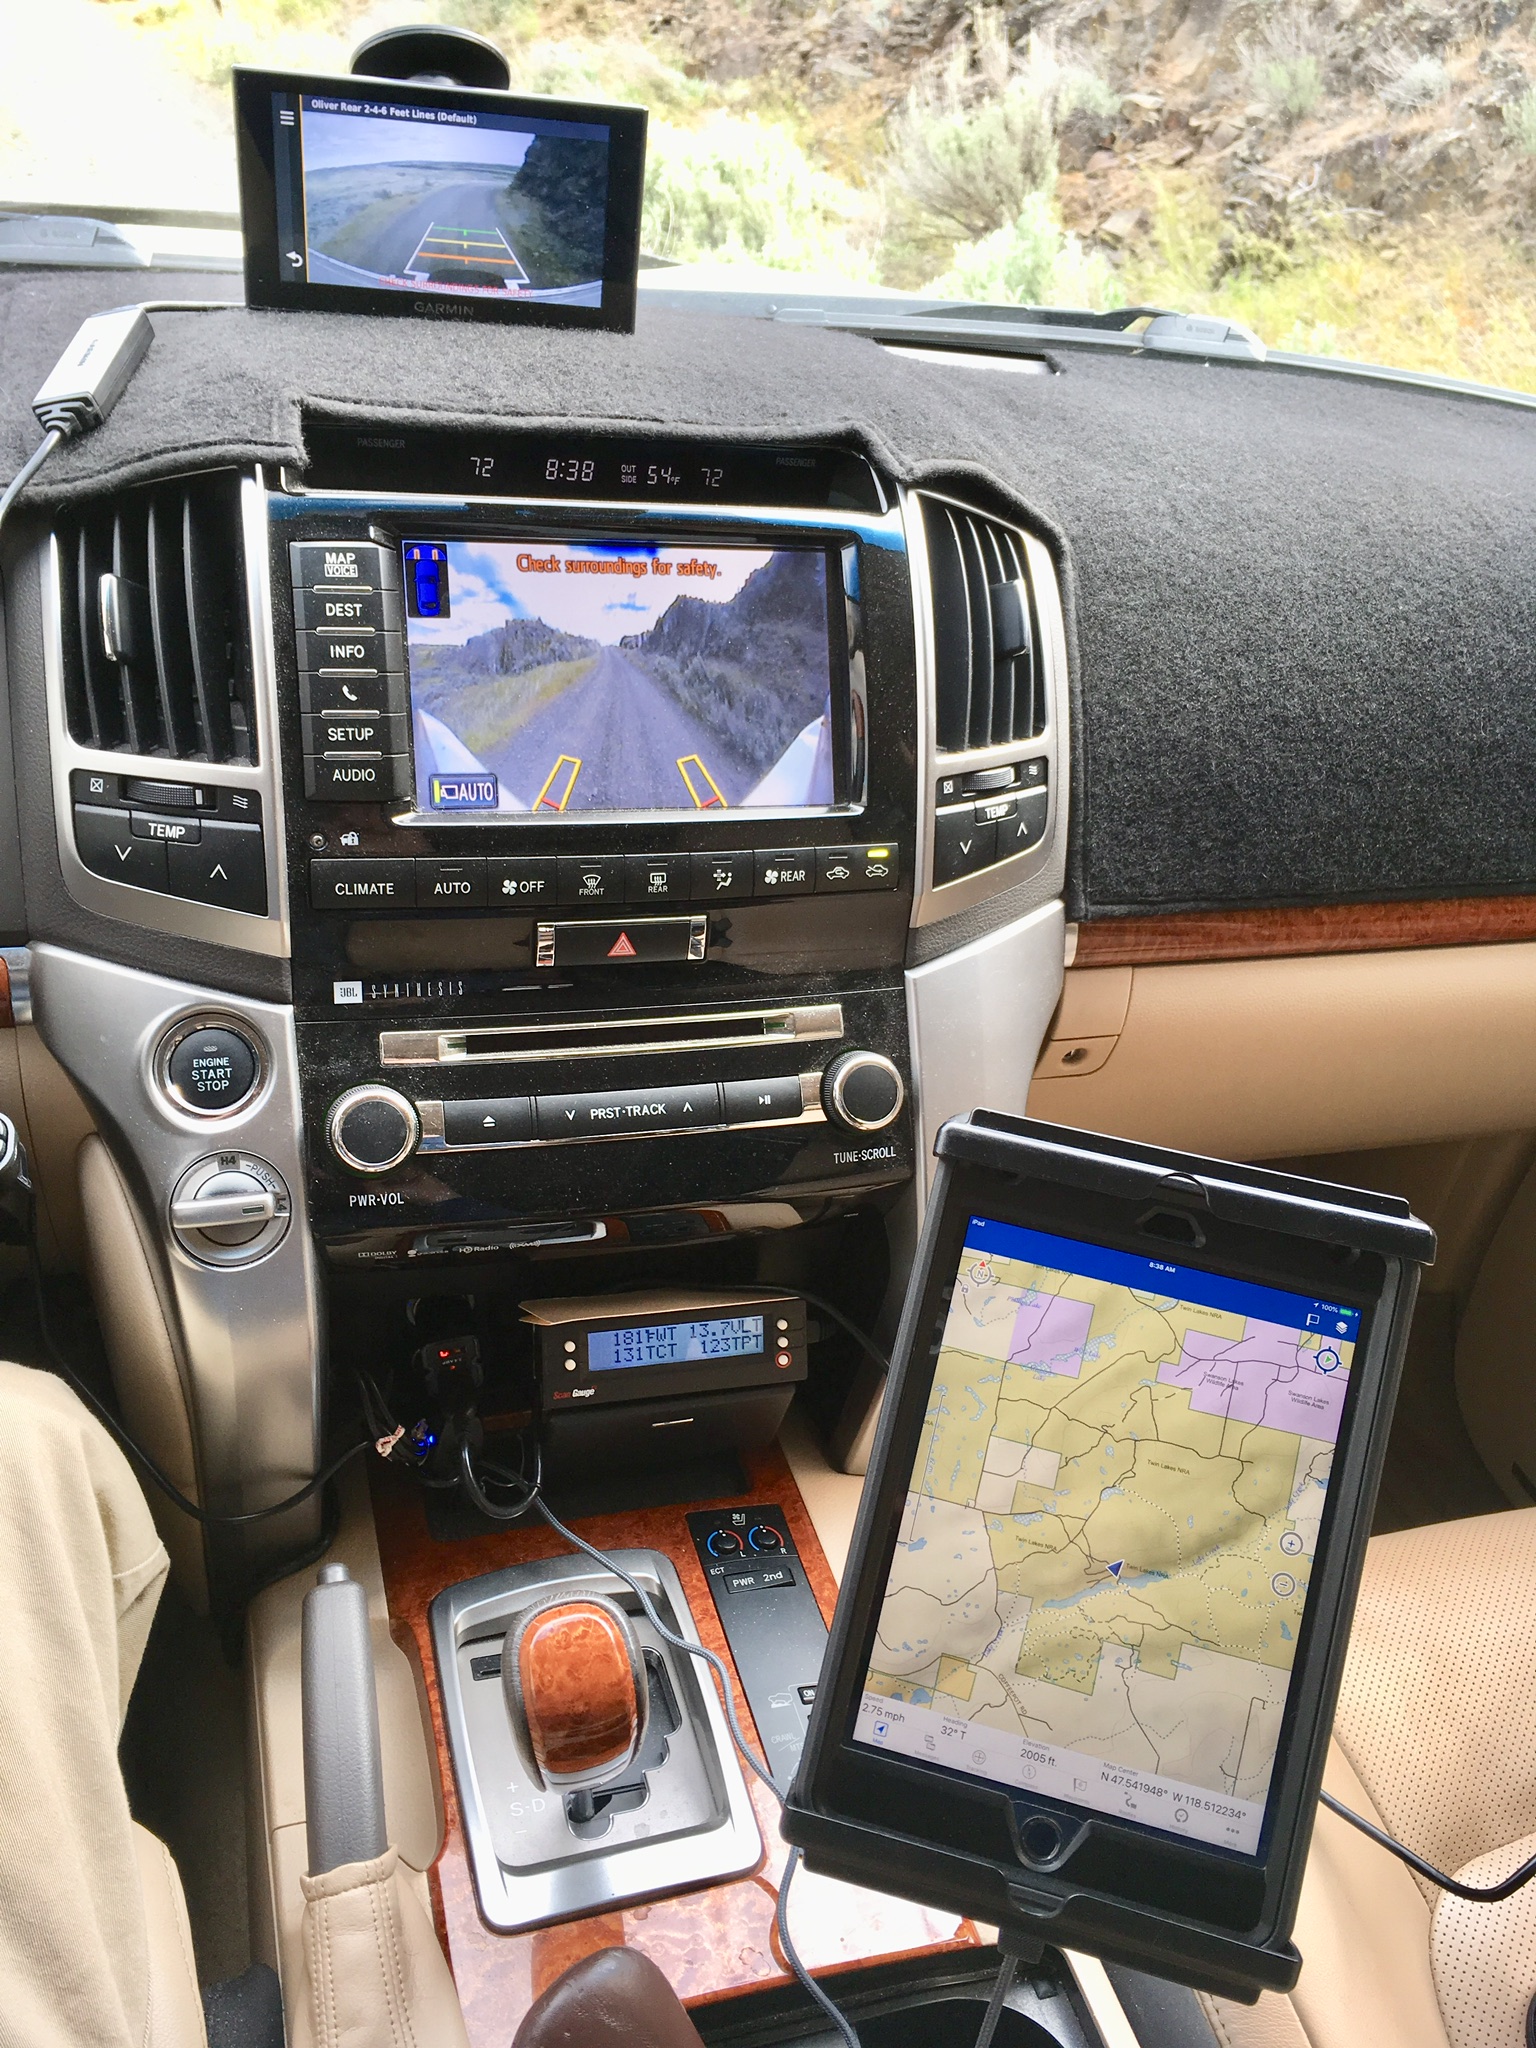
I wish you the best of luck figuring this out .... I wish there were standards so that factory truck monitors could easily accept outside video feeds. I do think you will need to find an aftermarket wifi dongle to connect to your nav head. My Land Cruiser has perimeter cameras as well as front and back cameras. I hoped to tie my trailer one into that system. No luck. I am now using a Garmin BC30 backup camera connected to my RV660 gps. It works fine, and having the second screen helps in certain unusual circumstances, such as going down a steep twisty dirt road in first gear, 4 Low. I have a view of what is in front of the truck bumper AND what is behind the trailer. I would lose that ability if I had the rear signal integrated into my factory display.... Sorry to hijack your thread. I actually believe having the monitor up high in your direct line of sight is WAY more useful, especially when you leave it turned on in heavy traffic. You don’t have to look away from the road to see it. Note that my high mounted camera, about 8 inches below the Oliver sign, allows me to actually the rear tire; plus the two furthest guidelines are adjustable. I have mine set at six feet and four feet. I think this is important! I don’t know if the factory unit has that capability.... John Davies Spokane WA
-
Just had a random thought. I could fabricate a long removable solid “running board” that could be slid onto brackets on the frame. It would also extend across the steps to the front of the hull, to act a deflector to keep the dust plume low down until it reached the rear wheels. Could that be effective at all? It would look odd, but odd never stopped me before. John Davies Spokane WA
-
Thanks for the link, I somehow missed most of that conversation, probably because of the very misleading title. I do hope that we can gather up as much info and pictures about compressor fridges as possible in this thread so that anyone who may be interested can easily find it. I really think this Forum has enough members and activity now that a FAQ section would be a great benefit. I have some thoughts on doing a permanent patch over the two big outside openings, but it would depend on what fridge I chose, in terms of leaving good access to the compressor and electronics. The Nova Cool F5800 looks very good because all that equipment is up high in the left rear (as viewed from the front of the unit) corner, so a large vent opening in the entry wall there could provide excellent access. If that turns out to be true, then doing a permanent patch job on the unused outside holes would be a good thing. Is there any market for a lightly used year-old absorption fridge? Maybe $400 on Craigslist? Being able to get some cash for the old one might help me sell the idea to my Personal Banker.... John Davies Spokane WA
-
Long Nova Kool install thread at the Escape Forum, no pictures for some reason. http://www.escapeforum.org/forums/f8/nova-kool-rfu-8320-refrigerator-installation-4741.html John Davies Spokane WA
-
Overland and SeaDawg, and anybody else who has knowledge or first hand experience, please comment. I am interested in plugging the two gaping holes in the side of the hull and also eliminating one potential fire hazard, the propane line into that area. I would love to see more pics like this from Overland: Please talk about what you learned from: Initial research Problems during the installation Tips for an easier installation How to neatly block off the outside openings What you have learned AFTER installing it - using the fridge What brands/ models work best in an Ollie, What brands to avoid. I have owned a portable ARB fridge for several years and like it a lot, so this is not completely new territory. I just hope that I can become educated here. I am currently interested in the Nova Kool F5800, mostly because it will fit nicely in the existing opening. The required cutout is 32 H x 23.25 W x 23.25 to 22" D (adjustable support frame). The Dometic RM2454 (my unit) opening: 36.5 H x 24.01 W x 23.7" D. So the new unit is shorter by 4.5 inches but otherwise really close. The Dometic is 4.0 cu ft, the nova Kool is 5.8 Cu ft, a huge incrrease. Parts diagram: ... http://novakool.com/products/single_doors/documents/PartsListF5800ACDC.pdf Installation and Owners Manual: .... http://www.novakool.com/support/documents/manualnkf-049revdec2013.pdf Cost is around $1350 plus shipping, warranty is two years, it works at 30 degrees off level, and the venting needed is 30 sq inches above and also below the compressor. ... And that is about the extent of my knowledge about Nova Kool. For those of you wondering why we are even interested in this stuff, please watch: ... Please discuss. Thanks, John Davies Spokane WA
-
I could try that, but I do keep some frozen stuff in the freezer, so anything I wanted to keep froze hard would have to go in my ARB 12 vdc unit. The rest of the fridge contents could warm up a little without harm, I guess. Can someone post pics of solid outside vent covers? I don't like to re-engineer what has already been sorted out. I would desperately like to hear if other Ollie owners experience this issue! The lower vent location is extremely far down under the hull compared to most other RVs except maybe for popups. It is located directly in the path of the rooster tail generated by the truck. So, am I getting all this dirt due to the basic “design flaw”, or is this a nasty byproduct of my Stone Stomper installation, which keeps all the debris down low rather than letting it billow up and partly disperse into the gap between? I could take off the SS and do some tests, but I hope that owners can just tell me if it happens to you too.!! If this is a design flaw then Oliver needs to be putting compressor fridges into their boondocking trailers. Or at least giving guidance about how to deal with the situation. Thanks. John Davies Spokane WA
-
My compressor doesn't have a high enough flow rate to clear the coils in between the two access openings. The blower does great. I do not have to take the extension tubes. If I had the blower I could also use it to clear the spot in front of the cabin door, but that would probably upset any neighbors. John Davies Spokane WA
-
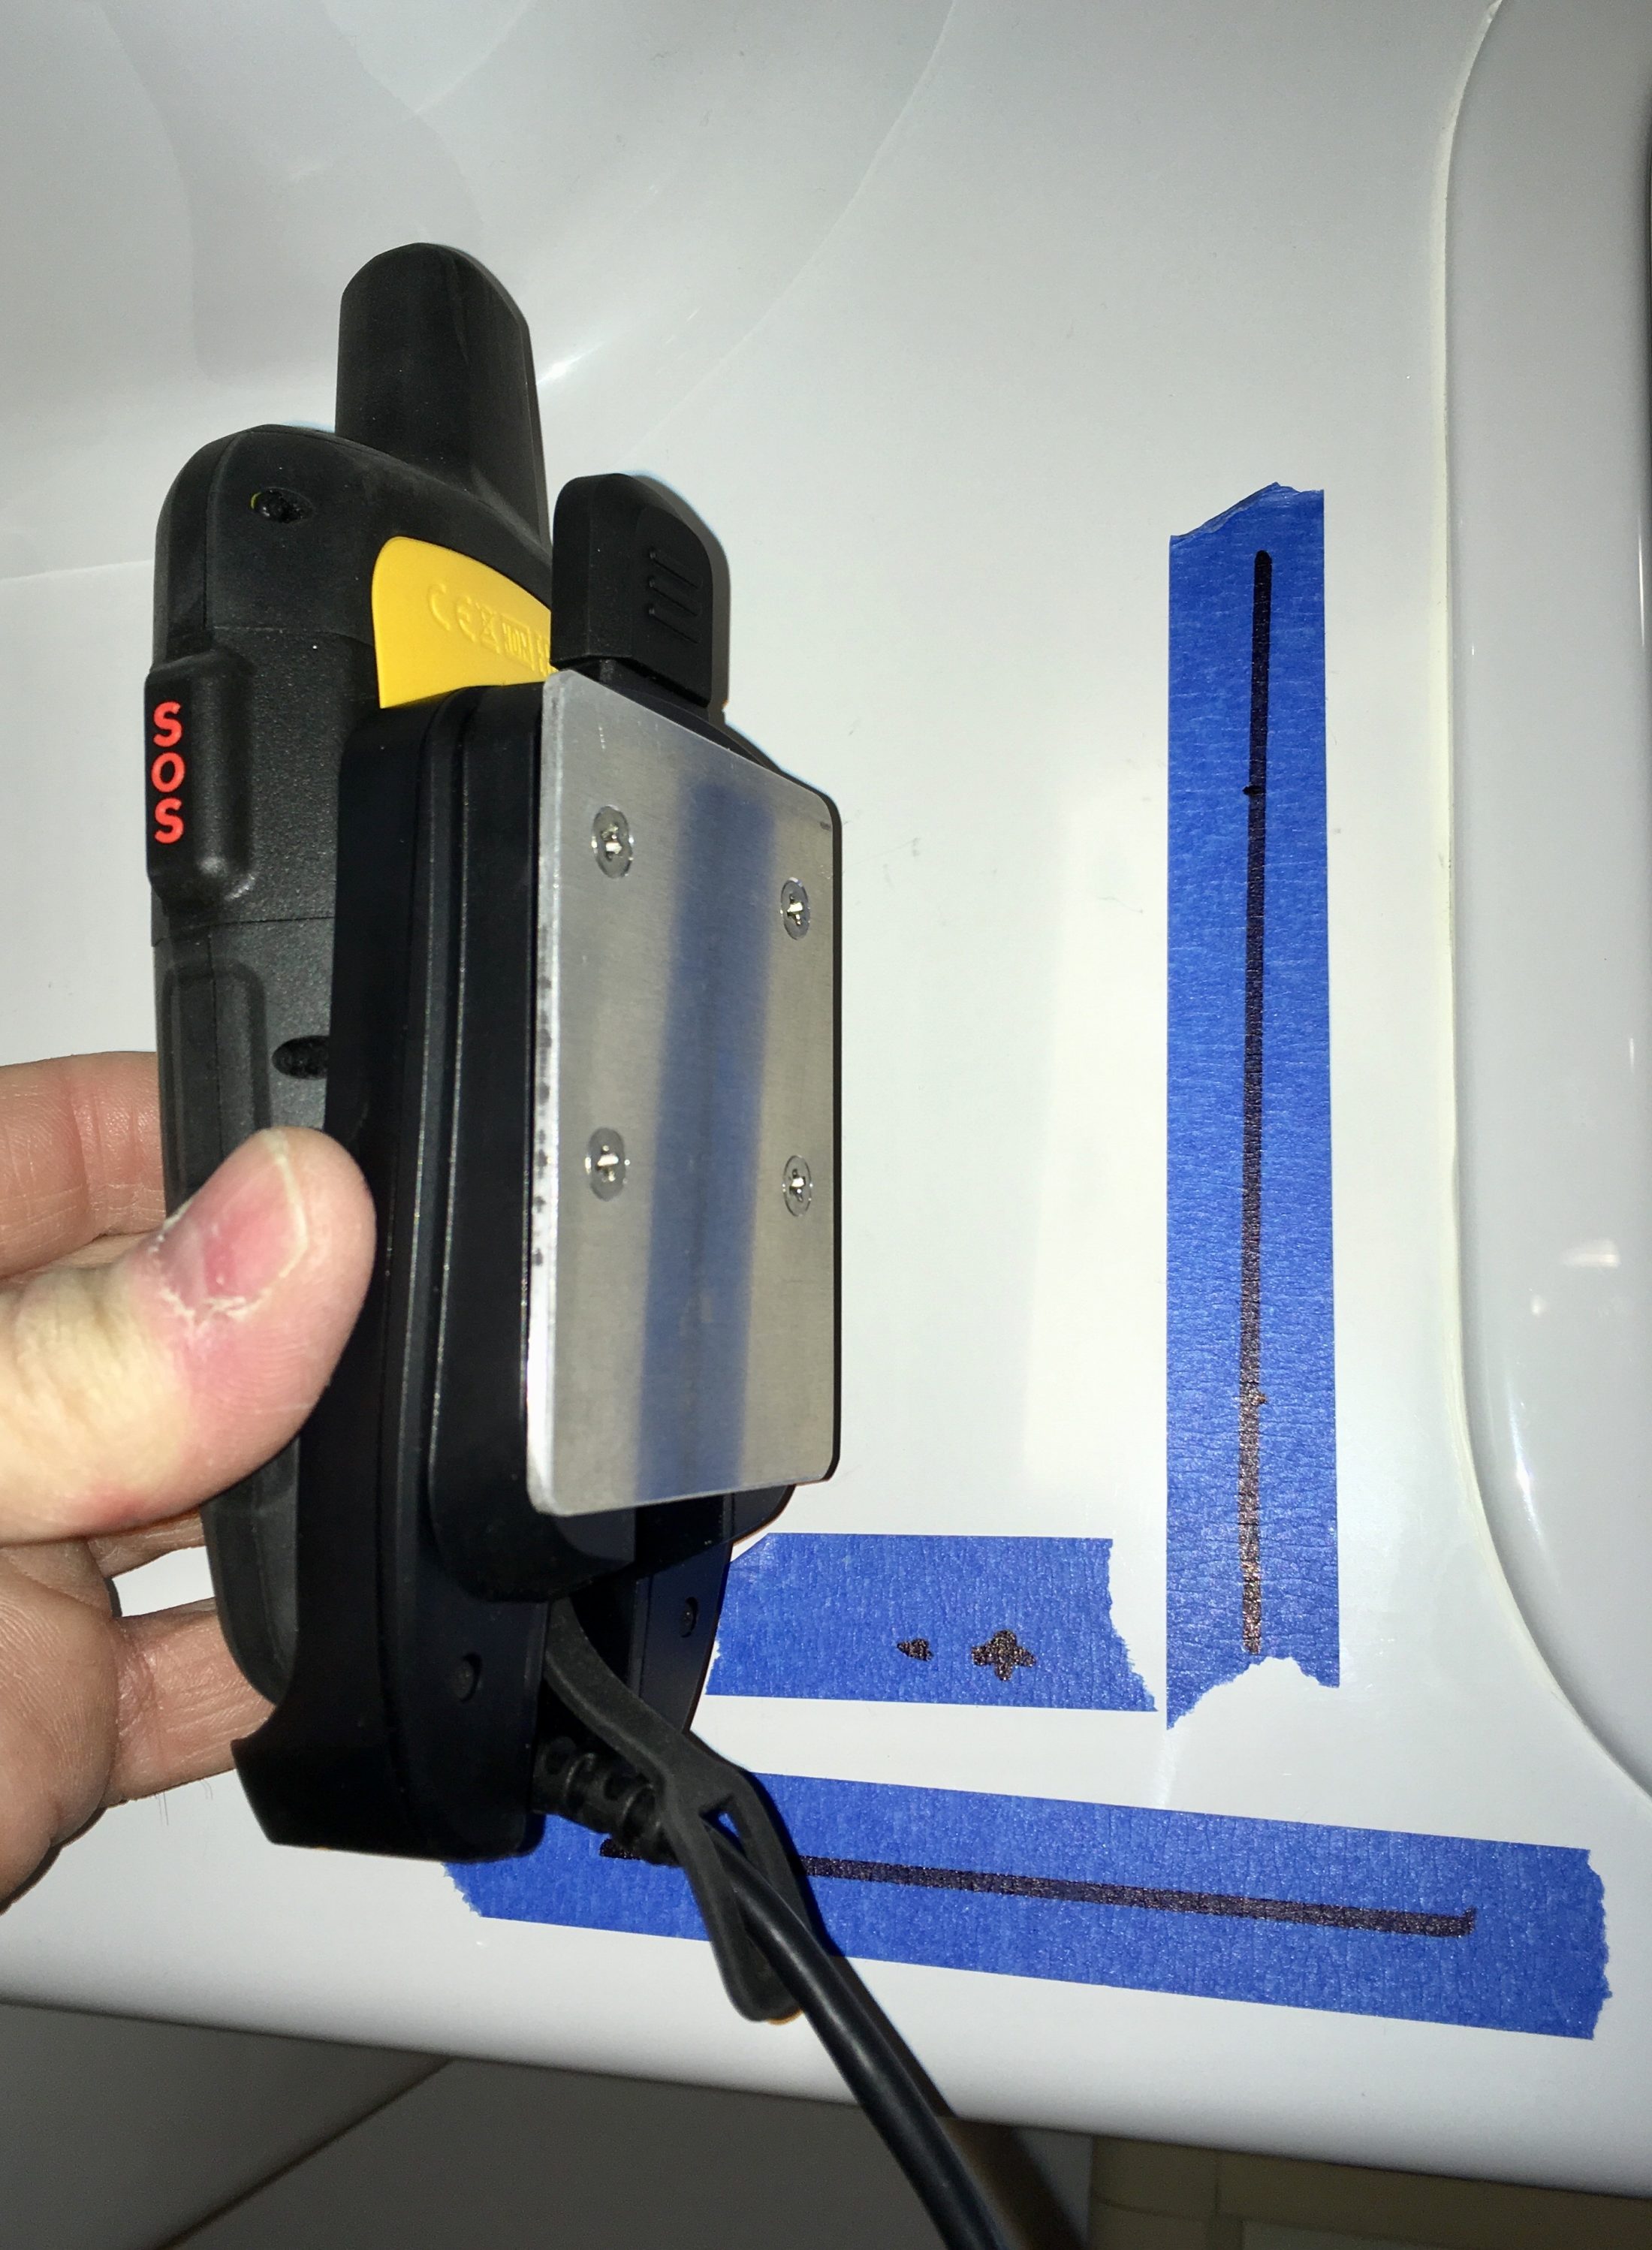
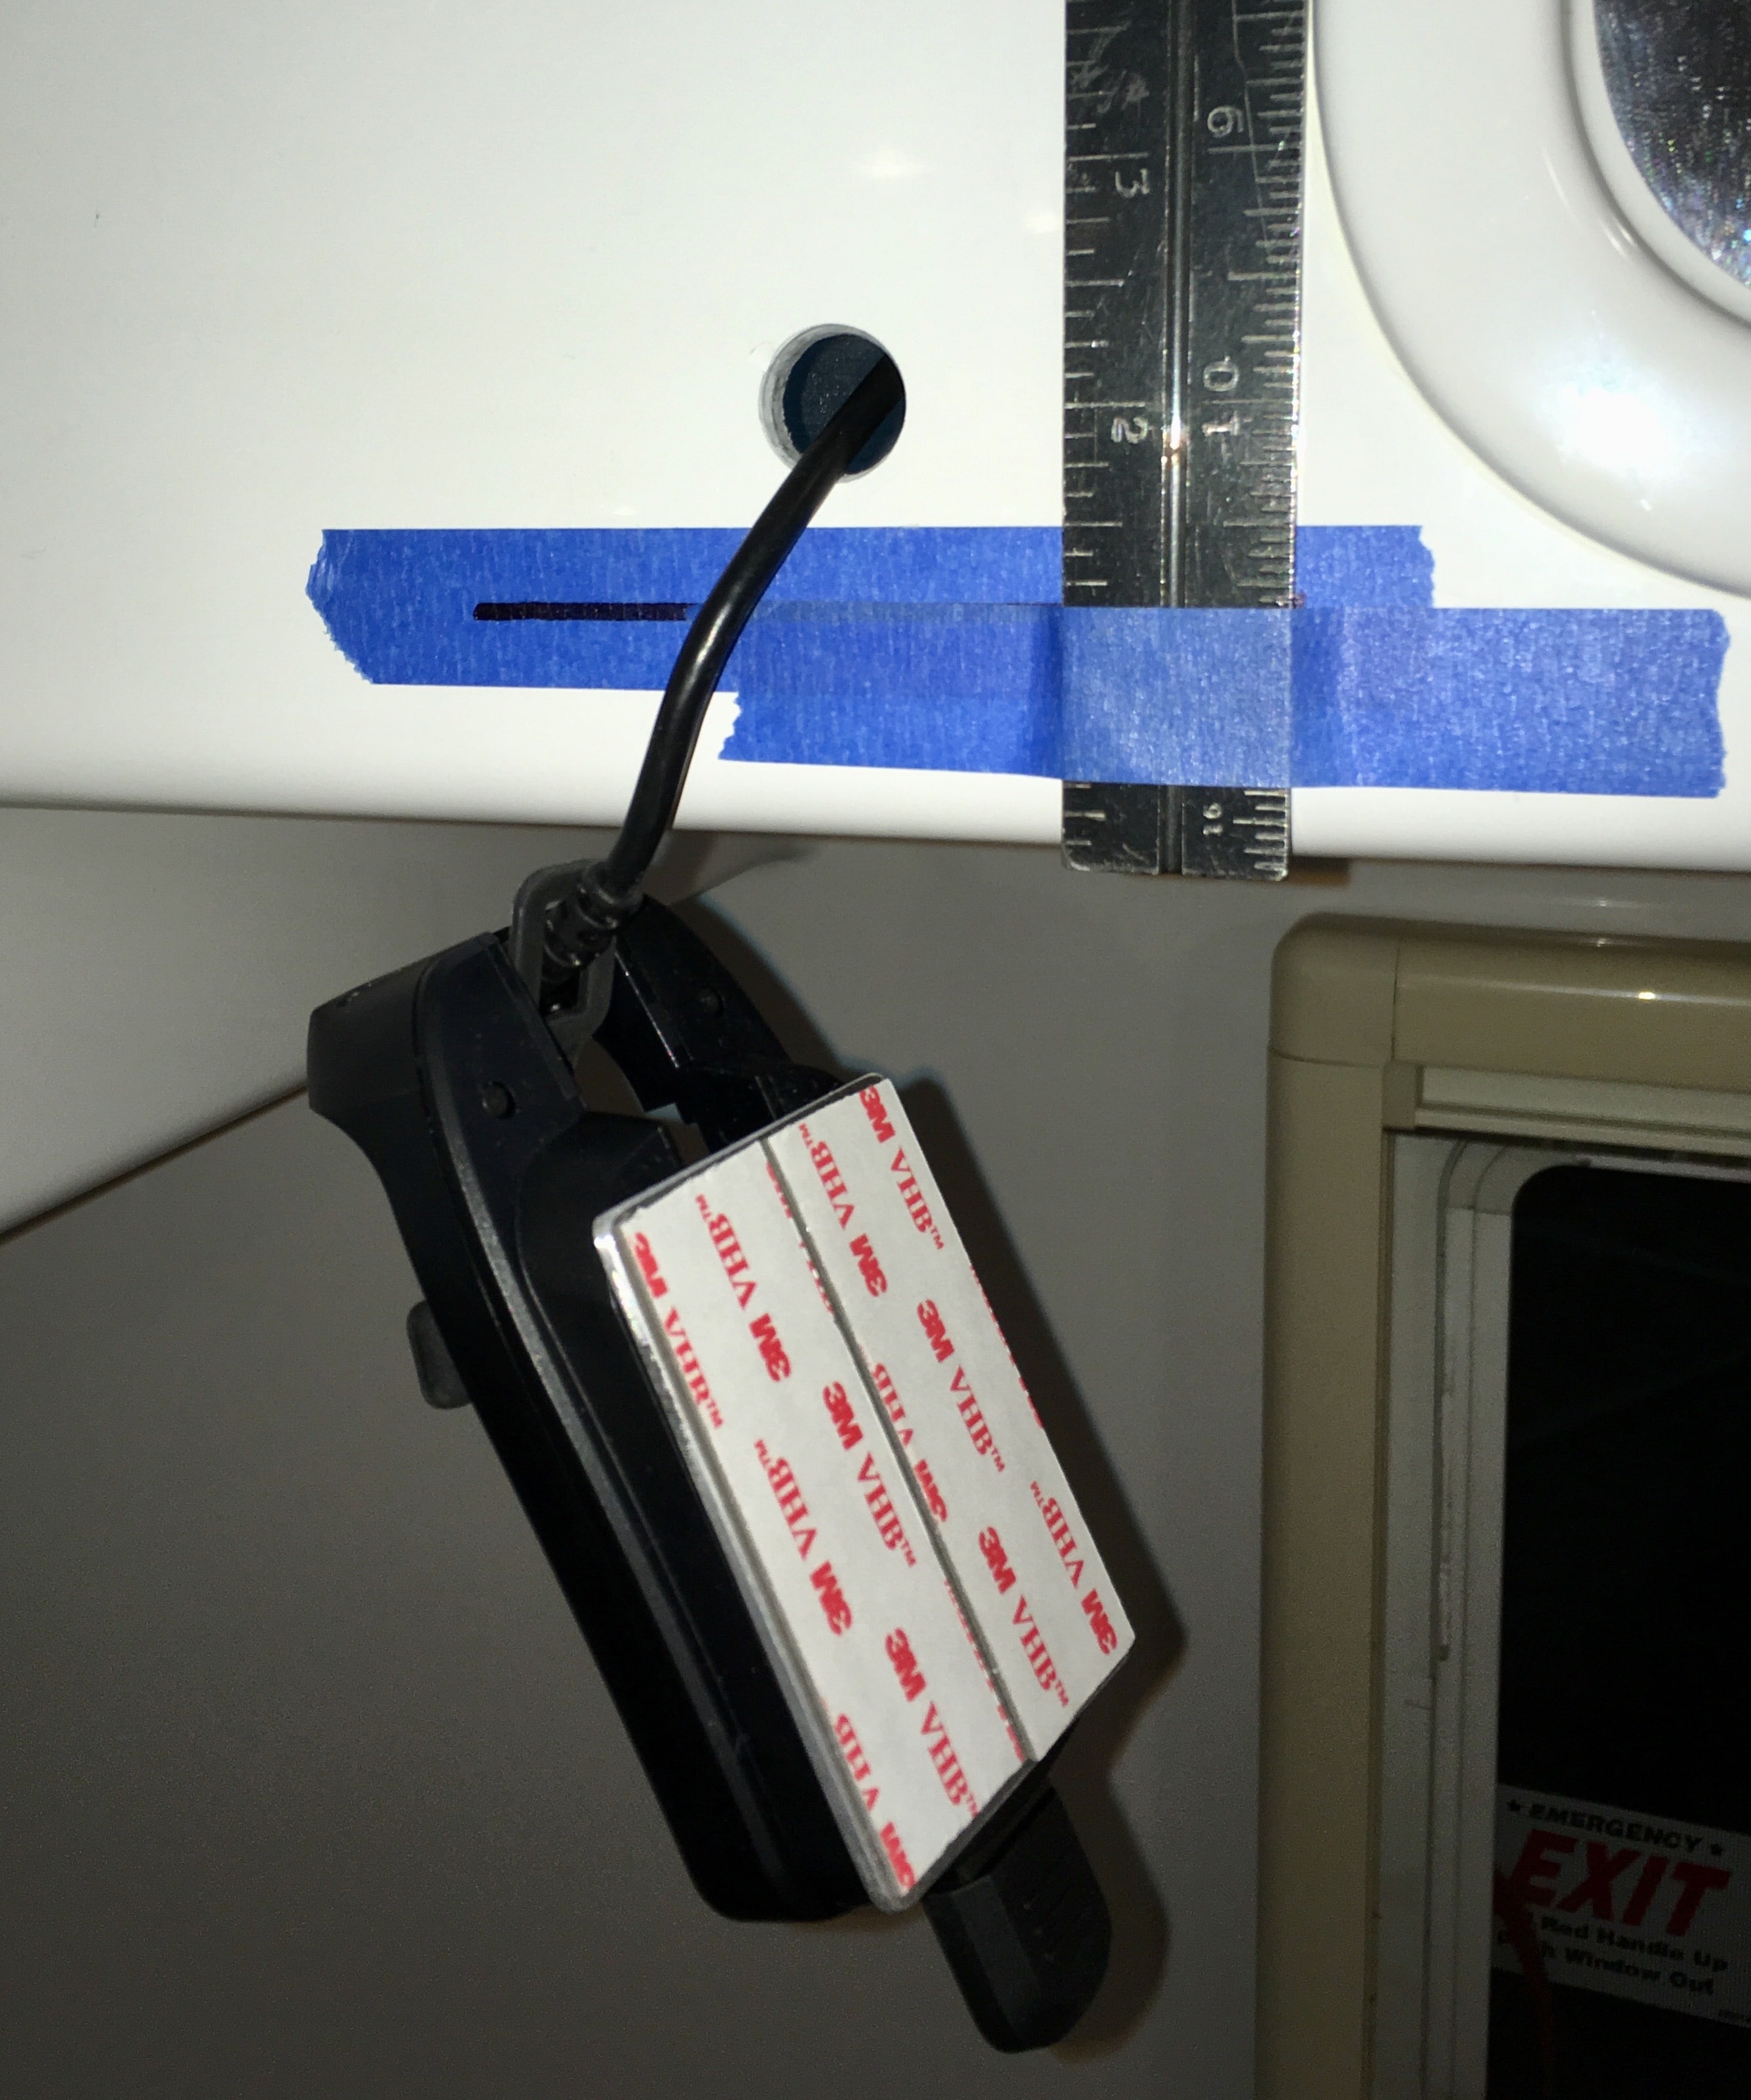
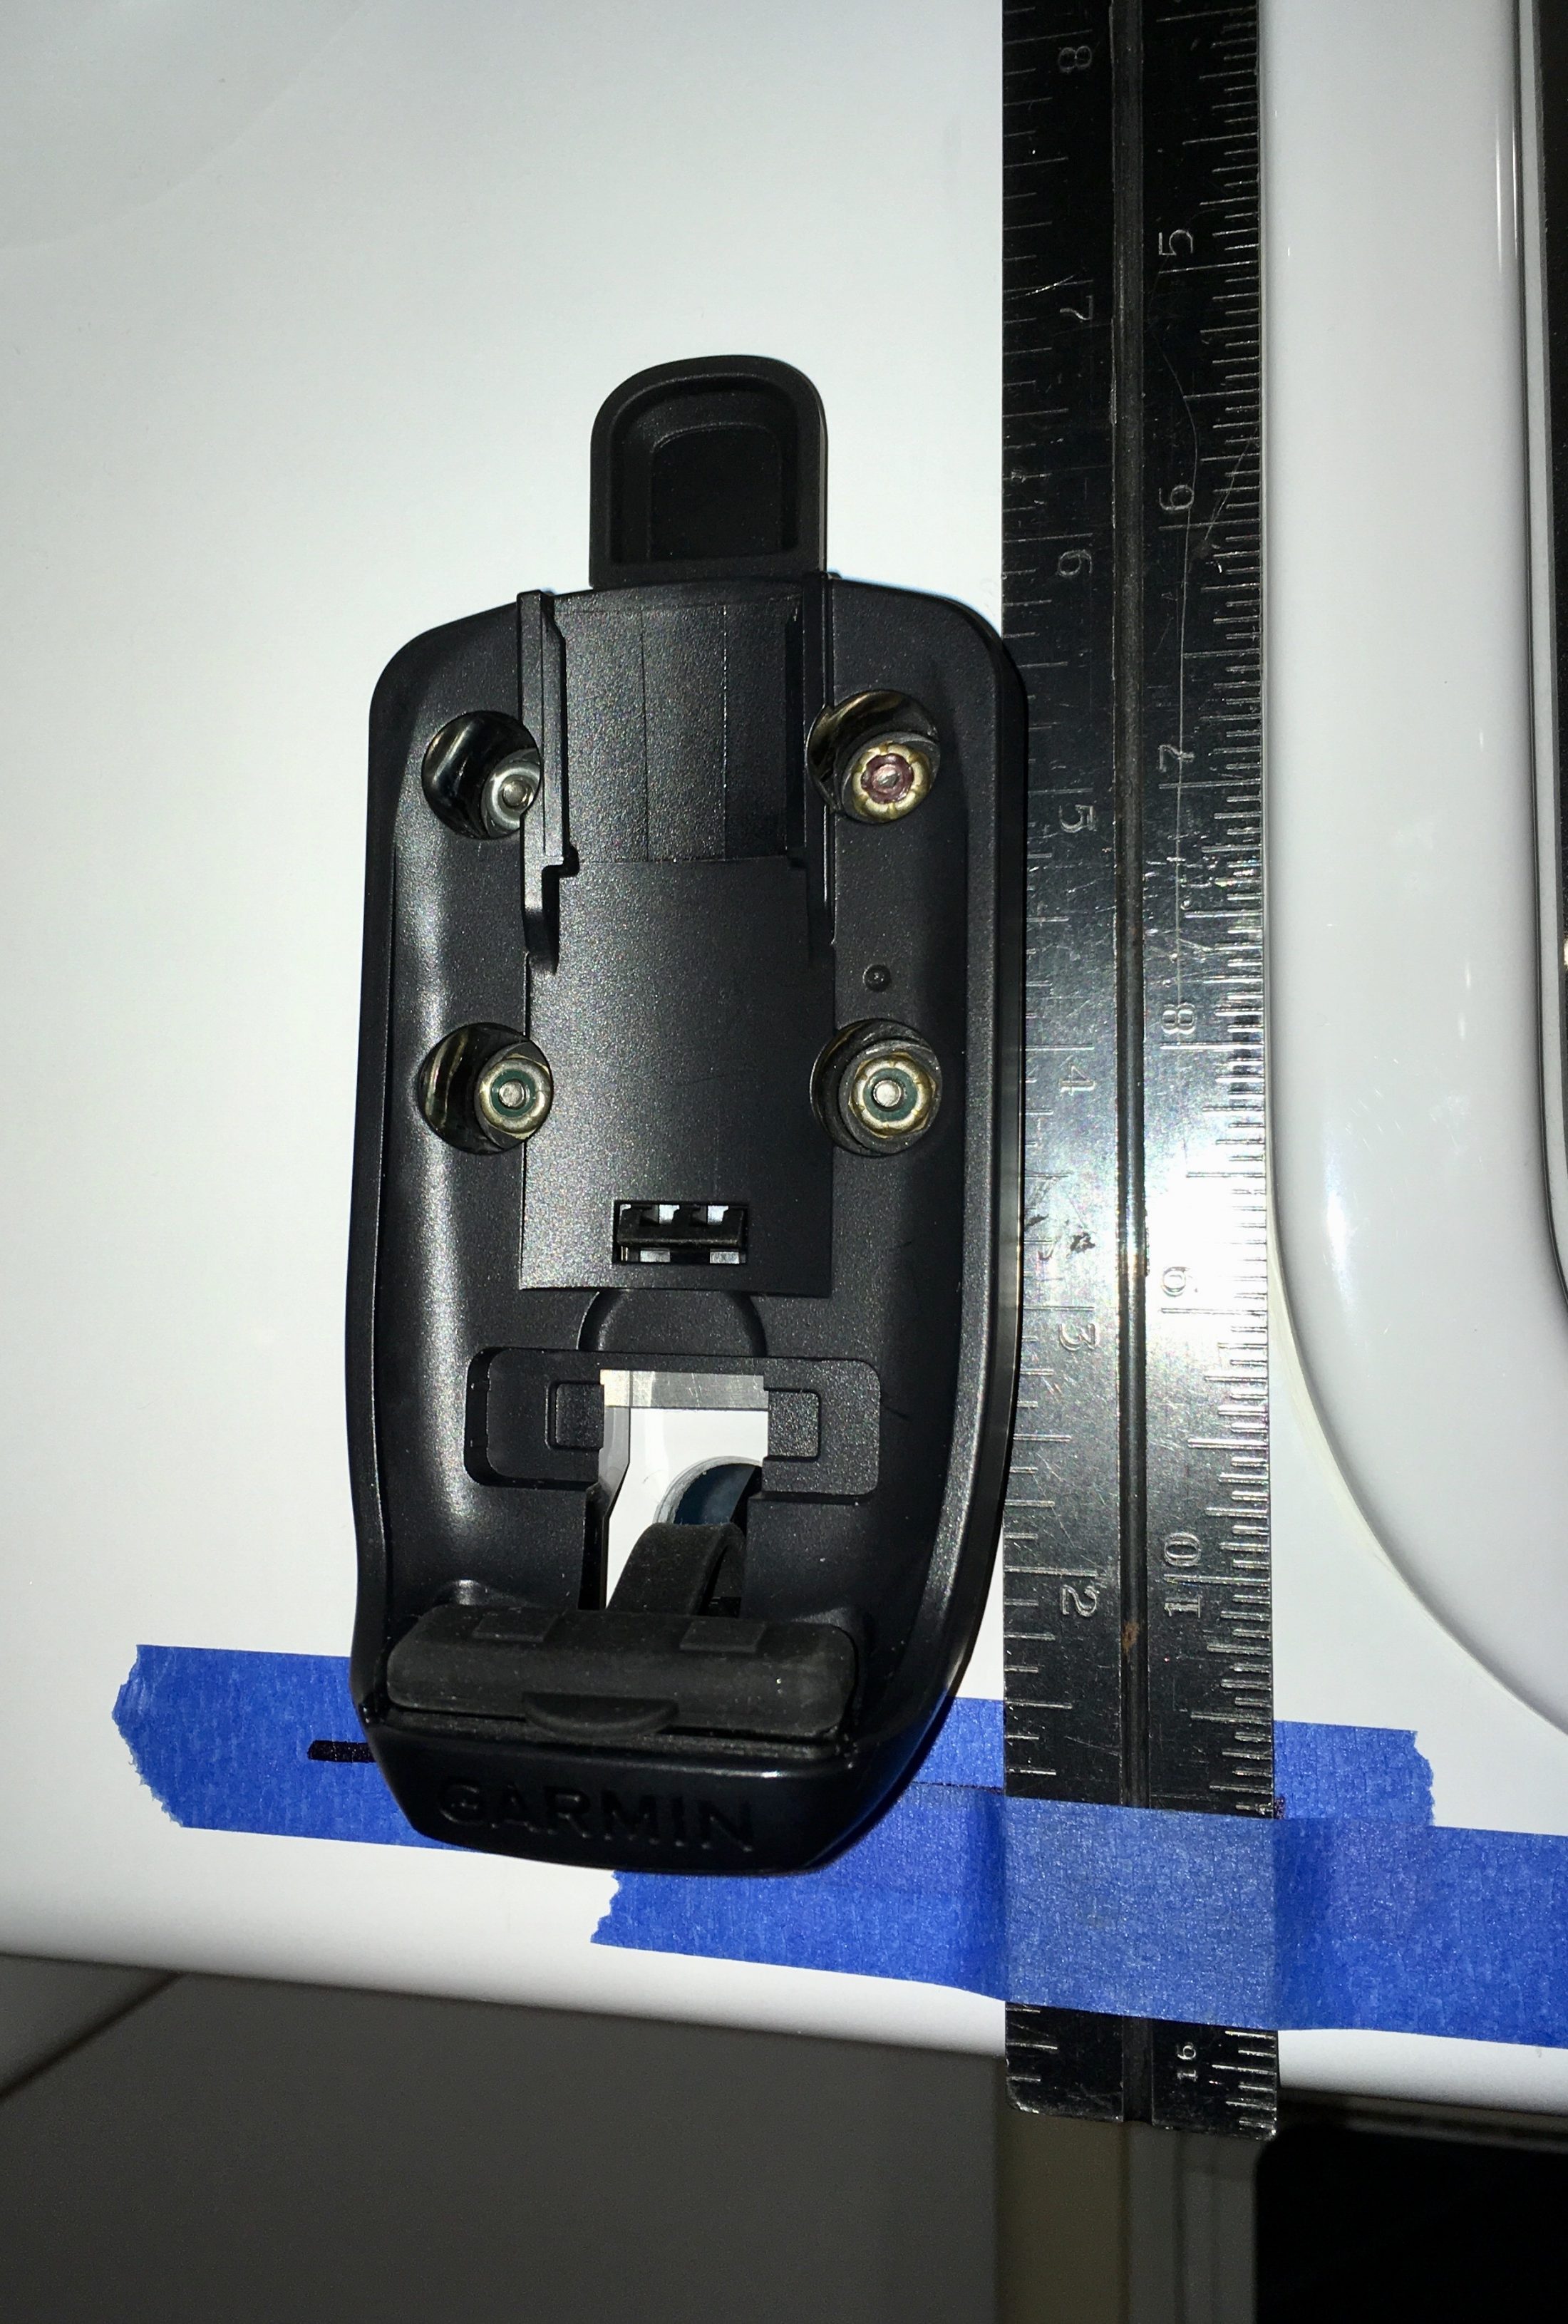
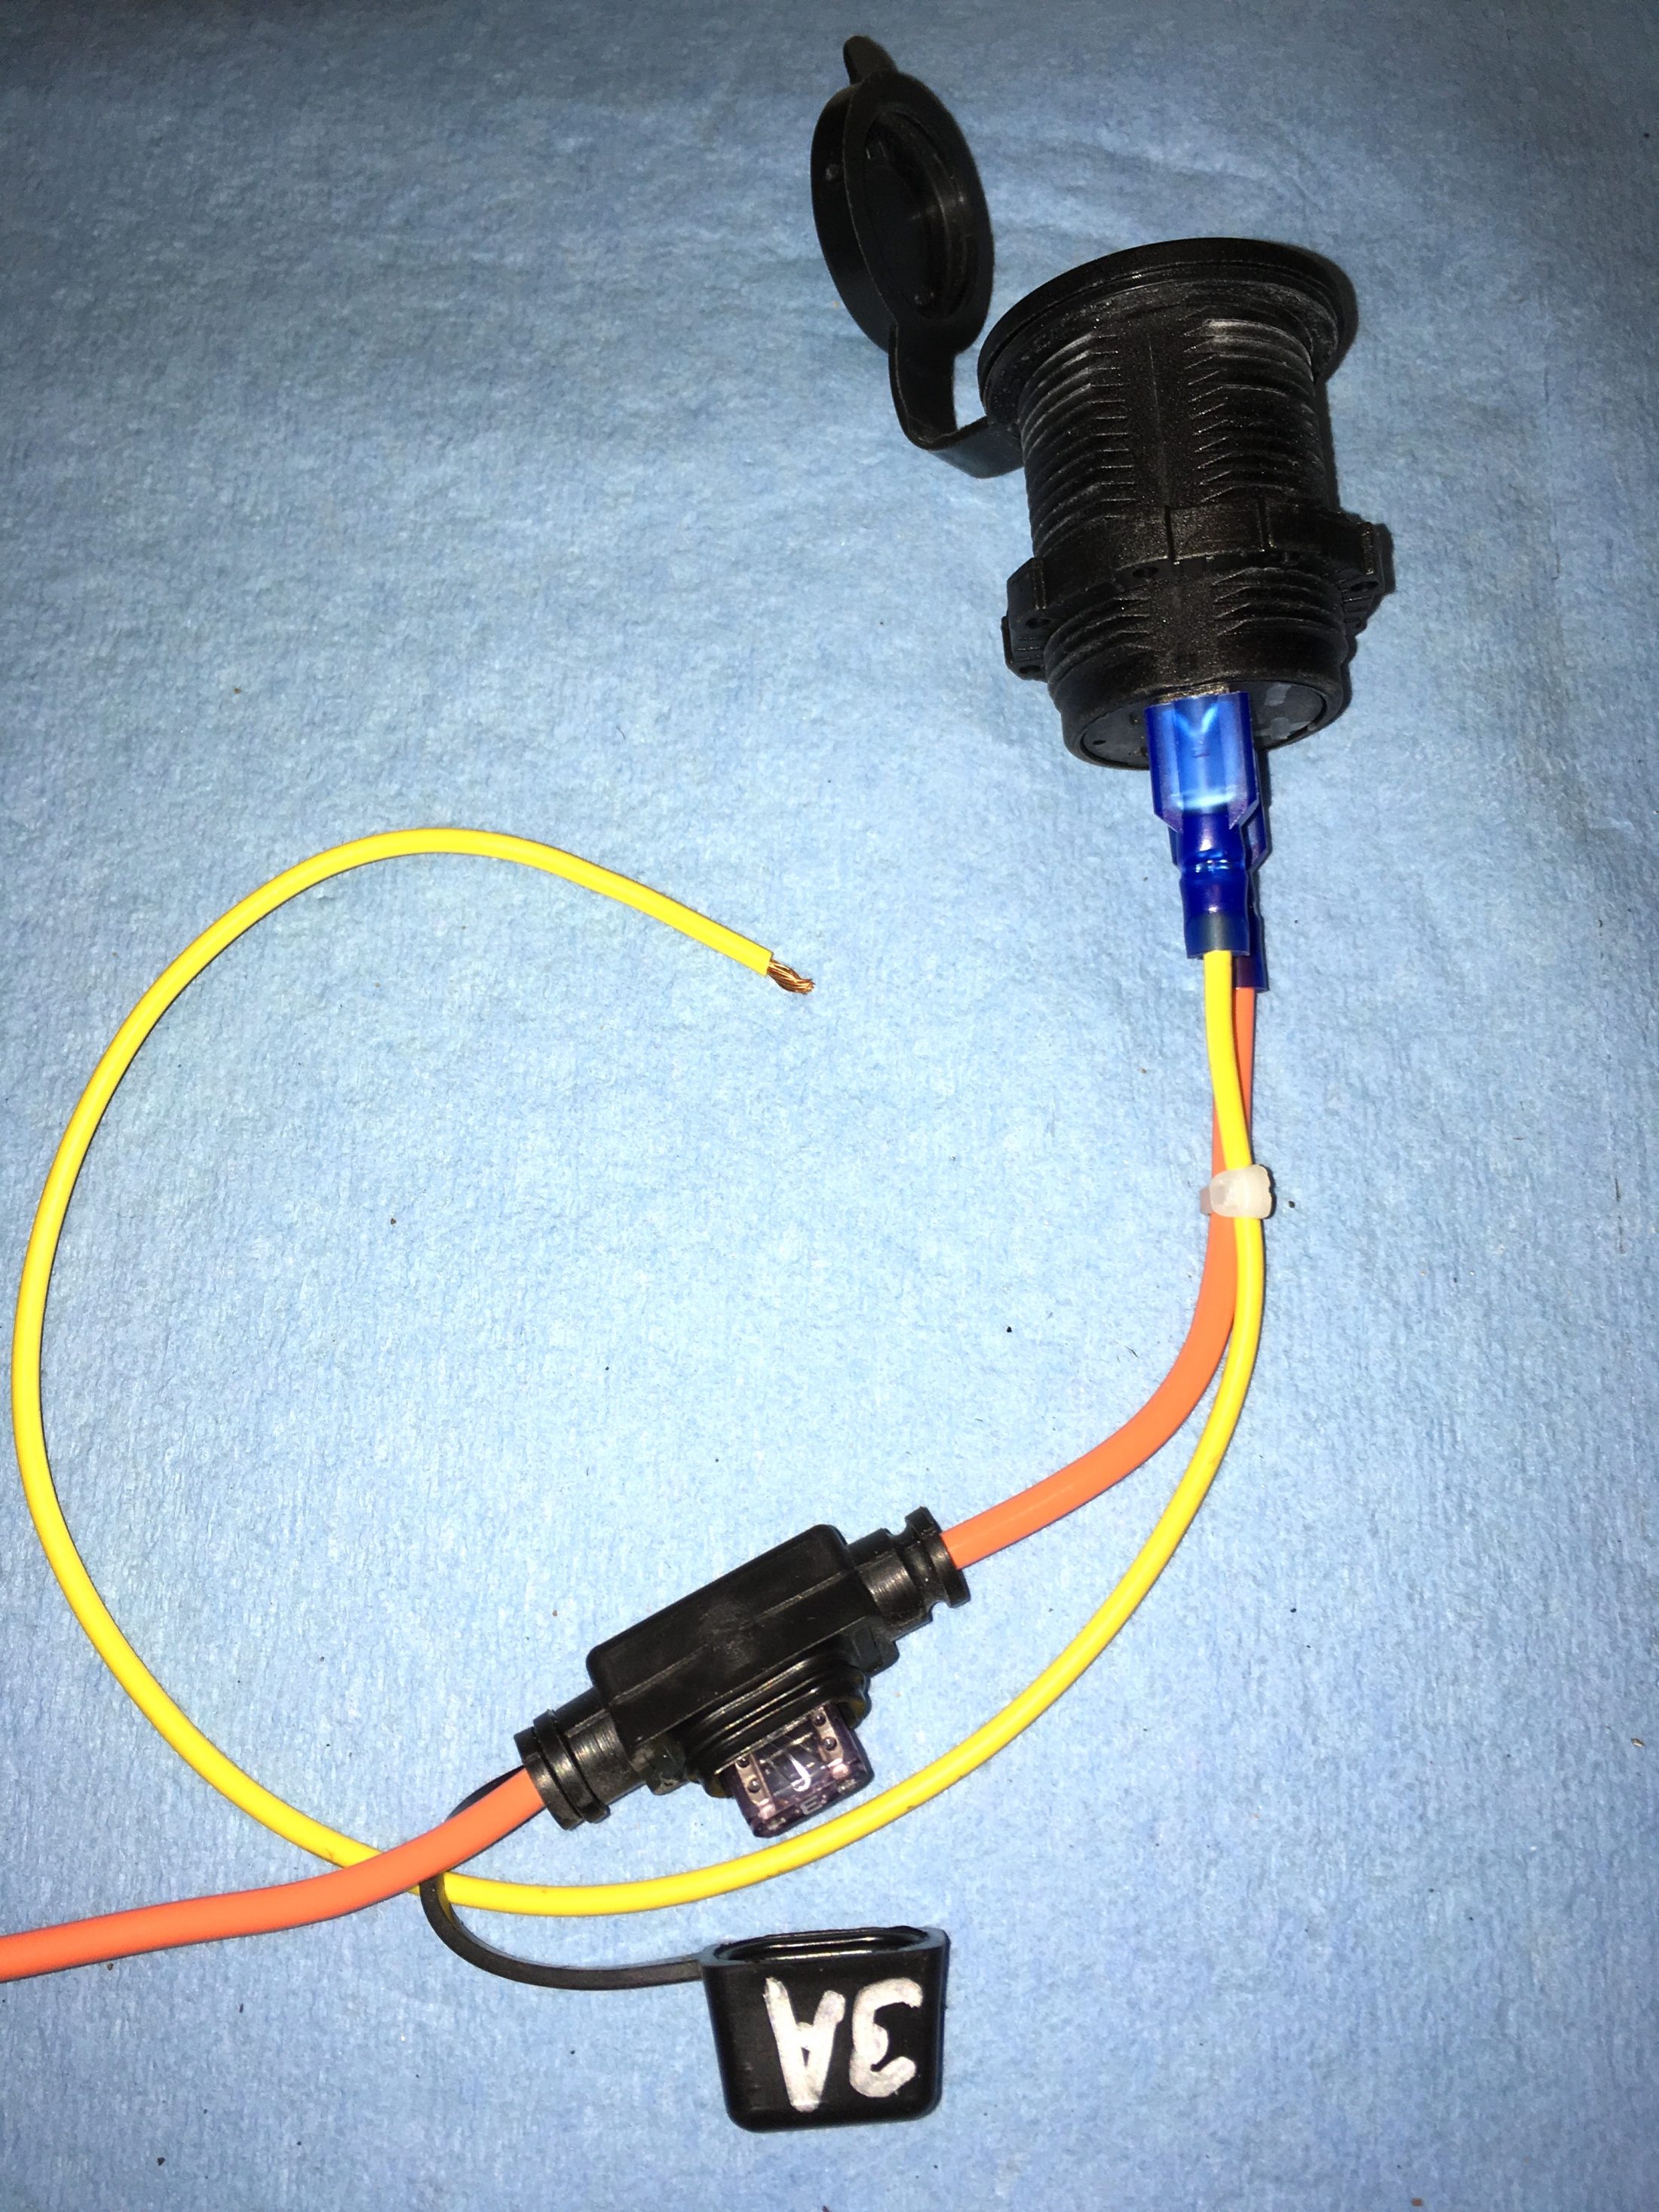
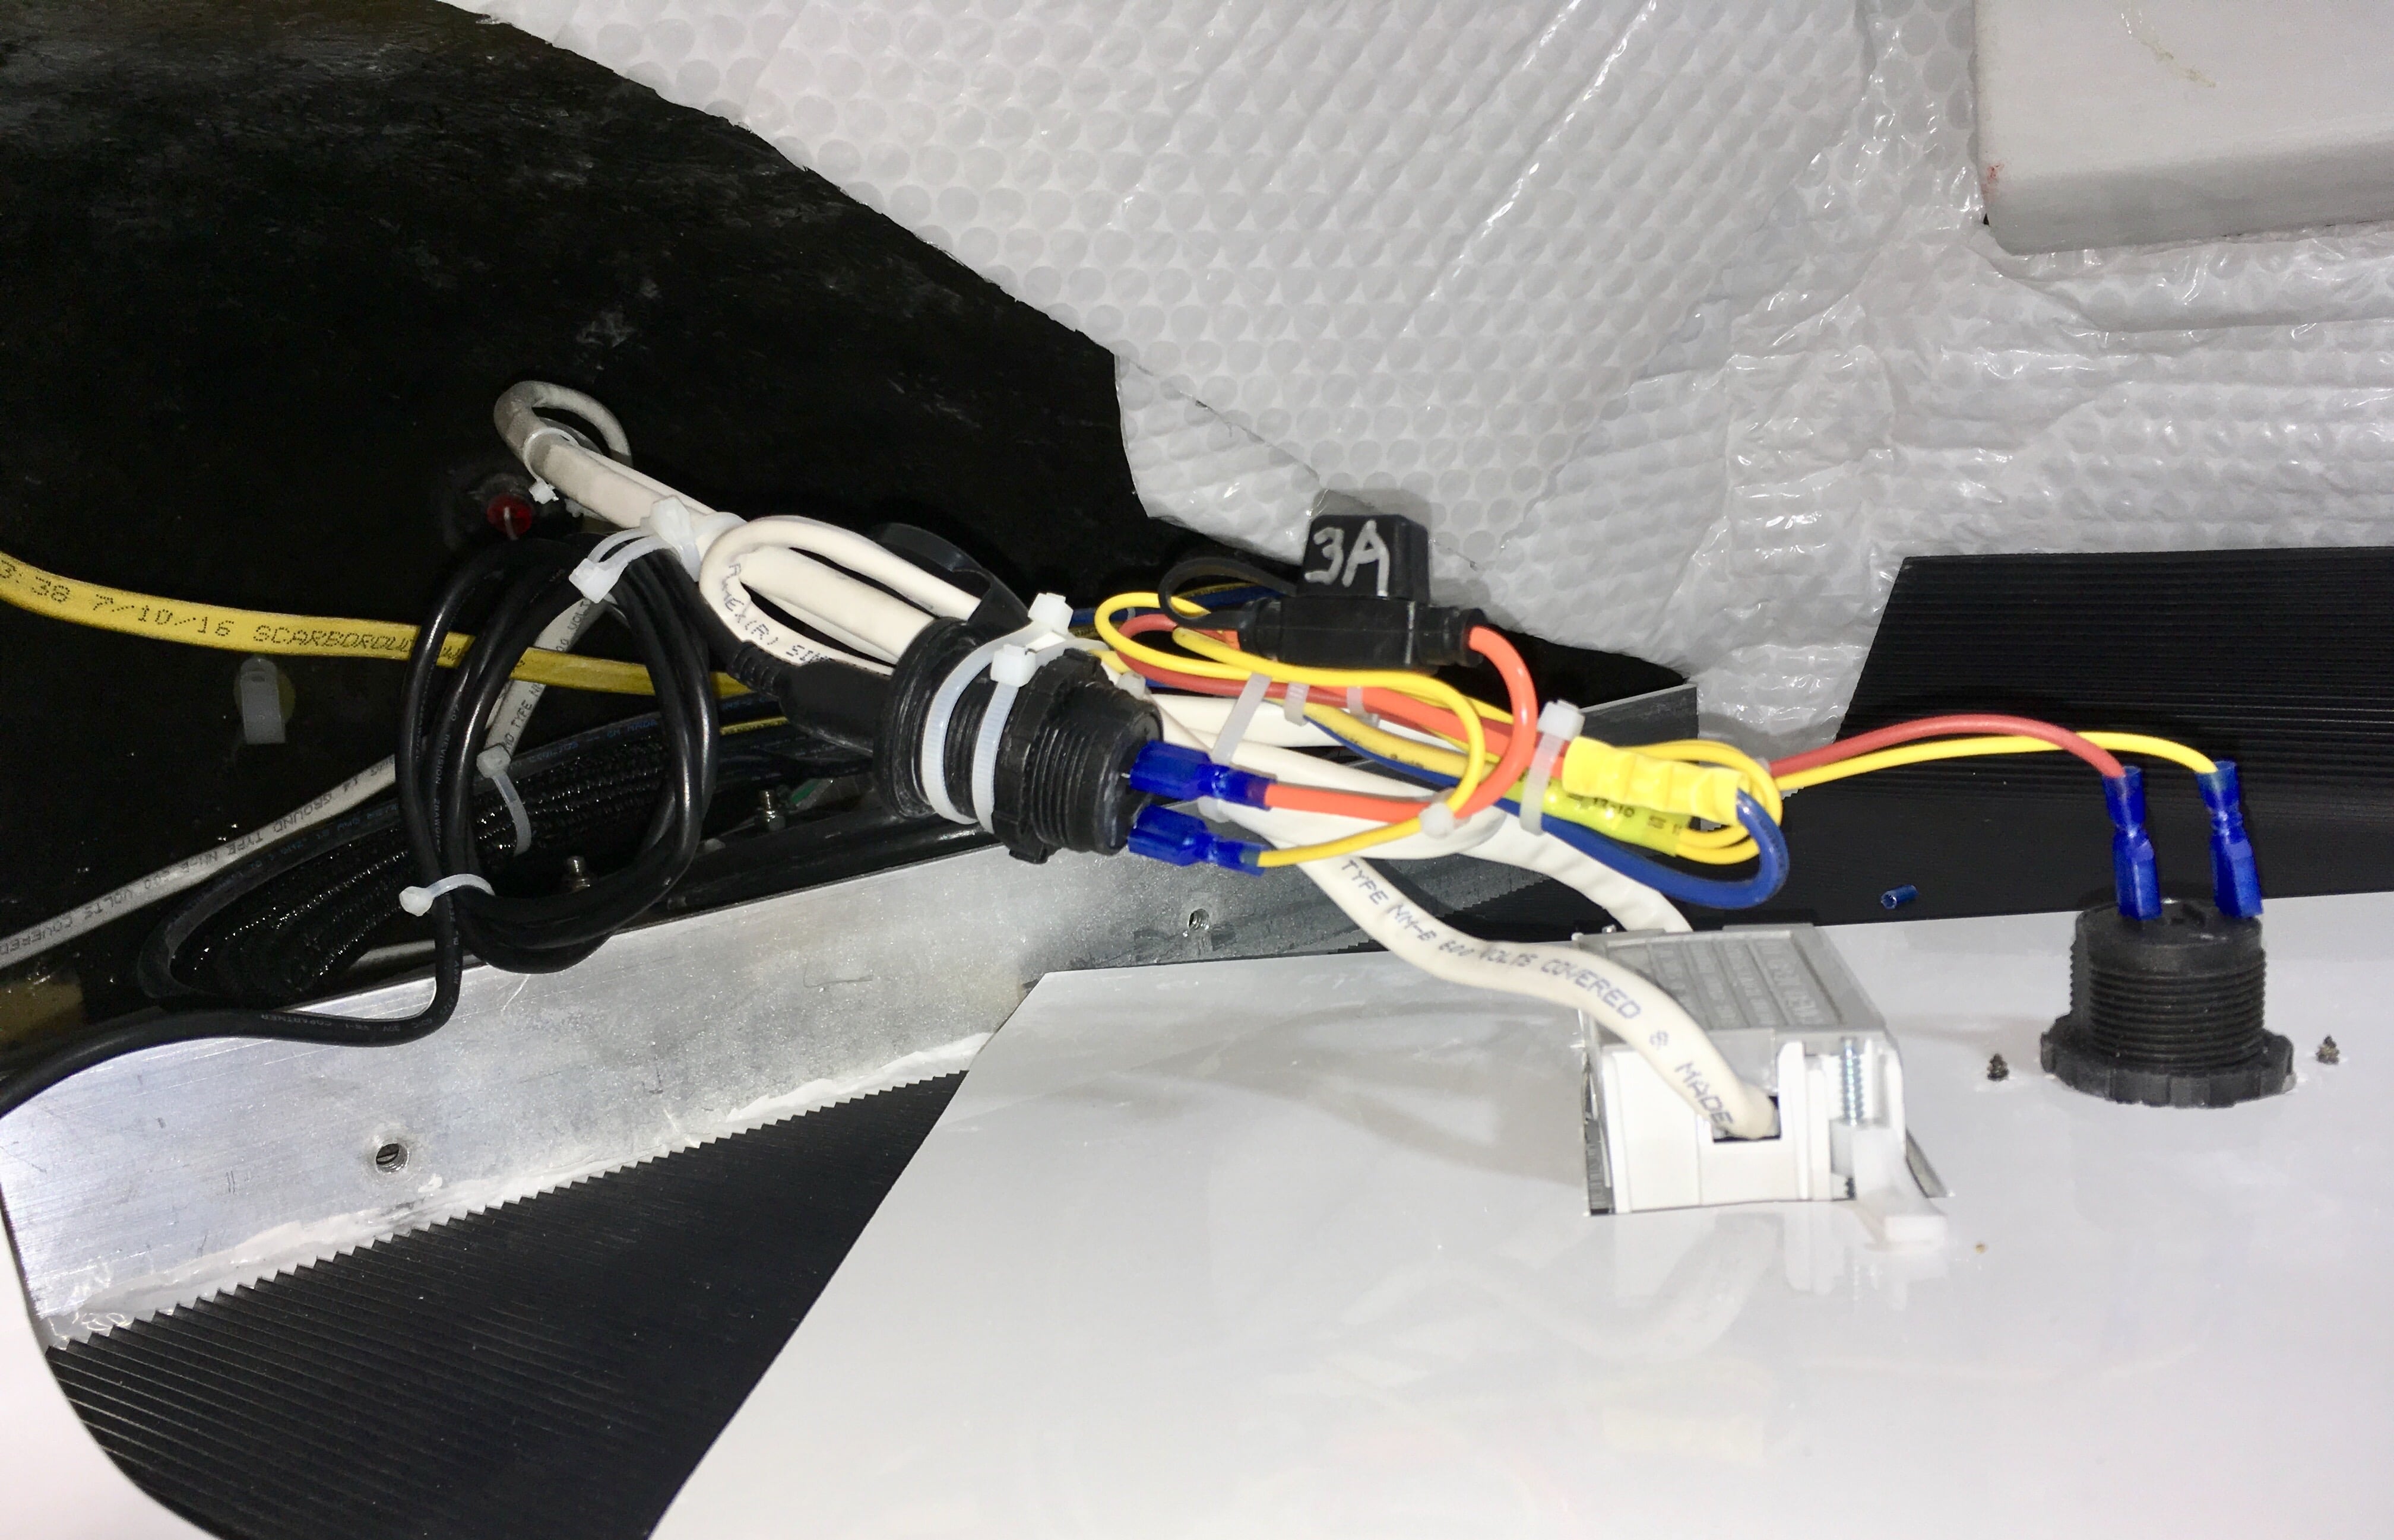
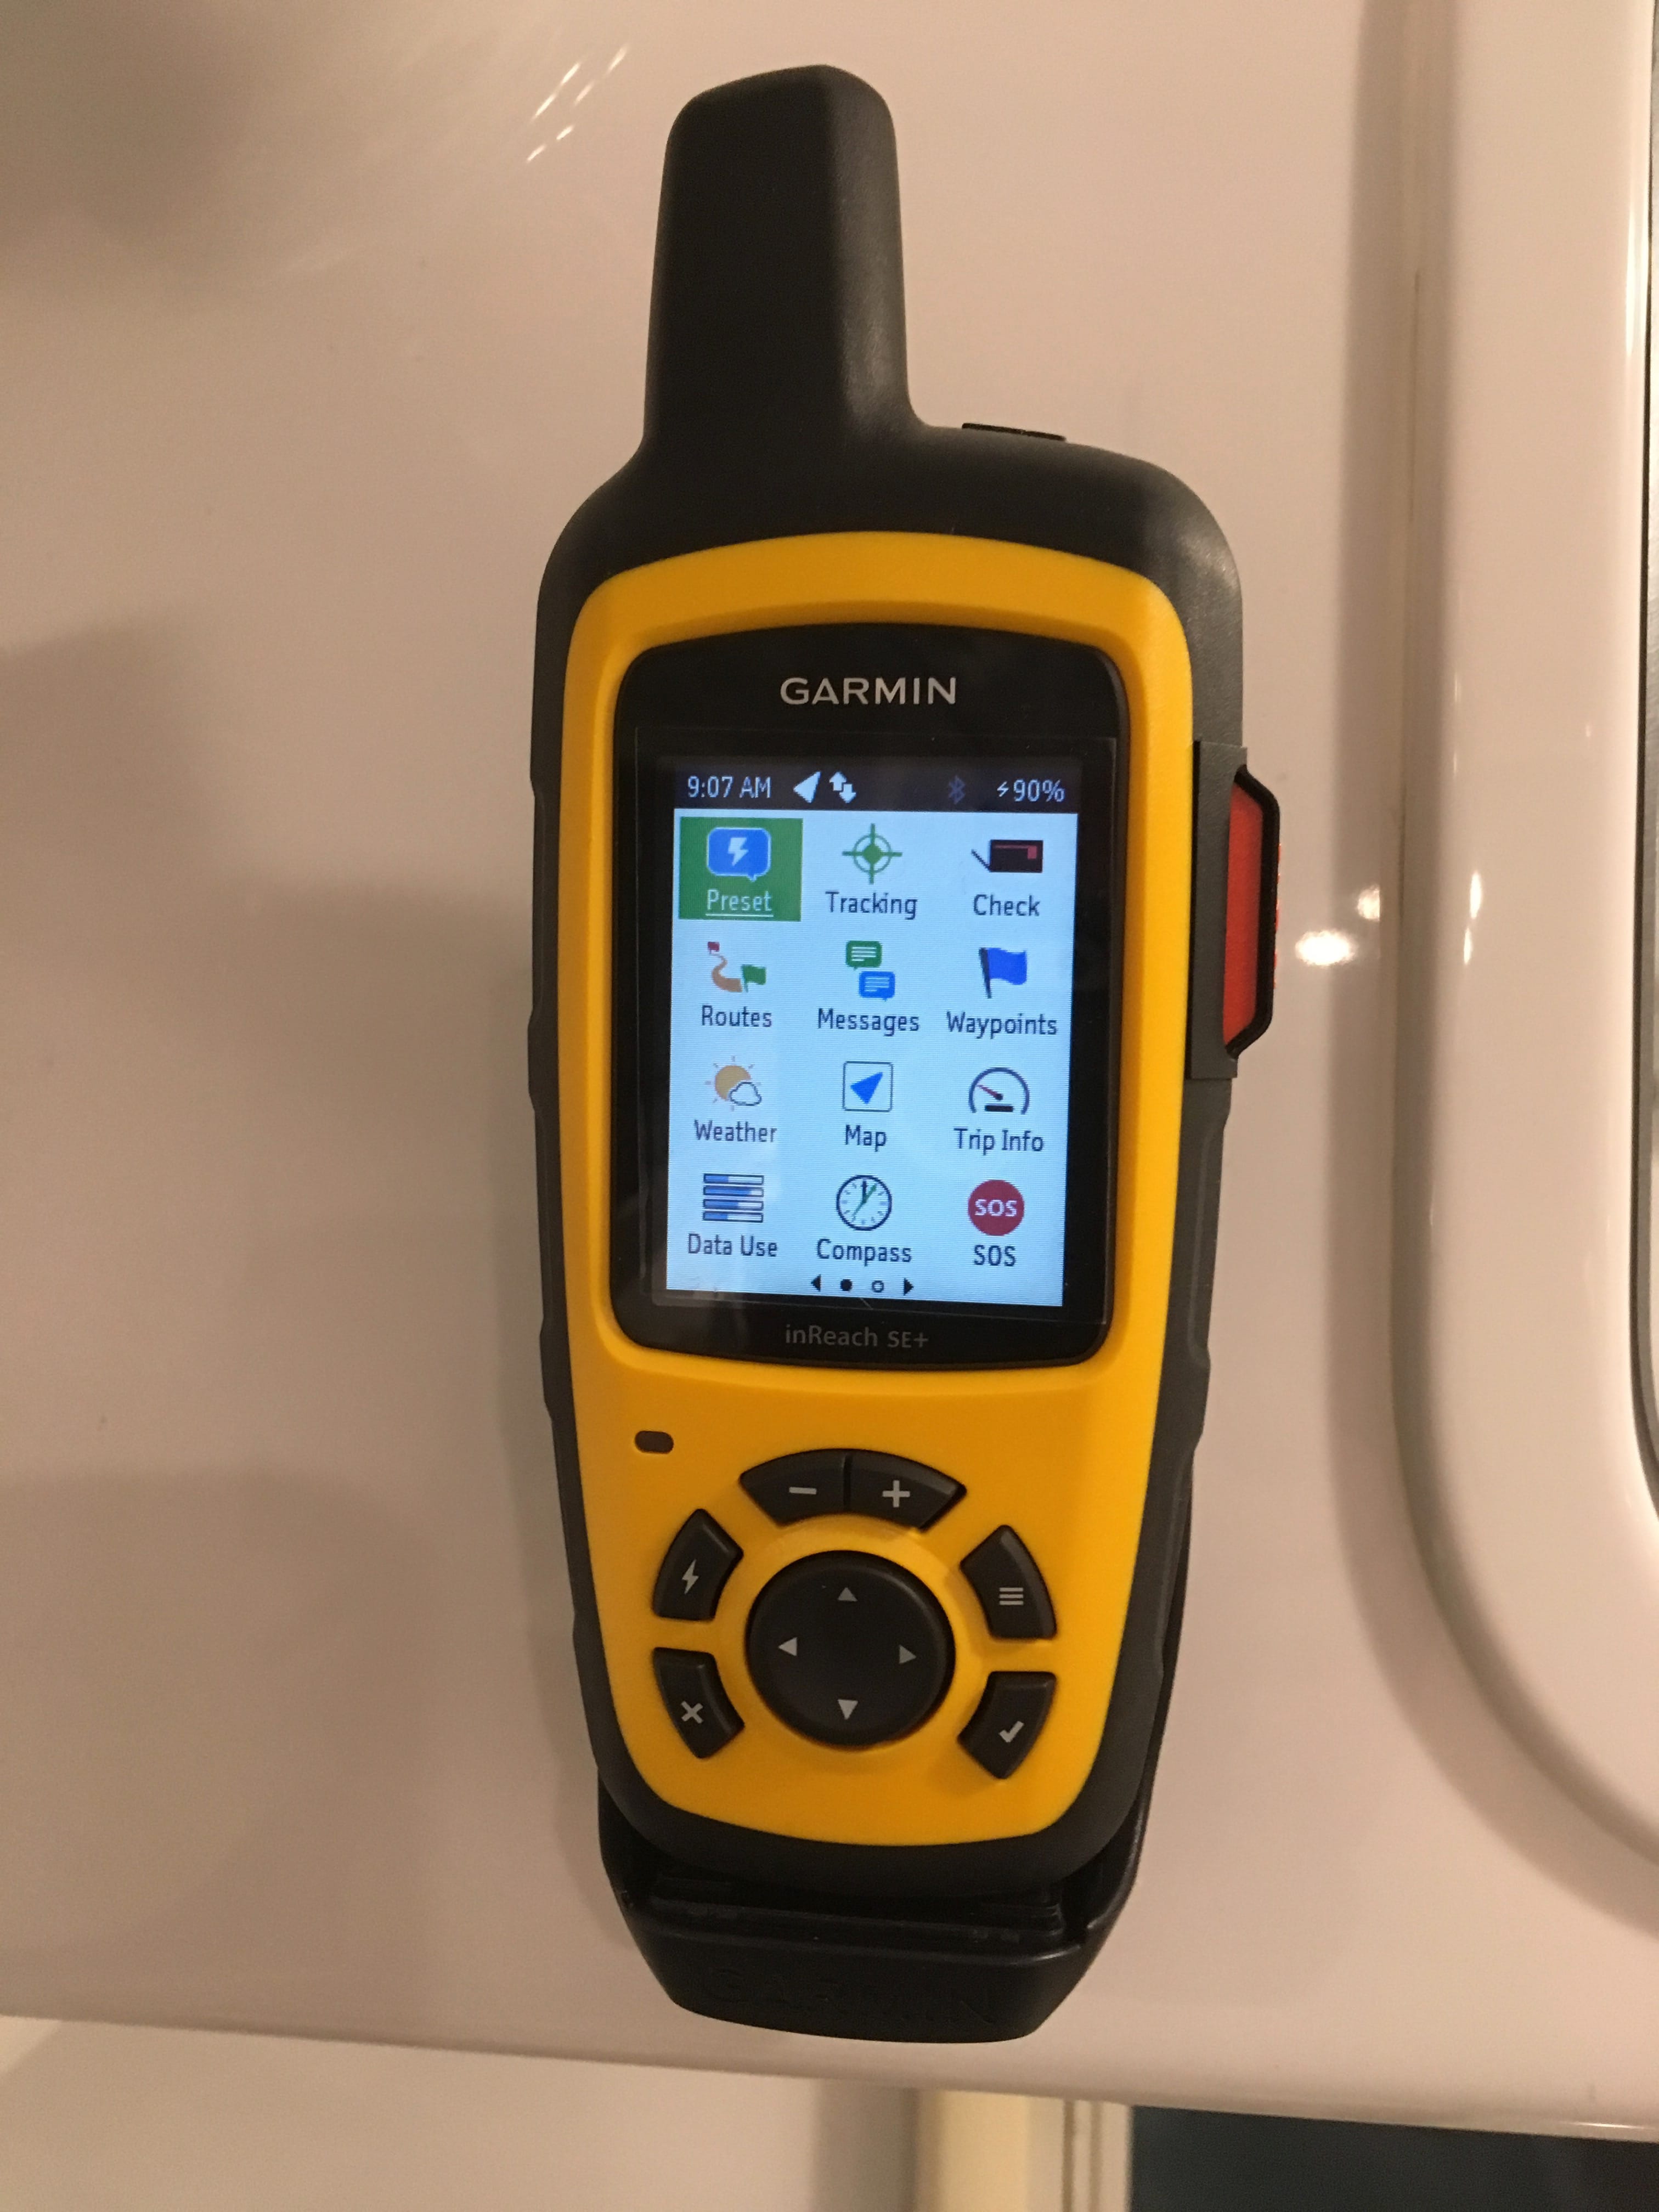
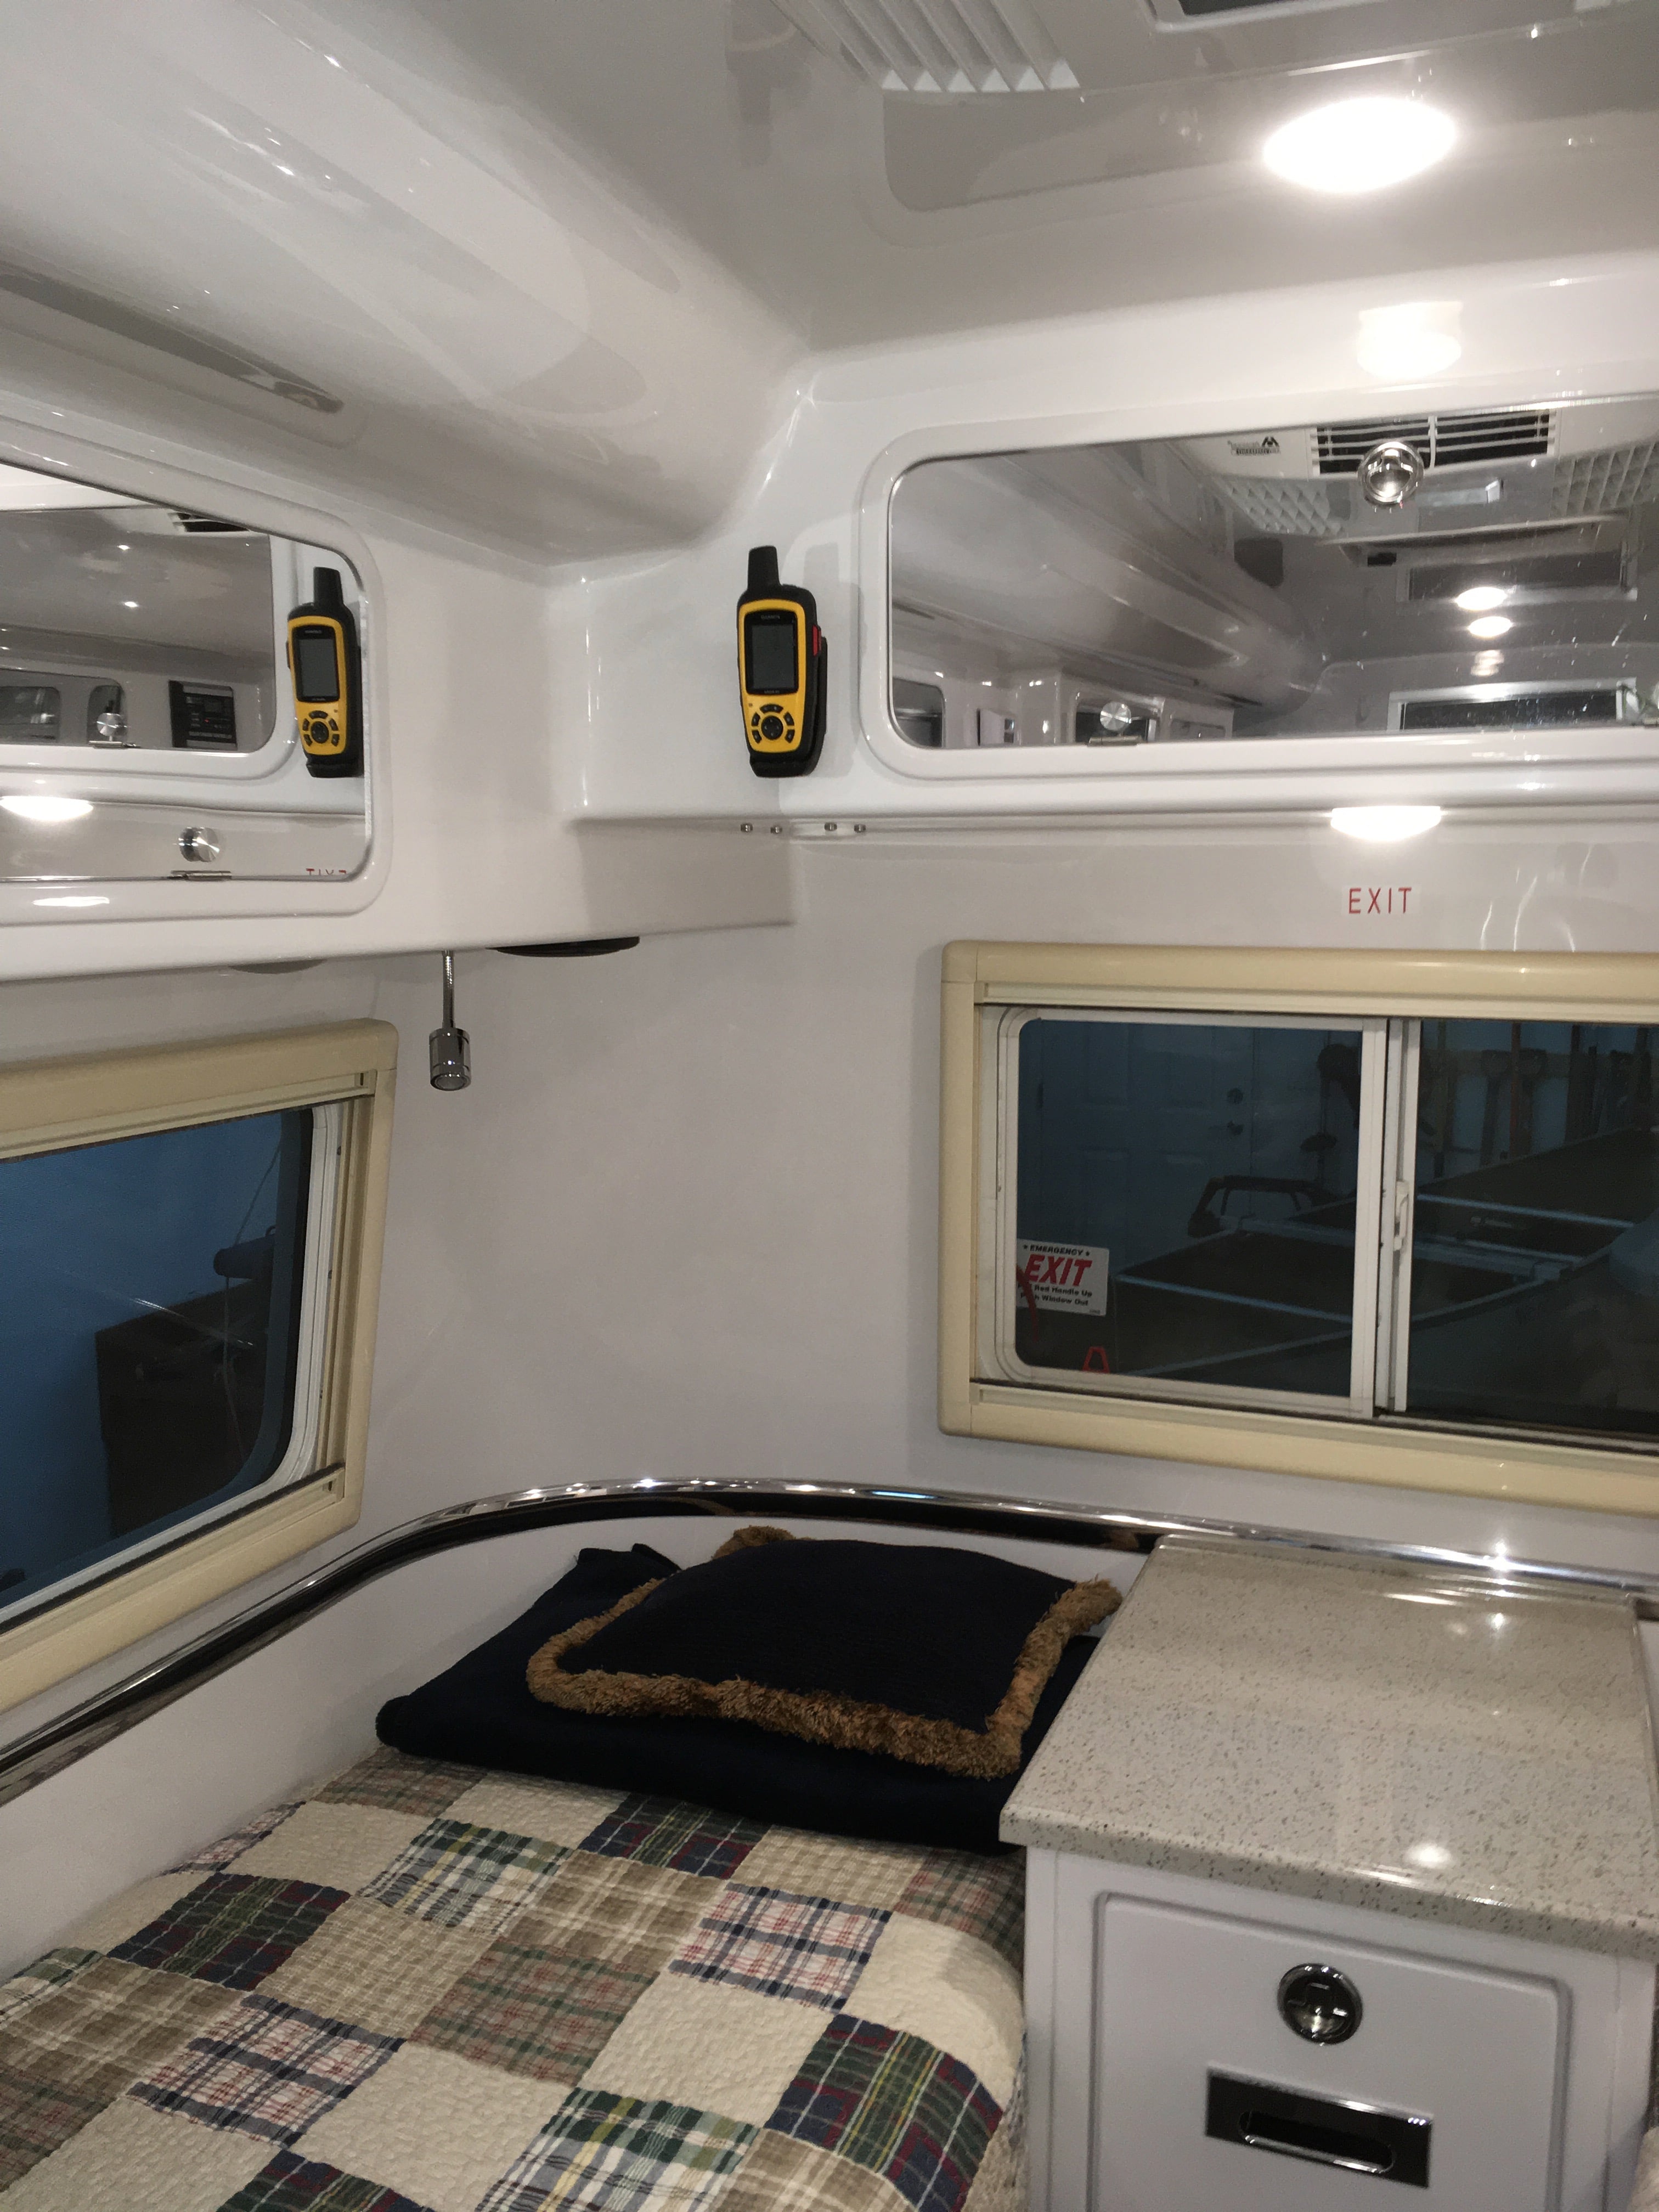
I spend a good amount of time traveling and camping way off the grid, where I have no cell signal. I have been using a SPOT ever since they came out, but I finally decided that I need more capability. The SPOT works great for continuous tracking while riding a motorcycle, but it is very crippled for sending help requests and the plan has gotten extremely expensive. I replaced it with a Garmin inReach SE+, so I can send and receive short text messages, send an SOS, and actually communicate real time with rescuers. It also links to the Garmin Earthmate app on my iPhone so I can use the phone to do stuff, such as access my Contacts. It provides great peace of mind and the basic plan is very affordable, and WAY less expensive than any sat phone. I am on the Freedom plan, and can suspend my monthly coverage if I want to , with no penalties. No mandatory annual subscription! I discovered that the inReach doesn't need to be outside, the fiberglass roof of the Ollie is completely transparent to its signals. I do think that the major appliances and pots and pans might get in the way, so I decided to install the powered mount at the back corner where it is easy to see and reach, and it can communicate from that location while it is charging. Normally a message will go out in under a minute, but sometimes it may be as long as ten. I needed clearance on top to lift the unit up and out of the cradle, and it needed to be positioned where I could route the USB charging cord into the upper rear compartment, so I could power a USB charger from the existing 12v round charger circuit... just to the left of the cabinet door frame looked ideal. I made an adapter plate from thick aluminum and screwed it in place using 6-32 stainless hardware: I taped a steel ruler to the frame, to act as an alignment jig. I was going to be spending hours looking at the mount from my bed and did not want it to be crooked! (Like my wonky rear window...) After adding 3M VHB tape, I stuck it in place: I took the factory installed Blue Sea USB low power charger from its location above the curbside bed, and wired it up: And spliced it into the existing 12 v system; That circuit stays hot all the time, and the inReach will charge whenever placed in the holder. It is easy to see from the galley or either bed (we sleep head to front) and it is easy to grab, and unsnaps from the mount with a flick of the safety catch. I have ordered an UNLIT USB high output dual charger for the empty hole over my bed. That will be a future thread. https://smile.amazon.com/gp/product/B01MRZ9ATL/ref=oh_aui_detailpage_o02_s00?ie=UTF8&psc=1 https://smile.amazon.com/gp/product/B01N2YKO3L/ref=oh_aui_detailpage_o02_s00?ie=UTF8&psc=1 John Davies Spokane WA
-
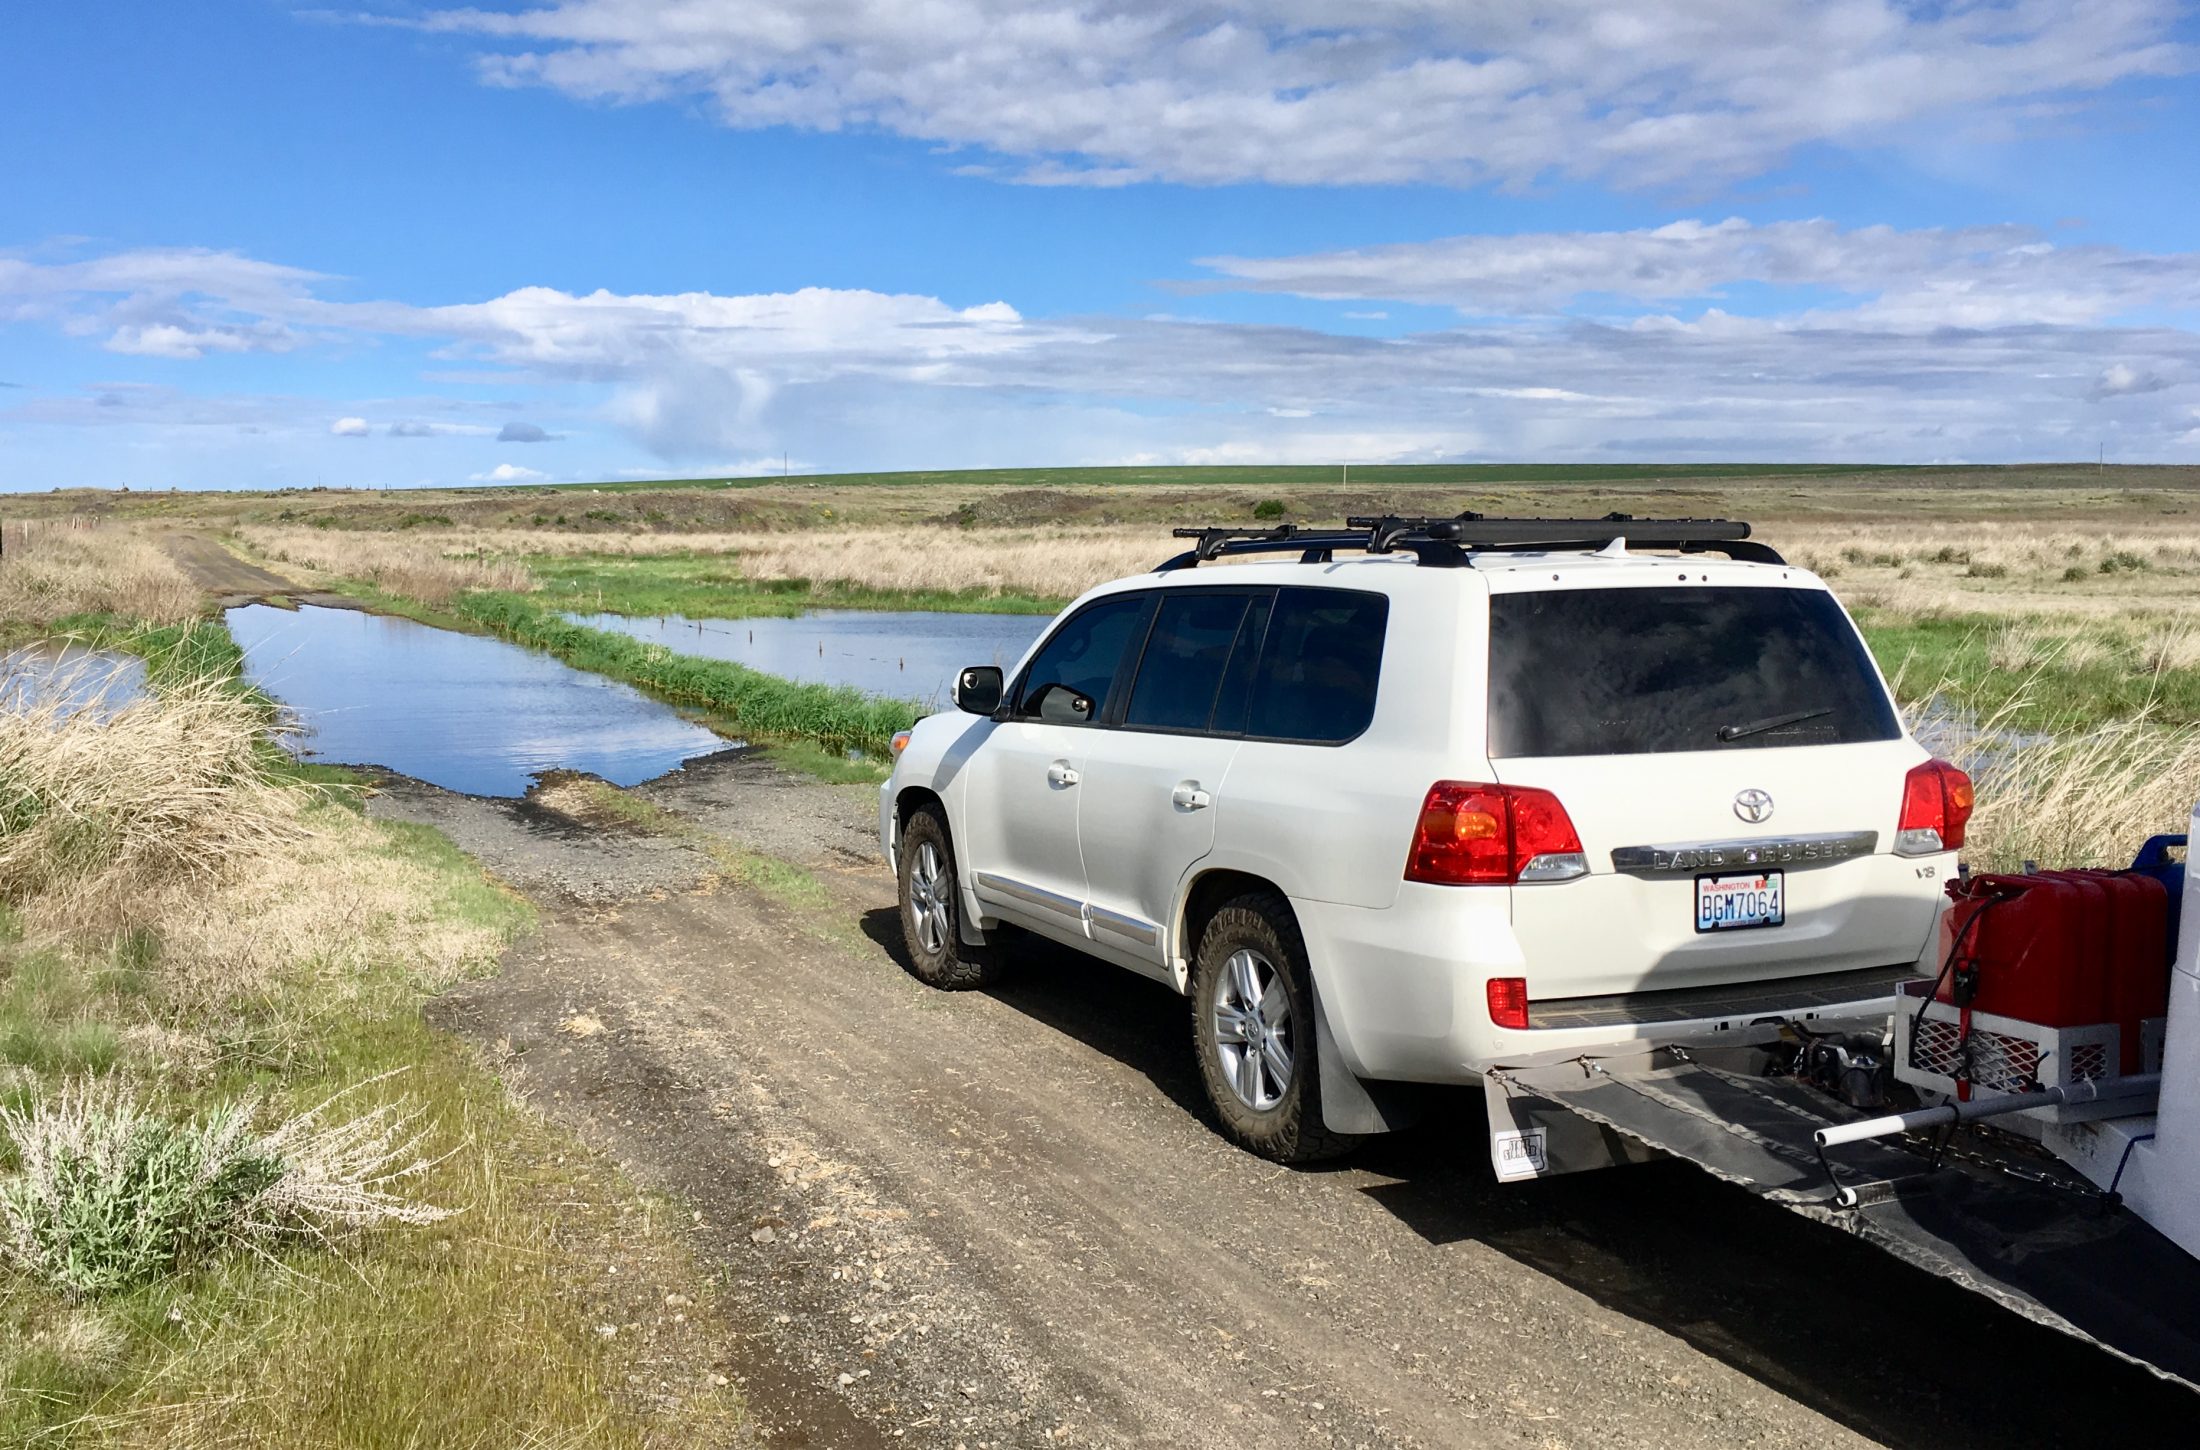
I have been doing more dirt road travel since I installed the Stone Stomper. Today I spent six hours exploring BLM land in Central WA and I covered over 60 miles of gravel ranch roads. To say my fridge coils were dusty would be an understatement.... when I got home I opened the two outside access panels and blew out a vast cloud with my gas powered leaf blower. The dust cannot be good for it, or my using big blasts of air to remove it.... I could make some solid covers and turn off the fridge completely, but I would rather not go to that extreme. Any links or ideas for filtration? The bottom opening is the worst, it is dead center in the main cloud kicked up by the truck. I do have a 12 v ARB fridge that I could put under the table, or inside the back of truck, but it would be a real pain to have to move stuff back and forth.... and it has only a quarter the capacity. Help! Should I just carry my blower on trips to purge the dirt? Do you think some Airtabs mounted in front of the openings would help? I did email them ... http://www.airtab.com/index.htm Thanks, John Davies Spokane WA
-
I use the Oliver Forums and choose to not participate in other social media! Instead of sending me and others like me away from here, please keep everything local. Why not just have a “Post your pictures” thread here? I don’t understand why you would even consider using other media..... I am certainly not going to sign up for Instagram. Sign me: Old Fart. John Davies Spokane WA
-
Boon-docking on BLM sites in USA
John E Davies replied to danielewilderman's topic in Ollie Boondocking
Thanks for the link. Unfortunately the data base is fairly crude and does not show smaller public parcels under a square mile like the one I pictured... I use GAIA and discovered that their Premium membership includes several useful layers such as public land ownership in more detail, and USFS MVUMs (motor vehicle use maps). I always use Google Earth satellite imagery instead of Google Maps for looking around potential camping areas, it has the extra detail needed to focus on important stuff, but it won’t tell you if the track in is open or choked with sagebrush, nor does it show washouts or deep potholes. With GM the detail blurs out as you zoom in, while GE stays sharper. We need a real time source with a resolution of a foot for checking potholes. Not happening in my lifetime. https://help.gaiagps.com/hc/en-us/articles/115003524547-Free-vs-Membership-vs-Premium-Membership John Davies Spokane WA -
Boon-docking on BLM sites in USA
John E Davies replied to danielewilderman's topic in Ollie Boondocking
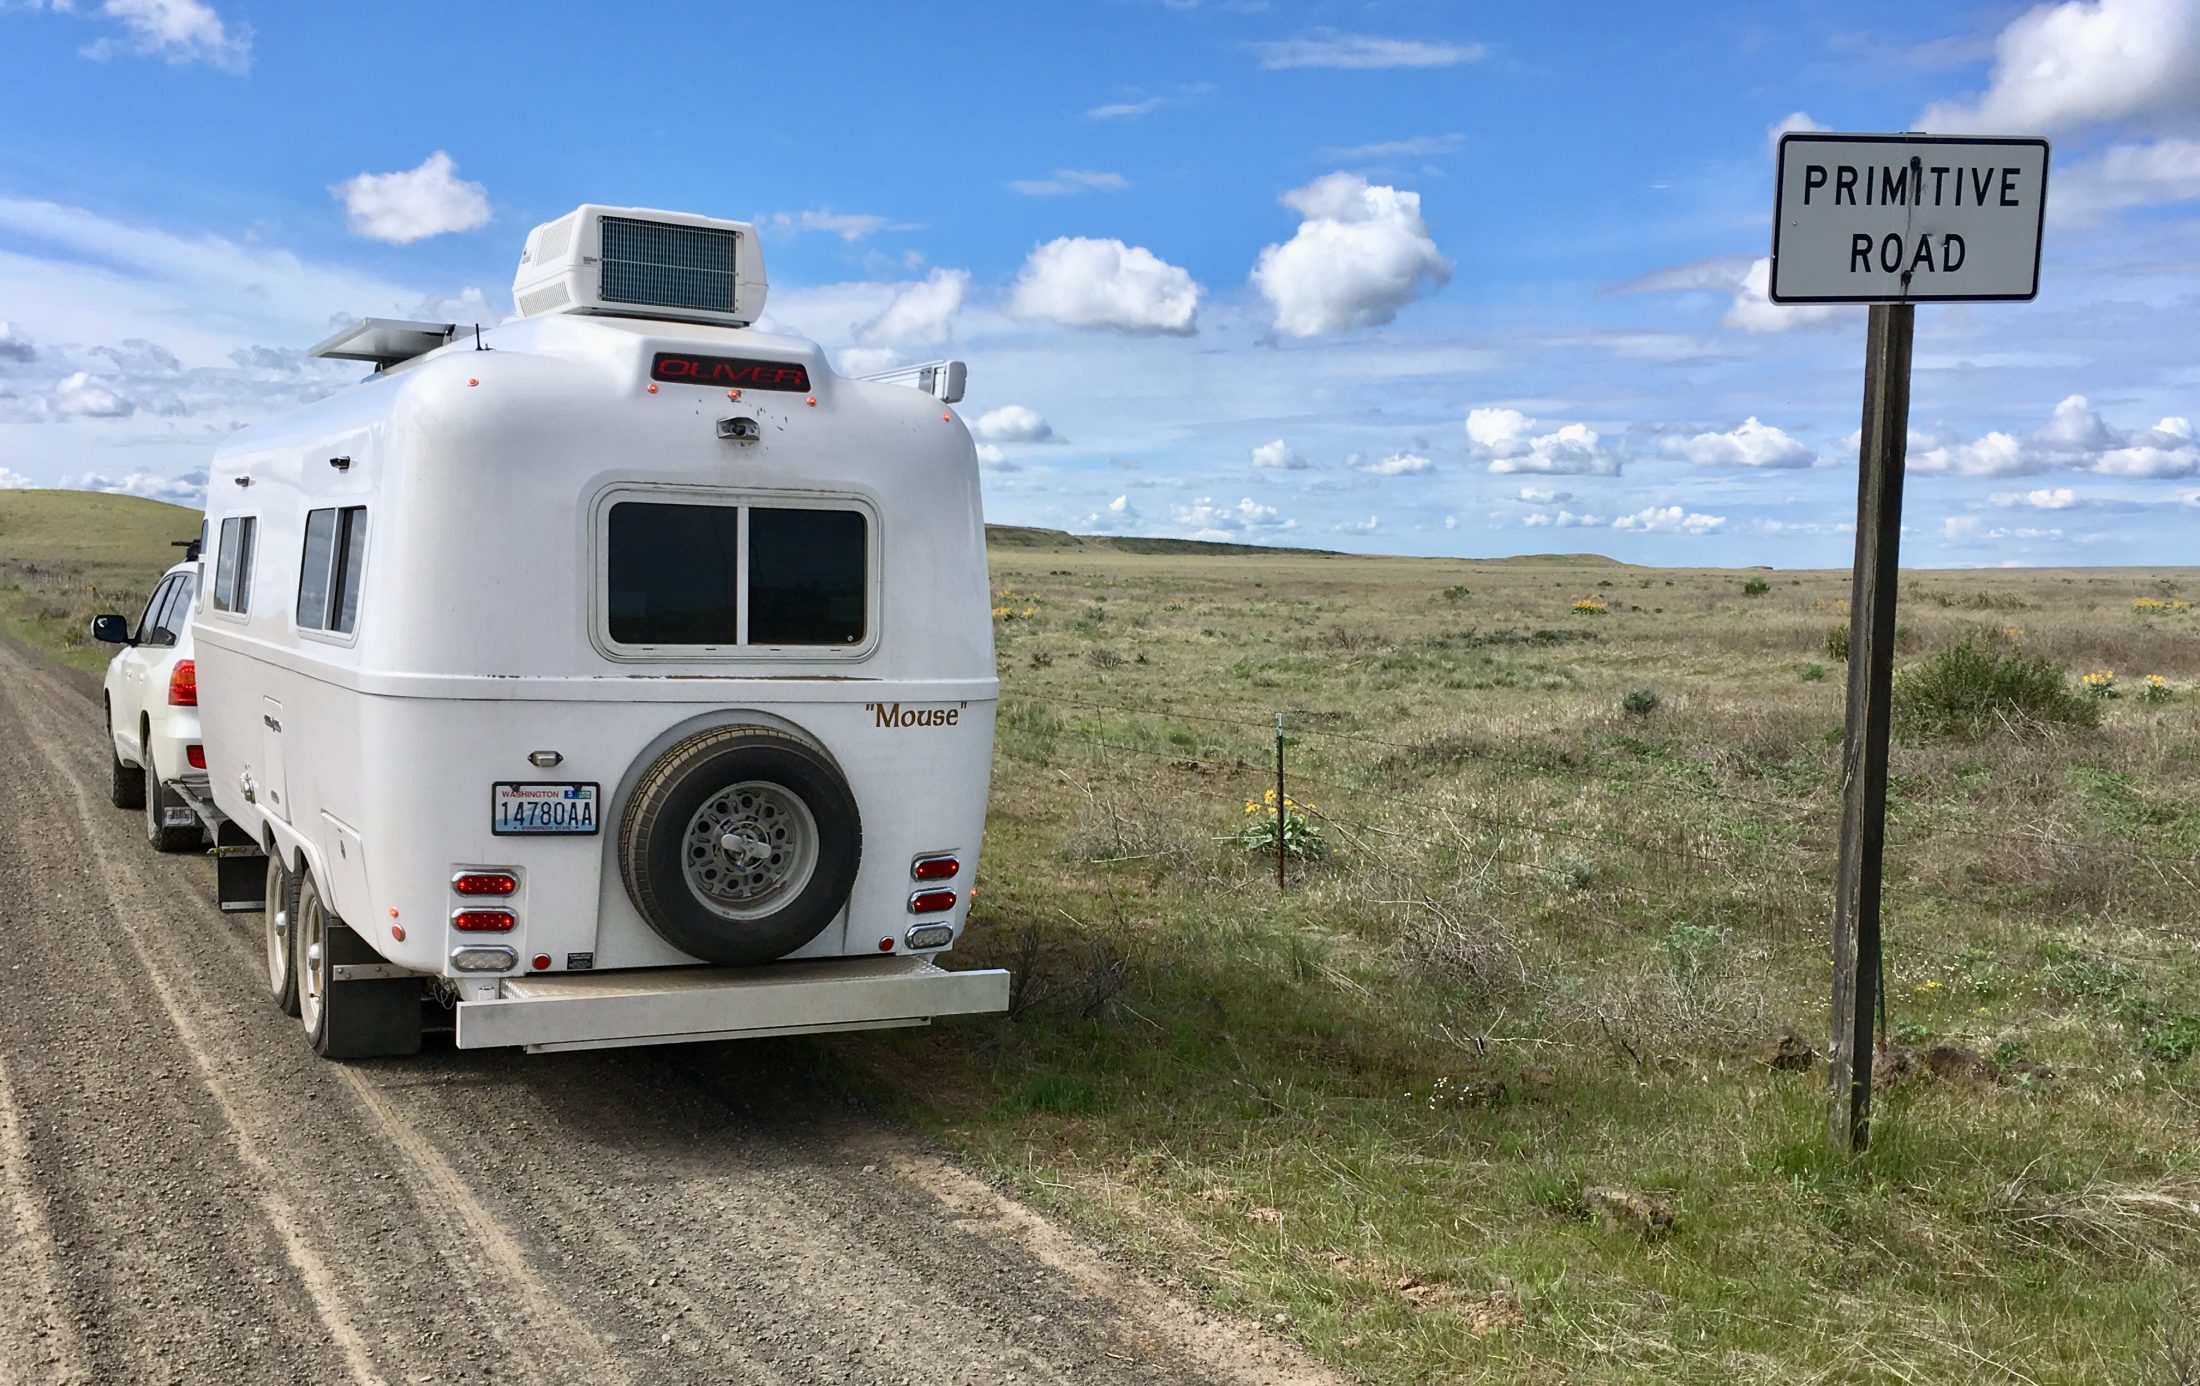
I sure hope there is, I really need more detailed info about access. For example, this is state owned public land in central WA. The setting was glorious but all the spurs going back to the sites were rough and very narrow lanes, with sagebrush lining both sides. I just am not comfortable backing my trailer through that stuff.... and much of the main road going in was heavily potholed and partially washed out. It would be nice to have complete descriptions of the way in, and pics of free camping areas. Maybe I just need to start carrying my weed whacker..... John Davies Spokane WA
-
Composting Head - No need for Black water tank
John E Davies replied to BackofBeyond's topic in Ollie Modifications
I don’t think so, unless you have a shutoff valve between them. The black tank is substantially higher up and would gravity drain into the gray tank, and the excess waste water would vent out onto your bathroom floor, and possibly onto the main floor.... Gross. Connecting black to fresh to give you nearly 50 gallons of potable water makes a world of sense, but I never saw any need for extra gray capacity. But I can dump my gray water using a garden hose under some shrubs, in many of the places I go. John D@vies Spokane WA -
Composting Head - No need for Black water tank
John E Davies replied to BackofBeyond's topic in Ollie Modifications
You could plumb the pee tank into the 18 gallon black tank, sure. Maybe. Somehow. How do you plan to clean the hose when it plugs up? The Natures Head tank has to be cleaned every three or four fills since it starts to get crusty with hard yellow mineral deposits. Soaking for an hour with a high concentration of powdered laundry soap in water gets it out easily. Maybe you could run a long pipe cleaner through the hose.... just watch your eyes! If you want to fill your black tank with urine, you need to be sure to always have some fresh water in there to start, plus a way to deodorize it. Normally you put half a cup of vinegar in the clear pee tank to kill the odor. I don’t see the point of this mod whatsover, but go for it if you must. I use a garden hose to drain my gray tank, I leave the big stinky at home.... and I am completely unembarrassed to carry around a full pee tank. Nobody who sees it has a clue about what is inside.unless they see me inside a stall pouring it down a toilet. I do not usually have company in there. John Davies Spokane WA -
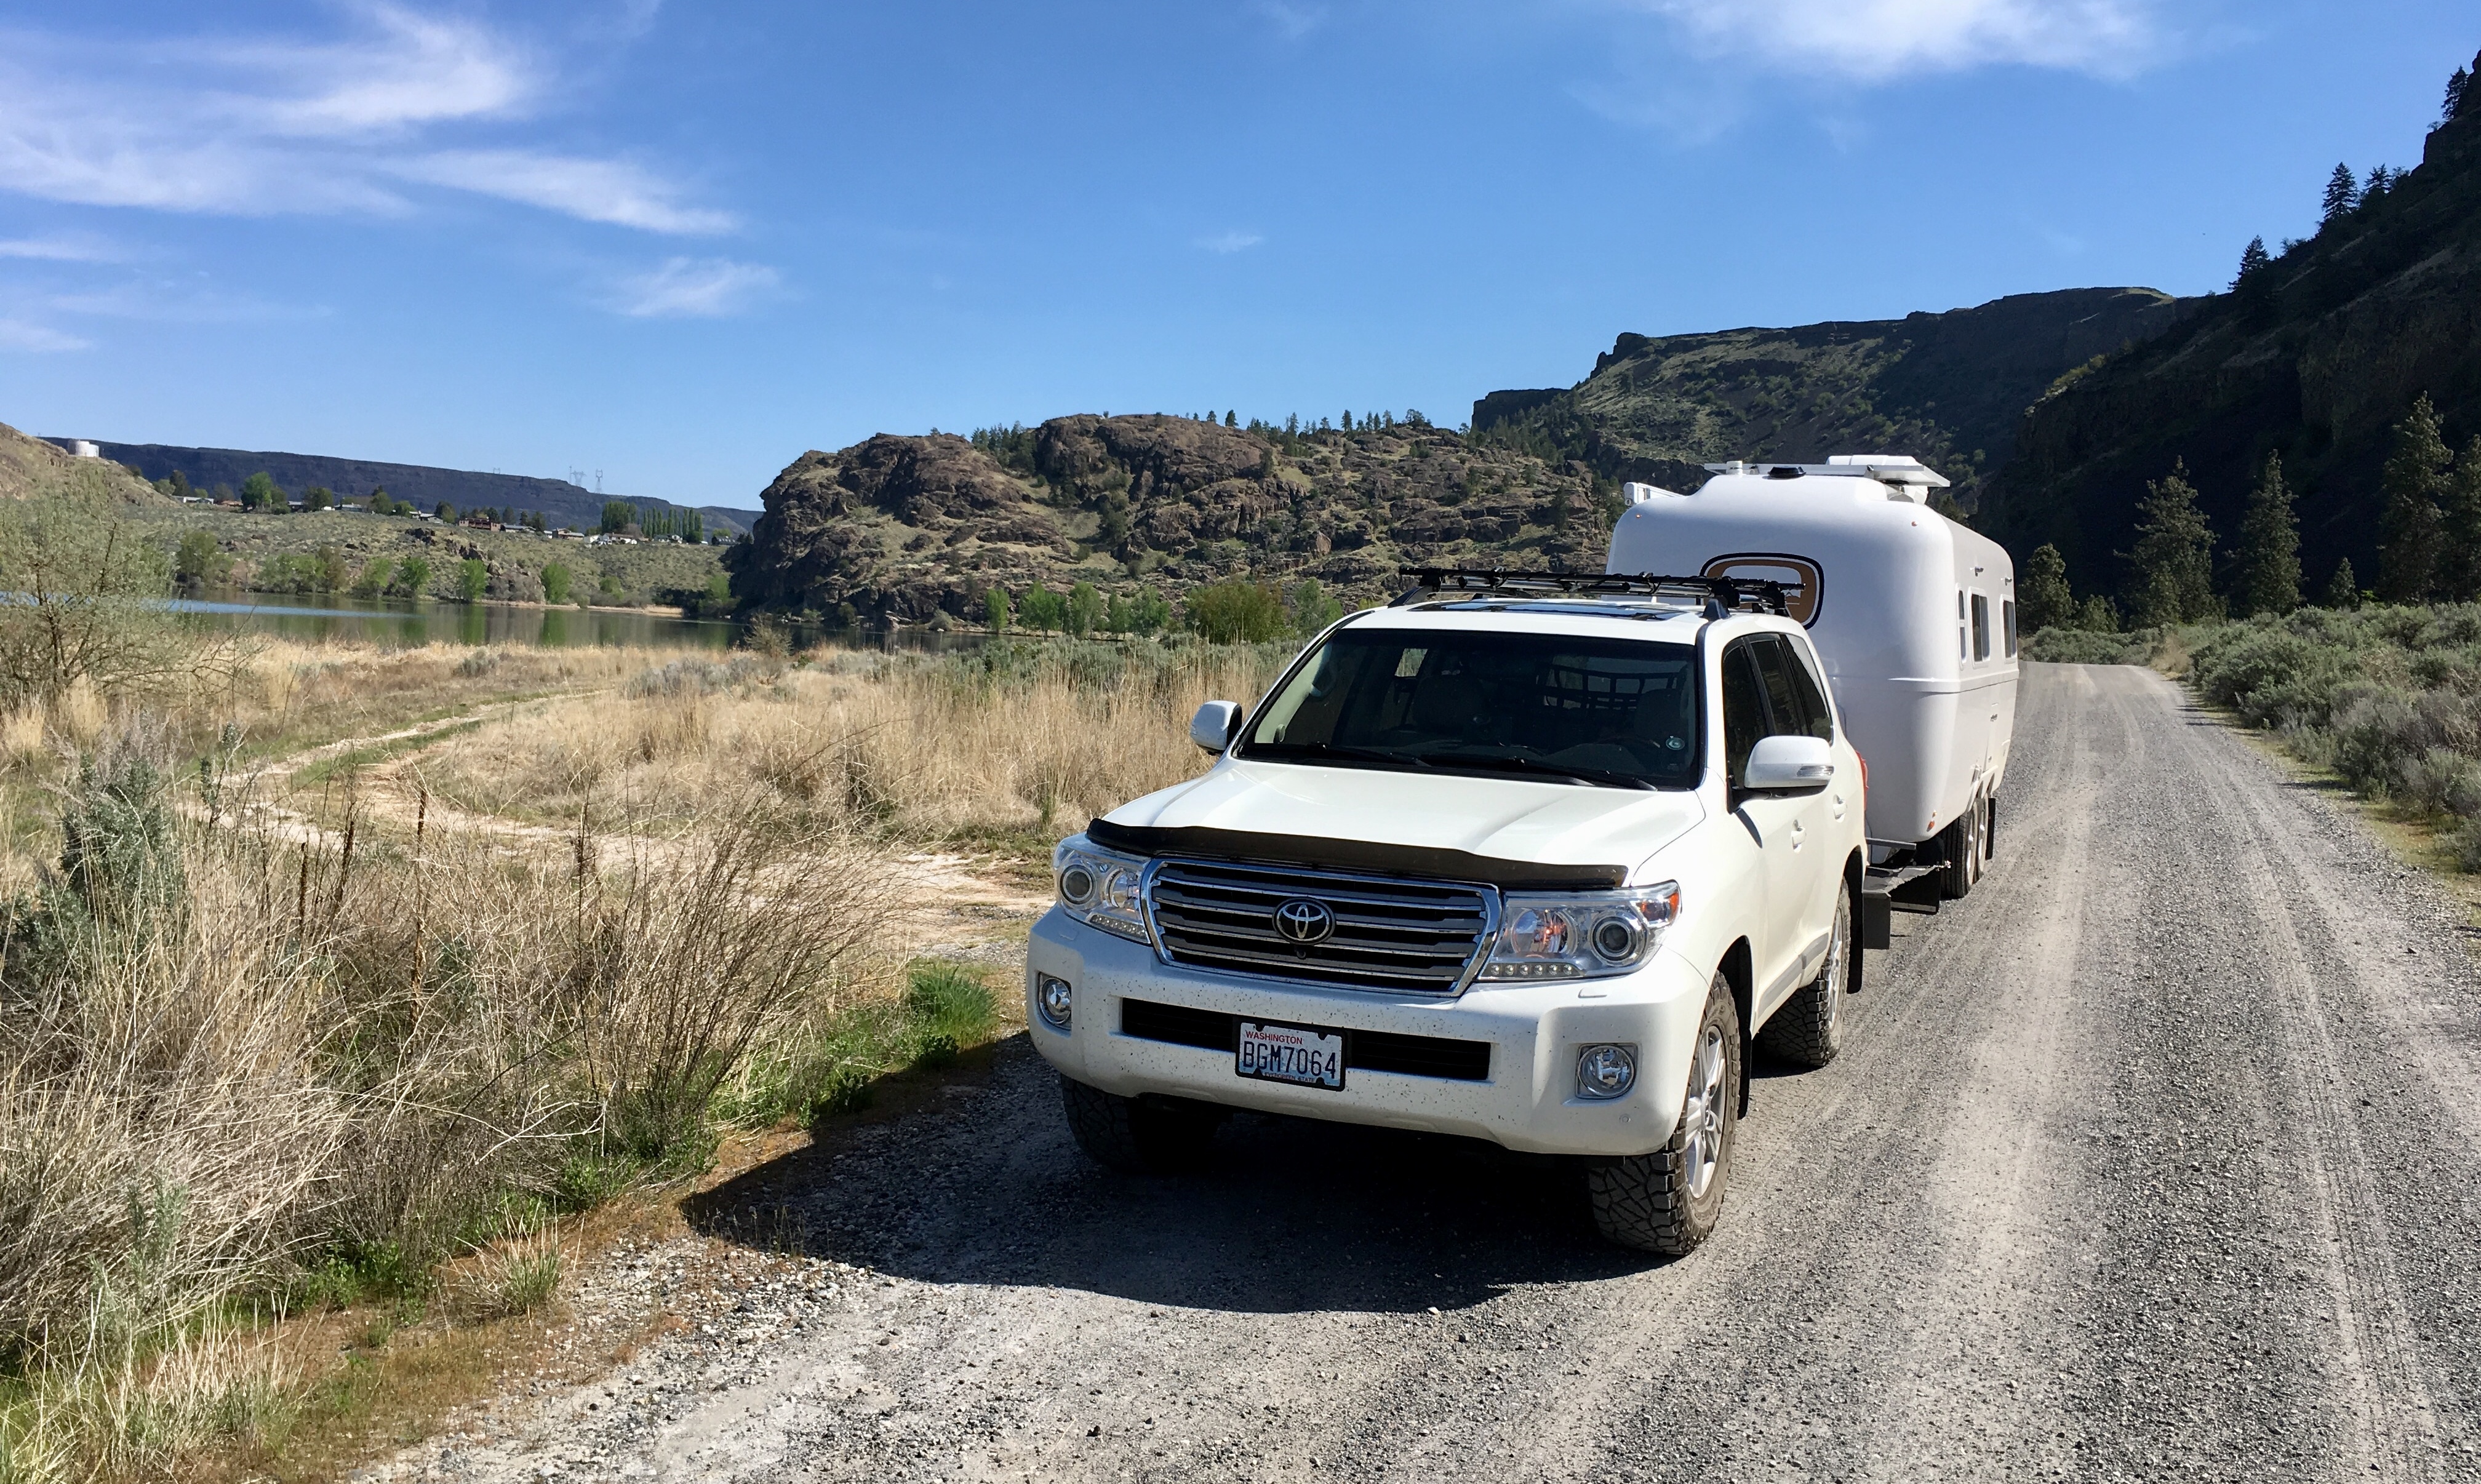
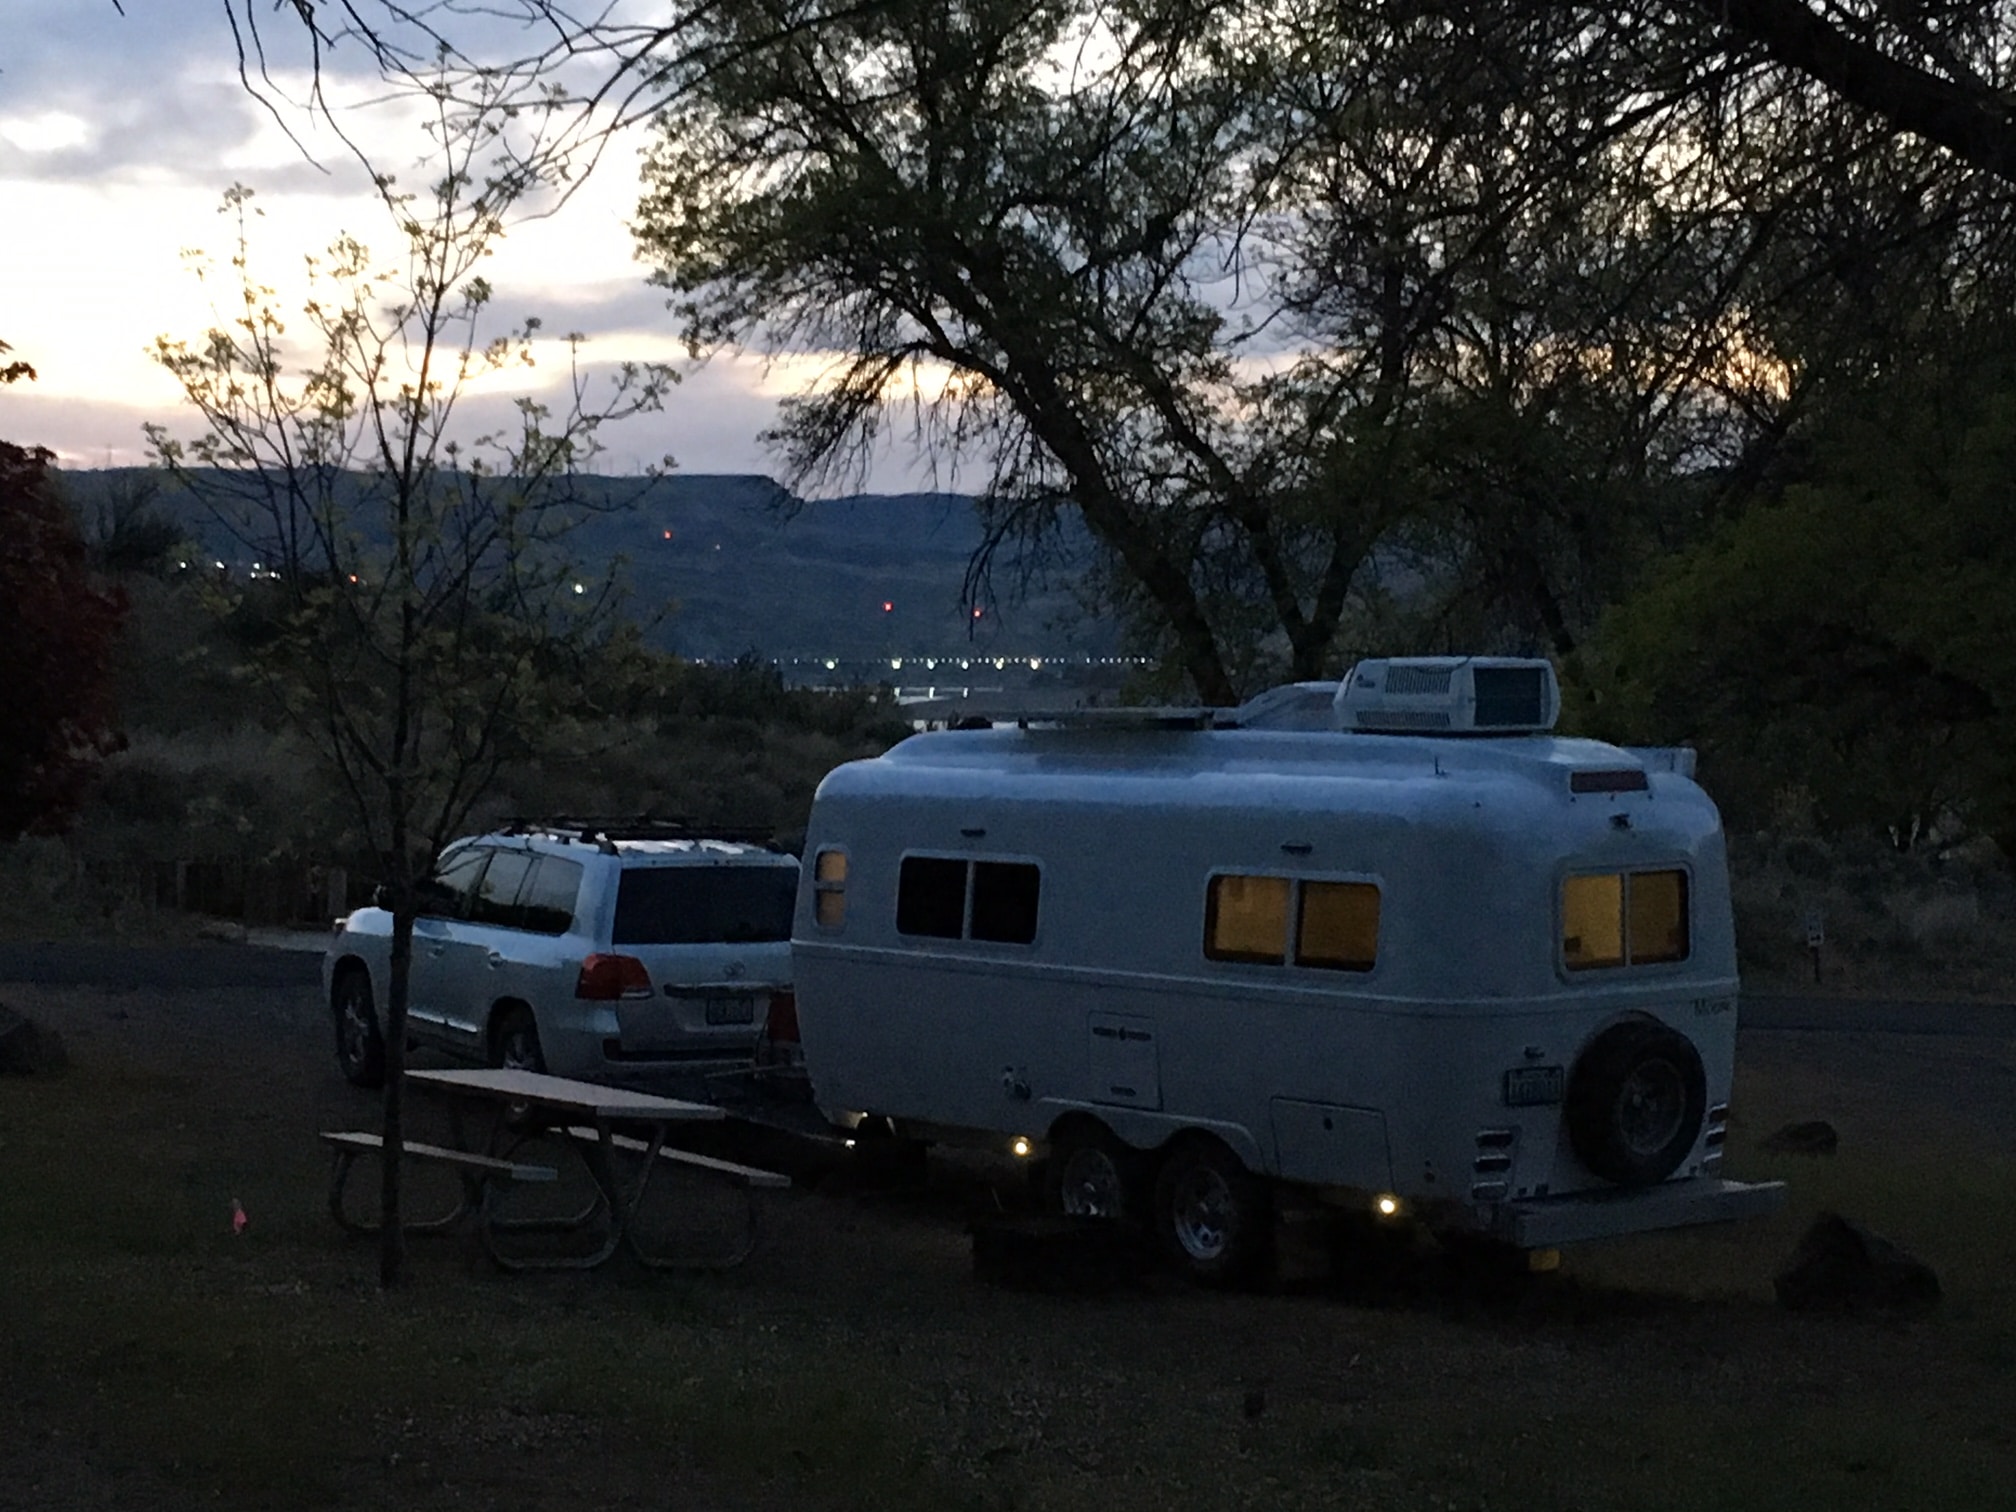
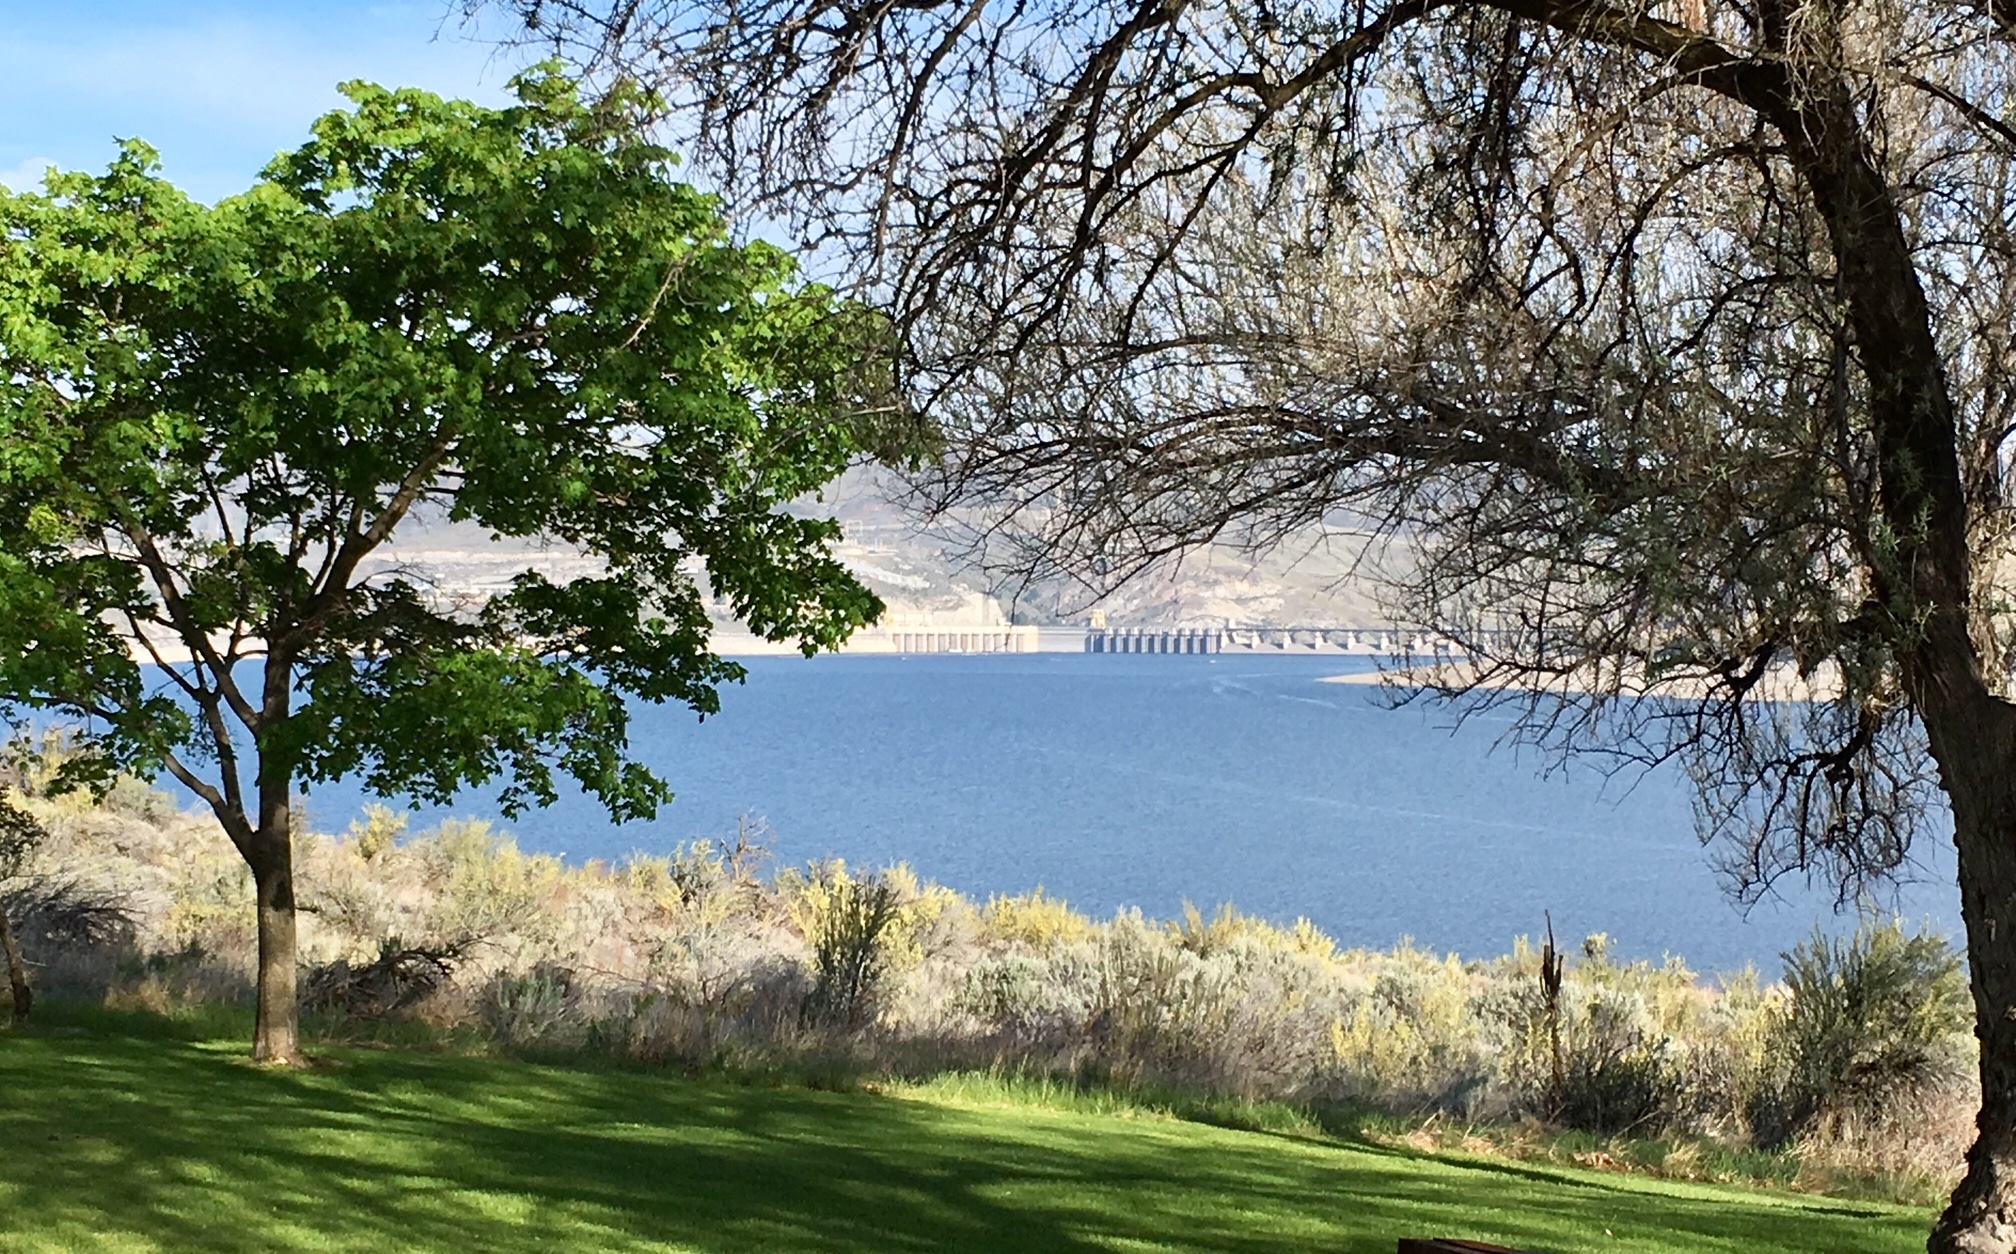
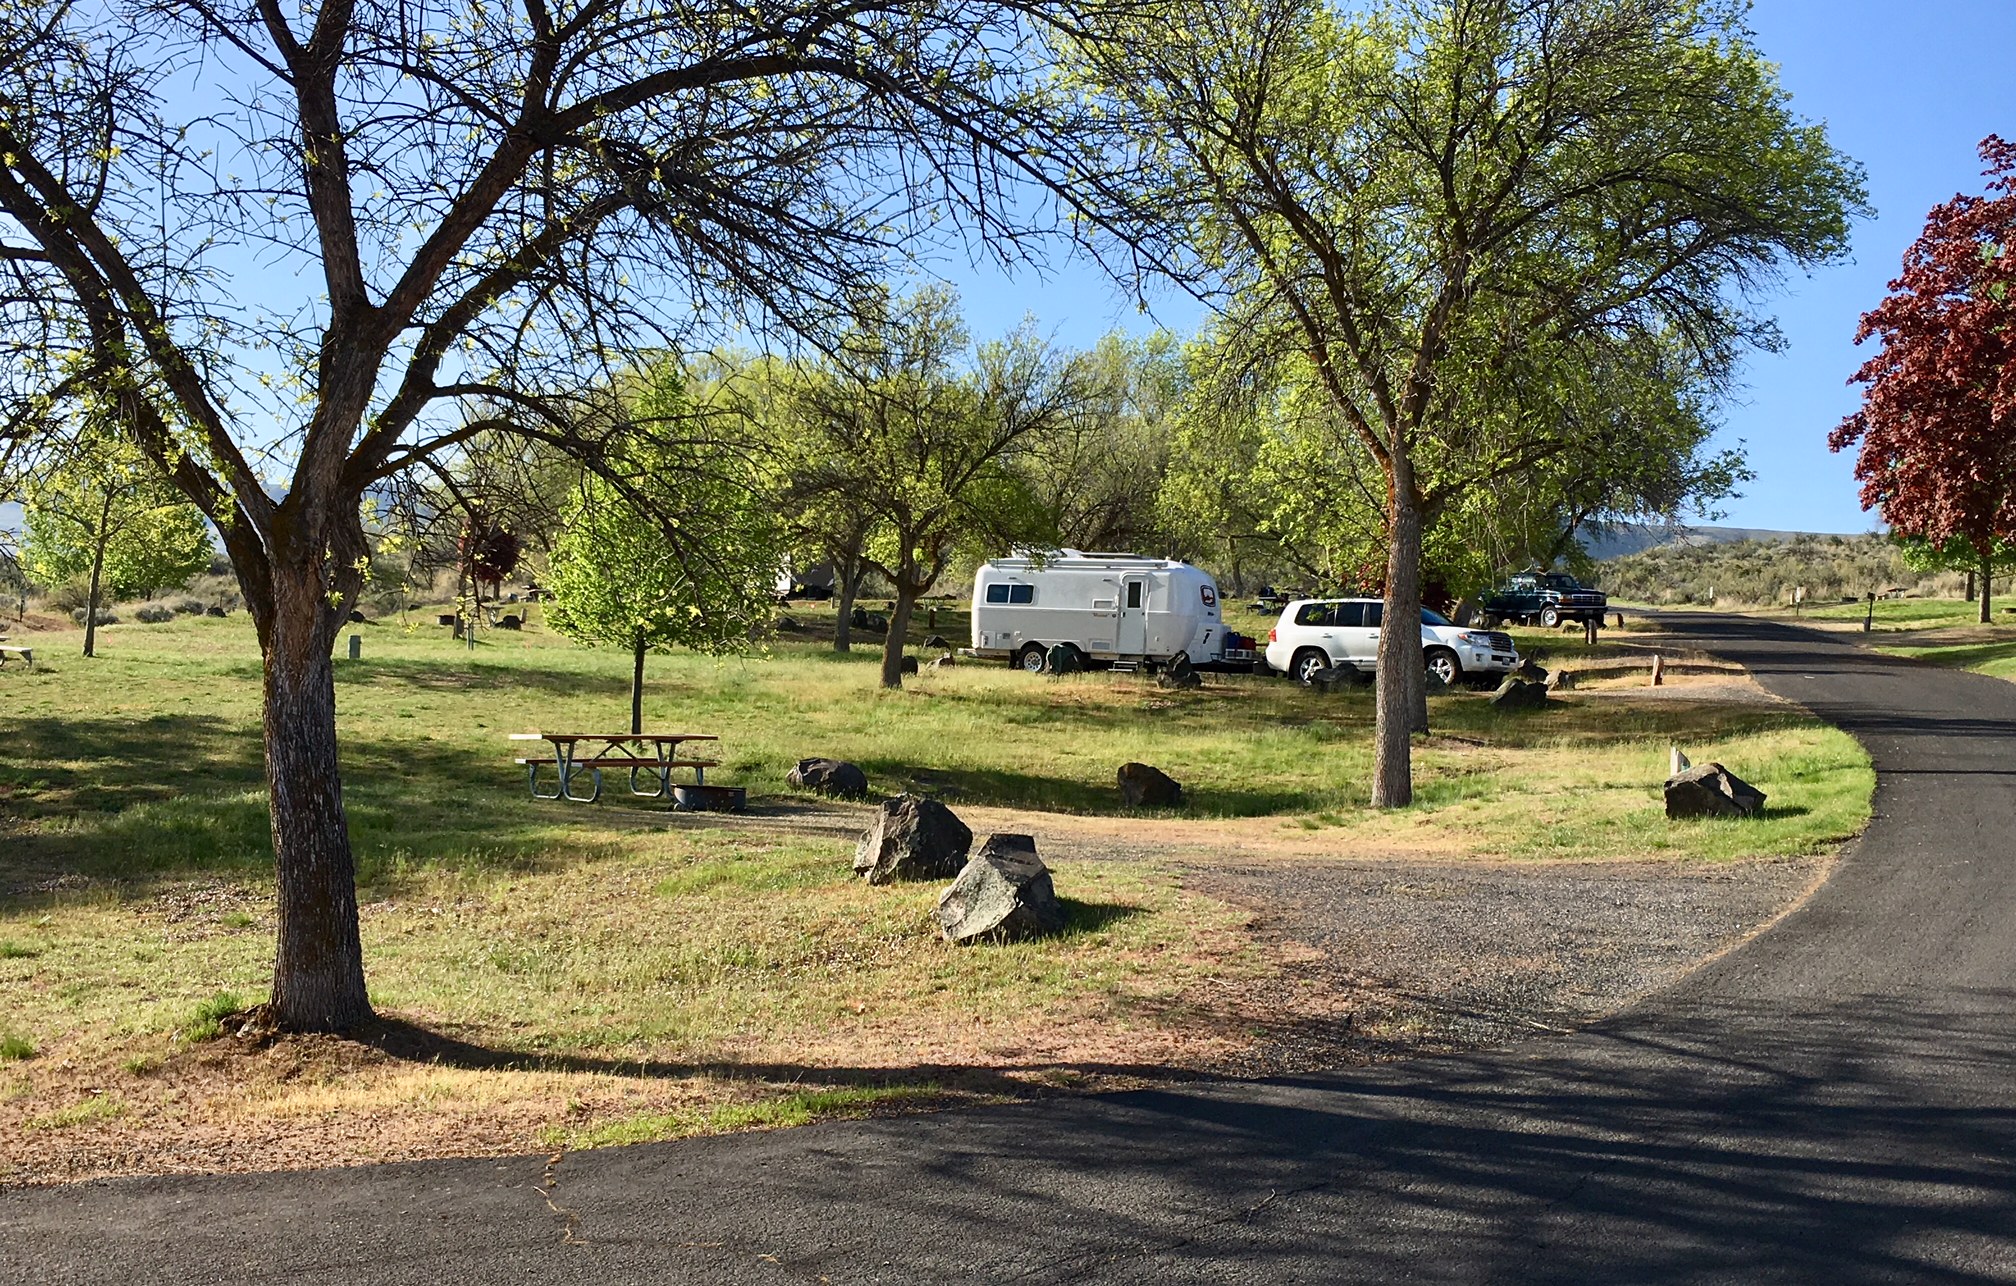
Spring Canyon Campground, on Lake Roosevelt two miles east of Grand Coulee Dam, central Washington. The dam lights are in the background. Lake access is very good, even when the lake level is low this time of year. Rates are $9 off season, $18 starting in May, and you get half off of that with a Federal geezer pass. There are two camping sections, the upper is newer, flatter and more easily navigated with a trailer. But the sites are really strange - they are all very short and back-in, and most have a strange partial carport roof overhead. You are expected to park the TV beside your trailer. I think this was designed before slideouts became ubiquitous. It is very unappealing to me, like camping in an apartment complex parking lot..... Has anyone seen this sort of odd arrangement elsewhere? It certainly would defeat the purpose of roof solar panels! The older lower section is on a substantial slope and the gravel pads are not real even. But the best view is there. Verizon cell signal is very strong a little way up the slope where we are. There are restrooms with running water but no hookups. There is a dump station. While shaded, there is lots of sun and it may be really hot in summer, though winter conditions are mild due to the low elevation. Winter camping here is encouraged. If you want to visit the dam area including wonderful Steamboat Rock State Park, and not pay $40 to camp, this is a teriffic location. But very busy in summer! Some sites are reservable. John Davies Spokane WA
-
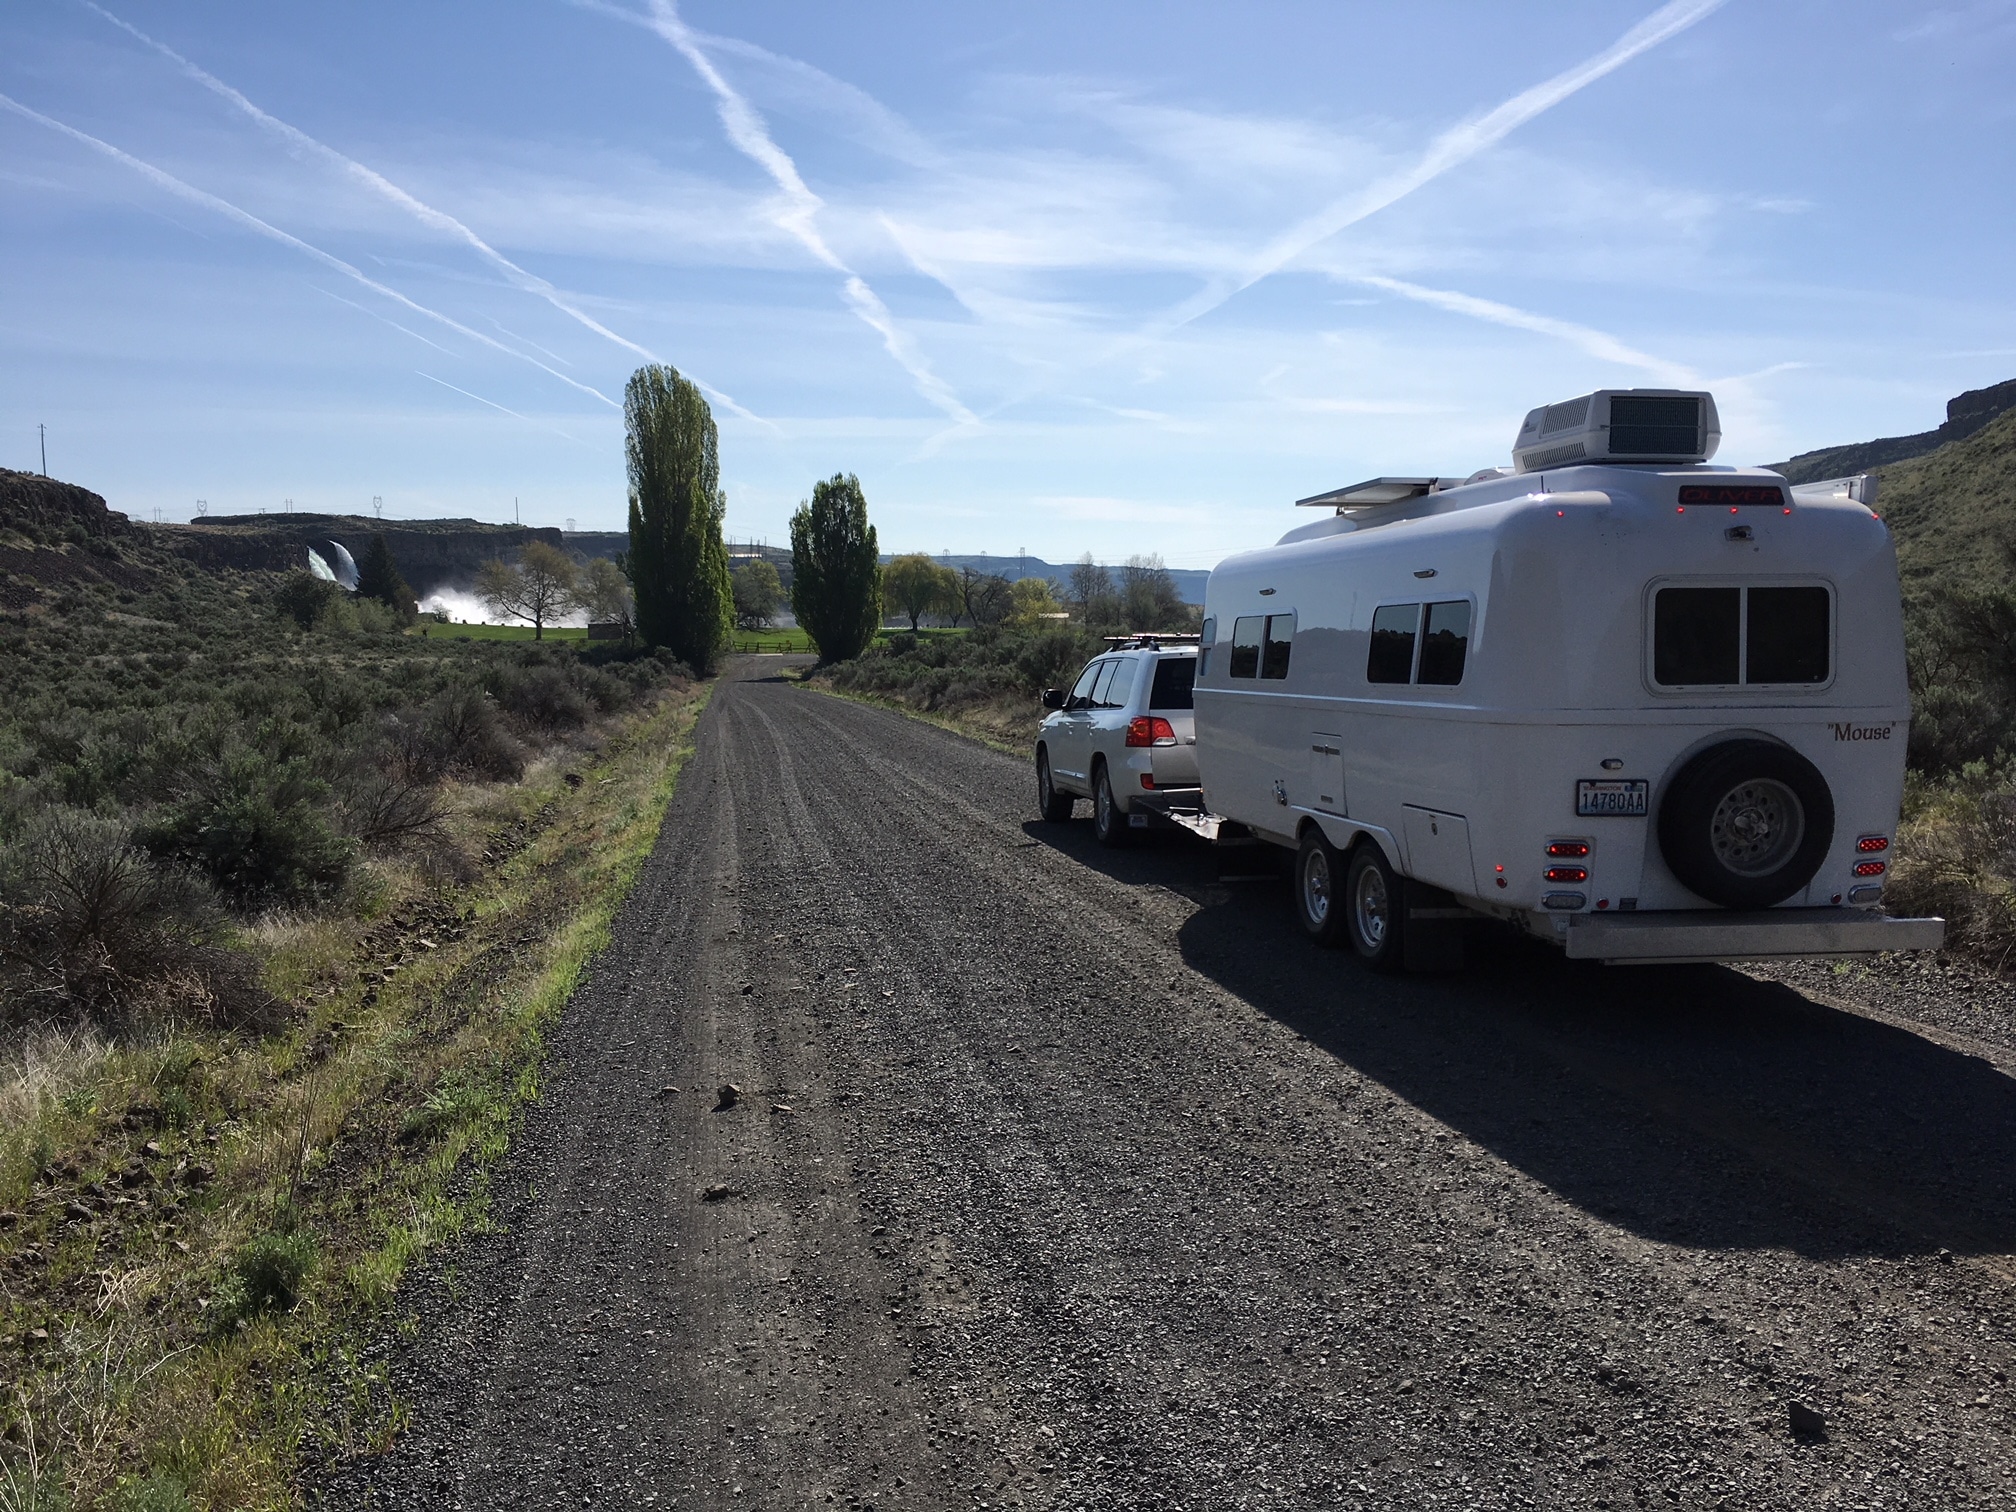
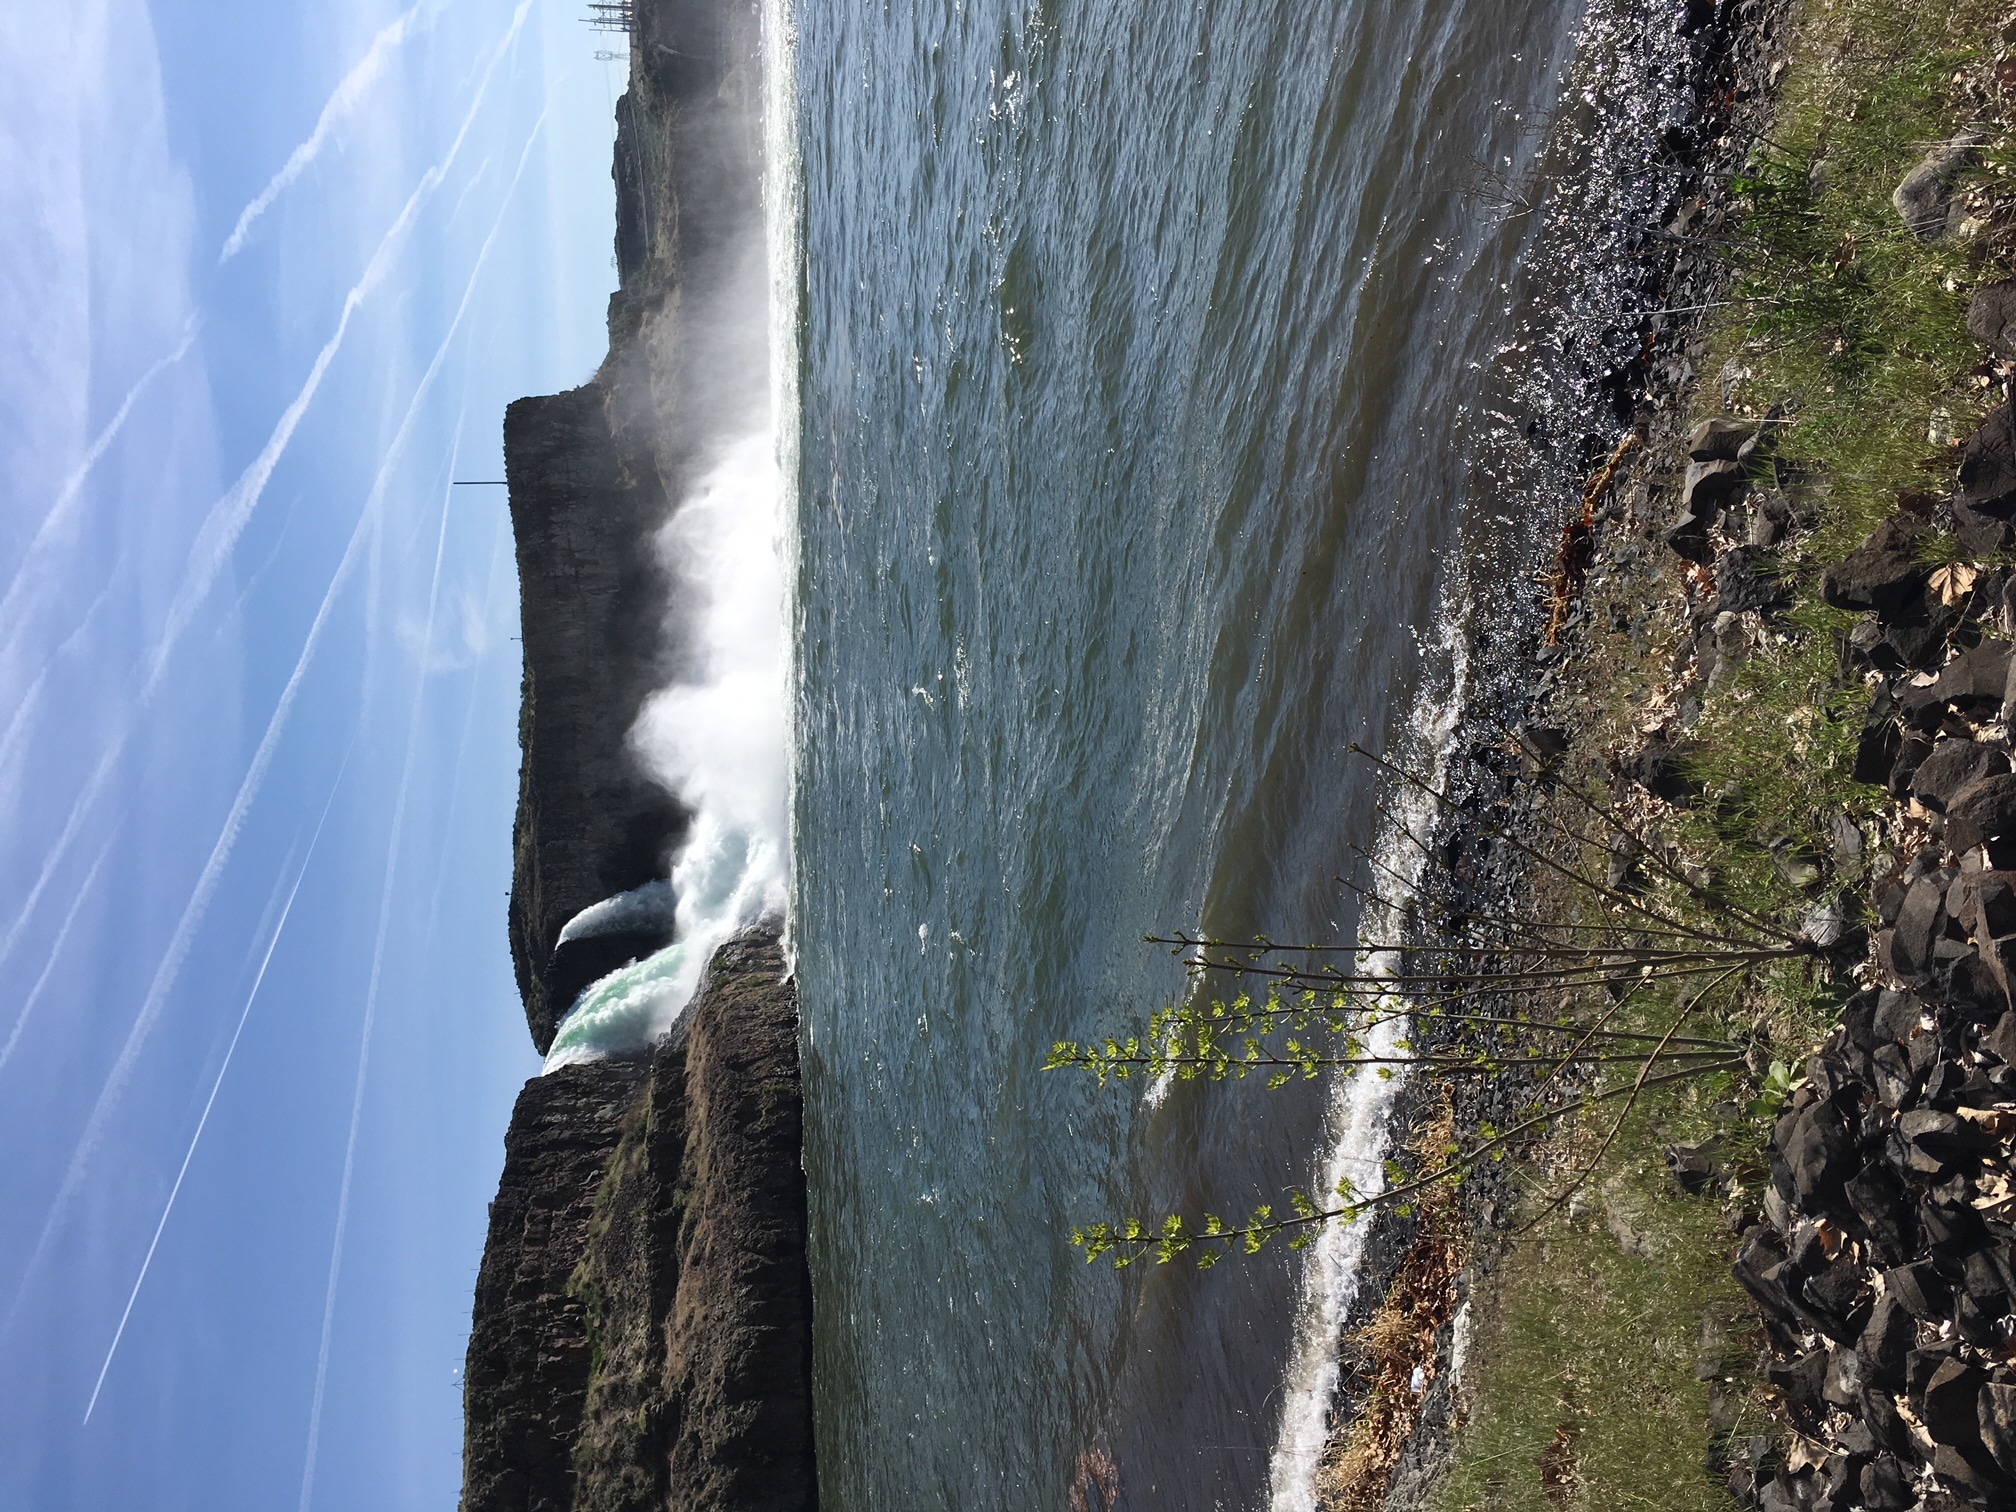
Summer Falls in central Washington in the Scablands (Great Missoula Flood erosion area). It is 15 miles as the crow flies NE of Ephrata, at the north end of Billy Clapp Lake. We did not overnight here since it is a day use area. A one mile maintained gravel road leads off the main road to the falls. Other than a short set of steep washboarded switchbacks, it is fairly level. For all intents and purposes, Summer Falls is a man-made waterfall. Technically any water draining down Arbuckle Draw and Trail Lake Coulee would have flowed over the falls, but so little precipitation falls in this area it would have been for a matter of days, if not hours. With the construction of the Columbia Basin Reclamation Project a series of canals were built to divert water to various parts of the Columbia Plateau for irrigation. The primary canal emanating from Banks Lake was routed over the cliffs at the head of Trail Lake Coulee, forming Summer Falls. The full volume of the Canal was initially allowed to flow over the falls, but some time in the mid 1980s a hydroelectric station went online adjacent to the falls, diverting almost the entire flow away from the falls. When enough water is being pumped into Banks Lake, the falls should be flowing, but the only time when the full force of the original falls will be evident is if the generating station needs to go offline for maintenance. The site was formerly administered by the state, but due to budget constraints was turned over to the Bureau or Reclamation in 2003. Nearing the falls, an astonishing amount of water was coming down. The Stone stomper and mudflaps work great, the rear window of the Land Cruiser stays clean! The back of Mouse, not so much. And I no longer hear rocks constantly binging and banging off the frame, rear bumper and steps. The falls drop 90 feet with great vigor, with 2 foot rollers crashing onto the beach, vast clouds of spray and a constant roar. Very cool! I can’t get this pic to load right, I can’t figure out why it is flipped. I am very glad I got to see this in full spate, by summer it will be shut down.... https://www.yelp.com/biz/summer-falls-soap-lake John Davies Spokane WA
-
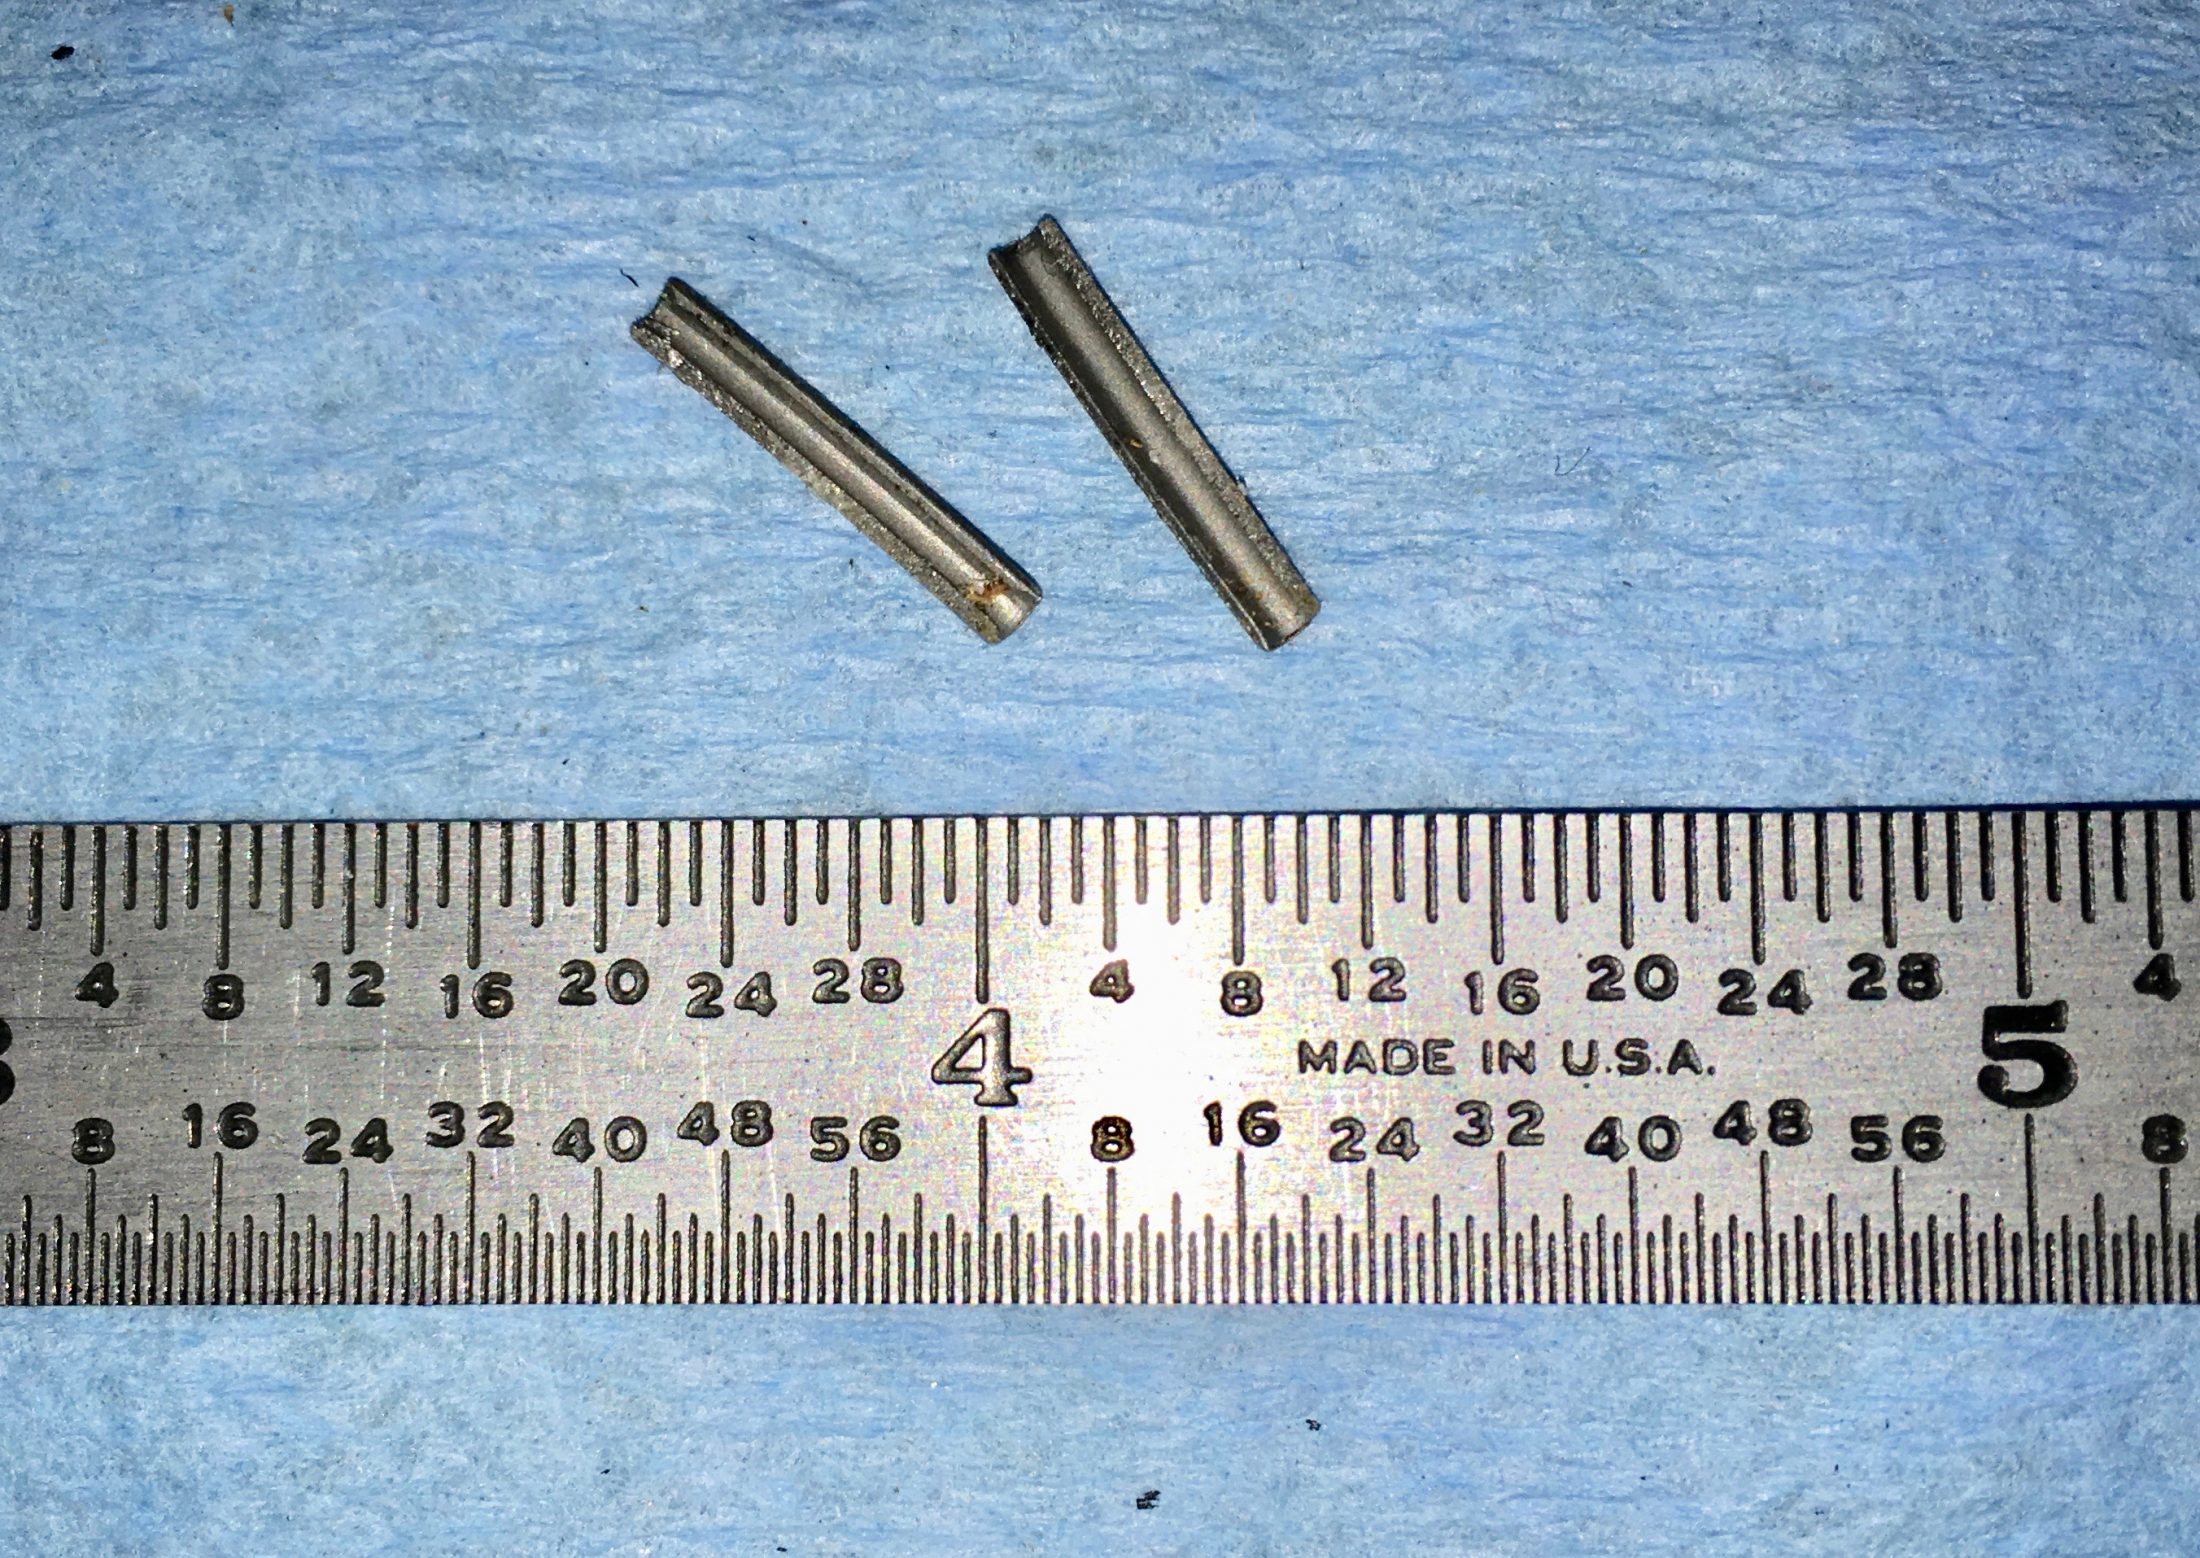
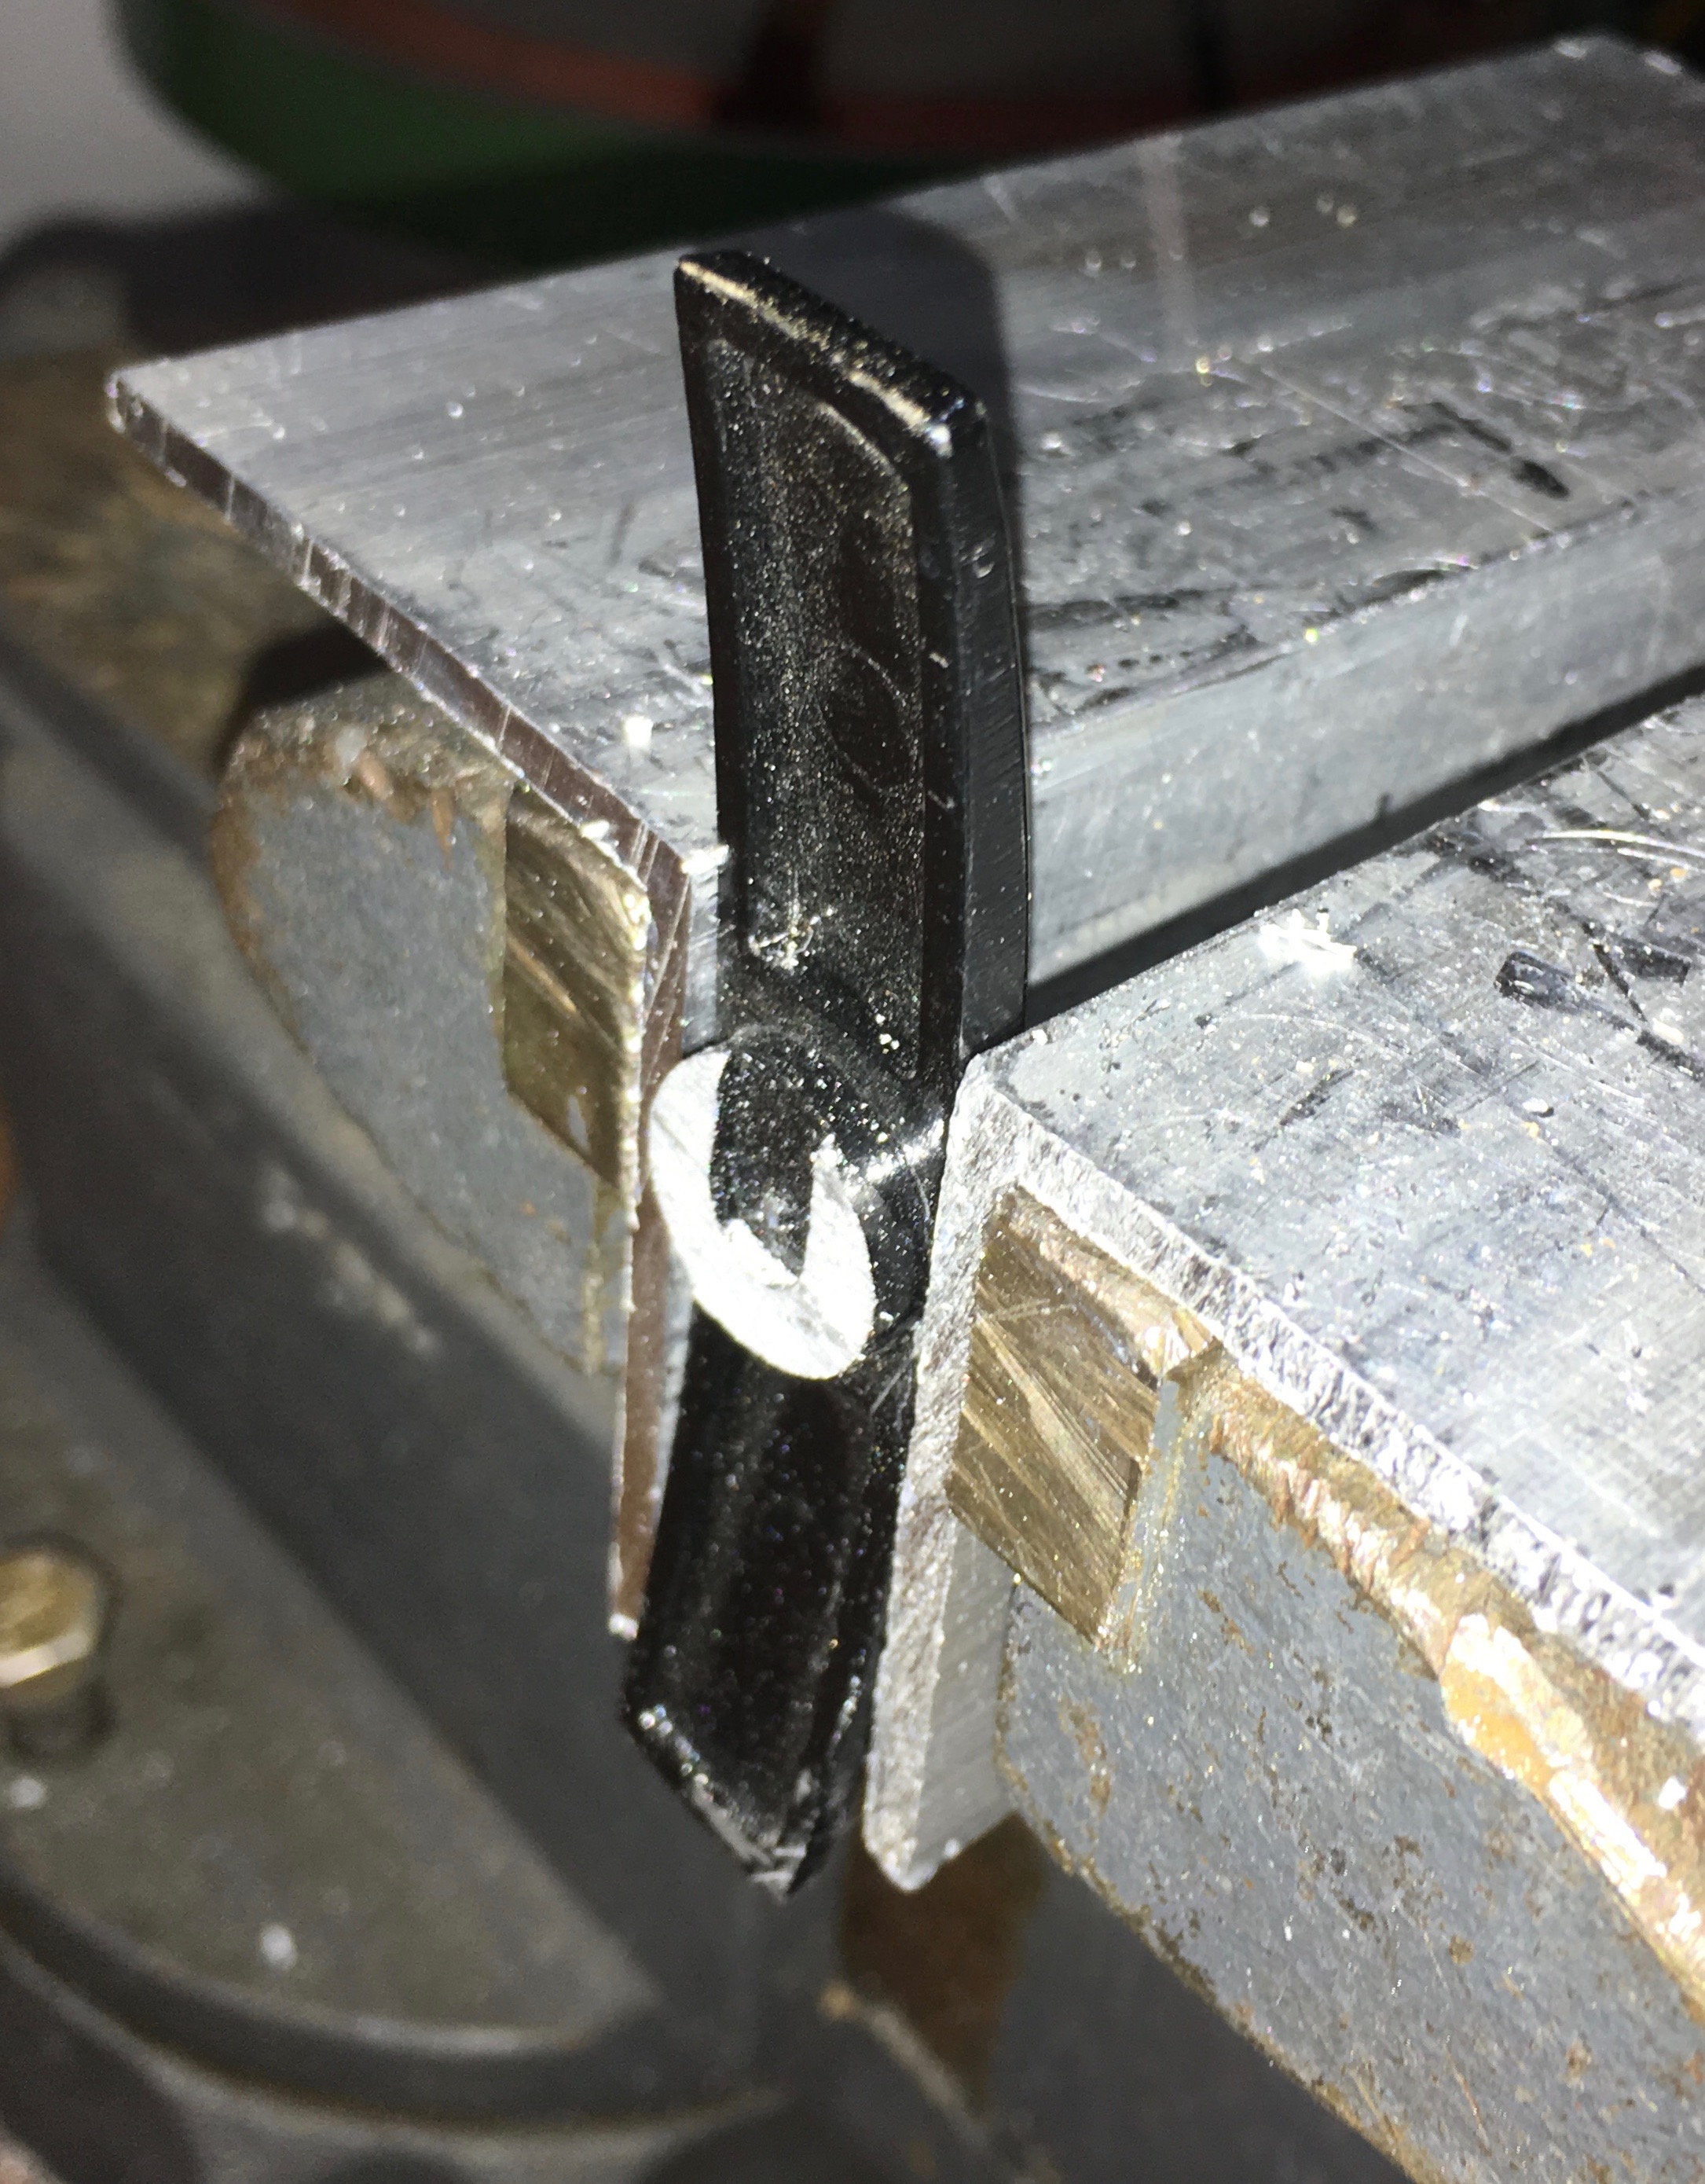
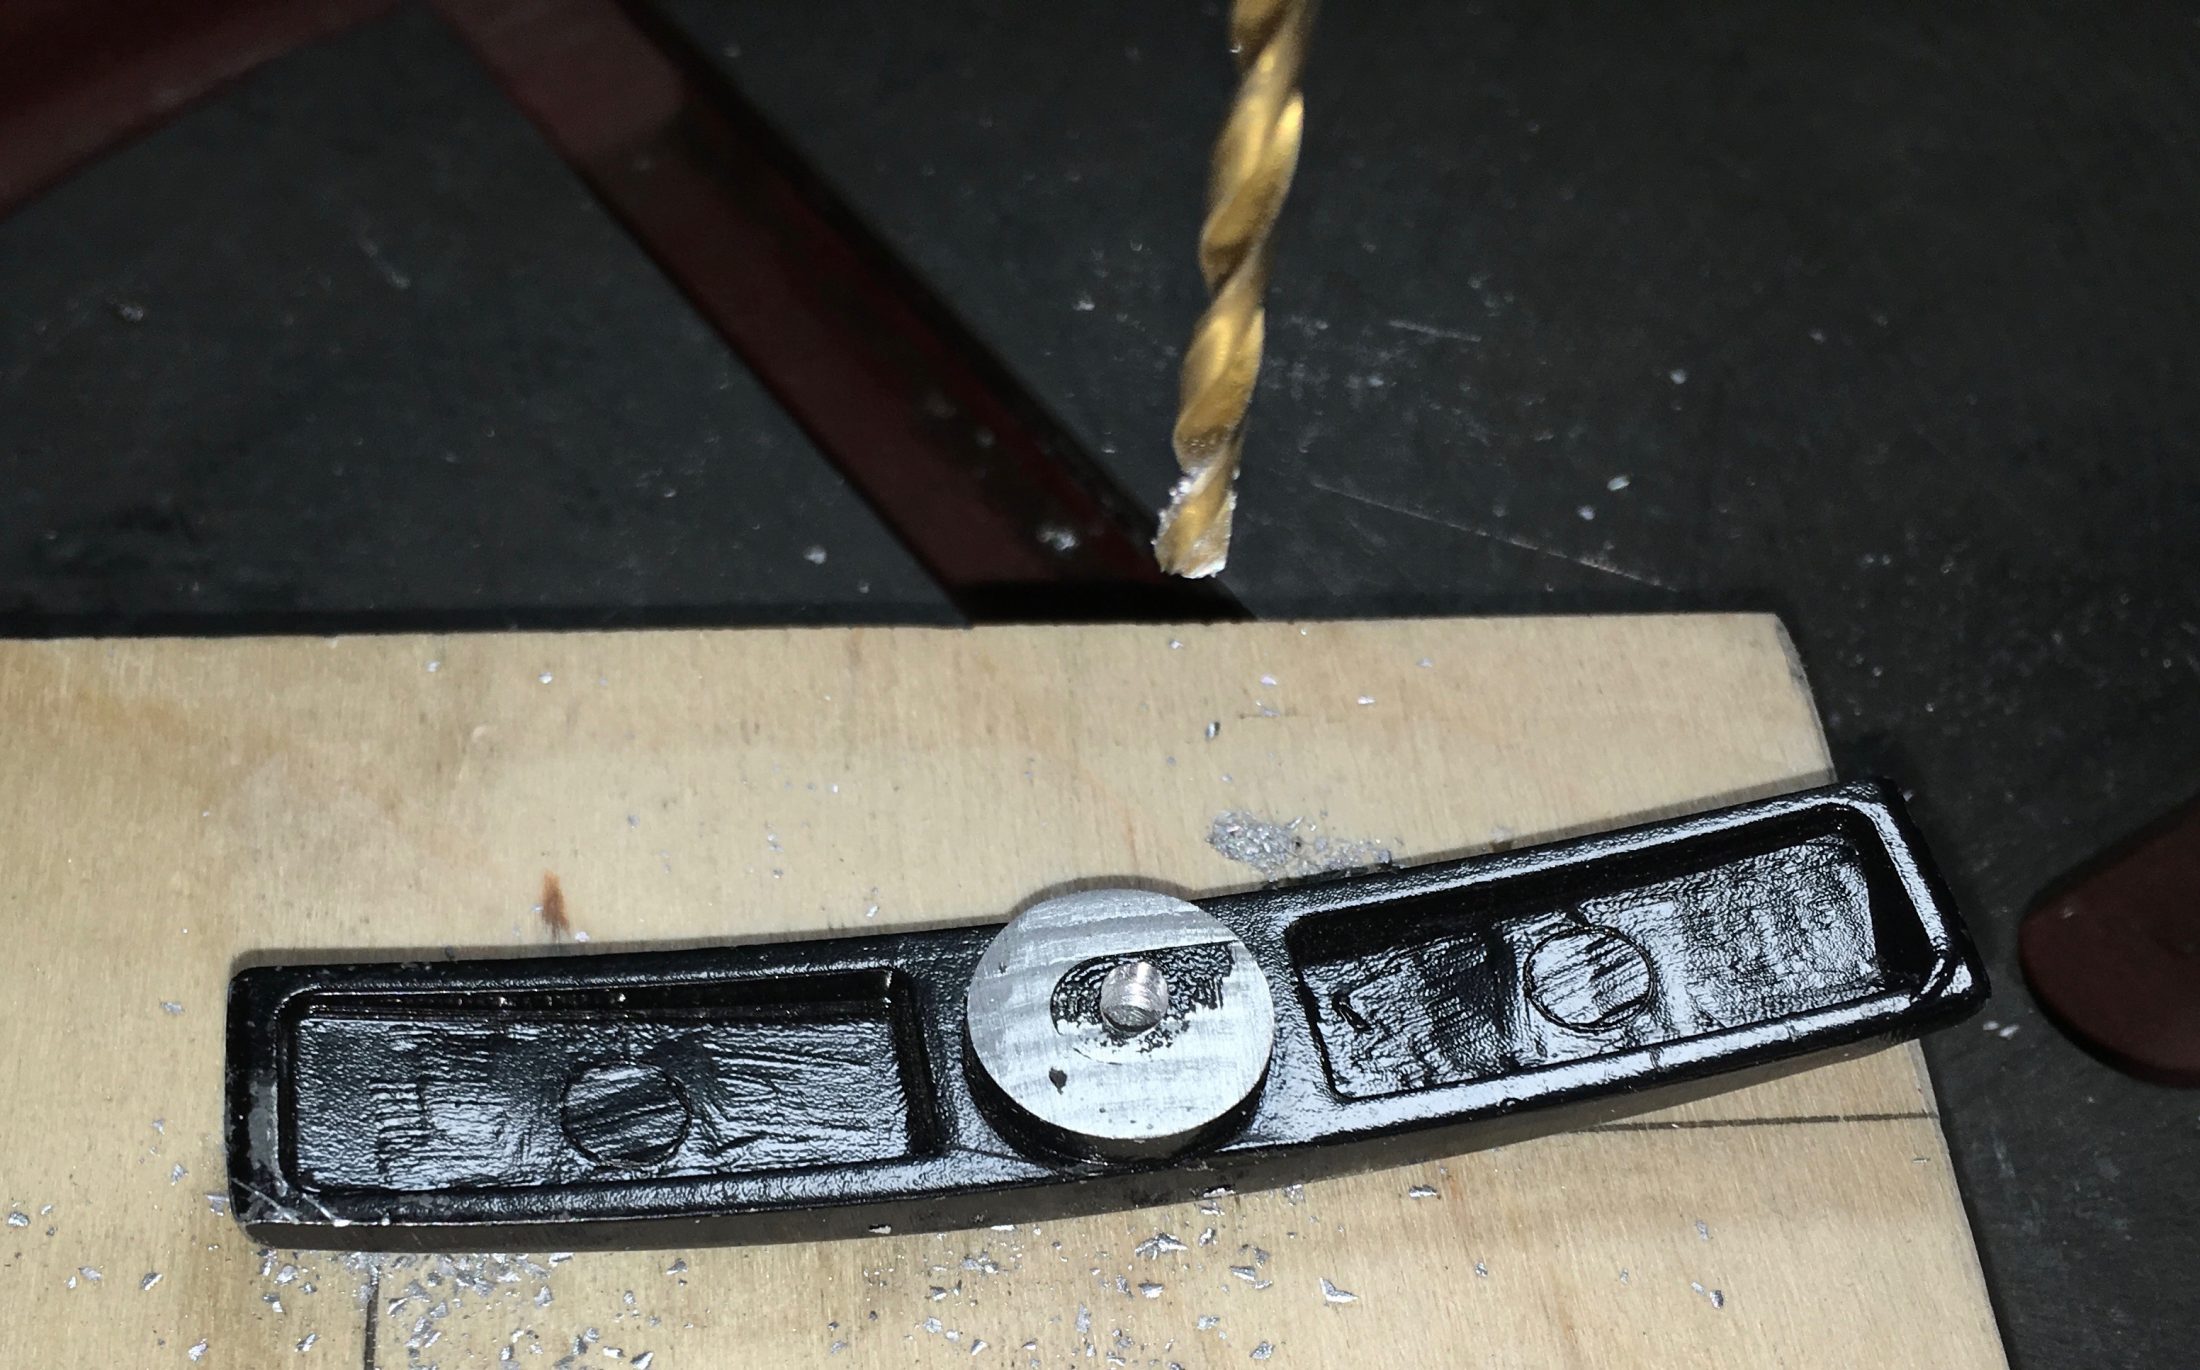
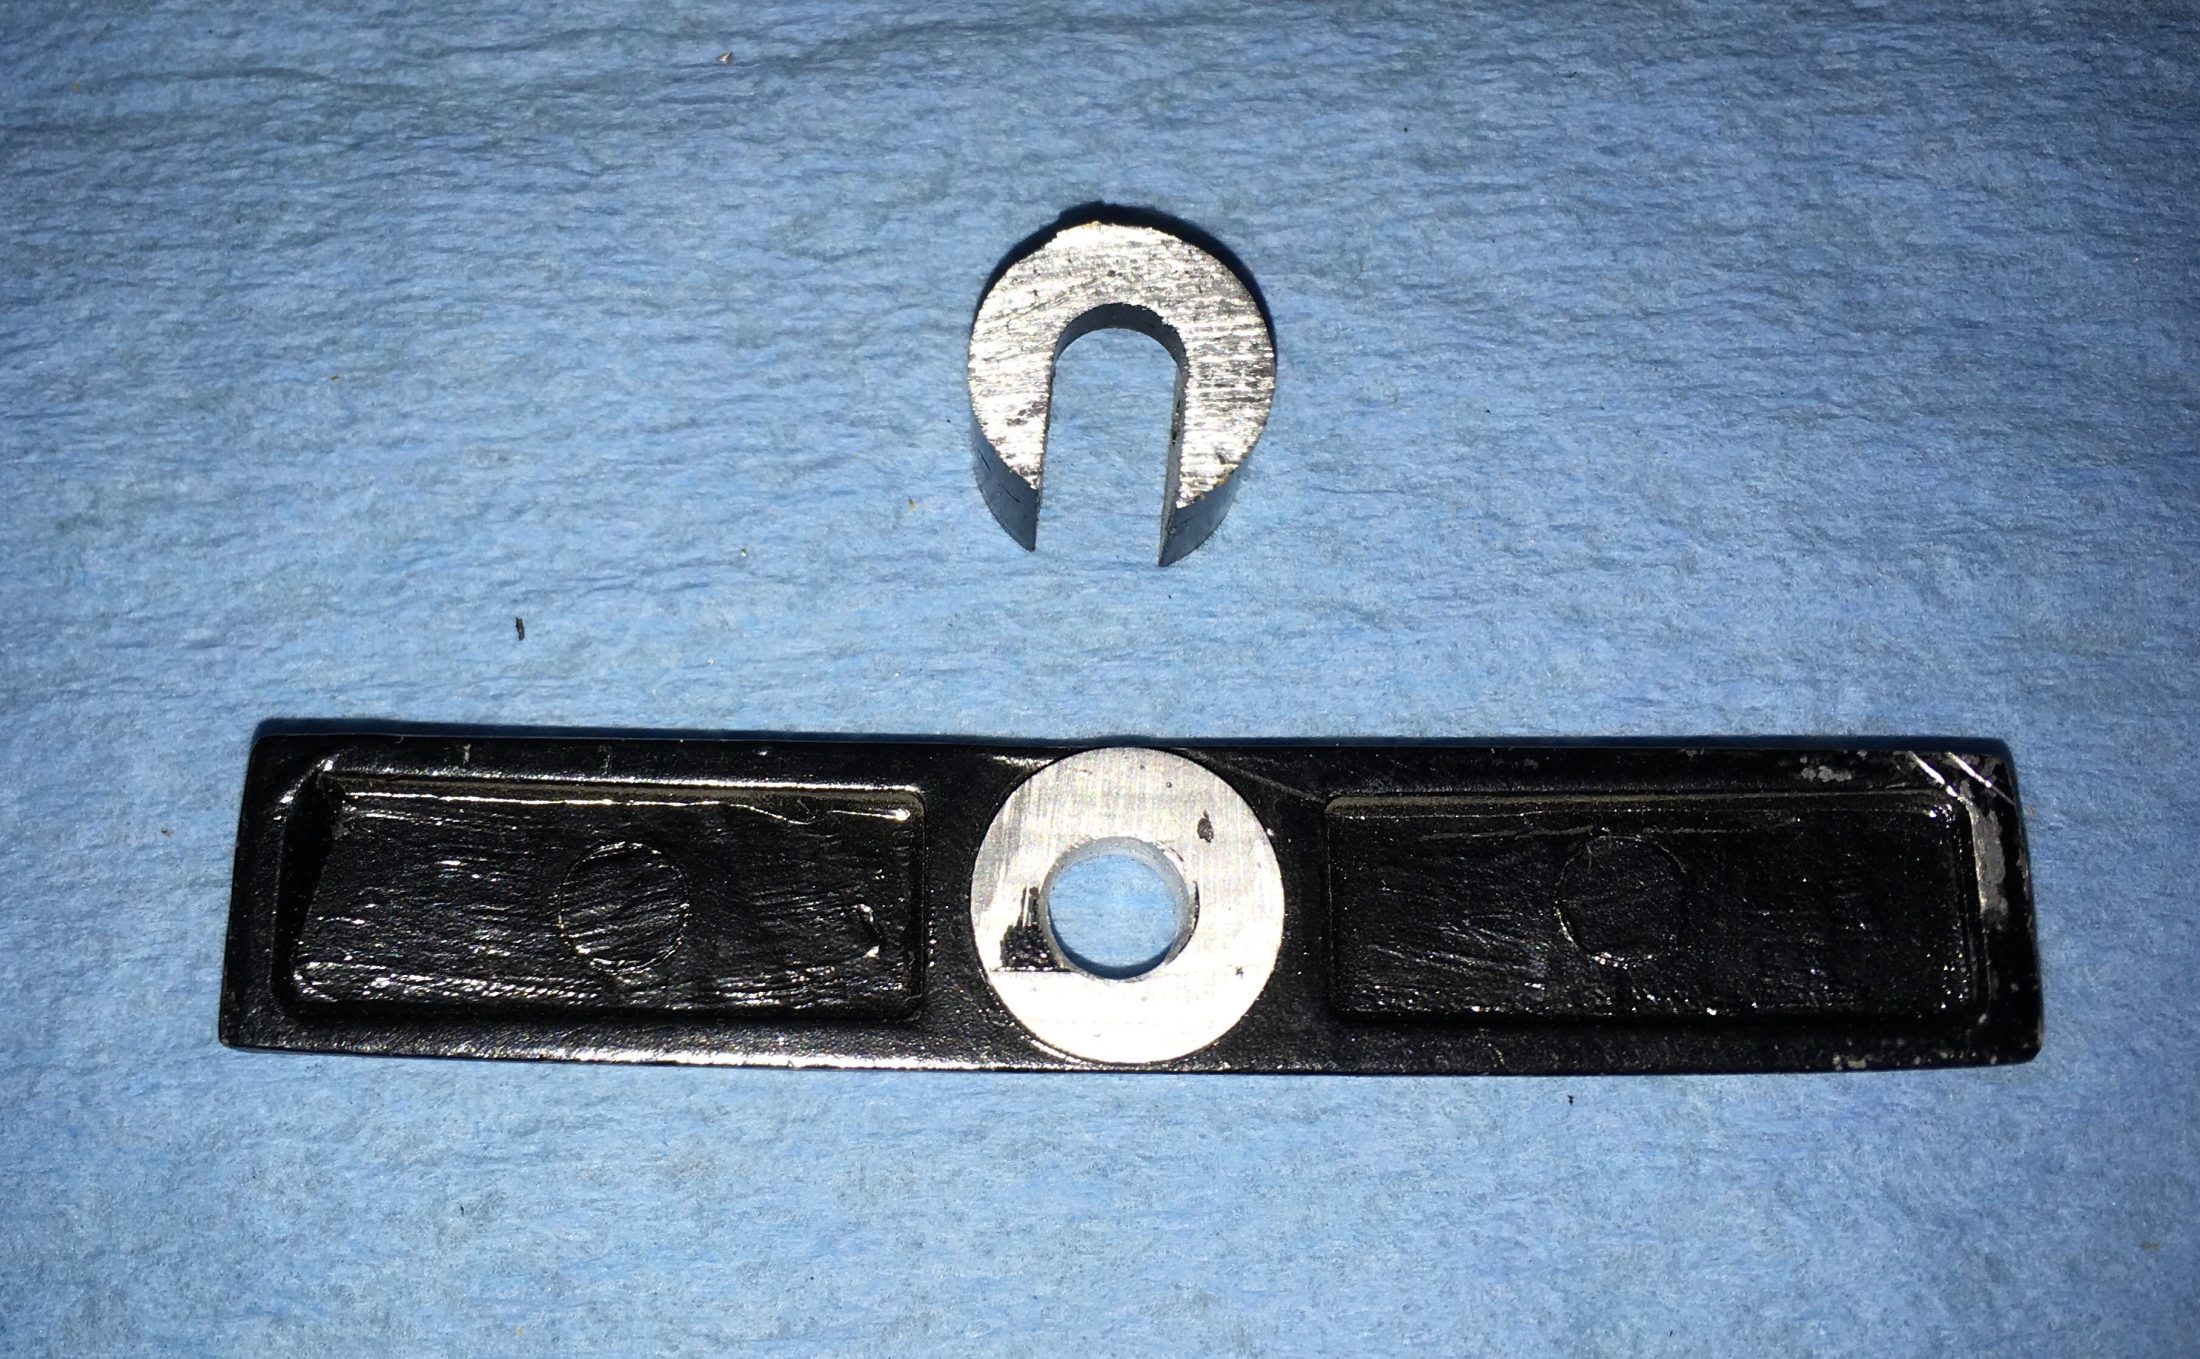
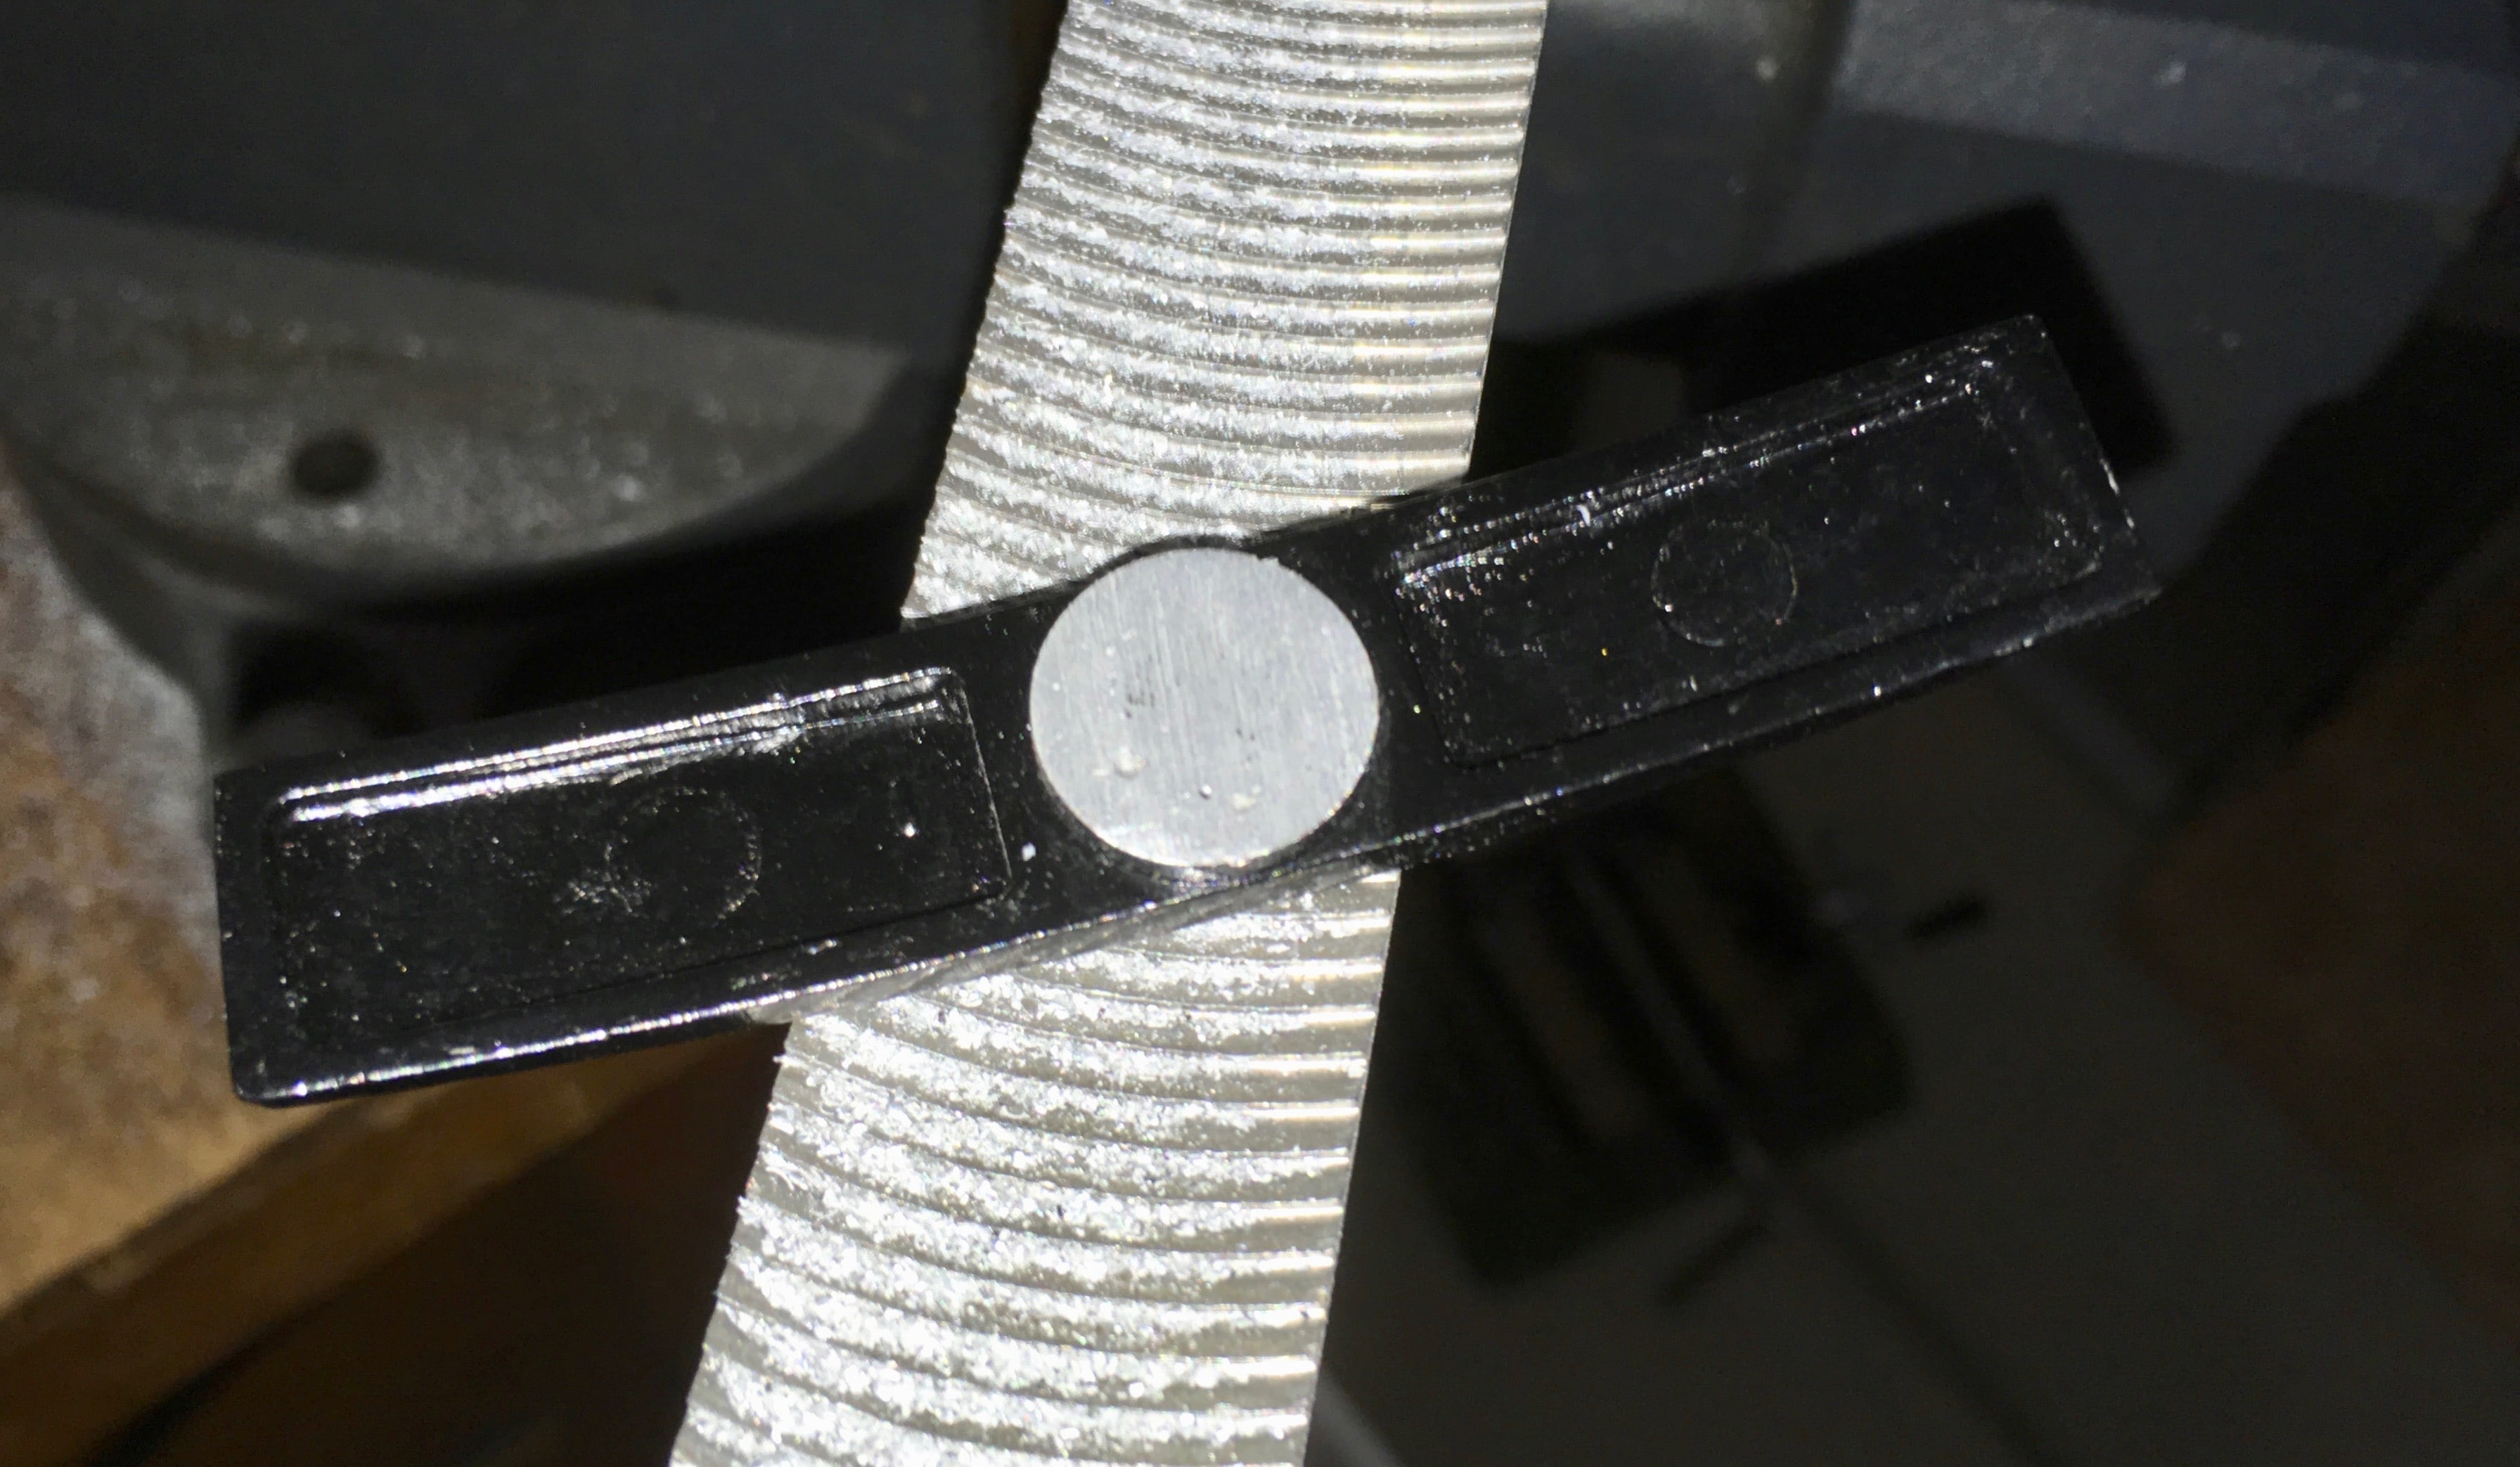
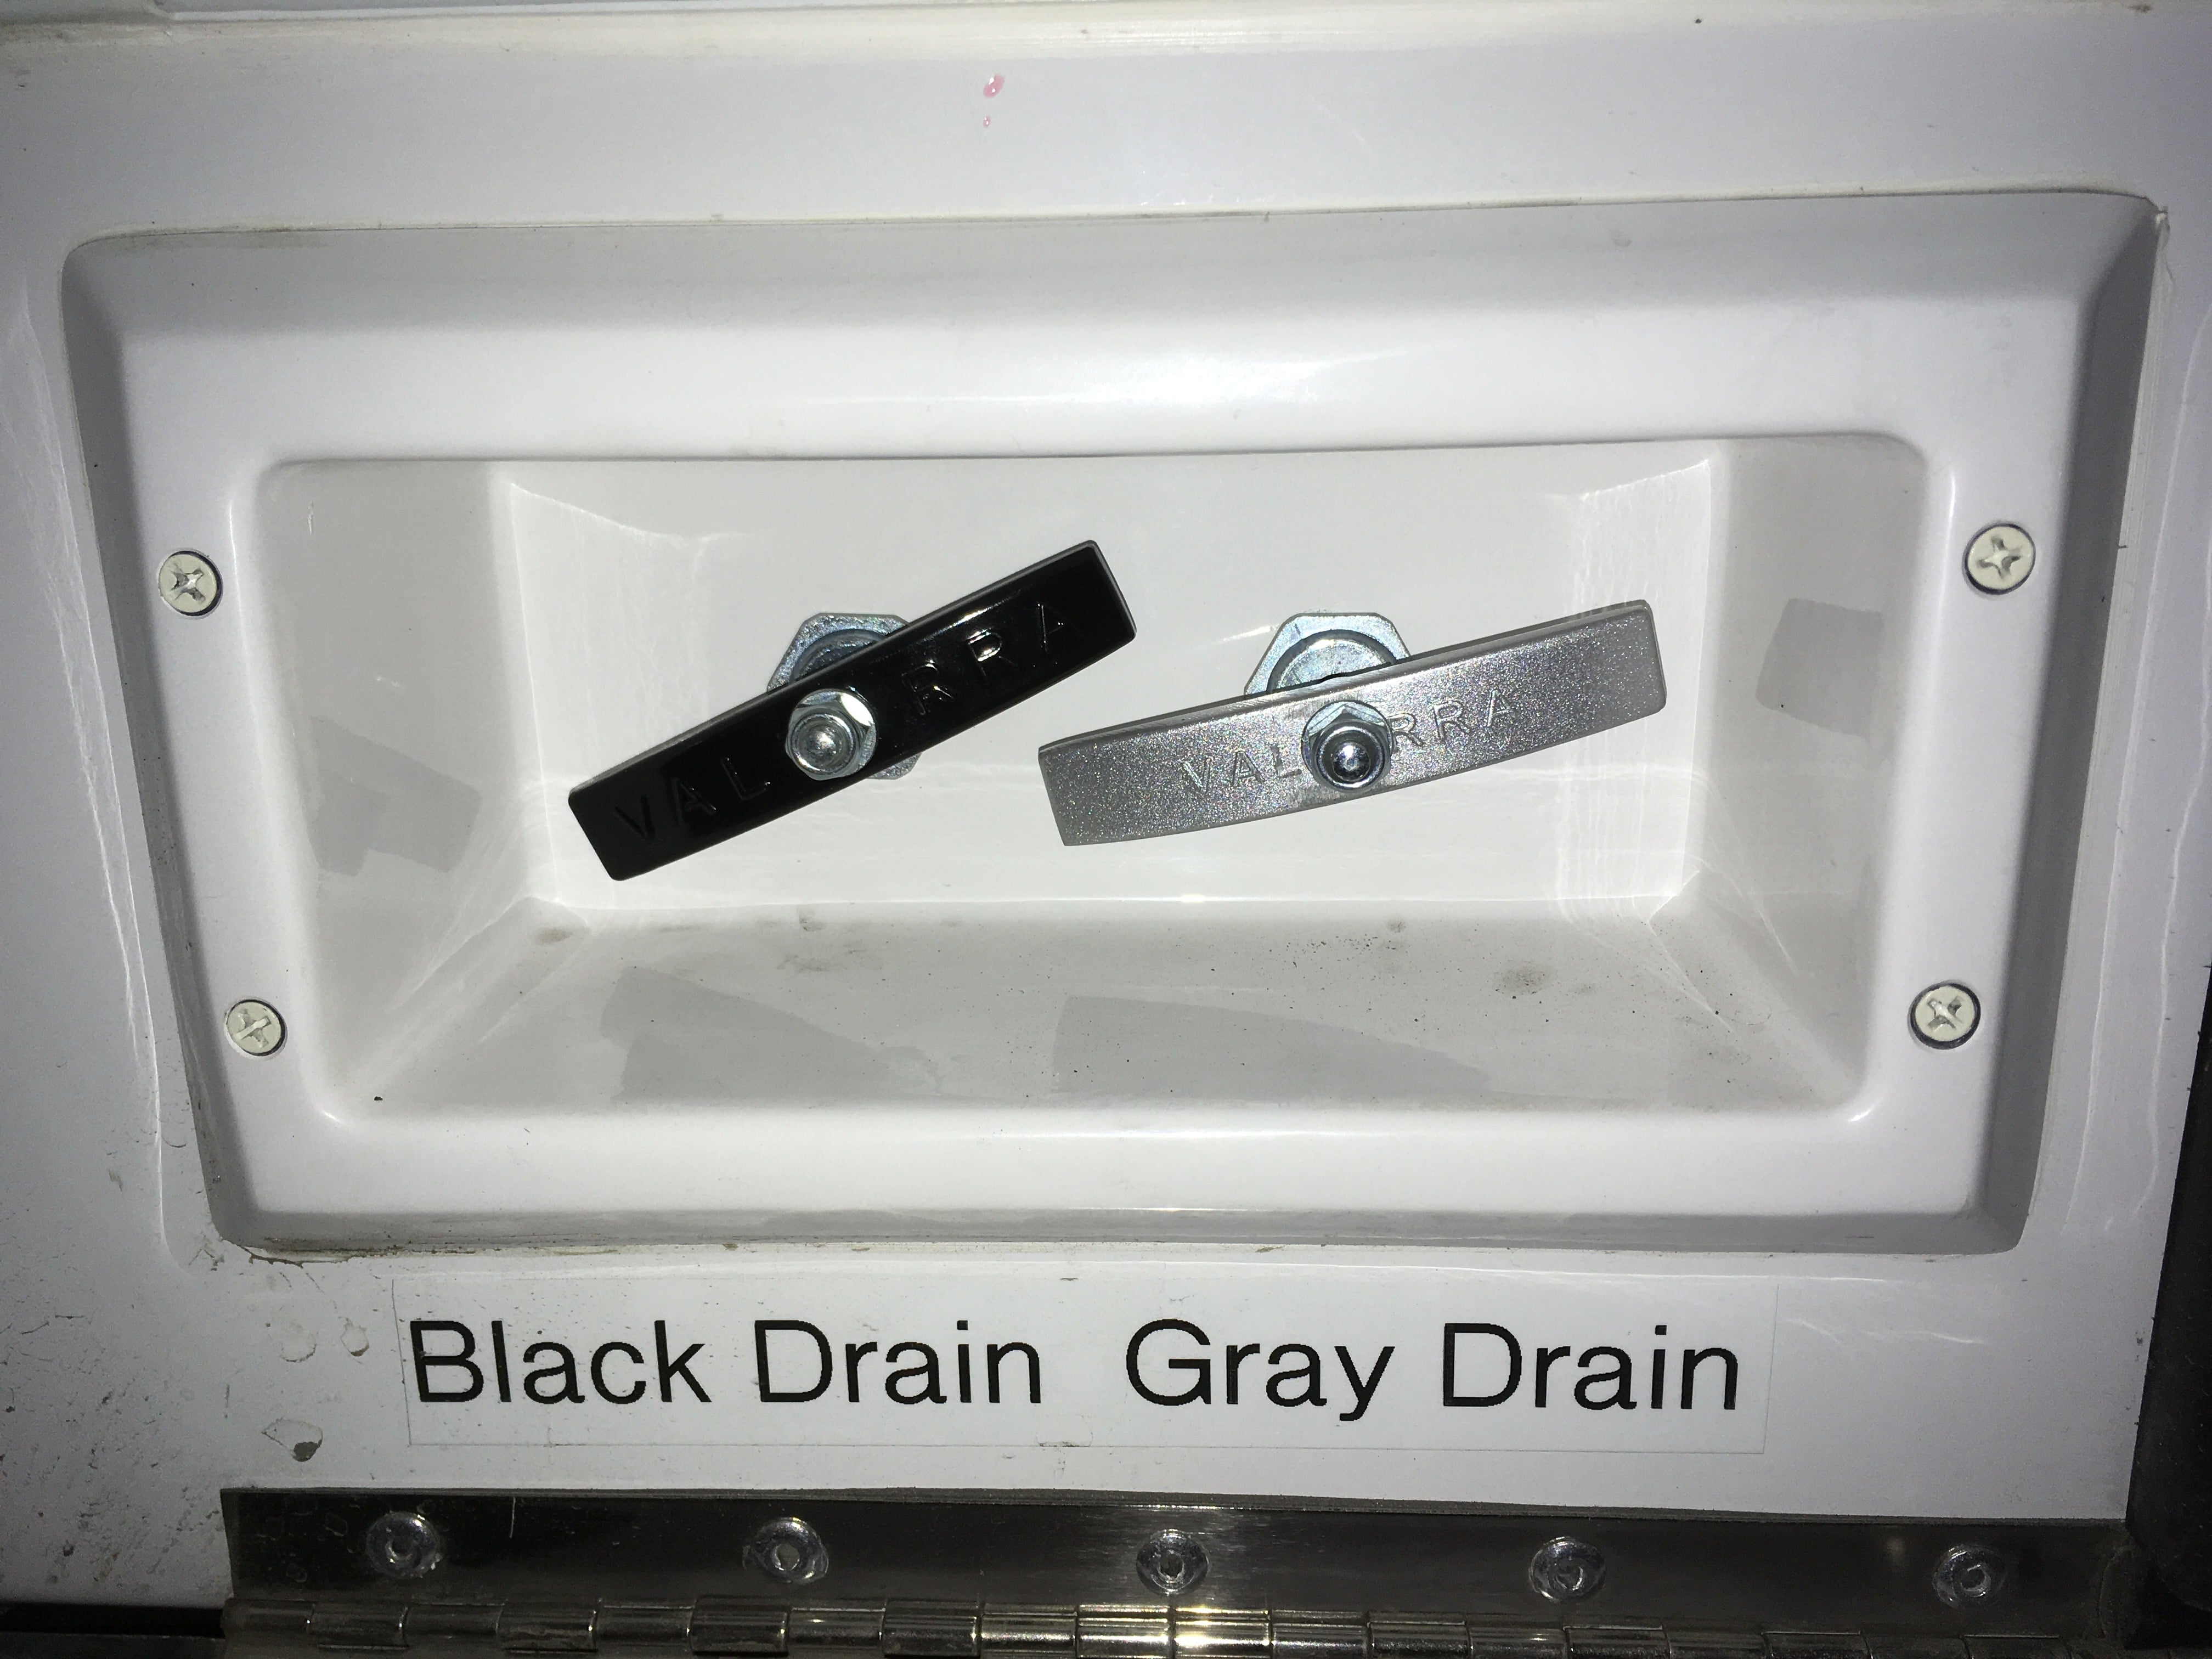
This is related to this thread, read more info here if you want to: ...http://olivertraveltrailers.com/topic/looking-for-a-threaded-waste-tee-handle-metric-6mm/ I never did locate a 6 mm threaded handle, so I modified the 1/4-20 threaded one I bought to make a silver colored Gray Water handle, and modded the other black handles to match. Here is the big reason to do this mod before one of your handles breaks off ... the dinky hollow roll pin through the handle is simply inadequate for the job. This one split into two long halves during removal: If your tanks are completely empty, it will make this job much easier. Don't accidentally dump anything nasty on the ground or get black water in your gray tank.... you will have to pull the rear handles out all the way to do this. Remove your old handles with a 1/6" pin punch and a helper (to hold a heavy block of wood underneath), after some really bad words. These handles are a pain to remove by yourself, and would be more so while camping. With a helper it doesn't take very long. Here are the threaded aftermarket and unthreaded Oliver handles for comparison. Secure a handle in a padded vise and cut off the excess shank with a coarse hacksaw blade. The finished handle needs to be 1/4 inch thick or less where the threaded rod goes through. File the cut side flat and true (90 degrees all around) and also take a little off the other side to provide a flat in the center. I used a large curved tooth mill file held in the vice and it worked well. Drill a pilot hole and then a larger one straight and centered, I used a 15/64",(just under 1/4"). I used a drill press just because it was there, but you could use a hand drill if you are careful to keep it aligned: Here is the finished handle with the cut off piece: And the other side after painting. I used DupliColor (brake) Caliper Paint - it sticks very well without primer, is really hard (contains ceramic) and it dries fast. I use it for all small paint jobs and am always happy with the results. Run the rear nut all the way down the threads, insert the handle, add a flat washer and a 6 mm Nylock nut. Clamp the shaft carefully with a small vice grip pliers to keep it from turning. Align the handle as desired, secure nuts. Done: Don't forget the one in the bathroom. This is one of those silly little things that takes a little time but virtually no money, as long as you have access to the tools, but it will save major headaches when your handle snaps off in your hand at the dump station, with a line of anxious campers behind you. John Davies Spokane WA
- 1 reply
-
- 8
-

-

-
All parts are standard 3/4" PVC fittings except for the female and male garden hose adapters, which may be a little harder to locate. Ace Hardware had everything I needed. I used yellow CPVC cement because I didn't't have the regular kind, but it is fine for this application. You can insert this inline with your fresh water hose after the filter, with the short arm facing up. With no water pressure in the hose (tee empty), unscrew the cap and pour in or inject the appropriate quantity of household bleach. Install upper cap and turn on the water. John Davies Spokane WA
-
Carry a small motorcycle on the back of the trailer?
John E Davies replied to John E Davies's topic in General Discussion
Thanks Steve, I guess it was your platform I remember. Can you please repost a pic or two? What do you think about removing the spare tire/ wheel to get some extra clearance and load capacity? The wheel and tire are about 65 pounds and the fiberglass cover is maybe 10....That might allow a bike to be carried closer to the hull, reducing the leverage effect on the mounts. And you could possibly brace or tie off the load to the rear tire mount, which would be a sold anchor. Thanks, John Davies Spokane WA -
I thought about Timbrens but they are expensive and are not adjustble in any way. Those airbags do fit all the LC 200 model years, read the buyer reviews on that page. There were no issues fitting them to my 2013. Amazon had the best price too. John Davies Spokane WA
-
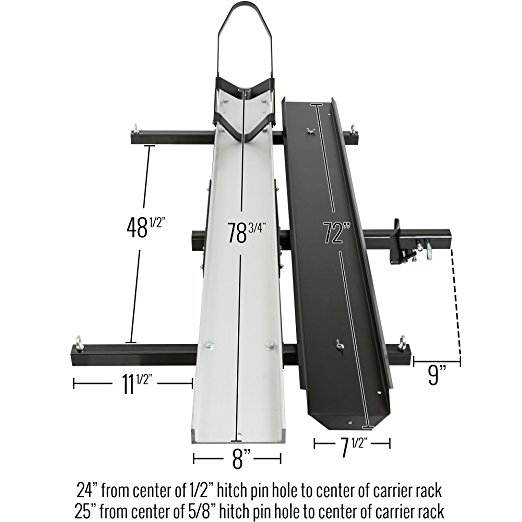
I have seen pictures of the rear cargo tray that is, or was, a factory option. How much does the tray weigh and what is the factory recommended max cargo load? Has anyone considered relocating the Ollie spare tire/ wheel to the tow vehicle, to allow more weight and better clearance in back? I am playing with the idea of carrying a small street-legal dual sport bike, like a Honda CRF230L (267 pounds wet), on the back on an alumium motorcycle tray, something similar to this, but utilizing two main mounts like the Ollie receiver uses.... I know the perils of upsetting the trailer balance, I just would like to know what is the heaviest load at the butt end of the trailer that would be flirting with instabilty (yaw) or over-stressing the frame. FYI, my front cargo tray weighs about 18 pounds and the max load is 140 pounds. I could carry the bike on the front of my Land Cruiser, but that would make me very unhappy for a large number of reasons.... Any ideas? Doable or crazy? I do think it would look very cool.... but not if it broke off the rear frame. I have considered an electric bicycle or electric motorcycle, but none of them have enough range. There are a number of mountain bike/ gas hybrids, like the FX Bikes (134 pounds), but I have not found one that could be plated for street use here in WA...! http://www.fxbikes.com Thanks, John Davies Spokane WA
-
Airbags: https://smile.amazon.com/gp/product/B003HJ3JOA/ref=oh_aui_detailpage_o06_s01?ie=UTF8&psc=1 KDSS warnings: http://www.sleeoffroad.com/technical/pdf_files/200_Series_KDSS.pdf Install video: I had a local shop install them, they charged $300, which seemed a little high... I had the two hoses routed to the jack compartment, with 24 inches coiled there so I can pull them out past my generator when fully loaded, for easy access. I use a compact mountain bike high volume hand pump to adjust them. I will take some pics and post them. John Davies Spokane WA
-
Yep, you can turn off your surge suppressor at the remote display, but the grounding plug mentioned is a much better solution. You should have one tucked in a galley drawer, supplied by Oliver. Just plug it into one of your 110 v outlets on the generator, and your cord in the other outlet. It should work fine. If you don’t have one, try to buy one locally. I think this is mentioned in the Progressive Owners Manual, you might dig out the literature and take a look, just to educate yourself... How is Moab? Busy? I love that part of the West. John Davies Spokane WA