
Raspy
-
Posts
666 -
Joined
-
Last visited
-
Days Won
45
Everything posted by Raspy
-
Reed, Excellent report. Sounds like Scott has been out of the loop. That would explain the delay and lack of response from Oliver.
-
John, As I wrote about in an earlier post, I have the fittings and the tool to install them. Plus I have the dip tubes in stock. My company is all geared up and the entire procedure is all worked out. We're just waiting to get the logistics sorted out with Oliver and a few other details. Then I can work out a system to get everyone fixed. Oliver needs to be involved in this for the existing trailers and the new ones about to be built. Not everyone will be willing or able to take on this modification, so it's not the time to rush in, on your own, with a rental arrangement outside of the work and planning that has already been done, or is about to be done. There is more to it than that.
-
An easy and reliable way to connect/disconnect the house batteries from the truck battery, automatically, is to use a "Ford solenoid" rated for continuous duty. The ignition circuit, or the alternator output would pull it in and the alternator power to the house batts would feed through it. The "continuous duty" rating means the pull in coil can stay energized continuously, as opposed to a starter solenoid, which looks the same, and is much cheaper, but can only be on long enough to run the starter motor. The one shown is rated for 80 amps continuously. It might be a bit light for a 100 amp alternator, but probably OK since the 100 amp output would not be continuous during the charging cycle. Here's one: https://www.zoro.com/white-rodgers-dc-power-solenoid-12v-amps-80-70-111224s1/i/G1031852/
-
Please read my earlier post. If the truck and the trailer batteries are tied together the alternator just sees one big battery. The alternator is regulated at 14.1-14.4 volts and charges the truck batteries with no problems.
-
Reed, I'm thinking that before you change over to an MPPT controller, you should run an accurate test with absolutely full sun on the panels for a full day and monitor the results. While it's true that the MPPT controller advertises up to 30% more charge, it's the nature of that difference that is important here. As I understand it, the difference in total amp hours delivered is at the top end of the collector voltage and amperage curve, or the Maximum Power Point, which is at voltages over 14.1 in full sun at relatively low temperatures with a normal angle of orientation. With PWM, or pulse width modulation, the controller cannot control the charging voltage, only the battery charged voltage, so it pulses power with varying band width to protect the batter from going higher than 14 volts. The affect of PWM is that there is a lot of off time in the pulses to keep the battery voltage under control. Whereas the MPPT controller is a DC transformer that can take the entire collector current and adjust its voltage to 14 so that you get full amps to the battery until it reaches 14 volts. This means no off time compared to the PWM pulses. This is where the overall difference begins to show up between the two. Then it goes into absorption mode and reduces the amps, while maintaining the voltage, until the amps reach a pre-determined minimum amount that triggers the Float stage. So the battery really does get charged fully instead of giving a false high voltage reading that increases the "off" width of the pulses in PWM. So, the real difference is during direct sun at higher collector voltages and, possibly, at higher states of charge. But at lower states of charge, in full sun, the difference may be small or none. Direct sun is the key here. Any shading drastically reduces the output of a particular collector being shaded, or just shuts it off. This can be as little as a tree branch shadowing one panel. Since the difference between the MPPT and the PWM overall amp hour delivery is at the top end of the voltage scale, and especially in cooler weather, any loss of collector output through partial shading can easily make up the difference between the two. In your case, you are needing a strong bulk charge to make up for the night's use, but you may be getting far less than the rated array output because of partial shading. Shading percentage is not equal to the percentage loss of output. Output loss is far more than shading percentage. Another factor to consider is the rated array output adjustment due to imperfect orientation. You may have to give up 10-20% right off the top of Oliver's rating because of that alone. I'm bringing an MPPT controller with me to Bandon. Maybe we can run some tests to compare results to your PWM controller. John
-
Auto and truck alternators are regulated internally and put out, at their terminals, 14.1-14.4 volts. Truck alternators are often over 100 amp output. I don't see why you couldn't run a large set of + and - cables to the rear of the TV. Then have a plug that connected directly to the trailer batteries with another set of wires. No additional charger would be needed. You'd need a high amp connector of some sort, maybe welding cable plugs. This would charge the trailer batteries up to the truck battery voltage while the engine was running, or 14.1 volts, and do it quickly. It would also pull the truck batteries down with the trailer batteries if left connected while not running. It might prove to be more practical than carrying a small generator as the truck could idle for 1/2 hour and do more than the genny in 1-2 hours, or so. You could also run the inverter while the truck was running with no battery problems.
-
I don't have any complaint at all with the size of the two twin beds. I didn't run to the dictionary to get the legal measurements of traditional twin beds and it doesn't bother me at all that there are other beds called "twins" that are a different size. I certainly don't think they have been mis-represented. No problem here. There are two beds, each sized for one person to sleep comfortably with easy access in between. And since there are two of them next to each other, and the same size, they are twins. Not twin beds from some bed store somewhere, but two small beds that match each other. Twins. I haven't seen any Oliver literature that claims they are a size different than they actually are, or claiming they are some standard "twin" household size. BTW, household "twin" beds don't have a rounded corner on one end either. And "normal" twin beds at home have thicker mattresses. And household twins are in houses not in small trailers. I just don't see what the problem is. But I'll contemplate it, maybe, while resting peacefully in my twin bed while out in the forest somewhere, as I listen to a babbling brook and a crackling campfire. I'll decide if I'm mad that this bed is a bit smaller than the one I slept in at home as a kid. Meanwhile, it is certainly much better than many I've camped with over the years in tents, the back of pickup trucks and on the ground. It's even better than the ones in my boat. While on the subject though, I was just deciding if I was mad about Oliver calling my trailer "white". I've seen a brighter, whiter snow white before, and this may not actually be as white as I expected! I've seen other whites, and I'm not sure this is actually white. Hmmmm. I wonder if they misrepresented it?
-
That is really nice Dave. I'm gonna do it too.
-

New owners: how is the Quality Control of your rig? Grade it!
Raspy replied to John E Davies's topic in General Discussion
I'm very happy with the quality of my Ollie Elite 2. It's not a perfect thing and I don't expect it to be, but it is excellent and it is definitely a keeper. While being able to pinpoint a few things that are not perfect I can give a long list of things that are way beyond what I have ever seen or what I expected. I'm thrilled with it. As far as practical use goes, the Ollie design is far more useful than a Airstream, in my estimation. That is not a quality issue, just a "design for actual use" issue. Things like food storage, battery location and capacity, ground clearance under the tanks and plumbing, the ability to open the tow vehicle tailgate while connected, etc, are all better with an Oliver. The only Airstream with a narrow body is the Bambi, but it only has a single axle. The tandem axle Elite 2 tows extremely well. It's stable and easy to keep in a lane. Then look at the aluminum body vs fiberglass. I've seen a number of pictures of Airstreams lately, and I passed one on the road, with hail damage. They looked like the surface of a golf ball! Absolutely not repairable without new body panels. Even the slightest rub against a tree branch will press in a stripe that will be permanent. If you want to go camping in remote areas, are going to be out in bad weather or you plan to put a lot of miles on your trailer, I can't see how you can do better than an Ollie. If you only want a luxury apartment, for the weekend, in good weather, or if you want to live aboard and be always hooked up to shore power, the AS might work better in the wide body models. Just don't base your decision on a few negative comments about the Oliver as the AS has it's share of complaints too. -
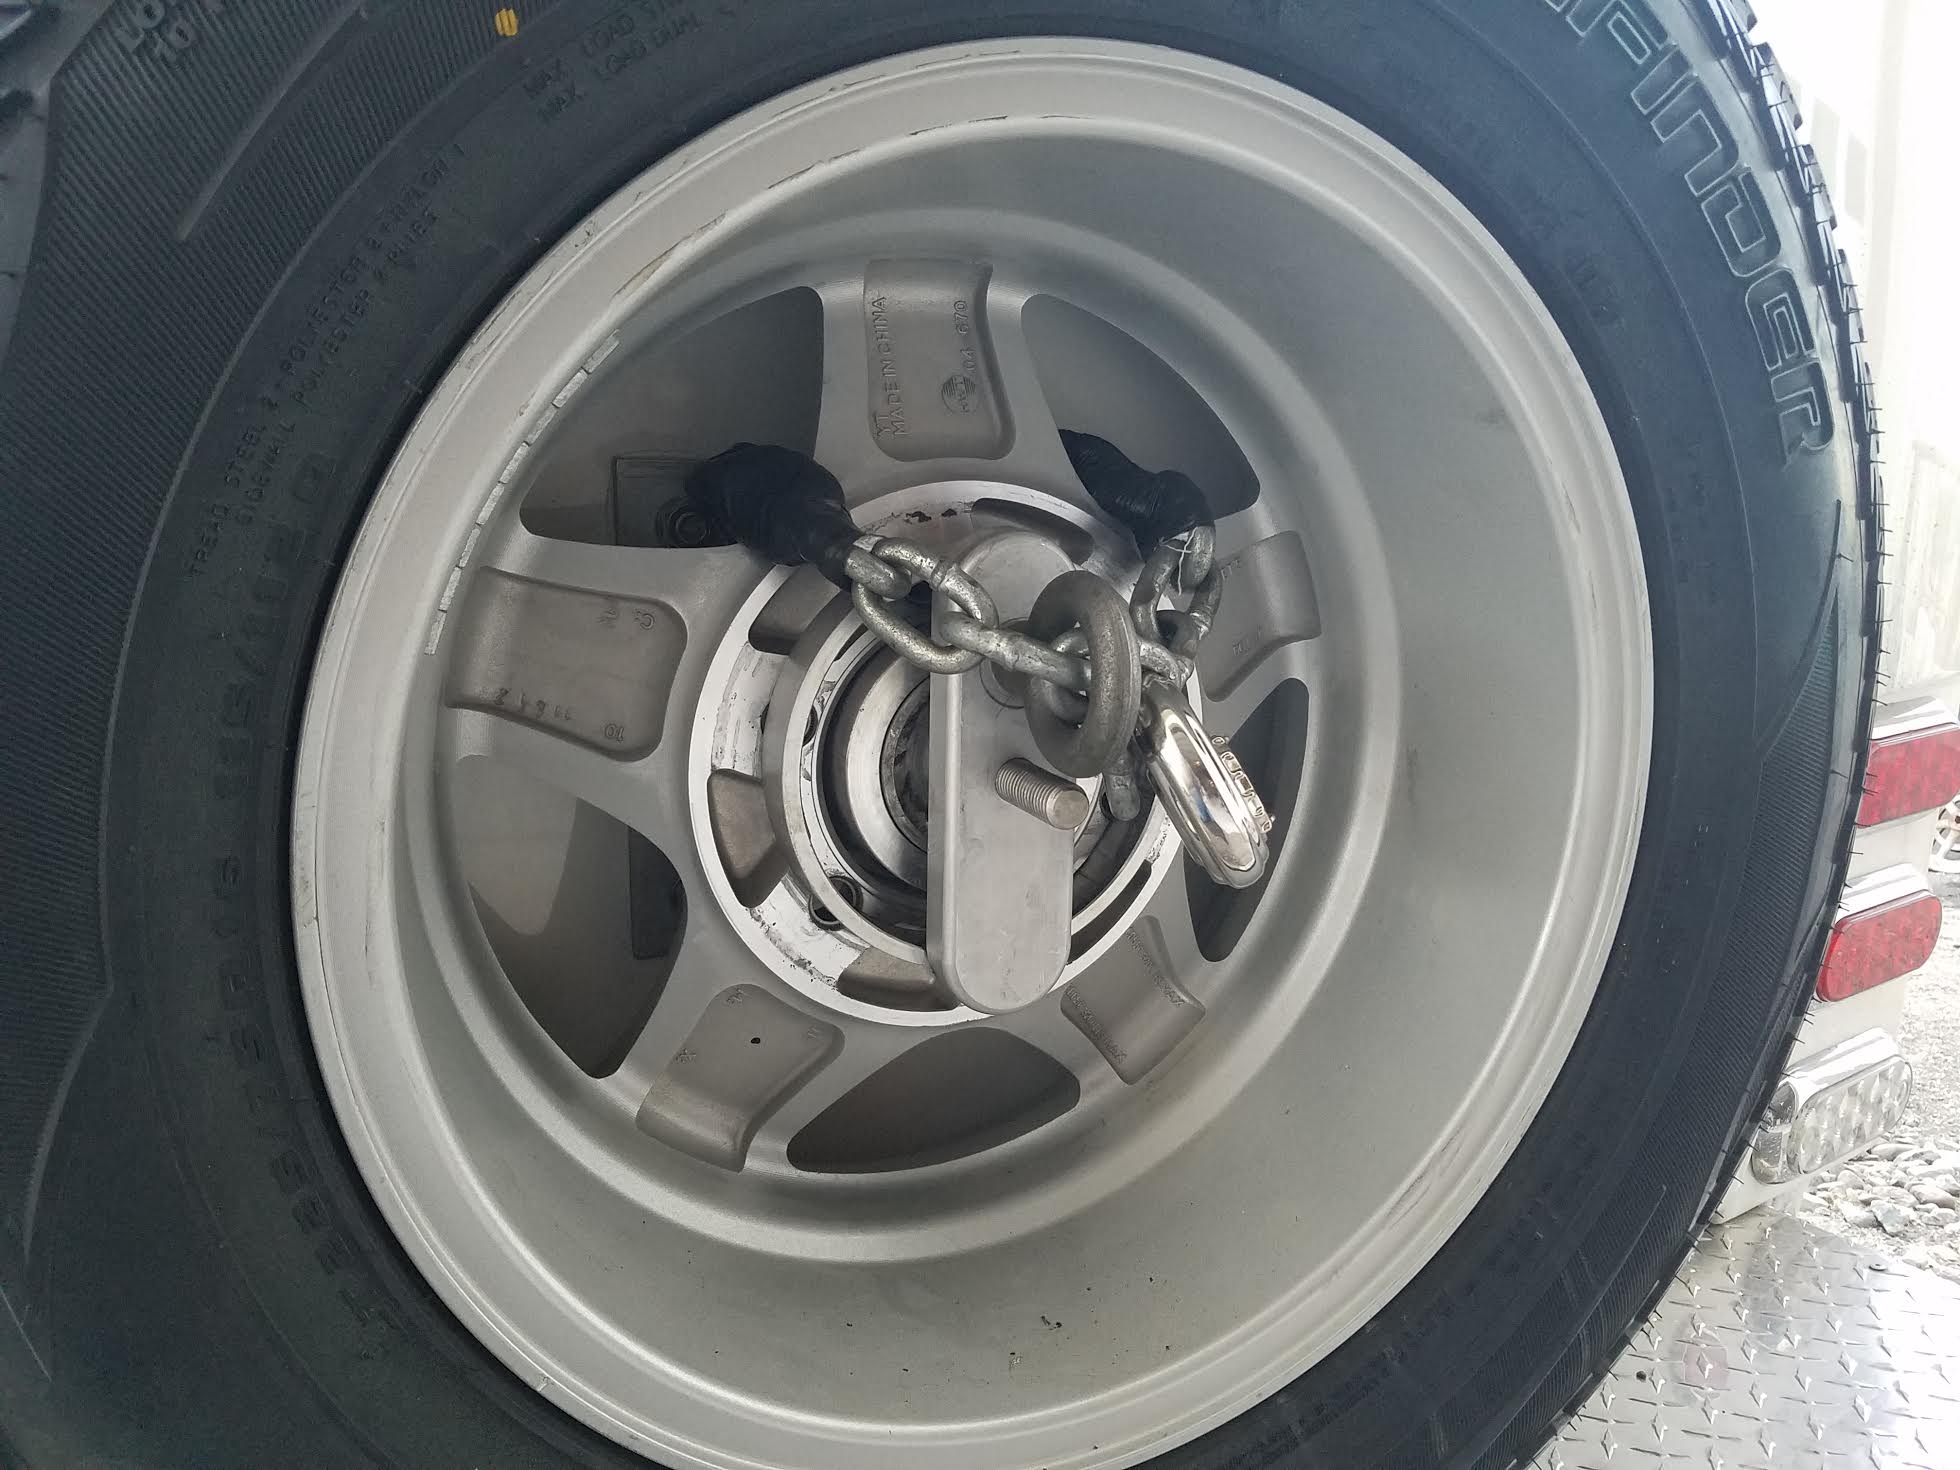
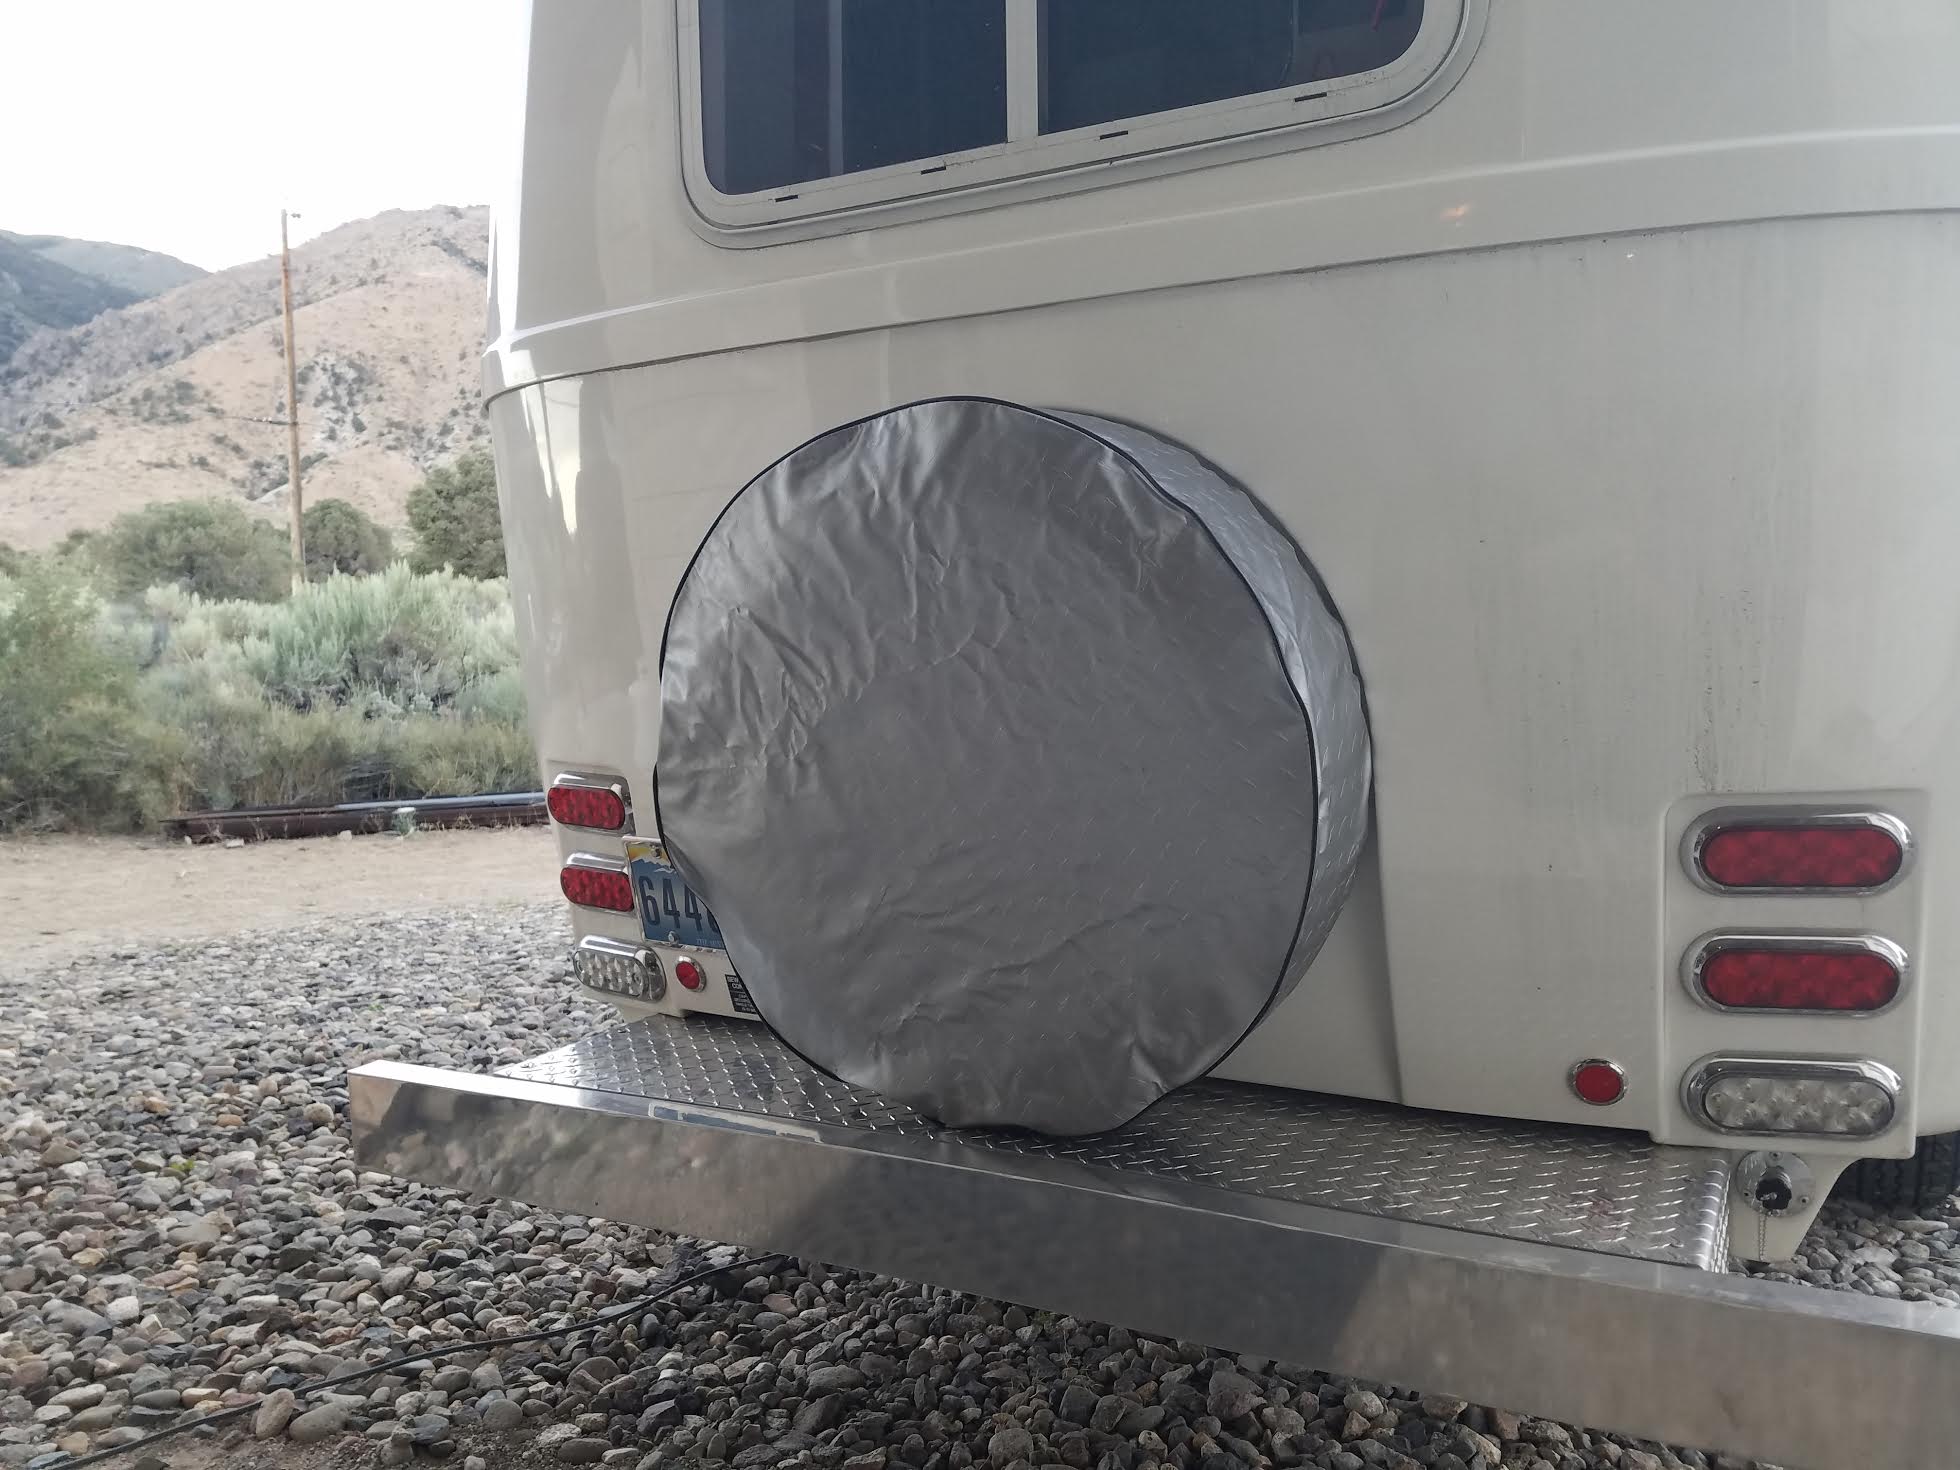
I finally got some pictures of my spare tire modification. Since my trailer had the small sized spare tire and cover, I can not run the fiberglass cover over the full sized spare I now have. There is just enough room under the full sized tire to slip on the cloth tire cover. One slight advantage of the soft cover is that it doesn't stick out beyond the bumper like the fiberglass one does. I also upgraded all five wheels to the star wheel design in the pictures. The locking chain is fixed to the bracket behind the tire and goes through an eye bolt in front that will not allow the wing nut to be removed. If the tire is turned around, the wing nut and locking setup will stick out beyond the tire and the wing nut piece won't tighten up against the wheel to hold it securely. It might be better to change this whole bracket to a more conventional spare tire bracket that would mount the tire with the front out. This would allow for easy tire pressure checks and easier installation of the soft cover.

-
Sherline Tongue Weight Scale: Trailering guide and usage manual
Raspy replied to John E Davies's topic in Towing an Oliver
John, I have one of these scales too, and it really works well. -
Maybe I'm missing something, but that is 100%. When the batteries get to 100% charge at about 14.2 volts, the charger goes to "float" mode, which, if they are flooded batteries, is about 13.2 volts. Your reading is normal for full charged batteries that are just being maintained.
-
Fresh water tank modification, new suction line.
Raspy replied to Raspy's topic in Ollie Modifications
Thanks for the kind words Yvonne. Please let us know what Jason says. John -
Reed, We were just talking about all the earthquakes lately. There were 19 of them about 6 miles from here about a week ago. All in the 1.5 - 2.3 range. Last night there was a small one here in Smith Valley, but I didn't notice it. I'm thinking your solar isn't working. Good test with the suitcase system to help diagnose it. Of course it's so easy to use more power than we realize, but still. I just ordered two 50 watt panels yesterday that I can store in the closet and set up on the ground. I want to look at your setup and get a few ideas about plugging them in and where to put the controller. Has Oliver said anything to you about the water tank upgrade?
-
Fresh water tank modification, new suction line.
Raspy replied to Raspy's topic in Ollie Modifications
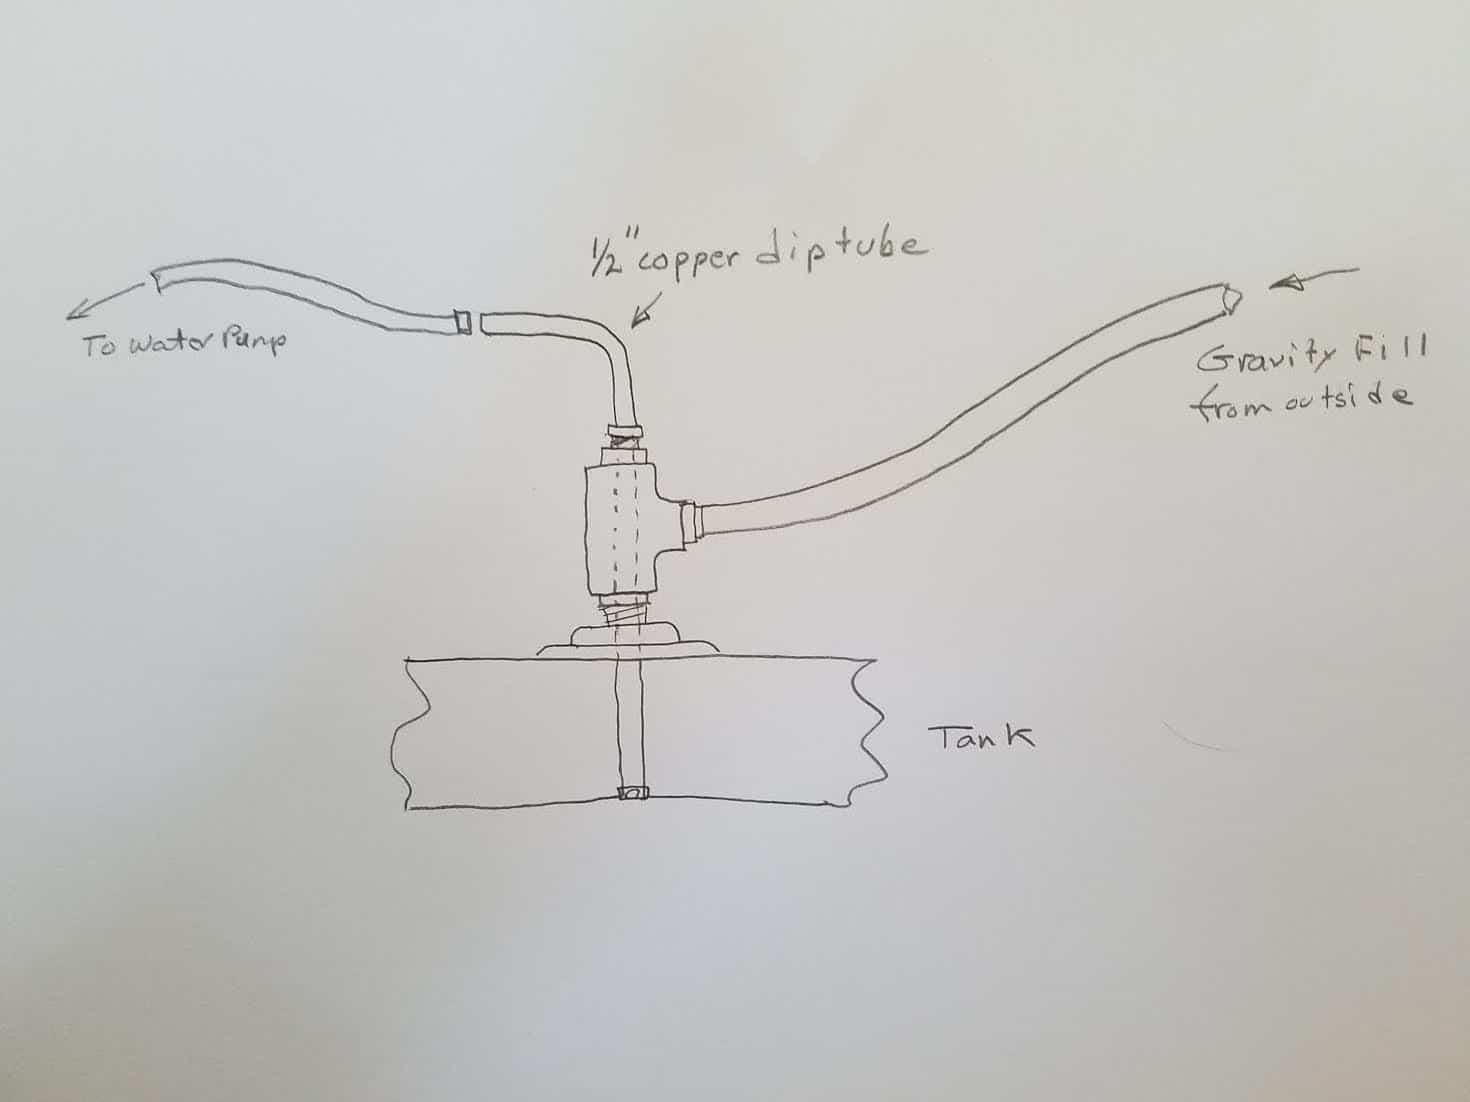
Randy, Maybe this sketch will make it more clear: The dip tube is the water pickup for the fresh water to the trailer. It is 5/8" OD and is currently what I have in my Ollie to pick up the tank water. The suggested modification to this would be to add a tank fill through the same tank port. This would be done by adding a 1" Tee around the dip tube with a 1' pipe that screws into the top of the tank. Then the dip tube would reach down through the 1" pipe Tee and on down into the tank to pick up the water, as before. The side of the Tee is connected to a fill pipe that goes outside and gets water poured into it. The incoming water enters the tank through the space between the dip tube and the inside of the 1" pipe. It's just a way of using one fitting for two purposes and I'm not sure we'll ever do it, but it's a nice idea if space is limited. Tank venting is still done with the stock vent.
-
Fresh water tank modification, new suction line.
Raspy replied to Raspy's topic in Ollie Modifications
bradbev, I don't know where the vent fitting is. Only the rearward outer corner of fresh water tank is accessible. That is where this new fitting is installed. I originally thought I'd have to weld the fitting in a conventional way, and I wasn't looking forward to it because I had to reach down in so far and there are other heat sensitive things in the vicinity. Then I decided to use spin welding and it solved the potential difficulty. I think I included a link to the process earlier in this thread, or in KarenLukens blog. It might be a good idea to ask Oliver what they plan to do with your Elite ll to fix the water problem, and then let us know what they say. -
Fresh water tank modification, new suction line.
Raspy replied to Raspy's topic in Ollie Modifications
Reed, Now imagine that the new fitting I've shown has a TEE in it, between the tank and the top of the pickup. In other words, the new pickup reaches down through a larger pipe with a TEE in it. Off the side of that TEE is a line going to your gravity fill port. This way, you could use the same tank fitting for both purposes, a dip tube and a tank fill. I have ordered 1" fittings for the next installations. This will allow room for the fill port, if desired, and a port big enough to get a small Vacuum hose into to clean the tank. One fitting will allow for the new pickup, a clean out port and a gravity fill port if desired. I did not think of a gravity fill port until you mentioned it, but it should integrate in well. -
That makes sense to me. I just checked and the last three numbers of my VIN are 092. My hull is number 92.
-
I already did mine. I had the undersized spare so I left the cover off and put on a full sized spare. I wrapped a chain around the aluminum piece sticking out of the back of the trailer that supports the tire, and bolted it tight to itself. Then I ran the two chain ends out through the wheel spokes. I then put an eye bolt on the large aluminum bar that holds the tire and put the chain through the eye. Then a lock through the chain ends secures it very well. It cannot be unscrewed. The threaded rod that the wing nut goes on is too long if you leave the fiberglass cover off. So, just unscrewed it, turn it around and screwed it back in. It sets deeper with the jamb nut and is out of the way. Then I put on a cloth tire cover to keep the sun off. It all went very well and fixes the "too small" fiberglass cover problem. Then I installed the license plate to the left of the tire, in a frame. It's bolted through the rear body. I left off the license pate light. Just clipped the wires, pulled them in and taped them out of the way. The full sized spare just clears the bumper to I was able to get the cover on. The wheels must be put on "backwards" to allow the chain and lock to sit in out of the way. This is an excellent mod for those with the undersized spare. I think it would be easy to re-design this mount if desired. A simple flanged spare tire mount would bolt on in place of the setup now used. There is a nice reinforcing plate inside to carry the load. I'm not sure it's a good idea though. If you get bumped from behind the load will be transferred to a much larger area from an inflated tire, and the tire sticks out the minimum amount. The hit going to a small steel bracket is more likely to do damage. Plus, any other bracket would make it stick out farther behind the bumper.
-
Fresh water tank modification, new suction line.
Raspy replied to Raspy's topic in Ollie Modifications
Overland, The dip tube that is in the picture is designed to go all the way to the bottom of the tank and sit against the bottom. It is designed with a bit of extra length to accommodate tanks that may be slightly different from the normal overall depth by dropping all the way to the bottom in any of them. If you look closely, you'll see the end is capped. This particular style sweat cap was picked because it is flat on the end and has rounded smooth corners. In other words, it is very kind and won't dig into the bottom of the tank. All of the water enters around the perimeter of the cap, not the end of the pipe. The cross-drilled pickup holes were drilled tangent to the inside surface of the cap. If you add the diameter of the pickup holes to the thickness of the cap wall, it comes to just under 1/4". The top of the holes are 1/4" or less, from the inside surface of the tank. This arrangement will pick up water down to about 1/4" deep and do it consistantly in any tank it is installed in. As mentioned earlier, mine began to get some air at 6% tank level, but ran until the gauge read 0%. At that point it was sputtering, but still drawing enough water to drink, but not to shower. There are four holes. The surface area of all four holes added together equals about 1.7 times the surface area of the inside of a PEX fitting. Allowing for the vena contracta of the flow through those four holes, the restriction is still less than each PEX fitting used in the rest of the system. I also chose to install brass fittings and a brass PEX ball valve. These have slightly larger holes through them than the factory plastic fittings. So, the pickup holes have no affect on the flow rate compared to the stock pickup. But if the holes were bigger, we could not get as much water out of the tank. This was the only way I could think of that had a consistent pickup depth, could be installed in any tank and always end up with that same depth (with no measuring or possible installation error). It is totally accessible and serviceable, even with the water tank full. It does not affect the original pickup fitting, or the original tank drain piping. And it ties into the existing piping at locations that are accessible, which makes the work much easier than it might have been. If debris enters the tank at some point and clogs one of the pickup holes, it will still work well. If more than one hole gets clogged and a restriction is noticed, the dip tube assembly can easily be removed, without draining the tank, cleaned and re-installed. You cannot do this with the stock pickup tube as originally built. BTW, any restriction that reduced the flow would put no extra load on the pump. They are designed to run fine with a wide range of suction head pressures and they are just diaphragm pumps, which are very tolerant of flow restrictions. These pumps can run dry or at full pressure constantly without damage. They can draw from full or nearly empty tanks without damage. The first thing you might notice with a clog is a reduced flow at the faucet with the pump running. This is the same thing you might notice with a clogged aerator in the faucet, it's the same effect as when the faucet is only partially open. Until my system started drawing air at about 6%, I could not detect a difference in the pump sound or the flow rate compared to before the modification. Then it pumped the air and the water to varying ratios until the tank was pretty much empty. This kind of tank, with wide and shallow dimensions, requires a non standard kind of pickup. It won't get every last drop, but I think it's the best we can do. Having tanks of this shape is a real advantage because they take up so little room, are protected from freezing and are not outside where they could get damaged. Fortunately, the corner of the tank and its piping are right there below the cover under the bed. In the past, I wanted to do some work on the water tank in my Fleetwood, but found it was nearly impossible. This is relatively easy and I was inside instead of underneath. The biggest problem here is making the emotional leap of deciding you are going to make a hole in the tank and then spin welding on a fitting. Once that hurdle is over it is just a matter of doing some PEX and fittings. I think the future ones will have a larger tank fitting bushed down to the 3/4" dip tube assembly. This will help with screwing the fittings together and give a larger hole to vacuum out the tank if needed. -
How to: Santa Cruz locking shotgun mount in the closet
Raspy replied to John E Davies's topic in Ollie Modifications
Never lock up a firearm? Get serious. When I leave home, any that I don't have with me are locked in my safe. If I step out of my trailer to run an errand, and leave one there, it is locked. When my grandkids come to visit, my safe stays locked. -
Fresh water tank modification, new suction line.
Raspy replied to Raspy's topic in Ollie Modifications
Reed, I haven't heard back from Jason. Don't know if I will. Maybe you should call him, since you know him better than I do. We can do your tank at Bandon if you'd like. -
Fresh water tank modification, new suction line.
Raspy replied to Raspy's topic in Ollie Modifications
John, Remember, there is no glue that works on polyethylene. It's inert and that is why it has to be welded. So with any mechanical connection there must be a gasket, or thread sealer or something. Those deck plates have a small O ring and the tank is flexible. Screws would have to go clear through and be nutted. Not a reliable system for a poly tank. I'm not sure there's room to get it in there either. Maybe. I'll look later with that in mind. I'm not confidant that it would hold the sloshing impact of the tank water. If so, and you could get your hand in there , it would be a way to install a bulkhead fitting for the suction line. I don't think I'd trust it. Another way to gain access later would be to install a 1 1/2" spinweld fitting and then bush it down to 3/4" for the new dip tube. Later, if needed, the bushing could be unscrewed to give a large enough hole to get a vacuum hose in. As far as renting/lending the tools, etc. I'm not doing any commercial stuff till I discuss it with Oliver so as to not conflict with their forum rules. It might be possible to rent the stuff and each person do their own work, but that seems unlikely. It might be possible to do the mod at a rally. Who knows at this point. It is definitely a good fix though. It works and it retrofits fairly easily. -
Fresh water tank modification, new suction line.
Raspy replied to Raspy's topic in Ollie Modifications
There's an idea! Plus we could hang out by the river, enjoy the Pine Nut Mountains and remember why it's so nice to be out in the great outdoors. In fact, we could probably host twenty or so right here! Tonight, I'm sitting here after 8:30 PM. Up on the porch and looking at the incredible Nevada sunset. Frogs are croaking, the sky is orange, the scent of sage wafting as the sky darkens. It's magical. A warm high desert breeze slides down the mountain after hot day. We call it the "evening performance" as the sun shadow crosses the eight mile wide valley and the day concludes. It's all worth planning the day around. So, with a barbeque, some great conversation, plenty of room to set up and the incredible Nevada sky, all while doing a few tank modifications, I'd say Yeah!!! We'd have Ollies till the world looked level. And everyone would be able to have more water when it was all done. It's the kind of experience you read about, with incredible Nevada and high desert scenes and stories. Too bad our coyote doesn't live here anymore or you'd all have her sitting in your laps and wanting to start a game. Can you imagine a Nevada sunset with a coyote in your lap? Now there is a western scene! I'll probably sit out here for a while yet. Our dog Gogo, is surveying the yard. Chiming clocks remind us once in a while. The frogs make me wonder about frogs in the desert. Venus will appear soon as the moon waits for the right moment, beyond a distant horizon, to show up. A fading bit of orange, silhouettes the mountains north of us and I'm reminded of why I went for this place to begin with. Enjoy. -
Fresh water tank modification, new suction line.
Raspy replied to Raspy's topic in Ollie Modifications
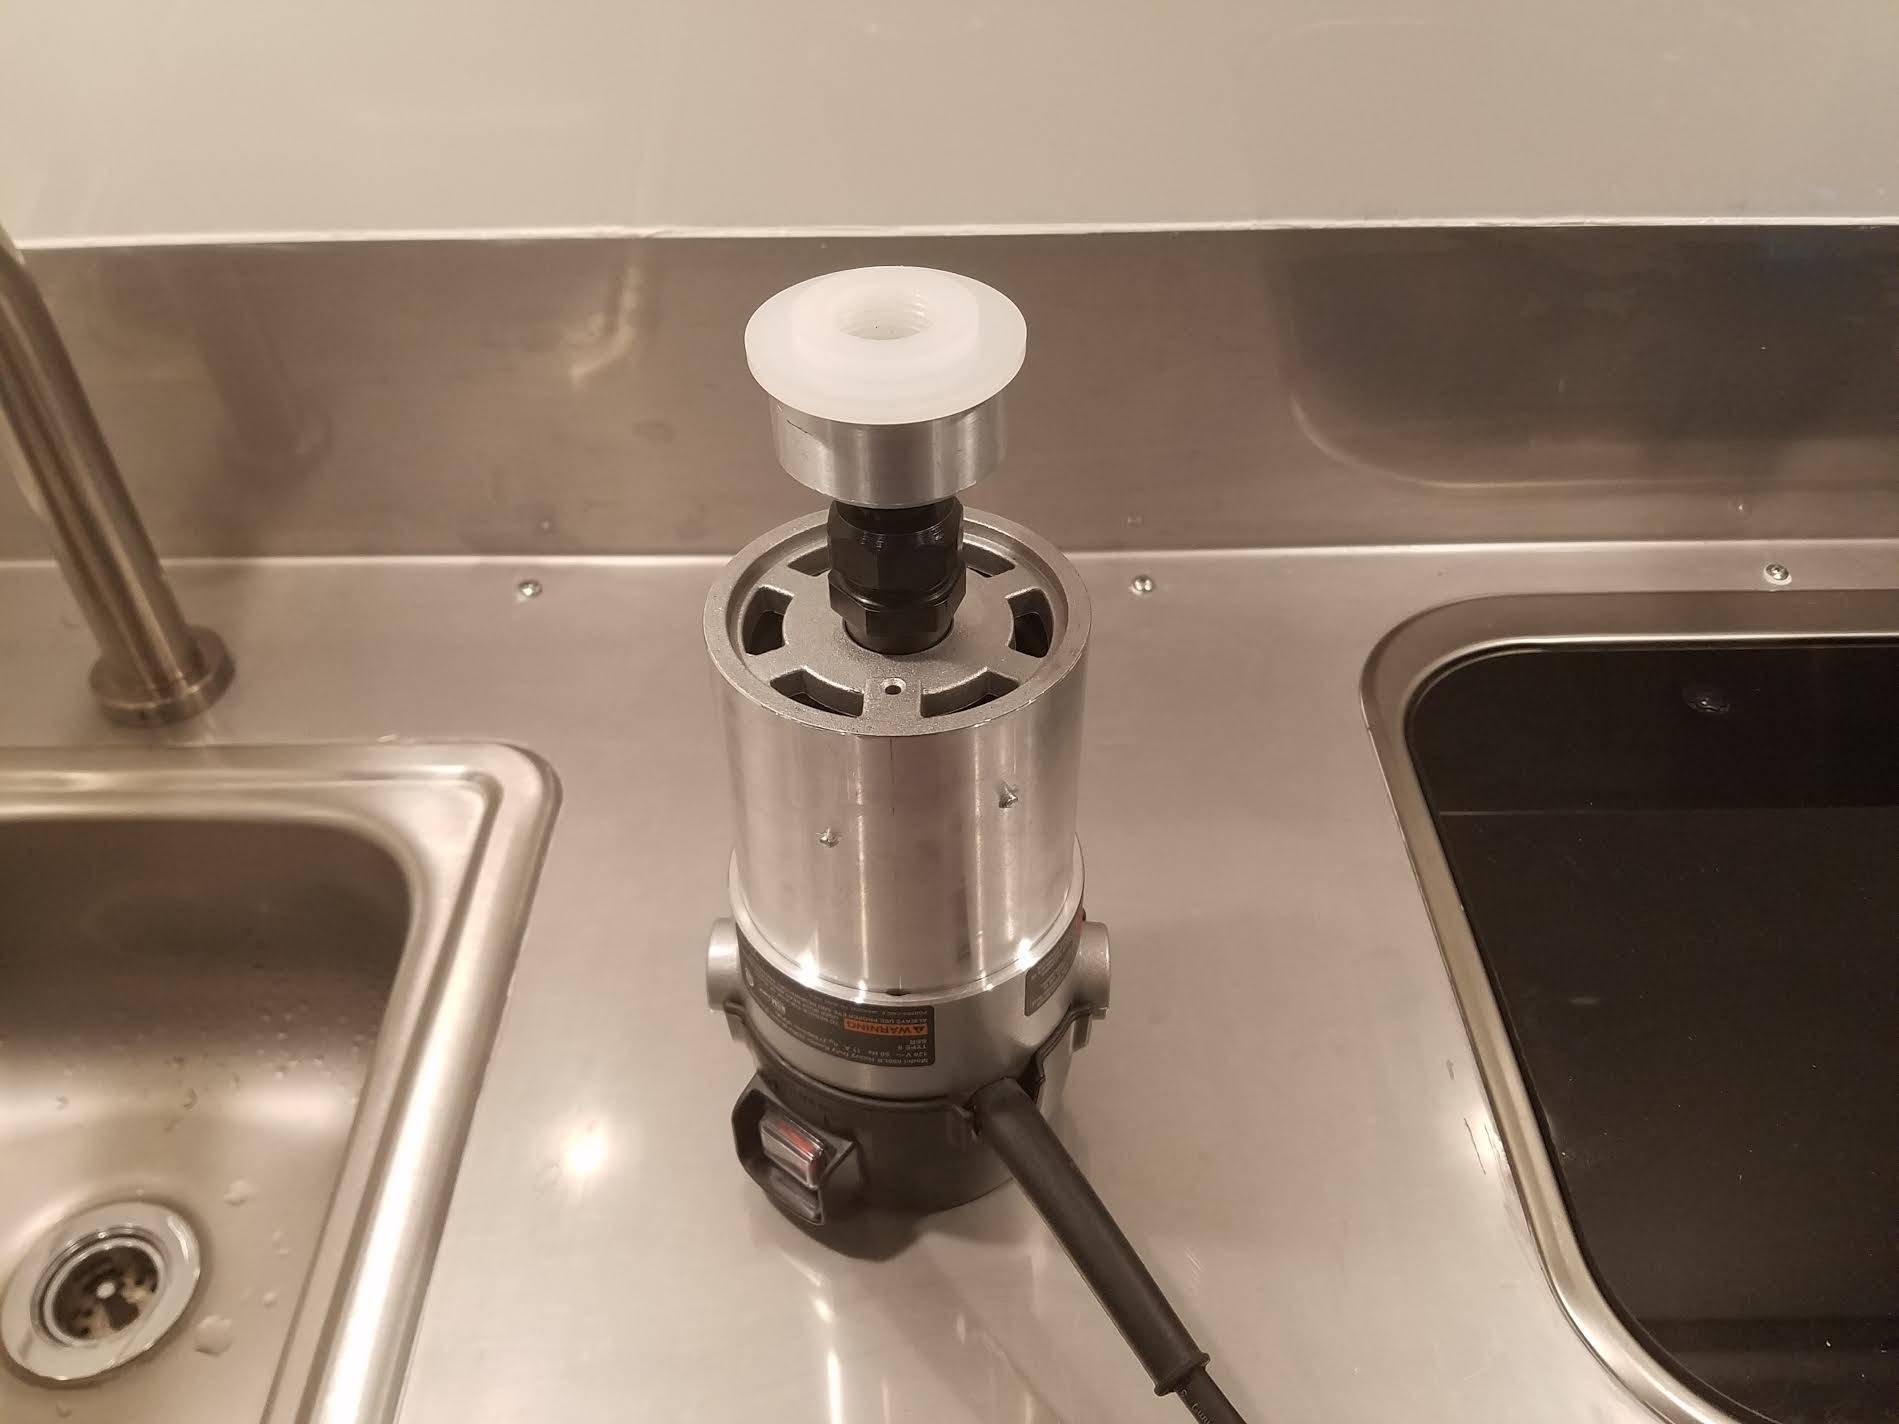
John, The spin welding procedure is very quick and easy, but it MUST be done correctly or it would be a disaster since the tank is in such a difficult spot. I had never done it before, so I ordered the parts and practiced with a couple of fittings on a five gallon flat sided jug. The jug wall thickness is about 1/2 what our water tanks are. It also requires a powerful router with a 1/2" collet. 1 1/2 HP seems about right for these 3/4" fittings. A slight down force that will allow the router to come up to full RPM, the tool held perpendicular to the tank wall, steady but slight down pressure. Two seconds max time and then release the switch. Continue to hold the slight pressure until the molten poly sets. If done right, you'll see melted poly all around the joint and you won't go through and ruin the attempt. I found the pipe thread wanted to cross-thread, so I ran a 3/4" pipe tap into the fitting before the weld. It's remarkably easy, but scary. Here is a pic of the router with it's depth plate removed, the driver installed and the tank fitting in the driver: