
Raspy
-
Posts
666 -
Joined
-
Last visited
-
Days Won
45
Everything posted by Raspy
-

Fresh water tank modification, new suction line.
Raspy replied to Raspy's topic in Ollie Modifications
Pete, Oliver hasn't responded to my phone message yet. I called Jason to talk to him about this, but missed him and left a message. Bu,t they did say, in their open letter, that they were going to hire an "expert" to solve this issue. It's really just a common sense approach to an obvious problem and probably the way they should all have been made. Normally, the side outlet they install would be fine if the tank was a tall narrow design, or had a sump in it. But with a flat tank, the side fitting leaves about 1/3 of the water trapped in the tank. This method completely solves the issue and the fitting can be easily pulled out if needed. Plus it leaves all of their existing plumbing in place and is installed in such a way that is easy to reach. The original tank drain is extremely difficult to get at, so any new fitting that would go through that hole would be so hard to install. I looked at it, but it's not practical to do it that way, plus, no matter what new fitting I designed to go through the existing hole, it would not pick up reliably below 1/4" like this new design does. It took a while to figure this out, assemble the parts, make the prototype and do the first installation with the spin welding procedure, but I think it's the right fix. -
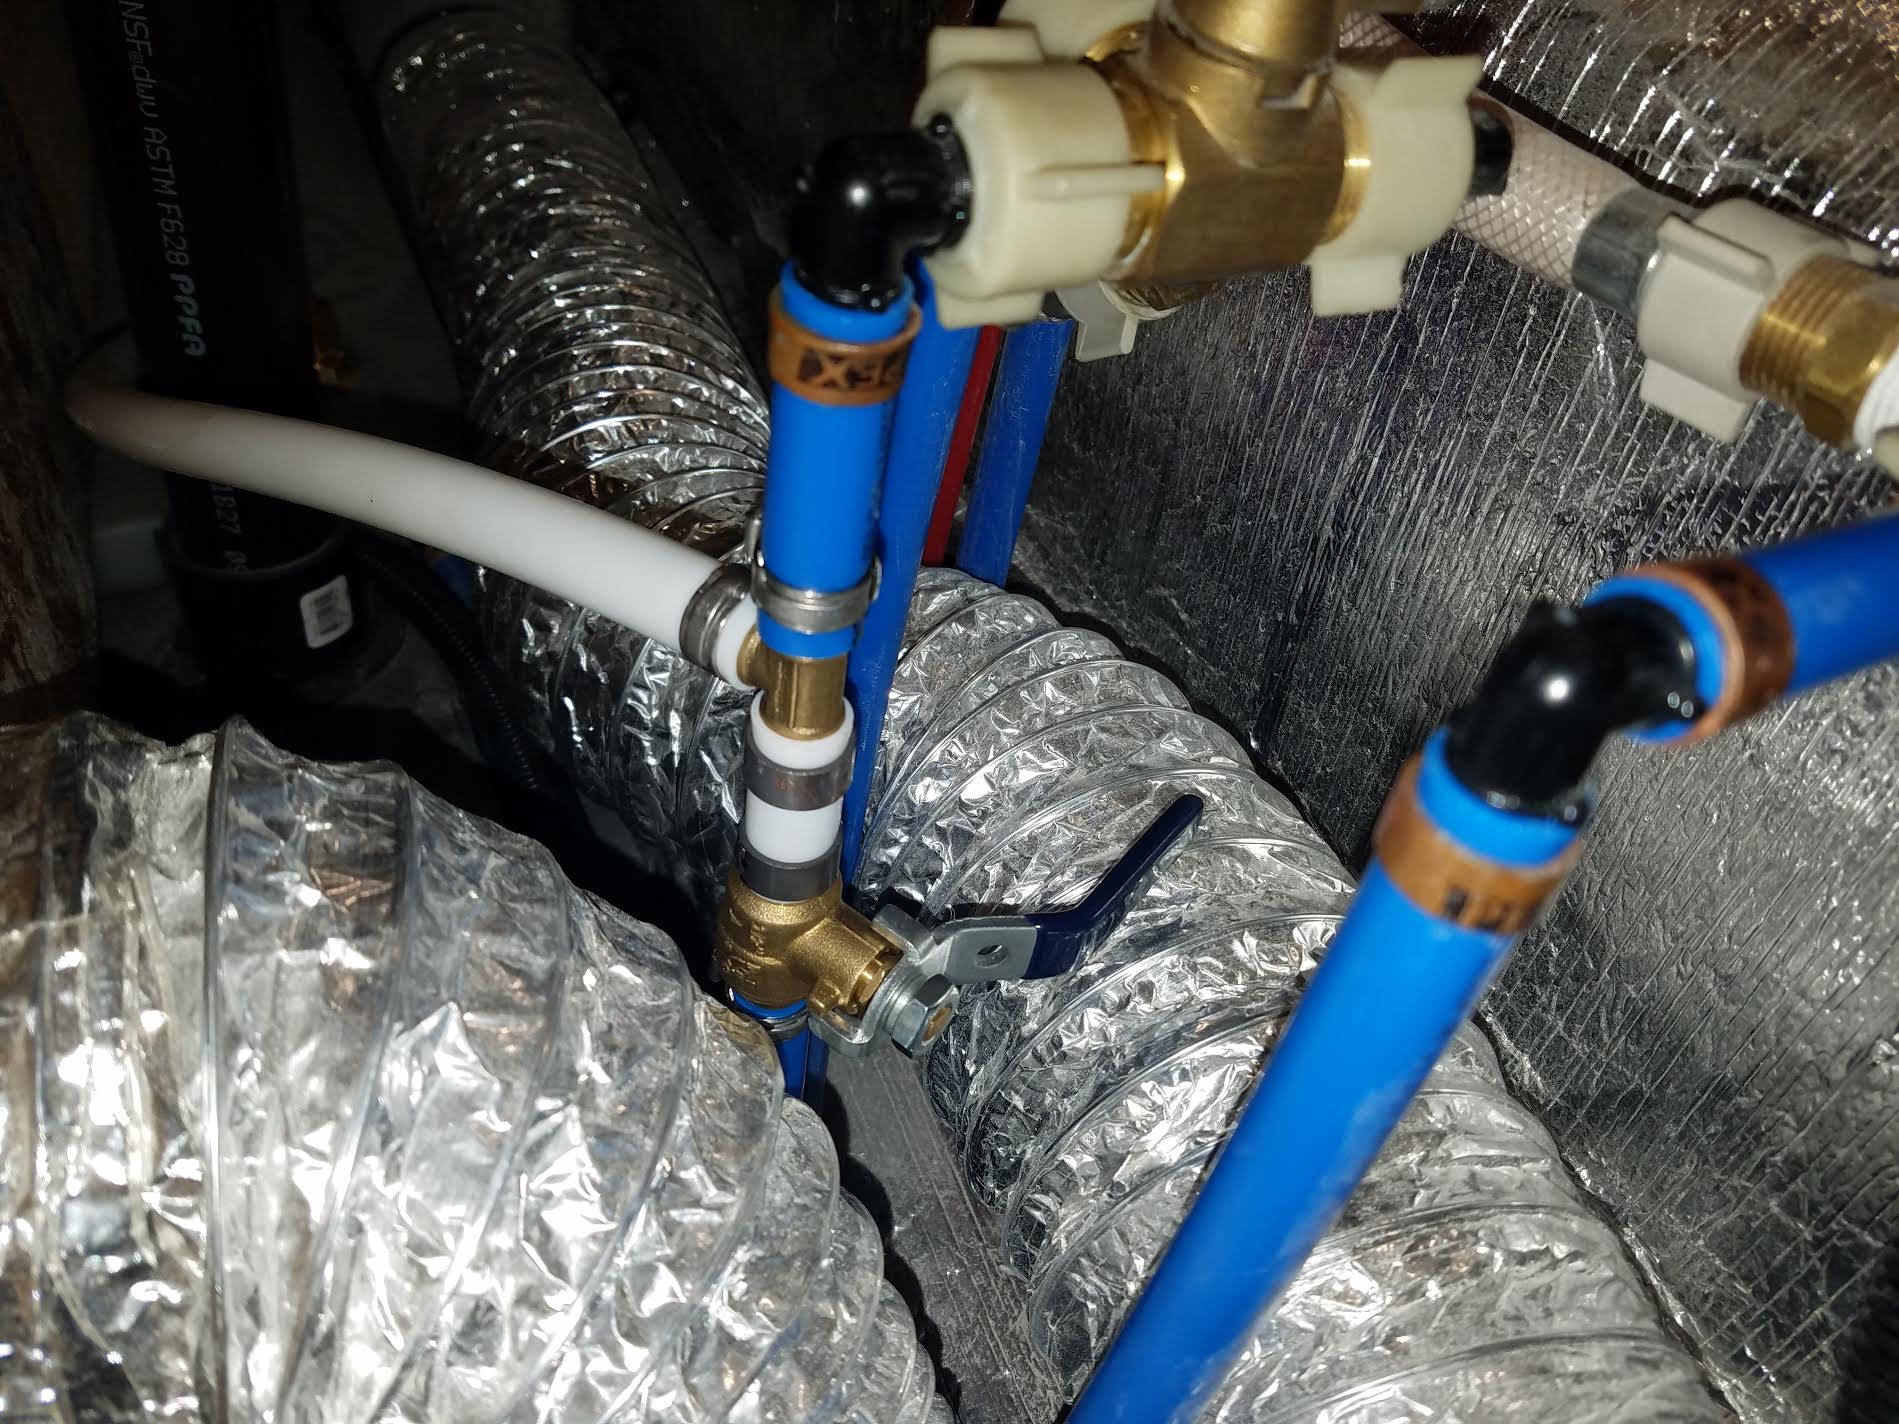
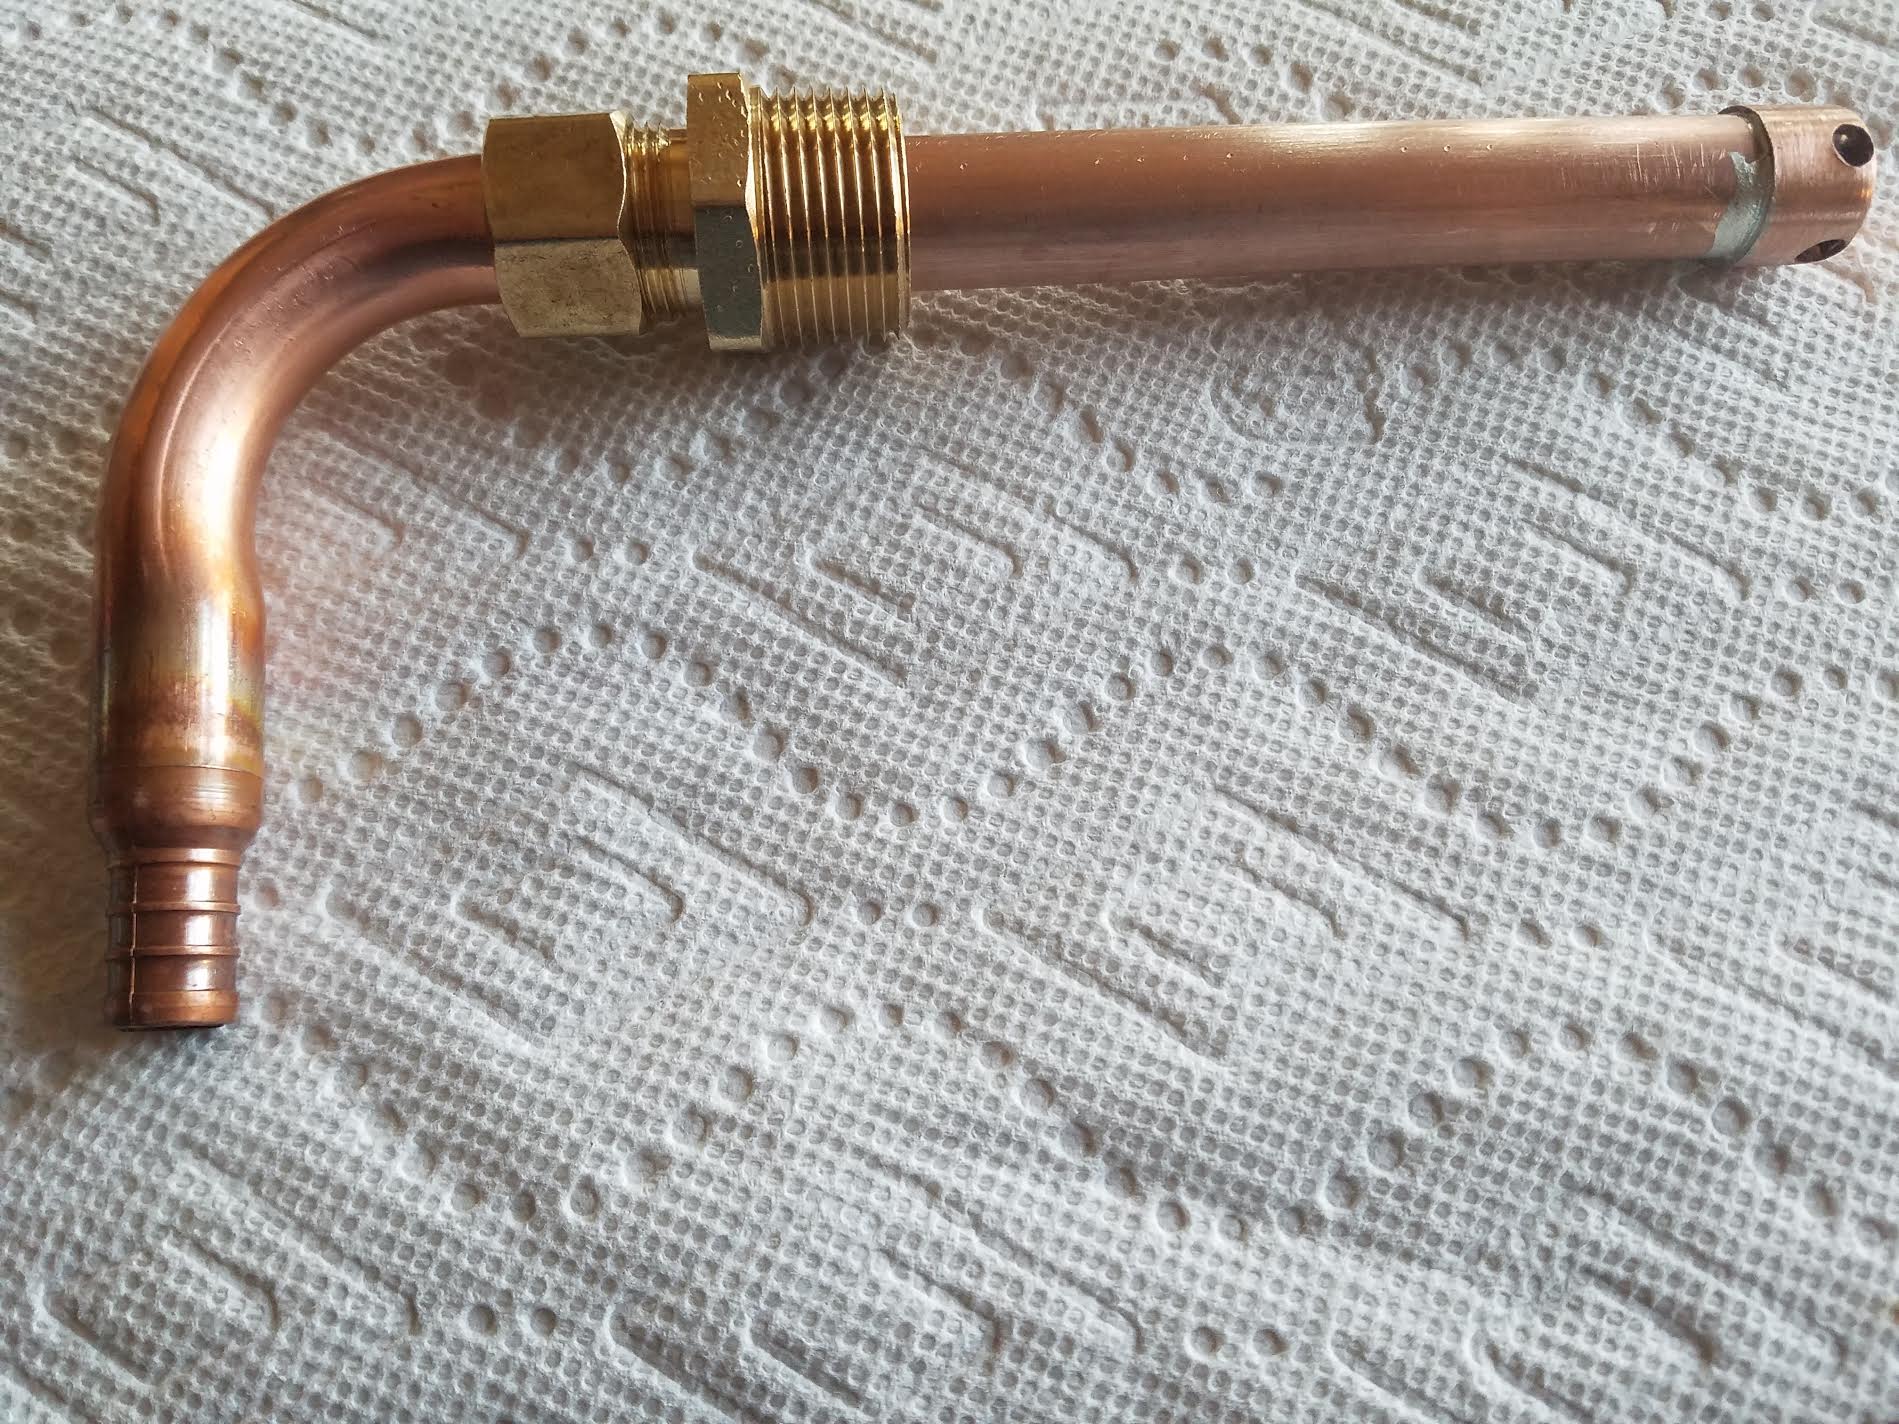
With all the talk lately about not being able to access all of the fresh water in the tank, I decided to make a new suction line and improve the situation. The stock line on mine will only draw water down to about 1 1/2" deep before it begins to suck air. In a 35 gallon tank that is only about 4" deep, this means about 1/3 of the water is not available, or about 11 or more gallons left in the tank. The stock pickup is on the side of the tank and cannot get all the water. So I made a top fitting that goes down and picks up the water at or below 1/4" from the bottom. When I started the installation I leveled the trailer and ran the water until it began to suck air. Mine did that at a reading of 25% on the gauge. If the front of the trailer is raised some, which I did not do, the reading would still be the same when the pump sucked air because the gauge reads right next to the pickup. You could get more water out of the tank with a raised tongue, but the gauge reading would be the same when it sucked air. After I installed the new dip tube, I continued to draw water and it began to suck some air at 6%. So, mine went from 25% (approx. 8 gallons left) down to 6% (approx 2 gallons left) when it began to get some air. Others have reported as much as 38% remaining which would be over 12 gallons. At a 6% reading I began getting aerated water, but a steady flow. Finally, the gauge went to 0% left. At that point is was about 1/2 water and 1/2 air at the faucet, but still flowing, or spitting. But even with a zero on the gauge it continued to pump out another gallon or so before I shut it off. All of this with cold only, not water drawn from the water heater. So, the volume from 6% to 0% was totally useable, probably not for a shower, but certainly for drinking. This is a prototype that works well, but it might still improve a bit with the next one. The pickup touches the bottom of the tank, but draws radially from below 1/4". It adjusts to any small differences in various tanks. It can be pulled out and cleaned easily if debris ever clogs it. All plumbing connections, where the new line ties in, are easily accessible and the existing tank fittings are not touched. The stock tank drain is retained. The area of the tank where the new fitting is installed is easily reached and the tools to do it all fit in the available space. After clearing all of this with Oliver to make sure there is no conflict with forum rules or warrantee issues with them, I can send anyone that wants to do this, a kit with the following: the pre-made dip tube fitting, a Polyethylene tank fitting, the special spin weld fitting driver, a 1 1/2" hole saw (if needed), the pinch ring tool and a PEX cutter. I'll also provide step by step directions for anyone who is interested. You'll have to have a powerful router with a 1/2" collet and a drill to drive the hole saw. Or, I can help you with a set of directions here on-line and you can assemble the parts yourself. The parts required are: (1) dip tube assembly, (1) 3/4" spin weld fitting, (6) 1/2" PEX pinch rings, 24" 1/2" PEX, (1) 1/2" PEX ball valve, (1) 1/2" PEX tee, a small container of Rectorseal 5. The only real tricky part is the spin weld. Besides the special procedure for spin welding itself, you have to make a new hole in the tank and vacuum out the chips. Here are some pictures:

- 51 replies
-
- 16
-

-

-
Buzzy, Your interior looks very nice with the contrast of dark and white. Looks like you added thicker mattresses. What are they?
-
Mike, I think you make some valid points. I didn't realize the infrastructure you mentioned was in such poor shape, or that camping could be that expensive at a military RV park. Yikes! $50. per night! One thing about "pay and benefits stop"; To those that served during war time, the VA benefits continue. I guess it could rightly be called a "benefit" to those that were not injured, but it's an obligation to those that were.
-
It is interesting that out of the approximately 27 categories of people that can use the sites, none of those include the common "honorable" vet. That is, unless he is 100% disabled, and then it's OK. I'm not disabled, but what about those that are 50% disabled? No, that wasn't a sufficient sacrifice to allow camping at a military RV site. Sheesh. What's wrong with this picture? There are 27 categories of acceptable campers, that are all ahead of vets who are less than 100% disabled. Hmmm.
-
I'm not authorized because I'm just a vet with an honorable discharge. Not qualified. Here is a list of authorized users: http://www.militarycampgrounds.us/authorized-users
-
I'm curious about this too. I'm a vet with a VA card. Will that do it????????
-
We have the mirrored finish and have no complaints with it. I also leave the cabinet lights on sometimes at night and we get light from around the perimeter of the doors. Just a bit of cabin light that helps us navigate at night without being too much. I've never noticed any excessive reflection from the mirrors. The mirrors make the trailer feel a bit bigger inside and they break up the white walls and ceiling.
-
Does your bathroom door close tight enough to restrict the heat air recirculation from the bath to the main cabin? Try the heat with the bath door open.
-
Hi Tom and Karen, Sounds like you have a great plan. Retirement soon here too, and then lots of Ollie time. You might also keep an eye on fiberglassrv.com. Used Olivers show up there once in a while and that's where I found my Elite 2. It was brand new and sitting in storage waiting for me. John and Liye (Raspy)
-
John, It seems like we all have the same problem. The top of the horizontal outlet is about 1 1/2" above the tank floor. So when the water reaches that level, air enters the system. And since the tank is only about 4" deep, 1 1/2" is a large percentage of the capacity.
-
Questions about the twin bed settup in Elite II
Raspy replied to carbon's topic in General Discussion
I'm 6'2" and one of the first things I did when looking at my Ollie was to lie down and stretch out. A short bed would have been a problem, but I don't feel restricted. It's a very comfortable place to be. -
I've ordered the parts and should be ready to do mine next week. I'll document it and you guys can see if you like the method. A couple of special tools are required, but the installation won't be too hard. The existing tank drain is retained. Stay tuned.
-
How to: Santa Cruz locking shotgun mount in the closet
Raspy replied to John E Davies's topic in Ollie Modifications
That is a nice installation, but it seems you are relying on a LOT of electronics, some you have no control over, such as the internal Oliver wiring. I had a lighting circuit quit working in my Ollie and had to track down the cause. In the process, I found workmanship that I would definitely not count on to save my life. Troubleshooting in an emergency is not viable. Even something as simple as a dead battery or a breaker being off would stop you. In an emergency, wouldn't something simpler be better? Simpler always equals more reliable. Seems like a 6" .357 revolver in a mounted holster would be more reliably available, quicker to access and perfectly serviceable for all but the most angry bears. If you want it locked, you could have it padlocked in place with the key in the lock waiting. Plus, if you wanted to go for a hike, or wanted both hands free while investigating, it wold ride well on your hip. I understand it wouldn't work in Canada, but electronics can fail there too. I bet you could devise a floor bracket and barrel snap clip that would hold the shotgun just fine. Then an easily released mechanical lock that could be left unlocked while you are home and locked when away, if desired. Absolutely simple and reliable. No back of your mind worry about wether it will work when needed. And, in an emergency, if you had to yell to your buddy to go get the shotgun, while a bear was dismantling your trailer, you wouldn't have to teach him how to release it. -
John, Before you get too wrapped up on the looks, or twelve holes vs ten, or fake rivets or not, look at the wheel specs. Load rating and max air pressure on both styles. You might also look at the fit of each style with respect to the width difference and possible offset difference. Mount each one and measure the clearances front and back. Decide if you like 7" width more than 6" width, etc. Look at the recesses around the lug nuts to discover the clearance for the lug wrench Oliver provides, or if a special socket is required. Compare the stem location on each one. To me, functional design is more valuable than minor appearance differences, and now is your chance to get the best one.
-
How to: Jack bubble level adjustment and indexing
Raspy replied to John E Davies's topic in Ollie Modifications
That whole top piece with the four tabs that contains the "level" is not stable enough to rely on. It can be turned and knocked off level too easily to rely on. I wanted to use it from day one, but gave up on it. After I get the trailer level, I adjust the jack level to match, and the next time it's way off. Also, you may find that the floor is not the surface you really want to use for the level reference. Water tank level, bed level and counter top level are also reference points that can prove to be worth looking at and probably more important than the floor. Once you find the best average for your use, you might find a spot that matches that the best for a leveling reference. Or at least you can lock-in your reference level to match it. Since I can't use the jack level, I have a couple of spots that I use for my standard. -
Here is a link to the Spin Welding process. Using this method might be easier than making a new fitting for the existing port and installing it. This method could be used to add a 1/2"pipe, top fitting, to the tank. There appears to be plenty of room to do this in place. Then a simple PEX or copper dip tube could be installed and piped with PEX to the pump. The existing line would be plugged. This method would fix the existing tanks, in place, and could also be used for new trailers. It would also allow easy removal/replacement of the dip tube if necessary. I have also worked out how to tie the PEX suction line into the pump line in a very simple way. Reed, maybe yours should be the first one done this way. I can go over the details with you to see what you think.
-
I looked carefully at my water tank and fittings today. It is possible to install a new suction fitting in the tank with a bit of creativity. This new fitting could have a pass through dip tube that angles down to get more water. I have a procedure in mind to do this if anyone is interested. The fitting itself is one issue, but the routing of the PEX to the pump is another. It looks to be fairly straightforward if done correctly. Interestingly, the tank is only about 4" deep and it looks like the pickup could be as much as 1" lower, so that would mean 25% lower in the tank which might mean 25% more of the volume available. The real fix for future trailers would be to make a top fitting with a dip tube going straight to the bottom of the tank There is plenty of room for it too. It might be possible to retrofit a top fitting if someone had the right plastic welding setup, but I don't. I'm a little concerned about screwing a new pickup fitting into the existing lower threaded opening on the tank. Those can crack. If they do, they are hard to fix.
-
I suppose it wouldn't be hard to get used to a slightly nose high attitude. In fact, I'm not as particular with mine as you seem to be. I have no idea how you can determine level within 1/2 degree, or why it needs to be that precise. Different places in the trailer don't agree with each other, so it's not that big of a deal. There doesn't seem to be any best place to measure it except maybe the bed or the kitchen counter. The front jack bubble level is definitely not it, the counter in front of the microwave is not it, the floor inside the door isn't it. I've more or less settled on the sink counter top to set my bubble, mainly as a consistent place.
-
John, The only difference on mine was a different size tire, but identical wheels. Are your ties all the same size? I think you have the EZ Flex setup, is that right? Looks to me those may need Locktite on the pin nuts. John
-
Dave, You cannot glue PEX. It's inert. In this case, if you findt he right diameter tubing to slip into it, you could use it on the pickup side where there is no pressure. Much better to go with a copper crimp ring on a barbed PEX fitting. If you want to run copper through your fitting and then connect to PEX, get a PEX fitting and solder it onto the copper. Or, at least a compression X female 1/2" and screw in a PEX X 1/2" male. That setup might allow you to get it into a very tight spot. If you look at my earlier post I described the fitting I think will work best. Reed, I'm gonna run my tank down tomorrow and see how far it gets. Probably the same as yours. Then I'll work on a fitting with the stuff I have here. I suggested Rectum 5 because it doesn't harden like True Blu. Not sure which might work best, but 5 works well on plastic. Another possible choice is aquarium silicone. Just don't use teflon tape.
-
The fitting on the tank appears to be 1/2" pipe thread and it looks pretty tight there. So maybe the new pickup could have a piece of PEX already crimped on that was about a foot or so long to get it out to where it could be coupled. I have a very good PEX crimp tool that will get into tight places. It's about the shape and size of a medium Channel Lock. We could just cut the pickup line back where it was accessible, and take out the old fitting. Mark on the new one with a felt pen where it should end up with the pickup facing down. Crimp on the short piece of PEX. Screw it in and connect it to the cut suction line. Done. One place to be careful is to not over-tighten the new fitting and crack the tank. Those welded on fittings are a bit delicate. Best to use some proper pipe dope, like Rector Seal #5 and not teflon tape. Some people refer to me as the "Pipe Dope", but we don't have to go into that.
-
It looks to me like the fitting shown will work if cut correctly to just clear the bottom of the tank, as long as the port is no closer to the side than the bottom. That fitting would be easy to make and it will fit through the port.
-
Reed, Can you measure your tank outlet fitting and see if it the same as Dave's measurement shown above? 'll measure mine too and we can see if there is a difference. We might be able to make up some new fittings and be done with it. John
-
Dave, That general idea looks doable. The inside piece could be cut to just clear the bottom of the tank when screwing it in and then a PEX line crimped on. It seems like Reed may have more of a problem than that because he seems to only get down to about 30% and that lower fitting looks lower than that. I know it would begin to suck air and spurt at the faucet at some point, but his, and possibly yours ,seem worse than others. If all tanks are the same, with the fittings the same distance from the bottom, we could just make up a bunch of fittings and make sure everybody got one. And Oliver could copy them, or they could begin to pull from the top of the tank. I'll test mine tomorrow or Saturday and see what I get. I haven't noticed the problem yet. John