
jd1923
-
Posts
1,112 -
Joined
-
Last visited
-
Days Won
33
Posts posted by jd1923
-
-
I use a less known brand of high-temp wheel bearing grease. You can see the specs in the picture. I bought a 10-pack online for what 3 tubes costs at the big-name auto parts stores.
Then I remounted the head plate. The gasket was firmly in place on the top aluminum plate and came easily off the pot-metal casing below. I didn't want the torn gasket, as you had seen earlier. I love this gasket sealer, Permatex High Tack. I've used it on almost any gasket that requires a dressing, for the last 30 years. Just brush it on and you can wait as long as time takes for assembly. It remains tacky, will not harden but seals extremely well. Works on gas, oil and water seals, so no water is getting into this and next time it will remove nicely.
I hand-torque the mounting bolts and lastly positioned the cross pin and tapped it into place. It went in much easier than it came out. When removing this pin, do not be afraid to hit it hard, punch centered, with a short heavy hammer. You can see the access hole in this photo too (photo take prior to applying grease).

-
Time to reassemble the jack. You want to get ample grease under the main drive gear. There is a spacing between the washers on the underside and I made sure this groove was packed. Then I thought the housing area under this gear should be filled with grease. Don't forget the washer which you can see in a picture above. The first time I pushed it in, it did not sound right. So, I added a heaping tablespoon more grease and the second time I could hear the correct swoosh sound, with excess grease coming out around the edges. I made sure every tooth on all 3 gears were greased and applied some on top.

-
 2
2
-
-
12 minutes ago, Steve Morris said:
... and of course USB specs change (now going to USB-C as standard.)
The Samsung TV Monitor installed here has USB-C port to connect a laptop, for charging and likely for many other uses.
-
2 hours ago, Frank C said:
Our 2019 Elite II has that 12v fuse panel in the attic next to the EMS remote display... There are a lot of variations in Oliver trailer builds over the years due to component substitutions, options and production line deviations/on the fly changes. We’ve joked on this forum that there probably aren’t any two identical Oliver trailers, especially in the early days of the first couple hundred trailers.
Frank, thank you for sharing your pictures. You would think the opposite would be true, where early in production they would have variations and later they would standardize on best practices. Love the pic John shared. I mentioned in another thread that this model is the "lost in Space" version!
I had a feeling that those of you with power awnings would have this subpanel, which makes sense requiring the two 20A DC circuits. We old hulls have the manual Fiamma awning, manual as in will hardly ever use it. Dual power awnings - priceless!
-
1
-
-
13 hours ago, Steve Morris said:
I added the funky panel. 🤣 It is fed from the 12ga wire that used to go to the 12V cigarette outlet... It is actually a much cleaner install behind there than any of Oliver’s jumble of wires. 😉
Now that I understand this panel is an owner's addition, it's really less funky, and instead it's actually very good work! In a manufacturing environment, it would be odd to work it that way. They would want a full assembly to mount quickly, and I agree yours is a cleaner install. Good use of the 12V outlet feed, since you have multiple 12V DC appliances. I have these cigarette lighter style outlets in the OTT and my TV and do not use any of them. I prefer the ones that have the USB built in. My A/V installation is all 120V AC, but I do plan to disconnect the same 12V DC source to connect a bedroom fan at some point. Thanks Steve.
-
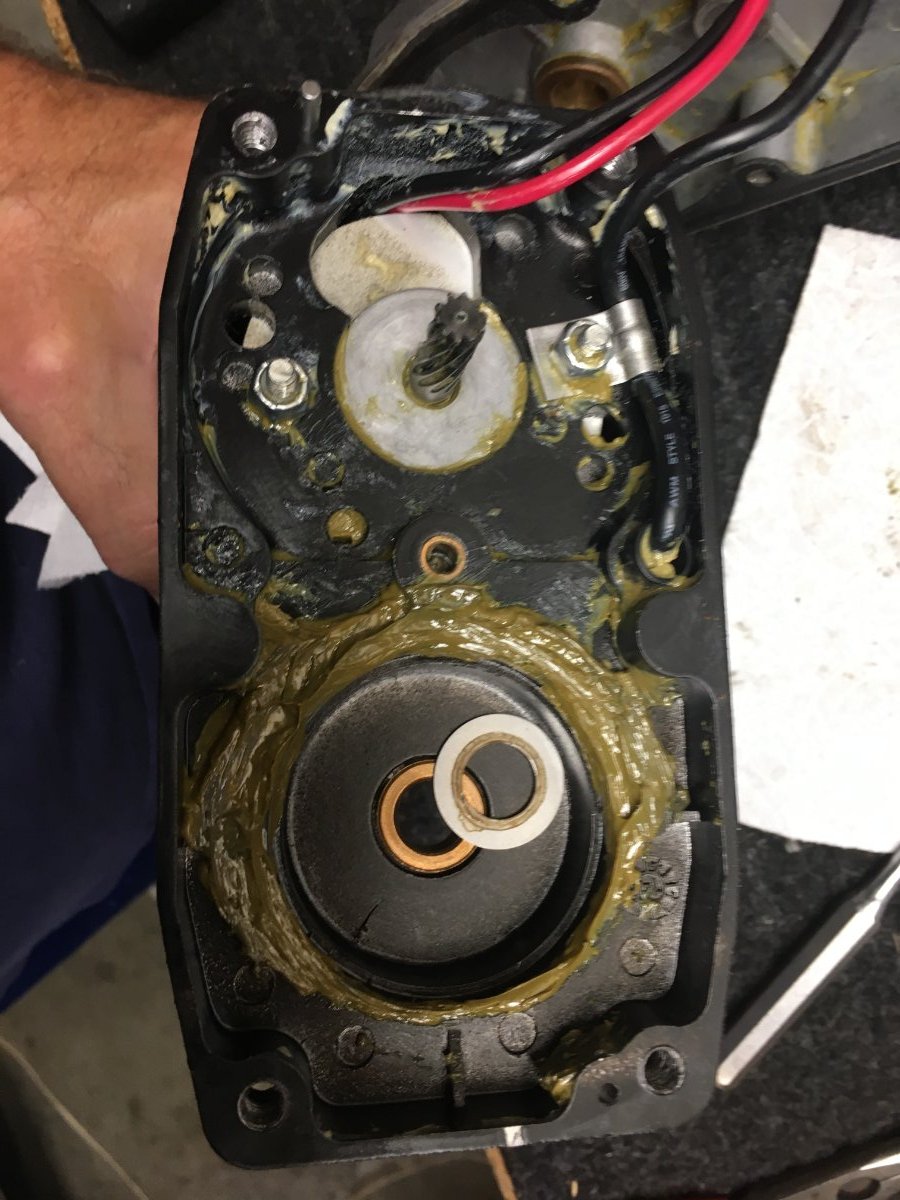
The bushings were not worn, but have an odd loose fit, that you would not see in auto applications, like in a water or oil pump. The only worn part I observed was the motor drive gear. See the pic. The relay gear contacts this drive gear at the top portion. It appears the bottom of this gear has cut into the drive gear some, might be some of the noise and the only way to replace this would be to purchase a new motor. It's good enough for now.
-
 1
1
-
2
-
 1
1
-
-
Next step is to thoroughly clean everything. Often, it's suggested to use a brake cleaner spray, like CRC Brakleen, but I try to use these seldomly, for several reasons. One good reason is they're $6 a can, and if you want the environmentally friendly version, it's $10 OTD (and works less effectively).
First, I pick out all the grease with an appropriate-sized screwdriver, large to small. Then I use a plastic detail brush (see pic), removing grease and wiping on a paper towel. I remove ALL the parts I can, and soak metal parts in old gasoline. I like to use what I have in my shop, and we always have old gas (after dirt riding we always drain the carbs on our bikes).
Note the dark gray color of the gasoline. I brushed and wiped these gears thoroughly and the dark gray is the metal suspended in the gasoline. It's good to have compressed air to blow parts clean.
-
1
-
-
You should notice from the pics (previous post), that I took my rebuild another step and punched out the cross-pin that holds the main drive gear into the housing. The picture shows the punch, the pin, gear and housing. Note the hole, that you would drive a punch through to remove the pin The pin can be punched either direction, as both ends are tapered. I was worried at first, trying to eyeball the thinner side, not!
John previously mentioned the black metal powder/shavings in the grease. Top of the gear was old and hard; bottom of the gear was soft, well used and rich of burnt metal.
-
2
-
1
-
-
Well at least another member opened this old thread, this year of 2023, before I did, and I thank you. After reading everything here, I jacked the front up high of our Oliver, and placed it on a jack stand. I started pulling the cover off the VIP3000 Power Jack and then remembered from JD's post, that I should first remove the power head.
You want to pull the head, using the 5/32" Allen key, and work the maintenance on your shop workbench. First thing I noticed is that the main driveshaft had a 1/4" play up and down, that cannot be good! Then I stripped down the parts, looking carefully at the gears and bushings. Let me show you a few pics first.
I do not have the pic when I first opened the top casing, but of the insides. But, like John wrote, the old brown grease is "cr@p." Not his words exactly, but to quote one of our lovely forum members. Thanks 😉
-
1
-
1
-
-
On 1/30/2023 at 10:18 AM, John E Davies said:
Stop on by sometime, you can take a look, I do not plan on opening it up myself for quite a while. John Davies
I could not agree more! LOL, thanks John. Now that I did my front jack, and the amount of short local travel we do, ask me again in 2028 and I'll service this again! Doing such maintenance annually is indemnification from the manufacture's legal department, not required.
-
1
-
 1
1
-
-
On 4/24/2020 at 6:10 PM, John E Davies said:
I have never opened up a jack, they are all starting to get a little loud, so I decided to service the front one. I don't remember them being this loud when new: .... John Davies
I listened to the audio clip, and mine is certainly loud too. I want to first thank JD, for publishing this years ago! I read this first and it saved me time. I'm going to add my rebuild that I worked today. Thanks for reading!
-
15 minutes ago, rich.dev said:
We have a 2023 and there’s no DC sub-panel in the attic.
Must be for specific options. Steve, or somebody with such panel, please let us know how the fuses are marked. Thanks
-
Thanks Steve, for your addition. Wish I had your SiriusXM package! I never thought I would want Sat radio, before traveling in the west. Our local FM stations fade quickly, and we have to seek 2-3 different stations, just driving from home to the Phoenix valley.
Yes, you need a TV to include a TV tuner for broadcast TV and a decent antenna, roof-mount will have greater range. We can hardly get broadcast stations up at elevation. At home they bounce the Phoenix digital broadcasts off Mingus Mountain and we get about 30 stations, all but NBC. Camping we can get a few stations or none.
I wasn't interested in 12V DC A/V components, since the Blu-ray, Dish Wally and most require 120V AC. I never fear running the inverter all day & night with this solar/battery setup. My last RV had less capacity (315 AH AGM and 1800W inverter), a system I installed, and it was always adequate to play music for hours, watch TV at night, and make coffee, run microwave in the morning, before the sun is strong. Out here in the SW you can count on sun 9/10 days!
It amazes me, the pictures I've seen, how newer OTT models have a 12V DC sub-panel in the attic. Love to know what all the 12V fuses connect to. Ours does not have this sub-panel. And what a funky install, with each wire running through its own separate hole in the panel! My side panel removes easily, and I mounted the TV monitor power supply behind the panel.
-
22 hours ago, Ralph Mawyer said:
So, is it feasible to run with one or two for three days, with minimal draw? Best way to do it?
It appears you have 4 6v batteries, therefore you must run 2, 1 battery is not feasible, as two 6v batteries must be wired in series to produce nominal 12v.
You have wiring diagrams above, but simply stated, you must connect the + post of one battery to the - post of the other. Then connect positive feed to the trailer to the remaining + battery post. Lastly connect the ground by connecting the final negative battery post to the trailer ground.
Positive automotive battery cables are usually red, and negative/ground cables are usually black. Installing in the order described here is safe and will not allow a short across your tools, when adding ground to the batteries is the last step.
-
1
-
-
I have what appears to be a marine-style master switch under the street side bed. I'm also new to Oliver. I have not yet tested this to see if it disconnects all power (batteries and solar charger). Of course, shore power can be simply disconnected. The solar charger should feed the battery bank only. There should be a main battery cut-off switch and if the switch under the bed does not perform that function, I will add a master cut-off switch soon.
I also find it hard to believe you'd have to wait overnight or 1-3 days with power disconnected from the inverter for a hard boot. Charge capacitance of the inverter should dissipate in minutes. If not, you can create a draw at the inverter output (connect a light bulb or any resistance) to force the drain of residual power.
-
5 hours ago, Boudicca908 said:
Is there a diagram for that? I didn't see one in my manual. Does the LP go to the WH first, then the furnace, then back to the stove and fridge?
I have no idea of drawings yet, and would like to locate some too! I just got under the trailer again and noted where the line was going up, right where on the exterior you can see the furnace and HWH, which both us LP gas.
-
1
-
-
On 7/23/2023 at 8:52 PM, John E Davies said:
Your early hull did not come with upgraded suspension, was that added at any time? John Davie
John, you and others reading might be interested in this. Your question got me looking at the old maintenance records. Our Hull 113 made its way back to OTT twice, April 2018 and May 2021. In 2018 it received the EZ FLEX upgrade, new Atwood furnace and another page shows "Replaced gas line to furnace and performed yellow jacket gas and function test." The LP line is wrapped in an automotive plastic wire loom. Our Oliver received major upgrades for 2018 (pic below).
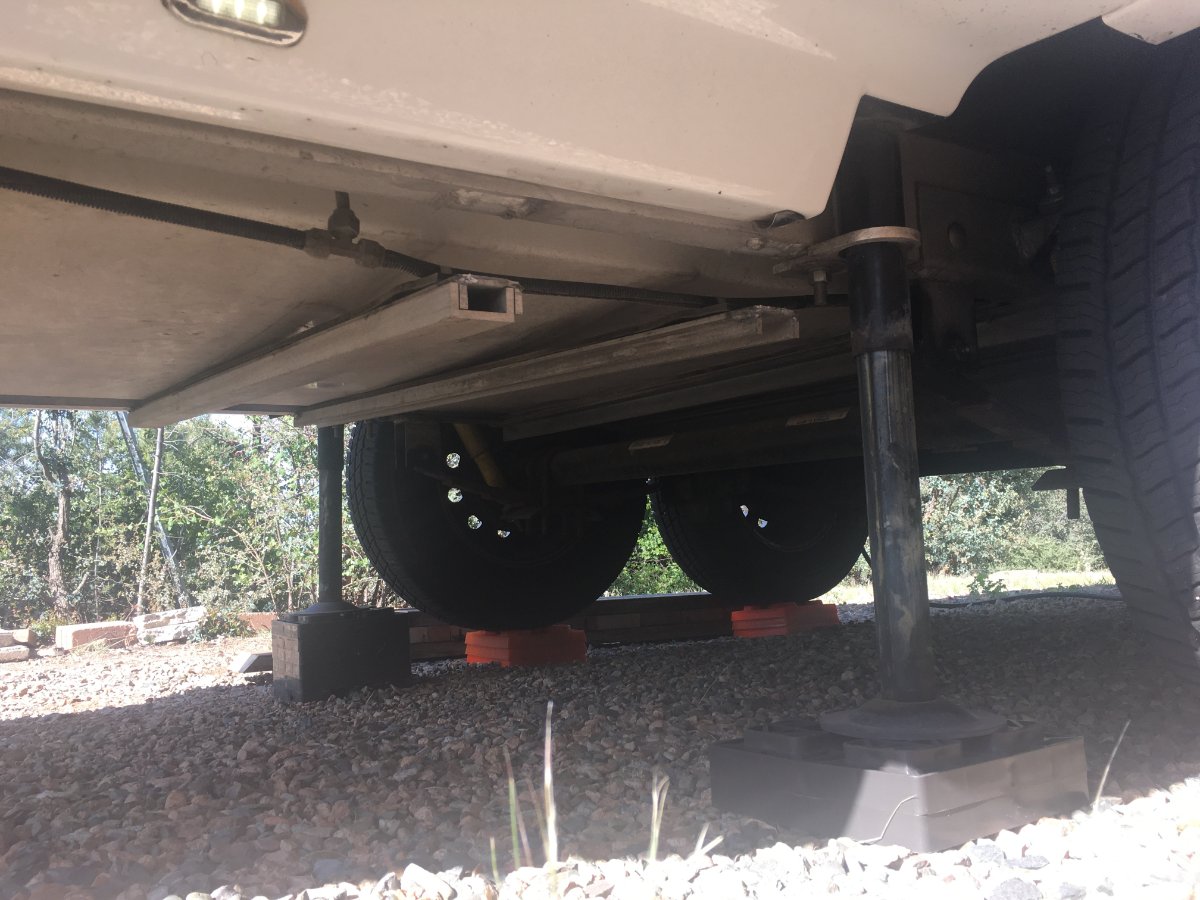
I imagine the welds broke in the year after OTT serviced the trailer May 2021, because certainly they would have seen it. The breaks looked 1-2 years old and it must have come from the rigid tires at 80 PSI. The 2018 receipt also shows new Monroe shocks, the ones on the trailer are yellow, looking like Bilstein from a glance, but perhaps Monroe also used yellow paint. I will know when I service them and will remove the shocks to bench test, replace if worn.
I imagine prices would be 2x today!
(Tried 3 times to get this photo right-side up.)-
4
-
-
BTW, after looking again under the trailer, the vertical LP line runs to the HWH and furnace, not the kitchen. We did inspect this and the grommet had shifted up after the repair. BTW, in our older OTT, all, yes ALL of our grommets need replacing. We put a little dum-dum on the LP line to the furnace. All three grommets in our battery bay are bad, subject of a later thread. Thanks
-
1
-
-
Thanks again, John, SeaDawg and Geromino John and you're welcome Boudicca908. It's the reason I posted this.
We did a 3-day trip, just to check things out, but I'll be working a whole lot of maintenance next few months. We travel mainly Jan-Apr and it will be in excellent shape by then! In fact, we just had a monsoon, temps dropped 20 degrees and I pulled my TV in the garage for new headlights and a suspension/brakes check. Next job will be on the Oliver, pull the wheels, pressure-wash all the old grease away and whatever I can hit on the underbelly. Then remove all the Dexter parts I can for cleaning, pack bearings with new hi-temp grease, open the brakes, full M&R on everything! And I will certainly review the appropriate JD posts, yes.
The other thing I did today was to yank all the interior blinds off, OMG how dirty behind, and OTT installed new ones just 2 years ago. I brought them indoors and Chris will detail them and clean the inside of the Oliver windows, with the AC running of course, as I'm working other maintenance.
Yes John, I do have the Dexter EZ Flex, so I guess by your account it must have been upgraded. We are fortunate that two prior owners, brought this Hull in to OTT a total of 3 times. One spent $4K just 2 years ago, including the new blinds.
I already have them down to 60, and I'm thinking 48 PSI. I like that number. I agree that the load tables state 45 PSI is enough. I wonder, how many miles are on this trailer? All at 80 PSI, ugh.
-
3
-
-
34 minutes ago, John E Davies said:
What were the tire pressures when you first checked them? John Davies
Yep, they were 80 and I believe all former owners ran this trailer at 80 PSI. Do you think that alone could cause alum welds to fail?
This does make good sense! And let's say the habit was to leave home or campsite, black and gray empty, fresh and HWH full, making the right-rear heavier and that's where the welds failed!
-
2
-
-
Most RVs come with 2 lead acid batteries, less AH per battery and no solar. You should be fine, as long as you do not plan on consecutive days of boondocking.
-
2
-
-
9 hours ago, John E Davies said:
I think it is very good that the sagging crossmember did not break the gas line. If you haven’t already, take a very close look at all the propane lines...
The first thing welder said was, "That wouldn't be an LP line, would it?" I said, "Yeah, the tanks are off and I released the gas in the line." and he proceeded without worry. There is a little kink in the line, as you can see front of the T, but it holds pressure, so I left it as-is. Yes John, good observation. The vertical line is right there, going up to the kitchen (edit: Furnace and HWH) which could have been damaged. We camped 3 days, just after fixing this and if there was an interior leak, I certainly would have smelled it. I would think it would be difficult to eyeball/follow that line along its entire length. No sag, no fiberglass damage visible.
CRM and rideandfly, thanks for your comments. I'll bet there will be a couple hundred OTT owners getting under their frames this week!
-
6
-
-
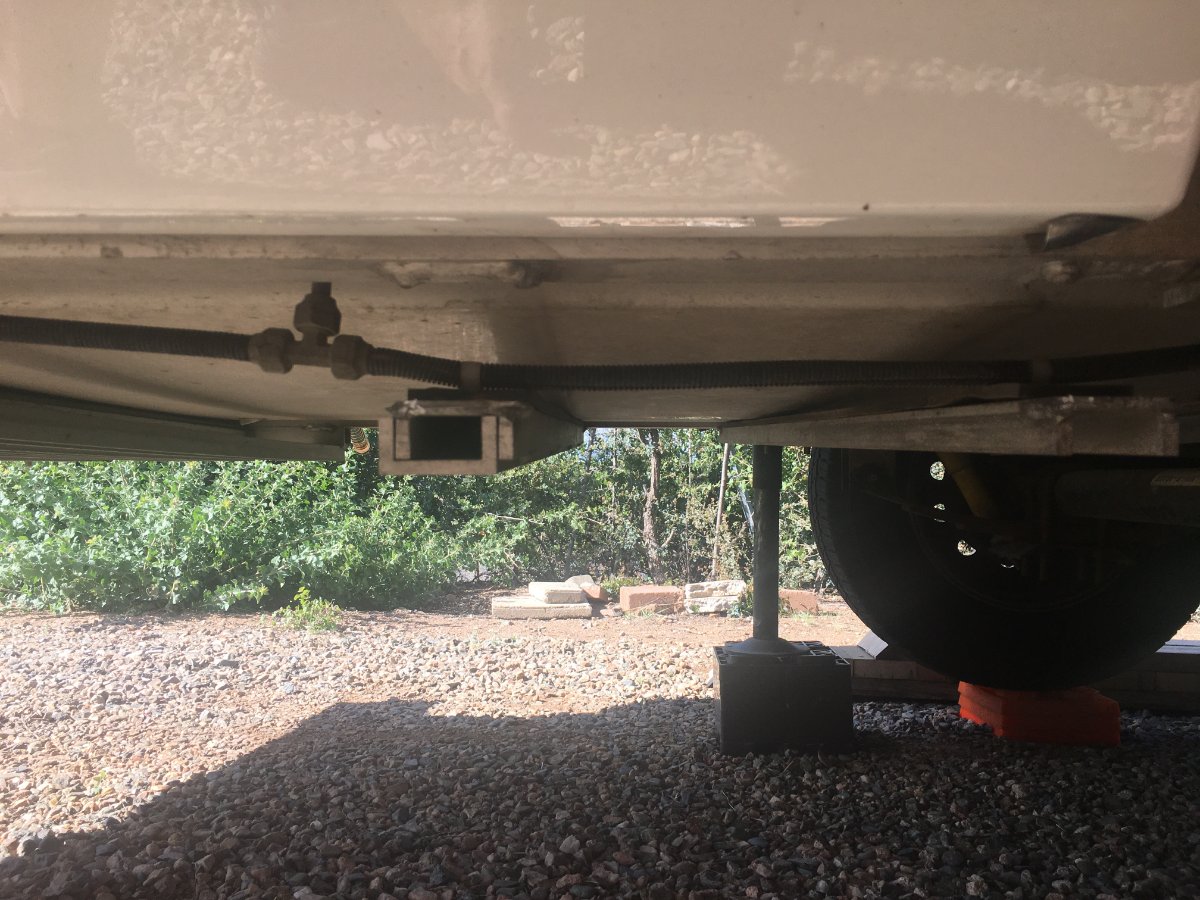
I just thought I would make others aware of an issue I found, go figure just the week after we bought our older Oliver EII. I can't remember a time, when purchasing a used car or truck that I had not laid on the ground inspecting the bottom side, left, right and front to back! For some reason, when we first viewed our OTT listed locally for sale, I did not look underneath. I think I was enamored by the beauty of and cleanliness of it, along with I felt we were just looking, and I wasn't thinking I would spend this kind of money on a TT. Later we closed the deal over the phone. Paid for it 2 days later and the prior owner brought it to our home.
I was down low installing 6" hose extensions on all the hose inlets, and I thought it was a good time to inspect underneath and could NOT believe what I found!
Pictures to follow. I found 2 broken welds, curbside the first two right behind the wheels. OMG, my heart sunk! I called the prior owner. He thought I did it by overdoing the stabilizer jacks (not). He said he recently greased the Dexter components and he could swear the damaged was not there before (again, not). You could tell by the aluminum corrosion that these had broken some time ago.
I'm not asking for help here, as I found a guy in town who runs a welding shop and does contract welding for many metal artists in town. He repaired this, charging an hour $75. Most of the hour was setting up for aluminum welding and creating a heat shield. I believe he used MIG. I gave him a Ben Franklin and it was done prior to our maiden voyage a few weeks back.
I had no idea the aluminum welds would break at the contact point. The OTT welds must have been defective when the frame was built (edit: OTT likely welded this fine, later replies show this to be 80 PSI tire pressure). I called OTT service to ask about this and other questions, and the rep really had little to comment.
My reason for writing this thread, is to let others know and to suggest that if you haven't looked under recently, it is a good idea to inspect your frame soon and regularly. Thanks for reading.
-
3
-
 9
9
-
-
2 hours ago, Mike and Carol said:
I need to do the same. Haven’t used it in years. For us, Sirius/XM is enough. Mike
We have SiriusXM in two vehicles (not our new tow vehicle) and we occasionally play music via their app on our phones. It was a challenge to get SiriusXM to charge us for 1 vs. 2 receivers monthly. We argued that we generally drive only one vehicle at a time. How much would they want for a 3rd receiver in our TV or OTT?!
Chris synced her phone via Bluetooth to the wall mounted Furrion audio system, so we can play SiriusXM. However, unless we install a SiriusXM antenna/receiver in our Oliver, we could seldomly use SiriusXM when camping. Many of our campsites out here have little to no cell service. No way a SiriusXM antenna/receiver can be integrated to the archaic Furrion systems.
Dish Network has many music stations too, and we can get that anywhere. We often play a jazz or country station while playing our favorite Rummikub!
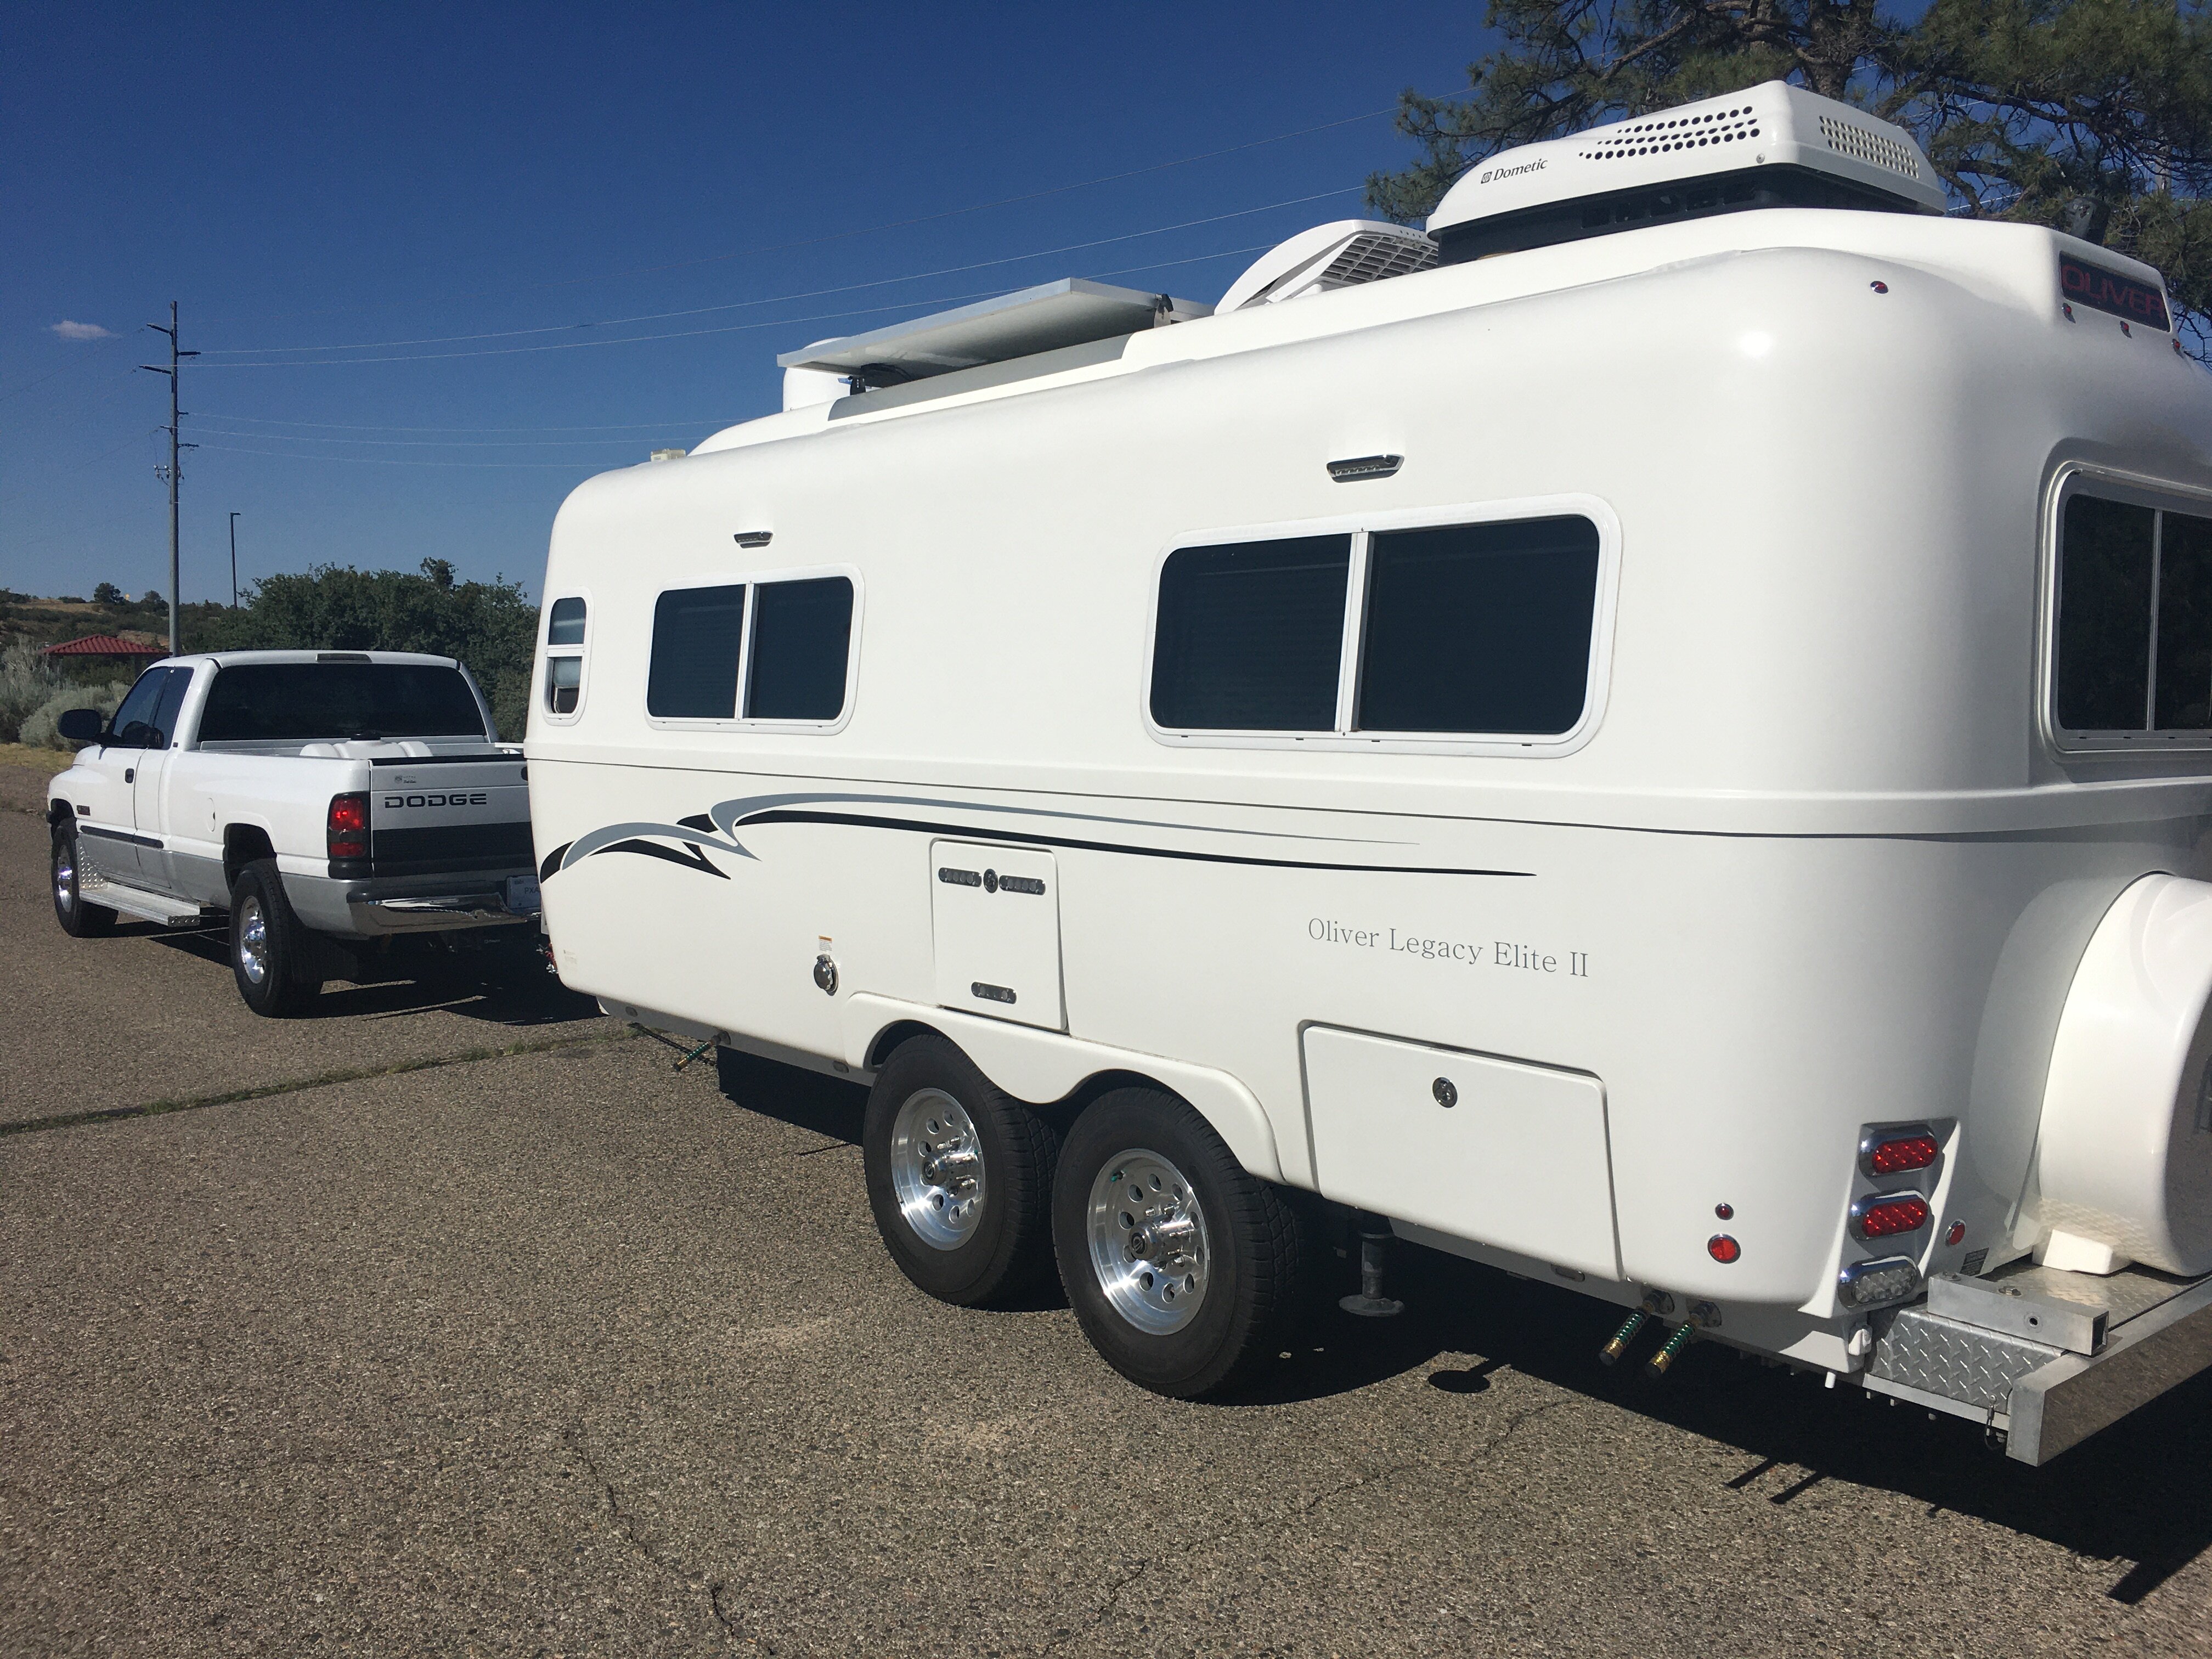
Any of you ordering a new OTT? Let them know you want a white wall-mounted receiver (if you can find one, or at least silver) with higher quality speakers in the corners with white covers. Look back at the first picture I posted. What are the only other black objects in the photo?
I may upgrade the audio system a few years down the road. The speakers could be upgraded, for sure, though something like this might add a simple cosmetic touch (not sure of correct size): Amazon.com: uxcell 2pcs 6.5" Mounting Hole Diagonal Distance Speaker Grill Mesh Decorative Circle Woofer Guard Protector Cover Accessories White : Electronics
I understand there is a way to turn off speakers in the current system. I'll have to figure that out, because the one by the dinette, just over your head, needs to be off when sitting there.
Mike and SeaDawg, delete those old dusty TVs, clean up your space visually and save about 20 lbs. in the rear of your Ollies! And btw, thanks for taking interest in my installation thread, even though TV A/V is not your thing!
-
3
-


.jpg.11894c8ac32e66551fc762500823f4c9.jpg)


HOW TO: VIP 3000 Electric Stabilizer Jack Service
in Mechanical & Technical Tips
Posted
Doesn't she look pretty! It did not look like this when I pulled the head! It's hard to do this work without getting the wheel bearing grease here and there. So, take advantage of that. I pushed and rubbed the grease in every nook-n-cranny, every piece of plastic and metal and the grease removes the dirt and corrosion. Kept rubbing with clean paper towels and this is the end result.
When I started this, there was a full 1/4" up-n-down play in the main shaft. By packing grease under the drive gear, there is now no play at all - hope this lasts!
I need to mount the head and clean the main jack post. I'll get back in a day or two to show that. When the head is mounted, I'll spray a little Super Clean on the head, brush it some, and hose it off to remove any remaining grease.