jd1923
-
Posts
3,646 -
Joined
-
Last visited
-
Days Won
281
Everything posted by jd1923
-

High Pointe Convection Oven Tripping CGFI Breaker
jd1923 replied to 2008RN's topic in Mechanical & Technical Tips
So your GFCI breaker on the Xantrex is protecting shore power also in any 120VAC circuit wired through the inverter. It runs your microwave which runs on lower wattage, likely rated at 1100W and using closer to 900W. Why can’t a 2KW Xantrex inverter produce or even allow pass through shore power to the rated 2KW? It would be nice to know how many amps the oven was pulling after 5 minutes, but I’m pretty sure it was nowhere near 2KW. If you can somehow reconfigure it to produce spec, or replace the inverter with a more capable unit, or rewire the oven to be used on shore power only. I replaced mine since we require to run our oven and our A/C unplugged. -
High Pointe Convection Oven Tripping CGFI Breaker
jd1923 replied to 2008RN's topic in Mechanical & Technical Tips
Straight-forward test! We travel with this 30 ft 12 AWG extension cord. With our batteries, I can even plug in a friend who isn’t off-grid capable! 🤣 https://a.co/d/01Nv8L4h -
High Pointe Convection Oven Tripping CGFI Breaker
jd1923 replied to 2008RN's topic in Mechanical & Technical Tips
I would not jump to that conclusion. Think of this as a next step in testing. If it doesn't work, meaning your oven blows a 20A non-GFCI circuit breaker, then your oven is drawing too much power and should be replaced. If it works and your readout still shows it's using about 11A +/- then it's the GCFI. Once it has been determined that it's working in the above test, then look into the Xantrex. It's likely the low-power cutoff, but check out these posts. Too bad in the first one the OP never wrote back to communicate cause (this happens too often). In Bill's post a hard reboot solved his issue, or it could be something else. My fix for a 2KW Xantrex was to replace it with a 3KVA Victron MP2! 🤣 https://olivertraveltrailers.com/forums/topic/11320-xantrex-inverter/ https://olivertraveltrailers.com/forums/topic/9255-xantrex-inverter-issues-try-a-hard-reboot/ -
High Pointe Convection Oven Tripping CGFI Breaker
jd1923 replied to 2008RN's topic in Mechanical & Technical Tips
I'm thinking you mean the GCFI 20A outlet you are plugged into had tripped. Your EMS readout displayed 12A which is the total input amperage from shore power, which would include the Xantrex charger if it was in fact charging at the time. Sounds like a temperamental GFCI to me and it's not the first time I've read this story on our Forum! Glad our home was built in 1980 when only bathrooms had GFCI outIets. If it was my garage or exterior outlet that I used for shore power, I would replace it with a standard 20A outlet, regardless of code. Or add a new 30A breaker to your service panel, run wire and a 30A dedicated outlet for shore power. This is what I did where we park our Oliver. Not running on the 2KW Xantrex? Check and lower your shut-off voltage setting which is often the case with Xantrex inverters (not Victron). Your oven pulling only 11A (12A - 1A) should run on any 15A household circuit, let alone 20A. And 11A on 120VAC is equivalent to 110A on 12VDC which translates to 1320W, which again should run on a 2000W inverter with a lot or room to spare! Could the oven be defective? Not likely, since it started up and pulled a measurement read by the EMS. You could think it's the oven since it blew on two power sources. But the microwave works. The oven must create a power spike the GCFI protection doesn't like. The only way to be sure is to connect to a shore power source that is not GFCI! The 30A shore power outlet at any campground are not GFCI outlets. Next time I need a GCFI outlet is the next time I take a shower with a live blow dryer in hand! 🤣 -
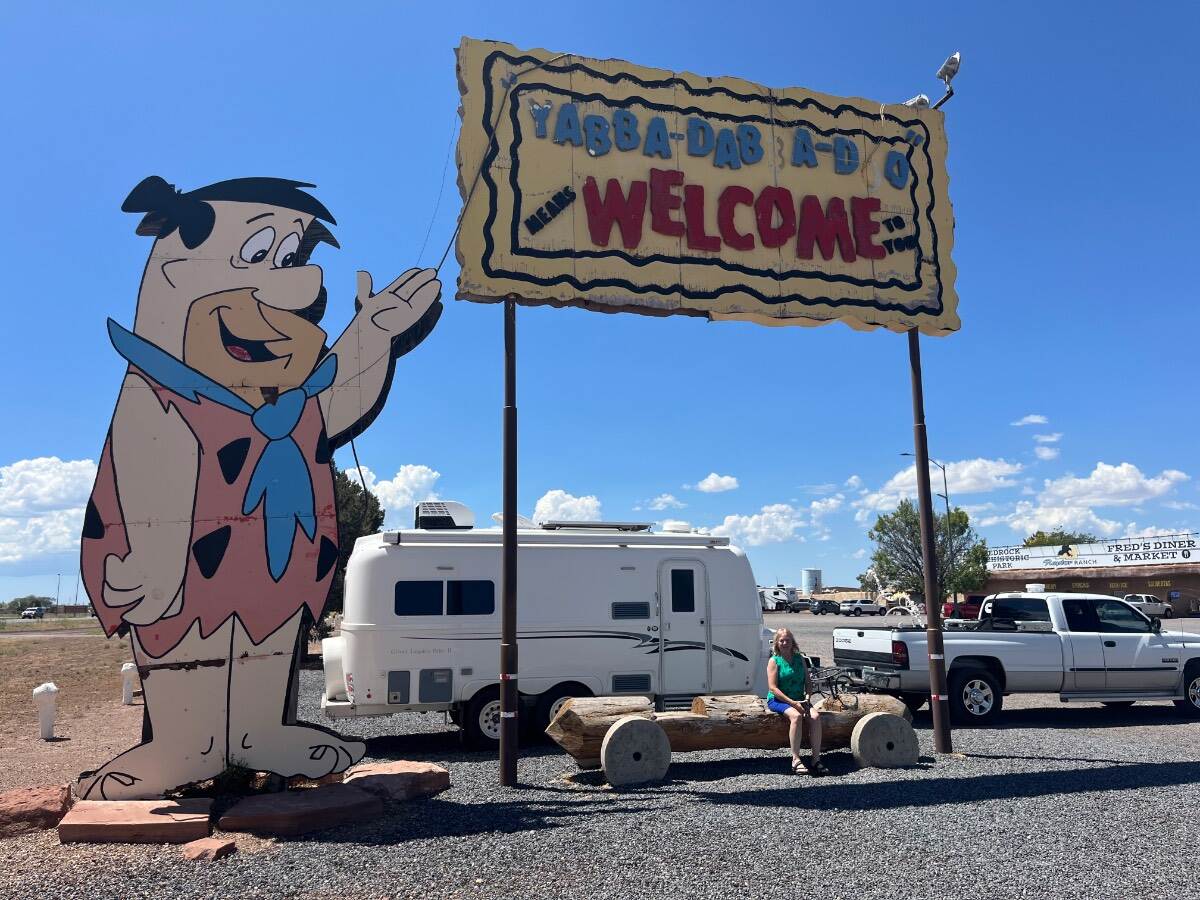
We have pics from our first visit too, 21 years ago.
-
You must not recognize the icon Flintstone metal statue built in 1972 near Valle AZ, road to the south rim of the Grand Canyon! It must have been pretty cool back in the day! We didn’t go in but backed in for this special shot. I’ll bet Fred would have loved an Oliver! 🤣
-
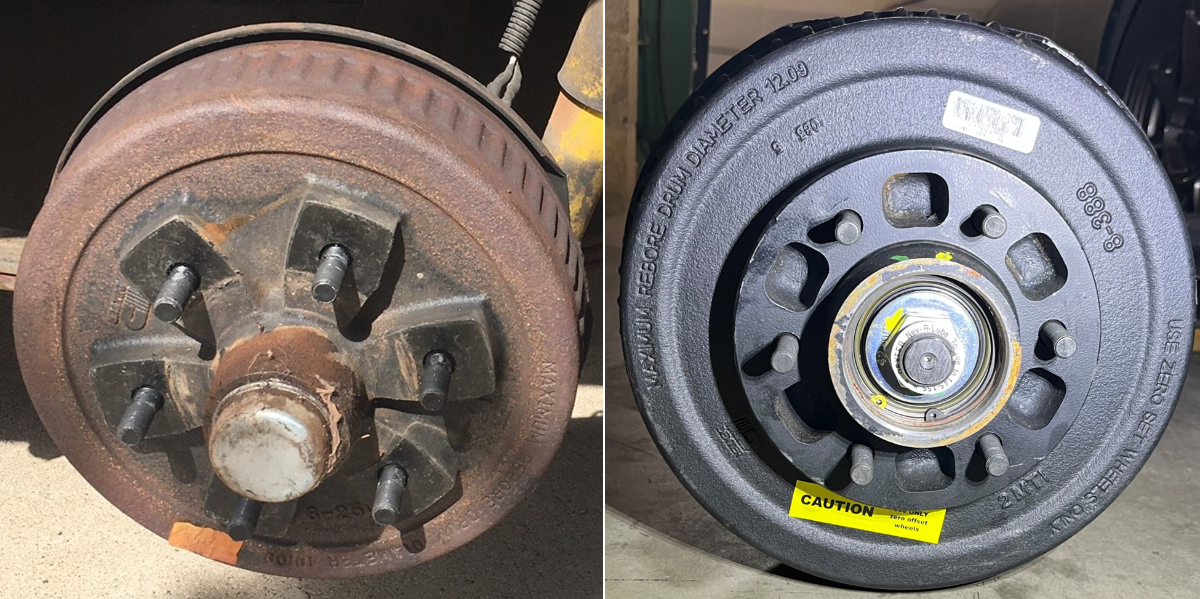
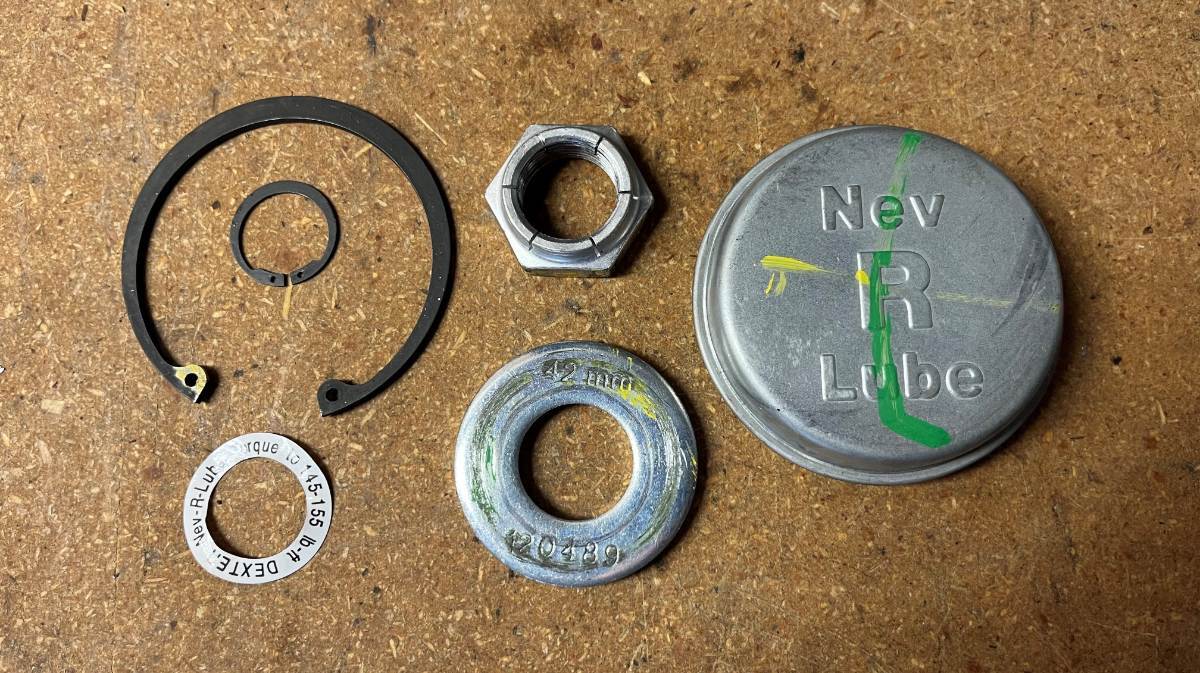
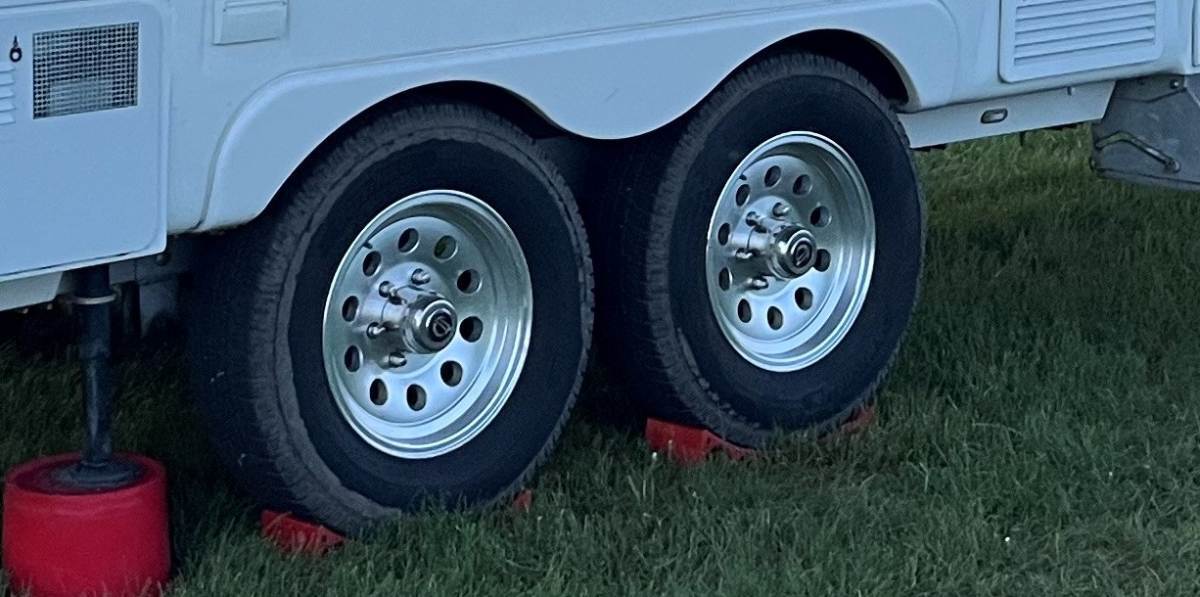
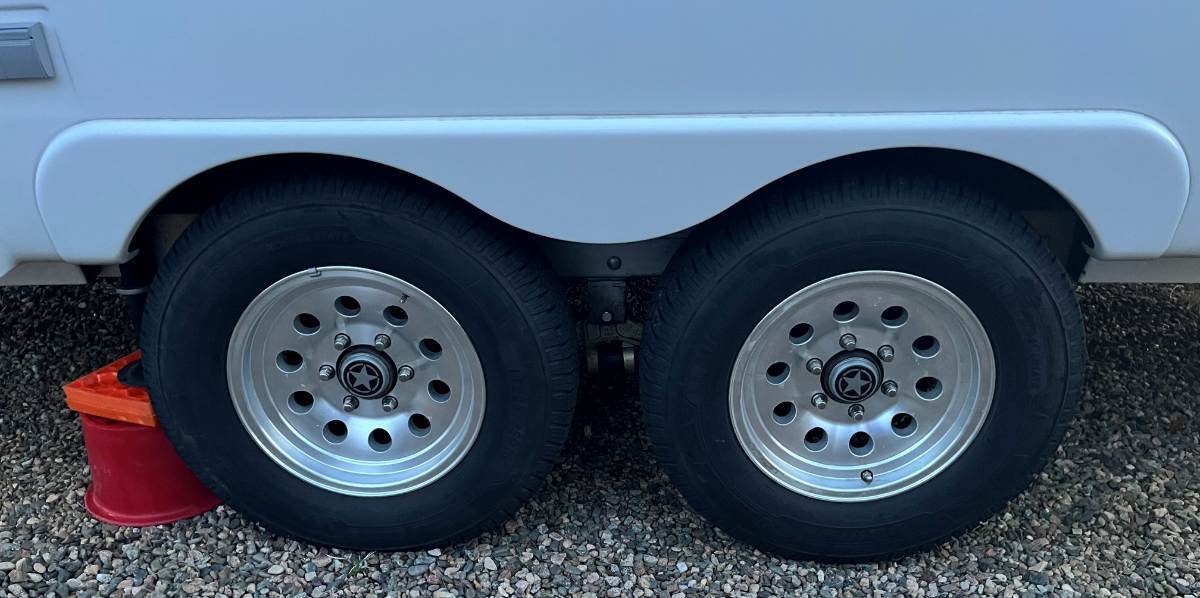
New axles may not fit all older sub-frames
jd1923 replied to Wayfinder's topic in Mechanical & Technical Tips
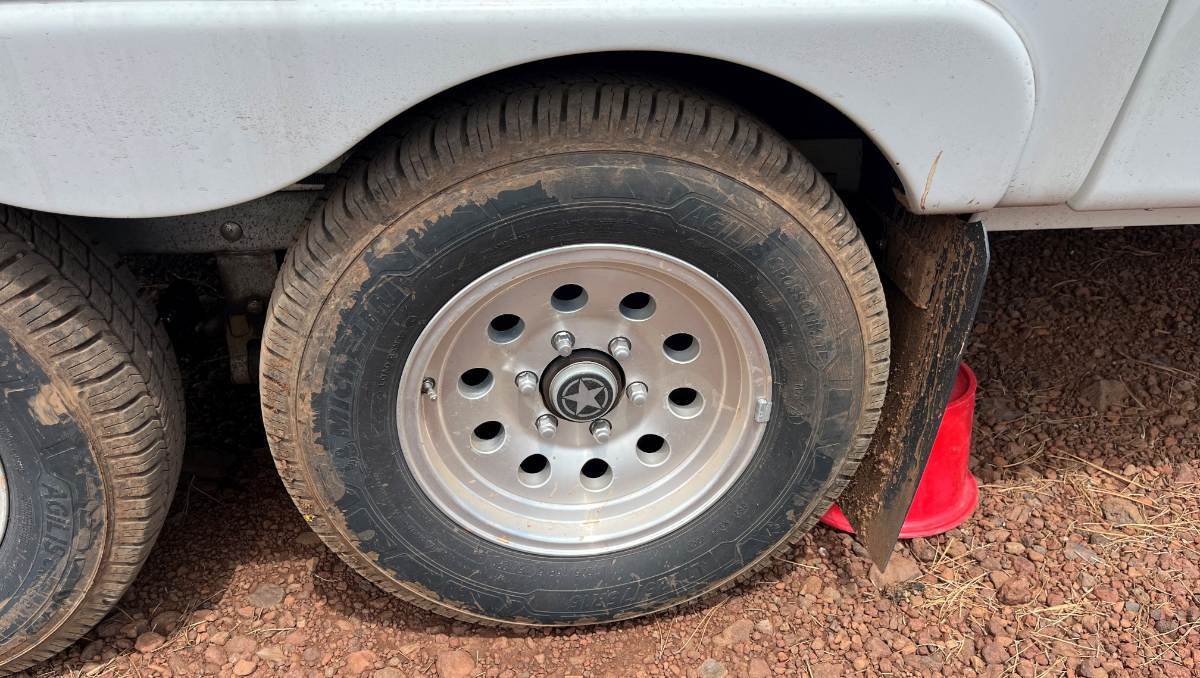
On the left are the standard D35 axles, 10" brakes. The hub is extended further out with the old standard bearings. On the right, we have Nev-R Lube axles with the flatter hub, protruding about as far as your lug nuts. Parts pic shoes the embossed Nev-R Lub dust cap and then before and after pics. With the Nev-R Lub bearings it makes sense to loose the big center caps which are no longer necessary, designed to fit over the original standard bearings. It would be nice if they made a flatter center caps, but emblems over the dust caps work fine.
-
New axles may not fit all older sub-frames
jd1923 replied to Wayfinder's topic in Mechanical & Technical Tips
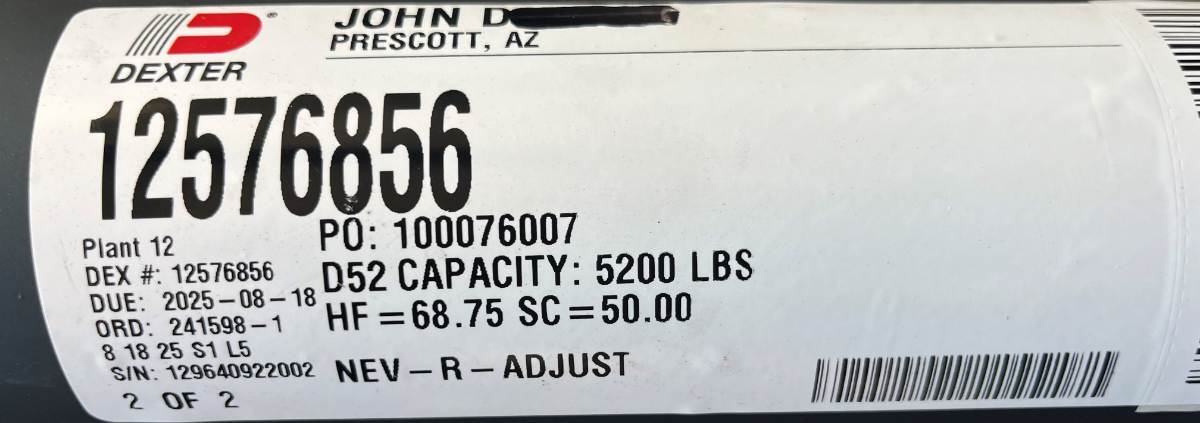
They also write Nev-R Adjust on the D52 axles with Nev-R Lube bearings. My label is similar except mine are SC = 50.00. The only hint of Nev-R Lube are on the bearing dust caps.
-
Custom Mud Flaps for the Tow Vehicle and Oliver
jd1923 replied to jd1923's topic in Ollie Modifications
@taylor.coyote, please post a picture when you have yours installed! Road tested, heavy monsoon rains on the highway, and puddles on the FS red dirt roads. Mud only in the wheel wells. Behind the flaps, no mud build-up. I've got some pressure washing to do next week!
-
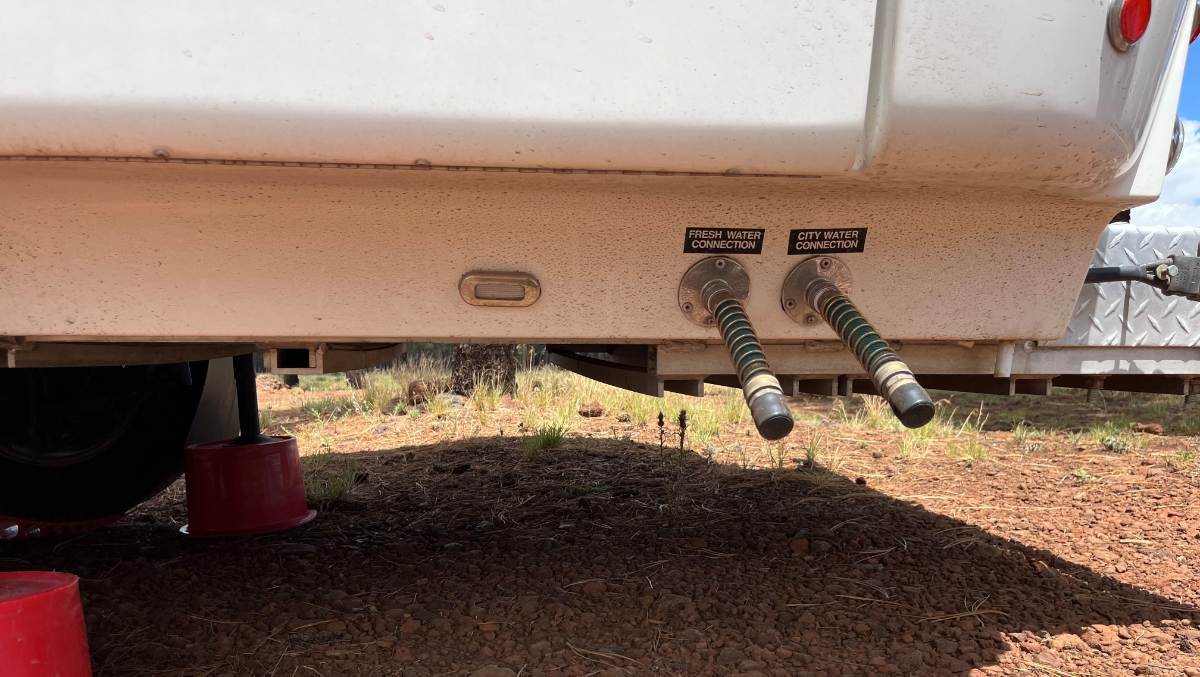
Thank you, Garry. Decent price on this part! Not to worry, I had enough water leak down in the basement already. A lot comes out the hull weep holes and out here it all dries in minutes. BTW, re long "nasty looking" links. I delete all the extra characters after the ?-mark and replace the ?-mark with a slash (/). Then you can copy/paste a shorter version like this: https://itcshopnow.com/products/exterior-shower-service-parts/
-
Furrion Chill Cube – Product Review and Installation
jd1923 replied to jd1923's topic in Ollie Modifications
@Boudicca908, the above is quoted from an earlier post of mine, page 1 of this thread. This was measured with Alcan Springs and the older 16" wheels which are 1/2" taller than the newer 15" wheels. I would say measure the height of your hull, to the top of your Dometic P2 A/C and add 3", or 4" to be safe. -
Me too. Dad was sent off to be European Sales Manager by his employer, a machine tool company. We lived in Wiesbaden Germany during the late 60s. Went back once in the 70s, did the backpack Europe thing all summer with my cousin. My siblings will only take trips to the UK and Europe, reliving their past maybe, as fly-over country is just not good enough. 🙃 Me, I like my fond memories as they were. I'll bet ya sleeping on the black sands of Santorini are not the same today as it was 50 years ago (on the back side of the island where the tourists don't go)! There was only one market/restaurant on the beach back then. We would eat pasta dinner with Greek salad for $.30 each. When they closed and turned off the lights it was pure dark, stars and shooting stars all over the sky! See the USA in the Oliver is our plan! 😎
-
Ours might need the same repair. Took an outside shower yesterday and when the faucets were on, shower head switch off, there was a lot of water coming out along the pull out hose, spilling inside and out. It could be the hose is just loose but as you found the part the hose connects to is often cracked. I won't look under the bed until we're home next week. Thank you for your post. Could you please supply a link for the shower assembly you purchased?
-
New axles may not fit all older sub-frames
jd1923 replied to Wayfinder's topic in Mechanical & Technical Tips
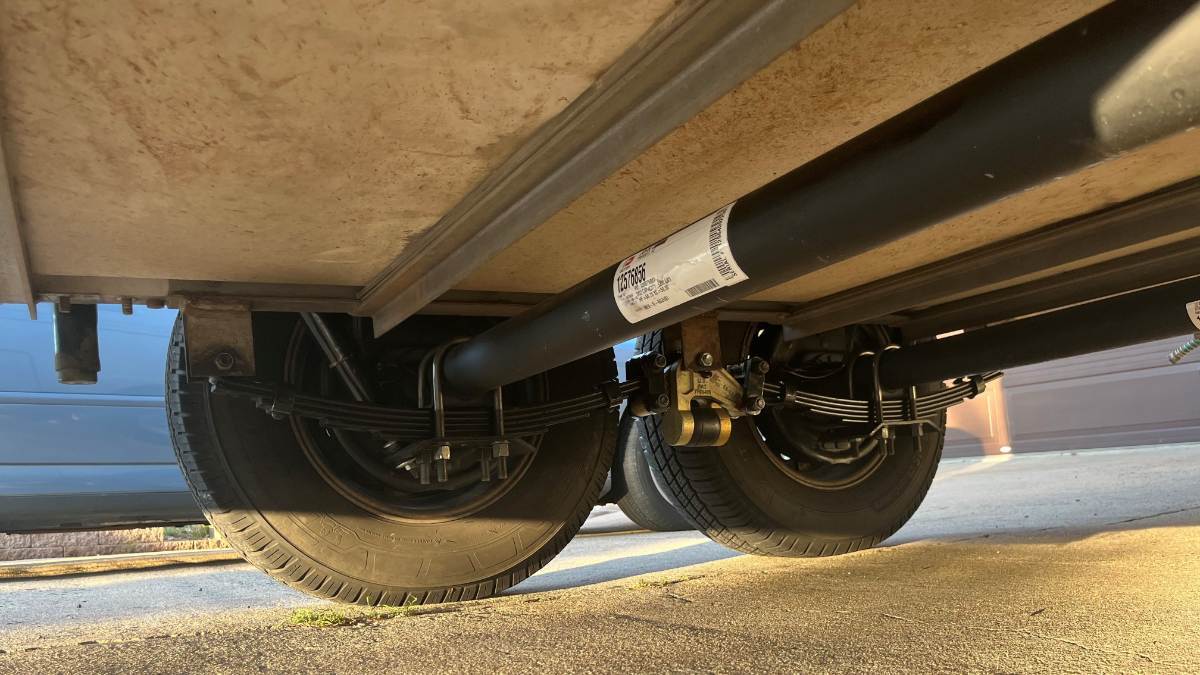
Hey Scotty, first thing make sure your Dexter axles delivered are to spec. It's not simple to measure the Hub Face HF = 68.75, but the Spring Center SC = 50.50" is very easy to measure, center-to-center or edge to edge on the spring mounting brackets. Yeah, the shocks are close to the tires. I just went outside in the drizzle as we're camping, too muddy to measure, but reaching in it seems our shocks are about 1.5" from the tires, more than enough. What must be realized, regardless of axle measurements, is the top of the shock is mounted to the Oliver suspension steel subframe. The top of the shock is where it could possibly rub the tire and this mount is static regardless of axle dimensions. Where the shock attaches at bottom on the axle is nowhere near the tires. I copied a picture here, complements of @Boudicca908 taken in my driveway recently while working on brake wiring. No tire in the pic but you cannot find a better picture of the shock alignment with OEM D52 axles. In this picture I see 1 1/2” either side of the shock, square as could be! 😎 And he’s not familiar with the Alcan Springs which you are also installing. They will not budge, more than a mm, I promise you, your new axles on Alcans will NOT shift! But it's great you found a good mechanic that notices the little things! Given your axle measurements are correct, please go ahead my friend! 😎 -
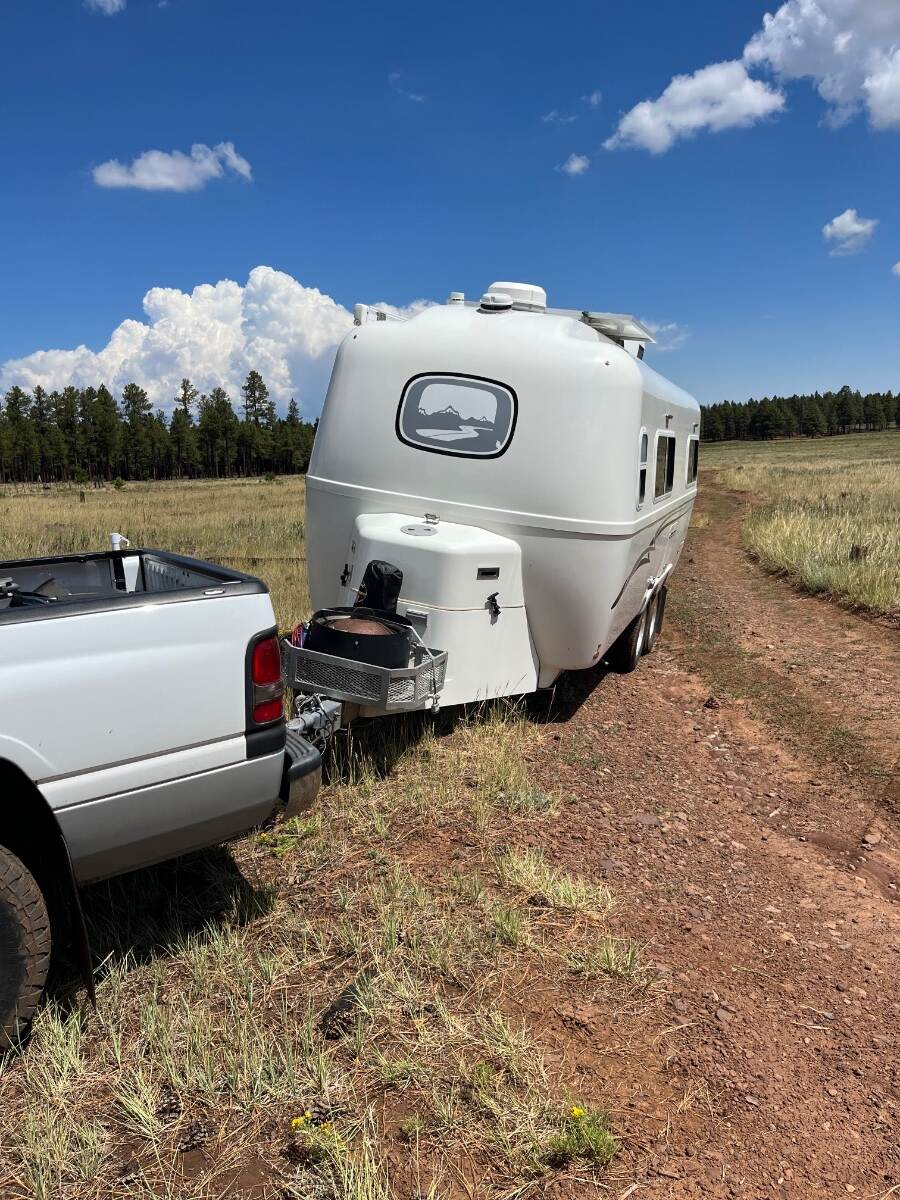
I will get a print made! What you didn’t know is, as soon as we pulled into that spot, the rear tires of my 2WD truck dropped into a shallow ditch and we got stuck in the mud! (recent monsoon rains) Our truck is in the picture mostly hidden by the Oliver. We’re not leaving until Saturday, the Oliver was in a good spot to level. Let’s spend the night, deal with it in the morning! 😎 Had 74 PSI in the rears. Aired down to 30 PSI. I unhitched the TV and drove it slowly out. Ran down the main rocky dirt road fast to get the mud out of the treads. Lined the truck straight in front of the trailer and backed her out. There was a 30” drop to the “jeep trail.” Don’t try this with your Oliver without a leaf spring upgrade! 🤣 We’re in a new spot just down the road. We have an onboard compressor that came with our Pacbrake exhaust brake. Wonder how long will it take to get these big tires back to highway PSI?
-
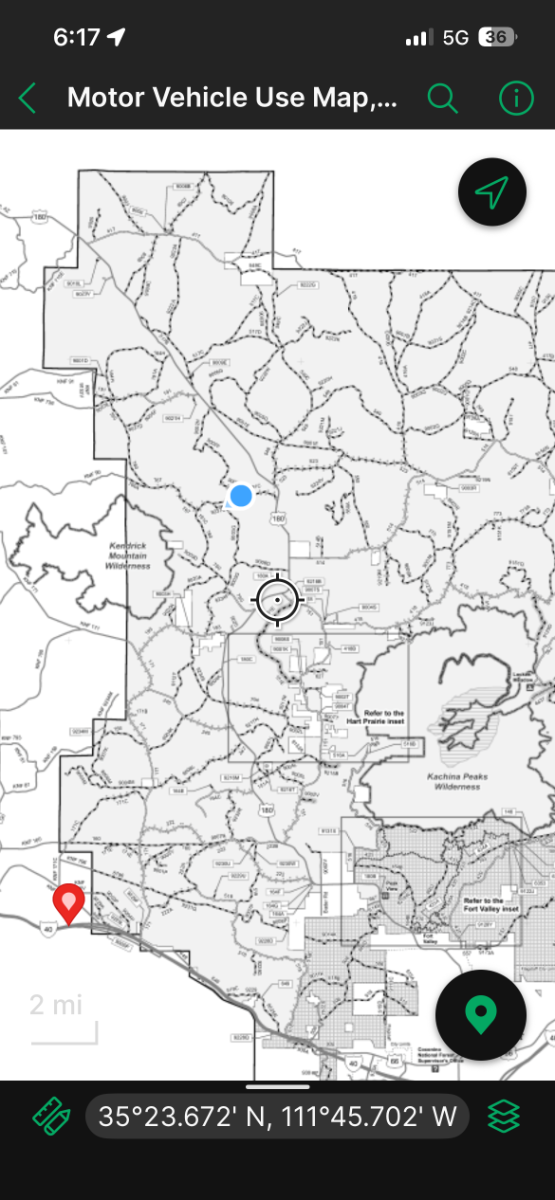
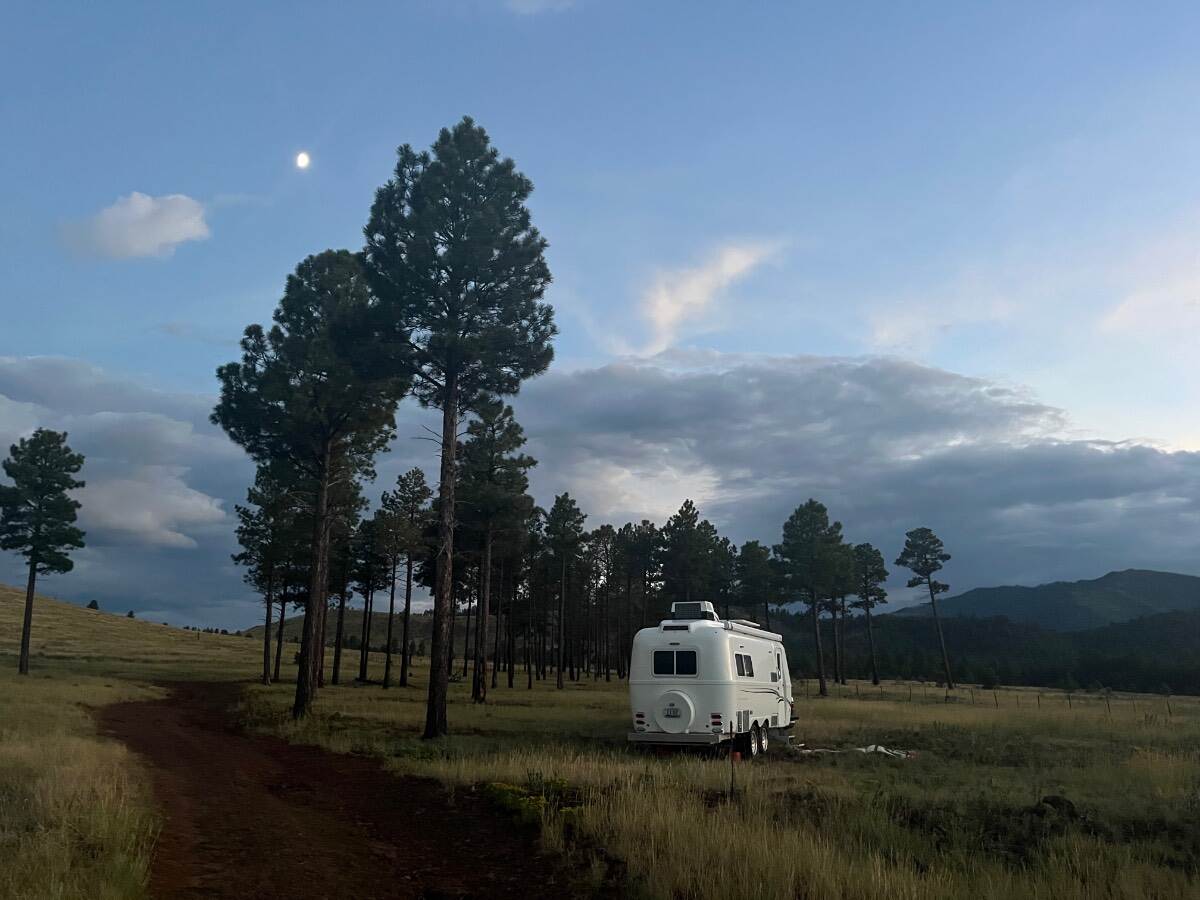
Thanks Bill, yes we found a great spot 25 NW of Flagstaff off US-180 towards The Canyon. 1.3 miles of dirt west on FS 191C. Lots of dispersed camping up here. Our first Oliver trip 3 years ago was to the south of Kendrick’s Peak. Now we have a great view of it to our SW! At 7500 ft after a warm day it was 62F at dinner time. I got just the right light and distance in the shot above. The one below, our view from the Oliver entrance, was taken hours earlier. One other camper and 2 trucks down our road all day! 🤠
-
Thank you, Mike. Probably 50+ Forum Members will read this today. Where are all y’all’s on your Summer trips? Please show us your pictures! Where’ Ollie? 😂
-
Hello from Oliver Legacy Elite II, Hull 1165
jd1923 replied to ArtandBeth's topic in Welcome to the Oliver Forums
Welcome to life with your Oliver and as part of our great community on The Forum! 😎 -
Furrion Chill Cube – Product Review and Installation
jd1923 replied to jd1923's topic in Ollie Modifications
Actual usage data to follow - Wow, we love our Chill Cube (and inverter/battery and DC-DC charger setup)! We left yesterday for a short trip to Walnut Canyon, just east of Flagstaff. With batteries fully charged overnight, I unplugged in the morning, packed the truck, and set the Chill Cube temp down to 73. I did so because we had pickleball from 2-4 PM, the Oliver with us ready, and our dog Charley would be in the Oliver while we played in the heat of the afternoon. We stopped for fuel and a snack (cabin nicely cool) and didn't make it to our boondocking location because of the very heavy monsoon rains in Flagstaff. We spent the night at Cracker Barrel, LOL! 🤣 (Can't drive down FS dirt roads in these rains as it's getting dark!) Checked battery SOC at 7 PM and it was 98%! We used net 20 Ah all day! Sun early in the day, cloudy later. We always have our Orion 50A DC-DC charger connected when towing. I figure it added approx 90 Ah while towing. So the Chill cube cooled all day using only 120 Ah, outside temps mid-80s. BTW, absorption fridge on DC all day too so this number could be less. The heavy rains made the cabin quite humid at 68% RH. Had our first experience with a leaky window (towing 70 MPH through monsoon rains). Thankfully only the dinette window leaked, beds dry. I switched the Chill Cube to DRY mode. Dog water bowl also spilled while towing. It rained until 10 PM while the Chill Cube dropped RH about 15% in the next couple hours, making it very comfortable to sleep. The DRY mode also made the cabin COLD overnight as it kept drying/cooling several degrees under the set temp (thermostat control issues common with many A/C models). Turned it off when I woke middle of the night. Cooked indoors powering the broiler in the Emeril. We'll be away 4 overnights and should be able to run the A/C on battery every afternoon into the evenings! 😎
-
Looking for a part of a 2019 wiring diagram
jd1923 replied to rferg800's topic in Ollie Modifications
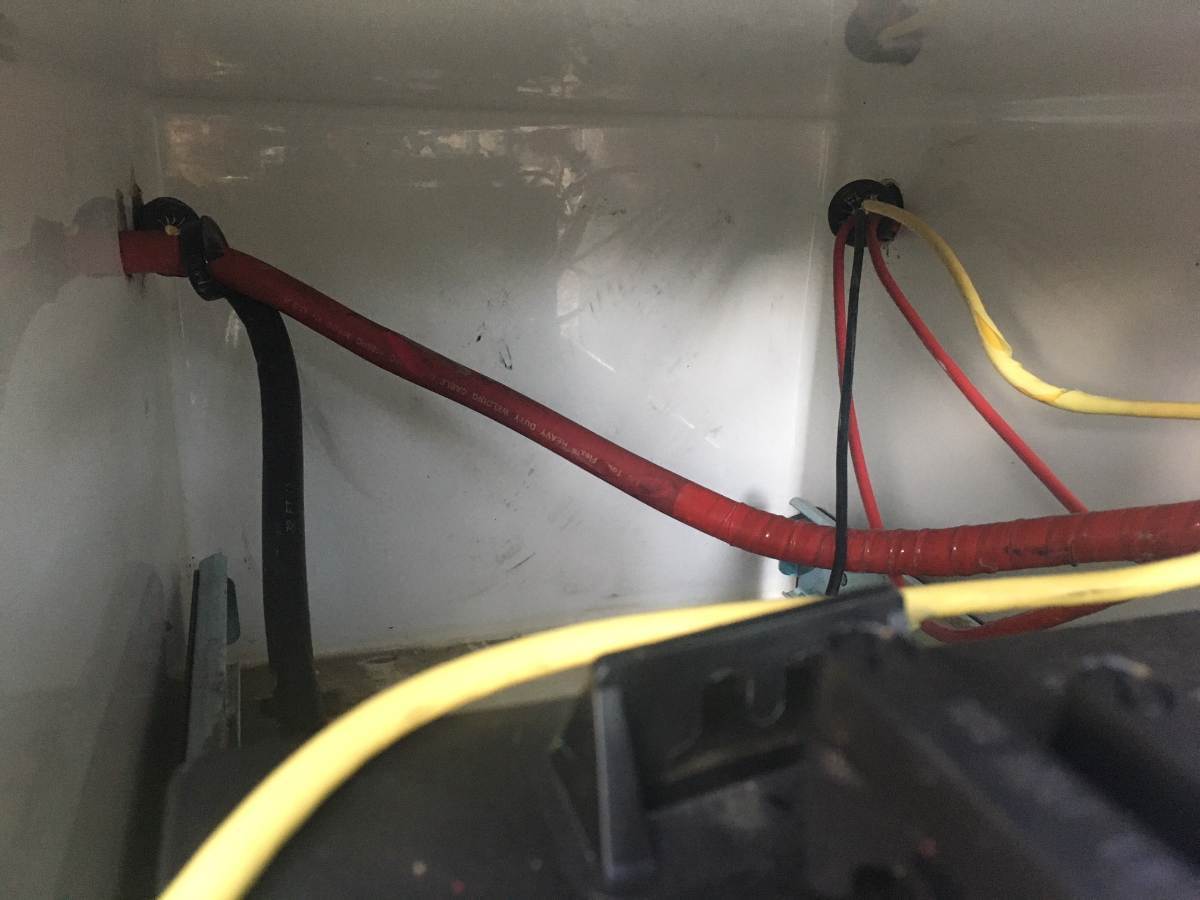
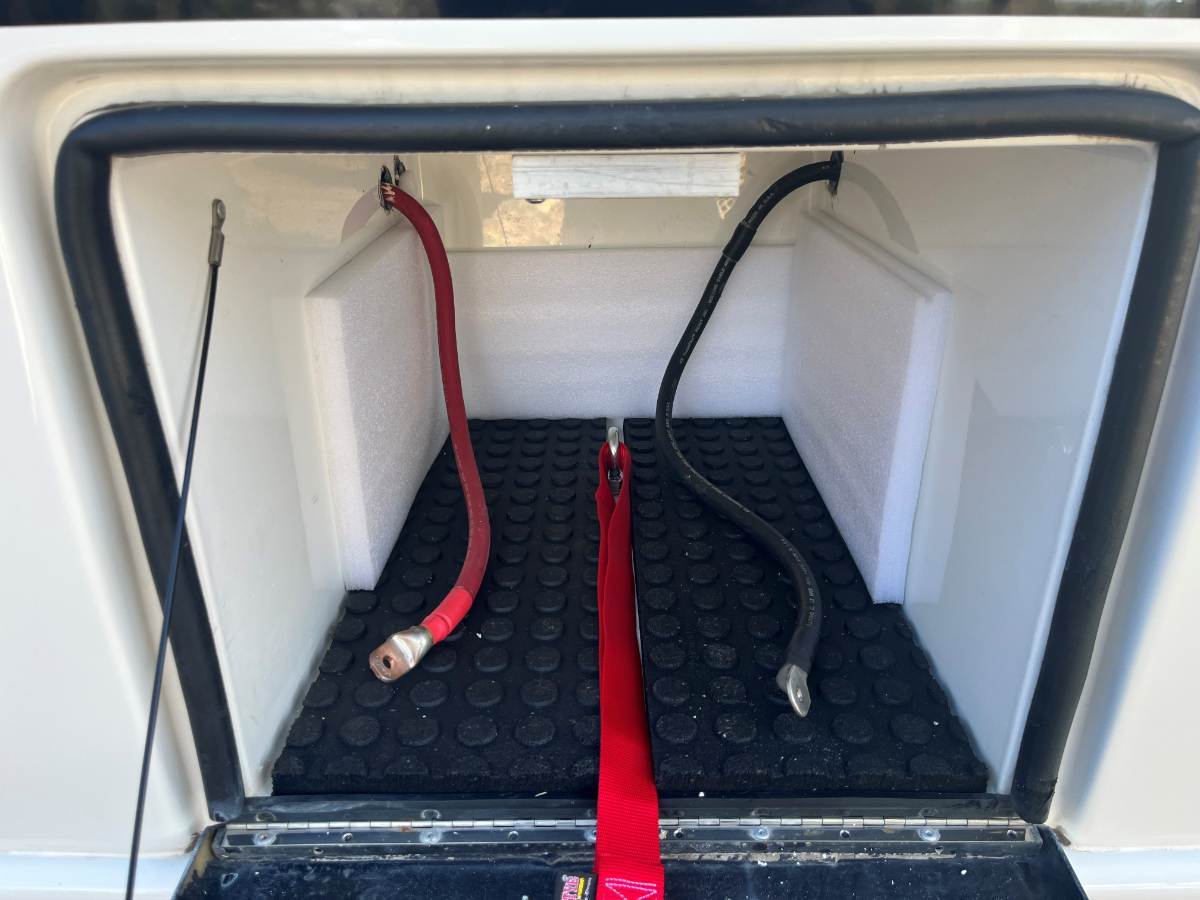
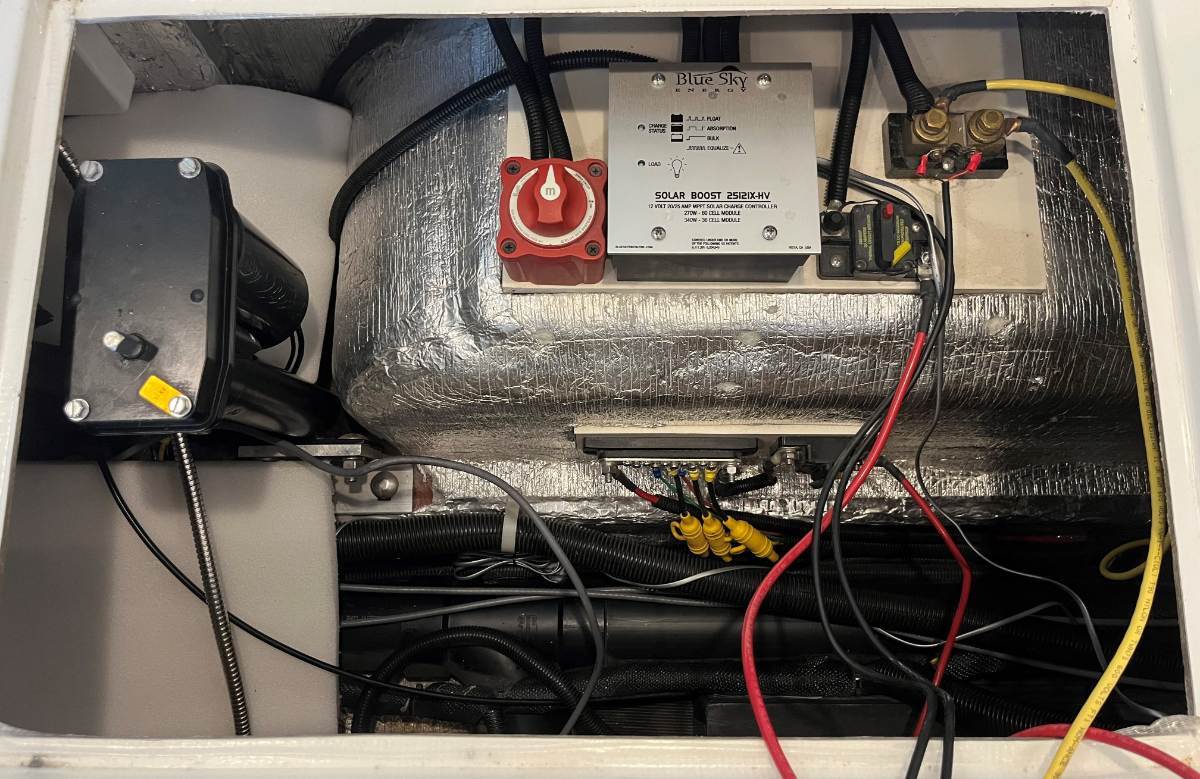
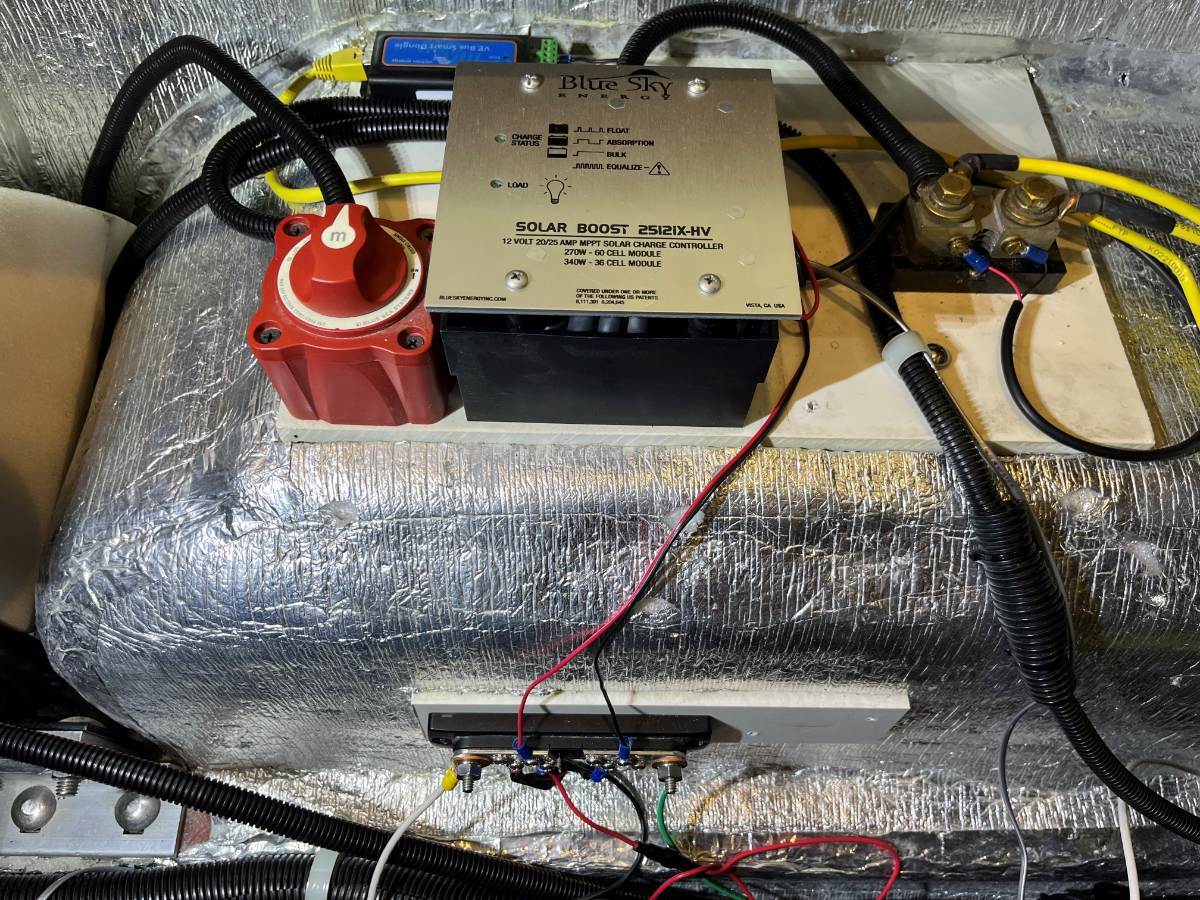
It's quite a different idea to build in what is designed as a portable power station! I would suggest an inverter that is made to be built-in (like the Victron MP2), one that has terminals that can be hardwired vs. plugging in all your connections that may needed to be checked often after towing the trailer. It's also more expensive, this item and the plugs alone will cost 100s! It's certainly original, crazy IMHO, but at the same time, I would love to see your implementation. I've been through all this, and I'm very happy to help with wiring questions! Now to answer this question... You will not find a wiring diagram to show all the wires to the battery bay. Bill noted, his wiring diagram does not even show the shore power connections to the EMS! First thing I did was to empty the battery bay, disconnect all the wiring, and except for the two main B+ and B- cables, fish all the smaller wires back into the basement of the Oliver (see my before and after pictures of the battery bay). It makes a world of difference! I also removed the tray since it weighs 30 LBS and I wanted all the room to house 900 Ah of LiFePO4 batteries The next picture (look bottom right) shows the 8 AWG wires that I removed from the battery bay. Basically you should find two red B+ wires. One of these connected to the 12VDC fuse panel and the other to the solar charger, plus the two corresponding B- wires to the ground bus. Additional lighter gauge wires will likely power a shunt or other. You just need to remove the wires, follow to the load and rewire internally. Your solar charger will be Zamp or something else, not the Blue Sky SC as shown in our 10-year-old hull. I added 400A bus bars and removed all the breakers and fuses out from underneath the streetside bed. These are 8mm thick pure copper: https://www.amazon.com/dp/B0D59Z9S7W/ All of our switching is now under the rear dinette seat. Notice in this next picture, the breaker to the solar is moved forward as are all the cables shown in the picture above. The 3 jack fuses are also moved forward (the wires started there anyway). There were some low power needs in the rear, so I took the light duty OEM bus, cut it in half to make it a +/- bus which is also fused under the dinette. There are many things to think about in an extensive inverter/LiFePO4 upgrade! 😎
-
@Boudicca908 I just noticed something else in the picture above. Notice the shackle dropped and is in the wrong position. After you left here and drove over a step or bump in the road, it likely gave a big thump and reset itself. If it is still dropped this way, driving on and angle slowly over a curb, should return it to correct position. Or it may have reset itself after we mounted the rims and lowered the hull. This happened to my old springs too. When you upgrade to Alcan Springs it won't ever do that again. They are too stiff to allow the axle to drop this way. See my Alcan picture for correct shackle orientation.
-
Earlier, but likely not as old as ours. We had a dish satellite but it was a bigger/wider unit. Same wheels, marker lights, battery door and no Zamp port like ours. Exact same pinstriping and grey color. It has the newer style doghouse latches. First time I've ever seen an Oliver traveling without the front basket!
-
Last time in an airport? Twas pre-Covid for me! 😎 Chris does an annual sister’s trip, to IL or FL. Me, last time I experienced the G-awful Planes, Trains and… for personal reasons, I flew back to Chicago in 2007 for my Aunt’s services, almost 20 years ago, God Bless. Started my current job teaching PMPs, 11 years ago and frequented airports every 2-3 weeks for 6 years, enough is enough! Now I present via Zoom! 😎 We have such a great home and local community, took us a lifetime to get here, so we don’t want to be away for more than a few weeks at a time, for the last 3 years, it’s been the Oliver only! That’s the beauty of the Oliver. We can visit the best of places just a few miles down the road! 😂