
ScubaRx
-
Posts
3,091 -
Joined
-
Last visited
-
Days Won
158
Posts posted by ScubaRx
-
-
22 hours ago, MAX Burner said:
Excellent idea. I'm sure it will work just fine. In fact, just last Friday I departed Frankfurt on a fairly tight layover and my checked bag didn't make it... I'm the Middle East right now, and I've been tracking the progress of my bag to my current location. It made it to the local airport late last night. Thanks to Apple's Air Tags - you can easily track your lost/missing items so long as its within a cell signal...
I've got one on Magnus' collar, too! WOOF!
It's my understanding that airtags use the proximity of iPhone's to track objects. If your tracked item (dog or generator) is not within 200ft from an iPhone, the Airtag system won’t be able to find them. Airtags do not have GPS or LTE to allow them to function independently, so without an iPhone around they can’t locate anything.
-
 1
1
-
-
18 hours ago, CnC said:
Well, our first and our second Victron 712 monitors were not Bluetooth enabled, so we had to drill and mount the thing in a manner that allowed us to monitor it and make changes. Neither one of the mounts were especially attractive - even to a techie. We found the digital monitor screen hard to read unless you readily understand the abbreviated language of digital displays. And, making program changes were a real challenge.
No, you don't need Bluetooth, but with it, one can mount the unattractive 712 monitor where the sun doesn't shine. It's easy - our third and present 712 monitor lives under the Ollie's dinette seat. Monitoring it via Bluetooth is quick, simple and can be done from anywhere nearby - that's important when you're switching things on/off to see how much energy it draws. Most importantly, making edits to the program via Bluetooth is Sooooo simple.
So, while it's true that you don't need Bluetooth, anything and everything I buy will probably have it. The Ollie is an exception, but that too will soon have Siri, Google or Alexa integrated into it's systems. Ask ChatGPT what it thinks 😉
Charlie.
Sorry, I didn't realize there was ever a BMV-712 that did not have built-in Bluetooth. At any rate they all do now.
At present, the BMV monitors consist of products with BMV-7 in the model name. Below I list the various current models. hopefully this will assist you to be sure you choose the right one for your application and budget.
Except for the BMV-700H they all have a voltage range of 6.5V – 95V and they all can handle 1 – 9999 Ah battery banks.
The models below, except as noted, are without Bluetooth built-in and I collectively refer to them as the BMV-700 series.
BMV-712 Smart (Bluetooth built-in, with Auxiliary input) This is Victron's latest model.
BMV-702 (with Auxiliary input)
BMV-702 (Black Face, with Auxiliary input)
BMV-700 (This is the base model)
BMV-700H (high voltage version - 60V – 385V)The **2 in the product name refers to the fact this product features a second input which can be programmed to measure the voltage (of a second battery, or battery temperature, or midpoint voltage.)
I am starting from scratch installing a complete new system in our truck to run our Dometic CFX3 75DZ refrigerator. I didn’t particularly care whether it was Bluetooth or not, but I chose the BMV-712 Smart because it came with a shunt, which you have to have for any battery monitoring system (it is my understanding that a 500A/50mV shunt, fitted with a quick connect PCB is now part of every BMV-700 series monitor product package.) I actually find the BMV-712 Smart monitor to be quite attractive with its included separate front bezel for a square or round display appearance, a securing ring for rear mounting and screws for front mounting.
So, if you are looking to update your existing system that has no decent monitoring capability (think Zamp) you will need to replace your solar charge controller. Also, if you think that it would be advantageous to have monitoring capability (it would) you’ll need a shunt and a way to monitor it. For monitoring, I’d chose one of the above models from the BMV-700 series.
But, if you don’t want the expense and trouble of a large solar refit or just can’t go on living without Bluetooth capability, then you could just add a Victron SmartShunt, an all in one battery monitor, only without a display. Your phone acts as the display which connects via Bluetooth to the Victron Connect app so you can conveniently read out all monitored battery parameters, like state of charge, time to go, historical information and much more. Personally, I want to be able to glance at a wall mounted monitor and know everything I need to know. I don't want to have to pull out my phone, find the app, start the app... you know the drill. The SmartShunt is an alternative for a BMV-700 series battery monitor, especially for someone that desires less wiring. It is is equipped with Bluetooth, a VE.Direct port and a connection that can be used for all the same things the monitors can do.
-
2
-
-
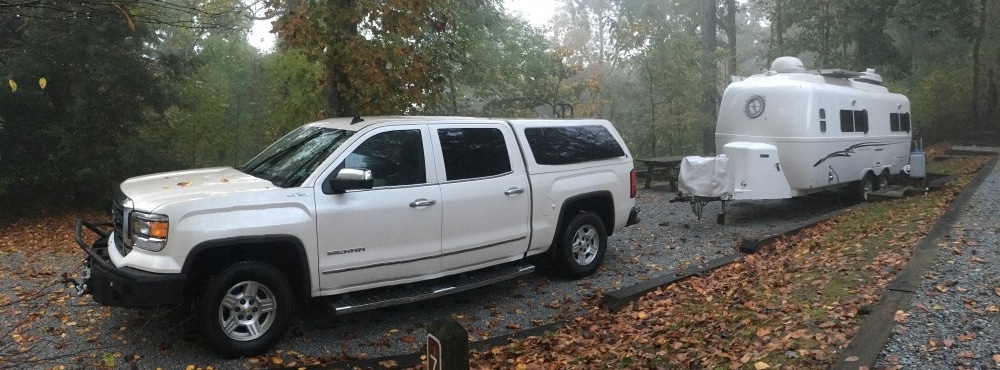
I have recently replaced the solar panels on the Outlaw Oliver. I used the old panels to attach to the topper on our truck. The truck panels will be used to keep a new Battle Born 100 Ah charged to run our Dometic CFX3 75DZ refrigerator located in the bed. In reading and researching different aspects of this project, I came across some info concerning the Solar Panel Disconnect Switch that I want to share with the group.
All existing Oliver's with a solar system installed at the factory will only have a big red on/off switch installed in the positive side of the power wires coming down into the coach before going to the charge controller. This serves as their Solar Panel Disconnect Switch.
The following information is from a guy named Nate Yarbrough and I copied it directly from his Blog Post that is listed below.
Is a Disconnect Between the Solar Array and Charge Controller Necessary?
Short answer: Yes. And here’s why:
NEC 2020 Article 690.13 says that “Means shall be provided to disconnect the PV system from all wiring systems including power systems, energy storage systems, and utilization equipment and its associated premises wiring.
Is a Dual Pole Disconnect Necessary for a DIY Camper Solar Array?Again, Yes… And here’s why:
NEC 2020 Article 690.13 section (E) States that “ The PV System disconnecting means shall simultaneously disconnect the PV system conductors that are not solidly grounded from all conductors of other wiring systems.
Since camper electrical systems are generally NOT grounded, this means that both the positive and negative conductors from the solar array need to be able to be simultaneously disconnected, and our dual pole breaker does exactly that where those other breakers and switches do not.
_________________________________________________________________________
This is a link to his YouTube Video.
https://www.youtube.com/watch?v=HOXnWXvLXko
This is a link to his blog post that gives you all the same info with written instructions, a parts list and pictures.
https://www.explorist.life/how-to-wire-a-solar-disconnect-for-a-diy-camper-electrical-system/
-
 2
2
-
-
19 hours ago, CnC said:
Most use the 712 to monitor the total flow to/from their batteries. You only need BT - no cell or WiFi. It's the easiest way to know what's happening in your Ollie. Turn on something and you can watch the flow from the batteries change. Soon, you'll be much more knowledgeable about your energy use. I wouldn't want to be without a 712.
Charlie.
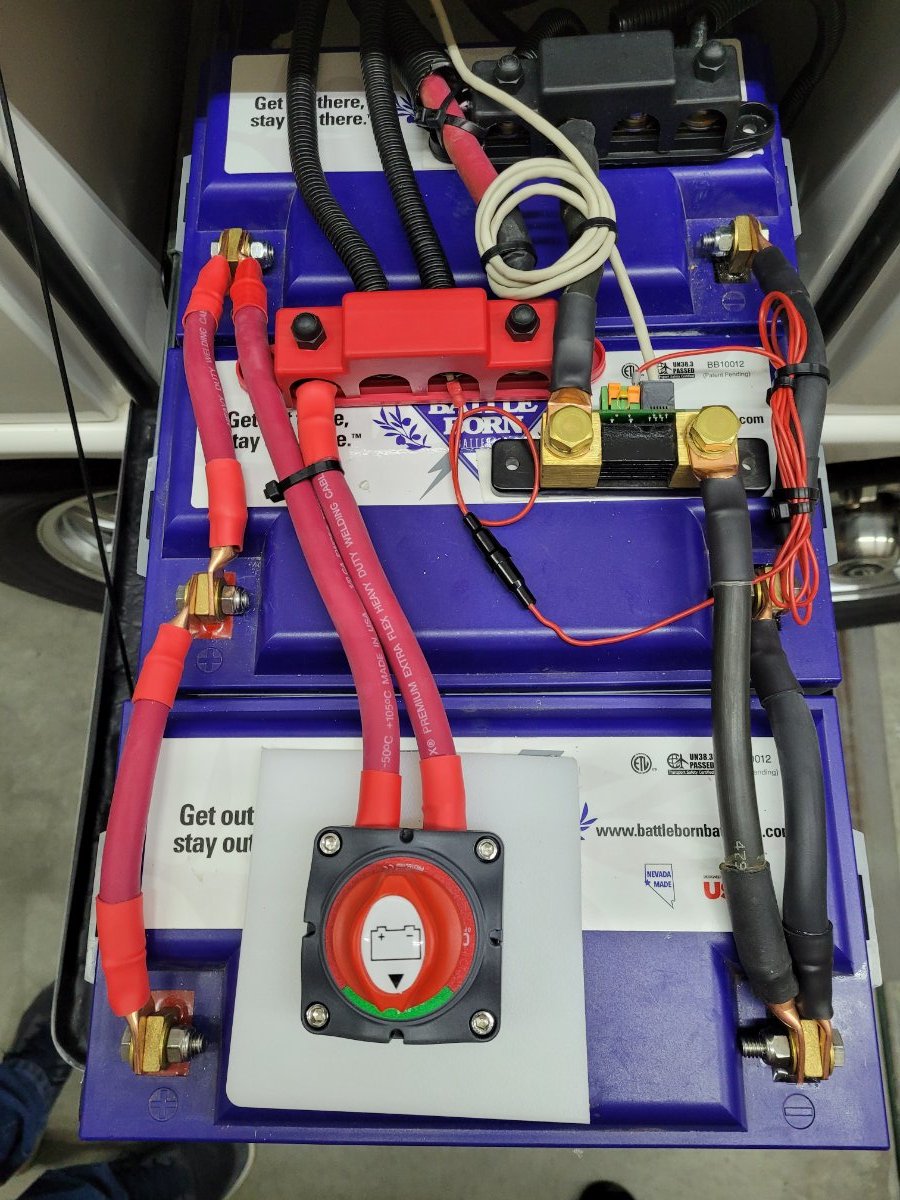
Note: it's the black thing in the picture with the negative leads running through it.

"...Note: it's the black thing in the picture with the negative leads running through it..."
The "black thing" shown in your picture is the shunt that is included with Victron 712 monitor. The shunt measures the real-time voltage of your battery system as well as the current draw. The 712 battery monitor uses these measurements to calculate the state of charge, power consumption, estimated remaining runtime, and other beneficial information about your battery system.
With the 712 monitor, you don't need Bluetooth unless you just like using a app on your phone instead of simply looking at the direct readout on the 712.
-
3 minutes ago, Katjo said:
Interesting. When did they pause production?
Early 2009 thru mid 2013.
-
1
-
-
In the early days, their go to caulk was 3M 4200 and MMA 300 High-Performance Methyl Methacrylate was their adhesive of choice. I don’t recall ever seeing them use 3M 5200.
-
1
-
-
3 hours ago, Wayfinder said:
I wonder if someone will someday rip out some of the complexity having solar, batteries, inverters, etc, and put in place a Jackery 3000 Pro, or something similar. Where everything is built in to the power unit. If it goes bad, just replace entire unit. Bam, done!
I doubt it.
-
4
-
 1
1
-
-
Would someone please explain to me why you need this port?
-
1 hour ago, John E Davies said:
Then why those amp readings? Does not compute…. My Victron MPPT unit will show, for example, 5.0 amps in from the roof panels, and 5.4 amps out to the lithium batteries. WayFinder’s pics don’t show that happening at all.
John Davies
Spokane WA
The Blue Sky system works just as effectively as the Victron does. It just doesn’t have all the bells and whistles like Bluetooth and color displays. You’re not taking the whole picture into consideration. In your example your batteries must be somewhat less than fully charged therefore they were accepting a slight charge and you apparently had no appreciable load at the time so you see a small positive value going to your batteries.
According to his photos, it appears his batteries are fully charged, therefore no charge going in. The negative difference in the two values is most likely a slight load that is taking away from the power coming down from the panels.
-
1
-
2
-
 1
1
-
-
8 hours ago, John E Davies said:
...Your solar controller is a basic PWM unit. It will always have a higher input amps figure than output.
A smart solar charge control (MPPT) boosts output amperage in mysterious ways few mortals understand. A PWM unit basically is a switch, on off on on on off on off. The MPPT magically combines volts and amps from the panels to give out a higher amperage into the batteries.
John Davies
If you’re referring to the Blue Sky controller as shown in the pictures, it is a MPPT rather than a PWM controller. The Zamp is the PWM system.
-
3
-
-
2 hours ago, HDRider said:
Why does it take a 2,000 watt generator so much longer to recharge the batteries than 400 watt of solar panels?
Because the generator is only supplying power to run your onboard charger which may be as low as 45 amps output.
-
3
-
-
42 minutes ago, Patriot said:
According to Oliver Service the very few rare cases they have seen have been attributed to running max tire air pressure and traversing extremely rough roads.
Patriot🇺🇸
I can personally attest that driving the 40 mile washboard gravel road into Chico Culture with 80psi in the Oliver tires is both stupid and detrimental to the Oliver. I'm not completely convinced that it didn't slightly alter the earth's orbit around the sun as well.
-
1
-
 9
9
-
-
1 minute ago, Wayfinder said:
I broke down camp just like you said, raised jacks, slowly, and kept safety chains connected to truck and was ready to pull break pin too if needed. But, it was steady as a rock.
I can never remember which way is up with my rubber chocks, mine do not have any concave shape to the one side. I think mine are these here. Flat shape on both sides.
Now these heavy duty rubber chocks look like real nice chocks, and weighing in at 3.5 lbs each. A set of four would do the trick for sure. And, they'll all match. 😉
Sorry, I assumed those were Harbor Freight. Either will work just fine. As a side note, I forgot to remove mine in the driveway once. I drove about 10 feet with them skidding along before they finally gave up and let me run over them. Ruined one (broke it).
-
9 minutes ago, CRM said:
Maybe I got lucky, but it worked for me the first try while installing new coax and an HDMI cable for an outside TV. I also only have the lizard skin insulation and not the Reflectix type which might have given me some extra space to work with?
Quite possibly.
-
8 hours ago, CRM said:
A good way to fish a wire between the hulls without damaging the insulation is to use a "ball chain". It usually finds it's way down on the first attempt just by jiggling up and down while letting weight of the chain do the work. I use one like this but without the large ring attached which I found has a way of getting snagged on things in tight areas. Ball Chain
I've successfully used this method from the attic down between studs on the interior of our house. I believe the wire chase in the rear of the Oliver is too tight with wires for this to work.
-
3
-
-
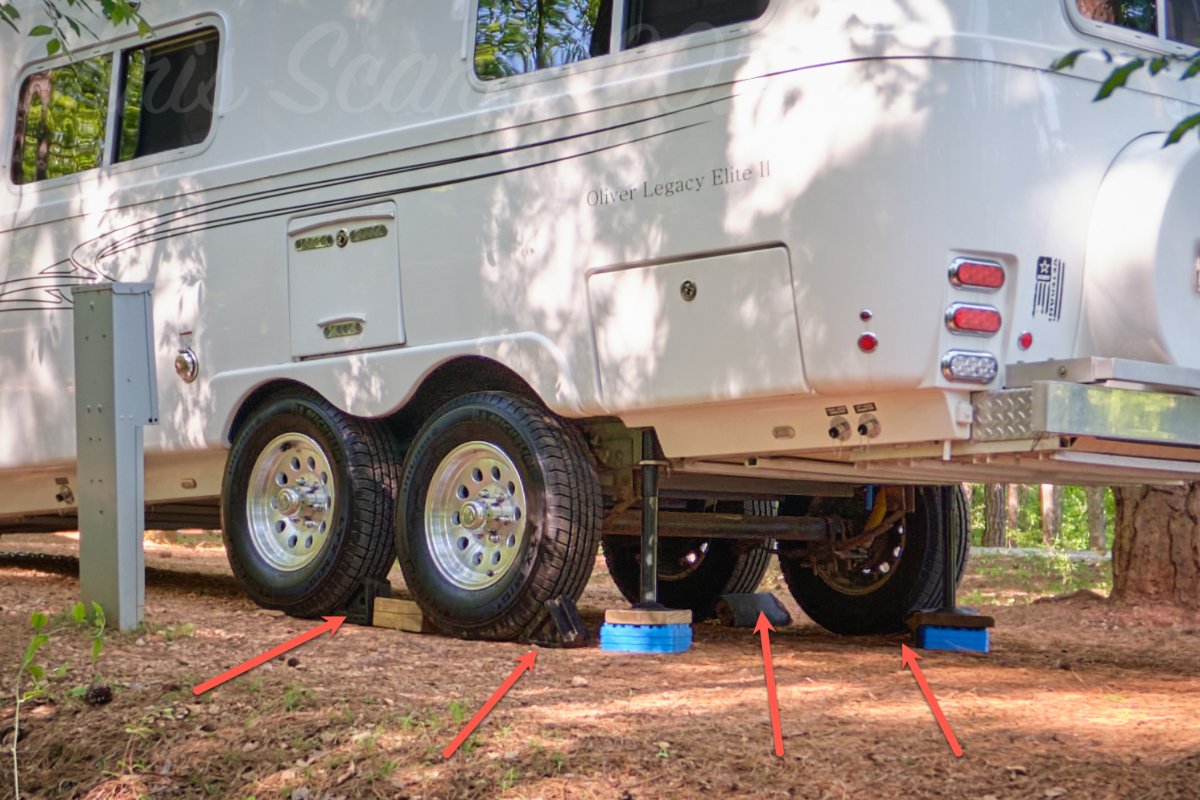
On 4/24/2023 at 11:34 AM, Wayfinder said:
Okay experienced Oliver Owners. In your opinion, what is the best way(s) to ensure you successfully park and unhitch on a slope or incline/decline?
What are the best chocks you've used?
And, I hate to ask, but better safe than sorry, do you see anything terribly wrong with what I've done in the pics?
Thanks.
The only thing I would change here is to turn the HF chocks over. The ridged side should be on the ground and the slightly concave side should be against the tire. In another of your subsequent posts it is clearer than these photos that they are upside down.
Also, when breaking camp, raise those rear jacks before raising the tongue. Keep the chocks in place until completely hooked up. You don't want to make the front jack try to lift the whole weight of the trailer and you certainly don't want the trailer at the bottom of the hill.
I think you made poor campsite into a completely workable one. We've run into this same problem in various spots, especially at Quartzsite.
-
1
-
3
-
-
If you’re going to be at either the Alabama or the Maine rally, come by and I can show you more.
Site E-05 in Guntersville. Not sure about Maine.
-
1
-
-
3 hours ago, Ty J said:
…Anyone know how to get from uppper cabinets to underneath by the inverter?…
The wire chase from the attic to the basement is in the aft port corner. I used a fiberglass rod to work from bottom to top. Once placed I pulled a piece of bulk weed eater cord down to the basement. I left enough cord rolled up at each end to pull from either direction. When finished, leave this pull line in place for future use.
Additionally, using this technique, I have successfully placed pull lines from the inside of the closet through the ceiling to the inside of the cabinet over the microwave and side to side behind the pantry.
-
3
-
10
-
-
On 4/21/2023 at 7:03 AM, MAX Burner said:
SLIDING WINDOW QUESTION:
Does anyone have difficulty sliding the windows open/close? Ours take 2 hands to slide open/closed, is there a maintenance tip/hack to get them sliding easier? (We've removed/replaced the plastic window glaze and cleaned out weep holes and tracks)
Have you completely removed the slider window, all the rubber channels and cleaned them by hand? After reinstalling it all spray the tracks with some dry lubricant for window tracks. Doing so will go a long way toward making those windows move easily and smoothly.
-
1
-
-
For indoor target practice I always enjoyed a Blow-Gun. It takes air to operate it so I don't feel like I'm hi-jacking the thread. I would practice for hours at home nights in the wintertime. I'd set up a cardboard target across the room in front of the wood stove fireplace insert and tape a kitchen match to it. I finally got to the point that I could light the match from about 15 feet away. Not a particularly useful skill I'll admit but you never know when a match wielding thug might break in and need to be rapidly dispatched. If I can hit a match head, surely I can hit a person. You have to be careful though. You wouldn't want to shoot his eye out.
-
3
-
-
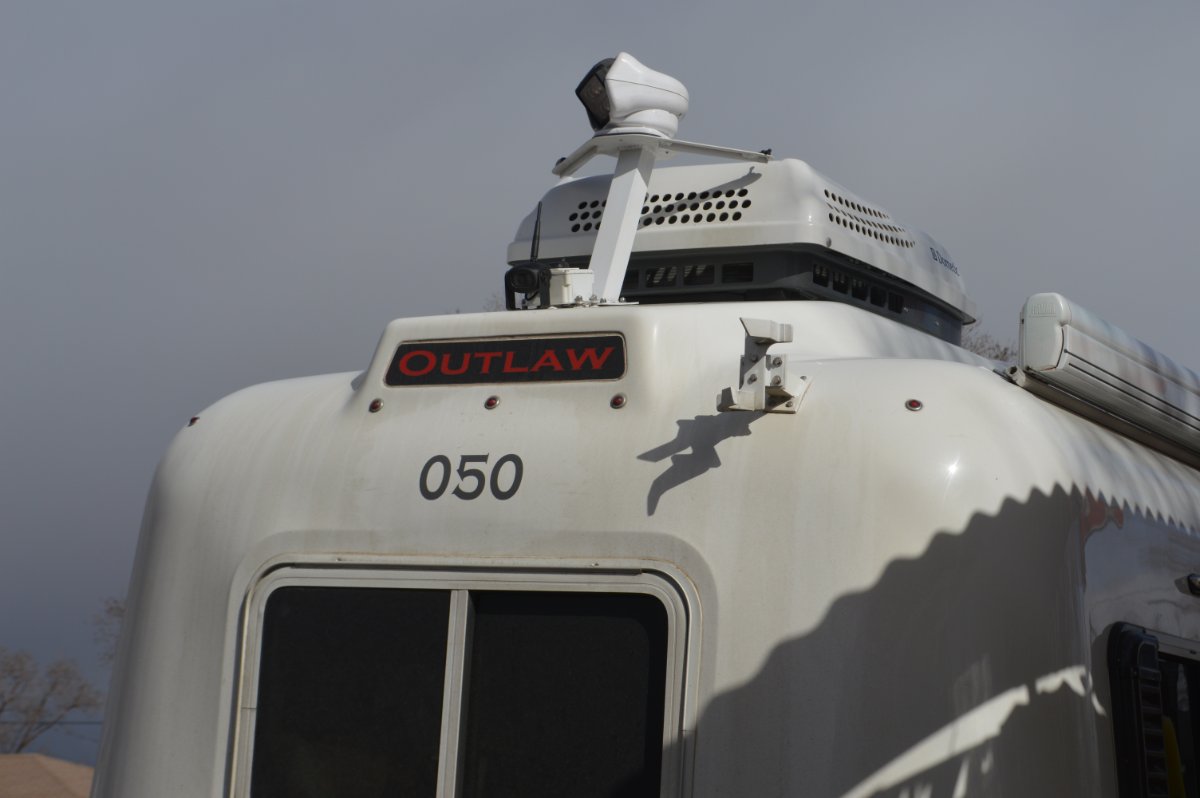
On 4/21/2023 at 10:17 PM, SeaDawg said:
...You can add lettering, but Oliver can't, since they must adhere to the arbitrary rvia "rules."
I really don't think RVIA cares what lettering is placed onto the upper light. The reason it is no longer a brake light (and hasn't been since 2009) is it is against the standards set by RVIA. Oliver has nothing to say about it.
As far as custom lettering went they would put anything you asked them to on it. We had "Outlaw" on our 2008 Oliver.
I forgot to tell them during our 2013 build to do the same.
As delivered in 2014...
They re-cut the overlay to say "Outlaw" and installed it for me a few years later.
It basically boiled down to who you asked.
-
4
-
-
- Popular Post
- Popular Post
I spoke to Anita yesterday and passed on everyone's well wishes. For some reason she is unable to access the forum inside the facility so she's not been able to respond here. She is currently in a step-down rehab facility in Columbia, TN. She states she is still in a lot of pain, but she is very appreciative of all our thoughts and prayers. She thinks she may be there several months. I'm hopeful that won't be the case. She did say that she is able to get into a wheelchair for short periods of time. They do not want her sitting up too long at this period of her rehab.
-
5
-
 10
10
-
11 hours ago, dewdev said:
Steve:
Can you send me a copy of the video or let me know if it gets posted on the forum (or bring it with you in June).
Thanks
I don't know if conner77 will have it ready before the end of the rally. We plan on leaving the Alabama Oliver Rally and immediately start slowly heading North to the Maine Oliver Rally. But, I'll be happy to show you how to do it while we're in Booth Bay in June, maybe others will be interested as well.
-
4
-
-
9 minutes ago, connor77 said:
Mystery solved. I wasn't thinking that the screws would actually be going through the gelcoat into the aisle but you and Patriot have educated me that this is exactly what is being proposed. Thank you both.
I realize this is very contrary to what most people think of or recommend when attaching something to a surface in the Oliver. The first hole you drill is always the hardest. After that first one, you'll feel more at ease drilling the next. I've drilled so many in mine through the years, I've probably lightened it a couple of pounds. You really will be pleased with the stability as a result.
-
4
-


Generator Security
in Mechanical & Technical Tips
Posted
Fifteen plus years ago when I bought our Yamaha generator to accompany us on our travels, I wanted a way to secure it in the basket. I had a vinyl covered cable with looped ends that perfectly fit around the generator and the basket twice. I secured the ends together with a puck lock.
I now keep the lock on the top of the generator under the cover to protect it from road grime and the weather. It also makes it much easier to get to when I want to unlock it (about once a year to change the oil.)
This has worked all these years as I still have the generator. Of course, it doesn't hurt that the generator weighs in at about 165 pounds, so it'll take a big ole girl to steal it.