

Galway Girl
-
Posts
551 -
Joined
-
Last visited
-
Days Won
17
Posts posted by Galway Girl
-
-
$53,900 was EII Twin base price for our 2019
-
-
We have a 2019 EII with the standard toilet.
Tanks on 2019 were specified as :
Fresh = 30gal - more like 28Gallons
Grey = 30 Gal
Black = 18 Gal (Now 15 Gallons reported in later models.)The NEWER Specs from 2023 data sheet are shown below:
Fresh Water Tank Capacity Design Capacity 32 Gal. Grey Water Tank Capacity Design Capacity 32 Gal. Black Water Tank Capacity Design Capacity 15 Gal. Use Case: Boondocking sites...no restroom or pit toilets.
We take very short (Navy) showers, wash hair outside or in a basin, and use wipes every other day.Black: Boondocking the black tank fills between 3-5 days. (If there are pit toilets or other facilities then we can get to 6 days.)
Grey: Typically lasts 8 days. We've not typically had an issue with GREY filling up.For Boondocking, the toilet really is the limiting factor, and many have specifically chosen the compositing toilet for that reason if they plan to do a lot of boondocking.
Craig
Hull 505
-
 2
2
-
 5
5
-
-
The water heater itself has an internal shutoff valve, so when you turn "off" the truma switch outside this valve cuts off gas.
The only other shutoffs are the ones on the front tanks.CS Hull 505 with Truma on board.
-
2
-
3
-
-
Bob and Marsha are the couple that showed us their Oliver on Referral from the Factory.
It will be fun to check in with them again!
Craig
-
1
-
-
Will be doing a repair as well....Oliver Charged me for the new block for our 2019.
Thanks for the articles in the thread which will help me prepare the surface for a good mount.
Attaching with wires to make sure they don't fully fall off is a great add.
CS
Hull 505 - 2019 EII
-
2
-
-
This is a screen shot from a tour video showing how the battery box is internally mounted.
Once the trailer is assembled there is no way to reach the area where the battery box is joined to the sidewall of the outer hull.
After final assembly the box is buried deep under the pantry area of the trailer.
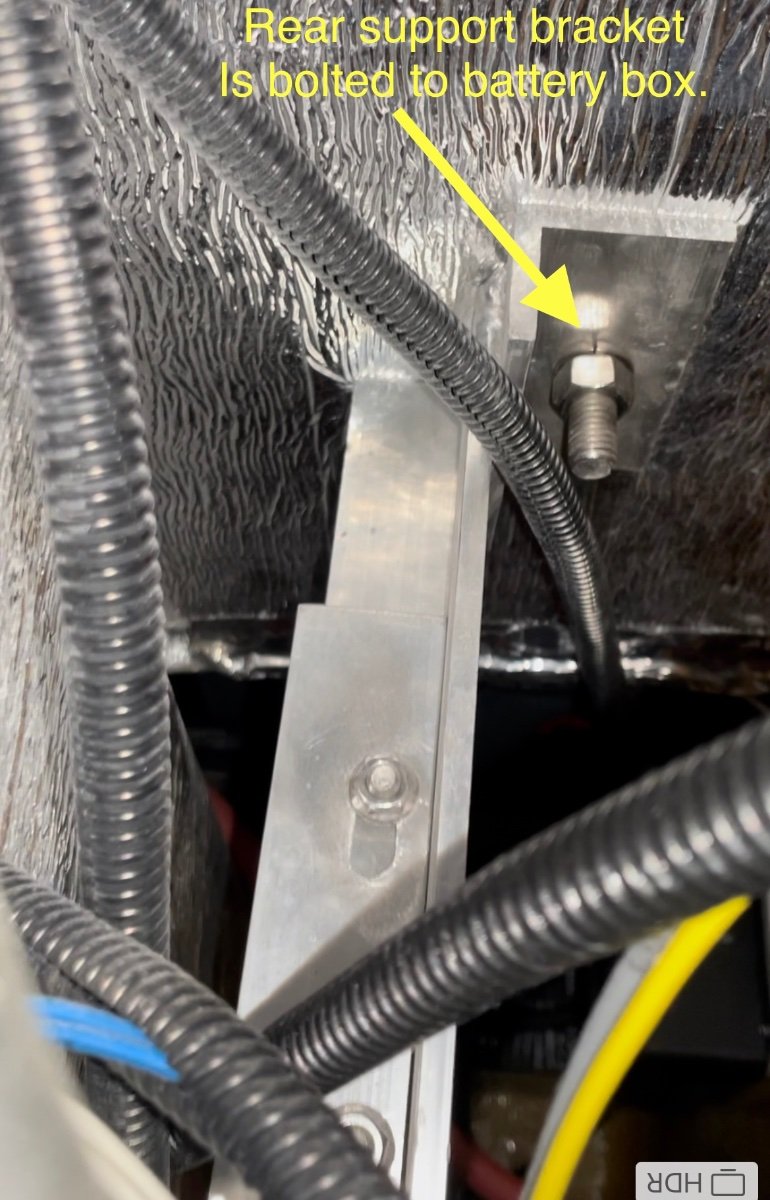
According to Oliver Service, after insertion, the box is supported by the outer hull by, by the wheel well and by a support arm that is bolted to the box on the top and the frame of the trailer on the bottom.The only way to get backer washers, or backing plates onto the rivets (or bolts if desired) is during the manufacturing assembly process. An owner cannot reach back into that space from the inside of the trailer.
For those of us experiencing sheared pop rivets, I'm not sure there's a much better solution than maybe stronger stainless rivets and perhaps some 3M 4200 Sealant/Adhesive to help hold the box in place.
I'll keep track of the repair and review it with Oliver the next time I get to Hohenwald and report back any updates.
Craig - Hull 505

-
1
-
5
-
-
6 hours ago, FrankC said:
that’s a “before” photo
Frank 😄
yes that’s the before pix. Only one bolt hole is slotted. In the factory the second hole is drilled after alignment & adjustment of hhe box. That means the brace is ridgedly bolted in the second hole as installed at the factory.
(Thus I wonder how it tipped out if the support brace is not really adjustable!)
-
36 minutes ago, DavePhelps said:
I would recommend 3 things.
Dave,
Thanks for the recommendations.
It is amazing that fiberglass (key word glass) cuts through rivets.
I need to do the project again I'll implement your suggestions.
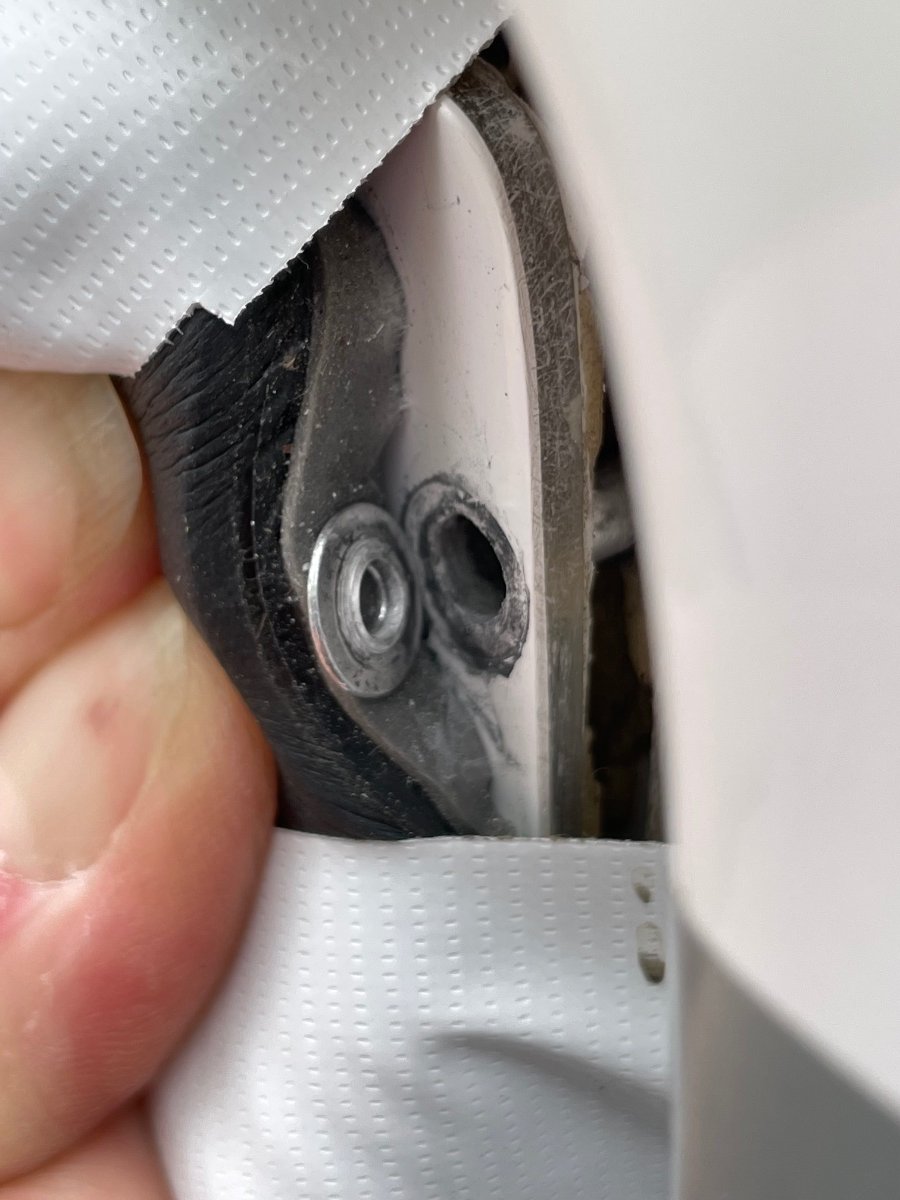
I'l also discuss your ideas with the factory when we close the ticket.Close ups of how the rivet failed. The factory had asked for these pix below.
I'd be interested in your thoughts on the failure mechanism of rivets in the pix.
-
3
-
 3
3
-
-
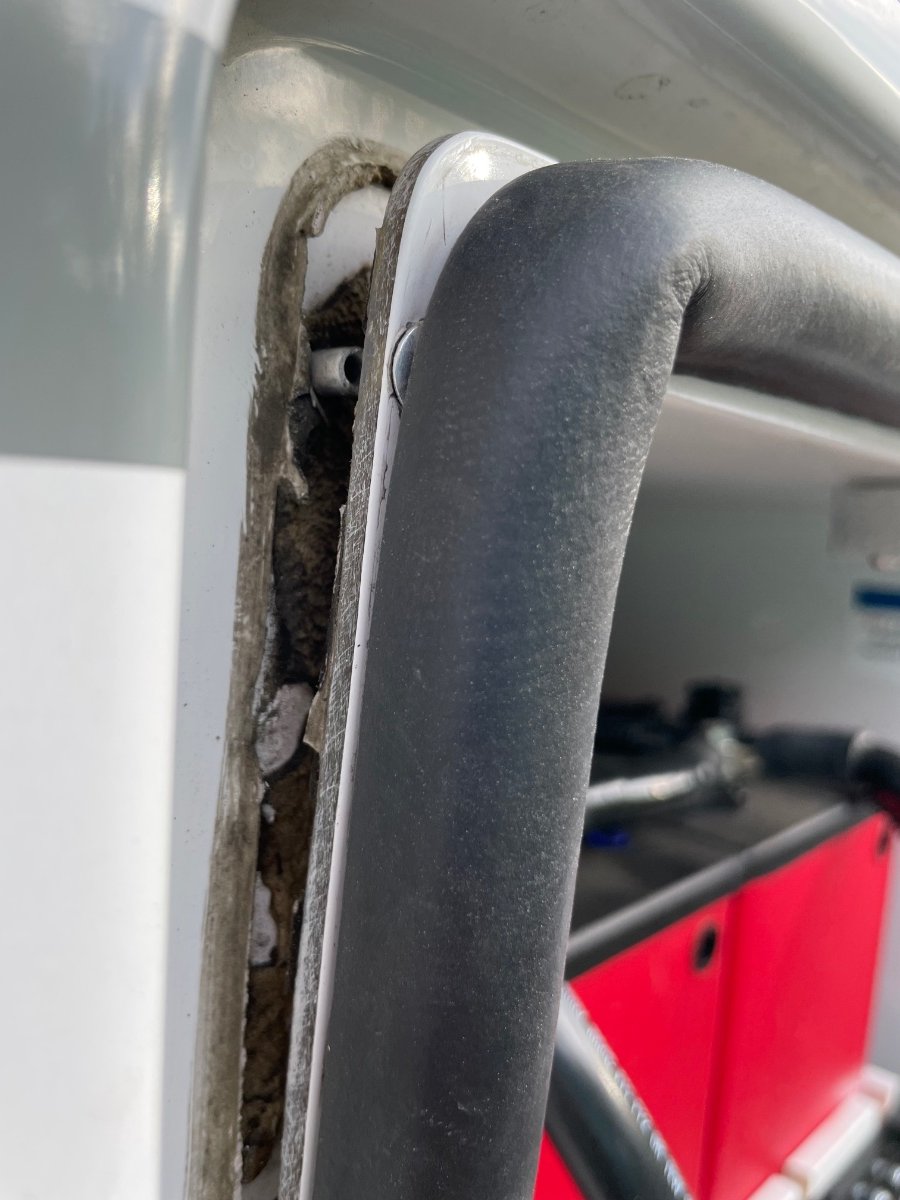
This spring as we were prepping for a new road trip, I noticed the battery box door seemed to be sticking out further than normal.
I thought I would adjust the latch to pull the door in a bit tighter.What I found was that the battery box had started to tip forward away from the main hull as shown the pix below.
All the rivets up both sides and all across the top of the box had sheared and the box was tipped out about 1/2".
I contacted Oliver Support to understand how the box was designed, mounted etc.
They cleared me for travel after having me check the support strut inside the trailer (under the pantry area) .
After some further consultation I was able to perform a repair.
Here's a sketch of how the battery box is installed in our Hull 505 (2019 Elite II) trailer.
The repair steps I took following Oliver instructions were:
1) Remove the batteries from the slide tray to get weight off the box.
2) Drill out all sheared rivets. (3/16" bit)
3) Release the 2 support bracket bolts inside the trailer under the pantry (one of which is adjustable).
(This step is a pain and requires some long extensions for the ratchet wrench to make reaching nuts possible.)
4) Tip box back into position. (Check that the box base still has a slight outward tip for water drainage.)
5) Re-tighten support bolts.
6) Re-rivet all around the perimeter.
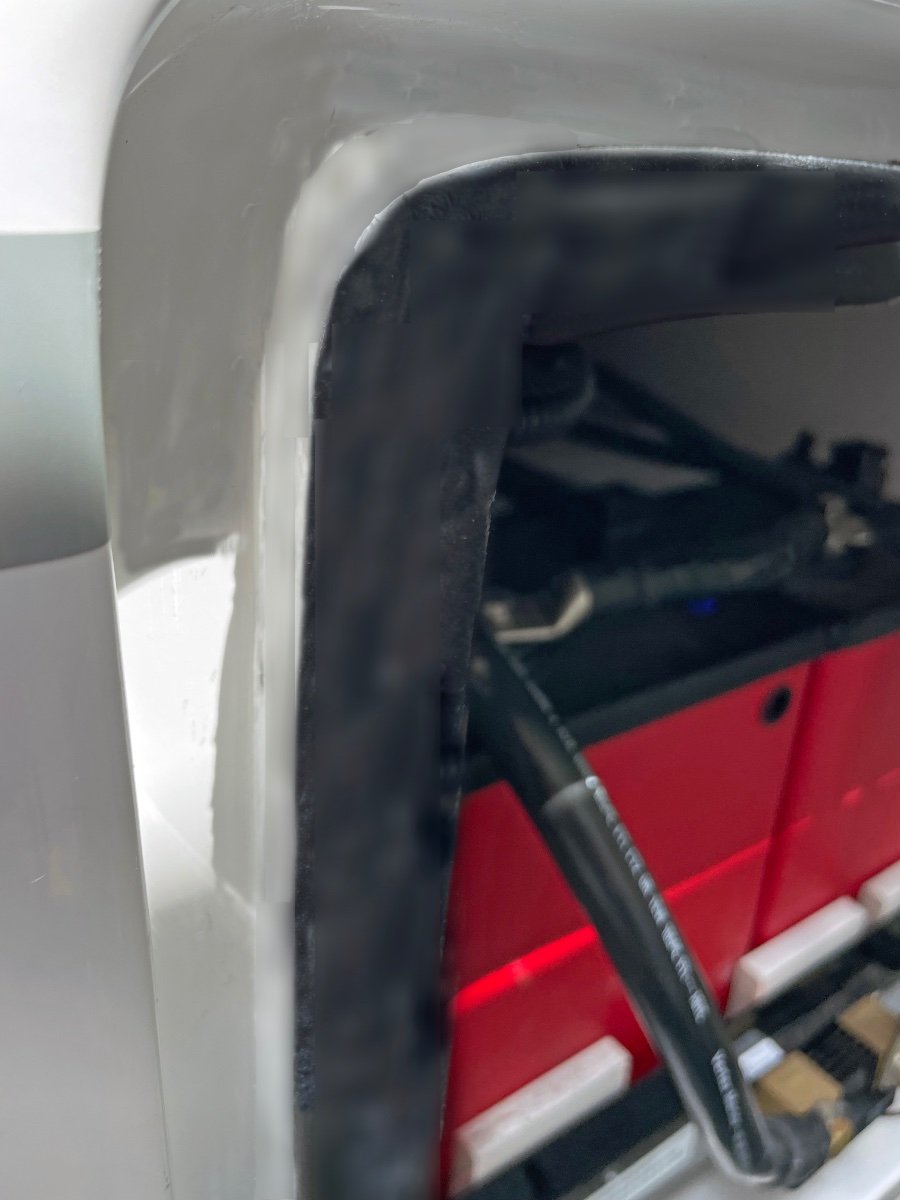
7) Clean seams and add a bead of boat life white sealant around the battery box seam. (See pix below).
Repaired Box Above: Door closes with a good seal all around and the box sealed to the body.
We are going to keep an eye on this as we travel this next year, and make a trip to the Oliver factory for them to inspect and repair if necessary.
I'm not sure of the root cause or mechanism by which the box tipped out in the first place.
One concern would be that the box is putting too much pressure on the outer hull while bouncing down the highway.
I don't see any indications of cracking in the glass hull or box at this point.Hope this helps if anyone else see's an issue.
Craig
Hull 505
-
7
-
5
-
-
Hull 505 - 2019 never had the seal.
-
1
-
-
41 minutes ago, FrankC said:
40 year old Fluke meter
Small world.
I was a voltmeter product manager at Fluke in 1978-82 for that handheld DVM (and other products) that Frank C showed.
It was designed with tests including driving over it with a fork lift to see if we could squish the case.
The person who was our mechanical designer iterated several times until it stood up to our abuse goals.
I still have (and operate) Prototype 004 at home.CS
-
5
-
-
36 minutes ago, mossemi said:
Would the battery on/off state show on the app like the picture below? Does the picture below show the status of 1 battery or a battery bank? Or would the app show on even if only 1 of 2 or 3 batteries is on? I do not have Lithionics batteries, but I am trying to understand them a little better?
Mossemi:
In the Lithionics app you see each battery as it's own entity.
They have a specific SN and you can rename them ...like Battery 1, Battery 2 or Front/Rear etc.
In the Lithionics app then you see each battery on or off and it's specific details.Folks with 3 Lithionics battery configurations have 3 different battery screens available to look at the details.
For the Platinum Package with 2 of the 315AH batteries you see 2 screens.In our case we also installed a Victron Smart Shunt on the negative side of the bank of 2 batteries.
This way we monitor the total of both batteries.
(To do that we're using 2 bluetooth based apps, one from Lithionics and one from Victron.)CS
-
3
-
-
If you have Lithionics Batteries, please check that the batteries are actually turned on (Blue lights and switch should be on the top of the batteries).
I've heard of some cases where one or more of the the Lithionics batteries weren't turned on at all...and as a result the owners were only using 1 battery out of a bank of 2 or 3 Lithionics depending upon the battery package you have.Also there is a service note out you should check out :
-
5
-
-
In March I reported my Truma water heater failure to NHTSA.
Instantly on the call they asked me to identify by Brand/Model/SN the LP Gas Regulator.They said at that time they were tracing down many regulator/parts failures and about to do a big recall.
After sharing pictures of our Regulator and Fittings they said our Oliver installed parts aren't the brand/model in their recall.
CS
-
2
-
3
-
-
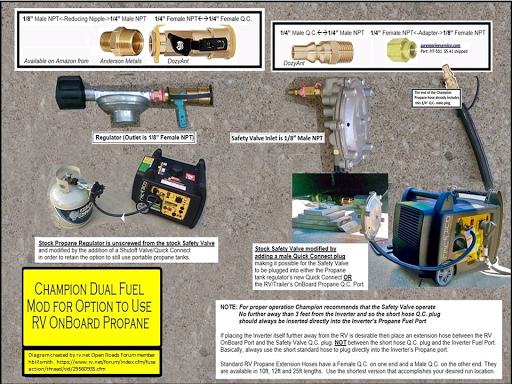
It depends on your generator...our Champion has a fuel flow safety device on the hose, plus a regulator.
We were able to remove the "regulator from the fuel dispenser" and put on a quick connect male fitting.
*Article here about that:
https://www.mpking.com/2021/02/connecting-dual-fuel-champion-generator.html
Here's video showing another persons solution.
In any case the safety device needs to be connected closest to the Generator, then an extension feed can run the rest of the way back to your trailer quick connect.
-
Curious,
Was there no black replacement flange available that would make it an easier replacement job?
Last November we had our toilet pulled due to leaks like you mentioned. When service finished the toilet was no longer set parallel to the walls and had a slight twist. I've been thinking about removing it to see what is happening.
Your pictures look like they might be rotated 90Deg from each other....so it's hard to reference how the two flanges aligned for the bolts that hold the toilet down.
-
And double check that your outside hot water shower wand had the valves turned OFF.
Once I had winterized and forgot to turn those outside shower controls back to off. With the wand head shut off, I was inadvertently cycling the hot and cold water through the system and it never got really hot.
So...just for grins make sure the outside shower controls are truly OFF.
CS-
1
-
4
-
-
Have you considered changing the outside curbside outlet to one with USB ports as well as the regular 120V plugs?
That would be weatherproof, but it would require that you run the inverter to get the USB power outside.
You may be able to change that particular unit to have ONE 120V AC Outlet, and ONE with a USB Outlet that could then be wired to the 12V power that also runs the pump.
There may be a way to see that outlet on the curb side under the bed, in our EII that plug would be between the water heater and the water pump on the sidewall.-
3
-
-
Just down the road east 14 Miles From Johnson City is the LBJ Ranch...which is a National Historic Park and a great attraction to visit.
To tour it you first check in at the LBJ State Park Office and pickup a drive through pass.
Then you continue onward onto the actual LBJ Ranch compound.In Johnson City you will find
• The National Park Visitor Center where park rangers are happy to
help you plan your visit
• The Boyhood Home in which President Johnson spent his childhood
• The Johnson Settlement where the President’s grandparents first
settled in the 1860sThe LBJ Ranch is located 14 miles west of Johnson City near Stonewall, Texas. A second visitor center, operated by LBJ State Park and Historic Site, is located near the Ranch. In order to see the LBJ Ranch, visitors obtain a free driving permit at the LBJ State Park and Historic Site Visitor Center.
CS
-
3
-
-
Dry Camping vs. Boon-docking are maybe two different things....which are you planning?
DEFINITION:
Boon-docking - No Hookups, no designated campsite, go off road to find a spot in a desert/forest/mountains with some ruts etc to get to the chosen site.
The road may be a fire service road that is pretty bumpy, rutted, not maintained.Dry Camping - No Hookups , paved or maintained gravel road getting to and even at the campsite.
May or may not have water near by, pit toilets.
Site has a designated number or space with markers (rocks/boulders/posts) for where to park the trailer.
Maybe a fire pit and table.Considerations:
For Boon-docking: In an Oliver
Size & Ground Clearance:
- The Oliver is perfect fit as it's width and length make it very agile even in older small campgrounds.
- Ground clearance is very good with no plumbing hanging down below the trailer to snag
- You still need to be careful for rocks and steep slope changes mostly for the back bumper
- The suspension for the Oliver is pretty good for moderate off road use. *(There are better suspensions on other types of trailers)
Water & Sewer:
- Water tank and Grey Tank are both limited to 30Gal, but has a standard boondocking port to suck in water from a bladder or tank.
- Black Tank is 18gal which is about 5 days for 2 ppl
-
Option of a Composting Toilet for an Oliver to make off Boon-Docking a much longer experience.
Electrical & Solar:
- With our Dual Lithionics 315 Batteries (630AH Total) and Solar we've gone 8 days without any sun and still had power.
- New Trailers are shipping with more solar wattage and use new Victron control systems
Hope your search is useful and let us know what you decide.
Our Blog is here if you are interested in use cases, pictures etc.
Craig Short
-
1
-
7
-
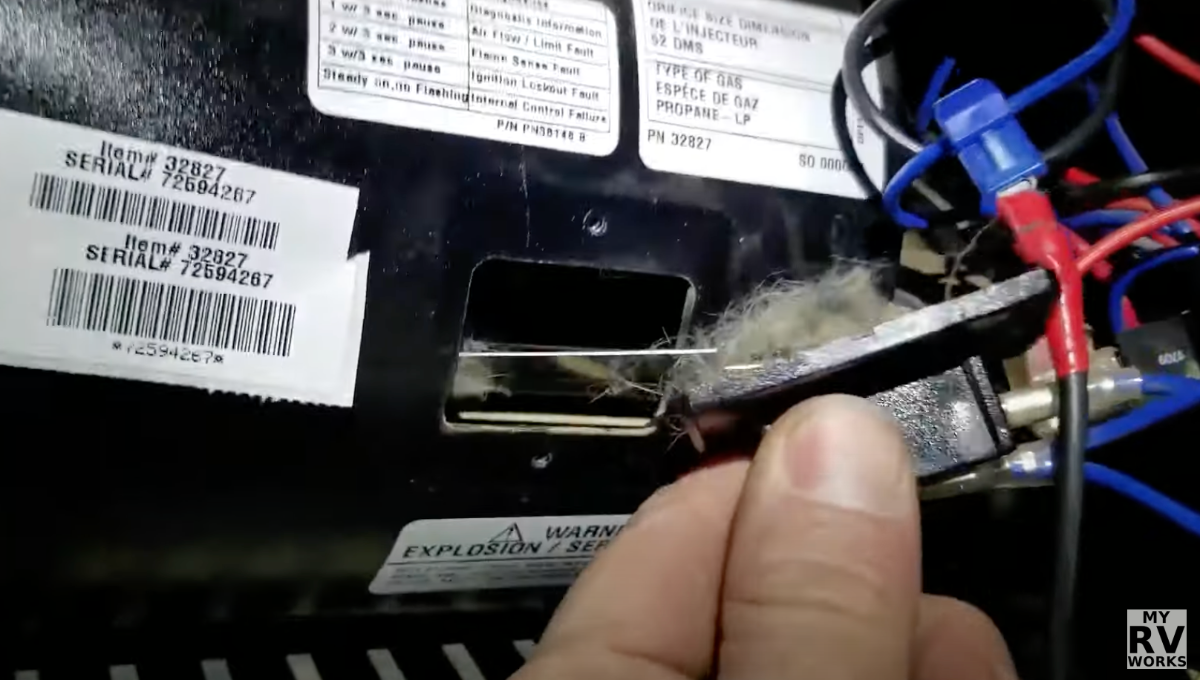
Here's how to check your sail switch....the outside panel of the furnace comes off with a few screws....the video shows what's inside (rotated 90 from how ours are mounted.)
Sail Switch with pet hair shown below...but could be just dirty.
The video :
-
4
-
3
-
-
I replaced my rubber stems with metal stems. I don't think it was necessary now that I've had it a while.
Even with the change over, I had one of those new stems loosen up on a trip, and I had to tighten it back up and put in air...and the TST system caught the leak.
CS
-
2
-
-
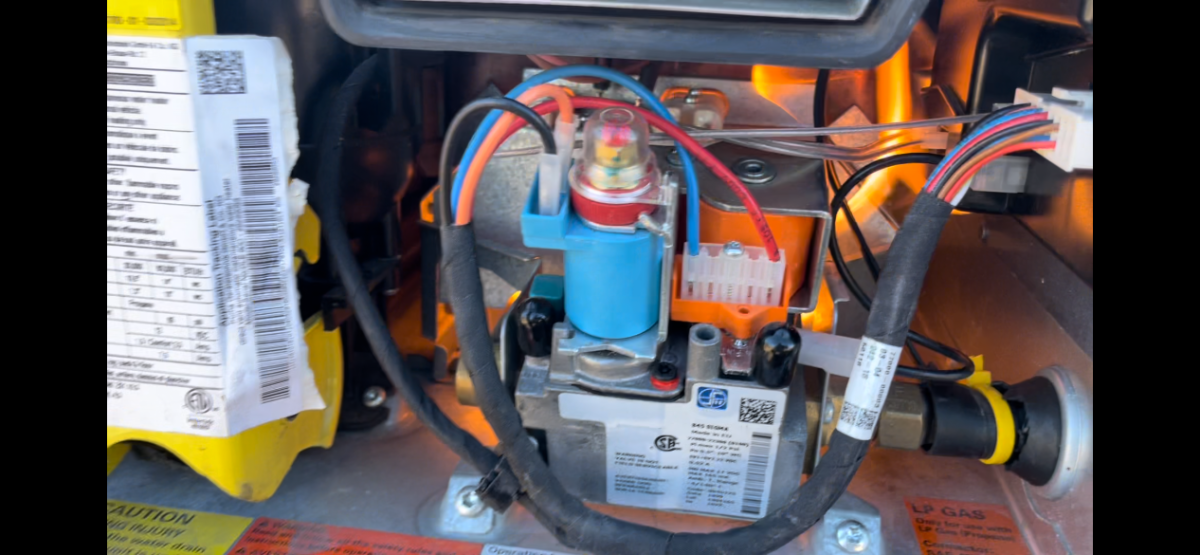
Our hull 505 in service Aug 2019 has a major Truma burner fail at 29 months. (past the 2 yr wty)
The burner box no longer contained the flames on startup and we smelled burning plastic before we shut it down.
Pix from video shows symptom of flames engulfing wiring and controls.
We ended up buying a replacement and having a unit shipped to us by Oliver (as Truma local service was un-available).
We had a local mobile tech do the re-install and all is well now.We were lucky this happens while daylight and I could take action immediately.
When we installed the new unit, we secured the back side of the water heater to the trailer frame so it can't bounce at all.
The old unit got shipped back to Truma for analysis in January 2022...we've still to hear back from TRUMA on the topic.
-
1
-
1
-
 2
2
-


Hot Water Heater (Truma) Bypass Valve Issue
in Mechanical & Technical Tips
Posted
You might also consider securing the backof the water heater to the frame with a strap or L brackets.
My water heater had an issue which included a fire, and one of the requested steps upon repair from Truma was to firmly attach the back of the water heater down to the frame it's sitting on. (The back of the Truma is sitting on a frame member for the trailer.)
After about 3 months, I heard back that the water heater I had was found to have an improperly torqued internal gas connection from the Truma factory. They told Oliver Service that upon tear down they found the torque issue was linked to a manufacturing line situation where their Torque tool wasn't properly calibrated. Not sure what batch of units that impacted but they eventually fully refunded my replacement unit.