

Galway Girl
-
Posts
551 -
Joined
-
Last visited
-
Days Won
17
Posts posted by Galway Girl
-
-
Thanks for the added and important detail
-
 2
2
-
-
On 3/31/2022 at 11:37 AM, Geronimo John said:
do you foresee any problems with mounting a ZAMP Solar Sidewall Port actually in the battery box hatch to feed directly into a solar suit case Voyager Solar Controller and batteries?
Geronimo John:
There would be room to mount the small waterproof controller inside the sidewall of the battery box.
I held my renogy unit up inside the box and it had clearance for the tray to slide, etc.
It also looked like it might even fit ON the door if you were careful making sure no other big cables in the front of your box.Since our trailer already has a ZAMP Sidewall Port, I plan to plug my controller into that port and leave the box tucked up under the trailer somewhere. The zamp port we have runs from the side of the trailer (just rear of battery box)into the area under the curbside bed. It has a 20A fuse inline, and then it connects to the Ground and + 12V lines that then continue into the battery box.
In my Kit I have the zamp solar cord with the proper SAE wiring connection for the Zamp Port on one end, and the Anderson's on the other to plug into my waterproof control box.
The ZAMP SAE ports are reversed polarity from most other brands. This is so a cable coming from a solar panel doesn't have a male connector sticking out with DC+ on the connector.
Craig
-
FYI on Hull 505 - the spray hose doesn't have a coupler, just the pull our faucet in a loop back to the fixture.
My next project will be John's most excellent rewire of the Fridge Outlet into a waterproof box!

-
1
-
-
Which bay of drawers is that, I assume the one under the stove.
-
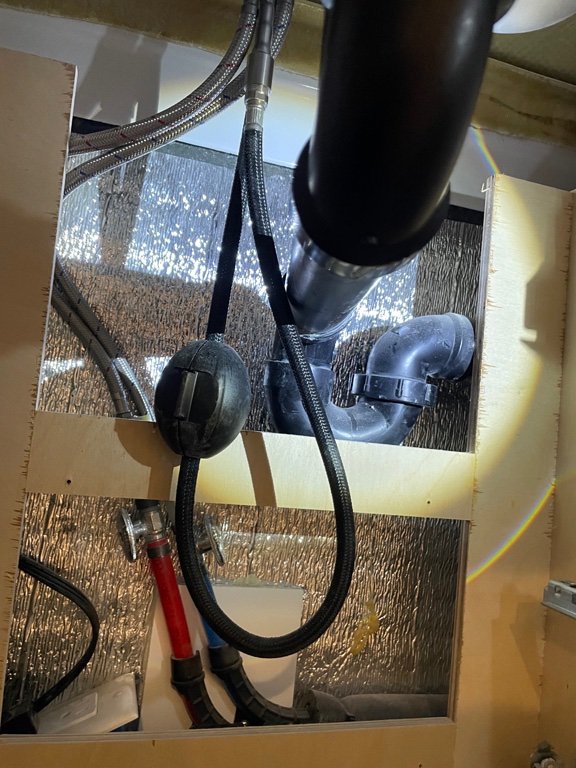
John,
Very slick to install that metal plate then mount the junction box to the plate.
Am I interpreting correctly that you have have 4 screws securing the mounting plate to the water line backing plate?
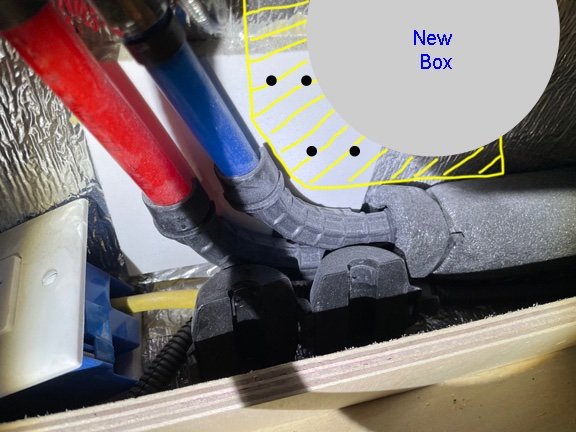
That should hold it pretty well as long as the backing board stays attached to the sidewall.Here's what I see inside my hull 505 with my impression of what you did:
(*new backing plate yellow, mounting screws black, new box grey)
As to your earlier post about the sink and the water coupler, my unit has no blue coupler on the pull out hose.
The hose comes from the faucet, makes a loop back up to the nozzle with no coupler, but it does have a weight.I'll do the mod you just showed before I leave on our next long trip.
Craig
-
 1
1
-
3
-
-
Welcome from Hull 505 in "Everett WA"...
Here's our blog....
Let's connect via a PM and exchange contact info.
Craig & Rose Short
Hull 505 - Everett WA
-
7 hours ago, Wanderers said:
Where did you purchase the Anderson connectors adapter for he side of the box.
I buy much of my small anderson parts online from Powerwerx Anderson Connectors
They have a good selection of tools, parts etc for many projects.
Craig
-
3
-
-
Portable Solar Upgrade:
We are preparing for more trips where we will be camping in more primitive settings.
In some cases we'll be in developed USFS campsites that have a fire pit but no water or electricity.
To extend our stay and recharge our batteries without starting the truck or generator we've decided to pull together a simple external solar kit.
We also want to be able to loan this kit to our family members who have other trailers with Zamp Solar input ports.Here's what's in our Kit:
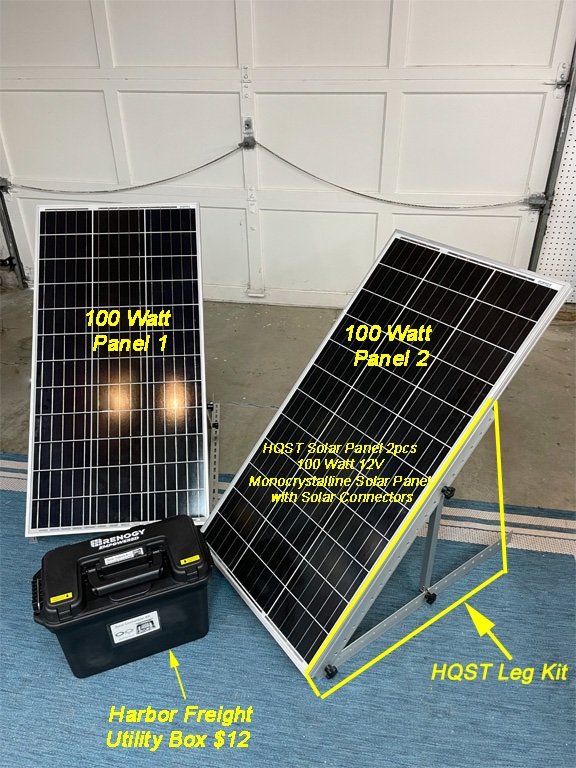
2 - HQST Solar Panels - 100 Watt 12V Monocrystalline with MC4 Solar Connectors
1 - Renogy Voyager 20A PWM Solar Controller
1 - Harbor Freight Utility Case (For cables, adapters, and the Solar Controller)
1 - Harbor Freight Apache 1800 Waterproof Case (So I can leave the controller out in the rain if necessary)
1 - Pair - Solar Extension Cables with MC4 on one end (RICH SOLAR 20 Feet 10 Gauge )
1 - Zamp Solar Cable (Modified to have Anderson Power Pole connectors on the end.)
Misc - MC4 Y Cables, adapters and FusesCost:
The total cost of this kit was < $300 ....a similar 200 Watt Solar Suitcase with controller is about $425.00.
Our USE Model:
Our kit is designed plug in to charge both the Aux Batteries in our truck bed and for our the main batteries for the Trailer.
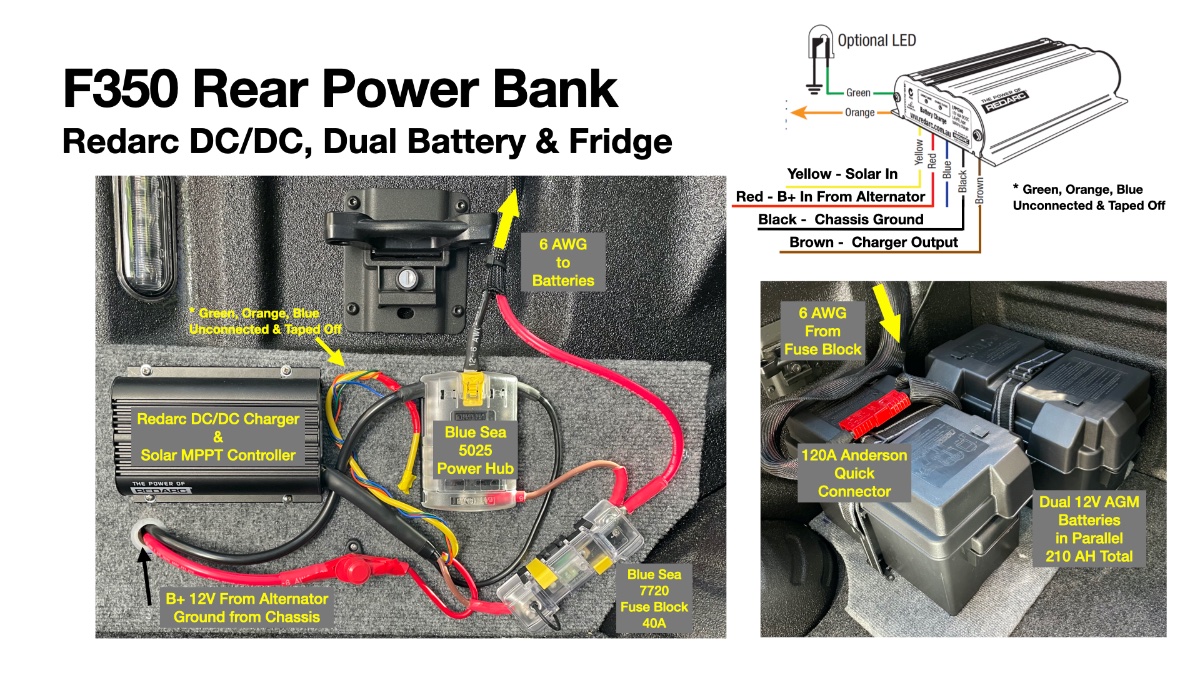
We also have made it portable so it can be loaned out to our kids and friends who also have a need for charging.Our F350 truck is setup with dual AGM batteries and has a Redarc BCDC1225D Dc/Dc Charter with Solar Inputs connected via 45A Anderson Power Pole Connectors.
(Another whole writeup on that project is here: Link to Truck Power Port Project
The Elite II units with Solar Options have an external Zamp Connector on the side of the trailer which is connected through a 20A fuse to the trailer batteries.
That Zamp Port doesn't connect to the onboard Zamp Controller, so you need a second controller for external panels.In operation there are two way's we connect up the Solar Panels:
1) To charge the truck batteries, the panels connect directly to the Power Pole connector in the truck as it's connected into the Redarc Charge Controller.
2) To charge the trailer batteries, the panels connect through a Renogy 20A PWM controller to the Zamp Port on the side of the Oliver.
System Overview Photo Repeated Below:
All the components will fit into two cases, one for the solar panels & legs,
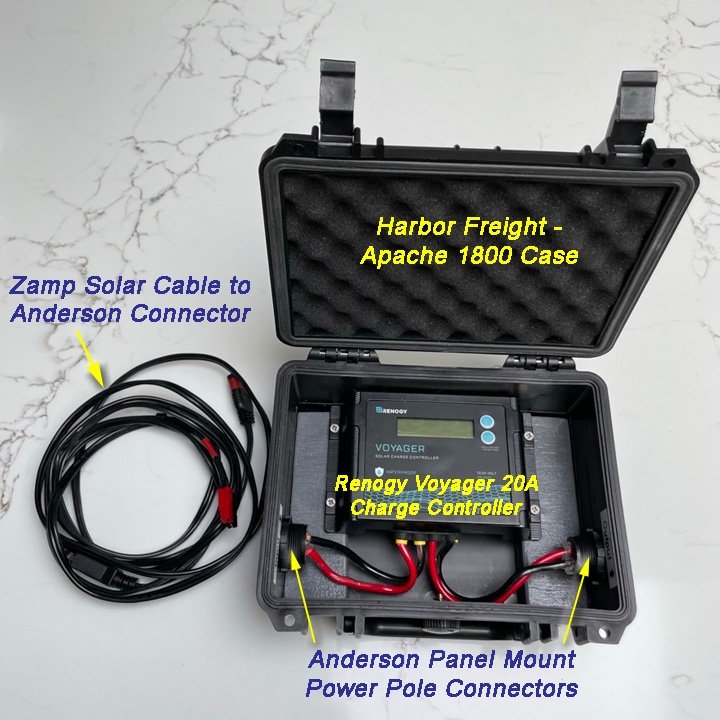
and another in a utility box for the cables, controller and adapters.Solar Controller in a transit case: For Mobile and Loaner Use
We want to be able to move the solar controller between various trailers in our family, so I decided to mount it inside a small waterproof transit case.
The case has Anderson Powerpole connectors on both the solar input and controller output side of the case.
These are nice connectors that are flush mounted into the box and include a dust cap for travel.
Harbor Freight - Apache 1800 Transit Case $12 on sale
Mounting the Controller:
The Renogy Controller is mounted to a piece of 3/4" plywood cut in a U shape to fit inside the bottom of the transit case.
This U shaped cutout helps hold the wire connectors up off the bottom of the case and gives room for the wires.
I wired the Anderson Connectors using the 45 AMP pins to 10 AWG stranded wire.
These wires are connected to the controller mounting screws via spade connectors.
Case open to show the Renege Charge Controller and connections to Anderson Plugs
Both the Input (Solar In) and Output (From the Charge Controller) use
Anderson Power Pole Connectors Capable of 45A)The Carrying Case:
All the cables, Y connectors, adapters, fuses and the whole waterproof case fit neatly into a Harbor Freight Utility Box.
The Solar Panels and leg system along with tie down stakes will fit into a separate case to protect them during transit.
There's even room left over for a voltmeter or other accessories like Crimpers or Cutters for solar troubleshooting.
Harbor Freight Utility Box has storage in both the base and the LID area.
Main Body of Box holds Cables and Controller in a waterproof transit case.
The lid of the box also opens and has room for MC4 - Y adapters, Couplers and Fuses.
In any case, hope sharing this give's some of you an idea for your own mobile solar upgrade.
Craig Short
Hull 505 - Galway Girl

-
11
-
-
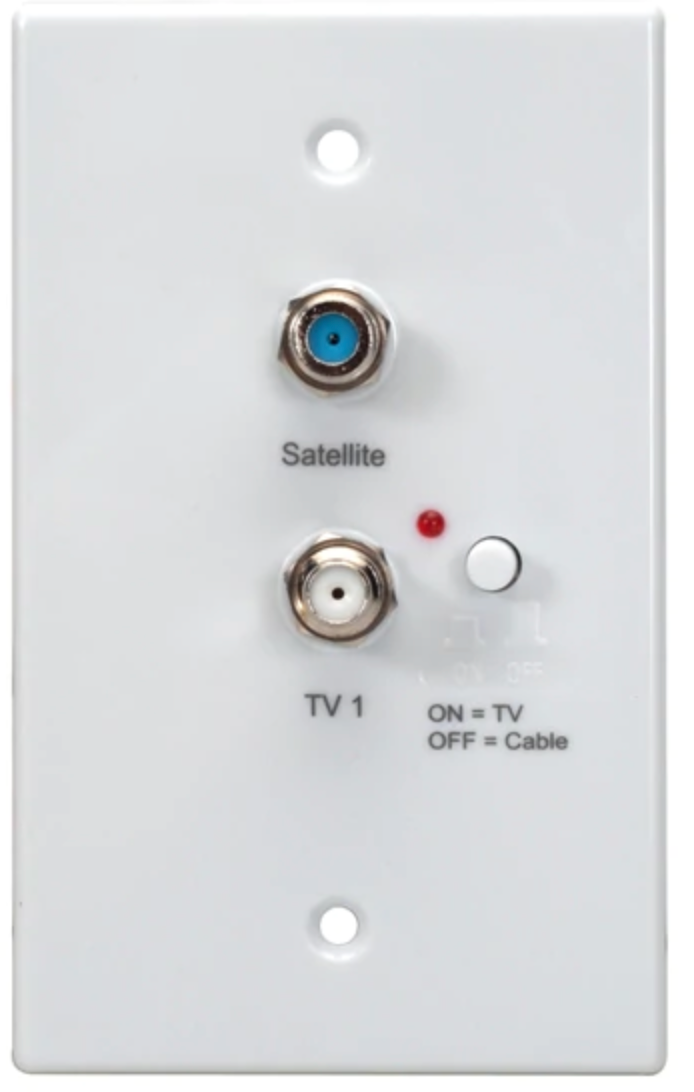
That wall mount amplifier channel is hooked up to the HDTV antenna. So when it's on , that input becomes the most powerful input and your TV won't see any CATV channels.
So when you turn it off, then the CATV scan should find the CATV channels.
One last thing, in my Hull 505 the factory had inadvertently wired the CATV input (outside) to the Satellite input and vice versa.
So if you still don't get anything, stick the outdoor cable into the other outside input and rescan.
After that I don't know what to tell you.CS
-
1
-
-
Also in the 2019 and I assume in yours.
When you are connected up to a cable port outside the trailer it comes into the "amplifier" in the attic.
The AMP is ON when the red lamp is lit.
It's only supposed to be on to receive off the air HDTV channels via your antenna.The red light (and amplifier) needs to be OFF to receive CATV , then do a channel scan for the CATV input that is feeding the TV from the CATV pedestal.
-
2
-
-
Dash That USB!
As we prepare for another long trip, we know we'll need to power dash top devices like our backup camera display and our Garmin GPS.A good way to solve the clutter is to add some new USB outlets and some arm mounts into the stock F350 Dash Tray.
I know many of you may have already accomplished this upgrade but I thought I would share our results.(By design the dash trays have been the same in the F150 and F250 from 2017 up through 2021.)
Here's a before and after shot of what the Stock Tray and the tray with the Built Right Industries shelf look like.
In our case in addition to the Built Right Shelf, we added USB and Cigarette Lighter Outputs which we bought online from Amazon into that tray.
We use the USB outputs to power our Garmin and the "cigarette adapter" to power our backup cam monitor.
We pulled the power from these off the back of the existing cigarette lighter output which has plenty of power for these devices.
We added inline fuses to these new plugs as a safety measure.
View from front back at USB and Cigarette Lighter in Dash Tray
View from the drivers seat.Here's a video showing how to remove and replace the top tray as part of this project.Hope that encourages others to do a similar project.-
1
-
3
-
-
Anyone wondering the difference between the GUTS of Battleborn vs. Lithionics may want to watch this from the Fit RV.
A teardown that compares the GTX3 Lithionics Battery to the Battleborns.
-
1
-
4
-
-
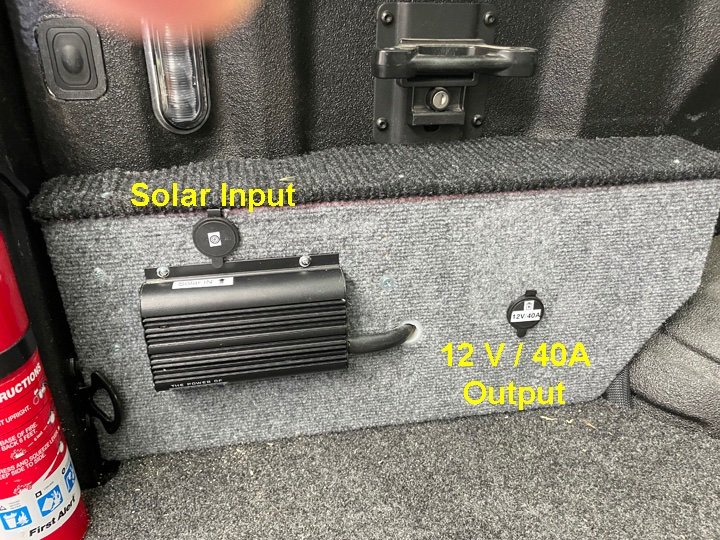
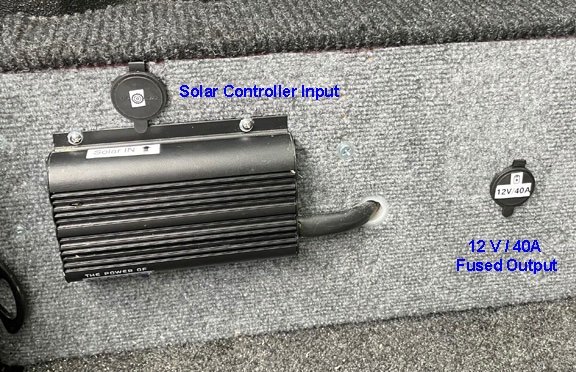
GJ - Thanks for the encouragement to improve.
Today I also added an input port for solar charging (feeds into the redarc) and an output port for running a compressor.
Used 45amp Anderson Connectors and fused the circuits.
Craig
-
1
-
-
Here is a NEW post that ties together posts and threads that generate a fair amount of feedback and I thought I should update them as things change.
First:
Starting a Lithium Upgrade:That post lives on this Oliver Forum thread:
(In addition you can find more details in our 4-Ever-Hithed.com web page blog is linked here: https://4-ever-hitched.com/ggs-blog/f/lithium-battery-upgrade )
Second:
...buried inside the Starting Lithium Upgrade thread...a ways down.Not long after the Lithium Upgrade I posted about adding an ARB Fridge to the back of our truck.
This mod required adding a pair of batteries and a Redarc BC/DC charger.
The original post is below :Recently - Geronimo John pointed out that the wiring details were good, but I had inadvertently exposed too many snag points with the wiring as shown.
As GJ pointed out, stuff flies around on bumpy roads and could easily contact or snag the wires.
After our recent 6 month road trip I took his words to heart to rewire the fridge/charger and build extra sturdy storage with Tie Downs for our F350.So here's both an update own the Fridge wiring and some pix of the new storage solution in the back of our F350.
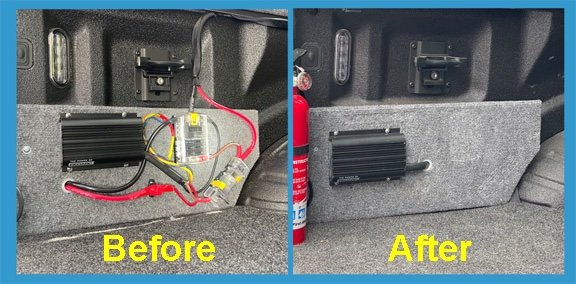
Wiring up dual batteries and a Redarc for Charging while driving: Original View:
After the feedback from GJ...I modified the wiring to put most of it on the back side of the mounting board. I added standoffs so there was room behind the board for the wiring and connectors and mad sure I had a simple way to drop that board back down with the removal of 4 screws. Here's the after pix on that modification:
UPDATED: Rats Nest tucked behind and wires now secured under edges of bedrug.
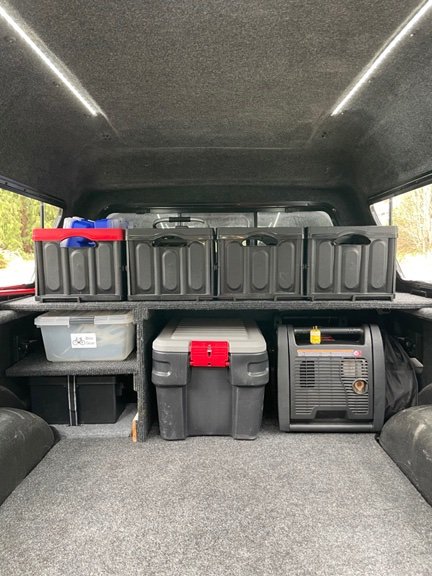
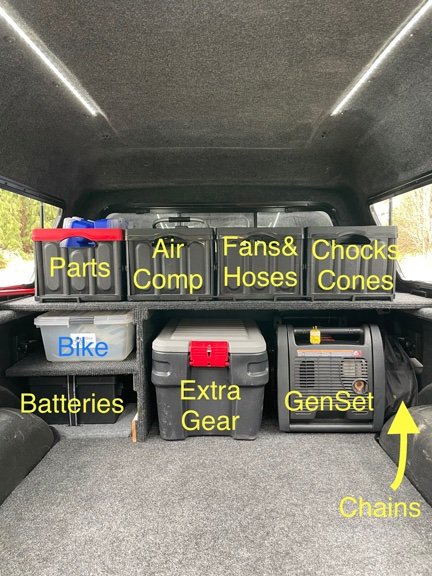
New Front Storage Shelving:
I then moved forward to create some storage space in the front of the truck for extra gear.
The goal was to create a place to store bins of gear that can be strapped down during travel.
Below: New Shelving with Storage Bins
Shelving unit is 6' wide x 2' deep.
Shelves and dividers 3/4" Plywood - wrapped in automotive carpet glued to surface.Access through side windows so I can quickly access all items in the top row
Here are examples of accessories we carry that fit into various spaces/bins
Hope that is of some use to anyone looking for storage solutions for the back of a truck.
Craig
-
10
-
-
Owned an F150 3.5 EB Supercrew 4x4 with max tow package when we bought our Oliver.
(Bought the truck first).It had a 12,700 tow capacity, but only 1580# payload which ended up being an issue for us.
Our gear + our EII tongue wt. of about 685# constantly left us right at the payload (or a little over).The F150 had plenty of power, and we got about 12.5 MPG towing.
However, we felt a bit uncomfortable on long downhill steep grades.
The Ecoboost 1/2 ton was about the same mass as the trailer and we felt pushed at times.
We didn't feel comfortable for mountain driving and eventually we upgraded to an F350 which we have now.If I knew what I know now, and was buying the Truck for an EII, I would go with either a 3/4 or 1 ton.
(When we bought our F350 it's price was identical to the F250 trim level, so we went with the bit bigger payload unit.
Oh...here's a chart I made while shopping for Fords.
It shows the PAYLOAD sticker (from door) numbers for various configurations.
* Note that a stripped down F150 (XLT) can have a 1900 LB payload in the longed configuration.
* The F250 High Capacity Option adds another 592 lbs of Payload .
* Jumping from the base F250 to the F350 adds 1240 lbs of payload.For most folks towing an Oliver EII the sweet spot is probably a F250 or F250 + High Capacity Option.
C. Short
-
2
-
-
Ok sorry for my bad.
-
3
-
-
We live in the wet and tree covered side of WA State.
Here's a post from our blog on using our upgraded Lithiums with the Existing Solar Panels and Zamp Controller:https://4-ever-hitched.com/ggs-blog/f/lithium-battery-upgrade
Look down the blog post near the bottom for this section:
*****************************
Roadtrip Testing in June
With the physical installations complete we'll be testing the system during our June road trip.
We camped in Kalaloch Campground on a mostly cloudy weekend with tree cover and shad for 1/2 the day.
Here's our State of Charge data for the dual GTX 315's in our trailer (Hull 505) over a few days of boon-docking at Kalaloch on the WA Coast in June 2021.- NO Generator Use, No Shore Power.
- 340W Solar on Roof and 30A Zamp Controller On Board
- No direct fully sunny days
Power Uses:
- Ran the max fan at night on low for air circulation and most of the afternoons
- Used the microwave sparingly to do some popcorn. Didn't do the Oven.
- Did NOT run AC as in our setup we have a 2000W inverter, not connected to the AC.
- Watched TV (we have a DC powered TV) each night for about 2 hours (streaming from downloads on the tablet.)
- Ran 2CPAPS all night for 8 hours.
- Did NOT run the generator nor hook up to any shore power.
DATA:
Starting AH: 630AH Total Capacity (both batteries)
- 8:00 AM Day 1 was 100% Partial Sun
- 6:40 AM Day 2 was 90% Rainy Day
- 6:13 AM Day 3 was 83% Rainy Day
- 8:27 AM Day 4 was 75% Departure Day
Total Used AH: 178AH or ~60 AH/day
Remaining AH: 452 AH (sum of both batteries)I estimated with the dual 315A Batteries we could last between 10-12 total days in overcast conditions like those we experienced with our normal power use model.
We can't run the AC because we only have the 2000W inverter and it's wired into the plugs for the trailer that power the Fridge, uWave and other outlets...but NOT to the AC which has it's own dedicated 30A breaker.
My guess is if we had the bank of 3 Lithionics which are part of the Lithium Pro Option (390AH) we could last about 7 days in slight overcast conditions.
Dual 315GTX's in the Platinum Option enable about 5-6 additional days of off grid camping given our use model.
*Your use model may be very different*
We'll be testing full sun as we travel in Aug-October and we will post an update.
Hope that data helps some folks!.
-
1
-
The one at Monroe is the tool only. thus part number DCM848B (bare tool is the B designator). The part you show is the the full Kit which is the part number you have: DCM848P2, and includes a bag and battery charger & battery.
"This DCM848P2 - 20V MAX* cordless kit includes a 5 in. Random Orbit Polisher, two 20V MAX* 5.0Ah batteries, charger, and kit bag." -
John,
Lowe's in Monroe WA has 5 in stock...they can be drop shipped to a Lowe's in Spokane or your house.
CS
-
Just FYI here's my explanation of our Lithionics Upgrade ...may be useful for those reading this thread.
https://4-ever-hitched.com/ggs-blog/f/lithium-battery-upgrade
Craig - Hull 505 - Galway Girl
-
3
-
1
-
-
52 minutes ago, Rivernerd said:
Bumping this old thread with a question: If another 2019 Elite II with 6V AGMs (wired in series) already has a Xantrex XC2000 installed, but an XC3000 is desired as part of a lithium upgrade (to enable running AC from the batteries/inverter), could you just swap the XC2000 for an XC3000, swap out the AGMs for Lithionics GTX 315 Ah batteries, and be done (except for disabling the 7-pin charging wire)?
In the 2019 the wiring for the 2000 W inverter only is connected to the outlets and the uW outlet.
It is not connected to the AC which is on it's own circuit.If you want to have a 3K inverter to run the uW then you would have a rewiring project ahead of you...and you may want to ask the Oliver Service about how you could accomplish the 3K inverter wiring.
Craig
-
1
-
-
Based on great feedback, I've made a change to the way our fridge wiring is hooked up.
After some reflection and trial an error I completed the project to bullet-proof and protect the wiring that is part of my truck bed 12V system.
1) Moved all the loose wiring onto the back side of the mounting board where it can't get snagged by items in the truck bed.
2) On the back side, I tied down the longer wires with wire clamps.
3) Added standoffs behind the board to allow some space for the components moved to that side.
4) Ran the main 12V wires to the bottom edge of the bed securing them under the bedbug.
5) Did the same for the 12V wires running over to the ARB Fridge connector.
6) I left the Redarc visible on the front of the board so I can see indicator LED's and where it has good airflow.The unit flips out with the removal of 2 mounting screws if I need to do any service.
Here's a before and after shot.
Thanks again to Geronimo John for the inspiration to ruggedize and clean up.
Tomorrow I'll put a shelf across the top of the area to keep anything from dropping down into the space behind the mounting board.M
My next project to build some shelving in the front of the truck for our various gear boxes.
Craig
Hull 505
-
5
-
-
Geronimo-John:
Fantastic improvement ideas!After having lived with it for 6 months on the road, many of the things you suggested were in the back of my mind.
Based on your ideas, I think I'll "rework" that area in the bed to make safer, more rugged and cleaner.
I also want to put some shelving in the front of the bed for better storage, tie downs and control of items in the truck bed.
There was far too much stuff moving for my taste on the 6 month road trip.Once I finish the next phase I'll repost the re-design of the electrical, and the new storage upgrades.
Again, thanks for the inspiration to improve the design for safer off road use.
Craig
-
2
-
-
Planning a trip that is Westbound following route 66 in October.
By November we would peel north from Santa Fe, up to Southern Colorado, then across to the Mighty 5 in Utah and Grand Canyon.
(See proposed route below.)
Our current timing has us in the Colorado/Utah & GC the first 10 days of November.
I'm starting to experince campgrounds 'winding down' by Mid Oct. *(no water, no electric). Some are just closed.Are the first 2 weeks of November too late in the year "weather wise" to hit those Natl Parks?
My main concern isn't as much the cold....but I don't want to be towing in snowy conditions in the mountains.Our backup plan would be to stay on the old 66 route through to Flagstaff, pop up to the GC then back down into Palm Springs area all before Nov 1.
Advice/Thoughts?
Craig - Hull 505-
2
-
 1
1
-


Replace Flooded batteries with AGM
in Mechanical & Technical Tips
Posted
I'll chime in that the PD 4045 Chargers (Progressive Dynamics) built in chargers that have been in the pre 2021 Olivers ...may have a jumper switch to set them to a "Lithium" setting.
See below the jumper (Yellow Circle) labeled WIZ or LI.
The other jumper (Green Circle) is for setting if your battery is WET Lead Acid / AGM -or- GEL . (All are actually lead acid chemistry.)
Normally for all Wet, AGM batteries the setting for the yellow jumper is WIZ.
The LI setting as described by PD Service sets a constant 14.6V voltage.
The (Wiz or Wizard) is their setting for all lead acid chemistry batteries (Wet / AGM / GEL)
The wizard provides a charging profile needed for many LEAD acid chemistry batteries.
The PD Uni does NOT provide a wizard or profile appropriate for Lithium....just constant V out.
Why's that matter?
When we did our upgrade to "Lithionics" batteries we were told specifically by the Lithionics Engineering team that they would NOT SUPPORT having the PD Series of chargers used with their batteries. Specifically they wanted the charger to have a Lithium Profile included for their battery warranty and lifespan.
Battleborn when queried told us the PD 4045 would work fine, then when challenged said they would prefer a charger with a LI profile, like those from Xantrex, Victron etc. for longest battery life.
So if you are going to use WET Lead Acid, AGM or GEL batteries, then the PD 4045 will do fine if your trailer has that charger.
If you are switching to Lithium, then double check with the battery manufacturer and let them know what specific charger is in your trailer.