Hokieman
-
Posts
332 -
Joined
-
Last visited
-
Days Won
5
Recent Profile Visitors
3,430 profile views


Hokieman's Achievements
")


-

Local web page to search Oliver forums via Google
Hokieman replied to Wayfinder's topic in General Discussion
Thank you Chris! You have gone above and beyond on this task. For those that haven’t tried it, the Oliver forum search tool is a tremendous help. -
Thanks Chris & John. I plan to crawl under my Oliver soon and check the wiring. I may pull it out of the D35 axles to inspect. John Davies had significantly undersized brake wiring in his 2017 Oliver. https://olivertraveltrailers.com/forums/topic/2685-how-to-brake-wiring-is-undersized-some-answers-and-partial-solution/
-
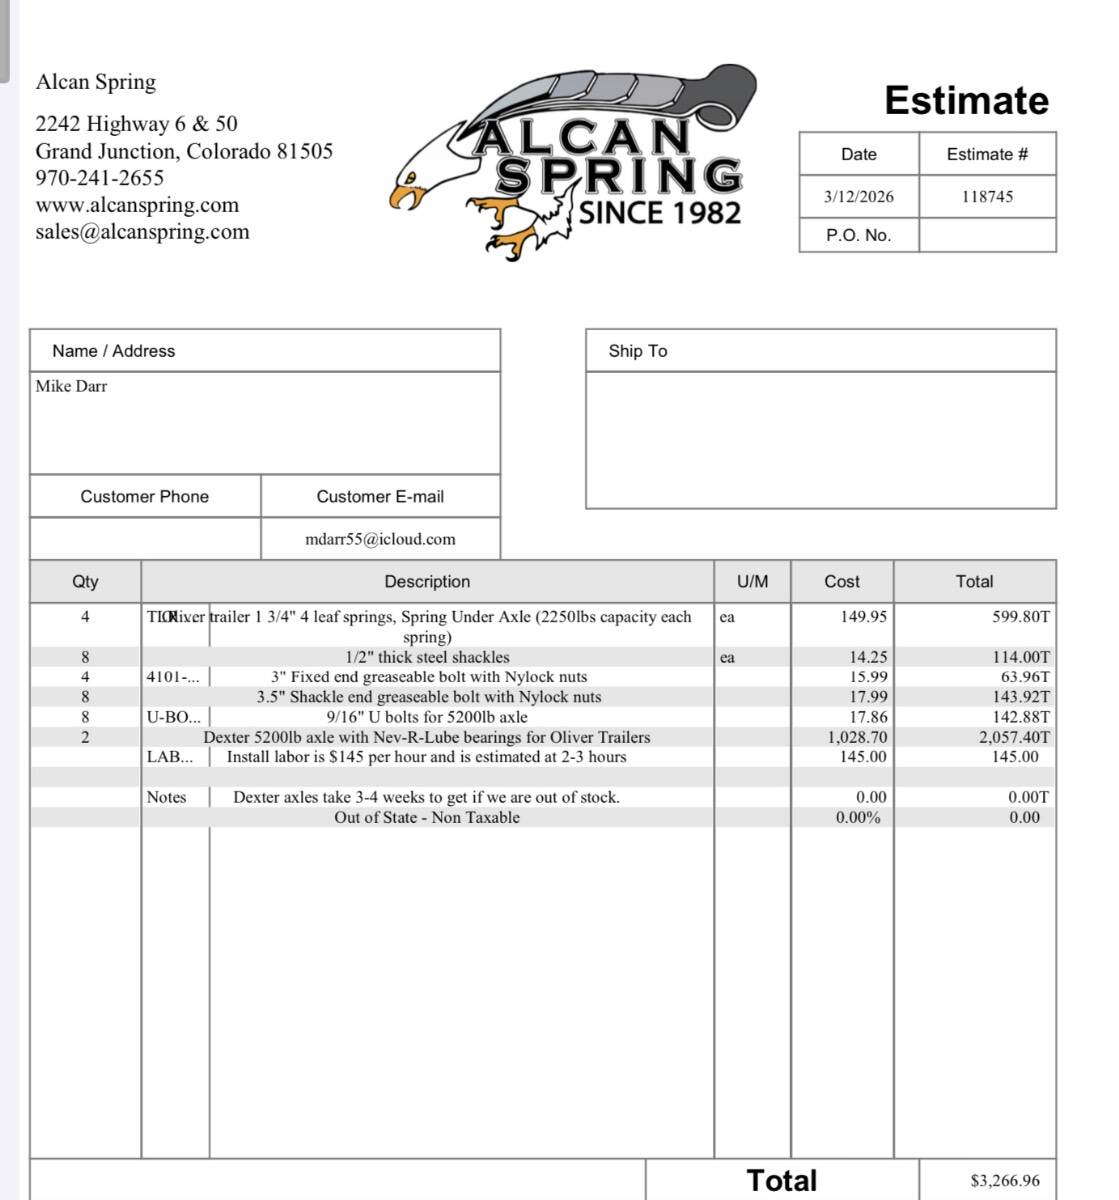
Alcan Springs Quote for Jan-2026
Hokieman replied to Wayfinder's topic in Mechanical & Technical Tips
I’m considering replacing my suspension, still have some teardown and inspection of brakes and drums to do first. I don’t have any problems, my trailer tows great with my F250, no WDH, doesn’t porpoise or wallow, not top heavy. I plan to travel to Colorado in June to camp for a month, so I called Alcan and discussed a quote with Tim. I advised him I was interested in the 4 leaf springs rated at 2250 lbs, D52 axles. I recently weighed my trailer at a Cat scale, it was 5940 lbs fully loaded, water tank full, gray tank empty. I can appreciate why many feel best with 5 leaf springs, but 9k spring capacity with a 6k trailer allows for significant overcapacity, which I feel safe with. Alcan 4 leaf spring leafs also extend well past the weak point on the Dexter OEM springs. Attached is the quote if interested. I had a few technical questions for Tim based on legitimate concerns raised by Geronimo John earlier in this thread. 1) Why does Alcan supply splined wet bolts, but the shackles are smooth bore? It seems this would allow the grease ports to rotate out of the optimal position. Tim explained the bolts are an interference fit, so once tightened up, they shouldn’t rotate. 2) Why does Alcan use 9/16” straight shank wet bolts, as compared to Dexter 9/16” shank stepped down to 1/2” threads? Tim explained they have seen many Dexter bolts sheared off at the shoulder (likely due to over-torquing). Dexter wet bolts should be torqued to 30 ft-lbs min, 50 ft-lbs max (see Dexter instructions attached). As Geronimo John explained, the Dexter wet bolt shoulder is designed to allow the proper clearance between the hanger tabs and the spring bushing. If Alcan straight shank wet bolts are over-tightened, there may not be adequate clearance between the hanger tabs, resulting in abnormal wear and possible difficulty getting grease to purge. Alcan provides a torque spec of 65 ft-lbs, but regardless, clearance should be checked, and torque modified as needed. Hence the reason Alcan use Nylock nuts. So, Alcan takes a different approach to this application than Dexter. Lessons we’ve learned from each other are to use caution torquing your wet bolts (either Dexter or Alcan), and be mindful not to strip the splines. I recommend strongly securing the bolt head while torquing the nut. Sent from my iPad 059-867-00_ez_flex_complete.pdf
-
Do you recall the wire size Dexter used internally on your new D52 axles? 12 AWG?
-
You could try Gorilla Clear Grip. It’s a clear, flexible, fast drying adhesive, nothing like original Gorilla Glue, or RTV silicone. It works like a contact cement. You put a thin layer on both surfaces, let dry for a few minutes, then stick it on. No need to clamp or hold it for more than a few seconds. I buy it at Home Depot, use it around the house for special projects. .https://gorillatough.com/product/gorilla-clear-grip
-
The standard plastic & aluminum mounts that came with it. They attach with a 3M VHB disc. Seem very secure, but not very attractive. I bought the optional aluminum mounts with 3M VHB, but haven’t used them yet.
-
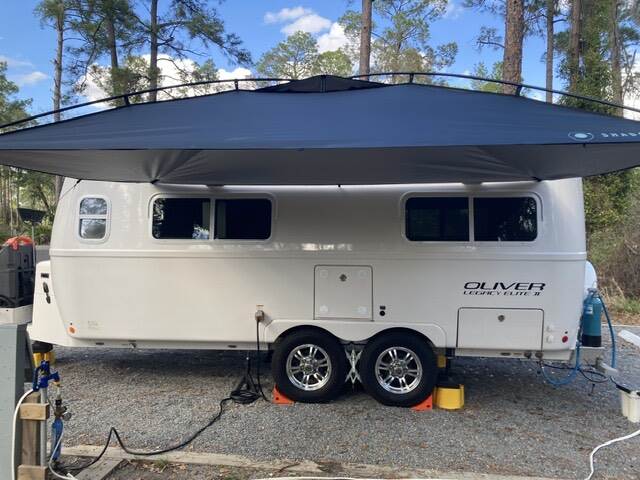
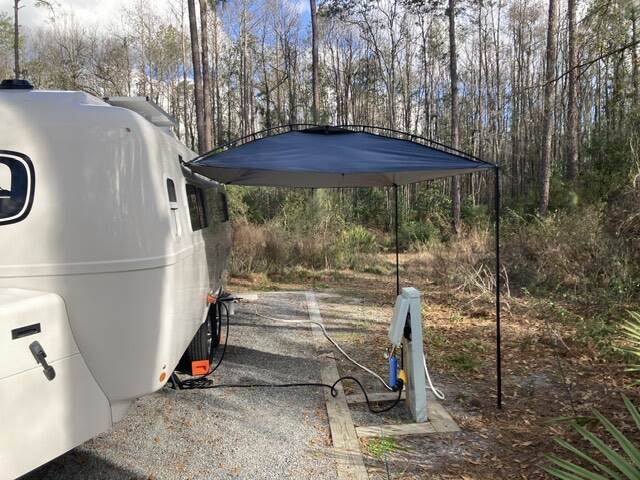
We have a Girard awning on the starboard side. We wanted something for the port side when we have the space and want the extra shade. The MoonShade XL works good for this, and it is sturdy and very well made. It is really just a lightweight tent awning, not like our heavy duty awning. The XL version is 9’ x 12’, and the longer side just covers both windows, providing shade in the bunk as well as the dinette. It’s expensive, but I bought it when it was a Kickstarter campaign for much less. I would not want to use it as the primary awning. https://moonfab.com/
-
I had 3 BB 100’s in use for 5 years, worked great, no problems. I was getting increasingly paranoid about my family safety, so I sold them on Facebook Marketplace for $150 each. I tested each one and made sure the buyer was fully informed of the issues. He was aware, but was looking for a bargain and willing to take his chances. I could perhaps have gotten a higher price, but my conscience kept me from being greedy. The way I figure it, I had $2450 total invested, so the cost of 300AH of trouble-free use cost me $400/year. I saved way more than that by boondocking. There are several dozens of them for sale on FB Marketplace in my local rural area, so my guess is many others feel the same way. It might interest some that @Overland had 2 out of 4 go bad in 2021. This was before the present design problems were known, apparently BB told him the BMS went bad. I recall he did a lot of off-road, so maybe his terminals shook loose internally and got hot. @Overland was able to get BB to pay for shipping and replace. https://olivertraveltrailers.com/forums/topic/4956-lithium-battery-upgrade/page/2/ Those were the days when BB was widely regarded as the #1 brand, and there were no reliable Chinese competitors. See Will Prowse glowing endorsement on YouTube from 2020 if interested. Yep, same guy that blew this up on the web, may have been indirectly responsible for becoming one of BB best salespersons.
-
This reminded me of an older thread (see link) that addressed battery box support bracket and bolts. Recommended reading for those that have not already addressed, it might help avoid a loose battery box. In my case, both nuts & bolts of the support were very loose when I checked them, and the holes were drilled poorly by the factory. I drilled a new “clean” hole and installed 3 stainless bolts, washers and nylon nuts. A quick and easy task. https://olivertraveltrailers.com/forums/topic/6112-battery-box-support-bolts-missing I recommend caution when sliding out the battery tray, be gentle and avoid leaning on the tray. It puts an excessive force on the rivets and support bracket, especially if you have AGM batteries.
-
Regardless of what the build sheet states, I’m confident all Oliver’s are equipped from the factory with either a standard charger or an inverter/charger. You can contact them to confirm your build. If yours is “missing”, a previous owner is probably responsible.
-
2020 Oliver Elite II Solar Disconnect Switch?
Hokieman replied to cowgs's topic in Mechanical & Technical Tips
Congratulations, and Welcome! We have an early 2021 #797 with factory solar option. There was no Lithium Pro option available at that time, it was offered on later models. Mine was equipped from the factory with the Blue Seas solar disconnect switch as yours is. It connects to the Zamp 30A PWM controller mounted adjacent to it on the side wall. There was no main battery disconnect switch. Within a month of taking delivery of my new 2021, I replaced the factory lead-acid batteries with 2 Battle Born 100A batteries, and installed an identical Blue Seas battery disconnect switch under the street side bunk. Cleaned up the wiring and installed MTBF fuses on the batteries, and added a Victron monitor and shunt. I do not have (or need) an inverter, I have the factory installed Progressive Dynamics 60A charger. The system has worked flawlessly for nearly 5 years. You are fortunate that your trailer was modified after manufacture by the previous owner, either as a DIY or at the factory. I don’t see a Zamp controller on your wall, and I do see a Victron battery monitor. Hopefully you have a Victron MPPT solar controller mounted somewhere under street side bunk, and maybe Lithionics batteries. None of these mods were offered by Oliver Service in 2020 or 2021. If you do have these mods, you have a terrific setup and as @Rolind mentioned, you can shut off the Lithionics batteries if needed. You can check with Oliver Service to confirm if and when they did the work. If you have Battle Born batteries (a common mod for us owners at the time), Oliver Service did not do the install. If so, I recommend you heed the advice in other threads about the safety issues with Battle Born batteries. -
Thanks for the suggestion, I’ll check them out.
-
I have the Victron BMV 712 monitor also, along with 3 BB 100’s that are 5 years old. Working perfectly, no problem. My temp sensor is located on the B+ terminal closest to the load. But it only measures the temp of that battery, which was fine before this mess. If anyone has a good idea how to monitor the temps on each BB battery remotely using the Victron monitor or otherwise, let us know. Otherwise, we can just monitor temps the old fashioned way. I checked terminals carefully yesterday, not loose, not discolored, no signs of stress. I put as much load on them as I could, including running fridge on DC. I don’t have an inverter, so the amp draw was only about 18A. I measured battery terminal temps before and after with Fluke thermometer. Temps did not increase, the amp draw is just too low I suppose. I shut the batteries off and put the winterized trailer back to sleep. Temps are in the low teens at night where I live, so no plans to go camping soon. Maybe BB will eventually do right for their customers, but I won’t postpone camping until that happens. I’ve got a few months to decide what my next steps will be.
-
I didn’t see where your PD charger model is listed, so not sure if what I did will help you. I have a PD 9260C, for lead-acid or AGM batteries. I ordered my Oliver with a basic 340W solar package, and two standard lead-acid batteries (no longer an option). I sold the batteries on Facebook Marketplace as soon as I got home, and I already had two BattleBorn 100A batteries on hand. They slipped right in. I intended to swap out the standard charger for a lithium model. I researched on the PD site, and found that they offer a remote pendant that plugs into the 9260C, and converts it to lithium. It was less than $20, so I thought I’d try it. Here I am camping in my Oliver 4 1/2 years later and everything is still working well. It requires a manual push of a little button to boost the voltage, but I don't need to use it often, so it’s no hassle. I don’t usually have the charger turned on, I let the panels keep the batteries charged (we don’t have an inverter). Every 2-3 weeks I turn on the charger, fully charge the batteries, and then synchronize them to 100% using my Victron BMV 712 Battery Monitor. My lithium conversion consisted of adding the PD pendant, a Victron BMV 712 battery monitor, and a Blue Seas battery cutoff switch. I also disconnected the charge wire from the tow vehicle, which was easy to access under the port side bunk. In addition to a PD lithium charger, I also have a Redarc DC-to-DC converter on my wish list. I’ll probably eventually get them, but I haven’t needed either so far, and we dry camp more often than not. I like to keep it simple.
-
Simple AGM to Lithium Conversion question(s)
Hokieman replied to Danno and Donna's topic in Mechanical & Technical Tips
I would be happy to oblige, but I parked the trailer in storage this morning and then drove home about 600 miles away. I’ll try to remember to get pics when I go get it in a few months. I recall I cut one hole (used 2” holesaw) in the same spot on aft wall where a battery cable had been routed through but now unused, while doing my Battleborn battery install. The other 2” hole is on the forward wall, down lower I think. I also cut several other 2” holes in bulkheads throughout the basement on street side and rear compartments to facilitate convective flow. I’m still brainstorming future plans to introduce warm cabin air to basement in extreme cold, which might include small, quiet 12v blower fans. We camped several nights this winter out West in low teens with no freezing problems or battery issues. Last night in mountains it was 24. So I’m wondering if I need to worry much about additional mods, as I’m not really planning on camping any colder than that.