

NCeagle
-
Posts
383 -
Joined
-
Last visited
-
Days Won
10
Posts posted by NCeagle
-
-
I'm really surprised they are doing away with the swooshes. 🤔 I know it's a personal thing, but we really like them for subtly breaking up the all white, "Mr. Clean" look.

-
 1
1
-
-
15 hours ago, Ray and Susan Huff said:
So, a question for those using a portable generator that doesn't have a 30 amp plug (with plug adapter): Aren't you only getting 20 amp service? Doesn't this limit the amount of power you can use while running on the generator?
We will mostly be using our generator for charging batteries and off-grid use of high wattage appliances such as an 1800w toaster oven (that we use in lieu of deleted microwave)
I've thought about the need for a 30 Amp generator - thinking primarily that I'd be able to charge the Lithiums faster - however, that's not true in our case. Our 3000 watt inverters are configured to charge the Lithiums at 100 Amps, which requires about 11 amps of 120V power, so a single Honda/Yamaha 2200 is plenty of generator to charge the batteries at full speed. In fact, a generator that can deliver 15 amps sustained at 120 volts can deliver ~150 amps (in theory) sustained at 12 volts. Your 1800W toaster will require (1800W / 12V) nearly 150 amps, which a single 2200 can also support. Just don't charge your batteries and run your toaster oven at the same time unless you have 30 Amps - and even then it's gonna be borderline for something like a charger and a toaster oven.
Bottom line - I don't see the pressing need for more than a small, 2200 Watt generator at this time - and whether or not it has a 30 Amp plug is not a differentiator when it comes to generators.
-
4
-
-
20 minutes ago, jordanv said:
Im curious about this addition? Is that something you made, or does the Elite II come with this?
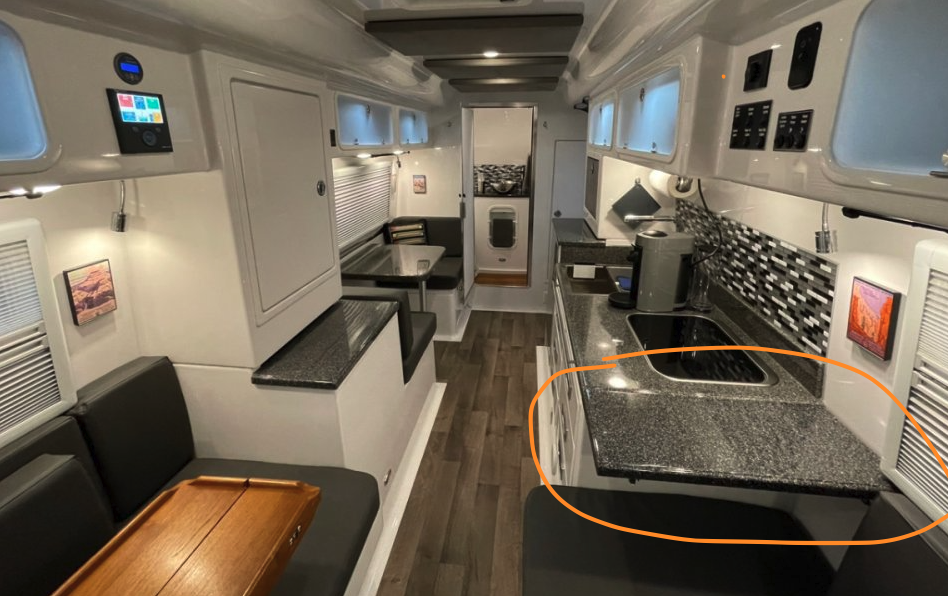
Our 2020 Elite II does not have this. The stove is also oriented differently so that the splash guard opens up to "protect" the bed from grease splashes. This must be an older feature - or more likely something Overland added to make us all jealous. 🙂
-
1
-
-
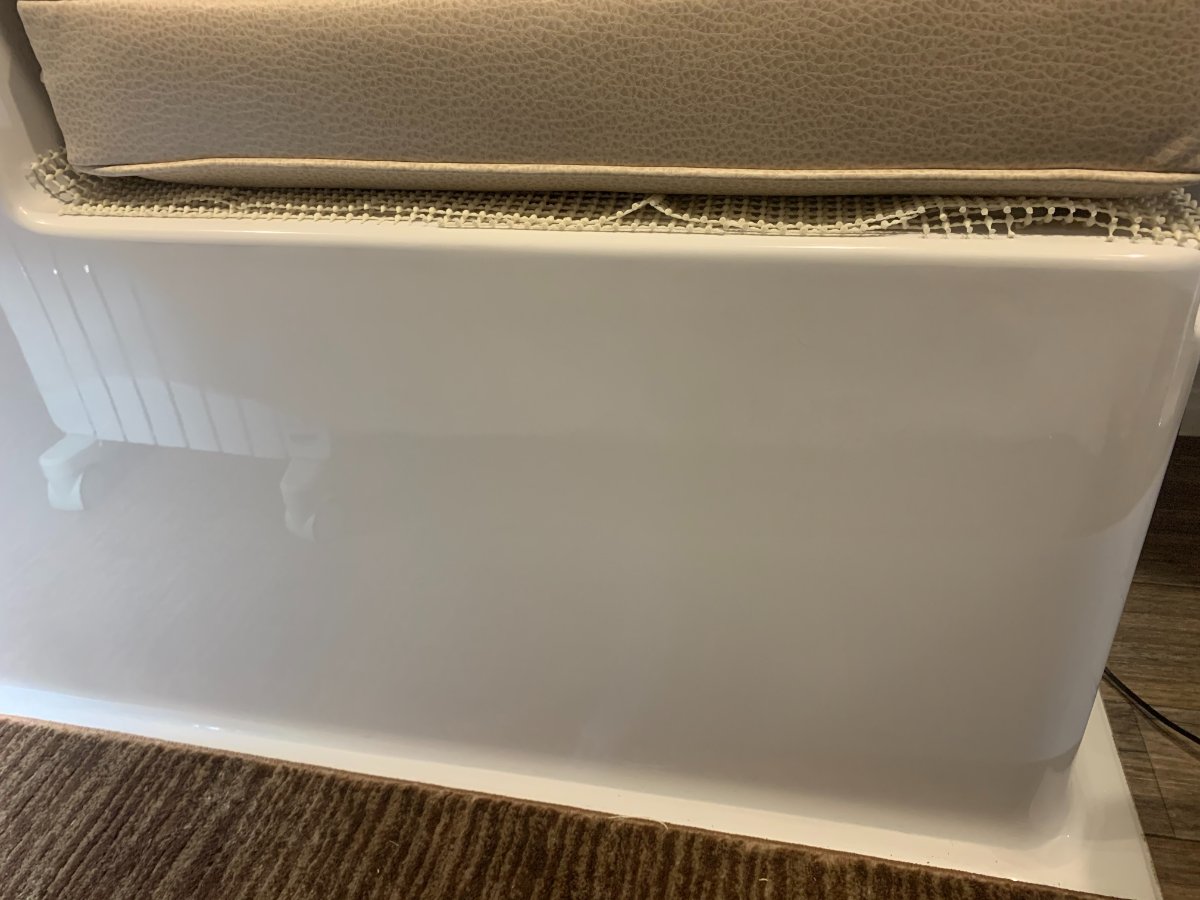
I have a roughly 6 inch by 2 foot area of Gelcoat under my dinette seat that is dull. It's not easy to see without the right light angles, but you can make it out in the photo, especially where the reflection of the space heater is interrupted. According to OTT Service, it was likely an area that was missed or not completed when being built - not a big deal to repair.
When it comes to buffing Gelcoat, there are tons of choices and some are better than others on white, so I asked OTT Service what they currently use in-house. They use a product called Buff Magic (https://www.amazon.com/Shurhold-Yacht-Brite-YBP-0101-Magic/dp/B001HBQDO8). I'm going to give it a try. As a bonus it also cleans and shines metals.
-
 2
2
-
-
While researching travel trailers in late 2019 / early 2020, I started out thinking we would be in an Airstream and like many others came across some good alternatives, namely the Oliver and Black Series trailers. I eventually narrowed it down to Oliver or BS. I have detailed pros / cons listed for each, although it's my personal opinions based on what I could find on the internet. We ended up choosing the Oliver Elite II, primarily for the following reasons
1. We definitely wanted a tandem trailer for towing stability, so that eliminated the HQ15 and the Oliver Elite I.
2. HQ17 vs Elite II... many pros and cons for each, but in the end it boiled down to the following:
a. HQ17 being a bit big for the two of us (it sleeps 4 with bunk beds, so great for a small family). It weighs 3K pounds more than the Elite II. May have had to upgrade from 2500 to 3500 tow vehicle.
b. HQ17 made in China - quality issues highly likely and could be tougher to find parts. I've had it with "made in China" for big ticket items - especially if it has any metal (aluminum or steel) in it. This was the real "show stopper" for us.
-
1
-
2
-
-
4 hours ago, Ray and Susan Huff said:
I did a quick search and don't see this subject covered. It's another thing I neglected to ask during our walk-through:
How do you get the center mounted television in the 2021 Elite II Twin to swing down? I can't seem to find any information in the manuals and no sign of a catch or button to release it. I tugged a little, but was afraid I might break something.
I'm hoping there is someone here who asked this question and can help me. It would be embarrassing to call Oliver to ask 😳
That means you didn't watch TV at all on your week+ journey home from Hohenwald? Bravo!!! 👍
-
1
-
2
-
-
53 minutes ago, John E Davies said:
Can you repeat your experiment with a much much smaller fan running all day?
Hey John, If I come up with a way to test a low velocity approach I'll do it, but I don't have a low velocity fan at the moment. I do agree that low velocity kept on or run longer should work better. 🤔 I'll try a similar test (with the same fan) using the ductwork as that's not hard to do either, but my guess is that's not going to be effective at moving the temps that much either - just good to have a comparison.
Ultimately, as @Mcb alluded to with the light bulb approach, heat strips might be the optimal way to solve this particular problem but I will have to take my time with that as it's more involved than these simple air/fan tests. Working with electricity is nowhere near as fun for me!
Thanks again for the suggestions. I'm having a blast (pun intended) trying this stuff!
-
1
-
1
-
-
42 minutes ago, Mcb said:
Interesting. Did you have the warm duct air running into the basement at the same time as the fans? Do you think that the moist air in the basement can be “drier” if the temperature is increased by the air from the ductwork?
if the object is to keep pipes from freezing using electricity, it might be worth trying running an extension cord with a clamp light equipped with a 150w bulb into the basement..
There are crawl spaces under old houses throughout Maine that use that technique to prevent pipes from freezing.. might help an Ollie in NC🙂
Hi Mcb, no - this was a strictly an all electric test to see how effective it would be at keeping the pipes from freezing. I used just a space heater to warm the cabin air and then the big fan to do this "blast" test. I suspect JD is correct in saying that a fan running on low constantly would be a better test, but my goal is not to heat the entire basement - just the highest risk areas of the plumbing.
Everything I'm trying is non-intrusive so far. Easy to test since I have the sensors set up and happened to have a fan I could try. I've been thinking low watt heat strips would be the best (similar to the light bulb approach), but I haven't gotten access to all the plumbing yet (some tough spots left). Blowing out the lines and putting some antifreeze in them is always an option too. 😃
-
Well, I gave JED's idea a try and the results were "mixed". I used a 400 CFM inline fan mounted on a piece of plywood that fit over the dinette seat hatch. I ran the fan for 10 minutes once per hour and monitored my temp sensors around the Ollie. In general, the cabin temp dropped dramatically and the humidity came up just as dramatically. The cabin dropped about 8 degrees each time I ran the fan and the humidity came up about 25% each time as well (expected as temps go down). In addition, the basement temps came up (dramatically) in the curb side basement (warm air was being pulled in) and the front street (where the fan was pulling from). The rest of the basement didn't budge much though (the other two corners) and the bathroom vanity actually got a few degrees colder each time I ran the fan. I suspect if I kept running the fan longer, eventually the basement and cabin air would equalize. I'm not really keen on making the basement and cabin the same temp though (super inefficient for the cabin) - just keeping the basement above freezing.
Bottom line is there's a LOT of cold, humid air in the basement and mixing it around with a big fan doesn't accomplish what I'm after and mitigate "cold" spots in the basement. Furthermore, it significantly brings the cabin temp way down and the humidity way up.
So... back to the drawing board. I'm going to test running some cabin air through the ducts now to see if the "targeted" approach works at all. This may not work well at all if the cabin isn't 90 degrees first! There may not be a feasible way to keep the trailer safe in freezing temps with electric only. 😞
-
2
-
-
WOW!!! That's good to know. Did you also vent the sides of the battery box? Wondering if the entire box is reinforced with the laminated aluminum? Thanks for sharing - this will help those of us lagging behind on this project. 🙂
-
3 hours ago, John E Davies said:
I think this could be a very cool solution (pun intended) for when you are on shore power. I actually don’t think it needs to be inside a furnace duct at all. The spaces under the floor are all essentially tied together by the huge gaps at the front and rear of the water tanks. You already have a great big air inlet at the curb side, for the furnace air. How about this....?
Mount your fan under the front dinette seat, if you can tolerate a loss of storage, or alternately under the rear one (use plastic ductwork because of the high voltage there). Leave its intake wide open and duct the outlet air into the cabin through a 4” hole cutout.
Put your space heater on the floor in the middle, facing backwards. Warm air will tend to pool near the back and will get sucked into the furnace grill. It will then flow all around the basement, through your new fan and out the front grill. No dampers needed. It might be fine with the furnace running (the suction could disrupt air entering the furnace box), but OTH I don’t think it would at all be needed when you are heating with propane.
In summer it will suck out the hot air from under the floor and cabinets and provide some extra cabin air circulation, as you commented.
I do think you should add holes in your battery box for the lithium battery area to ventilate. It consists of two closed and nested cubes and traps heat if the door vents are sealed.
I don’t think you need nearly as much as 160 cfm for heating, but in summer it would provide a nice blast of air. Research “bilge blower” in some power boat forums for some ideas, that is what essentially you are building. Look at 4” marine blower fans, I am not sure what is available in 120 volts AC, maybe there are some.
Good luck.
John Davies
Spokane WA
Thanks! Great idea to give a try! I can test how this works with a fan mounted on a piece of plywood that fits over the access hatch under the dinette seat. I'll set it up and see how it moves the temps around the basement. If there are still some dead areas that stay cold I may be forced to use the ducts as I have those set up and targeted specifically at the problem areas. The entire basement really needs some heat all around as the plumbing wraps around 3/4 of the trailer.
The battery compartment is staying surprisingly warm and looks like it won't need any venting specifically for heat. I have the Oliver provided heat pad in there anyhow as a last resort. Trying to keep the battery compartment cool(er) is a different problem than trying to keep all of the basement plumbing from freezing. I may be able to leverage some of this work I'm doing on the heat, but I don't necessarily have to. I'm going to wait and see how hot it gets in that compartment - I'm in NC and I won't have to wait long for some steamy temps - then I'll figure something out. You should have some great data on your venting project by then too!
-
1
-
1
-
-
Adding the extra ductwork to the street side basement to mitigate high freeze risk areas has worked well (see Cold temperature data thread), but it is dependent on propane and the furnace. I still want an all-electric backup to the furnace solution where cabin air warmed by a space heater could be moved around the ducts in the basement to accomplish the same thing. In addition to having a backup to the furnace I hope I never need while camping, the main reason I want this type of solution is to be able to use all electricity rather than propane/electricity to keep everything above freezing while my trailer is in "semi-hibernation".
I'm toying with the idea of using a 4" smart duct fan (or 2) like this (https://terra-bloom.com/collections/ec-inline-duct-fans-speed-adjustable-pwm-0-10v-wireless-controls) to pull conditioned air from the cabin. This particular fan has a wireless speed controller and can also be paired with a programmable thermostat. It uses technology that enables it to move 160 CFM using only 18 watts (120V).
As a bonus, this solution could also be used in the summer to move cooled cabin air around in the basement if needed (cooling street-side electronics and the battery bay for example)!
I have 3 primary options and maybe some folks will chime in with thoughts to help me decide which would work best (or maybe not at all). Right now I think these are in order of expense, with the cheapest first and the most expensive last.
1. 1 fan on the STREET SIDE ONLY with a new vent tied directly into the existing 4" ducts using an airflow damper. Efficient for the cabin as the ducts will restrict the amount of air exchange. Only requires one new hole. Will enough conditioned air make it to the curb side?
2. 1 fan on EACH side, each with a new vent, but NOT tied into the ductwork. This would just "flood" the basement(s) with conditioned air. Flexibility to run one or both fans. This may be overkill as we don't necessarily need all of the basement air to be mixed into the cabin air. Also requires 2 new holes in the cabin.
3. 1 fan on each side, both tied into the existing ductwork. Flexibility to run one or both fans (only need the street side in the summer). More efficient for the cabin as it restricts and focuses the air exchange.
Thoughts?
-
2 hours ago, Ray and Susan Huff said:
I did not realize the Honda companion 2200i has the 30 amp plug; I wonder why the standard does not.
Probably because with only a single generator, 15 amps is the max. These generators are made for more than just travel trailers and having only a 30 Amp plug with a 15 amp generator would limit it's usefulness elsewhere. When you add a companion, you can now produce 30 Amps so a 30 Amp plug makes sense.
I have the (non-companion) Honda 2200 and did the propane conversion like @IL_Travelers. Absolutely love it so far. I use my 15 Amp to 30 Amp adapter (which I'm sure you have as well) to connect to my Ollie shore power connection.
-
1
-
-
1 hour ago, Ray and Susan Huff said:
I've been wondering if a 100amp portable solar panel is sufficient to keep lithium batteries charged as we often camp in shaded campgrounds. And I agree with the solar panels helping recharge batteries during transit.
I know you meant 100 watt portable solar panel. To get an idea of what 100 watts of solar is capable of some simple math can be applied. At 100 watts, the max amps you will get in theory is ~5 (100 watts / 18 volts). So if you had 6 hours of "great" sun on your panel, you would theoretically produce ~30 amp hours (5 amps x 6 hours). In practice, these numbers could be lower - maybe a lot lower depending on sun angles, etc. - but it gives you a ballpark.
So for this example, no matter what type of batteries you have (as long as they are more than 30 Ah), a 100 watt portable solar will be sufficient to keep your batteries charged if you only use a max of 30 amp hours per day. In the grand scheme of things, a 100 watt panel doesn't seem like much when compared to a 400 Ah battery setup, but it all adds up! If you add it to the existing 340 watts (340 watts / 18 volts = 19 amps), then you can produce 144 amp hours in 6 hours of full sunlight (24 amps x 6 hours). 🙂
On an average day, do you know how many Amp Hours you typically use? We can keep it around 100 Ah per day without the convection oven / stove or any other inefficient components. Easy to double that if we aren't paying attention or not worrying about it because we have a generator and want a nice oven cooked meal.
-
2
-
-
44 minutes ago, John E Davies said:
Does the Oliver factory lithium option have any features to help cool the batteries, other than having no vents and some insulation inside the compartment door?
No.
46 minutes ago, John E Davies said:Any idea how hot the inside of the box gets on a 110 degree day in direct sunshine? Have you considered the importance of keeping that side of the trailer in shade during extreme sunny weather?
I hope to never find out, but pretty darn hot I'll bet! I'd rather be in a blizzard in the Rockies than in the desert at 110F! I'll keep my Ollie shaded in the garage if it's that hot outside. 😃
50 minutes ago, John E Davies said:
Cool idea! Can't wait to see how it turns out!
While driving the pre-existing vents will keep the compartment "chilled" and for camping in heat I'm thinking maybe I'll first try a small DC fan or set of fans (similar to the nature's head fan) to move air in and out of the pre-existing vents that I have temporarily plugged up for the winter. I need some real life temperature data before I start drilling and venting inside just yet.
-
1
-
2
-
-
I think a larger Ollie (Elite III) is a great idea to make the Oliver travel trailer (superior quality and functionality) available to those that want/need extra space. We have only owned our Elite II for a month and a half now, and I've already made a bunch of modifications. While I enjoy doing modifications and have many of the tools and skills needed to pull some of them off (especially with help from forum members who have been there, done that), there are some that I'd just rather pay for. So... in addition to a new Oliver III, I'd like to see Oliver start offering upgrades (packaged) to new and current owners of the I's and II's.
Some ideas that I'd have reached deeper into my wallet for... Deep winterization package (for extreme conditions such as Rocky mountain skiing), off-road package (with upgraded suspension, mud flaps, body protection), increased solar capacity, upgraded components like the refrigerator and/or A/C, options for using the available black tank when composting toilet option chosen. It would be great to have more access panels, ports, etc. located throughout the trailer to make troubleshooting, modifying and fixing things a lot easier.
These would be nice additions, but all in all I wouldn't trade in my TT for anything else - I'm very happy with the Elite II!
-
2
-
-
4 hours ago, Ray and Susan Huff said:
I know where the solar charger disconnect switch is; but the main battery disconnect? And the inverter/charger?
Will disconnecting all of these cause the LP/CO monitor to alarm?
Also, is there a chart for %SOC to voltage conversion?
There are so many questions; hard to think of them all during the walk-through. Just the realization that it is actually "your Oliver" is overwhelming!
The main battery disconnect switch and disconnect to the inverter/charger are both under the access panel located under the street side bed (the panel closest to the pantry). If you get a small flashlight and look around in there you'll see 2 disconnects. The one on the wheel well is the main battery disconnect and the one on the backside of the battery storage box is the inverter/charger disconnect. You can disconnect them all and have the trailer on shore power to run a small space heater, dehumidifier, etc... all without the batteries. But you will need the batteries for some things - like lights, the fan to the composting toilet if you have one, the fan to the furnace and anything else on that DC fuse panel under the dinette seat.
Don't worry about the %SoC to voltage conversion - the batteries will tell you both on the bluetooth app. The various monitors in the Ollie report slightly different readings, so I trust the BMS on the batteries themselves most.
If you need some pictures of the disconnects, I'll take some and post them tomorrow - let me know. Please tell whoever you can at OTT that you would like the electrical schematics so you are able to take care of your trailer. We have several new owners pestering them for the electrical diagrams. It's been challenging without them and I'm sure Jason is tired of the simple questions like "is the charge wire even connected if you have the Lithium package?".
-
17 hours ago, Ray and Susan Huff said:
So, what is your procedure for putting the batteries into storage? Discharge to 50%, then what? Turn off solar charging? Battery disconnect? Is there a way to limit the SOC to 50% without disconnecting?
We're new to lithium batteries in an RV; it seems there are so many variables and methods - no black and white/on and off/yes or no; 😕
Yes, get the LifeBlue batteries to 50% and then use the various disconnects to isolate the battery from any parasitic drains or charges. There are 3 disconnects, the solar charger to the batteries, the inverter/charger to the batteries and the main battery disconnect. Mcb also learned from LifeBlue that the batteries should be charged to 100% first to reset them, then discharge to 50% and disconnect as described. The battery voltages should still be monitored and if they drop below 13.0 V the battery should be recharged as needed.
-
1
-
-
2 hours ago, mjrendon said:
Other than when temps are too low, are there times when the Li batteries should not be topped off? Does the LifeBlue BMS have low temp cut-offs for charge and discharge?
Hi mjrendon,
Probably just old habits that die hard, but I haven't been topping off the Lithiums except for camping and while camping. When the trailer is in short term storage I want to keep the batteries between 80% and 50%. Don't ask me why - I just read a bunch of stuff on the internet and came up with that as a best practice for Lithiums in general (depth of discharge research), so I figured it's worth a try until I learn different. For long term storage, you only want 50% according to the specification sheet, but I am keeping mine in short term mode ready to go whenever we get a chance. It would be easier if the inverter/charger disconnect was easily accessible like the solar disconnect is, but no matter what your strategy, as it stands today you will be checking the status of your batteries all the time rather than them telling you how they are (at least these LifeBlue's). 🙂
The BMS does stop the charging from all sources when the batteries are at 100% (or so). It also has a low temp cutoff for charge (thus the heating pads are provided right now just in case) and I imagine discharge but I'm not positive about discharge.
-
7 hours ago, Overland said:
Mossey is right, you can only get the individual battery info on the Victron app by using all Victron gear. But believe that the LifeBlue app is supposed to do the same for their batteries.
With the LifeBlue app, you can monitor/connect to each battery individually but not both together. I think the LifeBlue app is very basic and has tons of room for improvement. I wonder how far out in the future before we see a real, functional "BMS" (configurable by the end user) and application (one that allows you to configure the BMS, collects data for trending, actually can monitor a bank of batteries rather than one...
We, the owners, are the BMS - at least I feel that way reaching under my seat every day or into the overhead bin to turn off the inverter or solar charger that's trying to keep my Lithiums topped off when they aren't supposed to be. For the $$$$$ we paid for the lithiums, I'm happy with the Ah but they are still a LOT of manual work.
-
On 12/29/2020 at 12:42 PM, Overland said:
I'm just curious how quickly the hull temps would fall. We do sleep without heat most nights, but in freezing temps, we'll typically keep the heat on, but at a very low temp - 50° or so - perhaps that's a more useful test. I know some other owners that do the same.
A test with an electric space heater would also be interesting to see, since there'd be no air circulation in the hull. Quite a few owners carry a space heater to use when plugged in.
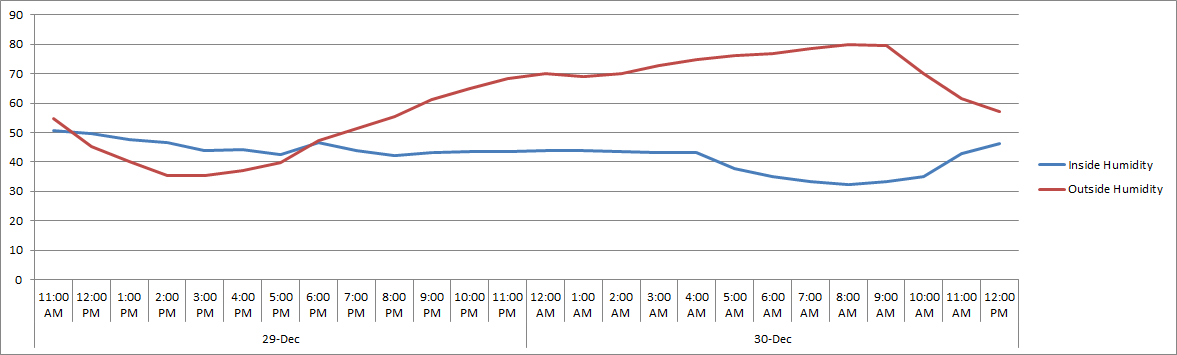
Ok, for the data geeks like me out there, here's the test results with no heat other than an electric space heater set to ~65:
This was a "real" test since I actually showered and slept in the trailer last night. Some of the interesting things that impacted the data:
- Showered at 5:30PM yesterday and again at 9:30AM this morning. You can see the associated spikes (about +5%) in the inside humidity from that. The humidity also stayed in the low 40's with me in there as compared to the low 30's without anyone. So each person may raise the humidity by 5-10% to JD's earlier point. It starts to go down again once I turned the heat up (see next point).
- The temperature dropped to about 62 during the night and I woke up cold at 3:30 AM. I had the space heater on low and it couldn't keep up. I put it on high mode at the same temp and slept fairly warmly for another hour. You can see that the temp does spike during that time and it does not drag up the basement temps at all - as expected.
- I added a sensor to the floor of the closet at 10:00 PM. It's just as cold in the closet as it is in the storage area and front street basement. I'm convinced I need to gain access to that area (somehow?) and poke a hole in the duct. 🙂
- At 7:30AM I pulled the plug on the test and started the furnace up. The temps in those 3 areas mentioned were around 38. The low overnight was 28, so maybe could have survived a few more degrees without the furnace but not much with the fresh water and city water valves probably at risk the most. I may have to address that risk as well. You can see everything shoots up pretty quickly once the furnace is started. Would have been nice to see how the temps rebounded on their own and how close it tracked to the outside temp, but I'll have to do that next time. I suspect they would not have rebounded fast at all given that when I cranked up the space heater at 3:30 AM it didn't stop the basement temps from plummeting at the same rate as the outside temp.
- I ran the space heater on the inverter for a while to see what kind of drain they put on the batteries. I charged the batteries at 5:30PM before I started and again at 8:30 PM after I finished. You can see the heat goes up in the street side basement from the inverter fan during charging. The batteries drained 45% (180 amp hours) over that 3 hours and it wasn't even that cold out! I had the heater set on low and it was drawing about 80 amps consistently when on. That's incredibly high drain, so electric heaters aren't going to work well for boondocking.
- All in all, it looks like all the basement temps came down about 10 degrees closer to the outside temps with the space heater as compared to where they were with the furnace. More importantly, the furnace is keeping the basement temps from falling as fast as the outside temp does. It's also a great way to get some heat into the basement areas pretty quickly if needed.
-
3
-
6
-
-
15 hours ago, TexasGuy said:
Does it really not smell. I’ve got a bit more time with to decide...
There's tons of discussions on the forum about the Natures Head. Tons of stuff on the internet too - a lot good and some really scary. Most owners have had good success and so far we have for the first 6 weeks. We've used the trailer to camp 3 times now and I have not emptied the solids bin yet - and it does not smell at all - even in my garage where it is venting when at home (steel garage w/lots of natural air exchange though). Oliver also installs a screen on the top vent now as many owners of earlier models have suggested. It's also not as hard as we thought it would be to hit the appropriate targets in the toilet. 😄
-
 1
1
-
-
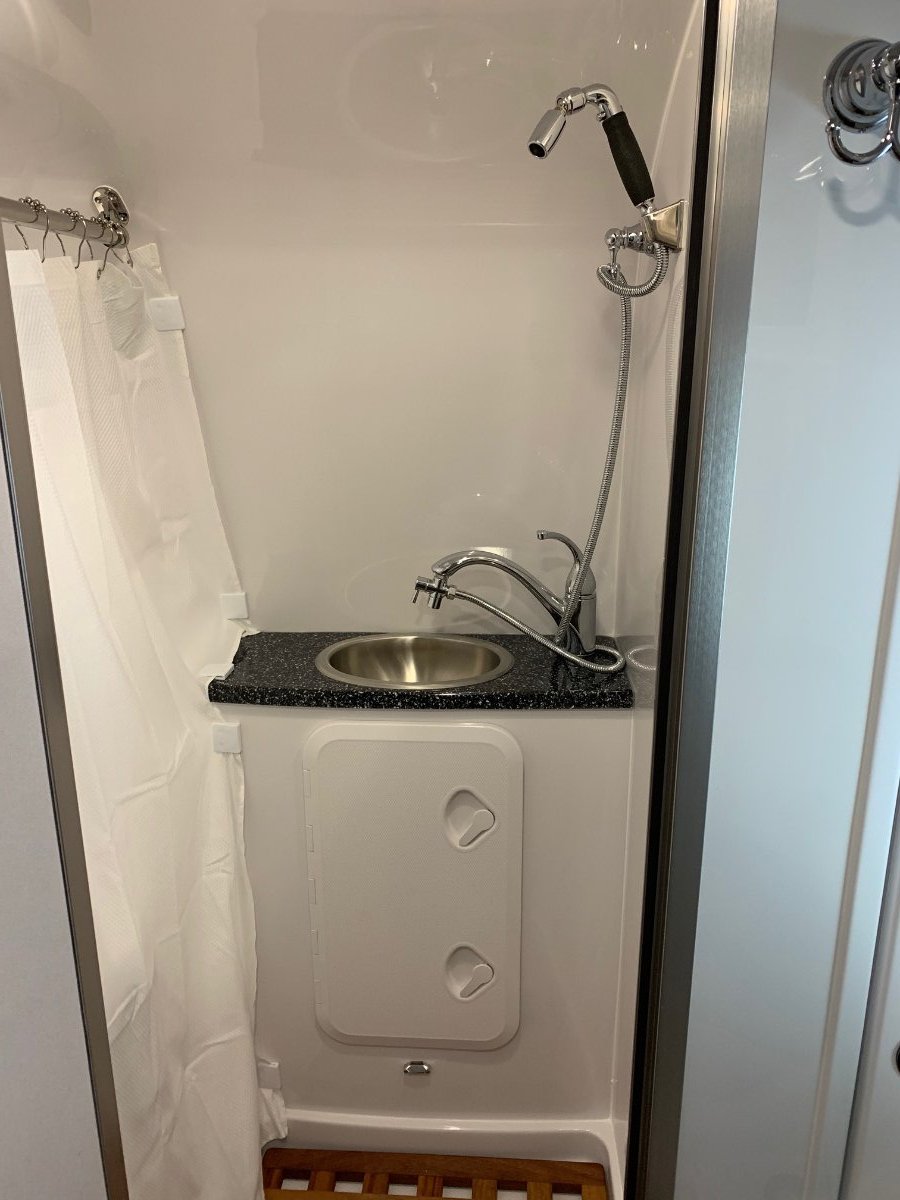
On 12/22/2020 at 3:54 PM, NCeagle said:
As a reminder, the spaghetti mess I created before I "used" @mountainoliver's idea and shower mixer...
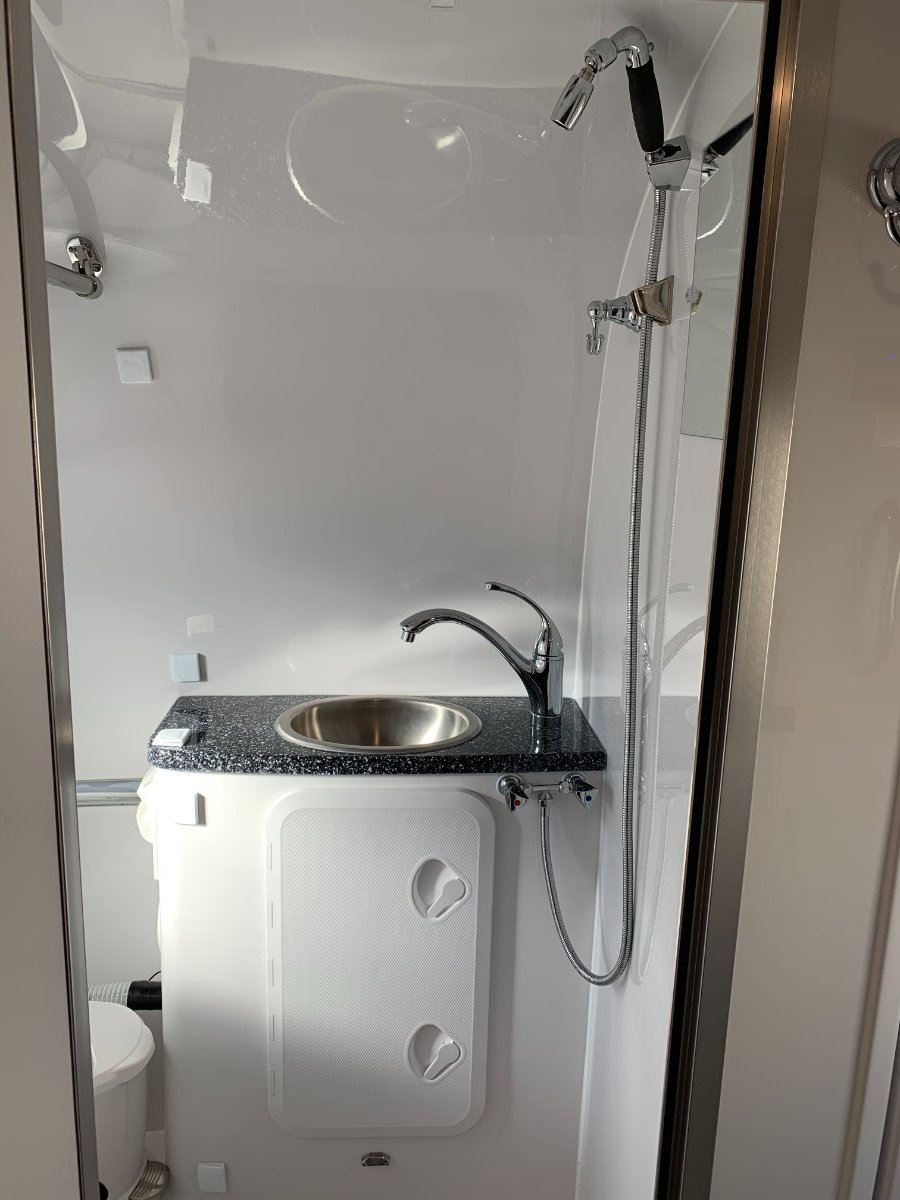
And now with the same shower mixer as Mountainoliver...
Mountainoliver, the check's in the mail! But... I don't know how to get anything delivered by the post office these days. 😉
So glad I didn't have to rip the caddy out again - sure made this addition easy!
-
1
-
6
-
 1
1
-
-
1 hour ago, Mcb said:
It would be interesting to see what happens to your experiment with the fantastic fan on, or open. We haven’t dealt with really cold temperatures yet, just a couple nights between 30-32, and the fantastic fan set on 10% with a window cracked kept the condensation away. We had the thermostat set at 66 or 68... something like that. I’ve noticed that the air being pulled into the cabin from the open bathroom vent by the fantastic fan set at 10 or 20% is significant... with the bathroom door open of course. Might be a good option to cracking a window.
I can run some experiments with the fan cracked and on during some different conditions. I know from some recent experience that with the fan open and running (which infers a window or two cracked), the inside humidity is going to approach the outside humidity. If it's raining or foggy you don't want to turn on the fan and crack a window. Been there - done that - got lots of water and condensation on the inside of the trailer in less than an hour. 🙂
-
1
-


Shining up dulled Gelcoat
in Mechanical & Technical Tips
Posted
Final verdict: the Buff Magic worked. I started out polishing by hand and could see it was working, but after my rotator cuff started aching I used my drill with a buffing pad on it. 👍 I figured I'd finish with my random orbital buffer but I probably won't bother as I can't see any swirl marks or blemishes up close from the first pass. Again, tough to see the real results without moving around and looking at it from different angles in the light, but I tried to capture the same lighting and reflection as the first picture. It does look like the rest of the interior now - new.