

NCeagle
-
Posts
382 -
Joined
-
Last visited
-
Days Won
10
Posts posted by NCeagle
-
-
23.5" for the 2020 EII we just picked up last November. Keep in mind your tow vehicle hitch will sink an inch or two (depending on your suspension, etc.) with the additional tongue weight (and any other weight you may be carrying in the back of your TV). My '06 2500 Silverado sinks 1.5" and I raise it back up to 23.5" with air shocks.
-
 2
2
-
-
5 hours ago, Ray and Susan Huff said:
I need to talk to Jason and get specific instructions . . . . do we install both updates or just the remote panel update? . . . . .
What did you do? . . . . . . did this fix the problem?
There is only one update and one set of instructions that I know of.
Problem fixed? So far I have not seen the [20] error code again since I upgraded the firmware but it's only been 2 days now.
-
1
-
-
4 hours ago, Ray Kimsey said:
Did you hear anything from OTT? We picked ours up October 14 (hull 676) and ours were not balanced either. Are you able to pull your trailer to a tire dealership and have them balanced, or do you need to take the tires off the trailer and carry them to the tire store?
Hi Ray, I did hear from OTT. I suggest you open a service ticket and OTT will in all likelihood offer to pay for the tires to be balanced. I haven't had the time to do it yet but I will when I return from my camping trip next week. I'll definitely research and scout ahead as suggested above.
-
 1
1
-
-
6 hours ago, Ray and Susan Huff said:
The upgrade sounds easy . . . . I have been corresponding with Jason but haven't since the bad weather situation.
Did Oliver (or Xantrex) email you the upgrade file or mail you a flash drive with it installed?
Just the files. They are pretty small so any small usb / flash drive you have around should work. @ScubaRxalso posted the links to the exact same files - the firmware and the instructions - earlier in this thread.
-
1
-
-
6 hours ago, Ray and Susan Huff said:
Thanks for the explanation and the great photo. Would we first install the firmware update before doing the cut-off/reset procedure?
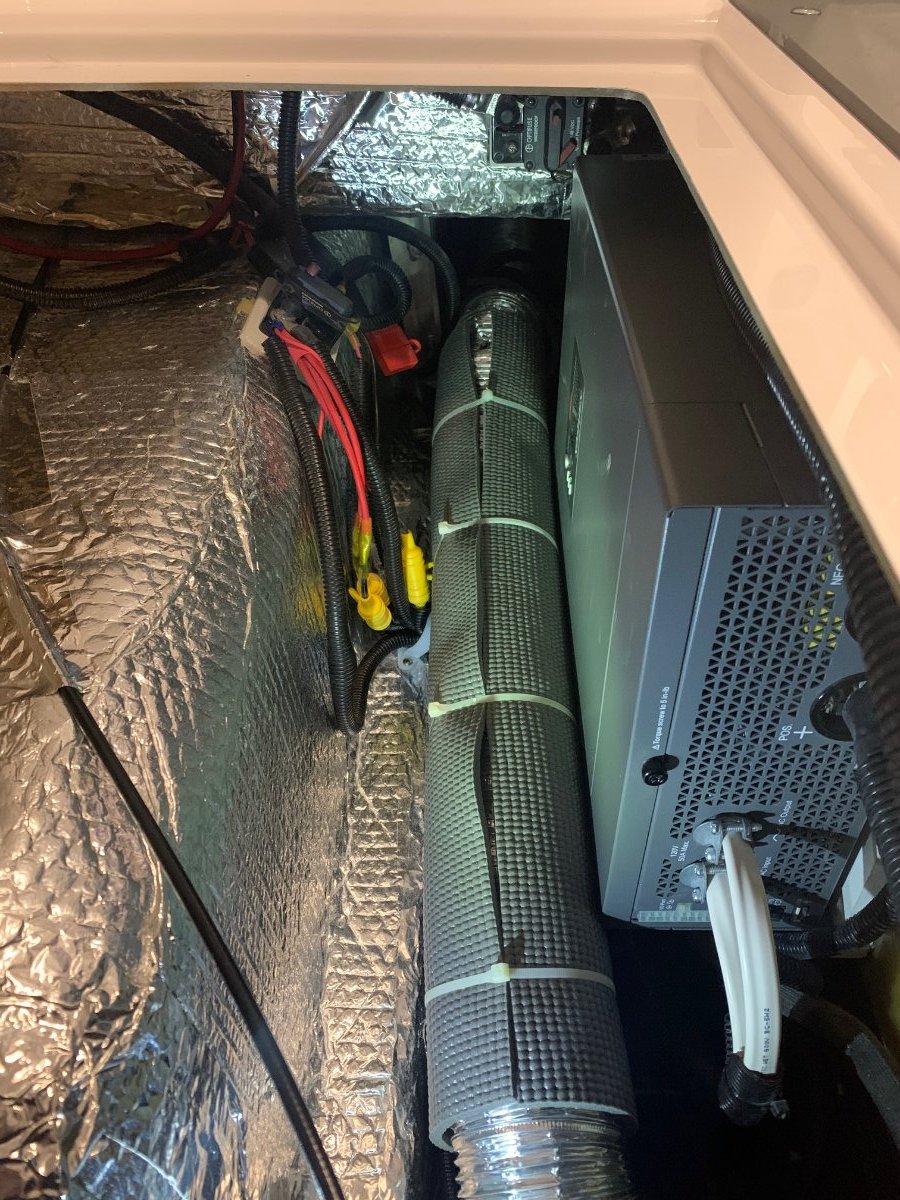
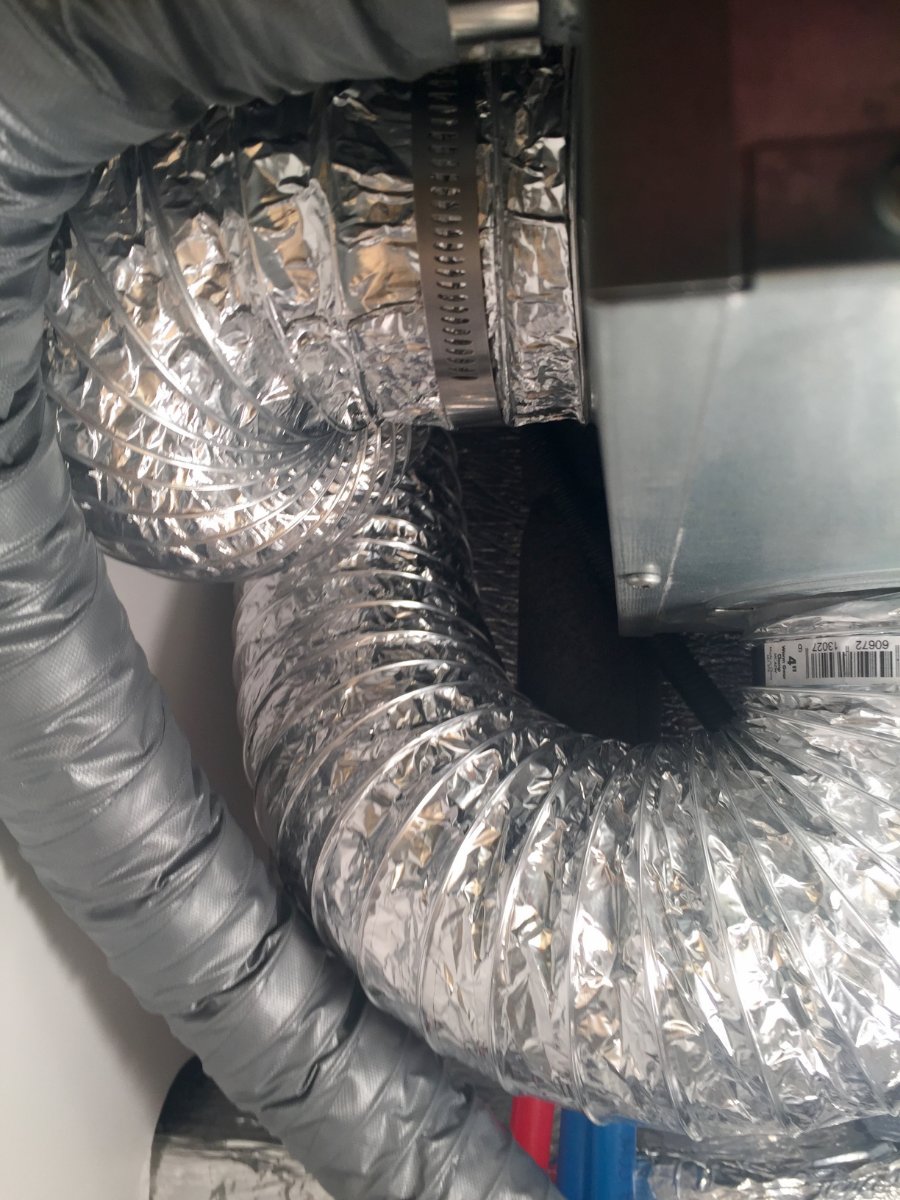
I can see the display panel in the center of the Xantrex "black box", just above the ducting. It sure isn't in a handy place to see; does a mirror help? I guess I need to do more looking around in the bowels of our Ollie and see what's there. After I get our taxes off to the accountant; looking forward to that solar tax credit 😁
What is the duct you have wrapped in rubber mat?
I reset the inverter first and got it working properly with the remote before installing the firmware, although it probably doesn't matter since you have to power cycle the inverter as part of the upgrade process anyhow. I just haven't been able to figure out why the "power" button on the inverter works sometimes and not others and I suspected the remote [20] error may have had something to do with it so I did a hard reset first. During the firmware upgrade itself, I was able to use the power button on the inverter to do the power cycle since I had done the hard reset first. 👍
You actually don't need to see the panel on the inverter to do the upgrade. The USB port (and two other ports) are right below those two white power cords coming out of the back of the unit (and so blocked from view). I did stick my head in there with a flashlight to "find" the USB. The flashing lights indicating the firmware is updating are also right under the port, and you just plug in the USB with the firmware on it, the inverter recognizes the firmware and downloads it, then you power cycle and it's done. You can then check the firmware version on the remote after upgrading - since it will be working for a change! 🙂
The duct is a modification I made to get some ducted warm air from the furnace to the street side. I have some holes in the ducts to warm some of the components that need to be warmed on that side in the winter - you can see one of the holes on top of the duct where the cell foam matting ends. The hole looks like it's an accident because I hacked it in there with a screwdriver, but it's on purpose to shoot warm air up towards the battery compartment. 😄
-
4
-
-
3 hours ago, Ray and Susan Huff said:
OTT has not communicated with us regarding the firmware update.
I suggest you contact OTT service by updating your service ticket on this issue and just ask for the instructions and the software. They were in the middle of testing the software and then the big storms hit and they haven't been able to get back into work and finish, but they have sent it to at least me and @Mcbvia email - maybe others. I have had it installed for a day now and fingers crossed - no [20] error code yet. 🙂
-
3
-
-
Hi @Ray and Susan Huff, you don't have to disconnect the batteries - use the relay cutoff located under the street side bed - nearest the pantry. There are two in there and you want the one that is mounted directly under the pantry. Here's a picture looking down the basement from the rear to the front on the street side. I've circled the breaker that is in between the batteries and the inverter. This is the one that you want to "trip" by pushing the top red square button. When you do that the bar on the side will come out - the picture shows the bar on mine "tripped". Do this and also cut off shore power. Then reset this breaker by pushing that bar on the side back in and turn on shore power if you want - then see if you have reset your remote.
Sorry for confusion!!

-
2
-
-
Moving the cold air vent seems like it would work, but I have some data that may work against this concept. While working on my bilge fan that I installed under the dinette seat, I tested and saw that for the first 15 minutes or so many areas of the basement didn't budge - even with the fan set on high at 350 cfpm. It took prolonged airflow to get the basement temps and humidity to move in any appreciable way. I haven't had extreme cold to test in this winter, but the furnace fan never runs for more than about 7-8 minutes when the temps are down around 20F and the cabin is set to 68F. This may not be enough time to actually accomplish the air mixing you are after. Just a thought - If you ran some extra duct behind the back storage area and down the street side like several owners have done - and moved the vent / added a few more - that would be the best way to get some additional mixing all around the basement.
-
1
-
-
5 hours ago, Ray and Susan Huff said:
Still code 20 . . . . . I check it every day. Screen is blank until I push the topmost button, then the [20] comes back. I assume the screen is timing out?
I'll do my best to record what the circumstances are if the display returns to normal.
@Ray and Susan Huff, this might be worth a try as it works for me. I am able to clear the [20] error code by disconnecting the shore power AND battery from the inverter for a few minutes. When you do that and restart it by putting it back on either shore power, battery or both it apparently does a hard reset.
Even if you can't get the [20] error code cleared using the hard reset, you should put the new firmware on. It's easy and very quick once you get it on the thumb drive. You don't need the remote to do this and it also requires a power off / power on sequence, so either way you are doing a "hard reset" along with the upgrade.
Like I said in the post above, according to Xantrex that may fix what's causing your [20] error code since you are apparently getting the code for a reason different than mine.
-
1
-
-
I was on the phone with Xantrex tech support for well over an hour yesterday. Jason had contacted them and they asked to speak directly to me since there were many questions about my configuration, what buttons I had pushed, what load I was running for the test.... etc.
In summary, here's what I found (I relayed everything to Jason):
1. The tech thinks the [20] error code that I can create every time by throwing the breaker between the inverter and the batteries is normal (sort of). He thinks that by having the battery "ripped" out from it's control causes a normal loss of communication for a split second. He says the remote should recover - but it doesn't so the bug here may be recovering from the disconnect error - not the error itself. Only time and maybe further testing by OTT and Xantrex will tell if this is really true. I'm skeptical because I can recreate the [20] error so easily and consistently with or without the new firmware.
2. I have the new firmware (1.06) installed that is supposed to fix the [20] error code, which comes up in many different scenarios where it should not (according to Xantrex). The hope is that the [20] error won't be coming up for reasons other than the hard disconnect described above. Again, OTT is testing and time will tell.
3. I told him that even when the battery is disconnected, the inverter still pretends it's there and says it's 100% full. He said that the inverter is still "seeing" the 1 foot or so of thick copper that connects to the breaker switch. It's sending a charge down that line and getting back "full" 3.7 volts from the wire. So the "phantom" battery may not be a problem but it still seems strange to me that the inverter doesn't know the battery is really not there anymore.
4. I asked if there's any way he knows of to "stop" and "start" charging programmatically. He said no and asked why I wanted to stop charging before the battery bank was full. As soon as I mentioned Lithium he said it makes sense and several other Xantrex customers with Lithiums have asked about more control over charging. So at least Xantrex is aware that chargers may need to become more advanced with the Lithiums taking the market.
5. I explained the software "workaround" I accidently discovered - using the charger ignition control setting (accessed via the main screen, remote screen or bluetooth app) to stop and start the charger. He pulled up his documentation to read about what the setting actually does. He actually said it's an "ingenious" way to use that software function and won't hurt a thing. All it's doing is turning the charger on and off via the firmware. We don't use that setting for what it's really intended for, which is to only charge the battery in a truck / ambulance / RV van when the engine / alternator is running.
6. After upgrading the firmware and starting to use the software switch to control the charger, I have put my inverter / charger through the wringer. I cannot / have not been able to recreate the [20] error. That certainly doesn't mean it's fixed, but I won't be seeing that error any longer because I threw the breaker.
I'm hoping OTT and Xantrex can figure out the rest and make the appropriate recommendations. I think everyone is wondering by now if I have a life - yes I do - and I'm going camping in GA and SC all next week so I won't be bugging everyone on the forum. 😄
-
6
-
-
Ok, thanks to @SeaDawg's comment above about a software setting to turn the charger off, some kind of neurons fired (or misfired) in my head and I thought of the post I had read from @Dgsmithyesterday about his issue with the charger ignition control "setting" being wrong - not allowing the inverter to charge the battery. Well, I went out and tried toggling this software setting and it works. I can turn the charger on and off with the software setting!! No more [20] error code, no more reaching under the bed all the time to toggle that relay - and its great IF it isn't causing any other unseen issues or risks.
This has been a valuable collaborative effort on this topic! The reason my inverter was getting the [20] error code was because of the way I was trying to take care of my batteries. Everything started pointing to the Xantrex misbehaving when no batteries were connected while it was alive and passing shore power through. There may be other things that can cause the [20] error code, but fingers crossed that this was the primary reason some of us are seeing it.
I'm not advocating doing this without validation from Xantrex / OTT Service that it's safe. I'm going to share all of this with OTT Service and hopefully they can work with Xantrex to verify if it's safe as a workaround OR have Xantrex provide a permanent, approved solution.
I'll shut up now - everyone can breath a sigh of relief! 🤣
-
2
-
2
-
 1
1
-
-
30 minutes ago, SeaDawg said:
Nceagle, I haven't read your xcpro 3000 manual, but with the variable charge settings available for various types of batteries on your device, I would think there would be a way in the settings to keep the charger from always trying to top off your battery to 100 per cent. As in, a set of "winter storage settings" that would only charge to a certain volt limit, representing say 50 per cent of charge, instead of physically disconnecting the charger. Or, a method, through settings, to turn the charger to "off"?
Hi SeaDawg, I completely agree that would be far better than a physical cutoff. I've actually asked this question and Jason has confirmed that there is no way to control the charger's "default on" except for ignition on/off and how many amps to send while charging. Another option, and maybe the best place for "software configurability" would be within the battery BMS itself.
I actually sent LifeBlue an email a few days ago asking them for best practices for travel trailers that spend a lot of time on shore power (like mine when at home). I told them I'm not going into "cold storage" mode because I want to move conditioned air around the trailer year round and need the batteries for that among other things (lights, etc). I told them my practice based on research from Battery University was to keep the batteries between 60%-80% and that had me charging the batteries about once per week back up to 80%. They confirmed that keeping the batteries between 60% - 80% was a good practice for that type of scenario. They also always say don't worry about keeping the batteries topped off though - because the BMS will protect them. But then they turn around and recommend storing them disconnected at 50%. 😄
Someone is going to win the race to market for sophisticated Lithium chargers or BMS systems and make some $$$. Sounds like a good opportunity for a start up. 🙂
-
1
-
-
Hi, when I try to create a "new" private message, I get an error that says "You can only send 0 messages per minute. Please try again later." I can reply to messages sent to me though. Am I making some kind of simple user error? Maybe I'm in "timeout" on the forum or something? 🤔
-
I just realized that when on shore power with the battery disconnected, the Xantrex remote and inverter both think there's still a battery there! It shows the battery as "100% full" and in FLT (float) mode. This all points to a problem with the inverter not really recognizing the fact that the battery has been disconnected. This also may help explain the fan cycling issue I saw - if the charger is thinking there's a battery there, it is sending a float charge to the relay? Could that be a fire hazard? Probably not since the wire is thick and the amps would be low, but imagine if the inverter thinks the battery is empty and sends 100 amps to the relay. That might be a problem.
-
1
-
-
If you are going to use Timken's, they make their own brand of grease: https://www.timken.com/products/timken-mechanical-power-transmission-products/lubrication-lubrication-systems/automotive-wheel-bearing-grease/
Not sure if it's better or not (probably not), but I picked up some Timken specific grease for when I replace my Dexter's.
-
2
-
-
Jason sent me this same version, U3 v1.06.
Something isn't adding up here. This firmware is from 8 months ago and from what I can tell most of us having this issue have just picked up our Ollie's recently and have the 3000 inverter (lithium package). I was working directly with Xantrex technical support about a month ago on a different problem and mentioned this [20] error code many of us were seeing. I was told at the time that they were aware of the issue and were testing a fix that required a complete re-flash of the software (not just a firmware update), and that it could only be done at a certified Xantrex service center. The tech didn't even mention trying v1.06 to try and resolve the [20] error and it was certainly available at the time.
I put the new firmware on yesterday - it was simple and only took a few minutes. I didn't think it worked it was so simple and quick, but my Xantrex is indeed now running U3 1.06. It has not fixed the problem on my inverter. I can recreate the [20] error every time by cutting the connection (using the relay) between the Xantrex and the battery while on shore power. I do this often because I don't want the Xantrex keeping my Lithiums topped off and the only way to stop the Xantrex from charging the batteries while on shore power is hard disconnect. I can also "fix" the [20] error by cycling the shore power AFTER the battery is already cut off from the inverter. The remote works fine until I connect and subsequently disconnect the battery again.
I don't think Xantrex expected their customers to be continuously connecting and disconnecting the batteries in order to manage the SoC, but you pretty much have to if you own Lithiums since the inverter is set up by default to always top off the batteries and keep them there. I know these Lithium vendors say don't worry about it - our BMS protects the battery... but that's a marketing response. All research points to the fact that temperature and SoC are the two critical factors in Lithium longevity. Temperature does more damage to the Lithiums when they are in a full SoC as well - so why keep them at 100% when on shore power?
I'll try and figure out what the serial number on my remote is and share it with OTT, but I suspect this firmware has nothing to do with our [20] error code.
In the meantime, if anyone with the Lithium package has a chance, it would be interesting to see if anyone else can recreate the [20] error consistently with the sequence I described above... or, if there are any other sequences that cause the problem?
-
2
-
-
Here are some pictures of the various things we've been sharing ideas on in this post...
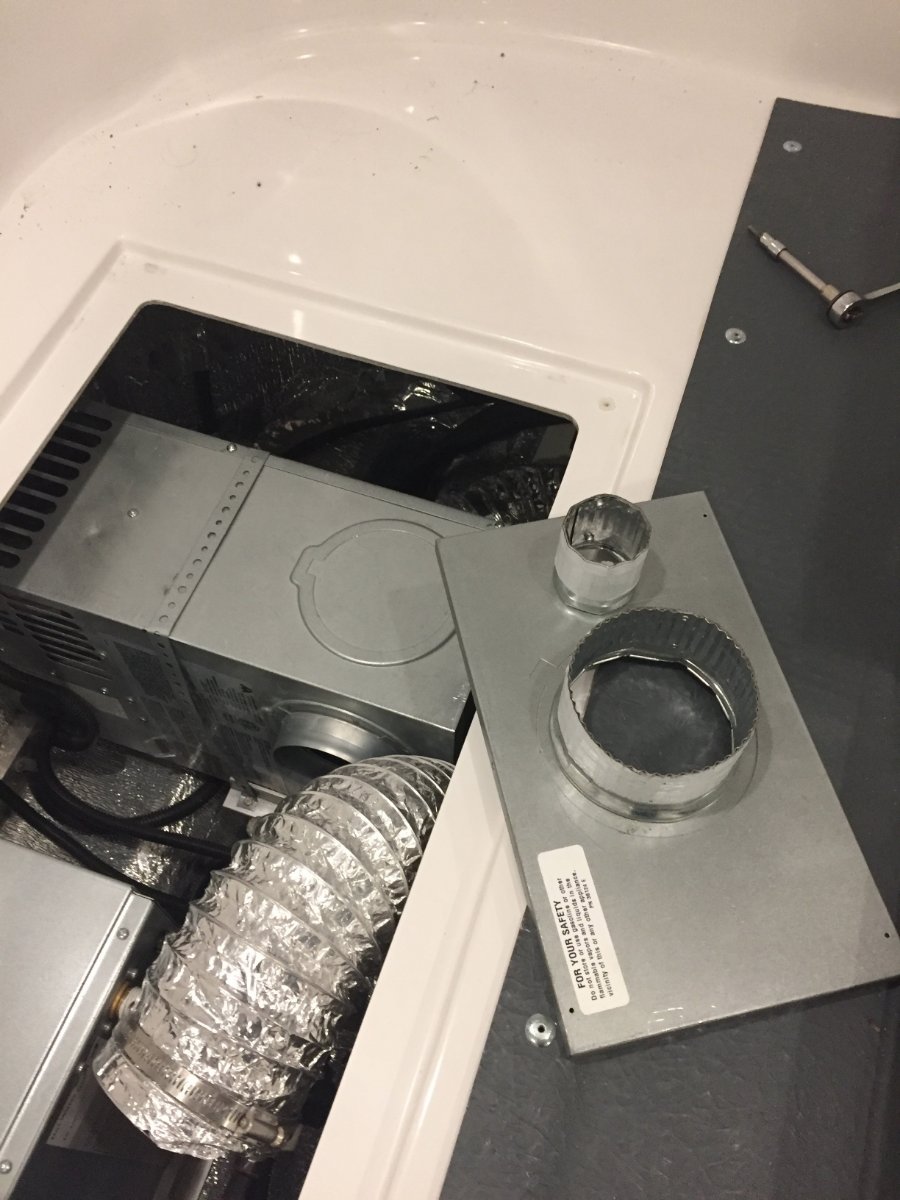
First, a boring picture of the 6" vent I put in for the "bilge fan" under the front dinette seat. Again, I wanted a way to move conditioned cabin air throughout the basement (hot or cold) that was independent of the furnace fan - which cannot be run without heat anyhow.
And the fan itself. You have permission to laugh at the bungee cord installation. It's temporary for now until I find a good way to mount it permanently. Ugly but it is working! 😉
Here's the remote controller for the smart fan. I "hid" it behind the blind sort of. It's not pretty either but it has a temperature sensor and all kinds of ways to program the fan for various situations. Also, no drilling or screws unless absolutely necessary - and it isn't necessary for this as I used 3M two sided tape and just ran the sensor wires through the hatch.
Now onto the other part of the "all electric" backup heat solutions...
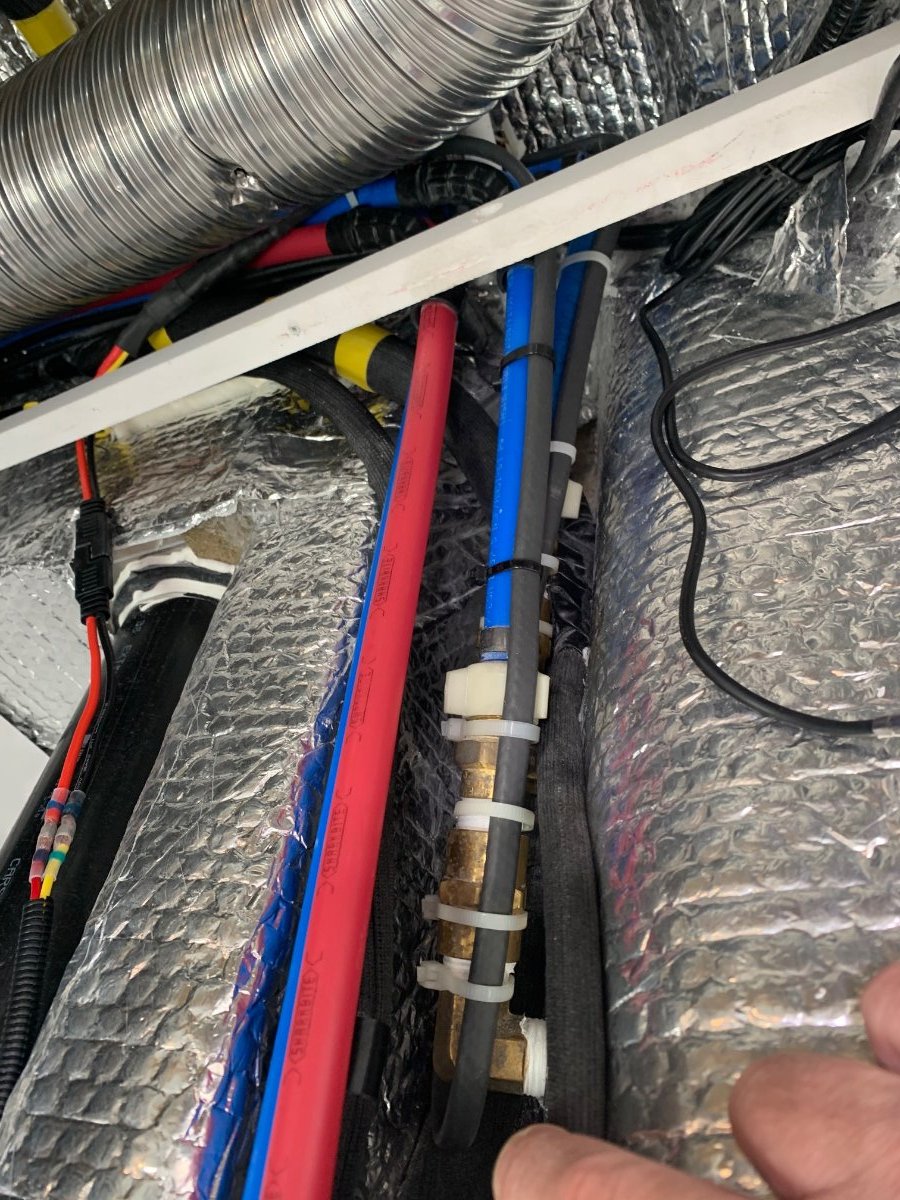
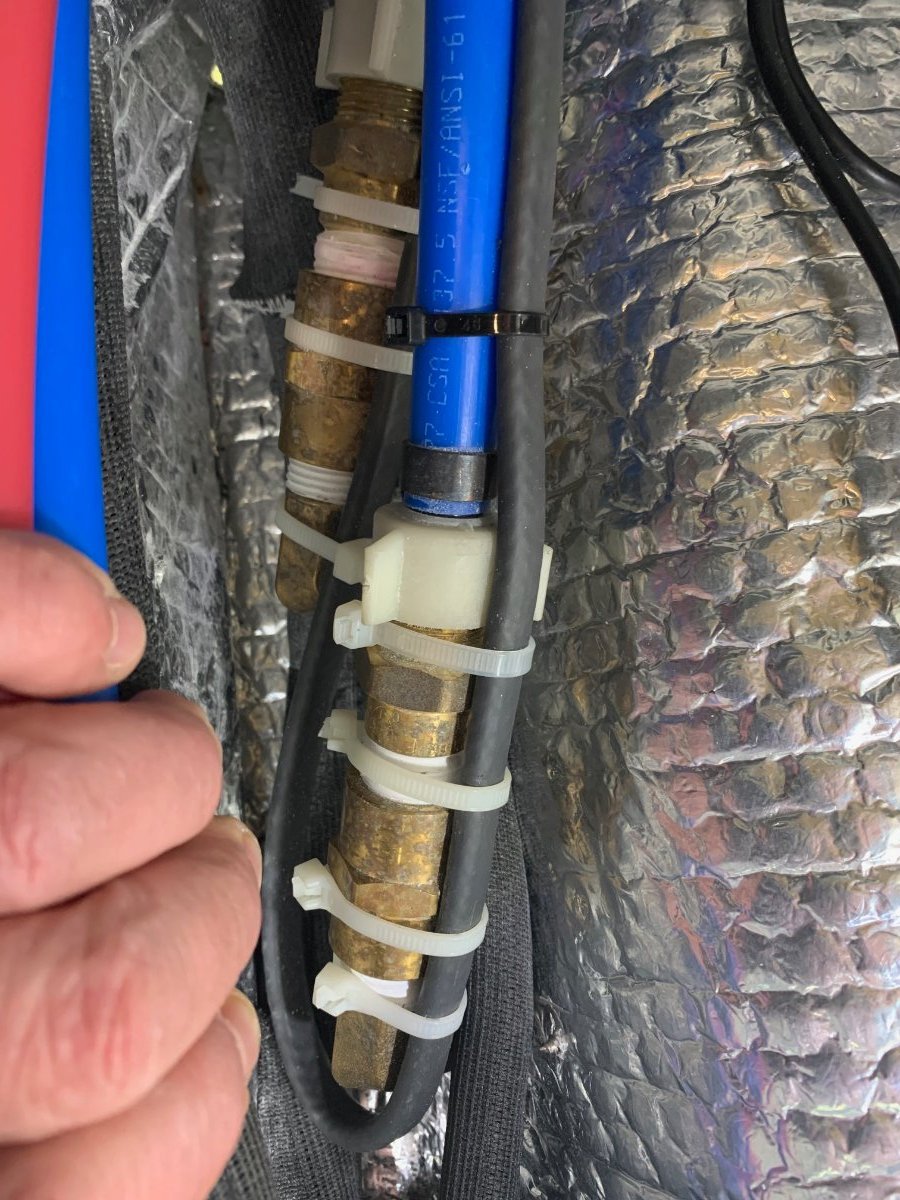
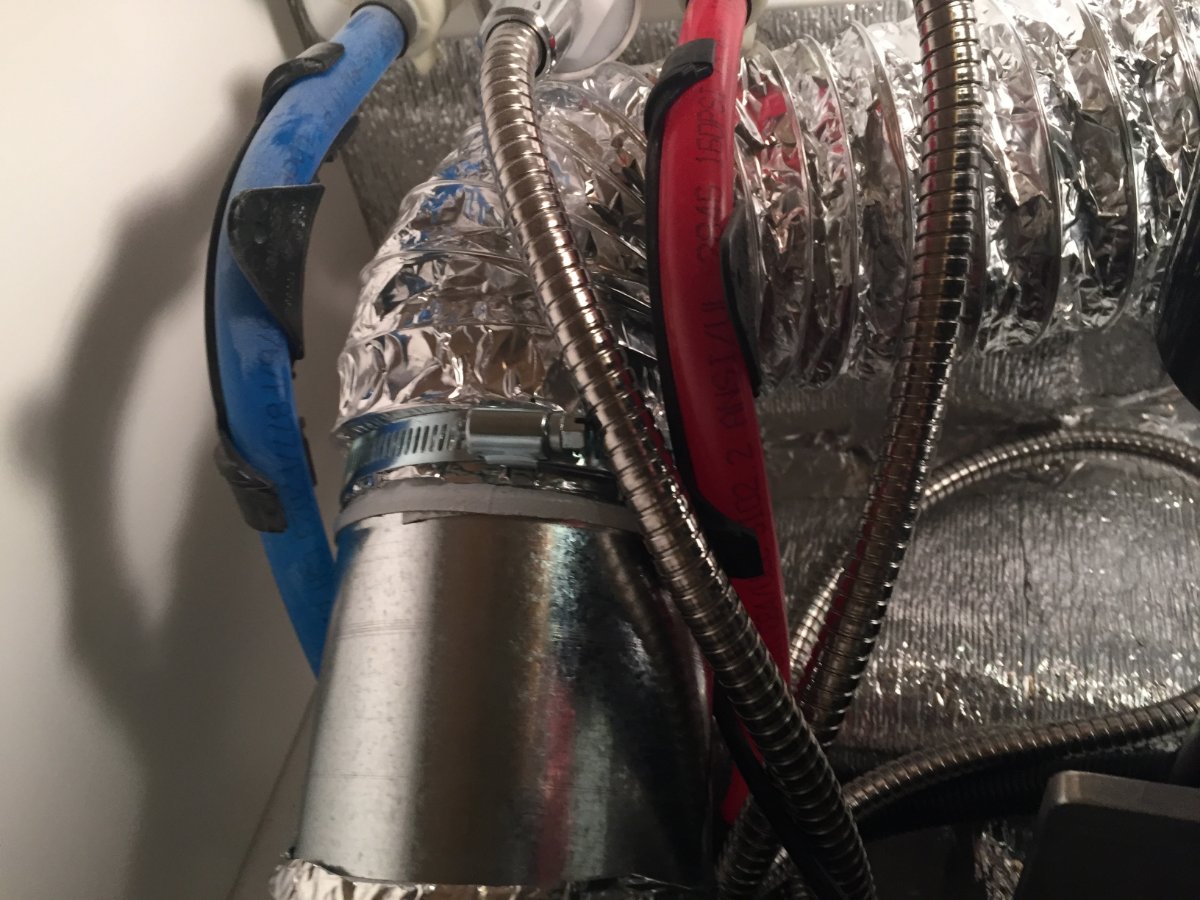
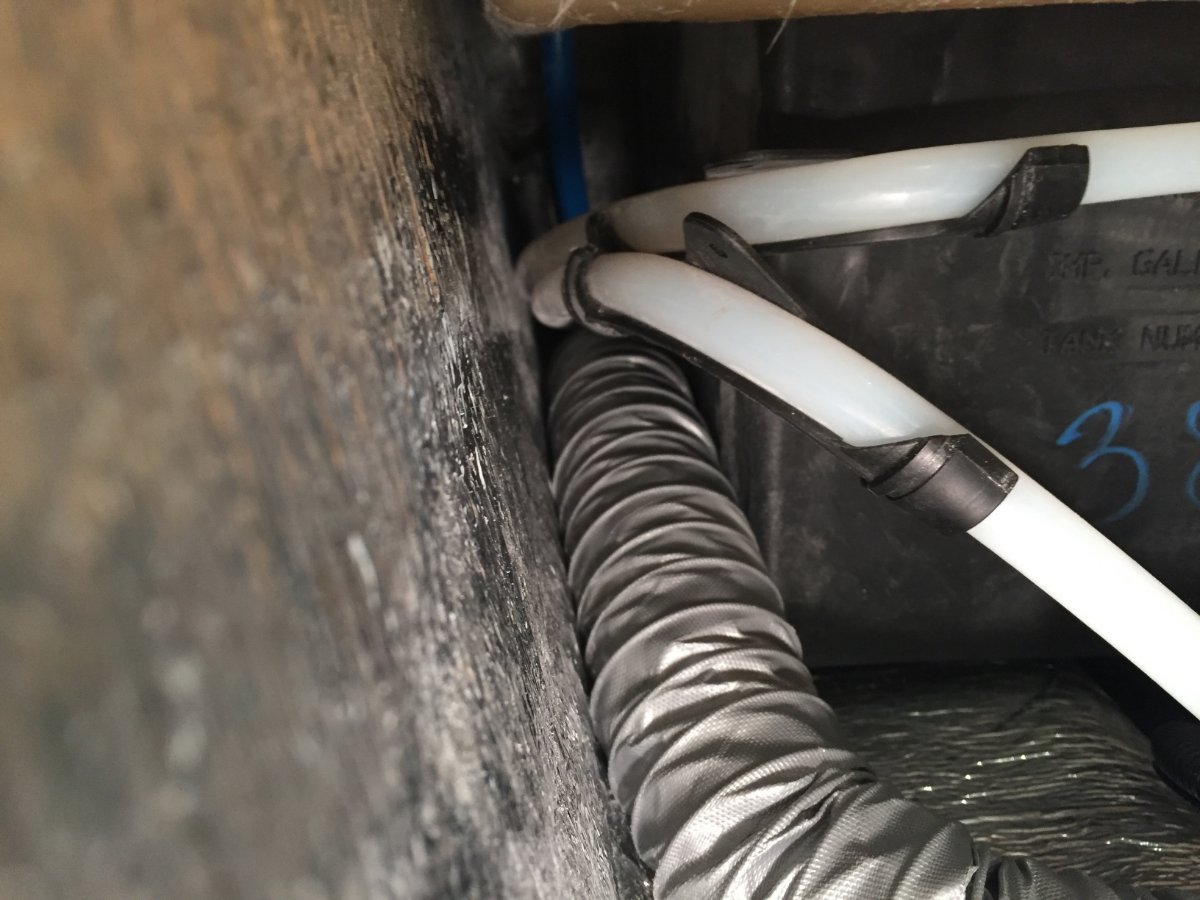
Here's the heat cable tie wrapped to the backflow check valves. Tough to see, but the cable is 4' long so runs 2' on each line - with the cable touching each backflow check valve. This is similar to putting a pump or two of antifreeze into each port when winterizing (I hope).
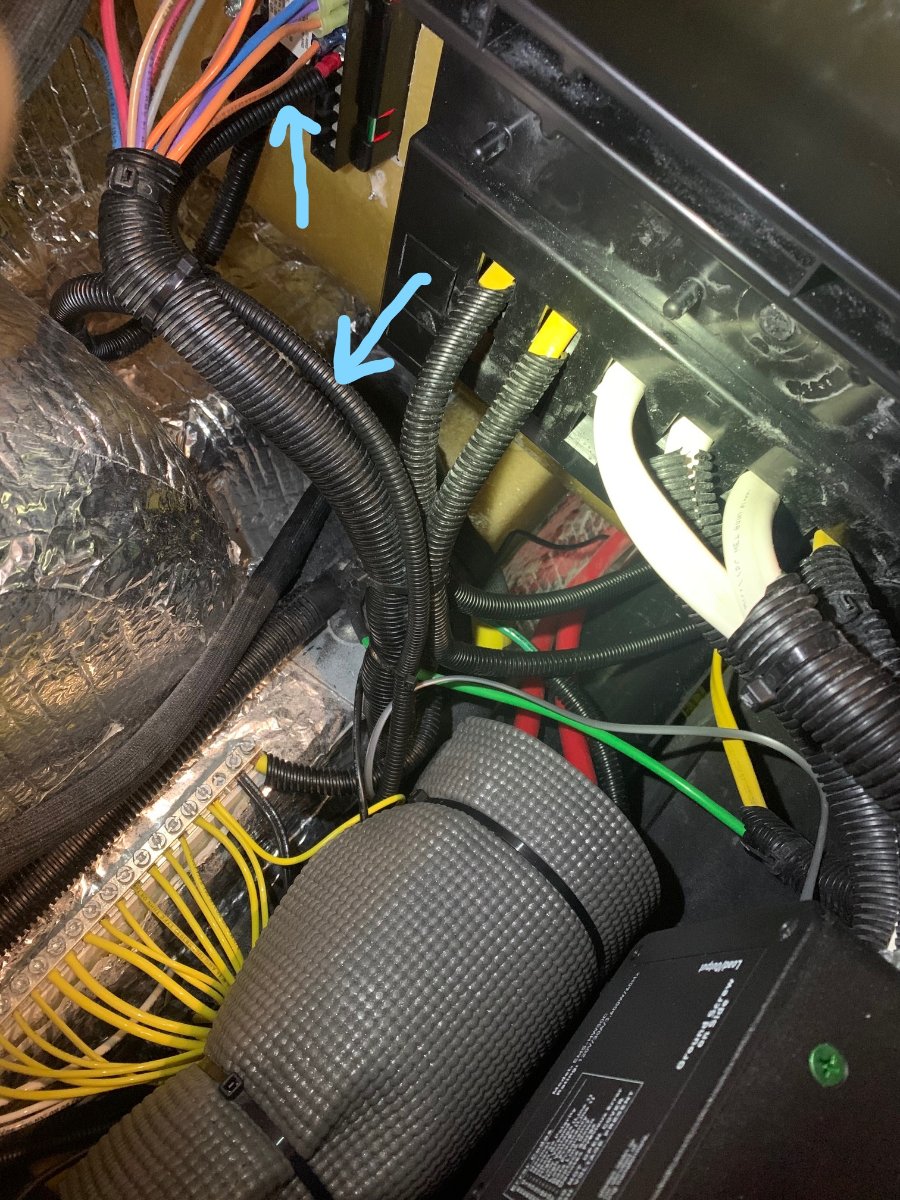
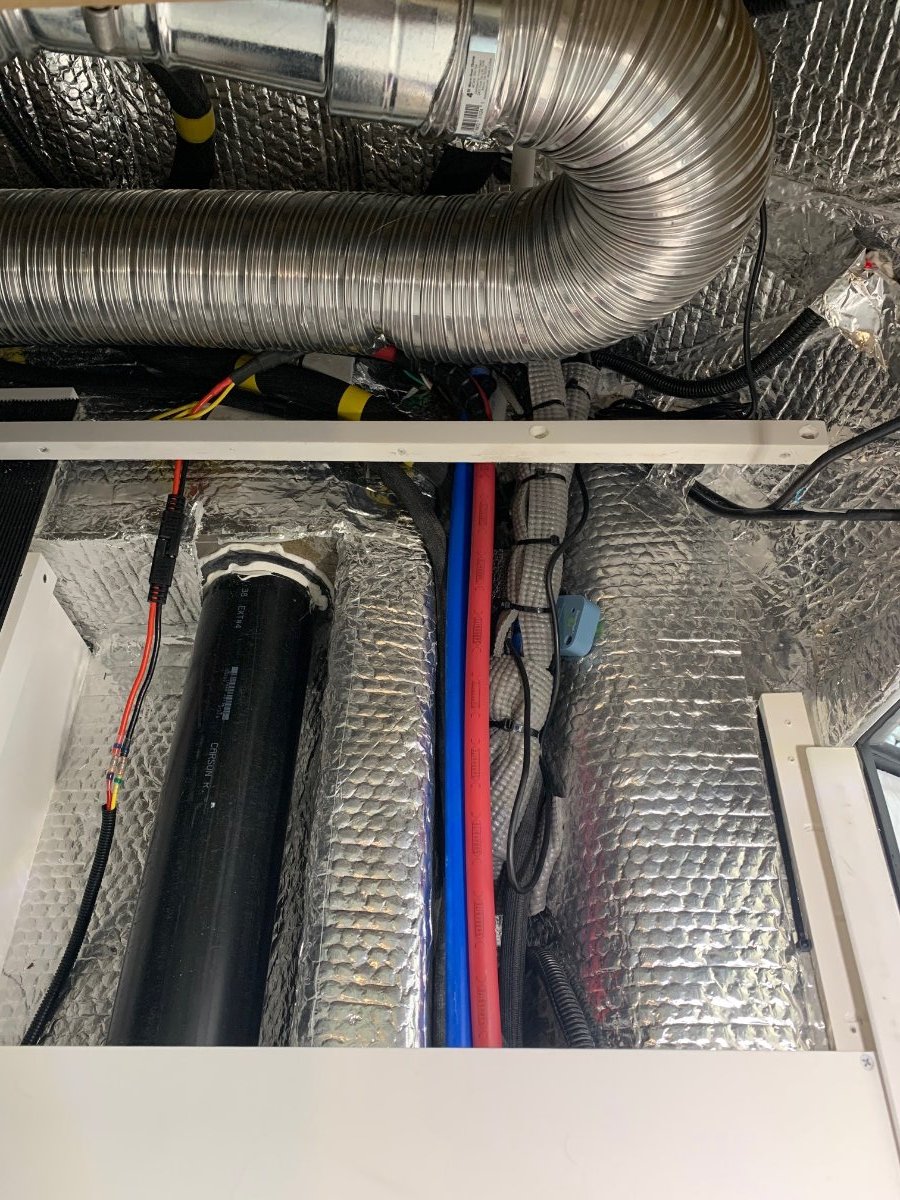
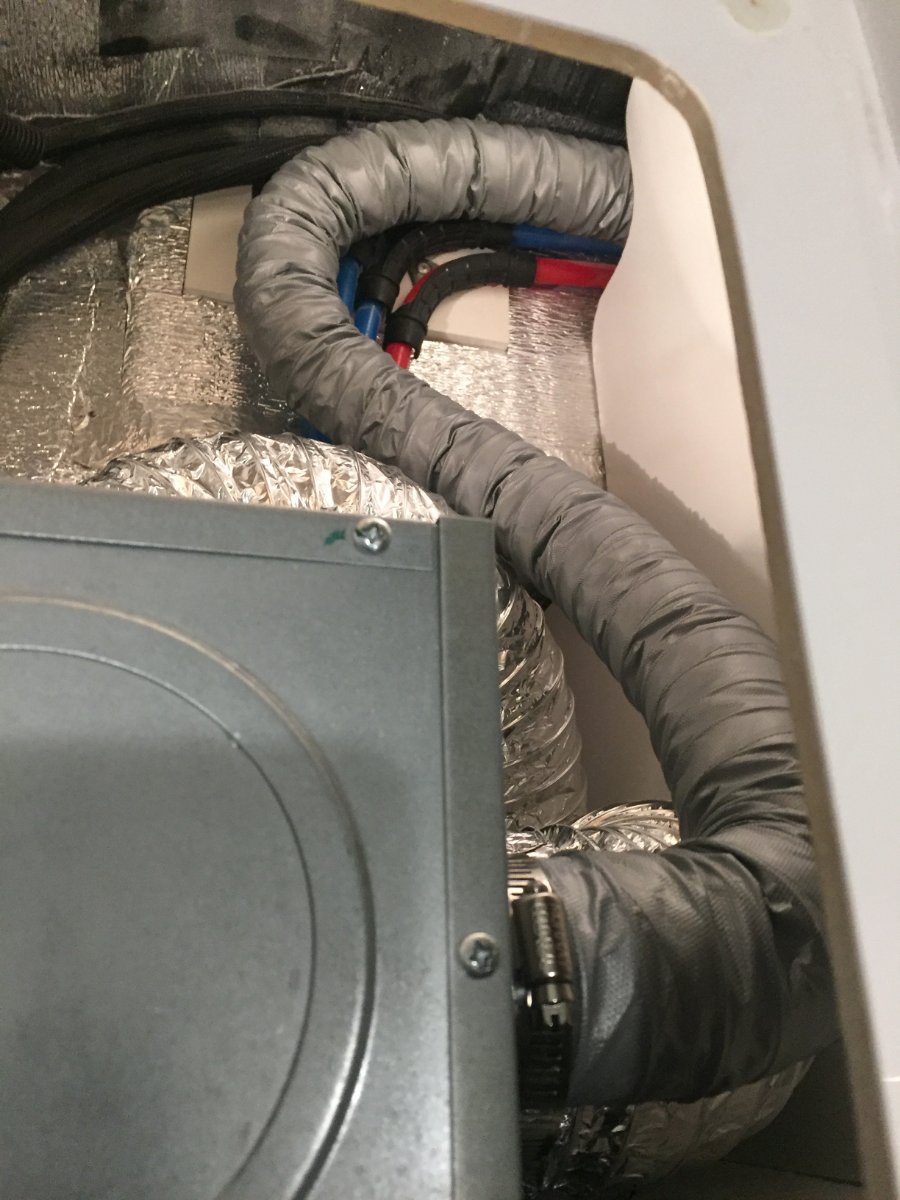
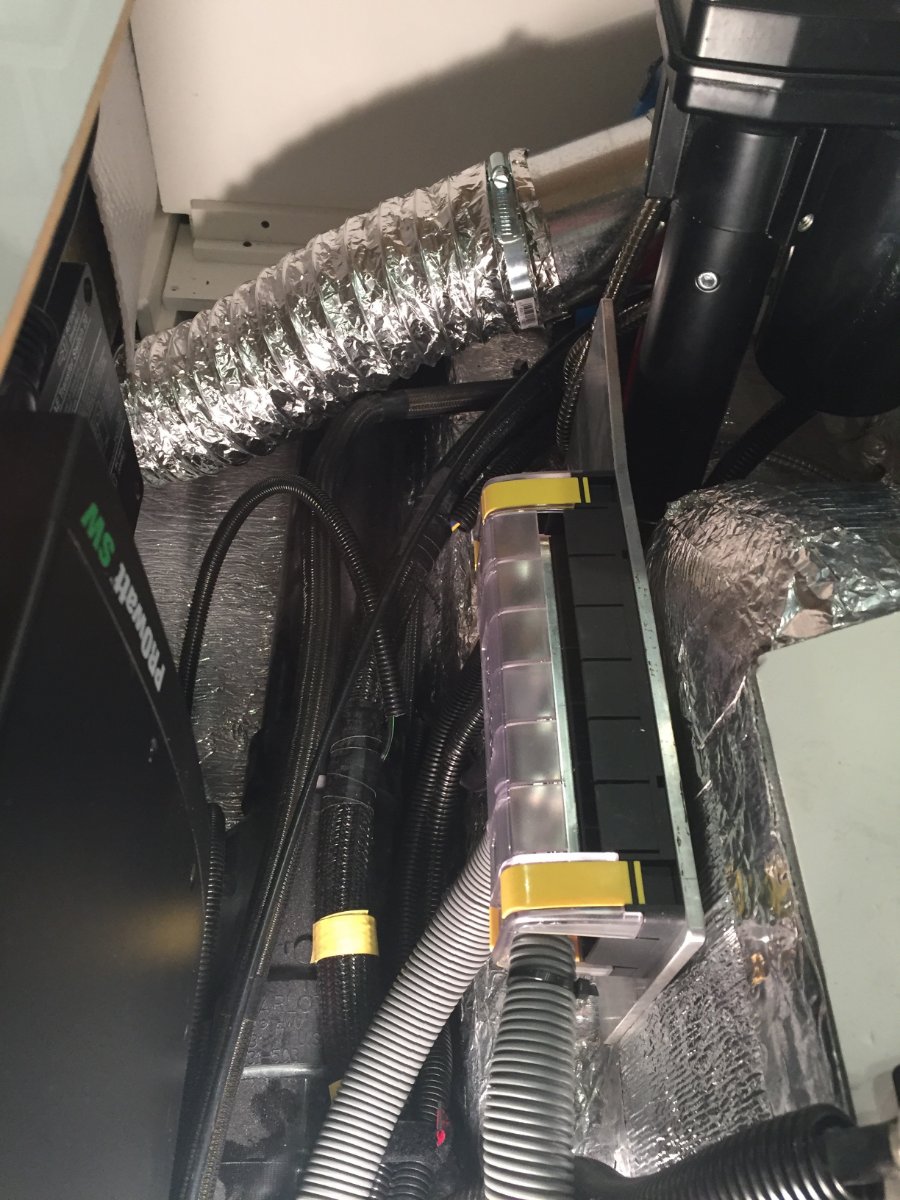
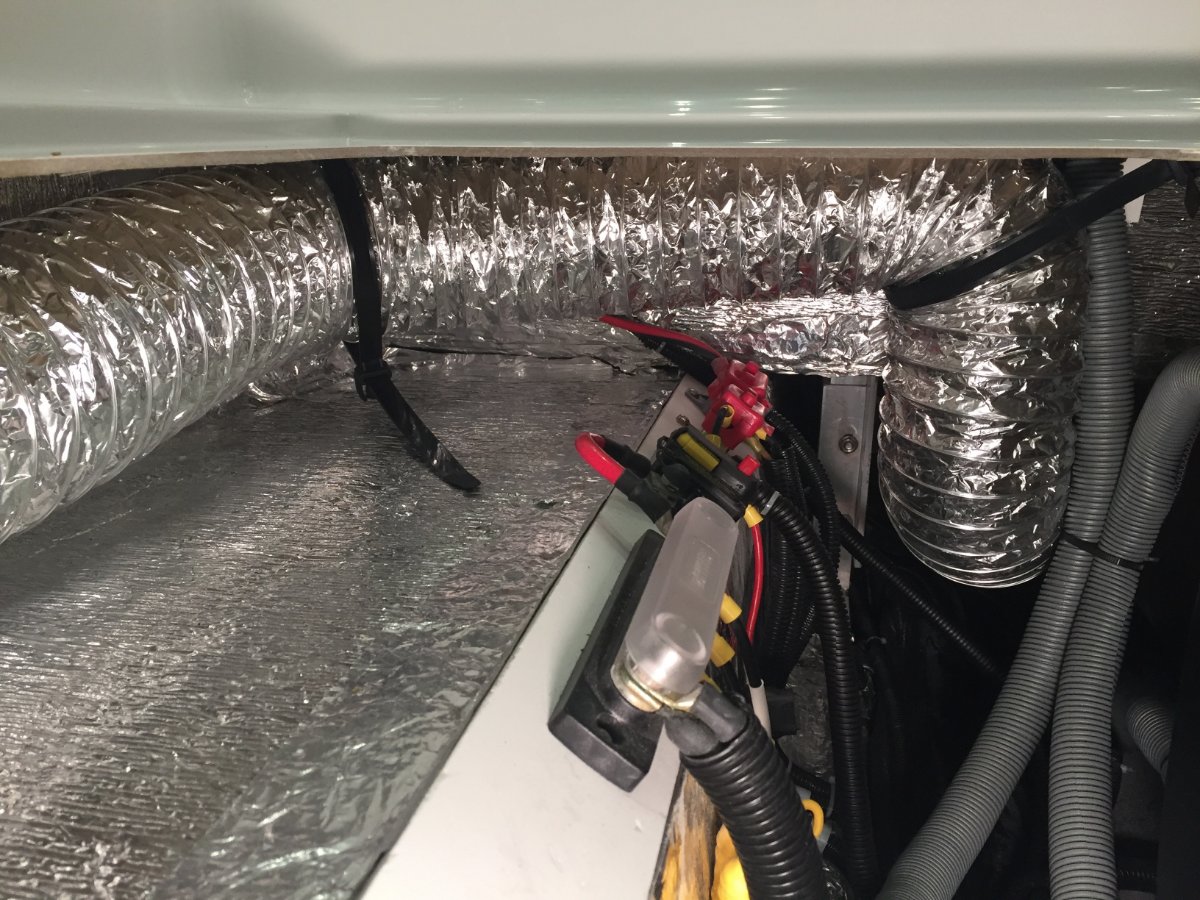
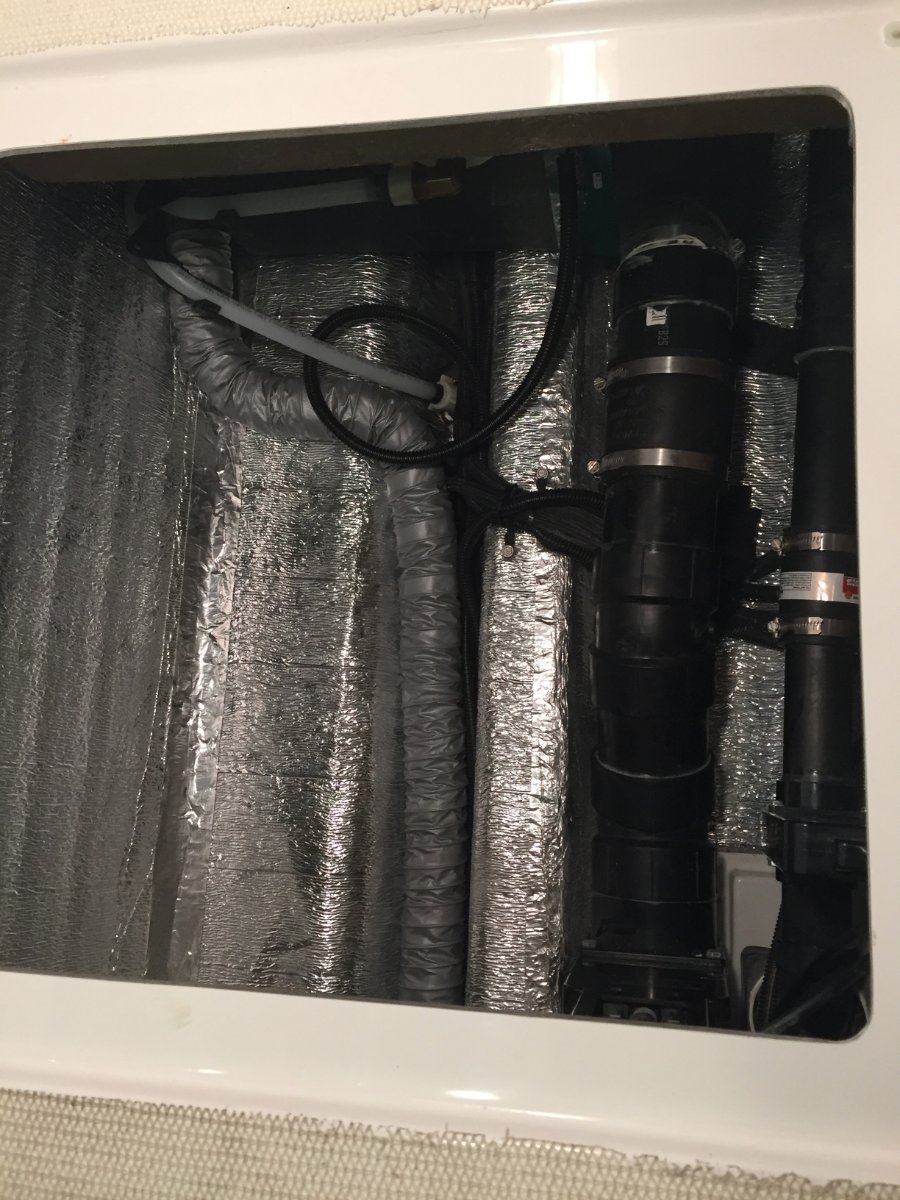
You can see the wires leading to the cable running in the "tray" along the black/gray drain pipe on the left (1st pic above). In the next pic, here's the connection I made to the 12V fuse box (annotated by the arrows) and the negative bus bar (yellow lines). I used lucky terminal number 13 on the fuse box and had to share a connection on the negative bus bar (I know, not a good practice, but OTT already had done it once so what does doing it twice hurt?). I'll put a switch in someday (maybe) - for now it's just put the fuse in if you want the heat cable on, take the fuse out if you want it off. Side note: That thing wrapped in the yoga mat is the end of my HVAC line that runs on the street side. If you look closely, you can see 2 red automotive vacuum hoses coming out of the end and going under the dinette floor. This is how I'm getting some heated air to the front street side from the furnace.
I'll share this picture below mainly so you can all laugh at the hole I created in my ductwork below the battery box (I used a screwdriver - LOL). Nowhere near as "sexy" as @Minnesota Oli's beautiful drilled hole! Paul, I may have to put in an order for that part so I can upgrade my solution someday! 🙂 The wire for the heat cable is running right underneath the hvac line in the picture.
Last but not least, I put some insulation around the cable, pipes and valves before replacing the floor to help keep the heat where it is supposed to be. You can also see my temp/humidity sensorpush tucked beside the line as well as the temperature probe from the smart fan tucked into and up against the check valve itself (for now I want a really accurate reading of the pipe temp). You are all welcome to laugh again - see the hole in the ductwork right above? Yep, my screwdriver got busy there too in order to direct some heat at the valves and plumbing in that area. 🙂
Heat cable test - not super cold out, but it is working for sure. Turned on the heat cable at 4:30 AM this morning.
-
5
-
2
-
-
8 hours ago, Ray and Susan Huff said:
Thanks for the info . . . . though it is "Greek" to me. We are still getting the "20" error, though it does occasionally go away and the remote appears to be working. We haven't had a need to use the inverter, but it would be a real pain to have to access it through the street side bed hatch to turn on and off or to check the status of the batteries.
The last information I had from Jason indicated that he has contacted Xantrex repeatedly and they still have no solution.
Keep us informed as to what OTT or Xantrex says about your observations. I wonder how many inverters (Oliver installations or other) are having this issue. If they can't find a solution, I'd like to have a different inverter.
I did update my service ticket with this info, and Jason told me Xantrex just sent OTT a new firmware version to try and fix the issue. Jason sent me the firmware to try yesterday as the Oliver team hasn't been able to finish their testing yet due to weather. It didn't work on my inverter - or at least I don't think it did as I was able to reproduce the [20] error immediately by cutting off the battery connection to the Xantrex while on shore power.
My remote is disconnected again until we have another version of firmware to try.
I agree with the new inverter comment. All I've been using the invertor for so far is charging the batteries and it's obviously not Xantrex's specialty. Whenever it's on and connected to a battery, it charges by default - and keeps it topped off, which is not what you want to do with your Lithiums if you aren't boondocking. I don't want the thing charging my batteries by default and I'm already sick and tired of reaching under the bed access hatch to trip the cutoff switch - or reset it so I can charge the battery when it needs it. I may eventually go with a dedicated inverter and a dedicated charger.
-
1
-
-
4 hours ago, Jairon said:
Nice find! I would assume the fan speed or on/off state is linked to load or a simple temperature sensor in the unit itself. I wonder what is causing load/heat after the battery disconnect event - actual load or a bug.
I think it's a bug because the load was identical on the prior days and there's no sign of the fan cycling. It may not even be related to the remote error code, but it seems suspicious.
-
1
-
1
-
-
On 2/16/2021 at 10:42 AM, Jairon said:
I was researching cables last night and that solution sounds far better than the ideas I was seriously considering. If you have a bill of materials and you care to share it, I'd love to copy it. 😁
No problem at all. I ordered 4 units (feet) of the cable, which is item No. K650016 and 1 termination kit, which is item No. K651001. I used some heat shrink tubing that I had as well to do an even better job on the cable termination and wiring ends. I also used a 3 amp fuse and 14 gauge red wire for positive and yellow wire for the negative connections. Oh, and some corrugated, split wire loom tubing to protect the wires (same stuff OTT uses everywhere on the wiring).
Oh, and the cable turned out beautiful. I carried it around and showed it to my wife and my son and the pets I was so proud. I just forgot to take a picture of it before I wrapped it around the check valves and tie wrapped it in. 😀
-
1
-
3
-
 1
1
-
-
38 minutes ago, Jairon said:
Is the water line to the toilet open by default when ordering new with the composting toilet option? What was the process to drain it and keep it drained?
What brand of heat cable did you go with?
Thanks!
Hi Jairon,
Yes, at least on our Oliver (picked up 11/20), the water line is connected and open (filled with pressurized water) to the inlet valve for a standard toilet. There is also a hole under the composting toilet directly over the black tank for a standard toilet, although the black tank has no hole on top of it. I'm glad it's this way though in case we ever decide to go with a standard toilet - or if there are ever next owners that want the standard toilet. I have a post somewhere in the forum that shows pictures of the access hatch I put in the bathroom vanity as well as some shower upgrades. One of the pictures shows the line going to the toilet valve and where I have installed a cutoff valve. I blew the water out of the line to the toilet valve while I had it cut, then I put in the cutoff valve and shut it. Again, it's still there for future use if needed. Let me know if you can't find the post / pics - it's easy once you hack your way into the vanity. 🙂
As for the heated cable, I worked with a company in Minnesota, https://www.oemheaters.com/. I called and talked directly with one of their engineers about the problem I was trying to solve and they recommended a solution. I bought all the parts and built the cable, then wired it in through an open terminal on the Ollie's DC fuse box. Pretty easy and pretty fun. I'm going to collect some temp data tonight and create a post on it hopefully tomorrow. Then everyone can start improving on it from there! 🙂
-
2
-
1
-
-
On 2/12/2021 at 1:18 PM, John E Davies said:
Has anybody tried this? I think that having that huge opening right under the sleeping area is a problem. Could the grill be relocated to the other side of the cabin, under the front dinette seat? Or in the front entry wall at the fridge? Then the big hole in back could be covered or replaced with a hinged access door. It seems as if the fan noise would be greatly reduced if it was located far away. You would have to install a baffle to keep stored items from blocking it under the dinette, which would reduce the volume a little. I’m unclear about the fridge area, if that could be suitable.
Before I start messing with it, has anybody tried this? Did you do any sound measurements, before and after?
There would be an added benefit - conditioned cabin air would be pulled around the water tanks, helping to keep them and the plumbing a little warmer.
Thanks.
John Davies
Spokane WA
I thought about trying this before I decided that I needed an independent backup for the furnace that could move conditioned cabin air into the basement. You probably remember helping me with ideas on implementing the "bilge" fan. My data shows that the fan works as it pulls the temps across the basement up (with heated cabin air), so I'm pretty sure this idea would work for you with respect to conditioning the basement air in the winter - in fact better since your furnace would be taking basement air and conditioning it rather than predominantly reconditioning cabin air.
Always trade offs though. My solution also works in the summer for cool cabin air, but it does absolutely the opposite for noise control! 😃
-
1
-
-
On 2/11/2021 at 8:04 PM, Minnesota Oli said:
The seed was planted for this furnace mod when we grabbed a canceled reservation three weeks out at a Minnesota State Park. This reservation was mid October and when the date arrived the weather forecast had changed for the worse. We stayed for only two of the three days and we received our first snow of the season, 6 inches of wet snow. We had a non electric site and my batteries were having trouble making it through the night and I was concerned about the water freezing in the Oliver. I have already addressed switching to lithium batteries and posted about it on Oliver Forum. Now I want to share with you what I have done to relieve my worries about water freeze ups in the Oliver, provided that I have a functioning furnace.
I first tried to identify the weak spots and came up with the following.
- Boondocking Inlet
- Outside Wash Station
- Fresh Tank Fill Inlet
- City Water Inlet
- Black Tank Flush Port
- Toilet Water Supply Line
- Hot & Cold Lines Crossing Back Of Oliver
The Oliver has all of it's heat ducts run on the curbside which protect the kitchen and the bathroom faucets from freezing. My plan is to run a 2" ducting along the back to the street side and terminating in to the trough that the water lines run in for the city water inlet, fresh tank fill inlet and outside faucet. This trough also has the check valves for those two inlets and has the floor of the exterior storage compartment covering over the top of it. To get at the trough you will have to remove the back wall of the storage compartment and flip the mat back that covers the floor. This exposes the water lines that come across the back of the trailer and drop into that trough. There is a wall that separates the furnace compartment from storage and extends past the wall you just removed. It has a opening for the water lines and it is large enough to run the 2" duct through it and on top of the water lines across the back and into the trough. Now you can flip the mat back down and they are long enough to cover the water lines and the newly installed 2" duct, then the wall is put back in place.
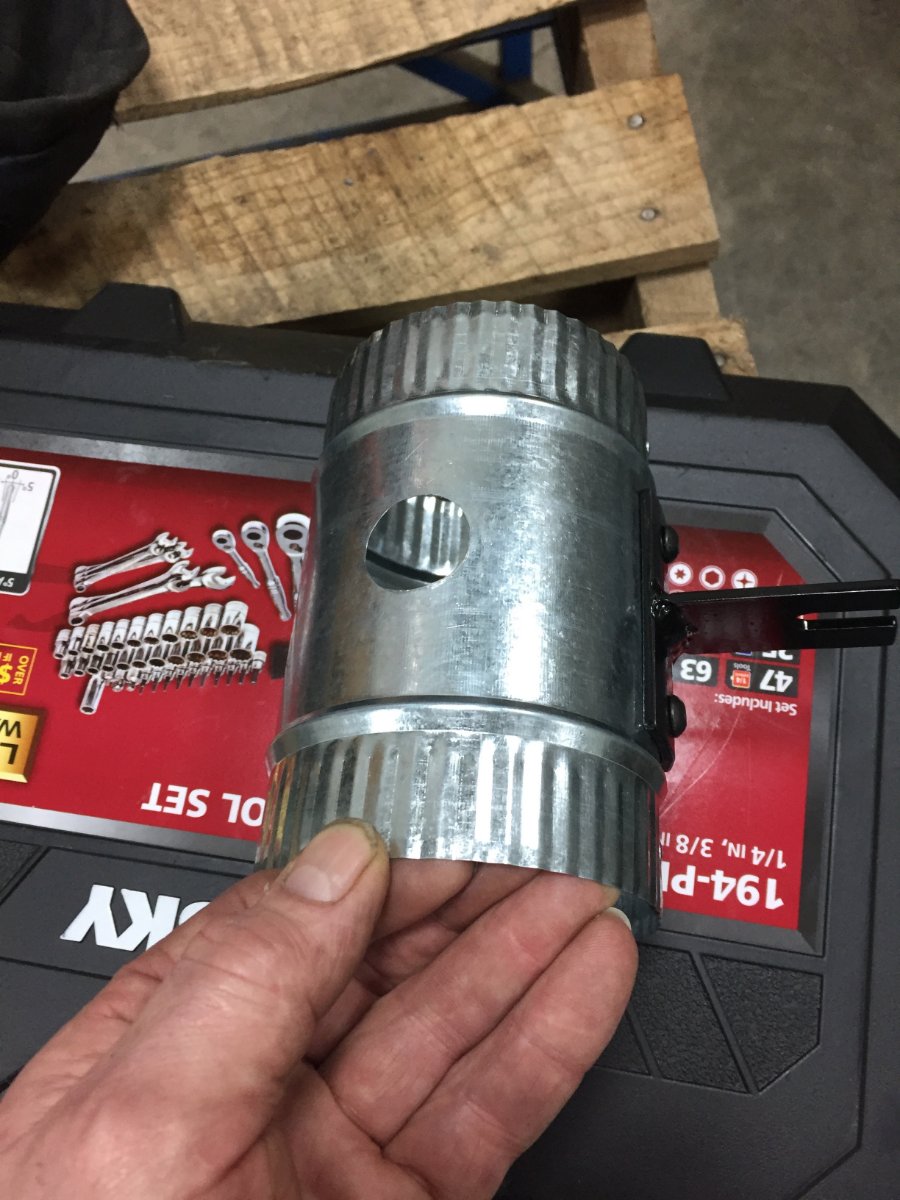
On the connection to the furnace I removed the back of the heat exchanger. There is one hard to get at screw on the bottom but the rest are easily accessible. I made two holes, a 2" and a 4" in that back plate. I could not find a 2" starter collar locally so I bought two 4" and removed the rivets on one of them and formed a two inch collar, cut to length and re-rivet.
I then installed the 2" and 4" starter collars to the heat exchanger back panel and then the panel to the furnace. I then hooked up the 2" duct to the furnace. Looking in to the access hole under the street side bed you are able to see where the water lines come up and out of the trough and to the valve of the out side wash station. When the furnace fan is running it will blow out a lit Bic Lighter held in that area. So we're protecting water lines, the check valves and dumping warm air underneath the outside wash station valve.
Now back at the furnace I attach a 4" heavy duty aluminum foil duct to the newly installed starter collar. It is routed forward a short distance until it can be routed across the basement to the street side and then fed between the hot and cold water lines that go to the outside wash station valve. At this point I need to use a 4" coupler that is 6" long to attach the next 8' piece of 4" duct. I use the 6" long coupler so I can add holes if I need to flood a area with heat, this particular coupler did not need to. I then routed the duct from the wash station valve along the outer wall and over the wheel well, make the corner by the battery compartment and then once getting past the wheel well go down and under battery compartment. Up in that corner I attach a adhesive base 3/4" cable anchor so I can loop a 20" releasable tie strap through it and around the 4" duct holding it up and out of the way. A second 20" tie strap is used were the duct heads down under the battery compartment, it utilizes the loop that anchors the 4/0 cable coming out of the battery compartment.
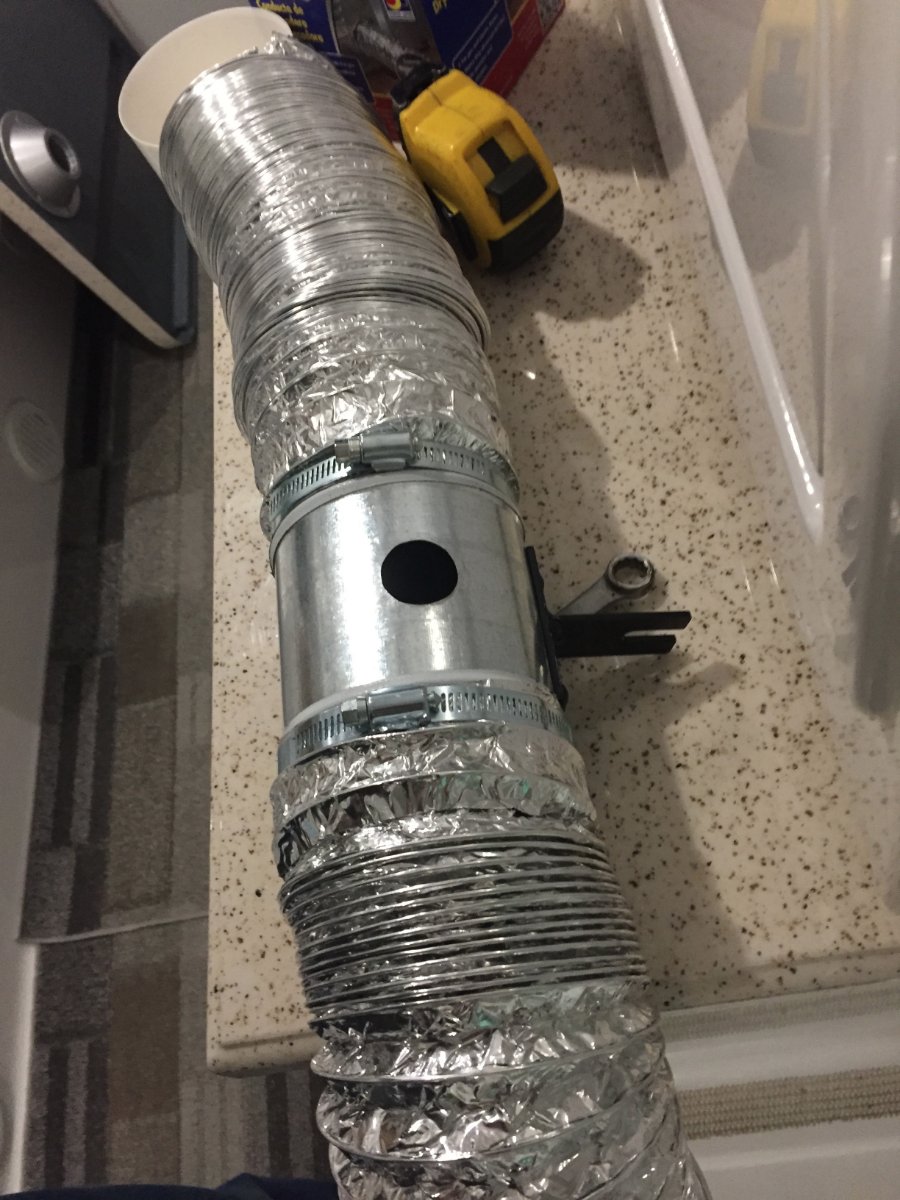
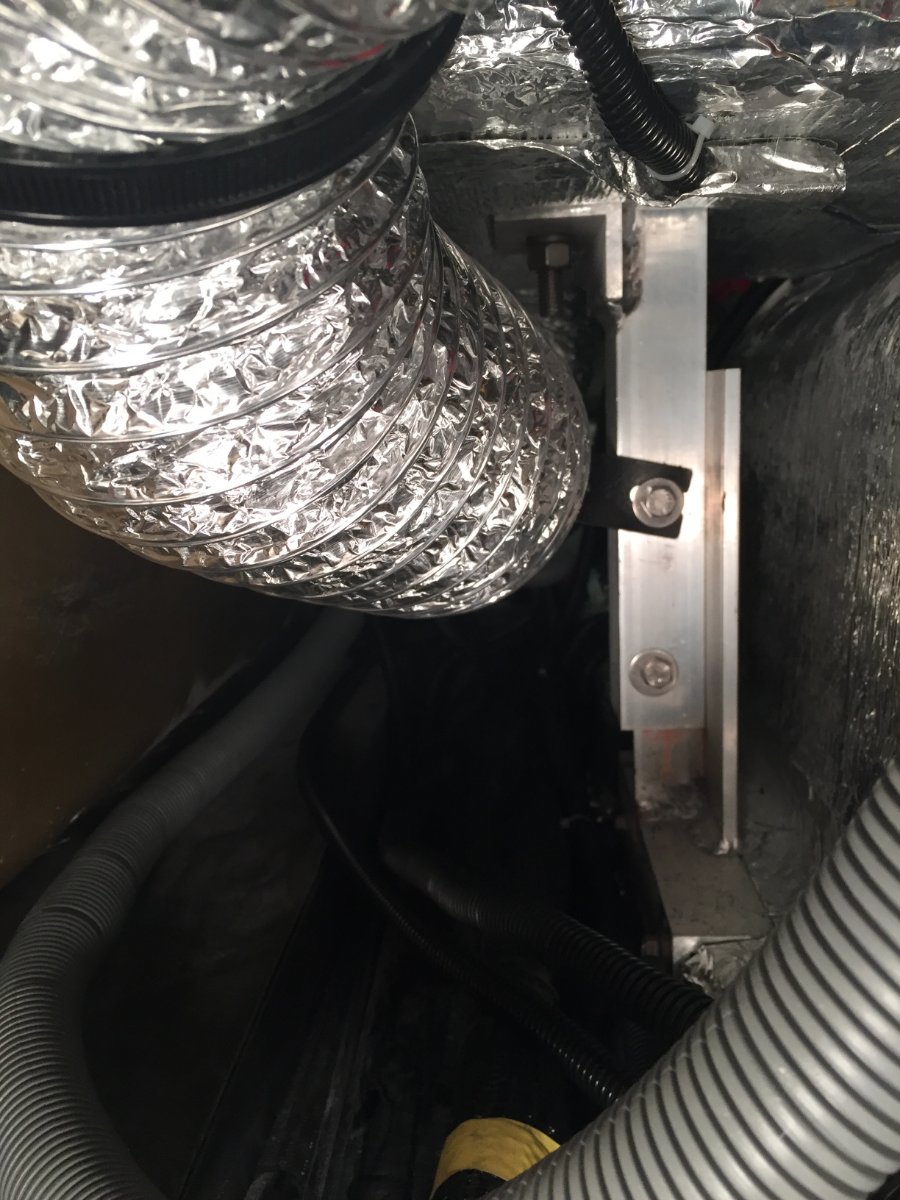
Next I prep another 6" long 4" coupler by adding a metal mounting bracket. It is bolted to the coupler using two 10-24 machine screws that go through the bracket the coupler wall and then a backing plate that has tapped holes. This coupler I will add a1" hole that will be pointed up to flood heat at the battery compartment.
The mounting bracket will be utilizing the upper bolt of the support leg for the battery compartment.
This keeps the duct up and away from the inverter and electrical components and positions it to flood heat up against the bottom of the battery compartment. The next length of 4" duct is clamped to that coupler and routed up from under the battery compartment over to and along the wheel well. It is held by two 20" tie straps similar to the other side.
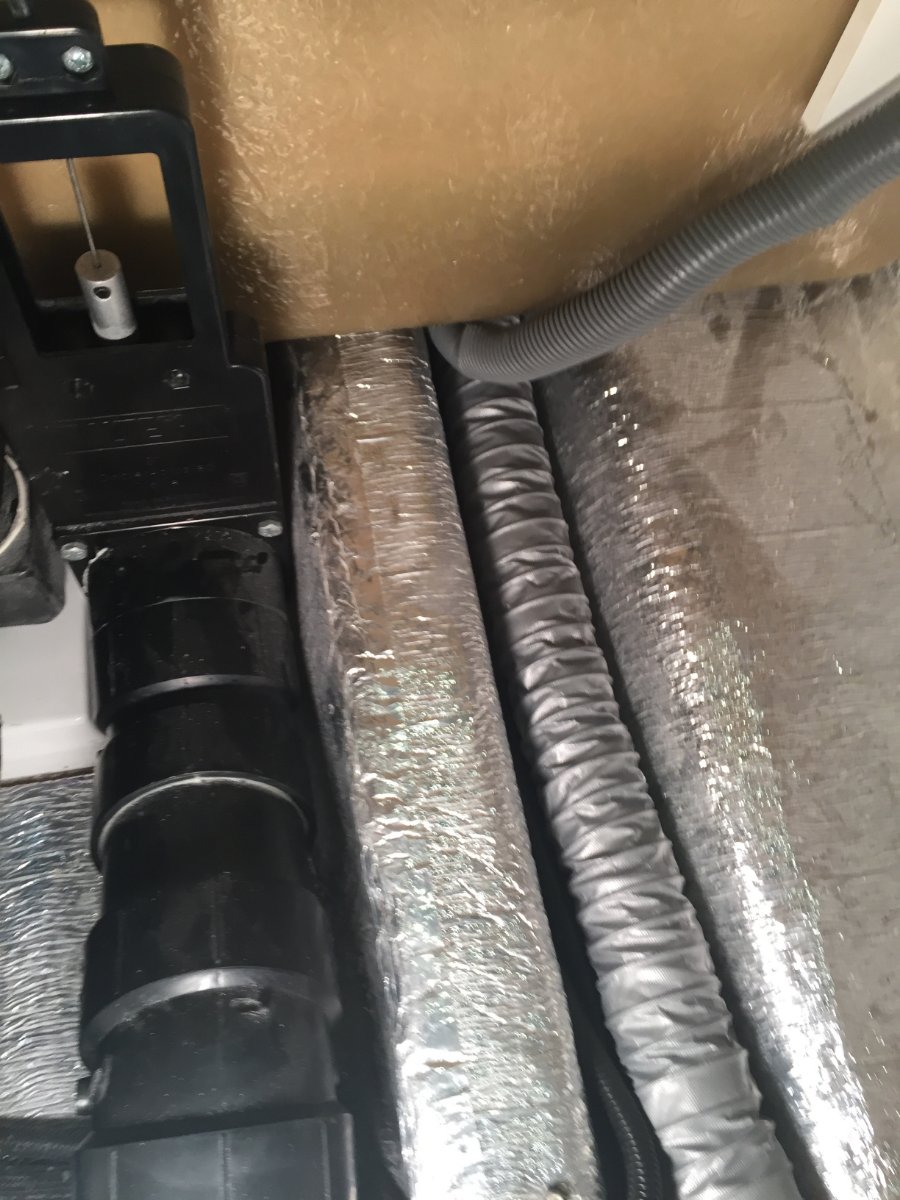
Because I want to run the heat duct under the foot space of the dinette I need to transition to 2" duct. There is access via the same trough that I utilized in the back of the trailer, but at the front there is more room and I am able to pull the 2" ducting through. From there it continues toward the front until it reaches the black tank flush inlet where it then follows that pipe back along the black tank and terminates by the water supply line for the toilet. At the transition point I add two more short pieces of 2" duct and route them down to where the main black tank drain pipe goes under the dinette foot space, they are terminated on either side of that pipe. There was not enough room to run the 2" duct but enough to force air along either side. At the transition from 4" to the three 2" ducts I simply inserted the three 2" into the end of the 4" and used aluminum foil duct tape to seal the transition. I also want to mention that I used the aluminum foil duct tape to reinforce the ends of every 4" duct by wrapping outside and inside before clamping.
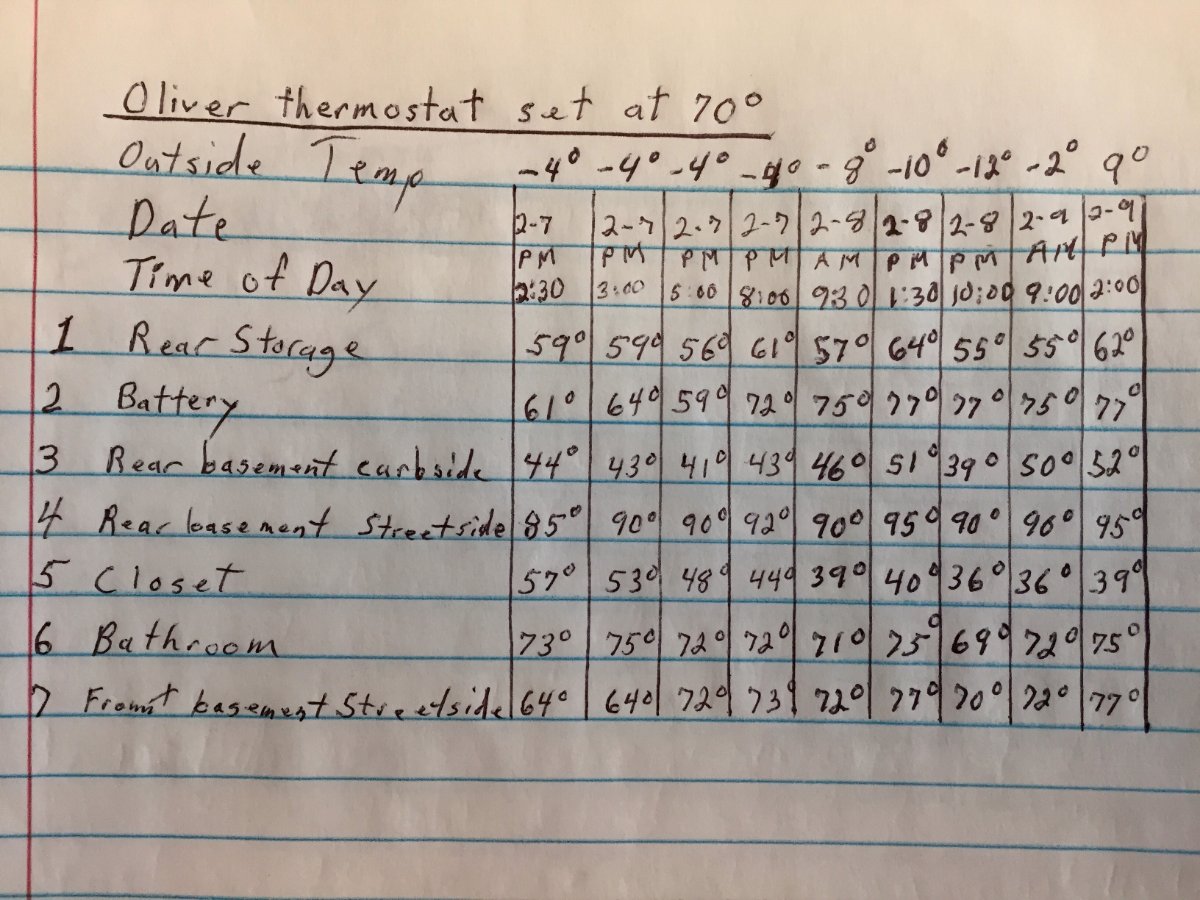
That should cover the install, now lets talk about the results of the test in subzero weather. I rounded up seven digital thermometers and put them in the areas I was concerned about.
- Was placed just inside the empty rear storage compartment.
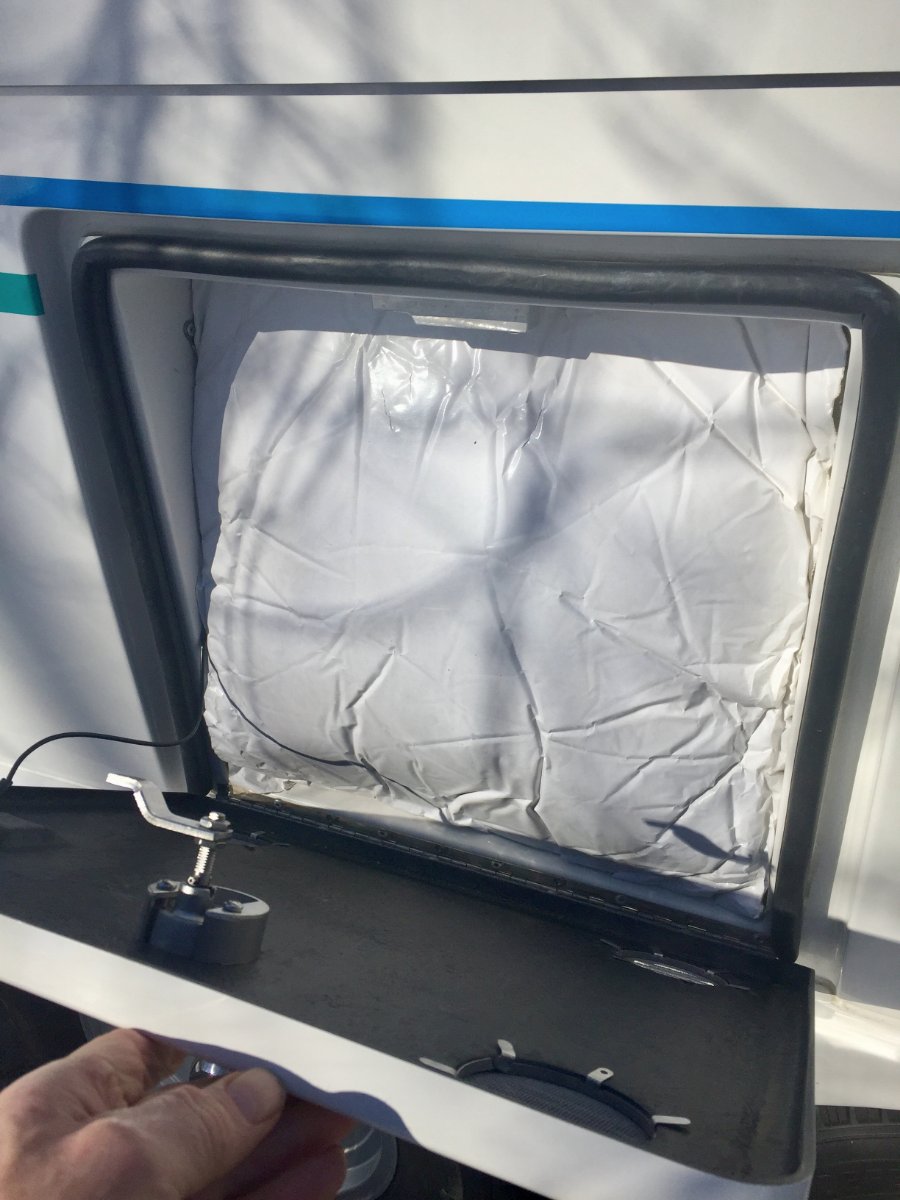
- Was placed on top of the batteries and a piece of acoustical insulation that was for large generator enclosure, it was 1-1/2" thick and 19" square. This was squeezed in the opening before the door was closed.
- Was placed in the rear basement curbside next to boondocking inlet.
- Was placed in the rear basement street side below the outside wash station valve.
- Was placed on the floor of the closet with the door left closed.
- Was placed on the lower shelf in the vanity in the bathroom with the door left closed.
- Was placed in front basement street side next to the black tank flush port line.
I moved it out of the heated shed at 1:00 pm on Sunday 2-7-21. I moved it back in at 3:00 pm on Tuesday 2-9-21.
The furnace was cycling off and on at -4 ' but I noticed at -8' and colder it ran continuous. I have the Truma water heater and that was also turned on. I checked propane consumption by putting on two 20 pound tanks that I had weighed and left them in place for 12 hours. It was -12' when I put them on and -2' when I took them off. Because of the subzero temperature the propane was not gasifying very well and the regulator automatically changed from the primary to the reserve after only consuming 2.353 gallons. The total consumed out of both tanks in 12 hours was 3.294 gallons, so that would be .274 gallons in one hour.
My Victron BMV-712 was telling me that I had depleted my 400 Ah Battle Born batteries to 47% and at rate of use I had two days and nine hours left.
I thought I would comment on a couple of things I like about the outcome of the project. The bathroom was comfy warm and the wall next to the bed was not icy cold.
I am not planing to take up subzero camping but it does gives me a benchmark to go off of for any situation that I might run in to. If you have any suggestions or see something that is of concern please let me know.
Paul
Beautiful work Paul! Thanks for sharing. I did the exact same mod using different materials and have been getting similar results across the entire basement. I just haven't had any really cold nights here in NC this winter to see how it would "scale" in super cold temps. I plan to try and use my Oliver to ski, so I've been trying to winterize it for the "5th season" you are testing in now.
I have also added an all electric solution as a backup to the furnace / propane mod. First, I added a smart fan under the dinette seat near the bathroom to pull air from the vent in the back across the basement nooks and crannies, and second I have extra protection for the two backflow check valves on the city and fresh water inlets with 4' of 12V self regulating heat cable. It takes 5 watts per foot and does a fantastic job keeping those check valves toasty on very little power (1.5 amps or so). I thought about putting another one on the winterization/boondocking port as that is a super cold area as well, but there are no check valves there that I can see, so I didn't protect it - I hope the water just drains out before putting the cap back on. 😬 Might just be luck that I haven't had it freeze. Maybe I should add another heat cable there? I also have the composting toilet (no black tank use) and have drained the water in the toilet water line, so I don't need extra heat in those areas.
-
2
-
1
-
I have stumbled upon something while doing my humidity and temperature testing that should be of interest to those with the xantrex 3000 getting the occasionally persistent [20] error.
First, my Xantrex remote had been working for well over a week. On the 14th, I purposely discharged my battery down to 60% and then back up to 80%. When I got to 80% I tripped the cutoff switch between the Xantrex and the batteries to stop the charging. That immediately caused the [20] error. I left it with the [20] error because I didn't know how to make it go away and it hasn't seemed to cause any problems. Well, I noticed this "sawtooth pattern" after looking at the data - I've isolated the street side basement (data visualization works again!!!) and you can see the sawtooth after the charging event:
That sawtooth indicates the inverter fan is turning on and off (every 5-7 minutes in fact if I look at the detailed data points). I unplugged the remote at the inverter and the inverter continued to cycle the fan on and off even without the remote. I cut power to the inverter and turned it back on without the remote and the inverter went back to "normal" - working fine without cycling the fan. I then plugged the remote back in and it was working fine again too.
Yesterday I repeated this sequence and got the exact same results. The [20] error came on after cutting off the battery from the inverter, the fan began to cycle every 5-7 minutes again, and I was able to correct and fix things by going through the exact same steps.
My concern is the fan cycling - that can't be "good" for the inverter and could cause premature wear on the components. I've left my remote disconnected for now so that this can't happen again until we have a fix or an explanation. Who knows what else may be going on with the inverter we may not see.
I'll update my OTT service ticket and call Xantrex today with this new information. I'll report back later on any new information.
-
7
-
1
-

.jpg.c1976ffa4a6e13256e0a8835b0d31861.jpg)


.jpg.b4fb182c2dd38b005d42f99a3317e409.jpg)


Xantrex XCPro 3000 warning code
in General Discussion
Posted
You want the first one - make sure it's version 1.06.