Sak
-
Posts
61 -
Joined
-
Last visited
Everything posted by Sak
-
Another option, although more expensive, is satellite based tracker like https://www.findmespot.com/en-us/products-services/spot-trace. This is good for areas that don't have cellular reception.
-
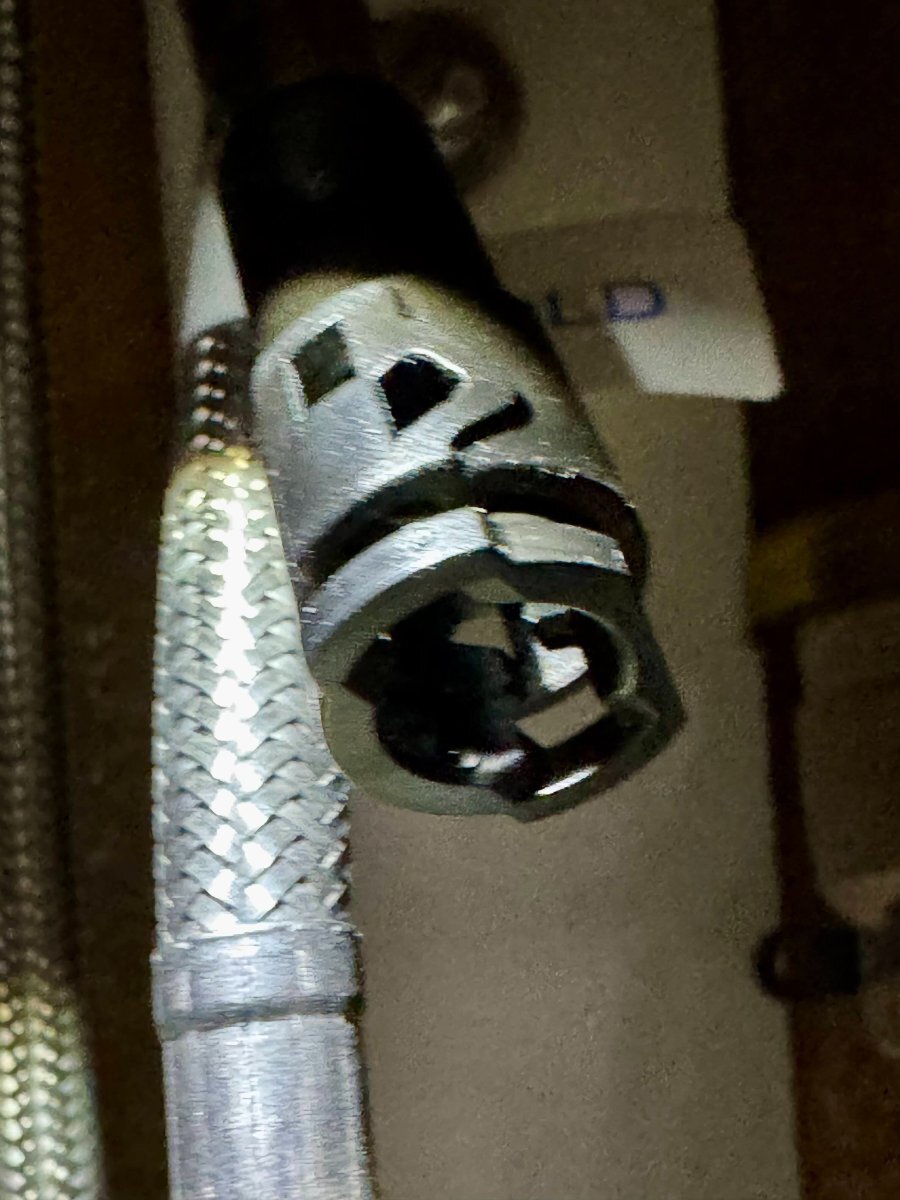
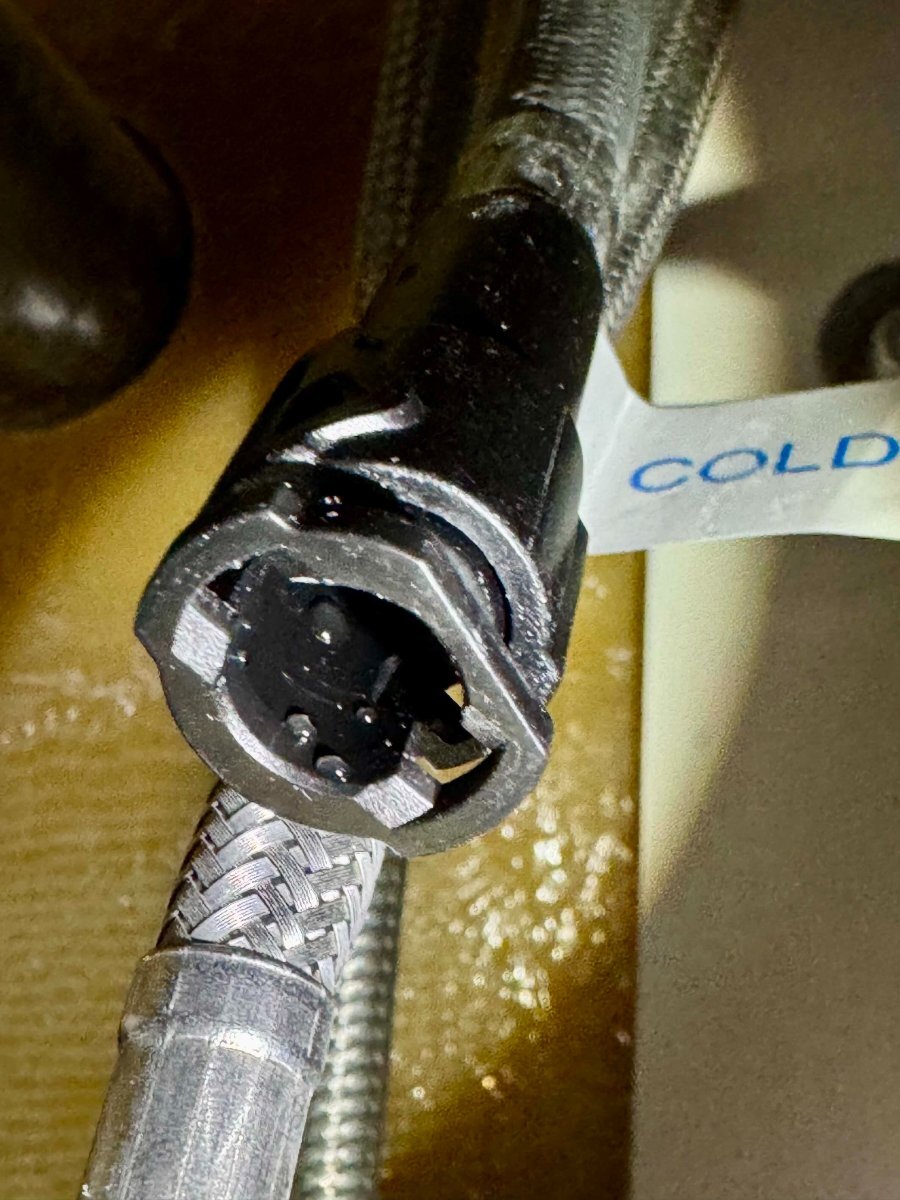
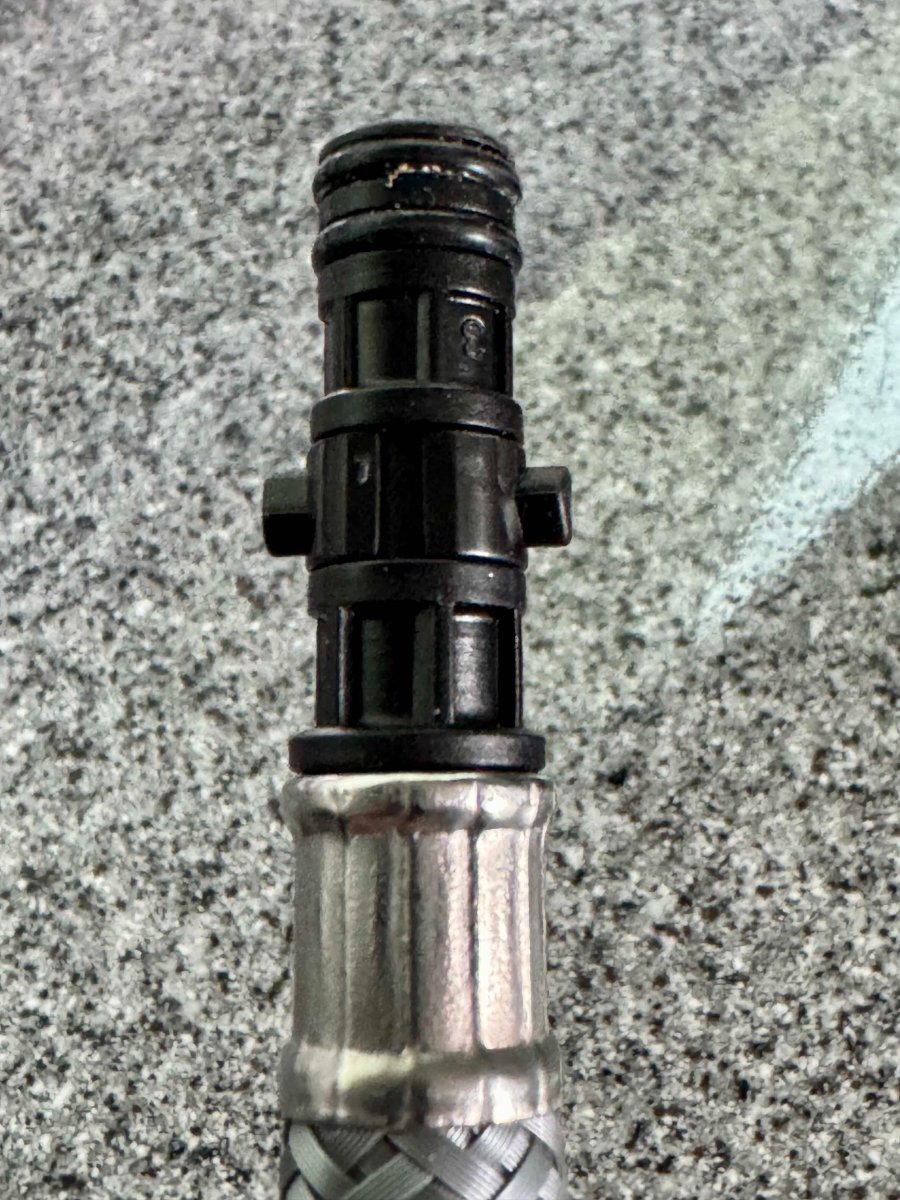
I have one of these faucet in the bathroom. I'm trying to replace the hose to a longer one but I am not sure what kind of fitting it is. Any ideas?

-
Yes, it works and has been working well for me. My RJ45 connectors are plastic but they are shielded. I can see aluminium tinfoil and small metal plate hat carry over the grounding signal. So far, I have no problem at all. However, you might want to check if you still need to splice the cable. I've heard that newer Starlink don't use proprietary connection anymore.
-
Seeking repair advice for a small roof crack
Sak replied to Sak's topic in Mechanical & Technical Tips
No, it doesn't appear to be structural damage, based on Jim and Chris Neuman's comment. I did buy this product below for a repair but didn't get a chance to try it yet. https://www.amazon.com/gp/product/B0BCYWF96P/ -
That's a good news. I will have to try that. Thanks!
-
Are they also getting in your A/C? I have to plug all the holes in the A/C shroud. Can't use A/C cover because we are located in a very windy area of eastern Washington state.
-
It's a charger for my Spot Trace satellite tracker.
-
I have the same wooden tray but it sits on a ledge and I can easily lift it and access the contents of the drawer. Is yours not removable?
-
Not sure for other model years, but for my 2021 Elite 2, I can access the the drawer by taking the top cover off. It's only held down by Velcro straps.
-
I was using this tool ordered from Amazon. The order of wires is actually on the tool itself, easy to identify. I'd recommend buying extra Cat 5 and RJ45 connectors and practicing on those first before cutting the actual Starlink cable. That what I did and I had no experience with this before. There are lots of videos on YouTube. The difficulty for me was fishing the cable through the attic space due to tight space but it wasn't that bad. Good luck!
-
I have the RV dish and the cable appears to be a normal Cat 5e. I used regular RJ45 connectors ordered from Amazon and they work without any problems.
-
It looks to be standard shielded Cat 5e cable.
-
I did cut the cable. For the length, I measured the distant from ceiling to the bottom of the trailer plus the width of the trailer and gave it about a few feet of slack. It wasn't too bad fishing the cable down. I basically followed the existing satellite coax cable. I imaging it would be very easy if I used one of those fish tape but I didn't.
-
That might be from the Xantrek inverter when it's charging the batteries.
-
Recently, my inverter stopped working and wouldn't power on. Here is what I found so far (long story, feel free to skip and go to installation section below) The trailer was parked in at my property with shore power and the inverter was working when we were back from camping trip a few weeks ago. Over the weekend we found that the breaker was tripped and narrow it down to problem with the inverter. When on shore power, either the breaker at the shore power or main breaker underneath the dinette seats would trip unless switched the breaker of the inverter to off. The inverter screens didn't show anything for both remote and on the inverter itself located under the street side bed. When not on shore power, inverter didn't power on. Checked the voltage at the DC positive and negative terminal at the inverter using digital multi-meter and confirmed that there's ~13V at the terminal. Tried to reset the inverter by cutting DC power using the 2 red button switches near the inverter and confirmed using digital multi-meter that there was no DC at the terminal. This also didn't work. The inverter wouldn't power on when restoring power to it. I decided to submit a ticket and Jason and I agreed that there's an issue with the inverter itself and I had to contact Xantrex. After submit a ticket to Xantrex, the technician recommended updating firmware and that didn't help. Xantrex agreed to send me a new one because it's still under 2 year warranty. Installation I got most of the information below from Oliver and it's specific to my 2021 LE2, please contact Oliver to confirm if you have a different model year. Disconnect Shore Power from the camper. Flip the 30A Main Breaker to the OFF position (located in the AC Breaker box under the Dinette) Flip the 25A Breaker for the Inverter to the OFF position. Trip the 200 or 300A Inverter Breaker located under the street side bed access panel area. The breaker is located up & under next to the side of the battery box. Remove the inverter cover in order to gain access to the wire connections. The 120V wires on located on the left with the 12V connections on the right, pictured below. Once the cover is removed you will need to disconnect all 4 wiring connections inside the inverter. As a precautionary measure, do not let the wires contact each other. With shore power removed & the Inverter breaker tripped there shouldn't be any power but it is best to be safe just in case you got in a hurry and skipped or missed a step. Make note of the 120V Wires once you disconnect for which one is the AC In and which one is the AC Out Disconnect the ground wire located on the top edge of the inverter. Remove the screws securing the inverter to the white AP1 board. There are two screws located on the bottom and two located on the top. You may see other screws that are securing the wires to the white board but it is not necessary to remove them when replacing the inverter unless you are installing new wires. See screws pictured below as reference. Follow the steps in reverse to install the new inverter. Mount the inverter on the white board & secure with the 4 screws Connect the ground wire Connect the 12V Wires. Red is positive & Black is Negative. Connect the 120V Wires. Be sure to connect the AC In & AC Out wires correctly. Reinstall the cover Reset the Inverter Breaker by pressing the leg by in. Turn inverter on at the inverter itself (not the remote display) and verify 12V to 120V operation through the inverter. Turn the inverter off at the inverter Flip the 30A Main & 25A Inverter breakers back to the ON position. Connect shore power to the camper and verify charge state through the charger to the batteries. It may take a minute or two for it to engage. Once the inverter has been installed you will need to check the settings and set it based on your battery type The only settings that are changed by the Oliver factory are: #02 ,#05, #20, #24 & #28, based on your options, and are in bold font below Xantrex Customer Support: 800-670-0707 Oliver Service Department: 888-526-3978
- 42 replies
-
- 12
-

-

-
Another excellent option for waterproof RJ45 port from Neutrik. https://smile.amazon.com/dp/B01L46SRCQ https://smile.amazon.com/dp/B019LPMOTY
-
Live streaming through the Furrion receiver.
Sak replied to Going's topic in Mechanical & Technical Tips
I have done this and it's been working well if I can see open sky, not so much with sites with lots of trees. I believe what you mentioned is an portable plan where you can take your Starlink with you when travelling. I opted for another plan called RV plan where I can pause the service without paying duringoff season. Another reason is that I still need internet service at home while camping for all those smart devices and video cameras. At home, I am using T-Mobile 5G home internet which is $30 a month. Overall, pretty happy with the total cost. -
If you have Xantrex and you can pair it to the phone app via Bluetooth and change how much it can draw from the grid. You can also change the max current for charging.
-
Installing external ventilation fan for Norcold N51 refrigerator
Sak replied to GraniteStaters's topic in Ollie Modifications
I was going to do something similar but then I found out about Fridge Defend so I decided to go that route instead. Ordered the product but haven't finished installing. See some discussion below. -
I am not using cable to connect my TV to the router. I am using WiFi. My setup is very simple. Starlink provides WiFi access to TV and phones. For Netflix, I am using Netflix app in the TV itself to stream. For anything else, I am using my iPhone and connect it to the existing HDMI port in the back of the TV. This way, I can also get audio out to all speakers if I select "Optical" audio input at the Furrion. Please let me know if you have any questions. Hope this helps.
-
I guess some people have a different definition of “sanitary”.
Sak replied to Frank C's topic in Campgrounds & Parks
Same! -
I had the "yellow caulking" too and can confirm that, for my case, it's a fine dust sticking to the caulk. Normal wash doesn't wash it off. Had to use soft brush to lightly scrub it off.
-
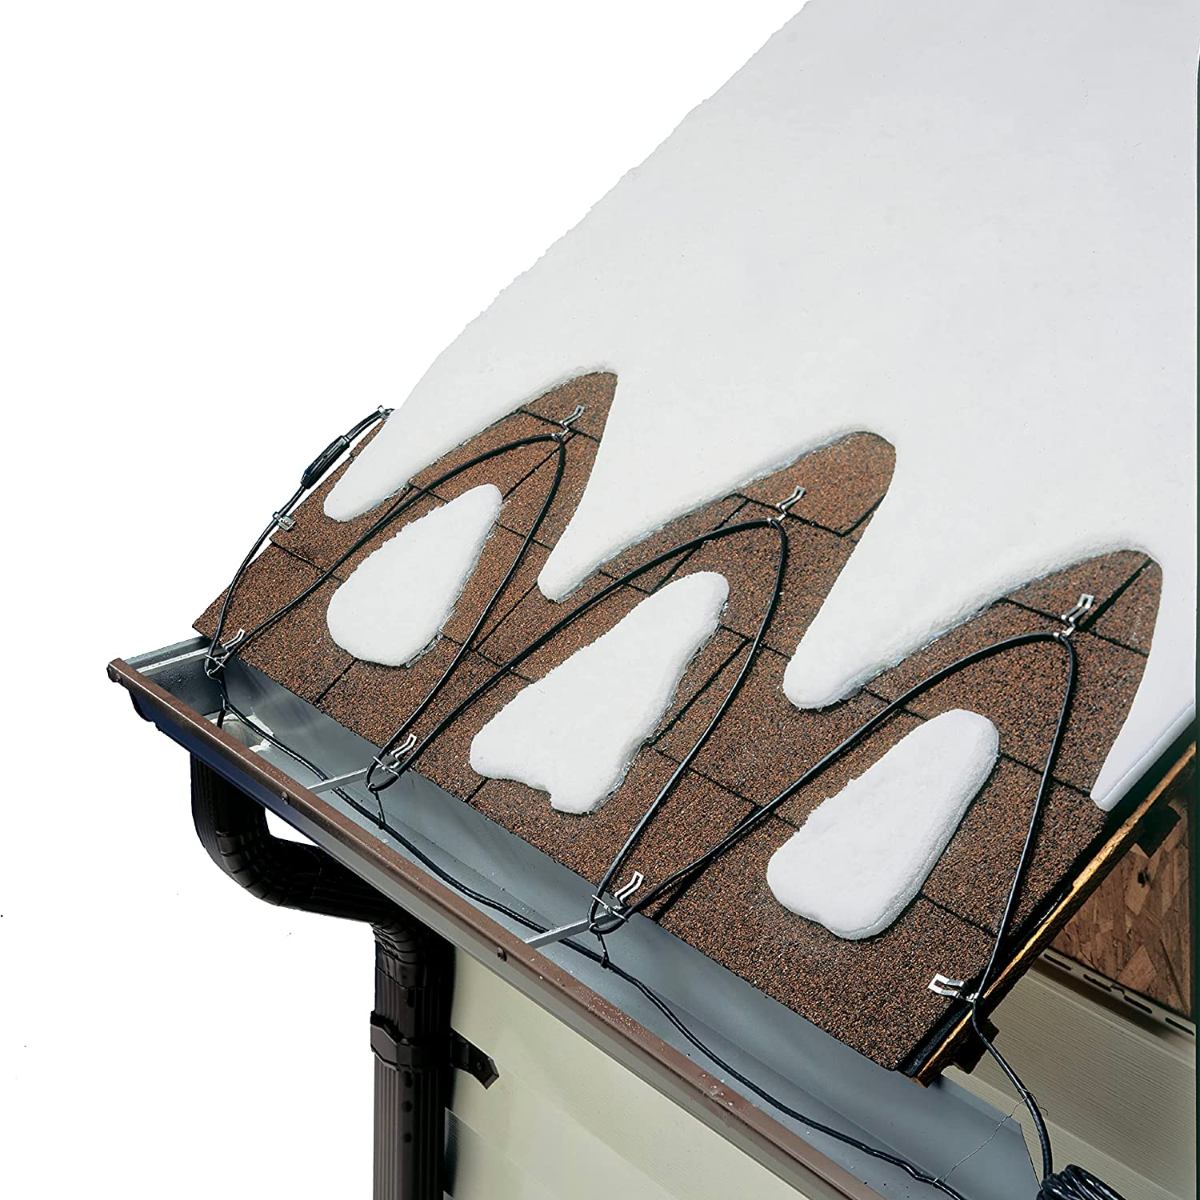
I don't get a lot of snow in eastern Washington and it usually melts away during the day but I wonder if it helps if putting one those heating cable on the roof beneath the cover. Of course you would need access to shore power.
-
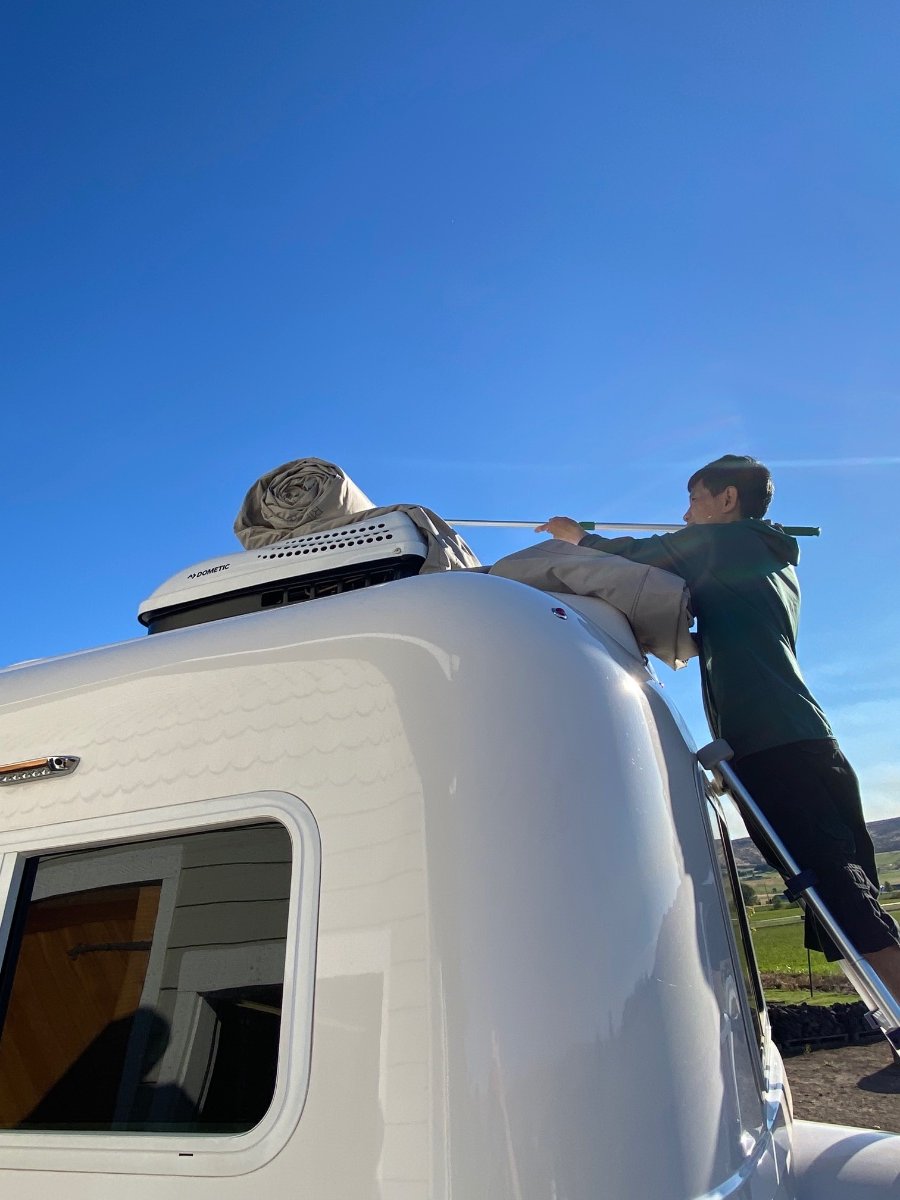
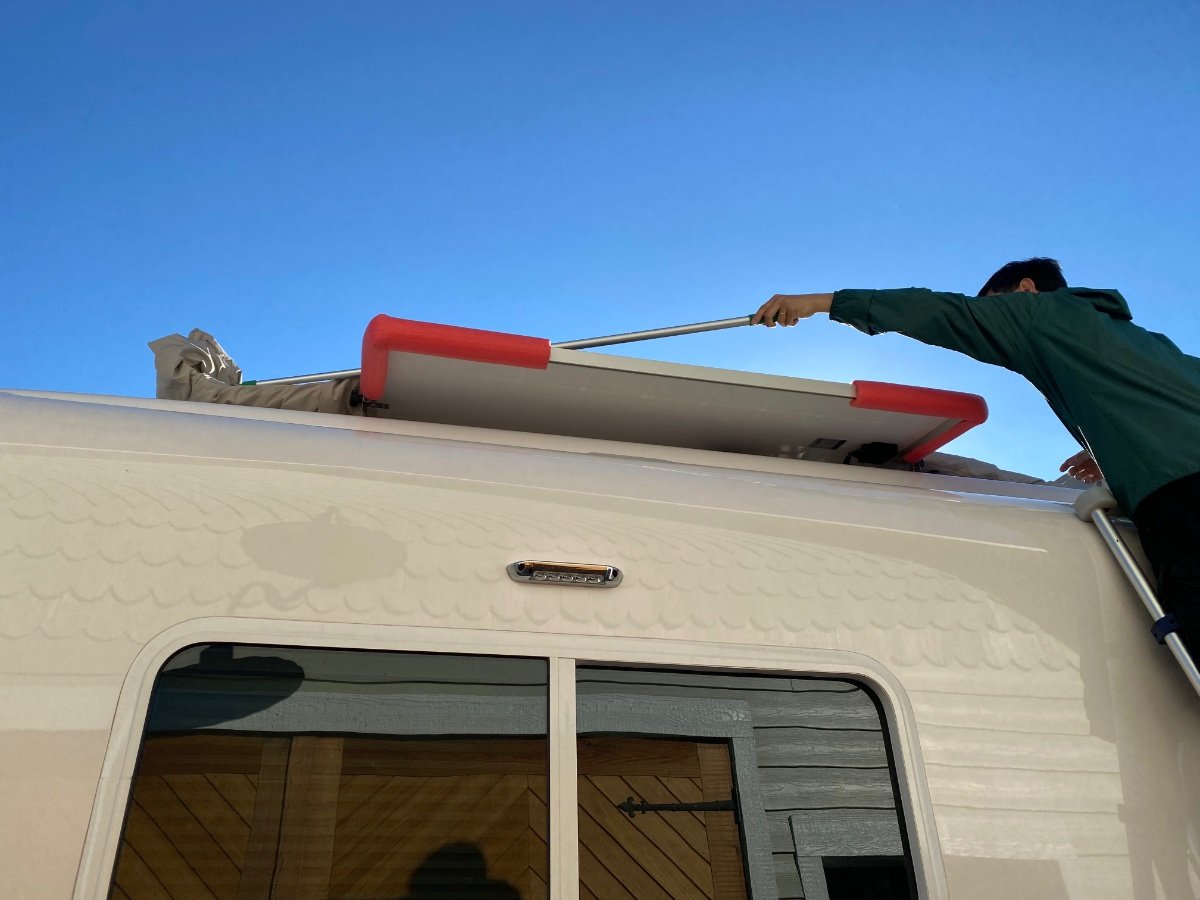
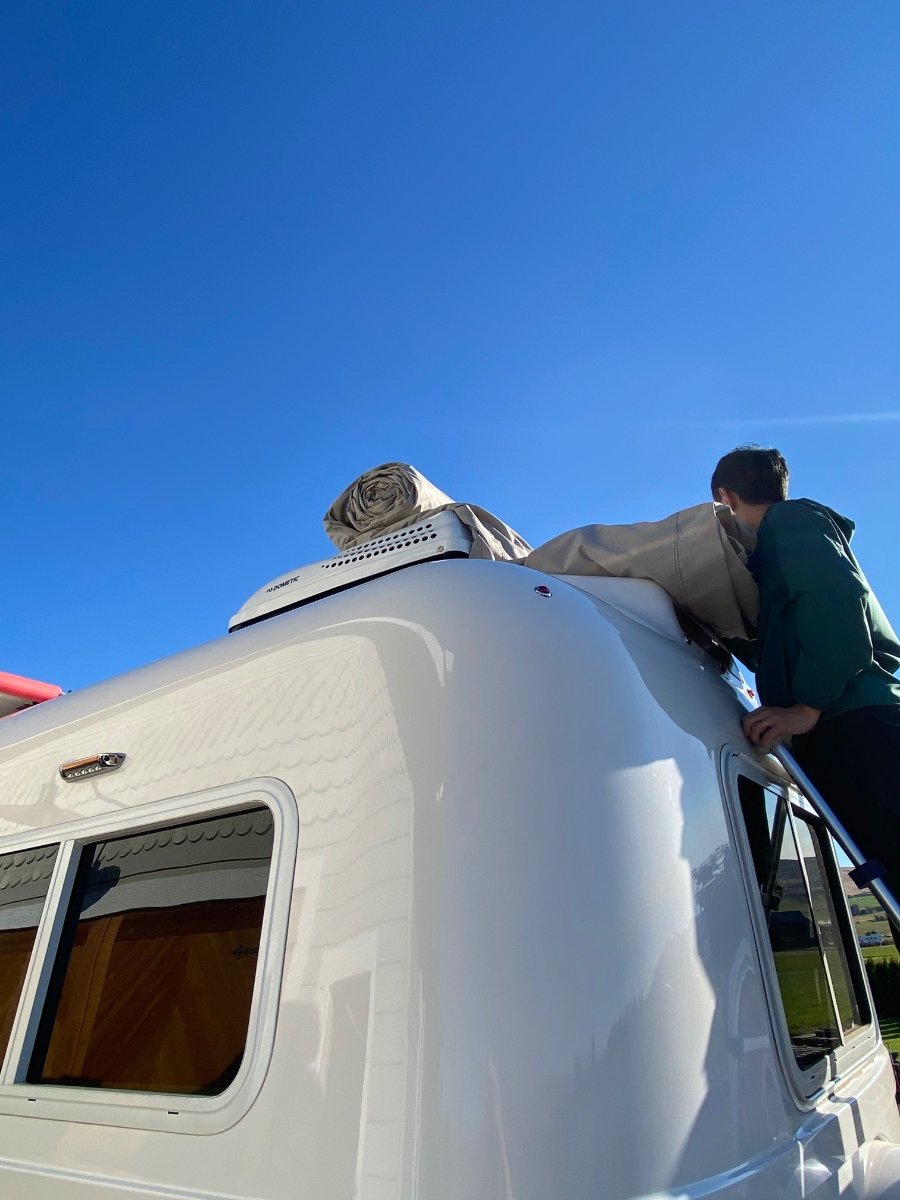
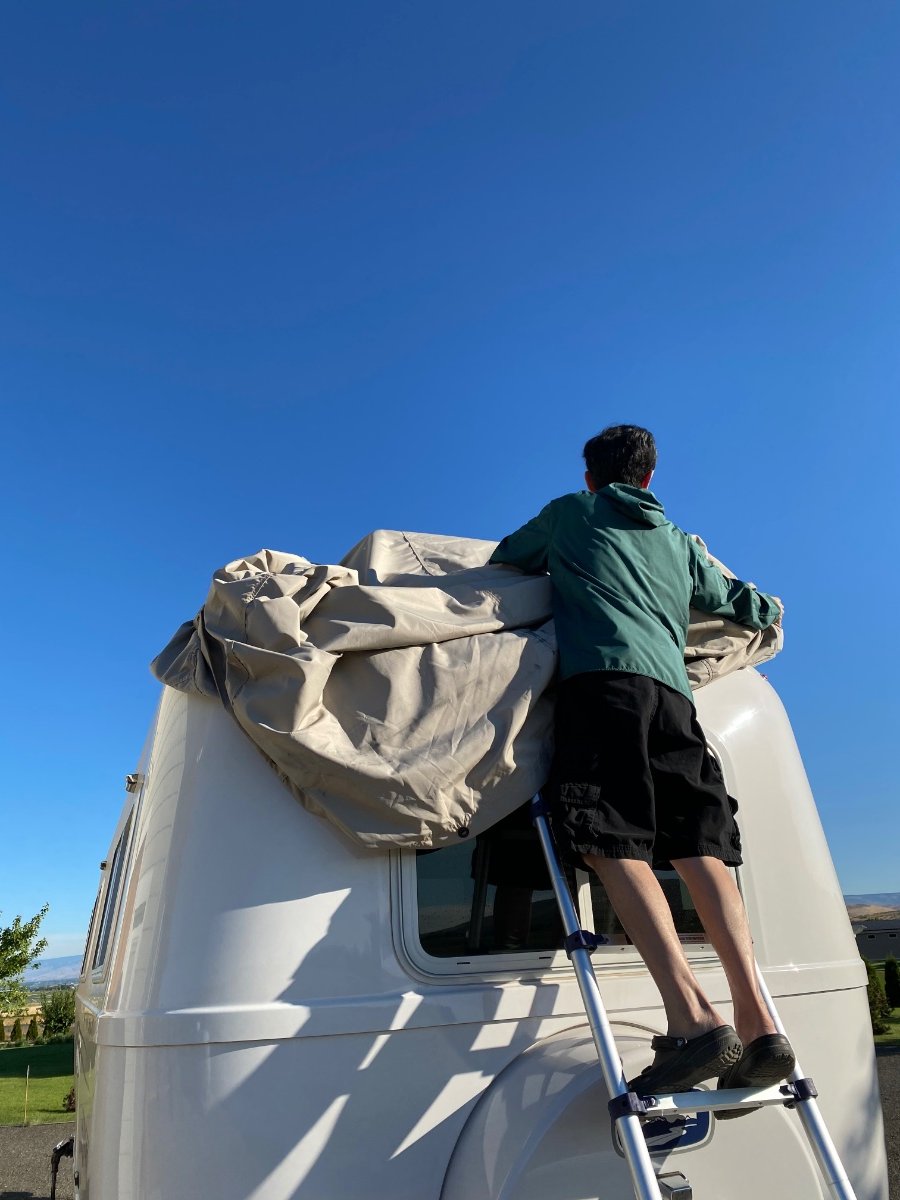
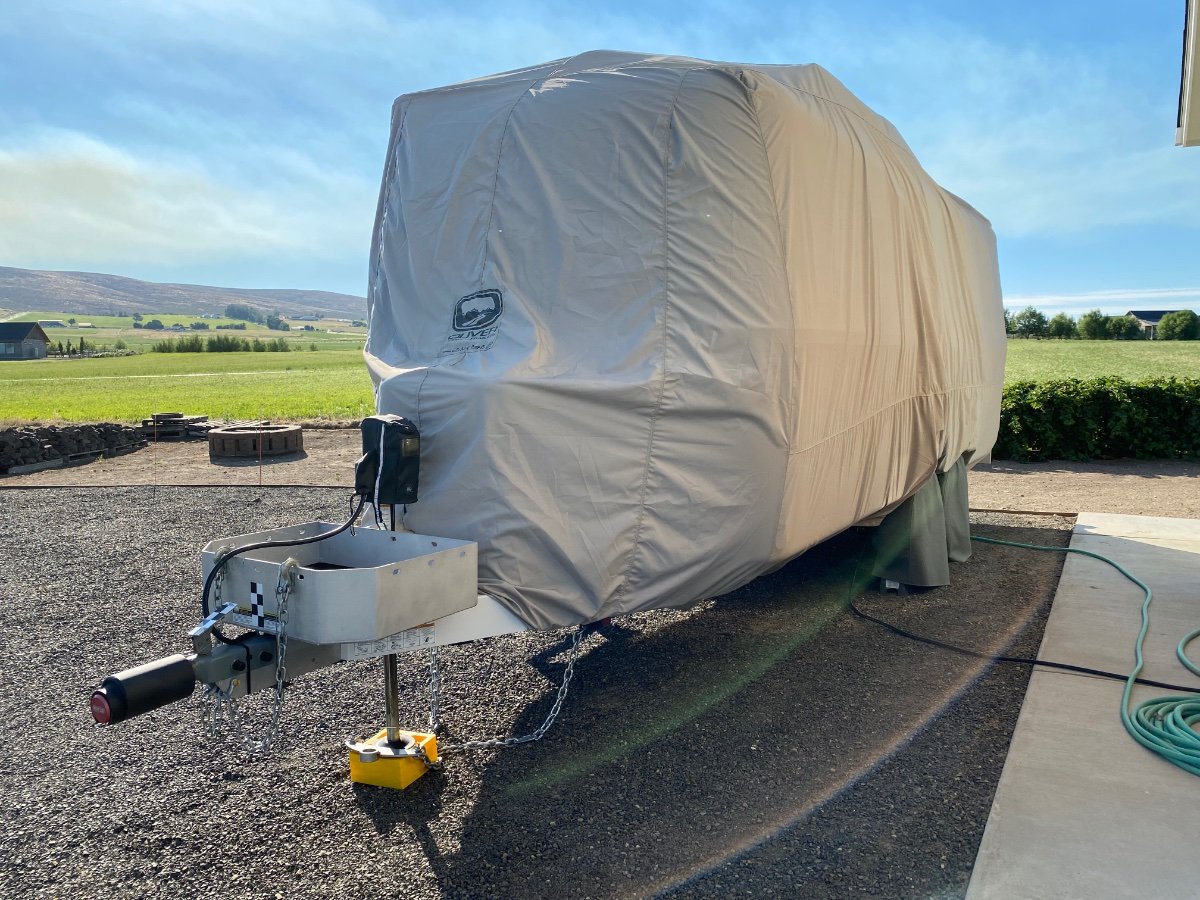
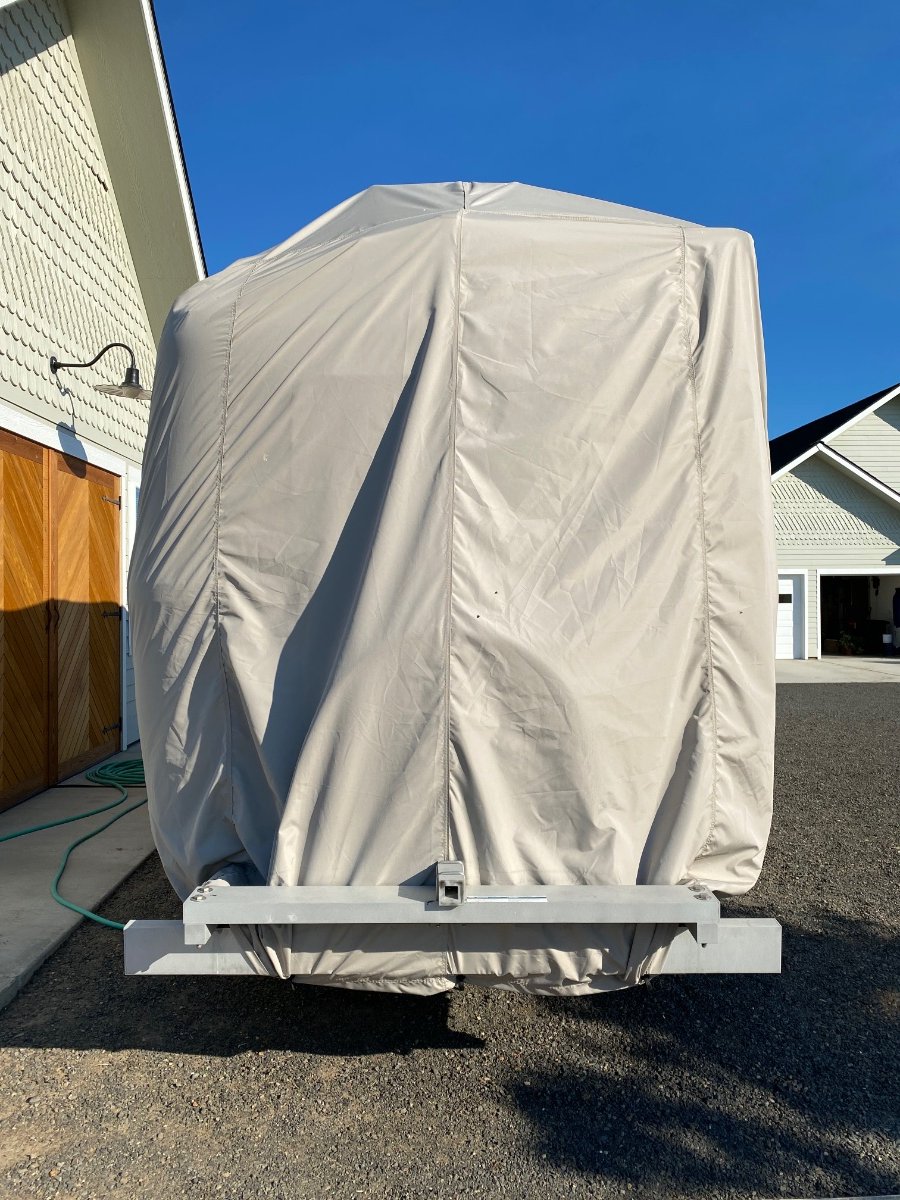
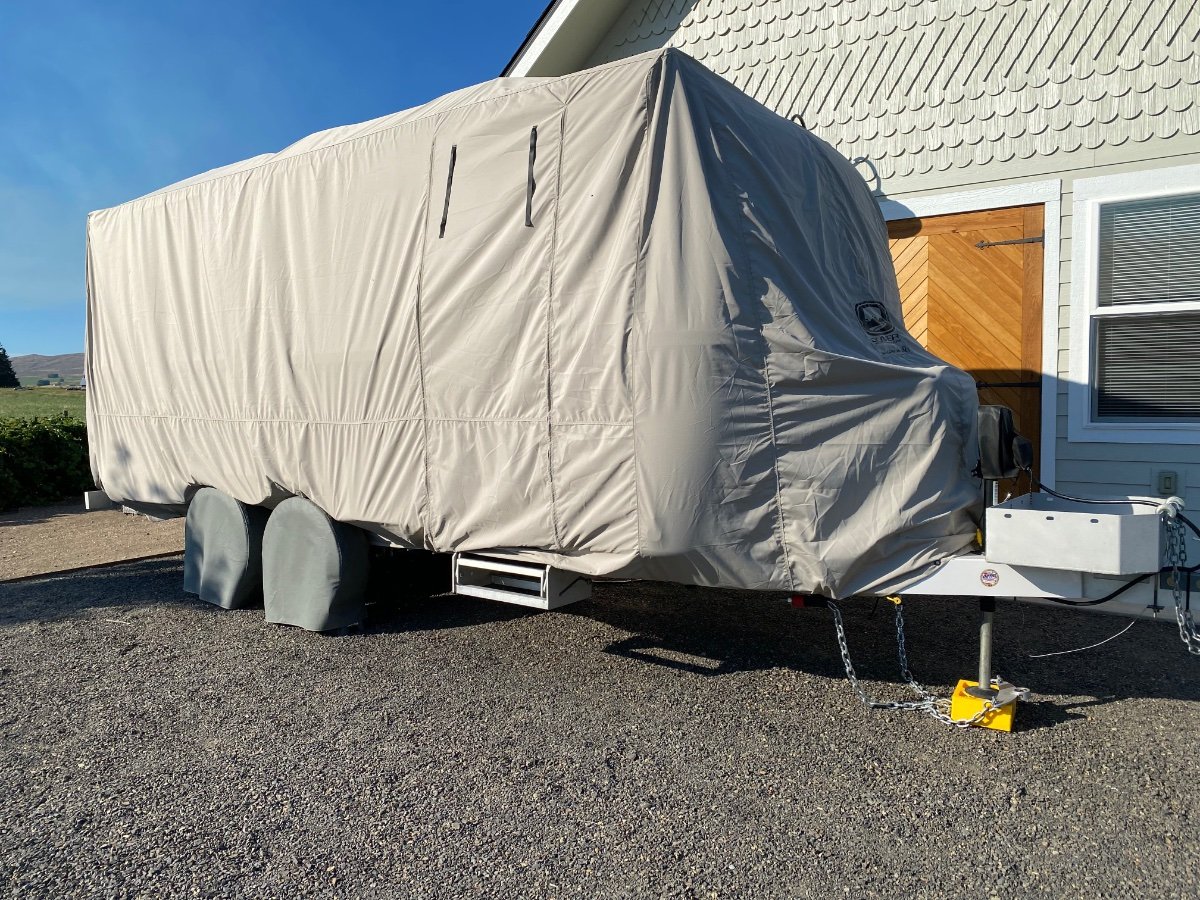
I'm using Calmark cover. It's very easy for me to put the cover on by myself. I usually start from the back to front. The key is to fold the cover into a very small roll so I can unroll easily from the back and spread to the sides. Here, starting from the back using a ladder, climb one hand and the roll of cover on the shoulder. Put the cover behind the AC, unroll it over to the front of the AC using a pole. I also use pool noodle to cover sharp edges of the solar panels. Once the cover is unrolled entirely, spread it on both sides starting from the back. Now the final product after using bungee cords to tie it snug. I don't used the ropes from Calmark. They only provide 4 ropes. I use 12-15 bungee cords and find that much easier to work with. I also don't cover the rear bumper. I can do this alone within 30 minutes if I really want to but I usually take my time and take special care around a ladder and end up being 45-60 minutes. Taking the cover down is much easier and much quicker. You just climb a ladder on one side and lift the cover to the roof then carefully pull on the opposite side. The key here is the roll the cover into a really small roll. I'd recommend taking pictures how it was rolled when you get the cover from Oliver. Hope this helps.
-
Seeking repair advice for a small roof crack
Sak replied to Sak's topic in Mechanical & Technical Tips
This is the opposite side.