
Wayfinder
-
Posts
541 -
Joined
-
Last visited
-
Days Won
11
Everything posted by Wayfinder
-
If it's as bad as it appears, I hope they (BB) don't wait for someone to get hurt or worse, die, from a battery fire. What a shame.
-
@David and Gail @jd1923 or anyone who fixed their own battery box - have you put significant miles on their Ollie and re-inspected your repair work on the battery box support? I will be doing nearly 1,000 miles in the next two weeks going down to Silver Springs for another Egg rally. I'll try to remember to inspect my own handy work to see how it holds up. I tried marking the wet bolts with a metal market, but mostly just made a mess. I will still be able to peak down and see if anything moved. Cheers,
-

Local web page to search Oliver forums via Google
Wayfinder replied to Wayfinder's topic in General Discussion
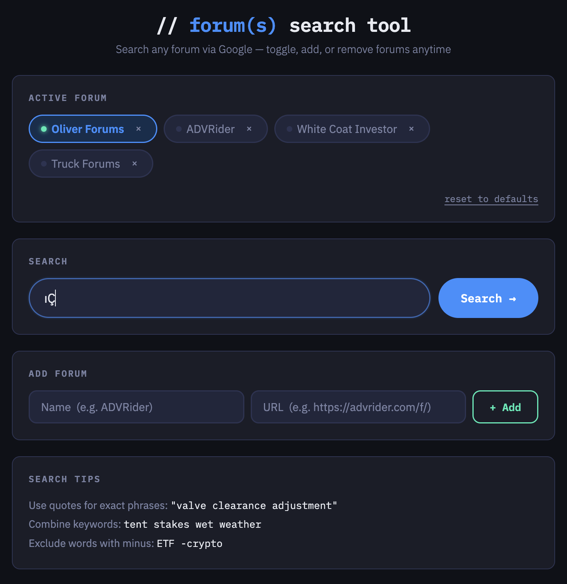
A couple folks asked for a more generic, multi-forum search tool. This is what I came up with, it's not Oliver Pretty, but works great. Now you can add or remove specific forums which meet all your camping forum needs. As a starting point, I added Oliver, a trucks forum, motor cycles, and to pay for all your retirement toys, an investors forum. LOL Change as you wish and reset back to defaults when needed. Or edit the HTML file yourself and tinker with it. Simply download zip file, extract HMTL file, and open in your favorite browser. Should just work. Have not figured out yet how to get it to play nice on an iPad. FYI: @Hokieman @Ollie-Haus forums-search-tool-v1.1.html.zip
-
New member introduction – excited to learn more about RV systems
Wayfinder replied to molin's topic in Introduce Yourself
This topic has been locked as this original user and both posts have been AI-generated. Senior Moderators have been notified for further action. -
Thanks @jd1923 for the links. I've been wanting to order one of these privacy screens for a while. I have a Fiamma F45S (the best), so I ordered the 14',3" screen, but the 9 foot version for more space. We'll see how it goes. It was on sale and I used my Amazon points, so bam, only $50. Dulepax RV Awning Sun Shade Screen with Zipper 9'X14'3'' -Second Generation RV Awning Shade Screen Significantly Improves Shadew and Privacy.Universal, Awning Screen for RV Camper with Complete Kits
-
I've had my pre-owned Elite II (2016) since 2021. And I interact with many other Oliver owners at rallies, such as Oliver rallies as well as general "egg" rallies, fiberglass rallies. Those are the best! I don't have much in the ways of upgraded electronics, but here is what I "think" I know. Maybe someone else will agree or not. From what I've heard, hardly anyone stays with the heavy, low-powered AGM batteries. Which I do have even today. I would recommend at least going up the 390AH lithium batteries, which will include the 3000 Watt Inverter. I would think, but not sure, it would make for an easier upgrade path in the future to larger lithiums if needed. I also do not have a compost toilet, but would like one by default, but also not worth my time and money to convert what I have. If NOT storing the camper inside or under cover, consider not having the "bulb seals" installed under the awning housing. They trap too much tree junk and makes it much more difficult to clean the roof. They can always be added later if you don't like a little rain dribble coming down the sides of the camper. If you think you'll do a good bit of desert camping, I would get the extra awning, otherwise, save the weight & money and any other hassles that may come with more electronic equipment. These is only my opinions. Like ears, we all have them. LOL Good luck. P.S. No matter what you order, it will be the best trailer you can purchase. Just remember, it's still an earthquake on four wheels with all standard RV parts & components. Things will break, but you'll seldom ever need to worry about the frame or body falling apart or leaking. Also this site will be your best bet for quick answers and how-tos.
-
Very kind of you @Geronimo John, thanks! @xdr I'm not sure how the previous postings have been interpreted by you, but well I hope. Personally, as someone who JUST upgraded his ancient 2016 original lesser springs with Alcan springs, I don't think you will have to worry about leaf springs for several years to come - if you purchase a new trailer. Those newer heavy springs and axles will do very well for you with, "hopefully", worry-free travels. And please do travel. There's really no better travel trailer on the market. Is it perfect? No, it's a rolling earthquake. Things will break. This is the place to get help & answers when needed, and Oliver Support of course. 😉 For those folks purchasing used trailers, like I did in 2021, there were some upgrades to be done. Good luck and let this awesome group of enthusiasts know if you have any further questions. Cheers,
-
Busy day on my Ollie, First: If you fixed your battery box support by yourself, you are a stud and have more patience than me. My buddy came over to lend a hand and it saved me at least 45 minutes and several choice words, I'm sure. It's fixed and is now WAY better than it ever was - since it only had a single bolt and no nut for.... who knows how long - likely years. We also used a bottle jack and some 1" wood planks underneath the jack to support it. I did NOT want to crack the grey tank - major concern. But thankfully nearly all the weight held by the jack was where the support bar was also sitting. We used a C-Clamp to straighten up the two bars a bit, not perfectly, but where I felt comfortable. Drilled a new hole and added the same bolt as the original, I actually had in the garage. I was ready with larger stainless steel bolts and nuts, but ended up not using in the end. Used lock tight on both and cranked down on stuff. Also have lock washers and flat washers where appropriate. I will mark the nuts with a metal marker and keep an eye on them. No more internal axle brake wires. Also found the issue with my brakes - thread updated here:
-
The Saga of corroded brake wires on older trailers
Wayfinder replied to Wayfinder's topic in Mechanical & Technical Tips
The weather finally cooperated with me today and I fixed a few things on the camper. The last thing fixed was the replacement of the front axle brake wire. Do you think this could have been a problem with my trailer brakes? 🤣 No test drive yet, but I suspect we will no longer have issues with intermittent brakes on the trailer.
-
That's also my project for tomorrow with my buddy. We'll do a buddy breakfast, hardware store, make metal shavings, then drink. LOL Thanks for the details on the bolt & nut @jd1923 A good place for me to start.
-
@jd1923 if I can get a weekend that's not freezing and I'm not working, I'd love to get started on that fix. I agree with everything you said.
-
I was wondering if anyone would notice those. The latch is still in working order, but I know many trays with a single latch would sheer off. Those blocks of oak wood with two screws in each have been there since 2021. I think Jason Essary even mentioned them when he saw them, and how they seem to work well. LOL You have a keen eye Bill. You win the prize for spotting them.
-
I was thinking the same thing as you JD. However, I am not confident, no matter what I do, even multiple bolts, that my home-brew fix will hold up to the weight of four AGMs above, with road bumps. I'm no metal guy but I'm thinking of an adjustable solution. Something like this device, (only an example and quick search). https://www.rockler.com/heavy-duty-lifting-leveler?country=US&promo=shopping&utm_source=google&utm_medium=cpc&utm_term=&utm_content=pla&utm_campaign=PL&sid=V91190&gad_source=1&gad_campaignid=17424410624&gclid=Cj0KCQiAtfXMBhDzARIsAJ0jp3C2O8eZqs9M8M7CpmGG4oAKjWuDowPNrbrKNJUMh9-A2esKafqTJ6IaAlxpEALw_wcB I will notify Oliver Service so they know of the issue and see what they suggest as well. It's best they have proper metrics for future improvements. Cheers,
-
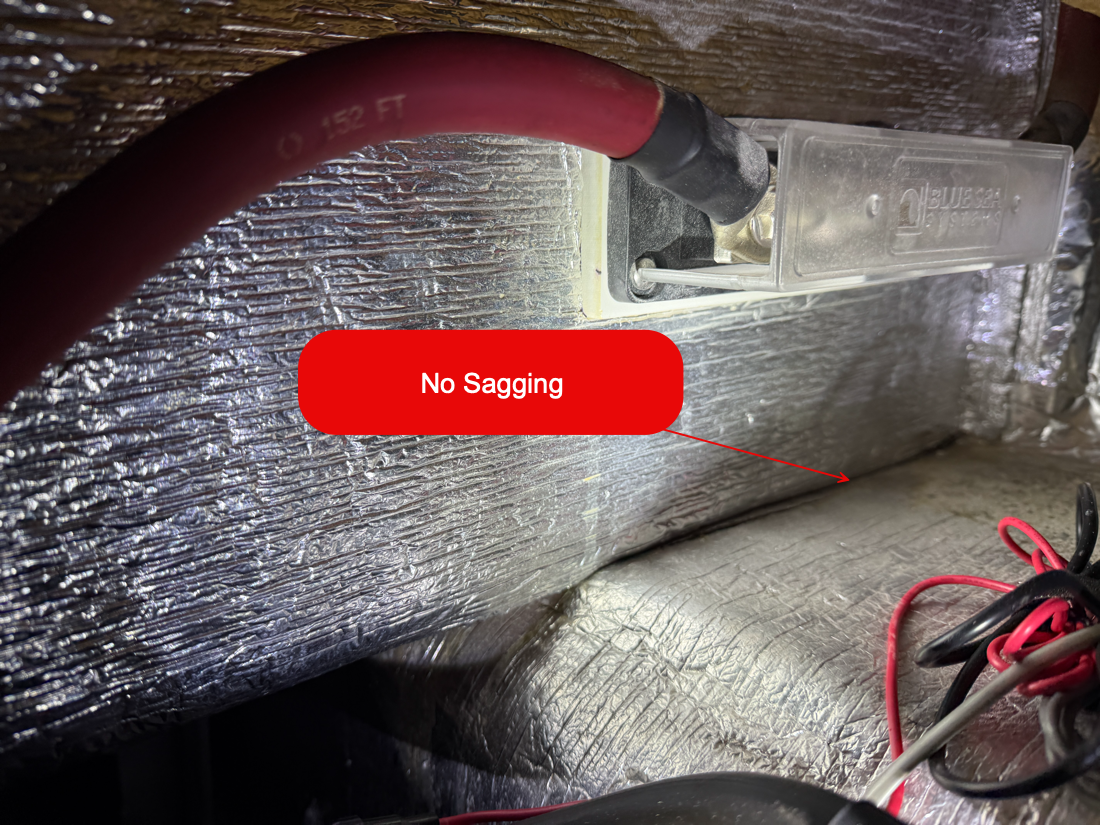
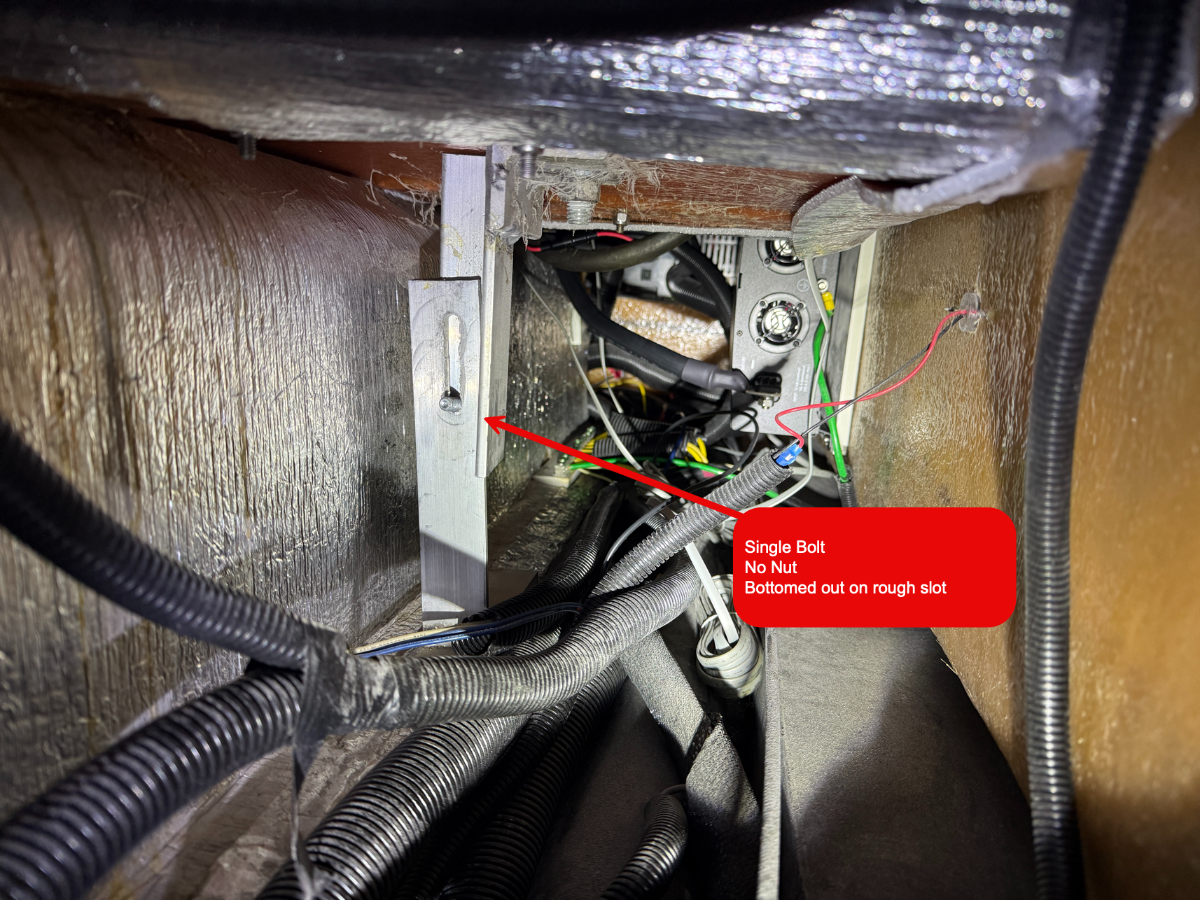
Looks like I have been very lucky with this battery box support issue. One, I only have a single bolt with no nut in sight. No real evidence it ever hat a nut, but I'm sure it did. The bolt has been bottomed out on the hand-cut slock for what appears to be forever. From all appearance, from outside and in, the box is still fairly in the spot it was from day one. I see no signs of separation. That is likely due to the fact that the bolt bottomed out on the slot and really could not come out of the hole. I will put double nuts, with Loctite, on the support beam this weekend. If anyone sees any issues I do not, let me know. I downsized the pics, but should be large enough to zoom in as needed. Also, I'm not sure why my pics have been uploading with such crappy quality. It's not what they look like on my computer. Might try another program to edit. PS. Replacing all pictures. \
-
Well crud... and I got lucky. I just checked my camper for the battery box separation and support issue. The box seems fine, and the single bolt that I do see, upon a quick inspection at night, revealed there is no nut on the bolt. So I will do a detailed inspection in the daytime and find a nut for that bolt. Thanks for posting this information! Great job guys!!!
-
@DavePhelps I see it's been close to two years since you have "resealed" the fender flares on your Ollie. Not sure if you have logged what you had used. I might have missed what exactly you used on them. I failed to log THAT one maintenance item when I "re-caulked" (or whatever), but I'm not happy with how much road dirt and rain-run-off dirt absorbs into any material which has ever been used on the fender flares, by OTT or others. I have even considered painting over whatever material is used in the fender flares to see how they resist dirt absorption. Seems excessive, but 🤷♂️... Has your exterior sealant held up well to resist dirt penetration? Which makes that area look "un-sat" or "a no-go" as we used to say in the Army. Thanks!
-
That would be a great part number to keep in my parts list. I'd also be interested in this answer if you find out @carnivore. My seals will be showing age more and more now that they're 10 years old.
-
Alcan Springs Quote for Jan-2026
Wayfinder replied to Wayfinder's topic in Mechanical & Technical Tips
Thanks John for the feedback. That's what I was hoping would happen. It was sort of cool to see the black sealant squeezing out between the leafs when I did the final snug-up of U-Bolts. Just interesting. -
Alcan Springs Quote for Jan-2026
Wayfinder replied to Wayfinder's topic in Mechanical & Technical Tips
I did a final torque of the U-bolts after 200 miles and the nuts only needed 1 to 3 quarter turns. I must say though, like others noted before me, I did have some minor.... "disruptions" (not damage) inside the trailer after that 200 miles - never seen before disruptions. I did have a rear upper cabinet door open for the first time ever, but at the same time, I noticed that the latch was free-floating on the panel and on all three rear panels. They were obviously lose before the trip, so they are snugged up now. Add that to the annual inspection list. Also for the first time ever, I had a bottle of salsa open up inside the fridge. No glass broken. So the bottom of the fridge must have been very bumpy to unscrew a lid. I will inspect plumbing area and electronics soonest. (updated: all good so far) Why do I mention this? Well, I'm thinking, and this is just me, so you do you, but I should have removed that lower/smallest 5th plate. Let's face it, that thicker steel is not going to break easily, especially with the second leaf being so extra long. But, oh well, I have 5-leafs now - all good. I'll just ensure things are buttoned up tighter. I can carry more alcohol and steaks now too. Overall, I did notice a HUGE difference with driving over bridges and not-so-perpendicular railroad tracks. The camper did not rock back and forth nearly as much as with the 3500 pound, ten year old, springs. 4-Leaf: 2250 x 4 = 9,000 lbs (just my recommendation after 200 miles - just things to consider - others here have only used 4-leafs) 5-leaf: 2750 x 4 = 11,000 lbs -
Alcan Springs Quote for Jan-2026
Wayfinder replied to Wayfinder's topic in Mechanical & Technical Tips
Well, thanks to my buddy Steve, we had a good time putting on the new springs at a great location. He's paying me back for helping him put his springs on. Based off what Lew at Alcan said, this is around 200 Oliver's receiving the springs. Pretty good. Once the weather clears I'll do the first 50 mile ride, come back, and retorque the U-Bolt nuts again to 90 pounds. Oh, and between two of you (us), do not lose your 7/8 inch deep impact socket, and do not forget to pick one up before starting the job. LOL Or, driving to the store to get one will delay you. LOL Helpful tools and hints: The new Ryobi impact drill, grease gun, and 4x4 hydraulic jack were all amazing - made things easy. Best to also have two small bottle jacks, 2x" & 4x" wood for cribbing. Not to mention PB Blaster, or equivalent, for the old U-bolts nuts, and small wire brush to clean off those old U-bolt threads before attempting to remove the nuts. One nut got bound up and I had to use old muscles and extra leverage to get the nut off. (Fun times). LOL
-
Good call @jd1923 on the Amp Meter Clamp. @Rolind - @John E Davies suggested this one in 2021. I also have it and it works fantastic for checking the brake wires going into the assemblies. I've used it a good bit tracking down bad brake wires on my rig. It helped me get and confirm my voltage was at 2.99v on each of the passenger side brakes, the farthest from the wire bundle on the driver's side behind the tires. Amazon: UNI-T UT210e Digital Clamp Meter AC DC Amp Meter Clamp Multimeter True RMS 2000 Counts Voltmeter Continuity Tester Capacitor HVAC Tool Multi Tester https://www.amazon.com/dp/B0BBMKLL5H?ref=ppx_yo2ov_dt_b_fed_asin_title&th=1 Davies Post is here:
-
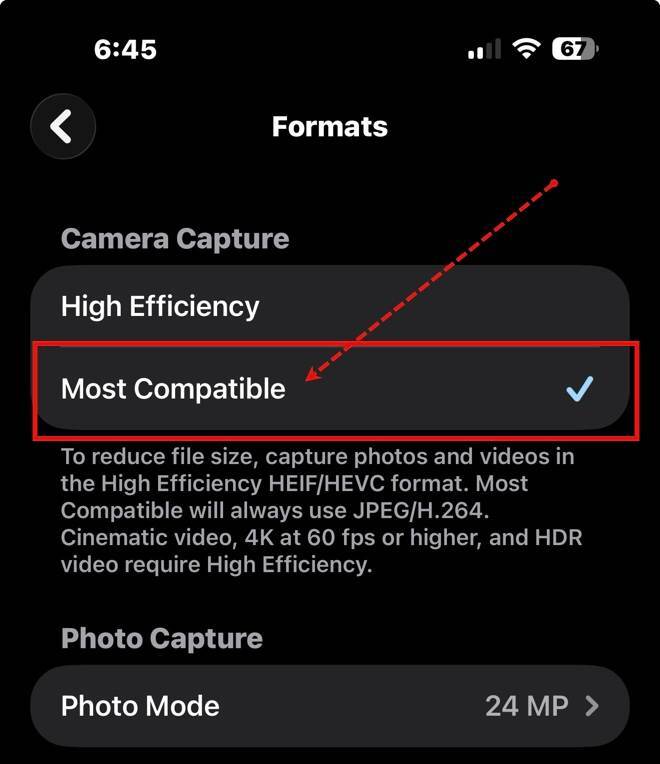
While researching my RV tech/inspector certifications, I was reminded that it's easy to change your phone's camera format. For an iPhone, the default these days is an HEIC format. Before you take a bunch of pics for posting to forums, consider changing your phone to a more compatible format. That way you do not need to convert or resize so much before posting. With iPhones (recent models) go to Settings, Camera, Formats, and under "Camera Capture" select "Most Compatible". Also to be more friendly to forums anywhere, change "Photo Mode" down to 12 MP (megapixel). Change both settings back for more a more efficient/capable format if desired. I'm a bit surprised these forums do not have a back-end convert function to greatly reduce storage requirements. 🤷♂️
- 1 reply
-
- 2
-

-

-
@ripple963 welcome to this awesome group of members. Like others have mentioned, I also use my jacks to level my 2016 Elite II. However, a few things maybe not mentioned here. I have already replaced the old Lithium grease in both of my Jacks in early 2023. So with 7 years of use, the original grease was indeed getting a bit dry or stiff. I think I got them just in time. Greasing jacks is also in the Oliver University video library. Put that on your long-term maintenance schedule. You should not need to worry about that until at least 2031/2032. Wow that seems futuristic to type. Anywho.... I'm always worried about bending a jack foot (round plate), so I always keep small, thin oak blocks in my truck in order to level out any blocking I use for my jacks - also good for leveling outside tables for cooking. We don't always get to be on nice level ground. And yes, like others, as long as Oliver does not change the jack models, I completely lift my Ollie off the ground for maintenance. I ONLY do this on completely level concrete/pavement if I can. As mentioned, I also use lots of good blocking so the jacks do not need to lower much. This reduces wear and the jacks do not rock back & forth nearly as much, making for a VERY stable camper. Good for normal camping and maintenance. SAFETY FIRST though. We all likely use additional jack stands when doing bearing/hub/brake maintenance. I will be putting on new leaf springs soonest and will have the camper jacked up for that too. I go slow when lifting the trailer, stopping for a moment in hopes of not blowing a fuse or other gear wear. Once you have your rig, add to your spare parts list the proper slow-blow fuse for the jacks. I think these days they wire all three fuses next to each other under one of the bunks. My rear fuses are near each jack. I have never found the front jack fuse if there is one in my hull. My used Ollie came with a nice aftermarket front jack and the fuse is outside with the jack. I have a new borescope camera now, I should look harder for the inner front jack fuse. LOL Good luck and keep using these forums.
-
This thread has evolved into an incredible resource thanks to everyone's input. It’s worth remembering that none of us are affiliated with or endorsed by Battle Born. If a product fails to live up to the marketing hype, we have to prioritize the safety of our families and move on. We can only hope that BB management find their own way out of this. While the name 'Battle Born' implies strength and integrity, corporate marketing doesn't always align with the reality of the consumer experience. The best approach is to listen to those doing the real-world research and keep sharing what we learn. We won’t always have all the answers, but as a close-knit team, we’re much safer and more successful together. Keep the great info coming, Oliver family!
-
Local web page to search Oliver forums via Google
Wayfinder replied to Wayfinder's topic in General Discussion
Thanks @zodd. Good idea about summarizing. I bet that tire subject, which will not be mentioned any more here, is one of the busiest threads we have. LOL Cheers,


.JPEG.3d21294117f5207ef90908c9f201e878.JPEG)