
Wayfinder
-
Posts
541 -
Joined
-
Last visited
-
Days Won
11
Everything posted by Wayfinder
-
 Also, I'm a very light traveler, and for now, solo. So weight is not an issue yet. The springs are my big concern before I retire and do a "real" road trip. I'm not sure if there are different 5200 lb axles from what OTT was attempting to put on my trailer. I can always find out from them I guess.
 -
Oh, I guess you missed the news from Oliver. They had completely removed my axles when they realized the new ones would not fit. The hangers are not in the same position as other trailers. There is no "play" with the new axles, Jason's words. They spent most of the day with engineers trying to make them work. This is why I still have all my old parts. They did however, install my EZ-Flex system, which I had provided the parts. It's a bummer, but oh well. Moving forward.
-
I wanted to get more hands-on with the specific parts that will get installed onto my #110 (2016) trailer. This should make me better at supporting the older trailers too. I will also add any parts I use to my Maintenance Log and keep with the Ollie's manuals for future owners, if any. Using JD's older thread for breaks and drums, I see the prices have gone up nearly $30 since 2021, just for the drum kit. 😜 I'd like to try to keep this thread focused on only replacing the OEM parts with either OEM parts or good alternatives, without going off the rails with fancy, expensive "possible" upgrade ideas. I have enough squirrels in my life. 😉 Also thanks to @mossemi for giving me an idea for a local shop from which to order, I might check them out too, but first to get smarter on what I will need. For you experienced owners and do-it-yourselfers, see if I'm mucking up anything please, if you have time to check your own notes. The trailerparts.com site provided by JD in 2021 still lists the part 655D with everything needed for the Brake Drum replacement. (Convenient) Dexter 10" x 2 1/4" Brake Drum - 6 on 5 1/2" with 1 3/8" x 1 1/16" Bearings (68149 x L44649) - 1/2" Studs - $99.24 NOTE: I know all about the better Timken bearings and races from other threads. They're on my radar if needed (it's a dead horse). I'm thinking of going with manually adjustable brake assemblies on my original Dexter Nev-R-Adjust axles. Dexter 10" x 2.25" Electric Trailer Brake Kit - Left & Right Hand Assemblies - 3,500 lbs. Axle Capacity - $136.71 <OR> etrailer Electric Trailer Brakes - 10" - Left/Right Hand Assemblies Manual Adjust - 3,500 lbs - $106.57 ** I don't think there is any issue going to manual brakes, is there? I don't mind adjusting myself. Thoughts? Otherwise, I will go with: Dexter Nev-R-Adjust 10" x 2.25" Electric Brake Kit - Left & Right Hand Assemblies - 3,500 lbs. Axle Capacity - $195.45 ($192 at eTrailer) And of course the all-mighty Alcan Springs I already have plenty of the Red Line CV-2 synthetic grease along with all the tools. I've repacked the bearing at least once. Shock Absorbers: Monroe 555001 (any other better options?) Grease Seals: National Oil Seals Part #473336 Purchased at O'Reilly Auto Parts (Also get at eTrailer, Item # RG06-050) (just where I found parts in 2021) Timken Parts if needed: 4 x L44649 Timken SET4 - Outer Bearings (1 1/16" ID) 4 x L68149 Timken SET17 - Inner Bearings (1 3/8" ID) 4 x L44610 Timken Outer Races 4 x L68111 Timken Inner Races
-
All good thoughts. It would be best, for my own experience, if I were to do all the work myself. Erggg. But the body is feeling its age. LOL I could also find a good shop near me to do the heavy lifting and me get the parts.
-
I have read much of this thread. Super helpful to all - and have captured the general steps for the springs installation, with correction of placement of wet bolts to be at 3/9 O'clock. Now I'm getting upset because I thought I'd have upgraded to 5200 lbs axles, springs, brakes, etc, but since Oliver cannot upgrade my #110, I still have a ton of work to do on it. My back hurts just thinking about it. LOL My under carriage to-do list still (oy): New springs (Alcan) U-bolts, nuts, plate (Alcan) New shocks (??) Brake assemblies (auto or manual adjust - decisions, decisions) Rotors Bearings, and races if not installed in rotors
-
@jd1923 and @Ronbrink did a great job laying out what they did to tie in the new Beech Lane fans. I just wasn't "getting it" at first what @jd1923 had done, since we seem to have the same fridge setup. Even with pictures in color I was not "seeing it". LOL. Now I get it thanks to Mike adding my own picture back to me. Nice! I've just ordered my Beech Lane and will be attempting the same setup. Thanks again, and again, and again, to everyone participating. We need to get together someday and talk in person. Maybe a non-rally technical gathering. Heck, we could even do a Zoom call or something like that someday. That would be fun too.
-
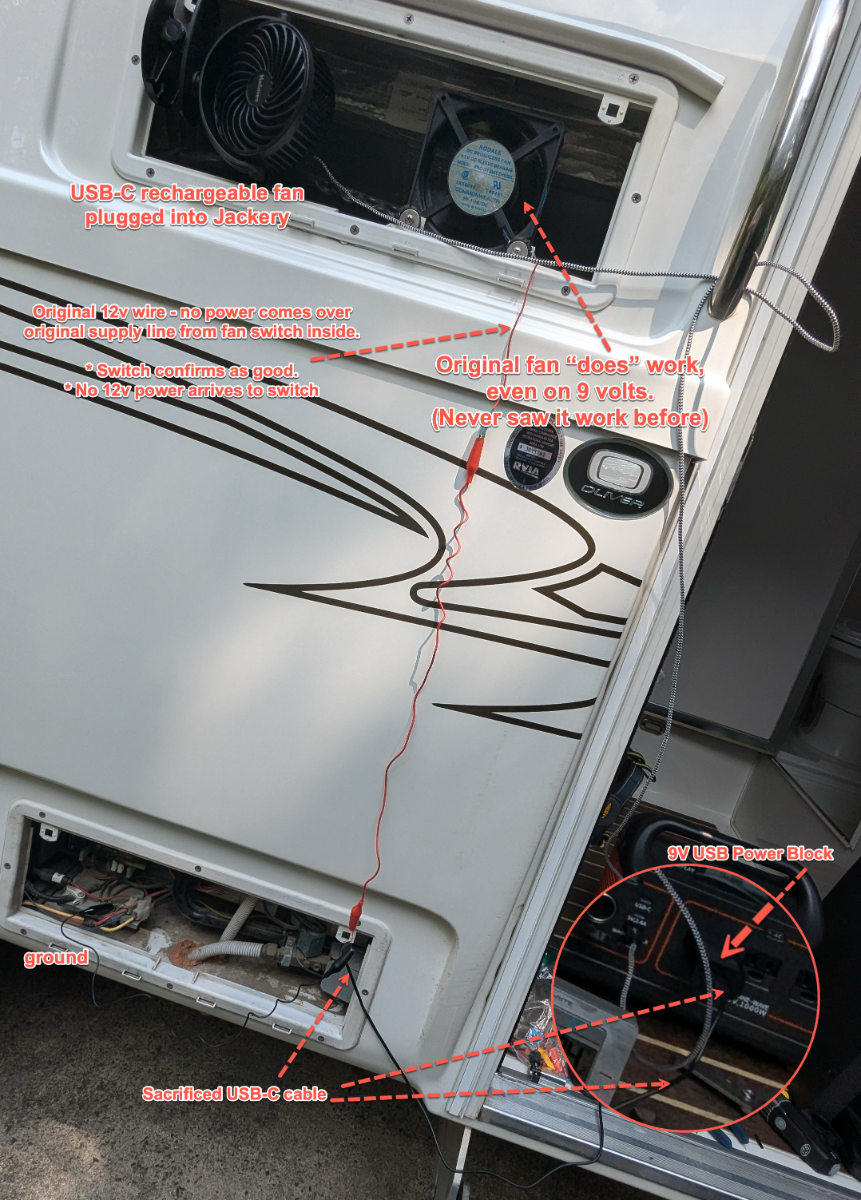
I did months ago when I was troubleshooting that fan. The wire going up to the switch provides no voltage at all and the switch itself seems to be working fine. Not sure when it comes from. Was not looking forward to pulling out the fridge just for that. I may run all new wires to power on/off the new Beech Lane twin fans. We'll see.
-
The new placement of the thermistor has done the trick. It's on the very last cooling fin inside the fridge and moved to the top. I woke up this morning with 29.5 degrees inside the fridge. I've not seen that ever. And that with no fan running last night. And the #5 lamp bulb was illuminated when I checked on it this morning. Now moving down to #4 setting to observe the temp drop.
-
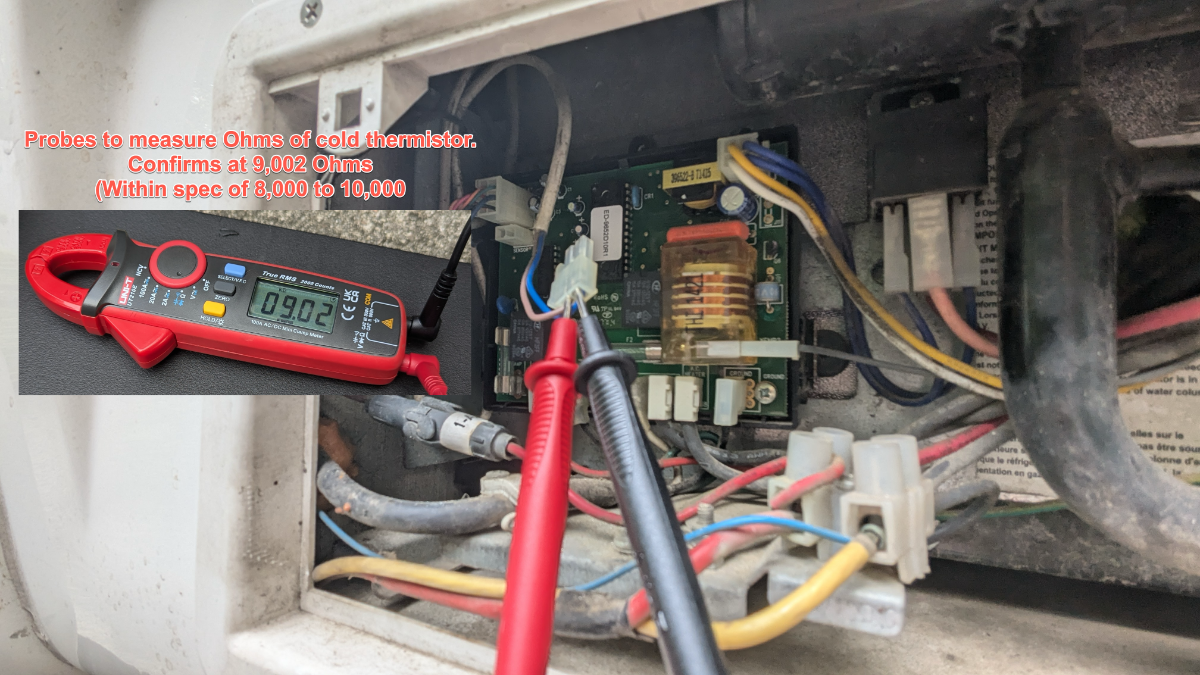
Mike, thanks for the confirmation where your fan now gets power. I was also wondering if that location would be enough juice for fans and fridge components. And No! There is no power making it to the inside fan switch. No biggy now that I know I can drop new wires to that location you circled. That's extremely helpful. Thank you so much. I have that beach fan in my cart, but did not pull the trigger yet. Also, after reading the service manual on the fridge and testing the thermistor, and placing it in the correct location in the fridge, I'm currently at 35.5 degrees in the fridge at 9:30 at night. The fan is currently off. This is the coldest I've seen it in a long time, and with nothing in the fridge. I think I have confirmed that lamp #5 in the "eyebrow" is faulty, I've set the fridge from #4 lamp to #5 and no lights (lamp indicators) on the eyebrow are lit up now, but the fridge still gets cooler. So far, so good. We'll see how much longer this fridge will last. Oddly enough I found the Domestic Service manual pretty straight forward and easy to read. I'm sorry for breaking any "Manly-Man rules" by reading the instructions. It will not happen often, I promise. 😂 I will site the Man's Prayer now from the Red Green Show.
-
Thanks JD. I had lost track of that threads altogether. I'm going to have re re-read that a few times to understand where the 12v power really came from. There's a lot there. I like that dual fan setup.
-
Well, I had to use what I had on-hand to confirm the fan functionality and I verified the thermistor. The fan has never worked and I've confirmed that... no 12v power is arriving to the fan push-button switch inside the camper. I'm not really wanting to pull out the refrigerator just to find the broken 12v wire. I'm afraid I'll brake something more important. That's one issue. I did confirm the inside switch and the fan itself do actually work. To verify the fan, I used an old USB cable to plug into a 9v source and a USB-C power block (AC) from an Amazon Fire TV stick. At first, I used a 9v battery to verify the fan worked, and it did (yay). I have never seen the fan spin before, ever! Now I'm thinking of finding another 12v source, or more likely, if I can use the 120v AC plug for a 12v block, instead of pulling out the entire fridge. I could run new wires from the fan. Something red-necky like that. How "destructive" is it to pull out the fridge in an Elite II? All the vent stack tape looks pretty tight in there, and the fridge seems super tight on the sides. Doesn't look fun to redo. Like others have mentioned in these forums, the Dometic fridges don't do well above 90 degree temperatures. I did move the thermistor (sensor) inside the fridge up a bit to the very top, and it was not on the last cooling fin, but the second to the last fin. I did not see any mention the placement of the thermistor mentioned in any of the RM2454 manuals. The coils look pretty clean behind the fridge too. One Note: The #5 lamp (light) of the temperature indicators, (aka the eye brow), on the front of the Dometic usually will not light up anymore. Mean anything? I did tap it once and it came on for a bit. I figure maybe it's faulty too. Has anyone switched out the mother board using the "Dinosaur" boards or only the Dometic OEM? Otherwise, the fridge pretty much cools the same on AC, DC, and Propane. Just not keeping up with the outside temps. Any other ideas? Thanks!

-
New axles may not fit all older sub-frames
Wayfinder replied to Wayfinder's topic in Mechanical & Technical Tips
My axle labels are nearly destroyed by road & weather. I'll see what numbers I can see engraved somewhere. -
New axles may not fit all older sub-frames
Wayfinder replied to Wayfinder's topic in Mechanical & Technical Tips
Mike from OTT replied to my ticket about getting specific measurements when they can. More to come. -
The Saga of corroded brake wires on older trailers
Wayfinder replied to Wayfinder's topic in Mechanical & Technical Tips
Well, I finished putting on new connectors on all the brake assemblies. Much like @John E Davies article in 2018, I also saw a marked voltage improvement at each assembly, at least 100 mV or better. I have gone for two 20 mile test runs with the rig and no errors from the RAM and I've been able to reduce the brake controller gain from 8.5 to 6.0 or 6.5. Will continue to fine tune that in up coming travels. -
The Saga of corroded brake wires on older trailers
Wayfinder replied to Wayfinder's topic in Mechanical & Technical Tips
@jd1923 the Google interwebs revealed that at least going back to 2018 RAM owners reported their trailers clicking. And yes I am a RAM owner. eTrailer explains that this is the truck ensuring the magnets are working and could use the brakes if needed. And as I learned, if the trailer has some questionable grounds or connections, the truck thinks there are no brakes, and gives up trying after a while, sometimes in the disable state. I'm not sure that's good logic or bad to disable the brake altogether. I rather just have the message remind me to check my brakes instead of completely turning them off. This could be my last RAM. -
The Saga of corroded brake wires on older trailers
Wayfinder replied to Wayfinder's topic in Mechanical & Technical Tips
@jd1923 any idea about the brake assemblies "ticking" when the truck is in run mode? Was guessing communication/testing of the brakes so the truck always knows the status. It tickets about the same rhythm that the errors might occur on the dash, when the brakes get disabled due to ground issues. Thanks! -
The Saga of corroded brake wires on older trailers
Wayfinder replied to Wayfinder's topic in Mechanical & Technical Tips
Thanks @jd1923 for your suggestions, and everyone's. I have a new DC clamp multimeter in the mail. I only had an AC clamp meter before. Before I finish up my brake wiring job I'm curious to see the voltages before and after, especially at the farthest distance to passenger side brakes. I'm torn between going internal and external wires. I'm thinking someone can at least see any issues if exterior. And with a ton of perfectly spaced exterior tie wraps, it should look "pro" - with the wire on rear, and slip above center-plane of the axle. Still thinking about it. I can be swayed. I'm malleable. 😉 -
The Saga of corroded brake wires on older trailers
Wayfinder replied to Wayfinder's topic in Mechanical & Technical Tips
Google led me to the 2018 forum discussion about wire size, right after I found this eTrailer article. https://www.etrailer.com/question-83165.html I'm thinking of getting eTrailers 12 Gauge Black Primary Wire to replace what's in the axles, and likely going exterior too, but using medium-size black exterior zip ties. Suggestions welcome. https://www.etrailer.com/Wiring/Deka/12-1-1.html I agree, what's in the Dexter axles are very thin, albeit double jacketed. -
The Saga of corroded brake wires on older trailers
Wayfinder replied to Wayfinder's topic in Mechanical & Technical Tips
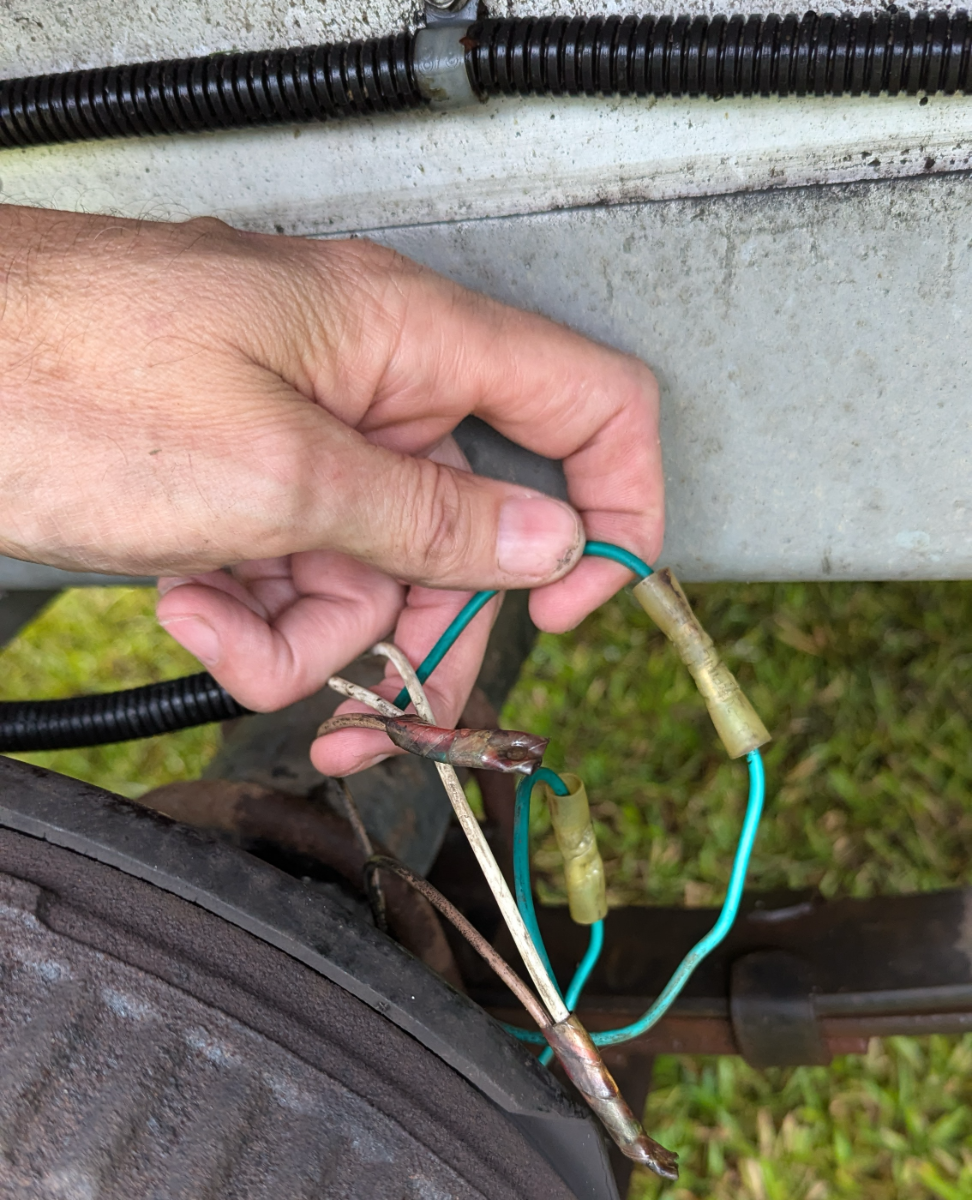
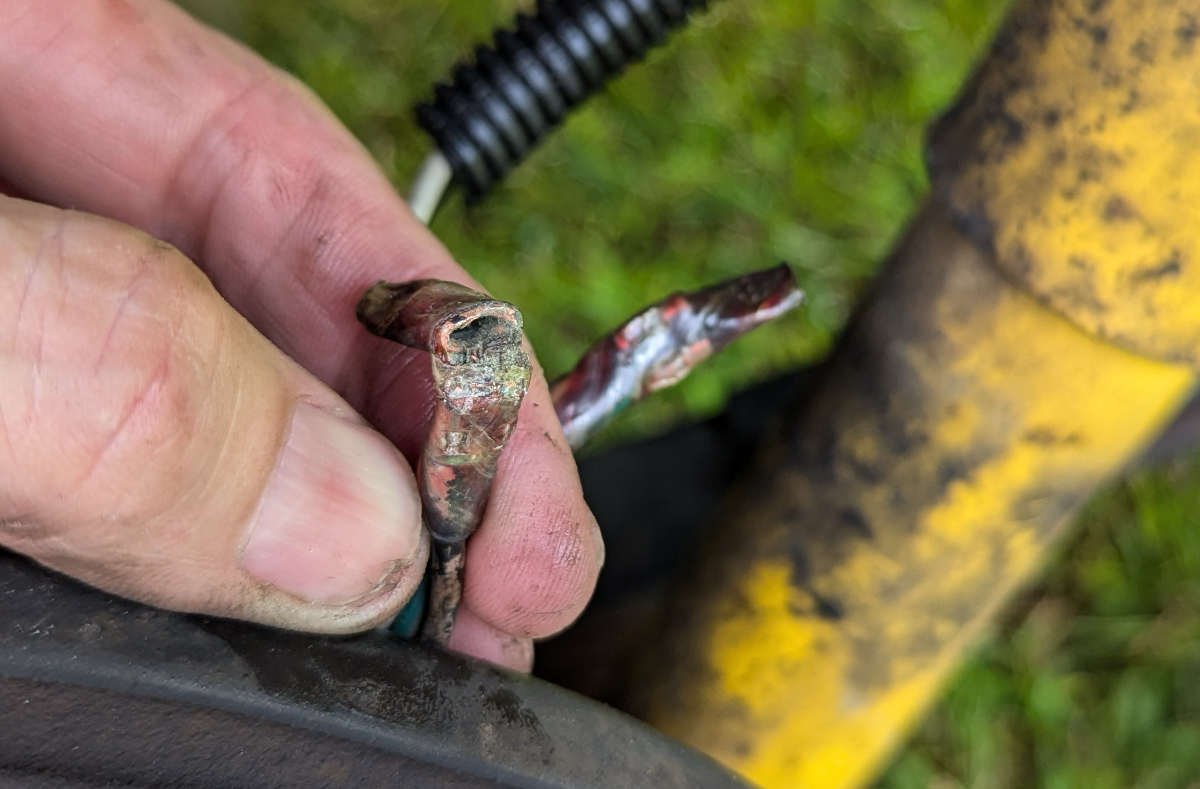
Those butt splice connectors on the green extender wires were too large AND whoever put them on did not bother to shrink wrap the ends, and they were quite large open ended connectors. Water traps for sure. Everything is reconnected and heat shrink wrapped ends are done too. No truck errors in the drive way, but I never did get those. Will test drive soonest. Finger's crossed. -
The Saga of corroded brake wires on older trailers
Wayfinder replied to Wayfinder's topic in Mechanical & Technical Tips
I was curious, when the truck is running, or in run mode, why do the brakes assemblies tick? Is this the communication signal from the newer trucks to check for voltage and ground? Thanks. PXL_20240718_124932977.TS.mp4 -
While at OTT Jason and I were talking about using the hull numbers to track service tickets. Unless I misunderstand him, and he seemed pretty clear, they have no way in their system to track repairs via the hull numbers. The numbers are "more for the owners", than OTT themselves. They "currently" pretty much track only via the owner's name. So, if you sell a trailer, the next owner would need to know your name, and likely have their database updated. I would think they have all the VIN numbers too. Since the VIN numbers no longer correspond with the hull numbers, it's not as easy now to use the hull #s. The VINs have "rotated" back around with new suffix numbers so they can no longer use the last 3 or 4 for the hull #s. Maybe many of you knew this already. BLUF: If we say we own hull # blank, it means nothing to OTT. They key on our name only, or mostly. They're just for us "fun monkeys" to use. Do you think Hull #s should be put on the back of Ollies by default? That would be a fun poll to run on FB.
-
Well, as some of you know I've been posting a "ton" of stuff on the FB group. I'm trying to share and received some good suggestions for troubleshooting all my brake issues. I was inspecting the brake wire bundles on the street-side wheel well when one of the very hard plastic sealed connectors broke off. I discovered even more corrosion (pictured). No wonder these newer trucks think there's an issue with the brakes, cuz there is. The voltage drop / resistance must be the issue. I'll get someone to press on the brake peddle while I have a multimeter on these. I'll compare the rear wire bundle to the front bundle, which I've not touched yet. To see if I can see a difference. If I do the test correctly. I placed new temporary connectors on the rear bundle at a harvest host in a very wet grassy field, after a huge downpour. Fun times. But the truck did not gripe about breaks for 2.5 hours going home, until the very end of the trip, after going through a HORRIBLE rainstorm on I-20. There seems to also be wire "extenders" on the green wire on the front bundle, and I don't like the look of the NON-sealed connectors. I cannot wait to see what they look like. I have shrink-wrap sealed connectors on-hand I will use. Any suggestions are welcome, especially as it comes to testing the voltage from the 7-pin to the bundles. Just things I've not yet done before. Kind of fun though. Thanks,
-
New axles may not fit all older sub-frames
Wayfinder replied to Wayfinder's topic in Mechanical & Technical Tips
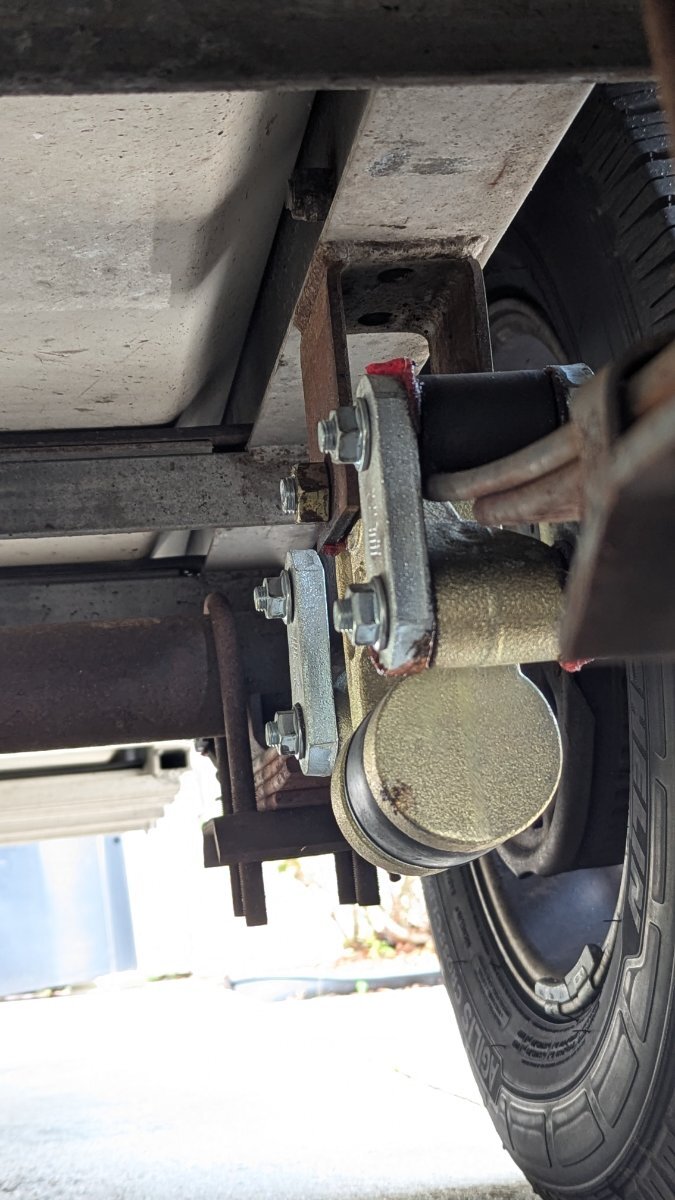
I just opened a ticket for Jason. Maybe he'll have those exact hanger measurements needs for the axles. I sent them a pic of one of my hangers, if they need to mark it up on the pic. If nothing else, maybe we can save his team's time by not entertaining the idea if the hangers don't meet what the new axles expect. New tech, old tech - they don't usually play nice together. Like mentioned above, it's not a defect. It's just the way things were done "back in the day" and now we all expect to have the shiny new "gear" on our old rigs. It's just not usually practical in the real world. LOL. This is why we constantly need to upgrade our computers. Dang it. Difficult to plan for the future widgets not yet on the market. Here's is pic of my driver's side hanger. We specifically talked about the position of this one.
-
New axles may not fit all older sub-frames
Wayfinder replied to Wayfinder's topic in Mechanical & Technical Tips
@jd1923I asked Jason about that very thing, moving the hangers. He was not keen on that idea at all in fear it would not, or could not easily, be done well enough. I think it comes down to what's practical for all the man hours needed. 🤷♂️ -
Since my #110 cannot get new axles due to frame hanger welds, I might beaf up the springs.