Overland
-
Posts
3,835 -
Joined
-
Last visited
-
Days Won
212
Everything posted by Overland
-

Saw a really cool bird dog/ utv trailer
Overland replied to John E Davies's topic in General Discussion
Cramped, but safe. John, that looks like it may be from Ainley Kennels. They gave me a really good price on a drawer unit for the bed of my truck with a water tank, but when I wanted to order, I couldn't get them to return my emails. -
Using fastners and drilling in fiberglass
Overland replied to Rumline's topic in Ollie Modifications
Really good info, guys. Sometimes I'll use tape and sometimes not. I haven't noticed any difference in the amount of chipping, so I mainly do it in situations where I might scratch the surrounding gel coat somehow. I'll have to try the friction drilling. And yes, always a mask when drilling or sanding the fiberglass. Sometimes I worry about those guys at Oliver. Doesn't seem like a lot of dust control is happening there. -
Off-pavement recovery - equipment and best methods
Overland replied to John E Davies's topic in Towing an Oliver
My wife noticed on Saturday that the grey water was pooling on the ground at the end of our hose, so the soil was saturated and I think it had been a week since the last rain there. So yes, it takes a while to dry out. Funny thing was that we were talking about a winch on the way up and my wife thought it would be better to prioritize getting a fridge for the truck. The winch got bumped to the top of the list on Sunday. -
Using fastners and drilling in fiberglass
Overland replied to Rumline's topic in Ollie Modifications
Worth trying. I've had good luck with a sanding disk on a Dremel but I haven't tried using a burr. -
Off-pavement recovery - equipment and best methods
Overland replied to John E Davies's topic in Towing an Oliver
I wish I had some now. Situations like that my brain goes into emergency mode so I don't think to take pics. The only one I've got is of my wife carrying the Maxtrax back afterwards and she'd be mad if I posted it because her hair is frizzy from the rain. We actually didn't get much mud on the trailer, just us from pulling the tracks out of the mud and repositioning them and of course the truck. We had the presence of mind not to spin the wheels trying to get out. I waited until we got home to clean off the tracks and truck, which was a mistake since it rained all the way back and the mud caked on the tracks ended up on everything in the bed of the truck. We used the outside shower to clean off our hands and shoes. Oliver needs to add a water pump switch back there so you don't have to track mud in the trailer to turn the pump on. -
Using fastners and drilling in fiberglass
Overland replied to Rumline's topic in Ollie Modifications
Absolutely. I've learned to go maybe one bit size up from what I normally might use. I just hold the bit in front of the screw and pick the largest size that still allows me to see some thread beyond. And I've found that you're more likely to crack the gel coat with the screw than the drill bit. Also, if you're drilling a larger hole and want to drill a pilot hole for the larger bit, then just drill enough to get a good centering divot in the gel coat. If you drill deeper with the pilot, then you're more likely to catch the edge of that hole with the larger bit and pop off a bit of gel coat. I think it's inevitable to have some chipping or crumbling around the edge of the hole, since the gel coat is so brittle, especially the white. But I've yet to have a disaster, knock on wood. The only visible scars I've made were inside the closet like I mentioned above, and then inside the battery box, where I drilled out a large hole to run 4/0 cable, but when I went back to the hardware store to get a grommet for the hole, they were out and only had one size larger. Stupidity forced me to try and enlarge the hole and the drill skipped and gouged the fiberglass about a half inch over. Fortunately it was inside the box and I've learned not to do that. -
Off-pavement recovery - equipment and best methods
Overland replied to John E Davies's topic in Towing an Oliver
Well we actually got our Ollie stuck in the mud this weekend. Or I guess technically we got the truck stuck trying to pull the Ollie out of the field we'd camped in. We'd picked a nice open field at Land Between the Lakes and we both knew that it was a bit risky since it was predicted to rain on Sunday morning. And per my earlier post, we also knew well that the soil at LBL is like grease when it's saturated. But the spot was at the top of a little rise and I figured that getting out we'd have the weight of the trailer in our favor. But of course to get the trailer turned around Sunday morning, I had to pull it around and off that little hill a bit, and the moment we got off of it we hit softer soil. Four low, diffs locked, all four wheels just spun. Fortunately we had our Maxtrax and a pair of bridging ladders and those worked like a charm. It was slow going, since we had to re-lay the tracks every 10 or 12 feet, but less than 20 minutes later we were back on gravel and washing off the mud. Moral of the story - you might feel like an idiot buying and carrying that stuff around, but when you need it, you need it. I highly recommend at least a set of Maxtrax in the vehicle, even if your only adventure off road is to pull ten feet off into your camping spot. Since we don't have a winch on the truck yet, had we not had the Maxtrax, our day would have involved a long hike in the rain to find a ranger or hunter to help pull us and the trailer out. Innocuous looking little camp site, isn't it? Maybe 60 feet off the gravel? Takes less than that to ruin your day.
-
Lagun Table Side Mount Retrofit in Twin Bed Elite 2
Overland replied to Overland's topic in Ollie Modifications
When I was a kid, the family car was a big Ford LTD, so I have a soft spot for land yachts. That car was a little bigger than our Ollie of course. -
Like John, I use stainless everywhere. They aren't that much more expensive, though I've learned that the local stores all get together each morning to remove the hardware I need from their shelves. If it's a place where I can bolt through, I do, using lock nuts and washers; but if it's someplace like the paper towel holder where I want the surface above to remain flat, I'll use a short wood screw that won't penetrate through - assuming that I'm not installing something heavy or that will have a lot of load on it. I've found that they hold really well. I'll usually put some of the 4200 on whatever I'm securing to pretty much glue it in place, and when I do so, I suspect that the screws are really just holding it in place until the adhesive dries.
-
Interesting. That must be new - mine is definitely fiberglass honeycomb. Plywood would have been lots easier to work with.
-
Lagun Table Side Mount Retrofit in Twin Bed Elite 2
Overland replied to Overland's topic in Ollie Modifications
If anyone wants to make the block I made, here's the list of pieces you'd need to order: #3075 Extrusion, 24" #4303 Bracket, 4 pieces #4302 Bracket, 2 pieces #3320 Bolt Assembly, 14 pieces You'll also need some stainless ¼" or 5/16" bolts to fix the block to the hull. I think most can be 1" or 1.25" long but you'll need two 3" bolts for the two vertical ones that go through the bed extension. I used lock nuts and large fender washers to spread the load against the fiberglass. I also cut off all the bolt ends around the bed side with a dremel and cutoff disk and filed them smooth so not to damage the mattress or cushions.- 75 replies
-
- 11
-

-

-
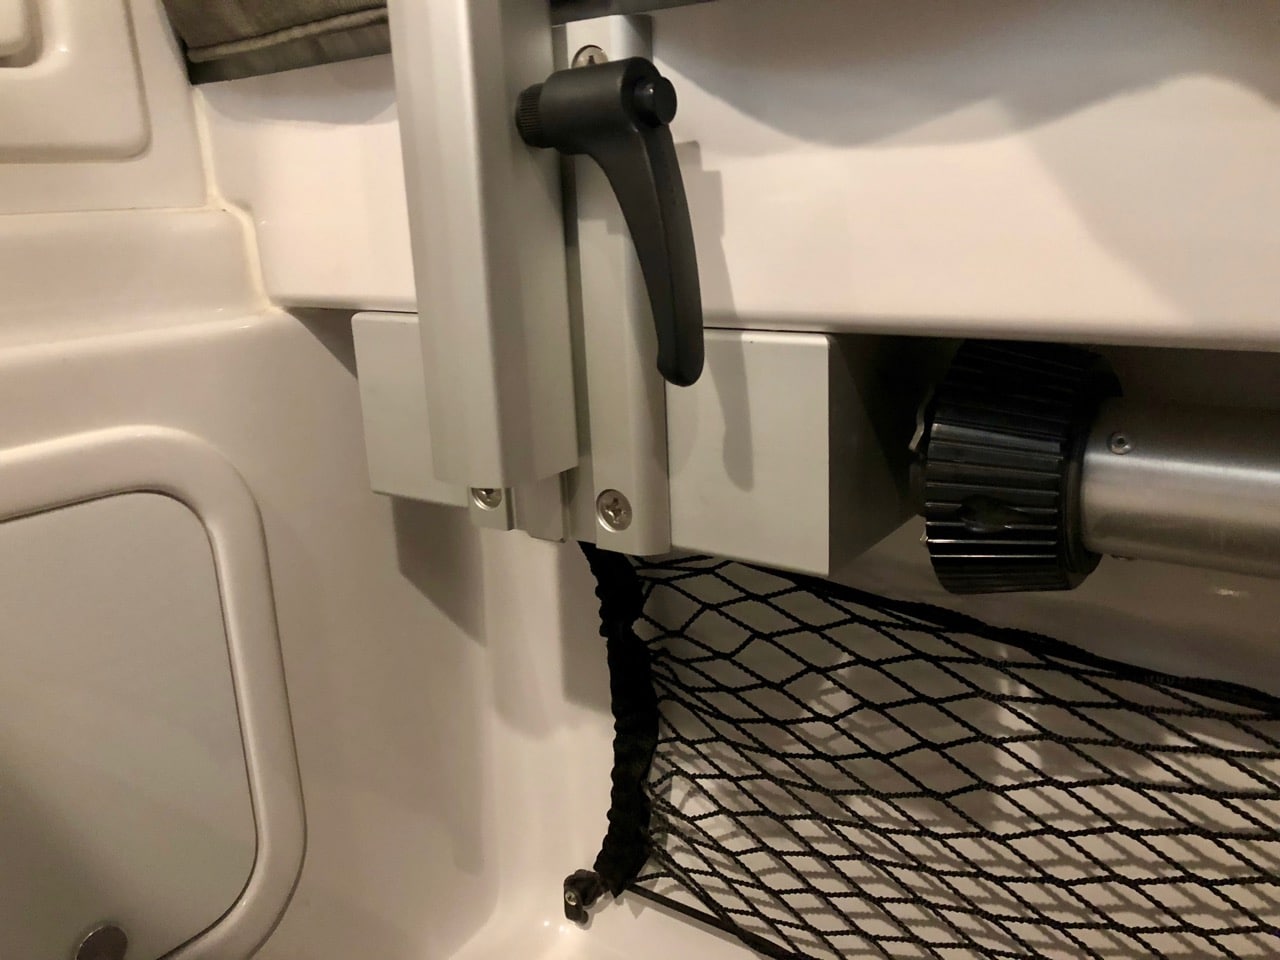
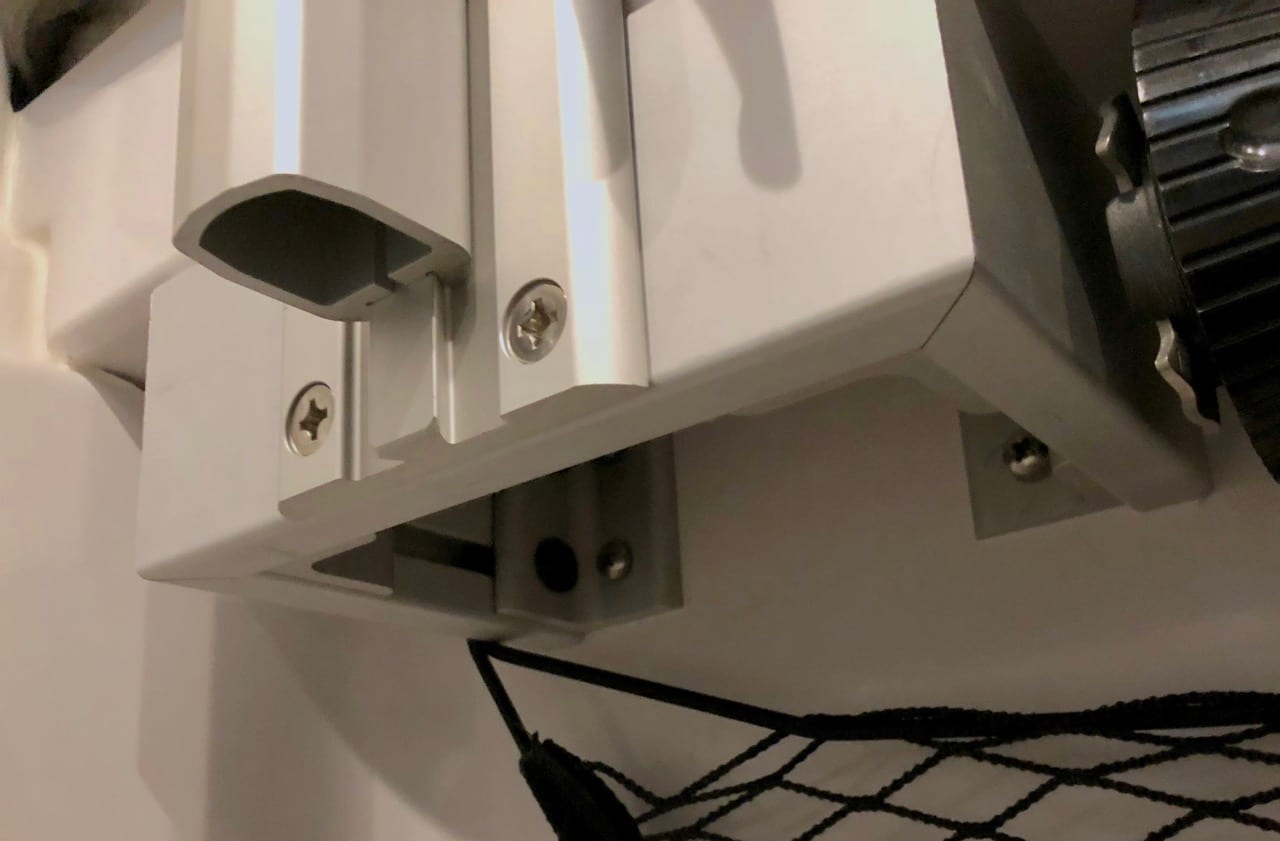
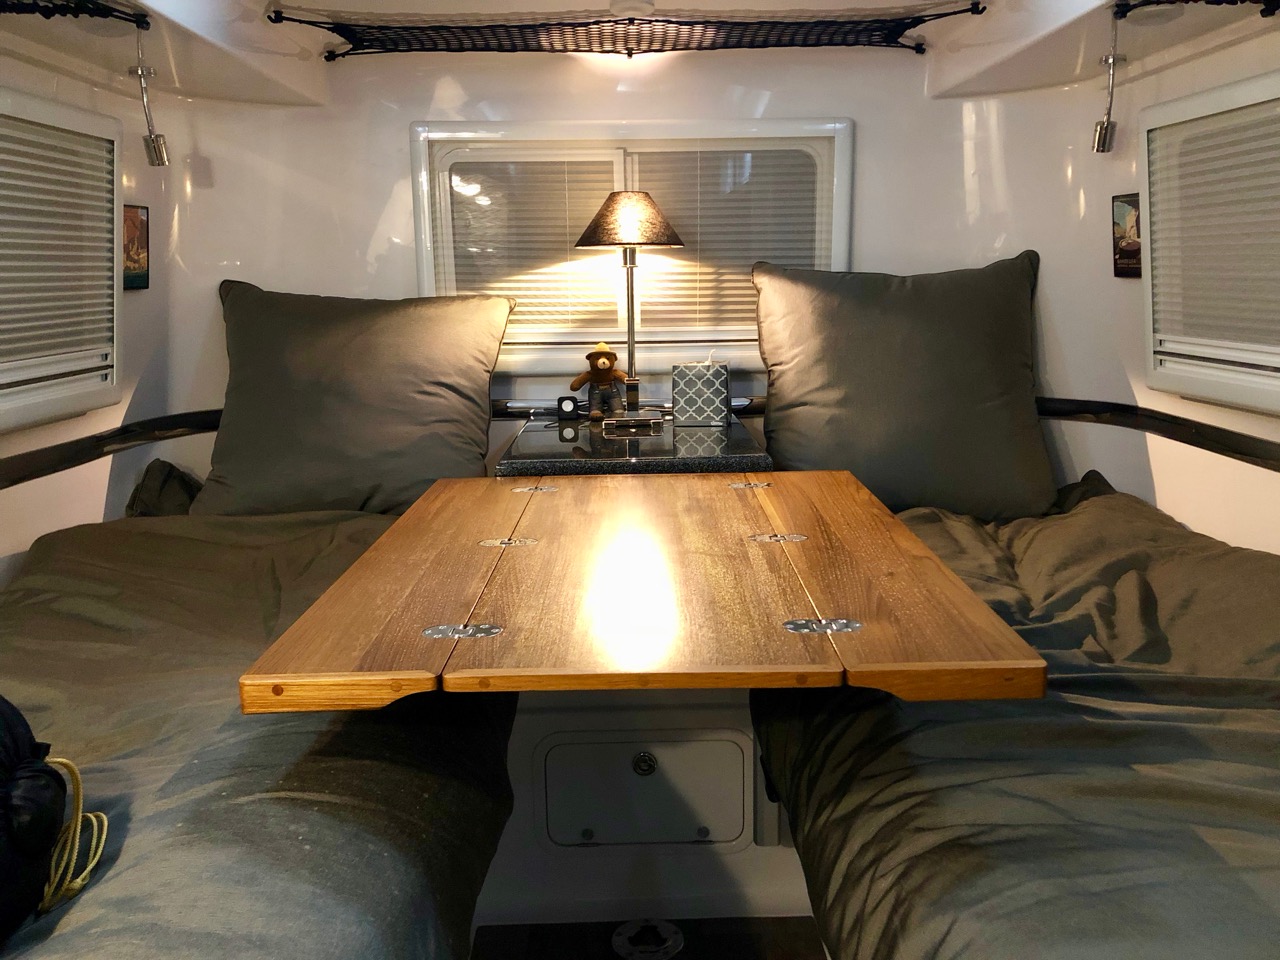
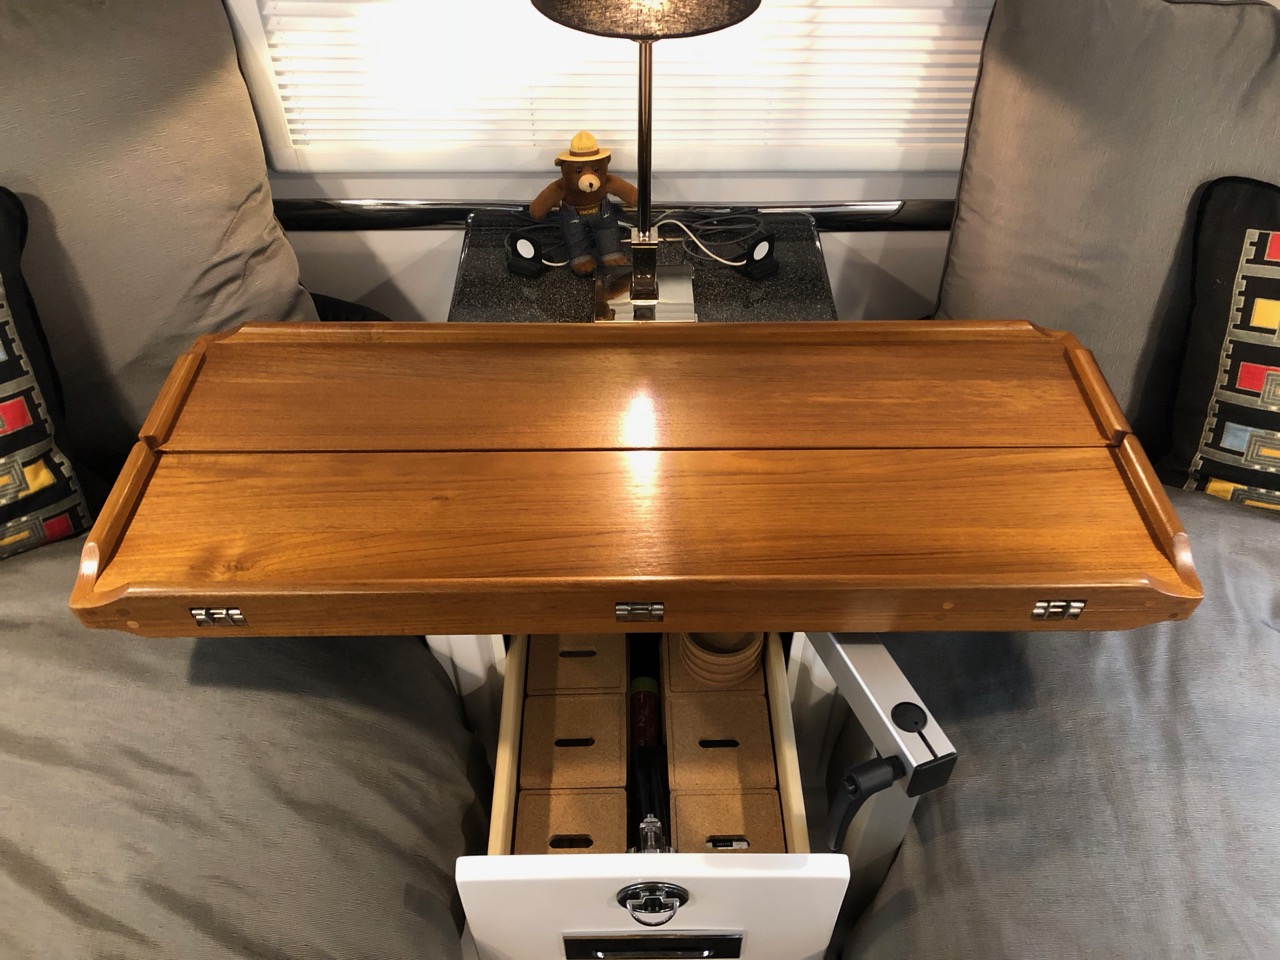
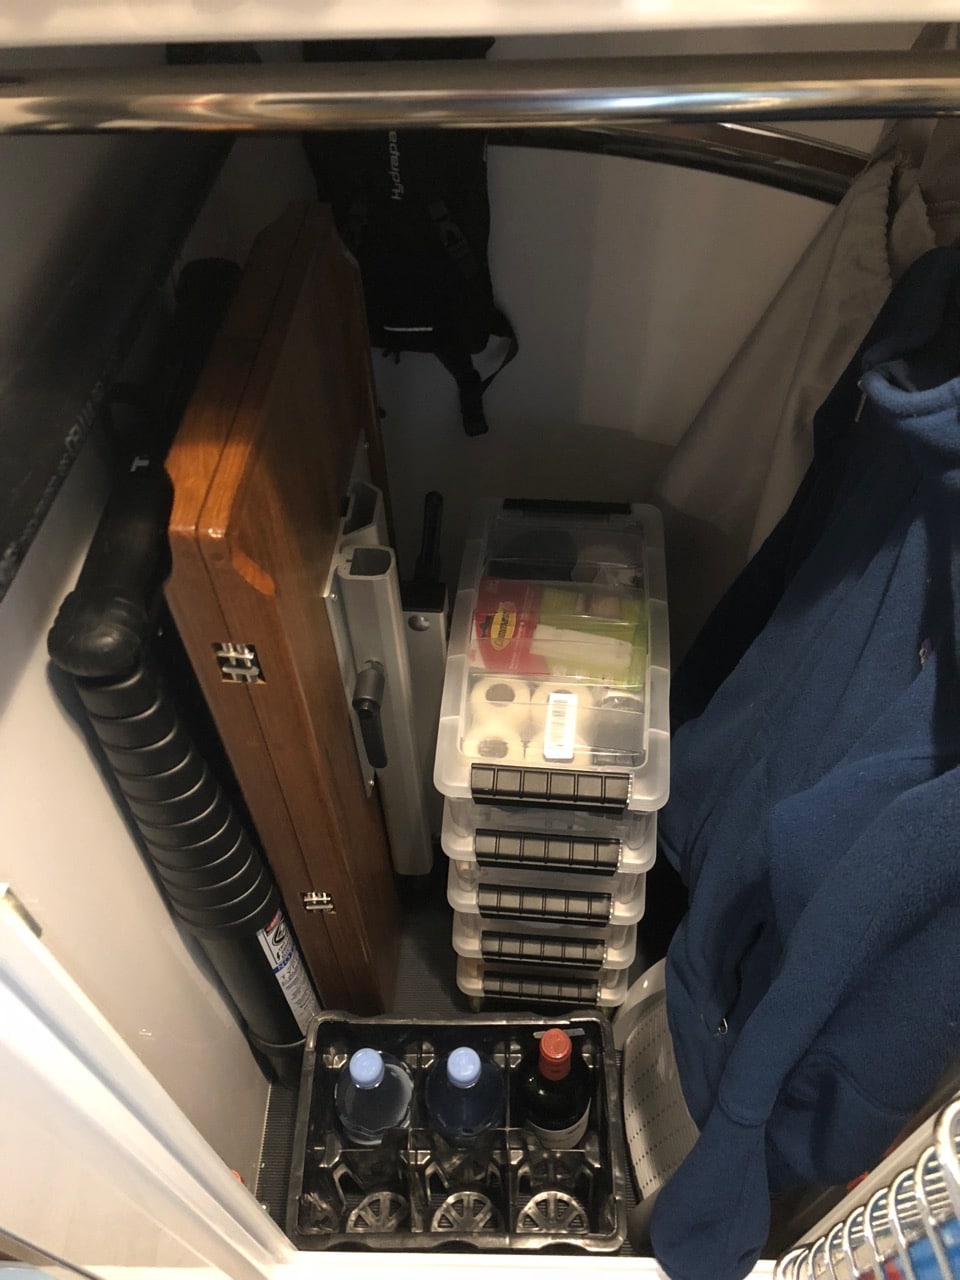
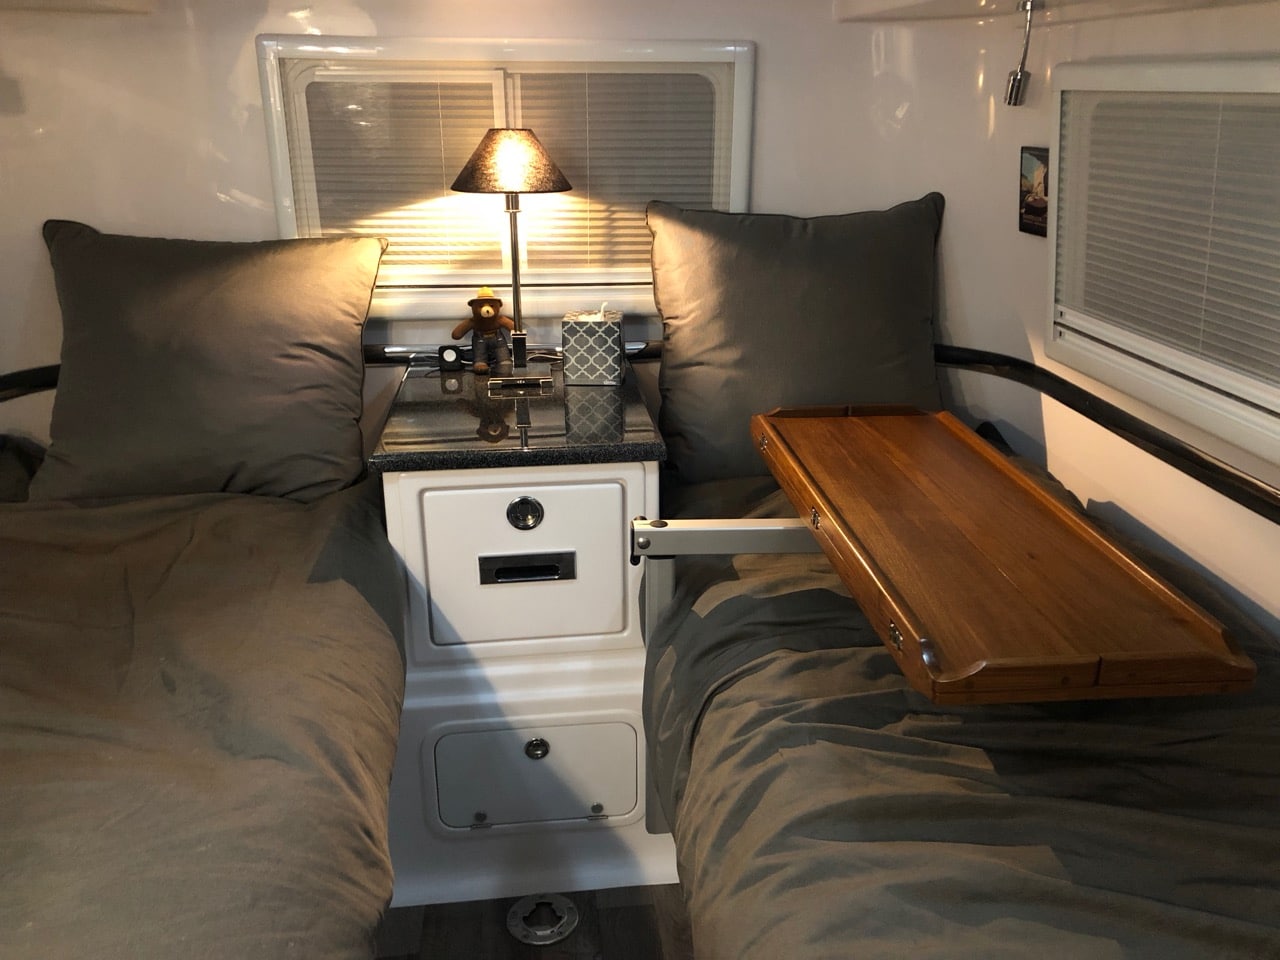
I think like a lot of Elite II buyers, we were torn between the twin beds vs the king. We chose the twin, but not so much for the size or comfort of the beds as it was the utility of nightstand and easy access to the overhead compartments. But we liked the idea of having a table and a large lounging area in the back, and so I set my mind on the idea of trying to have both. At first I designed a custom table for the back that would latch into the nightstand in the back with a pole in front, similar to how the dinette table works. I showed it to Oliver and they thought they'd give it a try, but as time went on and things got delayed or forgotten, I sort of gave up on that idea and asked if they would just sell me the standard table top and legs and I would figure it out. They did, and it was a big mistake since I could never figure it out. The table was just too heavy and bulky to put up and take down, and there was absolutely no place to store it. Plus the height with the standard legs was too short for the mattresses we had (another poor decision on my part). So on our first trip it was labeled the Albatross Table and it was just in the way the whole time. It didn't make another trip, just the two mounts screwed to the floor to remind me that not every problem has a solution. But the solution does exist in the Lagun table. I'd seen them before in the king bed model but I had sort of dismissed them as being too small to be of use. But that was before @rideadeuce started this topic about their upgraded table top. Their top was much larger, foldable, and just generally nicer looking than what I'd seen before; and so it clicked with me that with the Lagun mount, we could have a foldable table that could easily be stored or moved out of the way for access to the upper storage. Also the height could be whatever we wanted and unlike the table we had, could be quickly locked for travel. There were just two problems for us - the mount in it's normal location would block the nightstand drawer; and on top of that, we had opted for an access hatch to the basement right in that same spot where the Lagun is usually bolted to the hull. I needed a way to mount the table to the side somehow. So I made one of these - This contraption is made out of 15 Series extrusion from 80/20. I cut, mitered, and erector setted this little block and associated connectors to go beneath the bed overhang. The Lagun mounting plate (the vertical piece) bolts to the mount and then the whole thing gets bolted to the side wall under the bed in four places and to the bed overhang in four places. It looks complicated but if you have a miter saw and can play with Legos, you can build it. Here are some pics of the block in place so you can see how it mounts. The top two bolts on the Lagun plate bolt into the side of the bed extension, then there are two bolts on the block that secure vertically into the base of the extension, then another four bolts that go into the side wall of the base of the bed, opposite the basement. I marked and drilled for the two vertical holes first, then temporarily bolted it in place to mark all the other holes. You need to do this since not all of the surfaces are perpendicular to the trailer or one another. But the flat bottom of the bed extension runs parallel to the floor so if you use that as your starting point then the table top will end up parallel to the floor as well. The end result is extremely solid - The table top I chose is the 35" Nautic Sail top from Marine Teak. Look around on their site and you'll find a number of styles and sizes, any of which would be a great choice. (This is the same company as this one, btw, but they have more choices in table tops on their UK site.) I debated oiling it, but came to my senses and coated it in a couple layers of low gloss poly. Taking it apart to seal is no problem, but you do have to keep track of a number of shims that go under the hinges to make them flush to the wood. So here's the final result. I really like the versatility of the top. Use it folded, unfolded, bar height, table height, sideways, lengthways, stick it over the bed for travel or to get it out of the way, or...however. With the mounting plate where it is, we can raise the table hight enough to clear the nightstand and lower it enough that it sits on the bed locked in place for travel. As you can see, the drawer clears just fine. The table will work best once we have our cushions made to replace the mattresses, but we just did a quick weekend trip with it and it works well even as it is. And best of all, it fits in the closet -
- 75 replies
-
- 23
-
-
-

-
We have a dimmer and get limited use out of it. It takes too long to adjust the setting and whenever the inverter is on, the lights will pulse when dimmed. There's also a delay in adjusting so it's easy to overshoot how dim you want them. So we end up not using it much. We've found for the most part that it's easier to get the desired amount of light just by turning on and off lights. I think the only time we'll use the dimmer is when eating since my wife and I both think the dinette lights are too bright. That will change when we start using our Lagun table to eat and then I doubt we'll touch the dimmer ever again.
-
That one looks really nice. I think I might have preferred that to the one we have.
-
Mine is screwed in. You'll find that the fiberglass holds screws well, especially if you add some 3M 4200 to act as lock tite. The biggest difficulty is trying not to chip the gelcoat, either when drilling or when tightening the screws. Some chipping will happen inevitably, but if you're careful you can limit it to the area that will be covered by whatever you're adding. I've found the fiber granite has a softer gel coat (if that's what it even is) which is much easier to work with. You also have to be careful when drilling on the bath walls that abut the main cabin and the closet. Those walls are really thin and you could drill through if you aren't careful. And if you don't drill enough, then your screw will bottom out and it will pop out the gel coat on the other side. Sad to say I've got a couple of those in the closet, but you can't see them unless you poke your head in and look around for them. I have to say that while others swear by command strips, I haven't had much luck with them except for hanging some really light picture frames we have.
-
Our trailer was one of the last 'custom' trailers to be built. When we started talking with Oliver, custom was pretty much the norm and if you wanted to do something cool, they'd give it a shot. In fact we were encouraged by Robert Partee on our first visit to come up with some new ideas for them to try. But that was before they decided to dramatically increase production in 2017 with the second production line and all. Because we were sort of in the mix already with our trailer, and because they also new that we had cancelled a completely custom trailer from a different company to go with Oliver, they allowed us to continue with the modifications (and I think there were a few other trailers going through the line with ours that had some customization going on). But Oliver regretted having done so. With their new production line, so many new employees and older ones learning new jobs, it was just too much for them to pull our trailer out to make the necessary modifications before the next step was to begin. And they ended up missing a few things in line that were going to be simple but ended up being very difficult to retrofit in service later. And we had to take the trailer back to Oliver and leave it for another few months to finish stuff up later. In other words, it was a real pain for Oliver, and it tried everyone's patience, especially ours, and there were mistakes and miscommunication and missed deadlines, etc. However, we truly appreciate everything they did and in the end we have a great trailer. The irony is, that apart from one, maybe two of our modifications, I think it all probably could have been done faster and better if it just went through the line with normal options and then modified later on in service. And if anyone were to ask, that's what I'd say try to do anyway. Or, better still, do them yourself, which is what these kinds of threads are all about. Many of the things we had them do, I think now I'd rather have done myself anyway. At the time, it was too overwhelming for me to imagine doing them, but now that I've started to cross things off the list, the rest seem less daunting. But things like this counter extension I've essentially redone and so with 20/20 hindsight, there was no reason to have asked for it. Eventually there will be enough Ollies out there and coming off the line that I think some enterprising soul will have enough potential customers to open up an Ollie customization business. I could also see Oliver doing something like spinning off and expanding their service department into a customization business like that. That's what I've told them they should do at least.
- 47 replies
-
- 2
-
-
- counter
- counter extension
- (and 2 more)
-
Composting Head - No need for Black water tank
Overland replied to BackofBeyond's topic in Ollie Modifications
I need to correct myself on that - the hole I was thinking about is in the fiberglass floor, but on our trailer at least, there's no hole in the tank itself. The black tank is, however, already connected to the drain, which in turn is connected to the grey tank drain, so it seems like there might be a hygiene issue there to deal with. -
The paper towel holder is this one. We really like it - it has a spring that keeps the roll from unrolling while traveling, which also gives it just enough tension to make it easy to rip of a sheet one handed. The nets I'll need to take some photos of and post about. It's a simple mod that has really helped out day to day organization. We have them over the front door, over the beds, etc. I'll see if I can take some photos and maybe put them into the Snowball thread later today.
- 47 replies
-
- 5
-
-
-
- counter
- counter extension
- (and 2 more)
-
Also, where are the photos/video of the shell being moved onto the new frame? That's something I want to see!
-
A big thank you to Steve and Tali for the detailed explanation. Sounds like the failure is about what I expected. As I posted earlier, I saw and immediately recognized Outlaw when I went to pick my own trailer up from service. The steel braces were pretty obvious so naturally I had to inspect. I wasn't going to post about it on my own, for the reasons above and because I thought it was Steve and Tali's business to bring it up if they wanted. But once the photo was posted, I figured the cat was out of the bag, and so I asked. Having seen the damage in person, I'm in full agreement with Steve and Tali on the cause and the no call for alarm. It was clear to me that the problem was unique to their trailer, or perhaps to the first batch of early trailers, if they have similar frames. Being able to stand there and see both frames side by side, you immediately recognize that they're two different animals. Steve mentioned the longer tongue, but also the aluminum tubing is sized differently and the joints lack the same gusseting that our frames have. And the steel subframe is larger as well. Even the welds were different. With a longer beam (tongue) you get more deflection for a given load, and more deflection means more stress on the beam over time which, especially in aluminum, can lead to eventual metal fatigue and failure. But that's only if you exceed the limits of the material. DeHaviland Comets would break apart in mid air, but we still fly around in aluminum framed jets because they learned how do design out the weaknesses. I think the current frame is far more robust than the original and I'm personally not worried that mine's going to snap anytime soon, if ever. I didn't post the photo that was removed, but I did take a bunch for myself, simply because the repair job was so excellently done that I wanted photos to be able to show a repairman, should anything similar ever happen to us. Which I don't expect to happen. However, I am glad that this did become public, because it is potentially a catastrophic failure, and unlikely as it may be, I think people should add a frame check to their list of annual, or pre-trip maintenance checks. In the unlikely even that this should happen, you want to catch it early. I guess there's no way of knowing how quickly those cracks propagated through the frame, but since there was no evidence of any bending, like you'd see if it happened suddenly, I suspect it took some time. Had it been detected earlier, perhaps some less comprehensive repair could have been done. Anyway, you guys all know by now that if I have a problem with Oliver or the quality of any part of their trailers, that I am immediately here voicing my concern. This obviously was a big failure, but it didn't make me concerned. My take aways were this: 1) Inspect the bottom of the A-Frame at least once a year and probably before every major trip to check for possible cracks. They'll start at the bottom and work their way up, and would probably be located near one of the welded joints. 2) Think twice about placing a really heavy load permanently on the tongue. This is subjective, but I personally don't know if that's a good spot for heavy generators, water, fuel, etc. It may be perfectly fine, but that's my take. Especially if you also have the larger propane tanks. 3) Be wary of any modifications that would require drilling into the frame in that area. 4) in the very unlikely case that your frame does develop a crack, Oliver will take care of you.
-
If I'm lucky, I have one more project that I can finish tomorrow and then we're headed to Land Between the Lakes Friday morning for a short weekend trip. They have dispersed camping throughout, a few nice hiking trails, and plenty of other things to keep us busy. Hopefully the weather will be nice.
-
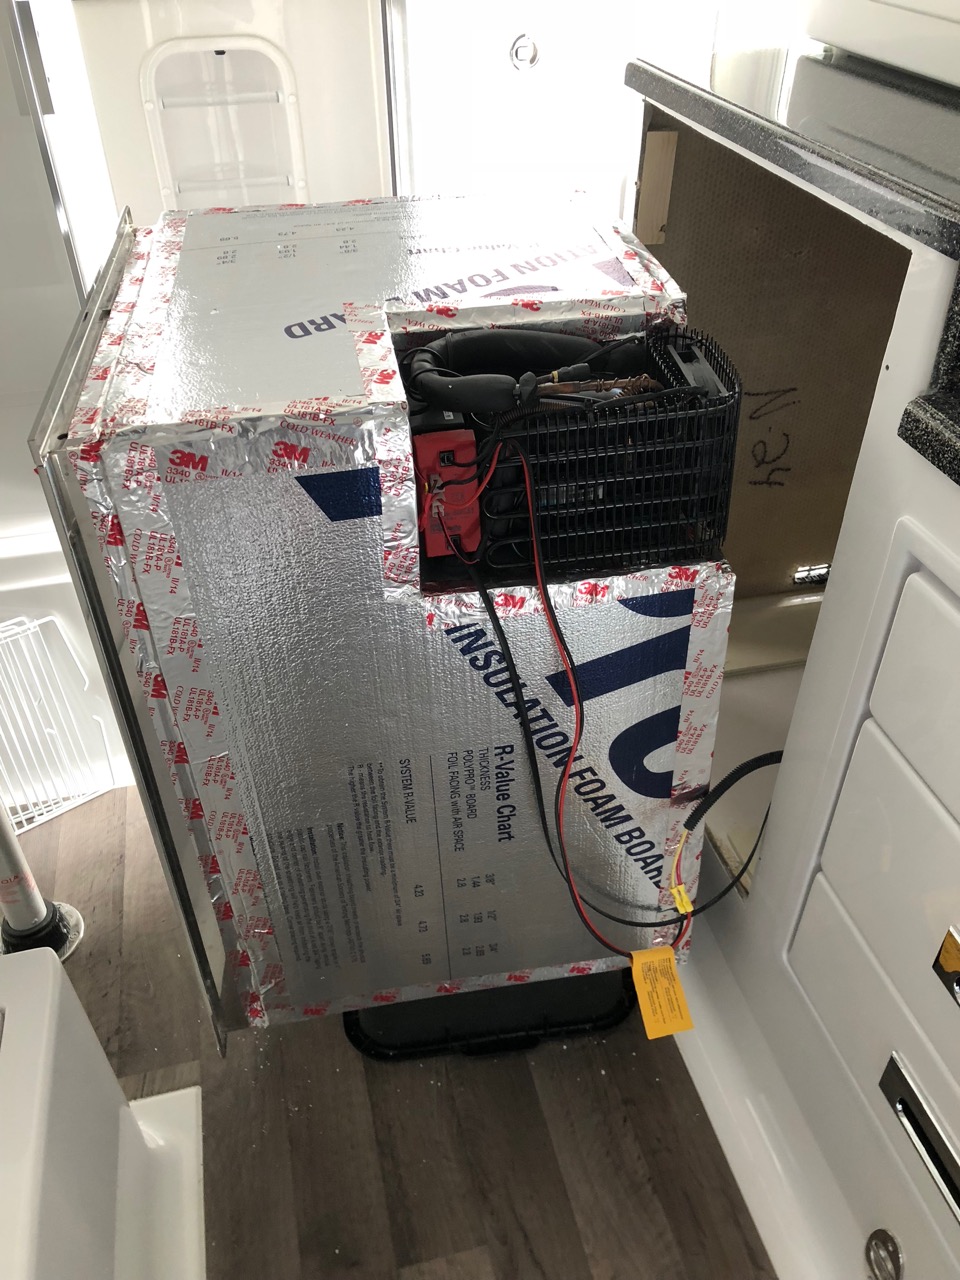
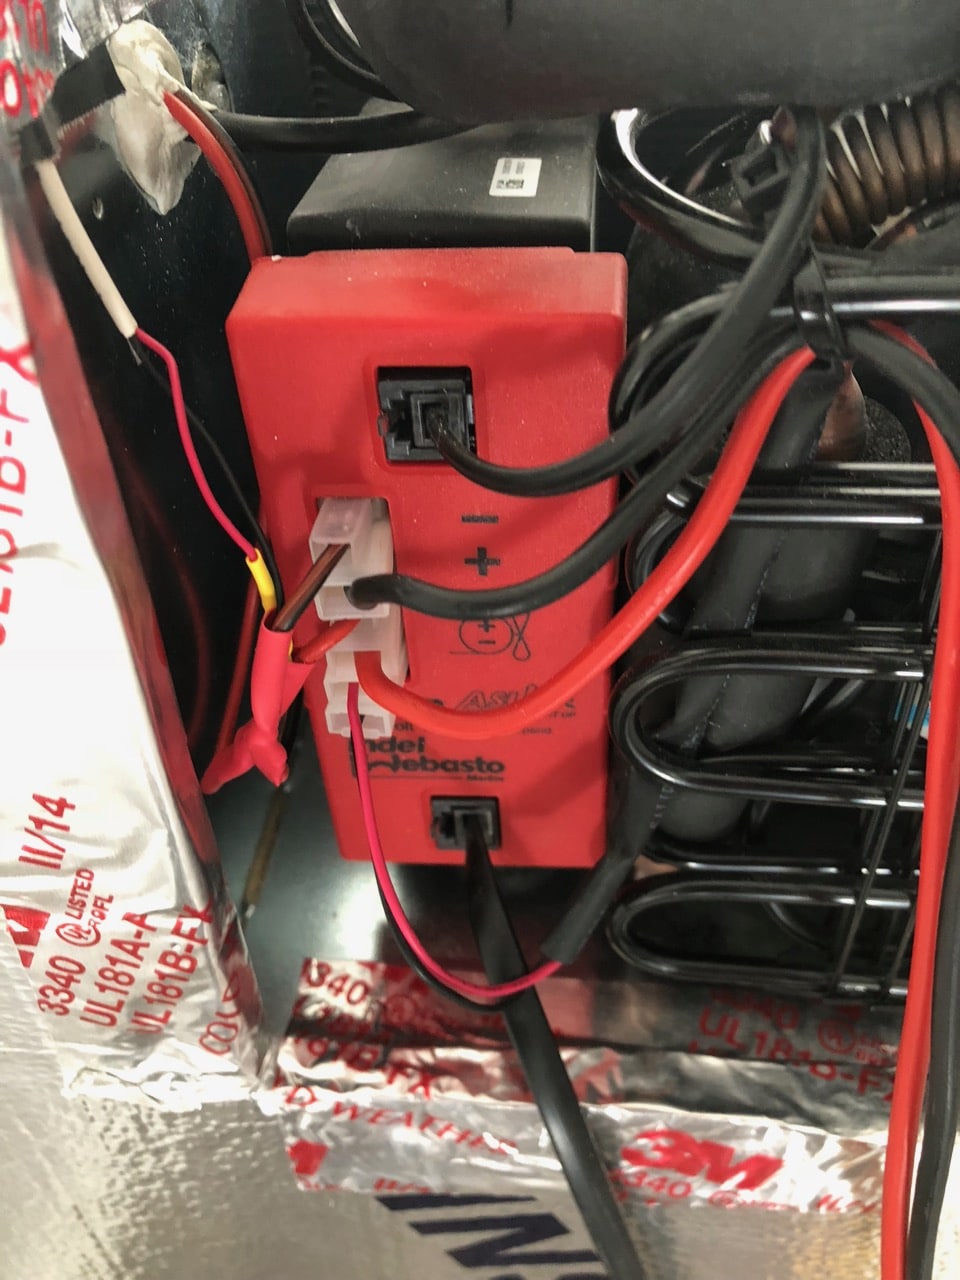
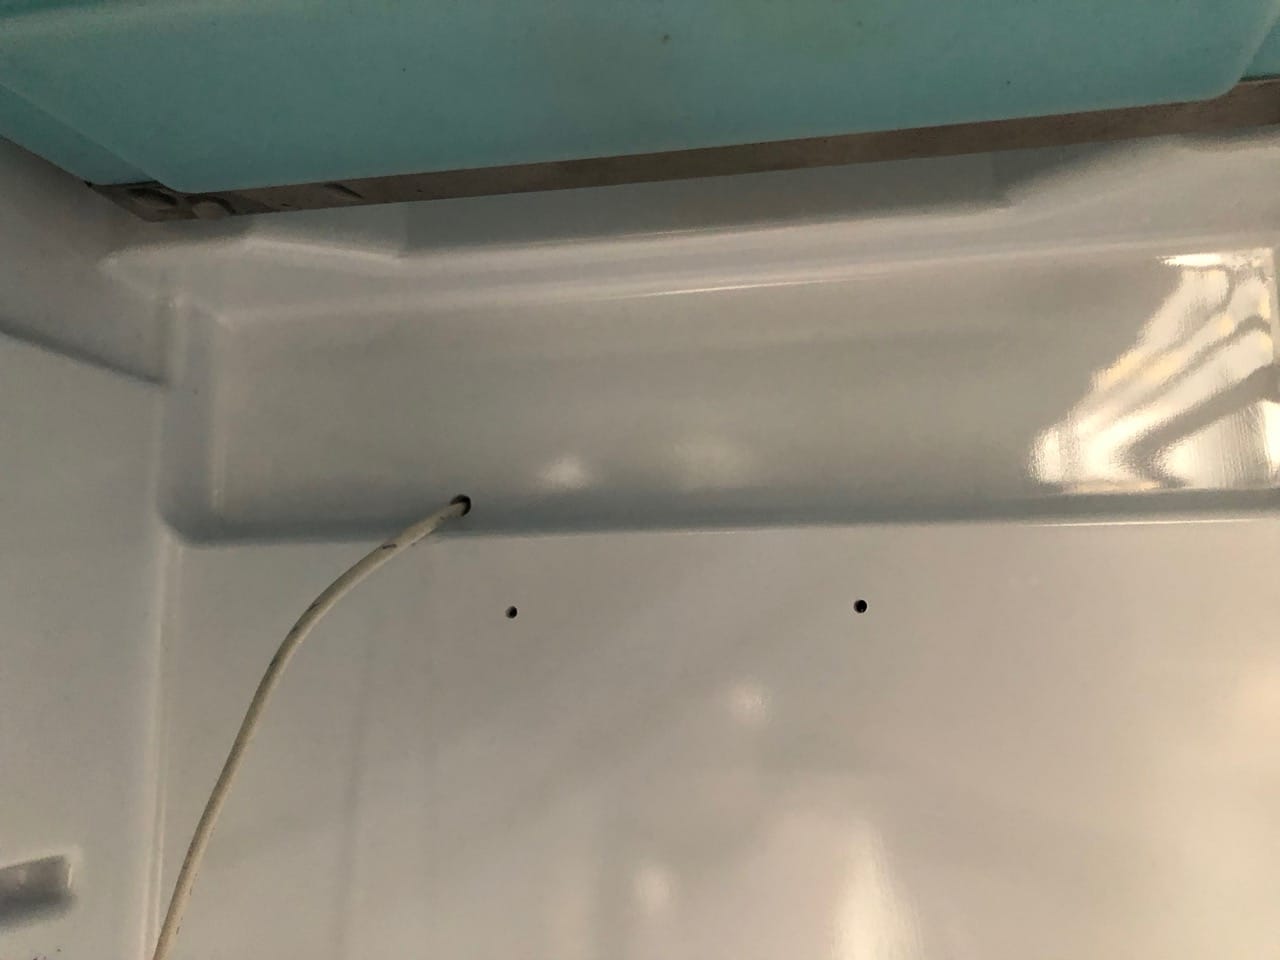
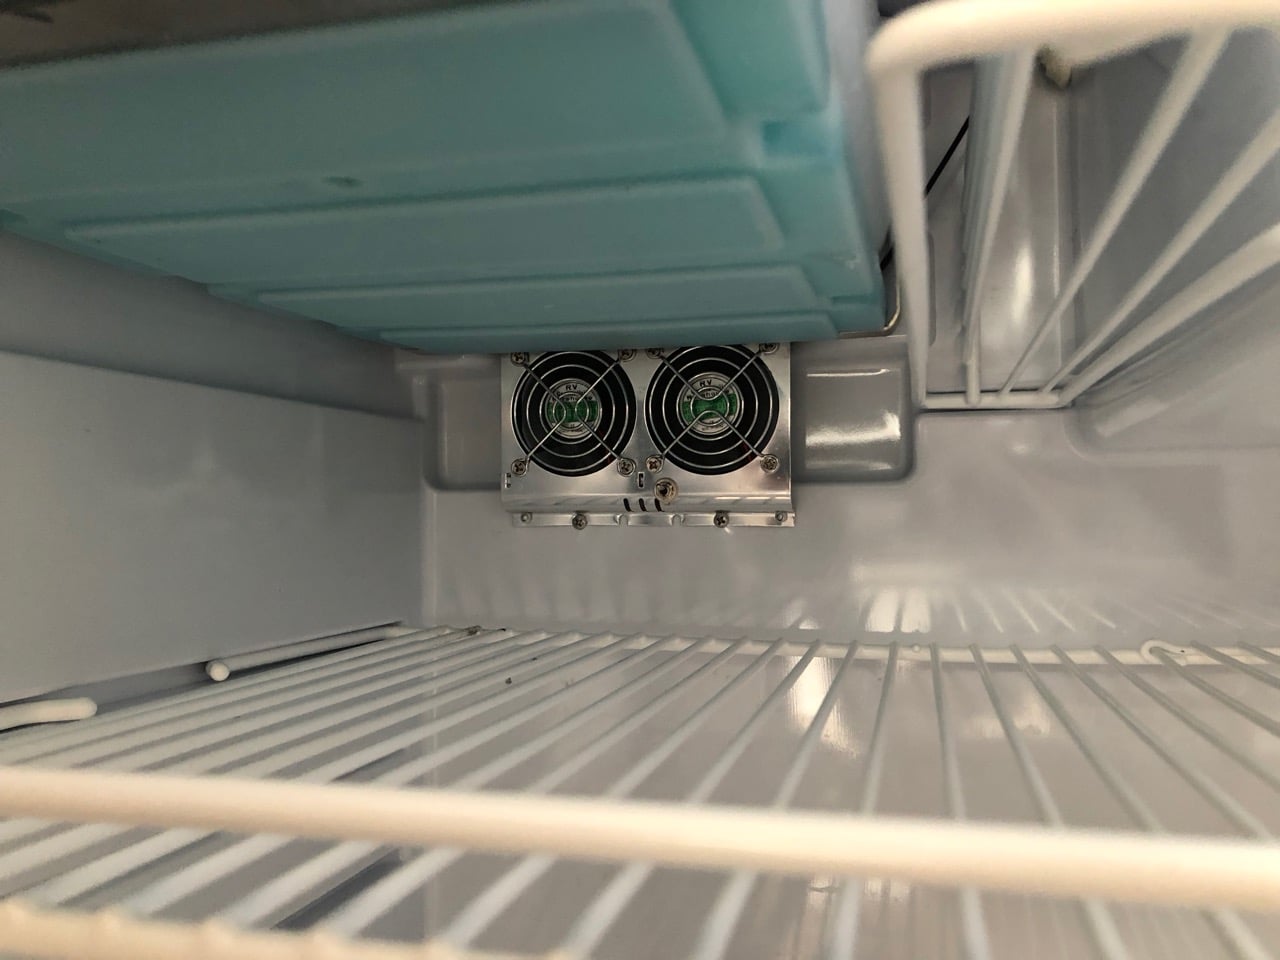
I posted a while back that we were having trouble with cold spots inside our Isotherm fridge. Basically, stuff under the freezer on both shelves would freeze more often than not. So I decided to add a fan just under the freezer to circulate the air. We'll see how it does. This is the fan I got - seemed much nicer than anything else I could find. It has two fans and connects directly to the 12v supply. You can keep the wiring in the fridge and connect to the light, if you have one, or if you don't, or don't want wires cluttering up your fridge you can do as I did and drill through to connect directly to the DC supplying the fridge. I drilled straight through the back behind the fan, ran the wire and caulked both sides. I tapped in to the DC fan supply on the side by the compressor. I had to flip the fans around in the housing since the fan kit is designed to blow into the fins on a dometic fridge. The fan has an on/of switch and seems to draw about 0.1 amp. You can hear it pretty well when you have the door open, but is completely inaudible with it closed. The fan isn't super strong but you can feel the air coming off of it even at the front of the fridge. I decided while I had the fridge out to add a layer of insulation all around. 1" in the back and ⅜" on the top and sides, which is all that would clear the cutout in the fiberglass. It was a tight squeeze even at that. I also spotted a couple fins on the coil that were touching the top of the fridge, which were probably what was causing an occasional buzzing, so I bent those back and generally made sure everything was rattle free. Drilling for the DC power - This is the ASU module on the side of the fridge where I tapped in to the DC. The wire with the white insulation sticking out is to the fan. The yellow bit is an inline fuse that comes with the fan. Not particularly convenient if it ever blows. All wrapped up in insulation. Cut the bejeezus out of my finger on that aluminum tape - And the finished product. I was fortunate that there is that little scallop in the fridge liner right where I wanted to put the fan. Otherwise I'd have had to block it out for airflow. Two screws hold the bottom, and the top is fixed with my favorite 3M 4200 since I didn't have access for screws. A little 4200 on the screws as always to hold them tight -
-
lol, true.
-
So, I remeasured and it's actually 12" from the bottom lip of the counter. I've edited the post. On ours, that leaves about 6.5" for a mattress. Our current mattresses have pillow tops that put them over that, but the extension will still scoot past them. We're swapping out for cushions now that were doing the Lagun Table (next project). I'm having them made 5" thick so no problem for us, but I knew it would be for others. In the closed position, it takes up right at 2" of bed space. I suppose there's nothing stopping someone from putting the extension from Oliver on a table saw and cutting it down to whatever size worked. It would just leave a rough edge that you'd have to sand down and polish. A lot of work, but not impossible.
- 47 replies
-
- 3
-
-
-
- counter
- counter extension
- (and 2 more)
-
Well, it's more an idea - they'd have to check first to make sure they're strong enough for the concentrated load of one of the jacks. Jason thought they'd be plenty strong, but you never know until you try one.