Overland
-
Posts
3,835 -
Joined
-
Last visited
-
Days Won
212
Everything posted by Overland
-
Looks like a great spot and I love the videos. One of our next trips will be Washington and then either down along the coast or up into BC. I'll have to hit you up for camping locations before we go.
-

Cabin pressurization system to prevent dust infiltration.
Overland replied to John E Davies's topic in Ollie Modifications
John, I like this project but I'm surprised at the amount of dust you're getting inside. We've had the outside of our truck and trailer caked in dust but never anything inside. Not even a film of dust on the counters, and even between the hull our trailer has stayed remarkably clean so far. We track all sorts of things into the trailer while camped of course, but that's a different issue. I'm wondering if the difference is our lack of fridge vents? I can't think of anything else different except I know at one point Oliver changed windows but I think that was before yours. -
Awning Parts available (free to a good home)
Overland replied to wdw0528's topic in Mechanical & Technical Tips
Related to this post, our Carefree awning weathered a hail storm last week outside Grand Teton with no issues. I'll try to do a post this week with some pics on how I've modified the awning and how I tie it down for the weather. But yeah, those little orange clips are going to be a constant headache for all of us with the Carefree. I've also broken off one of the metal tabs on the top joint of one of the arms by twisting it before I got it fully extended and that seemed to break off way too easily. -
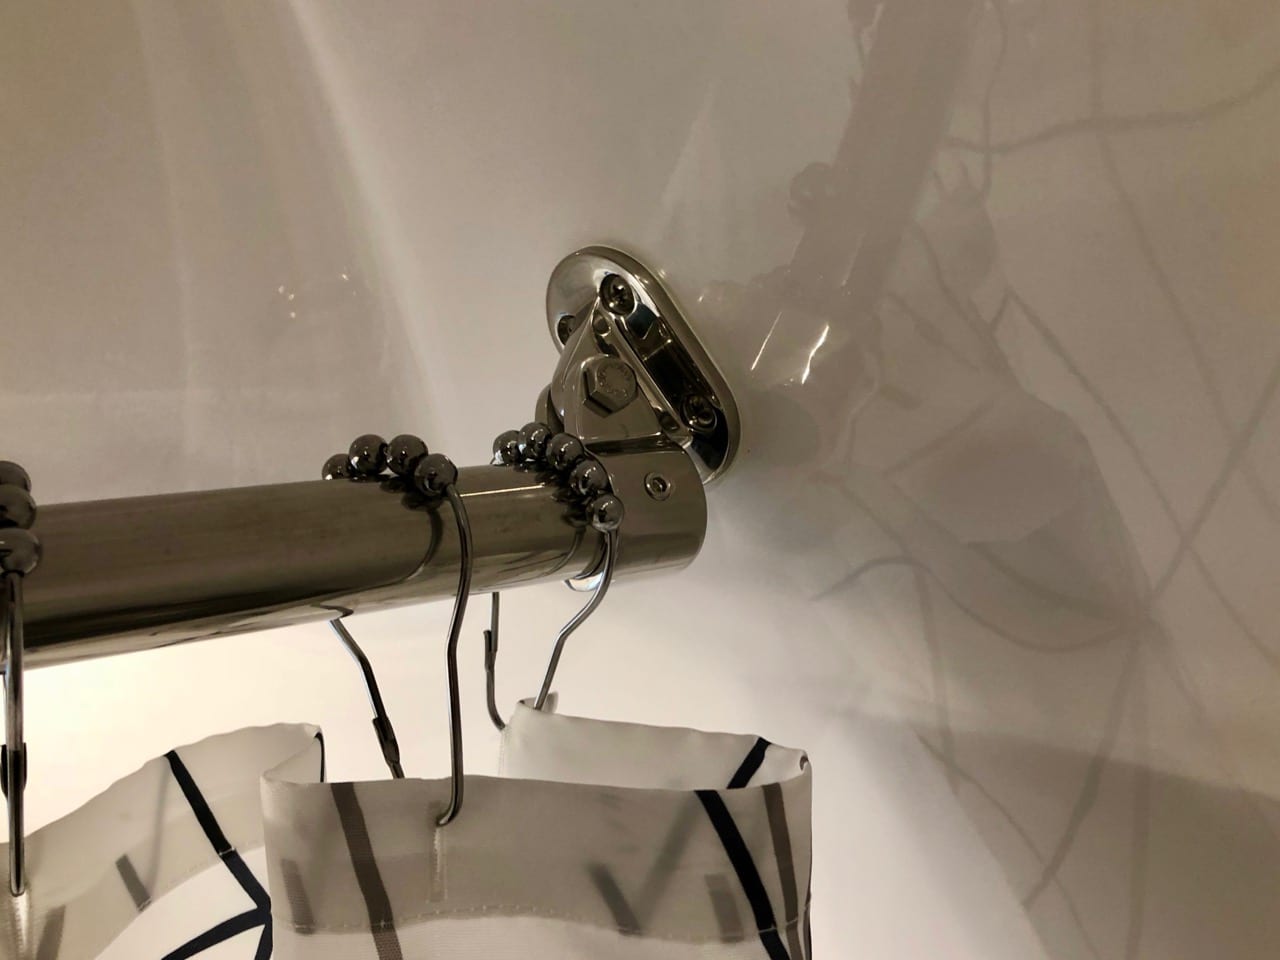
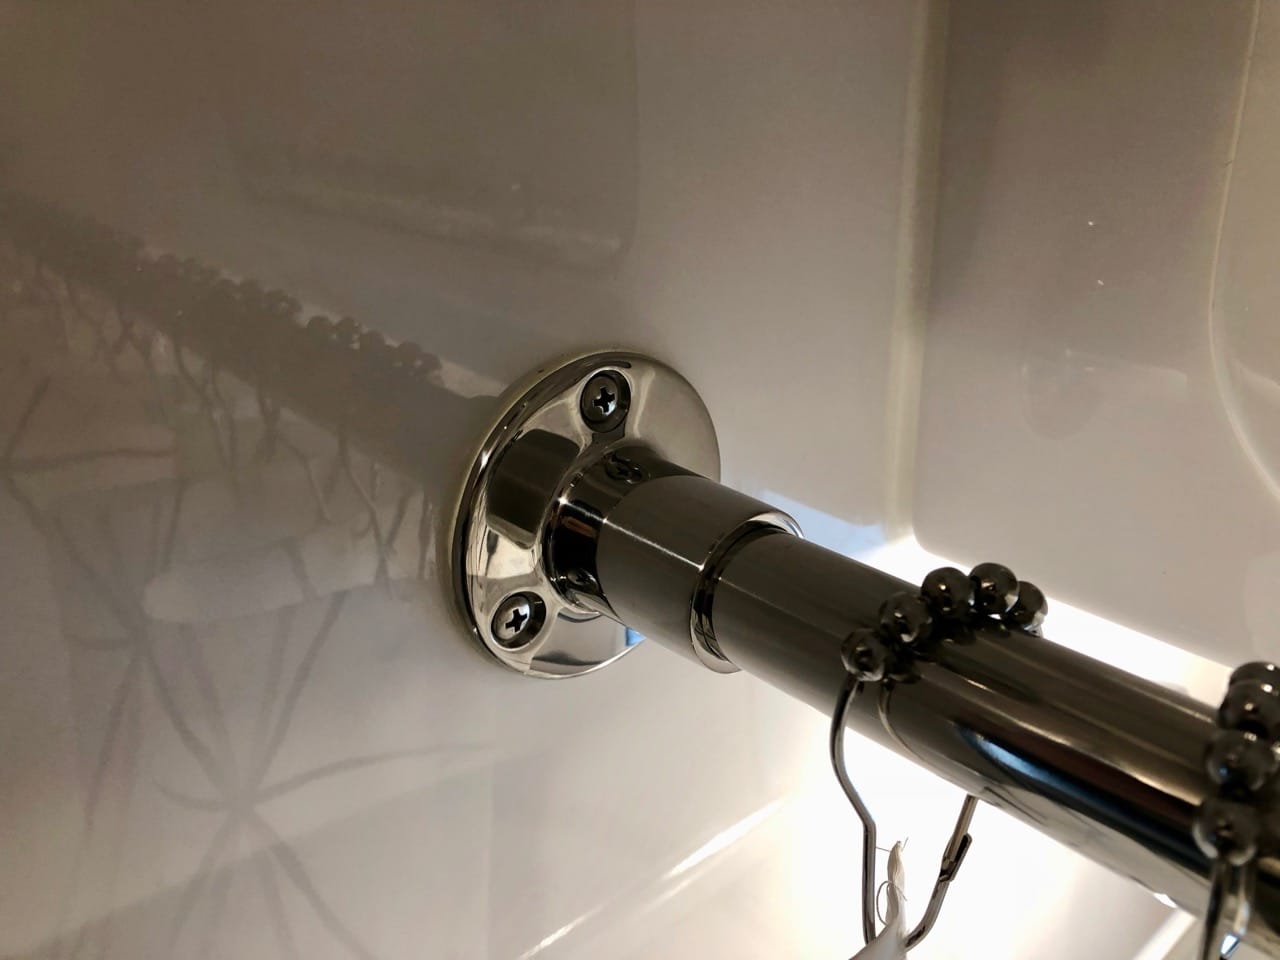
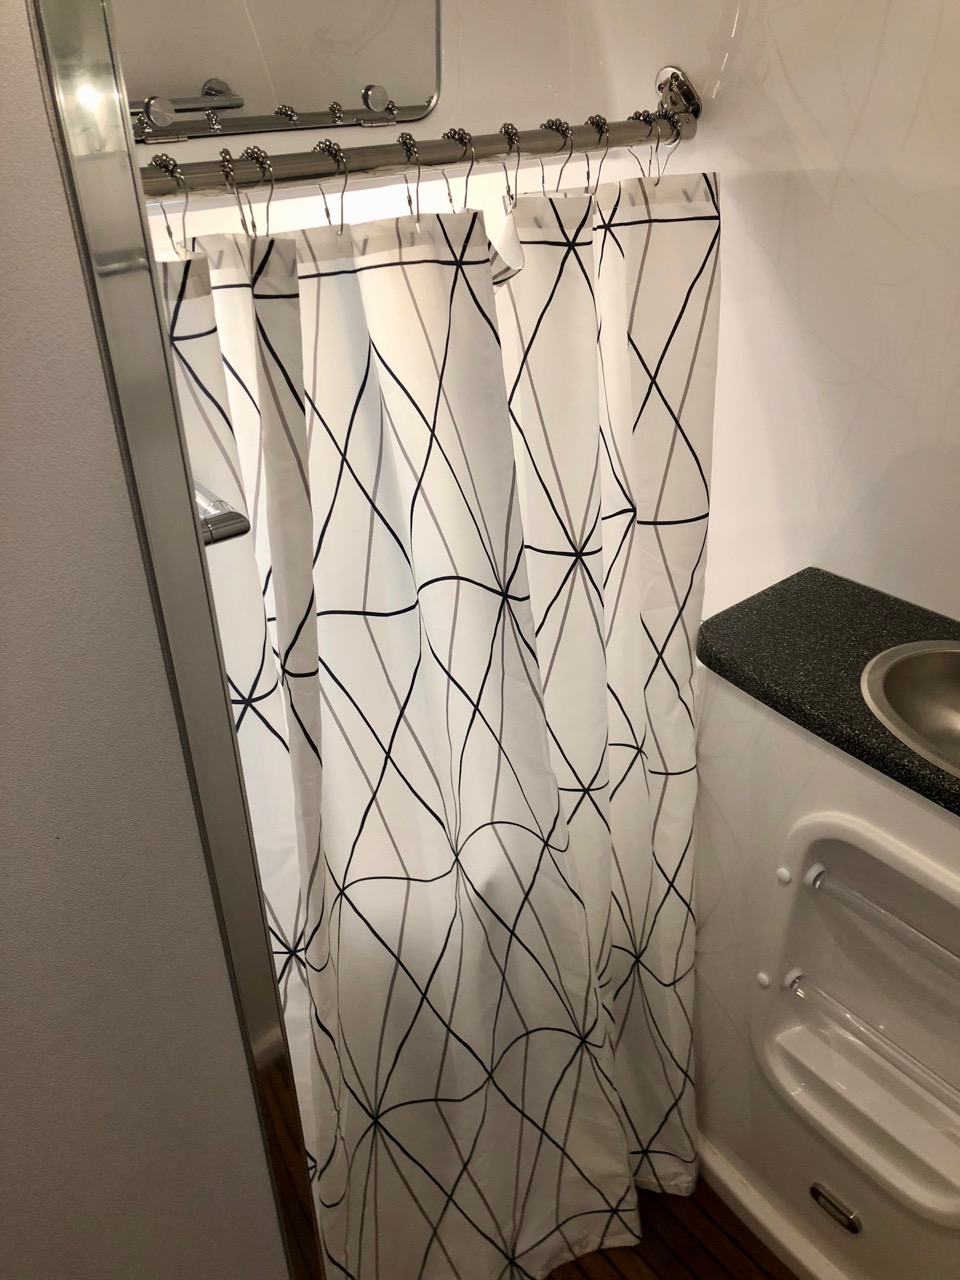
We asked for the one in front of the toilet but Oliver gave us the one over the door by mistake. So I ordered the parts and installed it myself, and now we have both, lol, though the one over the door just get used as an occasional towel rod. It wasn't hard, but I did have to do a lot of eyeball work to get it lined up just so against the curved front wall. I put mine higher and in front of the cabinet to give more headroom over the toilet and I lined it up with the bottom of the cabinet door so that when open the door sits on the rod at 90° and acts as a shelf. Very convenient. The curtain keeps the toilet area very dry, with just a little splash around the sides.

-
We've used ours I think 4 times when we couldn't outrun the weather. Generally we plan our destinations and trip timing for cooler weather - my philosophy is that if it will be too hot to sleep at night without an air conditioner, then it will surely be too hot during the day to do anything outside. I hate the noisy thing - but when you need it, you need it.
-
Yikes. Even knowing how badly built those things are, that video was a shock.
-
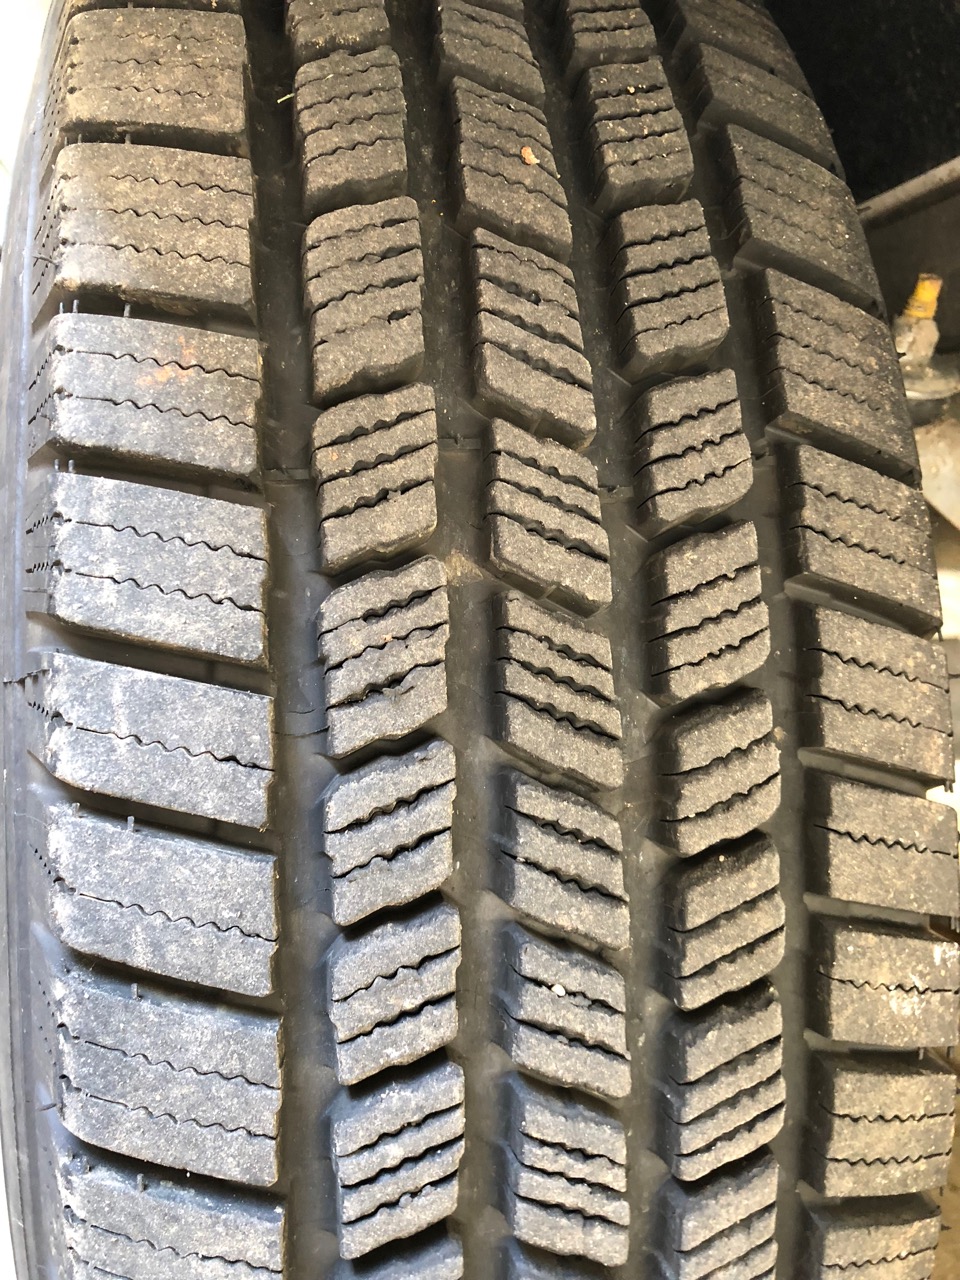
Just finished a 5k trip and on my post inspection noticed this tire wear, same on all four tires. I've never seen this before, except perhaps something similar on some all terrain tires that had seen a ton of gravel roads. I've driven some gravel roads, but I didn't think enough to see this sort of damage already (the KO2's on the truck are worn but even). I'm wondering if this is caused by scrub or maybe excessive braking? Anyone else have this kind of chunking on the center treads? I have 12.5k on these tires now.
-
John, that seems really unusual. I've got 12.5k on my trailer now, and it's seen it's share of rough roads, but the worst I can say about my shocks is that the front ones have a ton of road rash and corresponding rust starting to form on their front sides. No leaks at all.
-
Looks like it was a great time, and I'm sorry we couldn't make it. Hopefully next year. Congrats to all the organizers on a successful event. That tongue mounted bike rack looks interesting. I'd love to see some detailed pics of that.
-
I worry more about stuff like this and petty campsite theft, much more than anyone actually trying to haul away the trailer. My hitch uses two pins, so I had eTrailer make me two with matching keys (and a third for a backup), more to protect us from mischievous kids than from theft. The only thing I don't like about theirs is that the pins don't have a hole for a pin clip to hold them in place in case the lock fails. I'd love to find some longer ones with both a groove for a lock and a hole for a pin clip.
-
I like it. How easy is it to break down and store?
-
Thanks for the info. I'm hoping that we can spend time in the Dakotas on the way back. Teddy Roosevelt is definitely on the list. The original plan was to hit some of those places on the way up and then catch what we missed on the way down, but since we're going to yellowstone first, we'll have to do whatever we have time for at the end. There's always another trip. But the Corn Palace is right up my alley - I do like that the resident High School team is called the Kernels.
-
I'd just get a twin bed set from the store. You'll have to tuck a little bit more, but frankly, the 'correct' sized sheets that we got from AB Lifestyles aren't anything to write home about. The top sheet is very narrow - more like a ribbon than a sheet. Pretty useless, actually. And the material is O.K., but nothing special. We've kept the fitted sheets on to keep the mattresses clean, but just use sleeping bags on top now.
-
Composting Head - No need for Black water tank
Overland replied to BackofBeyond's topic in Ollie Modifications
Yeah, carrying a giant bottle of urine to a public toilet isn't a glamorous affair, but you get used to it. I believe the toilet already has a flap of some sort so as long as the line to the black tank is fitted to the urine tank, it shouldn't vent any differently. I think the trick would be fitting a disconnect of some sort since you have to remove the toilet in order to empty the compost. Perhaps a short length of rubber hose that could be pulled off would be the way to go, or maybe garden hose fittings would work. I say go for it. -
Speaking of loose plans, I was able to nab four nights at Yellowstone on the 15th - 19th so I guess we go there first.
-
We're going to do an early spring trip up to Glacier and maybe Banff (yes, we know it's a month or two too early for that but we like the cold), and we're taking any and all advice for good boondocking spots there and along the way. We're thinking we'll go nonstop up to Sioux Falls and across to Badlands, where we'll start our camping. Then over to Butte and head north to Glacier and Banff. On the way back, we may head over to Teddy Roosevelt NP first, then back down to the Badlands area to pick up anything we passed by on the way up. We're taking off in a couple of weeks and will be out for three. Our plans are loose, as always, so any advice on cool places to see around those areas would be greatly appreciated.
-
RV Related Podcasts & Camground Reviews
Overland replied to DeanCHS1980's topic in Campgrounds & Parks
Looks like a nice spot - was the campground crowded? We boondocked there last weekend and there didn't seem to be much traffic. Mostly turkey hunters and people headed to the offroad park. -
Anybody getting Notifications for Private Messages?
Overland replied to John E Davies's topic in Getting Started
What about the notification on the board itself though? There used to be a red bell in the lower right if you had unread messages and that disappeared at some point. -
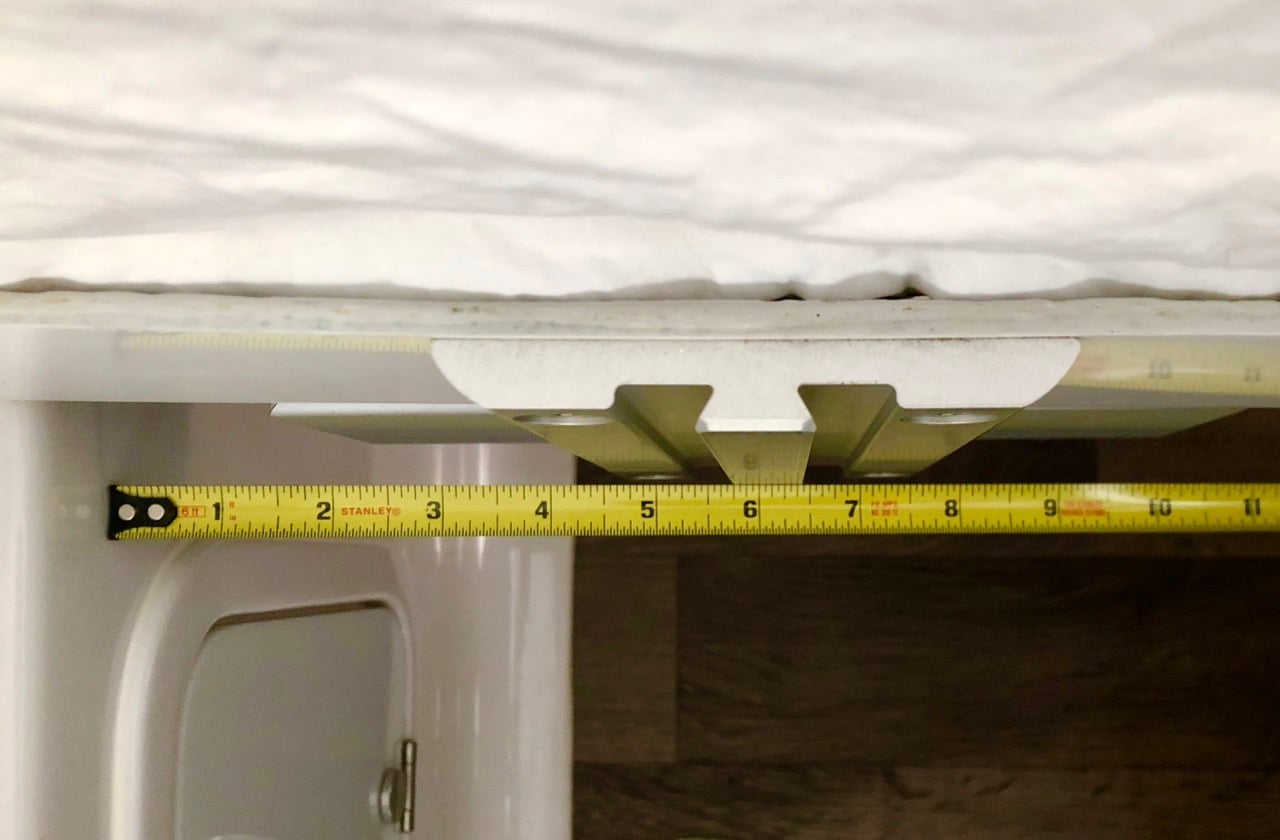
Lagun Table Side Mount Retrofit in Twin Bed Elite 2
Overland replied to Overland's topic in Ollie Modifications
Here you go, looks like about 6 ⅛".
-
Anybody getting Notifications for Private Messages?
Overland replied to John E Davies's topic in Getting Started
Makes sense, since I never log out. And I don't know how it determines an active user, but I typically keep the forum open in a tab somewhere. I should probably stop that - I've got 86 tabs open in Safari right now and that probably isn't good practice, lol. -
Lagun Table Side Mount Retrofit in Twin Bed Elite 2
Overland replied to Overland's topic in Ollie Modifications
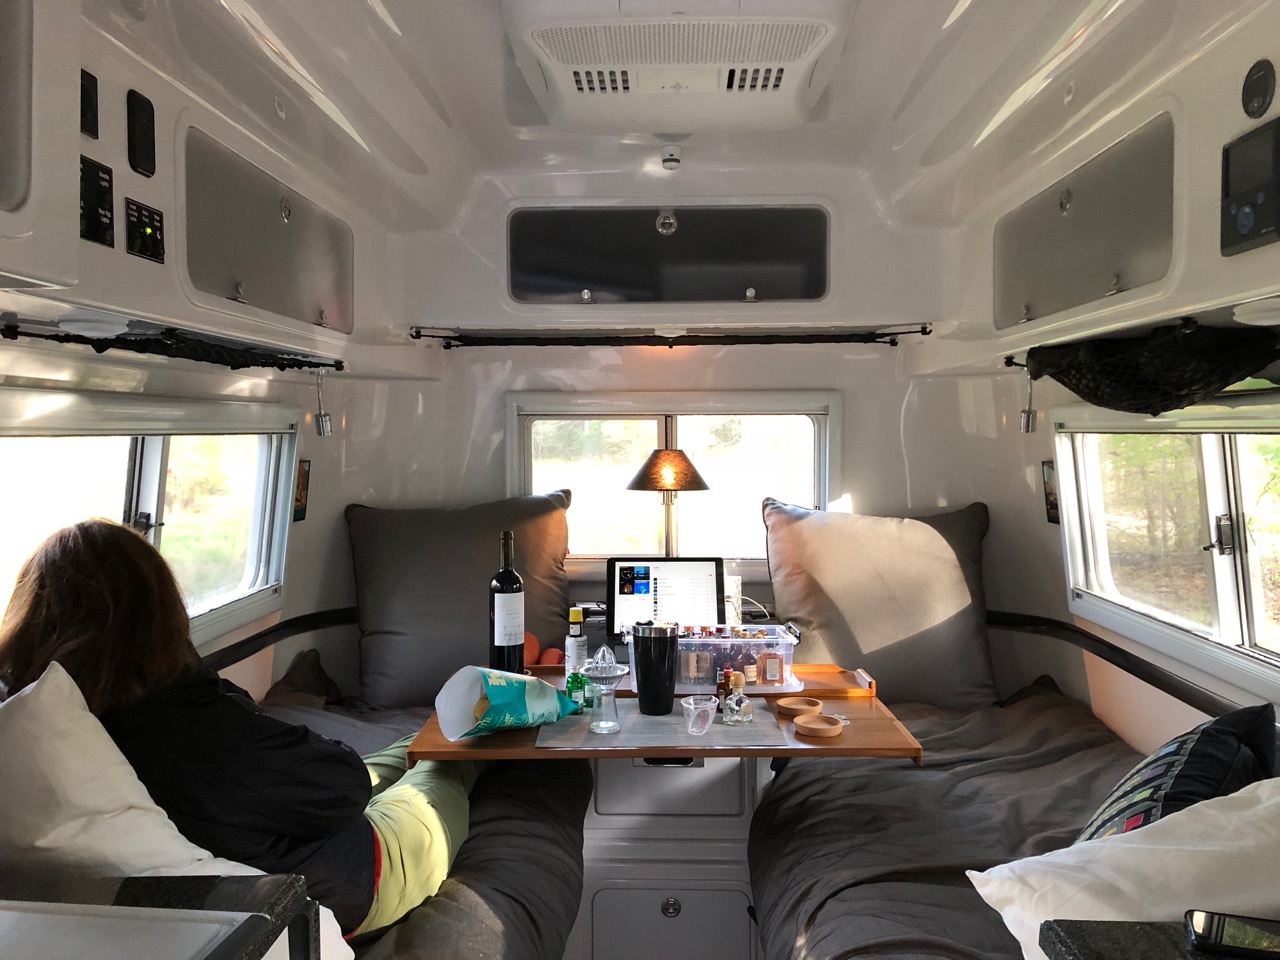
Can do - hopefully later today. If all you want is to center the table then the location of the mount isn't all that important, since you don't need to mount the table top in the exact center of the pivot. You'll actually get the most versatility out of the table the farther off axis you place the top. That way you can spin the top around for different positions. I'd concentrate more on keeping the leg as far out of the way as possible. Of course the closer to centered you mount the top, the more stable it will be. You'll have to experiment. How I set mine was to clamp the mount in place in different positions while experimenting with the placement of the top. I was hoping to get a position that would allow me to turn the table sideways so that it could be used as a desk over the bed for someone leaning against the pantry. I couldn't get it that far forward without the leg getting in the way (maybe it will work with some extra pillows as support), so I settled on a position that allows it to center in front of the nightstand lengthways when open, and crossways when closed, so that it could be used at 'bar height' with plenty of room in front by the beds. Here's an action shot of the table in full cocktail bar mode - And, uh, we don't really drink that much. I just like to be prepared, you know.
-
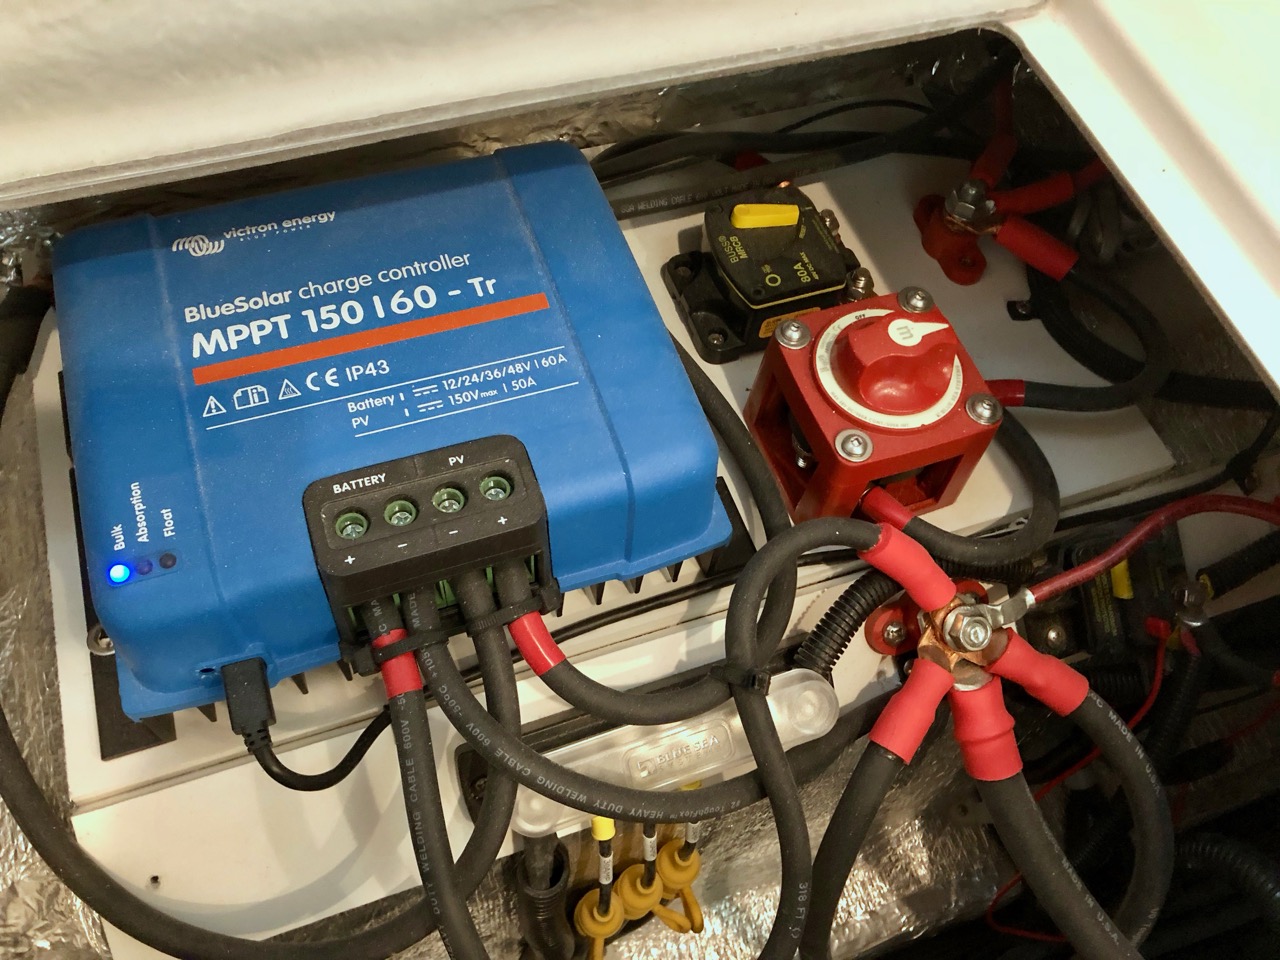
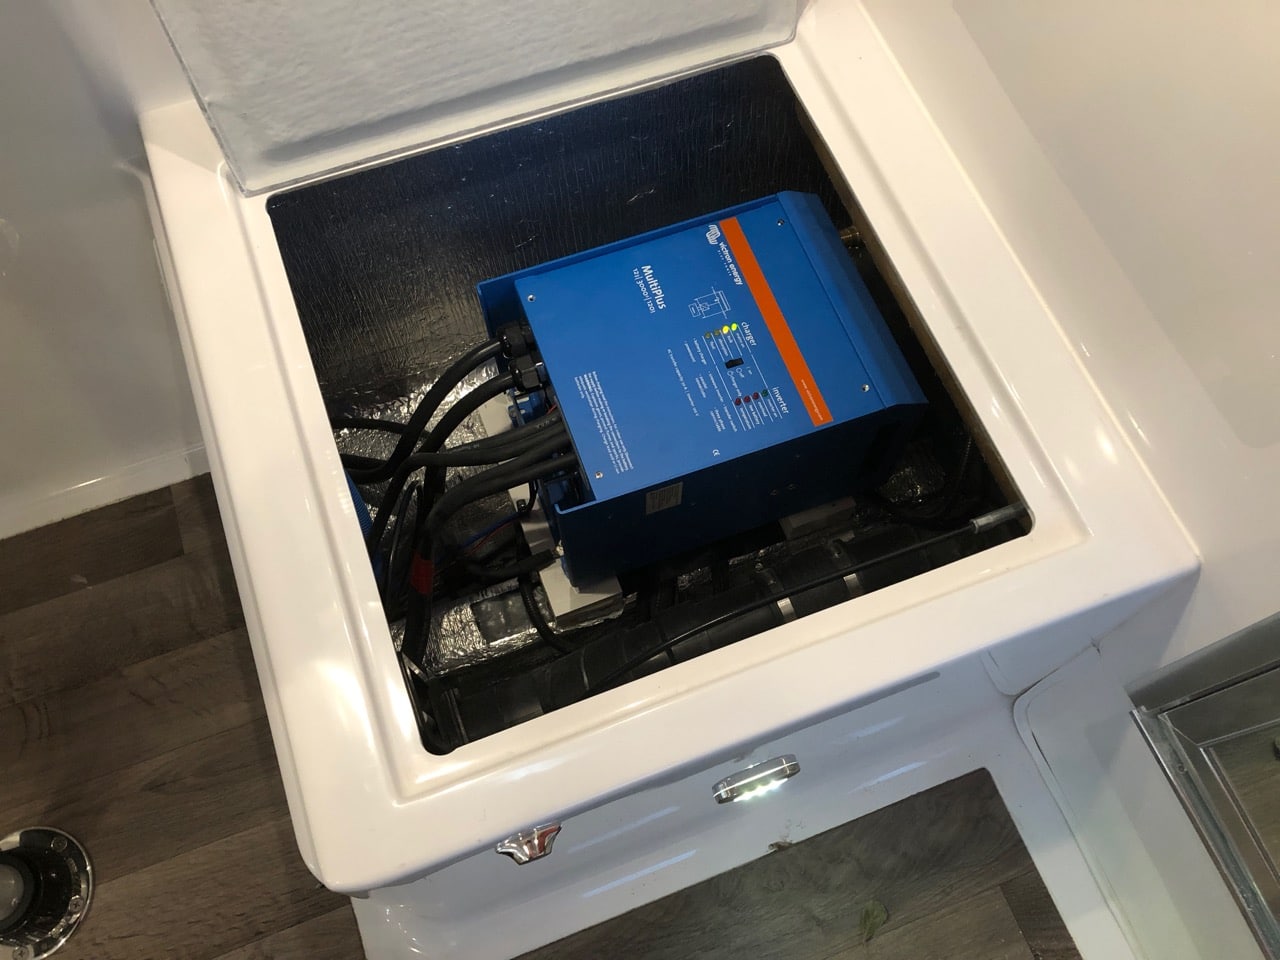
Starting a new thread since the other one seems flaky. This is mostly for Mike since I can't figure out how to send photos via PM. I'll do a big post on my electrical setup someday, after I've redone a few things and added a different hookup for my portable solar. Mike, this is the inverter itself, mounted under the dinette seat by the bath. You have to run pairs of + 12v, at least 1/0 AWG, in and out and also 120v both ways. And a ground strap to the case, so that's 7 large cables plus a coms cable and a temp sensor wire. I ran the 120v along the side and the 12v, ground and and coms through the trough under the dinette. I plan to pull the inverter and screw down a plywood base to secure it better, though it seems fine as it is, screwed into 2 layers of PVC. One thing I do want to do on this end is to install a manual transfer switch for the 120v, in case something ever happens with the charger. [attachment file=IMG_0078.jpg] The inverter has plenty of space for airflow in there. The only time I hear the fan is if I'm really loading it to the max, or if it's really quiet in the trailer when I just plug it in and it's bulk charging the batteries. This is the 12v + side, under the street side bed. Solar comes in at the top right, + goes to the combiner post, then to the cutoff, then though an 80a breaker, then snakes around into the charge controller. + out goes to the combiner post on the lower right, as does the twin + 1/0 from the inverter and the 4/0 + from the batteries, as well as Oliver's cable to their + bus. The bus bar and breaker on the small angled PVC panel are both Oliver's. I moved them a bit to get the post on there but otherwise, I tried not to touch anything on Oliver's side of the electrical. The battery + goes through a cutoff and a 400a fuse first, which are mounted out of sight on this side of the battery box. Solar negative goes around the back of the charge controller onto a combiner post that's hidden, then around the left side and in. Negative out goes down the open space in the hull to the terminal in the next photo. When I redo all of this, I'll add a much larger plywood base, swap the main combiner post for a bus bar, move the battery cutoff and fuse to the board for easier access and generally tie everything down better. Negative connections are kept away from the + on the dinette side of the battery box. Battery - goes into the shunt for the battery monitor, then I have the charge controller coming directly off the shunt and a short 4/0 jumper to a combiner post. Off that goes the twin 1/0 from the inverter, the ground from the inverter, and Oliver's - cable which goes into their distribution box. I removed the charger unit from their box so it's just a fuse and breaker box for me now. I'll redo this in plywood, swap out the combiner post for a bus bar and secure the wiring better.
-
Anybody getting Notifications for Private Messages?
Overland replied to John E Davies's topic in Getting Started
Any chance of this getting fixed? To see if I have messages, I have to go to my profile and click on the messages tab to see if I have any. I don't get any visual clue on the board and no email notifications even though I have them turned on. -
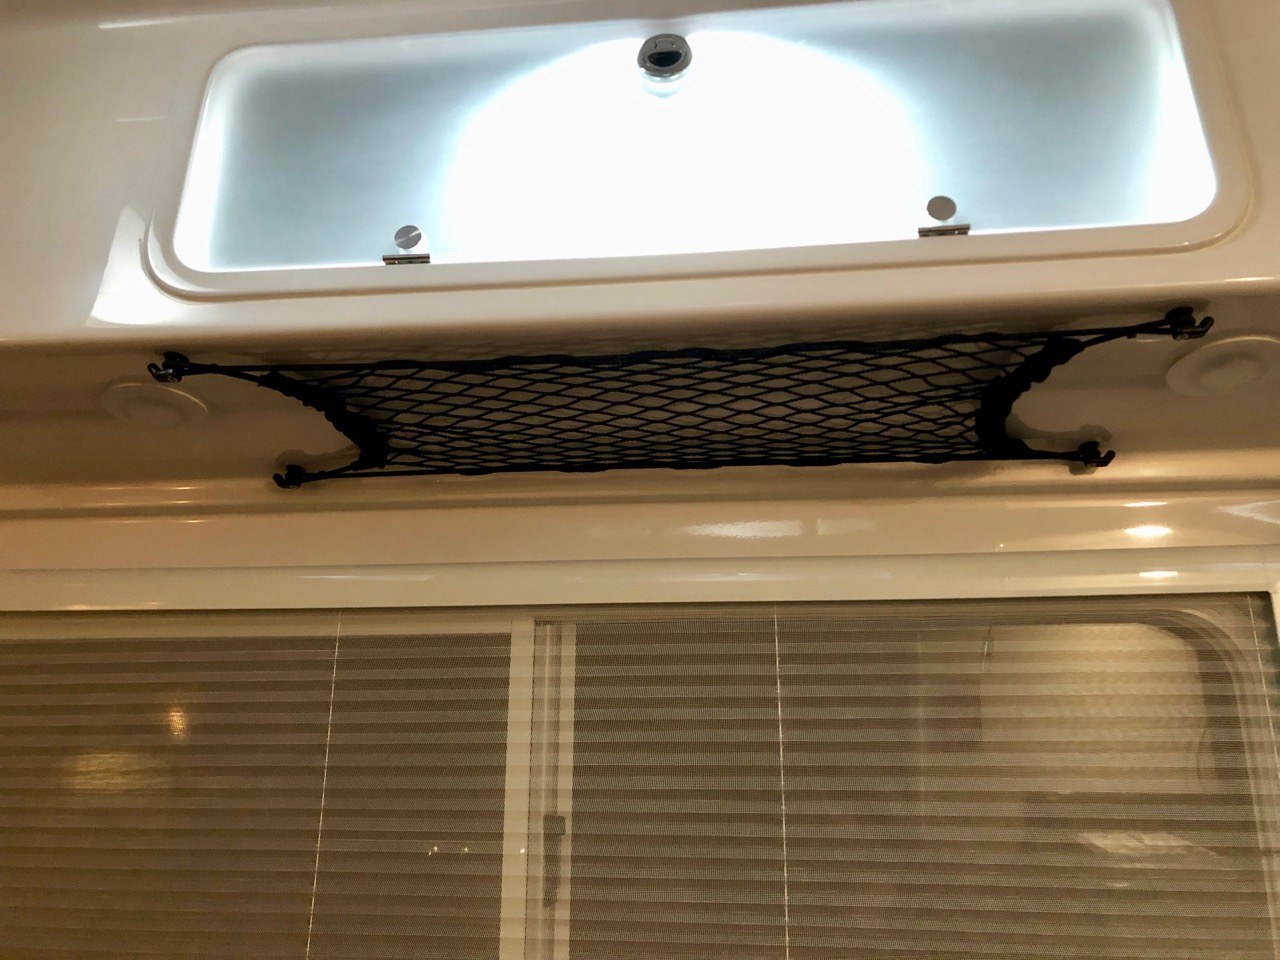
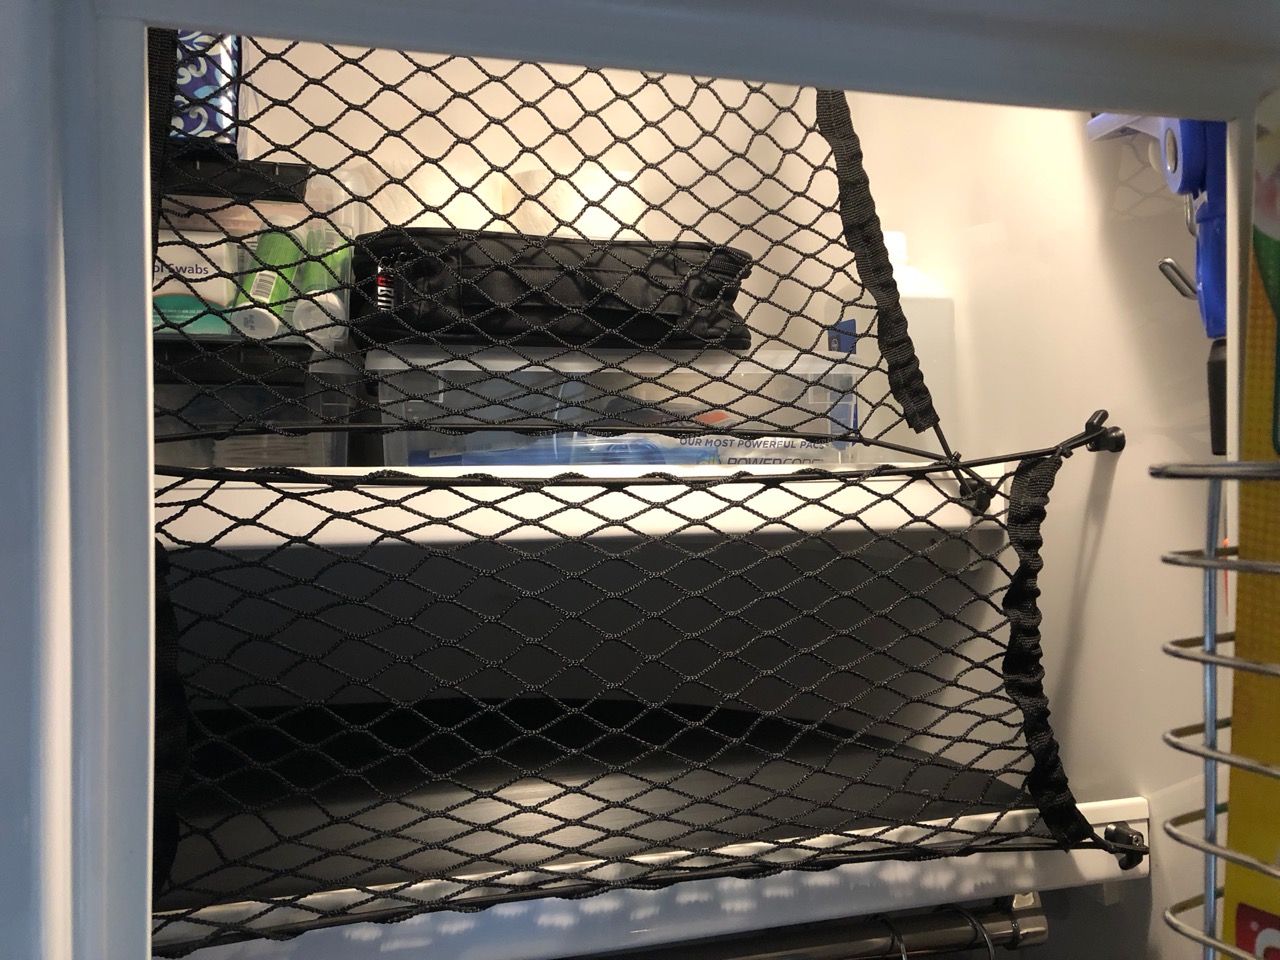
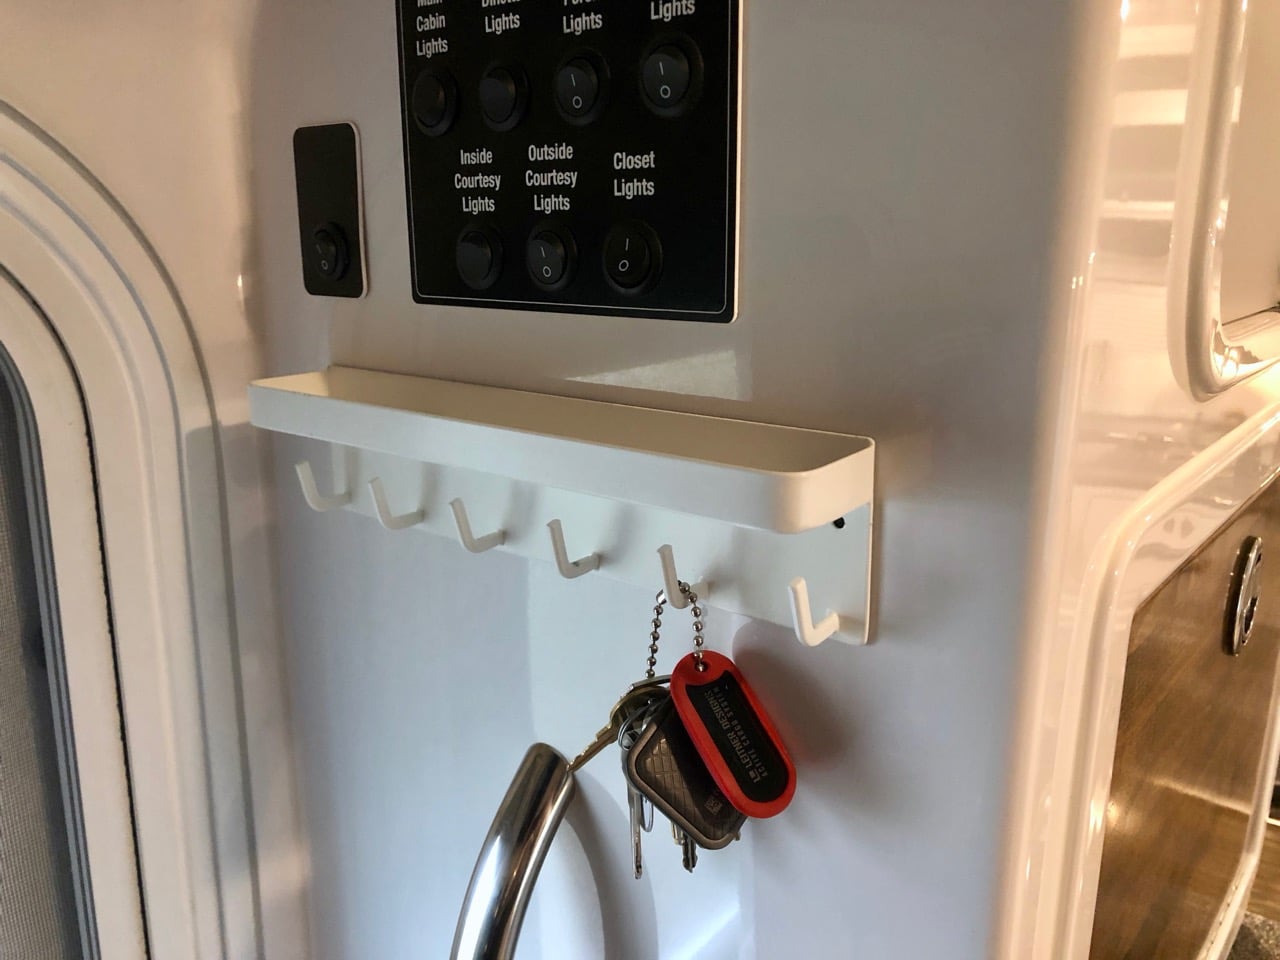
Someone asked about the cargo nets we installed. I bought several of these and two of these. They're a bit expensive for nets, but they're well made, and most importantly, the only ones I could find in those sizes. The smaller ones we have over the front door, over each bed, and then we also use two in the closet to hold in stuff on the shelves and one in the attic. One of the long ones I put under the street side bed to stash shoes, and the other went under the attic - that one we use the least. The one over the door gets hats and gloves and is the perfect solution for us for that stuff. The ones over the beds get down jackets or maybe a sweatshirt and also gets overflow clothes storage from the cabinets above. Under the attic is mainly a spot for day to day stuff that get's brought into the trailer, like maps and brochures. I just like having a place for all of that stuff so it doesn't go onto the beds or countertops. With such a small space to live in, I find that if there's a place for stuff within reach, then you'll use it and things stay pretty neat. We also bought a couple of these to go on the sides of the nightstand. They're great for stashing the phones while they charge. A few other organizing things we really like - This key holder is great by the door. We usually keep a flashlight on the shelf. These baskets for plastic wrap and stuff have really worked out well for us. I glued strips of 1x2 PVC to the door with 4200 and then screwed the baskets into that. Most everything we store goes into these stackable plastic buckets. They're small enough to fit places and to be able to see everything in them while still being large enough to hold stuff. I wish I could find some a little smaller that would fit more efficiently into the upper cabinets. Also, I noticed on this last trip that one of the handles had snapped so time will tell if these are rugged enough to last. For basement storage, I found that the rectangular milk crates fit perfectly and really keep the basement organized. In the very back, we have spare parts in several of the plastic boxes above, but in front of those you can slide one of these crates sideways, which will fill the back section of the basement and be flush to the corner of bed wall, and then two more will slide in lengthways to fill the front section of the basement efficiently. One crate gets water hookups, one gets electrical, and the one in the back gets water filters and things we don't pull out often. The plastic boxes are accessible from the interior hatch that we had installed under the nightstand. Being able to just pull out the two crates in the front when we have hookups and working from them really beats sorting through stuff in the basement. Our grey water hose and propane hoses go in the bumper. Chocks and blocks go in the bed of the truck, along with the grill, stove, fire bowl, and chairs.
-
Just a quick follow up to the refrigerator fan install - it works, and so well that I highly recommend it for anyone who's having trouble with fluctuating fridge temps or cold spots. My fridge now stays between 33 and 40, even when opening the door a lot, the freezer stays frozen, and everything in the fridge is a nice even temp with nothing freezing, regardless whether the fridge is packed full or nearly empty. I was able to turn up the thermostat a bit, too. It's really transformed the fridge. By the way, I've been able to do some closer monitoring of the fridge power consumption and I'm really happy with that as well. It will draw between 4 and 5 amps when starting up (a few seconds at that draw for each startup, or it will stay at the higher compressor speed when cooling off a warm fridge - I think that's only when it detects a charge from solar or shore power). After that, it's a steady 2 amps or less. The typical lighting we use at might draws more power than the fridge. I haven't gotten a bead on it's run time yet - I'm sure it's over 50% but by how much I don't know. Also now that I bent back those few little prongs that were vibrating on the case, it's quiet as a mouse. You can hear it when everything else is dead quiet, but even then it's not bothersome - you really only notice it when the compressor is switching speed and that's just because you notice the tone changing. The loudest thing in our trailer now is the fan to the composting toilet.