Overland
-
Posts
3,835 -
Joined
-
Last visited
-
Days Won
212
Everything posted by Overland
-
Someone should make that happen. Scott said he'd give me some to try, but I was already on the way back home when he texted. But yeah, at least bring it up to them at the Rally.
-
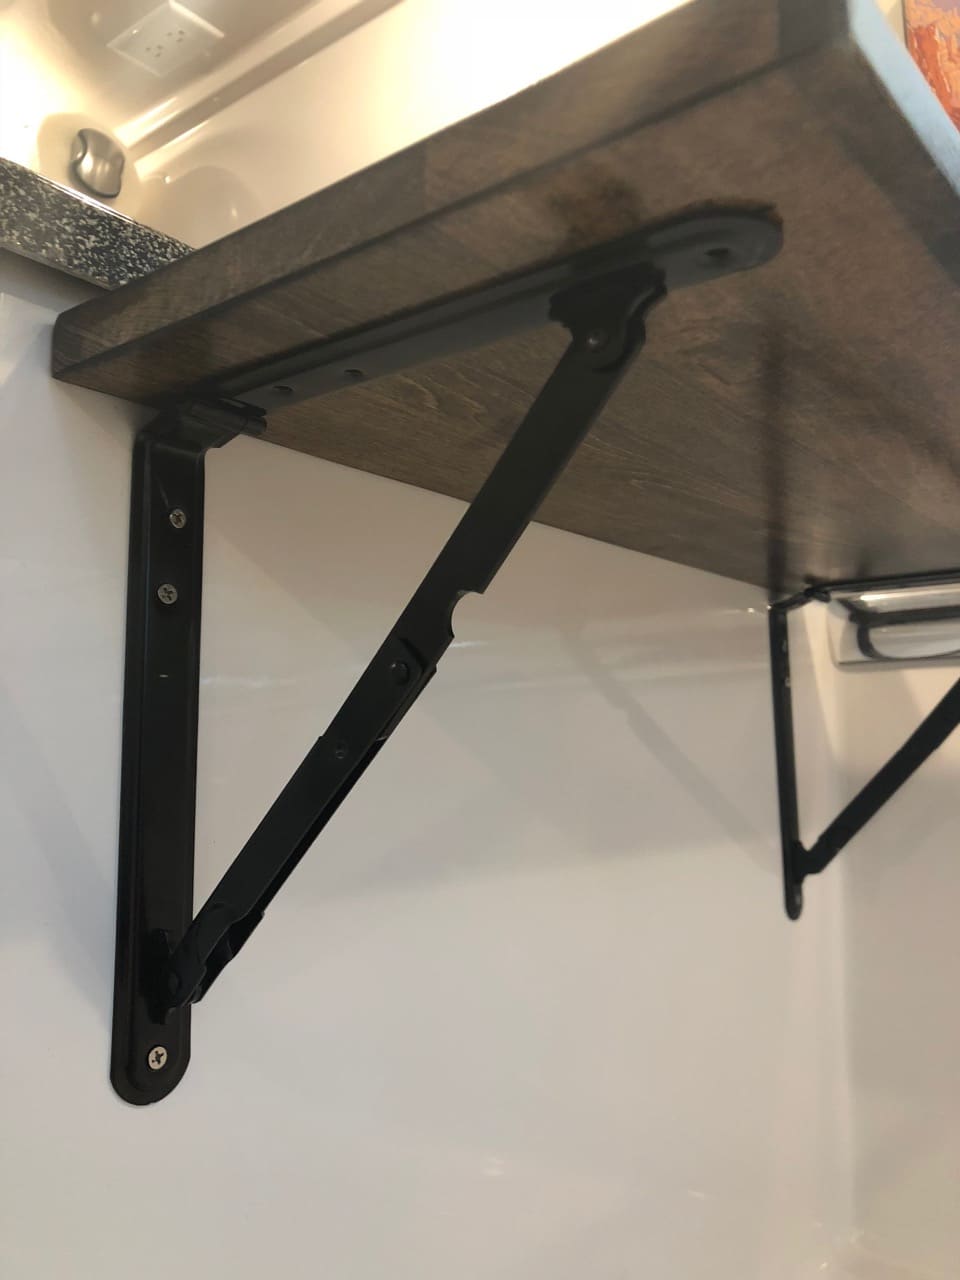
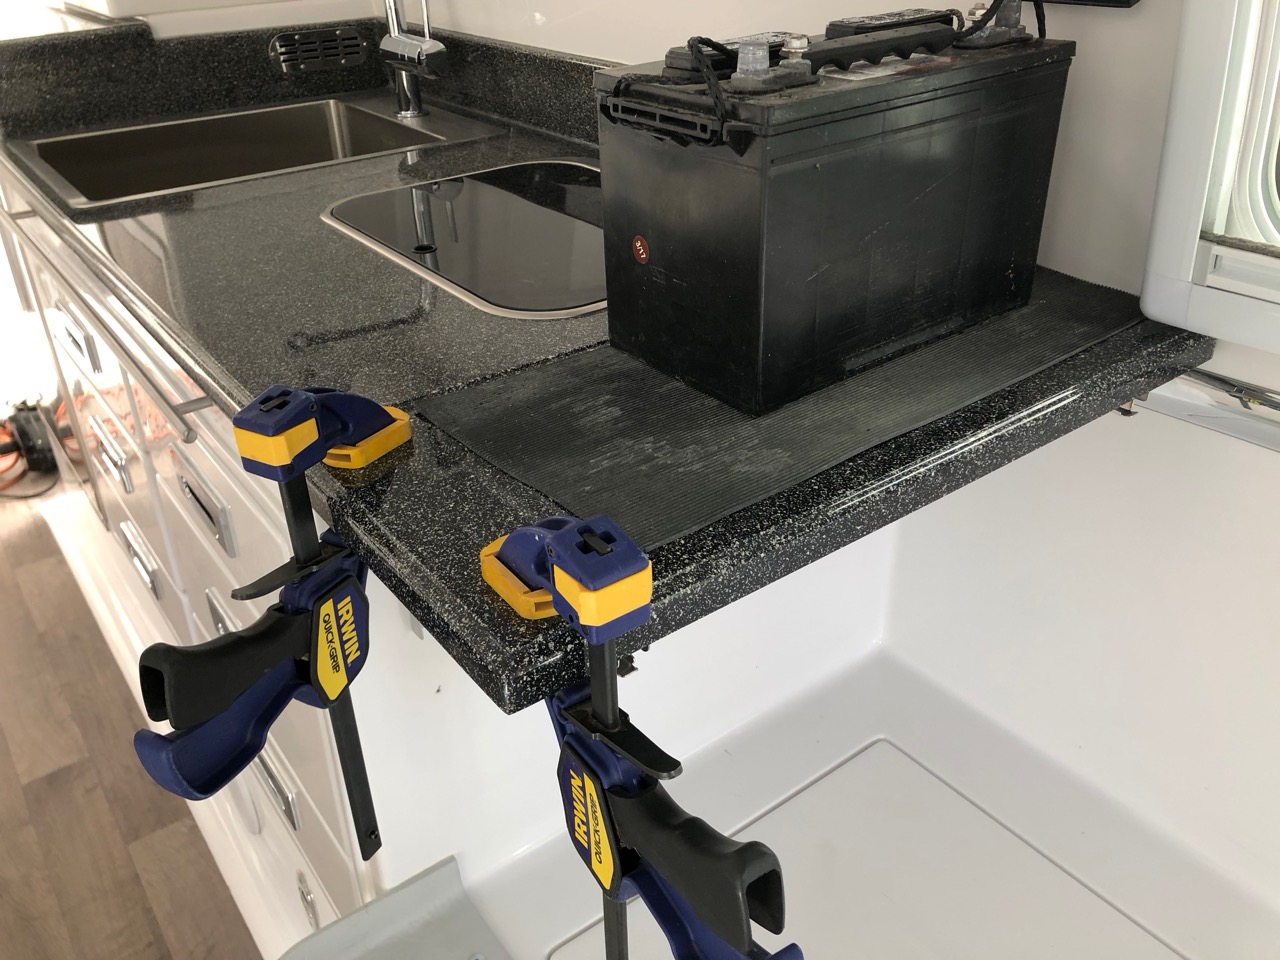
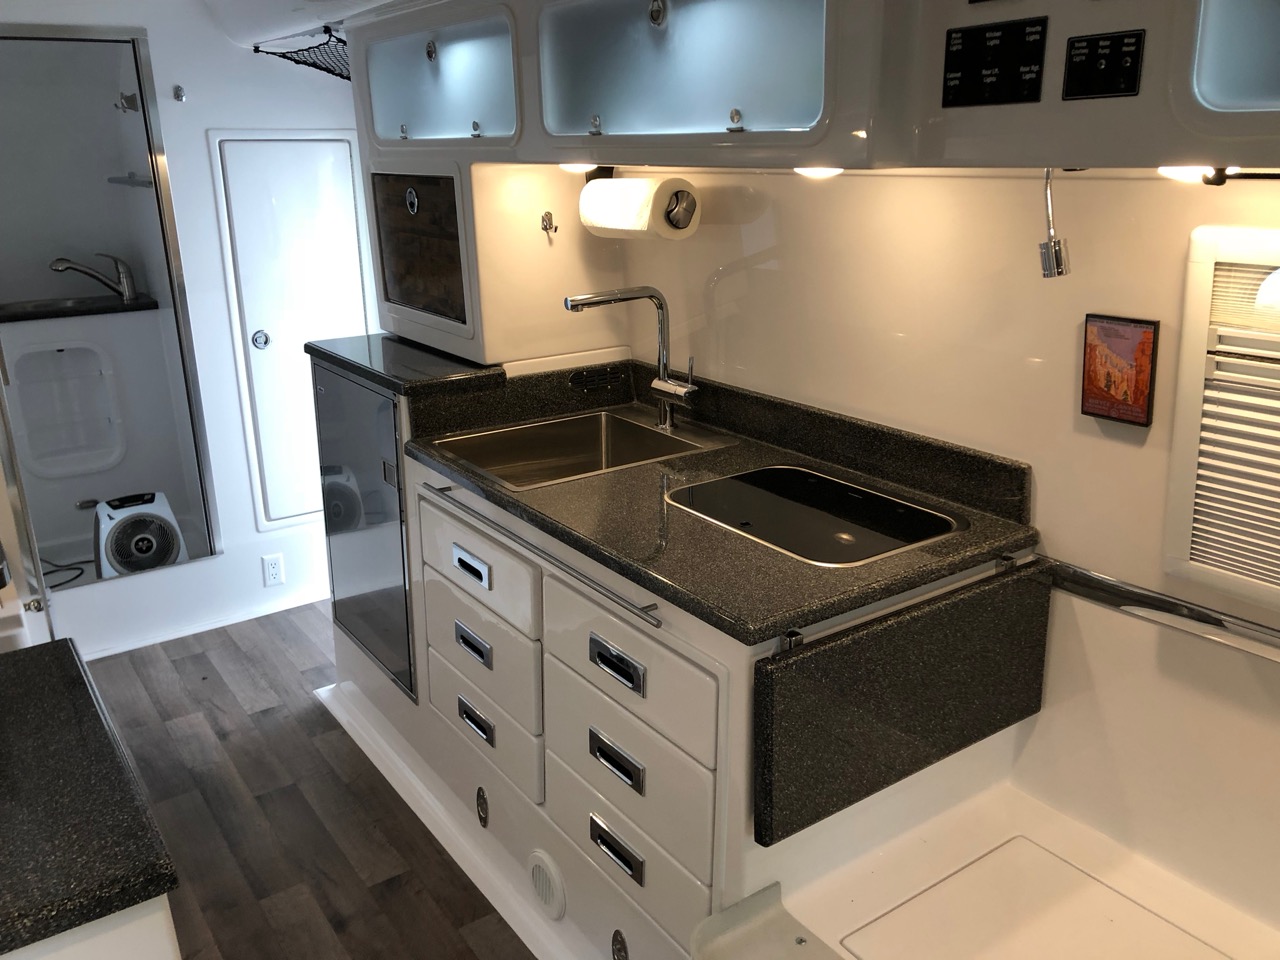
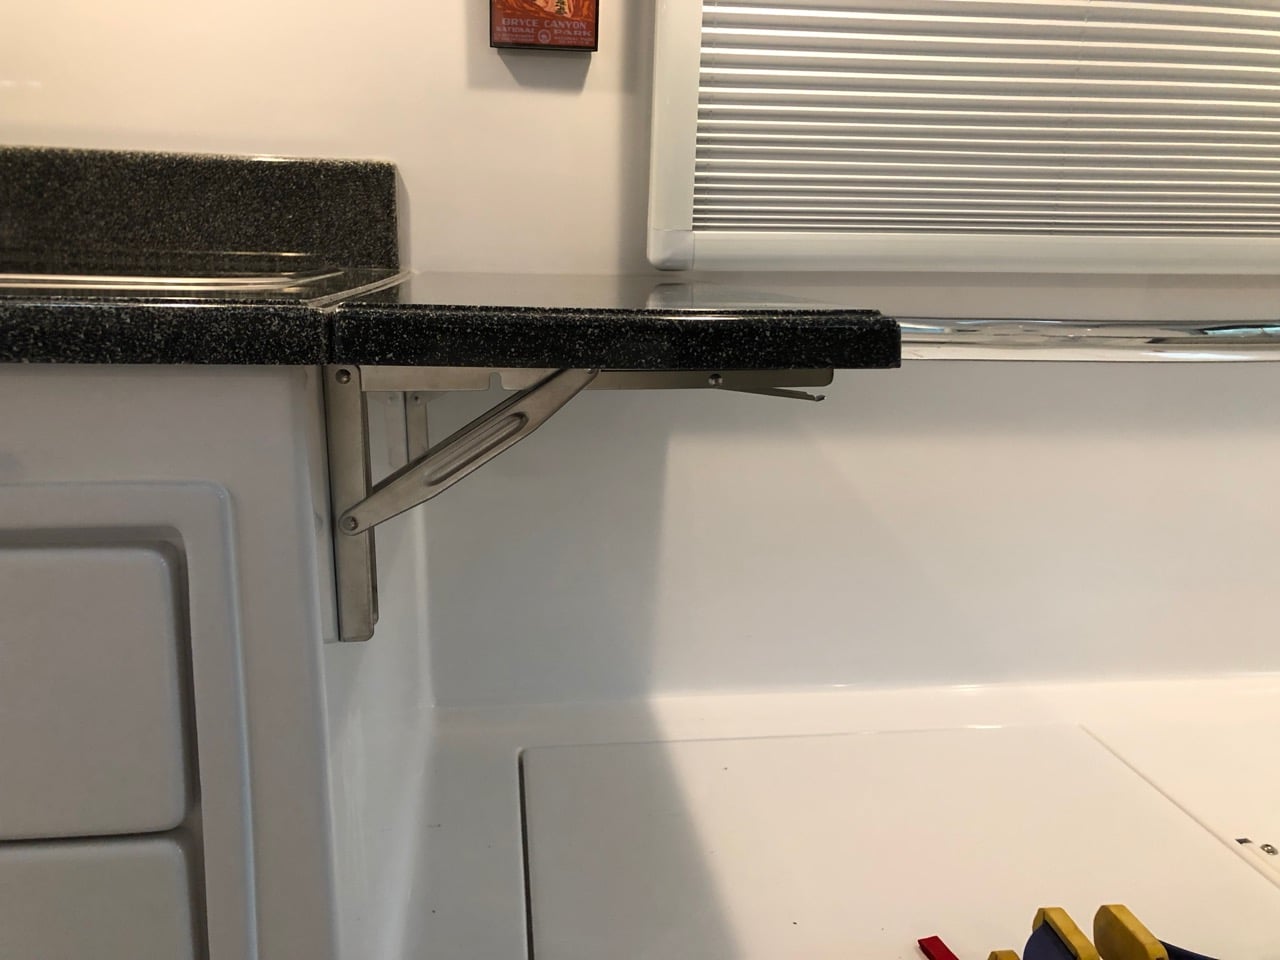
One of the things I asked Oliver to do for me was to install a 12" counter extension to the right of the cooktop that could be folded down when not in use. I figured we could use the extra counter space, plus I wanted a buffer between the cooktop and beds for splatter. This is what they came up with - This was perfectly fine and exactly what I was expecting, and we've really enjoyed using it. The only thing I didn't really like was that the hardware was finicky and just didn't work well. And the top ended up about 9" rather than 12", so it was a little small. And we had asked if they could make a piece of fiber granite to match, but they'd have to make a new mould for it so that wasn't going to happen. It also would have been nice if the extension were flush to the counter. So maybe a lot of problems. But we were happy with it nonetheless. But one day when I was running some wires through the pantry, I had removed the countertop beneath for access and just naturally set it down on top of the counter extension. Well, it fit perfectly; and thus, a new project was added to the list. I asked Oliver if they would sell me an extra top and picked it up when I got my trailer out of service a few weeks ago. I believe they charged $150 for it. Since I was redoing the top, I figured I'd search for better hardware as well. I found several options, but the ones that stood out were these from Amarine. They're super heavy duty and stainless steel. They work much better than what we had, and look nicer to boot. The only problem was that they were about a half inch too long for the countertop, so they'd have to be cut to size. But worth the trouble, so I ground the ends off a half inch. If you don't want to go through that trouble, my second choice was these, which are small enough to fit without modification. I cut a ½" piece of plywood that I could screw into to use as the base for the top. A ½" sheet will sit flush to the lip of the counter, which is what I wanted, but to make the countertop flush to the existing counter, it meant the hinges had to be high enough that I had to grind out a small notch for each hinge to clear. No big deal - btw, a Dremel with a small sanding cylinder works really well on the fiberglass, and leaves a smooth edge and no chipping whatsoever. Wear a mask. Here are the notches - The brackets are easy, just mark the holes, drill, and screw. I used ¾" #10 stainless on the bottom legs and ¼" #8's on the top. And 3M 4200 along each leg and on each screw going into the fiberglass to prevent it from backing out over time. Since none of the surfaces in the trailer are perfectly 90°, I needed to shim something to make the counter level. I considered grinding down the latch that holds the brackets at 90°, but that would have been difficult and if I ground off too much, I'd have to buy another bracket. Instead, I decided to shim between the plywood and fiber granite and then glue the top to the plywood with more 3M 4200, which I'm using so much that I've started referring to it around the house now as Snowball Glue. It's only about ⅛" max to shim - I used some stainless washers that I had lying about and just glued them down in each of the corners. I found that the top was a bit warped, so I had to weigh it down while the glue set - See, I knew lead acid batteries still had a use. I let it sit overnight and in the morning, I had what's in the photo above. Cool. BTW, if you want to do this and have mattresses, then you'll want to check their thickness to make sure the extension will clear when folded. Measure down 12" from the bottom lip of the counter. If your mattress is below that, you're good. If you have cushions, then no problem, but you'll need to move one of the back ones out of the way when raising or lowering the top. More pics -

- 47 replies
-
- 19
-

-

-
- counter
- counter extension
- (and 2 more)
-
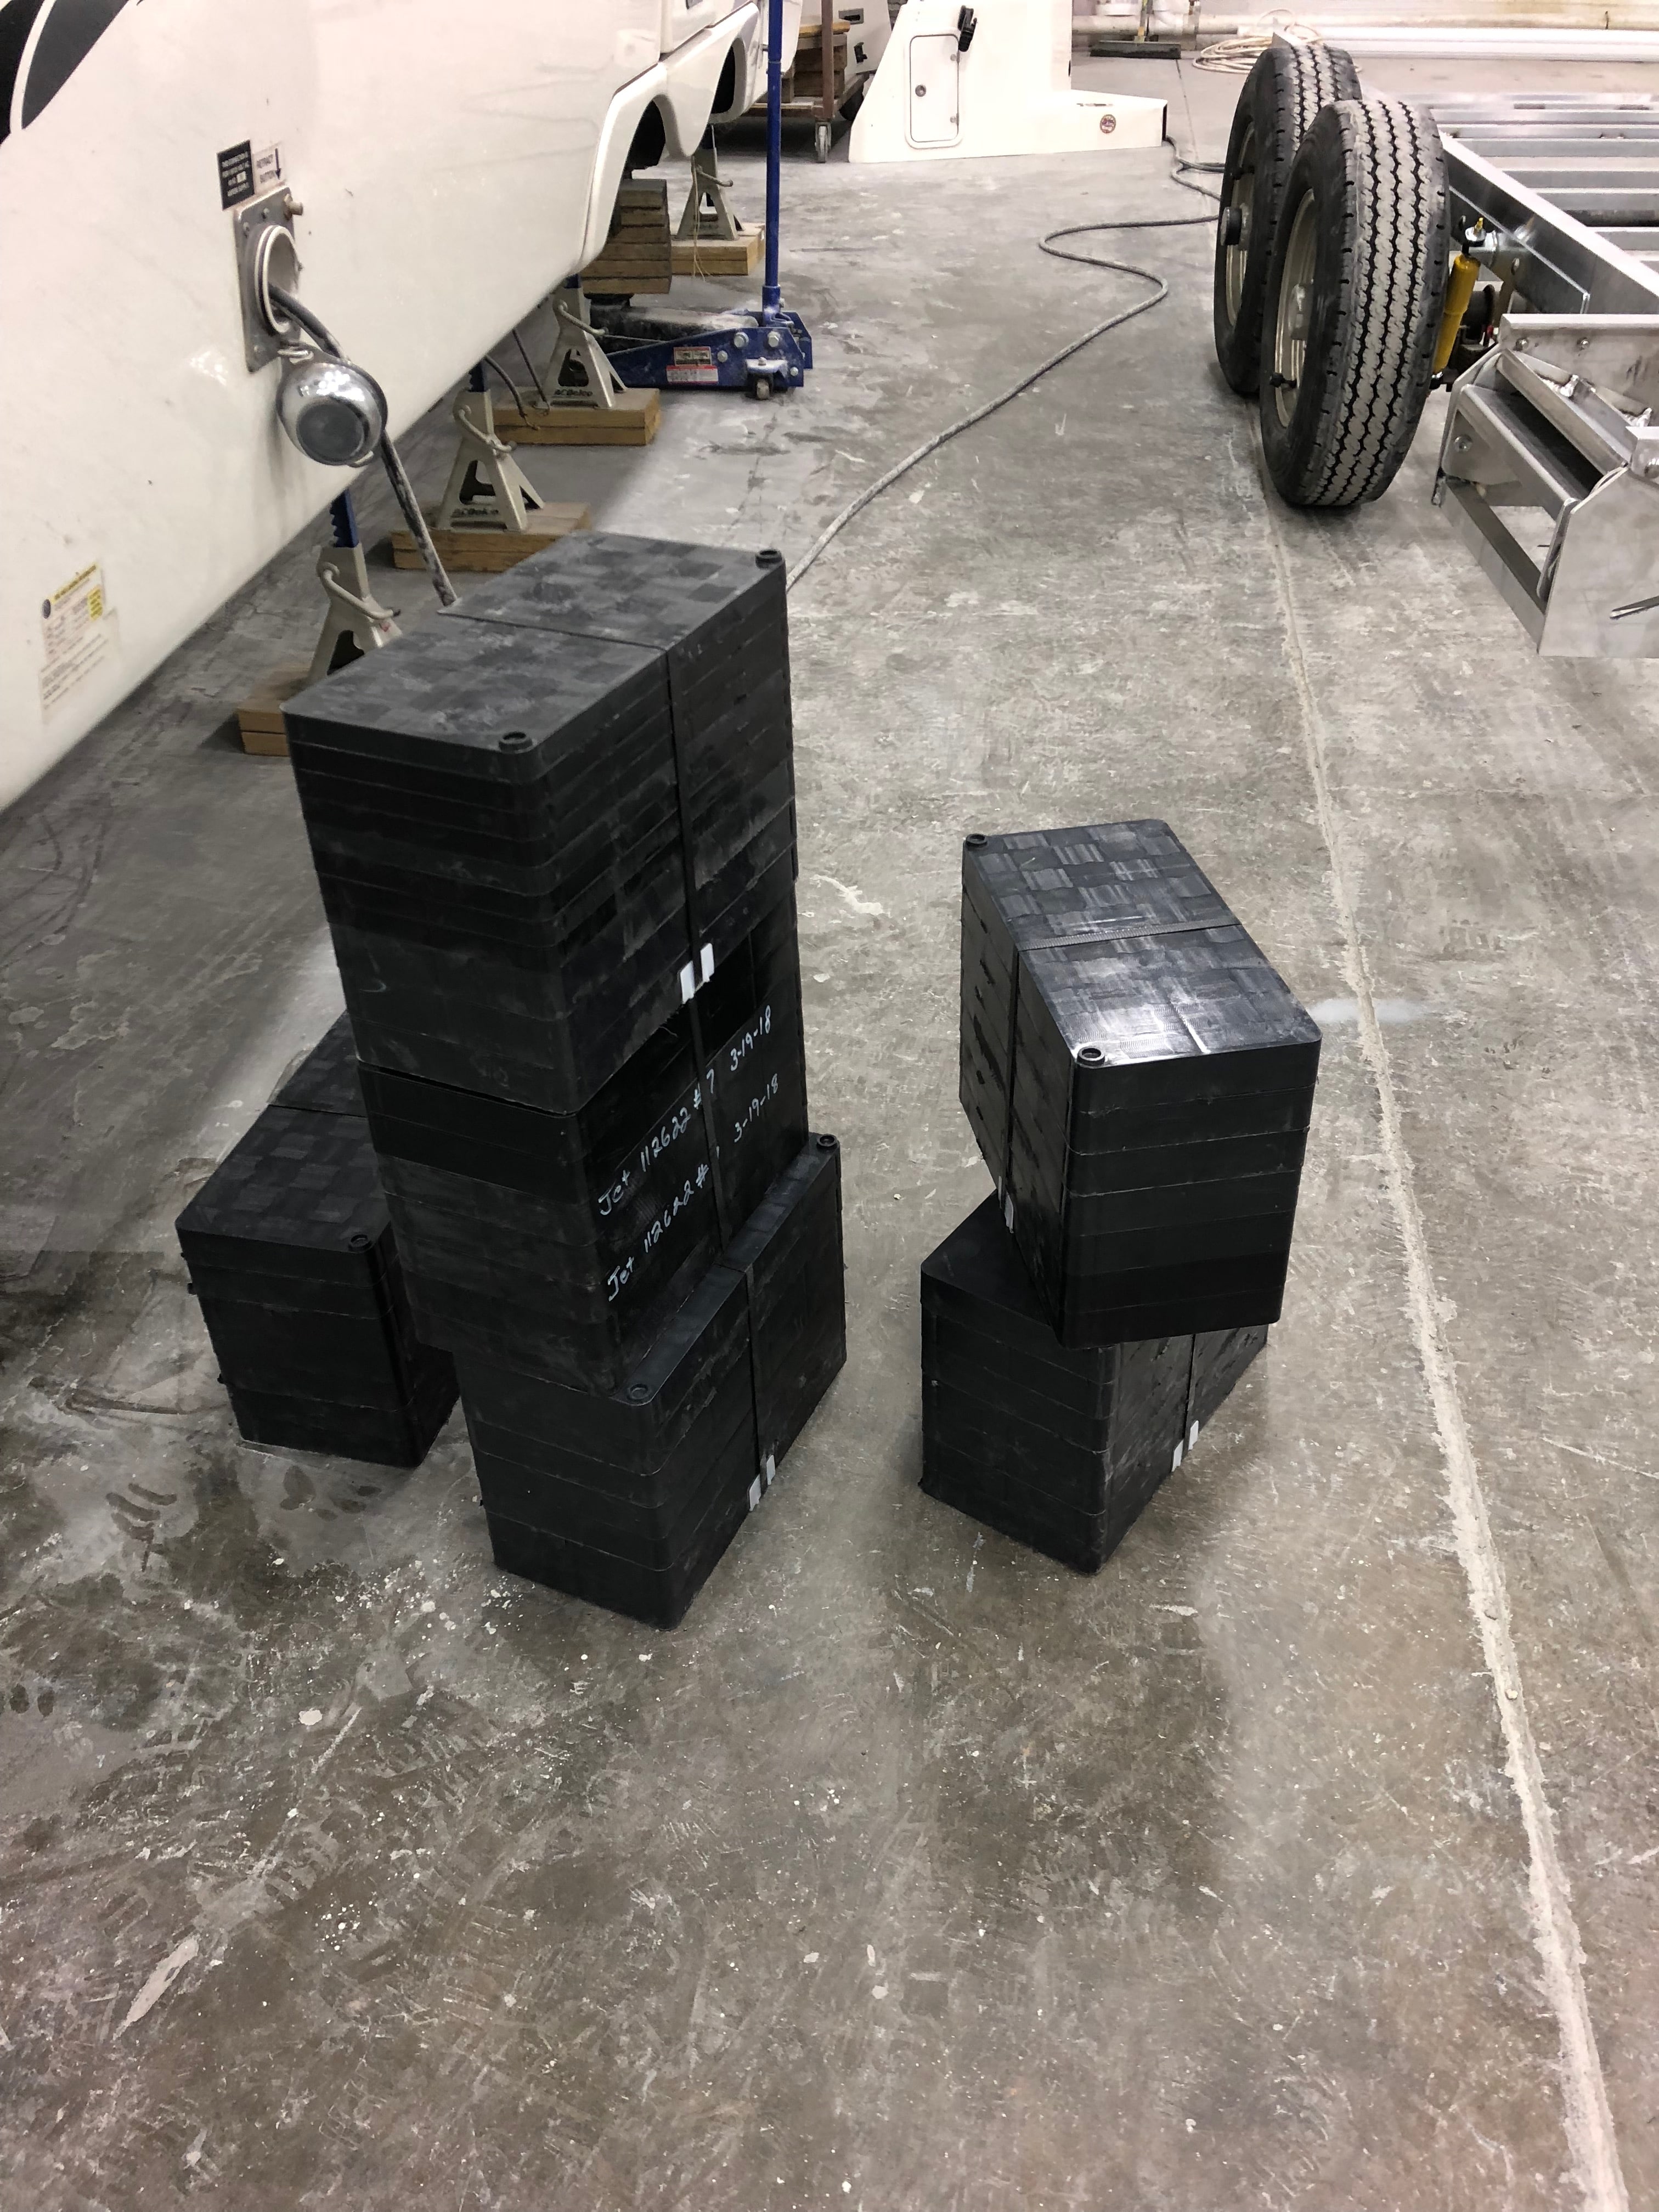
I ran across these while picking up our trailer from service the other week. They're a product that Oliver Technologies sells as part of their mobile home foundation kit. Jason had grabbed some that had been used for structural testing to use around the shop, and had strapped them together. I instantly thought they'd make for great jack pads. They're pretty much the size of the Camco levelers but about half the weight. They should sell these, or supply them with the trailers.
-
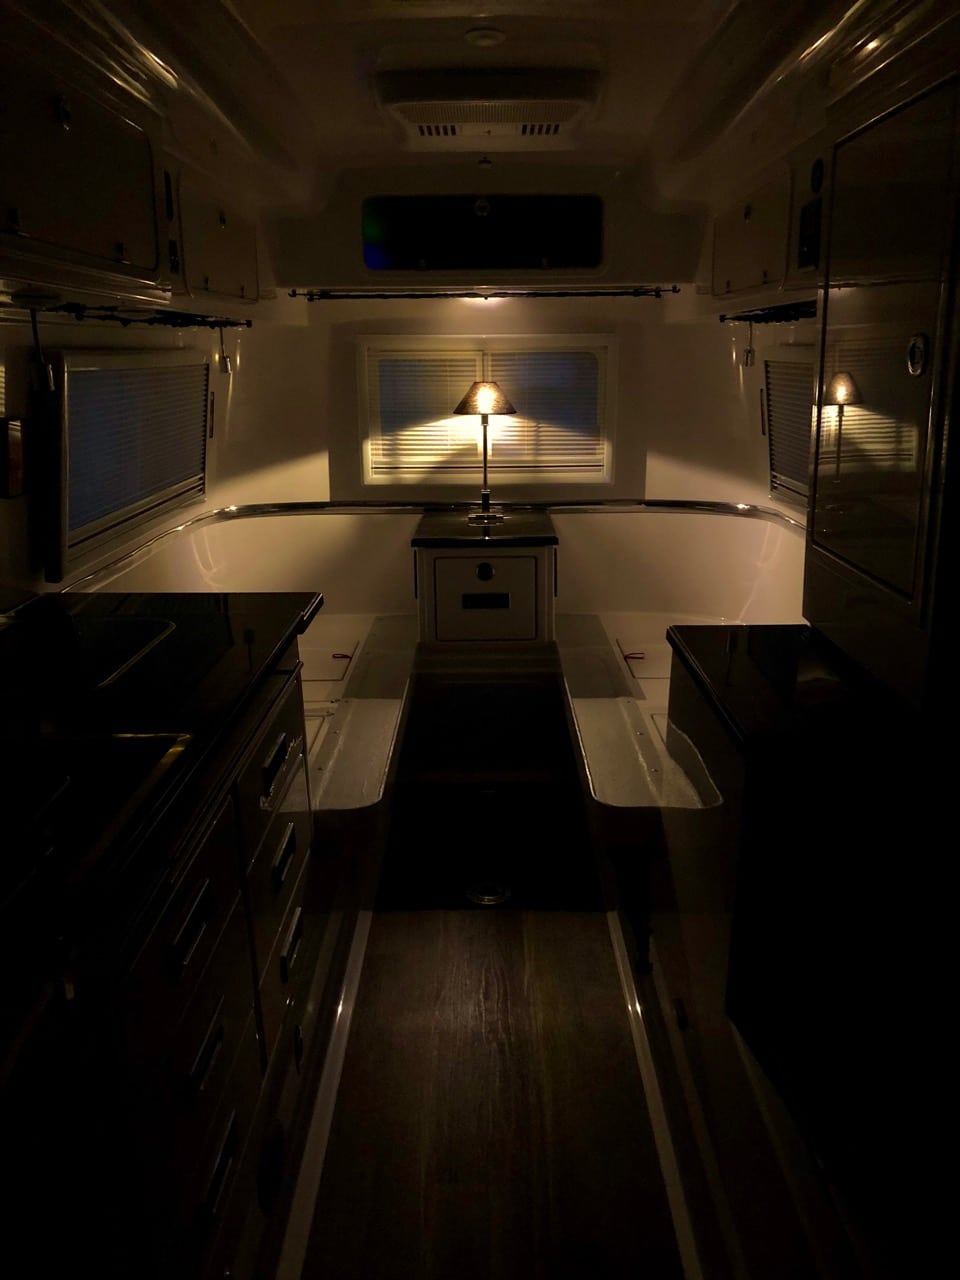
Like I replied above, the lamp and top are one now. I can actually grab the lamp by the bottom of the post and pull the top off, so if a bear comes through the door, it's an extra step but not anything I'm worried about. We don't use that compartment much anyway, but access to it is no different. There's enough slack in the lamp cord that I can put the top down on one of the beds. Or in an emergency, throw it on the floor, or at the bear. If anything it disguises that compartment better. Yes, but since I wanted to run the cord through the top to hide it, it made more sense to use that hole to secure the lamp as well. Plus I didn't want any chance of a heavy lamp like that flying around the trailer if it were to come loose. Not yet. I ran out of zip tie mounts. Plus I've ordered some with clips off amazon that will allow me to plug and unplug stuff without having to cut zip ties every time.
-
I did! But of course the lamp comes off with the velcroed top. I plan to use the lamp and top as a shield against the bear as my wife crawls through the window. I'm chivalrous like that.
- 8 replies
-
- 1
-
-
- lighting
- table lamp
- (and 4 more)
-
Really sorry to hear about Storm. Yes, I saw Outlaw in service also, getting it's frame replacement surgery. Was wondering if you were going to post about what happened - that looked like it could have been a real disaster. The breaks looked like textbook metal fatigue to me. Also, don't let Oliver cheat you out of that extra 18". You want the full 23'-6" version.
-
Here's a pic of just the lamp on. This makes it look slightly dimmer than it is, but it's definitely a low light level which is what we wanted. They're supposed to be 2W, but the battery monitor can barely detect them. In fact the amp draw went down 0.1 amps once when I turned on the lamp, so maybe they're magic bulbs.
- 8 replies
-
- 2
-
-
- lighting
- table lamp
- (and 4 more)
-
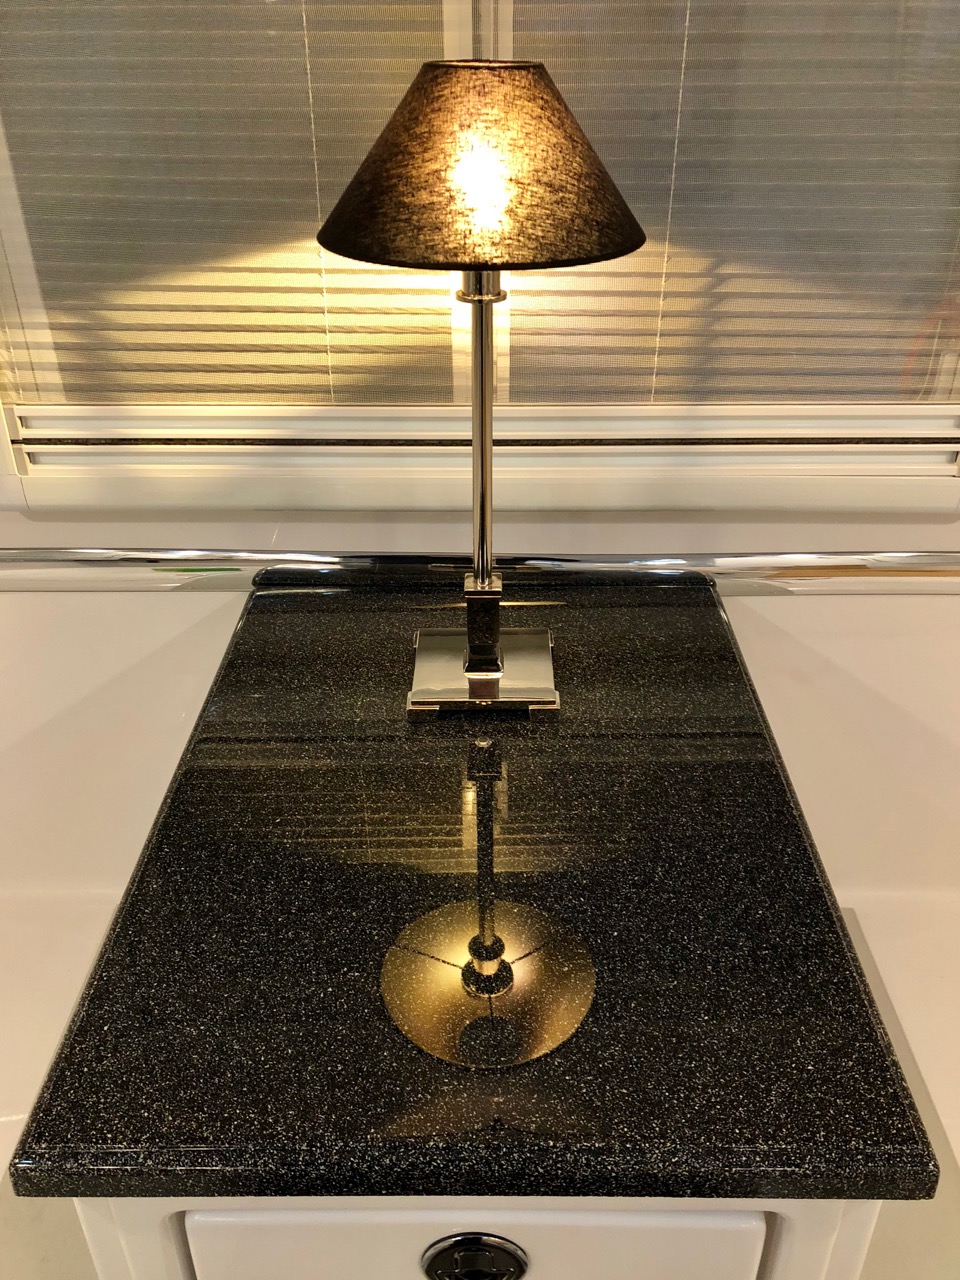
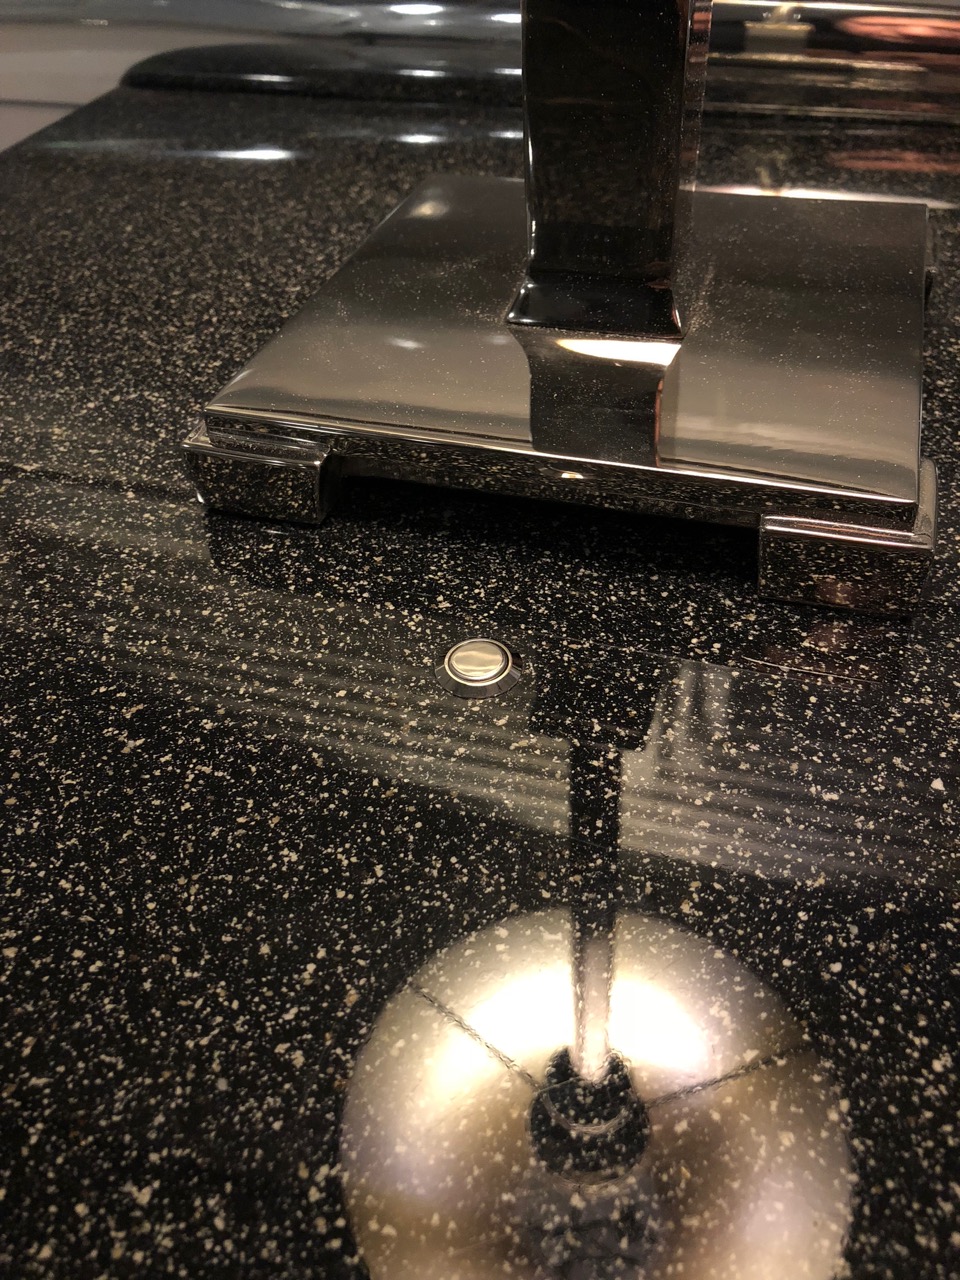
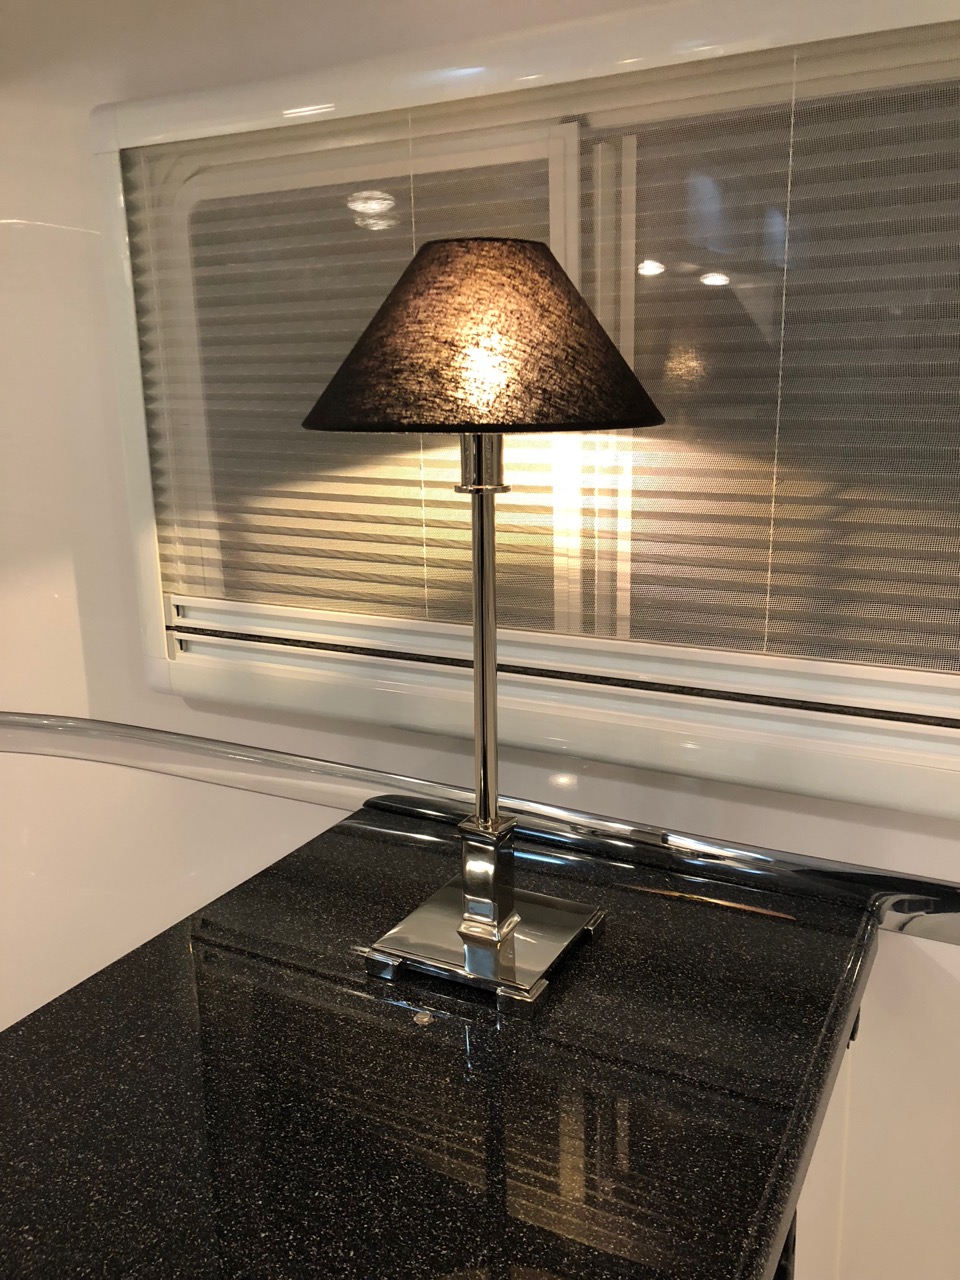
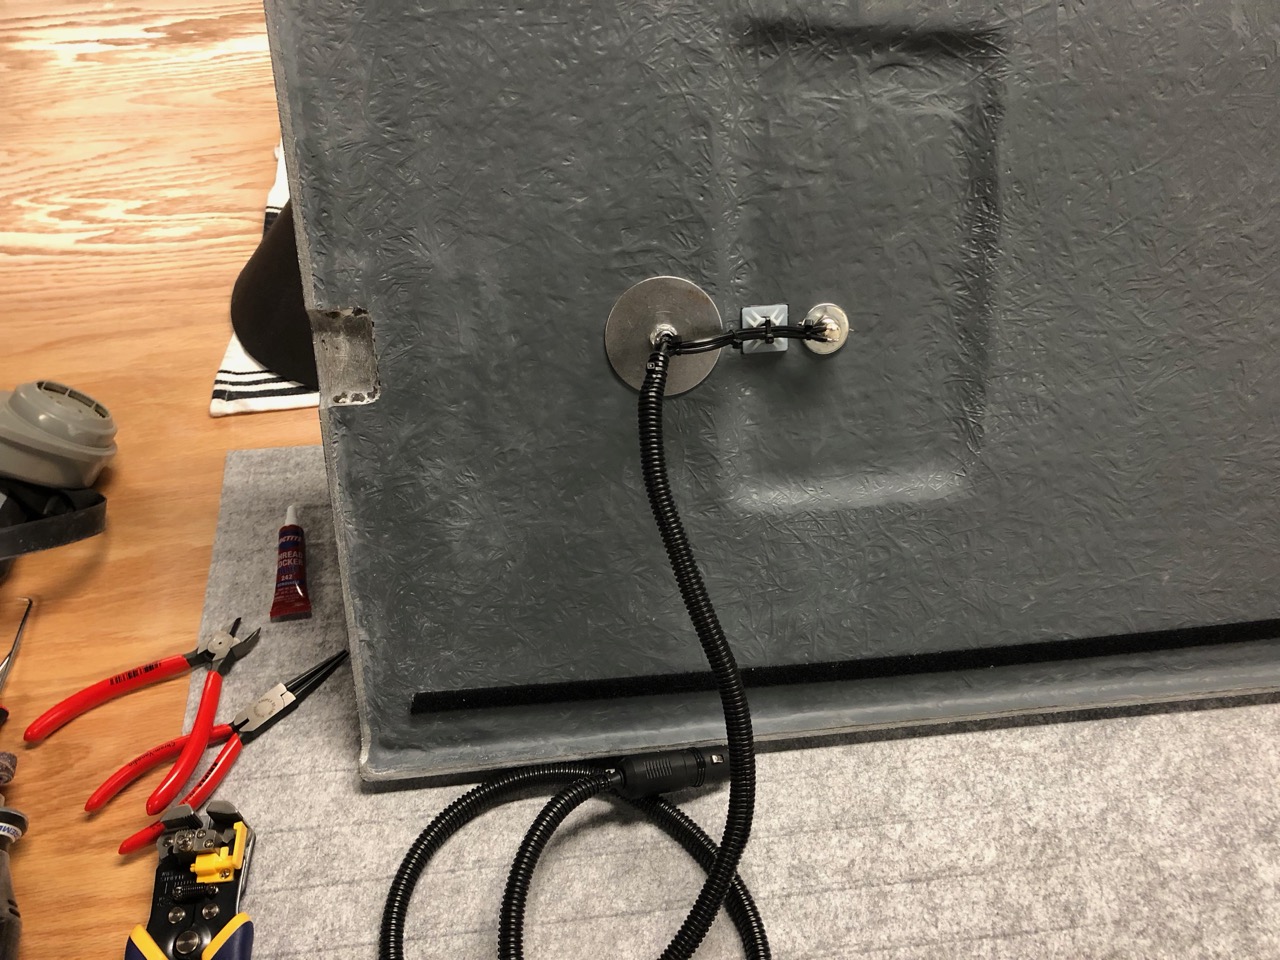
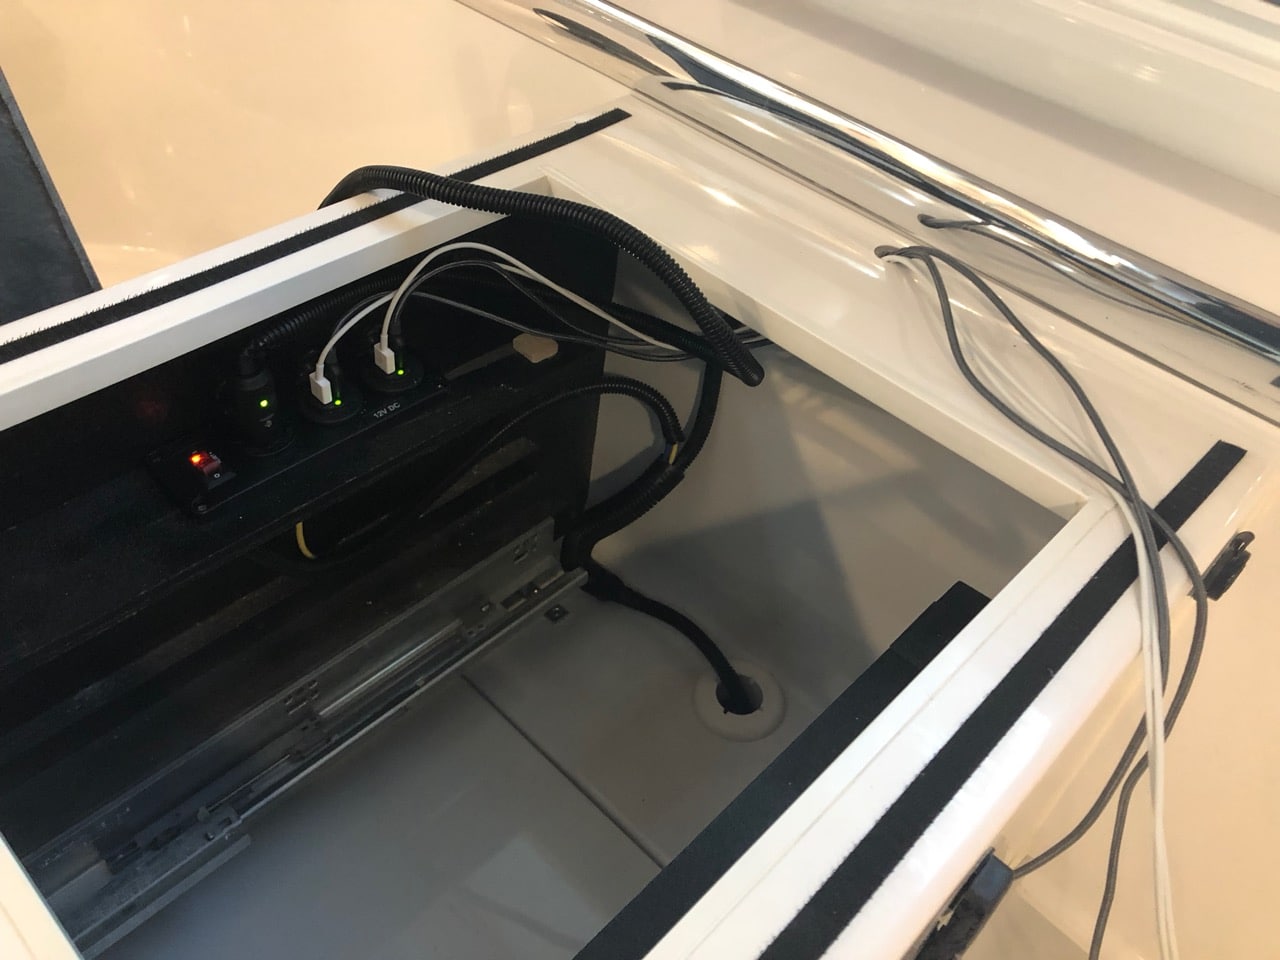
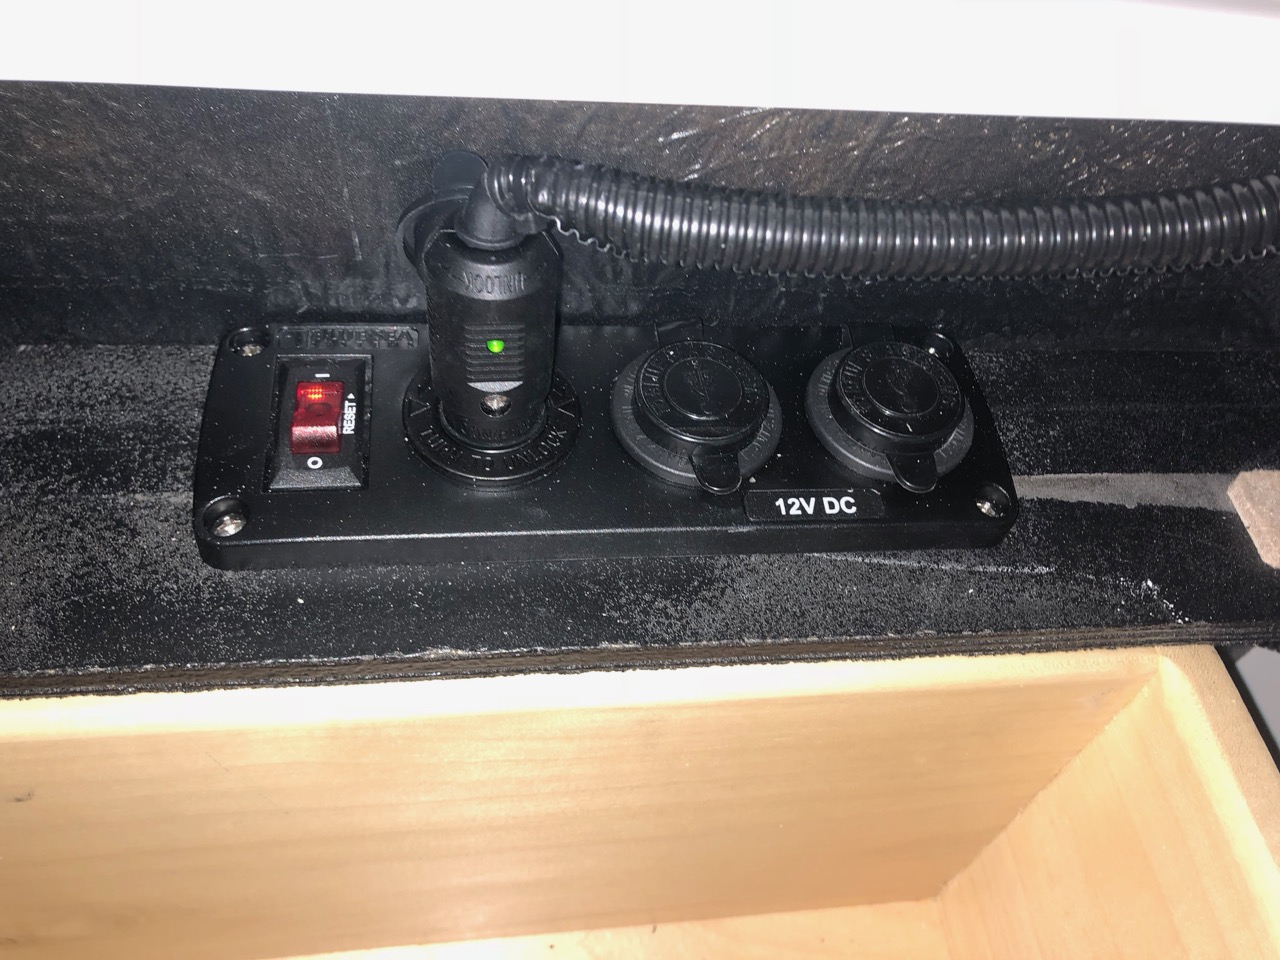
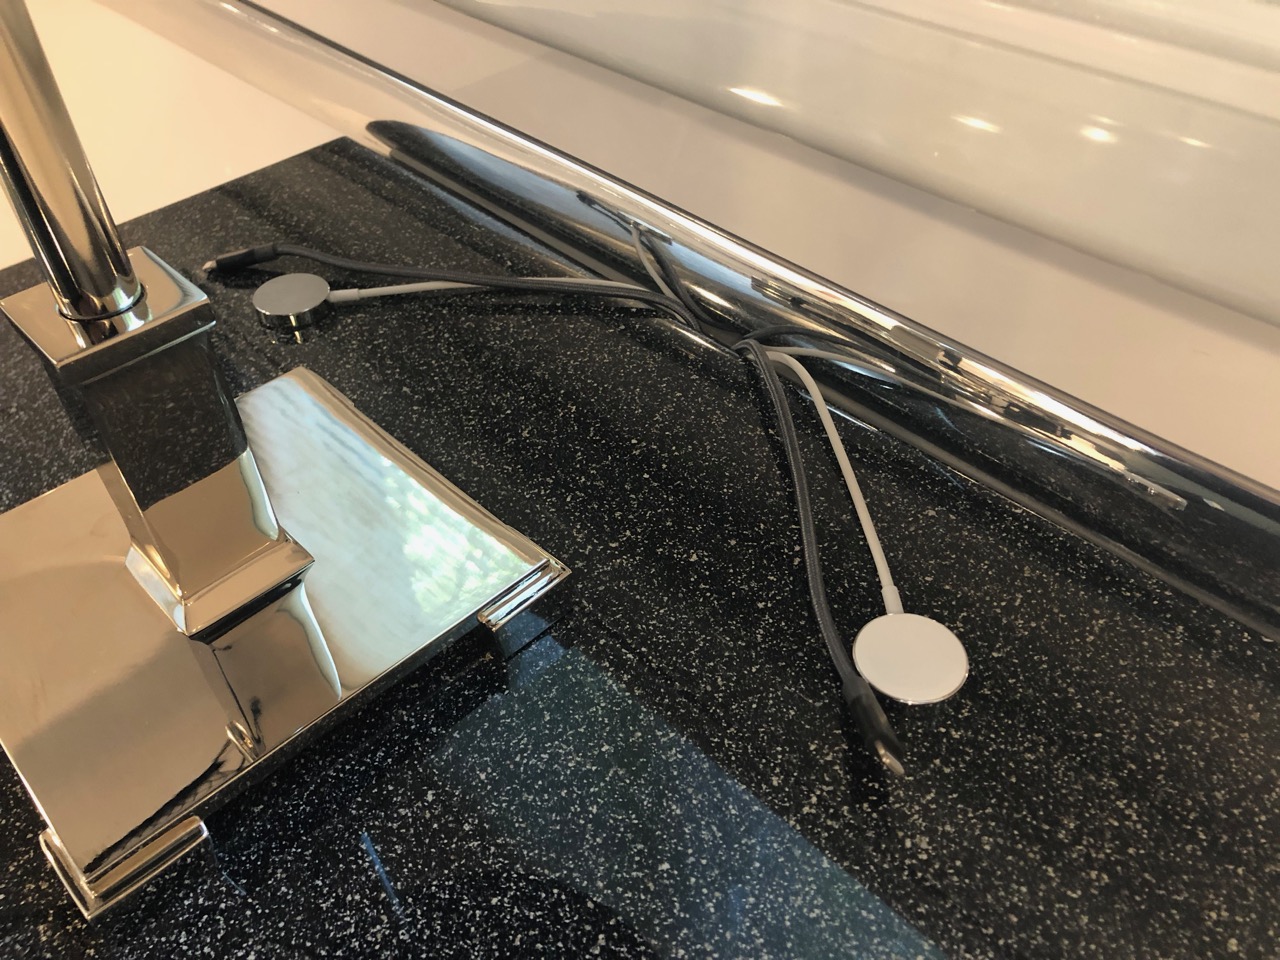
One thing we noticed the first few nights sleeping in the Ollie was that there's not a convenient light or light switch that can be reached from the bed. If you're on the curb side, you can sit up and flip a switch if you remember which one to flip but otherwise you have to get out of bed to turn on or off the lights. I loved the cool table lamp that @scubarx installed in the Outlaw Oliver, so I added a lamp to the list of to do's. My list of requirements for the lamp were: that it be 12 volt so that I didn't need to be plugged in or have the inverter on to use it; that it be securely mounted but easily removed; that all the wiring should be hidden and everything look completely built in; that the bulb have a nice warm temperature (I'm a believer in having only low temp lighting on for at least an hour before bed); that it have a switch that's easily accessible while lying in bed; and that the lamp itself should be high quality, able to withstand bumps and vibrations, and last the life of the trailer. So, with all that in mind, I first picked out the lamp. We went with the Petite Candlestick Lamp from Restoration Hardware. I would have preferred something a little bit more modern, but this one was the right size and has an Art Deco feel to it that I think goes fine with everything else we've done and with the trailer itself. It's way too tall as it comes, but dismantling it and cutting it down to a reasonable height for the trailer is pretty straightforward. I've gotten several lamps from Restoration Hardware, and they've all been super high quality and this one is no exception. They have a yearly or twice yearly half-off sale on lighting, so if you get one from them, be patient and wait because they're arguably overpriced at retail. Secondly, I found these bulbs on Amazon, which you can get in warm white or daylight, whichever you prefer. That's really all you need to convert a lamp to 12 volt these days, apart from swapping out the plug or direct wiring it to the trailer. I went with a lighter plug since I wanted to be able to remove the lamp. You can get those anywhere, but I highly recommend a locking marine style plug because the quality difference is substantial. Third, you'll need a socket for the plug if you go that route. I was fortunate in that I had asked Oliver to provide us with USB ports on the nightstand, so I already had 12 volt power run. If you don't, then you'll need to tap into the wiring behind the breaker panel on the right side of the attic and then run your wiring down to the basement and then up through the base of the nightstand. Shouldn't be too difficult but I can't say for sure since I didn't have to go that route. But I did need the socket, and while I was at it I wanted to add some USB ports inside the nightstand as well. (That's actually what I'd asked for, but Oliver placed the outlets on the side of the nightstand instead. Easily accessible, but otherwise you've got to deal with cords getting in the way of bedding and a little green light shining in your eyes.) So I ordered a combination outlet panel by Blue Sea off Amazon. It has a pair of dual USB sockets and a lighter outlet, and also has a switch and circuit breaker inside. It's a really nice panel. Finally, I decided that a little chrome push button mounted to the table top in front of the lamp would make for a great switch. This one was perfect. So, how to mount the lamp to the table. Steve and Tali had the genius idea of glueing magnets to the base of their lamp and to the underside of the table top. I experimented with that but just couldn't get it to work. Maybe the table tops are different or thicker, but I just got a really weak hold even with some super strong magnets. So instead, I decided to bolt through. Since I had the lamp apart anyway, I just swapped out the threaded rod holding it together with one that was a few inches longer than what I needed. (The way the original rod was made it couldn't be cut down.) When I put the lamp back together, I left the extra rod sitting out the base at the bottom. Then carefully drilled a ½" hole where I wanted the lamp, put the rod through the hole and screwed it in. I got the biggest washer I could find to distribute the load on the tabletop. Then I drilled another ½" hole just in front of the lamp and mounted the switch. The switch is just a tad mushy for my taste, but it's acceptable and I like the way it kind of disappears in all the reflections on the top. Underneath, wiring it up was a simple task and the only tricky part was that I had to solder the connections to the switch, and I've never developed good soldering skills. But it works. I added a few zip tie mounts with VHB tape to hold the wiring in place out of the way and keep it from vibrating too much. The switch connection is a bit exposed, so I think I might paint some plasti dip on the leads. Finally, I added the lighter plug, leaving plenty of slack in the cord, and covered the cord with wire wrap to protect it. In the nightstand, I removed one of the little shelves that hold the tray in place and mounted the outlet panel there. The panel is a bit too wide, but it's a good spot for it, so I cut a little notch on the bottom of the tray for it to fit back. I just unclipped the wiring from one of the USB outlets Oliver had installed and clipped it to the new panel. I'll probably run a jumper back to that outlet even though I doubt we'll ever use it now. I don't like the angle of the wire coming out of the plug, so I'll need to add another zip tie mount or something there, but I was down to the two I used on the top so I'll need to get some more. I then cut a scallop out of the back of the tray to run the wire, and any other cords we might have for charging stuff in the tray. You'll also notice in the pics that I drilled a hole in the back of the nightstand for USB cords to run, and ground out a little notch in the bottom of the top for the cords. I think I need to grind out a notch along the back as well, since right now I have to pull the top out a bit for the cords. And that's it. Pics...
- 8 replies
-
- 8
-
-
- lighting
- table lamp
- (and 4 more)
-
I talked to Shurflo and unfortunately, they consider anywhere from a 7 to 25 psi differential between cut-in and cut-out to be within spec. That's the spec on the pressure switch that they buy and isn't anything that can be adjusted. Luck of the draw, I got 10. They agreed that it was the lower differential that was limiting what I'm getting from the pressure tank. I guess I could go buy 100 pumps, pick the best, and send 99 back, but otherwise, I'm stuck. That's a tremendous variation, meaning that each of us could have vastly different experiences with the pump. It's probably the reason why the cycling on ours bothered us while other people don't mind. But I guess a smaller differential would be preferable to some, since the pump would kick on with very little pressure change in the system. So perhaps what I've got, an overly sensitive pump but a pressure tank that cuts down on the cycling, is better than a less sensitive pump that allows more draw down between cycles. They did help me diagnose that the bypass on the pump was also set unusually low, which was why it struggled when I set it to 55 psi. Makes me wonder if Oliver doesn't fiddle with these to keep the pressures down. That, or quality control at Shurflo is pretty lousy. Anyway, adjusting that should help the pump and they said I could actually close off the bypass entirely since I've added a pressure tank.
-

Composting Head - No need for Black water tank
Overland replied to BackofBeyond's topic in Ollie Modifications
Some plastics will leach things into the water that you don't want to drink. I believe if the black tank is HDPE plastic, then it's safe. I used to have a link to the manufacturer Oliver uses, but I can't seem to find it - maybe someone else has it, or you can call Jason Essary at Oliver. On the other hand, I believe some dyes will leach into the water, so even if the tank is HDPE, then the black dye might leach. Best to call the manufacturer to see. Or you can be like us and not use the onboard water for drinking or cooking - only dishes, showers, etc. If you don't connect the tanks, then you'll want to add an overflow/breather to the black tank so that it will fill and drain easily. -
Neat - you learn something every day. The trucks remind me a little of the Zulu tourist rickshaws in Durban.
-
Gorgeous photos, David. I'd have had a hard time leaving that first camping spot - is that the one you posted the map of a few days ago? What are the little tassels on the back of your trailer?
-
Composting Head - No need for Black water tank
Overland replied to BackofBeyond's topic in Ollie Modifications
I don't know if the black plastic is considered to be food safe, so that's your first thing to check. Second, Oliver cuts a hole in the top of the tank since they're convinced you'll want to poop in it one day, so you'll have to repair that. Connecting the two tanks shouldn't be difficult, but you'd probably want to research spin welding - there's a description here if you search for fresh tank water pickup. Then you'd have to lengthen the breather/overflow on the fresh tank since at the existing height it would just drain out most of what you put in. After that you'd be done, since you could fill both tanks through what would have been the black tank cleanout port. I think you'll find that you'll want to swap out the tank, which probably can be done through the dinette seat access. However, the tank itself is a custom size and shape so it might be expensive to have made. -
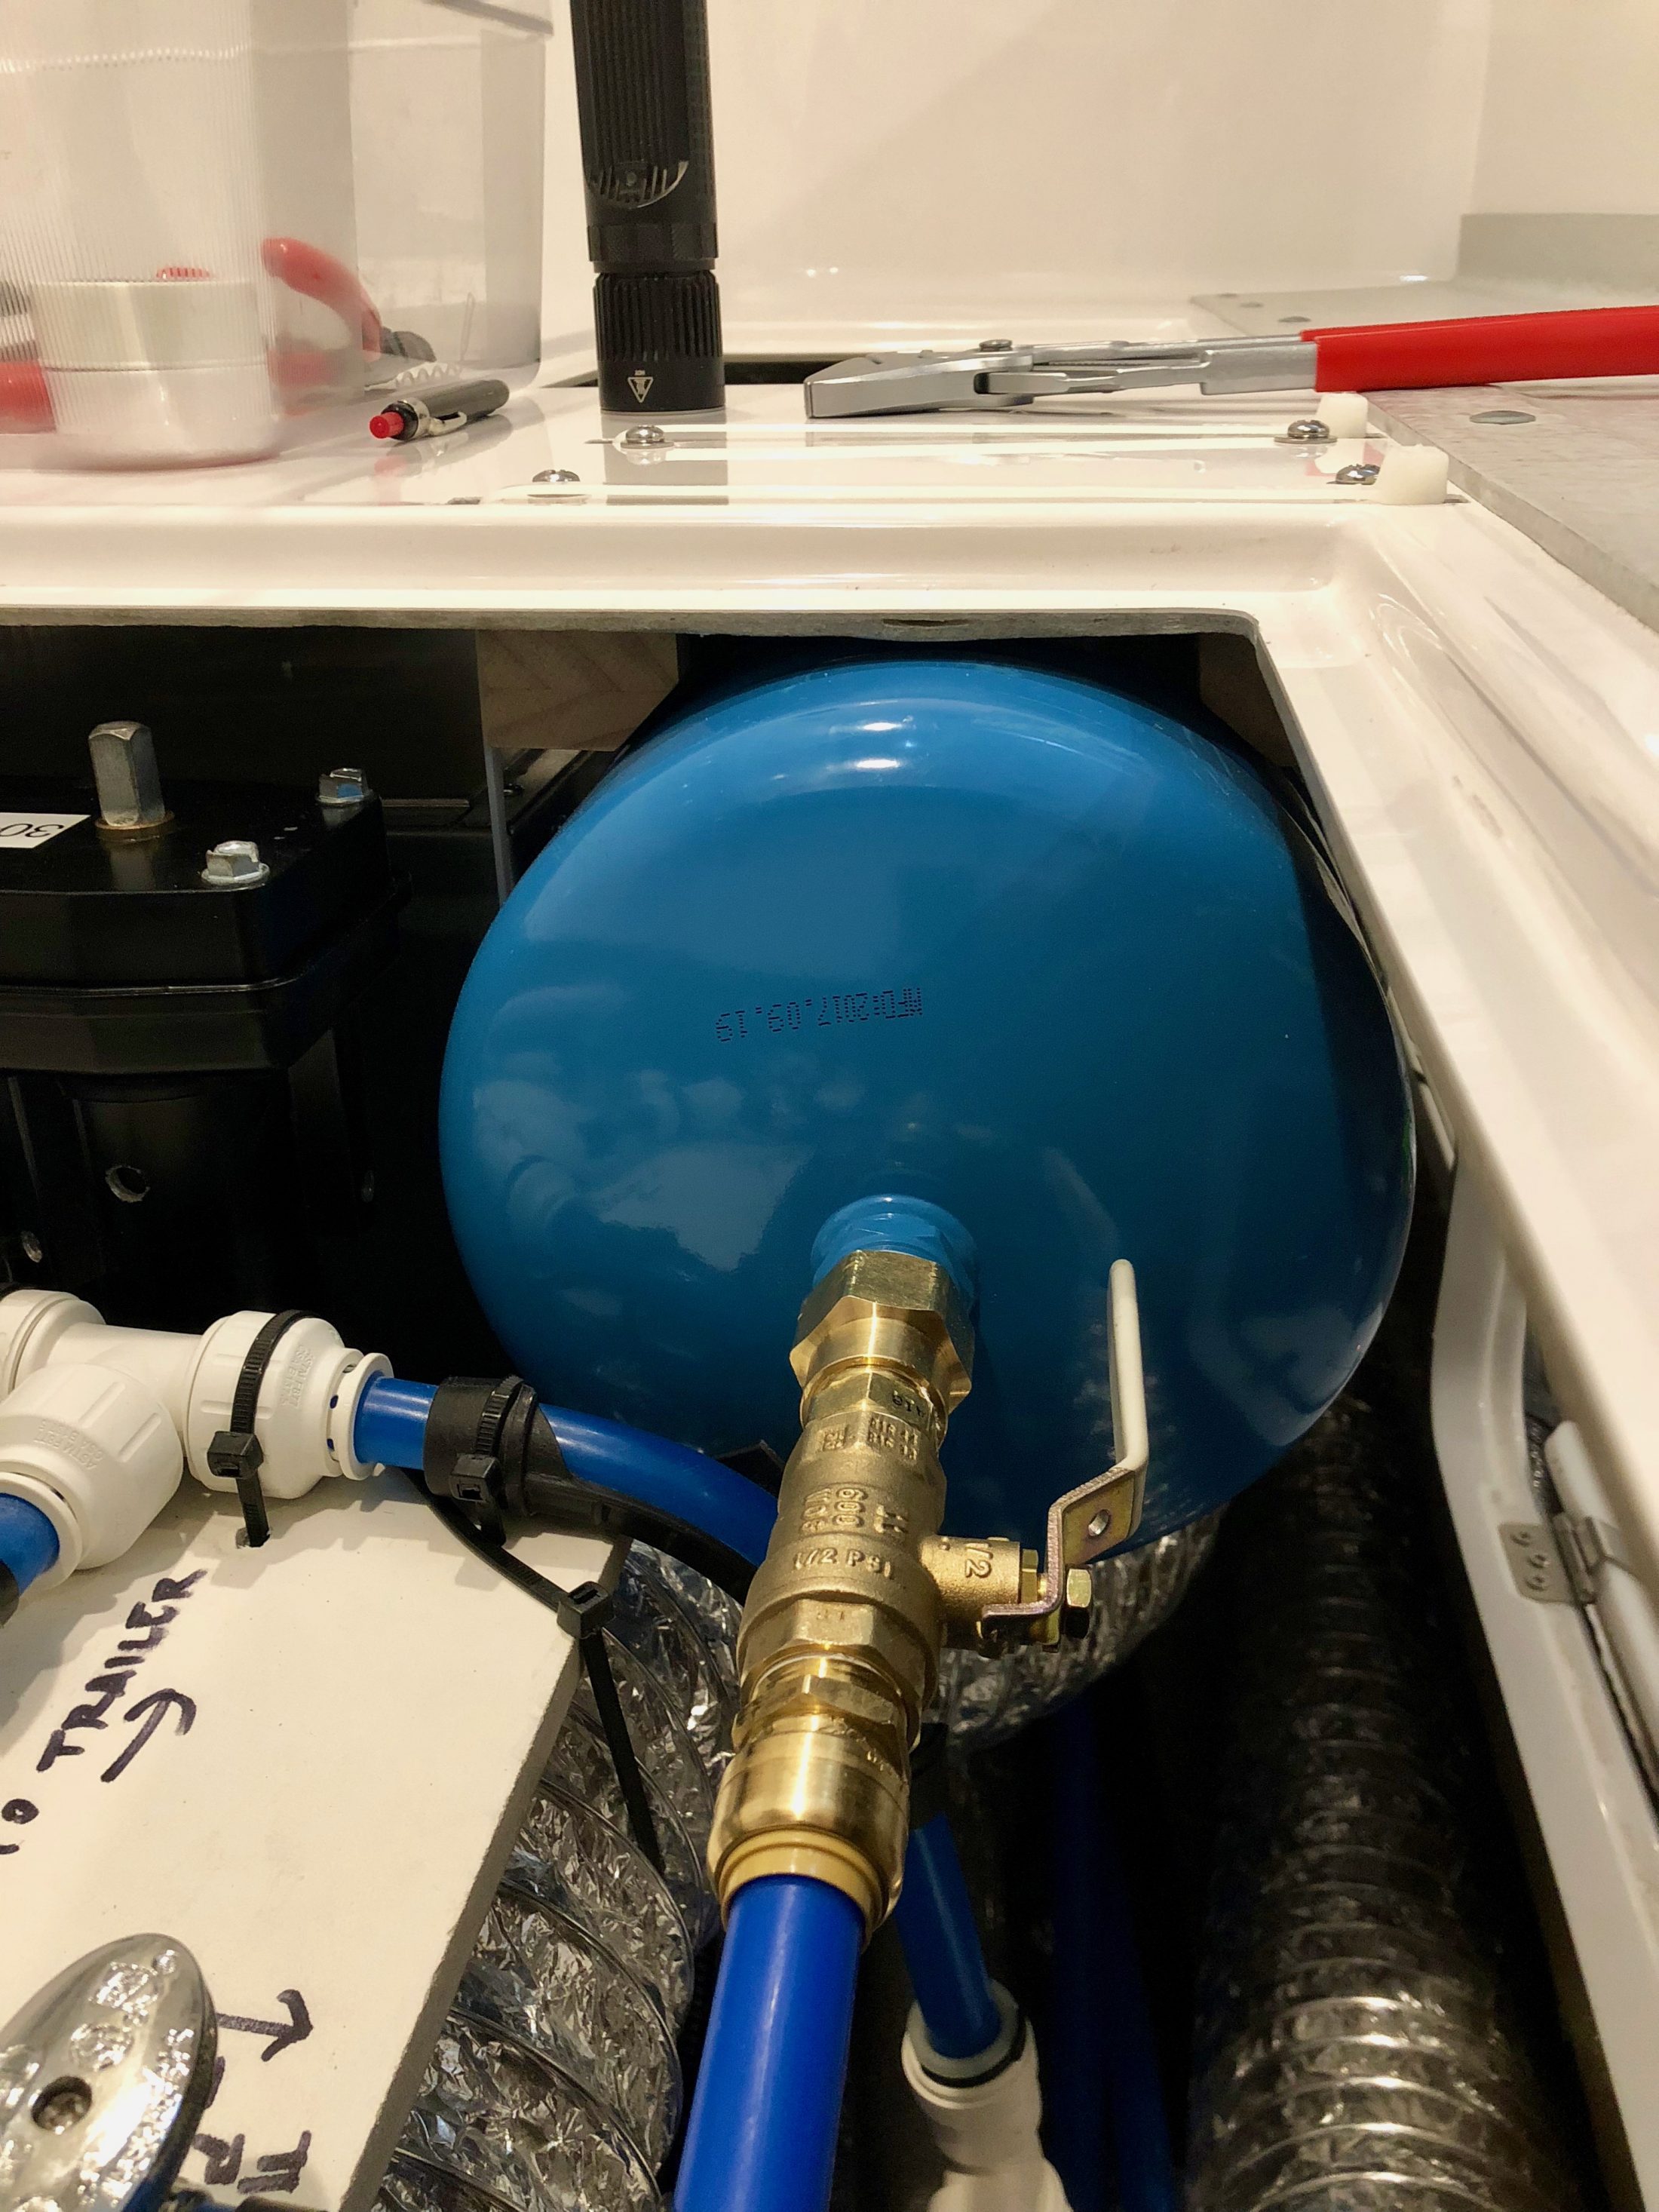
When I was looking at them a few months ago I used an online calculator where you put in the pump GPM, start and stop pressures, and how long you want the pump to run. I picked a 15 second run time and it came out as needing I think a 5+ gallon tank. This tank is supposed to be the “equivalent” of a 6 gallon so it seemed right. Choice is pretty limited in the smaller sizes. They don't make a horizontal model in that size, but I think the only difference is the mounting hardware, of which there is none. Had I gone smaller it would have exacerbated the problem I’m having with my pump not giving me the proper start-stop pressure differential, so I’m glad I got what I did.
-
John, I have had pulsing drips from the water heater pressure valve before, so perhaps this will fix that. I won’t have to move the tank. It’s right at the pump and access is good. It was just difficult to get it in that spot as I had to move some water lines to get it in place. Once in that spot it actually has a good amount of wiggle room, though fastening it in place was tricky. Anyway, the pump doesn’t sputter at all. Good thought on using water with the pump off. I can get 1.5 gallons that way so plenty for nighttime or occasional use. Thanks for all the replies. I think if there’s an improvement to be made it will be with the pump, but all of this advice on how to get the most out of the tank has been great and I think we’ll really enjoy having it.
-
It’s just a 2 gallon tank. They label it at it’s non-pressurized “equivalent” capacity. We do navy showers also - hadn’t thought of being able to time rinsing with the pump. This may then be ideal for that. And since we now know the draw down we’ll have a better idea of how much water we’re using. The problem we were having at the kitchen faucet is that we rinse dishes under a slow stream to try to conserve water. The pump would cycle every second and the water would spurt. This allows a nice even stream of water and probably for long enough to rinse several dishes. I suspect we’ll develop a technique for both dishes and showers to work with the pump cycles.
-
Pressure tank install... This is the Flotec FP7105 that one or two others have added, sitting under the curbside bed, kind of half in front of the water heater. It's a 2 gallon recharged tank. I placed it here because I wanted to add a valve to isolate the tank when traveling, winterizing, etc. Oliver gave me an access hatch for the water valves, and this sits just inside the hatch. It's nice because I can just reach in and feel for the valve and not have to crawl around on the floor looking for it. I just didn't want to travel with the water system pressurized in case there were a leak. This way I can just shut the valve and open a faucet and all the pressure is released. then when we get to camp, I can turn on the pump and open the valve and it doesn't have to fill the tank back up. I glued and screwed two blocks to the fiberglass to keep the tank from shifting, and then ran two heavy zip ties through to hold it in place. I put some rubber mat on the blocks and cut a block to keep the zip ties in place. It feels really solid. It was a pain to get it in there and work around it, but now that it's in place, accessing around it really isn't too bad. While I was in there, I did my zip tie tie-ing and fiberglass dust dusting. And learned my PEX skills, which is a necessity. Also, I bought a nice collection of PEX fittings and some tubing for repairs. The only thing I don't have is a crimper, which is darned expensive and bulky, but there are a few connections here and there which seem to require one. Mo pics...
-
Thanks John. Reading through the manual, I realized that the draw down, or amount you'll actually get from the tank is supposed to be from 0.5 to 0.7 gallons, depending on the pressure, and I'm only getting about half that. I'm thinking now that the difference is that on their chart, they say 0.5 gallons for 40-60 psi, which I assume is cut-in/cut-out pressures. That's a 20 psi difference and what I'm measuring, regardless of the pressure I set, is closer to 10 psi. I think if I were getting the 15 psi differential per spec on the Shurflo, I'd get closer to what I should be getting. Like I said, I'm happy with it as it is, though I'd like to get the most out of it. Installing it was a true pain in the rear. You look at it and think yeah, that would go in a half dozen places, but it does not.
-
Will do, thanks. I'm letting it sit for a while at the higher pressure to see if maybe the bladder is stiff and not expanding enough. I tried lowering the pre-charge down to 10 psi to see if perhaps it needed a bit of a push to get it working. That may have helped some as I seem to be getting closer to 6 cups out of it now before the pump cycles on. If I cut the pump and just let the water run, I get about 1.5 gallons out of the tank before it peters out. That's a half gallon less than the tank capacity but I imagine some water will always remain behind and the pre-charge and bladder will take up some of that room. Even if I can't fix it, 6 cups is 6 cups, which is better than nothing. It keeps the pump from going tump tump tump when the water is turned on just a bit, which is all I really wanted. I'll give Flotec a call in the AM.
-
Yes, Flotec recommends the same 2 psi below the cut in pressure. So I discovered on the Shurflo pump that there's a little 2mm hex screw on the pressure switch that you can adjust. I was able to adjust it so that the gauge read 55 psi, but the pump seemed to have a bit of trouble getting that last 5 psi. Cut-in at that setting was a little below 40 psi, so at least according to my gauge, it was close to spec. The problem is that even at that pressure I'm still only getting 5 cups of water before the pump kicks in. I'll have to search again, but I thought someone here said that with the Flotec tank they were able to get an entire shower out of it without the pump starting. Good for them if they can take a 5 cup shower, but if not, then perhaps there's something wrong with my tank? I can't think what it would be though. Perhaps the bladder isn't expanding enough?
-
I just got finished installing a Flotec 2 gallon pressure tank/accumulator and am having an issue with the pump short cycling. The Shurflo water pump in my trailer is the 4008-101-A65 (which should be the same as any one else's) and the documentation shows a cutoff pressure of 55 psi and restart of 40 psi. So with that info in hand, I set the precharge pressure of the tank to 38 psi. Hooked it all up and turned the pump on and it cycled on and off fairly quickly, like normal. Obviously it wasn't filling the tank, so I ran some water and sure enough the pump started right up. So I started lowering the pressure of the tank until the pump kicked on, which was about 28 psi and the pump ran until the tank got to 39 psi and the pump shut off. I repeated this several times and the pressures were the same. So, is the pressure switch on my pump set to 28/39? That can't be right. I'm measuring from the tank rather than directly, so maybe I need to go get an inline pressure gauge to verify the numbers. Regardless, as it is I'm only getting 5 cups of water from the tap before the pump kicks in and I'm pretty sure I should be getting close to the 2 gallon capacity of the tank. Any ideas?
-
I know at least one other couple have replaced the window with clear glass, and according to them it was a pretty easy modification to do. I think they said you can just buy the window from Camping World or maybe direct from the manufacturer. I don't think I'd like it unless we had a curtain of some sort. But I suppose that wouldn't be too hard to accomplish either. We've been in the middle of nowhere and had someone knock at our door. Spooky.
-
I've often had Oliver tell me that they needed to pass an idea by 'engineering', which I've always considered to be a euphemism for "someone with the last name of Oliver". At least I've never met this team of engineers on any of my visits. I do think that maybe their frame has been designed by a consultant engineer (maybe not the original one), but I suspect that for the most part they rely on experience, trial and error, and of course their suppliers' recommendations. And I've been told before about why things were the way they were, that company X got sued for not doing whatever, so now they do it too. I think that's just largely the way it is in markets like these, though before reading that article I would have thought that the larger companies would have true engineering departments.
-
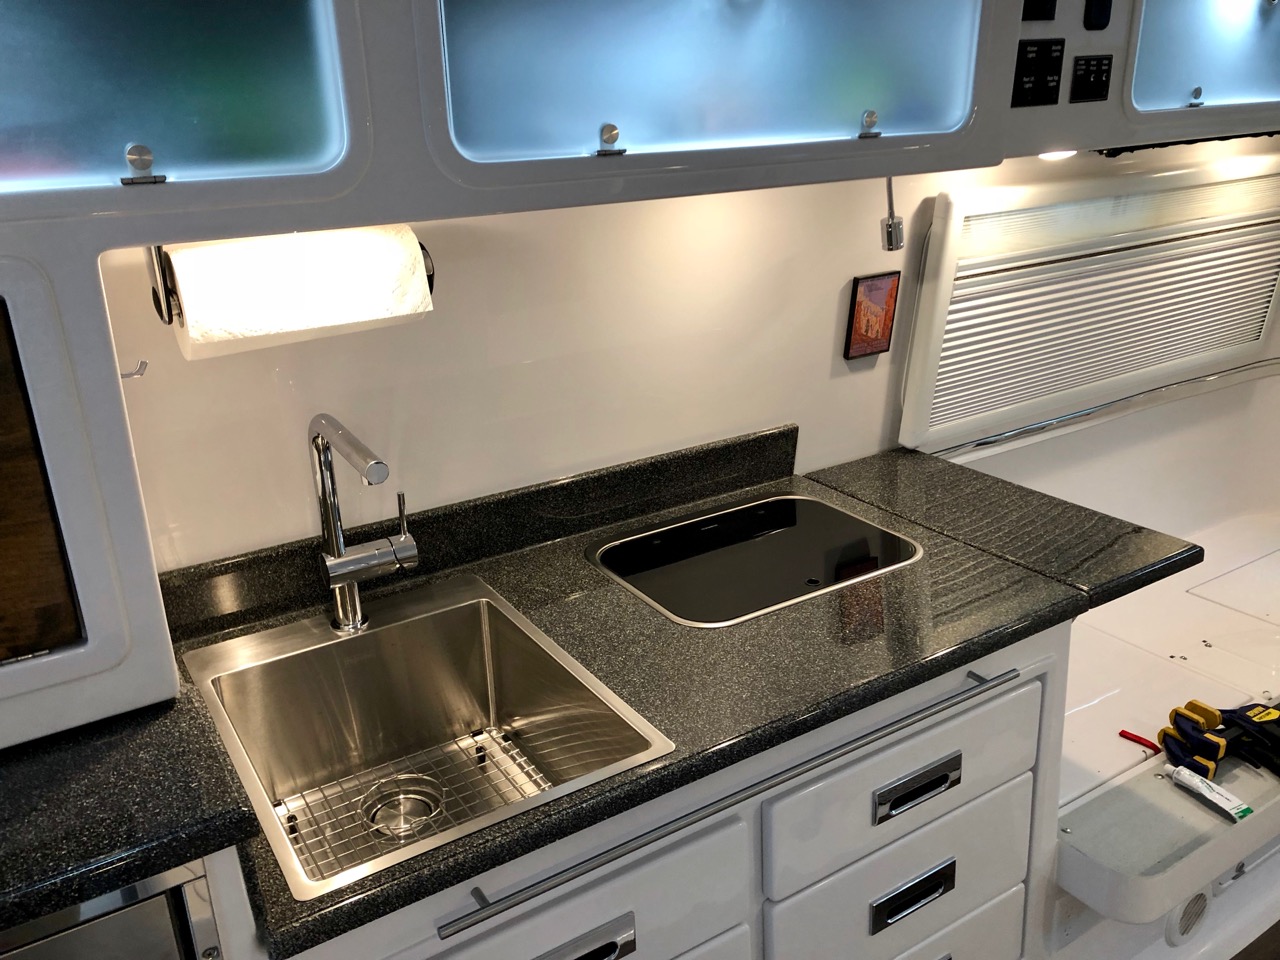
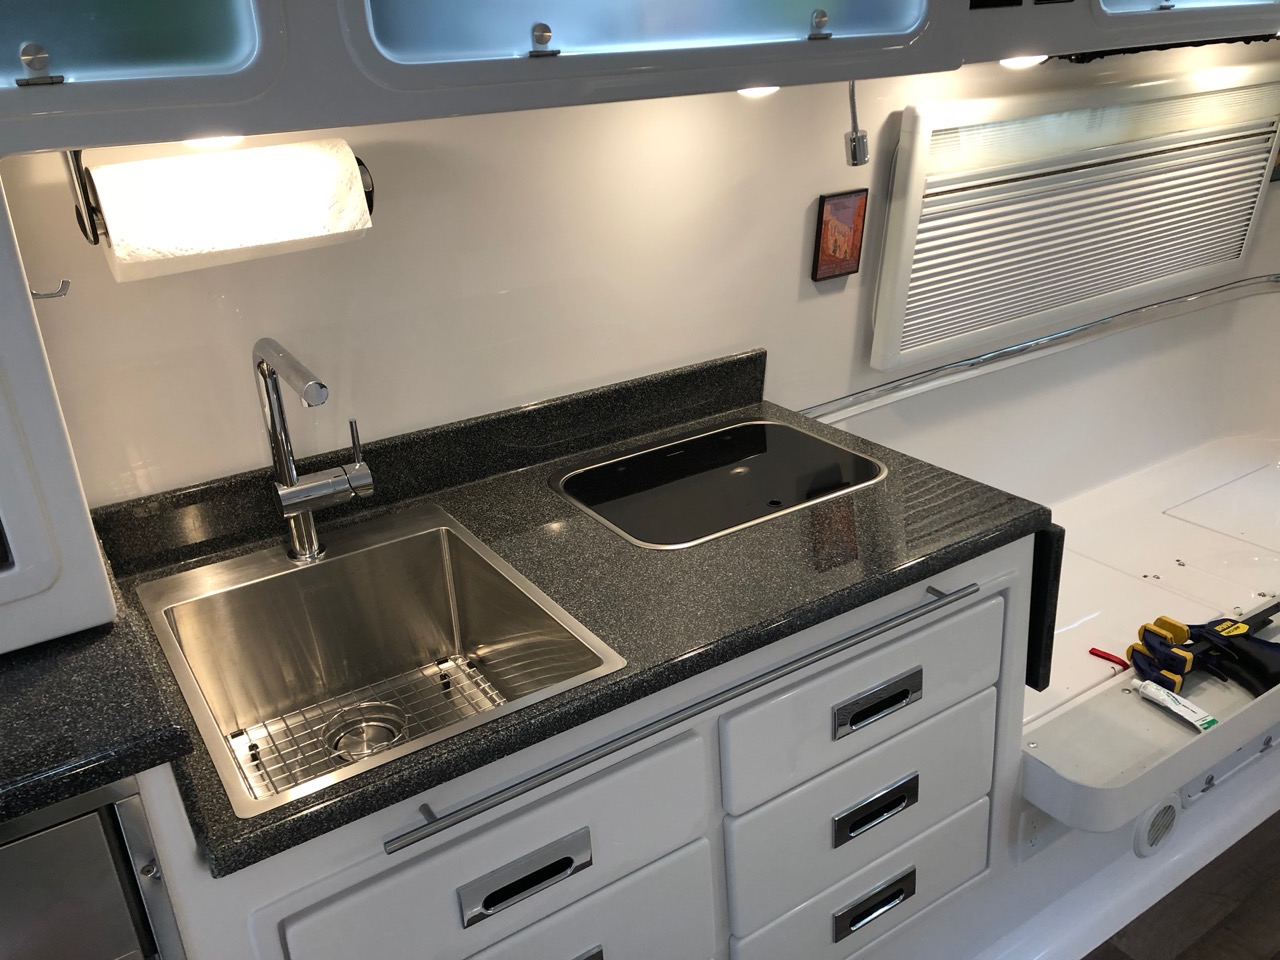
Yes, that's the one. Sorry that it won't work. Here's some more detailed, I hesitate to call them instructions, but... The existing cutout on mine was actually slightly wider due to the mounting hardware on the original Elkay sink, but I had to cut out in front and back. I started by taping down the template and marking both cuts. I located the sink in really about the only location it would go. I needed to leave enough space at the rear to turn the faucet handle, and at the front I was about as close to the fiberglass face of the cabinet as I could get. But basically, I tried to match the side and front reveal and that worked out pretty well. I tried using a Bosch T130 grit blade to cut the fiberglass, but though it made a nice cut, it was too short in a couple of spots so I had to switch to a longer T141. That one actually worked well, though the cut was rougher and it did chip in a couple of spots, but only slightly and not nearly so much as would show past the flange. I taped around the cut with masking tape to keep from scratching the countertop. After that, you'll need to remove the drawer trim using a razor blade to cut the caulk, then remove the screws where the sink will go (I think there were 4, 3 across the top and one on the left side), and then cut out the wooden brace working underneath. I used the jigsaw and cut the right side, then marked the left side of the cabinet to the depth of the sink. Then I cut the left side out from the front corner to the back of the sink. I think I did two cuts working toward each end. You could go ahead and cut all the way to the back if you wanted, since you'll just end up with a corner of the cabinet sticking out. You can then remove the brace and side piece together. The fiberglass on the front is fairly thick, and when you put the trim back, it will cover most of where you cut, so there's little risk of doing real damage. But work carefully nonetheless. I would test the flatness of your counter before trying to place the sink, and if it's bowed like mine, go ahead and shim it flat before doing what I did and having to scramble to fix it before the silicone on the sink set. The center of the cabinet has a little platform, maybe 2" wide that you can use to set whatever shims you use. I used a couple of pieces of the wood I had just cut out. Also before you set the sink permanently, just rest it in place and mark where you will need to cut the drain, since the drain on the new sink is at the rear. I think I cut it at about the halfway point. Perfect precision isn't necessary. You should have plenty of play at the trap to twist the drain to the correct angle. Once it's all flat, just run a bead of silicone around the sink and set it in place. Mine set in pretty flat and just a couple of taps with a wooden block pushed it flush to the counter. Next you'll need to trim the drawer trim so it will fit around the sink. It's soft enough to cut with a utility knife. The cut will be hidden by the drawer front so you only have to be as careful as your conscience allows. Then clean up the old caulk - I went around it carefully with a razor blade, then cleaned up the rest with minimal spirits. I actually only removed the caulk around the top and left side and pulled it out to work, but I think it would have been easier to just remove the whole piece. I taped it back to the inside of the cabinet to set it in place and then went around painstakingly with caulk. I'm a terrible caulker, and since I was going to use the same caulk to glue in the blocks around the sink, I was using the 3M 4200 which is a real bear to work with. But I managed. I noticed this morning that I need to go back in one spot that was a little thin. Since I had some 1x2 pvc left over from another project, I cut that into 4" lengths and used four of those to block around the sink on the right side where the counter wasn't level. I had a few blocks of oak that were about 3x3x2 that I used on the back. The sink has a flange on each side that I glued to. On the front, I ended up with about ½" between the face of the sink and the inside of the counter, so I cut a few strips of ½" plywood to block there. I made those strips the full depth of the sink since I used those to secure the drawer front back in place. That's not necessary, since the drawer overlaps the trim enough that you could secure the drawer with a bead of caulk around the top and sides. But I had in mind to use the velcro, so I needed a few blocks for that. I taped all of the blocks in place so they wouldn't move and left them overnight. The next morning I removed the tape and the temporary shims I had for the countertop. And that's pretty much it. The rest is just following the instructions for the faucet and sink drain. If there are any plumbers reading, stop now because I have to confess that I used silicone on the drain basket and fittings. But I figured with all the bumps and vibration that silicone would be better in the long run than plumber's putty. If you use the basket that comes with the sink, then everything should clear the existing drawer cut, or at least it did on mine. I did get a low profile elbow, which as I said is cheapy plastic, but it works and since it slips inside the old drain I didn't have to worry about measuring and cutting. You'll need to glue a PVC-plastic compression adapter to the old drain. It's called something else, but you get the idea. Just spend several minutes staring blankly at the plumbing fittings at Home Depot and eventually you'll figure it out. That's my approach, at least. The only other thing I did special was to zip tie the existing plumbing lines as secure as possible while I was in there. I don't like that Oliver just lays a lot of the plumbing in place without securing it and I've already had one fitting crack due to vibration, so whenever I'm anywhere near a water line, I zip tie.
-
Off-pavement recovery - equipment and best methods
Overland replied to John E Davies's topic in Towing an Oliver
Mentioning the gap beneath the bottom bolts made me go check mine. Oliver did the install and I'd just assumed they were flush to the bottom of the tongue. They look like they do from the side, but there's actually about a ⅛" gap. I'm not sure if I''m worried about it though. It doesn't look like it wants to move, and if it does get knocked out of place that ⅛" I can always remount it. On the other hand, if I find myself standing next to some ⅛" aluminum at Home Depot I might as well grab it. It's an interesting install underneath the trailer. For occasional use I can't see anything wrong with it, though for me using it every time we unhitch it would be too inconvenient. I've found that the springs on the two sets of pins are fairly stiff and so you might find that pulling them from that angle is difficult. But maybe if you grease them well they'll slide smoothly and not give you trouble. I wonder if an access port on the side of the propane cover would allow you to run a long extension to the crank from the outside, sort of like an old starter crank for a car.