Overland
-
Posts
3,835 -
Joined
-
Last visited
-
Days Won
212
Everything posted by Overland
-
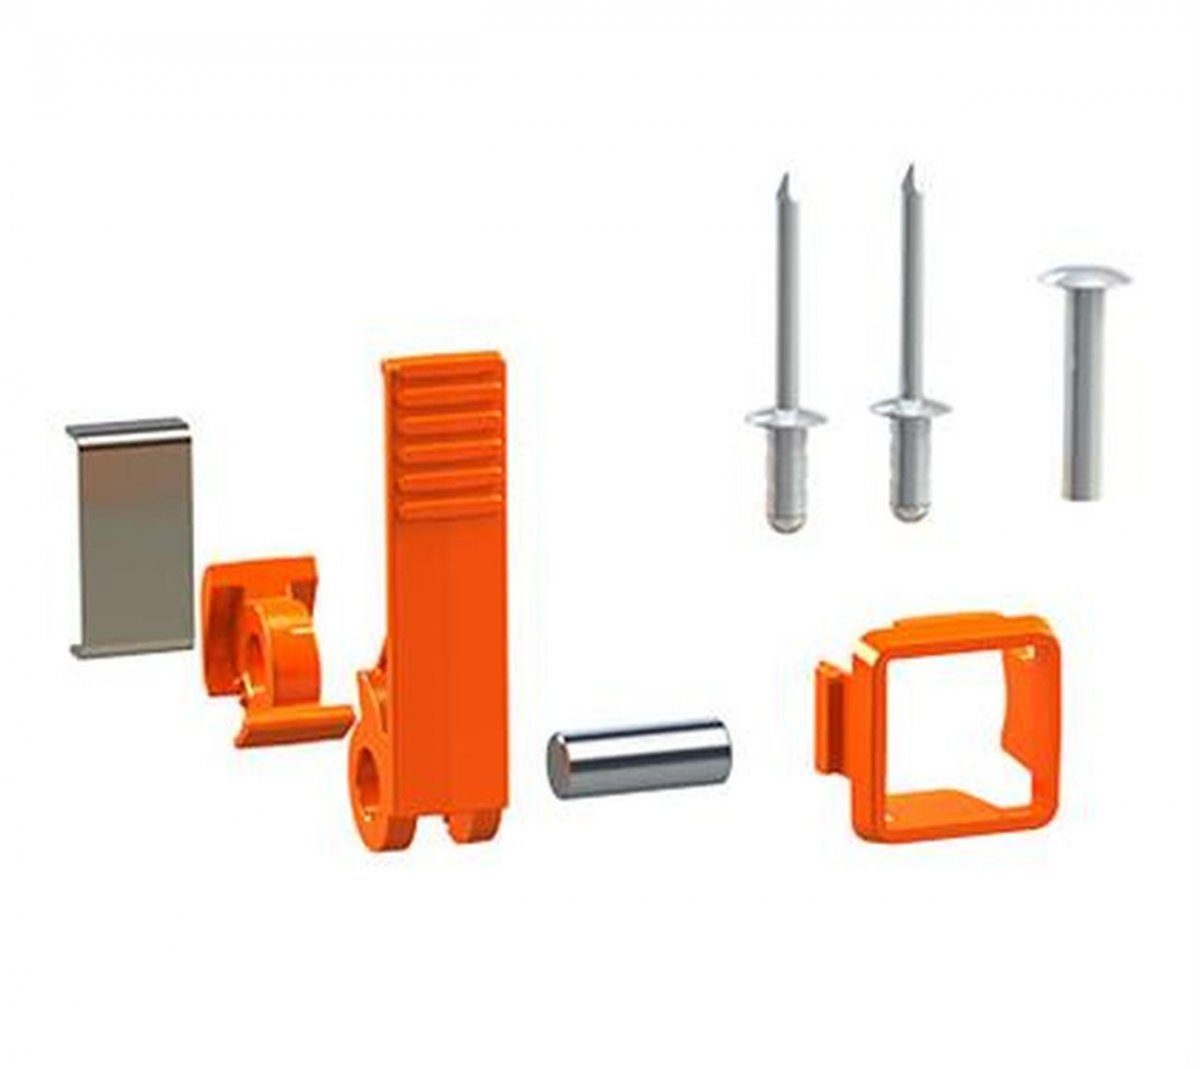
Just to be sure we're talking about the same part, it's the piece on the bottom right here, correct? Going by the parts diagram, I think the only way you can get that part is with the flipper kit. At least it isn't given a separate part number. 21a is the flipper kit, and it includes all the parts in the photo above. But the flipper kit is less than $8, so you might as well get it and then you'll have the flipper for when it breaks.

-

HOW TO: Element Fire Extinguisher Install
Overland replied to John E Davies's topic in Ollie Modifications
Yeah, it was a disaster of a night. Siri gave us some bad directions that took us down some super bumpy roads. When we finally got into the campground at around 10pm I got out of the truck and heard the alarm. It had gotten knocked lose from its mount and somehow that triggered it. Took forever to dig it out from between the hulls. And then I couldn’t get it to turn off so I had to bash it with a rock, lol. Lots of fun. By the time I started hitting it with the rock we were laughing so hard that we we could barely stand up. And that was before I turned on the water pump only to have my feet get soaked from water spraying out of the return air vent. And before I realized that I’d lost power to the fridge. We went to Santa Fe the next day, dropped off the trailer at a repair shop and found some tequila. That was her maiden voyage, and now you know why I’ve spent so much time tying down all the plumbing and electrical and why I carry a lot of tools and spare parts. She’s tough enough now to handle pretty much anything. 💪🏼 -
Thanks, I’ll have to get one like that.
-
I haven't actually done one, but it looks very very easy. You just take off the little orange retainer at the end that prevents the two arm pieces from sliding apart, then slide out the inner piece, remove a pin that holds the clip in place, replace the clip and reverse the process. The kit comes with the clip, a spare spring and pin in case you lose one of them, and a replacement orange retainer piece so that you don't have to worry about destroying the existing one getting it off. It also comes with two rivets, but it looks to me like you only need those if you plan to take the entire arm off to work on it - I think it would be a cinch to just work on it in place.
-
HOW TO: Element Fire Extinguisher Install
Overland replied to John E Davies's topic in Ollie Modifications
I don't either anymore. It got to be just the same stuff posted over and over, and their editorial content of course is mostly advertisements. Plus some of those guys are just a little too much into it. But there's still some good content and I'll pop over every now and then to search for reviews or just to see what's new. Thanks for finding that thread - I'd forgotten about it. What I haven't forgotten is that night I was frantically looking for the little smoke detector that had fallen between the hulls. For some reason I didn't make any new campground friends that night. -
Here's the tool bag that I carry all that stuff in. It was my regular tool bag until I reorganized my tools a while back. So I was glad to find a use for it - I don't think I'd spend that much on a bag just for spare parts, but I'm sure that there's something similar and more reasonable on amazon. But I do like these soft bags over hard cases since they're so much easier to stuff in a corner and don't jostle around as much. https://www.blueridgeoverlandgear.com/collections/tools/products/tool-bag
-
That's what happens when you're on the forum too often like me. Every time someone mentions something they carry, I add it to the list.
-
A couple of things I forgot about - along with the spare LP regulator, it's a good idea to have one or a pair of pigtails to go with it. The other is a set of Colby replacement tire stems - that's really for the truck, but they'd work on the trailer too.
-
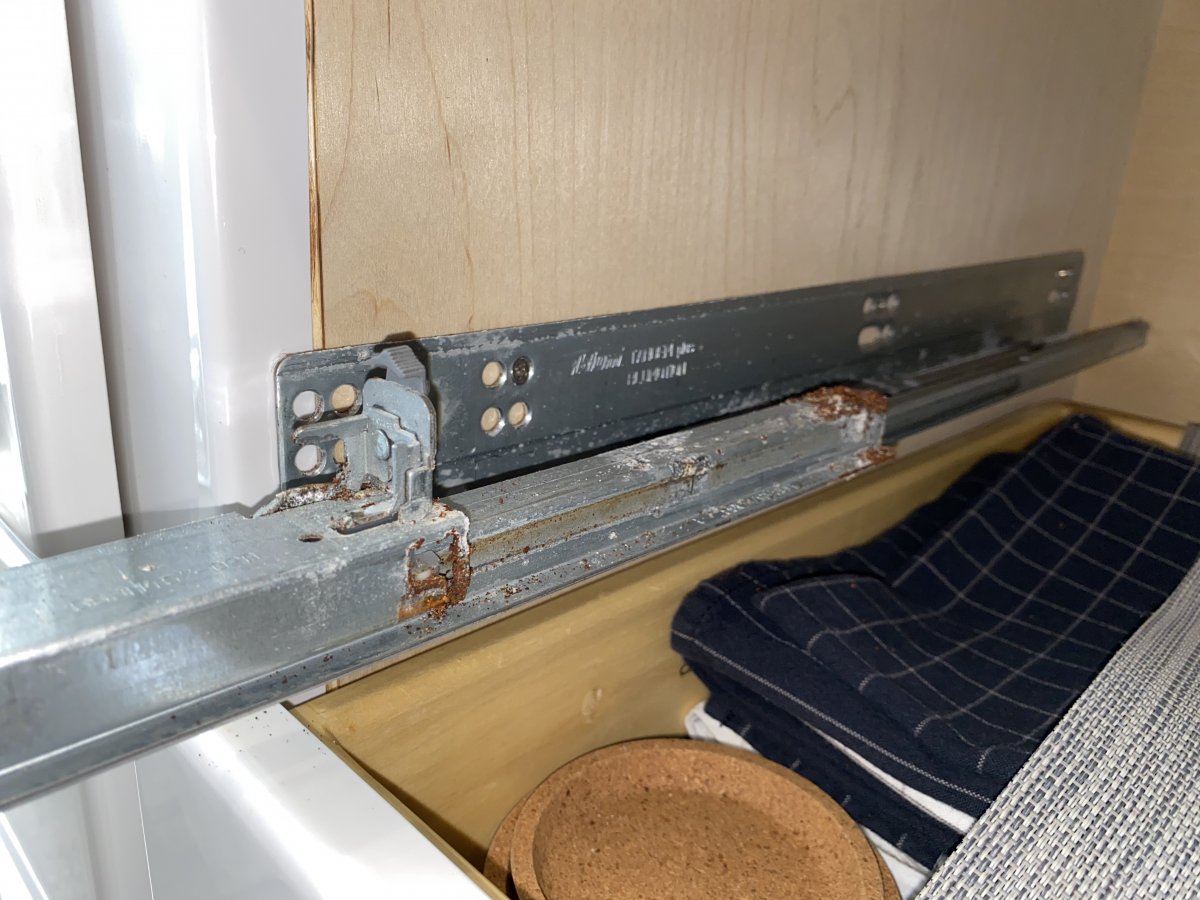
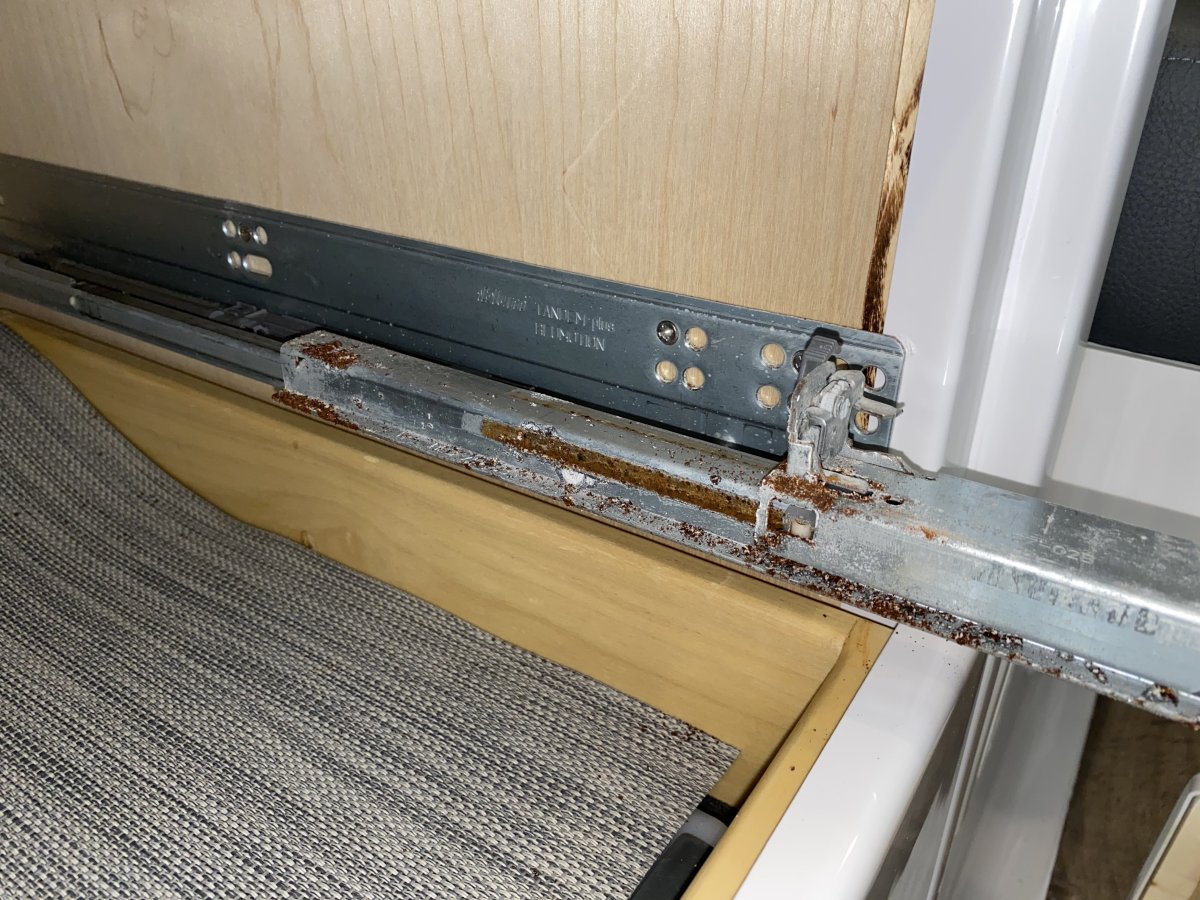
Has anyone experienced this? I just noticed that a couple of drawers were rough to open and it looks like the bearings on all my drawers are rusting - some pretty badly. Like, really badly. I'm not sure if there's a solution to this other than new slides. I guess I could take them out and soak them, but I'm sure they'd quickly rust up again. I have to guess it's just from humidity since there's no sign of water intrusion anywhere. Possible that I have a hidden leak between the hulls that's keeping it overly humid in there. I've got a dehumidifier, but I haven't been using it since it requires the trailer to be plugged in 24/7. I guess I've got a new project. I've sent a note to Oliver to ask about replacement. Blum has a lifetime warranty on everything they make, so hopefully they'll swap out the parts for me for free.
-
HOW TO: Element Fire Extinguisher Install
Overland replied to John E Davies's topic in Ollie Modifications
Good find - but I was thinking of a long discussion about different types of fire extinguishers, pros and cons, etc. But that was probably over at expedition portal. -
HOW TO: Element Fire Extinguisher Install
Overland replied to John E Davies's topic in Ollie Modifications
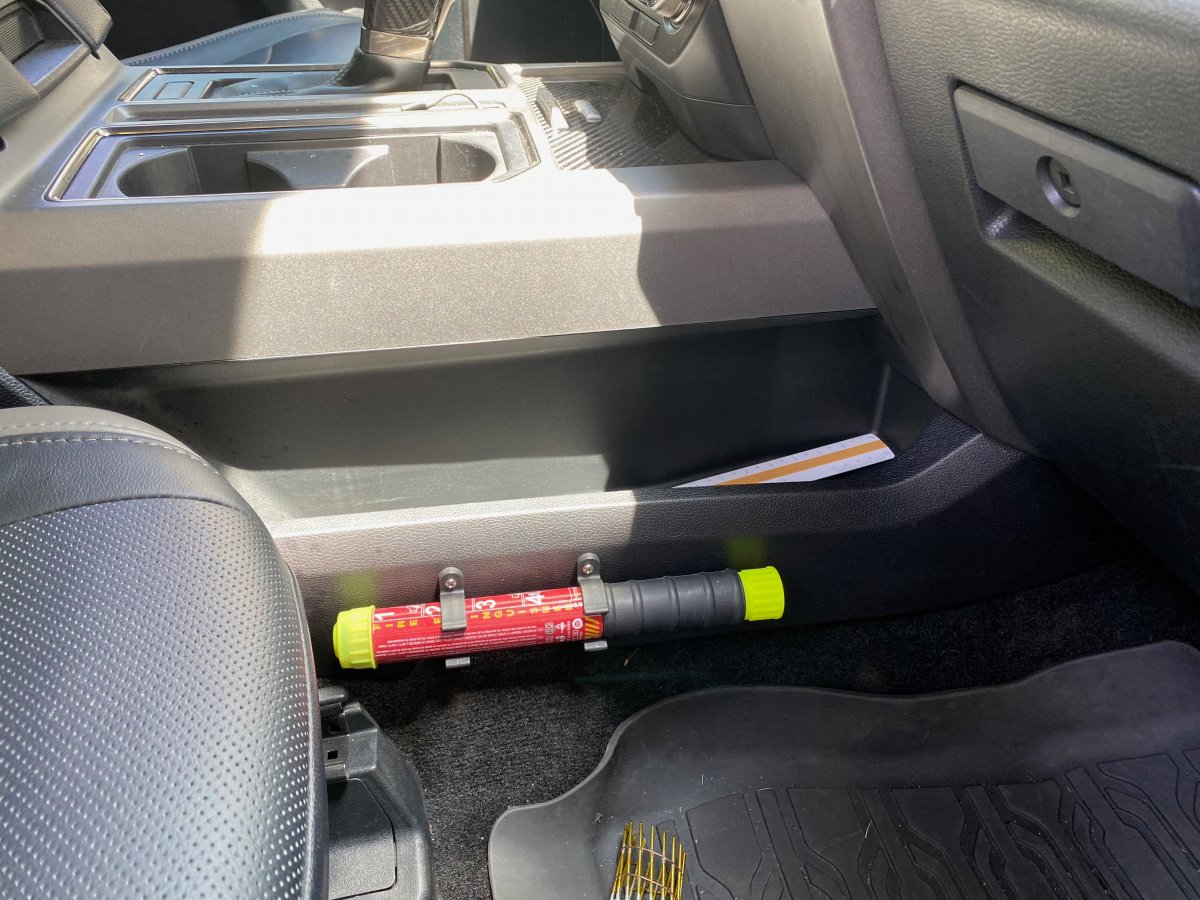
I placed one on each side of the center console - they're out of the way but visible and in reach even with a jammed seat belt. I thought we had a thread on these a few years ago. Maybe that was over on expo. They're great, but not cheap. I keep both mine in the truck and then just grab one to put in the trailer when we're camped. The clips that came with them hold them pretty solidly.
-
I had the same problem and ended up running the cables inside the pantry - in the front corner where they’re out of the way and not visible unless you poke your head inside. Obviously I had to drill through the pantry into the overhead compartment and then through the bottom. But the holes are small and tidy with grommets. My battery monitor is to the left of the pantry above the color display. There’s definitely a path between the hulls though if you can find it.
-
I feel the same - things are getting bad all around the south - but I think for now it’s still on.
-
Here's what I carry - Plumbing: ½" brass pex fittings: elbows (2), tees (2), ½" NPT adapters (2), ½" NPT elbow adapters (2), ½" valve (1) #4 stainless hose clamps (8) ½" press-fit end cap (1) ½" pex tubing (6 feet) - a single long piece is easy to stuff in the hull and not get lost ½" flex hose (1) Male garden hose fitting (1) Female garden hose fitting (1) Garden hose splice (1) Garden hose washers (4) Garden hose screen washers (2) Spare water pump - yes, I carry a complete spare pump Kitchen faucet repair kit - this kit came with my kitchen faucet Silicone tape Press-fit removal tool Bolt cutters - to remove copper crimps Utility knife You'll note that I don't carry a lot of press-fit stuff or a crimper. For emergency repairs, I think it's more practical to carry the small brass fittings and use hose clamps. You can always swap them out for crimps later (though honestly the pipe clamps hold better). They're almost as easy to use as press-fit stuff and take up much less room. Plus there are places in my trailer that are too tight for press-fit fittings anyway, and it would be silly to carry two types. Electrical: 12 awg wire (15') 12/3 romex (3') Wire nuts (4) Wago lever nuts (assortment) Misc 12 volt fittings (assortment) Misc 12 volt fuses (assortment) Primary 400A fuse (1) Jack fuses (4) Spare GFCI outlet (1) - very important! Locking cigarette lighter plug (1) Refrigerator light bulbs (2) Lamp light bulbs (2) - for the lamp I installed on the nightstand Electrical tape Crimper/Stripper Misc Parts: Spare propane regulator (1) Spare awning clips (2) - these are the little orange clips on the Carefree awnings that are destined to break one day Misc Repair Items: 3M 4200 (1 3 oz tube) 3M 4000UV (1 3 oz tube) Silicone sealant (1 3 oz tube) Eternabond roof repair tape (1 roll) Awning repair tape (12") Screen repair tape (assortment) Clear tenacious tape (12") 1" Gorilla tape (1 roll) Bungee cords (various) Zip ties (various) Metal wire (1 roll) Velcro strips (various) 1" VHB tape (1 roll) WD-40 (1 3 oz can) Lithium grease (1 1.5 oz tube) That looks like a ton of stuff, but the majority of it fits in a 12" x 12" x 4" Blue Ridge tool bag that stuffs easily in the basement. A few of the larger spares are in a box that's secured between the hulls along with some other items like the romex and pex tube , small things that I'm more likely to use I keep in the utility drawer, and a few things are always in the truck.
-
With iodine + filtration + UV, that's a pretty thorough purification system for bacteria - are you worried at all about heavy metals? As much as you've invested, I'd think you'd want to add an F1Pb filter or similar into the mix.
-
We definitely have some full timers, even in the smaller Elites. We’ve also had a few who lived in Elite II’s for a while but despite being big Oliver fans, ultimately decided that they needed a larger space. So it’s really down to the individual. I think the biggest factors with people who’ve switched are a dry bath, separate living and sleeping spaces and a wider bedroom with easier access to both sides of a queen bed. All reasonable desires and if you want those things you just have to weigh them against the various advantages of the Ollie. One of those of course being that Ollie is a fantastic boondocking trailer.
-
Here's all the info on the rally - https://olivertraveltrailers.com/events/2020-oliver-owners-rally/
-
I only just last week tried the Duragloss cleaner on anything, and yes, I tested a spot on the old caulk which is what turned gummy. It didn't clean the stains from the silicone caulk, but didn't seem to damage it either. It cleaned up the mildew spots on the old caulk pretty well, but at a cost. The dull paint on the frame is fortunately only something you'd notice with really close inspection, and I think some wax will shine it back up. Or worst case, a little buffing. I'm not worried about it, but of course wouldn't do it again. I asked because it occurred to me that it would be difficult to re-caulk around the windows with the gutters in place.
-
Re-caulking is regular maintenance. You'll be doing it soon enough, or paying someone else to.
-
I'm going with 3M 4000UV. I scraped the old caulk with one of these and cleaned up with alcohol. The other windows were much easier than the one with silicone. I'll go back over it with some acetone or MEK before caulking just to make sure the there's no residue from the alcohol. I tried MEK to start with, but I could tell that it was taking the paint off of the window frame. Not much, but enough to dull the sheen just a bit. Something else I learned - I had tested some Duragloss 541 mildew and stain remover on a few small sections of caulk to see how well it worked. It actually worked quite well, but I'm glad I did a test because when I scraped those areas, the caulk had turned gummy underneath a thin skin. Like almost right out of the tube sticky. Maybe it would have hardened back up with time, but this was maybe three days after, so it might not have re-cured well at all.
-
Not a bad idea. I was thinking about it just now and wondering if dust intrusion isn't as much or more of an issue than water. I haven't had a problem with dust so far; but a few others have, and that's not a club that I'm eager to join.
-
Since I had to redo the caulking on this one window, I figured that I'd go ahead and do the rest. Of course, like most of my projects, this one got delayed right after I got all of the old caulk cleaned off from everything. Two interesting things have come up - one, on two windows, when I scraped off the caulk from the bottom of the frame, a good bit of trapped water leaked out. Not just a few drips, but a steady stream for a good 30 seconds or so. Secondly, we've had a few gully washers come through and since I haven't recaulked, I've expected both times to have to mop up water on the inside, but so far, nothing - not even a drip, even between the hulls. Soooo...I'm wondering if caulking the windows is a belt and suspenders situation, since the windows also seem to have a black bituthene type sealant between the frame and the fiberglass. And if so, might the caulk actually potentially cause problems, holding water that gets trapped from clogged weep holes - at least that's the only place I can figure the trapped water came from. I don't really know how these windows are put together though, so I can't tell for sure. Thoughts? Another question, while pondering that - I'm wondering the same about the caulk around both the water heater and furnace. There's no reference in the manuals about caulking these on installation, and with the truma, at least, the door itself provides ample opportunity for water to get in, so caulking the frame doesn't seem to do much. Can't tell with the furnace. So again, I'm wondering if the caulk is really necessary.
-
I'm curious if anyone has tried installing these onto the flange of the window itself rather than just to the outside, and how that looks.
-
We'll certainly miss you around here Mike. Thank you for being such a helpful forum member all these years.
-
I like the look of the new cooktop. I especially like that it doesn't have those little rubber grommets holding the grates on. I'm always chasing those around whenever I clean. I've lost one and a couple more are split. I seem to remember someone posting a link to replacements and them being stupidly expensive.