John E Davies
-
Posts
5,759 -
Joined
-
Last visited
-
Days Won
243
Everything posted by John E Davies
-
Steel pieces work fine, but in the long run there are continual problems maintaining the looks. Especially on the tongue due to erosion by road spray and gravel strikes. Is there some reason you want to avoid aluminum? It is actually easier to work with, and better matches the Ollie construction.. and it is sexy looking. The only thing not easy about it is welding, you can’t do it well at home with a budget stick welder, it is a little bit of an art and requires a specialist. John Davies Spokane WA
-

HOW TO: Move the factory cargo tray to a rear rack
John E Davies replied to John E Davies's topic in Ollie Modifications
Thanks for the complement. I am anal as can be, and I was a General Aviation A&P for twenty years before retiring early to raise my kids. I could build an airplane, I still have the tools, just not the inclination. I was told more than once when working to back off, I was too picky - “good enough is good enough”. I should have worked for a corporate outfit with bottomless finances, shinier jets and floors, and a higher service standard. Tell me, as an airplane pilot, who do you want working on it, Mr Anal or Mr Good Enough? LOL. What is funny is that my daughter, who has no tech background at all, snapped up an admin position at one of those places, a Spokane based aerial firefighting outfit. Have you ever considered flying tankers? John Davies Spokane WA
-
HOW TO: Move the factory cargo tray to a rear rack
John E Davies replied to John E Davies's topic in Ollie Modifications
? It looks like any other Ollie with no rack, other than the Stone Stomper support I made.... what are you asking, specifically? John Davies Spokane WA -
HOW TO: Move the factory cargo tray to a rear rack
John E Davies replied to John E Davies's topic in Ollie Modifications
Thanks for the kind words. What you say is true, with several caveats. I did mention building the rack to be “fused” in the event of a rear ender, and I did mention the strength of these NATO cans and that I wouldn’t do this with plastic ones.. The rack “should” fold up into the spare tire rather than send all the energy into the frame structure. Obviously there is no way to test this, without completely destroying it. I removed my rear tire cover years ago, the rubber tire will hopefully add a cushioning effect as the cans get pushed into it. If not, then a fiberglass repair is easier and cheaper than repairing a bent frame. I can’t comment on the state laws about carrying fuel in back. You see Wranglers and expedition rigs everywhere with rear mounted spare fuel. Whether that is legal I don’t know, but is an extremely common way to carry gas. Nobody except possibly in CA will ever hassle you for not having “EPA legal” cans. (The one exception that I know about are the large WA State ferries, they do inspect and you can’t bring it if it is not correctly labeled - the tiny ferries never even look.) How would anybody even know what is contained inside? I carried the cans up front for a long time, it worked very fine other than the added tongue weight, but I much prefer having that stuff 25 feet away with the hull of the trailer between me and a potential fuel spill or fireball. I don’t worry about them being back there, not one bit. Do NOT carry plastic gas cans in back, please! That is different! Do not do this! John Davies Spokane WA -
HOW TO: Move the factory cargo tray to a rear rack
John E Davies replied to John E Davies's topic in Ollie Modifications
These are not replacement caps for the stupid screw-on ones. The cans are genuine official real military grade NATO cans. Mine are 30 years old and have never even been repainted. You can carry them sideways strapped to a roof rack or drop them six feet to concrete and they will not leak. Carried inside an enclosed vehicle they don’t seep nauseating gas smells. Military trucks sometimes carry them flat in racks under the bed. These are the best you can get, but you MUST avoid the cheap knockoffs. Plus they are not in any way CARB legal, so new ones often come with a sticker that says “Not For Fuel Use”. LOL.... I made short loops of steel cable so I can install padlocks on the lids to avoid pilferage, they don’t come like that. Here are a couple of sources, mine happen to be by Wedco. https://www.jerrycanwarehouse.com/product-category/jerry-can/ https://www.amazon.com/Wavian-Authentic-NATO-Jerry-Fuel/dp/B007ZICYXQ/ref=asc_df_B007ZICYXQ/?tag=hyprod-20&linkCode=df0&hvadid=312142020868&hvpos=&hvnetw=g&hvrand=15193396740314842701&hvpone=&hvptwo=&hvqmt=&hvdev=m&hvdvcmdl=&hvlocint=&hvlocphy=9033787&hvtargid=pla-570276520058&psc=1 They are available in different sizes, the big 5.2 gallon is most common. Buy a couple and you will pass them on to your grand kids.... John Davies Spokane WA
-
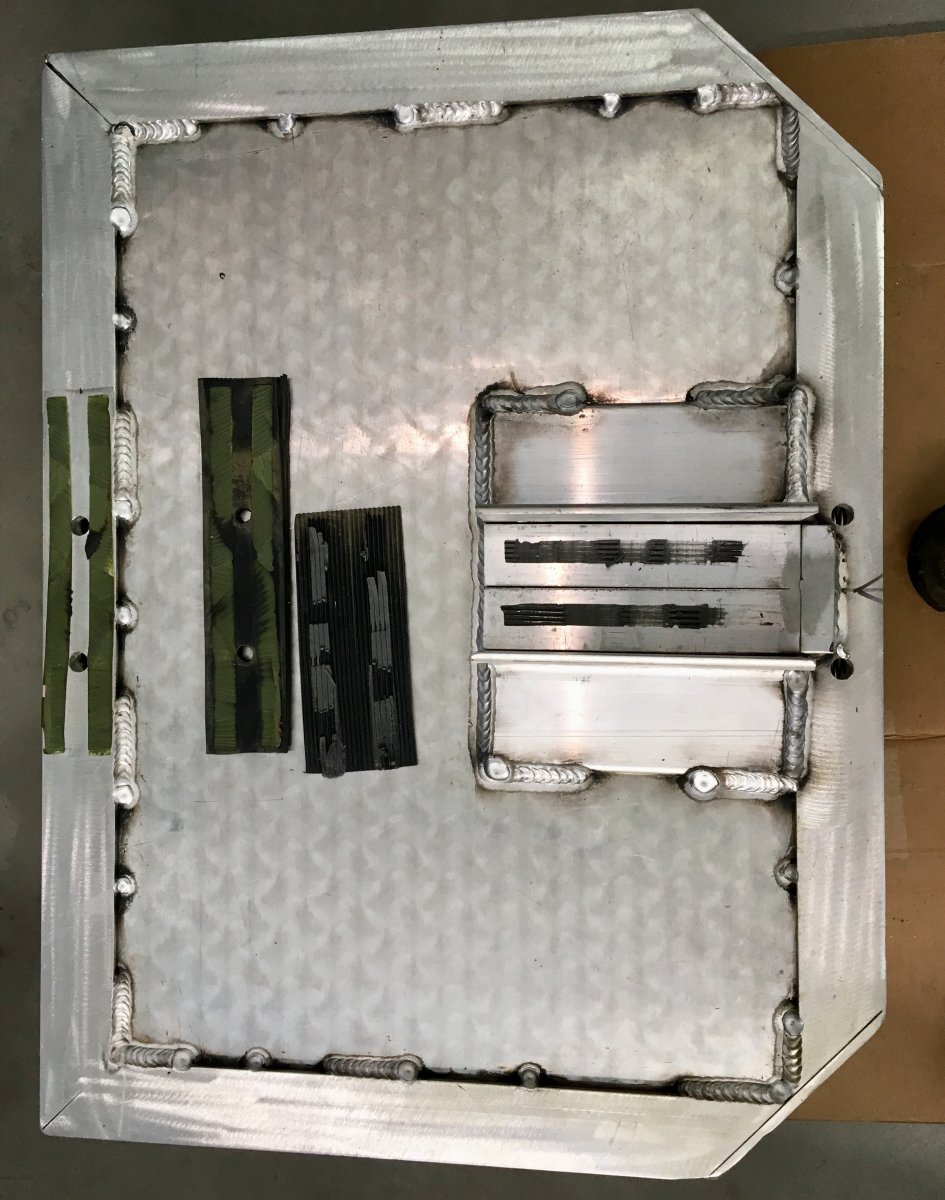
I personally would not expect anything from the hardware store to be even remotely trustworthy..... plus it might not be very attractive. Oliver installs the front trays with a couple of really long stainless "square top" ubolts, 5/16" diameter I THINK, one at the front and one at the back of the center frame tube. It seems a little light duty to me but I asked Service quite a while back and they have had no problems with this method. OTH they do add reinforcing angles to the sides to prevent rocking. Here is my tray, before I moved it to the back (the two rubber strips are not in their original locations): You could pick up a nice 6061T6 1/4" thick aluminum plate of appropriate dimensions at your local metals supplier, or order from here: ... https://alcobrametals.com/product/1-4-6061-t651-alum-plate/ ... but a local supplier would probably be way cheaper plus no shipping. A local supplier will have a scrap bin with odd sizes for you to look through, much cheaper. Attach the plate to the tongue using the ubolts, attach the box to the plate using stainless 1/4" bolts and self locking nuts. You will need a couple of thick plates at the bottom of the ubolts to "pinch" the frame. In a really severe jack knife the box would hopefully shear right off the plate without hurting anything else. I am not sure about the strength of u-bolts sourced online, getting them from a bolt supplier would be more trustworthy. Or you could ask Oliver Service to sell you some. Good luck, post pictures. John Davies Spokane WA
-
I already started one here..... If there are not enough items listed, for your particular equipment, for example, you can always add them. You need to have either Numbers (IOS or Mac) or Excel (Windoze) for these files to work - they are interactive. https://olivertraveltrailers.com/forums/topic/2774-how-to-davies-rv-travel-log-service-inventory-spreadsheet-excel-numbers/ The Oliver factory really needs to do a maintenance sheet or checklist, and post it at Oliver University. Unless it is already there, they keep adding stuff all the time. And I may not know much about some of the equipment anyway, if don’t have it..... Please let’s not drift too far off topic in this thread. You can always start a new thread or PM me, John Davies Spokane WA
-
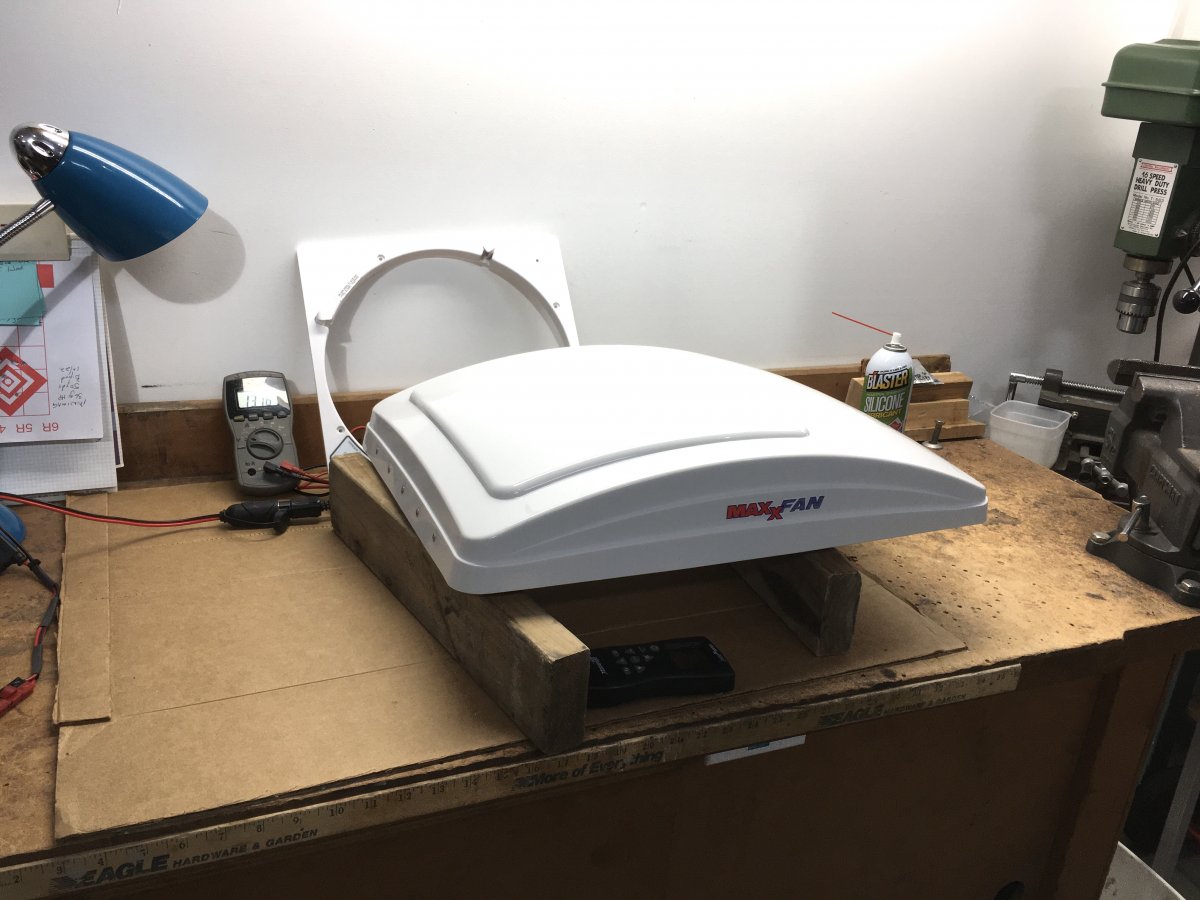
I am not quite sure I understand what you are asking. These are “full featured” fans with reversible motor, variable speed, thermostatic control, rain shield, etc. There are LOTS of parts, relatively speaking. .... https://www.maxxair.com/products/maxxfan/maxxfan_deluxe.php..... The hole in the roof is a standard size, you could easily replace your MaxxFan with a manual vent. There isn’t much that could go wrong with this that a squirt of lubricant every few years couldn’t fix. All RV appliances are made to low standards and are essentially disposable, meaning many people just use one until it fails and then they buy a brand new one to replace it. But if you are willing to do preventative maintenance it will last a whole lot longer, and hopefully remain working correctly. Owning an RV is a lot of work, no doubt about it. A lot of owners brand new to this world do not appreciate how much work there is..... John Davies Spokane WA
-
Do these have provisions for cabin ventilation? Any concerns about condensation or chafing under the cover material? How do you wash something that big? Thanks. John Davies Spokane WA
-
Some videos that I made when testing the operation: Normal operation after lubricating. This shows the range of motion with the rain shroud attached. It moves much further with the shroud disconnected at the rear hinge. 2017 MaxxFan 7000K with rain shroud attached, full cycle bench test, 13.2 volts DC. Rear hinge binding and squeaking. This was causing the jerky operation. 2017 MaxxFan 7000K squeaky and binding rain door hinge Normal play in rain shroud when partially open: 2017 MaxxFan 7000K sloppy at part open ***** NOTE ***** The ONLY positions where the rain shroud is not loose are at full closed or full open. At ANY intermediate position, the entire assembly will flop around in the wind. NOT GOOD - never leave your fan part way open using the black knob, especially in gusty winds or when towing. It can damage the parts. John Davies Spokane WA
-
Reassembly. I installed Andersen connectors at the main wires coming out of the ceiling for easy removal in the future.... If you don't want to do that, use a couple of yellow crimp slices. ... Anderson Power Pole Connectors Connect the wires and reinstall fan circuit fuse if removed. The fan should come awake with a beep. Test the operator with the remote and the built in switches. If everything is good, reinstall the fan, lower panel and trim panel. Done. John Davies Spokane WA
-
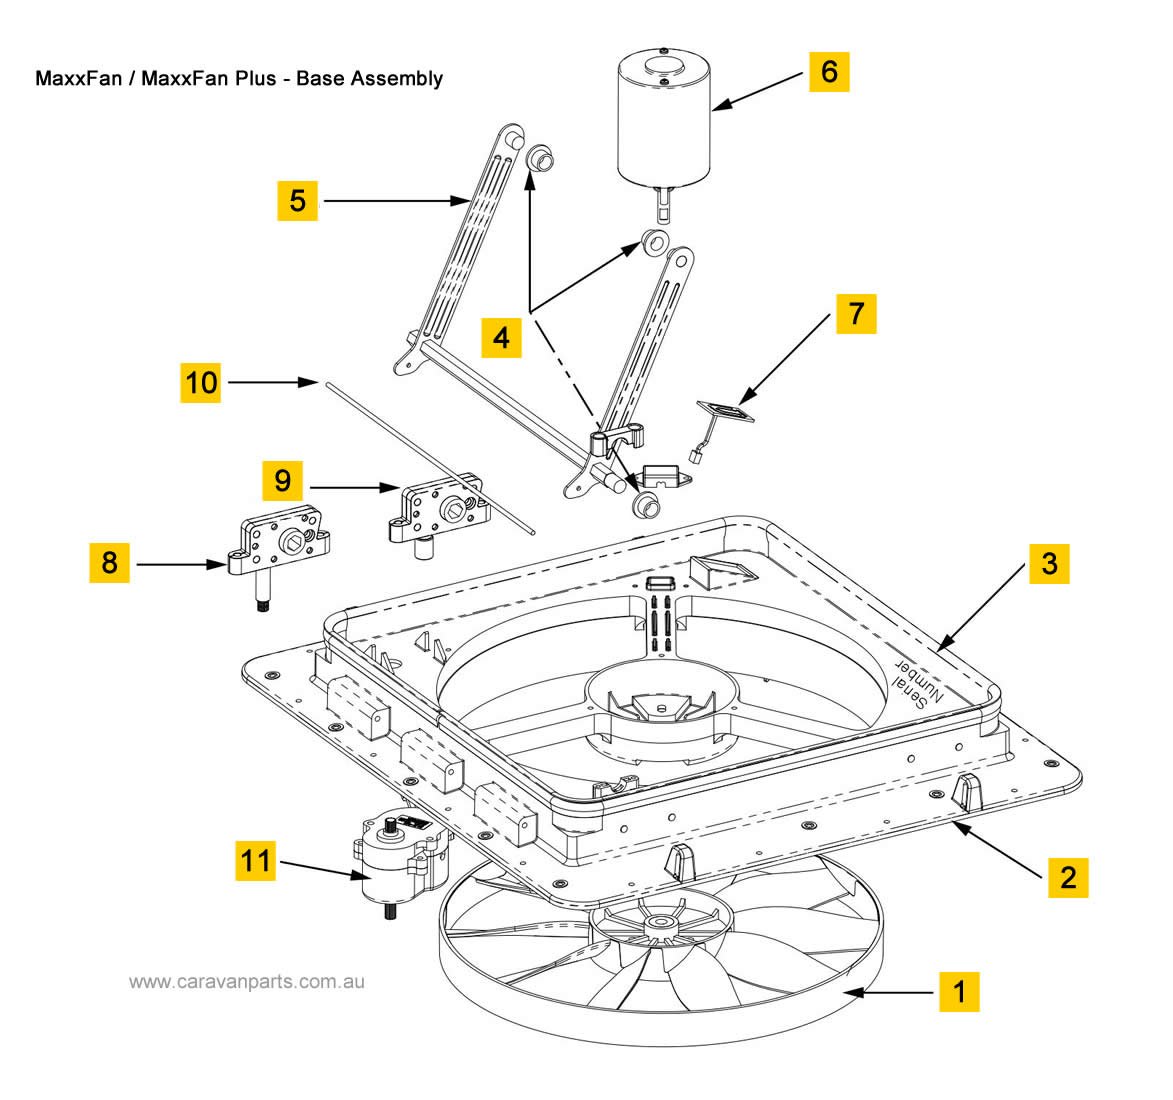
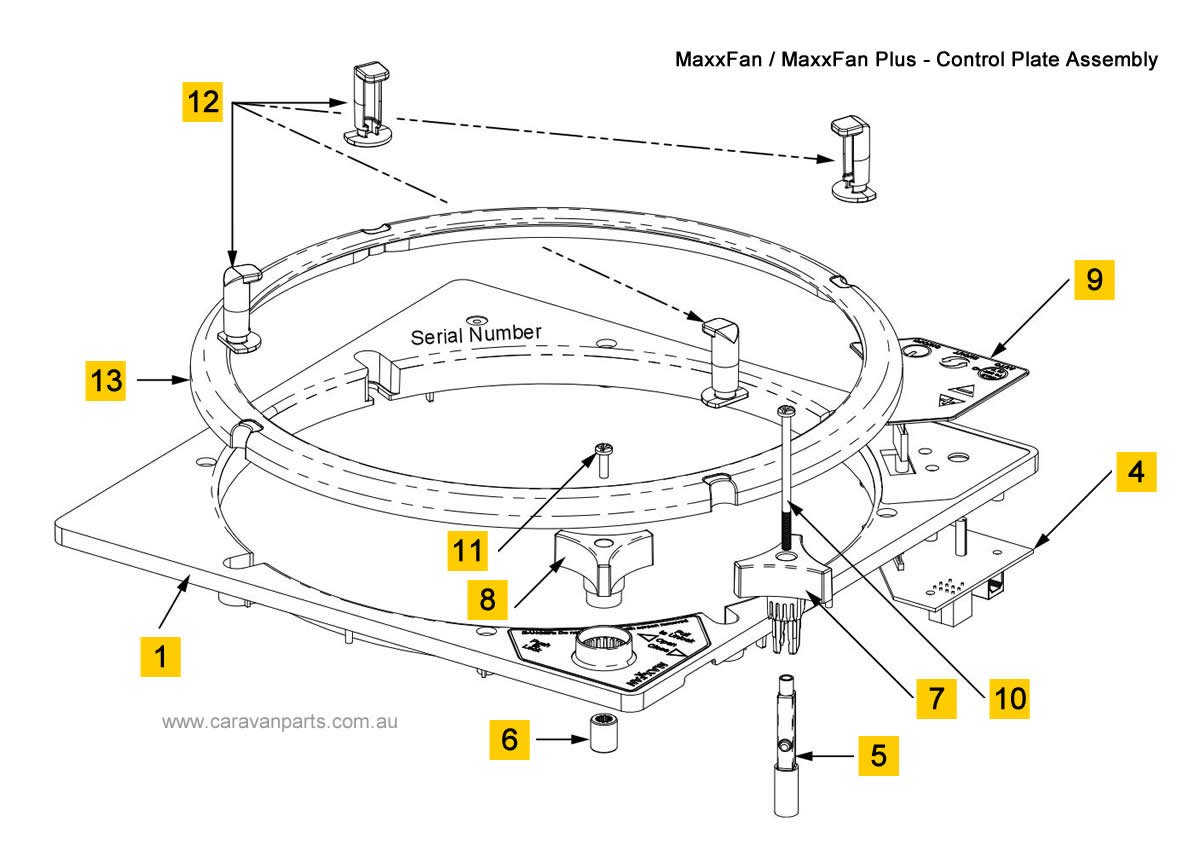
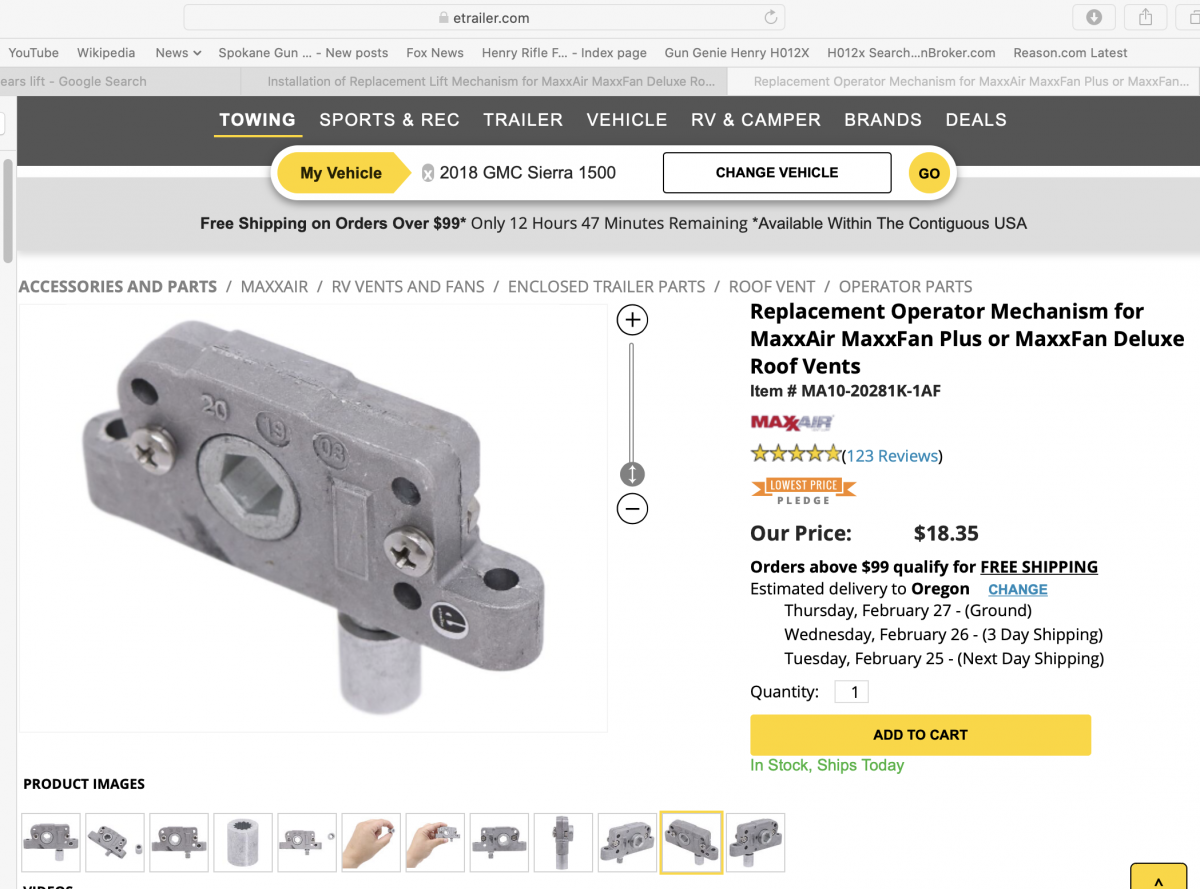
More tech info. These are generic pics, not specific to your fan. If somebody has an Illustrated Parts Breakdown for this series, please let me know, so I can update this. MaxxFan Operator Replacement YouTube Condensation fix John Davies Spokane WA
-
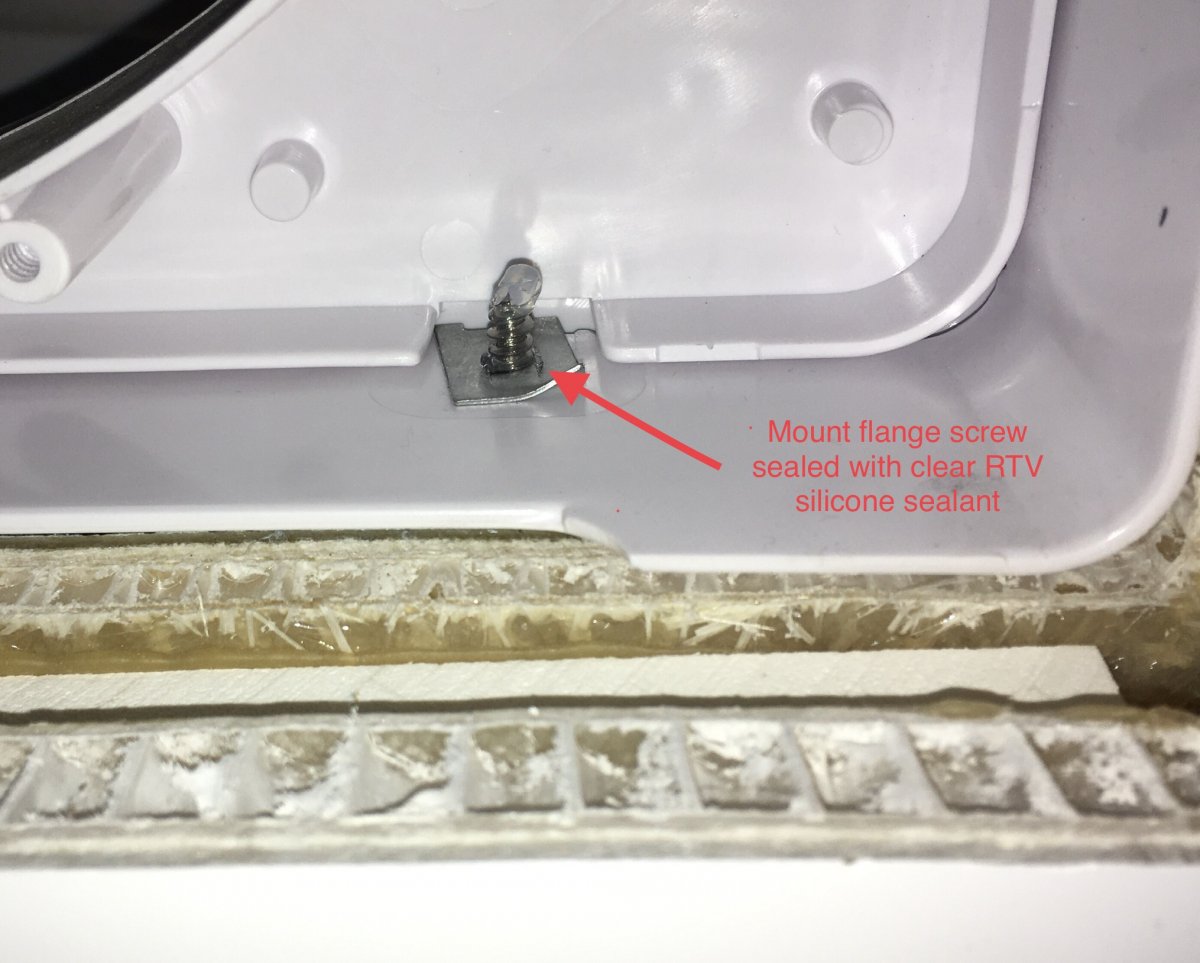
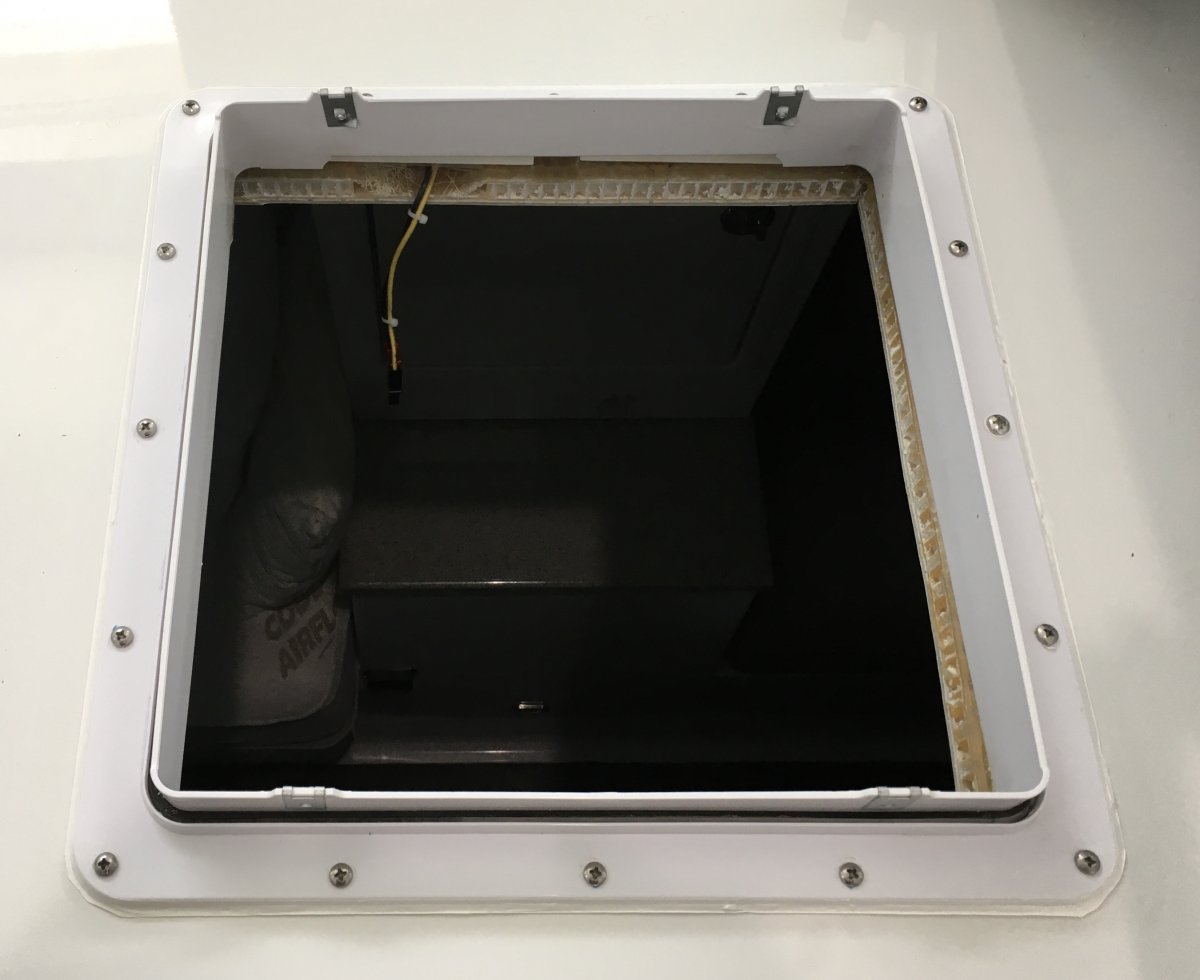
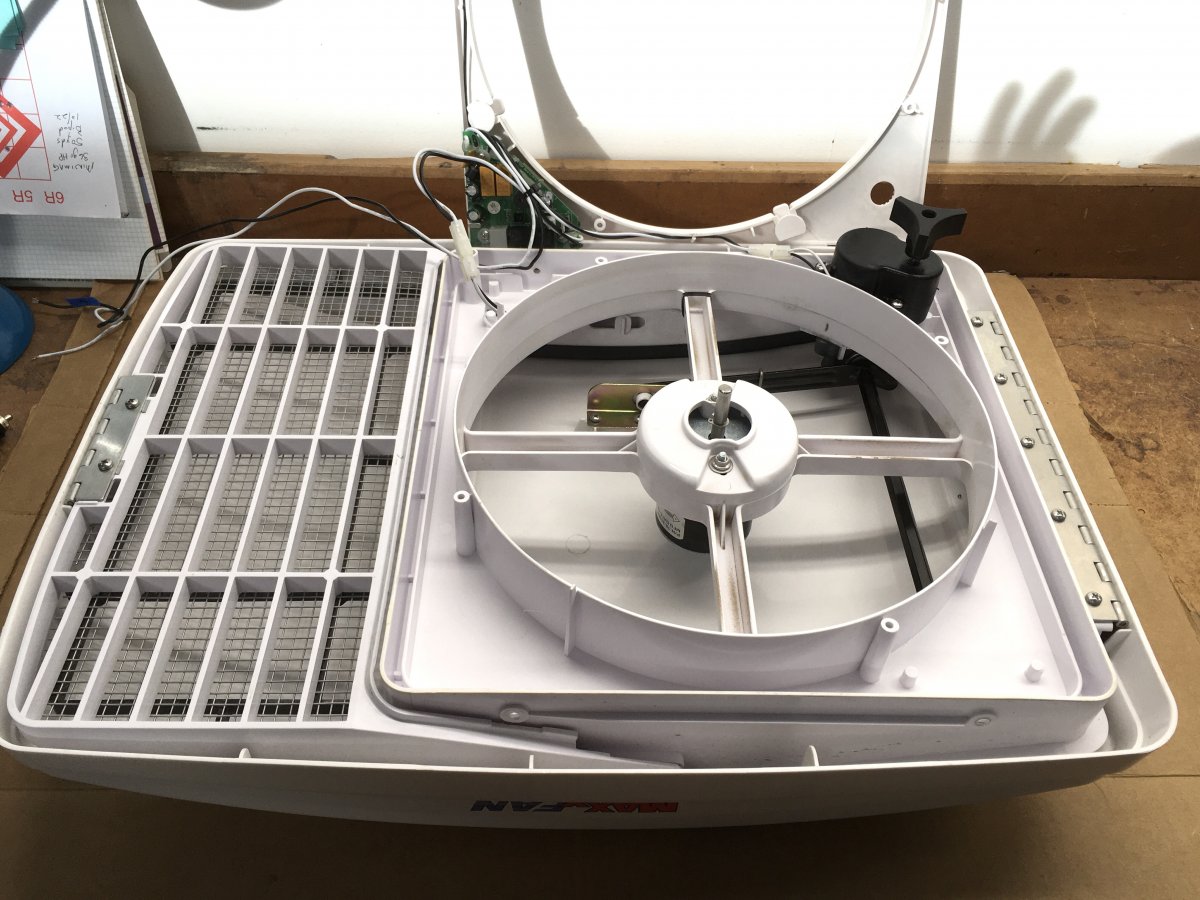
Sealing holes. The four screws holding the fan assembly to the shroud are open to the weather, and lead straight into the trailer. Make sure the shroud is raised for access (in the normal open position). Remove screws one at a time, apply some clear RTV silicone sealant to each hole AND each screw and reinstall. This will stop wind driven rain from entering, but the sealant will not make it hard to remove the fan for service. Silicone sealant doesn't bond to stainless very well, but it is adequate unless the screw is retightened or disturbed. The inside of this area, showing sealant: Notice in the above pic, the Oliver outer hull roof and inner cabin ceiling are bonded together here, with spacers and an air gap. Notice the fiberglass honeycomb construction. It won't trap or be damaged by water (unless it freezes and turns to ice.) How cool is that! The wire harness above the circuit board - squirt that cavity full. Prevents seepage onto board. This does NOT stop condensation.
-
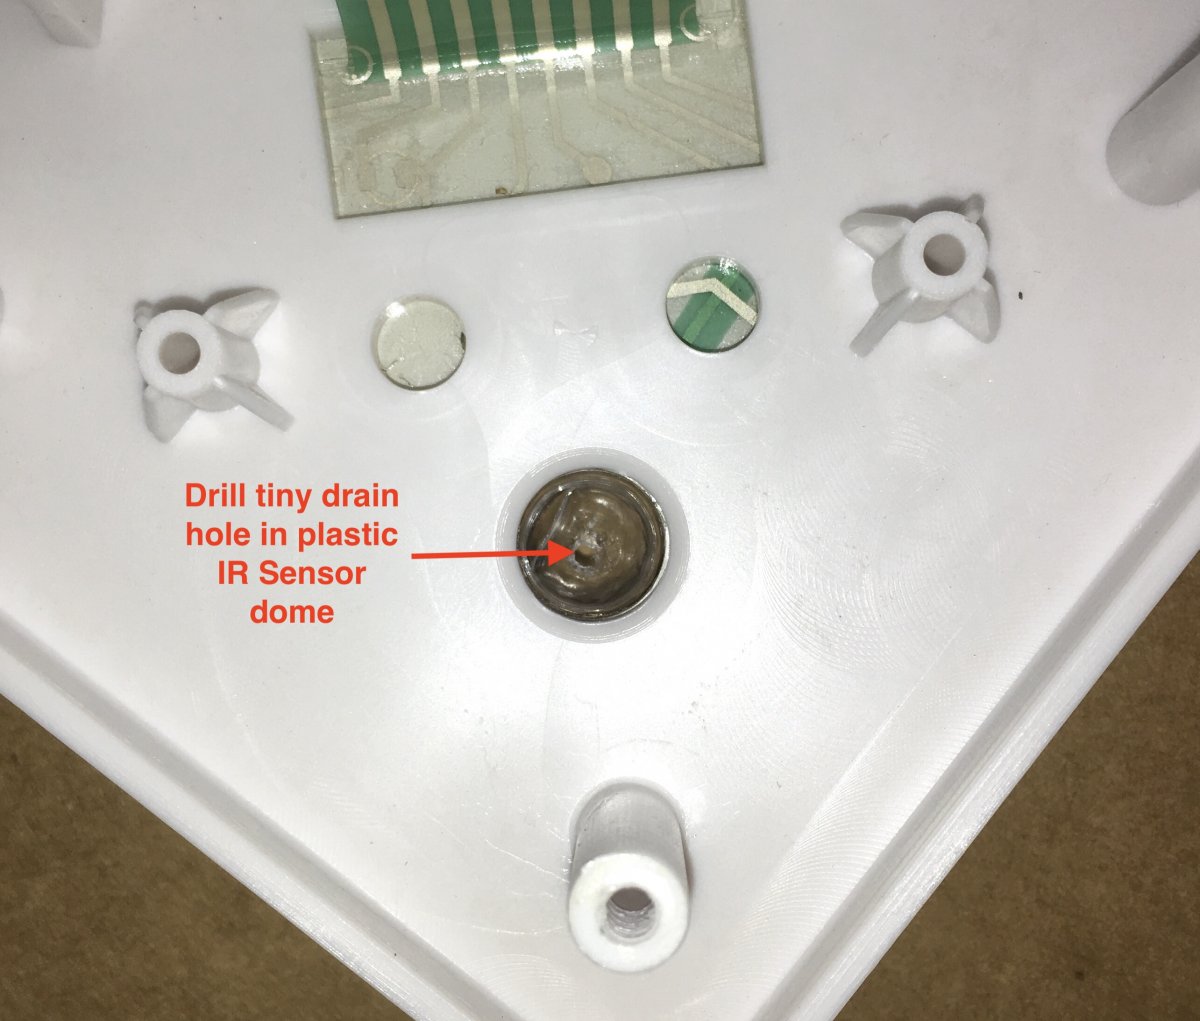
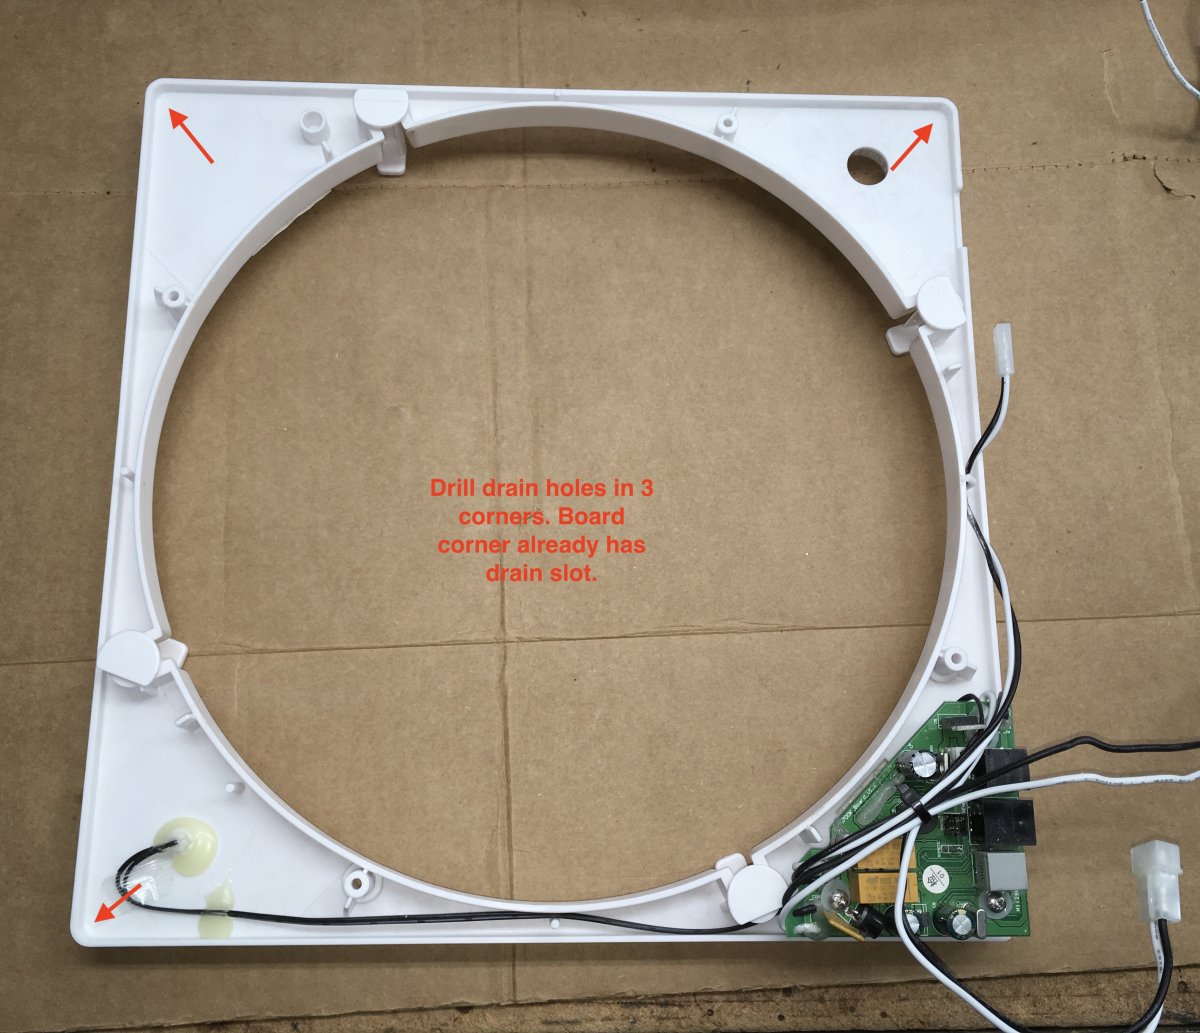
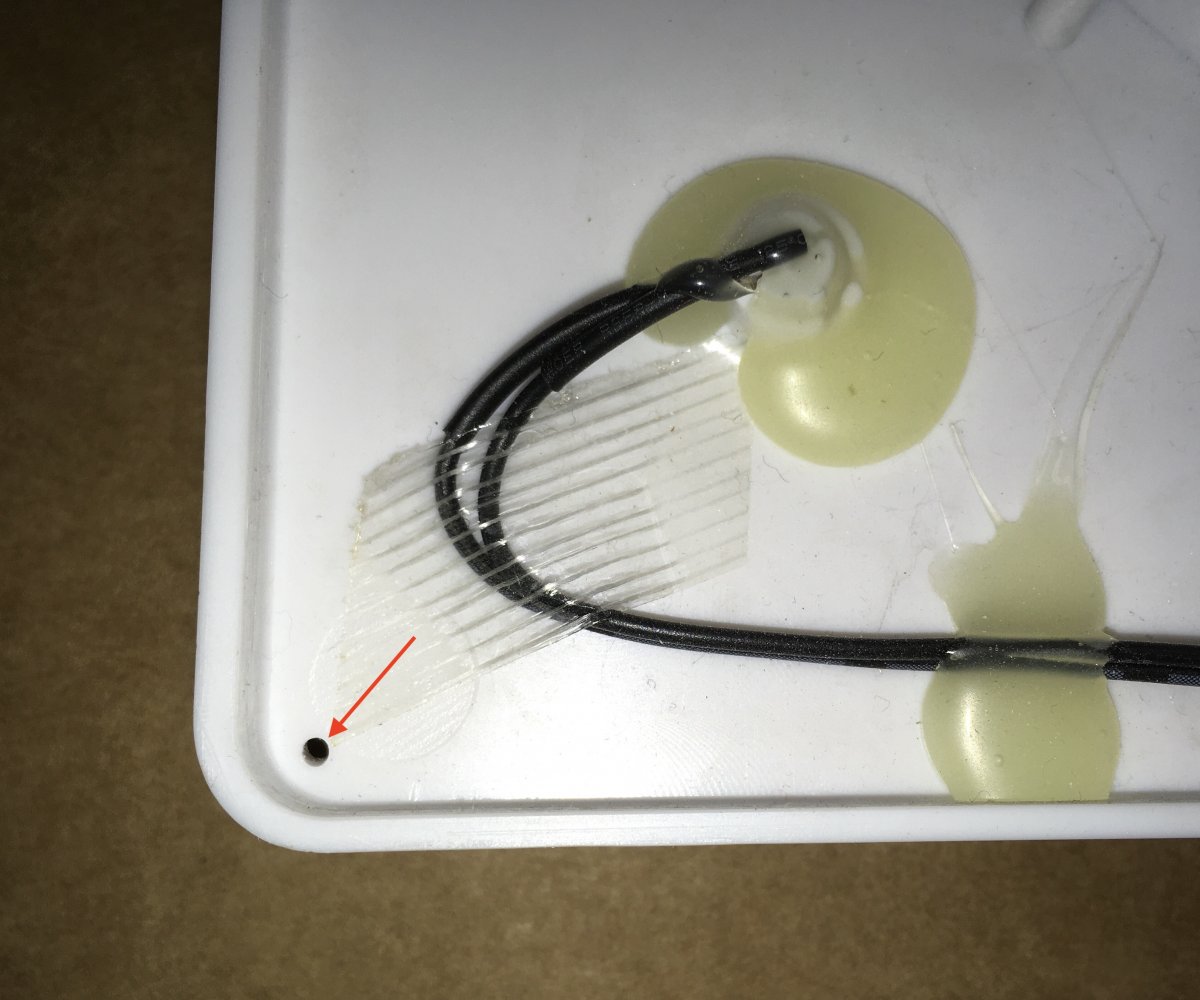
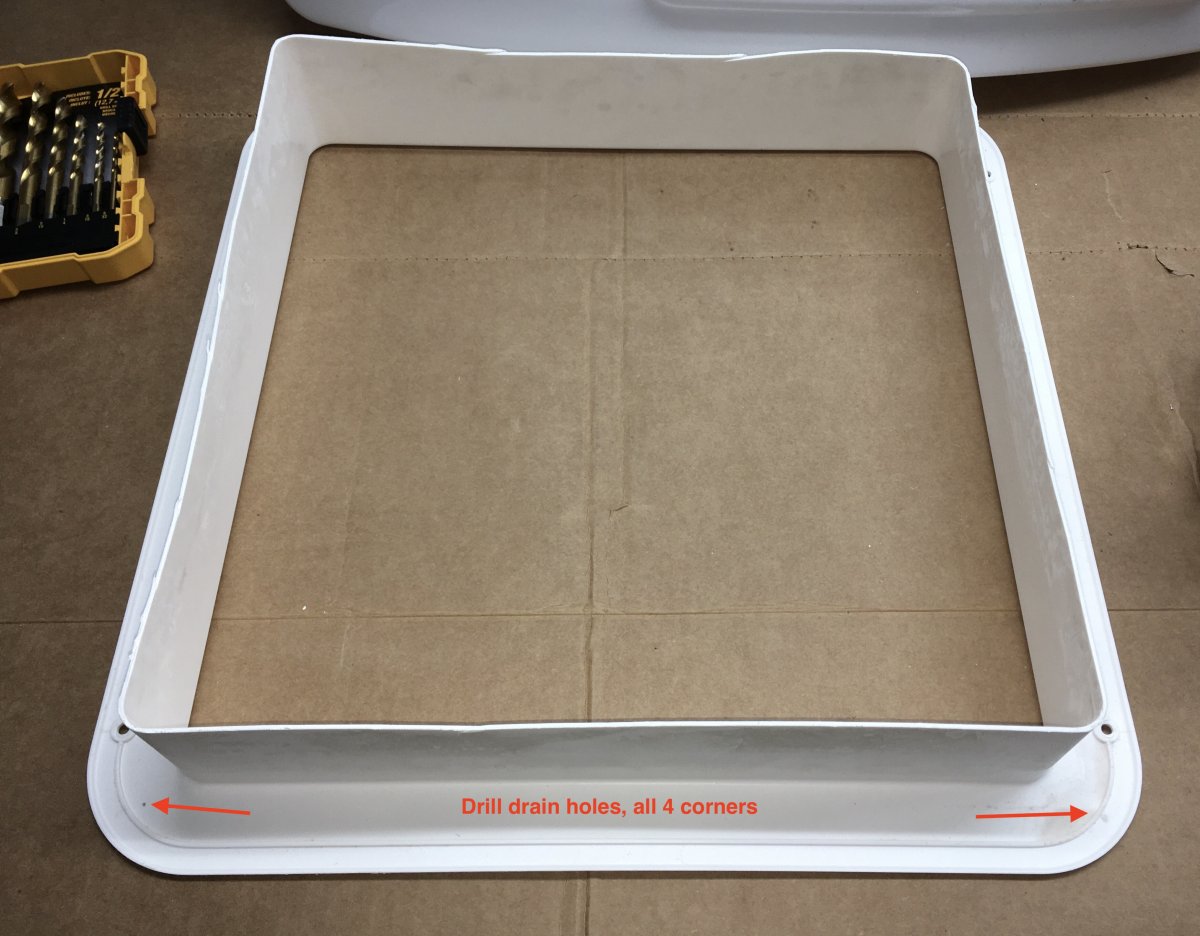
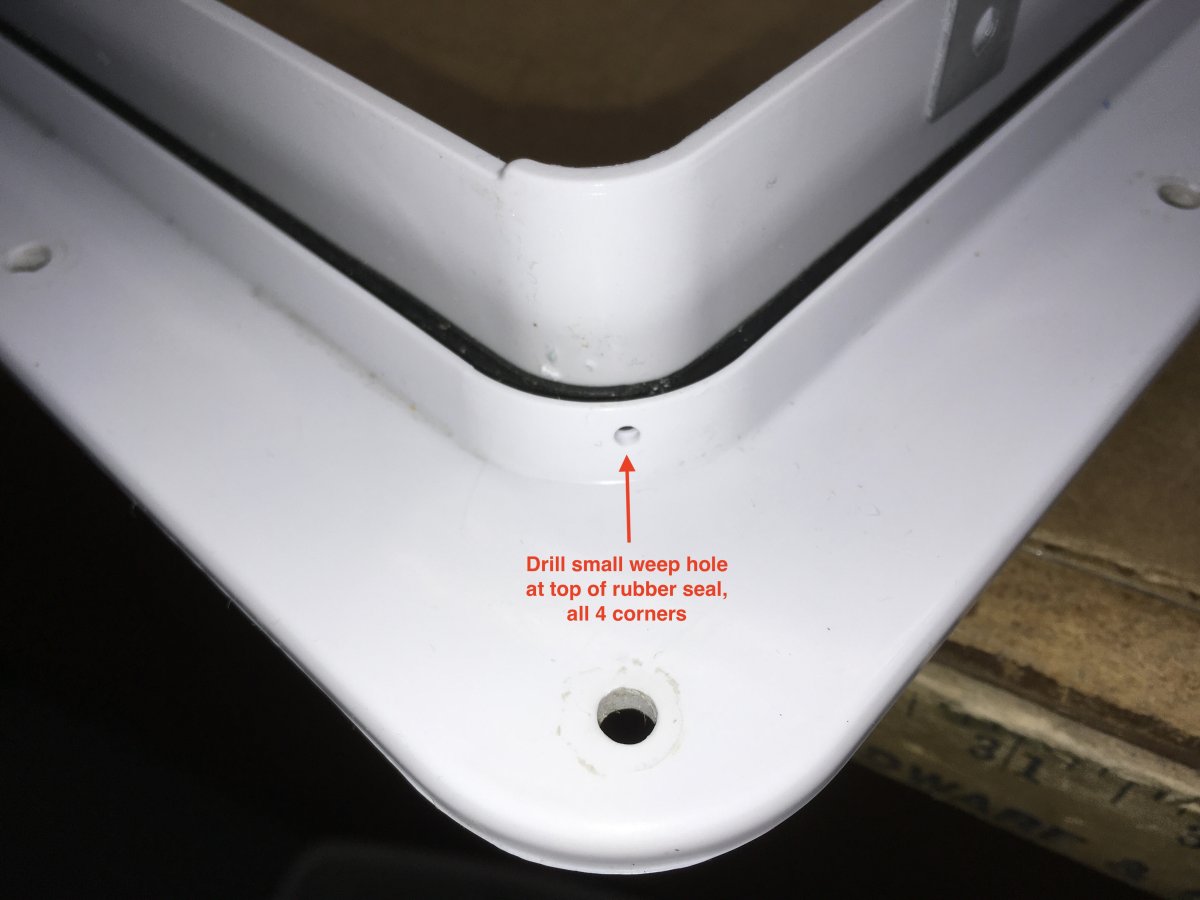
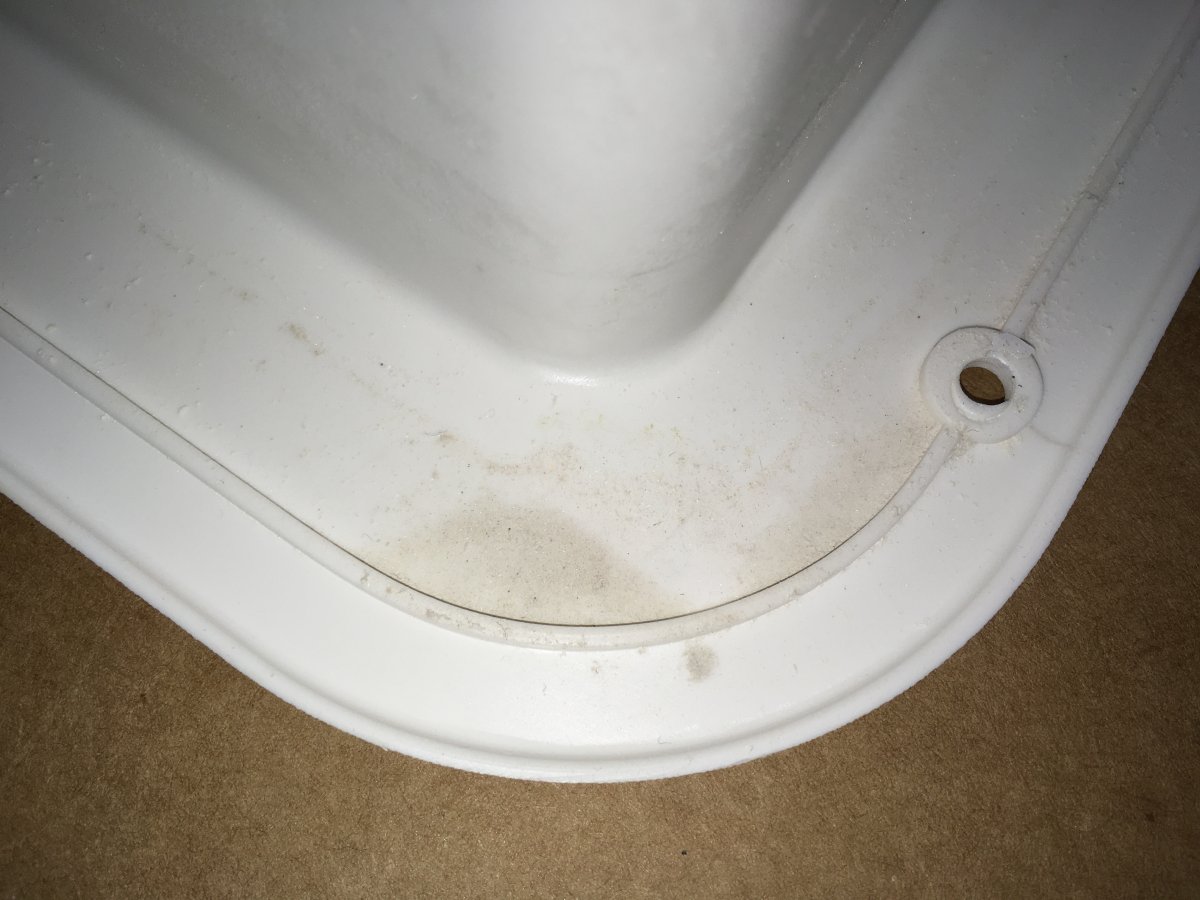
Water protection. There are LOTS of places where water can either enter or pool up. We need to drill a bunch of drain holes and seal some places. Circuit board: Remove the three screws and lift it out of the way. If your board is corroded, you will need to clean or replace it. See the YouTube video. Mine was fine. Drill a tiny drain hole in the bottom of the clear plastic "bubble". This prevents pooling around the IR sensor. Then reinstall the board. Lower panel: This can trap water. Drill three holes; the area around the CB does not need one. Detail pic: Lower trim bezel: Drill 4 holes in corners.: Fan mounting flange on roof, all four corners in case you did not already do it in the previous section: More. John Davies Spokane WA
-
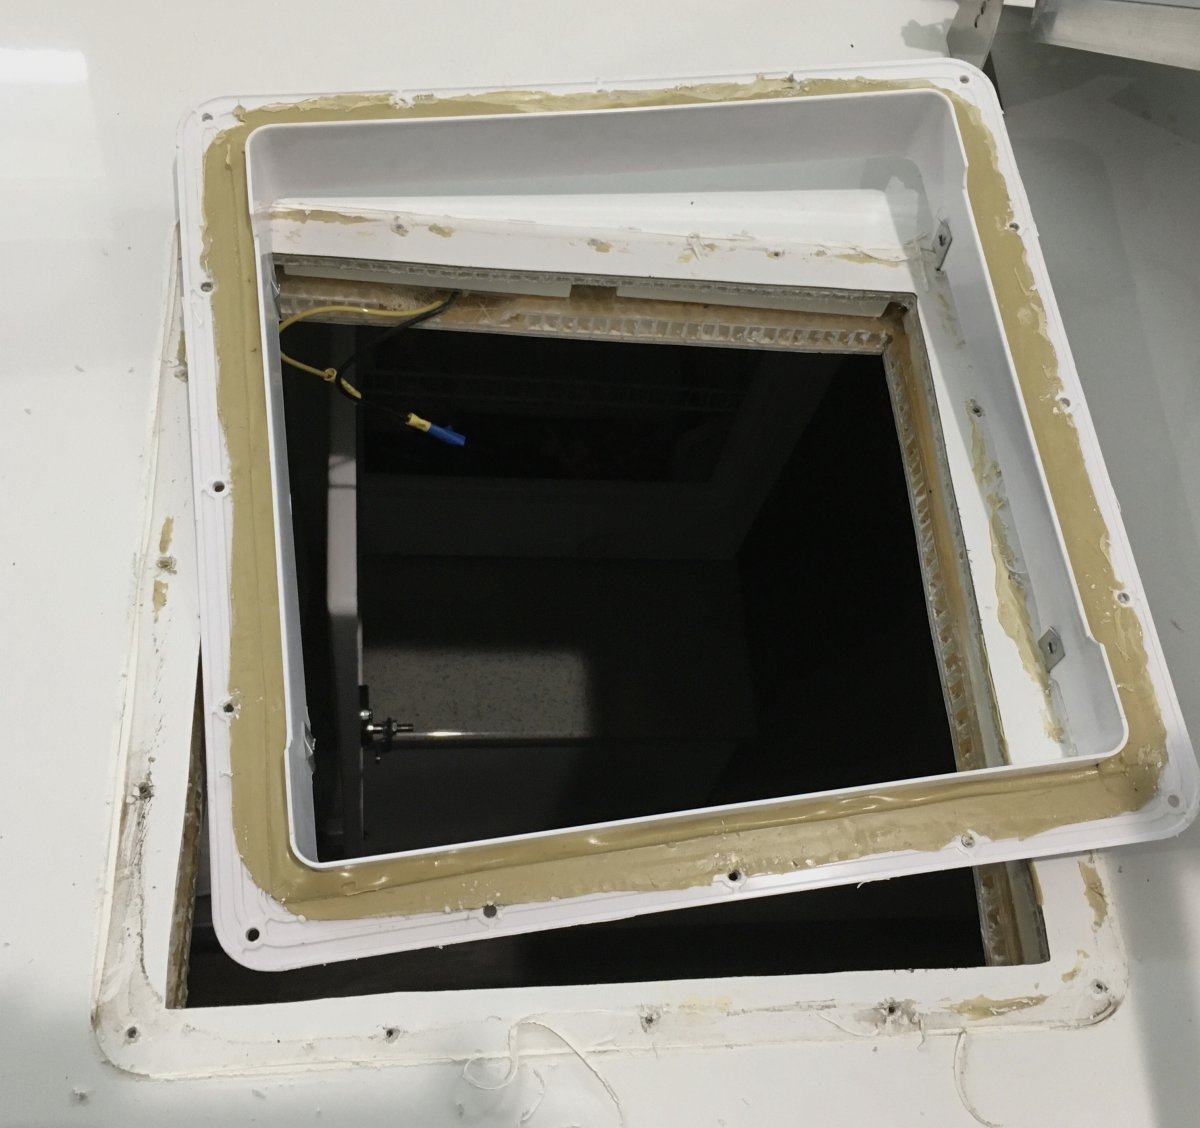
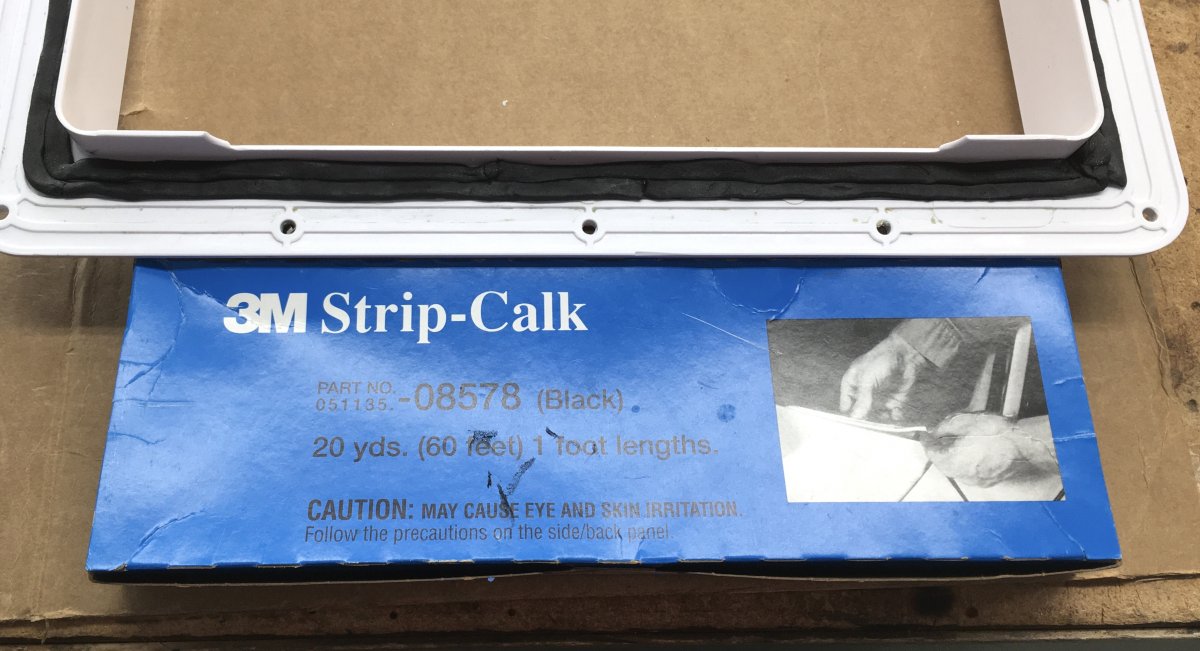
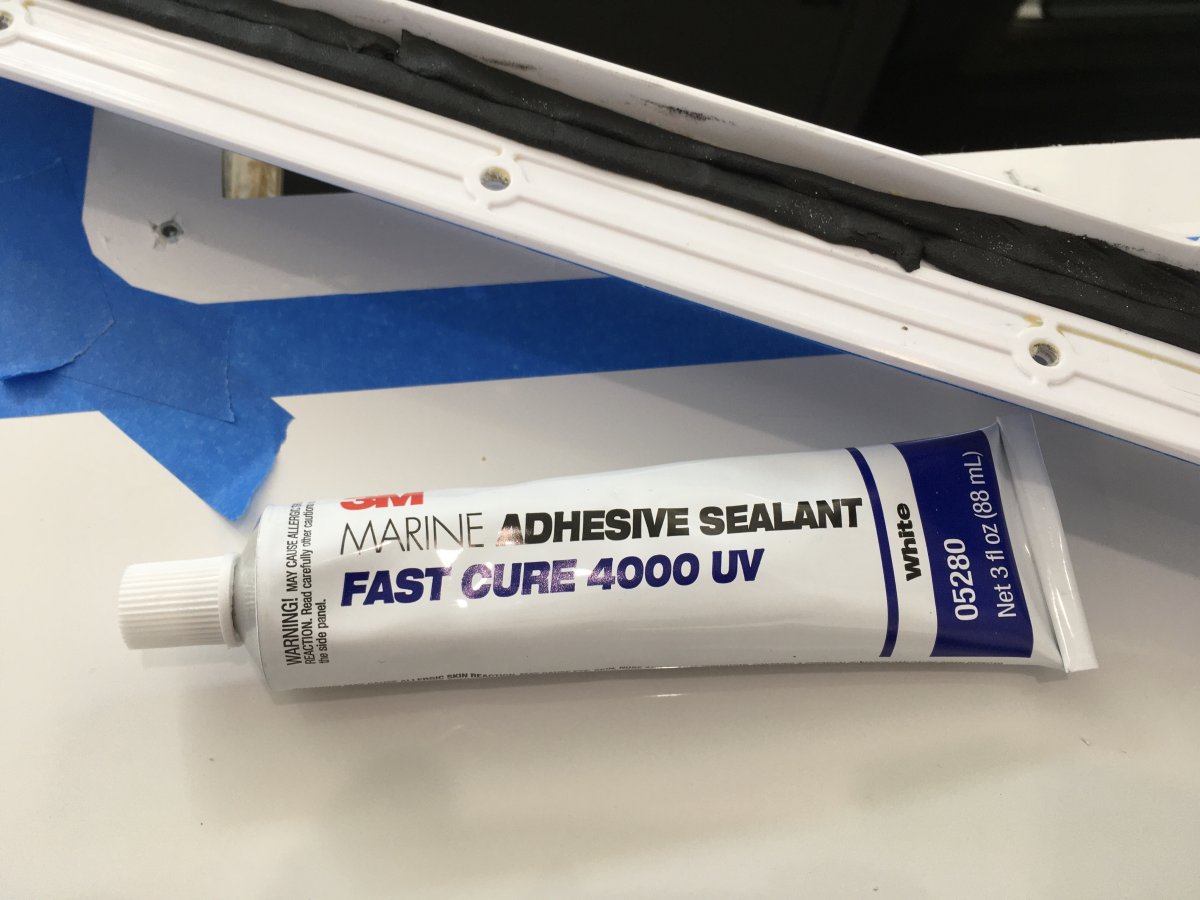
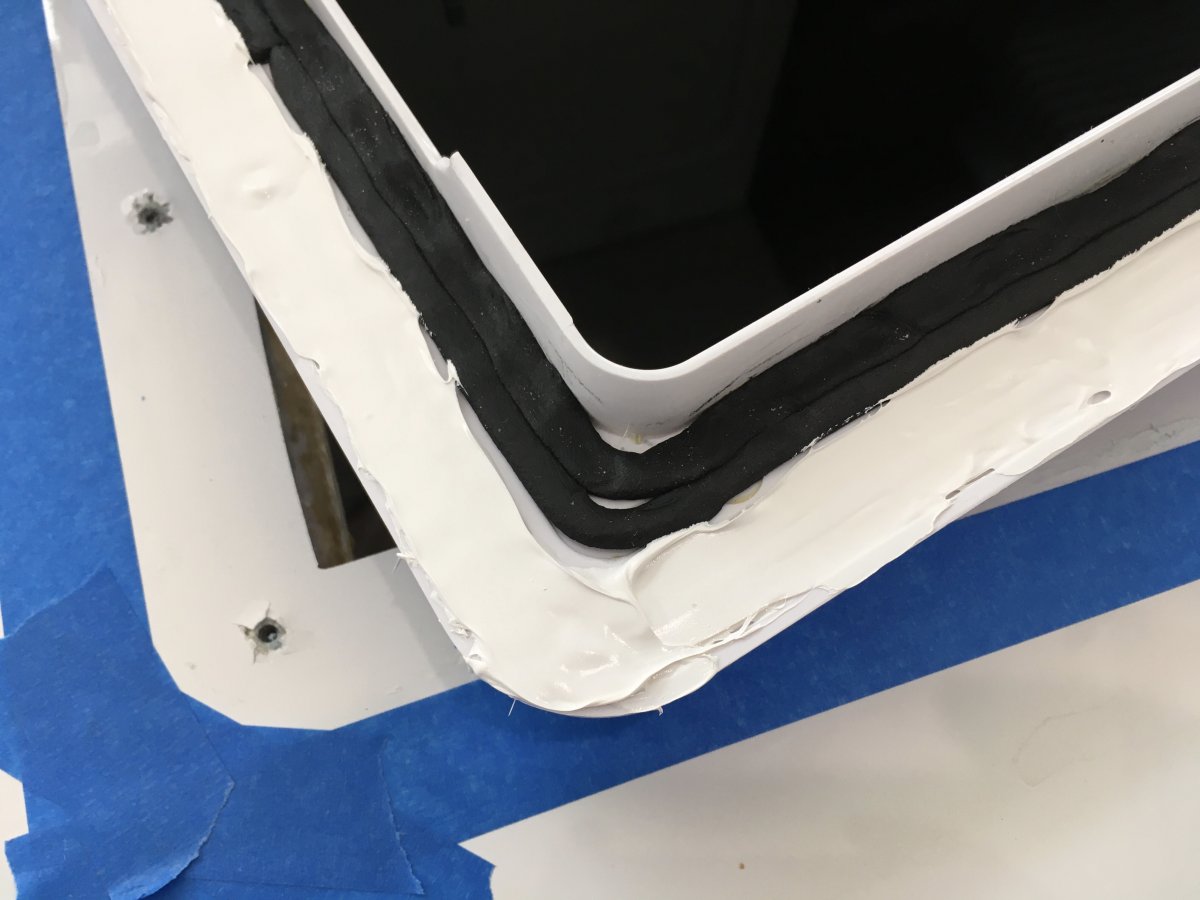
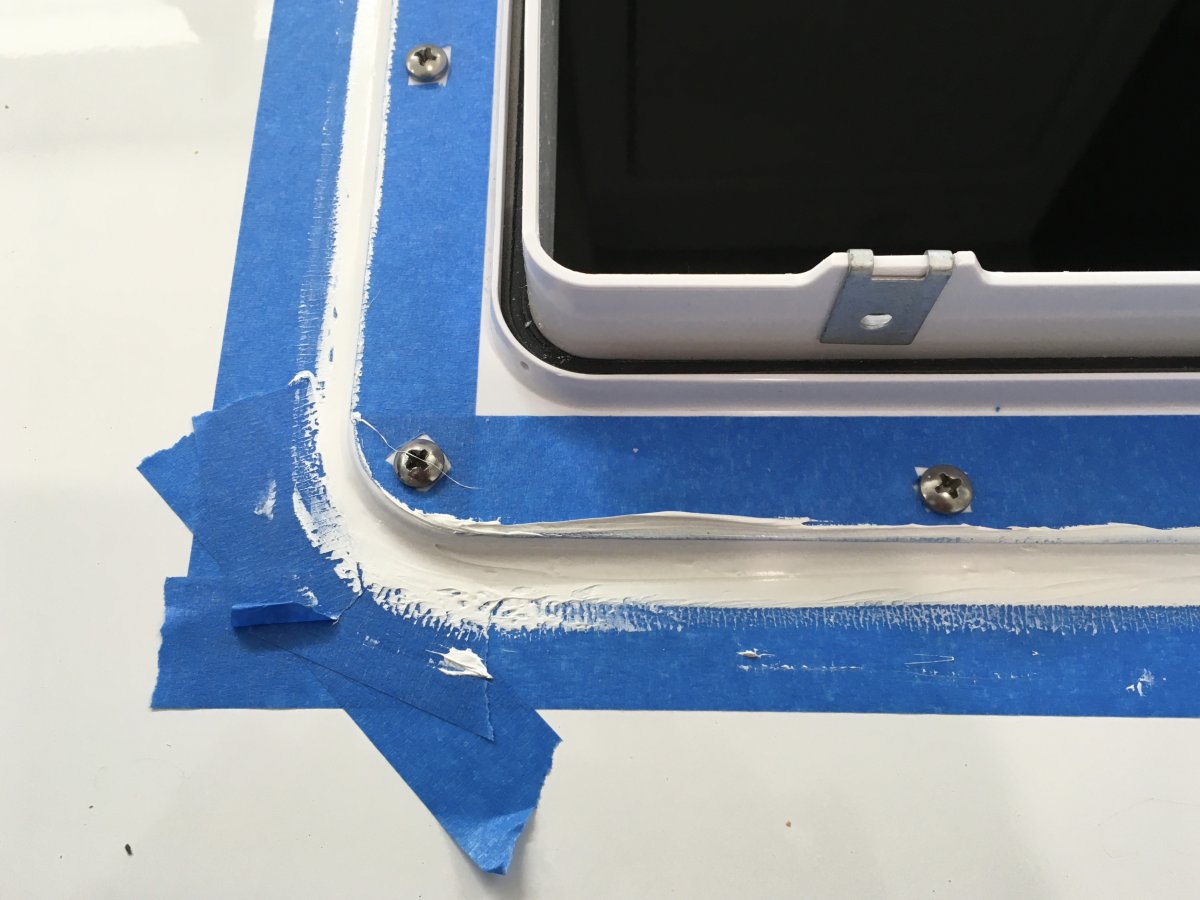
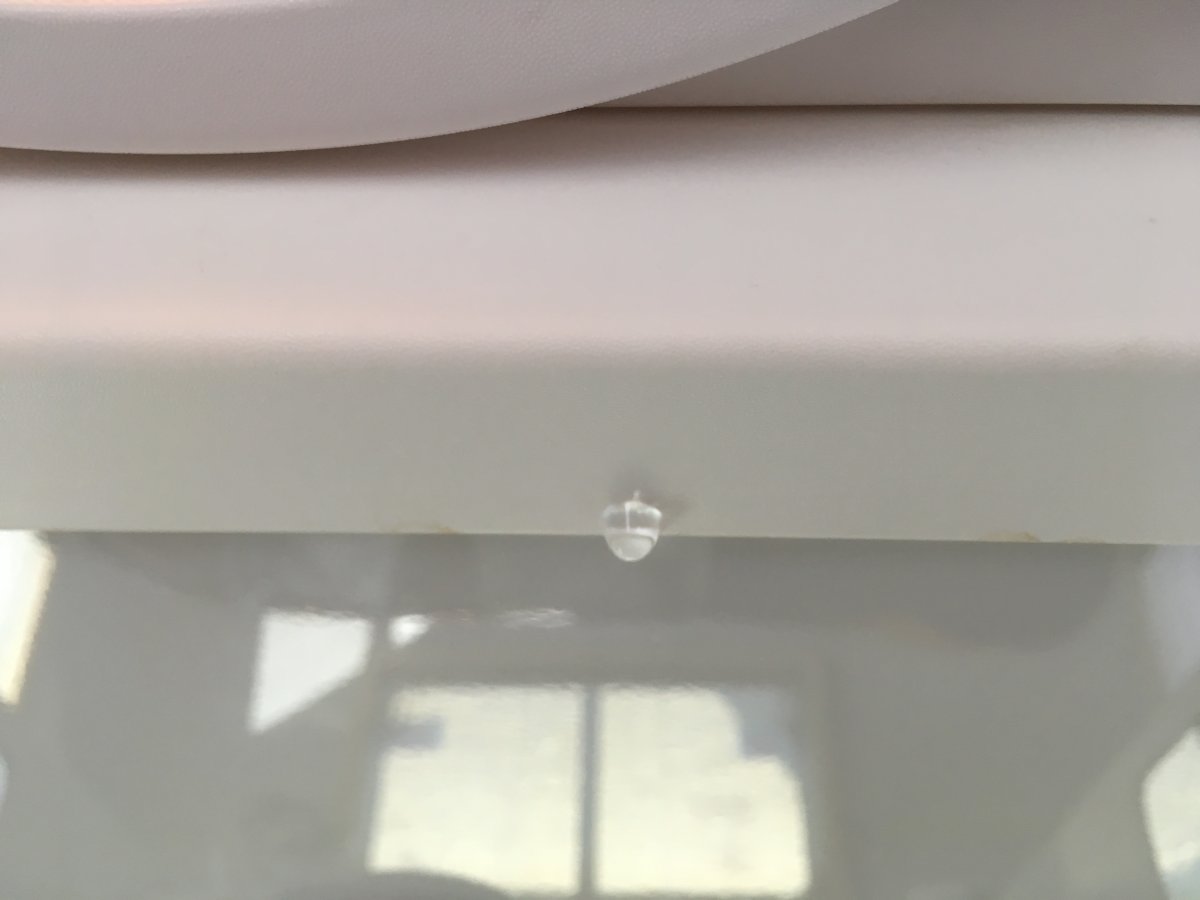
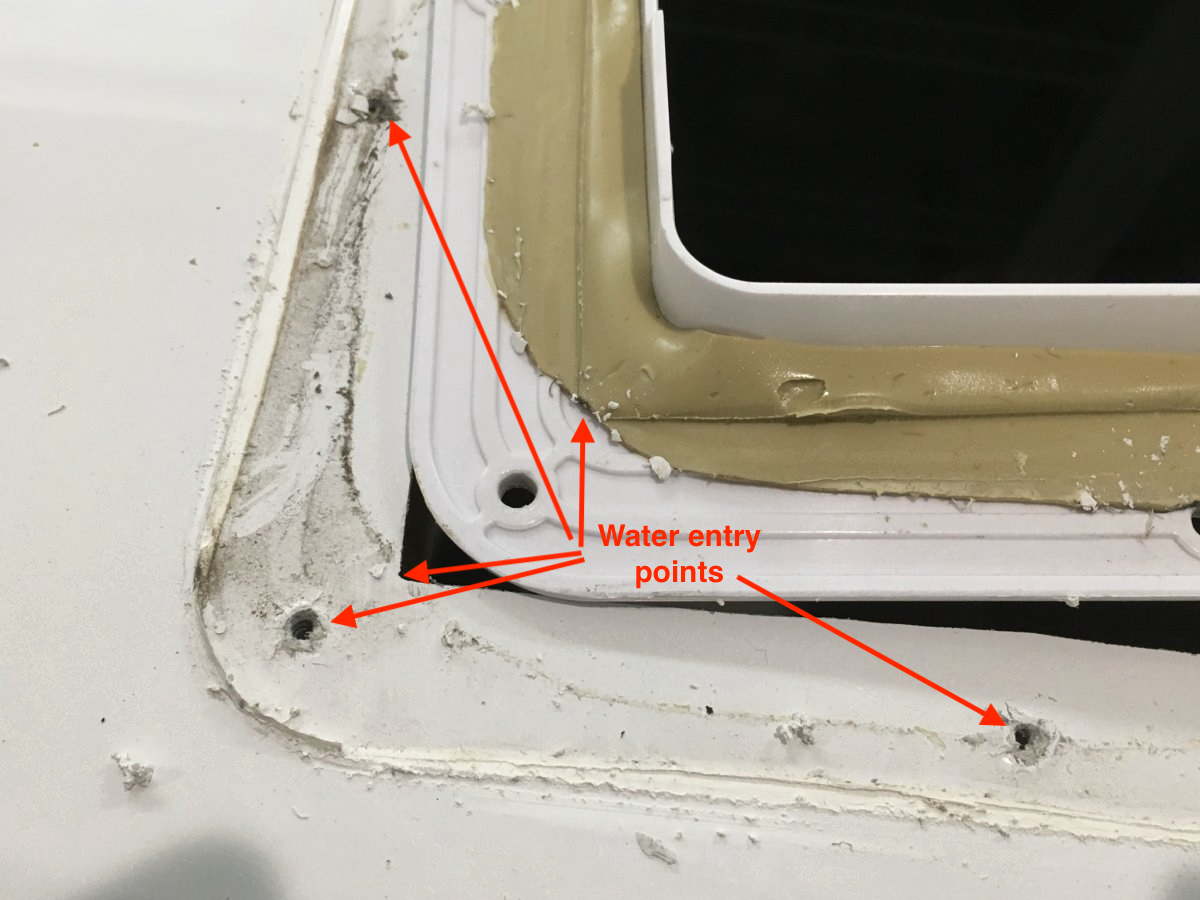
Removing the mounting flange. MARK THE FRONT OF THE FLANGE SO YOU CAN GET IT BACK EXACTLY THE SAME WAY! Otherwise the holes may not match up. This is only needed if you suspect a water leak, or there are obvious signs of distress around the edge sealant. I used a thin stainless putty knife and hammer to shear the factory sealant. My shroud was obviously installed incorrectly, with unsealed screws and plenty of entry points for water and dirt. The sealant should extend all the way to the outside perimeter! Fortunately the Oliver roof structure is robust and can take some water entry without damage. If yours does have water entry, try to blow any trapped water out of the screw holes so it can dry out. Remove all the old sealant using a putty knife and mild solvent. This will take some time. Try to get it all off! The fan assembly sits down into a channel, with a rubber seal at the bottom. It traps water, so drill small weep holes in each corner (4 places). Clean the roof and mask off around the fan leaving about about 1/8" to 3/16" gap. I wanted to use 3M 4000UV marine sealant. It is removable, BUT I really did not want it oozing down into the gap and roof structure. If that should happen, you would never get the flange off again, in one piece! So I used a clay based automotive strip caulk along that area to form a dam. Apply the sealant in two fat beads, and use the putty knife to flatten it evenly. Any excess will ooze out to be removed later. Most importantly - this seals the screw holes and screws! CAREFULLY install the flange. Drive in the screws gradually to bring down the flange fully and let the sealant move around. When they are fully seated, lay a bead around the perimeter if needed: Smooth out the sealant with a rubber gloved finger. Remove all masking tape: Clean up any minor messes with solvent before the sealant hardens. More. John Davies Spokane WA
-
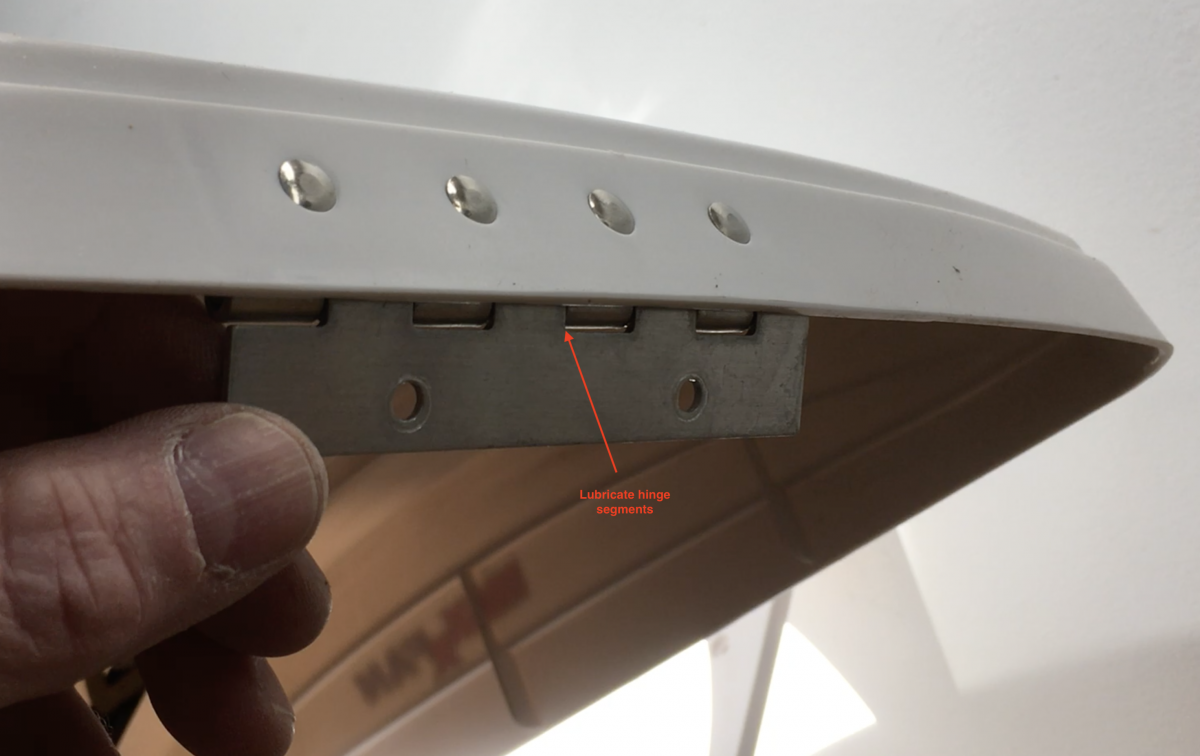
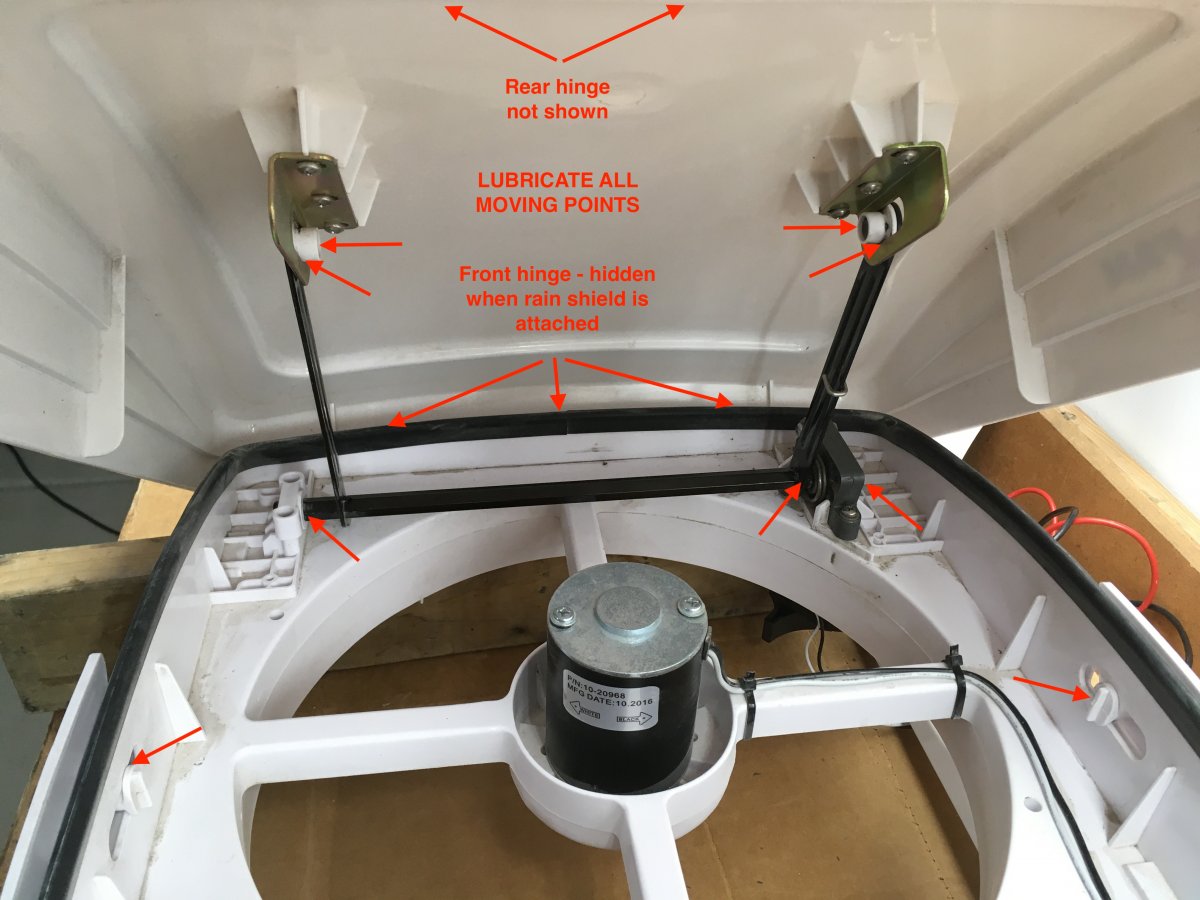
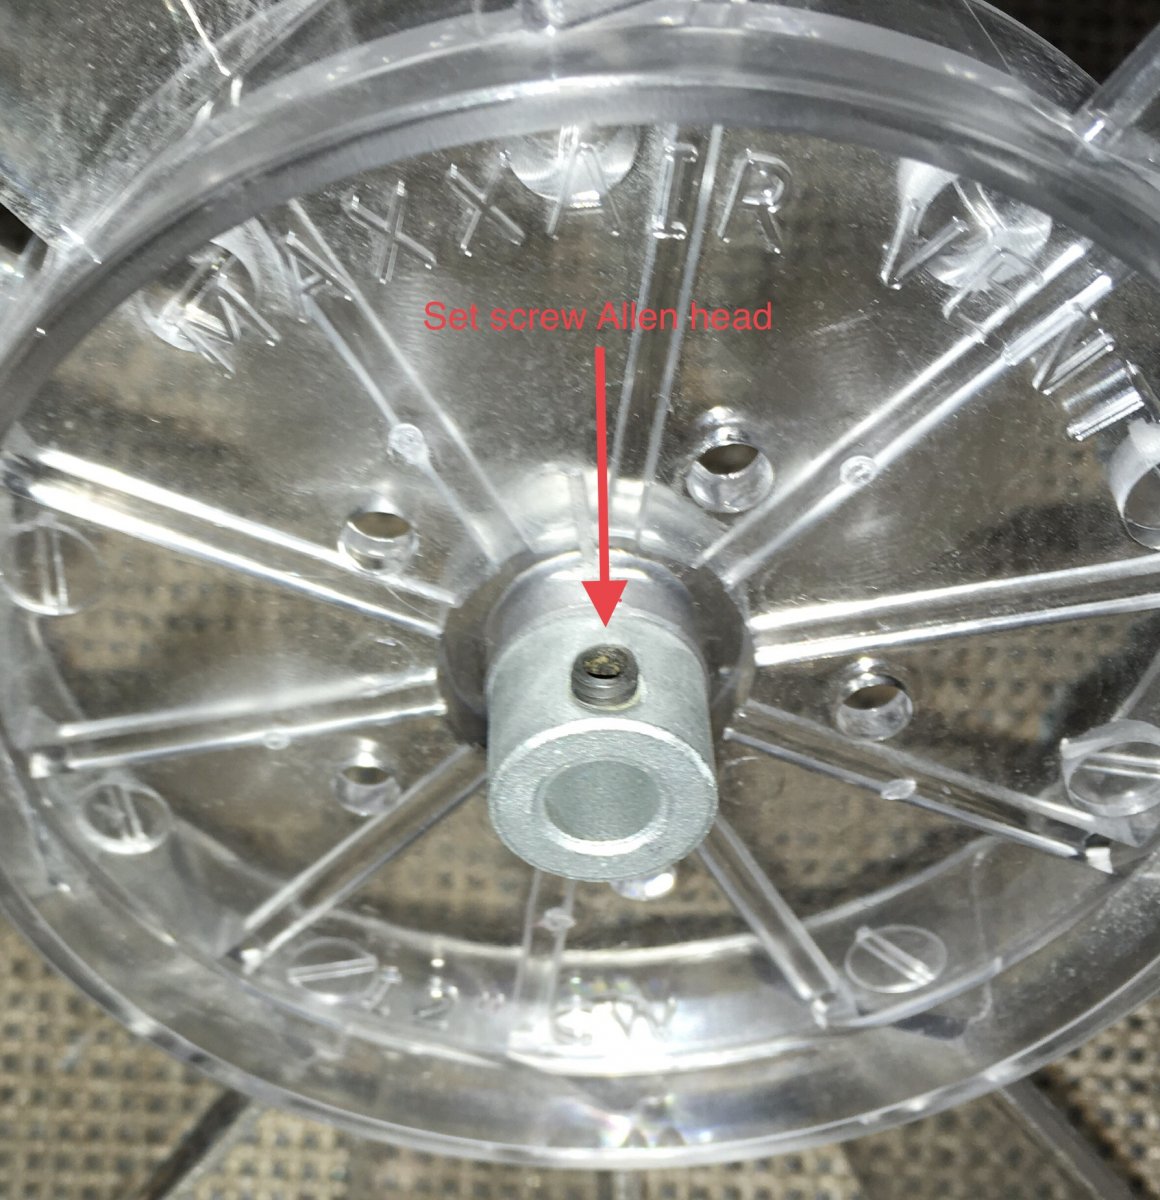
Inspecting and lubricating. I used silicone spray lube. Most other lubes will attract dirt and get gummy. Tri-Flow or a similar product might be OK, but I think even that attracts gunk. Remove the two screws holding the rear hinge to the upper cover. With the hinge disconnected you can run the upper cover up much further, for easy access. Lubricate all moving parts. My rear hinge was very dry and binding. I think that was causing the jerkiness. NOTE ! : The front hinge is pretty well hidden with the rain shield attached. With it disconnected and the top fully raised up, access is OK. If you want to disconnect the two arms, they simply press outward at the top and disconnect from the tracks. Make sure the two nylon bushings are OK. Obviously, if you are doing this with the fan removed, just flip it over to access the front hinge. Here is the "Operator" AKA gearbox. It can be disassembled if needed, but it isn't considered to be serviceable. The sides of the rain shroud attach at this point, the slot needs to be clean and lubed. More John Davies Spokane WA
-
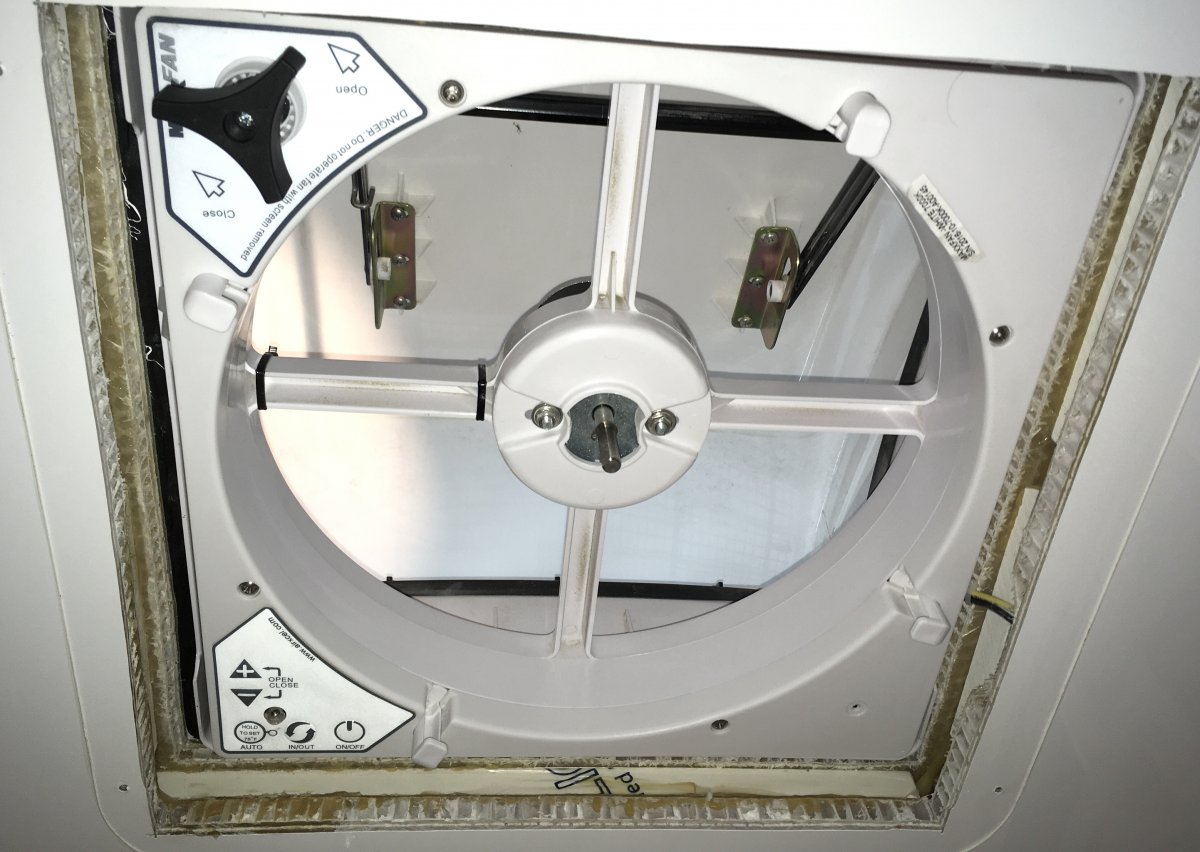
Remove the fan: Remove the 4 mounting screws for the trim ring, and then the knob screw and knob, and the 4 screws for the fan lower assembly: Lower it carefully and disconnect the white connectors. If they are stubborn you can use a large flat screwdriver to carefully lever them apart. You can leave the two large power and ground wires intact and let the trim panel hang on the pantry door, or cut the splices and remove it entirely. (If you want to run the fan on the bench, you will need that panel, so cut the wires.) Watch out that you do not short out the power wire (black). Remove the fuse for the fan circuit if you want to. Reinstall the knob so you can manually operate the fan. Open up the fan fully using the knob. Climb up on the roof and remove the four side screws holding the fan to the mounting flange. Lift off the fan and carry it to a safe place. More John Davies Spokane WA
-
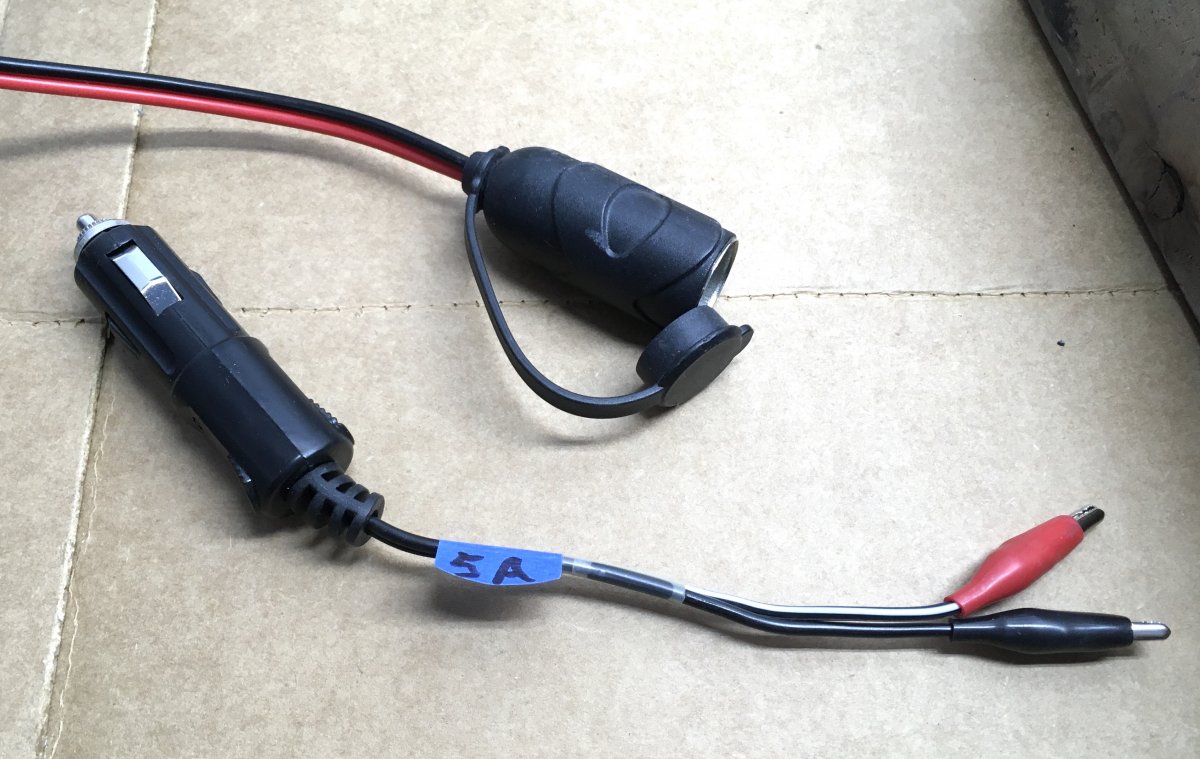
My fan was getting erratic in the opening/ closing modes. The upper lid would jerk and chatter. Also, I noticed a small nuisance water leak inside the cabin, even when the rain hood was fully closed. FYI: Oliver SEALS the visible edges of the inside trim panel, for a pretty appearance. I had removed mine previously and did not reseal it. Otherwise the water leak would not have been seen - the water would accumulate Inside of the trim until it eventually seeped out around the screws, Trim ring showing where water was pooling: After removing the outside flange assembly, this is what I saw: A really shoddy installation. I wanted to run the fan on my workbench, so I could get to everything, inspect all the hidden parts and make sure I got it fixed before reinstalling it on the roof. If you want to service yours, then you can leave it up top if you like, but removing it is not hard at all. I made an adapter to power the fan using an existing DC cable for my external solar panel port. It's a standard plug, internally fused. More to come. John Davies Spokane WA
-
As I mentioned above, I power it from the trailer when parked more than three or four hours, using a 12 v cable plugged into the solar port. It is much better than running down your TV battery, and much more efficient and safer than running the trailer inverter and using a high voltage extension cord. (When you do that, you are converting the trailer's DC to AC and then back to DC again at the fridge. Each step loses a significant amount of energy.) You need to understand “duty cycle” - it is the amount of time the compressor runs. Typically on a HOT day it runs about 50%. If you are towing and the cab is 70 deg, it won’t run as much. If the cab is completely closed up and 140 degrees, obviously it will be running constantly. At night with a cool cab it will hardly run at all. I try to keep the TV shaded with windows cracked. When parked in direct sunlight, I install reflective sun shields in ALL TV windows facing the sun (and its future path). I also keep the ARB set at around 0 degrees. If it is not too hot at night, even when unplugged the fridge temp only rises to 20 to 25 deg. Lots of thermal mass is very helpful in maintaining cold temperature - keep it full ! I keep a couple of half gallon milk jugs filled with ice inside if there is room. The more stuff inside, the longer it takes to warm up and thaw if it is not being powered. I freeze the jugs at home before leaving, that way the ARB doesn’t have to do that work. ARB makes a heavy duty outside insulation blanket for truly horrific environmental conditions. It is very expensive and I have never felt that it was needed. If I were given one, I probably use it. I hope that helps. PS, once you start using this type of fridge, you will NEVER want to go back to buying ice, dumping melt water and throwing away water-ruined food. Plus you cannot actually freeze stuff with an icebox.... that is the big difference! John Davies Spokane WA
-
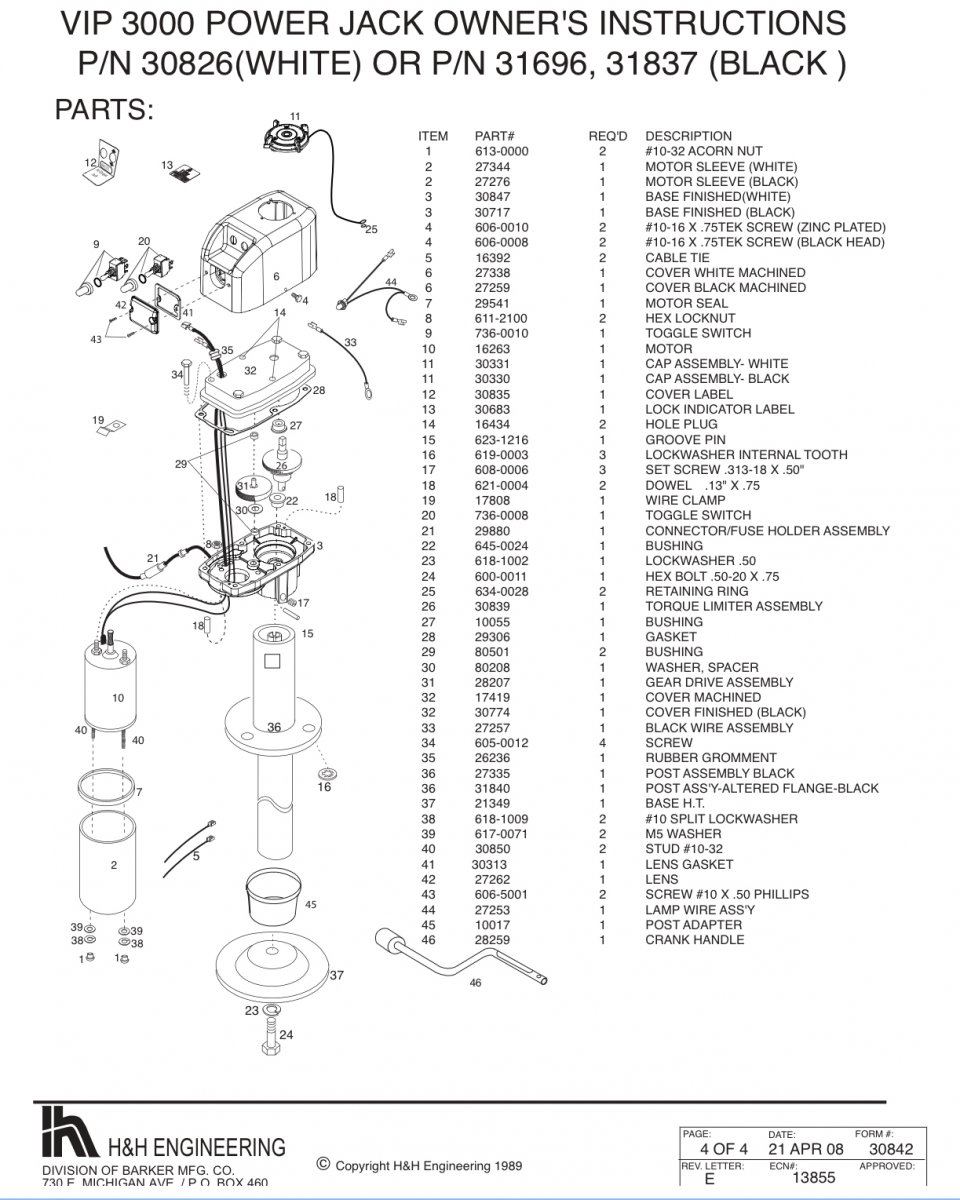
So who has taken these apart? I have been putting this job off in the hope I could find detailed instructions on how to strip one down, including removing the entire threaded shaft assembly. Does that slide up out of the main tube once the reduction gears and gear housing are removed? Is it pressed in or have a retaining pin? The manual can be found in the University section but it makes no mention of lubing the rod, however it does say do not pour oil down it.... Thanks. John Davies Spokane WA
-
GAIA nav app now works with Apple Carplay
John E Davies replied to John E Davies's topic in General Discussion
GAIA is by far my favorite app for offroad or off grid navigation (not autorouting) but only in the Premium version, which allows “layers” and offers a ton of different map types that you will come to rely on like USFS maps and the essential MVUM layer. I prefer Pocket Earth Pro by far as a general “road map” reference on a tablet. It has luscious, full featured Open Streetmap and 24K Topo, but it will not work with Carplay. I suggest that you try both. John Davies Spokane WA -
Maxxair fan blowing fuse
John E Davies replied to MaryandBill's topic in Mechanical & Technical Tips
BTW, the guy in the video camps in -30 degree F temps, for us mere mortals, especially those in a dry climate, his coating mod is optional. For those Ollie owners who routinely winter camp in frigid temperatures, do this! John Davies Spokane WA -
This is a huge upgrade. Now any offroad or saved maps can be displayed on your tow vehicle’s main screen. https://blog.gaiagps.com/gaia-gps-integrates-apple-carplay/?utm_source=newsletter&utm_medium=email&utm_campaign=february-newsletter-2-premium I currently carry my iPad on a Ram mount near the center console. To say that it is awkward would be an big understatement. My next TV will have Apple Carplay and I can carry the iPad tucked next to my hip. John Davies Spokane WA
-
Maxxair fan blowing fuse
John E Davies replied to MaryandBill's topic in Mechanical & Technical Tips
FYI here are pics of my board. Check Youtube, there is a video by a guy who repaired and modded his due to condensation damage. The IR sensor for the remote extends down into a clear bubble. I don’t think you would necessarily have to do his entire mod, but drilling a tiny drain hole there is mandatory. IMHO. John Davies Spokane WA
-
Have you used 4wd Low on public roads and highways?
John E Davies replied to John E Davies's topic in Towing an Oliver
I thought I would revive this dusty old thread .... I saw this $150 plug and play kit for late model Rams: engage 4 Low and flip the switch to keep the front axle UNLOCKED. For maneuvering a trailer at low speeds, or ascending steep low speed grades, this would be very useful. https://www.genosgarage.com/product/dodge-ram-cummins-bd-1030705-2-low-unlock-front-differential-kit/switches-sensors-drivetrain John Davies Spokane WA