jd1923
-
Posts
3,368 -
Joined
-
Last visited
-
Days Won
254
Everything posted by jd1923
-
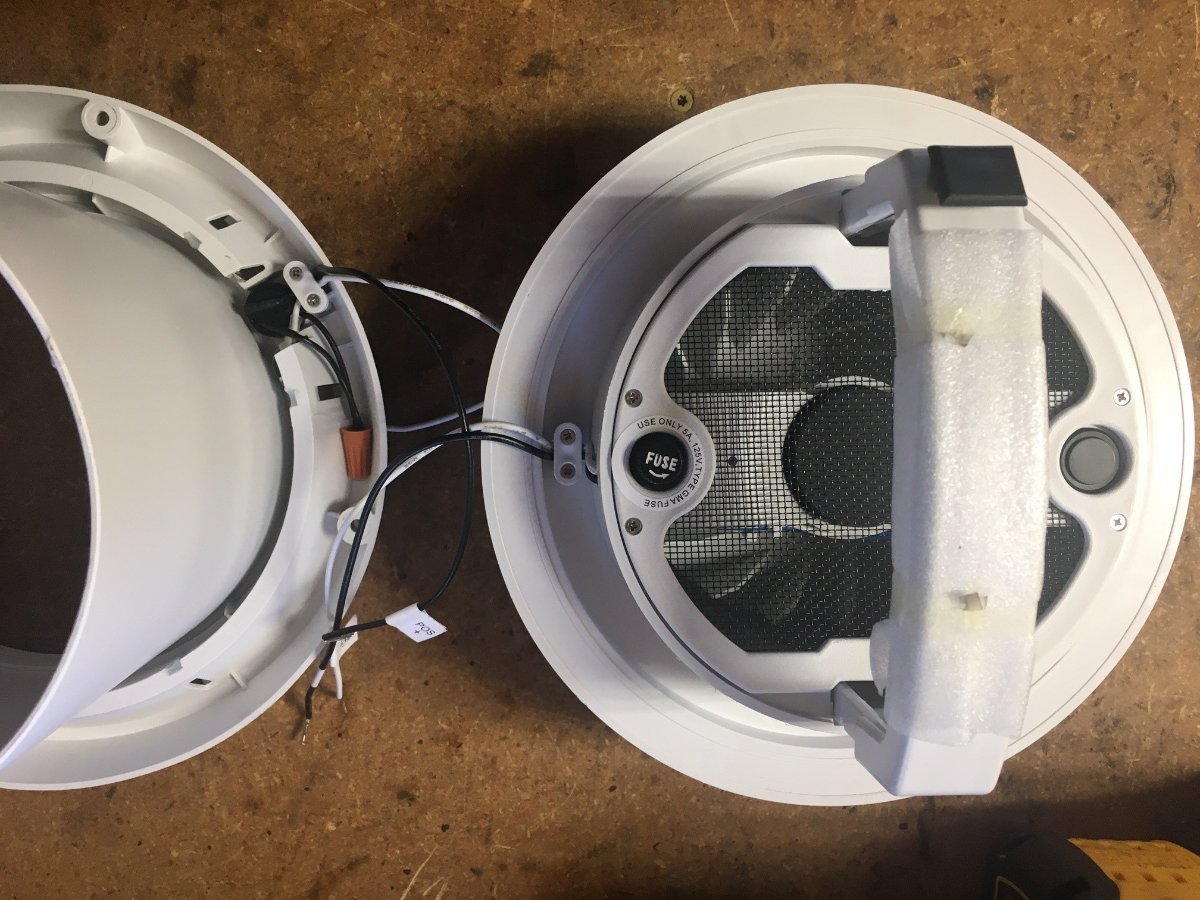
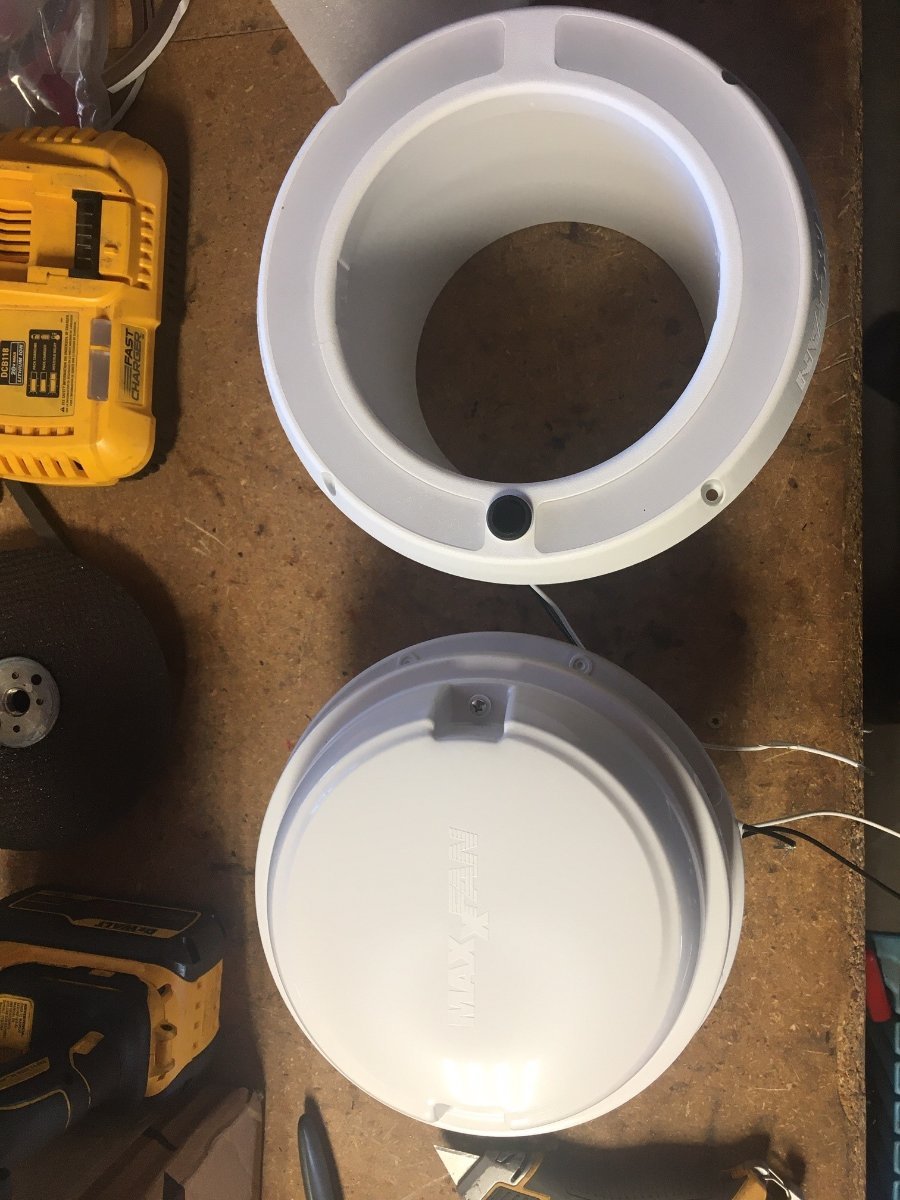
Received our Maxx Air Fan 6" Dome w LED from Amazon today. Got lucky again with Amazon used. Fan for $69 plus tax, yes packaging well damaged, but all parts included and cosmetically new. Tested the fan and LED light with my shop 12V marine battery and again all good. The product included all parts, rain guard, 6" ceiling extension, and everything you need. Earlier I suggested using 3M VHB tape and this will work on the exterior portion for sure. However, there is such a perfect flat surface, round around the external perimeter, OMG TG they do not have holes predrilled here! I'm thinking, if I can source a quality waterproof exterior glue/sealer instead of tape, I would apply a full-circle bead of glue to set this piece. If this was done, you would not have to caulk. Just apply and position in place and you're done! (again, no screws). The rain guard was included but will not be used. This is unnecessary, given the fan is installed and sealed correctly. This is designed for a wall-mounted installation. On an RV/TT you would need one with no vents to help somewhat. Put the solid portion up top and it may help when parked. Put it up front, and it my help when driving at highway speed, either way unnecessary. The interior portion is a bit trickier! there is not a full circle flat surface. There is an inner flat portion that goes 90% around the circle, and if that will contact the ceiling surface, you're good with VHB tape. You would have open screw openings on the fan surround on your wet bath ceiling. You could find 4 white plugs. Or if needed mount the 4 screws interior, which cannot cause a leaking situation, as the interior is merely cosmetic, holding the trim ring and LED light. Hope this helps!

-
@John E Davies made a good point. A quality rubberized plastic casing would be preferable, as long as the copper blades remain in good condition. Mine were toast! Hoping my new metal-cased plug lasts as long as the internals. I’ll apply dielectric grease around the plug so that dust and water will not affect the terminals. Take a look at my pic. This Mopar hitch has a housing for the trailer plug receptacle welded to the hitch in the 90-degree direction. It would be difficult to change this. There is 4 ½ inches clearance to the eyelet for the safety chains and 7” total to the 2” receiver. The standard plastic trailer is so long, I struggled every time, connecting and disconnecting. Now I have 2” extra room with this metal shorty! Tested all circuits today and all is good. Thanks
-
John, thanks for the link and yeah, I get it and thought some about that. I really thought the metal would be better in the SW and worse anywhere north where they salt the roads! I purchased this because it is 2" shorter than all the plastic ones. My receptacle runs in parallel to the bumper and the end of the plug goes over the hole where you mount the chains. Bad design, but it's there unless I change everything. I did run electrical tape around everything inside, about 3 layers of tape between wiring and the metal housing. I will buy a backup plastic one. Anybody know of a short plastic bodied plug? Or a 90-degree trailer plug?
-
Thanks @Frank C this makes sense and yes, the front jack has the same yellow fused link (I have pulled off that jack head for servicing). And thank you @MobileJoy the solar cutoff makes sense right there. I'll test mine to make sure at some point. Turn it off and the display should show 0 amps incoming. Why isn't there a battery cutoff on these OTTs? (or is there)
-
Thanks @Steph and Dud B that's a good idea for safety needs. Maybe I can run a switch for this purpose. Mine will stay disconnected, since I do not want charge going to or from the TV at all. I'm realizing that most of you have past experiences with travel trailers. We do not. Owned a Class A and a Class C RV, but not travel trailers. The 6 trailers I've owned never had batteries (except the small one for the brakes safety disconnect switch). When there are no house batteries, the 12V+ is used to tap the TV batteries to power for example cargo trailer interior lights. Then when the trailer plug is disconnected, there is no power at the plug.
-
Yes, it's now taped up and pushed below. That is the 12V+ to the front trailer connection that I just disconnected on purpose.
-
The setup under the streetside bed on our 2016 Hull #113 is quite a bit different from @Frank C's. Perhaps Frank, with hull 461 does not have solar? My pics attached below. I do not have the 20A breaker described before. I have a similar 12V+ bus connected on the ground side to a 40A breaker. The red cable far lefty appears to be the battery hot lead, the one far right connects to the breaker and to ground further to the right. Look close at the bus pic and you will see a smaller gauge black wire disconnected. Thanks Frank, I got lucky, disconnected this wire and it is the 12V+ going to the trailer plug. Anybody know what the other wires are? Mainly interested in the 3 black wires that have built-in disconnects. Also like to know what the red and green wires are. The large red marine switch does what? I turn it and nothing apparent! I would think it opens (disconnects) connection to the battery bank but switch it off and not much happens! There should be a main battery cutoff switch! 🙃
-
Thank you @ScubaRx!!! I opened this new discussion and asked the moderators to move a half dozen posts here, vs a Mechanical & Technical Tips thread I started on Suspension and Brakes Maintenance. Hopefully, @mossemi, @Frank C and @topgun2 who helped me immensely will find the new location.
-

Best Tire and Wheel Sizes on your HD Tow Vehicles?
jd1923 replied to jd1923's topic in Towing an Oliver
Thanks for article @John E Davies. I'm pretty sure my wheel brush is stainless steel, certainly not low carbon, since I've had it for 30 years and it's likely well over 40 years old (bought many of my tools at estate sales). Never any rust on it! Found something similar, there is a 6" Osborn Knot Wire Cup Brush on Zoro: Osborn Knot Wire Cup Brush, 6", 0003303000 0003303000 | Zoro This item is still made in USA, many others here Mexico. These ads do not spec type of steel. There is the compression disc on the underside, bolt welded to it, with rust on that part only. Glad to read that I didn't mess them up. The first wheel I cleaned 10 days ago still looks great! No, not painting, not refinishing the fronts at all! Just cleaning the backsides (rust/dust from brake pads) and wet-sanded by hand where the tire beads contact for a good seal. Also, cleaning the bolt holes and gently the valve stem recesses. They are not perfect, but you can see from the pics on page one, they're really nice as is. Not building a show car, but a truck that will see a lot of dirt/gravel roads - they will look great! What a beast of an old tool, mounted to an old Milwaukee 7" hand grinder that weighs a over 10 lbs. mounted!
-
Best Tire and Wheel Sizes on your HD Tow Vehicles?
jd1923 replied to jd1923's topic in Towing an Oliver
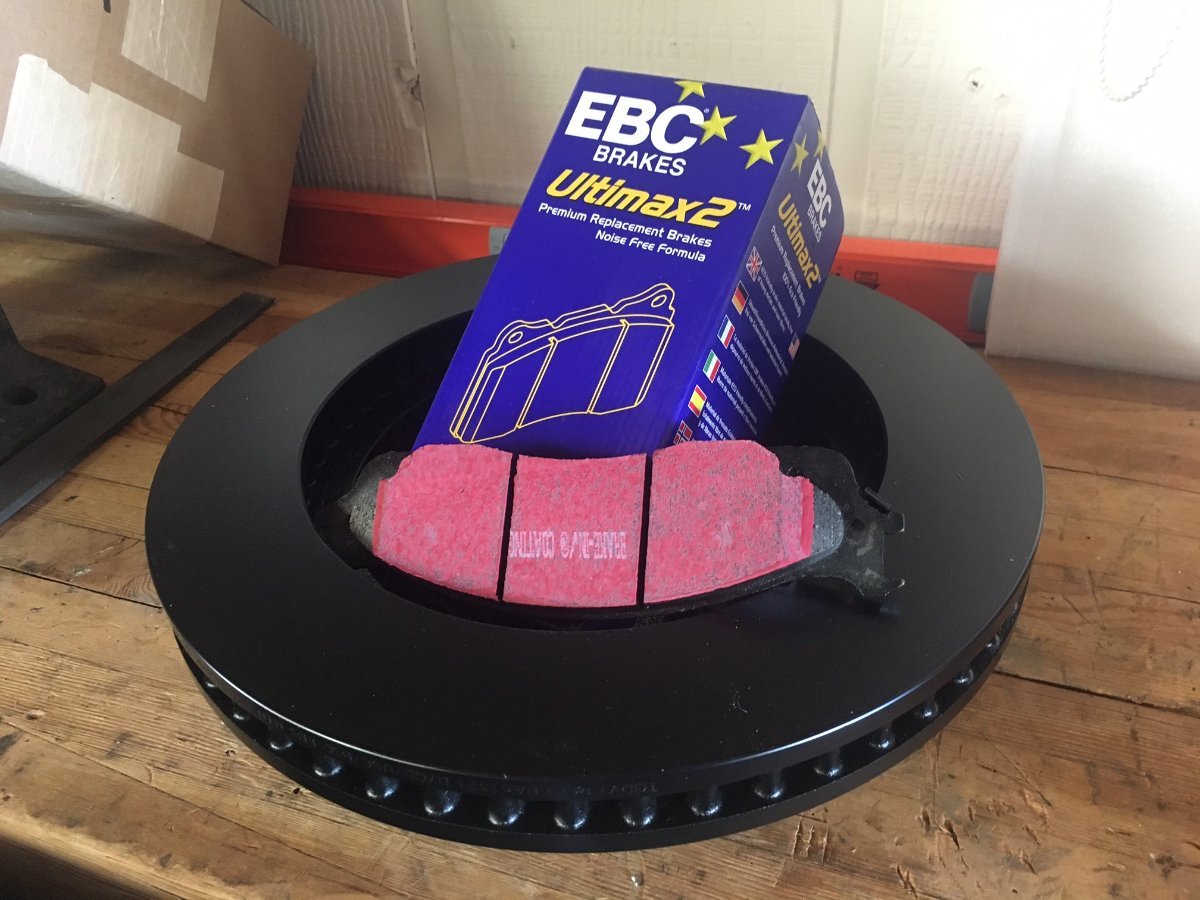
Since last week, I now have two wheels clean! It's a lot of heavy work with the heavy grinder and I like to space out the really physical jobs to only a few hours a day. There are other chores. Just received my brake upgrade! Going to 17" wheels allows me to upgrade brakes, from Dodge 2nd Gen to 3rd Gen brakes. The rotors are 1" larger diameter and thicker material. Parts include a pair of wider caliper brackets and upgraded EBC rotors and pads. It's amazing, but the calipers are the same, as they are HD already. Purchased all parts at Summit: EBC Brakes S1KF1502 EBC Stage 1 Premium Street Disc Brake Kits | Summit Racing Check the pic below! This must be a 60% increase in brake contact area for my truck. What an amazing product! You guys with newer trucks, install EBC pads and rotors on your next brake job. Didn't want drilled or slotted rotors or anything. These look great, just dark and huge!
-
Slide-out Pantry Shelf - No More Fighting the VELCRO!
jd1923 replied to MAX Burner's topic in Ollie Modifications
Bravo @NandNPNW for installing this without drilling mounting holes! This is great. The Ace Hardware product is likely good, I loved Ace in the day, back in Chicagoland, where Ace started! Next time, or if your install loosens up, go with 3M 4950 VHB tape. Instead of 12 LB you get 80 LB / SQ IN, so you could lean on the counter fully extended to get off the floor, been there Ha-Ha. This product is amazing! I'm an engineer and over-engineer about everything! I used to bolt down everything, but not anymore. I used this product to mount 2 large heavy solar panels on a fiberglass roof with only 20 SQ IN of tape each. This is an amazing product! Amazon.com: 3M Double Sided Mounting Tape 1” x 120” 4950 Foam Tape Heavy Duty Adhesive Waterproof for Car Home Office Deco Color White : Office Products -
Likely in recent years, the OTT lithium upgrade means solar upgrade too. Back in the day when many TTs and RVs had only 1 or 2 "marine" style batteries, and no solar, charging from the truck while driving made sense. You could drive to your next destination and have recharged house batteries. Lithium or not, I would not want to have 4 large AH under charged lead acid batteries, powering an inverter when boondocking overnight, and then leaving early in the morning, solar not having enough time to recharge. This would put an enormous current draw on the truck charging system which could cause ignition or computer sensor failures. BTW, this 12GA wire is not rated to charge a half-charged 300+ AH battery bank and could overheat and cause fire. This 12V+ Black lead must be disconnected on any trailer that has an inverter with a large capacity battery bank. With all your help, mine should be disconnected asap, thank you. I'm certainly glad my trailer plug needed replacing, which allowed me to learn this today.
-
Thank you very much, Frank! I'll look for this today, disconnect the black wire, and then test at the trailer plug. If I do it right, the black at the trailer end should show an open circuit and no more 12V+. Being only 3-4 months into OTT ownership, we're learning every day! I will look for these online and it would be much better to have electronic PDF searchable manuals than a folder full of paper.
-
Thanks @John Welte, @Mike and Carol and @topgun2. There are several reasons why I'm interested in the new Dill product, vs. TST and other like products. The Dill sensor is installed in the tire on an integrated valve stem vs. small plastic valve-stem-cap devices mounted outside in the elements. Dill sensors, like OEM automotive sensors, advertise a 5 to 7-year battery life. So, you replace the batteries when you replace tires every 5-7 years. Another feature is not having to mount and wire a proprietary screen! Just read the tire data from your cell phone. Soon I will be mounting a small screen for gauges integrated to the truck computer (OBD II port), to read EGT on the diesel, trans temp, and much more! I have a good place to mount that, down behind the cup holder and really do not want anything on the dashboard. Full specs are not yet out on this new product, to be released by October end, but you must be setup a cell phone alert when tire pressure or temp is outside of control limits. Having the data view portable will also be handy when filling tires. I'm holding off on my new tire purchase until these are released, price and full specs advertised.
-
Thanks Bill @topgun2 too! Now I have an issue. Yes, I have the four 6V golf cart style lead acid batteries, but I also have ample solar wattage to charge these! I never want to charge these large AH capacity trailer batteries from my truck alternator when driving, nor possibly drawing current from my truck batteries when sitting. Last thing I need is alternator or truck battery charging issues. I need to disconnect this Black 12V+ lead. Also, I'm not going to get in the practice of disconnecting the trailer plug, unless I am disconnecting the trailer. This is crazy! Good thing OTT stopped doing this. I can simply disconnect it at the trailer connection plug but would rather disconnect it at the battery side. Anybody know where the 20A breaker is located, as shown in the wiring diagram that @Frank C supplied?
-
Thanks @ScubaRx for getting this discussion started! Your first thought nailed it, and yes, it's pretty hard to connect 7 stripped wires without the black touching the white or another ground! Not an easy task to wire these, especially in this extra-small plug, where the wire lengths are less than 2" long. And thanks, @mossemi. I do understand the SAE and RV 7-way plug standards, but checkout the difference between the standards (in the eTrailer doc), where it states "Black - Battery Hot Lead" and the OTT version "Black - Battery Charge." I've owned a horse trailer, 3 cargo trailers and 2 flatbed/car hauler trailers and have replaced the trailer plug, or socket side on the truck several times. Most of these trailers did not have their own battery. In this case, the 12V+ Black and White ground are used to power trailer accessories, like interior lighting in a cargo trailer. Here the 12 VDC hot lead is from truck to trailer, not the other direction! And thanks @Frank C for confirming Steve's suspicion and supplying the trailer wiring diagram. Where do you get these diagrams? I have a standard OTT User Manual, in an Oliver 3-ring notebook, and a lot of now useless warranty information in a zipped case. I do not have the Oliver trailer connection graphic, that Mossey showed above, and I certainly do not have ANY schematics! Every time I see a wiring or plumbing diagram, in one of these posts, I save a copy to my Oliver folder.
-
Thank goodness your family and your Oliver is all OK! Years ago, pulling an enclosed cargo tailer from TX to AZ, we had a trailer blowout. Honestly, it's amazing that your OTT and connection to the TV is so solid, that you did not know the blowout even occurred - OMG! Ours was so drastic, that I immediately felt a tug on the truck steering wheel! The belts from the tire tore the fender off completely and it then damaged the siding of the trailer (cheap alum, not our OTT fiberglass). Got a new tire, miles down the desolate dry western highway. Of course, had to park the trailer and run an 85-mile roundtrip with the wheel. I'm going to purchase and install these from Dill. Our truck is 23 years old, so it did not come with TPMS. You can buy a set of 4, or 8 and monitor pressure via Bluetooth to your phone. I will purchase 8 and install inside of my OTT and TV wheels. Dill's new product will be available late October from Tire Rack (first reseller). For truck and trailer you would buy two sets (pat # 1604-V).
-
Ok, so I received the new trailer plug from amazon today. I chose this Curt product (made in Taiwan, not China TG) since our Dodge OEM hitch (yes Mopar logo on the cover) on my old Ram, has the receptacle pointing right towards the hitch, instead of pointing back towards the trailer. It's always in the way of the chain hooks, as was! This plug is very short: Amazon.com: CURT 58190 Trailer-Side 7-Pin RV Blade Wiring Harness Connector, silver : Automotive I was wiring it this afternoon and while doing so, I kept getting a 12V DC shock. Got out my voltmeter and the black wire had 12+ volts live, when NOT connected to the truck, OMG! I've installed several of these in my lifetime and I'm not at all used to ANY of the 7 wires in a trailer electrical connection being live when the truck is not attached. WTF is OTT doing? It is NOT at all standard to feed 12V DC to the truck-trailer wiring when not connected? This is crazy! hoping @John E Daviesor another member can explain (pic showing new plug). Please help!
-
For those not wanting to drill so many holes on your future installs, I strongly suggest using 3M VHB tapes (use only 3M brand tapes). 3M model 4950 is white, just over 1mm thick, and comes in 1/2", 3/4" and 1" widths. The 1/2" should be perfect for this fan. Clean surfaces with rubbing alcohol. Cut several 1" lengths and position them around the perimeter of the fan where it contacts the roof. The rain guard would only need a few pieces of tape. No butyl tape on this install, finish with a bead of white silicone caulk around the fan. I do not suggest caulking the rain guard, in fact I might not install the rain guard, as I believe this part is intended for wall mounting (solid on top and vented below). Amazon.com: 3M - 1/2-5-4950 VHB 4950 Heavy Duty Mounting Tape - 0.5 in. x 15 ft. Permanent Bonding Tape Roll with Acrylic Foam Core. Tapes and Adhesives : Industrial & Scientific VHB tape is way, WAY STRONGER than any kind of screws into fiberglass. I used this tape to connect the solar panel brackets to fiberglass roof on my old Bigfoot Class-C, with no screws at all. These large panels were very heavy, and never failed. I did use double mounting brackets (8/panel vs. the standard 4), given the size of the panels. Overlap Shear Strength of the 4950 tape is 80 lb./in², which is a whole lot of pressure. Your fan and rain guard will hold strong, I promise! Thanks @SeaDawg and @MAX Burner as I used your links and just purchased one for a future install. When I get around to this job, end of a very long list, I'll post the 3M VHB installation version!
-
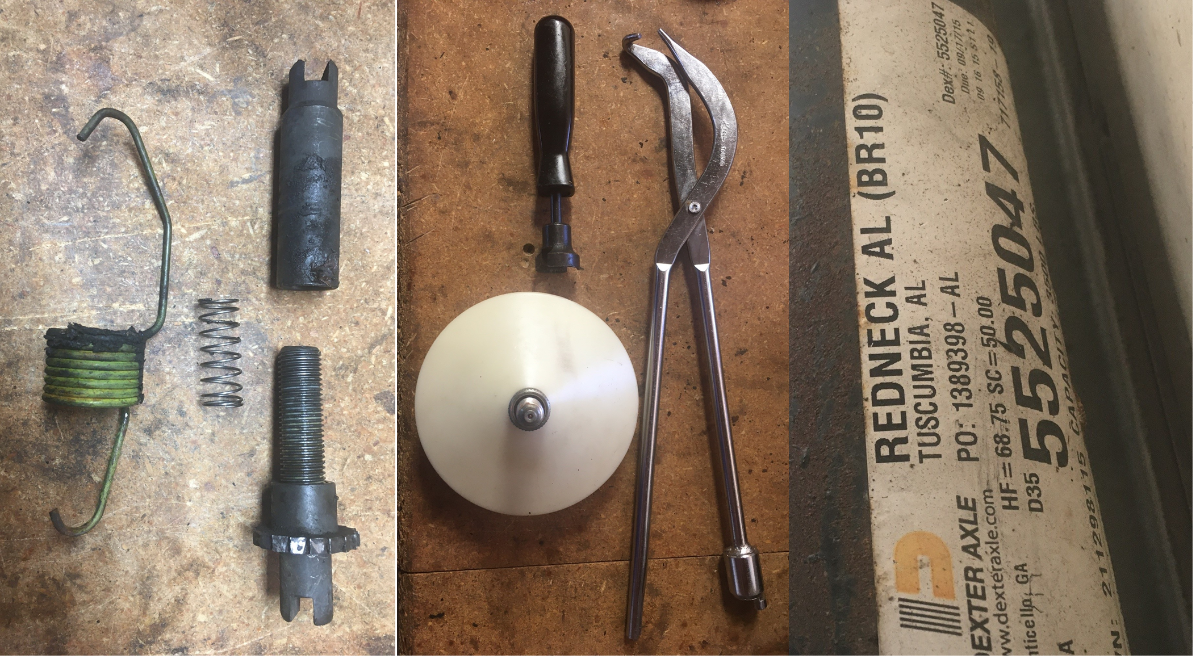
Thank you @topgun2! Got the streetside bearings done yesterday. I was able to find sockets the correct diameter to press in the races. Packed the bearings with a convenient tool, otherwise it's a large swab of grease in your palm. Removed the adjuster from the rear wheel to grease after having pressure washed this assembly. I ended up removing ALL the brake parts to grease the contact points and did some additional cleaning on the back sides of parts. When I work the streetside I will first remove ALL brake parts and pressure wash only the backing plates and suspension. You need these tools to do the complete brake job. Wondering how y'all use Brakleen and apply grease where it is needed, as this spray will remove the grease as well as pressure washing. But I really don't need to know, just won't use the messy spray. When I disassemble parts, I clean them by hand with GoJo hand cleaner, rinse with water and use compressed air to dry, and they will come out as clean as the one pictured above! The two axles both had identical labels, see label/part number, and there was another label "Nev-R-Adjust" on both. Love the REDNECK AL label - LOL! My front axle must be the older version. The only differences are as follows; There is a different top post which does not need the oblong assembly plate, there are two springs (easier to remount with drum brake tools) vs the one main cross spring. The self-adjusters are identical with one exception. The second one has the spring (pictured). I don't see any purpose for the spring, except to hold the adjuster nicely to the shoes during assembly. The spring is extremely light duty and can't do much, or is this the reason why some shoes "over-tighten?" Hmm, probably not. I've done brake jobs on a dozen 50s-60s-70s cars with drum brakes. They all had the two top shoe springs with oblong plate, never a large cross spring, and I don't ever remember having a spring in the adjuster! Tested the brakes, wheels on and truck attached. My son Adam hit the brakes as I was spinning the wheels. My heart sunk as the wheels did not stop! I could hear the magnets powered. What could be wrong? I had to rewire the front brakes, due to pack rats chewing the wires, but power to the magnet does not have a specific polarity. One wire needs power from the blue/brake wire and the other needs ground. They were working last week when I moved the trailer. Then we jacked up the other side, that I had not yet worked, same thing no brakes. Turned power up full on the brake controller and finally wheels would stop, but only a little. Symptoms are looking like a weak ground. It turned out to be the connection at the hitch. Our trailer plug, looking old, has a damaged/recessed ground blade. Must have achieved ground last time, but not anymore. Went on Amazon, ordered a new one and some dielectric grease! I'm thinking a day off this project, before I tackle the other side! 😊
-
Rebuilt the front axle brakes and greased all contact points with silicone brake grease. Today I will remove the adjuster spring on the rear and apply grease there, since yes, the pressure wash cleaned it dry. Installed the new shocks (don't over-tighten the rubber bushing). Amazon used was good for 3 out of 4, one was blown, as you could compress it easily by hand and it would sit there and return very slowly. I submitted a return on that one and ordered another one at the new price of $34. Good practice with new shocks, out of the box, is to fully compress them, and allowing them to expand, 2-3 times. My Timken seals arrived from eTrailer yesterday, so I will finish up the left side and start the right. They certainly look of better quality, with made in USA printed on both sides. BTW, if you have the original CHINA bearings, and they have been maintained, just clean them well and repack them and you should be fine for some time. For my Oliver, with dubious maintenance history, thought it was the right time to install new bearings. I like to get my vehicles fully serviced, while I'm still able to do this kind of work. And we're not like some of you who put 10K miles on a year! For us, 3000 miles would be a big year (I like to be home!). Like to plan our RV trips, driving just 2-4 hours a day, boondocking between other stops. I do not plan to open these drums, grease the bearings again for a few years, after I get them right. I understand the suggested maintenance schedule, often written by legal departments and not experienced mechanics. Also, not driving through major rainstorms, as JD had mentioned, which is a rare case in the SW. We pull over and wait out such storms!
-
Thank you Patriot🇺🇸, you have an amazing TV in your "2021 F350 6.7 liter Diesel Lariat..." OMG, wanna trade? LOL! New model Ford F250/350s with the PowerStroke diesel engine, have an exhaust brake accessory. I'm not sure if it is standard, or an option that comes with a special tow package. Perhaps the new Rams also have this, but not us old Ram 5.9 Cummins. It's pricy, but the purchase price of my TV was a steal and I planned from the start to put another $10K into parts for it, me being the primary installer! After I complete my build, I will still be at about 33% the cost of a new diesel truck! This is on my build list (watch the product video): PacBrake PRXB Exhaust Brake Cummins 24V (dieselpowerproducts.com) Keep in mind, we all need good brakes in stop-n-go traffic, both truck and trailer, since an exhaust brake cuts out at lower RPMs. The diesel engine brake is a must for frequent mountain driving. One hour from our home, on the way to Phoenix, is a 4000 FT drop in elevation!
-
The cold water from the pressure washer does something to the grime so it isn't sticky. I didn't mean to write "pressure-wash your driveway." If it sits there it will soil the driveway, but just rinse it away and you're done. JD, Ronbrink and you other Oliver/Dexter experts out there, please take a look at this pic. I put these two photos together merely to show a before & after, to show how clean the pressure washer got the rear wheel, but these brake assemblies are different! These are two different Dexter assemblies. The rear wheel has the large spring horizontal to the top (Like the picture Ronbrink posted). The front wheel has the two springs in an 'A' shape, connected to the main post (which standard in automotive applications). This can't be normal, can it? Do you think one assembly was replaced? The drums looked different too, even though they have the same part numbers. One looked like a raw casting, the other looked like it was painted black. I'll know more when I finish the streetside and remove the curbside wheels. What do you think?
-
Got to pressure washing yesterday! It really turned out nice. Had to lay on the ground under the trailer to clean the backside too. I'm not fond of the Brakleen type sprays. First you're wasting a couple cans of this chemical at close to $10 a can and it gets so messy as you can see in Ronbrink's pics above. After pressure washing you just need to pressure-wash your driveway a bit to run the dirt off. On the edge of our driveway, we have a landscaped wash, and the dirt just joins other Arizona dirt downstream! I took the front brake assembly apart and cleaned each part by hand and the pressure washed side looks almost as good. Did the backside of the wheels and tires too. You can also see the wheels before and after below.
-
I'm with Frank. You have an Elite I, get a half-ton truck. The Elite II requires a 3/4-ton truck, certainly if you plan to drive mountain passes. Get a Diesel and save $$ in fuel costs across country, My weights are in the middle. 13,220 lbs. truck and trailer, with fresh tank full and another 35 gal in the truck bed (yes, life out in the SW requires 580 LB in water, try that in an SUV), Truck alone was 7220 LB on 8800 GVWR, and our Oliver weighed right at 6000 lbs. We have room in both. If we were to go on a 4-week trip, I could see adding another 1000 lbs. I like these numbers. We had a class-C RV and were always fighting 14K LB GVWR. Just got a truck toolbox on Craigs. It's deep and can hold our Coleman grill with its stand, trailer jack, a jack stand, emergency triangles, all my tools and more. These are the kinds of things you may need. Check out my new layout. The small toolbox is for camping/cooking equipment. Toolboxes and water tank will be mounted soon, each is evenly spaced out, so lawn chairs and the like can fit between. Also, there is room for 8 FT lengths of lumber (where you see the scrap wood), for if I have to get supplies. One thing that may be hard to see in the pic, is the back half of the 8 FT truck bed is still empty! 😊