All Activity
- Past hour
-
Thank you Galway Girl for input from your actual experience! Very helpful!
- Today
-
I had this happen and found that one of the spade connections at the pump had come loose. I crimped the spade connection for a tighter fit, reinstalled, all good. A few others have experienced this, as well; simple fix!
-

Adding a Matching Rear Porch Light and some Front Lighting
jd1923 replied to jd1923's topic in Ollie Modifications
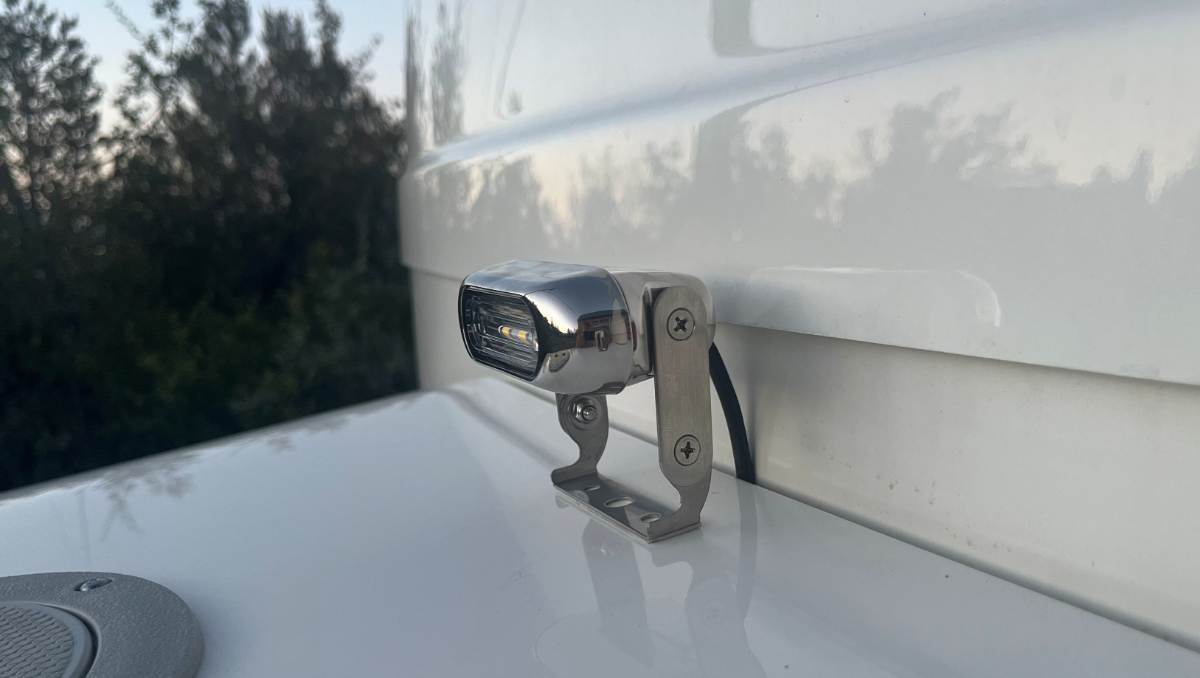
Got this working yesterday, using the screws supplied with the light on top and hardware I had in the shop to attach the bottoms. It looked hodgepodge today. I really should fab a proper bracket, but for now I just wanted to fix its appearance. Went to the local HW store and got four short 4mm countersink screws and two Nylok nuts and washers. I had to countersink the brackets further to get the screws flush. The assembly is much better, but now that the light is taller, I noticed two things. The base bracket looks cheap now that you can fully see it. And the height is right at the belly line where the hulls meet, so visually it's not good. It looked better shorter, but now the light is where you need it. If I was to do this again, first I would use the great idea @Steph and Dud B made above; to grab power and use the light switch on the jack. Second I would fab a proper bracket a bit shorter than this one and push it forward a couple inches to get the required angle. Then it's not up against the hull belly line and will look better. It's too late for me re the first idea, but I'll do the latter when I source the right stainless steel stock. Looks like one of those Star Wars robots! It's all the light we'll need to hitch-up and load or unload the truck in the dark when necessary. We now have proper exterior lighting on all four sides! 😎
-
Thanks so much @Galway Girl. I appreciate the information. I have already submitted tickets and called Oliver. I will be on the phone with Truma first thing Monday morning. Bob
-
As an aside...while Truma is very clear that they only want their technicians doing any updates or changes...I believe Oliver did a bunch of installation of new burner units . Be sure to turn in a "ticket" to both Oliver and Truma. See my PM for some more suggestions. CS
-
Please read my detailed report that I sent in on this topic attached....I've had truma's replace 3 times. First potential cause - Truma didn't properly tighten the brass fittings internally that feed the burner assembly. Second potential cause - Truma didn't crimp the burner tube assembly correctly, and with travel they rattle out (the burner tubes are like in a bar-b-q and can fall off which causes raw gas to be injected into the burner area for explosive ignition instead of gentle start.) This blog post has 3 goals and was SENT to NHTSA for evidence of why Truma needs to do something to fix their defective mfg process. 1) List symptoms we experienced with our Truma and use photos to illustrate the 3 firebox events. 2) Describe 2 different Truma reported manufacturing defects and show photos illustrating those issues. 3) Describe the in field solutions for each of the 2 manufacturing issues. 4) Show a pictures of the current Truma Burner Unit with all Manufacturing updates in place. The attached PDF is in full detail with picture of what is likely the issue or issues causing explosive ignition. Truma Issues.pdf Hope that helps...remember...you need to report this to both Oliver and Truma in order to get any warranty coverage. Craig Short
-

Furrion Stereo Upgrade: A Sound Choice
rideandfly replied to Snackchaser's topic in Ollie Modifications
@Snackchaser and @jd1923 Appreciate your constructive advice. Looking forward to wiring & testing the unit Monday! 😎 -
Our old Furrion jumbo heads sure are ugly! Your new iRV62 looks sooooo much better, even with the large faceplate which has a clean look! Excellent work cutting out the plastic sheet plus the aluminum sheet for added strength. The wiring should be the easy part. You're 90% there! 😎
-
I appreciate that. I have opened a ticket and sent a copy of the video to Mike Sharpe. I checked and there are a couple of Truma authorized service centers near where we are (Buffalo/Rochester area). Thanks for weighing in on a Saturday night. Bob
-
I’m sorry that this is happening and during a weekend to boot. Open a service ticket and see if you can send that video. In any event you’ll have to find an authorized Truma service facility to replace your unit. Maybe get the unit replaced now and take a chance on getting reimbursed after the repair?
-
Oliver has told me repeatedly that my water heater was not part of the recall. I have had numerous issues but this one is the most serious.
-
Looks like the burner has fallen apart. I thought that was an ongoing recall for this unfortunately all to common issue. I believe Truma says in this case not to use the water heater. Hopefully someone who has a Truma and has gone through the recall process can help.
-
IMG_3472.mov Almost hate to post this video, but I am in week 1 of a 4 week loop and just encountered a major issue with the truma. The video speaks for itself. Any thoughts?
-
During troubleshooting I did raise the nose. I probably exacerbated the problem! Best, Mark
-
Yes👍
-

Furrion Stereo Upgrade: A Sound Choice
Snackchaser replied to Snackchaser's topic in Ollie Modifications
@rideandfly Nice work! That's some clever engineering! -
It you look in the closet, there is a horizontal section of vent pipe about three feet long. If the trailer was parked with the nose up, that section of horizontal pipe would fill with water if the vent cap was off, or water was sprayed up under the cap. That's the only reasonable scenario that would cause blockage of the vent and result in slow drainage. Seems like dropping the nose back down would drain that standing water better than going on the roof with a vacuum. 😁 Us retired folks got to be carful on ladders! Cheers! Geoff
-
Furrion Stereo Upgrade: A Sound Choice
rideandfly replied to Snackchaser's topic in Ollie Modifications
Our original Furrion DV1200 failed a few years ago, I found an old stock Furrion DV1100 that was the same size and plug/play unit that only lasted a few more years. Our Original Furrion unit was much larger than Snackchaser's original Furrion unit. Like JD indicated the old Furrion cutout is large enough for an addition cabinet. Decided to use a iRV62 stereo/DVD/CD player from Amazon like Snackchaser. Cut out a large 11"X7"X1/8" black plastic sheet from Amazon to cover the old Furrion cutout. Also cut out a 11"X7"X1/16" aluminum 6061 sheet from Amazon to add strength to the plastic mounting plate. Sandwiched the aluminum sheet between the plastic sheet and fiberglass hull with the iRV62 bolted directly through the plastic sheet & aluminum sheets. Furrion unit: iRV62 with plastic & aluminum sheets: iRV unit with backing plate on right next to old Furrion unit: iRV62 installed today: Plan to wire & test on Monday. -
@dkeen, you're correct about using the tester. With the black probe on the ground bus, check for voltage with red probe on both sides of the fuse - with the fuse in place. There should be power on both sides of fuse. But that is probably not the problem if you already confirmed continuity through the fuse. If the fuse LED does not light with the switch on, it means that there is an open somewhere in the pump circuit. Probably a spade off one of the switches, or bad connection somewhere. Here are some easy checks: There should be a wire connected at the back of the panel directly behind the pump fuse. Count fuses from the top down to the pump fuse, and count same number of spade terminals from top down in the back — that will be the pump circuit and the easiest connection to check first. Just verify that the wire hasn’t pulled off the spade. Look at the pump wire connections next, pull on the wires to make sure they are properly spliced together. Least probable- You can slip your test probe into the pump butt-splices and check for volts to ground. Check all the pump wires with switch in both positions. !2 volts on any of these wires means you're getting voltage to the pump. If you have voltage, then the pressure switch is suspect. It should be normally closed. If it failed in the open position, then the pump and fuse indicator won’t work. If you haven’t found it at this point, then it gets more complicated and probably beyond typical DIY skills. The switches are 3-way, wired with the power going to one switch and the switch leg going to the other, with travelers in-between. The bath switch requires removal of the shelf which is a project on its own. This is further complicated by an in-line relay that handles full pump current so that the switches don’t have to. Sounds like your going to Oliver anyway, so its probably best to have them fix it. Even a seasoned RV repair guy would spend a good amount of time finding the problem. Good luck, Geoff
-
Ok, when using this method of sanitizing you should place the valves in the "normal" configuration. Concerning the water heater, was the water heater power switch (access from outside of the trailer on the water heater itself) in the 'on' position ( either up or down ). Of course don't try this when you're sanitizing ( water heater water inlet valve should be closed during sanitizing ).
- Yesterday
-
Adding a Matching Rear Porch Light and some Front Lighting
jd1923 replied to jd1923's topic in Ollie Modifications
Difficult to find a taller bracket spread 2 3/4" (70mm). But this item gave me an easy quick fix. Brought the light up 1 1/4" taller and no more shadow. https://www.amazon.com/dp/B0DT7221NZ/?th=1 -
IF you are worried about heat on your trip - you can use a Mr. Heater "Buddy" heater like THIS ONE. For over 20 years I've used one of these since they do not require electric and are reasonably good on propane usage. These heaters also come with CO and overall O2 sensors with automatic shutoff. Good luck and have fun on your trip! Bill p.s. These heaters are available at many WalMart's and Tractor Supply.
-
I apologize for not posting a resolution sooner. I changed the inverter circuit breaker for new. Hard to find. Home Depot website only. Charging issue resolved. My theory is a washboard road in and out of 11 Mile Reservoir State Park CO. Who knows?! Thank you for all your knowledge. Mark
-
Having shower pan backup and slow draining with water from bathroom sink, lots of gurgling through kitchen sink, slow draining with grey valve CLOSED. Normal draining when grey valve OPEN. I read this post which made me remember I had used a power washer during washing the day prior. Hooked up shop Vac to roof vent for 5 min. Same result of about half gallon of water. Seems to have solved the issue. Thanks for posting!
-
Dud, you are starting to get above my electrical knowledge which is easy to do😉. I assume I should set to 20V DC, hold black probe to ground bus, then red probe to each side of the fuse with the switch on?