Leaderboard


Popular Content
Showing content with the highest reputation on 04/10/2025 in Posts
-
After 3 days out boondocking, I tested the Orion XS 50A DC-DC Charger while driving 90 minutes to return home. SOC increased from 57% to 66% (9% of 600Ah). Ahs gained were 53.8Ah (271.8 - 218.0) or 36Ah per hour (pic1). I'm assuming the 10-12A generated from the solar charger covers the fridge on DC and +2A for our Inverter on standby, etc. It was a mostly sunny day with some haze. We started back on 20 miles of dirt roads, some washboard, then 20 miles paved roads. Our speed ranged from 10 to 50 MPH. I would consider it more equivalent to suburban driving, certainly not highway driving. The highest output charge rate observed was 47.8A early but most of the time it sat somewhere in the 30s. Battery voltage started at 13.10V and 13.35V ninety minutes later. Highest output charge voltage was 13.7V (pic2), even though it was configured up to 14.2V in the setup. I have an accurate voltage gauge in the truck measuring voltage at the starter batteries. With any amount of fuel pedal, it will most often read 14.2V. After I connect the DC-DC charger this reading drops to 13.8, then 13.7 and back and forth. Let's call it 13.75V. The difference between this and the input voltage of 13.1V (on Orion charge screen) shows a 0.65V voltage drop (TV batteries to input side of charger). This is likely normal for the length 65' of 4 AWG copper wire and 16' of the TV frame. That's all I got for now. In 3 weeks we are heading to Albuquerque and with some boondocking on the way home. It should be about 1,000 miles total. The real test will be in June, 4,000 miles in a big loop from AZ to MN and back! This is sure a great investment at $540 parts plus a day of labor.
 4 points
 -
I pulled the plug and got 3 Watt Cycle 280 Ah Lithium Batteries for a total of 840 Ahs. Yes, based on Will Prowse’s review, got the Blue Sea 400 amp fuse. I also bought the Victron Multiplus, yes, not the II, the Cerbo GX, and the Victron 50 Touchscreen. Good news is that Beast fits where the old Xantrex ProWatt SW was. I’ve read, and reread, and reread the great posts other owners have posted on their MultiPlus upgrades. Sad to say, it’s way over my pay grade. Have a mobile RV guy coming out to install. He is saying 3 to 5 hours for install. Seems fair to me, since I don’t have a clue. He says it might also take an hour to configure the Multiplus. I am hoping someone can give me their configuration or tell me who might get me that info to save me that $150 an hour of button pushing. I’ll have him install the Cerbo GX. I may install the Victron 50 Touchscreen later. Would like some advice on best place to run the wire and mount for that. I do NOT have the Zamp Controller panel installed so that hole does not exist in my trailer. My goal is to have all this work done before I’m on the road to the April Ollie Rally at Lake Guntersville. Any comments, suggestions, questions will be much appreciated. Thanks Gary Hull 292 The Range Rover2 points
-
Maybe show us a pix of what's already in your control panel by the pantry. If you have physical space there for your Victron Touchscreen that would be a good location. You can run a fish tape from a new hole (next to the pantry) down into the belly of the trailer and across to the location of your new Cerbo GX. You can access that between the wall area through the Access Port inside your pantry. Another option is to put the touch screen to the right or left side of the upper rear attic door. You can gain access down the back side of the trailer (back side of attic) with a fish tape. That's the location we put a new display when we upgraded. Alternate location for any touch panels if the space next to the pantry is already full of panels. Shown below - the space right of he rear Attic Door. The access path for the cable is along the belly area street side to the back wall of the trailer. Next cable runs up the back wall into the attic area. You need to un-bolt the rear interior wall of the attic to gain access to the back of the space shown. (Easy to do.)
2 points
-
As a former ad guy, I approve!! 👍2 points
-
Good to read this Gary. You've really made progress here! Having the mobile guy come out was the #3 option I suggested in another thread. 3 hours would be amazing (don't count on it) and get him to do the 5 hours max with Multiplus configuration which should only take 20 minutes. The Multiplus requires setting physical dipswitches (this was replaced by software in the MP2). You want LiFePO4 settings of course and for Epoch batteries I set bulk charge to 14.2V and all other charge settings to 13.6, but check for these numbers in the user manual for your specific battery choice. I'm not seeing any reason for external Zamp ports unless at some point you add portable solar (and when you do, add one Zamp/SAE or other port without drilling 5 holes into your hull like OTT does)! This guy has thorough Victron installation and configuration videos. He shows the Mk-3 USB interface I mentioned previously. I purchased the newer USB-C version which is the next-gen interface, given your laptop has a USB-C port (standard USB ports will soon not be offered on laptops. My new Dell Latitude 9330 has 3 USB-C ports only).2 points
-
HaHa that sounds Ok with me thats what I get for being late. This will be my first rally and really looking forward to meeting fellow Ollie owners and gaining knowledge about the Brand and modifications. Thanks to all who put so much content on the forums its really interesting to read about.2 points
-
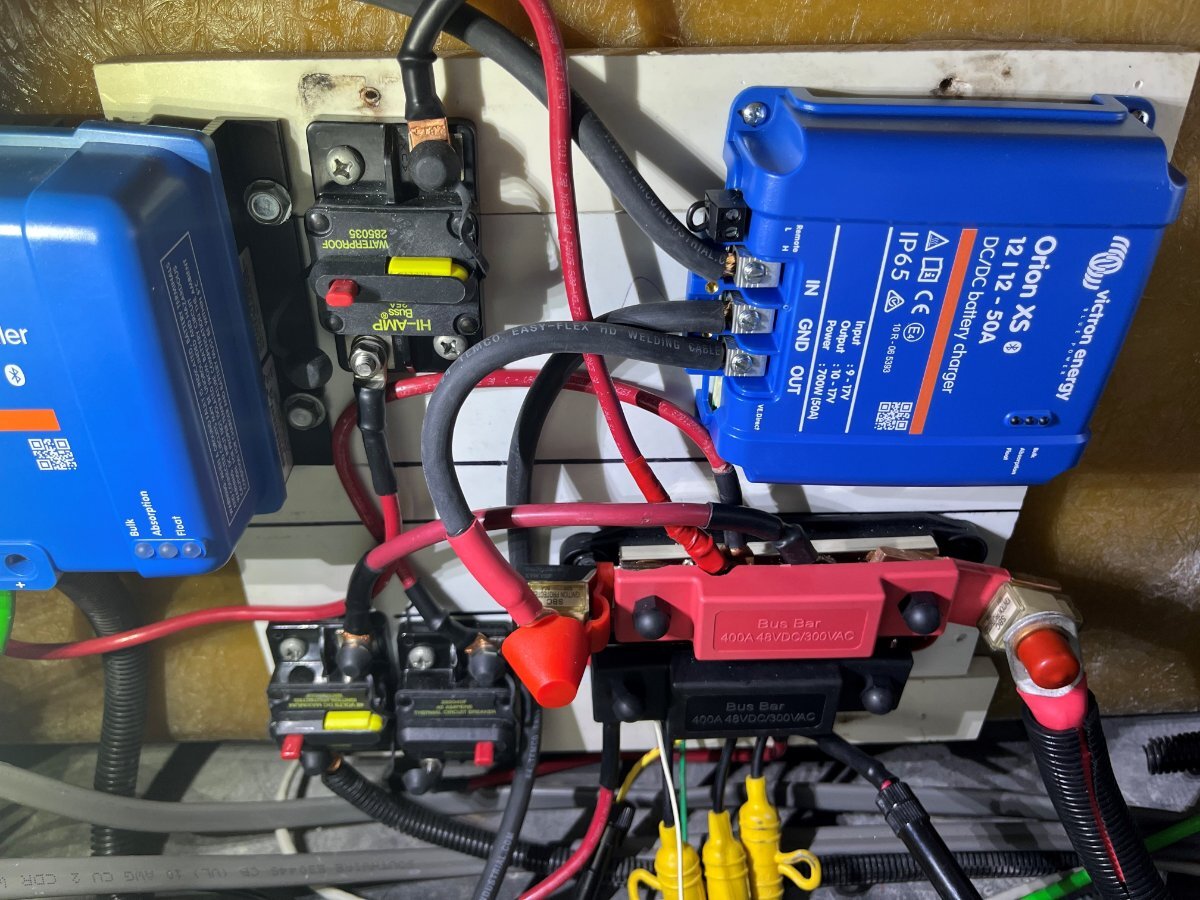
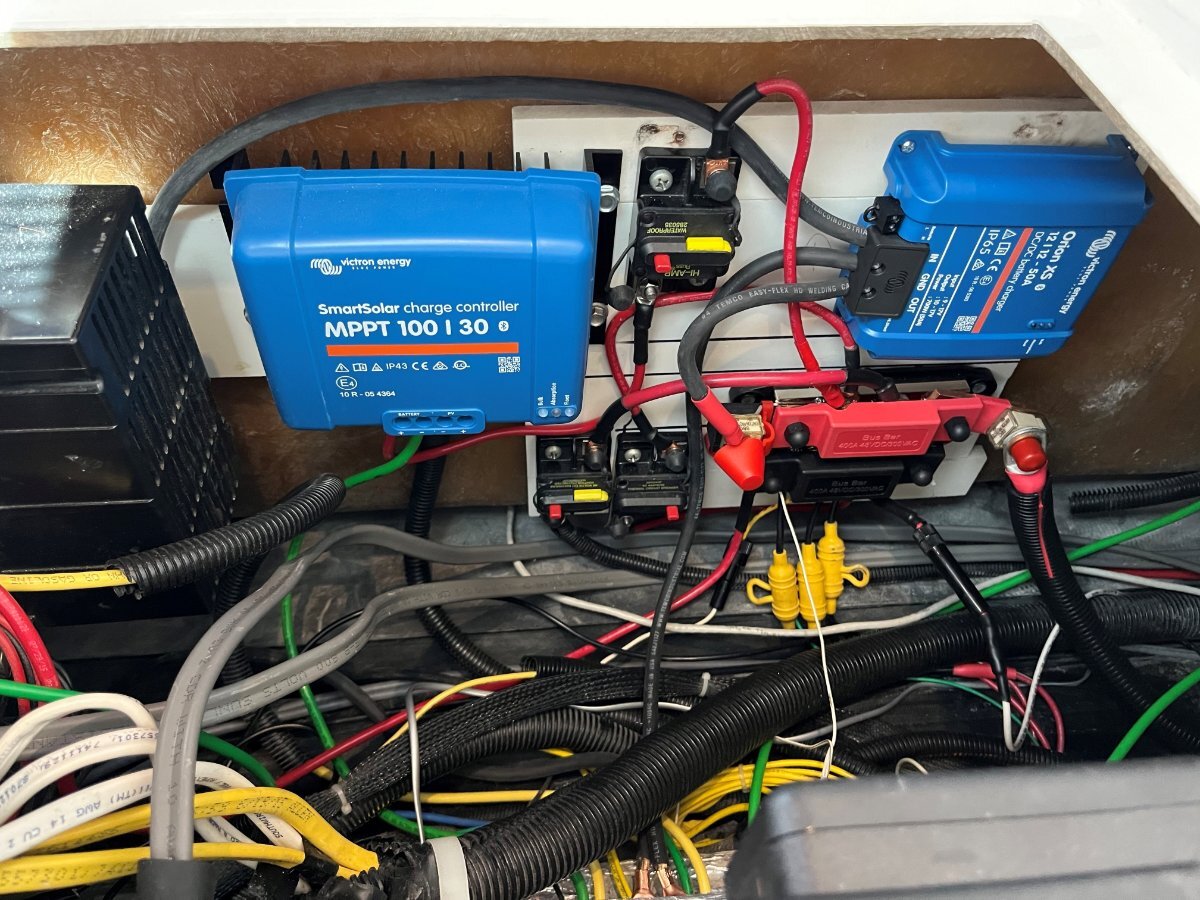
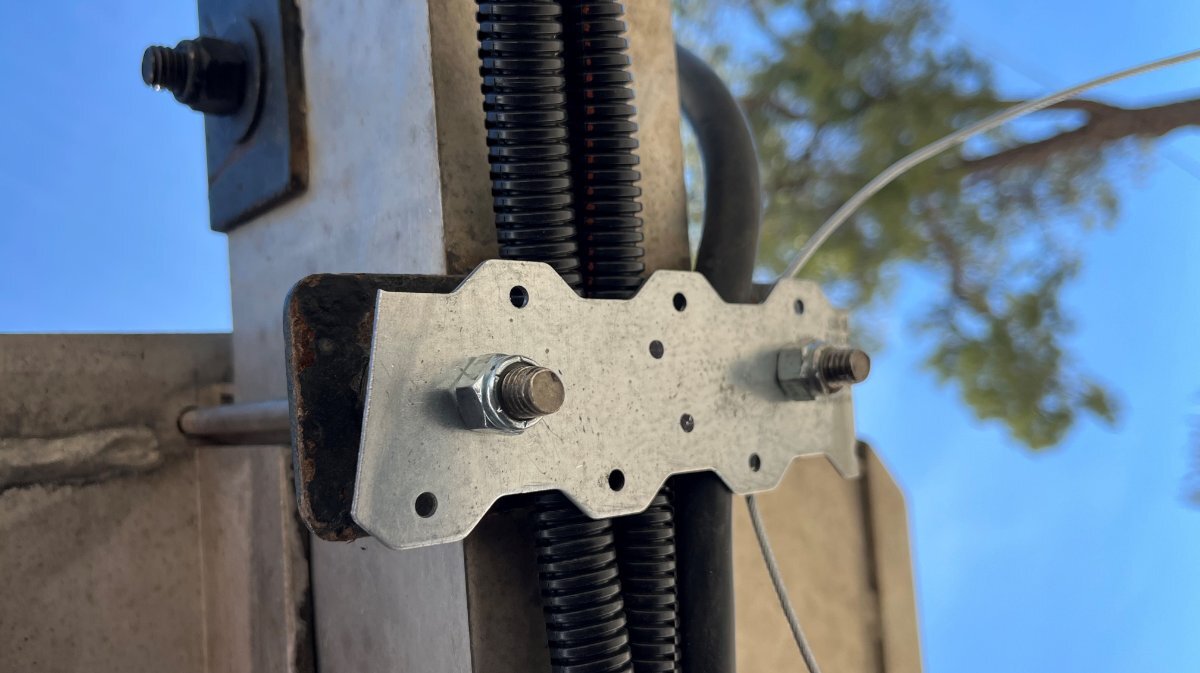
I’ve had the parts forever and between work and some travel, a list of injuries (that made it extremely difficult to kneel in the basement or crawl under the truck) I finally have this done, fully installed and performance tested! The bottom line is, “this charger is awesome!” A month ago, I was working on waste valves under the front dinette seat when it occurred to me to run the charger cabling in the Oliver since I had everything opened. I always drill the smallest hole possible, no fancy cable glands for me. Two 3/8” holes would been enough, but I had grommets in a parts box 1/2" OD and 3/8” ID which were the perfect size. I glued them in place and afterwards caulked all of the cable openings front of hull (no pics taken). It makes sense to wire the charger before mounting the board (pic1). The wiring is rather simple but the 4 AWG wire barely fits into the terminals. The 4 AWG wire will not fit into the Oliver ground/neutral bus, so I crimped on a lug and cut it to fit the opening. I installed the two grounds side-by-side (the other coming from the tow vehicle) (pic2). When I worked my earlier inverter upgrade and rewiring projects, I had saved room for the new Orion DC-to-DC charger (pic3 close-up and pic4). The main + bus (in red) is protected by a 90A Marine Rated Battery Fuse (MRBF) that connects by 4/0 cable directly to the Victron Inverter-Charger bus and then through a 400A ANL fuse connected to the batteries (400A Victron Mulitplus spec). All major circuits are connected to the main bus; the 40A breaker OTT installed for all the Oliver 12VDC circuits, two solar chargers (OEM Blue Sky for rooftop panels and a Victron 30A MPPT charger for a Renogy 400W suitcase) and the new DC-DC charger circuit which is connected through a 60A MRBF (see center of pic3). The secondary +bus (in black because I purchased a set) is protected by the OEM 40A breaker which connects to the 12VDC panel, the 3 jack fuses, etc. These are 8mm thick solid copper buses for minimal resistance. A considerable upgrade compared to the original OEM installation. I attached the Anderson connection, front of trailer, and then got under it to see all the many zip ties that OTT installed. OMG, they should have better cable management! I replaced a lot of these because of age, but I did not want to merely zip tie this new heavy dual cable harness! Instead, I used the u-bolts that hold the front basket and cut brackets to support the cables including the trailer harness in two places, in front and rear of the basket. The picture shows the front bracket (pic5). And after taking this picture I hammered both ends of the bracket to curve them up almost touching the upper bracket to create a D-shape. I could have purchased pretty brackets, but these were on hand, fully functional and can only be seen while lying on the ground! The trailer side installation was then done! When I finished and reconnected the house batteries, the blue light on the Orion started blinking and it was listed as a device on the Victron Connect app. So before even working on the tow vehicle installation, I was able to update the firmware and configure the Orion charger. I reduced the output charge to 30A for safety concerns and initial testing. The battery settings were close enough, within 0.1V of the specs for Epoch LiFePO4 batteries.
1 point
-
Thanks, and I hope it doesn’t put me to sleep. %^) ZZZZZZ get it?1 point
-
Last year's trip, stopping at Penobscot Narrows Bridge, this seemed like perfect product placement. 😀
1 point
-
The fact that Truma has changed the design would seem to indicate that they know that they have a problem. What is certainly true is that Truma does not have the capability to address the numbers associated with this recall so they're denying repsonsibility and pushing it off on others, in my opinion. Additionally, if a burner assembly is designed with eight tabs why would they choose to only crimp two?1 point
-
We love that part of Arizona, actually most parts of Arizona! Looks like a great trip. Mike1 point
-
We hiked just a mile or so towards the Juniper Mesa Wilderness (not even close). You would have to hike overnight and tent camp to actually get up into it. The woods here have been in drought for a while and not so just 45 miles SE in Prescott. Look closely, zoom-in on the trunk of this Alligator Juniper, one of many we found on the trail. This beast has grown right out of the granite boulders of the mountain. There must be millions of these trees in this wilderness area. We walked by hundreds today. The Alligator Juniper is the iconic tree of the Prescott NF. The trees in this area have seen a harsh climate (pic1). Closer to Prescott another Alligator Juniper has had a better life, some 100s of years of it. What an amazing tree with Chris in the picture! And btw, the Ponderosa Pine in the post above ain't bad either!
1 point
-
It's been quiet on this most important thread... Thanks @Mike and Carol for starting this! I have the week off and we wanted to get away. It keeps me from workin' on stuff and I need more of that. Almost 2 hours NW of us we can drive to the far NW corner of the Prescott NF. What a wonderful forest it is! At about 5600 ft elevation and little to no rain or snow in this area it's really dry here. We had a dry year, just 2 years ago we had a super-blossom, wild flowers everywhere this time of year but not this year. It's so dry the birds are scarce but Chris recorded a few chirps and pics . At dinner by the fire ring, we noticed a large southwestern jack-rabbit though, as big as a 20 lb tomcat. He came by and came by again later just to see us. At dusk jack-rabbits and great owls surround the woods. We found jeep trails every direction and are thinking of coming out here again next week with our son Adam and one of his friends. We'll also bring another TV with my flatbed trailer, towing our Havoc side-by-side, Adams KFX400 sport quad and my Honda CRF230, an old mans dirt bike (that means it's closer to the ground with electric start)! The boys can tent camp up on the mountain and we will camp here again, in this beautiful place and the luxury of our Oliver with Chris' great food! The Oliver makes traveling so easy. Check out our pics. The first is where Williamson Valley Rd, 20 miles NW out of Prescott where it turns to dirt. Then the Walnut Creek bridge made of bridge steel moved from the Gila River in S AZ over 100 years ago and then our weekend campsite where I am writing this from bed tonight, connected our first time with a Starlink Mini. Leaving tomorrow after another great breakfast and on our way home we will check out a few more forest roads. Is everybody else still stored for the winter? I wish you a great spring and summer travels! 😂
1 point
-
For anyone planning to recover their dinette cushions, and never has guests sleeping on that bed, I suggest making the seatback wedge shaped. One of my only complaints about the Oliver is how my bad back hurts after sitting at the dinette for too long. After only a couple outings, I added a length of pool noodle split in half lengthwise behind the bottom of the backrest. This 1-1/2" ish tilt made all the difference! Whenever we need to get the cushions covered, we will have the padding and covering made wedge shaped to match this angle.1 point
-
One tweak to the above settings if you experience low battery shutdown when using the 3000-watt inverter to power high-wattage appliances (like the microwave) with some later 2022 Elite II hulls: reset setting No. 02 for LBCO (Low Battery Cut Off) voltage to 11.5V rather than 12.1. Our Hull #1291 has the "new" 12V bus bar, which Jason Essary advised requires that LBCO be set to 11.5V.1 point


-
Recent Achievements
-


")


")


")


