

mossemi
-
Posts
1,615 -
Joined
-
Last visited
-
Days Won
39
Posts posted by mossemi
-
-
Another post from GaryJona about front protection information for the Oliver.
Mossey
-
 1
1
-
 1
1
-
-
18 hours ago, John E Davies said:
Does a long press sound like a logical design? Not to me. But now the display goes completely black when I turn it off.
That does make sense to me because of the remote control, which I use quite a bit. Much like turning a tv on and off by the remote, the tv is always on in the standby mode. So now I have to ask this question, when you turn the stereo off by a long press of the button on the face plate can you still use the remote to turn it on?
Mossey
-
2
-
-
@SeaDawg I had never used the report button and since it was midnight, I went ahead and did both method’s.
Thanks for explaining the procedure.Mossey
-
2
-
-
Mod’s, the above post looks suspicious to me!
Mossey
-
2
-
-
Do you have the ability to check the battery voltage at the battery? If not, you can check the battery voltage on the SeeLeveL tank display by pressing the BATT button.
Mossey

-
2
-
-
35 minutes ago, Keith-n-Jill said:
Secondly, this thing is useless on anything other than a perfectly level concrete pad. A 2.5 percent grade isn’t steep. The manufacturer claims that it can handle an incline and it will work on grass or gravel. I have my doubts.
Thank you for your personal review. I guess the advertisement picture with the women in platform shoes operating the dolly on a putting green or artificial turf is a little misleading.🤔 And from the looks of your sweaty t-shirt, you did get a workout.
Mossey
-
1
-
-
carnivore, That is exactly what I did and although I don’t remember that video specifically, I must have watched it and I’ll have to check my YouTube history. I do believe Nate is a pretty smart guy and his solution is very economical. My breaker and enclosure costs were less than $30.
Mossey
-
1
-
-
My Dometic refrigerator also came equipped from Oliver with a vent fan in 2017. And as Mike said, it also has a fan switch on the main panel just inside of the door. With the fan switch on, power is sent to a thermostat which then sends the 12v power onto the fan. So even if the switch is in the on position, the fan will not run until the thermostat reaches a set temperature then it comes on and shuts off when it cools to a set temperature. Mine usually shuts off at night and back on in the morning when it warms up. There are fan kits available on the internet as well as YouTube video’s on how to install one.
Mossey
-
2
-
-
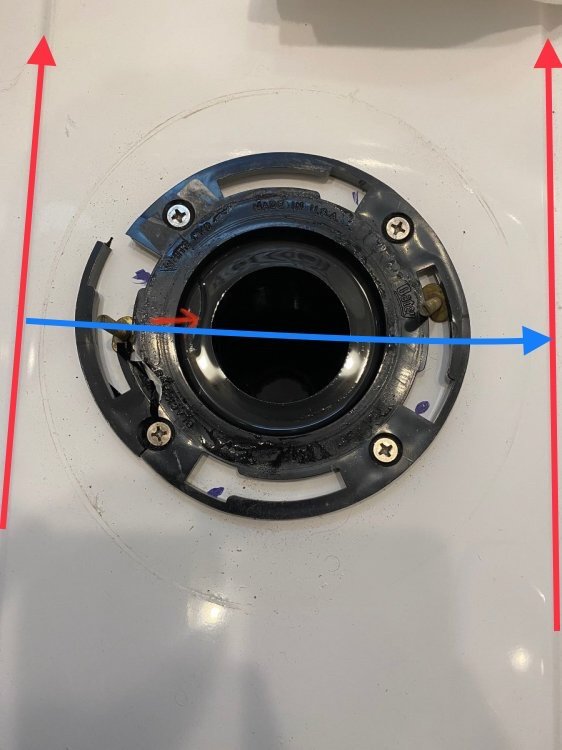
5 hours ago, Galway Girl said:
Your pictures look like they might be rotated 90Deg from each other....so it's hard to reference how the two flanges aligned for the bolts that hold the toilet down.
The pictures are oriented the same, so I added some arrows to them to try answering your question. The parallel lines in the originals are the elevated portion of the floor that the toilet sits on and they are represented by the red arrows. The blue arrows should be perpendicular to the red arrows and crossing the thinner portion of the mounting bolt slot. I would loosen both bolts and see if you can straighten the toilet to your liking.
Mossey
-
1
-
2
-
-
If your Xantrex remote switch is located to the right of the pantry, and above the forward facing dinette seat, you can access the back of the remote through the access port inside the pantry. And scraping the contacts by inserting and removing the connector as topgun2 recommended is an old telephone repairman’s trick. If that doesn’t work you can test for continuity through each contact with a multimeter if you can access both ends. That cable is about 25’ long.
Mossey
-
1
-
-
9 hours ago, johnwen said:
Mossemi, thanks for your candor and help. Are you by chance coming to the rally?
John
You are welcome! Yes, we will be at the rally. Site D7, right by the dog park.
Mossey
-
45 minutes ago, FrankC said:
And does Oliver use a wax ring between the toilet and flange as is standard practice?
No wax ring involved, but there is a light weight rubber donut that fits on the toilet in the same place a wax ring would fit. It has the look and feel of a car door gasket, but it is shaped just like a wax ring and it is solid. The gasket that fits in the tank hole is a very dense rubber compound.
Good luck and just ask if any questions come up!
Mossey
-
This was the biggest PITA that I have had with my Oliver. The 4 screws are 1" long and maybe #12. I did drill new holes with a 13/64” bit. The existing screws were sealed with a white product that was probably silicone. If you have replaced a closet flange at home, just forget what you know, because this is a new experience. My advice is to try a stainless steel, 2 piece repair ring before removing the original closet flange.
Now that I have said that, feel free to do what you want, but I’ll tell you about my mistakes and successes.
I will say the I did use an ABS flange with a stainless ring by Sioux Chief from Lowes, but it was the 3rd one I tried. The first 2 were ordered from Home Depot as well as the 2 foot section of 3" ABS pipe. It took HD about 6 weeks to complete that order. Make sure the closet flange will fit inside a 3" schedule 40 ABS or PVC pipe.
I removed the existing flange by removing the 4 screws and trying to pull the flange up. That didn’t work because of the rubber bushing in the top of the black tank and the flexibility of the tank itself. I could pull the flange up about an inch, so I put a couple of wooden wedges under the flange and then used a flat pry bar on a piece of 1x4" and worked a couple short pieces of 2x4" under the lip of the flange. I was then able to use the pry bar again and when the flange was about 3" up from the floor, it would stay in that position and I was able to remove the wood and pull it out. The rubber bushing came out of the hole in top of the tank and came off of the pipe because it wouldn’t fit through the floor hole and ended up on top of the tank.
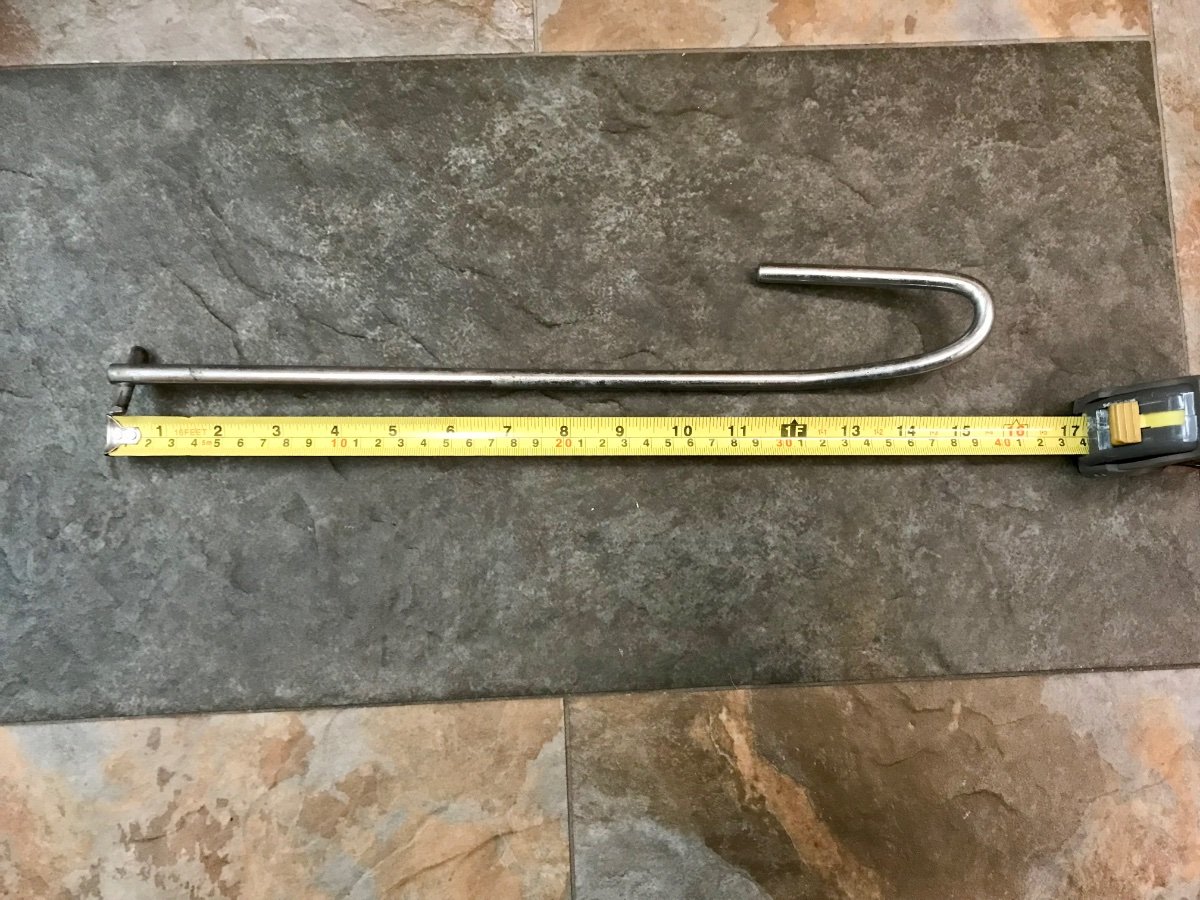
I noticed that tank hole was about 3/8" closer to the street side wall than the floor hole, they were misaligned. I didn’t think it would be a problem because Oliver was able to install it. Oh Boy, was that a mistake. After receiving the parts from HD, I cut a 4" long piece of the ABS pipe, beveled the bottom end to match the original and glued it to the closet flange. Then I put the rubber gasket in place on the top of the tank then inserted the flange through the floor and into the rubber gasket and pushed it into the gasket and got to within 2" of the floor where it stopped. So I removed it and applied some silicone grease to the shank and tried it again. This attempt got to within an inch of the floor, so I placed a short 2x6 on top of the flange and tried standing on it and it stopped about 3/8" from bottoming out. Throughout all of this effort I’m thinking the flex of the tank is preventing me from it seating completely. And then the stainless ring of the flange popped out of its slot. So I started over with the extra flange I bought and it would not fit flush either and then I bumped my head and the light bulb went on, the flange was bottoming out on the lip of the hole. Upon further examination of the original flange, I realized the that the 1/4" tall bottom ring had a different profile than the original and that was catching on the edge of the floor hole. I found that the Sioux Chief flange had a matching profile by looking at Pinterest pictures and confirmed that through their website. And the new flange had the same result, so I got my jigsaw out and enlarged the hole and it still wouldn’t bottom out. So I made a cup of coffee and tried to think of a way to push the top of the tank up from the inside. The picture below shows the piece of scrap rod that I bent into a J shape and reached into the tank through the Flange and pulled up on the tank while standing on the flange. I moved around the hole at 3, 6, 9 and 12 o’clock and the tank top moved up at each position and the flange was resting on the floor when I finished. I screwed the flange down and reset the toilet. Finally success!And by now you have figured out that I have the ability to make a long story, longer. And I am persistent to the point of stupidity! And I just had a new thought, has the tank moved from its original position and that caused the misalignment?
Mossey
-
2
-
 1
1
-
-
Google "Metal Supermarkets" for your area. My local store has all kinds of cuts or short pieces left after someone else bought a portion of a larger piece available. Or the will cut something for you. They are worth a try if they are nearby.
Mossey
-
4
-
-
2 hours ago, CnC said:
You might try unplugging from shore power, turning off the batteries and resetting the inverter/charger as something may have went wonky in its little brain. I had a similar issue once that involved 12 volt lights not acting correctly and that complete "reset" fix it. Thinking similar to a "computer."
Charlie.
I understand the stupid computer scenario, but how would that effect a single lighting circuit? The OP indicated that the other light are working fine. And of course I am assuming that the inverter/charger 12V output does not supply individual circuits.
Mossey
-
Your Ollie is 5 years younger than mine and I do not have the touch lights, so please excuse my questions if they are silly. Where are the 5 touch lights located? I assume they are not the ceiling lights because they are hard to reach for my wife and that would make the touch function a silly feature for short people. So I guess that the problem lights are under the upper cabinets. Is there a dimmer function on the lights that are malfunctioning or any of your other lights? Do you have the ability and a multimeter to test voltages? The lights in my Ollie are all 12 volts and I assume yours are the same. So if the other 12V lights are working as usual, the problem is probably isolated to that circuit. Are the problem lights on a 3 way circuit with 2 different light switches? Or is there a light switch at all and every touch light is it’s own switch?
Mossey
-
I am often in awe of this forum. The collective knowledge base is just amazing. And the kicker is that Galway Girl learned from their mistake and passed that knowledge on and solved another’s problem. I think that is an excellent example of the importance of teamwork.
Thanks to all who contributed ideas to help solve this problem, especially Galway Girl!
Mossey
-
1
-
3
-
-
21 minutes ago, dewdev said:
Bill:
I could not find on the Forum the semi-permanent rubber padding you are referring to. Is it possible for you to locate that post?
Try this link.
Mossey
-
1
-
2
-
-
On 4/20/2022 at 6:47 PM, sgcausey said:
If you remove your TPMS, how do you keep track of each sensor to its tire.
Although my TPMS sensors were marked at the time of the original installation, if I install them one at a time, the monitor shows the location of the sensor I just installed. Then I could mark them using dewdev’s labeling method or move them to the correct tire if they are already marked. Or you can clear the monitor memory and reprogram the system.
Mossey
-
1
-
-
8 hours ago, Geronimo John said:
Sadly the cost of the "Store Bought" Rock Tamers are above the funding line on my wish list. So I'm looking at a possible DYI mud flap effort before hitting the Alaska tour (12,000 miles) this summer.
I don’t have a F-150, but your plan sounds like a good one to me. Have you watched the installation video on the Rock Tamer website, in particular the portion about the flaps not hanging at 90 degrees and having a slight angle back toward the trailer? I did buy a used set of Rock Tamers on Craigslist for $125 which was a much better fit for my wallet.
Mossey-
1
-
-
8 hours ago, Mike and Carol said:
If I remember right (that’s a stretch these days), Raspy might be bringing his Xplore to the rally. Mike
I’ll bet one us is right and we’ll find out next month. Of course both of us could be right as well.🤔
Mossey
-
1
-
 2
2
-
-
3 hours ago, Mike and Carol said:
Don pops in here every now and then. You can PM him to see if it was his and he could probably answer any questions. Mike
If I remember right, Don threatened to bring his new camper to the rally. Of course that could have been last year’s rally.
Mossey
-
1
-
1
-
-
I’m pretty sure this was donthompson’s LEII at the Oliver Rally in 2018. And you may remember that he sold his LEII and bought a Conqueror trailer and sold it and now has a Kimberley T3.
I think the 80/20 products will make a excellent base for a 1-Up.
Mossey
-
1
-
-
There are a couple pictures in the post.
3rd page bottomMossey


Please advise. Battery app shows 11 per cent. Solar controller shows battery at 75 per cent, charging at 12.7
in Mechanical & Technical Tips
Posted
Would the battery on/off state show on the app like the picture below? Does the picture below show the status of 1 battery or a battery bank? Or would the app show on even if only 1 of 2 or 3 batteries is on? I do not have Lithionics batteries, but I am trying to understand them a little better?
Mossey