Trainman
-
Posts
805 -
Joined
-
Last visited
-
Days Won
9
Everything posted by Trainman
-

Oliver Legacy Elite II (Hull #104) has a new home.
Trainman replied to WandR's topic in Introduce Yourself
So Build # 104, was that built before indoor plumbing, or after? Congratulations, see you at the rally in 2020. trainman -
Ok, is just me, or is the Camco Revolution Sewer kit that comes with the Oliver just too floppy for normal use, that is my old Rhino Flex did not sag and collect waste in the tube when dumping. This mainly occurs when using the Camco Sidewinder Supports, the hose sags between every support and I spend all my dumping time lifting the hose up between each support to get a clear flow of the stuff. I went down and purchased a Rhino Flex Kit and it works fine as it did on my Casita when dumping. The Revolution is just to floppy to use and I put it in my shop for another day. The Revolution is nicer made and ends attach much better, but for use not so good. If I am missing something here, let me know if so, thanks. trainman
-
I ordered 3 24qt crates and three will not fit, they are 12x11x19.5. So I now carry the third one in the pickup, it is the one with the levelers and blocks in it, so it can go inside or out, no problem. trainman
-
Best rig I ever saw was a F-450 crew cab with a roll off-flatbed on the rear. The F-450 had an overhead rack over the cab and that is where he carried his bass boat, the flat bed part of the roll-off is where he had his Jeep Wrangle and motorcycle trailer with bikes on it and last he was towing an Airstream trailer, I would say it was a 30 footer. Everything was silver with blue trim, what could I say, it was one great rig. Looked like about $300,000 to me rolling along, I hope he was a full-timer. trainman
-
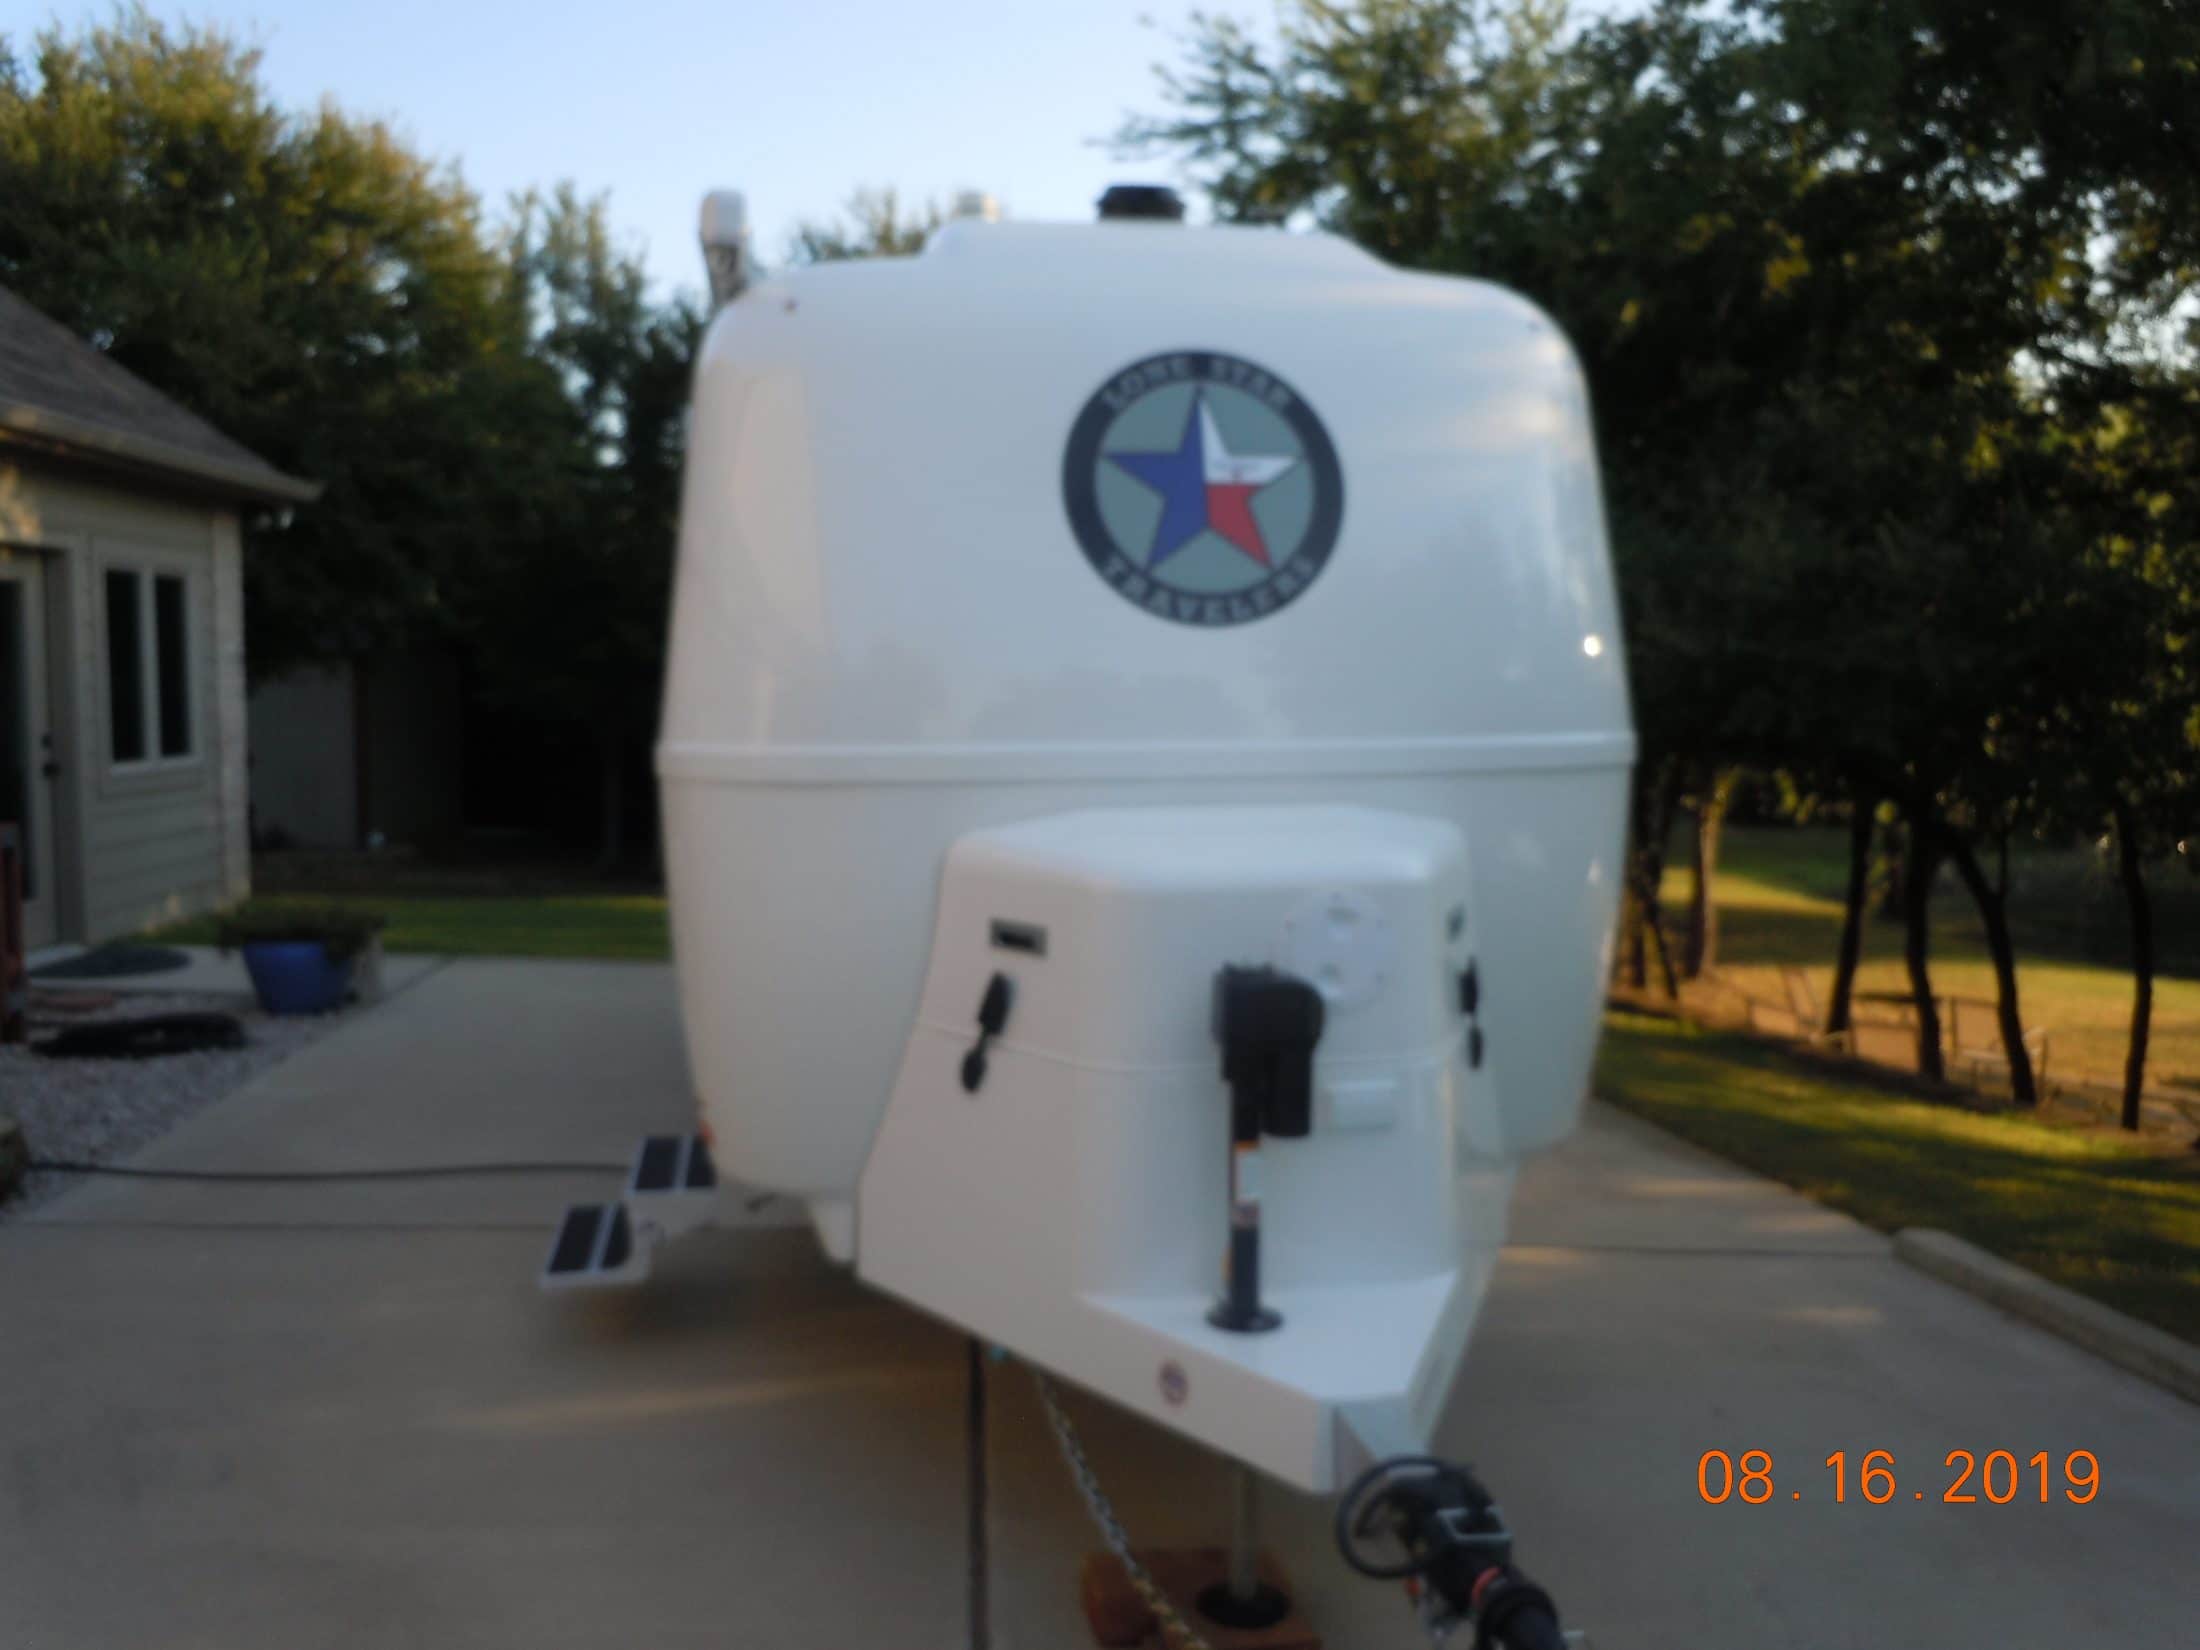
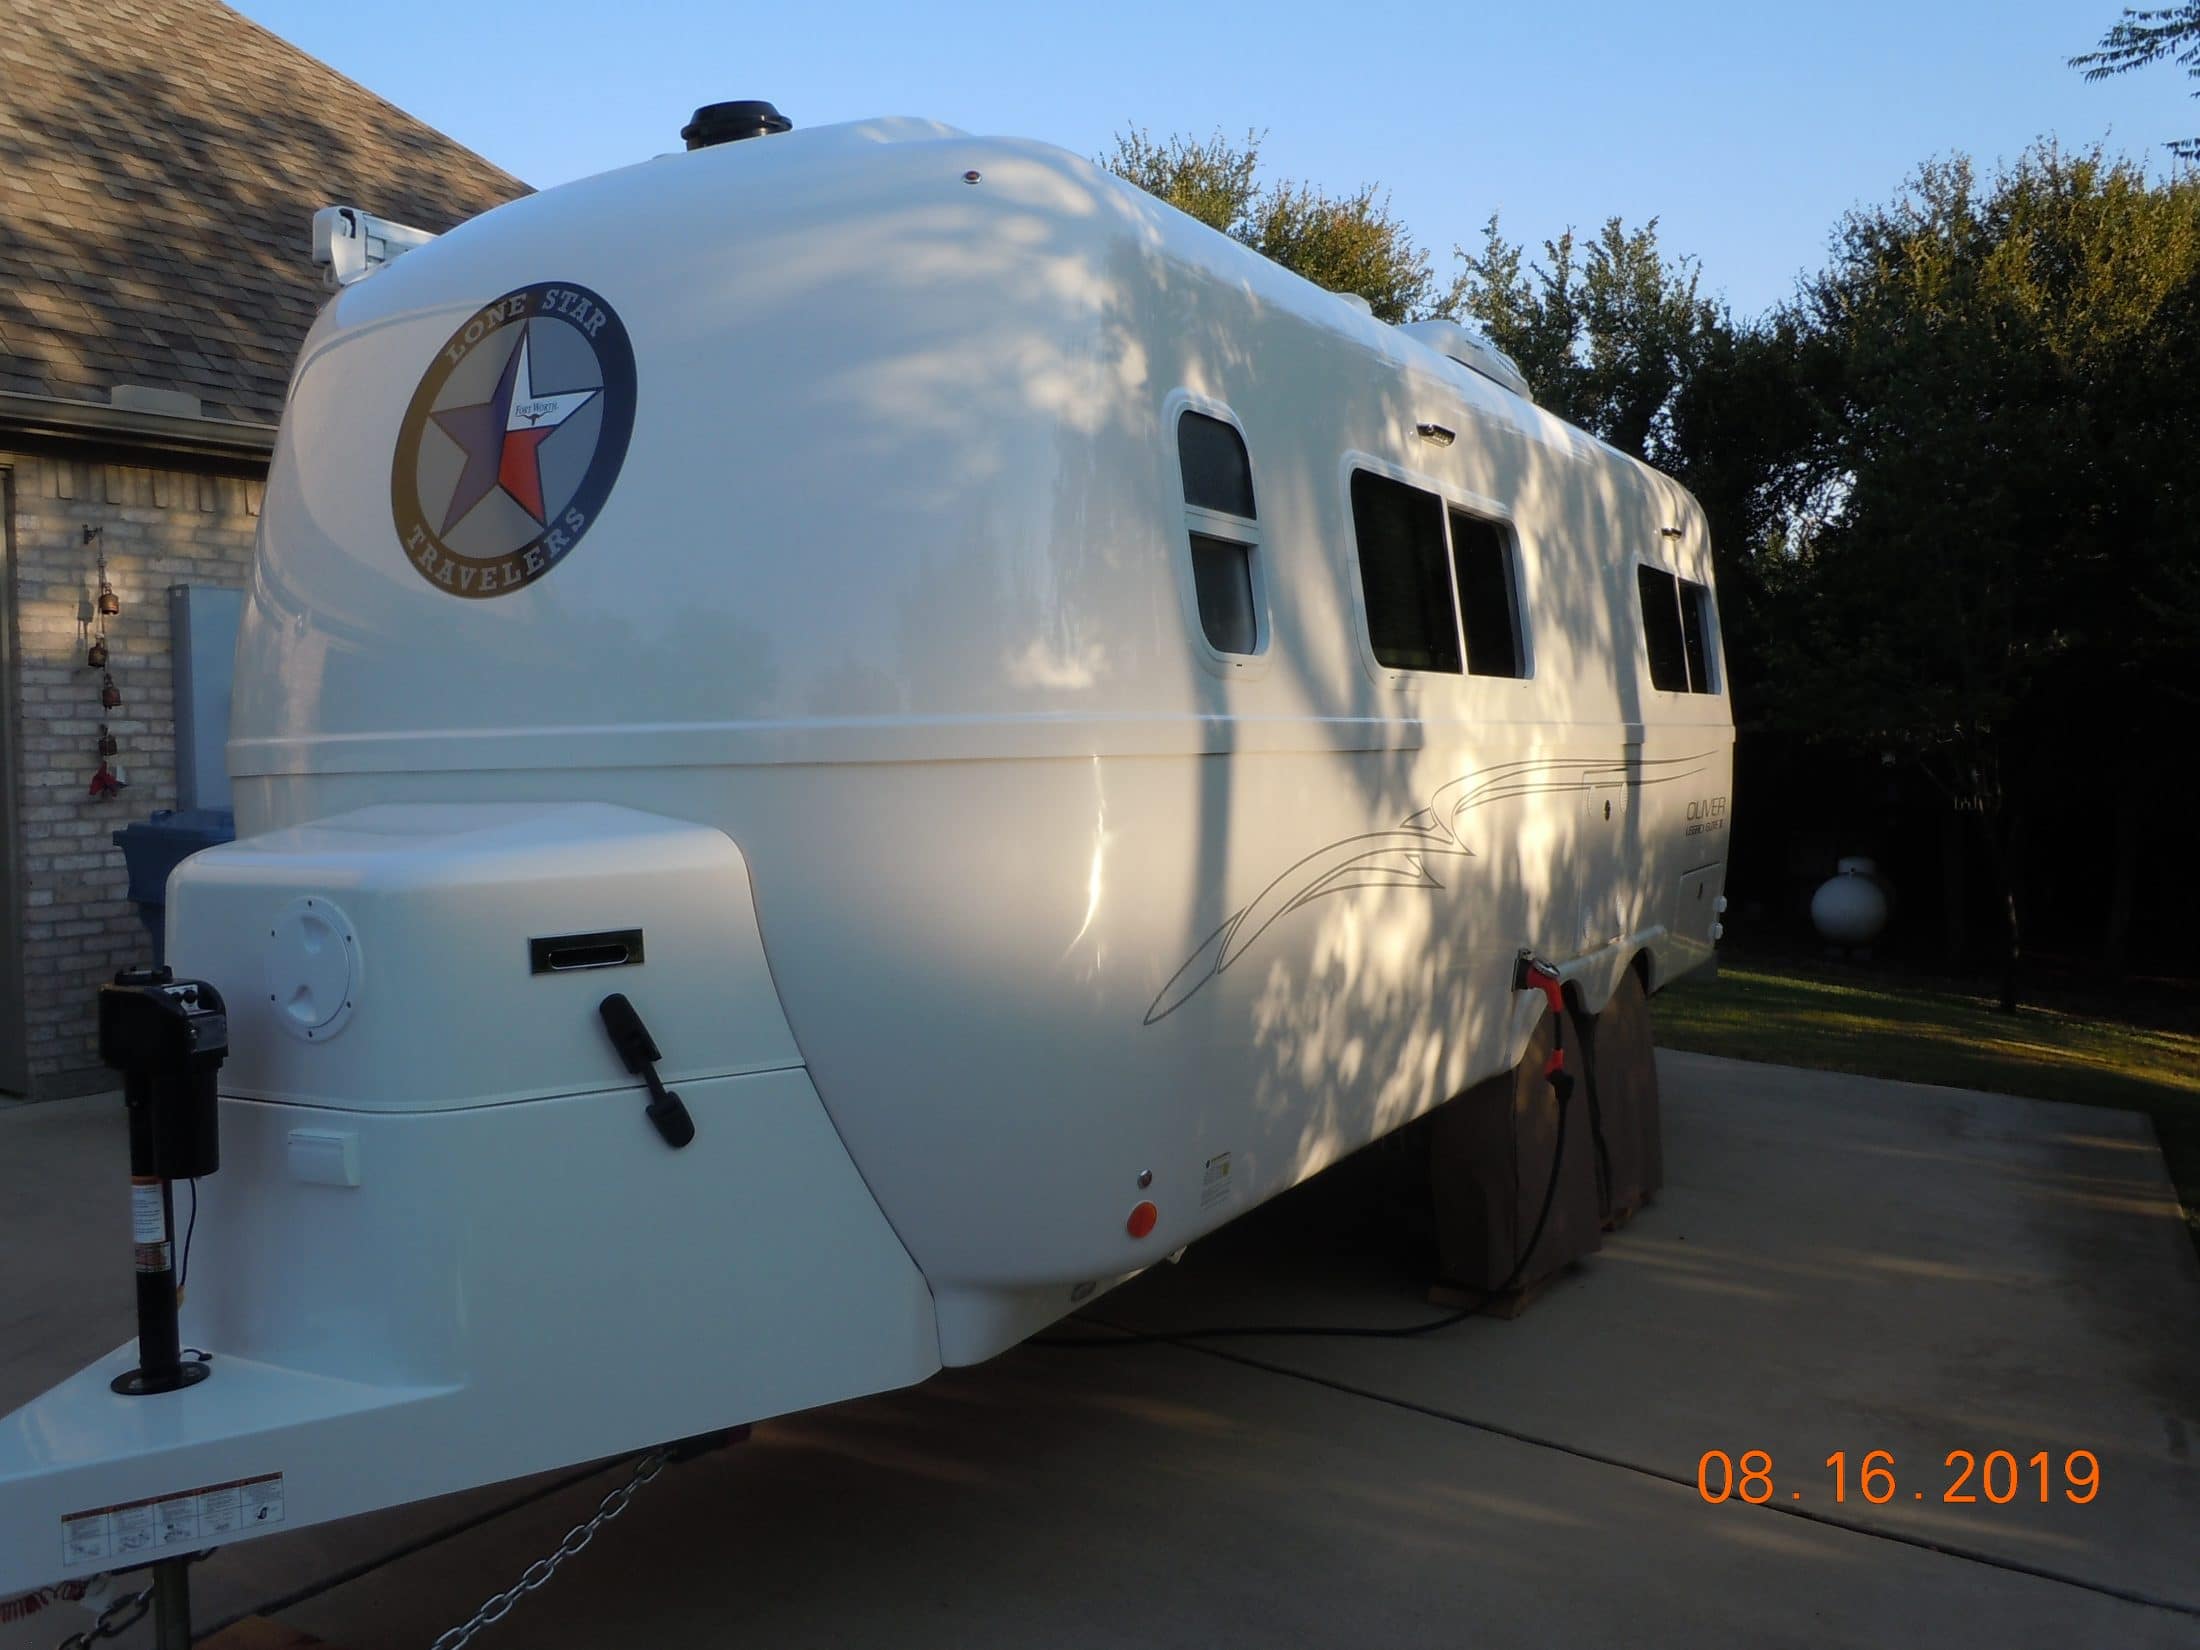
Mike, I liked your graphics so much I wanted to copy them, but being the nice guy I am I decided to do my own artwork and come up with another Texas theme. Mine goes with our new Ram Lone Star Edition pickup, I just followed the theme somewhat from the Ram to the trailer and out the spare tire. I have a set of 2019 Ram Lone Star Edition tailgate emblems that I may stick on the trailer side under the Oliver emblems at the rear, just still kicking the idea around for the time being. trainman

-
I ordered our new Oliver without the front and rear logos, have since put on our new logo design in those spots. I wanted the side stripes to be the thin style and not the double color thick ones, just because it's too much for a luxury trailer in my opinion, there are reasons why you don't see stripes and logos on the Lexus. I do plan someday to remove the side stripes, but will leave the OLIVER and Elite II logos on the rear sides, I think they do say luxury looks. Since our trailer theme is the "Lone Star Travelers" and I have our logos on the front and rear of the trailer I'm not wanting to overdue the side with something that goes with that, it would be too much and the trailer would start to look like a side show attraction vehicle. I have some ideas that I'm working on, both using the existing side stripes, or removing one of then and using just one, but this still remains in my head for the time being. Designing and building things has always been a hobby for me, so I really enjoy doing things like this, it passes the time when needing something to do. Remember everyone has what they like on there trailers and not any of them are wrong, it's a personal thing with each and everyone of us. trainman
-
The 404 Error problem has only happened a few times with me and I've been on the forum a lot since we got our Oliver in July. I just click out of the post and them click back in and in 90% of the time the Error did not come back and I was able to read the post. trainman
-
I ended up ordering these from Amazon, /Green-Elephant-Telescoping-Tarp-Poles/dp/B072K1B91Q/ref=sr_1_1_sspa?keywords=tent+poles&qid=1566243433&s=gateway&sr=8-1-spons&psc=1&spLa=ZW5jcnlwdGVkUXVhbGlmaWVyPUEzQzkzNlNaOFUyNTRCJmVuY3J5cHRlZElkPUEwOTgxNzYxMTJKMVRTRVM4TTlCTiZlbmNyeXB0ZWRBZElkPUEwNDgzNjU5MVFaWU9NV0wzRkIyTSZ3aWRnZXROYW1lPXNwX2F0ZiZhY3Rpb249Y2xpY2tSZWRpcmVjdCZkb05vdExvZ0NsaWNrPXRydWU= All reviews were good and it should work, made just like painter poles and works the same. The top end has a 1/4" screw in pin, shouldn't be any problem attaching it to the awning frame, etc. If you don't want to Copy and Paste the above, just type in Green Elephant Telescoping Tarp Poles on the Amazon website, I got the $49.99 ones, they adjust out to 91". trainman Or Click Here...
-
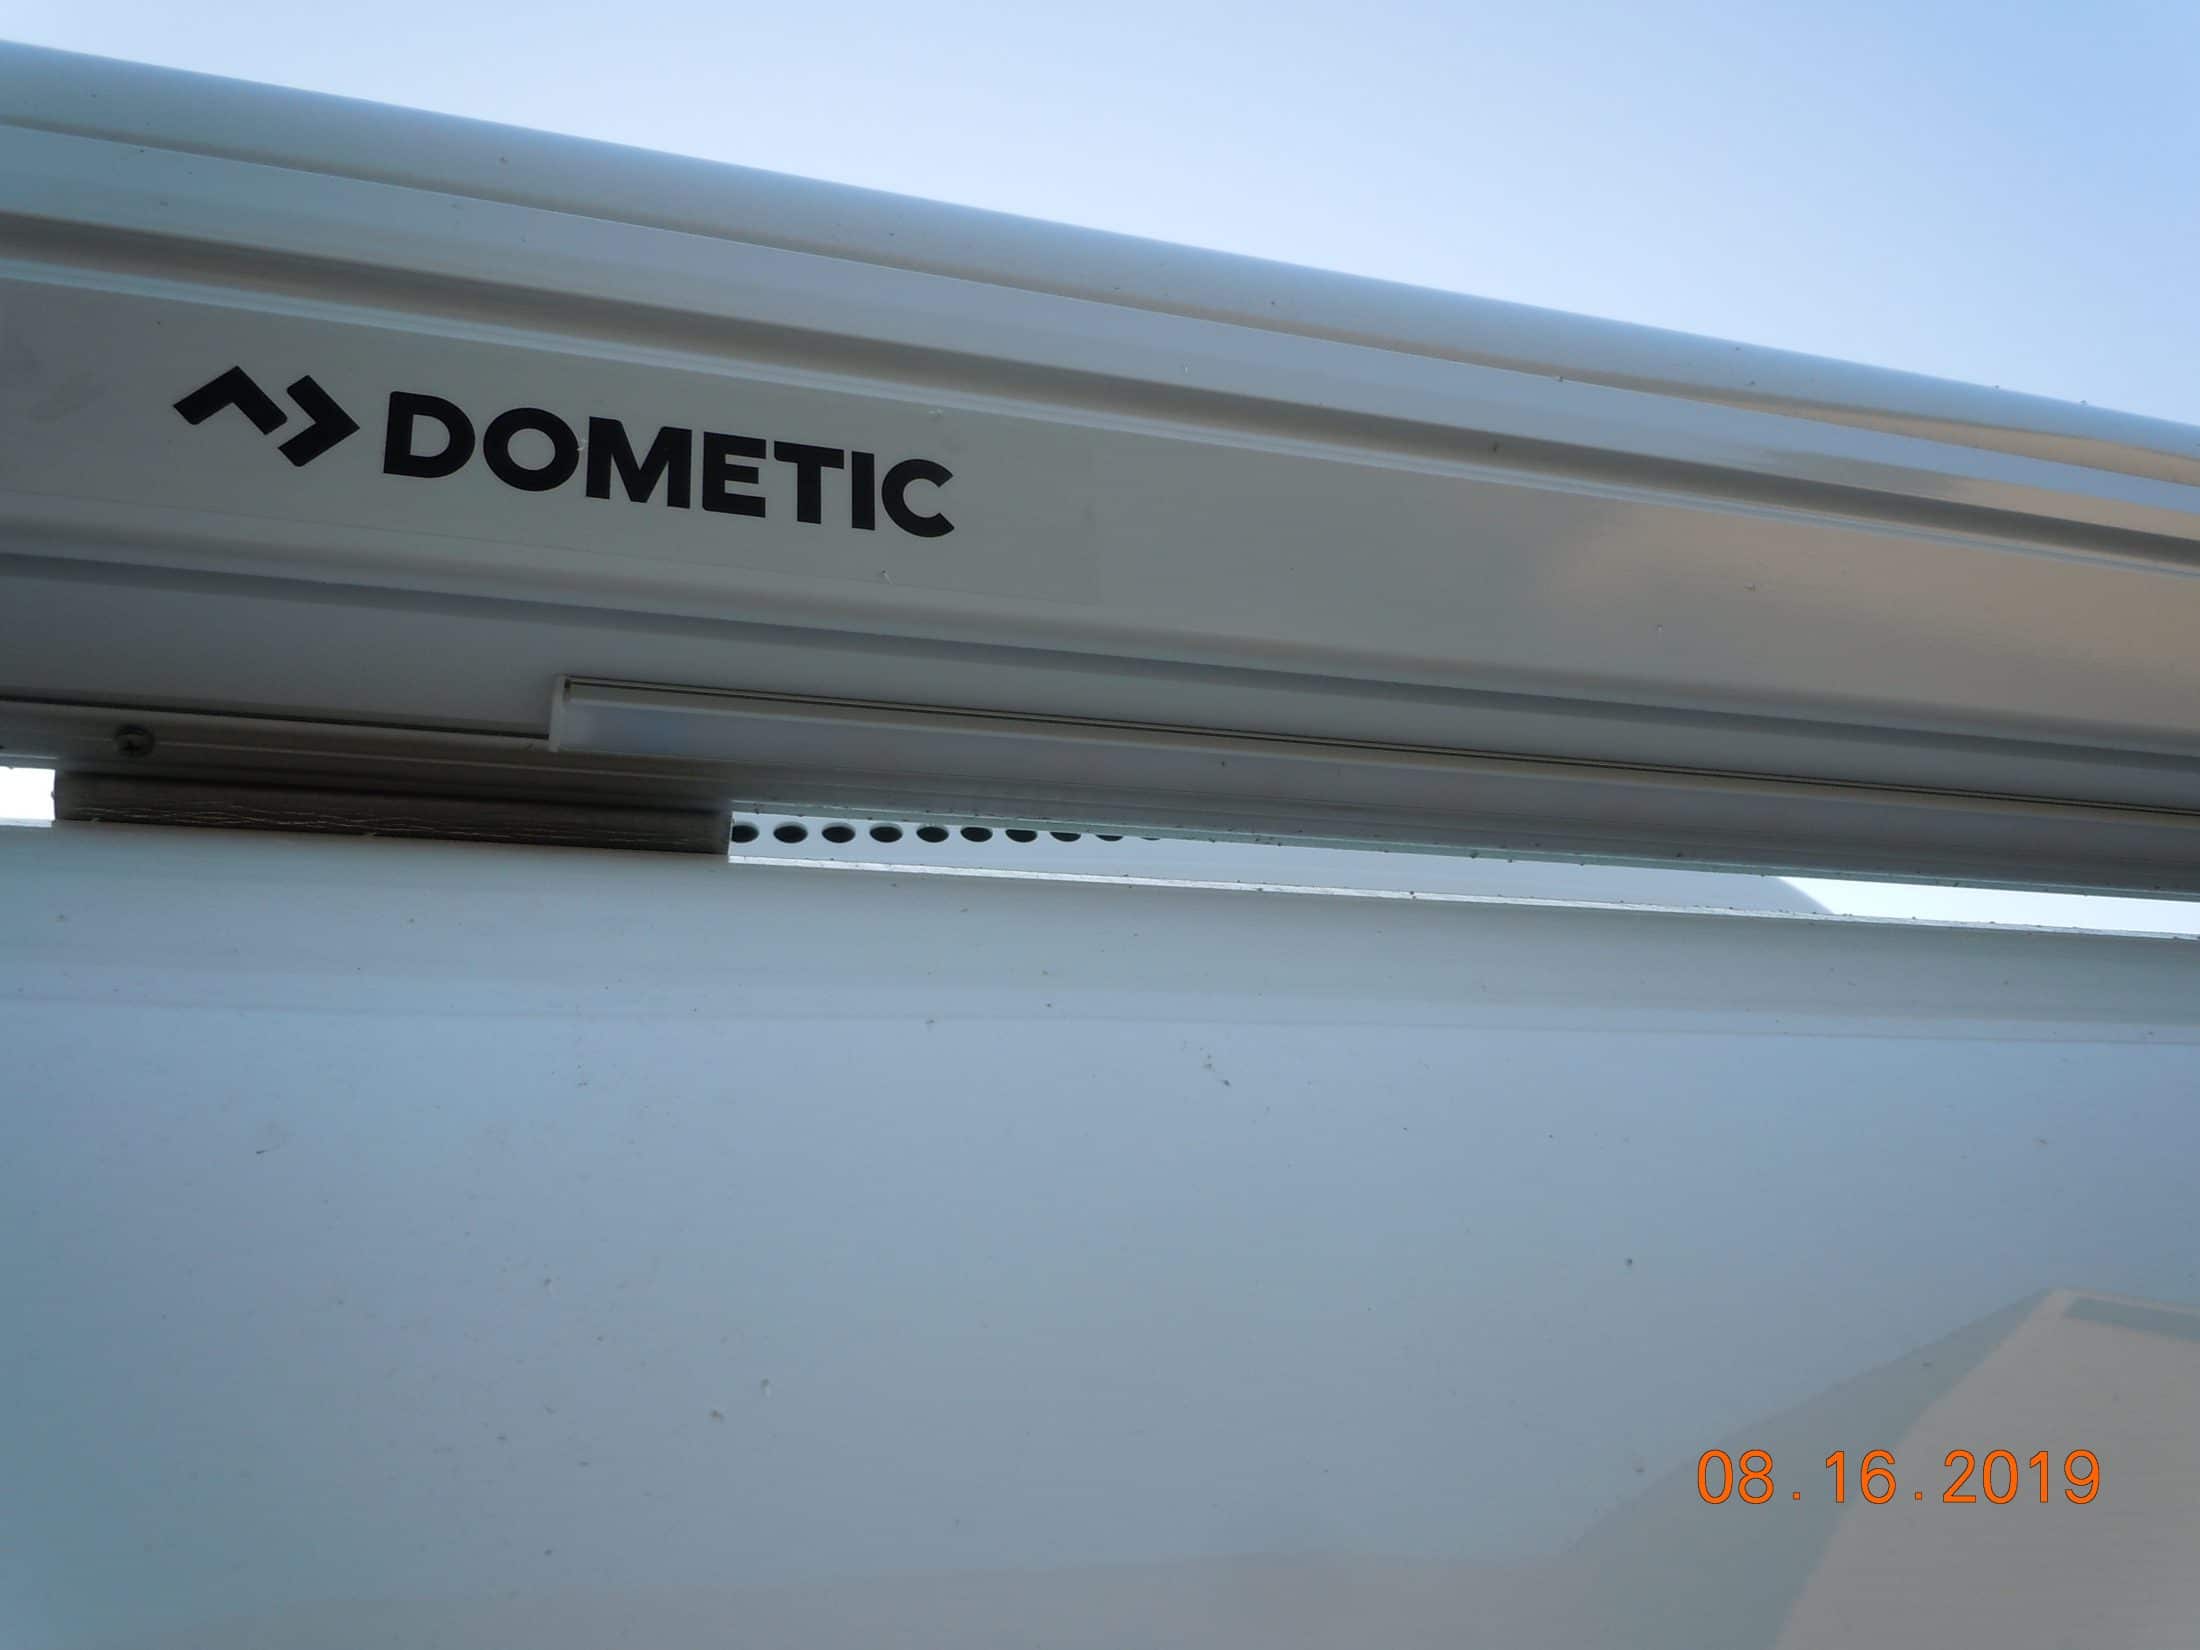
I ordered two poles today and we will see what happens, our awing is the Dometic that's what they are using on the new trailers, personally I don't see where it would make any difference on which awing you have, just use the poles and stake the corners down. Our Casita did not have an awing as we ordered it that way, I'm personally not a big awing fan, just because of having to take it down every time we leave the campsite, for obvious reasons. We have only been extending our awing about 1/2 to 3/4 of the way out and even without poles it does blow in the wind pretty good at times. So I will report back in 3 weeks after we see how this works out for us. Thanks to all who posted pics and what you do with your awing. trainman
-
Looks good, true getting it level and in the center takes a little time measuring, but it's worth it in the long run. Now if everyone shows up at the Oliver Rally next year I will know who is who by there trailer logo. trainman
-
Just wondered if any of you out there use painters poles for extra support for the awing. I notice my awing does sag more to one end then the other and the wind does wip it around somewhat and were talking winds 10-20 mph. Looks like this would be an easy fix to the problem. trainman
-
All our friends know me as "trainman" and Susan my wife as "trooper" and now a logo that says, "Lone Star Travelers", I think we got all the names we need. trainman
-
For the time being I will just lay the LED controller and 12V power supply along inside the awing cover when we use the lights and then run the wire along the awing arms and down the side of the trailer and plug into the 120v outside plug. This is not my preferred way of doing it, but for the time being it will work as we will only be using the lights when we are camping in one place and not setting up everyday and have to take the wires up and down. If I wanted a permanent way of doing it I would just run the 12V wires from the lights along the awning arms and put a small hole in the fiberglass by the light switch inside panel by the door and power them from there. This way the lights could be used anytime with the awning in, or out. One other idea is to purchase a 12V battery power source with a charger and just Velcro the battery behind the the LED's and power the lights that way, no wires, no drilling, just recharge when needed, will probably go this way after I find out if I'm happy with the lights. This might be the best way yet for me, https://www.amazon.com/TalentCell-Rechargeable-12000mAh-Multi-led-indicator/dp/B00ME3ZH7C/ref=sr_1_7?crid=2IQFDY04UVSFU&keywords=12v+battery+pack+with+charger&qid=1566069641&s=gateway&sprefix=12v+battery+pack+with+charger%2Caps%2C164&sr=8-7 trainman
-
From my use of chains back on the farm when I was young it was hard to break a chain. Sometimes pulling large trees with the dozer, or a large tractor you might break one. All being said, when used pulling (stealing) at travel trailer, you are pulling a free-wheeling object without much drag, so pressure on the chain is very little which makes one hard to break. I did install 3/8" safety chains on our Oliver and the tow weight rating was around 4300 lbs. each chain. I personally think that 1/4" would be all you need. I posted in an earlier post that I purchased these from Amazon, the hooks fit the Ram hitch perfect and were easy to hook and unhook with little effort. https://www.ebay.com/itm/2-35-SAFETY-CHAIN-3-8-SLIP-HOOK-CLIP-TRAILER-HEAVY-DUTY-TOWING-AUTO-PULL-145/132502180937?hash=item1ed9bed449:g:M8IAAOSw7p5agOMy:sc:USPSPriorityMailPaddedFlatRateEnvelope!76020!US!-1 trainman
-
Yes, installed it myself, have had experience doing this before, or should I say saw it done many times over the past 30 plus years. I put it on wet, not dry, easier to do and if it's not aligned properly you can slide it around, somewhat. Watch YouTub videos and see how its done. If you haven't done it before find someone to help who has some experience, don't try to do it alone, you can mess up a decal right quick where it becomes useless. trainman
-
I installed the LED awing lights the other day, I used the aluminum holders that are sold on Amazon along with a LED Kit they sell. I put it all up with double sticky tape and no drilling was used, since the lights are mounted to the awning part that extends out when opening, I will just plug in the light controller and 12v converter and Velcro them to the awning arms when I use the lights, as there is no room on the arms to permanently affix them when arms close and fold up. At this time I do not want to drill any holes in the trailer for running wires, maybe at a later date I will do that, but see no reason at this time. The aluminum holders are done very nice and have a plastic light cover that gives the lights when lit a mat look, comes with all the trim ends and mounting hardware, no double sticky tape is included. You do get enough aluminum strips to do two awnings, so you have extra to do something else if wanted. Install time was around two hours, most of that time was thinking about what I was going to do and how. trainman
-
Installed the new trailer logo decal yesterday on the front and rear. If anyone wants to know what one might cost, my local sign charged my $55.00 including tax for one 22" and two 6" decals, they also did the art work, I provided a drawing of what I wanted. trainman
-
Just wondering if there is anyway to adjust our Dometic non-powered awing, the far end opposite the door is about 6" lower then the door end when extended. I see there are several screws in the arm assemblies, I know some are mounting screws, but what about those set screws I see recessed in the arm actuator, what do they do. Just wanting to know how to raise the lower end of the awing. Do many of you out there used Painters Poles on your awing, I would rather not fool with that, but if that's what is needed I might give it a shot down the lime. trainman
-
I just got the art work back from the sign shop and here is the new designed logo for our trailer. It will be 22" round, the "Lone Star Travelers" is what we call ourselves, the Ft. Worth city emblem is on the state part as that's were we live. Don't think we copied anyone else, only exception is the state logo part was taken from our new Ram as it is a Lone Star Edition sold by Ram in Texas, the rest is my brain at work. Now if you see us camping, or elsewhere stop by we want to meet you as we are new to the Oliver world. trainman
-
I've been giving these awing LED a lot of thought, I decided to go this way and put the LED strip lights in the aluminum holders made for them. https://www.amazon.com/Starlandled-Aluminum-Installation-Professional-Accessories/dp/B01LL2SLME/ref=sr_1_1_sspa?crid=IMEPCSPSMVFG&keywords=led+strip+lights+plastic+cover&qid=1565034448&s=gateway&sprefix=led+strip+lights+plastic%2Caps%2C154 I'm going to use double sticky tape to hold them in place and run them on the bottom edge of the Dometic awing frame, this way the lights will come out when the awing is rolled out, but will also work when the awing is in its rolled up position. I don't like seeing any wires so they will probably be mounted on the awing arms that go in and out on the top side and then into the trailer for power. I may even consider a 12v power source (battery) and recharge when needed as these lights are for accent lighting and only used when the occasion calls for it. I will post pics when completed, it was 101 in Ft. Worth yesterday, so working outside when it's a little cooler would sure be more to my liking for projects like this. trainman
-
I always buy grade 8 bolts and stainless screws for all my replacement needs, or new projects when needed. My wife just can't understand why I'm going to Home Depot all the time for new hardware, when I have bins full of it in my shop. trainman
-
Upgrading Fold-Up Television (known elsewhere as a TV)
Trainman replied to WhatDa's topic in Ollie Modifications
I think you will find this is the one, it's the same one that's in our new Elite II, https://www.amazon.com/VIVO-Cabinet-Mounting-Monitors-MOUNT-M-FD27/dp/B01GGRJM4U/ref=sr_1_25?crid=13AD10W31V2Y1&keywords=rv+tv+mount&qid=1565031447&s=gateway&sprefix=rv+tv+%2Caps%2C158&sr=8-25 trainman -
As you can see I'm going from one mode to another on our new Elite II, today I'm thinking about adding a LED light strip to the awing. I observed the awing and see the only place to put the strip lighting is either on the inside and it would have to be in two sections as the center swing bar hinge would be in the way for continuous running of the strip, or put it on the awing cover on the bottom side and the lights could be used with either the awning in or out. I'm thinking on the bottom of the awing cover makes more sense them inside the cover, but now I would have to have a power cord showing to run the LED's. Any thoughts on what you did if you installed LED awing lights. trainman
-
From what I have read the answer is yes. Now let me tell you what I tried to find out about our new 2019 Ram 1500, where do I turn it off. If it can be done I have yet to find out where, I've been on the Ram Website, as well as other places, no I have not called the dealer service and asked them, but I plan to do so when I get our first oil change. I have also been told that when I put the vehicle in Tow Mode it will automatically turn the anti-sway system off, but that is not confirmed as of yet. All I really know is the two systems don't work well together and one fights the other, so OFF I would think is correct. trainman
-
I replaced my cables with chains, just because they are much easier to use. I purchased a set from Ebay, they are 3/8" links and were 36" long with hooks that were larger then the size on the cables that came with the Oliver. I did have to purchase two quick links as the 3/8' chain would not go thru the U-Clamps that come with the Oliver trailer, just something else to deal with, well it's only $$$$. One thing that really worked out well was, the large hooks fit my new Ram factory receiver very well and were much easier to hook and unhook with ease. Since I just installed the chains I have not shortened them as of yet, but will do so with my next trailer hookup in two weeks, I will see what others have said about getting the correct slack and cut them for the correct fit. I purchased these, https://www.ebay.com/itm/2-35-SAFETY-CHAIN-3-8-SLIP-HOOK-CLIP-TRAILER-HEAVY-DUTY-TOWING-AUTO-PULL-145/132502180937?hash=item1ed9bed449:g:M8IAAOSw7p5agOMy:sc:USPSPriorityMailPaddedFlatRateEnvelope!76020!US!-1 trainman