

dhaig
-
Posts
132 -
Joined
-
Last visited
-
Days Won
1
Everything posted by dhaig
-
Starlink Mini Installation- 2022 LEII- Alternate Approach
dhaig replied to dhaig's topic in Ollie Modifications
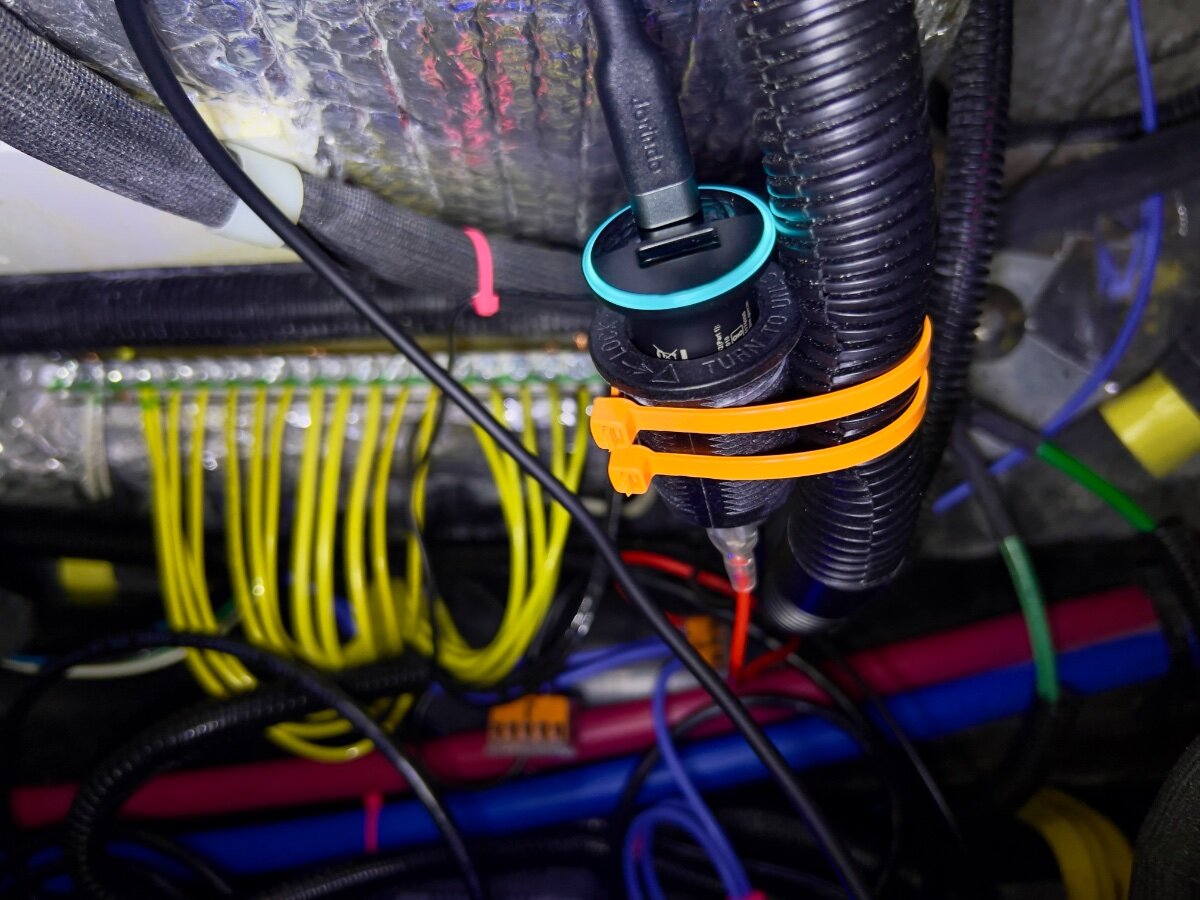
@Steve and Cindy, the RJ45 connector is reasonably well protected from rainfall when in use. The original Furrion cover acts as a small roof over the pass-through connector and cable when in use. When not in use, the black plastic cap for the pass-through connector fits into the RJ45 port and the Furrion cover closes over it. We have used the Starlink PoE setup through one thunderstorm will no ill effects observed. I examined the connector following the thunderstorm and did not see the need to add any further protection. Regards, Don -
@Snackchaser/Geoff, Your comment about a third party source for freezer door hinges is very timely. The stops on the freezer hinges of our Norcold refrigerator failed on a trip last weekend. Much appreciated. Regards, Don
-
Starlink Mini Installation- 2022 LEII- Alternate Approach
dhaig replied to dhaig's topic in Ollie Modifications
@johnwen, you are correct. A blue wire connects to the DC fuse box (12VDC positive) , then to the Wago connector. From the Wago another blue wire runs to the POE Injector. Also connecting to the Wago connector is a red wire which provides 12VDC positive to the auxiliary power outlet, providing power to the Starlink Router Mini. Apologies for the delayed response, we were traveling. Regards, Don -
Use space heater when below freezing???
dhaig replied to Dennis and Melissa's topic in General Discussion
@Dennis and Melissa, we have carried a small 120V ceramic heater when traveling during months when below freezing is possible. I included this heater on our trailer delivery trip in February, 2022, based on recommendations I had read on this forum. When enroute back to Dallas we encountered freezing weather and stopped for the night at a convenient RV park along I40, about an hour east of Little Rock. The temperature was below freezing when we pulled in, about 10PM. I had to chip ice off the water spigot to take on some fresh water. We had the furnace running and the temperature inside the trailer was comfortable when we went to bed. Several hours later, I awoke cold and the furnace was not operating. Assuming we had exhausted the propane in one tank, I dressed and went outside to switch the regulator to draw propane from the other tank, which we knew to be full. The outside temperature was in the low to mid 20s. Long story short, we were unable to get the furnace to startup by drawing propane from the full tank. I messed with the regulator, but could not get propane to flow. I tried connecting the hose from the first (now empty) tank to the full tank, but still no flow through the regulator. Consequently, I pulled out the ceramic heater and got It running on shore power. The ceramic heater could maintain the temperature in the trailer at about 60 degrees. I had no way to measure the temperature between the hulls, but I knew very little of the heat from the ceramic heater would benefit that space. We decided to forego morning showers and prepared to get underway back to Dallas, where the temperature was likely to be above freezing. Before departing, at 8AM Eastern time, I phoned Oliver Support and described our problem. They suggested measures we had previously tried, and suggested trying to light the cooktop to determine if propane was flowing. The cooktop would also not light. Oliver Support suspected the regulator was faulty and committed to shipping out a new regulator the same day. About two days later the new regulator was delivered to our home. I installed the new regulator and the problem was solved. All gas appliances now operated normally. The lesson I took from this experience was to carry the ceramic heater as a backup to the propane furnace if traveling during months when freezing weather is likely. So long as the propane furnace is operable and there is an adequate supply of propane I would rely on the propane furnace as the better protection from freezing water lines within the trailer. I would turn to the electric heater ONLY as a backup to the propane furnace. Especially at night I feel the safer option is to run the furnace, not knowing how low the outside temperature may drop to during the night. We have had no further occasions when the furnace would not operate and have stayed in the trailer multiple nights in similar temperatures. -
Do you drink the water from your fresh tank?
dhaig replied to Dennis and Melissa's topic in General Discussion
@Steve Morris, could you please provide details on the water filtration system shown in the photo you posted. Also please include details on how you mount the filter system to the side of the waste hose storage compartment. Thanks, Don -
Starlink Mini Installation- 2022 LEII- Alternate Approach
dhaig replied to dhaig's topic in Ollie Modifications
@johnwen, yes, I neglected to mention the wire I had listed as going to the Mini Router goes to the 12VDC auxiliary power outlet for the Router Mini. A USB-C adapter plugs into the auxiliary power outlet, then USB-C cable to the Mini Router. Sorry for the confusion. The power switch mount on the basement wall controls power to both the PoE Injector and the Router Mini's power supply (USB-C). -
Starlink Mini Installation- 2022 LEII- Alternate Approach
dhaig replied to dhaig's topic in Ollie Modifications
@johnwen, your guess was correct. The switch mounted on the forward basement wall connects to what had been a spare circuit on the fuse block via a junction. Three wires are connected by a Wago lever connector: wire from switch wire to the Mini Router wire to the fuse block If you used the same lighted rocker switch as I did, it has three wires, one smaller than the other two. This small wire needs power for the LED light in the switch. Don -
Starlink Mini Installation- 2022 LEII- Alternate Approach
dhaig replied to dhaig's topic in Ollie Modifications
@johnwen, my apologies for the delayed response to your question about mounting the PoE Injector on the forward wall of the basement, where I located the On/Off Switch. I had not seen your question. I don't see any problem locating the PoE Injector on the wall, as you suggested. I would not mount it on the basement side of the wall, but on the back side of that wall. Drilling holes for the mounting may be challenging from inside the space under the rear street side access hatch. I chose to locate my PoE Injector and Router Mini under the aft dinette seat, since that space is more easily accessible having to move only the seat cushions and not the street side mattress. -
@jd1923, I agree with your preventative maintenance philosophy and with having the right tools to deal with necessary repairs. I would rather spend the time and, if necessary, the money to address maintenance/repairs at home, or in nearby shops, rather than some remote location while traveling. Your description of checking the brakes and tightening the self-adjusters caused me a flashback to teenage years and a hands-on lesson in replacing brakes shoes and rebuilding wheel cylinders, under my Dad's direction. I still have the brake adjustment lever tool acquired then. Due to the limited storage space and desire to avoid adding unnecessary weight, I am inclined to adopt your approach, to carry only the critical bearing press fittings you have identified and a couple of sets of replacement bearings and associated parts. On the road, I would be most likely to seek out the nearest shop to perform the repair. Failure of wheel bearings is among the few potentially disabling items on the trailer. Failure of other items, such as water pumps may be inconvenient, but not likely to prevent returning home. I will add to my maintenance list an annual check of the bearings and brakes by lifting the wheels of the ground. Thanks for your detailed responses to my questions. Regards, Don
-
Starlink Mini Installation- 2022 LEII- Alternate Approach
dhaig replied to dhaig's topic in Ollie Modifications
@Steve Morris I purchased the same tripod adapter. It works quite well. We have an old aluminum tripod which I plan to use as the primary support for our Mini. -
Starlink Mini Installation- 2022 LEII- Alternate Approach
dhaig replied to dhaig's topic in Ollie Modifications
@Steve Morris I am pleased you found the tips helpful. It looks like you are on your way with the install. I like your base for the Starlink Mini. It certainly keeps it off the ground. 😀 -
Starlink Mini Installation- 2022 LEII- Alternate Approach
dhaig replied to dhaig's topic in Ollie Modifications
@johnwen, my apologies, I thought I had included the details on the Ethernet cable running from the RJ45 through jack utilizing the Furrion external shell. All of the Ethernet cables I purchased are Cable Matters products. All are shielded Cat 6A. In addition to the 20 ft. cable used inside the trailer, I purchased a 50 ft, and 2x 25 ft. cables and a single 1ft cable. I also purchased VCE CAT6A Waterproof RJ45 Coupler IP68, 10Gbps CAT6A/CAT6/CAT5E/CAT5 Female-to-Female Outdoor Ethernet Connector Shielded, Network Cable Extender for Outdoor Use 2-Pack, 5.3 in. To connect the Ethernet cable to the PoE splitter, I had to slightly trim the black plastic anti-snag protector on the 1 foot long Cat 6A able. This was necessary because of the tight fit through the watertight connector on the PoE splitter. You may have run across mentions of this issue by others online who are using this PoE Injector and Splitter. Once I trimmed the soft plastic cover over the cable release tab I was able to fit the RJ45 connector through the watertight connector on the Splitter. I chose to use the 1 foot long cable so that I could leave the splitter and the 1 foot cable connected to Starlink Mini. I find the connectors going to the Mini from the Splitter to be difficult to remove due to the watertight seals. I don't like the idea of pulling on the cables to release the Splitter from the Mini. I anticipate repeated removal of the Splitter from the Mini will result in damage to the cables on the Splitter. Replacement Splitters appear to cost about $65. At the other end of the 1 foot cable I attached one half of the VCE RJ45 couplers listed above. This way it is much easier to disconnect the Ethernet cable from the Mini without messing with the watertight connector on the Splitter again. I also installed the VCE couplers on the ends of the 50 foot and 2x 25 foot cables. This way they are like extension cords which are easily connected/dis-connected. I am impressed with the VCE couplers. They are excellent and easy to use. I bought the three longer length cables to be able to easily connect 25, 50, 75 and 100 foot long cables, as needed. I specifically want to avoid having to deal with a single 100 foot cable, which I find to be a PITA. I have not yet had a chance to use the Starlink Mini on a trip, but have only tested it with our LEII parked in our driveway. Due to tree coverage, I needed to connect at least 75 feet of Ethernet cable to position the Mini for a reasonably unobstructed view of the sky. The Mini still had some obstructions, but I was able to measure Ethernet speeds inside the trailer >100 Mbps. I sometimes saw speeds drop to the 50-75 Mbps and rise as high as 200+ Mbps. I suspect the variable is at least partially attributable to the position of Starlink satellites at the time of the speed tests. The satellites are each only in view 8-9 minutes, without obstructions. In any case, I connected my laptop to Starlink WiFi inside the trailer and was able to browse comfortably. I did not notice the occasional losses of service which I noticed in the performance data on the Starlink app. I don't recall any RV park or state park where the provided WiFi was anywhere close to the minimum speeds I have observed in our driveway. BTW, in our residence we have AT&T wired gigabit Ethernet throughout, so I have a low tolerance for poor WiFi service. I have high expectations for using the Starlink service, based on reports by others and my experience so far. At this point, I have not used any adhesive to attach the PoE Injector to the top of the frame member on which it sits. I have a small zip tie connecting it to a PEX cold water line. With the Ethernet cables attached it cannot really go anywhere. I did not want to use a more permanent method to secure the PoE Injector, until field testing on a road trip. We have our next trip scheduled in late August, so I will observe it over a 400+ mile trip. I will likely use a small strip of 3M VHB tape to fasten to the hard rubber frame covering. Good luck with your installation. If you have any questions, feel free to send me a Personal Message and I will be happy to answer. -
Haloview BT7 Touch Rear Camera installation on 2022 LEII
dhaig replied to dhaig's topic in Ollie Modifications
@mossemi, thanks for the info on the stubby antennas. I will keep them in mind as I start using our BT7. Since the performance with the antennas laid horizontal over the top of the monitor, I will see how this works out. Do you see comparable signal strength from the study antennas as you did from the original antennas? I also take the monitor out of our TV when we setup camp. I have a translucent Sterilite storage container where I store the monitor, wireless brake controller, etc. I keep the storage container on a shelf in the closet when camped or the trailer is in storage. I wrap the monitor in a scrap piece from non-slip rug pads to protect it in storage. -
Starlink Mini Installation- 2022 LEII- Alternate Approach
dhaig replied to dhaig's topic in Ollie Modifications
@johnwen, my apologies, I thought I had included the details on the Ethernet cable running from the RJ45 through jack utilizing the Furrion external shell. All of the Ethernet cables I purchased are Cable Matters products. All are shielded Cat 6A. In addition to the 20 ft. cable used inside the trailer, I purchased a 50 ft, and 2x 25 ft. cables and a single 1ft cable. I also purchased VCE CAT6A Waterproof RJ45 Coupler IP68, 10Gbps CAT6A/CAT6/CAT5E/CAT5 Female-to-Female Outdoor Ethernet Connector Shielded, Network Cable Extender for Outdoor Use 2-Pack, 5.3 in. To connect the Ethernet cable to the PoE splitter, I had to slightly trim the black plastic anti-snag protector on the 1 foot long Cat 6A able. This was necessary because of the tight fit through the watertight connector on the PoE splitter. You may have run across mentions of this issue by others online who are using this PoE Injector and Splitter. Once I trimmed the soft plastic cover over the cable release tab I was able to fit the RJ45 connector through the watertight connector on the Splitter. I chose to use the 1 foot long cable so that I could leave the splitter and the 1 foot cable connected to Starlink Mini. I find the connectors going to the Mini from the Splitter to be difficult to remove due to the watertight seals. I don't like the idea of pulling on the cables to release the Splitter from the Mini. I anticipate repeated removal of the Splitter from the Mini will result in damage to the cables on the Splitter. Replacement Splitters appear to cost about $65. At the other end of the 1 foot cable I attached one half of the VCE RJ45 couplers listed above. This way it is much easier to disconnect the Ethernet cable from the Mini without messing with the watertight connector on the Splitter again. I also installed the VCE couplers on the ends of the 50 foot and 2x 25 foot cables. This way they are like extension cords which are easily connected/dis-connected. I am impressed with the VCE couplers. They are excellent and easy to use. I bought the three longer length cables to be able to easily connect 25, 50, 75 and 100 foot long cables, as needed. I specifically want to avoid having to deal with a single 100 foot cable, which I find to be a PITA. I have not yet had a chance to use the Starlink Mini on a trip, but have only tested it with our LEII parked in our driveway. Due to tree coverage, I needed to connect at least 75 feet of Ethernet cable to position the Mini for a reasonably unobstructed view of the sky. The Mini still had some obstructions, but I was able to measure Ethernet speeds inside the trailer >100 Mbps. I sometimes saw speeds drop to the 50-75 Mbps and rise as high as 200+ Mbps. I suspect the variable is at least partially attributable to the position of Starlink satellites at the time of the speed tests. The satellites are each only in view 8-9 minutes, without obstructions. In any case, I connected my laptop to Starlink WiFi inside the trailer and was able to browse comfortably. I did not notice the occasional losses of service which I noticed in the performance data on the Starlink app. I don't recall any RV park or state park where the provided WiFi was anywhere close to the minimum speeds I have observed in our driveway. BTW, in our residence we have AT&T wired gigabit Ethernet throughout, so I have a low tolerance for poor WiFi service. I have high expectations for using the Starlink service, based on reports by others and my experience so far. At this point, I have not used any adhesive to attach the PoE Injector to the top of the frame member on which it sits. I have a small zip tie connecting it to a PEX cold water line. With the Ethernet cables attached it cannot really go anywhere. I did not want to use a more permanent method to secure the PoE Injector, until field testing on a road trip. We have our next trip scheduled in late August, so I will observe it over a 400+ mile trip. I will likely use a small strip of 3M VHB tape to fasten to the hard rubber frame covering. Good luck with your installation. If you have any questions, feel free to send me a Personal Message and I will be happy to answer. -
Haloview BT7 Touch Rear Camera installation on 2022 LEII
dhaig replied to dhaig's topic in Ollie Modifications
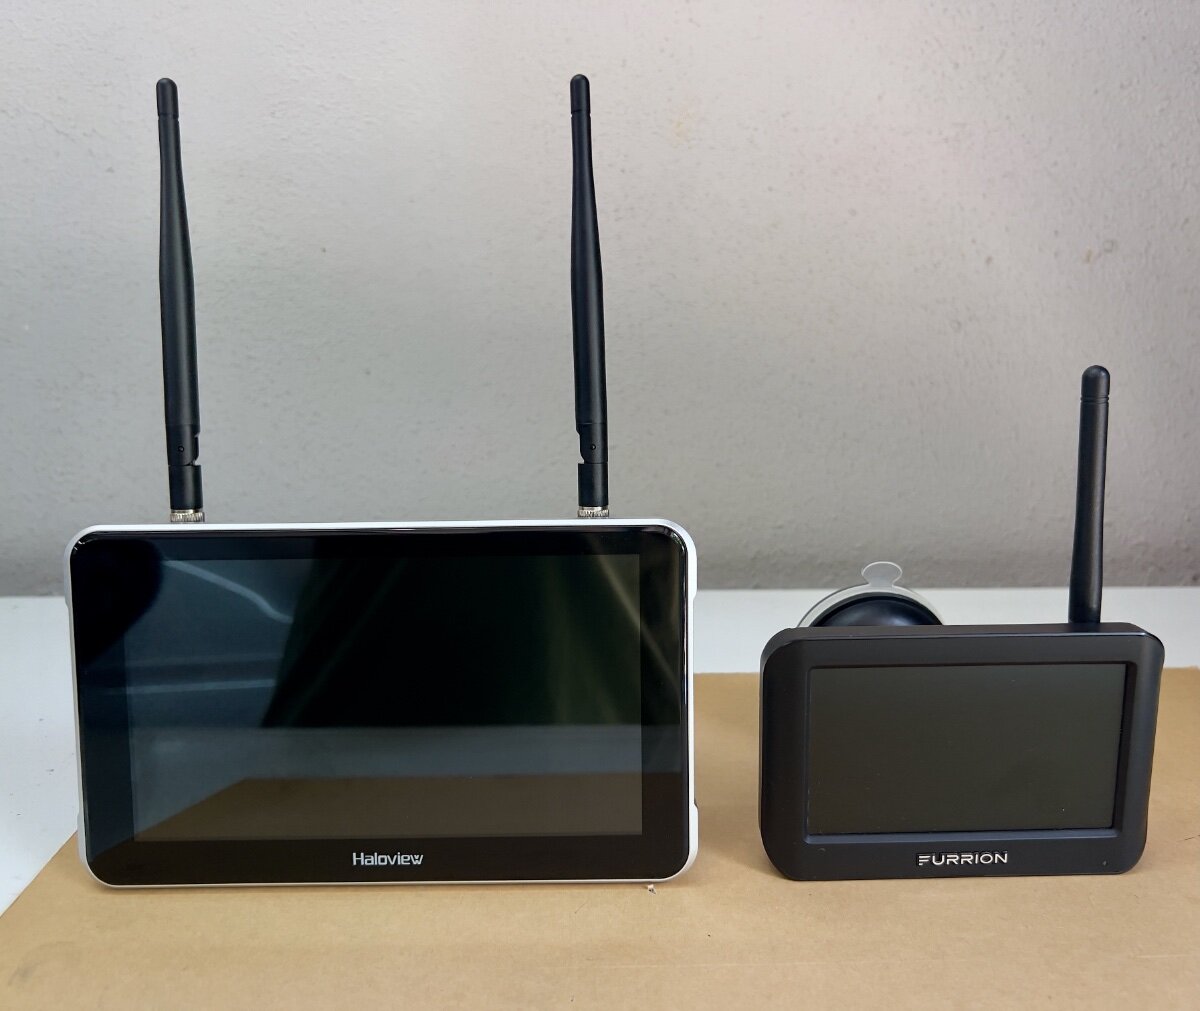
Steve, Sorry to hear of your poor experience with the Haloview MC7108. I am not familiar with this model, which apparently dates to 2019, based on the dates of YouTube reviews. The BT7 Touch, which I purchased, apparently dates to 2024. My experience with the BT7 Touch is limited to my 35 mile drive on Saturday and driveway testing following installation. In no case did I observe any flicker, dropouts or lag when viewing the monitor mounted to the windshield using the suction cup mount. The image was quite stable. As I mentioned, I folded the two antennas to rest horizontally on top to the monitor, which had no discernible effect on the performance of the monitor. If I recall correctly, the on screen signal strength meter dropped from 5 bars to 4. Also, on my short test drive, I was frequently looking back and forth from the TV mirrors to the BT7 Touch Monitor to compare the views to the rear and sides. The images on the BT7 Touch Monitor seemed to be real time images, with no delay, based on what I was seeing in the TV mirrors. We tow with a 2014 BMW X5 35d, using the standard door mounted side mirrors, plus a pair of Milenco MIL-2912 Grand Aero 3 Towing Mirrors. I have used these for 3-½ years, the entire time we have owned our LEII. I am very familiar with the view to the rear and sides provided by the mirrors, and I was comparing the increased visibility using the Haloview camera/monitor. We have a 200+ mile trip scheduled beginning August 27 (coincidentally 4 days prior to the closure of our Amazon return window). This will give me 3-4 hours driving time each way to observe the performance of the BT7 Touch camera/monitor. I will be happy to post an update following a trip of 400+ miles. Also, a minor clarification- The Haloview MC7108 Monitor resolution is apparently 1024x600, 720P high definition, not 4K. For reference, my Furrion, Model F0S43TADS, had resolution of 480x272. The Haloview BT7 Touch Monitor is 1920 x 1080, the resolution of 1080p (Full HD). Regards, Don -
Haloview BT7 Touch Rear Camera installation on 2022 LEII
dhaig replied to dhaig's topic in Ollie Modifications
@Snackchaser, thanks for the kind words. I have admired you many technical posts. I recall seeing your posting on turning on the rear camera. I had several projects in my queue at the time, but will revisit. Don -
Haloview BT7 Touch Rear Camera installation on 2022 LEII
dhaig posted a topic in Ollie Modifications
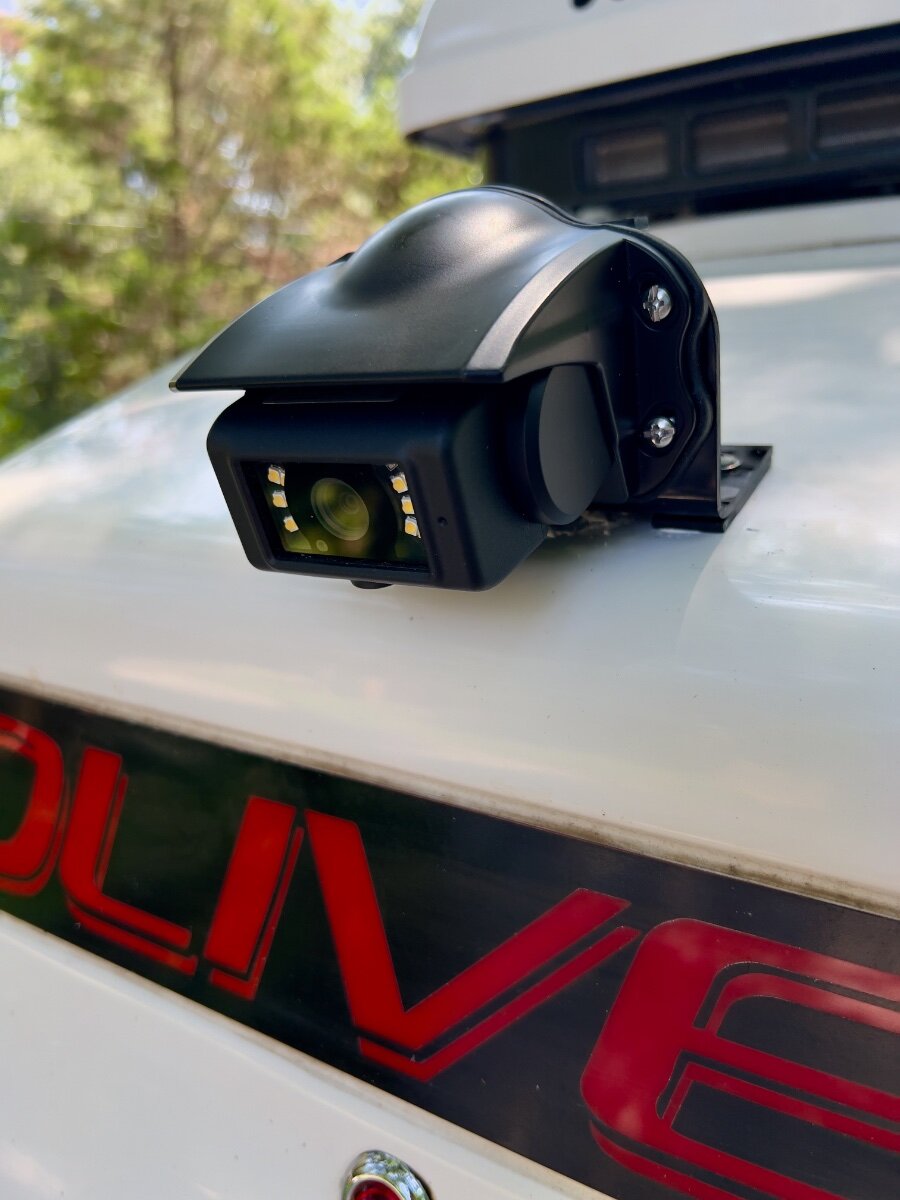
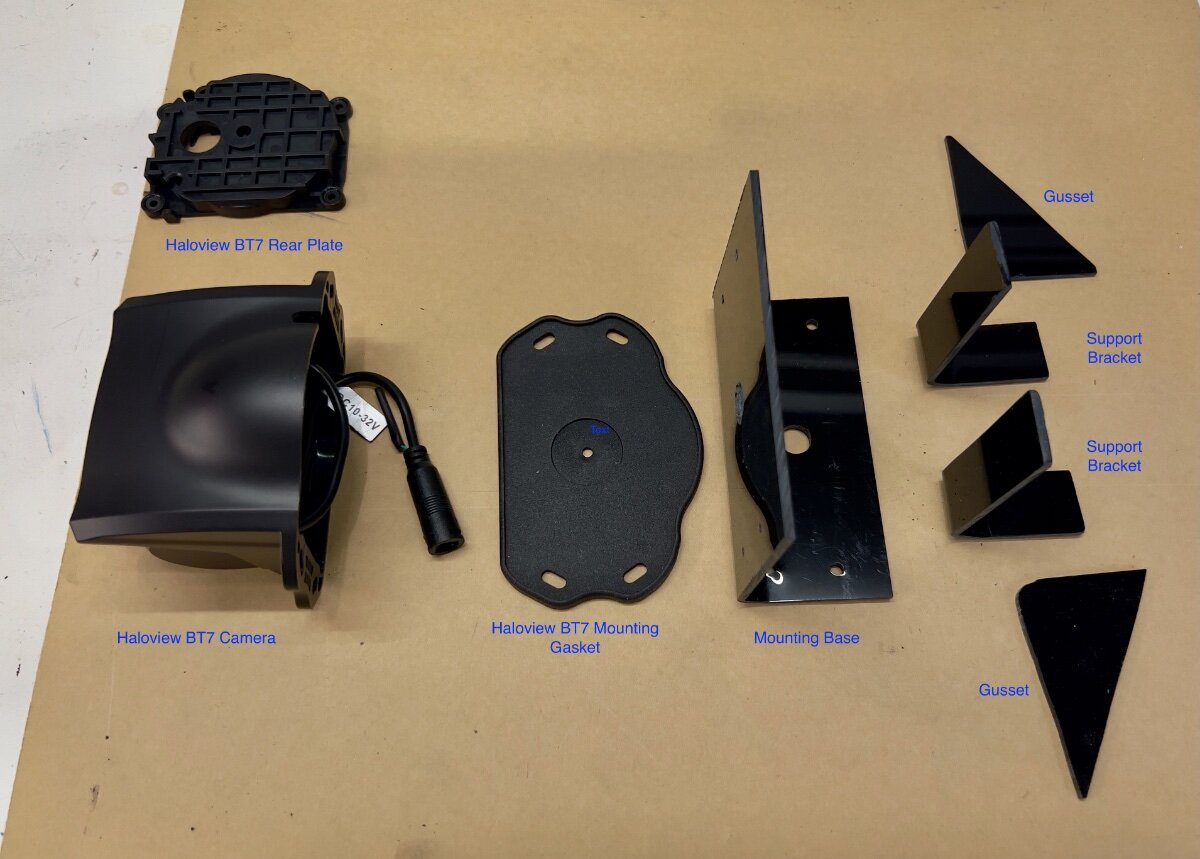
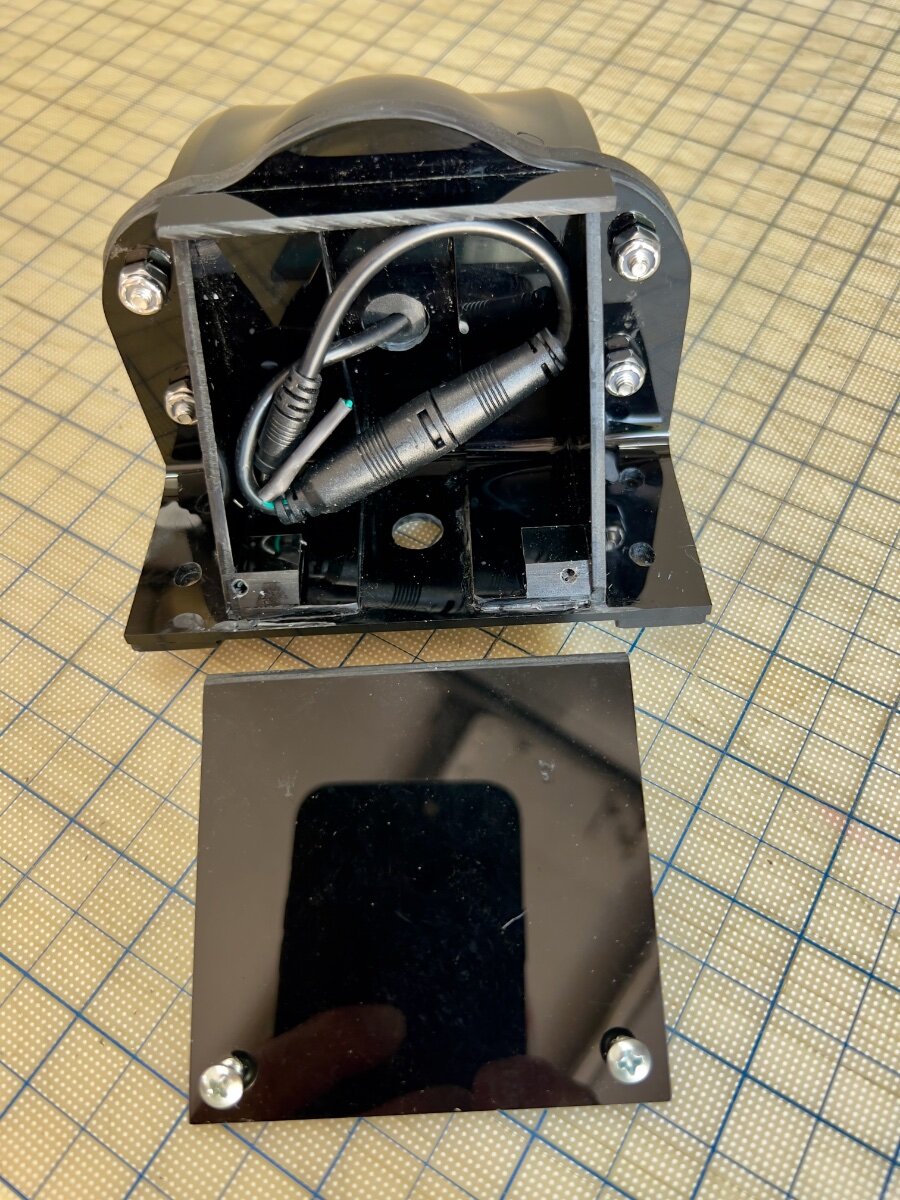
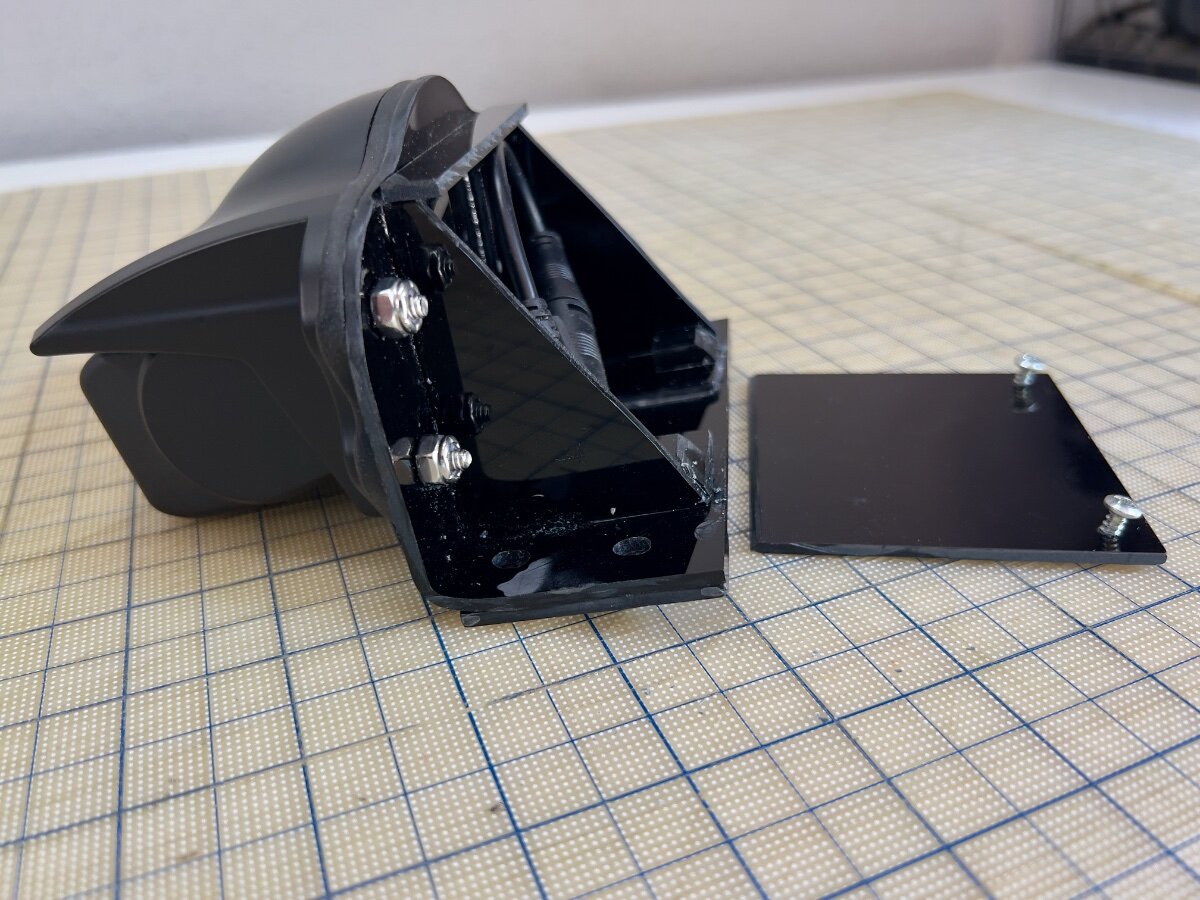
I recently purchased a Haloview BT7 Touch Rear Camera to replace the Furrion Vision S Camera System (Model F0S43TADS) we purchased as an accessory option on our 2022 LEII. Following delivery of our trailer in February, 2022, it was quickly evident the Furrion camera was largely useless. I continued to use the Furrion camera, with increasing frustration. The very limited view to the rear was a safety issue. I began to research RV rear cameras and after reading many reviews selected the Haloview BT7 Touch. I was impressed by the specs and favorable reviews, but failed to note the camera is designed to mount to a vertical rear wall, not the sloping rear roof of an LEII. I could have returned the Haloview camera, but I did not see a good second choice. Thus, I decided to fabricate a mount to be installed in the same position as the Furrion camera. The result is the custom mount below: Fabrication Process I had some black acrylic sheet, .010" thick, from a prior project (See: Window Vent Mod- Louvered Ventilators), which seemed suitable material for a camera mount. I had some thicker acrylic sheet, but decided to first use the thinner sheet to create a mockup by bending the acrylic sheet. Initially, I had concerns the thinner sheet would not be sufficiently rigid to hold the camera steady, but I was not sure I could bend the thicker sheet. The Furrion camera and its mounting gasket were removed from the roof of our LEII and used to begin the layout of the base for the new mount. I wanted to use the four existing holes in the roof which held the Furrion camera in place. I had a scrap piece of acrylic about 7" wide and 20" long. I used 2" blue painter's tape applied to the acrylic and, with a fine point mechanical pencil, began marking out the mounting hole pattern from the Furrion gasket. Next, I flipped the scrap sheet of acrylic over, applied blue tape and began positioning the Haloview camera on the tape. My initial concept was to have the main part of the mount be a single piece of acrylic bent to an angle of approximately 80 degrees. When mounted to the sloped roof of the trailer, the face of the mount would be approximately vertical for mounting the Haloview camera. The layout of the mounting base resulted in the base being approximately 2.0" wide, and the nearly vertical mounting face approximately 3.5" tall. I also allowed about 0.75" for the bend radius. So, before bending the rectangular sheet of acrylic was approximately 6.25" x 7.0". I cut this piece from the end of the 20" long scrap. Before bending, I drilled all needed holes in the mount base, as marked during the layout process. NOTE: See YouTube for many useful videos on bending acrylic sheets. To bend the mounting base, I sandwiched the rectangular piece of acrylic between two pieces of scrap wood approximately 12" x 3", with the acrylic area to be bent aligned on the long side of the wood scraps. I extended the acrylic from the wood scrap approximately 2.5" to 3.0" in preparation for bending. I clamped the sandwiched pieces to my workbench to ensure it would not move during the bending process. Using a heat gun, I began to heat the area to be bent, moving back and forth. Wearing gloves, I held two other pieces of wood, each approximately 2" x 5". As the acrylic became heated, I applied gentle pressure to the extended portion of the acrylic, using the pieces of wood in my hand. I continued to move the heat gun along the bend area until I could begin to bend the acrylic. As the acrylic began to bend, I used care to keep the bend straight and at 90 degrees to the sides. I used a steel carpenter's square to test the acrylic as I bent it. As I approached the desired finished bend angle, I released the acrylic to check the angle. Satisfied with the bend angle I trimmed the top of the mounting base to the contour of the Haloview mounting gasket with a scroll saw. Having the mounting base bent as desired, I began to plan how I would make it sufficiently rigid to hold the camera steady. The photo below shows the other parts which would comprise the rear support area. Also at the rear I wanted to enclose the wiring connecting the camera to the 12VDC power from the trailer. Haloview BT7 Camera and mount parts Once the mounting base was bent as desired, I cut two pieces approximately 1" wide from either end of the mounting base using a table saw. These two pieces became the support brackets. Being bent at the same angle as the mounting base, they fit well to backup the mounting face. The triangular gussets also add rigidity, being bonded to the mounting base and the support brackets. The photo below shows the mounting base (face down) with the support brackets and gussets attached at the rear. Acrylic cement was used to weld all parts together. Mounting base face down with support brackets and gussets in place Side view of mounting base with support brackets and gussets in place To protect the power supply wiring from UV exposure and squirrels, I added a cover and a top piece across the gussets. The rear compartment does not need to be watertight, since the wiring connectors are watertight. Haloview includes a short adapter which connects to the existing Furrion connector protruding from the roof. The photos below show the camera on the mounting base and cover from the rear and side views. Mounting base and cover (Rear) Mounting base and cover (Side) Mounting the Camera to the LEII When I removed the Furrion camera from the roof of the trailer, I noticed several things: The 12VDC power supply wiring passes through a hole in the trailer and was effectively sealed with the white caulking used throughout the trailer. This was not visible before removing the Furrion mounting gasket. The sealant was in good condition, however, it formed a small mound on the roof of the trailer. The base of Furrion camera was hollow and the mounting gasket conformed to the mound, allowing the outer shell of the camera to meet the trailer roof. The holes for the screws holding the camera to the trailer roof are NOT through holes, reducing the risk of water leaks into the trailer. The Furrion camera was not mounted at the lateral center point of the trailer, but not so far off that I had noticed in over three years using the trailer. The Furrion camera was also not quite parallel to the Oliver sign just below its mounting position. From the ground this was not perceptible. There were multiple trial fittings of the new mount as the fabrication process proceeded. From these fittings the following adjustments were made: The mounting holes for the new base were elongated (using a Dremel tool) to permit the new mount to be swiveled slightly in azimuth to have the front face of the camera parallel with the top edge of the Oliver sign. Two acrylic "runners" approximately 0.5" wide and 2.0" long, were attached to the bottom of the mounting base to straddle the mound of caulk where the power supply wire passes through the roof. I reused the mounting screws, putting fresh caulk into the screw holes and around the screws. The new mount covers the same area where the power supply wire passes through the roof. It is protected from UV by the new mount, but water can run under the new mount. The Results The Haloview BT7 comes with two mounts, one with a suction cup for windshield mounting, the other a 3M VHB bonded disk for attachment to the upper dashboard. I prefer the windshield mount, which is substantial and widely adjustable. It is very stable, with no vibration. The signal strength indicated on the monitor showed a 5 bar strong connection to the rear camera. Monitor comparison- Haloview 7" vs. Furrion 4.3" (diagonals) Yesterday, I took a 35 mile shakedown cruise for the camera on the way to the storage facility. The Haloview camera and monitor have met all my expectations. The visibility to the rear is vastly improved. I now see vehicles approaching in the same lane and in lanes on either side. I was particularly impressed to see merging traffic entering the highway on my right, before I could see them in my mirrors. Overtaking traffic is now seen well before they come abreast of the trailer. In bright Texas sun, the video on the monitor is clear and not washed out. There is no jitter in video from the camera, and the signal was always strong, even with the antennas folded horizontally across the top of the monitor. The touch screen controls work well and are easily used while driving. Also, my custom mount proved to be very solid, with no vibration of the video due to camera movement. I recommend the Haloview BT7 Touch camera to anyone considering replacing their Furrion rear camera. Unfortunately, Haloview does not appear to have a roof mount adapter available. I had sent an email query to Haloview Support and received a reply indicating they did have such a mount and provided the following URL: https://www.haloview.com/bt-series-camera-peaked-cap-bracket-compatible-with-furrion-and-voyager-pre-wired-rvs.html. Nothing on this page convinced me it was a roof mount. It does say the Furrion hole pattern is matched for mounting to the trailer. But only if the Furrion camera was mounted to a vertical surface. I have not yet received a reply to my email pointing out they sent me a link to a vertical mount. I hope this is useful to other OTT owners with Furrion cameras. Regards, Don
-
Thanks for sharing your A/C replacement experience. The Tosot unit looks very attractive compared to the Dometic. Would you care to share the cost of the new unit plus installation? Thanks. Don
-
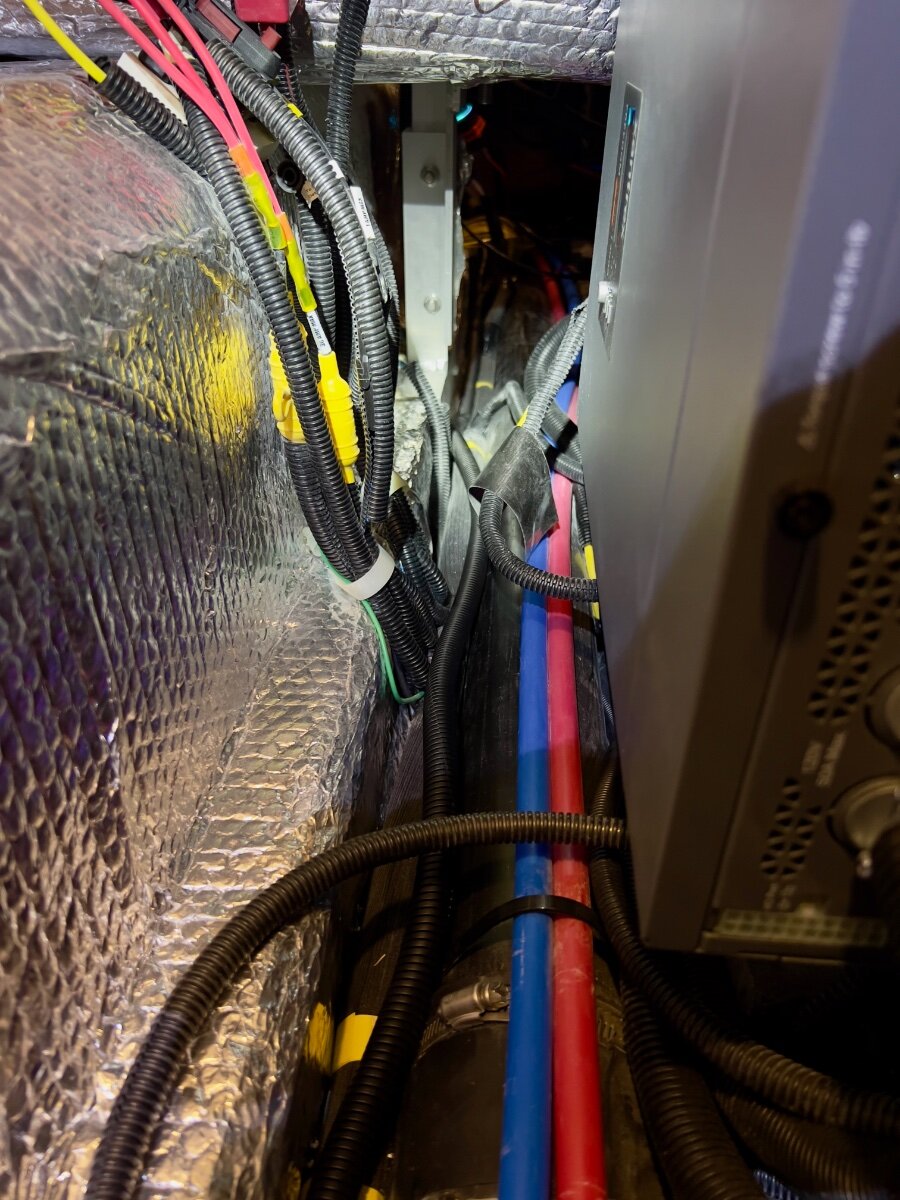
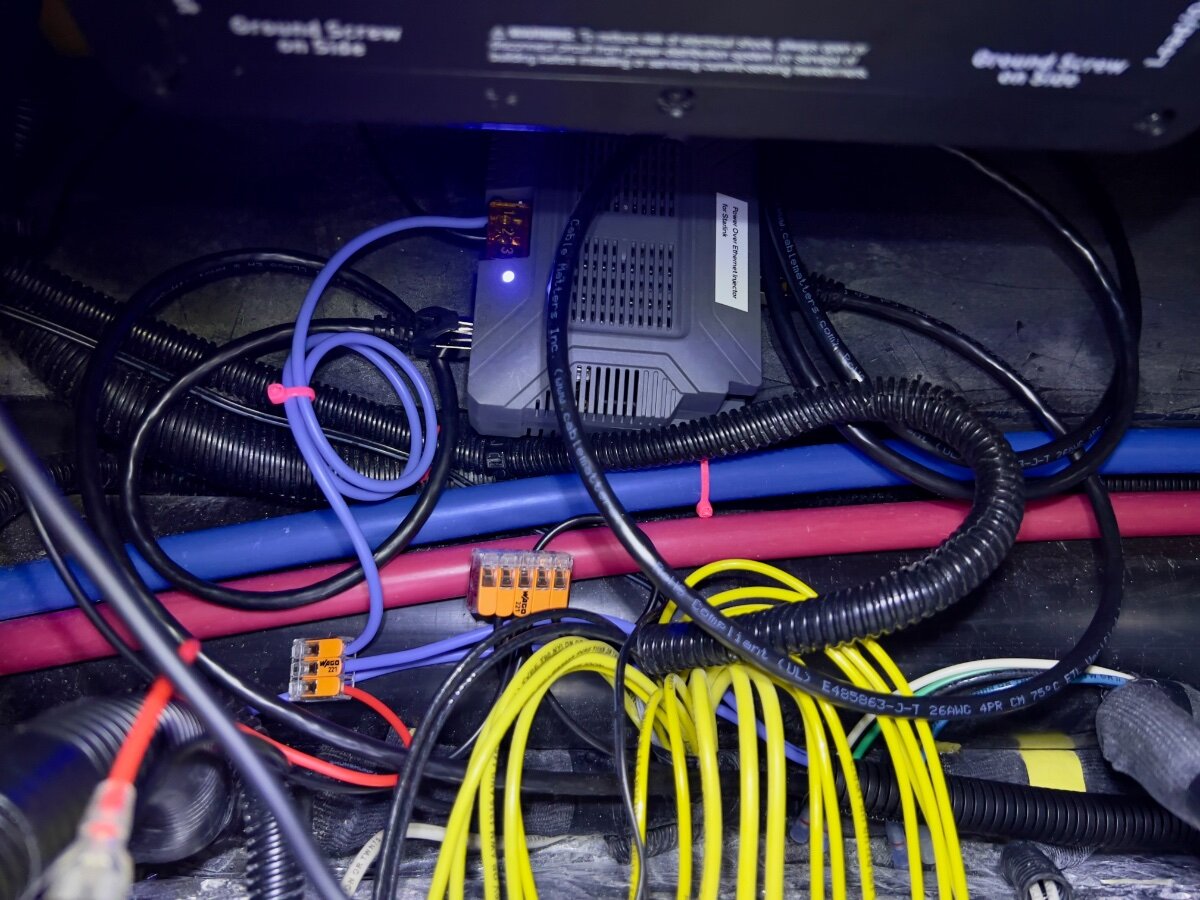
On a recent trip from Dallas to South Carolina we stayed in multiple locations with no (or very limited) communications capabilities (cell phone or WiFi). Over the three years we have owned our LEII, there have been many other occasions with no ability to communicate. As a result, we decided to order a Starlink Mini and a Starlink Router Mini to use on our trailer trips. I have been following Starlink related postings on the OTT Owners Forum, especially since the release of the Starlink Mini. I have found the postings by @Snackchaser particularly helpful in planning the installation of our Starlink system. I especially liked the use of a Power over Ethernet (PoE) injector to power the Starlink Mini and to provide an Ethernet connection from the built-in router back to the trailer, using a single cable. Installing the PoE injector and a DC powered router in the attic of the LEII seemed a reasonable location, being nearly directly above the exterior Furrion ports for connecting satellite and cable TV. So I planned to install in a similar location in the attic of our LEII, assembling a list of the components required. I ordered a PoE injector from MobileMustHave.com and the rest from Amazon. Once all the key components had been delivered, I began the installation, with the first step being to replace the Furrion Satellite coax port with an RJ45 pass-through connector and to fish an Ethernet cable from the basement to the attic. Replacing the Furrion coax connector with the RJ45 pass-through connector was no problem, even though enlarging the hole through fiberglass exterior shell was required. However, fishing an Ethernet cable from the basement to the attic proved to be a major obstacle. Although I have prior experience fishing wires through difficult spaces, I was unsuccessful getting a fish tape (or rods) from the attic to the basement. I could get the end of the fish tape rods down near the ceiling of the basement, where the interior shell ends and multiple cables run up to the attic area at the rear of the trailer, but not into the basement. As suggested, I tried following the A/C drain line and multiple other locations but could not get past the bottom of the inner shell into the basement. I tried running the fish tape/rods in both directions. No luck. Consequently, I began to ponder other installation locations inside the trailer for the PoE injector and Starlink Router Mini. After a couple of days, I had an Aha! moment- install the PoE Injector and Router Mini under the rear dinette seat. I inspected the space between the basement and the rear dinette seat, nearly all of which is readily accessible from the two rear street side hatches and the rear dinette seat hatch. Only the space under the battery compartment is not accessible from directly above, but is easily accessed from either side. I looked for any obstacles to using this location and found none. I could easily route the Ethernet cable from the Furrion/RJ45 pass-through connector forward to beneath the rear dinette seat. I located the PoE Injector atop the trailer frame member, just below the Progressive surge protector box, which is mounted on the aisle wall of the rear dinette seat. The PoE jack and the power terminals of the PoE Injector are positioned toward the front of the trailer. I connected a 20 foot shielded Cat 6 cable from the inner side of the Furrion/ RJ45 port, then routed it under the floor of the basement, around the street side rear stabilizer, then following the waste water line, forward to the area under the rear dinette hatch. About 3 feet of excess cable are coiled in the basement, concealed by the rear wall of the basement. I installed a lighted rocker switch through the forward basement wall, mounted high, almost directly above the side-to-side bubble level on the left side of the basement entry. This switch is to control 12VDC power to the PoE Injector and the Starlink Router Mini. Using 14 AWG silicone coated wire, I ran two purple colored wires from the space beneath the rear dinette hatch back to the rocker switch on the forward basement wall. A third, 14 AWG black wire was also run along the same route to the rocker switch. The switch has two terminals with red lead wires,: one to the DC power source and one to the load. The third terminal has a black wire, which connects to ground (the bus bar). The ground wire enables the light on the switch to operate when DC power is ON. On the DC power panel, position 15, I installed a 15 amp fuse. One of the purple wires connects to the 12VDC positive terminal on the PoE Injector. The other purple wire connects to position 15 on the rear of the DC power panel, using a crimp on connector. The single black wire from the switch connects to the ground bus located under the rear dinette seat. Another 14 AWG wire connects the PoE Injector negative terminal with the other end connecting to the bus bar. All wire-to-wire connections were made using Wago lever lock connectors. I also added a 12VDC auxiliary power outlet (cigarette lighter type) which is connected to the same circuit as that which powers the PoE Injector. An Anker 323 USB-C Car Charger Adapter (USB Power Delivery (PD) capable) plugs into the auxiliary power outlet. A USB-C to Male to DC 3.5 x 1.35mm Male Power Jack is used to power the Starlink Router Mini from the Anker charger. I found the Starlink Router Mini conveniently fits on top of the Progressive Surge Protector box. I later secured it with a releasable zip tie around the surge protector. The 20 foot Cat 6 Ethernet cable from the rear connects to the PoE jack of the PoE Injector. A 5 foot Cat 6 Ethernet cable connects to the LAN jack of the PoE Injector and to the WAN/Satellite port of the Starlink Router Mini. All Cat 6 Ethernet cables used are shielded. I believe this installation location approach has several advantages over an attic installation: Access is MUCH easier. Fishing wires is no challenge. A dedicated circuit from the DC power panel provides power to all Starlink related components. A lighted switch for the PoE Injector and Starlink Router Mini is located in the basement, near the exterior pass-through Ethernet jack. The PoE Injector is located where it cannot be covered by clothing or other cargo stored in the attic which might cause overheating. The VERY bright blue light on the PoE Injector is not visible in the cabin (always ON if power to the PoE Injector is ON). The Starlink Router Mini is located centrally in the trailer and should provide uniform WiFi coverage within the trailer. We have not yet taken the Starlink on a shakedown trip, but plan to do so at the end of August. Regards, Don
-
Accurately measure propane level for under $10
dhaig replied to Snackchaser's topic in Mechanical & Technical Tips
Like @Snackchaser, I use a luggage scale to get an accurate read on the propane level in the tanks. I purchased a pair of Mopeka sensors and found them to be unreliable and not very accurate. I had a couple replaced under warranty. They also seemed to have need frequent battery replacement. I would NOT recommend them. Amazon has a large selection of luggage scales for about $10, that are compact and accurate. With tare weight labelled on both tanks there is no mystery to the amount of propane when the total weight is known. Such as: https://www.amazon.com/Etekcity-Portable-Handheld-Suitcase-Temperature/dp/B082LYC2TN/ref=sr_1_7?crid=2PAZR2PQNSA24&dib=eyJ2IjoiMSJ9.lrxtiYiAaOxFumPFwJLLfi-V2pD7fJpKxfsl6UyzsKbSFL3YNBR0L1a7Px8SBzHhhW25VLBh912CrUyahxdkUjT1pqB3pRe933JDFfDr7ZaTgoTCb1mXdfINMMhl5OU0FibEUB2mMbq_9R89XeAeSb5MhrkSnnQ5YT6uUSpTQctrjSJqa-90Rcwkt-jGQLzD4jSFjCSRtp-YFlVIJhme_3etEGEES17uG605HrMmwLGyk2YZsL2lLr-nGzZUe7jC60bztrvKDpr9oVktN97bzUFLTJ8jfQEvF9T4OU-tq1A.NFHYzomQyFXtHPcZxq8NaPUGd5FyqkWMxZL0L2YMZgw&dib_tag=se&keywords=digital%2Bluggage%2Bscale&qid=1754537940&sprefix=digital%2Blugga%2Caps%2C138&sr=8-7&th=1 Don -
Correction: The tongue weight scale is Sherline, NOT Shoreline. despite what auto-correct thinks.
-
I also purchased the Shoreline Tongue Weight Scale. It works well and appears to be reasonable accurate. I also weighed our TV and LEII on a CAT scale and computed the tongue weight. The tongue weight reported by the Shoreline scale and the computed weight from the CAT scale were reasonably close, ~500 lbs. I have only measured our tongue weight once with the scale. Unless you make a significant modification or change how you load the trailer, I would not expect the tongue weight to vary much. Given the low frequency of use, I would try to borrow one from a friend, or perhaps rent a tongue weight scale, if one can be found.
-
@TxMN2020, I have just sent you a personal message which includes my phone number. I am offering my assistance to help work through the battery charging issues you have described. I have a 2022 Oliver Legacy Elite II, Hull 990, which is equipped with Lithionics lithium batteries. I live in North Dallas. Please give me a call. Don
-
@ghopkins1033, Yes, we still regularly use our exterior towel bar assembly. It has held up well. I have not had to replace any components. I had added two support tubes which connected to two tees in the outer bar, at the suggestion of @Bill and Nancy. The support tubes had suction cups at the opposite end to connect to the body of the trailer at approximately a 45 degree angle. I no longer use the two supports, due to another suggestion from @Bill and Nancy. @Bill and Nancy, operate The Bird Store, which offers bird feeders which utilize suction cups for mounting. They recommend their customers apply a thin coating of petroleum jelly or olive oil to suction cups to improve their holding capability on smooth surfaces. The lubricant applied to the primary suction cups eliminated the need for the additional supports. I now apply a very thin coating of petroleum jelly or olive oil to the 4" primary suction cups before mounting the assembled rack to the body of our LEII. The addition of the lubricant to the suction cups substantially increases their holding capability. The two 4" suction cups now easily maintain a load of as many towels as we can fit on the 4 tubes of the rack. The suction cups are easily removed by raising their levers and lifting an edge of the suction cup. A plastic putty knife is also useful for releasing the grip of the suction cups. We have learned to use clips on towels/clothing hung on the PVC tubes of the towel rack to prevent the wind blowing them off. The clips also help to keep the towels from blowing against the body of the LEII, which is not always free of road grime. I usually put a clip on a towel just below the PVC tubes, holding the towel on either side of the tube. We have found clips for chip bags serve well for this purpose. Walmart is a reliable source of inexpensive clips. I usually assemble the towel rack on a picnic table, where I also apply the lubricant to the suction cups. A small amount of lubricant also helps the PVC tubes to slide more easily into the couplings. Disassembly is very quick. Little space is required for stowage when knocked down. Regards, Don


.jpeg.bc5410dca345743218c7cdd61cd7a837.jpeg)
.jpeg.db24308a47698837a565fc55eec3a655.jpeg)
.jpeg.b601f1e7eac4638423f2297d1cfed3e5.jpeg)
.jpeg.799f3cf194b3b21d05b2a7bb19f728b1.jpeg)
.jpeg.dd379fc2e5087fa6910ce21b437441ad.jpeg)
forPoEInjector.jpeg.2ff4c7b3725adaf25e5bdfc30965ceff.jpeg)
atopProgressiveSurgeProtector.jpeg.5c03a313182d5fdb47bf1a254dec329d.jpeg)
