dhaig
-
Posts
134 -
Joined
-
Last visited
-
Days Won
1
Everything posted by dhaig
-
My wife and I returned yesterday evening from a 10 day trip, which involved stays at 3 campgrounds. We were tired upon arrival home and I failed to connect shore power to our 2022 LEII with the Lithium Pro solar package. This morning when I went out to unhitch, I found the 3 Lithionics lithium batteries (390 Amp hours total capacity) significantly depleted (12=13% SOC, voltage= 12.5 V). During our 10 day trip the 3 lithium batteries had stayed near full charge, since we were staying at full hookup campsites. On our return trip home, the Norcold refrigerator was running on DC for a total use of approximately 24 hours (10AM departure yesterday to10AM today discovery of low SOC level). The refrigerator load apparently was the primary culprit for drawing down the SOC of the batteries. The refrigerator is now OFF. I connected a 50 foot extension cord, rated for 15 amps, to a 20 amp outlet and to the power port on our LEII. When I checked the remote control display for the Xantrex inverter, I was surprised to see it reported being in "AC bypass mode", which was NOT charging the batteries. This same extension cord and outlet circuit I have used many times when the trailer has been parked in our driveway. I have previously observed the batteries being recharged very rapidly, e.g., from 50% SOC to 100% within 4-6 hours by the inverter. At no time during our trip did I notice anything abnormal in the battery charging. The Xantrex FXC Control app on my iPhone issues a notification "utility power not available or qualified due to poor ac power..." when shore power is first connected to the trailer. The display located in the attic reports normal shore power conditions: 120 VAC, 60 Hz, 1 amp, No error messages (E0). I have previously noticed on numerous occassions when the Xantrax inverter would come ON for short periods (2-3 minutes) while connected to shore power. I have previously asked Oliver Service why the inverter would come on when connected to shore power, when the batteries are at or near full SOC. The most recent answer received was a conjecture that our shore power was unstable. This seems unlikely, since I have observed the short intervals of inverter operation when connected to shore power in many different campgrounds and at our home, where I know we have stable power. I proceeded to read the Xantrex owner's manual to determine how to get the inverter out of AC bypass mode and charging the batteries. I am unable to determine how get the inverter to recharge the lithium batteries. The solar panels appear to be recharging the batteries slightly, due to having a largely cloudy day. Tonight I checked the SOC of the lithium batteries and they have declined 1-2%. I am going to turn the batteries OFF to prevent being fully discharged. Has anyone encountered similar charging issues? Regards, Don
-
First Impressions of our Oliver, and Some Questions (Part Two)
dhaig replied to GeoffChapman's topic in General Discussion
@GeoffChapman, prior to ordering our 2022 LEII, I received what proved to be good advice on multiple points from another Ollie owner. One recommendation was to forego the cellular booster option, as they were widely seen to be ineffective. I also read reviews elsewhere convincing me this was not a desirable option. If you anticipate going into areas with little or no cellular service, I recommend you consider purchasing a Garmin InReach MINI2, or similar Garmin inReach device. These cost approximately $400 and operate on the Iridium satellite network. They will operate anywhere in the world. Several service plans are available through Garmin and the plans may be started/stopped on a monthly basis. The least expensive plan is about $15. These devices provide safety features the cell booster cannot. Carried on your person, they could save your life if you are lost or injured in a remote area. IMHO, the devices are of much greater utility. They provide two way test communication and emergency messaging. The inReach devices can be paired with a smart phone via Bluetooth. A Garmin app on the phone will enable use of the phone keyboard for text messaging, which is far easier than entering text characters directly on the inReach device. Connecting your TireMinder booster to the switch for the rear camera should work well. I had not thought to do that, or seen such recommendations. I installed my booster under the rear dinette seat, so I must remember to turn it off when storing our trailer. You can access the rear of the control panel containing the rear camera switch through the access hatch over the microwave oven. You will probably need to pull out the control panel to access the switch wiring connections, which involves removing only a few screws. I assume you would leave the booster in the space behind the control panel. Regards, Don -
@johnwen, glad to hear your experience ended without injury or serious damage. We also installed a standalone TPMS for our LEII (Hull 990), the TireMinder i10, with 6 transmitters (TPMS), four for the trailer and the other two for our spares. See: https://technorv.com/products/tireminder-i10-rv-tpms-with-4-to-10-sensors?_pos=1&_sid=585f6a851&_ss=r I installed the signal booster under the dinette rear seat. I have tested the range by walking over 300 feet from the trailer with the monitor, without loss of signal. Our TV does not have the option for adding trailer sensors. Don
-
@topgun2/Bill, Thanks for the reply and the info on the dimmer. Sorry to hear of your hardship conditions you are suffering there on the beach in NC. And no Ollie nearby in which to seek refuge. Have you explored the viability of separating the exterior lights from the interior? Don
-
@topgun2/Bill, could you please post details on how you implemented a dimmer for the lights? Thanks, Don
-
@Galway Girl/Craig, could you please list the temperature sensors you are using to monitor the belly/bilge temperatures? I may have overlooked them on your Amazon page. These seem useful when camping in freezing weather to monitor the high risk areas, such as the external shower. I have been contemplating some mods to improve airflow, especially to the street side. Thanks, Don
-
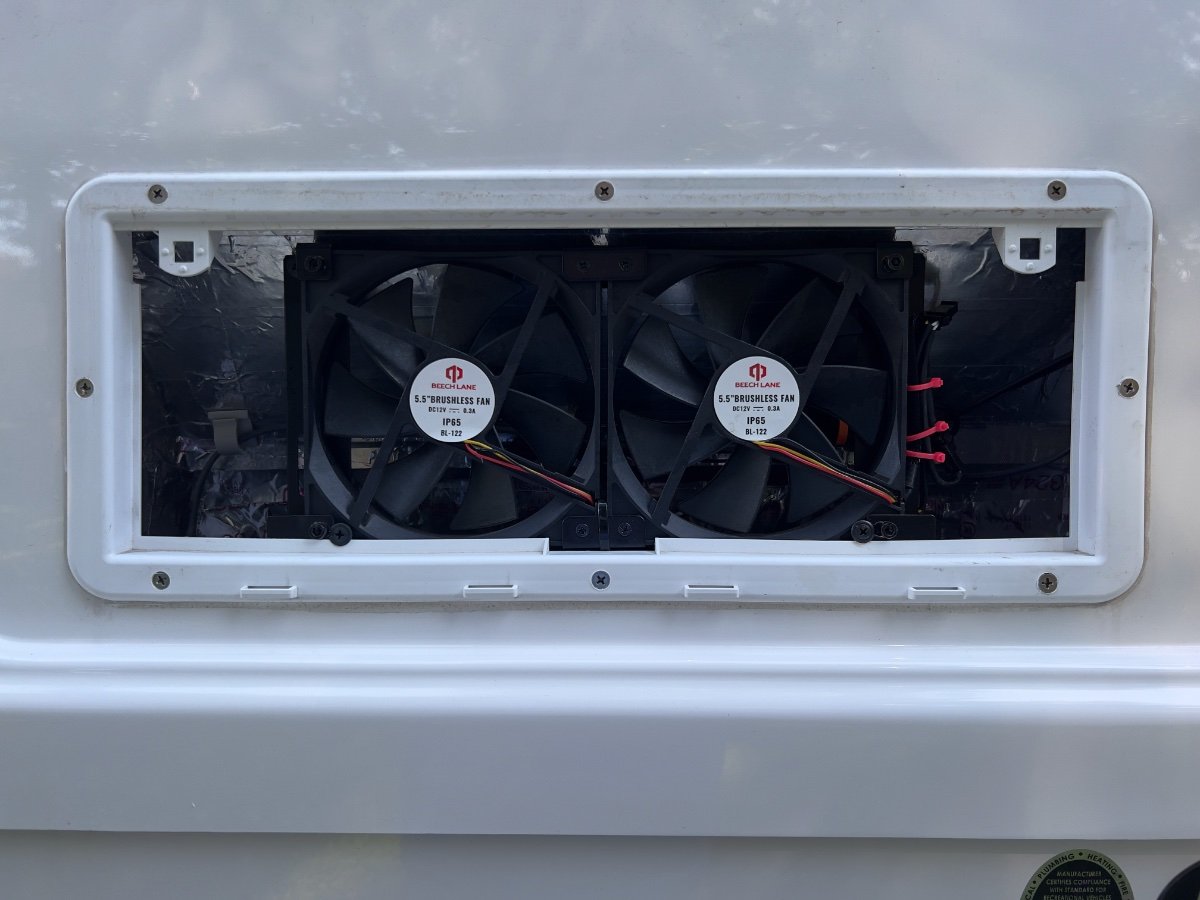
@Ray Kimsey and @CRM, my apologies for not including the detail photos below in my original posting. The fans come mounted together as an assembly. Mounting hardware is included in the kit. In the first photo below, at the right rear of the fan a flange can be seen with a Phillips head screw circled. This screw and a matching one on the left side secure the upper part of the assembly to the sloped MDF panel which forms the top of the rear compartment of the refrigerator. At the lower right another Phillips screw with a large head clamps to the front vertical edge of the vent opening. A hex screw attached to the front lower right of the fan frame holds a small rectangular bracket which clamps to the rear side of the vertical edge of the vent opening. Together, these two screws form the clamping mechanism to the vertical edge of the vent opening. The same arrangement holds the lower left side of the fan to the vertical edge of the vent opening. I editing the photo below to to brighten the interior details. Unfortunately, I do not have the exact dimensions of the upper vent opening. My recollection is that I did a quick measurement of the vertical height available inside the opening and concluded the 5.5" height of the fans would fit. Amazon lists the dimensions of the 2 fan assembly as: 1"D x 12.5"W x 5.5"H. The Beech-Lane website does not list the dimensions of the fans. My trailer is in a storage facility about 35 miles north of my home. The cables for power and remote control run up the left side of the compartment, across the sloped MDF panel behind the fans and up into the right corner of the compartment into the area behind the microwave oven. Our ELII is a 2022 model. I do not know if the size of the upper vent opening has varied over model years. I hope this helps clarify the mounting method. Don

-
@topgun2, Bill, I appreciate the story of your fan installation experience. Thanks for sharing. I dread projects which I must do a hurry, because they invariable turn into a huge PITA. Fortunately, I had no deadline pressure for modifying the installation of the remote control for my fans. Nonetheless, I had to re-do all of the electrical connections and add a few, due to the additional of the switch in the control panel, so there remains the possibility of problem "in use". The acid test will be our next road trip, where the shake table torture will be applied. I have very high confidence the fans can deal with extreme heat, as my driveway tests proved. One of the benefits of DIY projects is gaining the knowledge of where to look to diagnose problems appearing later. I try to take photos, before, during and after and keep notes. These are great aids in dealing with problems such as you described. Smart phones are a tremendous aid in doing so.
-
Trailer Brake Disconnect Warning/Message
dhaig replied to Mike and Carol's topic in Mechanical & Technical Tips
@Mike and Carol, I suggest checking for a loose ground connection, or a corroded connection, probably on the trailer. Also check the ground connection to the 7-pin connector. Add electrically conductive grease to the 7-pin connector, if you have not already done so. I have encountered similar symptoms on a utility trailer, which ultimately proved to have a poor ground connection. I have not seen these symptoms when towing our Oliver. Does the cover/latch on the 7-pin receptacle on the truck engage the catch on the 7-pin plug of the trailer to secure it? Have you tried wiggling the 7-pin connector when it is engaged in the truck's receptacle to see if this triggers the message?. I assume your Ram TV has an OEM brake controller. Has this been checked? When the message is displayed do the brakes respond when pressing on the brake pedal or by manually applying the brakes using the brake controller? When the trailer is connected and the the "trailer brakes disconnected" message is displayed do the lights on the trailer work? Brake lights? If you have another trailer or a friend has one, does the problem still occur when another trailer is connected to your truck? Good luck. Don -
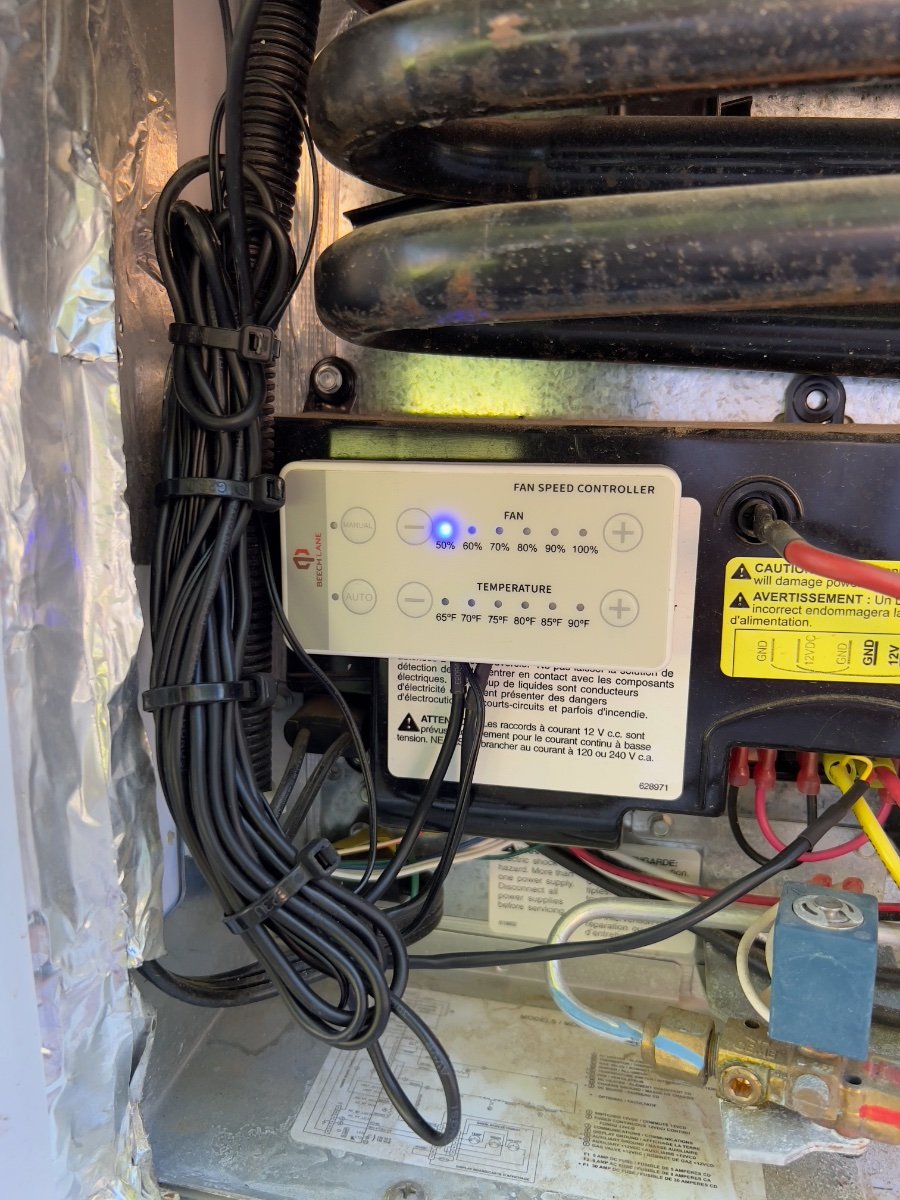
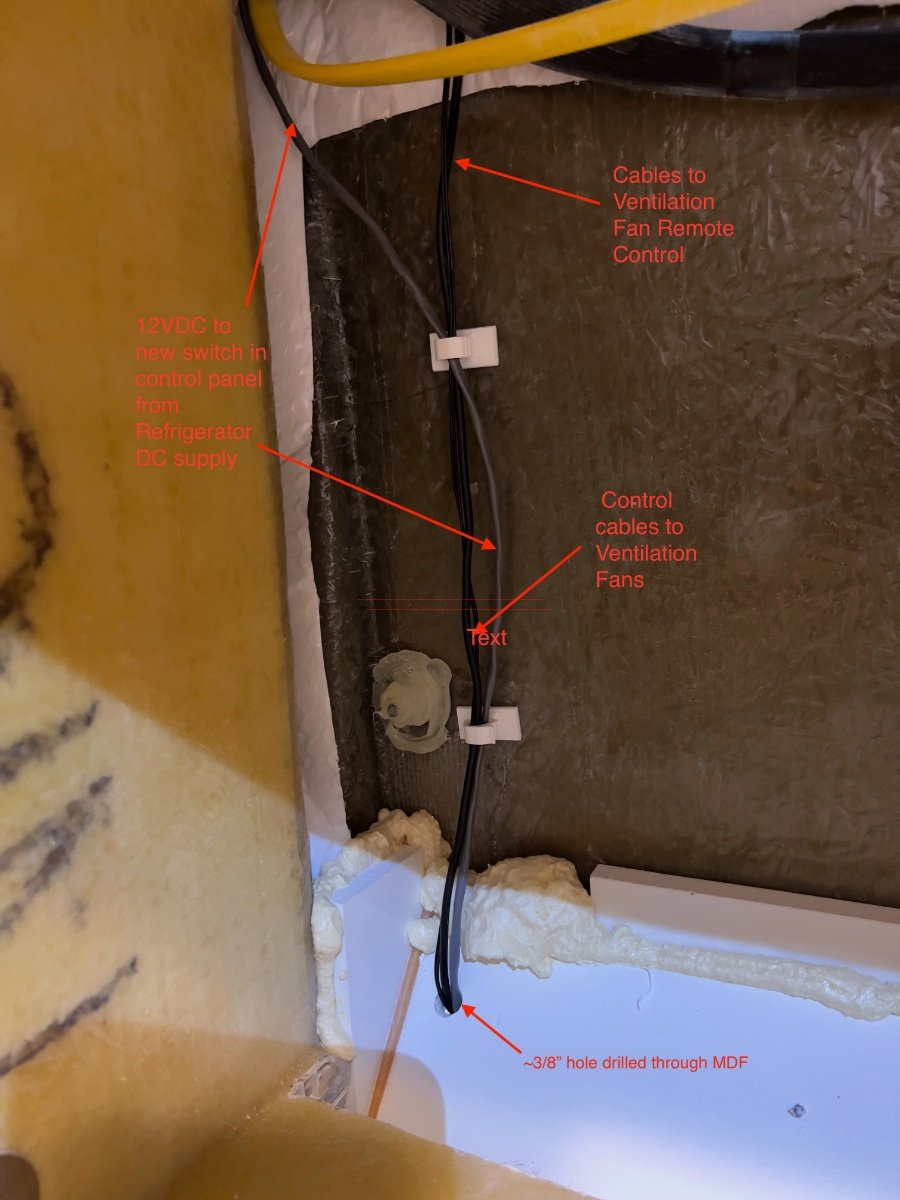
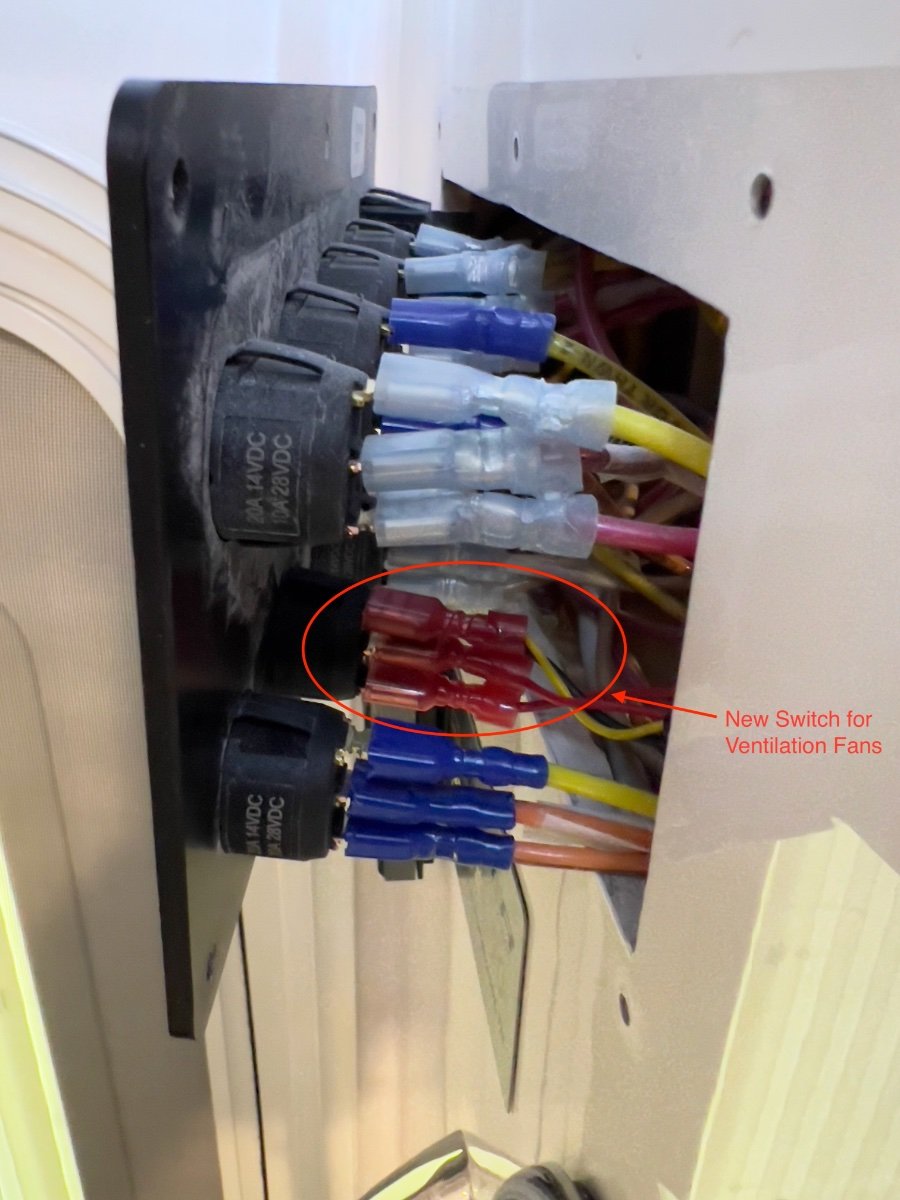
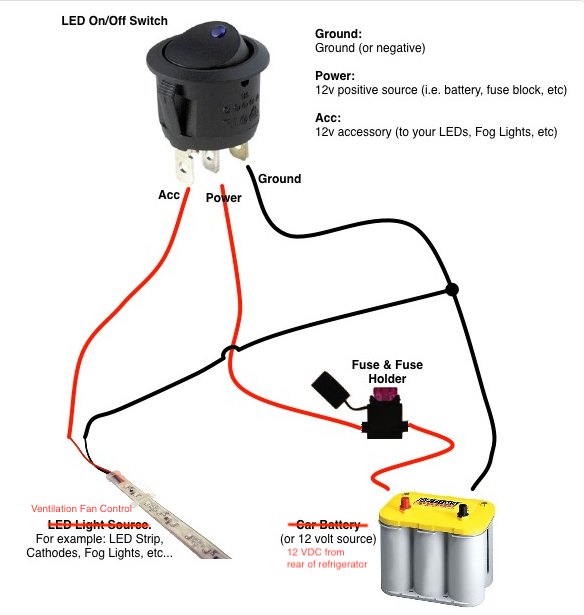
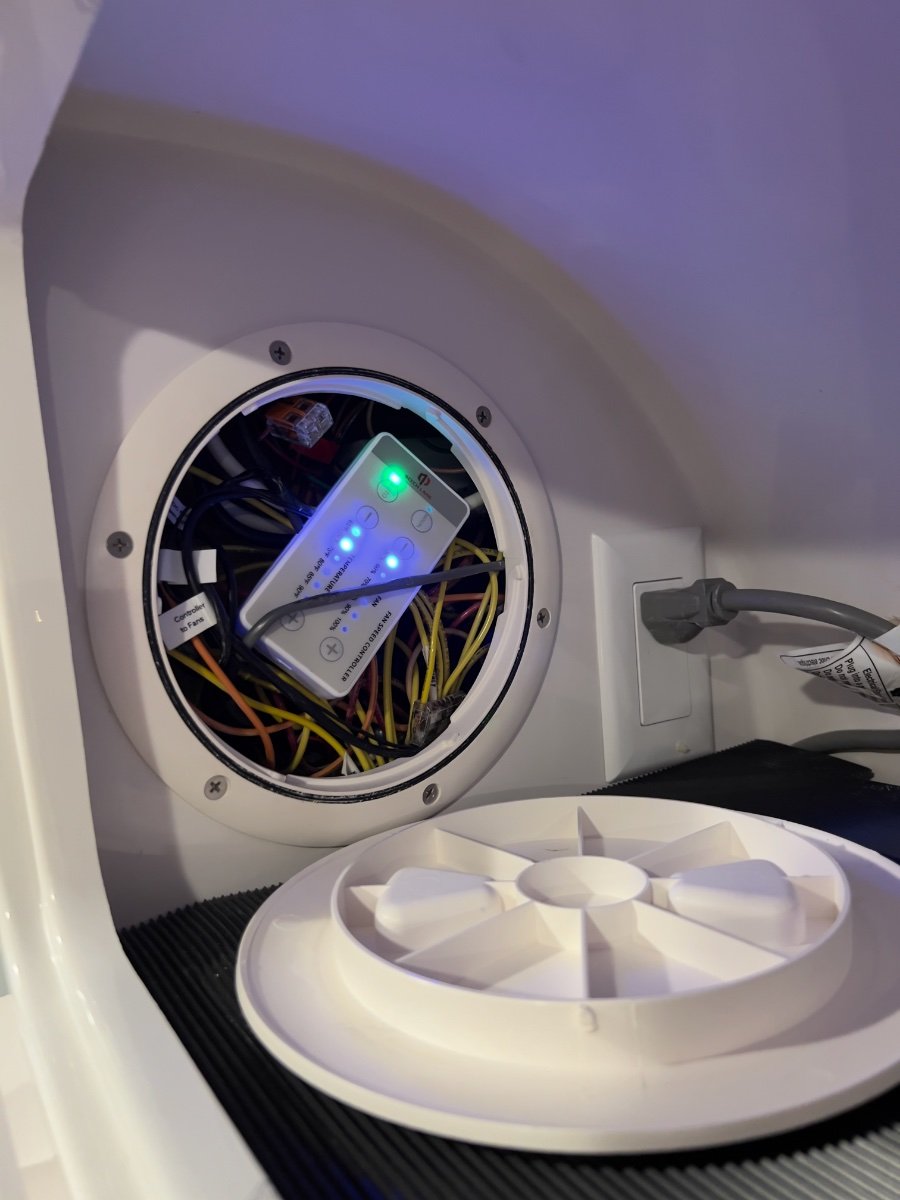
From late May to mid-June my wife and I took a loop trip from our home in Dallas, TX to: Greenville, SC; Asheville, NC; Asheboro & Seagrove, NC and back to Dallas. The trip covered approximately 1900 miles, with significant temperature variation. During the trip we experienced erratic performance by the Norcold Model 412 refrigerator, standard equipment in our 2022 Oliver Legacy Elite II trailer. The refrigerator would not maintain food safe temperatures in either compartment, except when operating on AC current. This problem occurred mostly on the second half of the trip, as daytime temperatures exceeded 90 degrees (F). Especially when in transit, operating on propane or DC current, the refrigerator temperature would climb to approximately 60 degrees and the freezer into the mid 20s. We contacted Oliver Service and made an appointment to have the refrigerator problem assessed in Hohenwald. We later decided not to divert from our trip plans and to deal with the problem when we returned home. Upon our return home to Dallas, TX, on June 20, I began a series of tests with the trailer parked in our driveway. To monitor the temperatures in the refrigerator and freezer, I used an AcuRite Digital Wireless Fridge and Freezer Thermometer, which we had purchased to monitor the Norcold refrigerator and had been using since September, 2022. I also used an Etekcity Infrared Thermometer 1080 to compare readings with the Acurite thermometer. The AcuRite and Etekcity thermometer readings agreed closely. With the refrigerator empty, I recorded the time required to go from ambient temperature to food safe temperatures using AC, DC or propane. Using AC, the refrigerator/freezer would reach food safe temperatures in 6-7 hours (low 40s F for the refrigerator; 0 degrees F for the freezer) with ambient temperatures ranging from 87 to 99 degrees F. Once achieved, when on AC, the temperatures on both compartments would hold in a food safe range. Conducting the same test on propane, the refrigerator and freezer would reach only 62 degrees and 19 degrees F, respectively after more than 12 hours of operation. This test also was done while ambient temperatures ranged from 87 to 99 degrees F. Similar results were observed while operating the refrigerator on DC. I again contacted Oliver Service and was recommended to take the trailer to an authorized Norcold service provider. Blue Moon Mobile RV (Blue Moon) was determined to be the closest available Norcold service provider. I arranged an appointment to bring the trailer to Blue Moon for troubleshooting of the refrigerator. Technicians at Blue Moon confirmed my observations of the behavior of the refrigerator. They also confirmed the cooling function was working properly, since proper temperatures were achieved when operating on AC. They also confirmed the single, small fan located at the rear of the refrigerator was operational, but providing insufficient air flow for the refrigerator to operate properly when ambient temperatures were high. Blue Moon conferred with Norcold technical support on their findings. Blue Moon and Norcold recommended additional fans be installed to dissipate warm air behind the refrigerator. Having anticipated installing additional fans, I had done online research and chose a dual fan assembly from Beech Lane 12V RV Fridge Ventilation Cooling Fan 5.5" (140mm). These fans come with a remote control with which fan speeds and threshold temperature may be set manually or automatically. These fans were installed by Blue Moon in the upper vent opening of our LEII. The 12VDC power supply to the refrigerator was also used to power the fans. The remote control was mounted to the cover over the refrigerator circuit board using double sided tape. The excess length cables provided with the fans were bundled with zip ties and secured nearby, as shown below. Blue Moon tested the operation of the refrigerator following the installation of the Beech Lane fans and reported food safe temperatures were being achieved and held, with high ambient temperatures. On July 19 I picked up our trailer from Blue Moon and returned home to repeat my prior tests to compare results running the refrigerator on propane and on DC. The trailer was parked in the same location in our driveway as previously. After installation of the ventilation fans, using propane, the refrigerator and freezer compartments achieved safe food temperatures in approximately 8 hours, with the refrigerator control set to 7, despite ambient temperatures ranging from 93 to 105 degrees Fahrenheit. Once safe food temperatures were achieved the refrigerator control setting was reduced from 7 to 6 and allowed to run overnight. The following morning both the refrigerator and freezer had slightly warmer temperatures, but still satisfactory for safe food storage. We have not yet had an opportunity to utilize the Norcold refrigerator on a trip to observe how effectively safe food temperatures are maintained when full of food and under changing environmental conditions using the three power sources. Based on the test results using the ventilation fans, I expect the performance of the refrigerator to be significantly improved. We should now be able to use DC to power the Norcold refrigerator when in transit, and avoid the use of propane. Performance running on DC appears to be similar to running on propane. While I was pleased with the significant improvement in the operating temperatures achieved by the Norcold refrigerator, there were three aspects of the installation I chose to change, all related to access to the remote control: The remote control for the Beech Lane fans has very bright blue LEDs which are ON whenever 12VDC power is ON. At night, we noticed a bright blue glow emanating from the lower refrigerator external vent cover. Accessing the remote control to change settings required removing the refrigerator external vent cover. When we store the trailer we typically turn OFF all DC power by turning OFF our lithium batteries. Upon the next use of the trailer, when DC power is restored, the refrigerator ventilation fans must also be turned ON manually. There was no switch to turn OFF DC power to the remote control. To address these issues, I relocated the Beech Lans fan remote control to the interior of the trailer and installed a switch on the control panel located at the entry to the trailer. I chose to have the remote control inside the access hatch in the storage cabinet located over the microwave oven, directly above the Norcold refrigerator. To re-route the cables to the ventilation fans, I had to remove the microwave oven. To install a new switch in the control paneI I had to loosen the panel from the wall. I had to add approximately 10 feet of 20 AWG twisted pair cable (gray) to reach from the new switch on the control panel to the 12VDC power supply at the bottom rear of the refrigerator. The photo below shows the routing of the remote control wires (black) and 12VDC power supply behind the microwave cabinet. I had to drill a ~3/8" hole in the angled MDF panel behind the microwave cabinet, directly above the refrigerator. I caulked around the cables after routing them through the hole and behind the refrigerator. Fishing the wires into the area behind the control panel was not difficult. The yellow Romex appearing at the top of the photo below supplies the AC outlet for the microwave oven. I contacted Oliver Service and ordered a single pole switch (with blue light) to match the others in the trailer control panel. The cost was slightly over $7, including shipping by first class mail. The new switch was installed in an unused location on the control panel which previously had a blank cover. I added crimp on spade type connectors to the twisted pair cable to connect to the terminals on the new switch. Although the new switch is single pole, there are three terminals on the rear with the wiring connections listed below: Ground (dissimilar color) DC Power IN (center) Switched DC Power Out I found the wiring diagram below which shows an analogous circuit. The switch and the ventilation fan remote control both require a ground connection. The Switched DC power terminal is connected to the DC+ power connection for the ventilation fan remote control. The new switch needs a ground connection in order for the blue light to operate indicating the switch is ON. In the diagram a car battery is shown as the 12VDC source. On the trailer, the 12VDC source is located at the bottom rear of the refrigerator. This DC circuit is already fused at the DC power panel located below the rear dinette seat. I chose to locate the Beech Lane fan remote control behind the access panel in the storage cabinet above the microwave oven. I made this choice to avoid having the bright blue LED lights on the remote control illuminating the interior of the trailer. The access panel is easily removed when there is a need to access the remote control, to turn ON the ventilation fans, or to change the fan speed or threshold temperature. The Beech Lane ventilation fans are very quiet. With the auxiliary fans running, the volume of air exiting the top exterior vent is noticeably greater than with the small, single OEM fan mounted to the rear of the refrigerator. We have not yet tried sleeping in the trailer with these fans running. There is no chance of hearing the fans inside the trailer with the Dometic A/C running. They are not noticeable when they are running unless you are standing close to the upper exterior vent. I recommend these fans to anyone having similar difficulty maintaining food safe temperatures in the refrigerator when ambient temperatures are high. Regards, Don
-
We use all three of the items recommended above with our LEI. I recommend all threeI: Andersen Ultimate Gear Kit Be sure to use the wedges under the curved levelers, to prevent your trailer rolling forward after unhitching. X Chocks Be sure to check tightness if you adjust the leveling after installing the X Chocks. Harbor Freight rubber chocks (4X) I place two on each side BETWEEN the wheels, which makes them captive and less likely to scoot. We also use the Camco Yellow Stabilizer Jack Supports, as well as 3 wooden blocks 6" x 4" x 4". The square spacers from the Andersen kit are used on top of the jack supports, in combination with a wooden block, if needed. These items in combination have enabled us to deal with a wide variety of sites, with varying degrees of non-level parking area.
-
@Caddymv kudos on the wind and solar powered towel rack!
-
Correction to my prior post- I purchased 6 sensors
-
I purchased the TireMinder i10 system with 6 sensors (I second the recommendation by @topgun2 to purchase 5 sensors). I am happy with the system, which has a small monitor which I keep in the console of the TV when towing. The monitor sounds an alarm to alert of problem conditions. TechnoRV.com is a good source. On the recommendation of @John E Davies, I also purchased two extension hoses to attach to the spare tires on our LEII and TV, Cheme Extension Hose, Air, 36" (2). In addition, I purchase a pair of valve stem extensions, Mellbree 2-Pack Tire Valve Extension, 90 Degree Schrader Tire Valve Stem Extension. These additions have proven to be quite beneficial, as the spare on the LEII is mounted with the valve facing the trailer body, requiring removal of the spare to adjust the air pressure. Our TV also stores the spare with the valve facing down, requiring removing the spare from its storage well to adjust the air pressure. In both cases this PITA is eliminated by having the extension hose installed with the TPMS sensor at the end and accessible. Don
-
I searched extensively to find a quality propane grill with dual burners and separate controls. I selected a Napoleon TravelQ TQ285 Grill. This grill is currently $295 on Amazon (vs. $319 direct from Napoleon). I managed to catch a sale for $250 on Amazon. This grill has a clamshell style body with porcelain coating and weighs just under 30 pounds. I also purchased a PORTAL Outdoor Folding Portable Picnic Camping Table to serve as a stand for the grill. The table was $80, but now listed on Amazon for $72. Compact size was a critical selection criteria for both the grill and table, since I needed them to fit in a rear mounted cargo carrier. Our tow vehicle is not a pickup truck, but a BMW X5. I did not want to carry the grill within the TV. Upon receipt of the grill, I modified the fuel feed to enable use of quick connect fittings for use with the low pressure propane connections on our LEII. I also purchased a DOZYANT 18 feet Low Pressure Propane Quick-Connect Hose, $25 from Amazon. Below is a photo showing connection for both high and low pressure propane supplies. The high pressure connection is on the right with a 1 lb. fuel container attached. The low pressure quick connector is located to the lower left of the regulator. The red handled valves control selection of the desired propane source. The grill is shown with its folding legs extended. This setup has proven quite satisfactory. The grill easily reaches any temperature you would reasonably need for cooking. The grates are cast iron. There is also a griddle available for one side, which we have not purchased. This grill lives in our rear mounted carrier, with a Champion Dual Fuel generator (also configured to use the low pressure propane connections on our LEII). See the packing arrangement below, including stabilizer bases, chocks, etc.. P Prior to using the grill, I line the interior with aluminum foil. The grill comes with a grease catch pan under the center, which I also line with foil. The aluminum foil is easily discarded after use. I scrub the grates with a grill brush and wipe them with paper towels. I also wipe out the grill interior to remove any grease prior to storing the grill back in the cargo carrier. We don't notice any odors from the grill following this procedure. I highly recommend this grill. Don
-
John, I also am sad to hear of your declining health and the impending sale of Mouse. You have alluded to health issues and your expectation they would lead to this point. I too learned a great deal from your informative posts. The documentation of your modifications is first rate. I have always been impressed by the thoughtful designs and the very high caliber skills evident in the fabrication of your modifications to Mouse. I thank you again for reviewing and commenting on my design for a rear mounted cargo carrier. Your imprimatur gave me confidence to proceed. I wish the best for you and your family. Thank you for your substantial contributions to the Oliver community. Don
-
@Billsarvis I added a rear mount cargo carrier to our LEII. A bike rack could easily be mounted in the same manner. See: Regards, Don
-
Window Vent Mod- Louvered Ventilators- Fabrication Lessons Learned
dhaig replied to dhaig's topic in Ollie Modifications
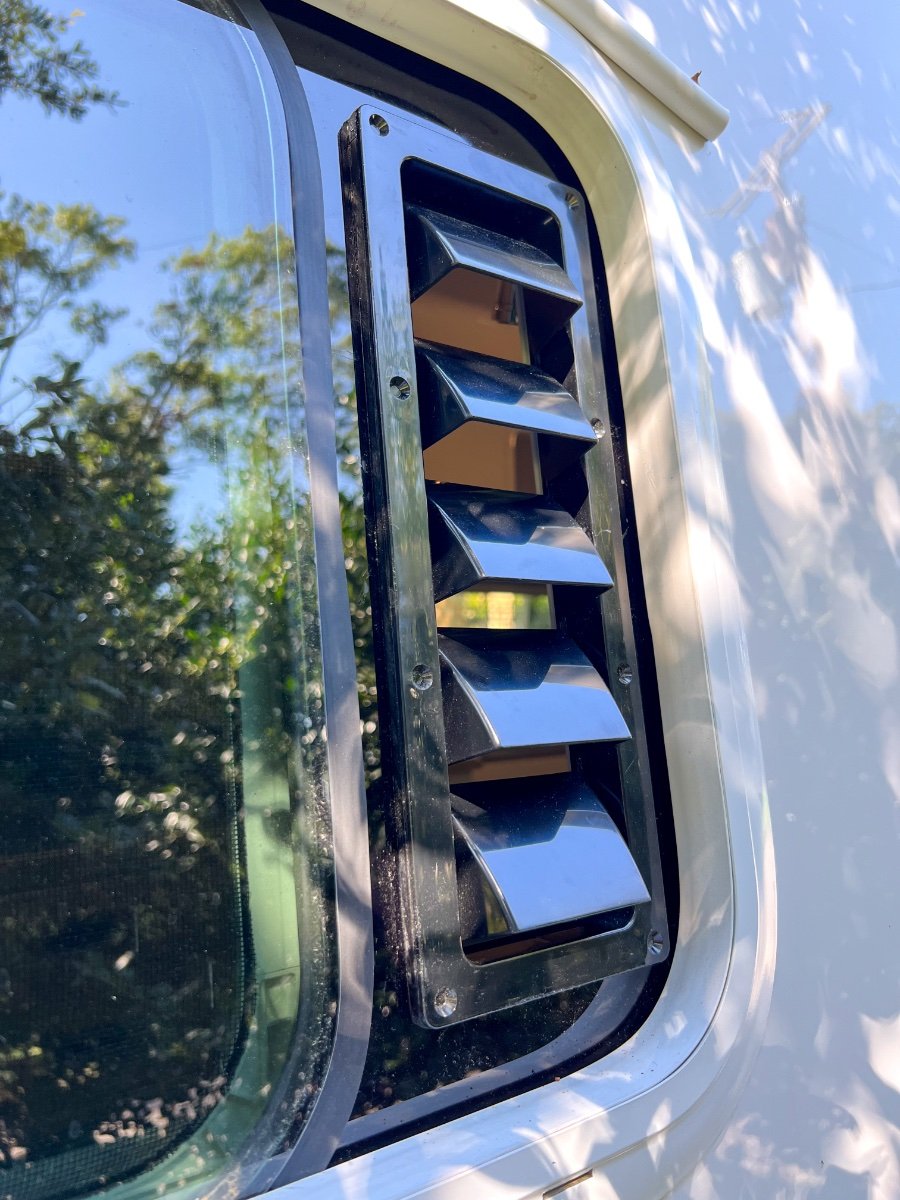
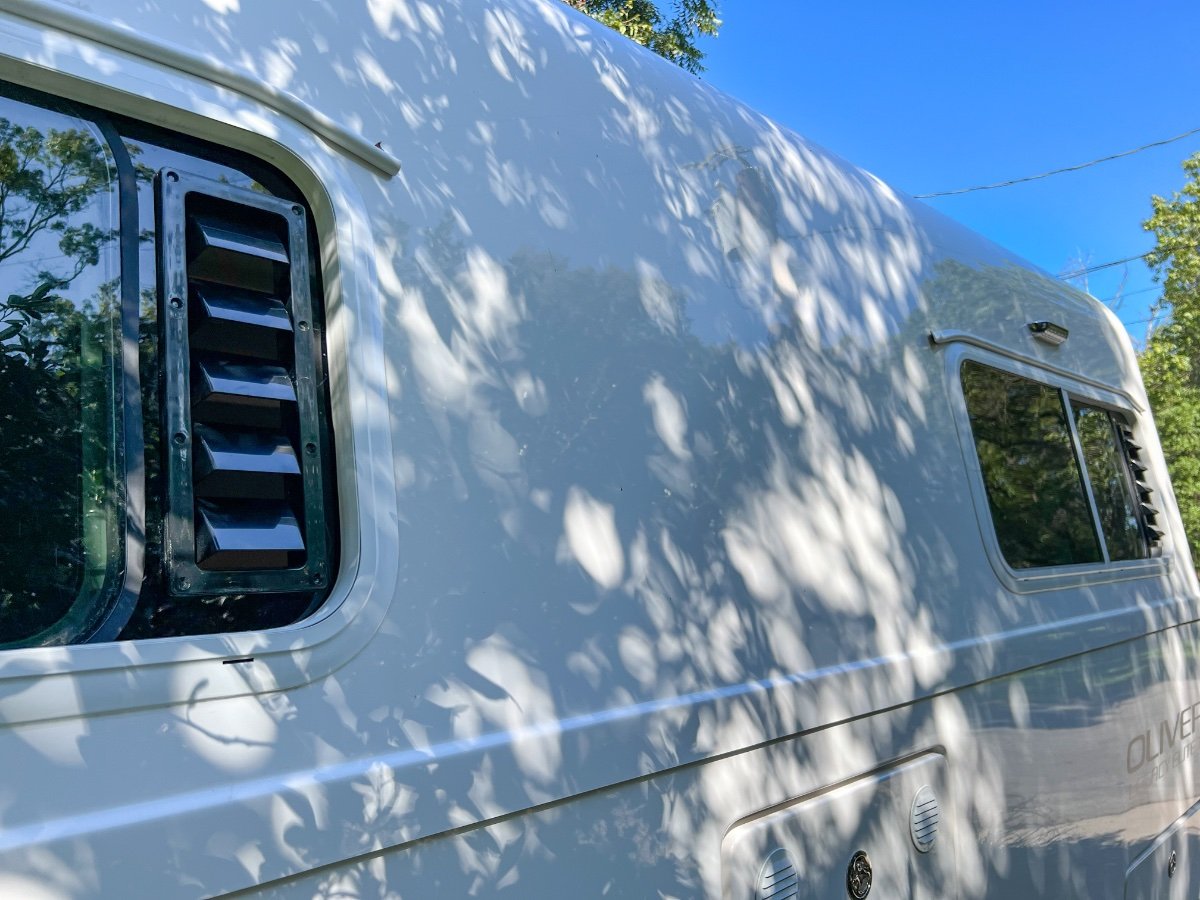
@hobo, my apologies. Please see photos below. Note the screens are not in the fully closed position in some of the photos. As I mentioned, there was some variability on the edges of the sliding windows, however, the rubber edge trim conforms reasonably well to close small gaps between the mounting plates and windows. How effective this is in preventing water penetration remains to be seen. I anticipate we will have opportunities to conduct field tests during our trip to Colorado over the next 2-½ weeks. I would not rule out the possibility for the vents to be mass produced, but I have not had any opportunity to test them across model years of LEII trailers. The most critical dimension to control is the depth to which the rear of the louver vent projects inward, toward the sliding screen, before there is interference. There is space above and below the mounting plates. The vertical position of mounting plates is determined by the match of the upper and lower curves of the mounting plate fit with that of the windows. I have no idea how much dimensional variation there might be in windows installed by Oliver over the model years.
-
We had what appears to be the same experience as @Steve and Cindy following delivery of our LEII. Water ran down the wall below the windows to pool along the edge of the beds. Their description of the leak matches what we saw. We returned to Hohenwald, where Oliver Service resolved the problem. They reported a butyl rubber seal had not been installed by the manufacturer of the windows. Oliver installed the butyl seal and returned the trailer to us within about two hours. Since this corrective measure was taken we have NOT had any leaks from the windows, nor elsewhere. Our Hull is #990. I suspect there was a batch of windows with this problem in common.
-
Window Vent Mod- Louvered Ventilators- Fabrication Lessons Learned
dhaig replied to dhaig's topic in Ollie Modifications
@Brian and Brandelyne, thanks for the kind comments. I was concerned that I had caused you alarm about the degree of the ventilation problem. I don't think it so serious it should cause concern over your pending delivery. A bit of a nuisance with available solutions. I apparently gave you the impression I have owned multiple trailers. I have not. Our Oliver is our first RV. Not having had any prior experience with RVs, I did a lot of research before selecting our Oliver. A significant factor in our selection of our LEII was the information provided on this owners' forum. The postings appeared to me authentic, with no apparent influence by the Oliver organization, including postings of both criticism and praise of the product. The participants in this forum have been very helpful in my RV education. I was also quite impressed by their ingenuity in making improvements and modifications to their trailers. I try to return the favor. Don -
Window Vent Mod- Louvered Ventilators- Fabrication Lessons Learned
dhaig replied to dhaig's topic in Ollie Modifications
@Brian and Brandelyne As you have likely seen in the comments, ventilation during rain is an issue to some owners and not to others. I offer the follow comments based on our experience owning our LEII since mid-February. Since I have expended my time and about $50 on the louvered ventilators, you can count me among the owners who want better ventilation capabilities. The week we took delivery there was constant, heavy rain in Hohenwald and surround areas. We also encountered heavy rains between Hohenwald and Dallas during our 10 day return trip. Anytime there is more than light rain water can readily enter partially open sliding windows. There were several nights when we had opened the windows slightly open (3-4 inches) for ventilation and were awakened by heavy rain and water entering the cabin through the open windows. This is especially noticeable when the open window is above the bed where one is sleeping. We have only a curb side awning, which I have tried extending 1-½ to 2 feet when rain is falling (or expected) to shelter the partially open curb side window. When the awning is extended this short distance it generally prevents rain from entering the partially open window. However, a large quantity of water accumulates in the awning. I had expected the rainwater to run off the ends of the awning, but this was not so. I was alarmed to see how much water was held by the awning and became concerned it would damage the awning. Our awning also has a motion sensor, which will automatically retract the awning if winds are moving it. We have had the awning retract during thunderstorms. During another trip, we were camping in western NC, near the Blue Ridge Parkway. We had left our dog in the trailer while we went hiking, as she was not permitted on the trails. Rain was not expected and temperatures were mild, so we left windows partially open on both sides of the trailer. About 2 hours later an intense thunderstorm appeared. We had small umbrellas with us, but still got rather wet. Upon returning to the trailer, we found wet beds from rain entering the windows. On the same trip, we were camping at Paris Mountain SP, near Greenville, SC. We received heavy rain a couple of nights we were there. So we have become cautious about having windows left partially open. I had read many comments on the forum about the need for ventilation to prevent condensation. We have used the Maxx fan and the bathroom fan to help circulate air in the trailer. When operating these fans, fresh air must enter from somewhere and the trailer has few places to admit any significant volume of outside air, hence opening windows becomes necessary. Consequently, not being a keen on sleeping in a wet bed, I was very happy to see the forum post by @csevel with her clever solution for providing ventilation, especially during rainfall. Thus, I decided to follow the louver ventilator design to have a solution available for a problem I expect to encounter regularly. The cost was relatively low and the solution appears likely to improve ventilation, with lower risk of rain water entering the cabin.. I agree that the sliding windows on our Oliver are more likely to admit rain water when opened than are awning type windows, which tilt out from the bottom. The tilt of our sliding windows further aggravates the problem, as there is no protection from rain falling directly on the lower part of the windows. Also, I have read many forum posts about the need to keep the weep holes along the lower window track clear to prevent water accumulating in the window tracks and spilling into the cabin. I have also read more than a few forum posts about various over window awning/hood designs by Oliver owners. I suspect many of these designs result from experiences similar to ours. There are also many forum posts about Oliver owners installing EZ Gutters over the window, as I also recently installed. I can think of no reason to install these gutters over the windows than to reduce the amount of rain flowing over the windows. I was aware of the vulnerability of the Oliver sliding windows to water entry prior to placing our order. The risk seemed manageable. I was also aware through my due diligence research before our Oliver purchase of very significant water leakage problems common to most RVs due to structural integrity issues. The Oliver construction, with no major seams on the roof appeared to me likely to prevent most of the water leakage issues experience with other brands. I have found reports of water leaks in Oliver trailers to be quite rare. If Oliver offered a choice of window styles, sliding or awning, I would likely choose awning, assuming that option was also double pane insulated glass, which I understand most are not. I am not aware of any Oliver trailers ever having awning windows. This was not a deterrent to our ordering an Oliver trailer. We are happy with our purchase. Regards, Don -
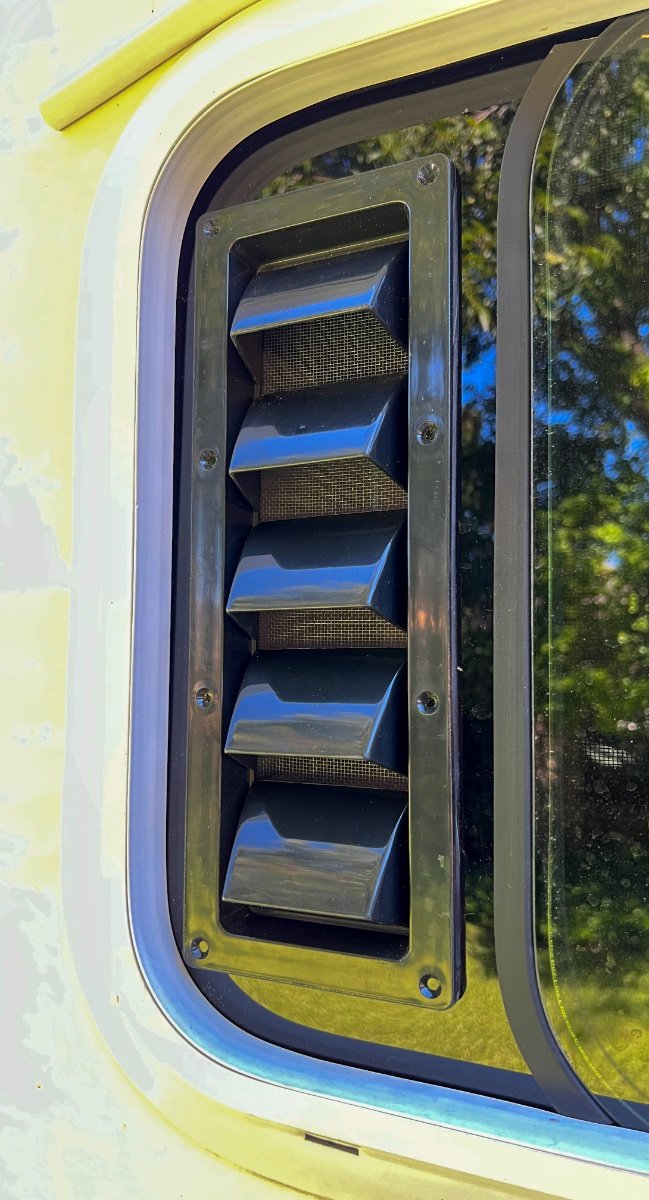
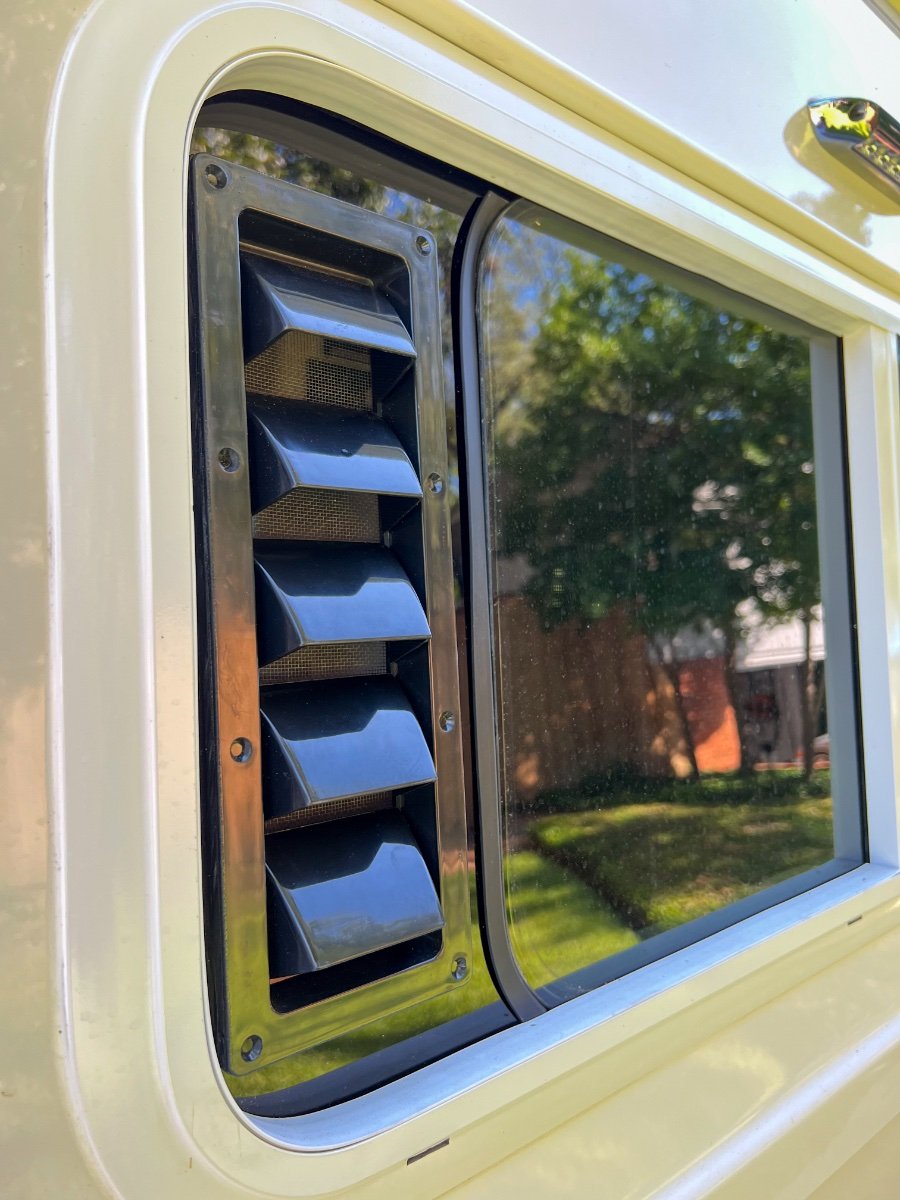
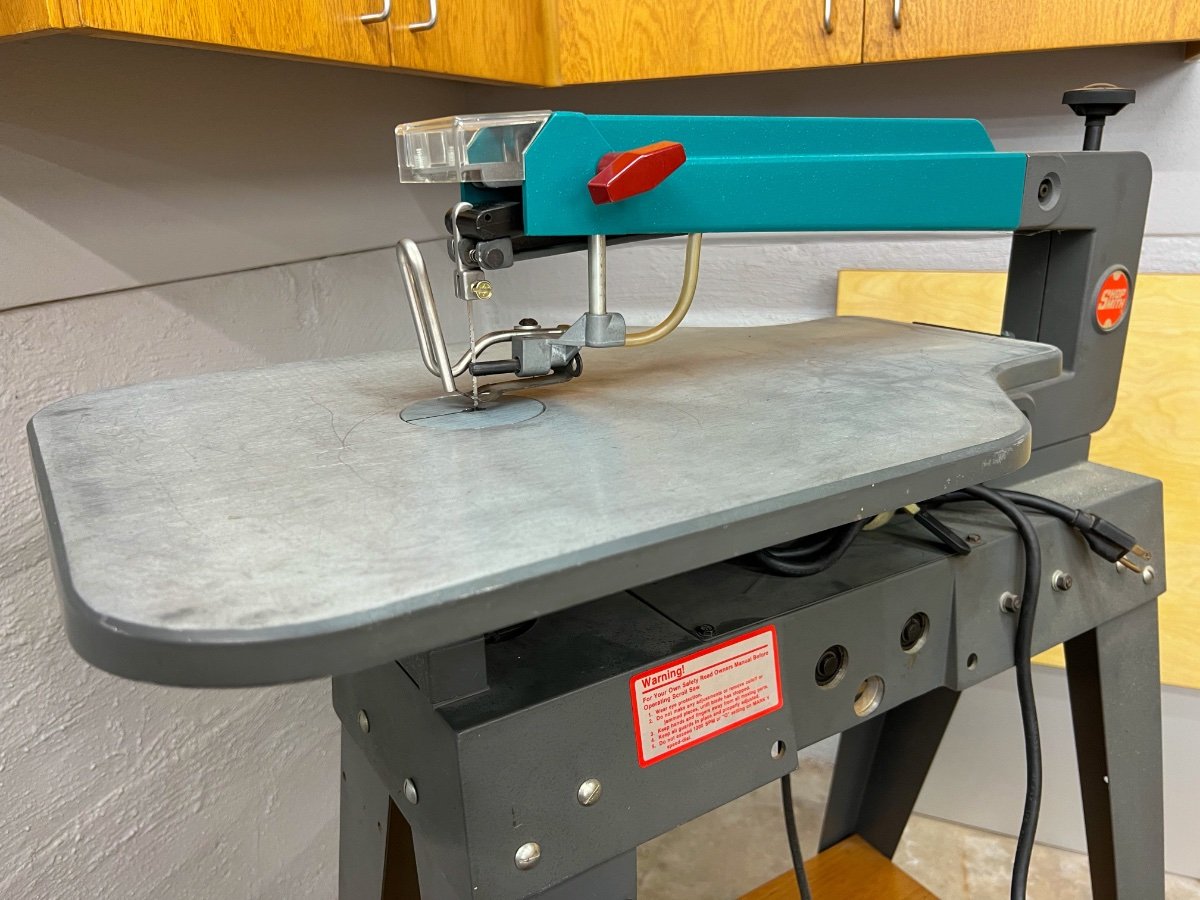
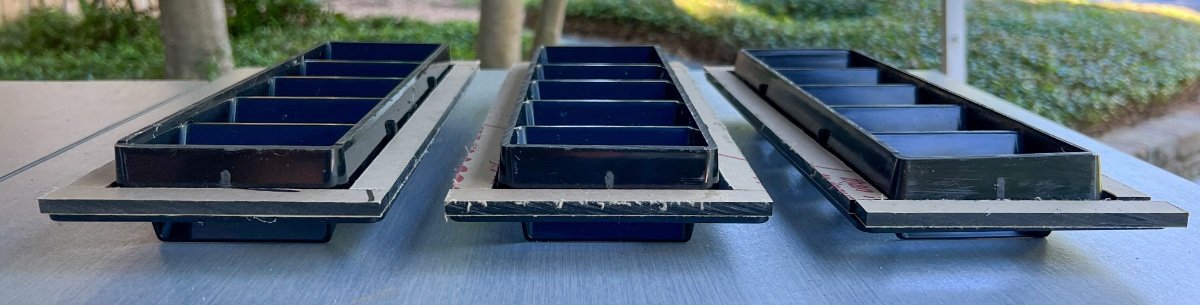
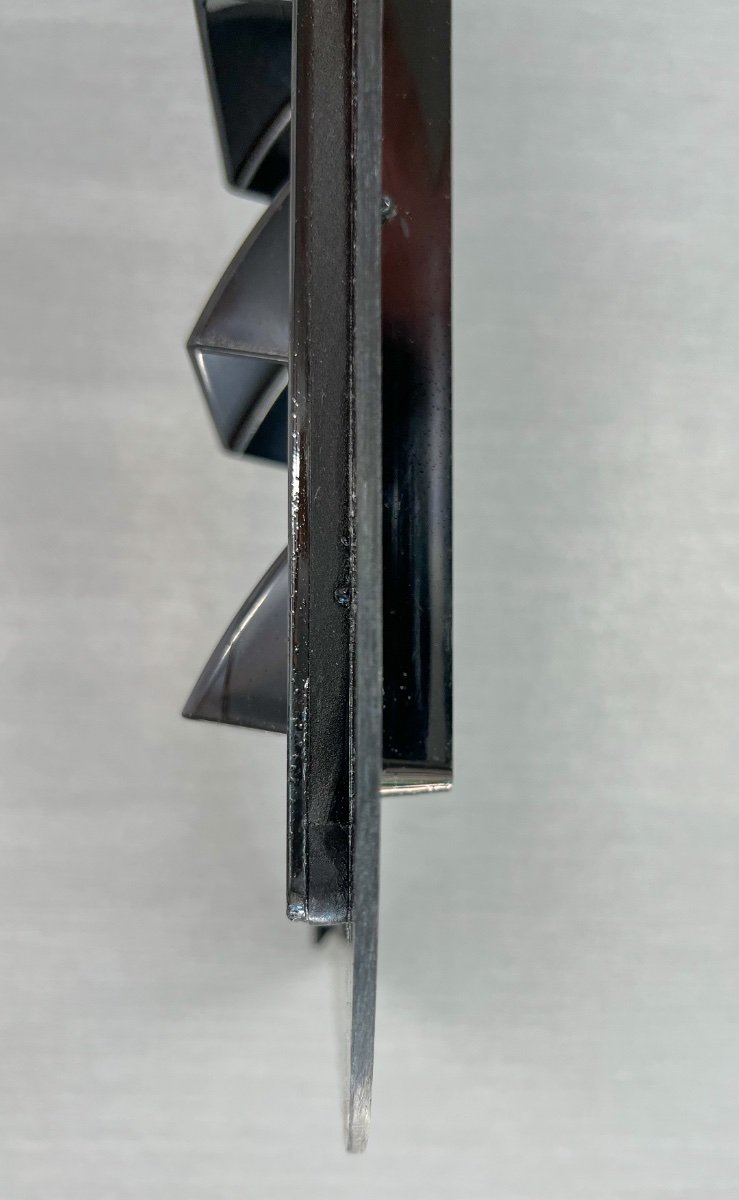
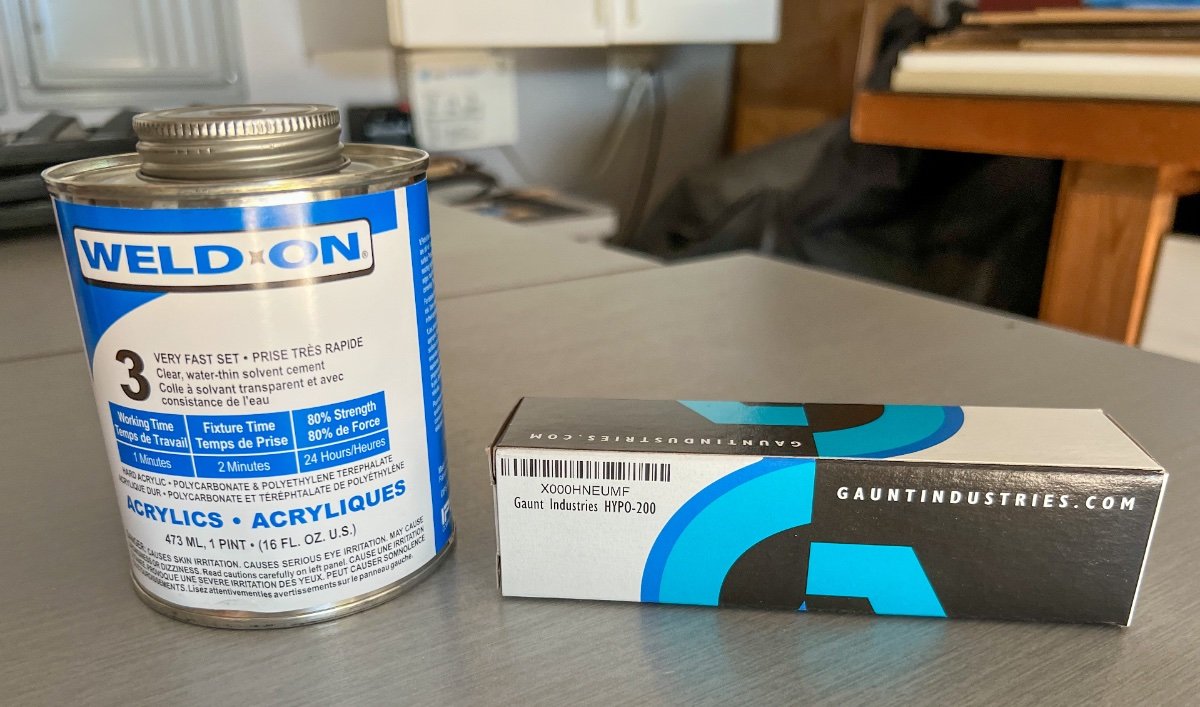
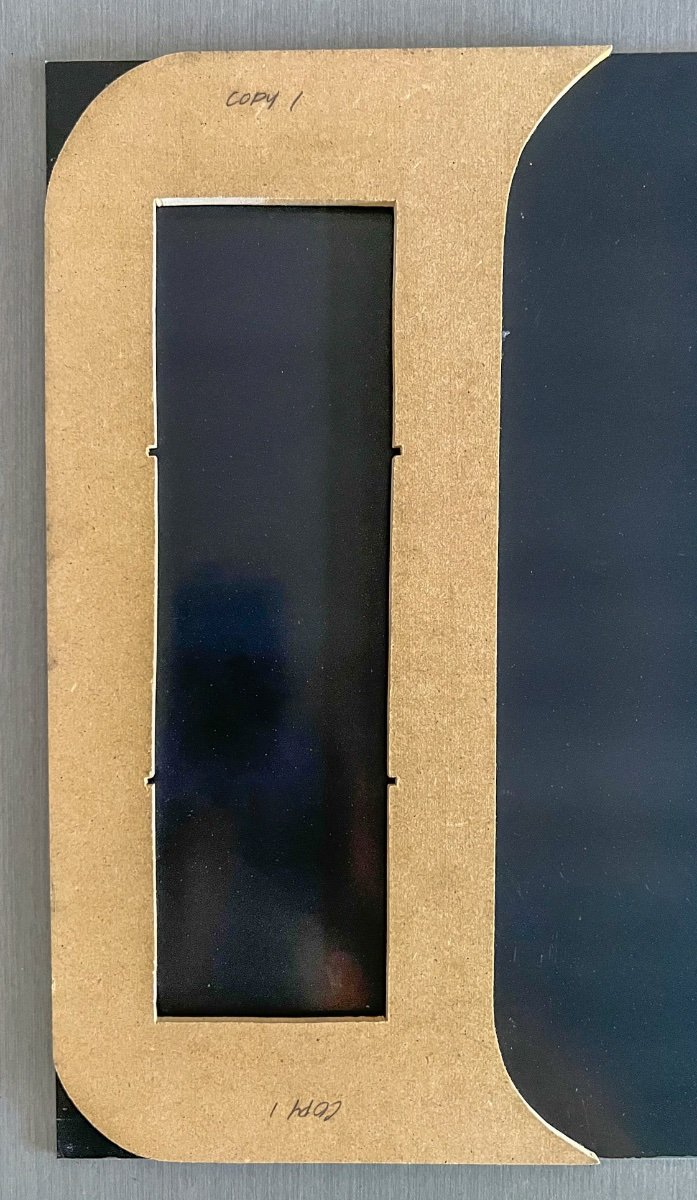
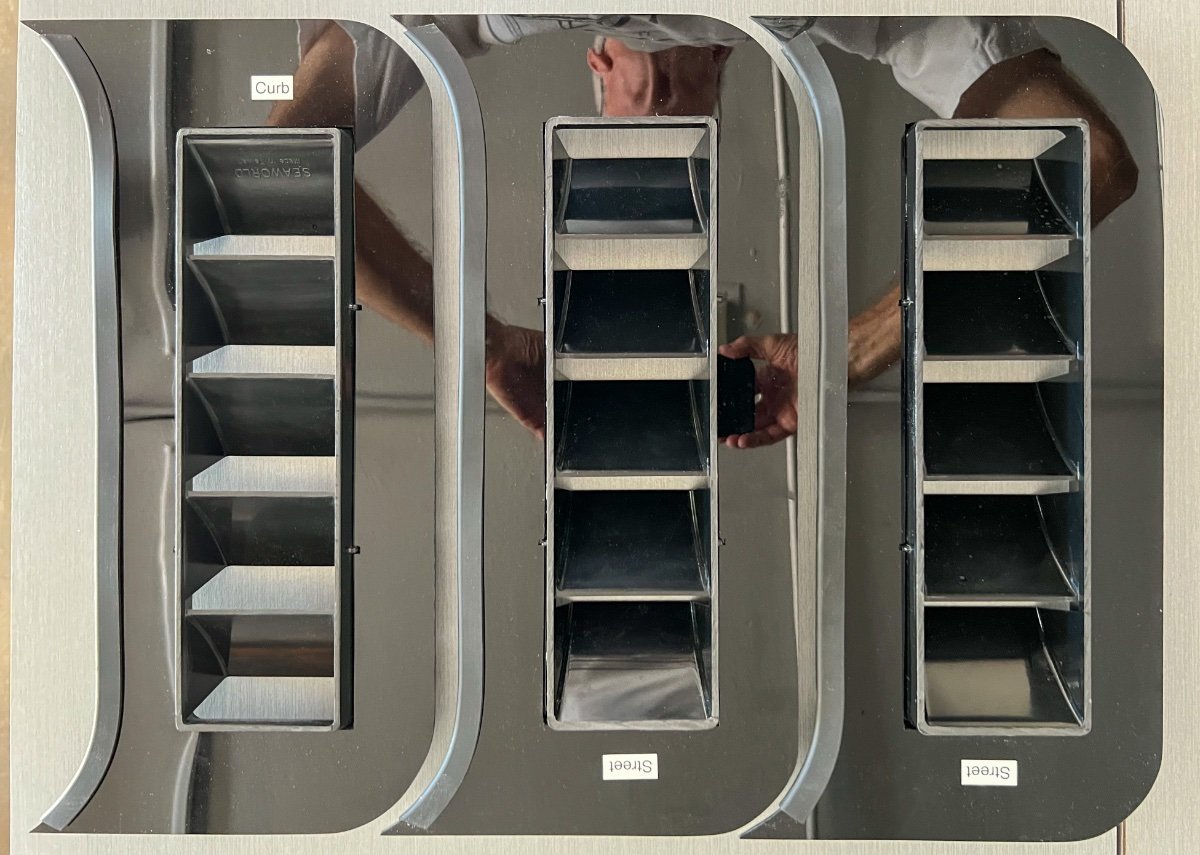
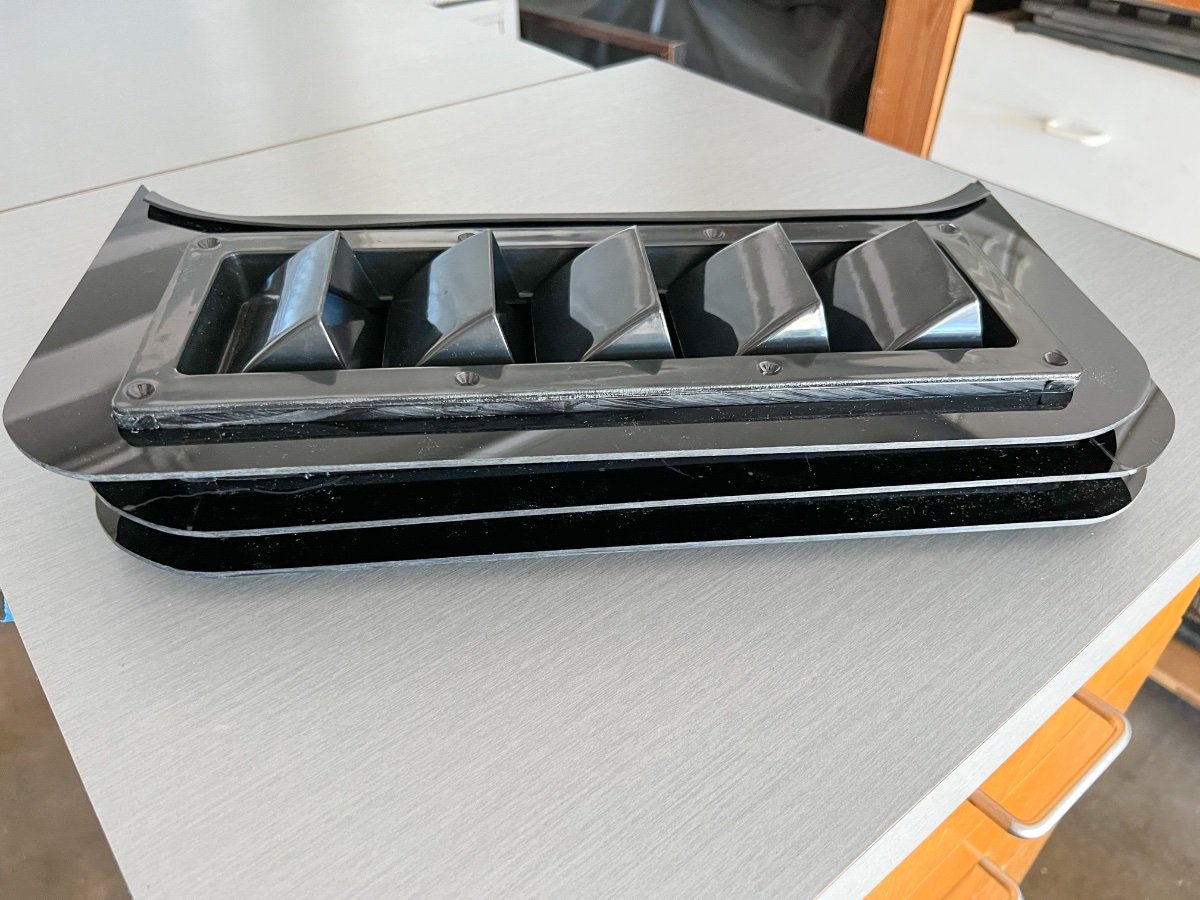
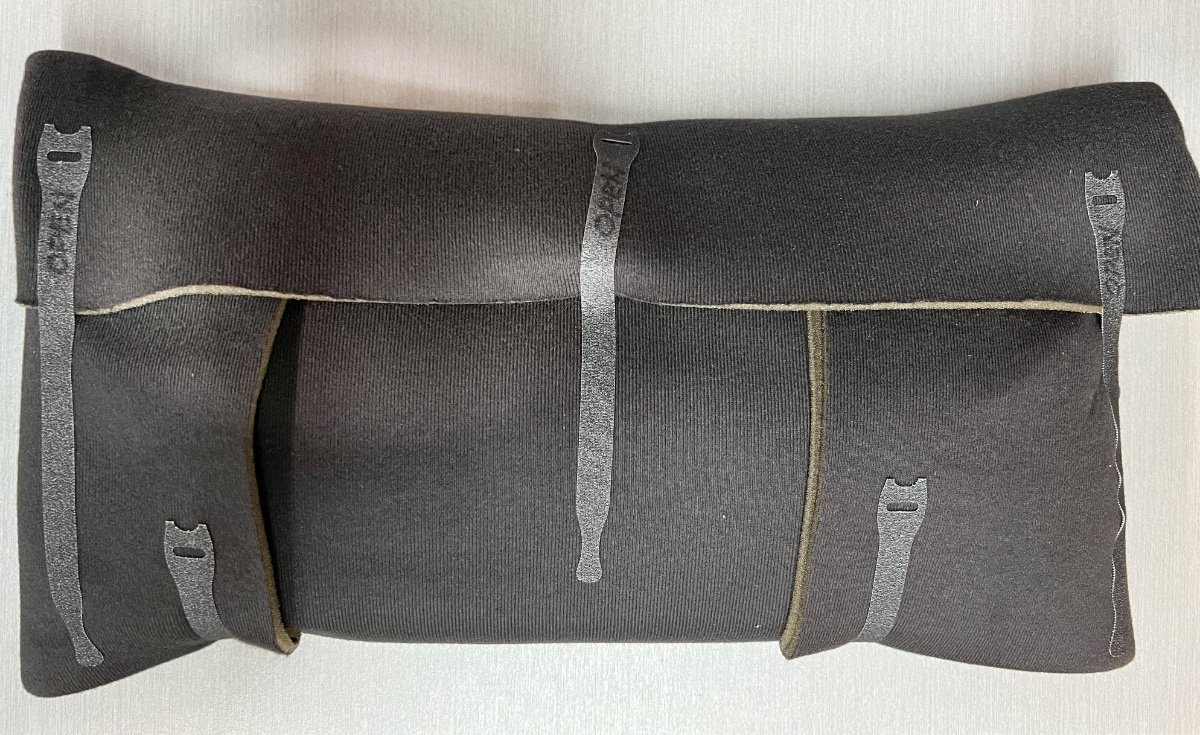
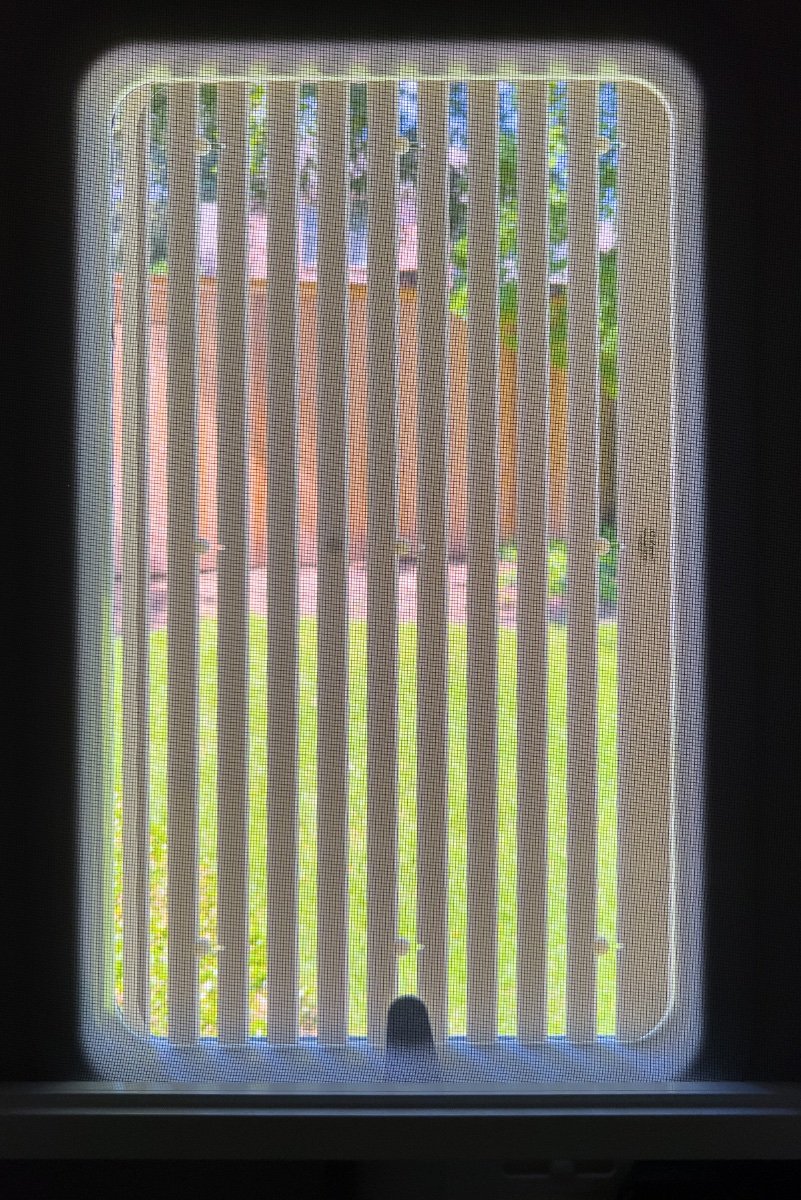
I recently undertook fabrication of a set of louvered ventilators for the three side windows of our LEII, following the excellent design posted by @csevel. I want to share some lessons learned for others who may want to fabricate a set for their Ollies. The window vent consists of two main parts, a purchased louver ventilator and a custom made acrylic mounting plate, shaped to fit a partial window opening, into which the louver is mounted. I executed the fabrication a bit differently from @csevel. Since I wanted to produce a set of three louvered ventilators, I made a template using 1/4" medium density fiberboard (MDF) for the mounting plate. I, too, used one of the window screens as a guide for the edge contours of the template to match the sliding windows and frames. The final mounting plate template is 16-3/8" tall and 6-5/8" wide at the midpoint. The rectangular opening is 3-½" wide x 12-1/16" tall. After tracing the screen contour for the vertical edges of the template, I clamped the window screen to the MDF and used the screen as a template for my router to follow, to cut the shape. Cutting external edges of MDF template I had purchased the White Water Plastic 5-Slotted Louvered Ventilators from Amazon, although they are now shown as unavailable. I recommend searching for other sources, such as West Marine. It appears the same product is sold under multiple brand names. I used one of the purchased louvered ventilators to determine the size of the rectangular opening required in my MDF template and centered the outline for the opening. Note the rear of the louvered ventilator is tapered, so the opening needs to be large enough to accept the entire rear projection through the MDF mounting plate template, with the flange of the louver meeting the mounting plate. The rear projection also has two reinforcing ribs on each of the long sides and one each on top and bottom, which require notching the sides of the opening for clearance. To cut out the rectangular opening in the MDF template, I first tried to use my router, but found it very difficult to control the router and tried various guides, unsuccessfully. Achieving accurate cuts freehand with the router was also very difficult. In retrospect, using a router table to cut the opening rectangle would not be too difficult if done with straight outer edges, prior to cutting the outer edge curves. Frustrated by my lack of skill with the router, I switched to using a scroll saw to cut the rectangular opening in the mounting plate. This requires drilling a starter hole inside the rectangle, then inserting the scroll saw blade. The scroll saw proved very useful in making accurate cuts to make the MDF template. I tried to cut the rectangular opening as accurately as possible, which was relatively easy to do. If a scroll saw is not available, I recommend using a high quality hand held jigsaw as another option. After cutting the outer curved edges and rectangular opening in the template, I sanded the edges smooth and inserted one of the louvers into the template to test for fit. I used blue painter's tape to hold the louver in the template while testing the fit in the window opening. Test fitting the MDF template and louver I inserted the MDF template and louver into the window opening to verify the curved side abutting the window fit closely, with as small a gap as possible. I made slight adjustments to the template with a belt sander mounted upside down on a work table. I also verified the template could be inserted into the window track while inside the trailer, without requiring removal of the window shades or screen. While inside the trailer, position the mounting plate and louver through the window opening and tilt the top topward the upper screen track. The mounting plate is first inserted into the upper track of the screen, then placing the bottom of the plate into the lower window track, then moving the top of the mounting plate from the screen track into the window track. Sounds confusing, but works easily after a few tries. When the mounting plate template is inserted into the window track and pressed against the window edge, there is space above and below the plate and the window track. Once the mounting plate template is in the window track, it should be lifted slightly as the window is moved to shut against the plate. This should result in the curved edges of the mounting plate mating closely with the curved outer edge of the window, top and bottom. Closing the window against the mounting plate secures it in place, seated against the vertical edge of the track and the edge of the window. After several trial fittings and minor adjustments to the template, I was satisfied the template mounting plate would fit snugly to minimize the chance of water leaking in at the junction with the window. I did all of the trial fittings on the street side window above the bed. Only then did I test the template in the other two similar windows, which is when noticed the edges of the three windows are not uniform. The street side aft window had some black sealant projecting from between the two panes of glass. On the other windows, the sealant material does not extend from the edge of the two panes of glass. When fitted against the outer pane of glass in each of the three windows, the mounting plate template proved to be a snug fit, when carefully inserted. As a final test of the fitment of the mounting plate template, I tested to verify each of the window screens would close. Initially, they would not. The rear of the louver ventilator projects one inch from the rear of the front flange, causing interference with the screen and preventing its closure. Since the louvers do not have any screen built in to prevent entry of insects, operation of the standard window screens is essential. @csevel indicated her screens would close with the louver in place. I suspect my louvers and hers may not be exactly the same depth. Or, since our trailers are five model years apart, there may be differences in our windows. My solution to resolve the screen interference issue was to reduce the rear projection of the louver ventilator 3/8" by: Removing 1/8" off the rear projection of the louver ventilators using a table saw; Fabricating spacers from 1/4" thick acrylic sheet to insert between the mounting plate and the front flange of the louver ventilators. Removal of 1/8" of depth from louver ventilator 1/4" Spacers dry fitted to rear of front flange of louvered ventilators In the photo above, all three louvered ventilators have had their depth reduced by 1/8" and 1/4" spacers dry fitted prior to cementing in place. The spacers are 9/16" wide, surrounding the rear projection of the louver ventilators. (The protective paper coating is still in place on the spacers in the photo.) Side view of spacers bonded to rear of the flange of a louver ventilator The spacers were bonded to the rear of the flange using acrylic cement applied using a small application bottle with a needle applicator (from small box in photo below). After dry fitting, I cemented the spacers to the louvers, starting with the top and bottom, while the side spacers were in place loose, without cement. After the top and bottom spacers were firmly cemented, I cemented the side pieces. I found using spring clamps to hold the spacer pieces in place worked well while the cement set. I test fitted the louver ventilators inserted into the template mounting plate to verify the interference problem with the screen was resolved. The screens cleared with very little space to spare. Fabrication of Mounting Plates Having completed the mounting plate template, I next made a copy of the template, also from 1/4" MDF, as a backup in the event I damaged the master template. Making a copy also served as a dry run for routing the acrylic sheet. Using double sided woodworking tape. I fastened the template copy to a sheet of 1/8" black acrylic sheet, in preparation for cutting the first mounting plate. (Use the woodworking tape sparingly- 6 pieces 1 inch in length is sufficient. Otherwise, it can be difficult to remove, with adhesive left behind.) MDF template on acrylic for routing From experimentation cutting scrap acrylic sheet with the router, I had found the router bit would quickly melt the acrylic sheet. To avoid melting the acrylic sheet, I removed the excess acrylic material from around the template and the rectangular cutout, leaving only 1/16" to 1/8" of material to be removed by the router bit. I was then able to obtain smooth edges following the template for final trimming with the router. With the template attached by woodworkers tape to the 1/8" acrylic sheet, I used the scroll saw to cut the acrylic, keeping the saw kerf 1/16" to 1/8" away from the template. This freed the first piece of acrylic from the larger sheet and removed excess acrylic material from around the template. I mounted my router, with a 1/2" flush trimming bit, to a small router table. I then proceeded to trim the remaining acrylic sheet from around the template, both the outside edges and the rectangular cutout. After routing the first mounting plate, I repeated the same steps two more times, attaching the template to the acrylic sheet, trimming away the excess material using the scroll saw, then making the finish trimming using the router mounting in the table. When I had routed all three mounting plates, I lightly sanded the edges of the acrylic mounting plates to remove the sharp edges. Assembly of louver ventilators to mounting plates The louver ventilators with spacers attached are dry fitted to the mounting plates. Once satisfactory fit is verified, the parts are ready to be cemented using the acrylic cement. NOTE: The louver ventilators for the Street side windows are oriented opposite those for use on the Curb side. Position the mounting plates properly to abut the windows and insert the louver ventilators with their louvers on the outside and the louver openings facing down. I found it easiest to start by cementing one of the short ends of the louver ventilators to the mounting plate, using a couple of spring clamps to hold the parts together until the cement formed a firm bond, which takes about 5 minutes. Proceed to cement successive sides of the louver ventilator to the mounting plate, one side at a time, applying spring clamps until the cement cures. Use the needle applicator to apply cement at the intersections of the parts. Allow the cemented parts to cure overnight. The acrylic cement is very effective at welding the acrylic parts together, producing a very rigid assembly. Completed set of louvered ventilators and mounting plates After assembly, I added the same rubber edge trim recommended by @csevel to the edge of the mounting plate which meets the window edge. This trim seems to conform well to close any gaps between the windows and the mounting plates. The completed units are quite rigid and nest reasonably well. I set the width at 6-5/8" for two reasons: To yield three mounting plates from a 24" x 24" sheet of acrylic To keep the mounting plates and louvers as small as possible to facilitate storage in the trailer. I made a pouch to contain the louver ventilators to make it easier to store them without concern for damage to them or to other parts of the trailer. I had leftover car headliner material, which is relatively thin, with a foam backing, to which Velcro straps readily attach. Summary This project, which I first thought rather simple, provided several challenges. I spent much more time than expected to achieve an acceptable result. Given the extended drought and high temperatures in Texas, I have not had an opportunity to test the effectiveness of the vents, nor how well they keep rain out. In a week we depart for a two and a half week trip to Colorado to photograph fall color. I expect we will encounter some test conditions in the mountains. I hope this information is useful. Please feel free to contact me with questions. Regards, Don
-
Opportunity for a FREE ZARCOR door window upgrade!
dhaig replied to hobo's topic in General Discussion
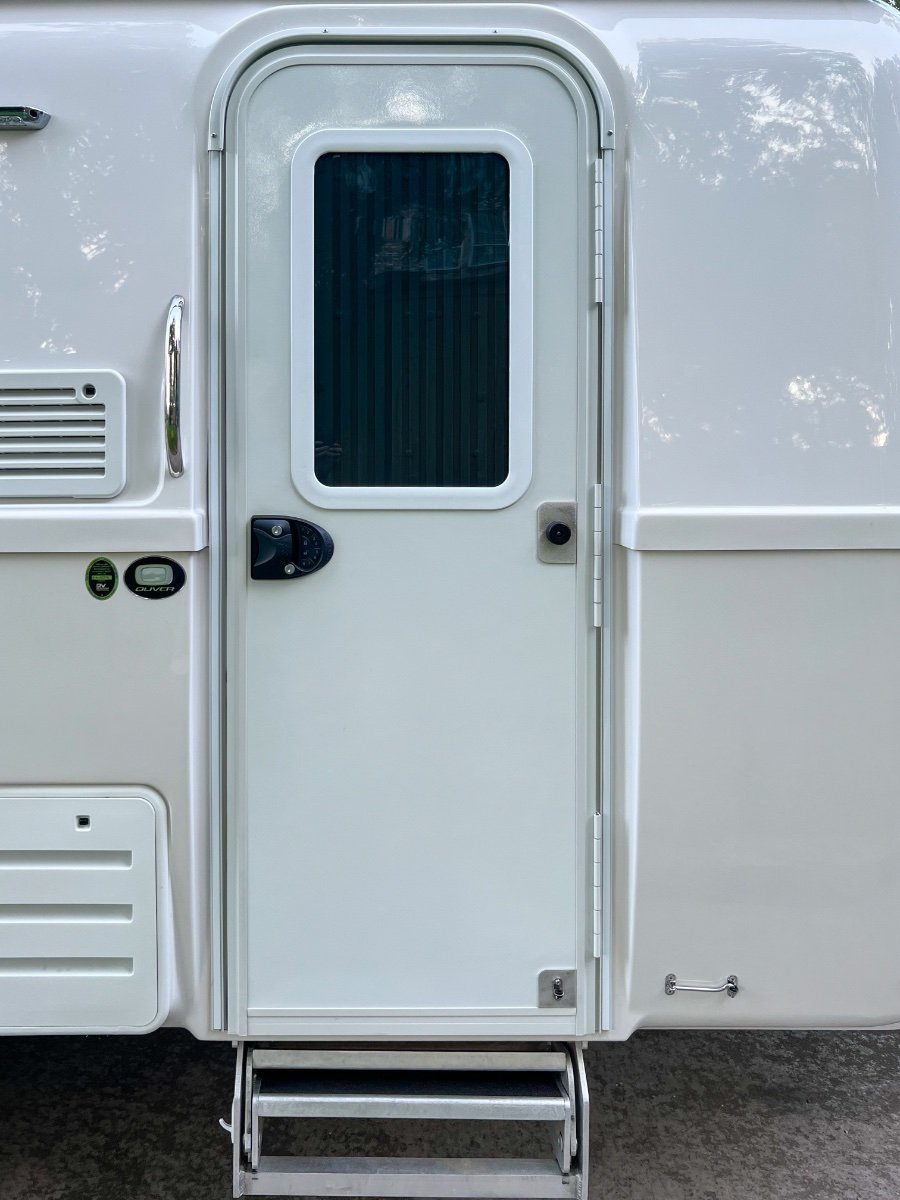
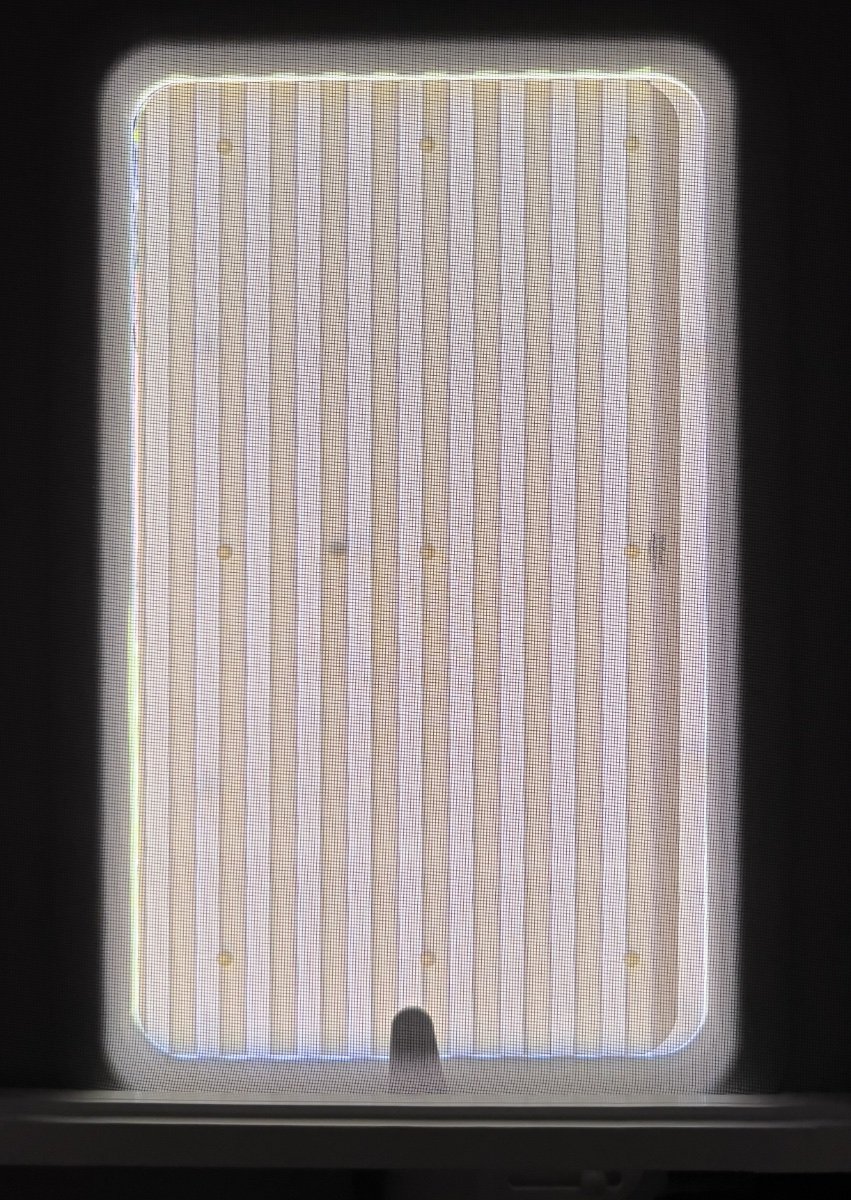
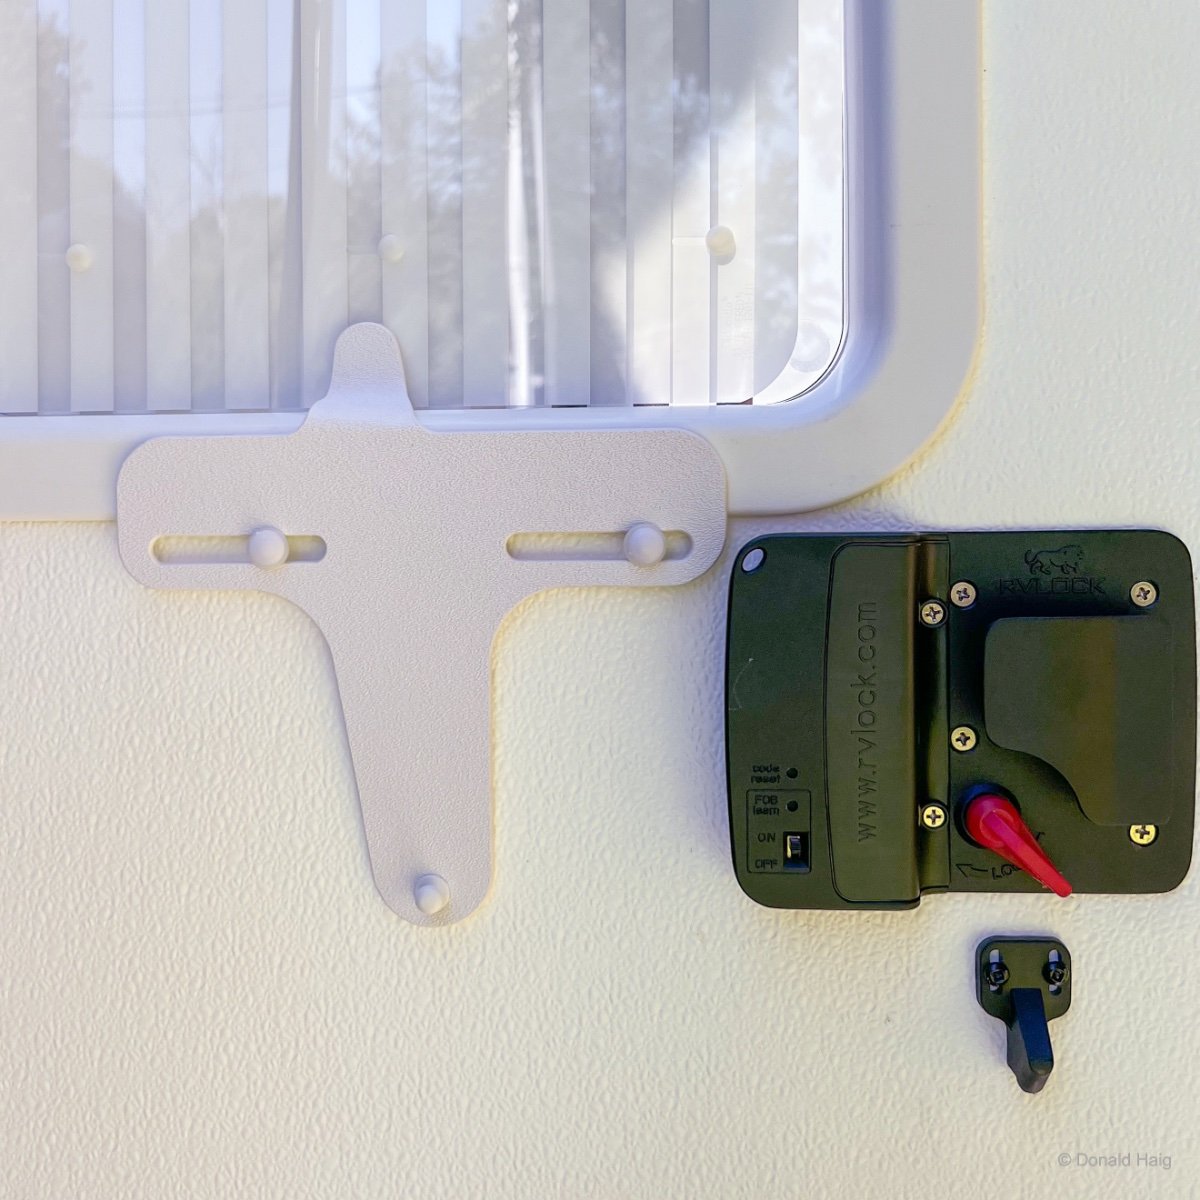
On Friday, I took our LEII to the Zarcor Solutions facility in Addison, TX (a burb north of Dallas) for installation of a tinted window for our entry door and Zarcor's Closures Shutter Blind and the video recording of the installation. John Harder, President of Zarcor, had previously sent me a sales receipt showing the cost of the parts as $149.00 and installation labor of $120.00, for a total of $269.00. The sales receipts also showed a discount of $269.00 for allowing Zarcor to use our trailer to make an installation and sales video. Thus the cost to me was $0.00. John's team demonstrated their experience by carefully removing the inner trim from our entry door to remove the standard textured glass. I had previously seen photos posted on the OTT Forum where the fastener tabs which retain the inner trim had been broken during removal. Javier, the primary installer, carefully inserted the plastic release tabs into the slots around the inner trim. Several fastener locations could not immediately be released. Javier's experience became evident as he continued to work the release tabs until all of the fasteners released, undamaged. The RVLock 4.0 which I had installed post delivery had to be removed to permit access to the slots to free the fasteners on the lower right corner. Once the inner trim was removed, the textured glass was easily removed and the new clear, tinted glass inserted, with new sealing caulk around inside of the frame. The outer window trim was not removed, retaining its factory seal. Once the tinted glass was in place the Clozure Shutter blind, consisting of two sheets of acrylic, was fastened to the inside of the glass with small Velcro disks. Each acrylic sheet is coated with vertical white stripes approximately 3/4" wide, alternating with clear stripes. The acrylic sheet against the glass is fixed, while the other sheet slides approximately 3/4" left/right to open/close the shutter. Moving the acrylic sheet causes its white stripes to cover the clear areas of the fixed acrylic sheet, preventing light from entering. A plastic handle attaches to the movable acrylic sheet and rides on two screw mounted glides to move left and right. The two acrylic sheets which form the shutter are easily removed for cleaning. A minor interference problem was encountered, with the open/close handle not able to move fully due to the position of the RVLock. Zarcor will modify the handle slightly to eliminate the interference issue and provide a replacement handle. The entire installation, with video recording, took approximately one and a half hours. We are pleased with the new window and the operable shutter. We now have visibility through the window in the entry door and a means of controlling entry of light to the cabin. The tinted window closely matches the other windows in the trailer. During the day there is little or no visibility into the cabin through the new tinted glass. At night, with lights on in the cabin, there is some visibility from the outside. With the shutter closed there is no visibility into the trailer and nearly all light is blocked. Although we have owned the trailer a short time, we quickly learned the textured window admitted a lot of light from the early morning sun. It also admitted light at night from nearby campground lighting. These problems are solved by the Clozures Shutter Blind. The Zarcor team indicated the processing of the installation video would take a couple of weeks before it is posted to the Zarcor website. I will post an update when the installation video is available. Below are photos from the completed installation. Exterior view of door with shutter blind open Interior view of closed shutter blind Interior view of open shutter blind Handle to slide shutter blind open/shut (RVLock 4.0 on right) Regards, Don
- 32 replies
-
- 10
-

-

-
@roguebooks, from your description, I would venture you have a low voltage condition, with the AGM batteries below 3.0V, or your batteries are disconnected. The 601 code appears if either condition occurs. I knew my batteries were disconnected, since I had turned OFF all three of my Lithionics lithium batteries. As soon as I turned the batteries ON, normal conditions were observed. Good Luck. Don
-
Yesterday, I retrieved our 2022 LEII from storage to prepare for a trip. When I placed the trailer in storage, two months ago, I turned OFF the three Lithium batteries, but neglected to turn OFF the Zamp Charge Controller. With the batteries OFF, the charge controller flashes code 601, indicating battery disconnected or less than 3.0V. I reviewed the 2022 Oliver Optional Features Manual, Abnormal Operation Mode table, page 402. Page 399 of the same manual shows the wiring connection, with two large gauge wires connecting to the batteries. The trailer was in a fully enclosed storage unit with no windows, during which time the Zamp Charge Controller display apparently flashed the code "601" the entire time. I completed the Proper Lithionics Restart/Reboot sequence specified in a Technical Service Bulletin issued 3/3/22 by Oliver, which does not involve any changes to the charge controller. Once the three Lithionics batteries were ON, the charge controller displayed the battery condition as nearly fully charged, essentially at the same level as when placed into storage. Cabin lights, brake and signal lights, stabilizer jacks and electric brakes all appeared to be operating normally, so I proceeded home with the trailer in tow. From this experience I conclude the Lithionics batteries must not fully turn OFF when their ON/OFF buttons are pressed, even though the indicators show the batteries to be OFF. The charge controller does not appear to have any other source of power, nor do I see any mention of an internal battery. Also, the solar panels were receiving no sun light and could not produce voltage to power the charge controller. I had not disconnected the solar panels from the charge controller. Thus, I assume the battery management system must continue to supply power to the charge controller, but NOT provide any charge to the batteries when they are in the OFF state. The charge controller also must have very low power consumption to display the "601" error code, with no significant consumption of power from the batteries over two months. Has anyone else made a similar observation? Can anyone provide details on how the charge controller and the Lithionics batteries interact when the batteries are OFF? I am still learning the characteristics of the Lithium Pro solar power system in our trailer. Thanks, Don