

Wayfinder
-
Posts
364 -
Joined
-
Last visited
-
Days Won
1
Posts posted by Wayfinder
-
-
Yeah, I tried two industrial bearing companies here in Augusta, GA, and they almost chuckled. No, they have no clue.
I will check with the local camper centers too. They certainly should know.
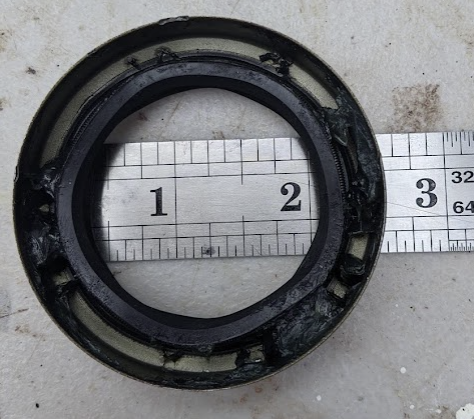
I was able to get NAPA to cross reference one, but it's a bit thinner than what I took out. This was cross referenced with a Dexter 01003600 Grease seal. NAPA called it an oil seal. They are short on parts too. Parts right now might be difficult to get.
I even have a call into Oliver. Nothing back from Mike yet.
Hey, if you all have so many extras, what is the part number of the seal?
A direct link to the seal at reputable site online would be great too. Maybe I'll call eTrailer. If this is so damn easy, and a common axle, then why does no one knowing the part part number? Oh wait, I am in Georgia, that might be it. Smack!
Angry eyes are going to put on soon.
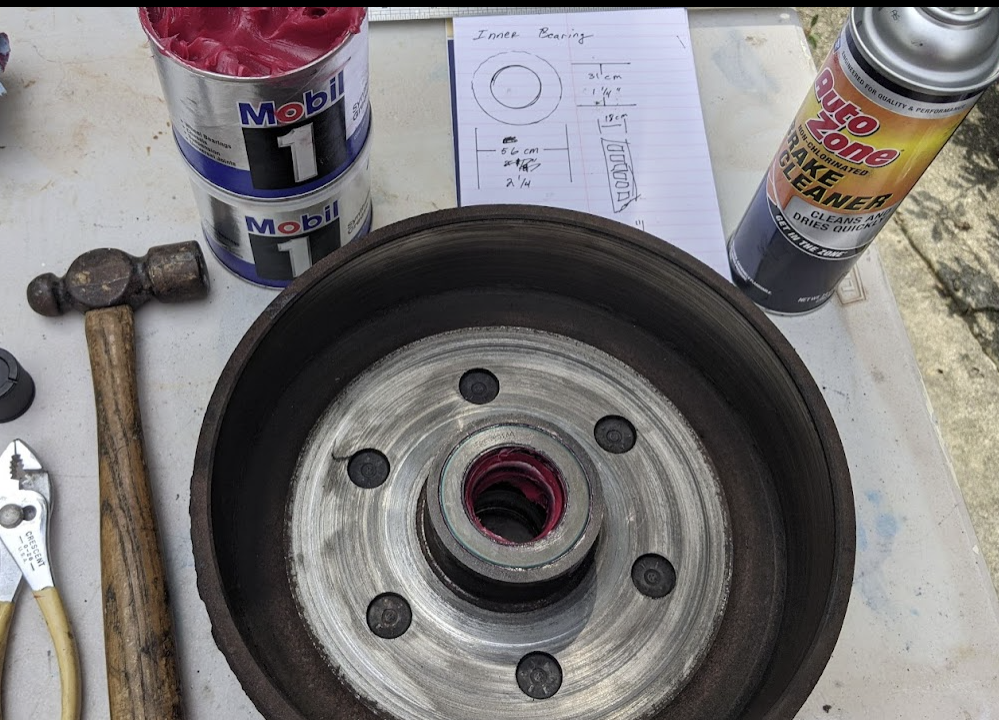
This is NAPAs reference. Which is only 1/4" compared to the 1/2 inch thick seal I took out. Also the original seal I took out. what not much grease in the seal. The seal felt better made too compared to what I took out. Again, I will only do this one set just to get the hub back together. I was kind of fun. I've not done this stuff since the 80s.
A bearing packer would save lots of time and ensure they're packed as good as one can do.

Everything looked and felt good (smooth). I got to this job just in time.
Shaft looked and felt great too.
-
 1
1
-
-
This thread has great information. Thank you. But, I do not see specific part numbers for JUST the seals AND from trusted vendors. This will be my first time packing my bearings on this trailer.
I will likely pick up the BK2-100 bearing kit, either from Dexter themselves or the RedLine brands which @topgun2 listed. I did inspect one set of bearings so far, to get an idea of their overall condition. All looks well enough, but definitely in need of new grease. I'll see if I can find the Redline CV-2 grease locally. I only have 7 days before I leave my current location and now afraid of driving too far. At least it's not the hot summer. I was monitoring the hub temps on the way from NC to GA. All hubs remained cool on the 5 hour trip. But it's time to pack the bearings.
I'm looking forward to doing it, but would like to ensure the correct seals first.
I cannot purchase this on Amazon, but is this correct?
This is should be correct, right? It seams that these axle parts are somewhat common and interchangeable between different brands, like Lippert and Dexter for example.
http://www.dexterpartsonline.com/product/BK2-100
Or this Redline
Will these seals be right for 2016 EL-II?
I was really bummed when I discovered I have NO zerk fittings anywhere on the trailer. Not even on the hubs. I see upgrades are needed.
Details on these parts with options will certainly help all the new buyers out there.
It would be great if Oliver themselves added videos to their University training pages, just for repacking the bearings; since it's so important to do and needed so often. Oh sure, there are tons of videos on the subject on YouTube, but being specific to Oliver and the different axles they might use would be great. Especially with part numbers listed. I found no paper work on the axles in the mounts of manuals that came with the trailer. These types of videos would ensure Oliver stays at the top of the list in regards to high quality and customer-focused.
Thanks again folks!
Chris
-
Great ideas.
Also, while Wayfinder is in my so-called dry-dock this month for minor repairs and clean-up, I've been pushing air through the hull with a fan on the passenger-side bed area hatch, and keeping both dinette hatches open for exhaust, all windows are open. This is in hopes of reducing some of the inner hull odors. The good thing is it's not musty, just odors of older plastics, glues, and fiberglass, etc. It's dry as a whistle otherwise.
I may have some fiber board around my GA house. I certainly have plenty of extra Reflectix and 1/8 inch thin plywood. It's free and would make for a nice light-weight platform.
Chris
-
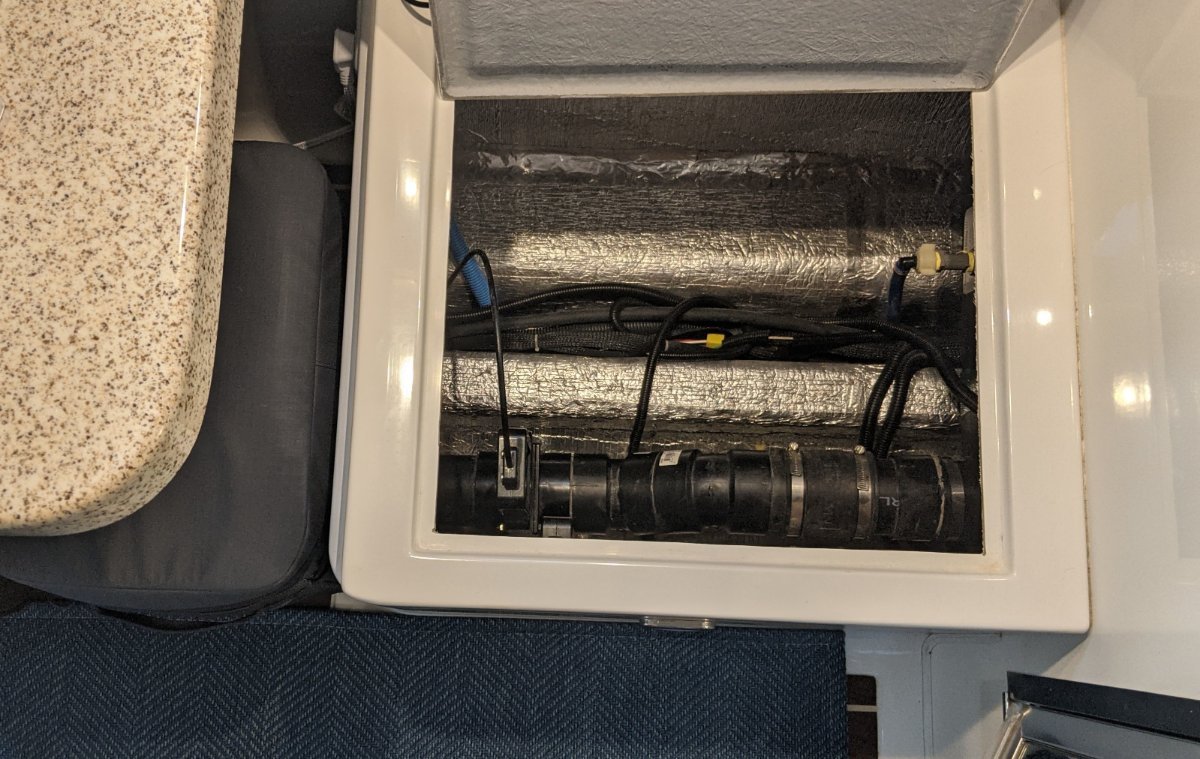
Has anyone come up with a safe and reasonable solution to use the front-most area under the dinette site, next to bathroom? I'm nervous to put anything in there due to the one inlet line going into the black tank. Also, due to the mild odor in the hull, (not nasty, just different), all I can think of is storing soft, seasonal clothes in two heavy duty outdoor garbage bags, or a vacuum sealed bag.
I just don't want anything moving around in there, and should be very soft. I was considering doing a mod of a nice pull-out box or bin of sorts. Maybe a soft cooler, like the one under the table in this picture. Again, I would want to keep that sealed in a heavy plastic bag too.
Ideas and threads are welcome.
Thanks,
Chris
-
Thanks Bill, that was going to be one of my next questions. Mud flaps. Awesome.
-
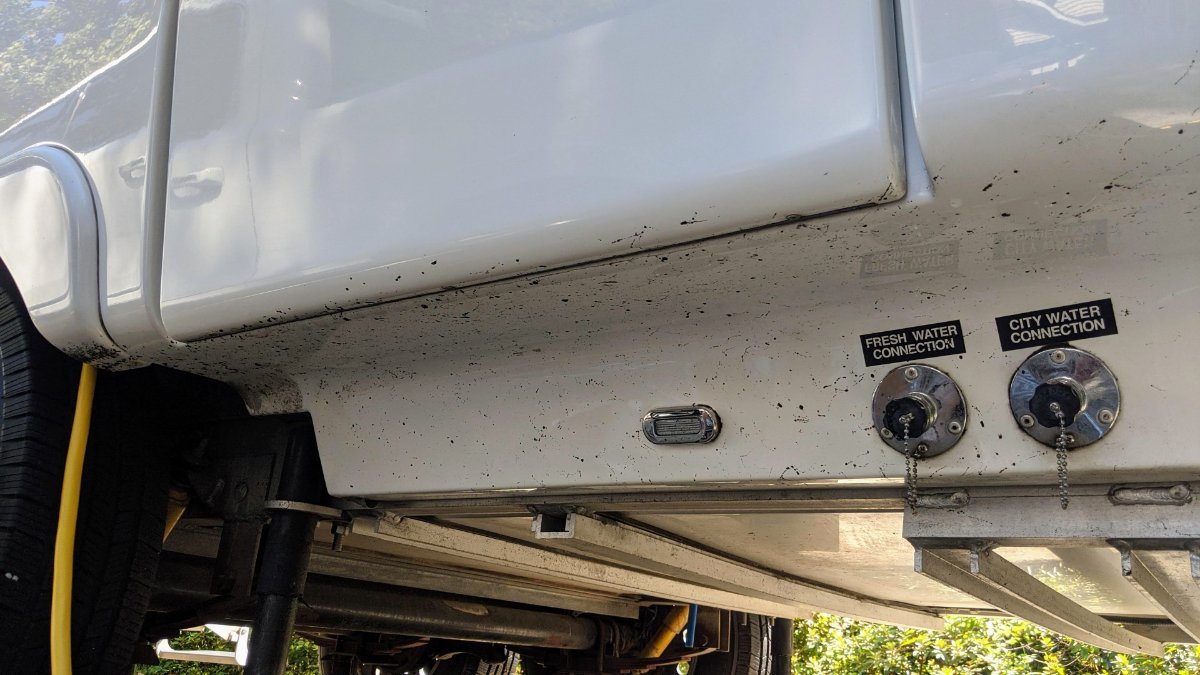
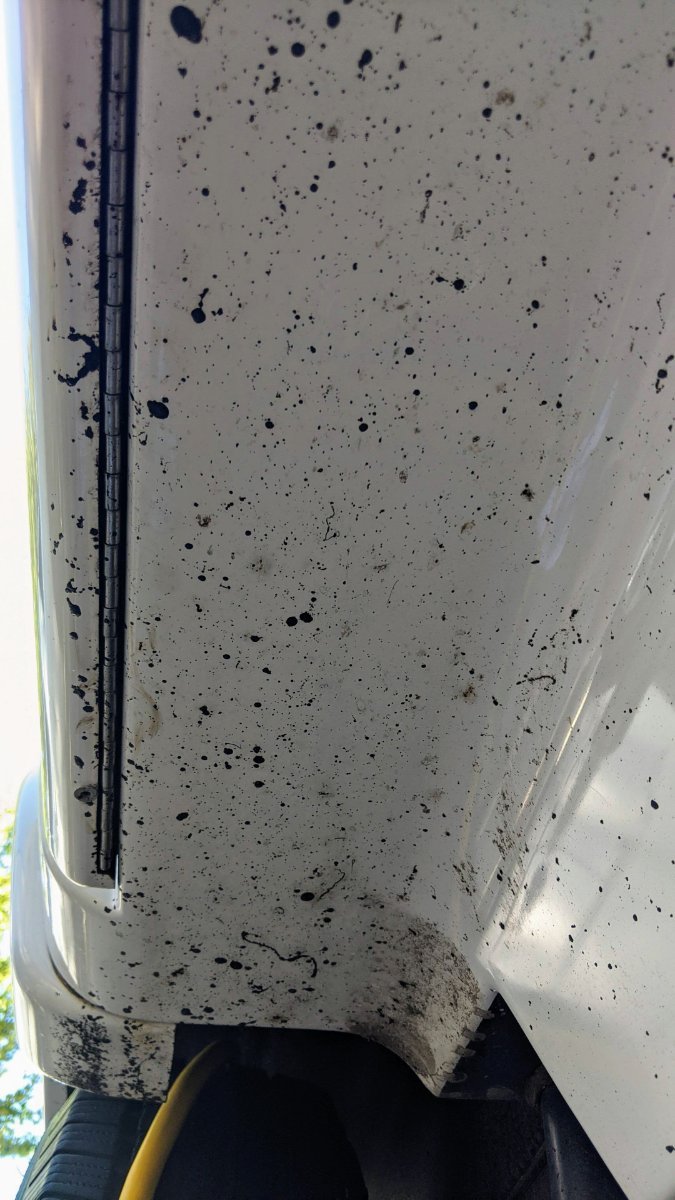
@John E Davies That 3M cleaner is the best. It did not take much elbow grease, time, nor cleaner to complete the rear area, rims, and fenders. I doubt I even used 1/4 of the can. I spends less than an hour. Amazing stuff, but must use it outside, in a breeze, with a fan. LOL
The marks on the clean pics are pits from road debris. I can see black Rhino-liner in the future for the lower portion of the hull.
Q: Has anyone protected the lower hull with Rhino-Liner like material? Would like to see pics of that.
#110 is coming back to life. I'm thinking of these next few weeks as Wayfinder is in dry-dock for repairs and clean up, which basically, it is. Great weather here in GA this week.
Here are some before and after shots. Thanks a bunch, again! The starboard side not nearly as bad.
-
 3
3
-
 1
1
-
-
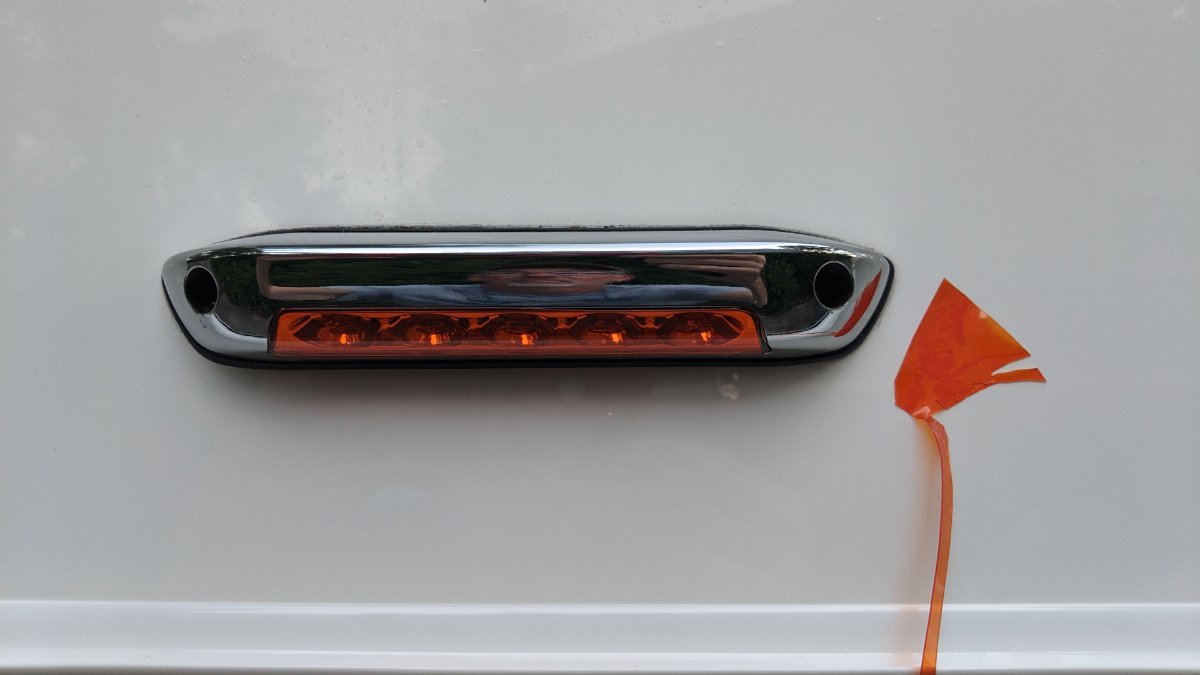
I just put on this material on the entry way lights, on the LE-II 2016. Real simple. The material is quite thick and rubbery with one sticky side. The directions said it was forgiving to move around a few times, and not to touch sticky side, duh.
I put it on at night, not a great idea, BLINDING. But, the bugs that were there when I started, seemed not so interested in the lights after application of material. At least the GA bugs.
I chose the Amber (orange) color. It is NOT too orange with the light on. It's a subtle change (not a drastic orange glow at all). Quite nice.
I "might" have had enough to do all four thin lights on the LE-II, but I would have had to cut VERY precisely. There is not a lot of material. I only wanted to cover the entry lights anyway.
https://www.sailorsams.com/ITC-RV-LED-Porch-Light_p_14885.html
Lamin-x One 4 inch x 8 inch Universal Film Cover (Color : Amber)
-
2
-
-
Well, the new water pump arrived before the new part for the old pump. The pump works like a champ. It took a while to get the air out of the lines, but finally succeeded.
More basic maintenance to come in preparation for Winter camping, in NC.
Water pump model: SHURflo 12v 3.0 GPM Revolution RV Water Pump # 4008-101-A65
https://www.amazon.com/dp/B010TKMK4O?psc=1&ref=ppx_yo2_dt_b_product_details
-
1
-
-
Ok fellas, I've seen mention of folks ordering the 33" and the 35" Dexter kits. Which is it for the 2016 LE-II? ? My hubs appear to be 33.5" apart, both sides.
K71-652-00 (33"/6000 libs) - https://www.amazon.com/Dexter-K71-652-00-Complete-Suspension-Kit/dp/B01HOAGBSI
<OR>
K71-653-00 (35"/8000 lbs) - https://www.amazon.com/Dexter-K71-653-00-Complete-Suspension-Kit/dp/B01HOAGBHO
Thanks, Chris
-
All great points Mossey. Thanks. I'll look further into the 500 Amp shunt, with the bluetooth add-on.
-
9 hours ago, mossemi said:
The greasing discussion pertains to the Dexter E-Z Flex suspension upgrade.
Did you look at suspension connections from the inside as well as the outside?Mossey
Hey Mossey, Yup, I felt around everywhere. Looks like a simple suspension system. Drat.
I can take some pics if needed. Or, maybe I should start a new thread. For the poor folk with low-end suspensions. LOL
-
1
-
2
-
-
I had ordered a grease gun and grease, but did not verify that I even had grease gun points. I was able to cancel order in time, mostly.
I do not have any easy to grease points on the 2016 axles. How do those points get greased? Manually take apart? Nope, I cannot do that. I do not have the tools. Maybe a break/tire shop, I guess.
Thanks,
Chris
-
Does anyone see a real reason why I might change from braided cables to chains for the hitch area?

-
Sorry I did not close this thread out. I finally added the Andersen to the trailer. The RAM 1500 did have a liability statement in the manual for 5,000 lbs or more.
It also took care of the porpoising that was occurring on rougher back roads and bridges. Well, not really bad bridges, but it's better.
It was very easy to install. I did get the suggested chain extensions. I used 24 links, not 23 (just in case I needed it). Must have a good torque wrench and some muscles, and/or a friend.
Thanks all.
-
2
-
-
I know where there's another used Ollie, 2017. It's in much worse shape then mine. They still have it way over-priced for the condition. I'm sure it might also be missing some plugs, or could be soon. LOL
Just kidding. But it was a quick though.
Not paying $14 for a piece of rubber plug that is 32mm by 2.x mm. Nope The duct tape can stay for that.
https://elkrv.com/products/window-plug-weep-hole-for-8600-8700-8800-series-black
-
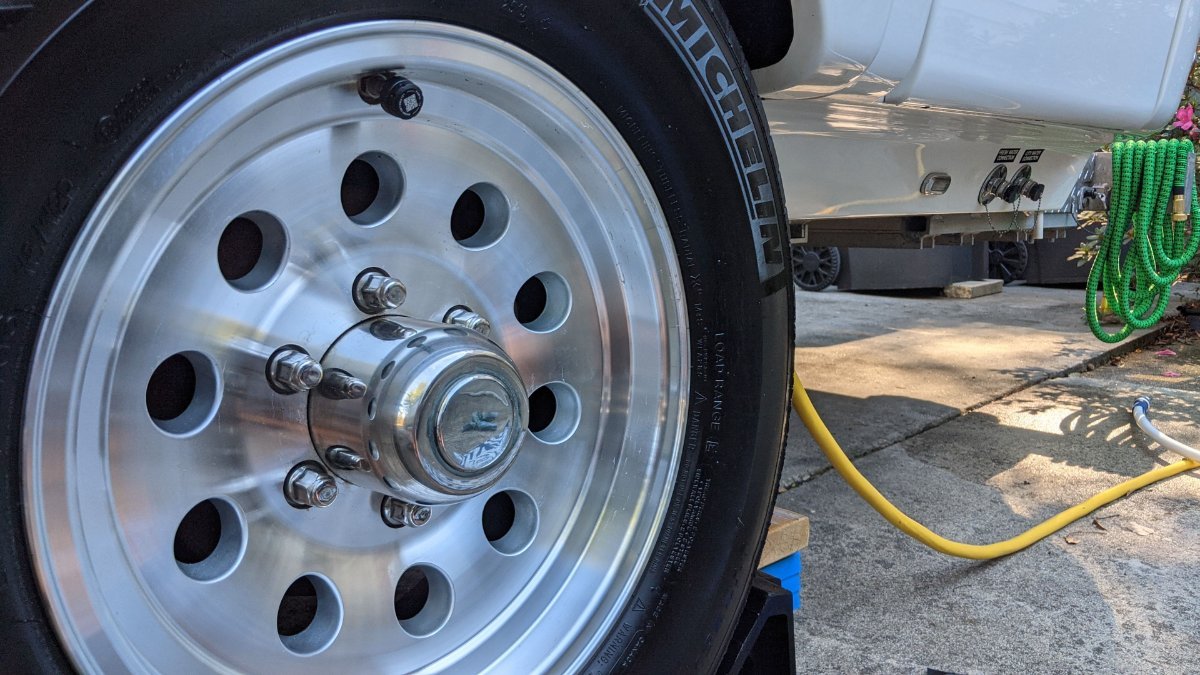
Thanks JD. I found with the rims, plastic scrappers really helped to loosen up the big chunks. A must-have for the tool bag of a fiber glass toy.
https://www.amazon.com/gp/product/B091TPHSTG/ref=ppx_yo_dt_b_asin_title_o04_s00?ie=UTF8&psc=1
It's like I'm at dry-dock and I'm prepping for another long voyage, which, I guess is true.
Chris
-
2
-
-
53 minutes ago, SeaDawg said:
From your photo,, it does look like your door sits a bit proud, and the latch could be tighter, or the gasket material needs replacing. Does the door move when pressed, after latching?
You're the first I've ever heard of with this issue. So sorry.
I was able to adjust the latch "shaft?" to allow the door to be much more snug. That might do it. I'm afraid over time however, the damage has been done to the tray. Hopefully it has not been weakened due to rust. I washed the trailer by and for the first time today, and when inspecting the battery hatch/door, the entire battery cabinet had a thin layer of water. It was touch to reach with 4 large batteries in the way, but I was able to dry out the cabinet and adjust the door.
I'll keep an eye on it from now on. I also cleaned and greased the battery tray rails, it was looking pretty "aged" too.
Thanks yet again for all the great advice and tips. I'm trying to get ready for full-time RV'ing in North Carolina, Georgia, Florida.
Chris
-
32 minutes ago, John E Davies said:
Chris, have you tried tightening the door latch? If seal is in good shape it should not leak around the door perimeter. If the seal is bad, replace it before adding a gutter. I did place a straight section directly across the top of the fridge upper vent, that looks like a place where water would enter at will. I have not needed to put any others other than around all the windows….
John Davies
Spokane WA
I too added a strip above the upper fridge vent. Thanks!
-
What's the best and safest way to tackle this road tar? It too came with the Oliver. Fun times ahead. I cleaned most off the rims with light acetone, but not so sure about the fiberglass.
Thanks, Chris
-
Also, I'm missing a battery strap. I'm poked around Amazon, but was unsure of what might work. Any ideas? I might go to an automotive store and check, but they will likely be too short for two batteries.
-
2 hours ago, John E Davies said:
What brand is that shunt? the Aussie gear is generally top notch (Redarc in particular.)
John Davies
JD,
This is the Brand of shunt I have. The app is poorly rated. It's a BMPRO BatteryCheck. Very basic information.
https://teambmpro.com/wp-content/uploads/140000_M-BatteryCheck.pdf-
1
-
-
A while back I installed the rain gutters around the windows. Great suggestion! However, I'm getting rain water into the battery box area; more than I would like to see. It's starting to corrode the tray parts.
How bad would it look if I put a strip of gutter over the battery box hatch, and/or over the hatch vent holes?
The pin-striping is in the way of where I would like to place a strip.
Has anyone come up with a better solution, or needed to?
Thanks, Chris
-
I will have to think about that. I'm still honing my skills with electricity. Rather do it with an experienced person. Maybe if I upgrade batteries and other components.
Great upgrade thread JD.
-
1
-
-
While conducting preventative maintenance, I found a couple potential unseen issues with the batteries.
First, there was a loose connection on the primary negative terminal where wires leave the batteries into the trailer. Could have added resistance.
Next, I was troubling as to why I could not connect to my Bluetooth battery monitor from Australia (POS) - came with the used trailer. Come to find out there was unseen-corrosion inside the cable connectors on the battery monitor device itself as you see in this photo.
I'm hoping to change out with a victron Bluetooth SmartShunt. Seems like they are difficult to find on Amazon this week.
"Victron Smartshunt 1000amp/50mv Bluetooth Smart Battery Shunt"
When I'm on the PC next, I will search the forums to see who has experience with these Victrons. I am trying to figure out where I'm going to put this and figure out where this yellow wire goes from the current setup.
Does anyone know where the yellow wire might go? This is a 2016 LE-II, not sure if the wire is stock or not. Seems like it is.


Dexter Axle Bearings
in Mechanical & Technical Tips
Posted
Finally. I have a part number to the seal. I leave in a week and needed to find local.
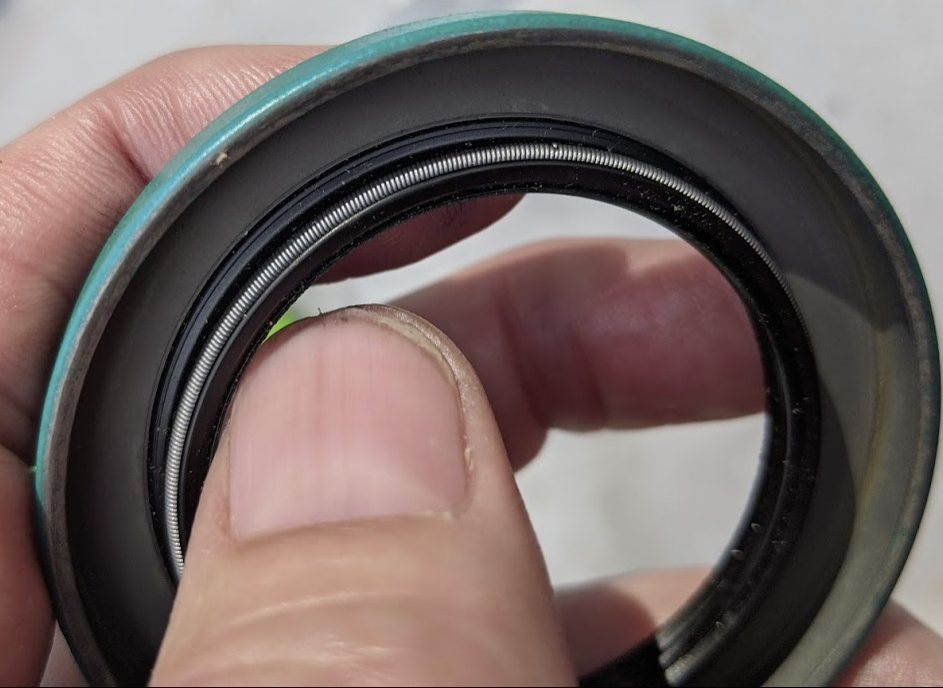
O'Reilly Auto Parts had what I needed. But again, they only had four left in stock. I bought all of them. These seals are heavier duty compared to what I took out.
National Oil Seals
Part number 473336
Approximately $12.50 each