

Wayfinder
-
Posts
364 -
Joined
-
Last visited
-
Days Won
1
Posts posted by Wayfinder
-
-
Hey guys. I tried trudging through some of the 8 pages on the Alcan leaf spring thread listed above. Wow, that was a long thread. But I did not see mention of an actual part number to reference for the Alcan. Did I miss it or do they go off the basic specs of the springs that @Geronimo John mentioned in his attached document (very handy, thank you).
EDIT: Ah I see, it's a super small business, so likely no specific part number, and just give them the specs.
Thanks.
Chris
-
 1
1
-
-
22 hours ago, MAX Burner said:
Not sure what Jason's comments meant regarding new Dexter axles not fitting on @Wayfinder's hull....???
I started a separate thread just for the axles as there will be interest in that for some time to come.
https://olivertraveltrailers.com/forums/topic/10347-new-axles-may-not-fit-all-older-sub-frames
-
9 hours ago, jd1923 said:
Any chance you can ask for the hard measurements? I’d like to measure mine to see. Thanks
I failed to get that measurement and I won't see them again. If those hangers are perfectly flush with the sub-frame, you have a good chance of them working. My hangers are not flush at all.
Maybe the welder had a really good party the night before. LoL
-
1
-
 1
1
-
-
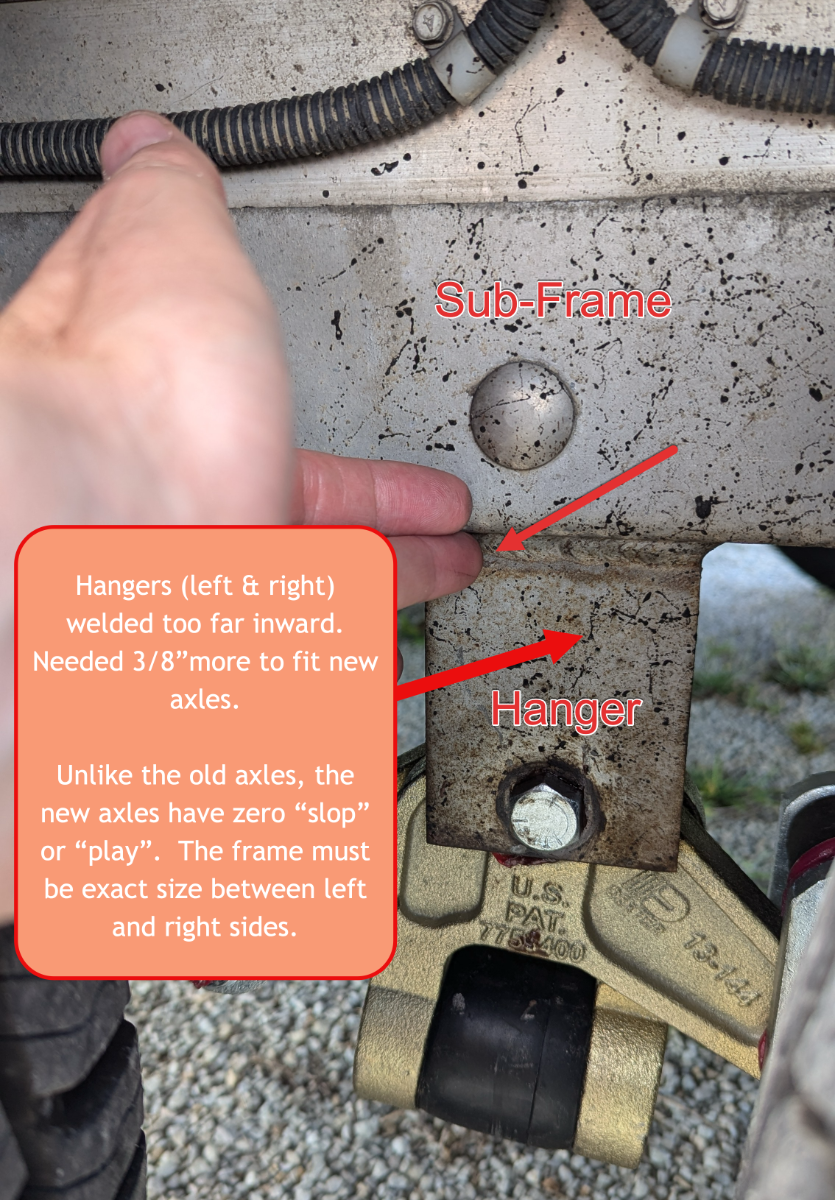
Okay, here are more details on the new axles not able to be fit onto #110.
In the attached picture, my trailer's hangers are welded a bit too far inward on the sub-frame. The new axles do not have ANY "play" or "slop" in them for a fudge-factor. This is unlike the original axles. The frame hangers MUST be spot-on in regards to measurements. So, between the left and right hangers, there is not enough room. They needed 3/8" more to make them fit correctly.
Oh well, it saved me a bit of $$. They said my shocks are still good and they installed my self-provided EZ-Flex suspension parts for me.
The new windows and shades look awesome and the new batteries are working with more Amp Hours than I had with the crappy Interstate batteries.
Jason seemed to give me a "facial & verbal compliment" and said the trailer is still looking great. I think he was a bit surprised due to the age of the camper. Wait until CGI gets their hands on it tomorrow.
Oh, also, they are out of trailer covers and likely will not order them again, since not too many folks get them and .... some other reason, can't remember. He suggested I call Calmark Covers to see if they can still get me one. It will make the ceramic coating last longer. Mostly only cover it in winter and early spring.
-
 3
3
-
-
2 hours ago, CRM said:
What was different about the new axles that caused them not to be compatible with your Ollie?
I'm not entirely sure yet, but it was a measurement that was, I think Jason said, 3/16 inch off, or something like that. I'll get details when I pick it up. Hopefully no more issues were encountered by the team. I don't want to be... "that guy". LOL
-
2
-
1
-
-
Well, as I just posted in the FB group. I can't get new axles on #110, they will not fit, but I did go ahead and get new AGMs for now! I just do not have time this year to fiddle with Lithium experimentation myself. They are installing my Dexter EZ-Flex system, which I had not yet gotten around to installing. A shame they spend so many man-hours trying to fit the axles onto the frame. I'm very pleased though with everything so far. Very impressed by the integrity of the Oliver service team.
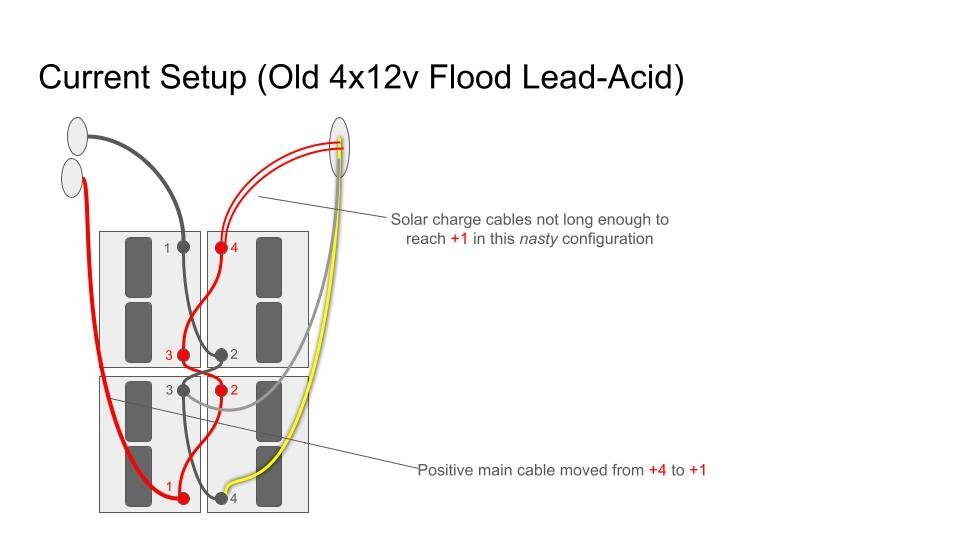
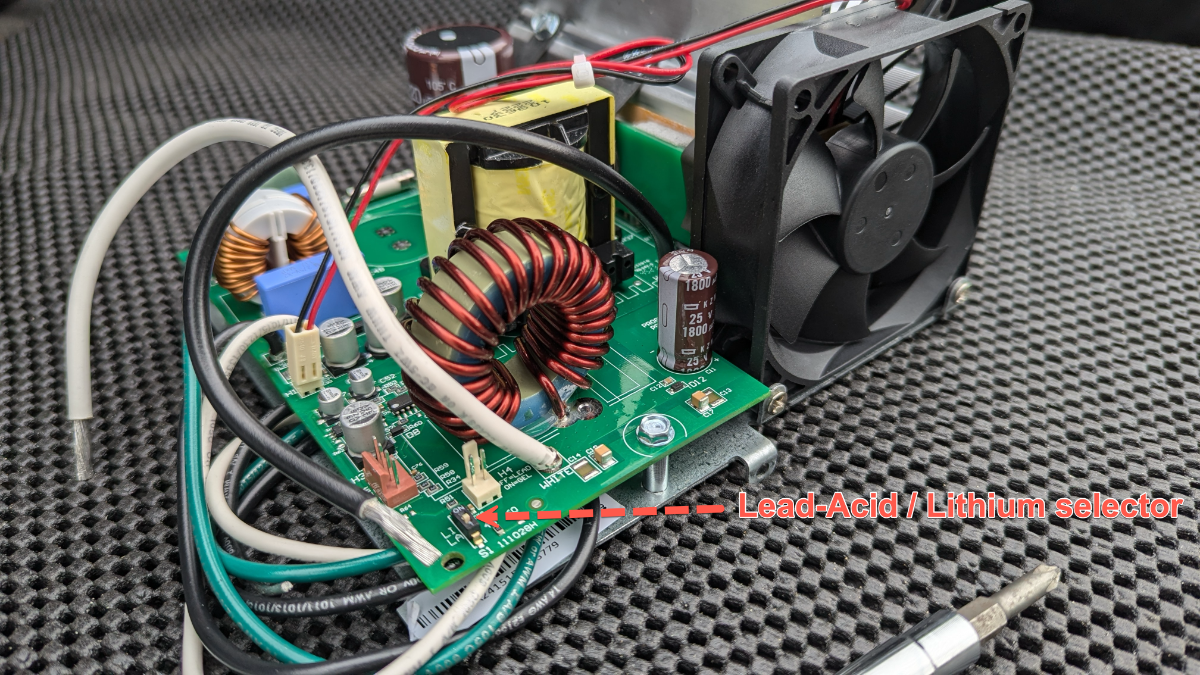
Jason did say the Progressive Industries converter I just upgraded to, which has a Lithium switch on it, part # PD4045CSV, is not "certified" with Lithionics, but is for Battleborns. The way I use the camper now, I really have no real "need" for Lithium, although I know I will love the future upgrade. Let's face it, guys can get each other "excited" over new shiny tech toys. I know I do. This might be the last set of lower-end batteries. Mine were not even able to maintain the hot water pot, which only needs 1050 watts of power. Since the "rube" who installed the batteries at the NC dealer connected the positive inverter cable to the wrong end of the batteries bank, the batteries did not degrade evenly, or together. So, screw it. Out with the old. At least Oliver will wire everything back up correctly. They have all the pre-cut connectors I'm sure. Jason said it takes less than an hour typically to install the batteries. Hopefully no more surprises. New large windows are in along with new shades.
-
3
-
-
I replied to someone on Facebook, I figure I would post here too for coverage.
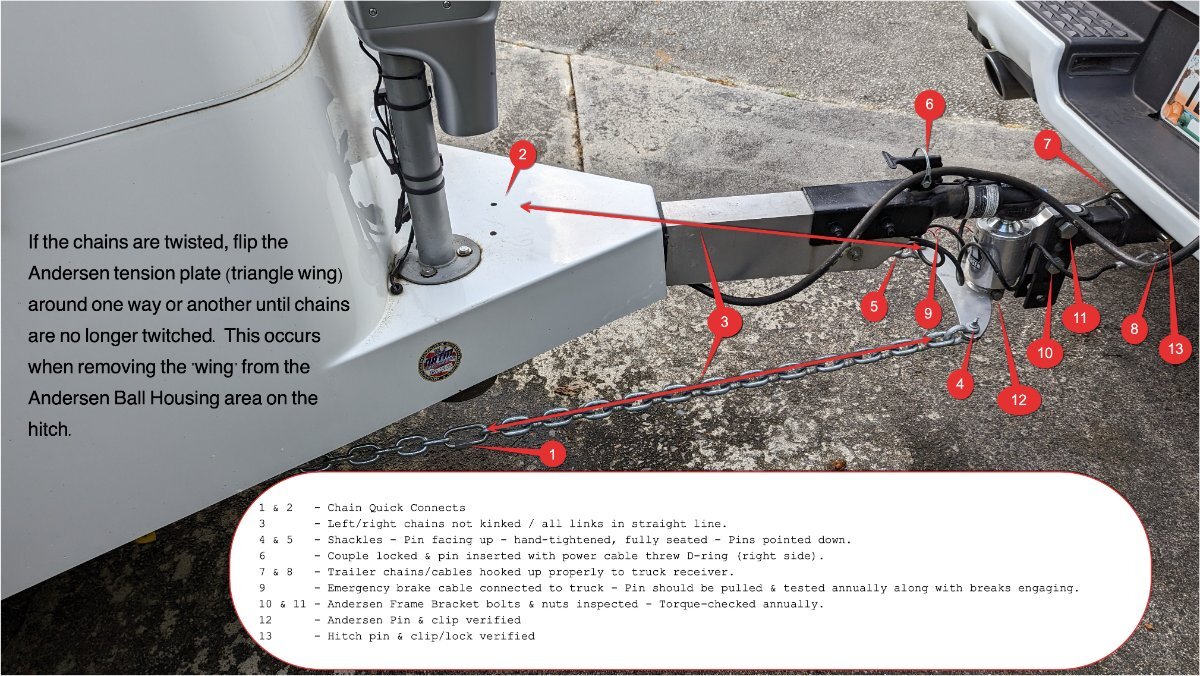
I use 13 points of interest to check before rolling out on a trip and anytime before I move the camper. Even if parked along in a shopping area. Just to ensure someone is not "mucking" with stuff. I don't always get "13", so I'll start again! LOL
I've seen both Oliver and non-Oliver folks with twisted chains using Andersens. Very easy to correct by "flipping the wing" one direction or another.

-
1
-
6
-
-
I had this video pop up on my "suggested list". Very informative. I never did understand all the different sizes and names for wires. Americans! We're some stubborn folk, aren't we?!
Looks like he's doing a good job with his new training series too.-
2
-
 1
1
-
-
14 hours ago, Patriot said:
@Wayfinder
If you need a place to over night while have service done, we highly recommend here - https://www.clarkthecrow.com/Melissa Wickline the owner is an incredible person and host and we had an awesome stay. 🌟🌟🌟🌟🌟
Thanks David. That's exactly where I'm staying.
-
2
-
-
Update: Well, I've had the system on a few days of Solar and a few days of 20A shore power. The BlueSky and converter seem to be working totally as expected and as it was before my battery tray clean-up.
A good long shutdown/reboot fixes almost everything. Even us. LOL
I'll be at the factory for the first time in a few days. Not sure what to expect, but excited.
-
4
-
-
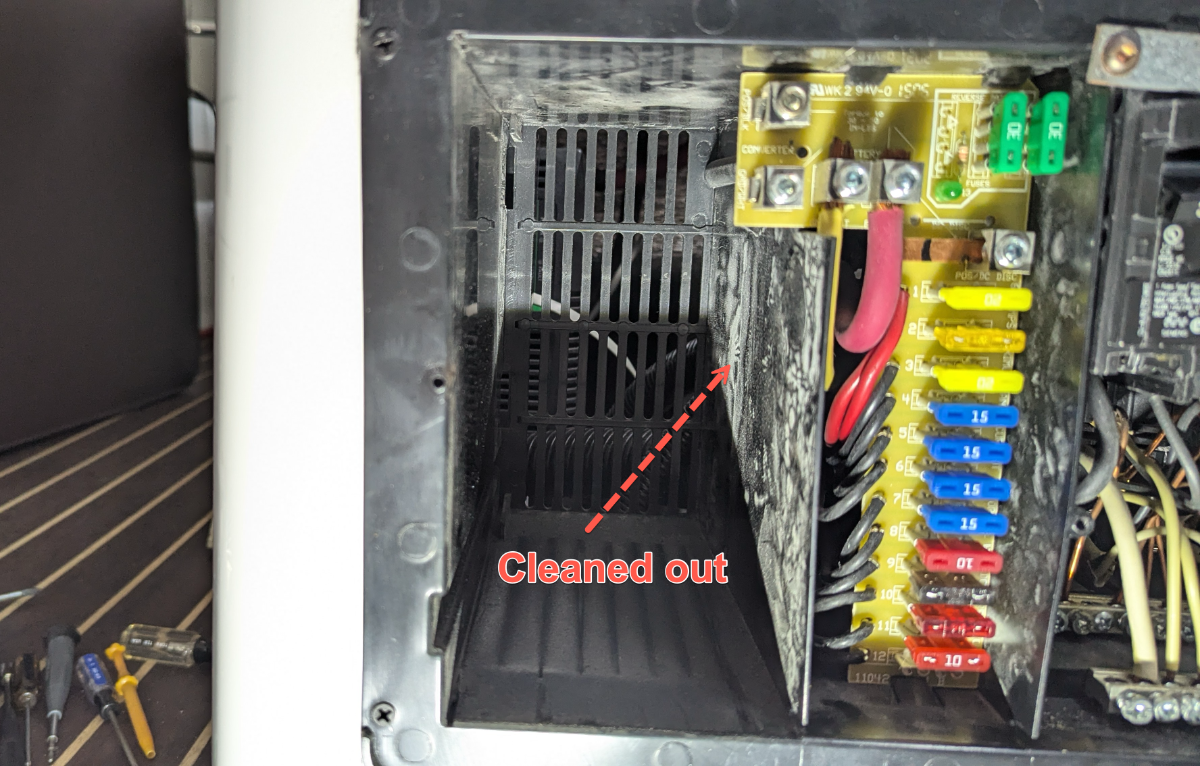
Yes, #110 has the exact setup pictured above. Mike (forget last name) at the AL rally told me how to test my fan and power leading to it. I found that no matter what, there is no power going to the fan. I tested the switch and it appears to work as expected. I have not bothered to pull out the fridge, and/or microwave, to figure out there the disconnect is yet. I've lived with the fan off since I owned the trailer. I will be asking Oliver which to pull out first to trace the wire. I figure it's the fridge. Again, not knowing where it's connected in the cabinet. I wonder if it ever worked, even for the first owner.
-
1
-
1
-
-
23 minutes ago, topgun2 said:
OK - this will not explain the 2.3 - but - did you pull the fuse on the propane detector?
Just so I understand your question. Do you mean the CO2 / propane detector under the dinette by the electrical panel? If so, then yes, I pulled the fuse during one of my tests to see where the draw was coming from. During one test ALL 12v fuses were pulled out, just to be sure.
Good news this morning. After putting the trailer in "dark mode" last night, (with everything off and breakers popped open) the Blue Sky seems to have "fixed itself". After verifying the batteries had stabilized down to 12.94v and were holding this morning, I powered up the solar controller and reset the rear breakers. In short order I noticed a more "expected" behavior from the ProRemote, with only a draw of -1.1 amps, while it was rethinking it's life's decisions. LOL
I verified all settings as Ryan from BlueSky had me set them to a few years ago (same batteries). All was well there.
One test I did, out of curiosity, was to change, just for a few minutes, the "self discharge" setting. Ryan, and the user manual, suggested keeping it at 10% for FLA batteries. I put it to 0.00% to see what the ProRemote would say the draw would be. It immediately dropped down to 0.0amps. After re-reading the ProRemote user manual in the house, I went back out and set it back to 10% self discharge. The ProRemote leveled out to what I would consider a more "normal" behavior for my system, with a draw of -1.1amps consistently.
As the sun is coming up now, the system is going from float to acceptance and back again as needed. Also, the charge level hashes (#####) appeared much, much sooner after turning the system back on, compared to yesterday or day before. Previously they would not show up for hours, which frankly I think was a normal behavior for my system if the power was taken away from the BlueSky for a while.
Either way, it feels like it is "happier" now. I'll keep an eye on it throughout the day. I'll keep only solar on it for now and keep the shore power off until I confirm it's behavior.
Thanks again! Great fun learning something new that does not involve a keyboard and a desk. LOL
I still have not gotten around to checking the draw using my clamp multimeter. I will, hopefully today. Depends how busy I get at work.
-
5
-
-
@topgun2 it's not the inverter. Good thought, but like you, I really don't use it too much. It's in an off state.
I must say, I've had a good bit of fun touching all this stuff and getting more hands-on.
I've been wanting to find something in retirement, whatever that will look like for me, to replace my current IT job/hobby. Something where I'm moving around more yet still staying technical. Thirty years of desk work on a keyboard in data centers has taken its toll on my back and neck. My interest has been solar and batteries for a long time, but have been nervous about doing things on my own. Usually I find when I do finally accomplish a new task or learn a new skill, I find it wasn't that hard after all. I'm a big scaredy-cat. LoL
-
4
-
-
@jd1923All good questions. First, I had to clean up the tray and paint it, so all the batteries had to be removed. Also, I have the new converter, so I was thinking "maybe" that had something to do with it, as I'm still learning the system. The great news is I'm learning and there's no better way to learn the system's behavior than with old gear that I cannot wait to get rid of. LOL
I too noticed the light still on from the solar, but I just now noticed it takes a few moments to go out after killing the power.
I've shutdown the rig for the night, all breakers open or off and no shore power.
It's 9pm and I'm taking readings on the batteries until I go to bet in a couple hours. I'll check to see if there is any "real" drain on the batteries in the morning.
Heck, I even pulled the emergency break pin to ensure the drain increased by the expected -12amps, and it did. I suspected maybe a stuck break or something.
I'm suspecting the BlueSky is wonky at this point since taking out the batteries for a day or so. Heck, it's old and it may have lost it's marbles, I know I am.
I'll be at the factory next week, for other extensive upgrades, maybe I can get them to upgrade the solar controller along with batteries too, but maybe not Lithium right now. But that's a larger discussion with Jason, his team, and my wallet.
Again, I'm winging all this right now. Not sure which way I "need" to go at this moment in the trailer's life, or my own travel plans, Lithium or AGM. I know all the pros and cons with the batteries, all too well. Decissions, decissions! $$ Cha-ching $$
I'm not sure how long it takes for the batteries to "settle down" from being on a charger since the trailer was on shore power. I did notice, with all this heat we have in GA, that the new converter fan was running when I opened the panel box. I don't think I ever noticed the old fan running. Maybe it was dead, but that's not -2.3 amps worth, especially when the converter breaker was off during earlier testing.
13.14v - 9:25pm
13.07v - 9:40pmThanks for all the great suggestions. It curious to me at this point.
Chris
-
1
-
-
@jd1923 to correct that display issue Ryan had me simply take the display panel out and unplug the phone jack looking cable. That resets the display. It happens to mine about once a year. More to come. Thanks.
-
3
-
-
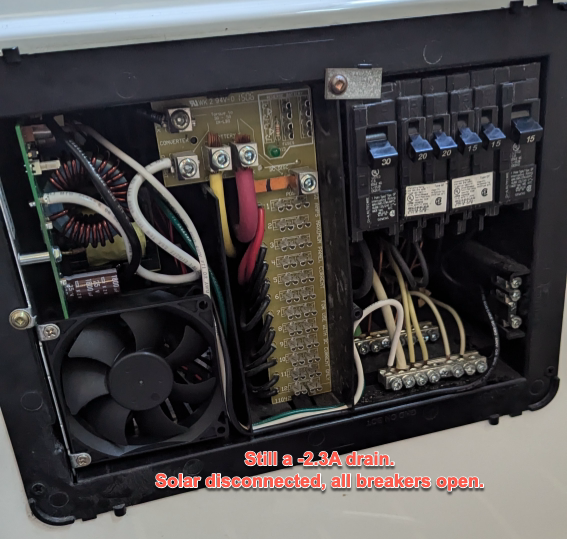
Well darn. I'm not sure if this is normal. I don't think it is. There seems to be a -2.3Amp draw on the system, even with every breaker off, EVERY 12v fused pulled out, and every resettable breaker popped open under the driver's side buck.
Could this be the new converter/charger doing this?
I need to wait for a cooler day to switch back to check. It's nasty hour in Georgia this morning.
The only other thing changed was the battery configuration after tray clean-up. See battery diagrams, current -vs- orginal. That's the easiest to put back.
There is NOTHING plugged into the trailer. No shore power, etc.
Updated: I just ran through the troubleshooting instructions from Progressive Industries, everything checks out perfect and batteries are charging off of shore power, 120v/20a receptacle. https://www.progressivedyn.com/wp-content/uploads/2017/05/PD4045-TROUBLESHOOTING.pdf
For my 2016 Ollie, the converter breaker is the 15amp breaker all the way to the right of the panel picture below.
Thanks!
-
1
-
-
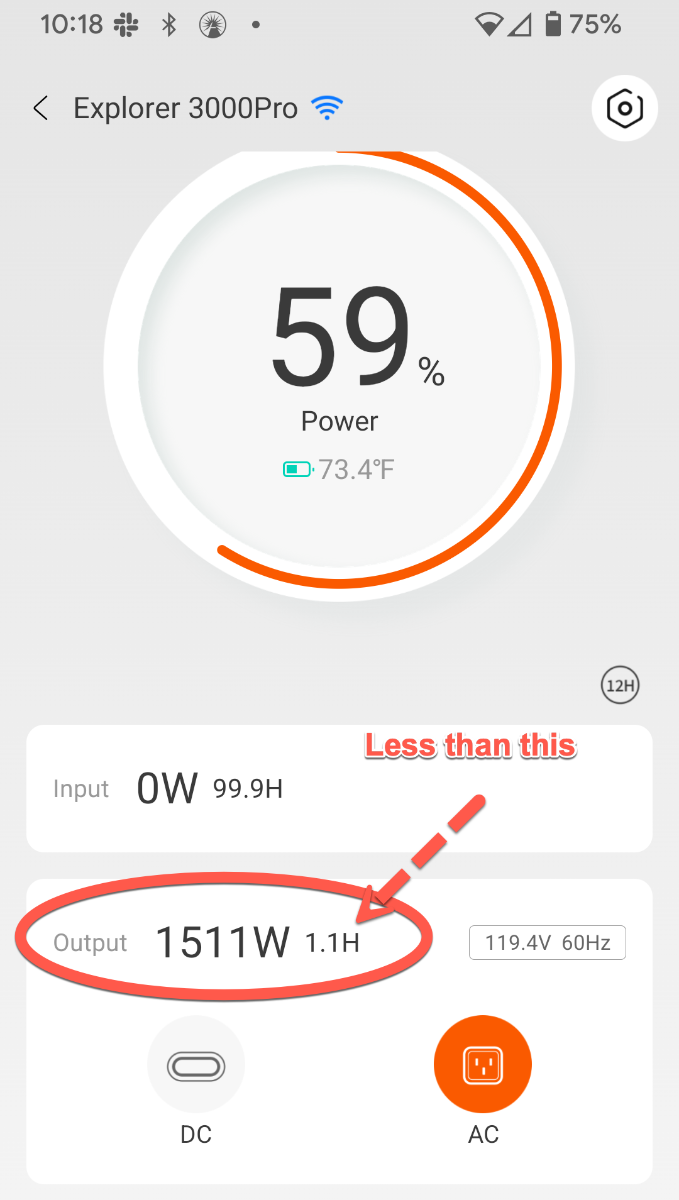
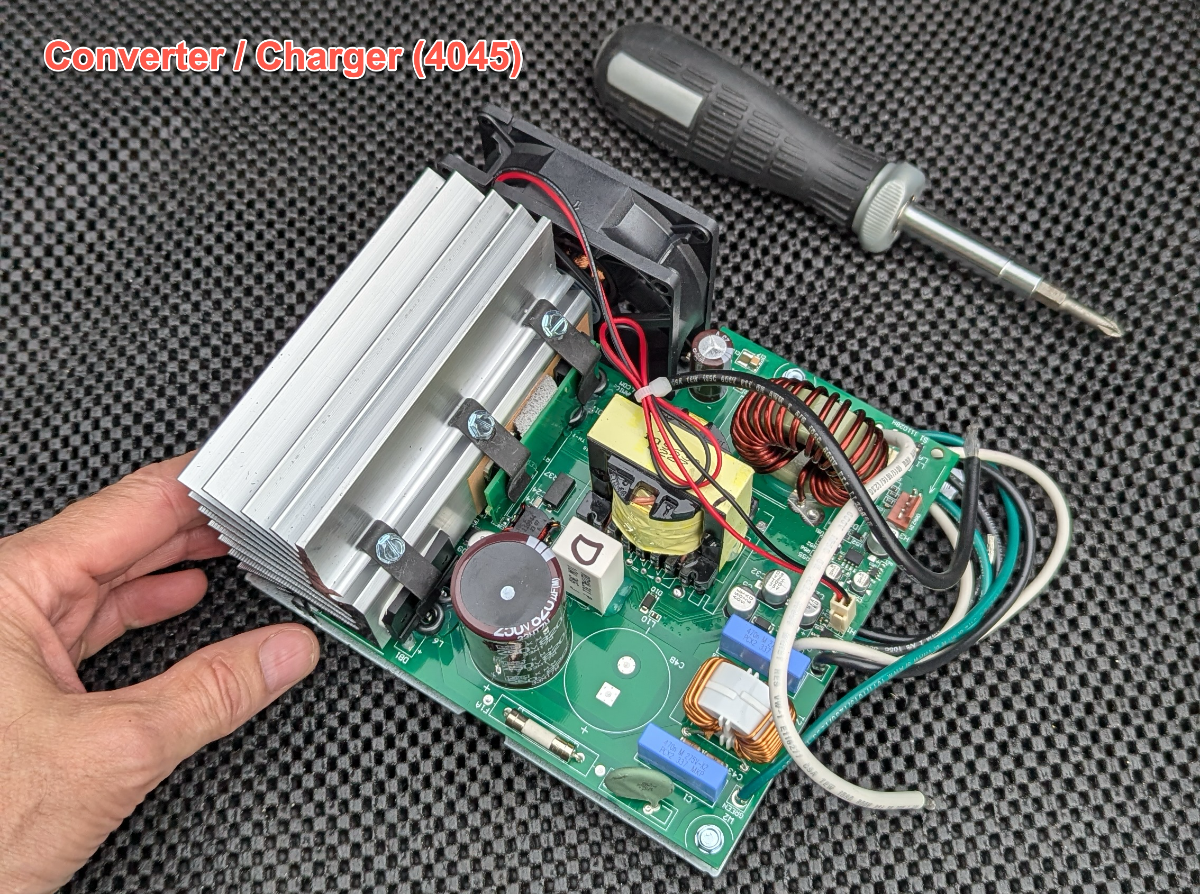
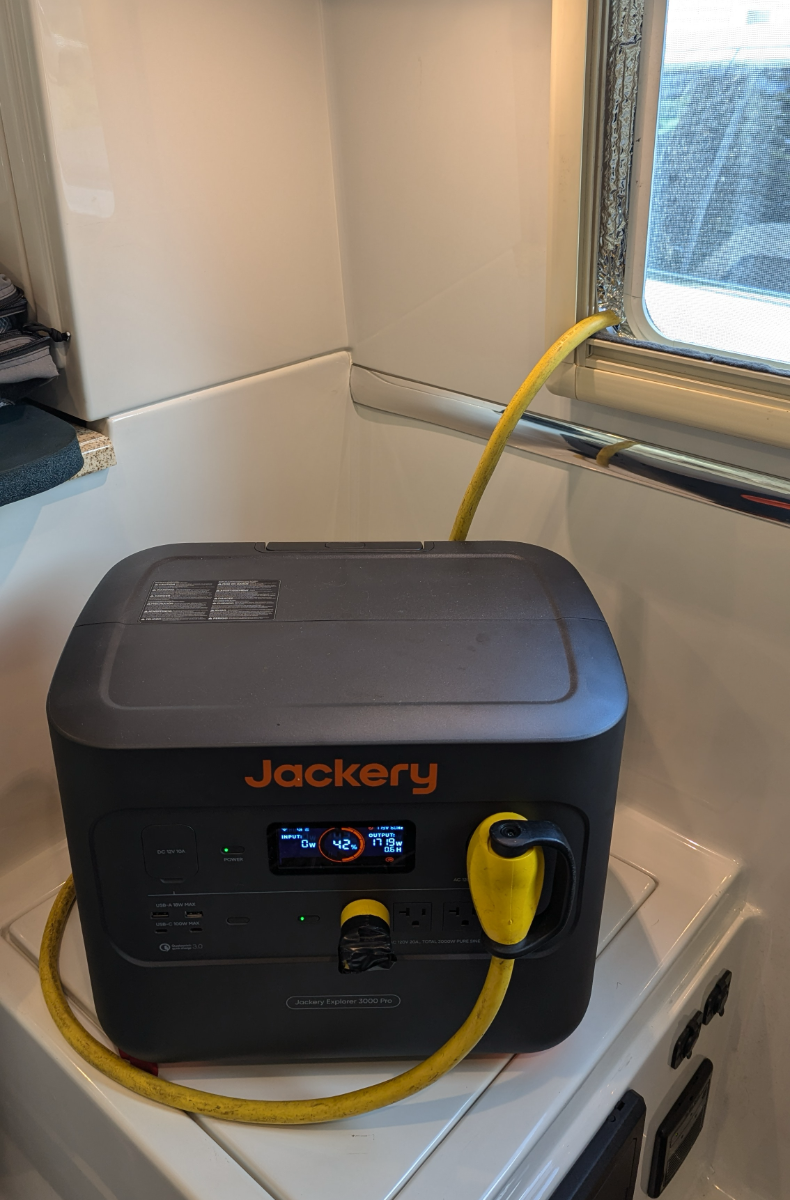
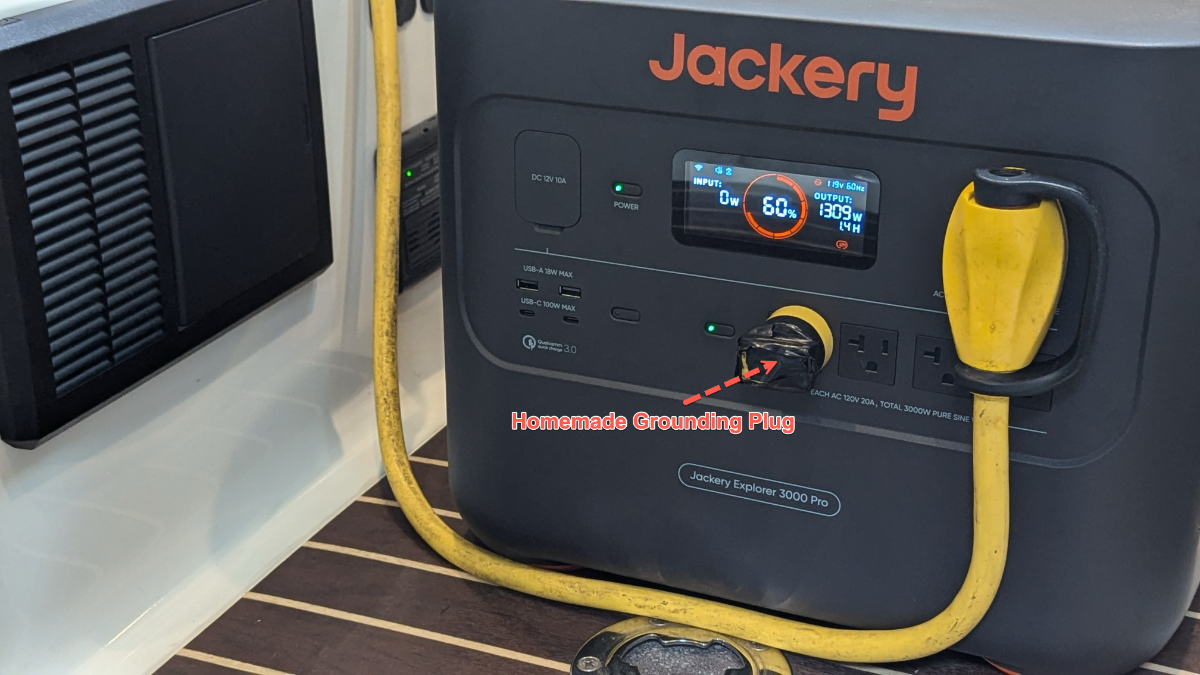
Well, as many of you know, the converter/charger upgrade is easy. I had no issues with mine. Step one "check". The cricket noise may or may not have gone away. I cannot tell with Tinnitus - same sound.
I checked basic functionality of the charger/converter with my Jackery 3000 Pro. Everything seems fine. Even ran the A/C for a while.
-
1
-
3
-
-
I'm surprised to see many companies now offering 11 year warranties. Let's face it. Nothing outside of good water heaters offers that length of support. Interesting. Says a lot about the technology, that's getting to be all too common. Only time will tell.
-
1
-
-
When I'm at the OTT factory in a couple weeks, I'll have a lot of new questions and taking closer looks at the latest electrical setup.
-
1
-
-
3 hours ago, jd1923 said:
The picture on this page, showing the Big Beard battery standing up got me thinking... You can fit four (4) of these bad boys standing up in the Oliver battery bay! (no tray of course, for the off-grid crazies out there) Big Beard Battery 12-Volt 300AH 3600 Watt Lithium Battery | Big Beard Batteries
It would have to be completely cloudy and off-grid for ..... maybe a month or two before using all that, with some A/C usage.
Also, I love me some of Todd's "Two Minute Tech-Tip Tuesday", but they have a lot to prove with those batteries. Maybe something about the name, "Big Beard Battery". 🤷♂️
-
1
-
-
Thank you guys for all the great info. I'm making new documents with pics and explanations not only for me, but the next owner, if ever. These docs will be updated as the camper gets updates.
I also keep fairly extensive maintenance & parts logs.
-
2
-
-
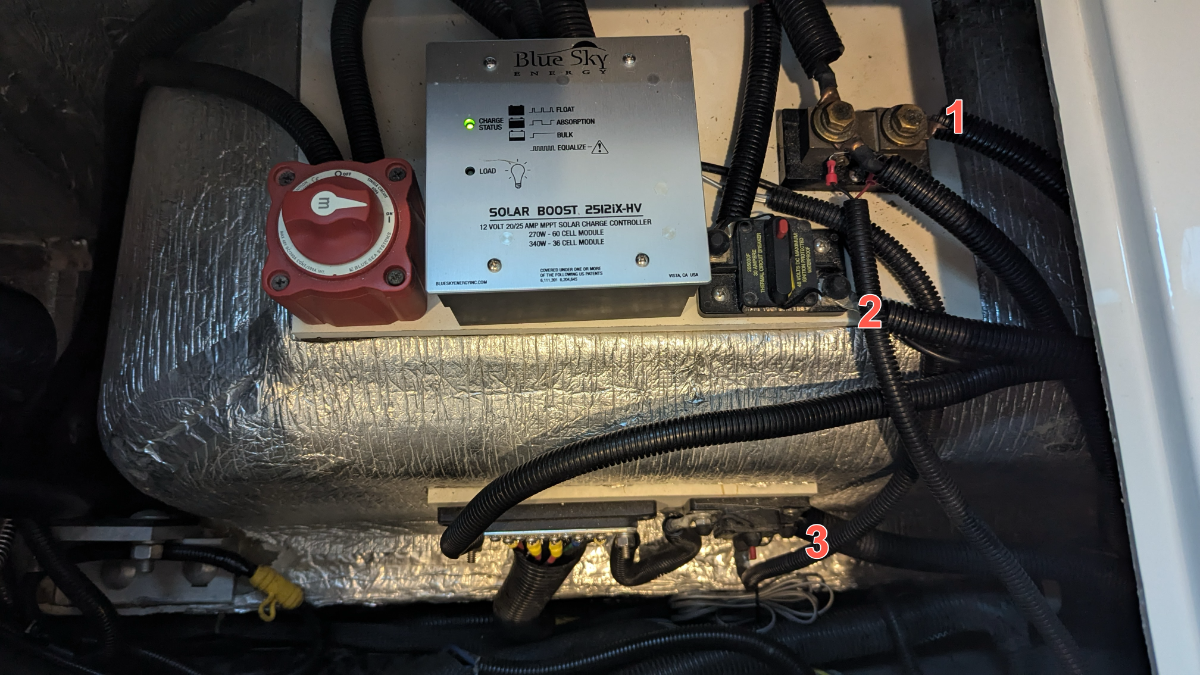
Thanks Max Burner,
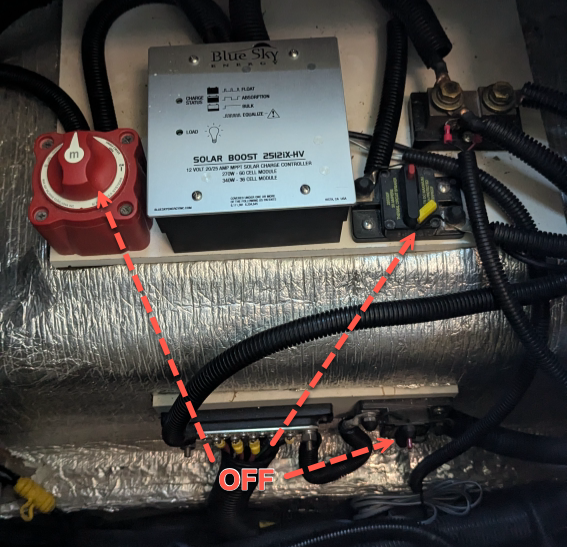
Yeah, I have the good ole MPPT CC from BlueSky. I'd love some confirmations on these numbered pieces.
1. A shunt to what, I'm not sure.
2. Kills the BlueSky Charge Controller
3. I'm not sure yet.
Also with Lithium batteries, where did you send up placing your Victron SmartShunt?
Thanks,
-
1
-
-
I think my spare on #110 is smaller than my current, and original Michelins. Not sure I can get one of the main tires into the spare cover. I've kinda tried once. Seemed like it would be too tight.
Anyone else seen that before?
-
2
-
-
@SeaDawg again, thanks for all the good advice.
@topgun2 I'm starting a clean thread on this as not to drive SeaDawg crazier. LOL
I was hoping to do a systems upgrade in pieces, if possible. First converter (in the mail), then batteries, etc - if that makes sense.
Right now with hull #110 (2016), I have all original equipment, except batteries. Currently Flooded lead-acid.
I have the Xantrex 2000W inverter with the BlueSky Solar controller and ProRemote.
I did just pick up a new Victron Smartshunt, but holding off installing it until I choose new batteries.
I'm an IT guy of 30 years, so not a complete dumb monkey, but maybe a bit slow at first. LOL. I'm always scared to try new things by myself, failing with someone else is not that bad.
Also just ordered the new Progressive Industries converter (PD4045CSV) to allow for Lithium charging.
Great threads on these forums for all that stuff!
I was wondering if the Bluesky Solar controller can be configured to properly charge most Lithiums. I can always call Ryan, if he's still at BlueSky. He showed me how to configure the controller using the ProRemote panel. I'm okay with it.
Naturally, I'd love all Victron stuff, if it would fit nicely. And again, I want some hand-holding by a qualified person. Maybe I'll seek out a pro who would allow me to work with them to learn. Some do, especially in the Van community.
I'm not yet looking at running the A/C off of batteries. That'll take a newer A/C unit. Not a priority at the moment and keeping it as simple as possible.
Realizing I'm just learning and dreaming, and there are MANY paths from which to choose, here's just one idea I was recently considering, due to battery form-factor in the current battery box & tray area. I'm sure there are negatives I'm not thinking about yet.
Can I, or should I, do this in stages? Naturally money will be a factor, and I'm a working stiff, so time can be an issue.
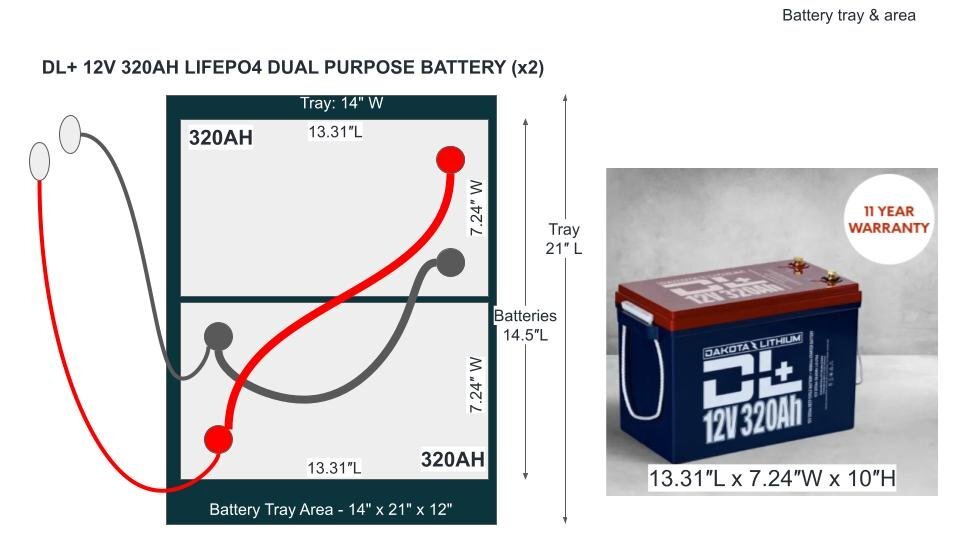
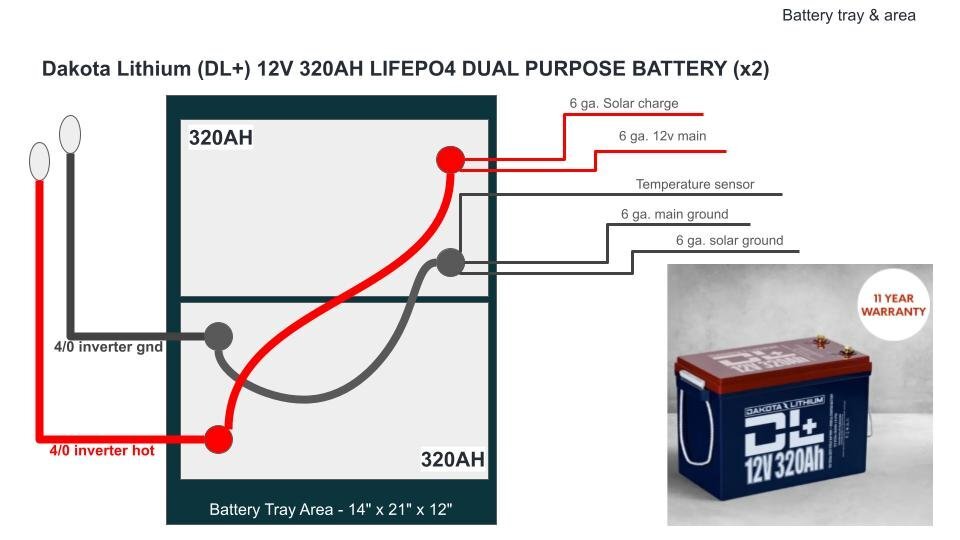
One thought is to install two 320AH Dakota DL+ batteries to make for a simple and clean wiring setup with redundancy built-in.
I was briefly considering a single 320AH battery from Dakota, or any good battery, however, that does not give me any redundancy if one battery fails on a long trip.
I'm okay with Battleborns, 12v 100AH, but I'd want very clean connections, maybe a custom bus bar to connect all the batteries with shrink tubing and covers to protect connector bars.
At best, I currently only have 160 Ah useable in my old crappy lead-acids. Likely less due to age.
Pics are not to scale.
I am subject to all the things I have not yet considered, that you will teach me. LOL
Thanks!
-
1
-


Broken leaf spring
in Mechanical & Technical Tips
Posted
Since my #110 cannot get new axles due to frame hanger welds, I might beaf up the springs.