
Wayfinder
-
Posts
423 -
Joined
-
Last visited
-
Days Won
2
Posts posted by Wayfinder
-
-
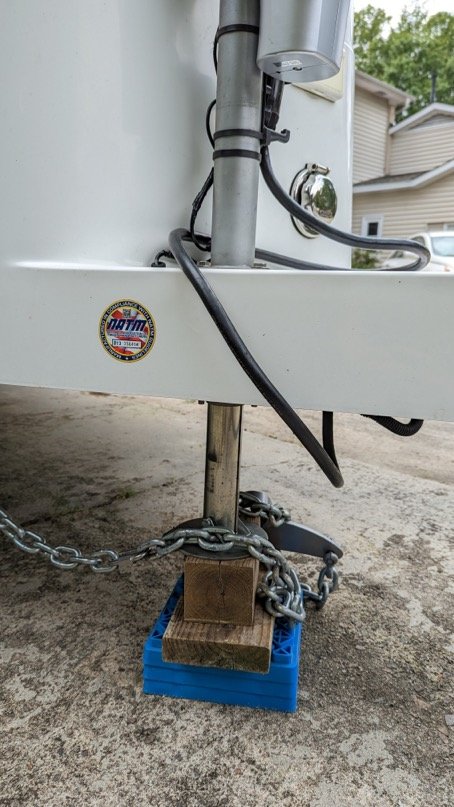
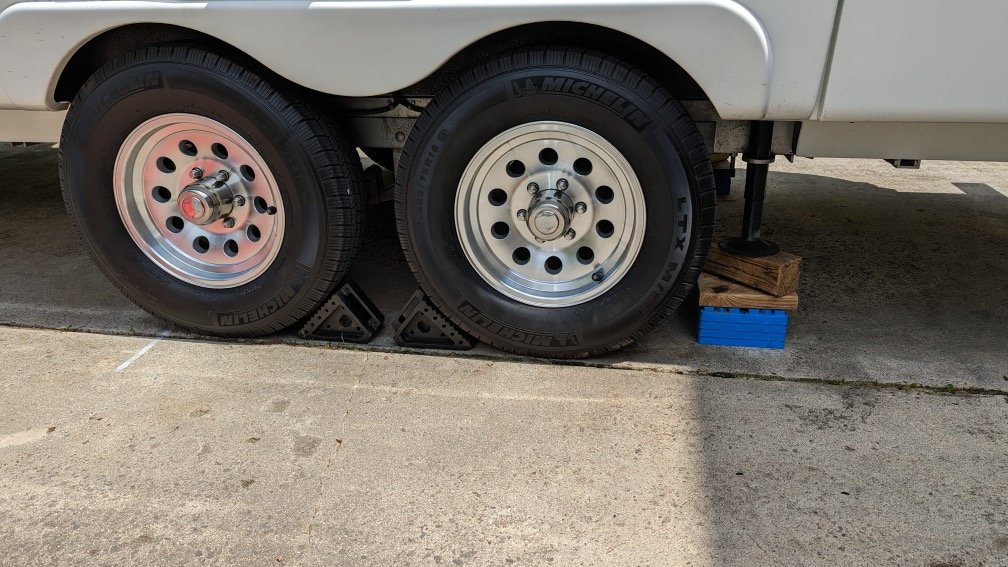
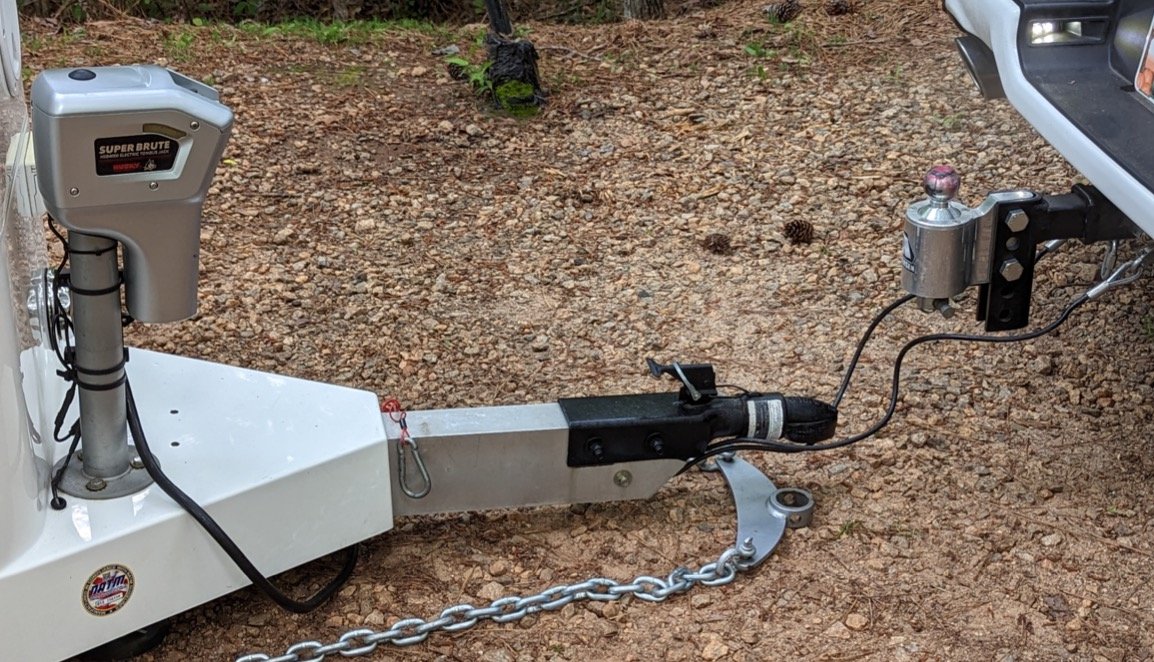
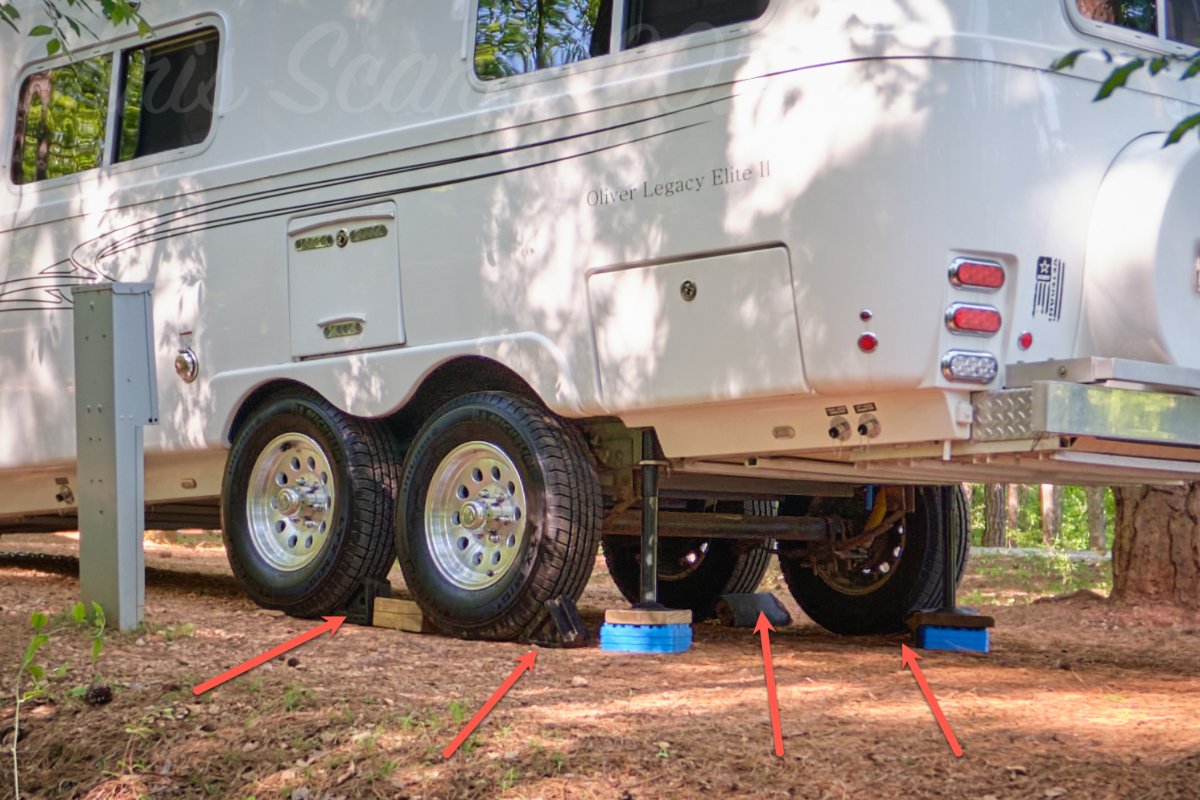
Well, thanks to all the reminders and scary stories, I not only successfully hooked back up, but the Ollie didn't move a bit. I was able to lower my truck (using my RAM airbags) and get just close enough that the safety cables (chains) (attached pic) were able to reach the receiver on the truck. I'm still shocked that the trailer didn't appear to move at on on a 3.7 degree slope. Although, I had to use my Rubber mallet that I always carry to persuade the blocks to come free from the tires. Especially the one chock with what @Geronimo John called a "shear-plane". That was determined to keep tires in place. LOL
I will be adding a few more things to my next trip, like X-Chocks and a few more 2x6. I do have one pair of the Andersen Levelers, but didn't try using them, but then again, only the rear-most axle/tires could have been lifted with the Andersens I had on hand.
Attached are some pics of how I always block on level ground I prefer to have the 4x4 under then jack foot itself, and always positioned diagonally.
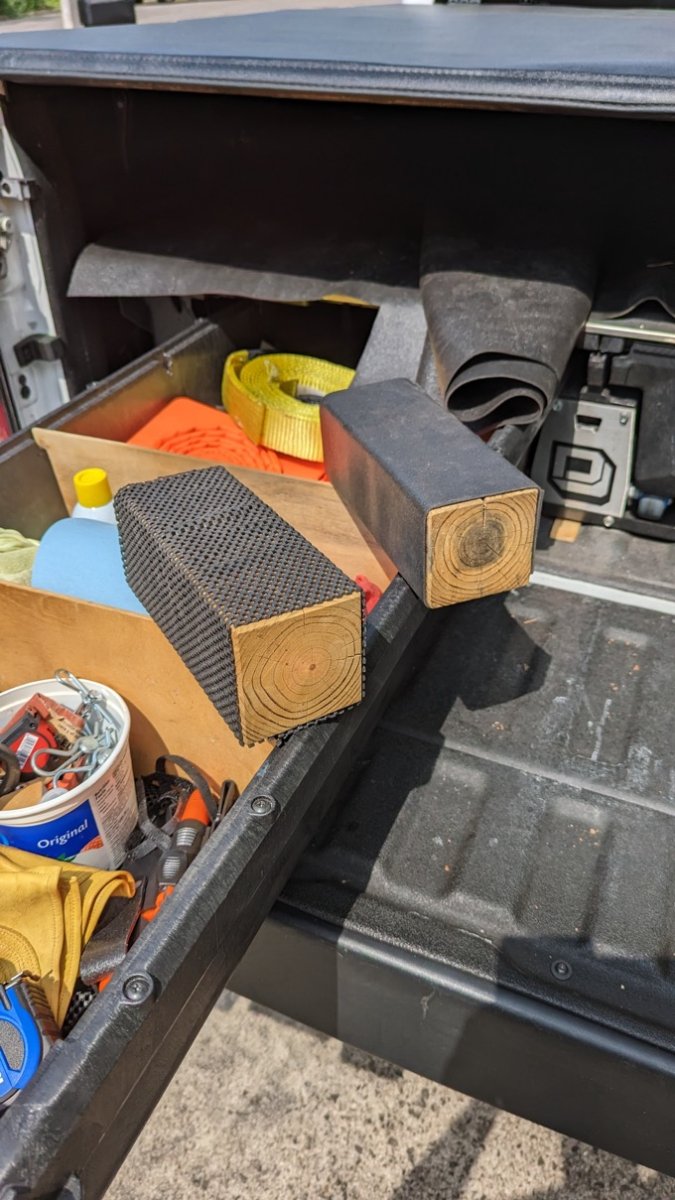
Also a shot of two different 4x4 blocks I JUST now wrapped in different rubber (non-slip) materials. I like the solid material better, but the perforated material is really non-slick. I will test out to see if that makes any difference in ANY situation. I also need to cut some of that solid non-slip material for my Andersen Levelers, mine did not come with rubber pads like I think they do now.

-
 1
1
-
-
@Geronimo John and everyone, thanks for the reminders. More 2x6s are needed. With careful design and planning it might be worth making several of the interconnect, so in my case this week, I could have assembled a ramp-like solution to at least reduce the slopping affect. The upper most plank could have a "stop" block (make from oak) glued and screwed to the very end so you know you cannot easily to too far.
-
2
-
-
Thank you everyone. That's about what I was thinking too.
There's not much to tie on to with the Oliver, except the Anderson chains or chain holds.
The ground is sloped 3.7 degrees.
-
1
-
-
Okay experienced Oliver Owners. In your opinion, what is the best way(s) to ensure you successfully park and unhitch on a slope or incline/decline?
What are the best chocks you've used?
What other safety measures do you take?
Have you made better chocks than you can find in the stores?
This is what I dealt with this week. First time, and was nervous about it. I used four large solid chocks. Two are simply 4x4s wrapped in rubber non-slip material, that other are purchased heavy duty solid rubber triangle chocks.
And, I hate to ask, but better safe than sorry, do you see anything terribly wrong with what I've done in the pics?
Thanks.
-
2
-
-
Great advice from both of you. Adding to my checklist.
This was the first time to park on a slope towards a lake. So the cable did stay connected to the truck last and I was ready to pull it after that just in case. Also, being anal is safe, usually.
Although, I would hope I would have the peace of mind to video record and Oliver floating in a lake because at that point there would not be much else I could do. LoL
I wonder what Tennessee Oliver would say if someone brought an Oliver to them for repairs and was full of water and a fish or two? Hehe
-
 1
1
-
1
-
-
Well, I guess I answered my own question thanks to YouTube. Does anyone check this on the Olivers?
-
2
-
-
Is there a thread that explains the process of undoing or unlocking the brakes once the cable has been pulled? I'm just curious in the event I ever have to manually pull it on a slope. Can you undo or unlock the brakes easily? What's the process?
-
Beer fridge it will go! LOL
-
1
-
 2
2
-
-
20 hours ago, AndrewK said:
Chris,
I have used Dicor BT-1834 on two windows, the Truma Aguago frame, the Atwood heater frame and the outlet covers with great success.
If you are applying it while it is cold, you won't find it to be as sticky as it, when it is warm. It also does not compress as well.
Andrew
Good tip. It sounds like you have had to reseal more items than I've heard of before. I was wondering about that stickiness, or how it pulls apart with more "stringiness", is that a word? I might try to put it in the refrigerator before putting it on the door frame, than, lit it warm up in the Georgia spring air before pressing it onto the hull. Sounds legit to me. Thanks @AndrewK
-
Oh, don't misunderstand me, most all the smells have remained "gone" since I did that initial blow-out nearly two years ago. I only mentioned it because I too found it strange that a 5 year old TT (then to me) still had some "funky" smells. No, not really glue or resins, or poo or pee, just, well, something, and not horrible, just a bit noticeable.
The smells are mostly all gone since I did that initial air-out. Just wanted to bring it up as a possible solution and to state how surprised I have been that they remained gone since. Now that I think of of it, it might be good for people with bad allergies, although, they may not elect to go camping in the first place. LOL
Cheers,
Chris
-
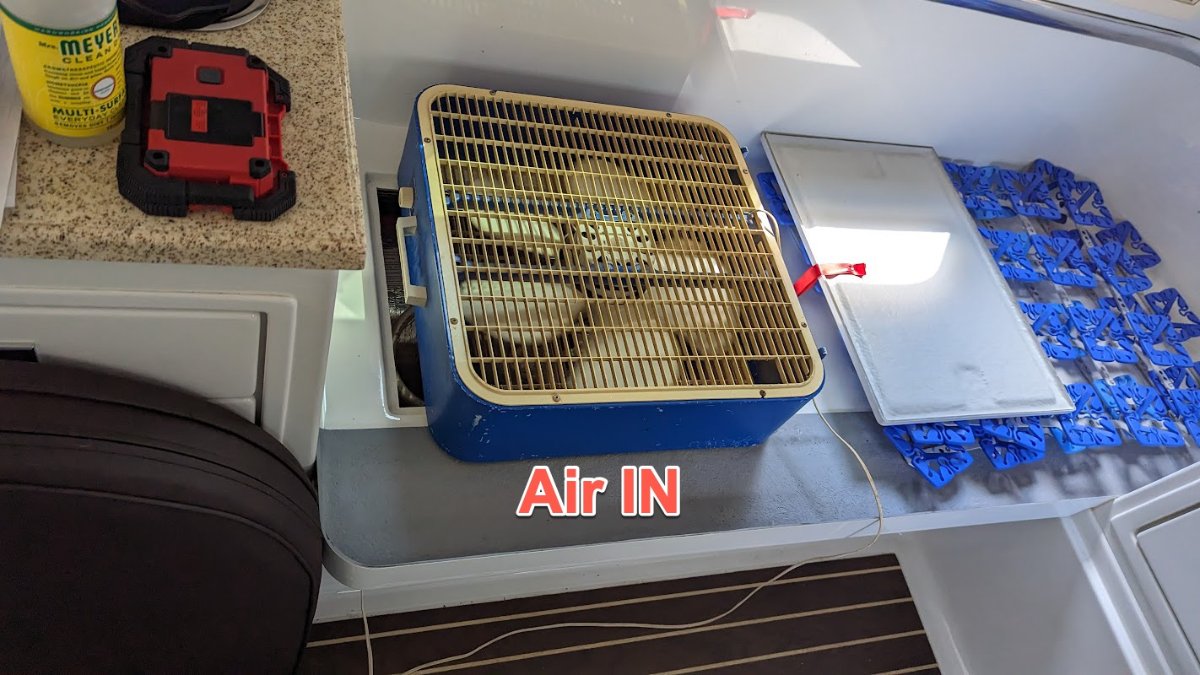
I thought I had posted something about airing out the hull using a fan, but that was nearly two years ago and I can't find the thread, if there is one at all.
I wanted to update my findings on hull 110 (2016), which I purchased used in 2021. I had always noticed a "funny" smell from the trailer, especially from within the hull area. Not a horrible wet smell, but maybe more of a mechanical, glue-like smell.
Well, even today the trailer still smells MUCH better, even after sitting in the sun all last summer. The inner hull is still not nearly as bad as it was when I purchased the trailer.
I think Oliver, or more efficiently, the new owners, should air out their hulls a few weeks after they get them. Some owners get their new trailers so fast that I bet glue is still curing upon pick-up.
This is what I do. A 24" fan blowing into the passenger side bed hatch with the dinette hatch open, tyically the one closest to the bathroom (not pictured), along with all windows open and roof fans running at least on low. Try it, see if it improves the hull smell, even on older Olivers. Good luck. I ran mine for hours on a nice sunny day the first time.
I'm only showing the electrical hatch open, as that's where I was working replacing the CO detector today. 😉
-
6
-
-
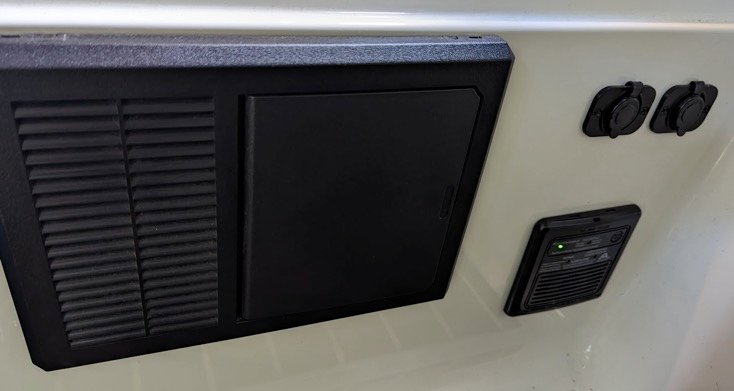
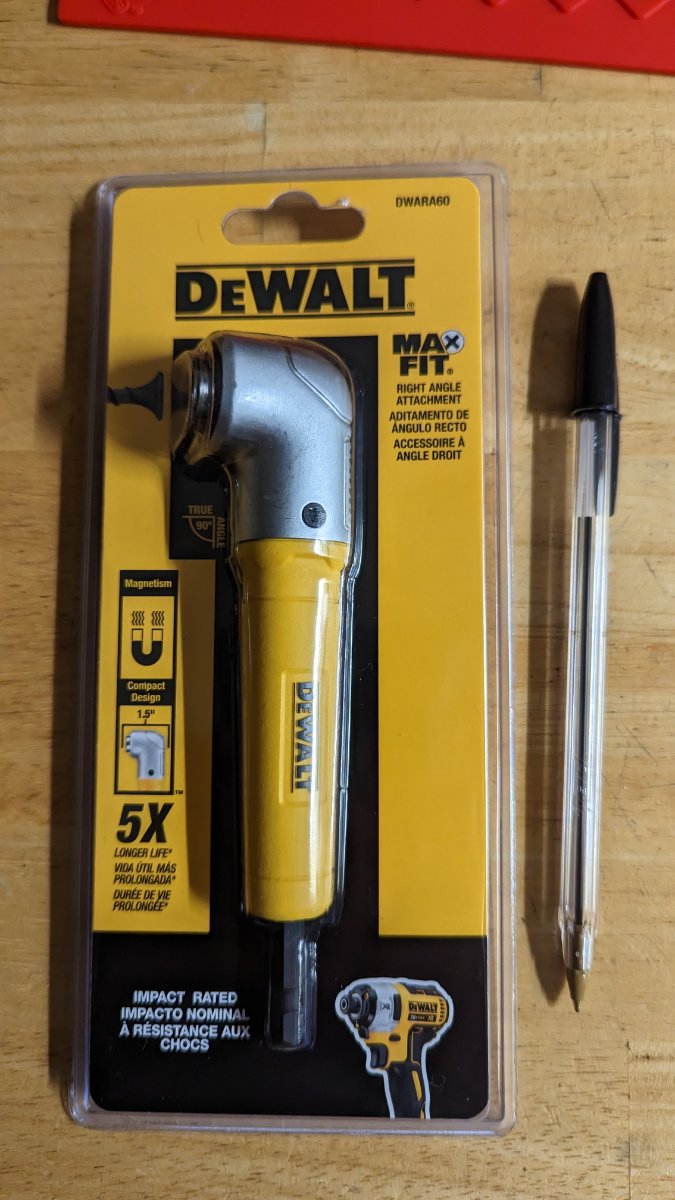
This little right-angle drill bit holder did okay. A good space savor for any project.
Lippart used screen door screws that were VERY, VERY TIGHT to get into the holes of the hinges.
-
Well, I put the new CO detector in, and for being the much less expensive color, it totally matches my #110 setup; maybe even better than the white one.
-
4
-
-
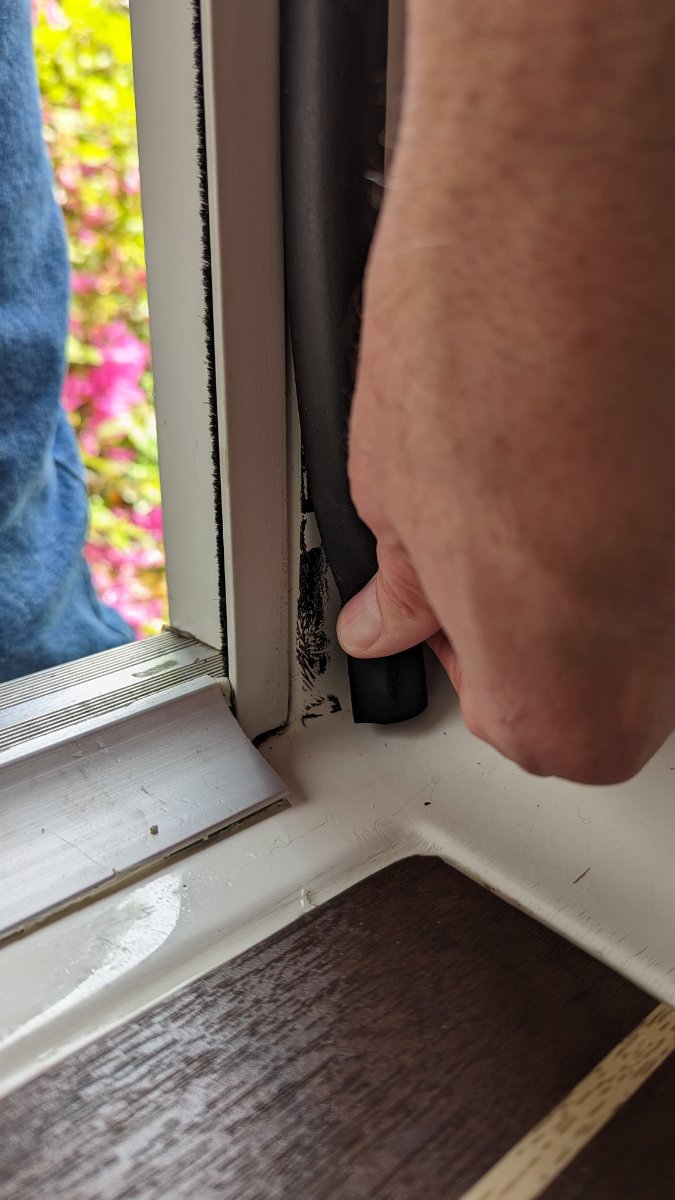
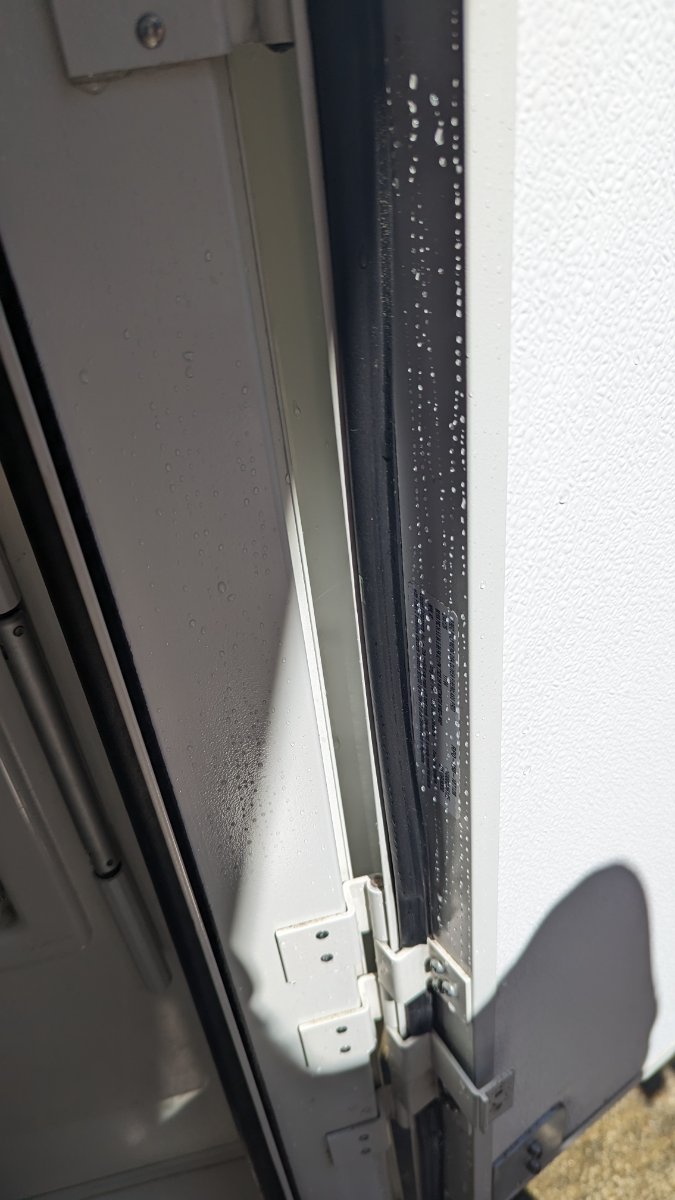
I just called Oliver. They just use the grey Butyl Tape on the walk-in doors, so I'm good. They did say I'll need to go thru Lippart for a new door seal. I think that's another spot that can be a problem, although for now I have augmented it with another small, "double-tubed", seal on the hinge side of the inner frame. It works so well I don't see any more light shining through now. It's only a temporary stop-gap to get me through to the Rally in May, unless I get the seal before then.
I'm hoping nothing in life comes up so I can meet more Ollie owners.
-
I found one YouTube video where a Lippart door was replaced. Doesn't look difficult at all. I do however want to make sure I have the best Butyl Tape possible.
Any suggestions or are they basically the same.
I might make it into a YouTube video, so you all can laugh at me.... I mean give me constructive suggestions. LOL
I have this stuff, but not supper impressed, yet.
Dicor BT-1834-1 1/8" x 3/4" x 30' Butyl Seal Tape
-
Congratz, looking great. Have fun.
-
1
-
-
@mossemiI was also considering removing that PITA gasket and put my extra gutter guard just over the door. I agree, that gasket is horrible and at least needs an area in the middle to release water and junk. Now you have me thinking.
-
2
-
-
Also, here is where water is coming in from now. Between frame and hull. Yay. Only way to door right, is to pull the door. Looking on YouTube now to see if anyone has a similar issue on a fiberglass hull. If not, might be a YouTube video I should do myself. Maybe I can get some advice from somebody at Oliver.

-
This might help get in those tight spots on the doors.
-
1
-
-
I put this on the wrong thread, but here it is again.
I found out tonight that the door is leaking between the door frame and the hull. The entire door and frame needs to be pulled and resealed. Not looking forward to it.
Also need to order the big seal/gasket under the awning from Oliver. Again, a pain and will take two people to remove the awning
-
Unfortunately I found out tonight that it's leaking between the door frame and the hull. The entire door and frame needs to be pulled and resealed. Not looking forward to it.
Also need to order the big seal/gasket under the awning from Oliver. Again, a pain and will take two people to remove the awning.
-
Great info and web site GG. Thanks!
-
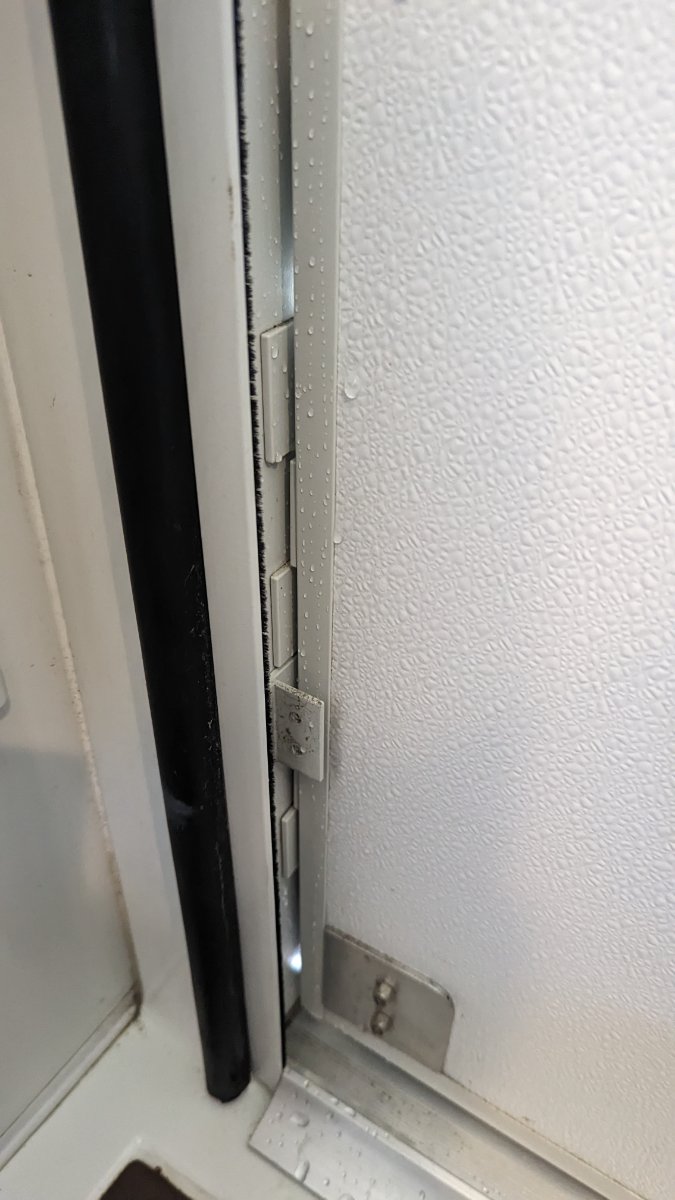
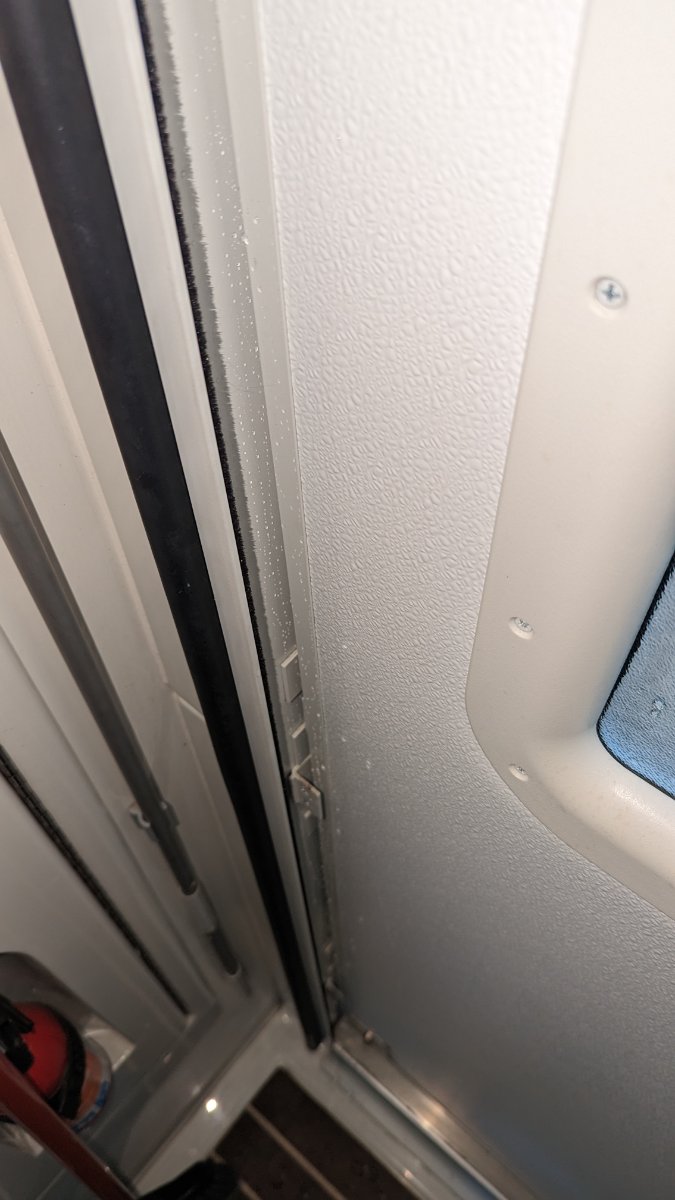
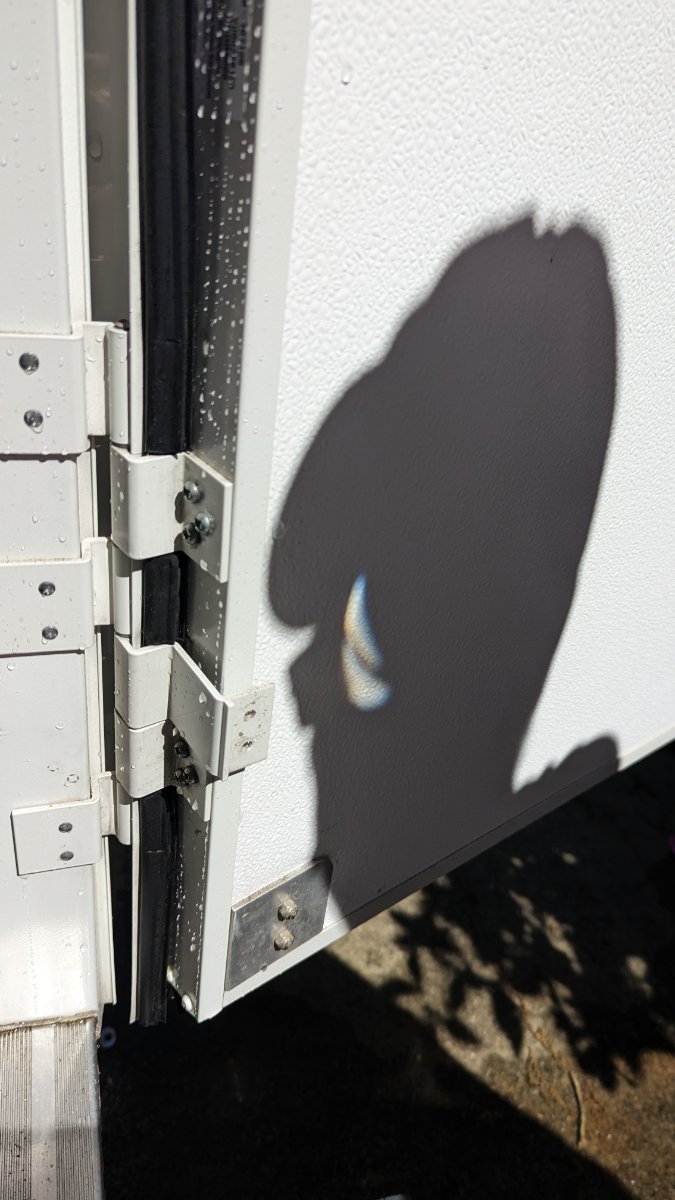
The main walk-in door is, and likely has been, my big leaky issue this hold time, not the window on the door. The window is good now for sure since I re-sealed it. Now to tackle the real issue. Here's some picks of the leaks. I had someone spray water outside while I looked inside, without the screen door attached (pain to remove).
Screen Door Removal
The screen door was kind of a pain to get off. Those Roberson square head screws were in TIGHT and with a tough angle at which to get to them, with the main door in the way a bit. I need to get new screws now since two of the heads were a bit damaged getting them out of the screen door mount. Not sure if Phillips screws would do any better and not sure I could find machine torque screws in that form-factor & length.
Has anyone changed those screws out for something better?
Door seal replacement
Has anyone found a good replacement for the door seal (strip)?
The way the current strip is placed on the door, at least as it sits on the side of the hinges, it's a horrible placement, I think. It gets "pushed" out of the way unlike all other sides of the door. Maybe I can simply augment that seal with one that's on the core of the door itself and not just on the outer overlap of the door. Not sure that's too clear. Maybe these picks will help? But, that will certainly affect how the door closest. It would have to be a very thin seal for sure.
Basically from top to bottom on the hinge side the door leaks. I've head to keep the canopy extended more than I'd like to so I'm not cleaning up puddles of water after rainstorms. I'm trying to get & keep #110 in perfect order, especially before the rally in May. 🙂
-
Well the window is tight as a drum, but the door seal by the hinges on the other hand, OMG, might as well be a strainer. New separate posting coming for that.
-
2
-


Parking on Slopes or Hills
in Mechanical & Technical Tips
Posted
I broke down camp just like you said, raised jacks, slowly, and kept safety chains connected to truck and was ready to pull brake pin too if needed. But, it was steady as a rock.
I can never remember which way is up with my rubber chocks, mine do not have any concave shape to the one side. I think mine are these here. Flat shape on both sides.
Now these heavy duty rubber chocks look like real nice chocks, and weighing in at 3.5 lbs each. A set of four would do the trick for sure. And, they'll all match. 😉