

Wayfinder
-
Posts
423 -
Joined
-
Last visited
-
Days Won
2
Posts posted by Wayfinder
-
-
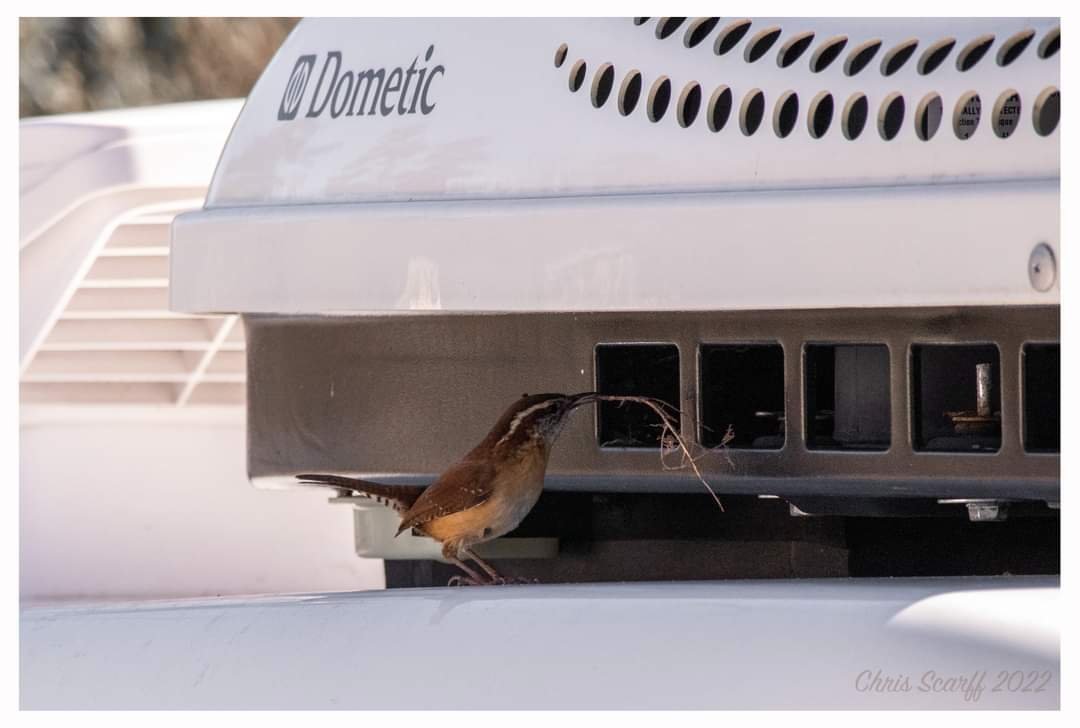
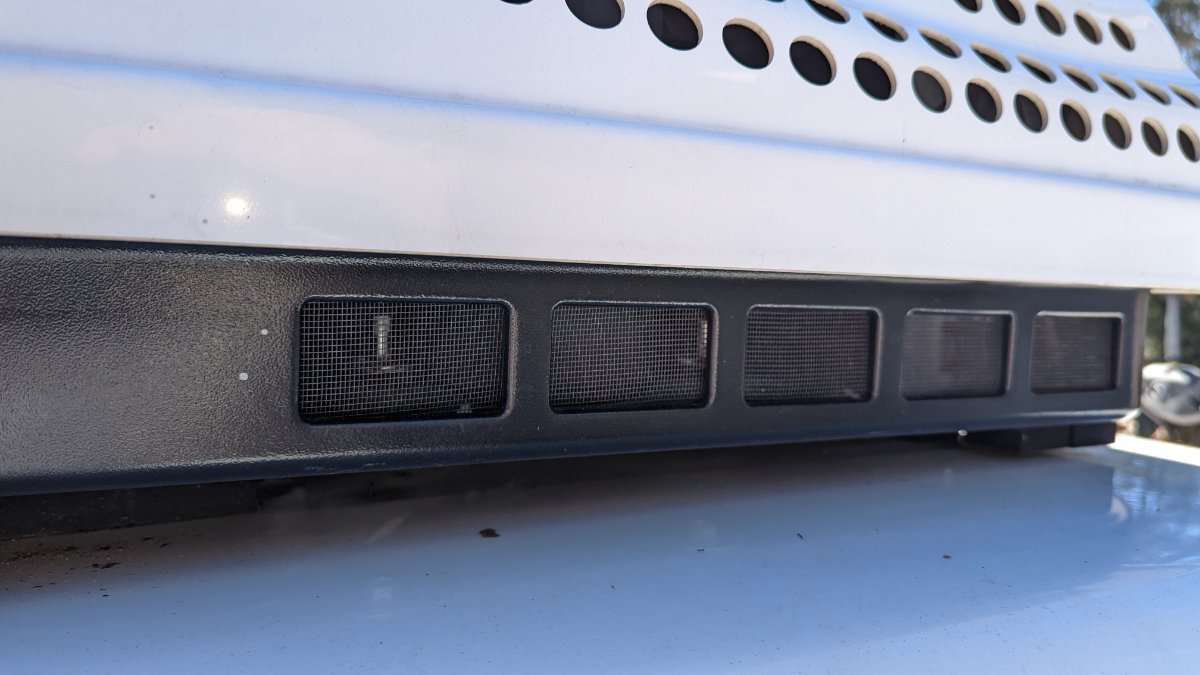
The screen I placed in the side of the AC and held in with magnets held up well when traveling. And, no more birds.
-
 1
1
-
-
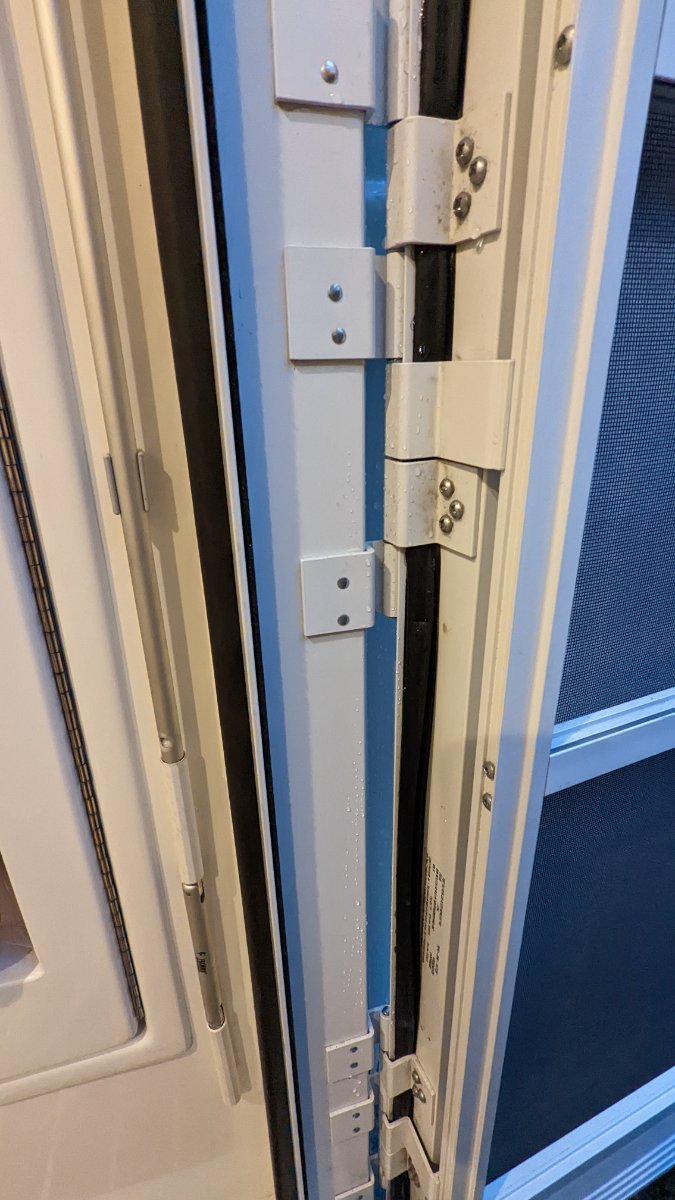
Bill and all, thanks for the suggestions. It's been a year of adversities, but finally found that the window on the door leaks. Should be easy to fix, but I have not removed all the internal screws of the inner frame.
Has anyone had to reseal the door window?
Thanks, Chris
-
I basically went through the same routine. The new remote can only shut off the inverter, not on, but ONLY with the new cable provided with the new remote. So I assume it's now a firmware issue. Old inverter versus a 2022 remote - dated on the side of the remote. I sent a support ticket to Xantrex, but have heard nothing. They may be laughing, due to age of inverter. I may buy a new one, they appear to be the same exact form factor, but first will see if I even use it enough to warrant a new inverter. Wait until it too dies.
-
After a year of sitting, my Xantrex ProWatt SW Remote also died. I did just try suggestions above, but looking at the date on the side of the remote (2018), it appears it was already replaced by previous owner. I have Hull #110 (2016). Ordering from Amazon now, $25.00. I'll try to report back on this thread.
Amazon Search: "Xantrex 808-9001 PROwatt SW Remote Switch"
It's been a long year of personal challenges, time to take the Ollie out for a short trip. I was in it nearly everyday checking battery/solar statuses.
-
It was time to touch-up the bulldog hitch. I used a pretty good Rust-Oleum flat paint, after wire bushing and cleaning well.
Should I bother with a clear coat enamel on top?
What would you do?
Thanks,
Chris
-
1
-
-
4 hours ago, mossemi said:
Ok, it's silly question time! Have you verified where the leak is in the door seal? Is it possible that the leak is elsewhere and pooling by the door?
Mossey
It took me weeks to finally confirm it was the door. The weather seal looks okay. I will take a much closer look at it soon, again.
-
2
-
-
They are likely original as I'm the second owner.
-
1
-
-
Has anyone had leak issues on the main walk-in door on the 2016 EL-II? I don't like how the seals are not continuous throughout the entire edge of door. I'm getting a good amount of rain on the floor.

-
 1
1
-
 1
1
-
-
I just tested the lower frame of the A/C unit. It's magnetic. I have a few old magnets from hard drives I can place on the screen inside. It would stay in place even in a hurricane.
-
2
-
-
Well, it's been a while since I posted anything. Today I had to kick out some wrens building a nest in the air conditioner, on the driver's side, where there is open space under the cover. I temporarily added some screen material on the inside, but it will not stay without a better solution. I better add it to my pack-up check list to take down.
Has anyone had this issue? Right now the trailer is in my driveway. Not where I want it, but for now, it must be.
-
1
-
 1
1
-
-
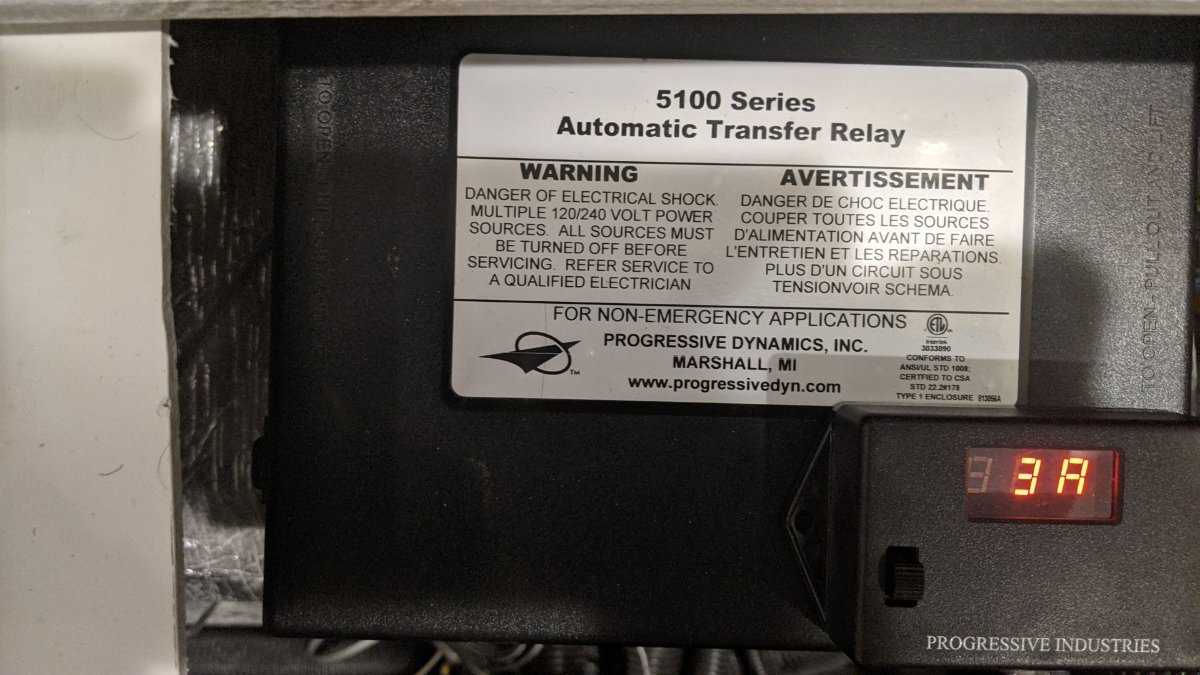
Wires looked okay when I pulled them out from connectors to inspect, just dark colored, but no melting at all.
-
During my full-time adventure, I discovered this in the Progressive Dynamics ATR. I was not happy to see that the two connector screws indicated in picture were VERY VERY loose. Had to turn several times to snug them up good. Now I need either a new ATR, or at least figure out how best to change those two half-melted wires. The busbar plate, or ledge (black), is secured to the box with two rivets.
Has anyone ever see this before?
Also, while looking closely, I noticed the front 30 AMP receptacle on the trailer is not protected by the EMS, only the driver-side 30 AMP connector is protected by the EMS.
Any thoughts or teachings on the differences between the two 30 AMP receptacles?

Thanks,
-
Well, after some serious life-changes and nearly four months full-time living in the LE-II, I've taken a new job in Georgia and leaving North Carolina. Time to prep the trailer for storage.
I do have some upgrades in mind soon.
- I want to order all new shades as my strings are starting to fail on the beige colored shades. I want white next.
- I might upgrade the suspension when I replaced all the break assemblies.
- New sink faucet, maybe sink too, we'll see.
Also, if you all don't know yet, AT&T and Verizon now have reasonable cellular hotspots (pucks) with high data plans for a reasonable price. I lived on 100GBytes / month and only used 50 GB once, but then, I was only in the trailer in the evenings and rarely stuck around on the weekends. I streamed everything using an Amazon Fire TV 4K stick. I live mostly on YouTube Premium though.
Everything else in the trailer is working perfectly. I learned a lot while full-timing in the last summer and early winder in North Carolina.
Once I find a storage location and might start showing the trailer again thru Oliver.
Happy Holidays!
-
3
-
I had two blinds snap a string in the same week. I have the old beige colored frames so I'm thinking of ordering all new white ones and calling it a day. Some of the blinds aren't folding closed very nicely anymore either. Hull 110 is getting up there in age so it's about time.
Thoughts?
-
Wow, the fan setting was on Lo. I don't remember fussing with the fan setting, but I did place the AC down very low one evening so it would not cycle and have issues with the small generator. I think a soft start is in my future. I don't typically use a generator, but I didn't have a 30 Amp outlet at the house.
Once again, thank you all. Thankfully it was simple.
I'm heading into winter here in NC while full-timing. I'm pretty nervous of things going wrong, especially when heat will be needed to protect the water lines. I'm at a great RV park though, so we'll see. I'm interested to see how long the two 30 lb LP tanks will last, especially since I'll be at work most days and will set trailer to some undecided low temp.
I wonder if anyone has that sort of experience with the Ollies. I'll poke around forums.
Chris
-
1
-
-
This might be a complication question & solution.
I recently ran my trailer off a generator. The A/C could, JUST barely, get started, but always did. I only ran it for an hour or so before bedtime to dehumidify while in Georgia.
I got home and ran the furnace for the first time in a while. Furnace turns on and works great, but so does the AC unit. And the AC just constantly runs, and cools. It normally cycles on and off, annoyingly so. I rather have a constant fan anyway, side point.
My temporary solution was the flip the AC breaker off. Next day, I tested again, and same result.
Any ideas?
-
 1
1
-
-
Thank you @Geronimo John. Unfortunately it was not guaranteed to get to me before I had to hit the road again. But that's okay. I'm not too happy with the old break assemblies/kits on #110. One is manual and three are auto-adjusting, which, one does not seem to auto-adjust at all. I had to use @John E Davies trick to get the automatic arm out of the way of the adjuster. There are no teeth left on the adjuster, so the automatic arm has nothing to grab onto. Understandable.
Next will be to decide which Break assembly kits I go with. But, that's for another day.
I think good old-fashioned manually adjusted assemblies is the way to go. I'm almost temped to take it to Tennessee and have Oliver do a bunch of suspension and break upgrades. But, they'll likely charge WAY more than me doing it myself. They're too busy for that anyways, I'm sure.
You guys are great. Sorry for repeated questions. These forums are not nearly as good as Google search algorithms, so tougher to find the correct info for each unique situation.
Cheers,
Chris
-
1
-
-
@John E Davies This thread helped me today. I found that I have ONE manual break assembly and THREE not-so-auto-adjustable assemblies. You're trick of holding up that automatic arm with a thin screwdriver helped me. One of the assemblies really does not have "teeth" to adjust with. I guess it was auto-adjusted too much.
I did improved the stopping power, but I'm still upwards of 8 or 8.5% on my truck tow break. I'd like it closer to 5% (out of 10).
I'm too tired to get on the ground one more time today. Maybe another day.
Next, I'll want to know what "BEST" break assemblies I should get for poor old #110. I'm not liking the whole "Nev-R-Adjust" crap. What BS. Maybe I'll stay with good old fashioned manual adjustable.
I'll have to dig through the forums more to see what folks are saying is best assemblies/kits these days.
Suggestions are welcome on the assemblies and if I should start a poll/thread or something else.
Take care,
Chris
-
1
-
-
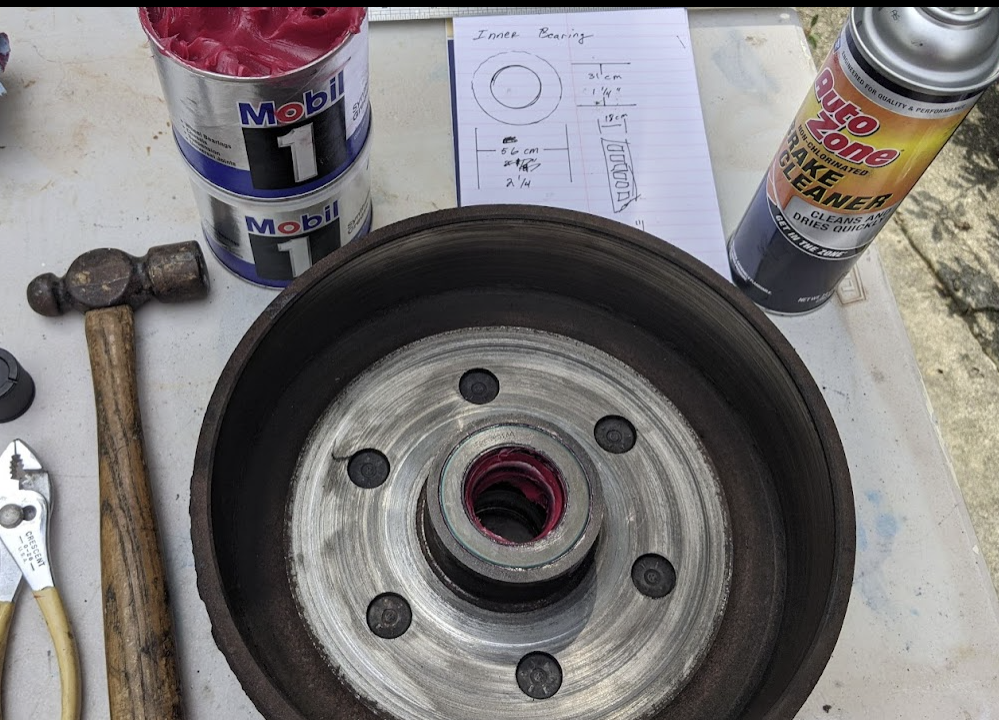
I'm looking forward to trying the Redline CV-2 grease, when I can get my hands on it. The schedule is tight and didn't want to drive any farther without some sort of new grease. The bearing look great, so that's good.
I enjoyed doing the repack. It's therapeutic in a way. And greatly satisfying.
-
1
-
2
-
-
Ha, yeah. Where were you @mossemi when I needed you? Lol. Camping I bet. LoL
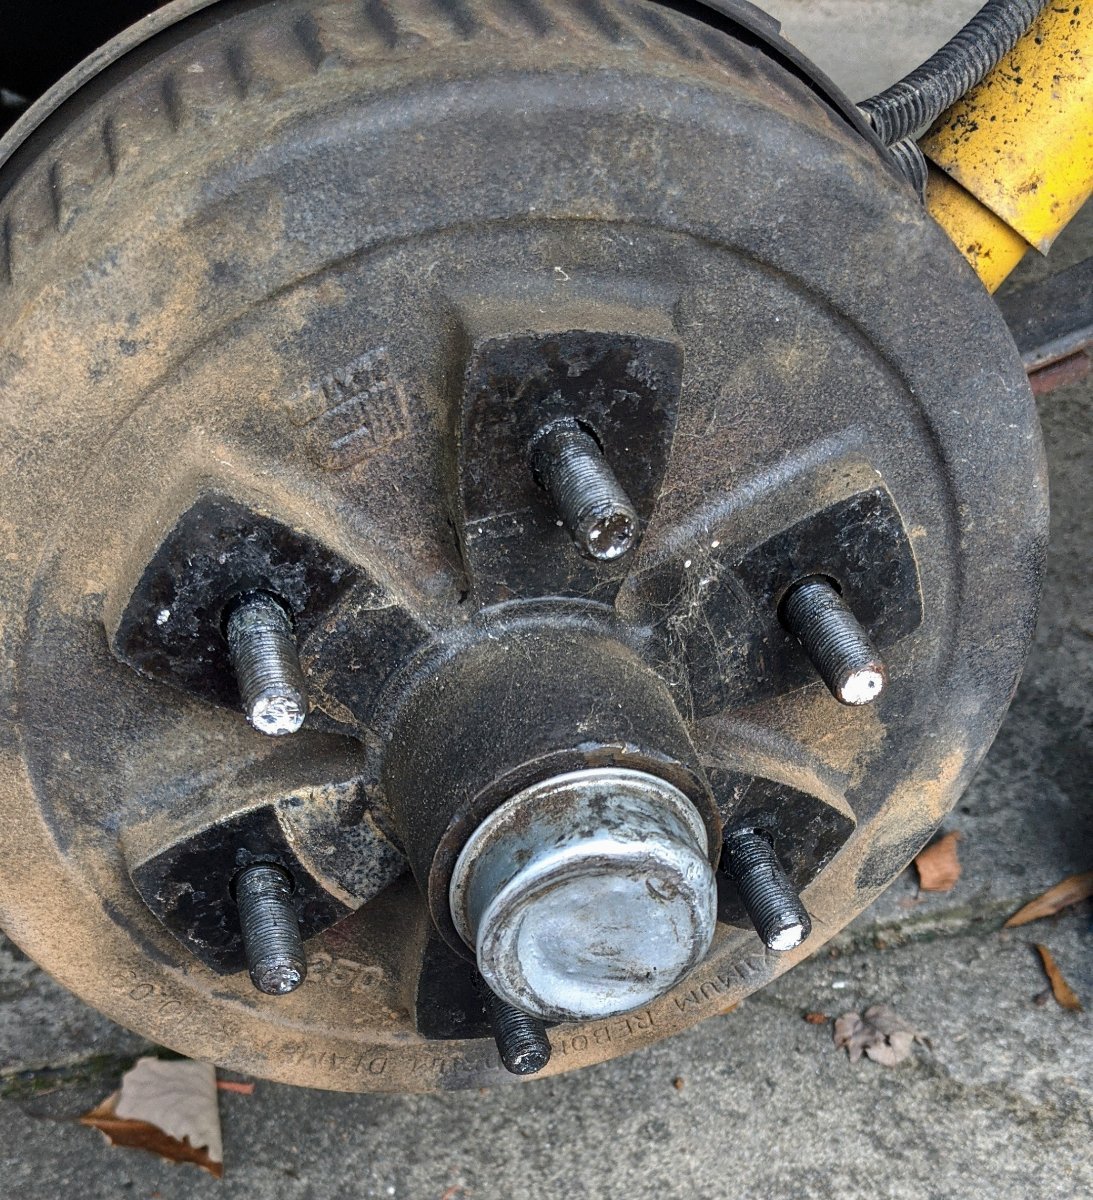
Also, I took the second tire off and discovered a very abused grease cap. I mean, good grief, how hard do you have to hit a aluminum cap to get it back on. Mechanic must have had anger issues.
-
2
-
-
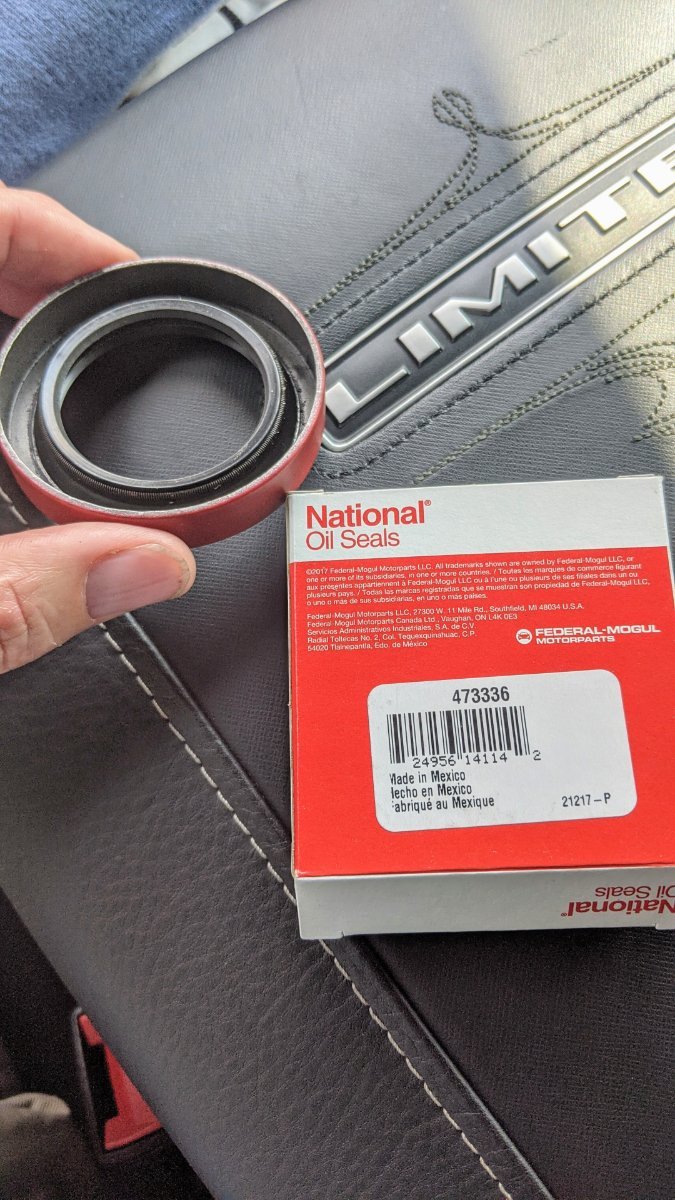
Finally. I have a part number to the seal. I leave in a week and needed to find local.
O'Reilly Auto Parts had what I needed. But again, they only had four left in stock. I bought all of them. These seals are heavier duty compared to what I took out.
National Oil Seals
Part number 473336
Approximately $12.50 each
-
Yeah, I tried two industrial bearing companies here in Augusta, GA, and they almost chuckled. No, they have no clue.
I will check with the local camper centers too. They certainly should know.
I was able to get NAPA to cross reference one, but it's a bit thinner than what I took out. This was cross referenced with a Dexter 01003600 Grease seal. NAPA called it an oil seal. They are short on parts too. Parts right now might be difficult to get.
I even have a call into Oliver. Nothing back from Mike yet.
Hey, if you all have so many extras, what is the part number of the seal?
A direct link to the seal at reputable site online would be great too. Maybe I'll call eTrailer. If this is so damn easy, and a common axle, then why does no one knowing the part part number? Oh wait, I am in Georgia, that might be it. Smack!
Angry eyes are going to put on soon.
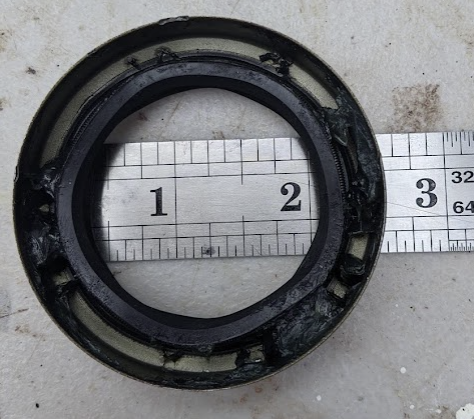
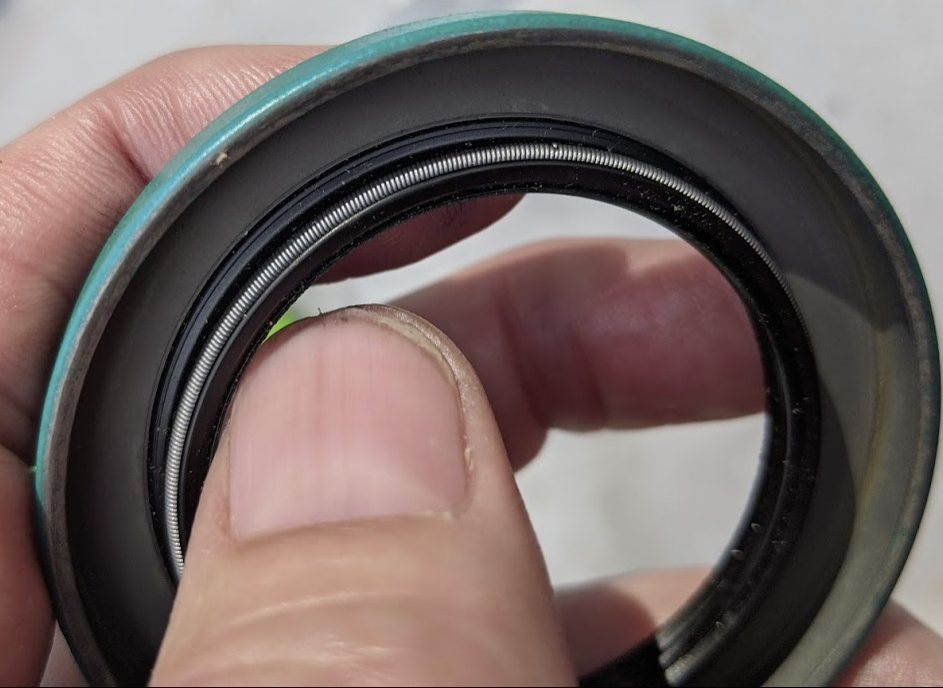
This is NAPAs reference. Which is only 1/4" compared to the 1/2 inch thick seal I took out. Also the original seal I took out. what not much grease in the seal. The seal felt better made too compared to what I took out. Again, I will only do this one set just to get the hub back together. I was kind of fun. I've not done this stuff since the 80s.
A bearing packer would save lots of time and ensure they're packed as good as one can do.
Everything looked and felt good (smooth). I got to this job just in time.
Shaft looked and felt great too.
-
1
-
-
This thread has great information. Thank you. But, I do not see specific part numbers for JUST the seals AND from trusted vendors. This will be my first time packing my bearings on this trailer.
I will likely pick up the BK2-100 bearing kit, either from Dexter themselves or the RedLine brands which @topgun2 listed. I did inspect one set of bearings so far, to get an idea of their overall condition. All looks well enough, but definitely in need of new grease. I'll see if I can find the Redline CV-2 grease locally. I only have 7 days before I leave my current location and now afraid of driving too far. At least it's not the hot summer. I was monitoring the hub temps on the way from NC to GA. All hubs remained cool on the 5 hour trip. But it's time to pack the bearings.
I'm looking forward to doing it, but would like to ensure the correct seals first.
I cannot purchase this on Amazon, but is this correct?
This is should be correct, right? It seams that these axle parts are somewhat common and interchangeable between different brands, like Lippert and Dexter for example.
http://www.dexterpartsonline.com/product/BK2-100
Or this Redline
Will these seals be right for 2016 EL-II?
I was really bummed when I discovered I have NO zerk fittings anywhere on the trailer. Not even on the hubs. I see upgrades are needed.
Details on these parts with options will certainly help all the new buyers out there.
It would be great if Oliver themselves added videos to their University training pages, just for repacking the bearings; since it's so important to do and needed so often. Oh sure, there are tons of videos on the subject on YouTube, but being specific to Oliver and the different axles they might use would be great. Especially with part numbers listed. I found no paper work on the axles in the mounts of manuals that came with the trailer. These types of videos would ensure Oliver stays at the top of the list in regards to high quality and customer-focused.
Thanks again folks!
Chris
-
Great ideas.
Also, while Wayfinder is in my so-called dry-dock this month for minor repairs and clean-up, I've been pushing air through the hull with a fan on the passenger-side bed area hatch, and keeping both dinette hatches open for exhaust, all windows are open. This is in hopes of reducing some of the inner hull odors. The good thing is it's not musty, just odors of older plastics, glues, and fiberglass, etc. It's dry as a whistle otherwise.
I may have some fiber board around my GA house. I certainly have plenty of extra Reflectix and 1/8 inch thin plywood. It's free and would make for a nice light-weight platform.
Chris


Actual Dates of the 2023 Oliver TT Rally at Lake Guntersville, AL
in Events & Rallies
Posted
Well, I did it. My first rally event of ANY sort in my life. Make it a good one. LOL
I reserved spot G28, but I will arrive on 16th and depart on 22nd.
I'm not sure if I'll be solo or with one other person. We'll see. 🙂
Cheers,
Chris